Apex Legends Benchmarks and Gaming PC Build Recommendations
After hitting a whopping 25 million players within the first week and crossing 50 million players within a month of release, Apex Legends is shattering player-count-milestones one after the other. For comparison, Epic Games’ Fortnite touched this milestone only after 16 weeks!
Respawn Entertainment’s take on the hot Battle Royale genre is arguably one of the best ones out there. And that’s saying something when considering the plethora of developers who seem to be targeting this genre after the runaway success of PlayerUnknown’s Battlegrounds (PUBG).
However, Apex Legends’ eye-catching graphics do take a toll on PC hardware. Especially when using older hardware. If you’re looking to upgrade your PC to get the best possible performance in Apex Legends without breaking the bank, we’re here to give you a hand with full build recommendations.
Choose Your CPU carefully: i7 vs i5 Performance Comparison
When going Intel, this is a question that every gamer inevitably ends up asking: Do I need an i7? Using an i7 does give you a frame rate boost, but only in certain scenarios.
If your system is limited by CPU, then you’d see substantial improvements when opting for a 9th Generation Intel Core i7 over an i5. The only scenario where a system is limited by CPU, or is CPU-bound, is when you use an extremely powerful GPU to play games at relatively lower resolutions and/or graphics settings (an RTX 2080 Ti at 1080p resolution, for example).
However, since most gaming remains firmly GPU-bound, which is limited by the GPU you’re using, an i5 will do the job without a hitch when it comes to games like Apex Legends.
So, what performance can you expect? For a CPU comparison, we take a system built around an Nvidia RTX 2060.
Here, you can see the CPU having virtually no effect on the FPS you get at WQHD (Ultra quality settings). On the other hand, at FHD (Ultra) the disparity between the CPUs starts to become a bit more pronounced.
Nonetheless, always keep this in mind – if you have some wiggle room in your budget, it is always better to go for a better GPU than a CPU. Why? Because you’re more than likely to enjoy much better performance that way.
9th Generation Core i5: Best Value for Apex Legends?
Considering the disparity between prices compared to the disparity between performances, we’d say that an Intel Core i5 is one of the best value processors you can buy to enjoy Apex Legends to the fullest.
These CPUs are capable enough to power both Full HD Monitors as well as premium WQHD monitors. Moreover, their price-performance ratio makes them an irresistible option for those who’re on the lookout for value buys.
Recommended PC Build and Expected Performance for Apex game
So, now say you’re ready play Apex Legends with Core i5, what kind of configurations you will need to run your game smoothly?
Basically you can have a look of the minimum PC system requirements for Apex Legends from EA website. Here we’ll cover two PC builds to you– valuable Epic Gaming PC and the other high-end recommended – the Legendary Gaming PC that will match up with Apex Legend’s PC system requirements.
The Epic Gaming PC build
When using the GTX 1660 Ti at Full HD, you can make full use of a 144 Hz monitor with just a few graphics tweaks in Apex Legends. In a competitive game, the lower input lag and enhanced fluidity will most definitely give you an edge over your opponents.
MSI’s Optix MAG271CR Gaming Monitor features a gorgeous curved panel, stunning color gamut, spectacular bezel-less design, a Full HD resolution, and a fluid 144 Hz refresh rate – all the ingredients needed to grant you a premium gaming experience with the hardware we chose for this build.
The MSI B360M MORTAR motherboard boasts the feature-set needed to extract the most out of the Intel Core i5 9400F processor. Not only does it look great in any PC build but it also helps your hardware stay cool with an excluded thermal design – extended heatsink.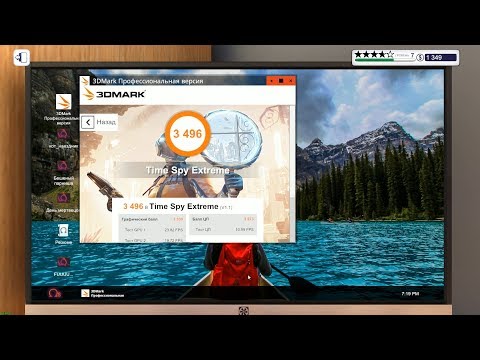 Also, the B360M MORTAR boasts dual M.2 slots for your SSDs to ensure faster loading times for your games and applications.
The Legendary Gaming PC Build
If you can stretch your budget a little, you can enjoy Apex Legends at the stunning, much-desirable WQHD resolution. What’s more, if you can manage to get the RTX 2060, you can push past 100 FPS to make optimum use of a 144 Hz monitor and get a fluid gaming experience even at WQHD. Of course, you’ll need to make a few graphics tweaks (turn off a few settings) to achieve this.
The unlocked Intel Core i5 9600K needs a decent Z390 motherboard to get the most out of it. You should ideally overclock your CPU to make sure that your hardware is performing to the limit.
MSI’s Opitx MAG271CQR Curved Gaming Monitor grants you all the features you need to enjoy gaming with this build and more. While the superb WQHD resolution (1440p) ensures that your games look stunning every step of the way, the 144 Hz refresh rate and 1ms response time allows for a smoother, more fluid gaming experience.
We recommend the MPG Z390 GAMING EDGE AC as it grants the most bang-for-buck when it comes to a full-featured ATX motherboard. Its enhanced thermal design with an extended heatsink allows for excellent overclocking capabilities – ensuring that you seldom run into heating issues like thermal throttling.
Apex Legends Expected GPU Performance with Intel 9th Generation Core i5 and Core i7 Processors
Still not sure what performance you can expect with a certain PC setup that you’re considering? Our extensive testing should help make your purchase decision much easier.
▼Apex Legends Performance at Full HD Resolution
As expected, at Full HD, the disparity in performance between an i5 and i7 is evident from the RTX 2060 FPS results.
If you’re looking for a budget gaming build and don’t mind turning down graphics settings to get past 60 FPS, the GTX 1050 Ti and Core i5 9400 configuration will serve you well. However, do keep in mind that lower minimums (46 FPS) will cause your FPS to dip at times.
For those looking to push past 100 FPS to make full use of a 144 Hz display, we recommend the GTX 1660 Ti + Core i5 9400 build. In fact, if you turn your graphics settings down enough, you can push to close to even a steady 144 FPS.
▼Apex Legends Performance at WQHD Resolution
Again, as we predicted earlier, the performance disparity between the i5 and i7 almost vanishes at WQHD when using an RTX 2060 graphics card. In this case, there’s no point of considering the GTX 1050 Ti because the game won’t be playable. Our recommendations for this resolution are an RTX 2060 + Core i5. Since a Core i7 doesn’t offer much of a performance boost, you should try getting a better graphics card instead of a better processor if you do have some wiggle room in your budget.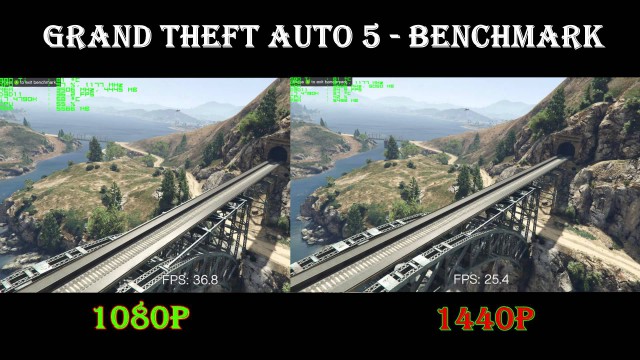
A RTX 2070 + Core i5 soundly thrashes the RTX 2060 + Core i7 when it comes to performance in Apex Legends, and as a matter of fact, also in most other games you’ll play. Considering that this performance difference comes at almost the same price, going for the RTX 2070 instead of splurging on an Intel Core i7 is a no-brainer for gamers everywhere.
Introducing the Build & Benchmark bundle
We’ve teamed up with The Irregular Corporation to create the ultimate Steam bundle for PC enthusiasts! The Build & Benchmark bundle includes the runaway hit game, PC Building Simulator, and the full version of 3DMark, the gamer’s benchmark. This special bundle also comes with a 20% discount compared with purchasing each title separately.
3DMark is for gamers, overclockers, and system builders who want to get more out of their hardware. With its wide range of benchmark tests, 3DMark has everything you need to test your PC’s performance.
3DMark tests GPU and CPU performance by rendering extremely demanding game-like scenes in real time. The faster the benchmark runs, the better your 3DMark score.
3DMark shows you how your score compares with results from other systems with the same hardware. Lower than average scores may indicate a problem with cooling, configuration, or faulty components. Higher than average scores show the potential for overclocking your hardware. And if you’re wondering what your 3DMark score means for real-world game performance, 3DMark also shows you the frame rates you can expect in a selection of popular games.
We update 3DMark regularly so that you can benchmark the latest PC gaming hardware. When you buy 3DMark today, you benefit from over nine years of continuous development, updates, and enhancements.
In the smash-hit game PC Building Simulator, you build and grow your very own computer repair enterprise as you learn to diagnose, fix, and build PCs. With real-world licensed components and comprehensive hardware and software simulation, you can plan and bring your ultimate PC to life.
Career mode puts you in charge of your very own PC building and repair business. Customers will provide you with a range of jobs from simple upgrades and repairs to full system builds, which you must complete while balancing your books to ensure you are still making a profit!
PC Building Simulator lets you experiment with a wide selection of accurately modeled, fully licensed parts from real-world manufacturers. Express your flair by coordinating LED lighting and cabling colors to make your builds stand out. Choose from a range of cooling solutions including fully customizable water-cooling loops. If money were no object, what would you build?
Once your rig is ready to go, turn it on and see how it benchmarks with a fully accurate simulation of 3DMark! Not happy with the results? Jump into the BIOS and try your hand at overclocking.
When you buy the Build & Benchmark bundle on Steam, you save 20% compared with the total price of buying 3DMark and PC Building Simulator separately.
The Build & Benchmark Bundle is a «complete the set» bundle. This means you only pay for titles you don’t already own. For example, if you already own 3DMark, you will only have to pay for PC Building Simulator and you will still get the 20% bundle discount.
Buy the Build & Benchmark bundle on Steam
If you bought 3DMark from our online store, or if your 3DMark license key starts with 3DM-, please read our support article, «How to add a 3DMark license to Steam,» before purchasing the bundle.
How to build Windows 11 with your own hands. Step-by-step instructions
This material was written by a site visitor and has been rewarded.
Recently there was an article from fellow Nike3G about the horrors of custom builds of Windows. I completely agree that putting an unknown assembly on your PC is a bad idea. But I do not agree with the conclusions of the author of the article that it is necessary to install a clean assembly. There is a more interesting option.
Today I’ll tell you how to make your own build of Windows 11. The question may arise — why build at all, is it better to install the original image or take someone else’s build. These two options have disadvantages. If you install the bare original Windows, then everything will have to be configured there, install all updates, your favorite programs, and configure the interface. If you install your assembly, then immediately after installation you will receive a system customized for you and you can get to work. Installing your assembly will take much less time, and, in addition, immediately after installation, you can work in the system, and not engage in long and tedious installation and configuration of programs.
Why is it better to make the assembly yourself, rather than downloading a ready-made one. Other people’s assemblies are fraught with many dangers. You cannot be sure exactly how the assembly was changed, which programs and processes were introduced, and which were removed. It is possible that a Trojan, or a spy, or a miner is built into such an assembly, which will extract cryptocurrency on your computer. Or it may happen that the unfortunate assembler removed some important components and services, and at one fine moment such an assembly will refuse to work for you. In addition, it is not a fact that you will like the way the builder set up the system, and you still have to reconfigure the interface for yourself.
recommendations
The method described by me is not unique and not the only one, but one of many options. The main thing is that I will show the unprepared reader that it is possible in principle — to make your own assembly, there would be a desire.
You need to download the original image on the official website — https://www.microsoft.com/ru-ru/software-download/windows11
Select the desired language and download. Next, we need a virtual machine in which we will install and configure everything. I recommend using the free VirtualBox. Download it from the official site — https://www.virtualbox.org/wiki/Downloads. You can also download the extension pack there, but we won’t need it when creating our own assembly.
Install VirtualBox, create a virtual machine. Allocate resources to the virtual machine based on the power of your real computer on which the virtual machine is installed. At least 2 processor cores, at least 4 gigabytes of RAM, at least 50 gigabytes for a virtual system disk.
Go to the machine settings and insert the downloaded iso image into the virtual drive.
Start the virtual machine and install the operating system. If you have an old PC, then you will receive an error message.
By the way, another advantage of our image that we are creating now is that it will never give such an error and will be installed on any computer.
What to do? Return to the initial installation screen, press the Shift + F10 buttons, the command line will appear. Write regedit in it.
Go to the “HKEY_LOCAL_MACHINE\SYSTEM\Setup” section and create a new “LabConfig” section there
In this section, you need to create three DWORD parameters (32 bits) with the names: BypassTPMCheck, BypassSecureBootCheck, and BypassRAMCheck, and of which assign a value of 1.
After you close the registry editor and the command line, and the installation will continue without errors.
During initial system setup, if you do not have a Microsoft account, you can select an offline account.
So, our system is installed. You can find out the system version — press the key combination Win + R, enter the winver command and a window with the system version will open.
As you can see, at the time of writing this article, the current image downloaded from the Microsoft website had version 22000.318. The site will always contain the current assembly. Next, you need to go to the update center and let the system download all available updates.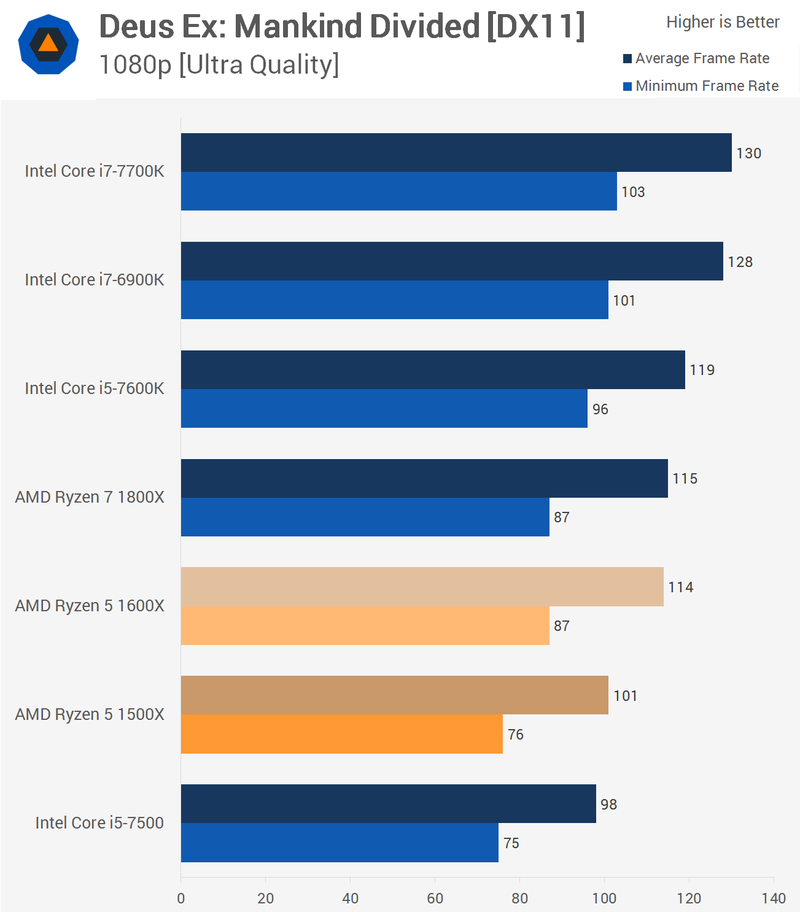
After installing the updates, you can open the Windows version window again and see the changes. In my case, the system version changed to 22000.348.
While Windows is downloading and installing updates, you can prepare programs. You can download all the necessary programs in advance, make an iso image out of them and other files you need and slip it into a virtual machine, and then install all programs from a virtual disk inside the machine. An ISO image can be created using the UltraISO program.
I always try to give preference to portable versions of software. If the program has a portable option, then I choose it. I create a portable folder in the root of the system drive and put all portable versions of programs there. You can change the wallpaper. For example, I took a green wallpaper from the standard distribution of Windows 7. You can set the Start menu in the style of Windows 7, for this you need the StartAllBack program. One of the advantages of this program is that it allows you to place the taskbar on top, while the standard Windows 11 taskbar can only be at the bottom of the screen. Now we have a desktop that resembles a warm lamp seven.
You can also install solitaire games from Windows 7. They exist as a separate installer.
After you have installed all the necessary programs, it’s time for optimizations. The best option would be to use the Win 10 Tweaker utility. Current version at the time of writing 18.1. The program has paid and free versions. For most ordinary users, the features of the free version are more than enough. Each tweak is provided with a comment about what it does and why it is needed. You can decide for yourself which tweaks you need. The author of the program suggests applying all the tweaks at once. I personally use only a few.
For example, I don’t disable updates via Win 10 Tweaker because I want to receive regular system updates. And also do not turn off the defender. If the defender swears at some of your long-familiar programs, then you can add it to the exceptions in the defender settings.
I’m adding useful context menu functions, disabling annoying notifications when launching programs, autorun of removable media. In the application section, I turn off the standard programs I do not need Movies and TV, People, Groove Music, Sketch, Get Help, Tips, Feedback Hub.
After you make all the settings you need in this program, you need to go to the Cleaning section. There I select all the checkboxes. Win 10 Tweaker will remove all unnecessary and unnecessary files, this will reduce our future system image. For example, on my fresh system, the program found 1 GB of garbage that is not needed as part of the image.
Next we need a free utility called DISM++. The program has a Russian interface and has great possibilities for setting up the system. You can explore its capabilities yourself, maybe some menu items will come in handy for you. In this program, I also select the item cleaning. I check the boxes to clean up the WinSxS folder and Cache. The WinSxS folder contains old versions of applications in case updates are rolled back. I only clean this folder with DISM++ in preparation for imaging.
Already after cleaning Win 10 Tweaker, DISM++ cleared another 1.24 GB on the disk.
Now we proceed directly to creating a system image. I do it through the DISM++ program. Go to the menu File — Save Image As. Select the root of drive C, file type — Ultra image compression. Then click OK.
After some time, a file with the esd extension will appear in the root of the virtual machine’s system disk. This is an image of the system. For me, it weighed 5 GB, your size will be different, depending on the number of installed programs. It should be noted that the image is created for a long time, and unpacking the image is ten times faster.
After the image is saved, shut down the virtual machine. Now we need to extract the esd file from it. There are many ways to open virtual disks. For example, a virtual machine disk can be opened in the free DAEMON Tools Lite program. Mount the virtual disk image in it, you will have a new drive, copy the esd file from it to your computer. This completes the image creation process. Save it in a safe place, for example, on a USB flash drive, so that you can use it when installing the system. The esd file format is understood by the standard Windows installer, so you can optionally embed it into a standard Windows image by giving it the standard name install.esd.
To deploy the esd image on a real computer, I use the two programs BOOTICE and WinNTSetup. They can be run in a Windows environment or from a WinPE boot image. You can read about what WinPE is on the Internet.
To prepare the future system disk, I use the free BOOTICE program. We launch the program, select the drive where we will deploy our image.
Click the Manage Partitions button, then Repartition. We clear the first three sections. Then select «GUID Partition Table (GPT)» and check the box «Create ESP Partition». Then OK and in a second the disk will be prepared.
Now run the free program WinNTSetup. It requires three parameters. The path to the installation files — we specify our esd file. The disk on which the bootloader will be installed — select a small ESP partition on the target system disk. The disk on which Windows will be installed — select the main system partition following the ESP. Click Install and OK.
Extracting the image to the m.2 drive takes 2-3 minutes. Unpacking the image to the HDD may take 10 minutes. In any case, it will be much faster than the standard installation.
Upon completion of unpacking, we reboot into the operating system already installed and configured specifically for your needs.
This material was written by a site visitor and has been rewarded.
IT industry news, reviews and tests of computers and accessories
- PCs and accessories
- Desktop PCs and monoblocks
- Portable PCs
- Servers
- Motherboards
- Enclosures
- Power supplies
- RAM
- Processors
- Graphics cards
- Hard drives and SSDs
- Optical drives and media
- Sound cards
- TV tuners
- Controllers
- PC cooling systems
- Modding
- Notebook accessories
- Peripherals
- Printers, scanners, MFPs
- Monitors and projectors
- Input devices
- External drives
- Acoustic systems, headsets, headphones
- UPS
- Webcams
- KVM equipment
- Digital Home
- Network Media Players
- HTPCs and Mini Computers
- TV and home theater systems
- DLNA Technology
- Home appliances controls
- Gadgets
- Tablets
- Smartphones
- Portable drives
- Electronic readers
- Portable media players
- GPS navigators and trackers
- Wearable gadgets
- Automotive infotainment systems
- Chargers
- Accessories for mobile devices
- Photo and video
- Digital cameras and optics
- Camcorders
- Photo accessories
- Photo Editing
- Video editing
- Programs and utilities
- Operating systems
- Development tools
- Office software
- Testing, monitoring and diagnostic tools
- Useful utilities
- Graphic editors
- 3D Modeling Tools
- Internet world
- Web browsers
- Search engines
- Social networks
- Cloud Services
- Messaging and conferencing services
- Website development
- Mobile internet
- Useful tools
- Security
- Anti-Malware
- Access controls
- Data protection
- Networks and telecommunications
- Wired networks
- Wireless networks
- Network infrastructure
- Cellular
- IP Telephony
- NAS drives
- Network management tools
- Remote access tools
- Enterprise Solutions
- System Integration
- Educational projects
- Electronic document management
- Cloud Services for Business
- Virtualization Technologies
Our Youtube channel
Archive of publications
| 1999 | 1 | 2 | 3 | 4 | 5 | 6 | 7 | 8 | 9 | 10 | 11 | 12 |
| 2000 | 1 | 2 | 3 | 4 | 5 | 6 | 7 | 8 | 9 | 10 | 11 | 12 |
| 2001 | 1 | 2 | 3 | 4 | 5 | 6 | 7 | 8 | 9 | 10 | 11 | 12 |
| 2002 | 1 | 2 | 3 | 4 | 5 | 6 | 7 | 8 | 9 | 10 | 11 | 12 |
| 2003 | 1 | 2 | 3 | 4 | 5 | 6 | 7 | 8 | 9 | 10 | 11 | 12 |
| 2004 | 1 | 2 | 3 | 4 | 5 | 6 | 7 | 8 | 9 | 10 | 11 | 12 |
| 2005 | 1 | 2 | 3 | 4 | 5 | 6 | 7 | 8 | 9 | 10 | 11 | 12 |
| 2006 | 1 | 2 | 3 | 4 | 5 | 6 | 7 | 8 | 9 | 10 | 11 | 12 |
| 2007 | 1 | 2 | 3 | 4 | 5 | 6 | 7 | 8 | 9 | 10 | 11 | 12 |
| 2008 | 1 | 2 | 3 | 4 | 5 | 6 | 7 | 8 | 9 | 10 | 11 | 12 |
| 2009 | 1 | 2 | 3 | 4 | 5 | 6 | 7 | 8 | 9 | 10 | 11 | 12 |
| 2010 | 1 | 2 | 3 | 4 | 5 | 6 | 7 | 8 | 9 | 10 | 11 | 12 |
| 2011 | 1 | 2 | 3 | 4 | 5 | 6 | 7 | 8 | 9 | 10 | 11 | 12 |
| 2012 | 1 | 2 | 3 | 4 | 5 | 6 | 7 | 8 | 9 | 10 | 11 | 12 |
| 2013 | 1 | 2 | 3 | 4 | 5 | 6 | 7 | 8 | 9 | 10 | 11 | 12 |
- About us
- Advertising placement
- Contacts
Featured articles
The HP 205 G4 22 AiO is one of the best solutions for office and remote work
In this review, we will consider a monoblock model from HP, which is a recognized leader in the production of computers for both home use and offices. The HP 205 G4 22 All-in-One is a model of a new family based on the latest generation of AMD processors that offers good performance coupled with an attractive price
Logitech G PRO X Superlight is a lightweight wireless mouse for professional e-sports players
The Swiss company Logitech G introduced a wireless gaming mouse Logitech G PRO X Superlight. The new product is designed for professional e-sports players, and the word Superlight in its name indicates the low weight of this model, which does not exceed 63 g. This is almost a quarter less than the Logitech G PRO Wireless 9 manipulator announced a couple of years ago0004
ASRock h210 Pro BTC+ Home Mining Motherboard
A recent study by the University of Cambridge showed that the number of people who use cryptocurrencies today is approaching the size of the population of a small country and this is just the beginning, the world is changing. Therefore, ASRock has developed and put on sale a very unusual motherboard — h210 PRO BTC +, which we will consider in this review
The top panel of the Rapoo Ralemo Pre 5 Fabric Edition keyboard is covered with fabric0004
Rapoo has announced the Ralemo Pre 5 Fabric Edition wireless keyboard in China. The novelty is made in TKL format (without number keys section) and attracts attention with its original design. The MSI Optix MAG301 CR2 has a curved screen for maximum gaming immersion.
The Optix MAG301 CR2 is a new addition to MSI’s line of computer monitors for gamers. It is equipped with a VA type LCD panel with ultra wide (21:9)) curved screen (radius of curvature — 1.5 m). It measures 29.5 inches diagonally and has a resolution of 2560×1080 pixels
The SilverStone MS12 kit converts an M.2 2280 SSD into a portable drive
SilverStone’s product catalog has been expanded with the MS12 kit. It allows you to create a portable drive based on a standard M.2 2280 SSD with a PCI Express interface
ADATA XPG Spectrix S20G SSDs combine performance with an eye-catching design
ADATA Technology announced the XPG Spectrix S20G series SSDs. They are designed to equip gaming PCs and, according to their creators, combine high performance and spectacular appearance.