How And Where To Plug In All Your Fans On The Motherboard [Updated Guide]
TABLE OF CONTENTS
1
PC Fans. You can’t have too many, you can’t have too little.
For being something that does the relatively simple task of moving air from one place to the next, it sure has some complicated quirks.
And one of the other “quirks” of fans is figuring out where to plug them in to— on your Motherboard or otherwise.
With so many different possible places you could connect your fan to, where exactly are you supposed to plug in all your fans to make sure your computer doesn’t overheat?
Let’s see:
Where to Connect All Your Fans
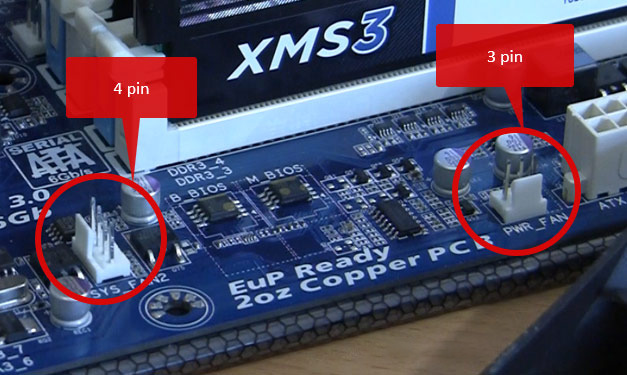
In short, the place you connect any standard consumer fan to is one of the many 3 or 4-pin fan header(s) on your motherboard.
Your motherboard will most likely have at the very least two or three headers like this.
Any one of those can and will power a fan just fine.
Image Credit: MSI
A Fan Header’s Label on your Motherboard will generally end with “_FAN”, followed by a number.
The reason they’re labeled differently is that certain fans and cooling-related components have different requirements.
For example, a system fan doesn’t need all that much power to run, so it doesn’t have as much amperage or Wattage compared to the CPU fan header or pump fan header.
So even though you can plug any 3 or 4-pin connector into any 3 or 4-pin header, it’s best to plug the fans into the designated fan headers and anything else that you need into their own headers like “PUMP_FAN1″—if they have their own headers, not all motherboards have specific headers like that.
This is especially true for the CPU_FAN and CPU_OPT headers.
You should only ever plug in any fans related to your CPU’s cooling into CPU_FAN first and then CPU_OPT optionally.
I explain the difference between them and go in-depth about them in our article here, but in short, CPU_FAN is responsible for making sure that your CPU doesn’t burn itself up— and the PC actually boots.
It, first of all, makes sure that there’s at the very least one fan cooling the CPU and then tries to dynamically alter the fan speeds of the fan(s) connected to it to keep the CPU cool.
If it can’t do that or if nothing is connected to it, it will shut down the PC and won’t let it boot without a warning.
So it’s very important that it’s only ever connected to the fans cooling your CPU.
CPU_OPT is the same as CPU_FAN, but it doesn’t shut down the PC. You use it if you have more fans than CPU_FAN can handle.
So, having gotten that out of the way, here’s where you should plug in your fans.
CPU Cooler Fans
Most if not all fans responsible for cooling your CPU—regardless of whether you’re running an air cooler, a liquid cooler, putting all your fans through a hub, etc—should be connected to your CPU_FAN header.
Motherboard CPU_OPT and CPU_FAN Headers
Any leftover fans that you can’t connect to CPU_FAN, any pumps (if there are no pump-specific headers), or other miscellaneous CPU cooling-related components with 3 or 4-pin connectors should be connected to the CPU_OPT header.
Sometimes a CPU Cooler with multiple Fans will come with its own splitter that you plug all your CPU Fans into, and the end is then plugged into the CPU_FAN Header.
That would regulate all fans to run at the same RPM. Using another header like CPU_OPT for additional/secondary CPU FANs, though, would allow you to regulate the speeds of them separately through fan curves in the BIOS or a software. This can be practical with large radiators where you’d like one of the 3 fans to run faster than the others, for example, but is rarely done.
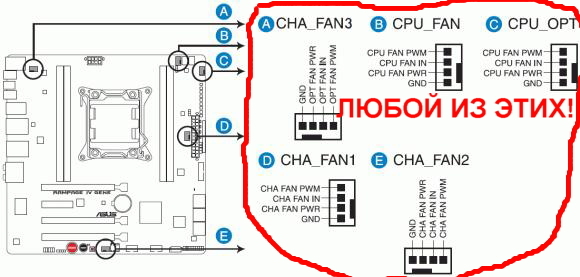
Case Fans
All fans unrelated to your CPU cooling (I.e. Case fans) should be plugged into any headers with names such as “SYS_FAN” or “CHA_FAN”.
These are fan headers dedicated to powering non-critical fans such as case fans and every motherboard has a few of them strewn around.
Most SYS_FAN and CHA_FAN Headers will be 4-Pin, but you can also connect 3-Pin fans to them. 3-Pin Fans can’t be controlled as precisely as 4-Pin PWM Fans, though.
As for the numbers and location of the various system and chassis fan headers: Pick whichever is closest to the fan you’d like to connect while routing the fan cable in a way that doesn’t obstruct airflow.
GPU Fans
GPU Fans of Open Air and Blower-Style Cooled GPUs are already plugged into the necessary fan headers on the Graphic Card’s PCB. There’s no need for you to manually connect any GPU Fans to the Motherboard or elsewhere.
AIO Cooled GPUs typically come with a Power connector that you plug into a SATA/Molex Power cable (so directly from the PSU) and have a Data Cable that plugs into a PWM Fan Header (so any old SYS_FAN or CHA_FAN Header) on your Motherboard to report and control fan speeds. This can vary between GPU AIOs though.
Power Supply Fan
The Power Supply comes with its own fan that does not need any kind of manual connection to the Motherboard. It is pre-connected to its own PSU “Motherboard” inside the PSU’s Case and should not be tampered with.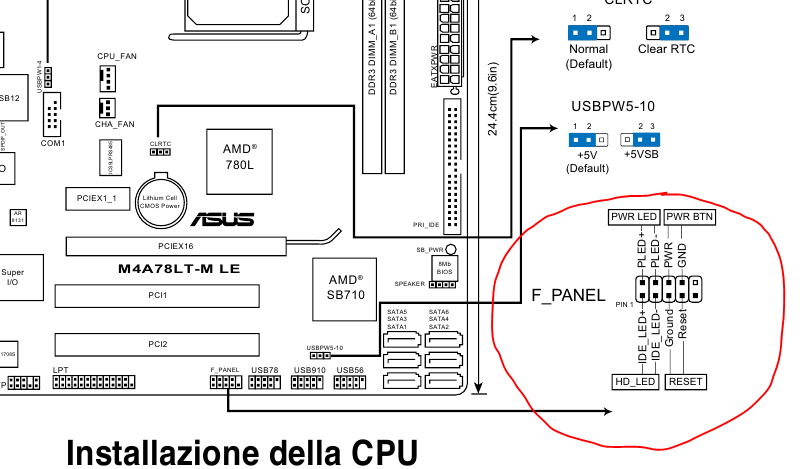
How Many Fans Can I Plug Into My Motherboard?
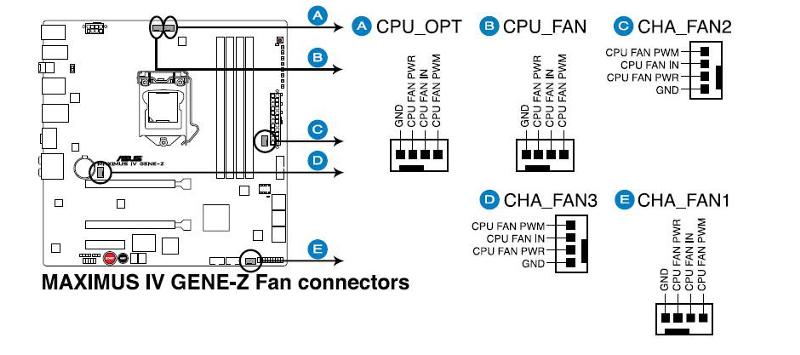
You can generally plugin around 3 – 8 fans depending on your motherboard.
Image Credit: ASUS
Some motherboards—especially budget or physically smaller motherboards—have fewer and some higher-end motherboards have more.
There’s no set industry standard for the number of fan headers that come with motherboards.
However, this doesn’t mean that you can only connect as many fans as your motherboard has fan headers.
There are plenty of ways that you could add in more fans. From simple Molex/SATA to 3-pin/4-pin fan adapter cables, fan splitter cables, fan hubs, and even advanced fan hubs with RGB control, fan control, and temperature sensors!
It’s worth noting that when it comes to Molex/SATA adapter cables and fan hubs, you won’t have any control over the speed at which your fans run. They’ll always run at full speed.
This is because they’re simply connected to a power source, not the motherboard.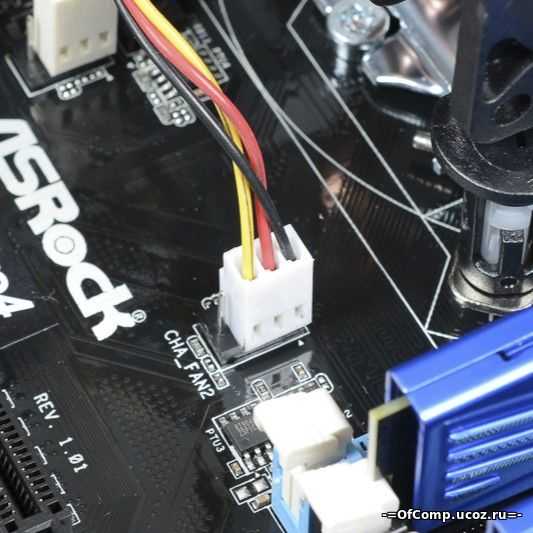
Most fan splitter cables and higher-end fan hubs, however, generally allow you to control the speed of the fans connected to them.
And more advanced fan hubs even allow you to control the speed of each fan connected to it individually!
FAQ
Are All Fans Compatible With All Motherboards?
Generally, yes. The vast majority of consumer fans are compatible with the vast majority of consumer motherboards.
If you have a computer fan and a motherboard with a fan header, there’s pretty much a 99% chance that they’ll work together.
That doesn’t mean that you’ll get all the functionality, however—there’s no PWM functionality in a 3-pin header—but it will still work and run.
Can You Plug a 4-Pin Fan Into a 3-Pin Header? And Vice Versa?
Yes! 4 and 3-pin fan connectors and 4 and 3-pin fan headers are compatible with each other.
The only issue you’ll have is when connecting a 4-pin fan connector to a 3-pin fan header.
4-pin fan connector connected to a 3-pin header and a 3-pin fan connector connected to a 4-pin header.
You won’t be able to use the PWM functionality of the 4-pin fan connector, so you will have less/no control over the speed of the fan.
Is One Fan Enough for a PC?
It depends entirely on the PC.
Is it a titan of a machine with the highest-end components around, built to do computationally intensive tasks such as rendering, gaming, AI work, and other things like that?
Then no, one fan most likely won’t be enough for a PC like that unless it’s out in the open air with no case around it—though even then it would still need a good CPU cooler.
But if the PC is something simple made for moderate media consumption, browsing, and other less computationally intensive tasks, then one fan would most likely be enough to suffice.
Do Motherboards Come With Fan Splitters/Fan Hubs?
Some do, some don’t.
Generally, fancier more expensive motherboards throw in fan splitters or fan hubs as a little extra thing to create a more enticing offer.
But most motherboards don’t come with any fan splitters or fan hubs.
Is It Safe to Use a Fan Splitter/Fan Hub?
Yes. Unless there’s something at fault with the fan splitter/hub itself, there’s practically no chance of a fan splitter/hub destroying anything.
However, when it comes to fan splitters specifically, there’s a small caveat there in that you generally shouldn’t connect more than 3 fans into one fan header with a splitter—assuming that it isn’t also connected to a Molex or SATA connector for additional power.
This is because most fan headers can only output 1A (Amp or Ampere) of power and most fans take around 0.20 – 0.35 amps to function.
If you plug in more than 3 fans that take more power than the 1A of the header can handle, you run the risk of burning out your fan header and potentially seriously damaging your motherboard.
Over to You
Hopefully, that explained everything you need to know about where to plug in all your fans.
It’s a bit puzzling how we still haven’t figured out an easier and more standard way to manage fans and fan connections considering how confusing the current method can be, but still.
It’s not all that difficult if you take things slow and double-check that you’re plugging into the right header.
Have any other questions about PC components? Feel free to ask us in the comments or on our forum!
CGDirector is Reader-supported. When you buy through our links, we may earn an affiliate commission.
Where to plug in Case fans? [Beginners A-Z Guide 2022]
Written By Steven Arends
You are currently assembling a pc and might be wondering where to connect the case fans.
Or, you were facing heating issues and bought a new pair of fans and can’t figure out how you can install them into your pc.
In short, Where do I plug my case fans into?
Case fans can be installed directly into your Motherboard’s 3 pin header or 4 pin header and if your case fan has PWM Connectors then you need to install it into your 4 pin Headers. You can plug your case fans into the PSU via a Molex connector.
Well, I have been there and I know how hard it can be to get all the answers by searching through the internet.
You don’t have to worry anymore; as a pc enthusiast and assembler myself, I will present you the complete guide on where to plug in your case fans.
Don’t skip any part as I am going to explain the process step by step.
Why not build your whole rig with aura sync compatibles? Find out the latest updates regarding aura sync compatible LED strips and aura sync CPU coolers.
How to Install PC Case Fans
1. Plug Your Case Fans Into The Motherboard
2. Plug Your Case Fans into Power Supply Unit
Installing Case Fans: Two Things to Consider
1. Direction Of Case Fans
2. Place to Mount Your Case fans
FAQ
Final Thoughts
How to Install PC Case Fans
First, you need to know you can hook up your case fans with two components.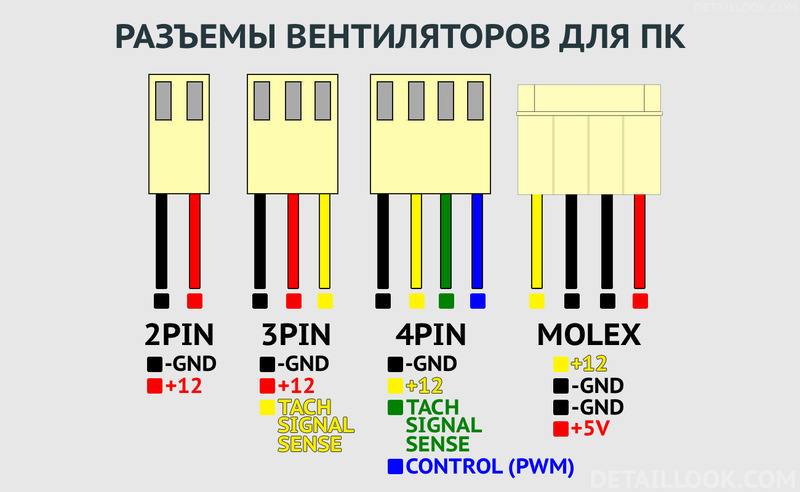
- Motherboard aka MOBO.
- Power Supply Unit aka P.S.U.
So, let’s get into the procedure.
Here are the steps to install Case Fans:
1. Plug Your Case Fans Into The Motherboard
If you want the best possible outcome from your fans, it would be best if you hook them up with your Motherboard.
If you plug your fans with the Motherboard, that way, you can increase/decrease the fan speed from your motherboard BIOS. But for that option, you need to plug it in with a 4pin cable.
Usually, every MOBO comes with at least two fan headers. But you have like MOBO like B450m you will have like Four pin headers.
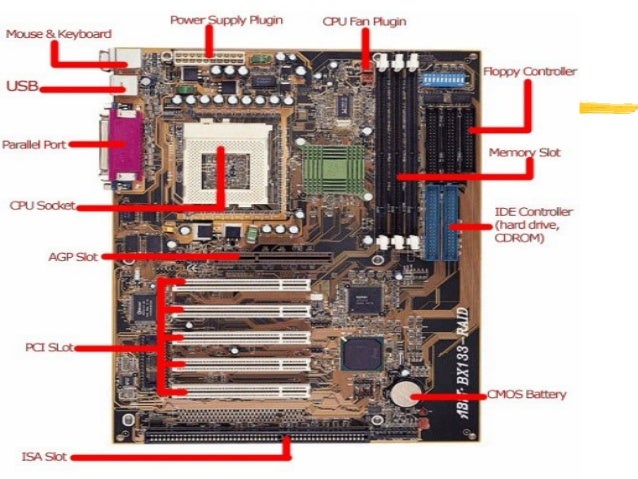
Now look for these pin headers around your Motherboard:
- SYS_FAN (System Fan)
- CHA_FAN (Chassis Fan)
- PWR_FAN (Power Fan)
- EXT_FAN (Extension Fan)
If you are facing difficulties locating them, search at the bottom left of your Motherboard. You will quickly get one Header.
After finding the Header, it’s time to plugging it in
- Every connector will have two tabs like a bump (at the beginning of the port and at the end of it) line it up above the Motherboard.
- Gently push the connector down the Header until it’s fully connected to the MOBO.
There you go; you are done plugging it up.
Follow our guide on how to Connect Extra Fans to Motherboard
2. Plug Your Case Fans into Power Supply Unit
Before plugging in, you should check what PSU model you have. Things you need to connect your case fans to P.S.U.
- Four pin MOLEX connector (Comes with the P.S.U.)
- Three-pin MOLEX connector (Comes with the Fan)
Keep that in mind not all P.S.U.s or the Fans come with the connector. But most recent units will have connectors.
You can directly connect your Fan to the P.S.U. with a connector.
But what if there’s no Molex connector in your Fan?
Well, you can get the P.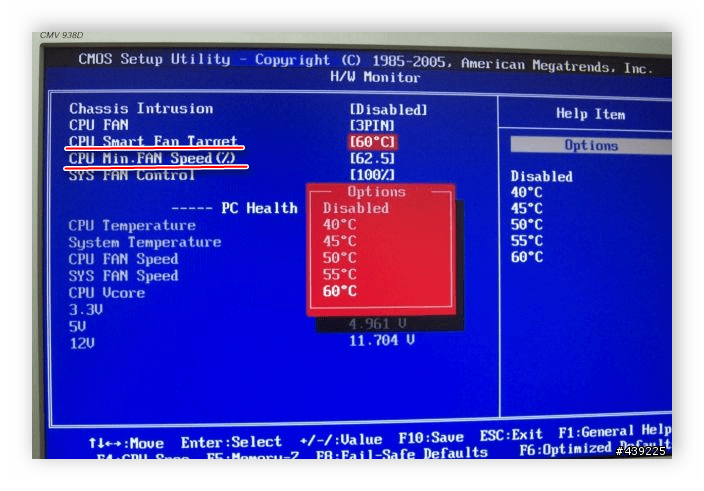 S.U. to Fan Pin Header Adapter. That way, you can plug your fans into the P.S.U.
But plugging your fans into the P.S.U. have some back draw in it. Like you cannot control the fan speed. The Fan will always run at the maximum speed.
Installing Case Fans: Two Things to Consider
Before jumping into how you are going to attach the case fans. You need to know a thing or two about the fans.
When you open up your pc casing, you will see most likely Four types of fans:
- CPU Cooling fan.
- Intake fan.
- Exhaust fan.
- S.U. Cooling fan
You can easily pick up the faulty fans by just looking at them. Either they will not spin, or even if they spin, they make that weird grinding noise.
And If you have any fans that are heavily clogged with dust. Please clean them out to avoid the heating issue.
Now that you know about the type of fans, you need to look at how case fans work.
First, the intake fans will take in the cool air from your room or wherever your pc is, then cool your pc parts, and then with the help of the Exhaust fan will push out the Hot air.
Before installing the Fans, you need to know how to face them.
Read more on how to Fix PC Fans Loud When Idle
1. Direction Of Case Fans
You need to set up your case fans properly. If you don’t, the fans will do more harm than good.
So, some new Intake fans will have an indication on the body which way it should face.
But what if it doesn’t?
For that, you need to see that fan label or the sticker in the body. Usually, the sticker side would be the front side. So put the Fan that way.
But if there’s no sticker as well. Then it would be best if you looked for the spokes or the mesh grill of the Fan.
For example, when installing Intake fans, the sticker or spokes will be inwards the pc case.
Check out our separate post on how to Set Fan Curve on PC
2. Place to Mount Your Case fans
Usually, the intake fans should be placed on the front side of the case to intake the cool air from outside, and the exhaust fans would be at the backside to let out the hot air.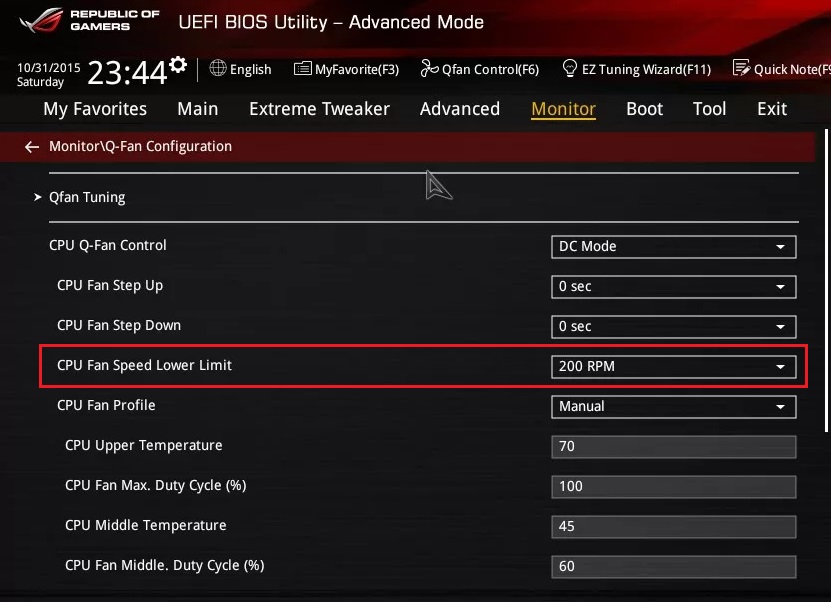
Some new cases will have a vent on top of it. But don’t make a mistake and install an Intake fane over there. That vent should be used for exhaust fans; that way, the hot air will have more ways to get out.
To mount the Fan first, you need to find a perfect place for it. So that when you install the Fan, you can reach the Motherboard or P.S.U. Easily. That will help you with cable management.
When you are done finding the perfect spot, align the Fan with the four holes in the case and screw them up.
You may also like to read: How to Fix a Noisy/Rattling PC Fan
FAQ
Question: Can I plug casing fans without the preferred headers in the Motherboard?
Answer: Yes, you can plug them in your PSU or get a Fan splitter caller Y-Splitter.
Question: Can I plug a 3-pin fan into a 4-pin Header?
Answer: Yes, you can, though you won’t be able to control the fans.
Question: Can I plug my fans into the AIO PUMP Header?
Answer: No, you can’t AIO_PUMP Headers are for water coolers only.
Final Thoughts
Casing fans are essential for your PC’s overall health, and one should be able to install them correctly.
My suggestion would be to research a little before picking up the fans to know what fans you can plug into your Motherboard.
And if you have any future queries, you can always reach us.
Programs for controlling fans (coolers) on a computer
- What you need to know before experimenting with coolers?
- SpeedFan
- Open Hardware Monitor
- Argus Monitor
- NoteBook FanControl
- MSI Afterburner
- Proprietary fan control utilities that are subjected to intense heat. Many users have no idea that coolers can be controlled, more precisely, their rotation speed. But this is not always possible.
If we are talking about fans connected directly to the motherboard (for example, a CPU cooler, case fans or hard drive coolers), then the speed control of their rotation should be supported at the level of the motherboard.
 If this is a cooler that cools the video card, then the rotation speed change must be supported by the graphics adapter itself.
 Controlling fans connected to the motherboard in a standard way involves changing the corresponding parameters in the BIOS. In the case of video cards, this is done by making changes to the driver settings. Non-standard methods involve the use of special utilities. Some of them are developed by the manufacturers of the motherboard, video card, laptop, etc., others are third-party developers. Consider popular programs for controlling computer fans.
What you need to know before experimenting with coolers?
It’s not for nothing that we called the process of controlling the rotation speed of coolers an experiment, because the consequences of this procedure cannot be predicted exactly in advance. By default, all computer fans are set to operate in automatic mode. When necessary, the speed of their rotation increases or, conversely, decreases.
 It all depends on the current temperature of the cooled component. When you want to adjust the speed of rotation of the coolers manually, then the automation will have to be turned off. And it’s always a risk.
 You never know exactly how the fan will behave after manipulating its settings — it can simply stop spinning or slow down so much that the level of cooling it creates is insufficient. And this is not to mention the possible failure of coolers, which is usually observed when manually increasing their rotation speed above the default value (the higher the speed, the more voltage must be applied to the fan, and if it turns out to be too high, the device may burn out). ).
But as practice shows, the negative consequences of experiments with controlling coolers are a rather rare occurrence, and the failure of the cooled computer components themselves is even more so (thanks to the functions of protecting devices from overheating, unless, of course, they were somehow disabled) .
SpeedFan
Freeware
SpeedFan is one of the most famous utilities for real-time monitoring of rotation speed and control of cooling fans and more. The program is designed for experienced users who have experience in overclocking the processor and video cards, but no special skills are required to control coolers.
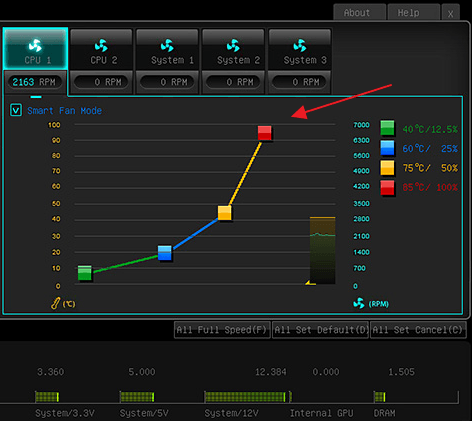
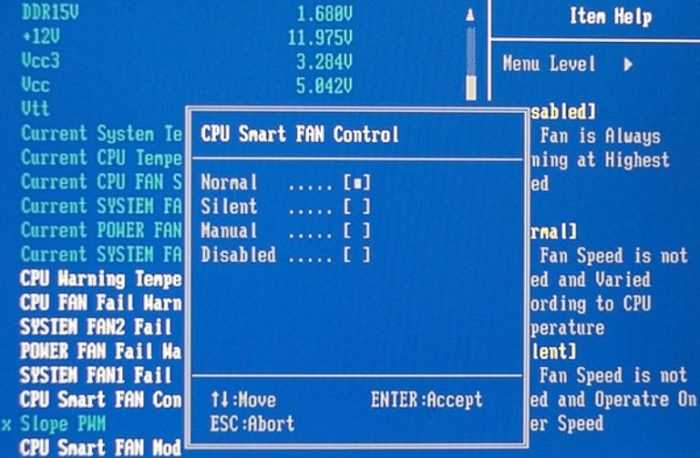
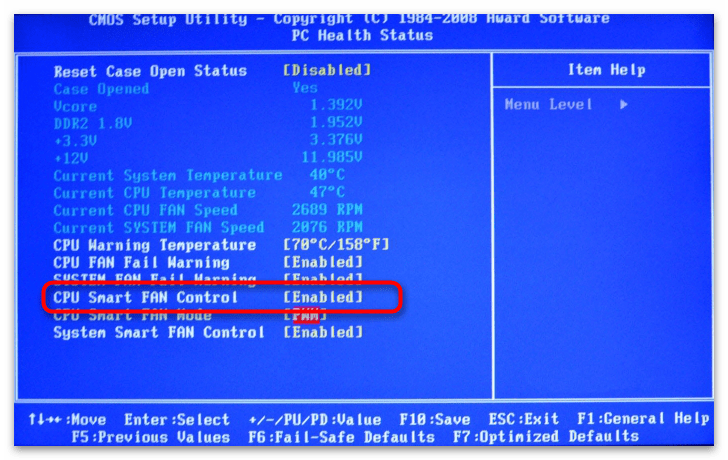
1
The fan speed is adjusted by changing the percentage value opposite the options highlighted in the image above:
- “Sys”. Case cooler (hood, airflow), connected to a special socket on the motherboard and providing control of the overall temperature inside the system unit (case). The current fan speed is displayed opposite the «Sys Fan» line, and the temperature is displayed opposite the «System».
- «AUX» (Auxiliary). Approximately the same as in the previous case. These are also auxiliary fans connected to special sockets on the motherboard. May also refer to the small northbridge and southbridge coolers that are built into some motherboard models.
 They can also be used to cool hard drives. Those. it is impossible to say exactly what exactly AUX coolers cool without looking inside the system unit.
 - «CPU». This is the most important fan of any computer, responsible for cooling the central processor. The current rotation speed is displayed opposite the “CPU Fan” parameter, and the processor temperature is displayed opposite the “CPU”, “Core 0”, “Core 1”, etc. (readings for individual processor cores).
- «GPU Fan». GPU cooler or, in a simple way, video cards. The rotation speed is indicated opposite the parameter of the same name, and the current temperature is opposite «GPU».
Please note that the availability and names of certain parameters in the SpeedFan program depend on the motherboard model and/or other criteria. Negative temperatures next to «AUX» usually mean that the cooler is not connected to the corresponding socket on the board.
Download SpeedFan
Open Hardware Monitor
Freeware
Open Hardware Monitor was originally created to monitor the operation of all important computer components, including the rotation speed of both main and additional coolers.
 But this utility also has a function that allows you to manually control the fans.
 The fan speed control function (Controls) is located in the section of the main window that contains monitoring data for a specific device. Those. if it is a CPU fan, then the option to control its speed will be located in the section with the name of the CPU model, if it is a video card, then in the section with the name of the video adapter. If the “Controls” function is missing in one or another section, this means that the device does not support cooler control or the program itself does not support a specific model of the motherboard, video card, etc.
To control fans from the Open Hardware Monitor program:
- Find the “Controls” line in the section with the device name.
- If this is, for example, a video card, right-click on the “GPU Fan” option, open the “Control” submenu, then “Manual” and select the desired rotation speed in percent.
Download Open Hardware Monitor
Argus Monitor
Shareware
Argus Monitor is another monitoring software with powerful functionality to control the speed of any fans.
 The utility has a convenient and, moreover, Russian-language interface, but it is paid (30 days can be used for free).
 There is a separate tab for each of the computer components supported by the program. If you need to adjust the rotation speed of the video card cooler, go to the «GPU» tab, there is a drop-down list to the right of the graph — set the value «Manual control» in it (a warning window will be displayed where you need to agree with the risks of subsequent actions), set the desired rotation speed of the cooler in percentage and click the «Apply» button:
The fans connected to the motherboard (including the CPU cooler) are controlled in the Motherboard tab. payment» in the subsection «Management. vent.» Each individual cooler has its own settings profiles. For example, we need to adjust the processor fan: in the drop-down list opposite the line “CPU Vent. 1″ (in our case), we also set the value to «Manual control», set the speed using the slider and click the «Apply» button.
 The same can be done with any additional cooler.
 The instructions above are the simplest ways to control fan speed from Argus Monitor. But the program is also capable of taking control, automatically changing the speed of a particular cooler depending on the temperature of the component that is being cooled. To begin with, opposite the name of the device (fan), you need to set the value “Control. program» and press the «Curve» button.
An additional window with a moving graph (curve) will open. By moving the curve points vertically, the cooler rotation speed is adjusted, and the temperature is set horizontally, at which the program will automatically set the specified speed. There are 7 such points in total.
Similarly, you can automate the operation of a video card fan or any other.
Download Argus Monitor
NoteBook FanControl
Freeware
NoteBook FanControl is designed to control laptop fans.
 It’s free and extremely easy to use. The utility is able to control the rotation speed of all coolers present in the design of a mobile computer. The only condition is that it must be supported by the program.
 The latest version of NoteBook FanControl at the time of writing this review supported more than 200 different laptop models from Acer, Asus, Dell, Fujitsu, Gigabyte, HP, Lenovo, Medion, Sony, Toshiba and some other companies. Notebook fans are controlled in a few simple steps:
- First you need to select the configuration: click the “…” button opposite the “Select Config” inscription, select the laptop model in the “Config” list in the newly displayed window and press the “Apply” button there ( if the required laptop model is not in the list, the program can be closed).
- Move the «Fan control service status» switch to the «Enabled» position (you can set it to «Read-only» first to just get acquainted with the available functions).
 It remains to adjust the rotation speed of the coolers using the sliders displayed below (because in our case the utility was launched on a desktop computer, it shows incorrect data and does not work at all).
More experienced and highly motivated (complicated) users can configure their own fan control configuration for their laptop model, for which the NoteBook FanControl program provides the appropriate functions. They can be found in the laptop model selection window by clicking on the “Edit” button (in the new window that opens, be sure to click the “New” button, otherwise the configuration of the selected model will be edited).
Download NoteBook FanControl
MSI Afterburner
Free program
Program MSI Afterburner is designed primarily for overclocking (increasing performance) of video cards from any manufacturer (but only those graphics adapter models that support this feature) ). However, it also has a function that allows you to adjust the rotation speed of coolers for video card models supported by the utility.
Using the MSI Afterburner program is quite simple:
- Press the angular button labeled «Auto» opposite the «Fan Speed» slider (this unlocks the slider itself, which is inactive by default).
- Set the desired speed as a percentage using the unlocked slider.
- Press the «Apply» button with a check mark. Ready.
There does not seem to be a complete list of graphics cards supported by MSI Afterburner, but it is known to include AMD (ATI) and NVIDIA graphics adapters starting with the Radeon HD 3000 and GeForce 8X00, respectively.
Download MSI Afterburner
Proprietary fan control utilities
they can function on different computers, regardless of the manufacturer of the motherboard, video card or other components. But there are also highly specialized proprietary utilities that can control fans for devices of only a certain manufacturer. We will not consider their functionality, but only give their names, the equipment they support and download links:
-
ZOTAC FireStorm .
 The program is used for overclocking, monitoring and control (including coolers) video cards manufactured by ZOTAC. However, this company produces adapters based on NVIDIA graphics cores. Supported models include GEFORCE GTX/GT, GEFORCE GTX 16, RTX 20 and RTX 30 series graphics cards. You can download the ZOTAC FireStorm program for a specific graphics card series from the link above.
- Aorus Engine . The same as in the previous case, but for video cards manufactured by Gigabyte. The latest version of the Aorus Engine at the time of this writing supported graphics cards based on GeForce RTX 2070/2080/2080 Ti GPUs (but you can also download an earlier version of the Aorus Engine for older graphics cards from NVIDIA from the link above).
-
Easy Tune . Another program from Gigabyte, but for managing motherboards from this manufacturer. Among other things, it has functionality for controlling the rotation speed of CPU coolers and additional motherboard fans.
 The link above leads to a download page for several utilities from Gigabyte, including the «APP Center» program, which must be installed in order to be able to run Easy Tune.
This, of course, is not the whole list of proprietary utilities for controlling fans. We recommend that you go to the official website of the manufacturer of the motherboard or video card installed in the computer — perhaps there you can download a program to control the coolers of these devices.
NVIDIA WORLD / Additional modules for RivaTuner
NVIDIA WORLD / Additional modules for RivaTuner
RealTemp
Download (~ 0.01 Mb)
Intel processor temperature monitoring plugin with integrated
DTS thermal sensor (including Core 2 and Core i7 models).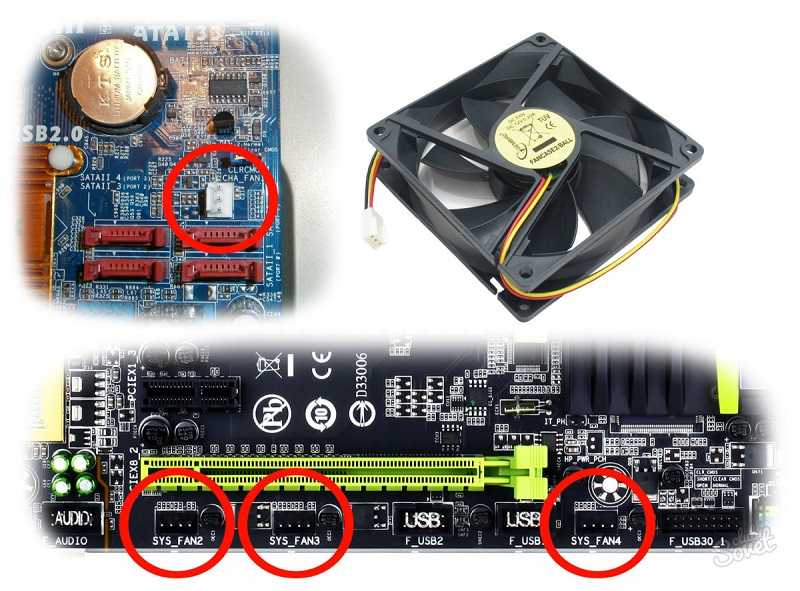 Beyond temperature
frequency and processor load are displayed, synchronization is possible
custom settings with utility
real temp.Author:
unclewebbInstallation: Unzip the file, RTCore.dll files and
Copy RTCore.cfg to \PlugIns\Monitoring, RTCore.rth file to Help\Plugins\Monitoring.
In the RivaTuner monitoring module, enable the RTCore.dll plugin and the required
charts.C2DTemp
Download (~ 0.05 Mb)
Intel Core 2 CPU temperature monitoring plugin. Temperature value
taken directly from the sensor in the processor, for each core
separately. Source code attached.Author: Igor Levicki
Installation: extract and run the resulting file.

After completing the wizard, in the RivaTuner monitoring module, enable
plugin C2DTemp.dll and graphics CPU Temperature. Source
installed in \SDK\Samples\Plugins\Monitoring\C2DTempCPUCOREDIDE
download (~ 0.04 MB)
Plugin Monitar of processors AMD AMD
family K8. The temperature value is taken
directly from the sensor in the processor. For dual core processors
values are displayed for each core.Author: Arekhta Dmitri
Installation: extract the archive, copy
CpuCoreDiode.dll in \PlugIns\Monitoring. In RivaTuner monitoring module enable
CpuCoreDiode.dll plugin and CPU Core Temperature graph.Speedfan
download (~ 0.
 01 MB)
 Plagin for importing information about the temperature and speed of information about the temperature and speed
CPU fan from the program
SpeedFan to module
monitoring RivaTuner. SpeedFan must be running before starting RivaTuner.Author: Alexander Choporov
Installation: extract the archive, copy
SpeedFan.dll and SpeedFan.ini in \PlugIns\Monitoring. In RivaTuner monitoring module enable
SpeedFan.dll plugin and SF CPU temperature and SF CPU fan speed graphics.
Configuration via SpeedFan.ini.SF2RT
download (~ 0.02 MB)
Another plugin for information from the program from the program
SpeedFan to module
monitoring RivaTuner. Readings of all used SpeedFan are imported
temperature sensors, voltages, fans.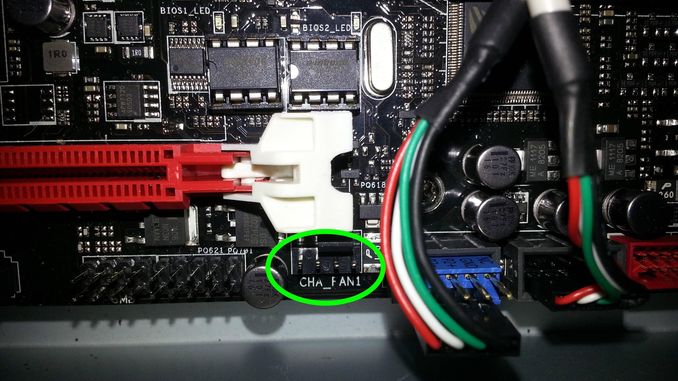 Interaction is possible with
versions 4.28-4.31, SpeedFan must be running before starting RivaTuner.Author: dans
Installation: unzip the archive and run SF2RT.cmd.
After completing the wizard, in the RivaTuner monitoring module, enable
plugin SF2RT.dll and appeared charts. Setting via created in
during the installation of SF2RT.ini.SFSHAREDMEM
download (~ 0.05 MB)
2223 and another plugin from the programs from the program
SpeedFan to module
monitoring RivaTuner. Imported readings of temperatures, voltages,
fans. SpeedFan must be running before starting RivaTuner.
Source code attached.Author: Arekhta Dmitri
Installation: extract the archive and copy the files
SFSharedMem.dll and SFSharedMem.cfg in \PlugIns\Monitoring. In RivaTuner monitoring module enable
plugin SFSharedMem.dll and appeared graphics. Setting via
SFSharedMem.cfg. SaveIconsDownload (~ 0.05 Mb)
0223
Plugin for saving/restoring the position of icons on the desktop with
using the RivaTuner Launcher tool.Author: Ray Adams
Installation: extract the archive, copy the file
saveicons.exe to the RivaTuner folder. In Launcher, create two
standard (Regular) element, specifying .\saveicons.exe as the application,
as startup key -s to save position and -r to
recovery, and assign a hot key to each item. At
running RivaTuner, just press the specified key combinations to
save and restore positions, respectively. You can also create labels
for these actions to the desktop.G92 TEMPERATURATURATORING
download (~ 0.