How to Underclock a GPU With MSI Afterburner
By
Shan Abdul
Share
Tweet
Share
Share
Share
Email
More power is always good, but what about those occasions where you need to turn the juice down?
Image Credit: Pixabay
A graphics processing unit (GPU) is used to render graphics-intensive processes. People spend hundreds of dollars on powerful hardware to achieve the best graphics, but people rarely tinker with their GPU in the same way they might with their CPU.
But, did you know that you can both overclock and underclock your GPU?
So, how do you underclock your GPU, and why would you want to in the first place?
What Is GPU Underclocking?
The GPU comprises different cores that function as the heart of your graphics card. Each core runs at a certain speed, known as the clock speed. Since these cores are responsible for graphics processing, the higher their clock speed is, the better their performance and vice versa.
Graphics card manufacturers set a default clock speed for their products, called the factory clock speed. Even though most users run their graphics cards at the manufacturer’s clock speed, others know how crucial optimizing GPU performance can be.
To match their graphics requirements, they either increase or decrease the clock speed, also known as frequency. Underclocking refers to lowering the clock speed of your graphics card.
Related: How to Check If Your CPU or GPU Is Overclocked
Although underclocking restricts the GPU from running at full power, it also has many advantages (discussed later in the article).
How to Underclock a GPU
The easiest way is to underclock a GPU is with dedicated software. There are lots of options when it comes to underclocking a GPU with software. The most popular include:
- MSI Afterburner
- Rivatuner
- NVIDIA Inspector
- ATI Tray Tools
- ASUS GPU Tweak
We recommend MSI Afterburner since it has a simple interface that is easy to understand for beginners. No matter how new you are to underclocking, you can do it in a few minutes.
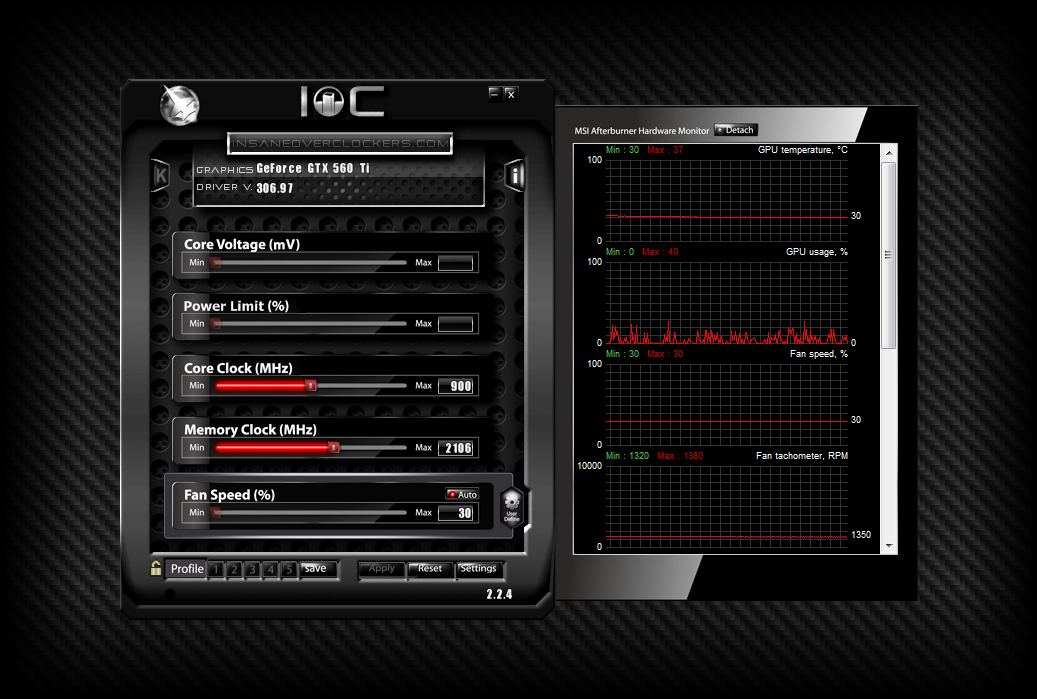
- Download MSI Afterburner from the MSI official website. Follow the instructions to install the program and launch it after it has been installed. Afterburner offers a variety of user interfaces, but they all provide the same features and control settings. Our explanation is based on the MSI Cyborg Afterburner Skin Red by Drerex Design interface.
- If your default interface doesn’t look like the one shown above, tap on the Settings (gear icon) and go to the User Interface tab. Under User interface skinning properties, select the interface mentioned above.
- In this interface, you will see two round dials on the left and right sides of the controller. The dial on the left shows the clock speed of your graphics card and memory. As well, you can see the set voltage and temperature on the right dial. In the middle, there are six sliders that let you control all GPU settings.
- With the fourth slider, labeled Core Clock (Mhz), you can control the speed of your GPU cores. A slide to the left lowers the clock speed, i.e., underclocking, whereas a slide to the right increases the clock speed, i.e., overclocking. Watch how the clock speed decreases as you move the slider to the left.
- Reduce the clock speed to whatever level you want, but make sure this will not cause your games or programs to lag, crash, or display unusual errors. If that happens, it means you have underclocked your computer too much, so increase the clock speed slightly. As such, it’s usually best to decrease in increments rather than huge chunks. Only by trial and error will you find a balanced clock speed.
Additionally, you can undervolt (decreasing the voltage) your GPU to lower power consumption. You also have the option of changing the fan profile to alter the fan speed. You might have to play around, but you’ll find the right balance between GPU clock speed, fan profile, and voltage to get your GPU to perform efficiently while underclocked.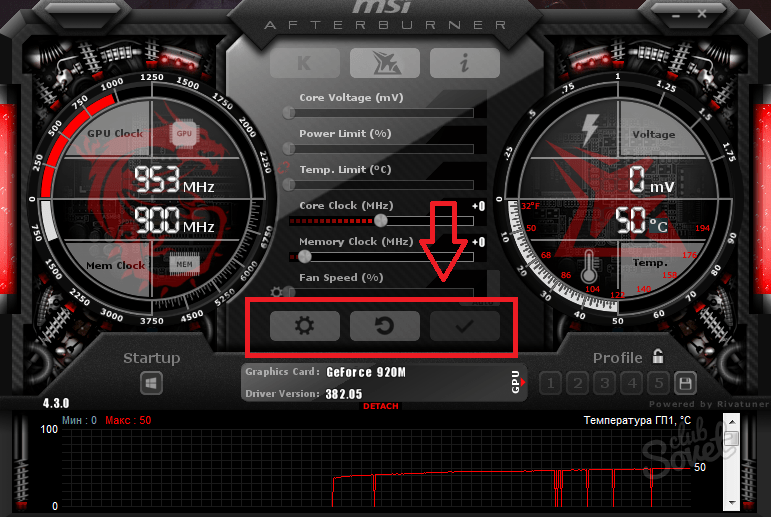
Related: How to Make Games Use Your Dedicated Graphics Card
What Are the Benefits of GPU Underclocking?
You’re probably wondering why you would want to underclock your GPU in the first place. Here are four reasons why GPU underclocking is worthwhile.
- Lower Electricity Bills: When you underclock your GPU, its cores run slower, using less energy. The result is a decrease in power consumption, which leads to lower electricity bills.
- Improved Thermal Management: The faster the GPU performs, the more heat it will dissipate. Reducing the GPU’s processing speed will significantly reduce heat production.
- Low Fan Noise: Underclocked GPUs have a slower fan speed than overclocked GPUs. A fan running at a slower rate makes very little noise. This reduces the disruption caused by fans.
- Extended GPU Life: The lower the load your GPU handles each day, the longer it will last.
 Underclocking will also help you extend the life of your GPU. Even so, running the GPU at a lower speed would defeat the purpose of owning such an expensive unit.
Less heat emission, lower fan speeds, and better thermal management benefit not just your GPU, but also the rest of your system.
Is It Safe to Underclock Your GPU?
While underclocking your GPU has many advantages, there are a few things to keep in mind before you do it again.
In the first place, underclocking the GPU limits its performance, so regardless of how expensive and high-quality your GPU is, you won’t be able to utilize its full potential.
It may cause some graphics-intensive games and programs to freeze, crash, or lag. You may also see graphics-related errors. Before you underclock your GPU, ensure you won’t be running any graphics-intensive software.
Secondly, even if you’ve underclocked your GPU, your power supply unit may still be supplying the same amount of power that your GPU doesn’t require. Consequently, your GPU is likely to be overloaded, resulting in damage to your hardware. Though it’s rare, the possibility exists. However, undervolting your GPU may alleviate this problem.
RELATED: Why Are Graphics Cards So Expensive Right Now?
Underclock Your GPU With Ease
Remember that an underclocked GPU is like a double-edged sword. Despite its benefits in reducing your electricity bill, lowering fan noise disturbance, and extending GPU life, there are risks associated with it. If you are a complete beginner and have no idea what you’re doing, avoid changing anything. You may end up damaging your graphics card. Furthermore, underclocking your GPU can help to reduce heat and potentially decrease your electricity consumption, but it comes with one key loss: graphics processing power.
5 Signs It’s Time to Upgrade Your Graphics Card
Read Next
Share
Tweet
Share
Share
Share
Related Topics
- Technology Explained
- PC Gaming
- Graphics Card
- Building PCs
- Overclocking
About The Author
Shan Abdul
(315 Articles Published)
Shan Abdul is a Staff Writer at MUO.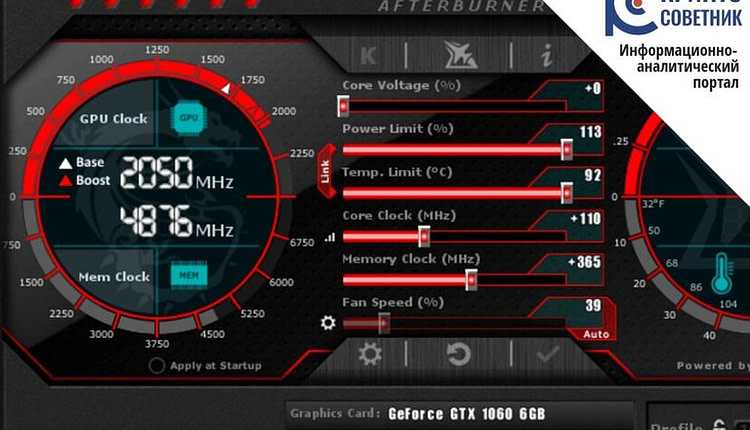 Having used Windows for over a decade, he’s accumulated plenty of experience with the OS. He’s been writing on a variety of Windows topics for over three years, incorporating his expertise to teach readers how to get the most out of their Windows devices and resolve issues with the operating system.
More From Shan Abdul
Comment
Subscribe to our newsletter
Join our newsletter for tech tips, reviews, free ebooks, and exclusive deals!
Click here to subscribe
Guide to Boosting Your Graphics Card with Afterburner
Having a dedicated graphics card, even if it is not the latest model, it is possible to exploit it to enhance the computer by pushing its processor to maximum power, with an overclocking procedure.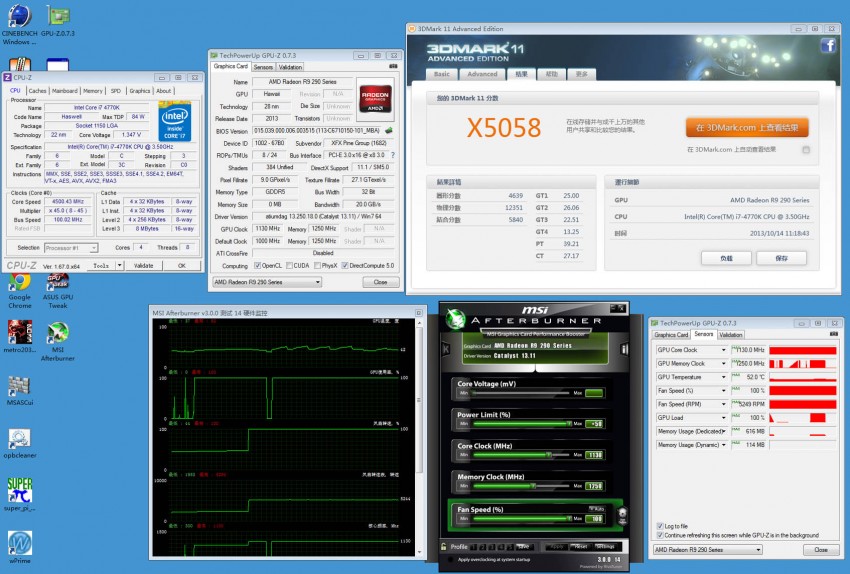
Overclocking a processor means increasing its energy and its computing capacity which the manufacturer keeps lower for a matter of safety and energy saving.
Overclock the GPU (i.e. the graphics card) is a procedure allowed by manufacturers that anyone can do on their computer without too much difficulty, using a program that does not require special knowledge or advanced computer skills.
While the risk is very low and almost zero, overclocking can, theoretically, damage the graphics card processor or other components in the computer.
The important thing is to proceed with caution, increasing the power step by step, without immediately going to the maximum.
In this article we see how to overclock the computer’s GPU to increase its power using the program Afterburner for Windows which works on both NVIDIA video cards and AMD GPUs.
Overclocking is recommended on a fixed desktop PC, but not recommended on laptops that may end up generating too much heat and consuming too much power.
This graphics card overclocking guide therefore focuses on a desktop PC running Windows, which has one NVIDIA or AMD GPU (not other integrated systems such as those from Intel).
1) Overclocking programs to use
The program we’re going to use is MSI Afterburner, free and compatible with any NVIDIA or AMD GPU.
To measure performance we should also have a benchmark program on hand, such as Unigine Heaven, to do the performance comparison before, during and after.
GPU-Z is another program to keep open during overclocking to measure temperature, fan speed and graphics card power in real time.
2) Know exactly what graphics card we have in the PC
Each graphics card is different: in its basic NVIDIA or AMD design, in the customizations added by manufacturers like ASUS, Gigabyte or Sapphire, in the generation and then in the small variations and imperfections of the manufacturing process itself.
In addition, the results of overclocking and the maximum performance of the same graphics card may differ from one computer to another depending on the hardware configuration.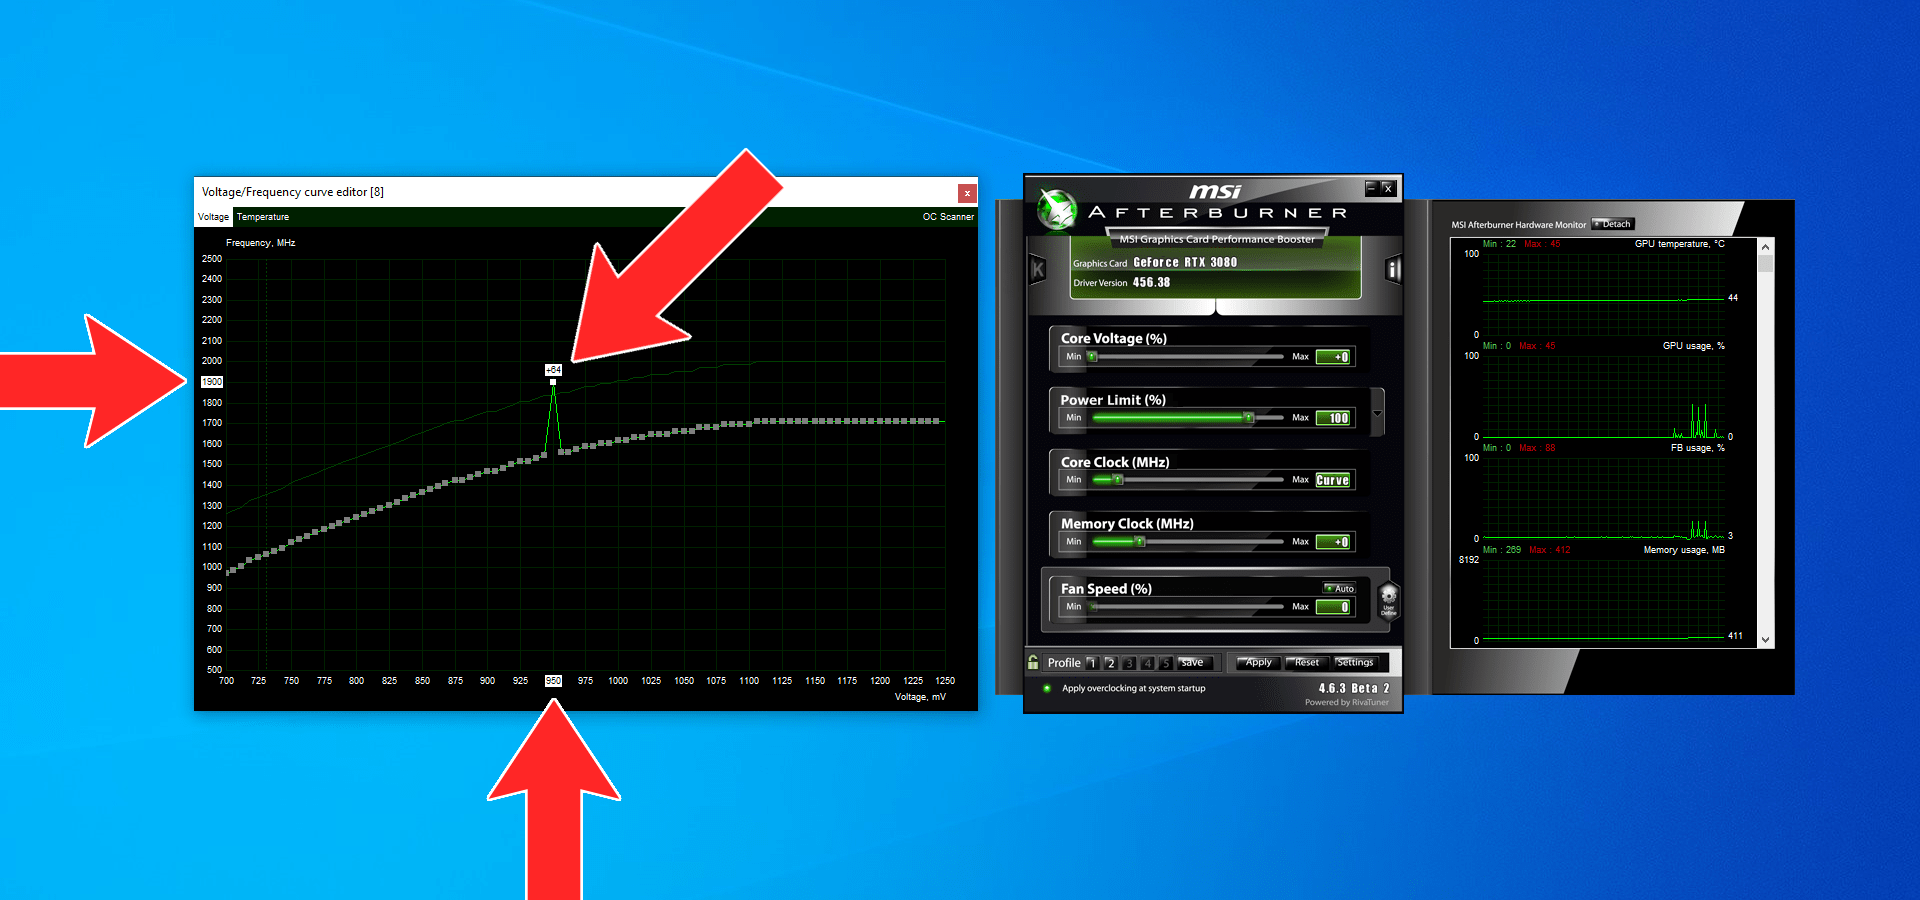
To know everything about computer hardware you can use a program like Speccy, free, simple and precise.
Don’t forget to update the graphics card driver to the latest version, which is always very important to maintain high performance.
3) Run the benchmark before overclocking
Before we begin, we need to see where we are starting from and then use the benchmark tool mentioned in point 1, measuring the performance of the GPU when it is pushed to 100% of its current possibilities.
Keep GPU-Z open to check processor usage in real time even during the benchmark.
Save the values shown or write them down somewhere.
4) Open MSI Afterburner to boost GPU clock and voltage
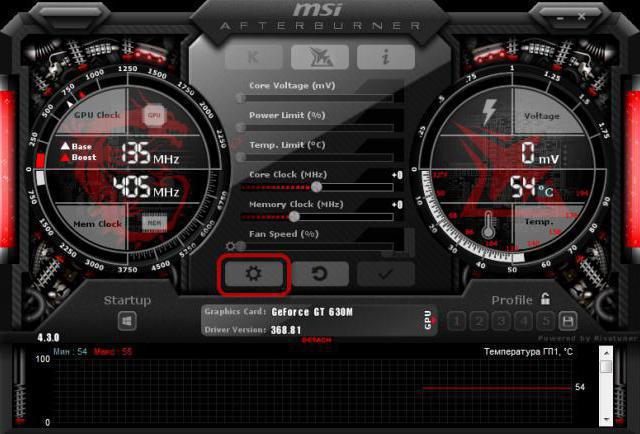
Afterburner’s overclocking tool has an interface that looks like the odometer in a car video game, which makes it look very sophisticated.
What interests us for a video card overclock are the values of the core clock which is the speed measured in MHz and the electric voltage (Core Voltage), measured in Volts that the board is able to absorb from the PC power supply.
In the latest version of Afterburner you need to press the gear icon to open the program options and activate the voltage control unlock.
Randomly changing any of these values can make the GPU and computer unstable, so it’s important to proceed step by step and gently raise the speed and voltage until stability issues are encountered, then go back and stabilize on a stable maximum value.
Change the clock speed first, using the control in the center, going to +10 or +20.
Press Apply and notice that in GPU-Z the GPU-Clock value grows and is higher than Default Clock, which is the initial speed.
If everything went well and there were no problems, you can rerun the benchmark to see if, by pushing the GPU to the maximum now, the computer freezes, crashes.
Also note if visual artifacts appear in the benchmark graphics or black dots or colored dots that are not good.
If there is none of this, you can try to push the GPU clock forward another 10 points, otherwise you have to move it back and retry the benchmark until the performance is stable and error-free.
As mentioned above, it is possible too increase the voltage of the GPU to allow clock values higher than the initial limit by increasing the Core Voltage value which is in percentage.
Raise it by 5% and then run the benchmark to verify that there is no instability.
Increasing the voltage also causes an increase in heat which must be kept under control.
The Temp limit value in Afterburner tells us that when the graphics card reaches that temperature the PC will shut down for safety.
This value can be increased, but it is not recommended at all.
The process of increasing the clock and voltage values slowly can be repeated again and then measuring the performance with the benchmark, until you see the first problems.
At that point, go back to the previous values, make sure the temperature doesn’t rise too much by using the benchmark again and stabilize overclocking in Afterburner.
The end result should be a performance improvement of around 10% or possibly more depending on your PC configuration.
With Afterburner, it is also possible to increase the GPU memory clock speed, but it is not recommended as performance will not significantly increase.
Also, Afterburner can manipulate the fan speed on the GPU, which by default is in «auto» mode which is fine.
The graphics card will automatically increase or decrease the speed of the cooling fans when its temperature sensors detect the need to do so.
Once you have finished overclocking in Afterburner, look at the lock at the bottom right that needs to be unlocked and then click on the disk to save the configuration and then click one of the numbers to save the profile.
In case of problems, you can always press the key that restores the initial values, the one with the arrow that goes back.
ALSO READ: Change CPU, Graphics Card and RAM speed: better programs
GPU Overclocking: Guide to Boosting Your Graphics Card with Afterburner
{{newsDetailData. date}}
{{productlineTag.title}}
,
(Taipei – Taiwan) For overclocking enthusiasts around the world with their hearts set on breaking world records the difference between success and failure can be razor thin. For gamers looking for the smoothest graphics performance, frozen frames and artifacts at high loads detract from their gaming experience; 3D Blu-ray movie watchers may have also run into the problem of massive power consumption and rocketing temperatures. The Afterburner graphics card overclocking utility from leading motherboard and graphics card manufacturer MSI provides overvoltage support for the widest range of graphics cards on the market compared with other software. Core overvoltage can also boost overclocking potential by up to 27.7%1 and unleash your graphics card’s full performance. Voltage adjustment can be used to lower core voltage. In addition to power savings, lowering the voltage can also reduce GPU temperature, running noise and CO2 emissions. The energy-savings and carbon reduction from collective use of the Afterburner utility are the equivalent to planting an expanse of forest equal to 10,000 football fields in just one year!
Support for the Widest Range of Graphics Card Makes Voltage Adjustment Easy
Don’t be fooled into thinking that overvoltage is the privilege of high-end graphics cards. The MSI Afterburner utility offers the best GPU overvoltage support in the industry with over 60 compatible graphics cards starting from the MSI N430GT and MSI R6700. Graphics card performance can be pushed to the very edge with voltage adjustments as small as 0.001V. The MSI Lightning, Hawk and Power Edition series even provides completely support for MSI’s exclusive Triple Overvoltage function. Being able to adjust the core, memory and AUX voltages at the same time allows enthusiasts to dominate the world of overclocking.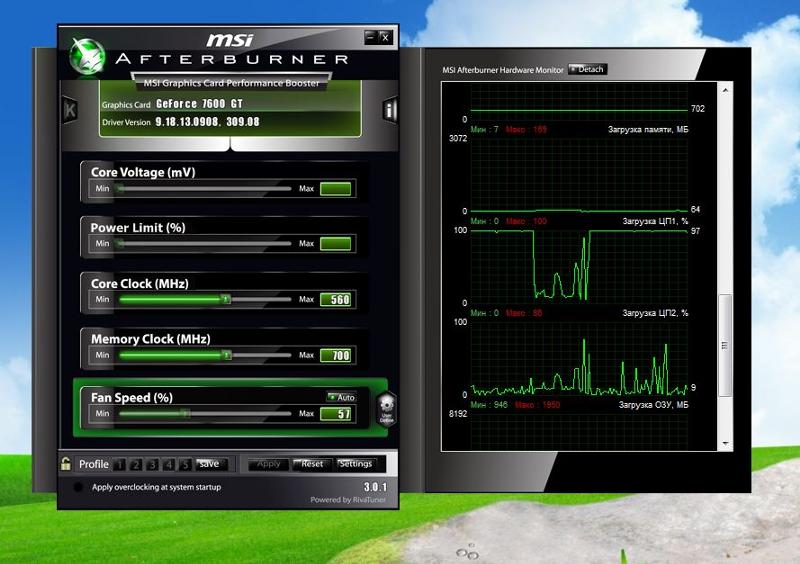
Overclock and Overvolt Graphics Card for Game Stability
The first thing that many gamers try when they run into a performance bottleneck is to overclock their graphics card but this often isn’t enough.MSI Afterburner’s overvoltage function allows the core voltage to be increased during overclocking for a staggering boost that extracts the last ounce of performance from your card! The GPU on the N560GTX-Ti Hawk for example can easily be overclocked to more than 1000MHz after overvoltage. The increase of 27.7% compared to the reference board helps meet gamers’ ever-increasing performance demands.
|
The MSI Afterburner overclocking utility unleashes your graphics card’s full potential after overvoltage. |
Save Energy and Money with Reduced Voltage, Power Consumption and Noise
Energy-saving and carbon reduction are not just the responsibility of society but are the responsibility of everyone living on planet Earth.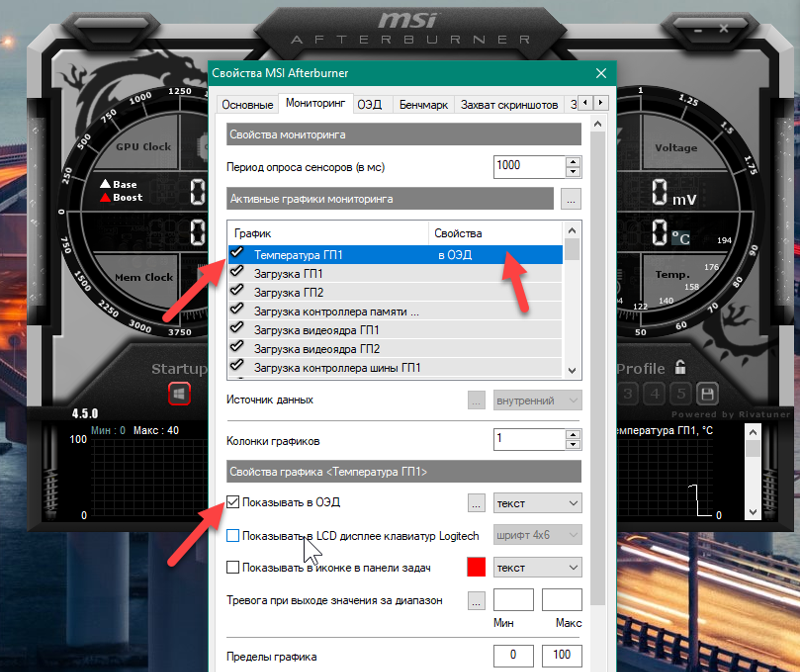 The MSI Afterburner utility can also save power by reducing graphics card voltage as well as core and memory clock. Fans can then run at a lower speed to save on wear and tear, power consumption, heat and noise.
Take the MSI N480GTX Lightning when it’s running 3D games under a 3-way SLI model for example. Power consumption totals 645W before voltage reduction and 585W after voltage reduction. The difference means savings of up to 175,200 kWh in a year. If there are five million platforms around the world using the MSI N480GTX Lightning’s 3-way model, the reduction in CO2 emissions from the saved power is equivalent to planting 5.9 million trees in one year; enough trees to cover an area the size of 10,000 soccer fields!2 Thanks to MSI Afterburner’s easy-to-use power saving wizard, users can do their part for the environment even while using computers.
|
60W of power can be saved on each platform. 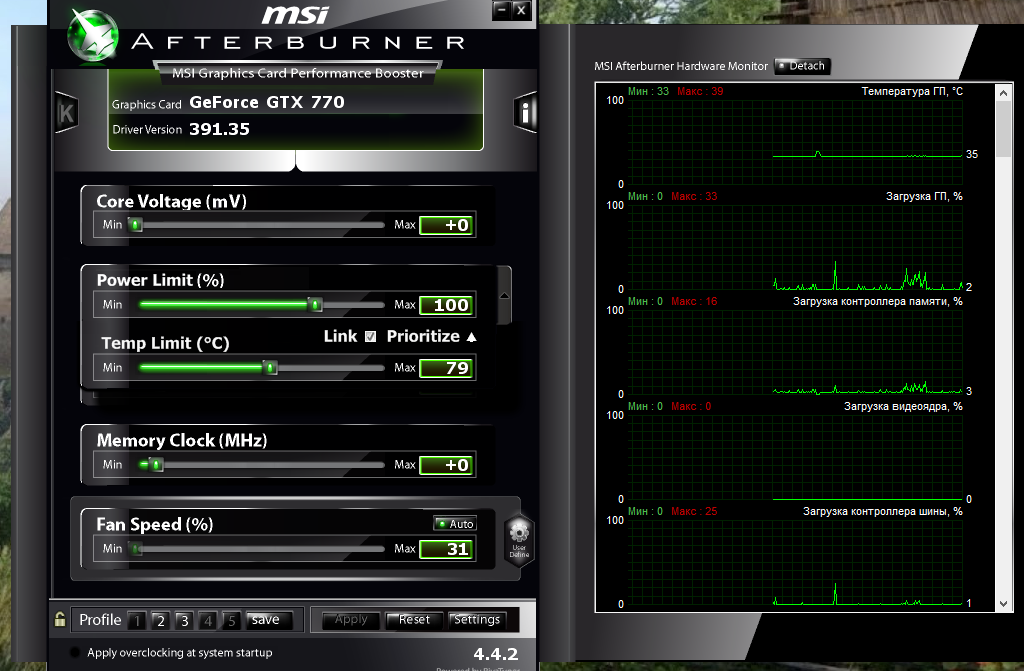 What an amazing result! What an amazing result! |
For more information about the Overvoltage function, please visit: http://event.msi.com/vga/afterburner/overvoltage.htm
For more information about the MSI Afterburner overclocking utility, please visit: http://event.msi.com/vga/afterburner/
1. Actual test results may vary according to the platform and methodology.
2. Equation:
60w x 8 hrs x 365 days = 175,200W = 175.2 kw/h
1kw/h = 0.75 kg/CO2
175.2 kw/h = 131.4 kg CO2
131.4 kg CO2 x 5,000,000 = 657,000,000 kg CO2
Each tree can absorb approximately 111kg of CO2 per year
657,000,000 kg CO2 ÷ 111 ≒ 5,918,919 trees
The Complete Guide to MSI Afterburner (Beginner and Advanced)
MSI afterburner is a very popular overclocking software. It gives you a detailed overview of various hardware components of your PC. It can benchmark your performance, record gameplay, show FPS in-game, has multiple language support, enables custom fan profiles and also works for both any Nvidia and AMD cards.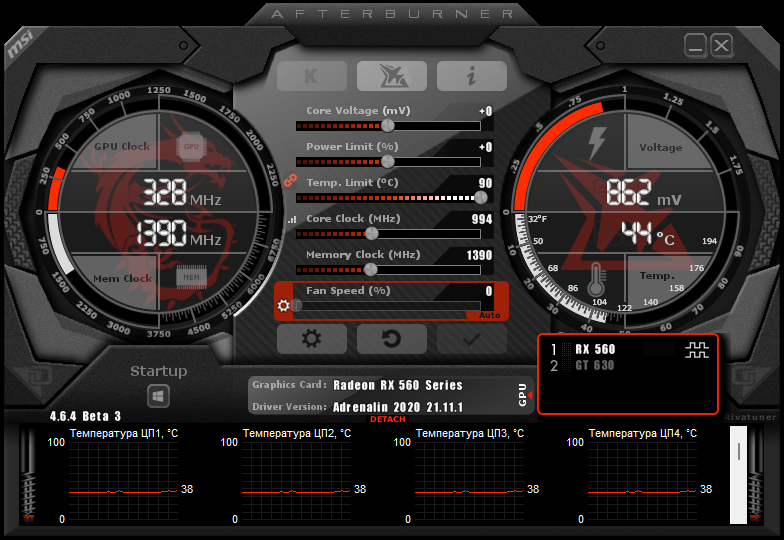 The best thing? All this for FREE. Yes! MSI Afterburner is free software. In this guide I will guide you to set up the software and teach you everything you need to know about it.
Downloading the software
- First, go to https://www.msi.com/page/afterburner and download the software
- In this tutorial I’ll be using Kombustor to benchmark and stress test the GPU to ensure stable overclocking. Now, go to https://geeks3d.com/furmark/kombustor/ and download the Kombustor software. You can use any benchmark software.
- Install both Kombustor and Afterburner. Also install the Riva Tuner that comes with the afterburner.
Before we do anything, Let’s set it up to suit our requirements.
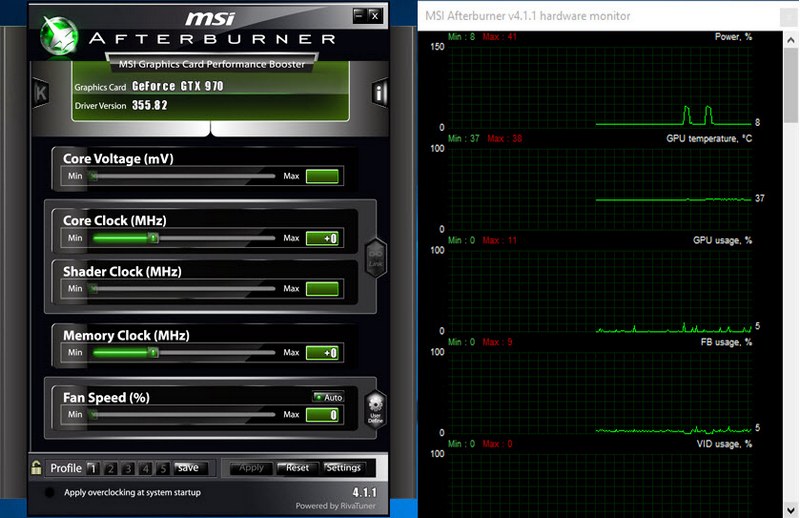
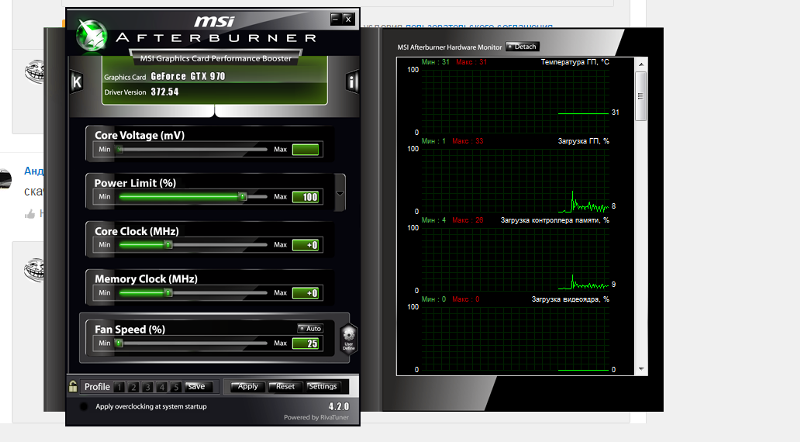
You can see the GPU clock on the left and side and underneath that is Memory clock. The GPU clock shows the speed of the cores of the GPU. The memory clock is the speed of the VRAM of the GPU. You can also see the voltage on the right-hand side and the temperature underneath it. The three buttons under fan speed scrollbar are Settings, reset and accept changes respectively. You can monitor various components like GPU temperature, RAM limit, CPU temperature, CPU clock in the graph section. To remove stuff you do not need, just right click on the graph and go to properties and untick components you do not want to monitor.
To set up the software
- Click settings and check start with windows and start minimized. This causes the afterburner to open in the background and apply the overclocked settings in the background for you automatically every time you start your computer.
- Enable Unlock voltage control and Unlock voltage monitoring. That’s it. The rest of the settings are up to you.
MSI Afterburner Interface
Core Voltage(mV): The core voltage adjusts your voltage in millivolts from the stock voltage of the card. Voltage gives you stability. The higher you raise it, the hotter your temperature becomes. However, the higher you raise it, the higher you can overclock your card. I don’t change the core voltage when I OC my GPU, I just leave it at the standard it came. I only change this when I want to go extreme OC.
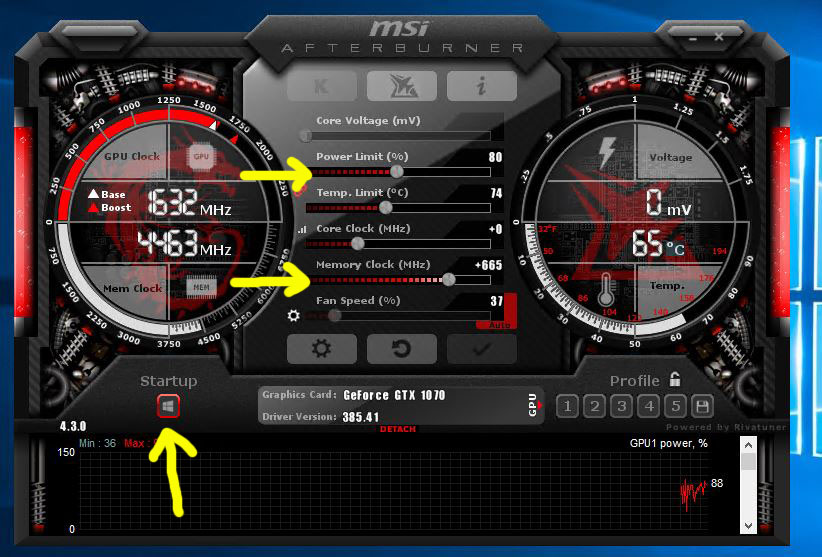
Power Limit (%): your card has a set power that it is set to consume. This slider allows it to consume more power if it needs to achieve higher overclocks. Increasing the power limit increases the amount of power it can receive.
Temperature Limit(°C): This helps to regulate the temperature in which the GPU is running. Do not let the Temperature Limit exceed 85°C for a longer lifespan.
Core Clock (MHz): This is the speed of cores on the GPU. Increasing Core Clock boosts performance and hence adds extra FPS. This has more impact on gaming than the Memory Clock.
Memory Clock (MHz): This is the frequency of the VRAM of the GPU. Increasing Memory Clock is safer than increasing Core Clock. This has more impact on graphical applications like photoshop etc. This is mostly not affected by core voltage.
Fan Speed (%): When You overclock your GPU, it’s overall temperature increases. Increasing fan speed will help you to run the GPU at an optimal temperature. My suggestion to you is to increase the fan speed to maintain the temperatures below 85°C. Note than increasing fan speed increases the noise it generates.
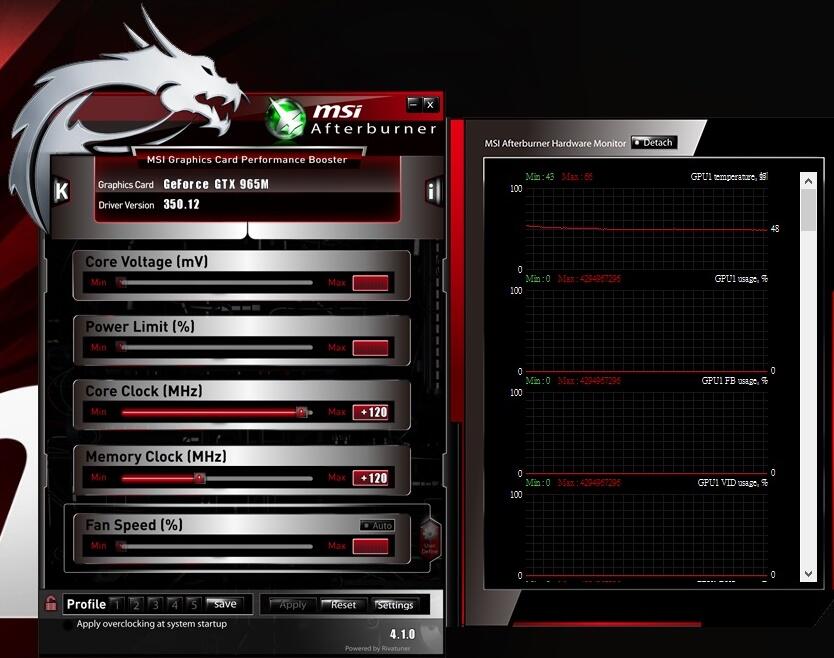
NOTE: In the case of most laptops, Core Voltage(mV), Power Limit (%), Temperature limit(°C) and Fan Speed (%) cannot be manipulated. This is because few laptops have GPUs that cannot be overclocked (for example 940m). Laptop owners can use the below guide for overclocking.
Beginner’s Guide to Overclocking
For a beginner, I would suggest not to tweak Core Voltage and Power Limit. You should never touch your GPU’s core voltage unless you’re a seasoned pro. You can change your fan speed as you like depending upon how OK you are with the noise it generates. Here is the process I recommend for those who are new to overclocking and want to play the safe game:
- GPU overclocking contains two parts first we overclock the core clock and then the memory clock so first increase the core clock by 25Mhz. You can use your mouse or left and right arrow keys for this. Now stress test it in FurMark mode in the Kombustor for 5 to 10 minutes.
- Keep an eye on the Kombustor window for any issues. These include any flickering, graphical issues, screen turning black, Kombustor crash and any driver crashes.
- If you do not experience any issues, increase the core clock by another 25Mhz and stress test it for 5 minutes. Keep repeating this process until you start having issues.
- If any of the issues start showing up. It means you have reached your max point of GPU overclock. Any further increase will crash your drivers. Nothing to be afraid of here. The drivers will reset themselves. This is a process to find your maximum GPU increase overclock point.
- If you start experiencing issues at a set core clock stop testing and re-apply your last stable clock setting. This will be the max point of your core clock.
- Repeat the same test for Memory clock. Increase it by 50Ghz and stress test it with FurMark for 5 minutes until you experience issues.
- When you start having issues re-apply the last stable clock settings. This will be the max point of your Memory clock.
- During the process adjust the fan speed so that the GPU temperature remains below 80(°C)
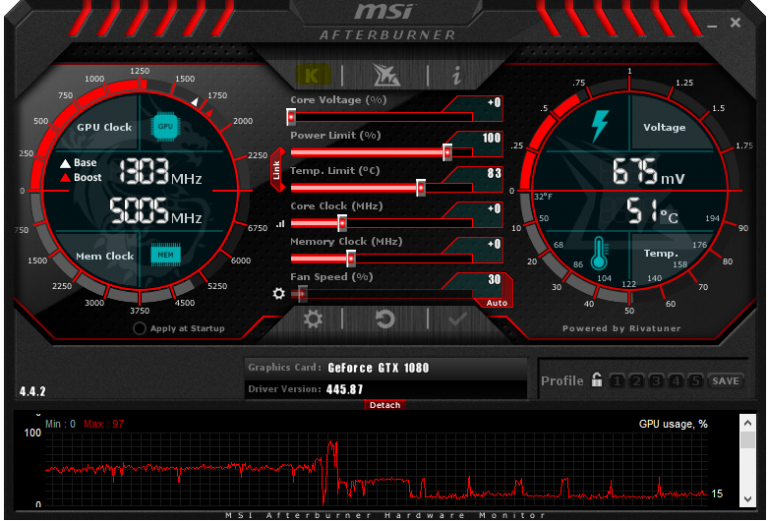
- Stress test the whole setting for 15 to 20 minutes. If you start experiencing issues decrease the core clock by 20MHz and restart the test. Your Core clock and Memory clock values should be somewhat as shown in the picture below but not exact because those values vary for each GPU
Note: If you notice any issues while you play games, just decrease the core clock by 10Mhz and memory clock by 25Mhz. This will usually do the trick.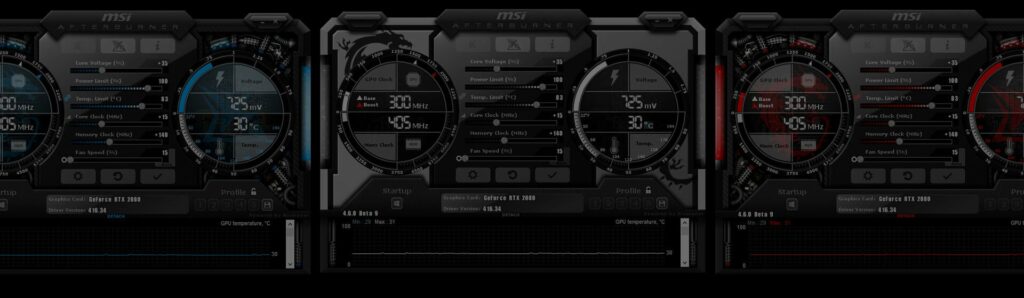
How to Save Your Settings
Press the save button under Profile and assign the configuration to the profile number of your choice. That’s it! Next time you open the afterburner, you can automatically choose this configuration by selecting the profile number you have just assigned.
Finally, click the apply at the windows startup button. This will enable the overclock automatically when you start up your system.
Advanced Guide to Overclocking
Enabling Custom Fan Control:
Most graphic cards have default and automatic controls for fan speed. This is to reduce noise. Overclocking generates heat and requires a good flow of air to keep GPUs working in optimal temperatures. Using default fan settings during overclocking will restrict the overclocking capability of the GPU. Hence it is essential to set up a custom fan curve. Here is how you do it:
-
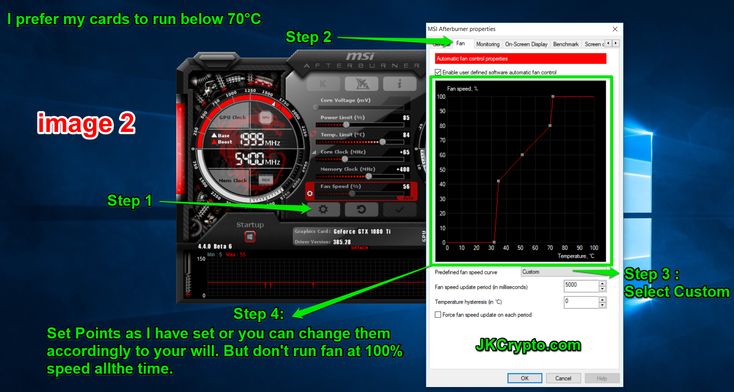
- First, Go to settings and under the “fan“ tab check the “Enable user-defined software automatic fan control” option.

- You’ll be provided with a graph with Fan speed and temperature and you’ll notice a few boxes which you can left-click and drag around.
- You can make new boxes by clicking anywhere on the line and dragging it. You can also delete a box by selecting a box and pressing the delete button.
- My recommended settings are shown in the below image.
- This basically means up to 30°C fan speed is 20%. when the temperature increases to 50°C, the fan speed is 60%. When the temperature is 60°C, the fan speed is 80% and finally when the temperature exceeds 80°C, the fan speed is 100% in usage.
- This is what I recommended. You can set it as per your needs
- First, Go to settings and under the “fan“ tab check the “Enable user-defined software automatic fan control” option.
Next, we will be tweaking Core Voltage(mV) and Power Limit (%). Make sure your GPU has adequate cooling. DO NOT let your temperature exceed 90(°C) at any cost.
- First, Increase the value of Core voltage (%) to the maximum limit.
- Then increase the Temperature limit to 80(°C)
- You’ll notice the Power limit also increases.
- Now, start increasing the core clock speed by 25Ghz and run stress tests using Kombustor for 10 to 20 minutes.
- Keep on increasing the core clock until you see issues like screen flicker, screen blackout, Kombustor crashing, driver crashing, etc. Noting to be afraid of here. It is a part of the process.
- If you noticed any issues, stop stress testing and reapply the last stable core clock setting. This is your max point of core clock overclock
- Repeat the same process for Memory clock by increasing the memory clock speed by 50Ghz until you start having issues.
- When you start having issues, simply reapply your last stable memory clock settings. this will be the point of your maximum memory clock overclock.
- Run the stress test of this configuration for 20 to 30 minutes to see if it is stable. Your configuration will be somewhat similar to the below picture.
 It won’t be exact as it varies for every GPU.
 - Finally, click on the save button and apply it to a profile of your choice
- You can also select the “Startup” button to apply this configuration on starting up your PC.
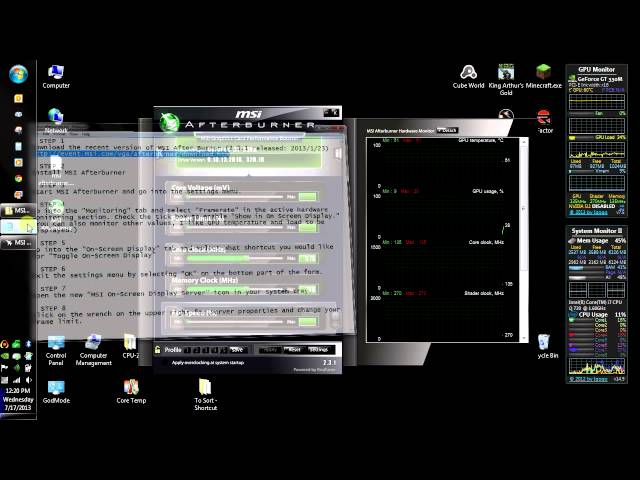
How to use the On-Screen Display (OSD)
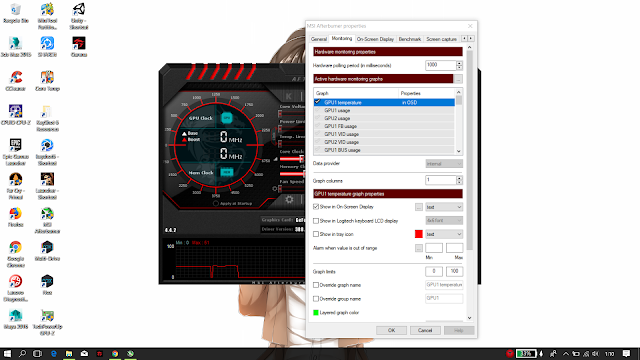
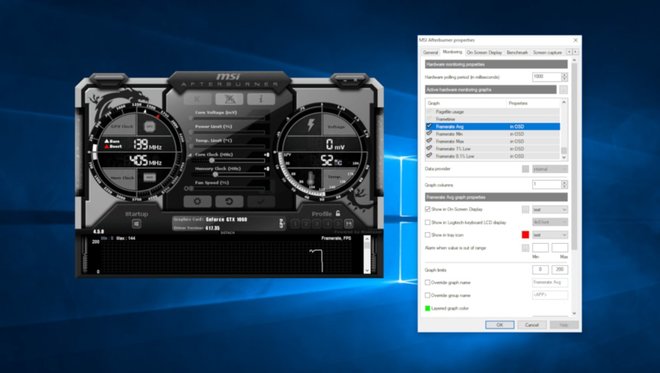
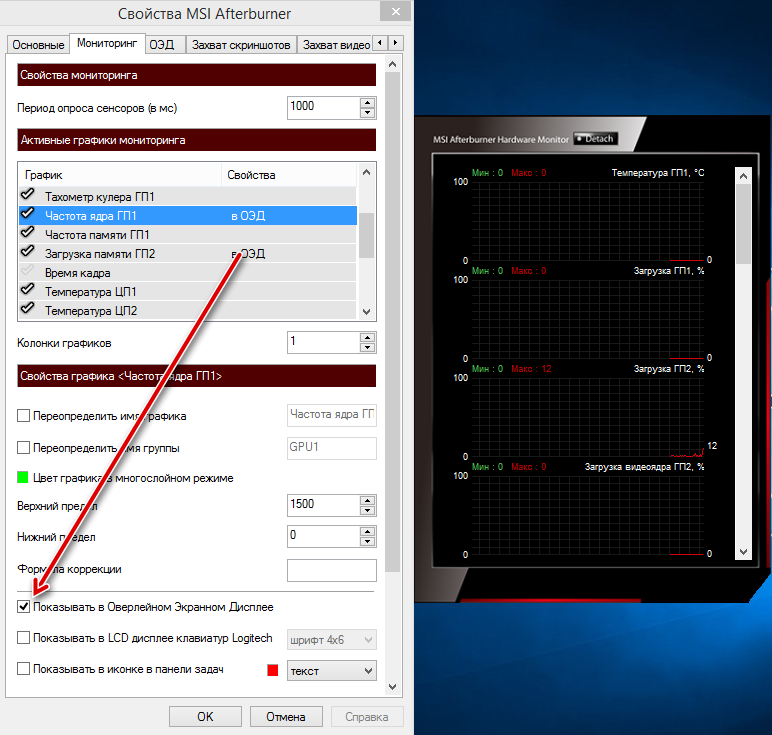
- In MSI Afterburner go to settings, then select the Monitoring tab and check the components you want to see on the OSD.
- Then select them all using the “Ctrl” key and check on the “Show in On-Screen Display” option.
- Go to the On-Screen Display tab and type in the hotkeys to toggle the on-screen commands and click apply.
- Open the Riva Tuner and turn on the “Show On-Screen Display” option and click apply.
- Select the “Application detection level” to Low and turn on the “Stealth Mode”. Some games mistake Riva Tuner for modding software. By enabling the stealth mode, you will not have this problem.
- You can also change the position of the components by changing them in the preview.
 Just click it and drag it around until you are satisfied with the placement. (Click on the images below to enlarge them)
That’s it! Press these commands while in-game to toggle them.
Limiting FPS using MSI Afterburner
You can limit your FPS using Riva Tuner. Generally, using V-Sync can limit your FPS, but gives you an input lag. This is the reason we use MSI afterburner. Limiting FPS has many advantages:
- Smooth gaming experience
- Decreased heat produced.
- Decreased noise produced.
- Decreased energy consumption
- Increased Life span.
- Increased stability during multiplayer gaming.
Limiting FPS is especially beneficial to Laptops and Low-end gaming PCs. Here is how you do it:
- Open Riva tuner and type an FPS value into Framerate limit
- You can disable the FPS limit by simply typing “0” into it. That’s it!
That is all you need to know about MSI afterburner. It can also record gameplay but I do not recommend it because of how complicated the setup is and also because the alternatives available are far better. If you want me to write an in-depth tutorial on Screen recording, just drop a comment and I’ll do it ASAP.
we reduce the noise and heating of the video card
The warming is just around the corner, which means that soon the computer cooling systems will cope with their tasks worse. How to reduce the temperature, noise and power consumption of video cards without spending a single penny on it? Read this article about graphics adapter undervolting.
Undervolting is a term for reducing the voltage and therefore the current used by the video card, which entails a significant decrease in temperature under load (in some cases by 10 degrees). However, this is not the only advantage of undervolting, this procedure also helps to combat video card noise in games.
Course
Development in Python
Explore popular mov programming to earn $1300 via rіk
REGISTER!
As a rule, lowering the temperature by even a few degrees will reduce the speed of the fans of the active cooler, which makes a noticeable difference in the noise level. In some programs (MSI Afterburner, Trixx) you can go even further and further reduce CO noise by adjusting the cooler algorithm. As a first approximation, you can focus on a temperature of 80 degrees Celsius. That is, change the fan speed so that under load the chip does not warm up above 80 degrees. However, this is another topic, but today we will talk about undervolting.
Zmist
- 1 How to reduce voltage? How to reduce voltage
Reduce the voltage gradually. For example, from 1.200 V first to 1.150 V, and then in steps of 0.01, i.e. up to 1.140, 1.130, etc. After each decrease, you can test the stability of the video card, that is, keep it under load for a while. For this, you can use the same FurMark.
Undervolting is somewhat like overclocking, only in the opposite direction — instead of increasing the frequency, you need to lower the voltage. After the first failure (the driver will display a message), you should go back one step by increasing the GPU voltage, and thoroughly test the stability of this mode.
Consider several ways of undervolting. The first two are reduced to the use of special utilities, and the third, more advanced, to flashing the BIOS of the video card.
Program method
MSI Afterburner
In the main window of this program there is an adjustable parameter Core Voltage, which is responsible for the level of voltage supplied to the core of the video card. As a rule, this parameter is in the range of 1.100–1.200 V and is set by the manufacturer with some margin.
In principle, you can reduce the Core Voltage indicator with any step (but preferably with a small one), this operation cannot somehow harm the video card. The worst that will happen is that the computer will freeze, or, more likely, a message will appear in the system tray stating that an error has occurred in the video card driver.
The disadvantage of MSI Afterburner is that it does not allow you to adjust the voltage of not all video cards.

Sapphire TRIXX
Despite the fact that the name of the Sapphire Trixx application, as in the case of MSI Afterburner, contains a mention of a specific video card manufacturer, the utility works with adapters from all companies, not just those listed.
Trixx has the advantage of being able to adjust the voltage of more video cards. In other words, if Core Voltage is disabled in Afterburner, try Trixx.
Trixx’s voltage regulation procedure is basically the same as Afterburner’s. The required slider is located in the Overclocking tab and is called VDDC.
The only disadvantage of Trixx in terms of undervolting is that the utility cannot restore the voltage value when the computer is restarted. Only the core and memory frequencies are restored, and the voltage must be set manually each time. Afterburner does not have this drawback, but, as already mentioned, it supports fewer video cards.
Changing settings in the video card BIOS
Let’s start with the usual warning in such cases.
 You carry out all the operations described below at your own peril and risk. Do not flash the BIOS if you are not sure of the correctness of your actions. A damaged or failed firmware update can damage the graphics card, voiding the manufacturer’s warranty.
 So, what to do if the video card is not supported by the Afterburner program, and you don’t want to set the voltage manually using Trixx after each reboot of the PC? In this case, you can edit the parameters specified in the BIOS of the video card.
AMD Radeon
You can use utility GPU-Z or ATIWinflash to save the BIOS to a file on your computer. The second program is preferable because it will come in handy again later to update the BIOS, while GPU-Z will no longer be used.
After saving the BIOS to a file, you need to open it in Radeon BIOS Editor , and on the Clock Settings tab in the Voltage fields, set the voltage value selected earlier in Afterburner or Trixx.
 After that, save the edited BIOS (Save BIOS), preferably in a new file.
The last step is to launch ATIWinflash, select the necessary video card if there are several of them in the computer, load the edited BIOS into the program (Load Image) and press the Program button to flash it. The program will “think” for a while, after which it will offer to restart the computer and load the video card with a new voltage value.
NVIDIA GeForce
0043 NiBiTor (NVIDIA BIOS Editor) to change the voltage of the video card (Voltages tab, 3D parameter). Note that in some cases, a limited range of voltages with a certain discreteness or even several specific values will be available for the 3D mode. If the list does not contain what is required, you may have to abandon the idea of \u200b\u200bflashing the BIOS or use a value that is slightly higher than the minimum sufficient.
Kepler BIOS Tweaker is required for graphics cards based on Kepler and Maxwell chips (GeForce GTX 6xx/7xx).
 However, due to the multiple operating states of GPUs due to GPU Boost technology, these models are often only used with software voltmod.
After editing, the BIOS must be saved to a new file and uploaded to the video card. To do this, the utility NVFlash is downloaded, after which the file with the edited BIOS must be flashed. To do this, you need to remember the basics of working with the command line by typing in the console: nvflash.exe -6 BIOS.ROM. In this case, BIOS.ROM is the name of the edited firmware file, which must be located in the same directory as NVFlash.
Results
To ensure stable operation of video cards, manufacturers set the voltage of the GPU with a certain margin. Often, it can be somewhat reduced without obvious consequences for the device itself, thereby reducing GPU heating, and, accordingly, the noise level of the cooling system.
A side bonus of reducing the supply voltage is also a reduction in the power consumption of the video card.
 The account in this case goes to tens of watts for modern high-performance video cards. Whether the game is worth the candle is up to you.
MSI Afterburner Overview, Customization Features
Before the advent of home mining farms and modern ASICs, users used video card acceleration techniques to improve the processing power of equipment. Initially, the RivaTuner utility was used, which was created by Alexey Nikolaychuk.
However, support for this utility stopped in 2009, and MSI Afterburner appeared instead. The presented version not only allowed to accelerate video cards for games, but also made it possible to use video cards for mining at home. To mine cryptocurrency at home, you should study the features of using, downloading and further changing the parameters.
How to download the program
This version of the program allows you to speed up video cards to increase power and performance. To download MSI Afterburner without viruses and third-party components, you should use the official download site https://ru.
 msi.com/page/afterburner.
 On the official website, you can find three versions of the program that are designed for different devices. You need to select the appropriate option, designate an installation location, and complete the download.
Features of installing the program
After downloading the program to your computer, you need to go to the section where the file was installed. The installation procedure consists of the following steps:
- You need to select the latest version of the utility from the list provided (currently version 4.6.4 is used).
- After selecting the appropriate version of the utility, you must run the Setup.exe file to install it on your computer.
- The system will automatically open a dialog box prompting you to select an installation package. If the program is installed for the purpose of mining, uncheck RivaTuner Statistics Server.
- After reading the terms of the agreement, you should check the appropriate box about consent, and then start installing the program.
- The program will start downloading to the computer.
How to overclock the video card to improve performance
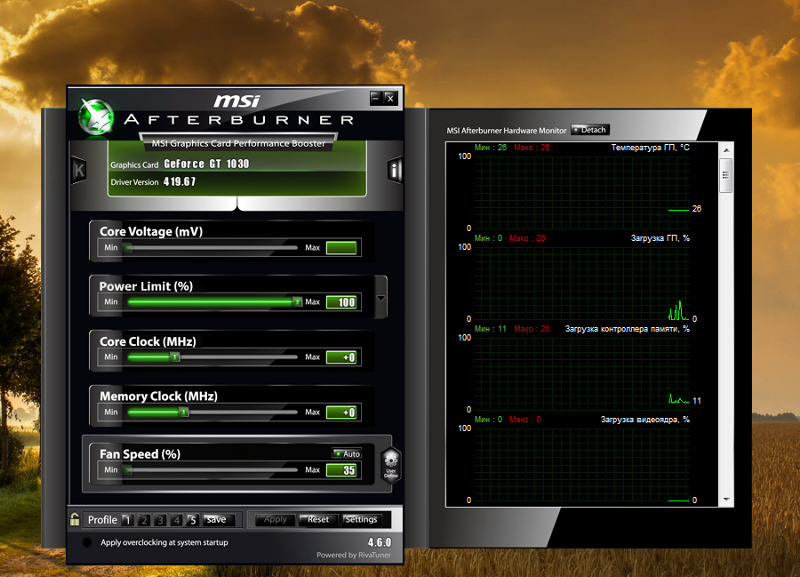
After completing the installation, you need to properly overclock the video card in the program to improve its performance. With MSI Afterburner, you can change the following specifications:
- It is possible to increase the frequency of the memory;
- Reduce energy consumption to save resources when mining;
- Increase fan rotation to optimize cooling systems;
- Select automatic program start.
If the set uses the same video cards, you can check the box next to the line «apply settings to all». When using different models of video cards, you will need to configure them separately. The presented characteristics will optimize the operation of all systems, as well as accelerate the performance of the equipment, which will allow you to mine cryptocurrency at home.
Memory boost
It is quite easy to increase the frequency of the memory and core, for this you need to go to the main section of the program.
 The video card with the main parameters will be displayed on the screen. In the Memory and Core Clock section, you should change the frequency indicators. You can do this in one of the following ways:
 - Move the slider in the corresponding section with the mouse.
- Write the desired value in numbers and then confirm the selection by pressing the Enter key.
It should be taken into account that when working with AMD cards, it is enough to write the required frequency value. When setting parameters on an NVIDIA card, all changes are recorded in the format of increasing or decreasing the indicator relative to the factory settings (+100; -100).
Decrease in power consumption
High power consumption is the main factor affecting the cost of mining. To reduce energy costs, the core voltage should be changed. This can be done by changing the «Core voltage» indicators. It is necessary to change the settings gradually so as not to damage the equipment.
Some GPU versions do not have the ability to change core voltage settings. In this case, you will need to run an additional program. More information on ways to reduce power consumption can be found at https://altcoinlog.com/nastroika-msi-afterburne.
Optimization of coolers for video card cooling
The power limit parameter, which is also located in the main interface of the program, is responsible for optimizing the functioning of coolers. Initially set to «0», corresponding to 100% power consumption. If during operation the video card heats up excessively, you should reduce the power limit. To begin with, it is worth trying to reduce the indicator by 20. If during operation there is a constant fluctuation in the core frequency and a decrease in the hashrate, it is worth trying to increase this indicator.
After that, it is additionally recommended to go to the cooler settings in the main section of the MSI Afterburner program. Here it is recommended to set the operation mode to «Fan Speed» to cool the video card.
 The user can also choose to manually control the cooling system. You should always keep in mind that when the video card is heated, the speed of the cooling system should increase. Otherwise, the video card may overheat and also fail.
 Automatic program start
Inside the system, you can set the program to automatically start when you turn on the computer. This will automate the process of setting basic parameters at system startup. To select autorun, do the following:
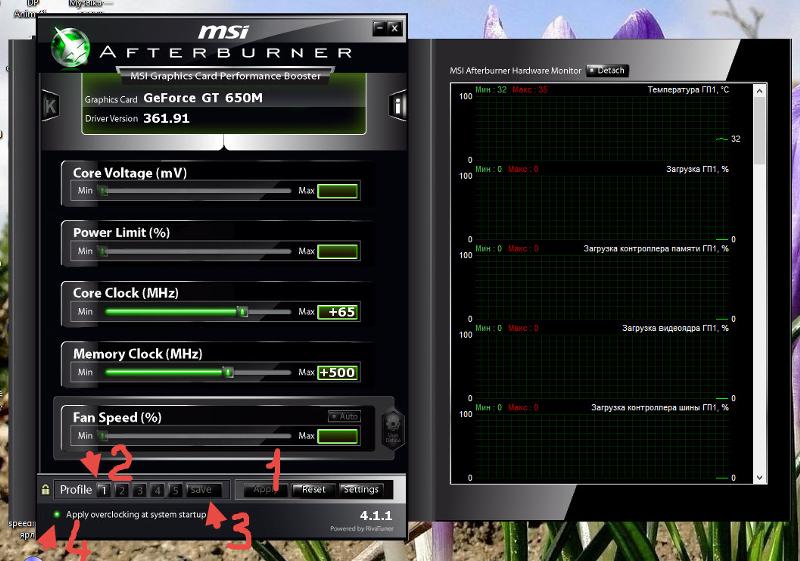
- At the final stage of the settings, select the «StartUp» item, which is located in the lower left part of the screen.
- The program will open a dialog box in which you must check the box to start automatically with Windows.
- Profiles will be marked with numbers on the right side of the screen. Here you should click on the «Save» button. By alternately clicking on the profile buttons, you can set the choice of algorithm for mining at system startup.
Additional features and advanced settings
In addition to the basic parameters mentioned above, additional characteristics can be configured in the program.
 Among the additional parameters it is worth noting the following:
 - Status monitoring;
- Profile setting;
- Changing the system interface.
In the «Monitoring» section, the user can set the frequency of polling sensors to monitor the status of all systems. The «Profiles» section allows you to set a key combination with which you can configure the selected parameters in the system. The «Interface» section is designed specifically to change the appearance of the program for the convenience of users.
Conclusion
There are now other ways to speed up video cards to improve the basic performance and processing power of the hardware. However, most users are accustomed to using MSI Afterburner. For mining at home, you can install the MSI Afterburner program, perform basic settings, and also adapt the system to work with a specific computer model. Using the presented option will allow you to mine cryptocurrency at home.
How to overclock GeForce and Radeon graphics card on laptop and PC
How to overclock graphics card using MSI Afterburner? How much to overclock an AMD and NVIDIA video card on a PC and laptop? You will learn about this in this article about overclocking.
GPU overclocking is to increase the speed of the graphics card above the standard level to squeeze out more speed for your games! It’s like pouring a fire booster on a grill… It will help you get the steak a little faster, but it’s a force to be reckoned with. Here’s the thing: Each video card operates at a certain standard frequency. For example, my NVIDIA Titan Xp (2017) runs at a maximum frequency of 1582MHz on the GPU chip while 12GB of memory runs at 5505MHz. NVIDIA has taken a rather conservative approach in this matter, since silicon is able to operate at higher frequencies, which allows more operations per second. Either way, you can expect a slight performance boost.
In other cases, overclocking can give you an advantage in improving visual details. For example, only overclocking allows me to play Nier: Automata in 4K resolution with maximum detail at a stable 60 FPS. Without this overclock, I would have to cut some visual settings and make sacrifices. Note that other GPU dependent tasks can also benefit from overclocking, including media rendering, which is mostly done by the GPU.

How safe is overclocking a laptop and PC video card
Overclocking is relatively safe these days. If something goes wrong, the laptop or PC will crash or give visual artifacts (which is also a good warning that your game is about to crash), but the chances of you actually damaging your hardware are low. . However, GPU damage can happen if you decide to become a professional GPU overclocker using LN2 or «shunt mods» to remove voltage caps so you can supply more power to the GPU…but I wouldn’t touch that with a ten foot pole either! It is short-lived and offers little benefit at high risk. It’s up to you, but you can obviously kiss that guarantee goodbye!
Software optimization before GPU overclocking
Overclocking is a hardware approach to optimizing your PC. It should only be used if your PC is already optimized at the software level, otherwise you will negate the improvements made by overclocking.
 To build a solid foundation for overclocking, you should first optimize your PC software for gaming and consider using Avast Cleanup to reduce the impact of third-party processes on your PC. The combination of optimized hardware and software will give you the best performance.
 Overclocking is an easy way to improve the performance of your PC or laptop in games or multimedia. A few things you will need:
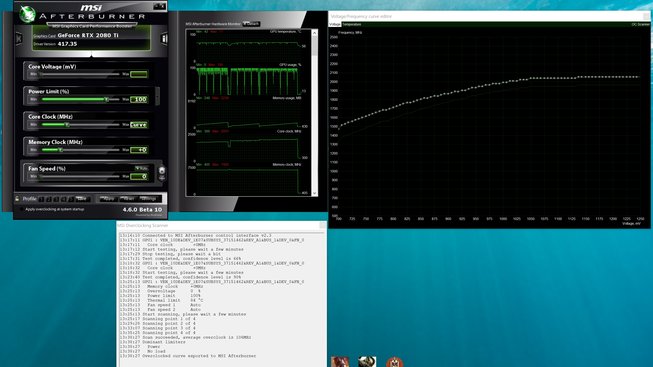
- Overclocking tool — my personal favorite and probably the leader of the bunch is MSI Afterburner which works for most AMD and NVIDIA GeForce chips. Please note that the newer versions of MSI Afterburner also have an “OC Scan” feature originally developed for NVIDIA’s latest GeForce RTX series (2070, 2080, 2080 Ti) that automatically overclocks your GPU — a nice feature. More on this later. You can download MSI Afterburner and its latest beta versions (which I recommend, especially for new generation GPUs) from this page. MSI Afterburning 9 Overclocking Tool0024
- If MSI is not for you, then EVGAs Precision XOC is a good alternative that works great on non-EVGA cards.
 However, EVGA requires you to sign up for an account before you can download this (otherwise) free and great tool. EVGA Precision X Overclocking Tool
 - AMD users may want to look at AMD Overdrive, which is specifically designed for AMD GPUs. If none of the above tools work, this will help you push your hardware to its limits — and more.
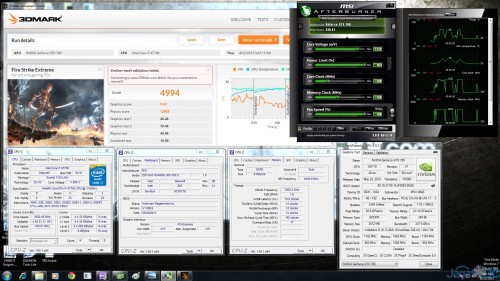
- GPU stress test — GPU overclocking seems to work well at first glance, or even for minutes or hours when you’re gaming. However, in my experience, overclocking shows its true effect after a few hours of actual play. Just recently, I thought I had found the perfect overclock settings for my Titan Xp GPU, but realized that these settings lead to a crash after 1-2 hours of play. That’s why you need a good GPU stress test utility — run it for a few hours to find your personal settings. Personally, I use two tools for this: 3DMark and Unigine Valley.
Run this test and get baseline data about your GPU’s frame rate, stability, clock speed, and temperature.
 Repeat it several times to get an idea of the capabilities of your GPU.
 3DMarks Stress Test provides a lot of detailed analysis and is easy to automate, but you need to have the «Professional» (paid) version for this. Unigine Valley renders a very complex forest, pushing your CPU/GPU to the limit.
How to overclock your GPU — step by step instructions
Overclocking sounds dangerous, but it really isn’t if you follow the steps below thoroughly.
Before proceeding with step 1, make sure you have benchmarked the default performance (see section above) to determine baseline performance. This way you get an idea of how much performance you can achieve!
Step 1: Run the overclocking tool
I’m going to show you how to overclock your graphics card with MSI Afterburner as it’s my preferred overclocking tool, but the method is very similar for other tools. Ready? Cool. First, let’s launch MSI Afterburner.
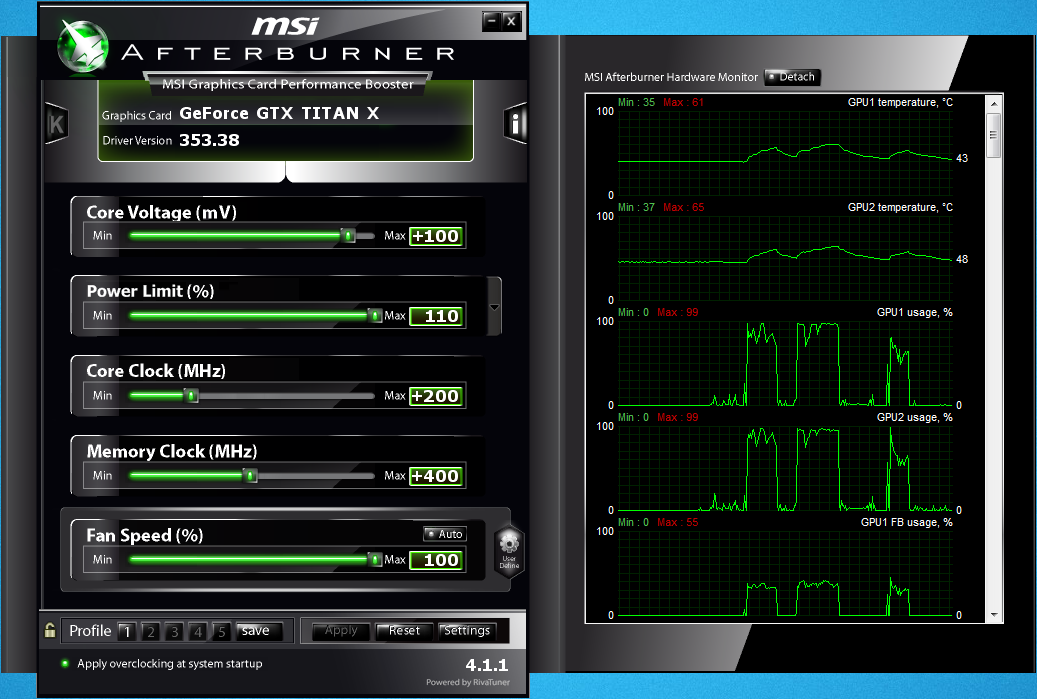
MSI Afterburner overclock settings
Let me explain what you will see:
- Current GPU and memory frequency — the number goes up and down based on current GPU needs, so if there is no GPU load, you shouldn’t see too much fluctuations.
- The current voltage — note that most modern GPUs do not allow you to change the voltage, as this can damage the hardware. There are workarounds (such as flashing the BIOS and other methods), but we do not recommend doing this, as it provides only minor benefits.
- GPU Temperature — usually around 80-85° is a good maximum. If this value is exceeded, the video card may overheat and fail.
- Power Limit — Here you can usually increase consumption by 20%, which gives additional space for overclocking. If your graphics card is limited to 250W, you can increase it to 300W by moving the slider to the right. At the same time, keep an eye on the temperature and noise level. The higher the limit, the more heat.
- Temp Limit — Increases the temperature limit before the GPU throttles too much.
- Core Clock — magic button number 1! It increases the clock speed of the GPU and is one of the key measures to improve performance.
- Memory clock — Magic button number 2! It increases the memory frequency, which increases the bandwidth — another key factor for getting more FPS.
- Startup — This button allows you to start Afterburner every time you boot your computer.
- OK — «Let’s fire this up» button that uses the overclock button.
GPU overclocking
Now let’s get to work. First, increase the temperature limit to the maximum and increase the power limit by 10%. This will give you some headroom for the first big overclocking step. Now move the GPU slider to the right by +50 MHz. Press the OK button (9). Usually any overclock in the 5-50 MHz range does not cause any problems, so this is more or less to check if overclocking works at all. If not… well, it’s time to buy a new graphics card, since your current GPU won’t be able to handle overclocking.
MSI Afterburner step-by-step overclocking
Is everything working fine? Then let’s do a GPU stress test.
 Launch 3DMark and Unigine Valley. Don’t see any artifacts or glitches? Fiction. Then let’s increase the clock frequency in steps of 10 MHz. We press OK. Test again. If everything works, repeat this again and again and again until you reach the limit at which the game crashes or the PC / laptop restarts. Then decrease the frequency by 10 MHz to get some headroom. In my case, I was able to overclock my Titan Xp to 170MHz (stable).
 How to overclock computer and laptop video card memory
You can usually overclock memory (Video RAM/VRAM) by 10-15% to get a significant performance boost in games that rely heavily on it, especially those that require a large load. number of textures. In the case of our Titan Xp, its memory runs at 5505 MHz, so I was able to easily overclock it by 400-500 MHz. My advice is to start small, in 50 MHz increments, and work until you hit the limit. Please note that games react differently to high memory frequencies. Some of them will run much faster without problems, others may show artifacts.
 Initially, I overclocked the memory to +700 MHz, which worked fine in all games except my two favorites — The Witcher 3 and Nier: Automata. I had to lower the frequency. (Sad trombone.)
 How to increase the power and temperature limit
If you have encountered a limit and have not yet done so, set the temperature and power limit to the maximum. Then try again! You can likely increase the GPU and memory clocks a little more, but that won’t be much, and it’s likely too noisy. Personally, I settled on the maximum power of + 114%.
Now for the last piece of advice: You have to determine the maximum overclock yourself. There is no manual that says “Do you have a GeForce RTX 2080 Ti? Then your maximum is +200 MHz GPU and 800 MHz VRAM!”. And I would like to. The fact is that each chip is produced differently at the chemical level. Each silicone compound is slightly different and there are variations, so one chip may not withstand heat and stress as much as another.
Can the graphics card be overclocked and how much can it be overclocked
Most GPUs can be overclocked, although you may encounter some incompatibility issues — especially with laptop GPUs and the Intel HD GPU — but overall it should work flawlessly.
 When it comes to laptops specifically, most of their GPUs can be overclocked, but you will run into thermal limits when doing so.
 Overclocking laptops like this GeForce 965M GTX on Surface Book: Possible, but beware!
Most laptops use powerful components in a tiny chassis with limited airflow. Overclocking your GPU will increase heat (more operations = higher temperature) and you will hit the thermal limit. During gaming sessions, the laptop may shut down and restart. However, even with limited overclocking options, you can achieve some acceleration on laptops. Take the Surface Book for example: Before overclocking, Far Cry Primal’s framerate dropped to 44 FPS…
…and overclocking raised the minimum FPS to 52! This is a noticeable improvement for a laptop. However, please note that some laptops are not designed for overclocking and may fail even with the slightest OC tweaks. In this case, alternative performance optimization methods should be used, either manually or using PC optimization software that helps reduce background activity.
 In addition, you may need to update your GPU drivers and overclock your CPU for additional performance gains.
 Is it worth buying an already overclocked graphics card
To avoid the above experiments, you can always buy a factory overclocked card — such as EVGA FTW3 or MSI Lightning Z — that goes beyond the factory clock speeds of the original NVIDIA reference models.
To put things into perspective: While the 2080 TI defaults to 1635MHz, the Lightning Z defaults to 1770, and with more powerful PSUs and PCBs, you can overclock it even further.
Time to play play
What did we get as a result of all this overclocking? We did benchmarks with some of the latest games and 3DMark. The results are pretty good.
On the left we see last year’s Assassins Creed Odysseys, which struggles to reach a stable 60 FPS even on high-end hardware in 4K resolution. Overclocking allowed us to get a little closer to this magic number.
 On the right, in the game Shadow of the Tomb Raider, overclocking turned out to be very useful: in SLI mode, we managed to raise FPS from 91 to 110.
 In all cases, we were able to get a noticeable performance boost that sometimes made the difference between stuttering and smooth 60 FPS (or more). Now stop fiddling around with your watch and just enjoy your games — that’s the point! Don’t be me spending hours and hours looking for the perfect clock down to the last MHz. (You will not feel any difference between 175 and 170 MHz).
How to safely overclock your video card — instructions from Hardware Times
Blogs
mpanasovsky The post was rewarded
Overclocking a graphics accelerator is a very safe procedure compared to overclocking a processor. It will not void your warranty and will improve your gaming performance by 10%.
 In addition, to overclock the GPU, you do not need to dance with a tambourine over the BIOS settings, but only a few software tools are needed. A short instruction on overclocking the memory frequency and GPU frequency of video cards appeared on the Hardware Times website. We will talk about this further.
 recommendations
GPU overclocking is a very safe procedure compared to CPU overclocking. It will not void your warranty and will improve your gaming performance by 10%. In addition, to overclock the GPU, you do not need to dance with a tambourine over the BIOS settings, but only a few software tools are needed. A short instruction on how to increase the memory frequency and GPU frequency of video cards appeared on the Hardware Times website. We will talk about this further.
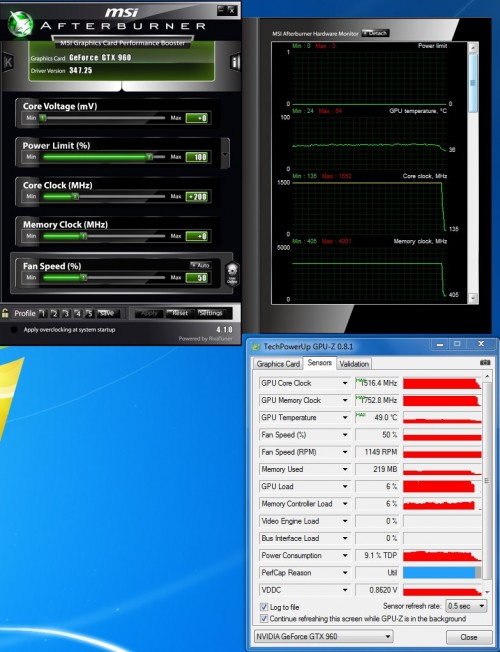
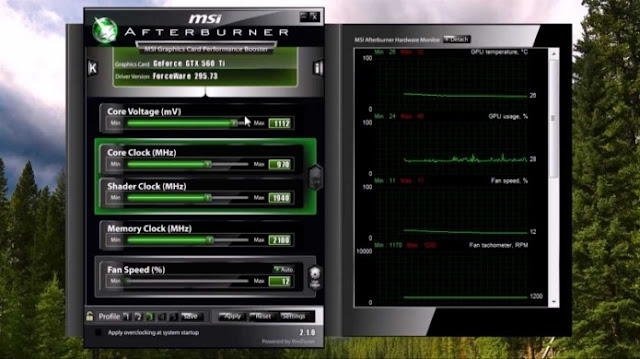
First you need to get GPU-Z software and MSI Afterburner. It is also recommended to use a game with a built-in performance benchmark, such as Deus EX: Mankind Divided, The Division 2 or Shadow of the Tomb Raider.

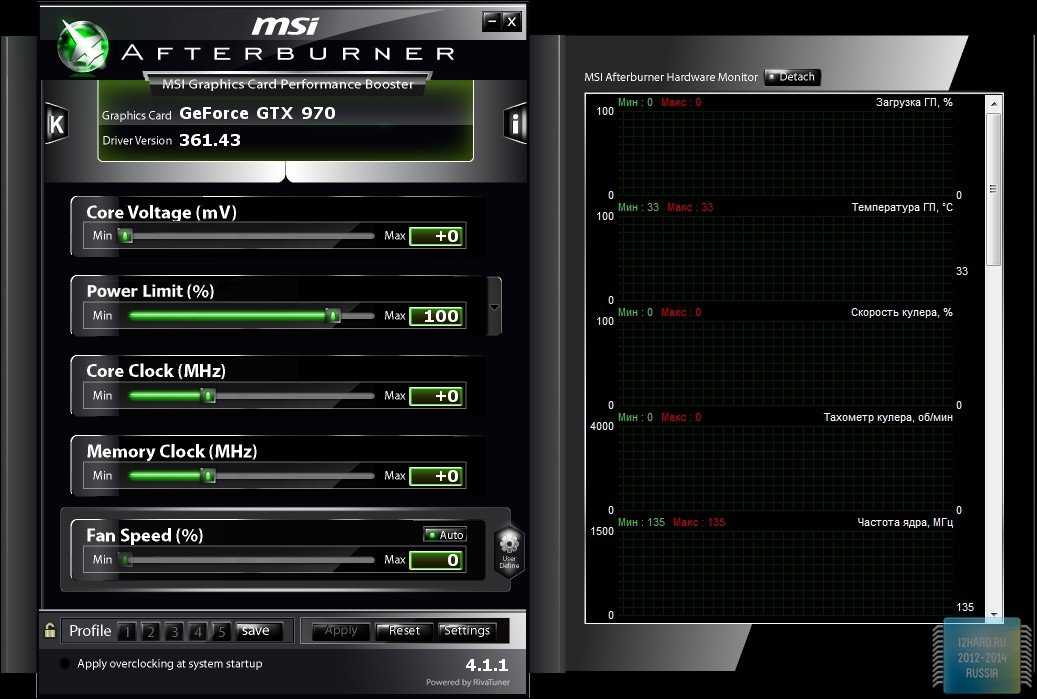
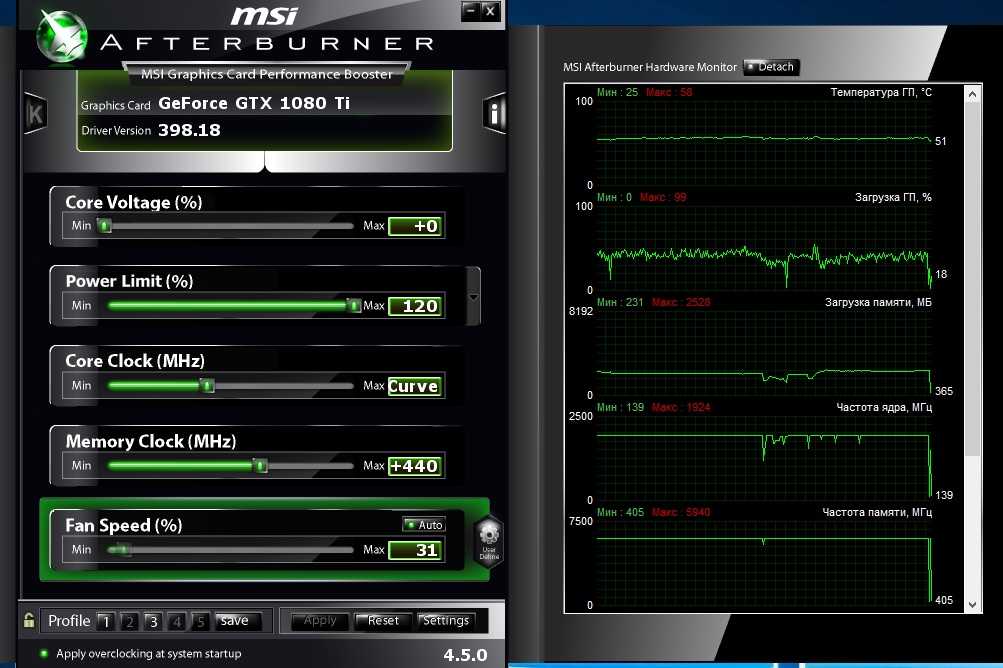
In MSI Afterburner, you will see GPU and memory frequencies, core voltage, and temperature, which should be less than 75 degrees. If it exceeds this mark, you need to solve the problem with overheating before you start overclocking the video card.
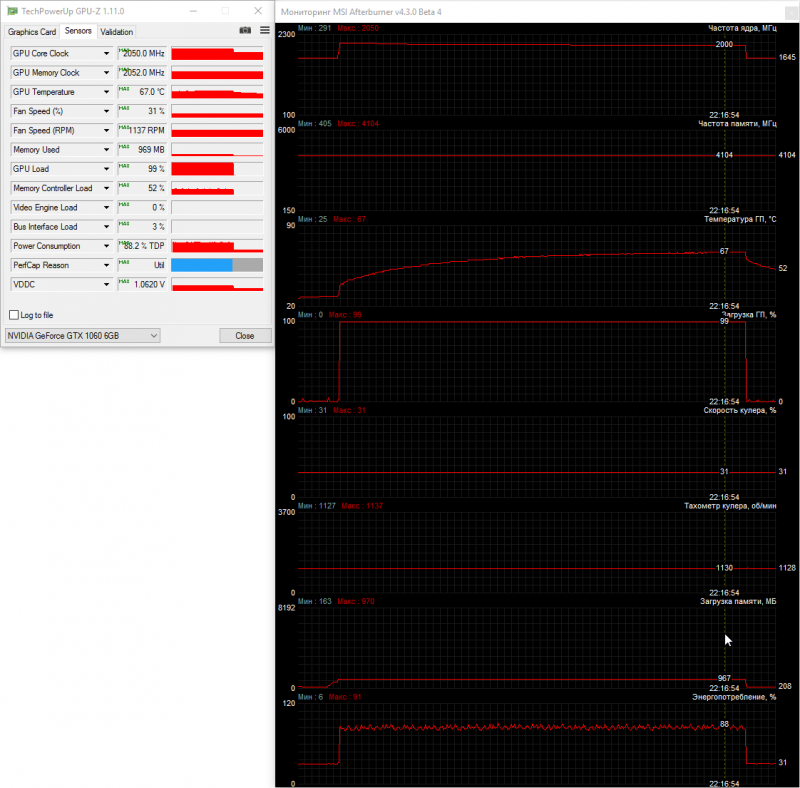
In MSI Afterburner, you need to turn up to a maximum of three sliders, as shown in the image above: Core Voltage, Power Voltage and Temp Limit. Next, add 100 MHz to the GPU frequency. Run the game in windowed mode and GPU-Z. In the application, you will see a lot of options, and you need to follow four points:
- GPU frequency;
- GPU temperature;
- energy consumption;
- PerfCap Reason.
If the game runs without problems for about 20 minutes, and the temperature and power consumption are at the same level, you can rejoice — you managed to increase the frequency of the GPU by 100 MHz. After that, increase the chip frequency by another 100 MHz. And do not forget to follow the main parameters of the video card.
If artifacts appeared during the frequency increase or the game simply turned off, then you should pay attention to the PerfCap Reason item. It will indicate the reasons why it was not possible to increase the frequency of the video chip. It can be voltage, temperature or power. Or all at once.
The situation is slightly different with AMD video cards. The PerfCap Reason option is not available, so you will have to monitor the temperature and power consumption yourself. Throttling awaits you if the limit is exceeded.
recommendations
Memory overclocking is an easier procedure. Here, the GPU-Z application is not needed. You can close it and increase the frequency in MSI Afterburner until you see problems on the screen.
This material was written by a site visitor and has been rewarded.
Effective advertising for your business
The most modern military developments of the Russian Federation — Kalibr, X-101, Ka-52, etc.
 fell into the hands of US engineers.
 GeForce GTX 1060 is back — amid high prices for RTX 40, gamers are buying up old graphics cards
Russian stores have dropped prices for NVIDIA gaming video cards — 5 gaming models with discounts up to 16%
Prices for AMD and NVIDIA video cards in Russia are melting before our eyes, and current models of the current generation are getting cheaper
Cougar unveils open frame case for E-ATX motherboards
Turkish business asks Gazprom to postpone gas payments until 2024
Videos of early GTA 6 gameplay leaked online , and the exploit is already on Github
The faces of the characters of the cult RPG Gothic were recreated using a neural network
Elon Musk arranged a poll — how to «reconcile» Russia and Ukraine
Core i9-12900K is no longer needed — Ryzen 5 7600X for $300 is not inferior in games to the flagship for $600
Microsoft confirmed the performance drop in Windows 11 22h3
Astrophysicists have found new evidence of the existence of water in the ice lakes of Mars
First results have appeared graphics cards Nvidia RTX 4090
Steam statistics for September: cheap graphics cards are more popular than others, AMD processors are inferior to Intel
0003
A powerful gaming PC cannot be cheap — 5 actual processors for a gaming assembly in 2022
Hackers hacked the PlayStation 5 and were able to download pirated games to the console 2022
RTX Game Graphics Improvement Guide
MSI GTX 1070 AERO OC and GD100 Maintenance One Year After Use
A full license of Windows 10 costs only 581r at the big fall 2022 sale
Adata XPG Caster RGB DDR5-6400 kit review.
 Overclocking and tuning DDR5
 Review of the new format of RAM Dell CAMM DDR5
Test and review of the cooler Jonsbo HX7280 or Black Chinese vs AMD
Review of the MSI Raider GE76 laptop (12UHS-600RU): the most playful of all gaming
Why HIMARS is dangerous and its weaknesses — in detail with pictures and capital letters
Power Consumption of Video Cards, Mining Farms and ASICs: A Comparison Table of Electricity Consumption 2021
The middle of the month comes, the miner receives a check for electricity, and there the housing office demands to pay for two neighbors above, below and in addition for the alleged counterfeit Tesla. It turns out that without settings, the farm will reel on a good half of its own profitability.
What can be done about the energy consumption of the farm? How to measure it? How to save on electricity for the farm? So let’s figure it out — excel in the teeth, we consider the consumption of ASICs and mining farms.
How to calculate the consumption of a mining farm
A mining farm involves several video cards at once, plus the work of the motherboard, CPU and PSU, which contribute.
Before you start cutting aluminum bars for the rig, you should calculate how much the farm should theoretically consume when mining. Hereinafter, all numbers will be in the context of the Ethash algorithm, oriented for ETH mining.
Data obtained from threads on mining forums, video reviews with video card tests and downvolting case studies. The consumption of a particular farm is recommended to be calculated using two methods — from the outlet with a voltmeter and before assembly in Excel based on open data.
Why mining consumption is different from gaming power consumption
Or why nominal TDP and card consumption from reviews on Overclockers will not give a real picture.
Rendering of game models is jerky, frame by frame, somewhere there are more details, somewhere hair and leaves on trees devour the FPS.
 The load is unevenly distributed — first there is a plateau of feasible load, then a peak.
 In the conventional Witcher 3, the power consumption of the video card will look like this:
Going beyond the nominal TDP, for example, 180 watts, the card will eat only a third of the total power per hour. At moments the video card will consume 100 watts, at moments it will calm down and gnaw at 55 watts.
When mining, the load is monotonous, always at the same level. It turns out that the card operates at peak or near-peak levels, consuming the same amount of electricity on average.
A schematic graphics card consumption graph during mining will look like this:
Convenience of electricity consumption by the video card during mining is its stability — you can calculate how much the farm will consume per month. Let the price of cryptocurrency change, but the cost of one kilowatt is more stable than grandfather’s basement.
Power consumption Nvidia video cards when mining
Video cards from Nvidia have their own set of algorithms with which they are able to work.
 But we are interested in Ethash.
 Consider the consumption level of popular 10th line video cards: 1050, 1060, 1070, 1080 and TI versions .
Video cards from the Greens By Ethash 1050 Ti 1060 (6 Gb) 1070 1070 Ti 1080 1080 Ti Rated TDP 75 120 150 180 180 250 Watt/hour stock 75 100 125 120 214 220 When PowerLimit is reduced 55 80 90 100 190 190 Power consumption of AMD video cards
People’s video cards with a quick payback: RX 470, 480, 570, 580 and 5500, 5600, 5700 .
Miners note a large number of gestures for setting up AMD and hardware that is demanding for maintenance.
Not all video cards from the 5000-series line are suitable for cryptocurrency mining. For example, video cards of the 5700 XT series produce as much as their younger counterparts, but cost more and consume more. When downvolting the 5700 XT, no benefit was observed from the activity, and therefore this procedure was considered useless.
Red video cards By Ethash RX 470 RX 480 RX 570 RX 580 RX 5500 RX 5600 RX 5700 RX 5700 XT Rated TDP 120 150 150 185 130 150 180 225 Watt/hour stock 120 135 130 140 110 116 130 219 Downvolting ~75 119 110 89 90 94 103 Useless. 
How much ASICs consume
ASICs are available for mining Bitcoin and Ethereum, we will limit ourselves to studying the profitability of mining Ethereum ASICs. The devices themselves are not amenable to manual BIOS modification and do not have tools for power settings. By default, ASIC consumes according to the level of its TDP.
However, companies like Hive are releasing custom firmware for ASICs, which should reduce consumption and increase frequencies. Extremely experimental area, open data for comparison not found.
Antminer E3 PandaMiner B3 Pro Innosilicon A10 Pro+ 6G Innosilicon A10 Pro 5G Consumption 760W 1250W 1300W 750W Hashrate 190. 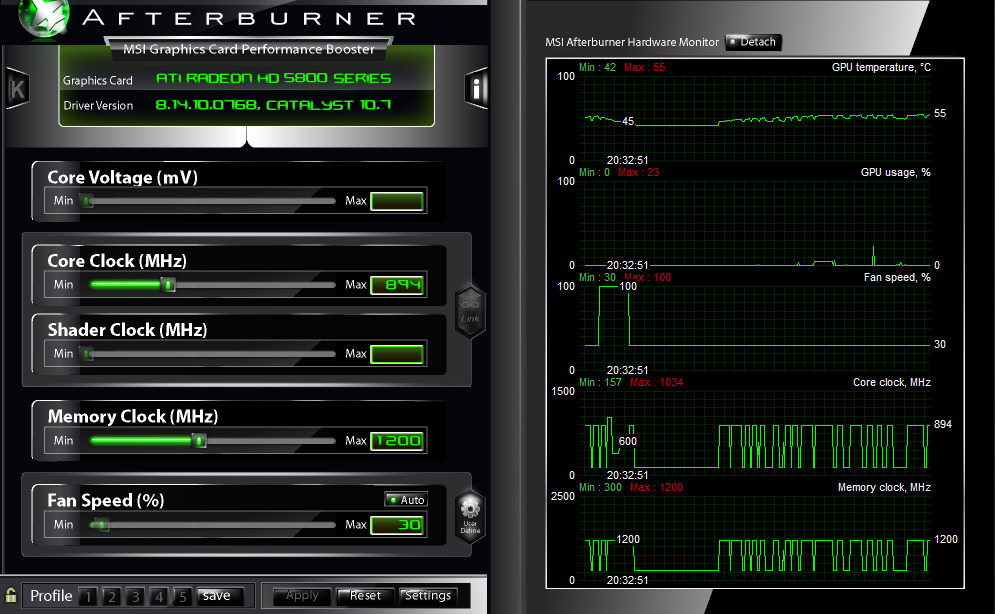 0 MH/s
 230.0 MH/s 720 Mh/s 500 Mh/s Prices 400 — $1400 1900 — $2200 5800 — 6000$ 4500 — 5000$ Comments Note that it is quiet. Has OS: Windows 10 10A socket recommended Why do Asiki consume a lot?
ASIC is a compact truss with boards containing silicone crystals, adapted to solve a narrow set of tasks.
Since they are optimized for one task, they solve it at the maximum level of design power. Each ASIC is a kind of kamikaze — it mines the currency until it burns out or breaks, which is what they are designed for. Therefore, ASIC consumption is strictly high, as is profitability.

What else consumes electricity in the farm? In 2008, at full load, processors could eat even more than they were supposed to nominally consume.
With the advent of new technical processes and nanometers, it became possible to install processors in farms that nominally and in fact consume up to 35 watts. The farm on the Celerons is considered the best folk option, but nothing prevents it from being collected on the Athlones with the Zen core.
Since extra kilowatts in mining will cost electricity, it is recommended to select processors with TDP up to 35 watts, without overclocking. The role of the processor in the farm is mediocre — there is no load on it, which means that it makes no sense to purchase an expensive CPU.
How much electricity does a mining farm use?
We are counting. We take the known data as a basis.
One spherical vacuum rig for 5 RX 580 cards with bios filed to reduce consumption. A total of five cards, each of 90 Watt.
 The motherboard, together with the hard drive and the CPU, consumes up to 35 watts.
 It turns out , which in a day, the farm will eat 12,000 Watt-hours , or 12 kWh.
How to reduce the energy consumption of a mining farm?
When there are a lot of rigs, consumption grows along with the number of mining installations. Higher hash rate means longer electricity bill, but there are a few tricks.
Experienced miners use two main methods to reduce farm consumption: downvolting and flashing the BIOS of the video card. There is a third method — using Tablets to increase the hash rate on video cards with GDDR5X memory, which, coupled with downvolting, can give a second wind to an old 1060 or 1080 Ti farm.
Power Limit limitation through MSI Afterburner
Let’s describe two methods to reduce the power consumption of the video card.
The first method of reducing the consumption of video cards is rough.
 Suitable for any video card, regardless of the configuration, amount of memory, type of GPU and its layout.
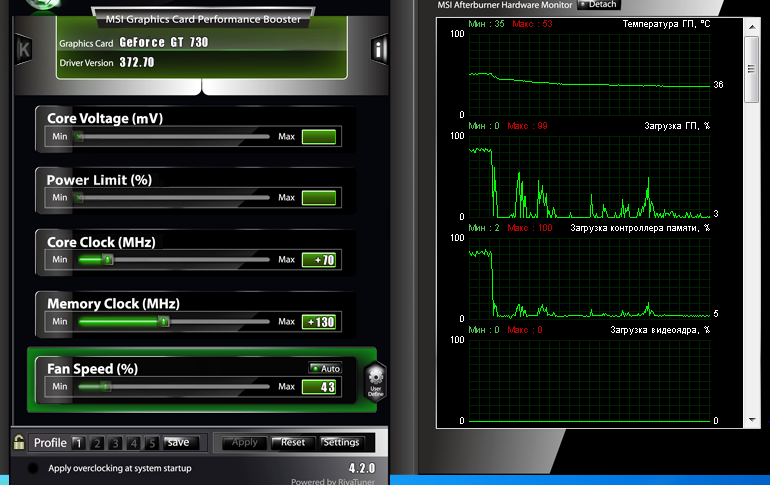
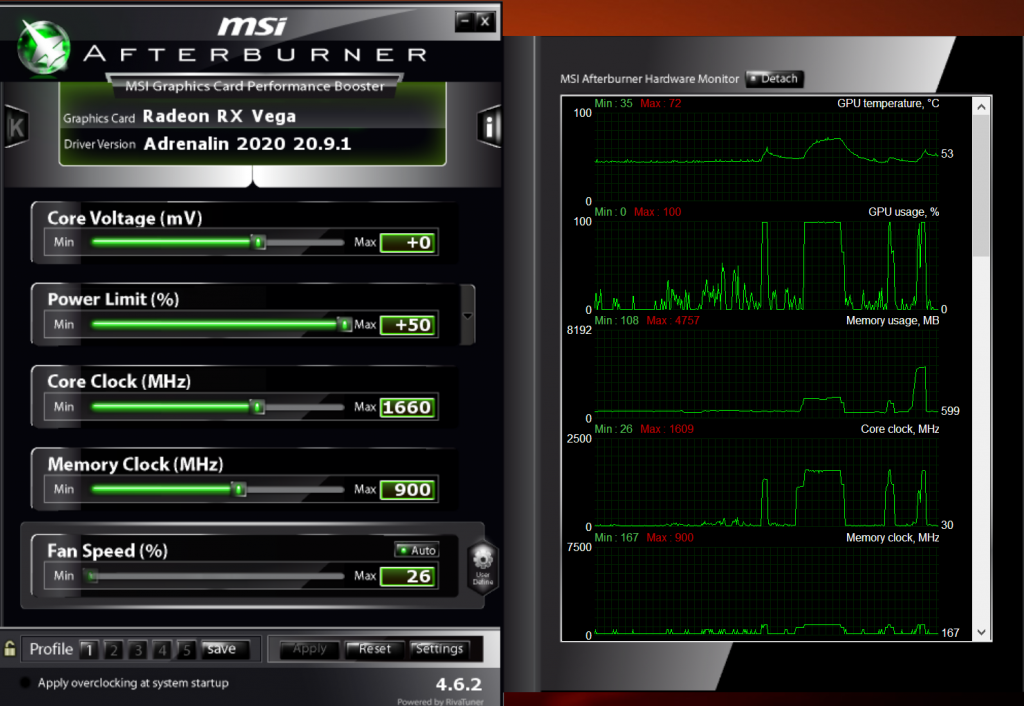
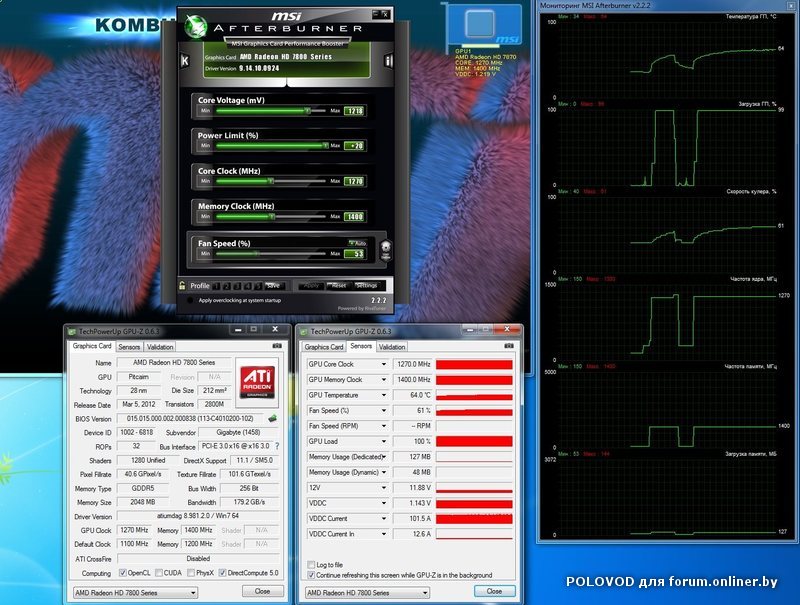
 Download MSI Afterburner, open the graphics card settings panel, reduce the Power Limit to 75%. After lowering the power limit, we test the hashrate of the card in any miner, if the result is satisfactory, then we leave everything as it is.
You can lower the power of the video card until it turns blue — this will not harm it. The minimum level at which the card will be able to continue mining without loss in profitability will be the result.
A satisfactory result is a loss of no more than 10% of the hashrate of the card in the drain. For example, if the card was producing 30 MH/s and lost 5, then this is not good. In order not to lose the hashrate when power is limited, they practice increasing the frequencies of the GPU and video memory upwards.
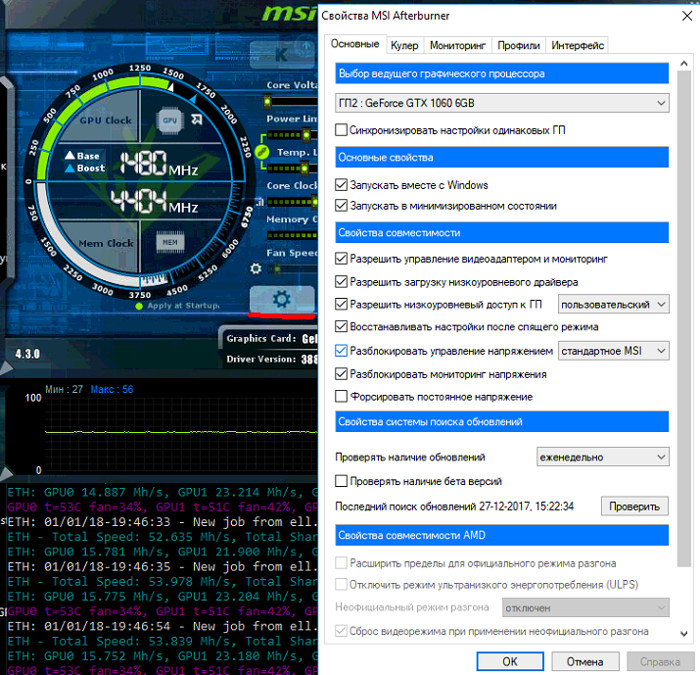
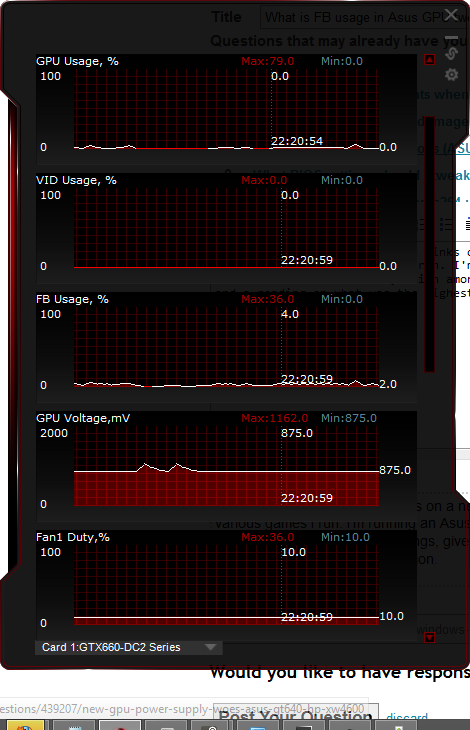
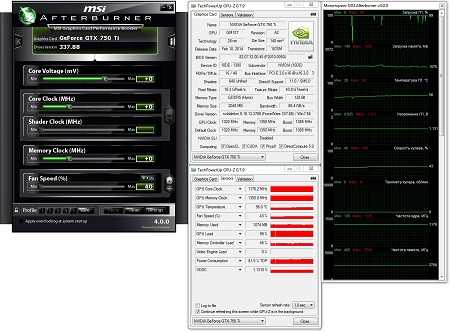
In the screenshot — Power Limit is reduced to 65% for the P106-100 card. The core consumption has become 800 millivolts.

The second method of reducing the consumption of the video card is thin. This method is called downvolting and consists in manually selecting the optimal voltage for the video core. In some cases, you will need to manually modify the BIOS of the video card — the power system will not always allow the card to work at a reduced voltage all the time.
After testing, the native BIOS of the video card is unloaded and all states are flashed to the desired voltage.
Downvolting means flashing the BIOS of the video card.
Strictly at your own risk. A card with an edited BIOS may not be accepted at service centers for repairs. When a card arrives for repair, it is checked for wear and the latest BIOS configuration is raised — if it differs from the standard one, then the video card is considered unattended.
The general principle of downvolting is as follows — reduce the power supply to the core, increase the memory or core frequency, depending on the algorithm.
In order to properly downvolt the video card, you need to select the voltage level on the GPU at which it can barely breathe. With a constant load, the video core may consider that it is in boost and drop the frequencies and voltage for several hours — this is an unpleasant scenario when mining.
To get around the manufacturer’s restrictions embedded in the BIOS, you need to select the voltage level at which the core will consider that it is normal and will not throttling or resetting frequencies.
BIOS editing: for video cards from AMD
Flashing the BIOS is necessary only in one case — the video card is not able to hold its Power Limit from Afterburner for more than two hours.
ATIFLASH is used to upload the BIOS from the video card to the hard drive. Using the «Save» button, you can save the firmware file to your hard drive. The file should be given .ROM permission to make it easier to open later.
BIOS editing for AMD video cards is done via SRBPollaris by D0kt0r.
 Open the .ROM file, in the Powerplay tab, change the data as you wish. In the «Voltages» tab, you can change the conditional PowerLimit as in MSI at the BIOS level. After flashing, the card will work at a distance from the factory core voltage.
 In the screenshot above on the map, voltage adjustment on the GPU is available and +25 Mv is selected. When flashing, the video card will work at the «Regular voltage + 25Mv» level.
Through the PowerTune tab, you can edit the power limits for the video card. For example, set it to 90 watts and let it do what it wants, but it will have to shrink into it.
Alternative — Polaris Bios Editor. The interface is different, the essence is the same.
Select the field, write the desired value next to the APPLY CHG button, press it and save.
BIOS editing: for video cards from Nvidia
Nvidia BIOS is flashed via NVFlash. This is a console utility designed to edit the BIOS file.
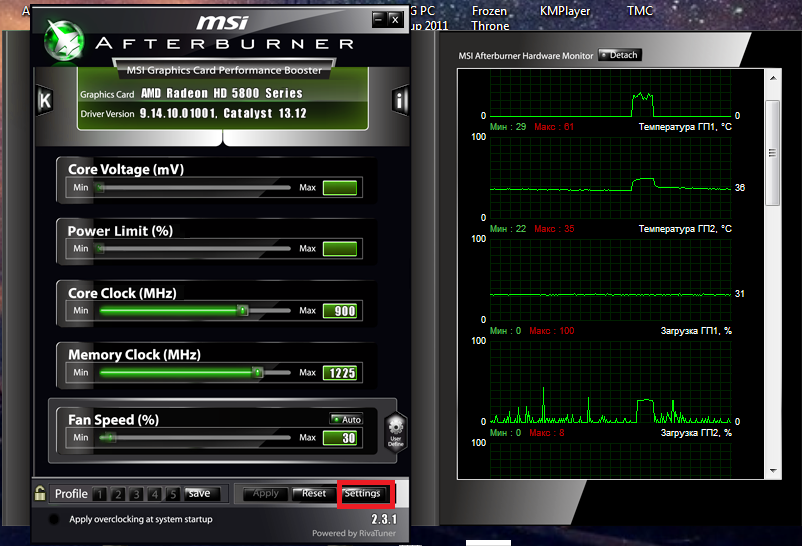 For Nvidia, no software was found to unload the BIOS directly from the card.
 Before flashing, download the bios of the video card from the general database. Before downloading, make sure that the model of your video card matches the values in the BIOS.
Let’s figure out how to determine if the BIOS is suitable for a video card.
In the screenshot above, the bios for a 1080 Ti video card with GDDR5X memory from Micron. This is not suitable for a card with Samsung or Hynix.
And here are the bios figures for 1060, which supports Samsung, Micron and Hynix. Donor card — Asus GTX 1060 6 GB
By default, BIOSes are backward compatible with each other, but look carefully at the memory — take Bios for yours: Elpida, Hynix, Samsung. You can find out the type of memory by disassembling the video card and examining the inscription on the chips or through the GPU-z utility in the «Advanced» tab, where there will be a drop-down list, select the BIOS section.
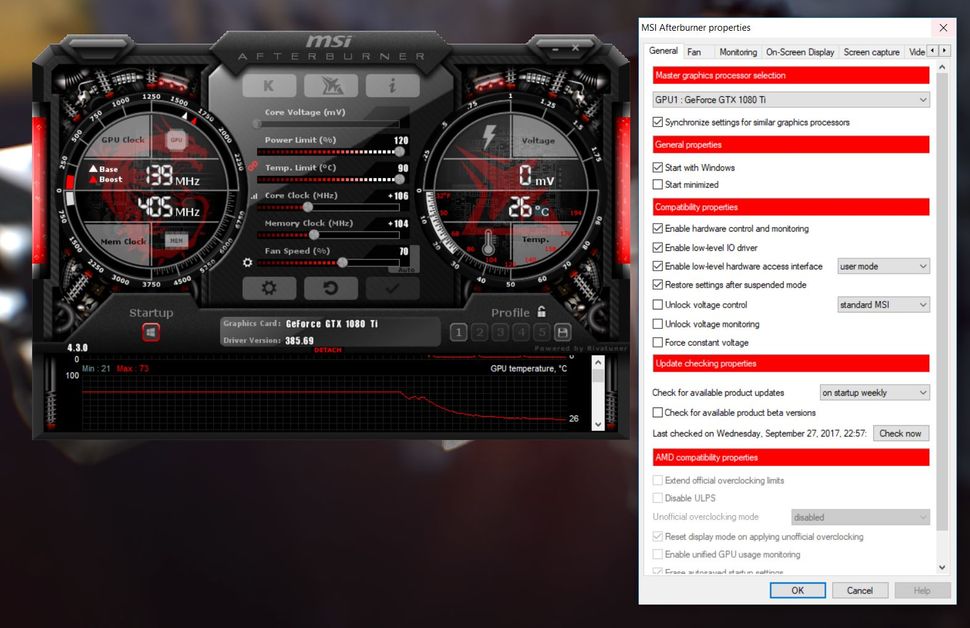
Procedure after downloading NVFlash and selecting BIOS.
- Create a folder in the root of drive C: Name it for example NV Unpack the downloaded flasher into the created NV folder.
- Run the command prompt as Administrator from the Start menu.
- In the command line window, go to the folder with the flash driver: cd C: / NV
- Unlock the video card for firmware: nvflash64 —protectoff Upon completion, we will hear a characteristic tone.
- We flash with the command nvflash64 -6 [firmware name.rom] The system will ask for confirmation — press «Y» and wait for the firmware to finish.
Firmware
- Reboot the computer. The new BIOS will only take effect after a system reboot.
- Using GPU-Z, make sure that the required firmware is installed.
Optimal downvolting values for video cards RX 4xx and RX 5xx version
Please note that reference video cards have their own settings and in some models you will have to select values manually.
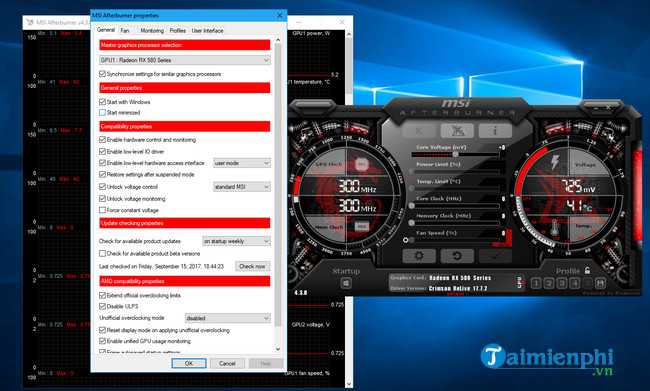
Video cards of the RX 4xx line feel good with 800 — 880 Mv per core, RX 5xx will work with the same indicator. It is recommended to start at 800 Mv while downvolting and lower the voltage until the image from the video card is dumped. This will mean that the GPU is not able to go down below. The graphics card will not be damaged by the voltage reduction process.
Is it possible to save on cooling? In mining, cooling can be adjusted via HiveOS or MSI Afterburner, but remotely. More about this in a separate article.
The optimal configuration is one in which one window in the room is converted for ventilation. More about this in our longread about building a farm.
Register on our Hashalot mining pool if you are ready to mine now.
GPU optimization for mining | Freedman Club Crypto News
Cryptocurrency Bitcoin, like other coins, can be earned in many ways by making deals on exchanges or by mining. Since the Bitcoin exchange rate is the largest, it is this cryptocurrency that miners are trying to extract.
 In addition to mining BTC, you can mine other digital assets.
 Mining is carried out with the help of video cards, and Nvidia is considered the most popular. Since they are not designed to mine crypto, they must either be overclocked or flashed.
Video card firmware
Before starting the mining program, video cards are flashed. This procedure is risky and very often the cards fail, so you must follow the instructions very carefully. When the video card is flashed, you can start running the mining program.
As mentioned earlier, with the help of video cards, you can mine not only Bitcoin, but also other coins, in particular Zcach.
Mining Zcach
It is worth using Nvidia cards to mine this coin, because it is caused by the presence of the Equihash algorithm and the EWBF mining program.
Setting up the Nvideo control panel
Once the Nvidia drivers are installed, you can start setting up the control panel.
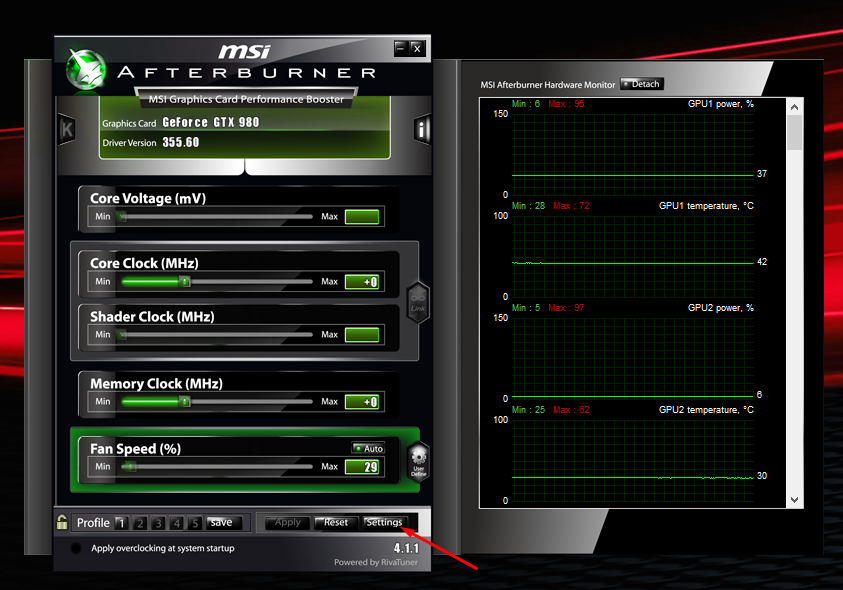 In the panel menu, go to the «3D Settings» section, and select the 3D settings for games.
 In order for the video card to work well and not consume a lot of power, you can use the MSI Afterburner program.
MSI Afterburner, what is it?
It is worth noting that a program such as MSI Afterburner gives good results in reducing power consumption. It is designed to reduce core voltage. Due to this, the use of electricity is also reduced by twenty percent, and the temperature of the video card itself is also reduced. To reduce power consumption and optimize the performance of the video card, you can either reduce the power consumption limit (TDP), or manually by setting a constant voltage and core frequency on the voltage curve.
This optimization of video cards for mining is considered the easiest and most convenient. To reduce the consumption, the voltage on the core should be lowered to such a parameter that normal operation is still possible.
In addition, the program allows you to plot the dependence of the fan speed on the current temperature.
 It is important to keep the Gpu temp target within an acceptable range.
 Gpu temp target is the temperature that the cooling system will try to maintain so that the hardware does not fail.
It’s worth remembering that each video card is equipped with a unique processor die, so there is no one universal setting. In order not to damage the card, you need to overclock it gradually, be sure to check how efficiently it works. Once you have found the best performance and efficiency, you can write down this value and move on to another card.
If MSI Afterburner freezes, then you should use another utility to improve performance.
Video card cooling
To prevent the temperature of the video card from rising excessively during mining, it is necessary to cool it. Otherwise, there is a high risk that it will quickly fail. To reduce the load on the video card, there are different ways. As mining graphics cards become more powerful, they generate a significant amount of heat that must be dissipated.
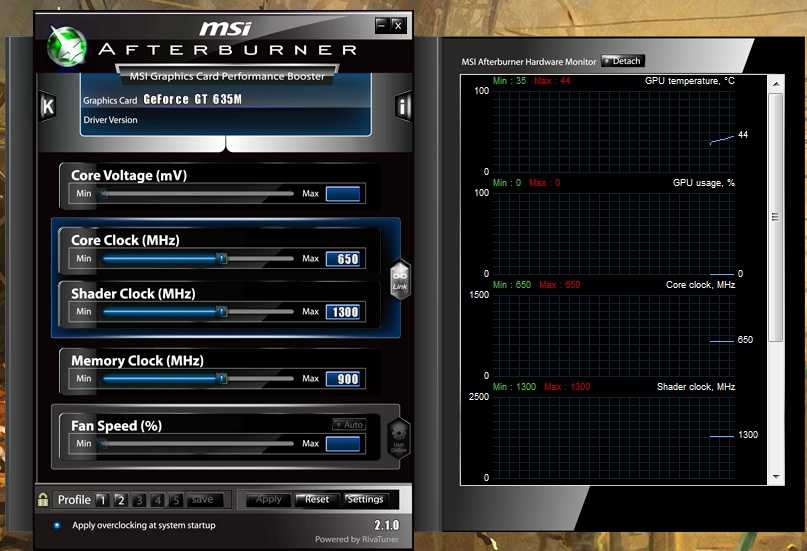 Most often, this method is used — a cooler is placed on the video card along with a radiator. The number of coolers depends on which card and which manufacturer.
 You can purchase a graphics card with multiple fans (2 or 3) at once. With their help, they will accelerate faster, and the performance will be quite high.
There are also heat dissipation systems using hybrid circuits. In this case, the temperature is reduced by a water cooler, other elements are cooled by a fan and a radiator. This type of removal of excess heat energy is considered effective. It makes it possible to lower the temperature of the video card by at least 20 degrees, and sometimes more. However, such systems are expensive.
Operation control
In order not to freeze the computer and the mining process is not interrupted, it is necessary to periodically monitor the operation of the video card or video cards. The miner must monitor whether the temperature of the equipment rises to a critical value, not to overclock the clock frequency above the permissible limits.
