Basemark GPU | Basemark
BASEMARK GPU
The Ultimate Graphics Performance Benchmark
Basemark GPU is a professional evaluation tool to evaluate and compare graphics performance across mobile and desktop platforms. Uniquely, it supports all major graphics APIs and operating systems.
Consumers can check their device performance for free with Basemark GPU and the integrated Power Board online results comparison service.
For OEMs and processor vendors, Basemark offers a fully featured version, please see the licensing section below.
Basemark offers a complimentary license for independent media publications to be used in their product reviews.
iOS 14+
Rocksolid
Basemark GPU is developed on top of Rocksolid®, a Basemark proprietary graphics engine. Written in C++, this engine allows us to efficiently develop objective benchmarks for multiple operating systems and graphics APIs.
Rocksolid Engine architecture abstracts resources and rendering. In this way, all platforms run the tests with the same workload. This functionality makes the benchmark reliable between different operating systems. The small footprint, efficient and fast Rocksolid Engine is also being used in many industrial applications.
Advanced features
Basemark GPU runs through an advanced game-like scene with up to tens of thousands of individual draw calls per frame. Thesetests showcase the benefit of new graphics APIs like Vulkan and DirectX 12, both regarding performance and in content production:Allowing designers to craft a massive number of individual objects without being limited by older API instancing strategies.
Results
You can easily compare your device performance to other device performances in the integrated Basemark Power Board 3.0 service. The free version always submits all results to the Basemark Power Board 3.0. In corporate and media versions the results submission is optional.
Supported Platforms
The rendering module can use OpenGL ES or Vulkan for Android and Metal for iOS and MacOS. For PC or Linux desktop computers, it can use OpenGL, Vulkan or DirectX12, depending on which APIs the system supports.
Rocksolid architecture makes all visible entities (including the application controls and graphics tests) look the same on all platforms.
Main features
Our aim is to make it easy to test and compare your devices. To achieve this, Basemark GPU offers multiple different modes that will give you official test results. These can be then submitted to the Power Board 3.0 results page. Payable versions also enable you to run custom tests with a wide selection of different options.
-
Ease of use, all the APIs in one software
-
Updated, easy to use Launcher
-
Made to work with all Personal Computers, desktops, tablets and laptops
-
Custom options to allow tinkerers to do detailed benchmarking
-
Automatic upload to online (on free consumer version)
System requirements
A graphics card with Vulkan 1. 0, OpenGL 4.5, Metal 2 or DirectX 12 support and supporting at least one of following texture compression formats: Adaptive Scalable Texture Compression (ASTC), Ericsson Texture Compression version 2 (ETC2) or Block Compression (BC7).
Additional requirements:
-
Android 7 or later. ‘arm-v7a’, ‘arm64-v8a’, ‘x86’ or ‘x86_64’ SoC
-
Windows 10 or later with x86_64 or arm64 CPU
-
Linux Flatpak support or Ubuntu 18.04 on x86_64 CPU
-
iOS version 13.0 or later
-
macOS Catalina or later, x86_64 CPU
-
12GB RAM on 64-bit systems (6GB RAM on 32-bit systems)
-
2GB video RAM
Versions
Basemark GPU Free
The Free version of the software is for home or private use only and offers end-users the ability to test and evaluate their systems’ graphics capabilities. This version always submits the test data to Basemark’s Power Board 3. 0 and displays a single system performance score without any breakdown analysis.
Basemark GPU Corporate
The Corporate version is a fully-featured commercial version for companies. Please contact our sales for more information!
| Features | Free | Corporate |
|---|---|---|
| GPU Score (Native and Offscreen) | Yes | Yes |
| Test Score Details | No | Yes |
| Select Test | Yes | Yes |
| Forced result submit | Yes | No |
| Internet Connection Required1 | Yes | No |
| Custom Configurations | Limited | Yes |
| Test Automation | No | Yes |
| Ability to render arbitrary screen(s) | No | Yes |
| Data Export | No | Yes |
1Free version will not show the test results without a connection to Basemark Power Board 3. 0 database.
Modes
High Quality
Basemark GPU: High Quality mode targets Desktop systems using high-resolution textures, advanced effects, increased number of objects and demanding geometry based on today’s AAA PC game standards.
Medium Quality
Basemark GPU: Medium Quality mode targets Mobile systems based on today’s AAA Mobile game standards. The medium Quality mode is a subset of a High-Quality mode regarding decreased texture resolution, number of objects, amount of geometry and limited effects.
| Mode | Official Offscreen Resolution | Max Triangles Per Frame | Max Texture Resolution | Max Memory Requirement | Max Draw Calls Per Frame |
| High Quality | 3840×2160 | ~2 M | 4096×4096 | 4 GB | ~10k |
| Medium Quality | 1920×1080 | ~0. 7 M 7 M |
2048×2048 | 1 GB | ~2000 |
In the High-Quality mode, the user can enable most of the advanced features with high-quality settings. In the Medium Quality mode, some of the advanced effects have been either disabled or limited in quality, to simulate a realistic workload on high-end mobile devices.
To circumvent VSync limitations on mobile devices, we render each benchmark frame off-screen and display only a miniature image of each frame. This way no frame is dropped, and the results are accurate. If you want to see the graphics in their full glory, please choose Experience Mode.
On mobile systems, the user can select the Native (OnScreen) or OffScreen test. The Native test runs the test using the mobile device native resolution, thus revealing how well the content runs on that specific device. The Mobile Offscreen test always runs on a fixed 1920×1080 resolution, and this result is comparable with other devices that may use the different native resolution. Both tests send their results to the Basemark Power Board 3.0.
| Feature | High Quality | Medium Quality |
|---|---|---|
| Physically Based Shading | Enabled | Enabled |
| Tiled Forward+ Rendering | Enabled | Enabled |
| High-Dynamic Range (HDR) / Tone Mapping | Enabled | Enabled |
| Cascaded Shadow Maps | Enabled | Only one shadow map |
| Bloom | Enabled | Enabled |
| Depth of Field | Enabled | Disabled |
| Translucent Objects | Enabled | Disabled |
| Ambient Occlusion | Dynamic | Static |
| Screen space volumetric light scattering | Enabled | Enabled (Low Res.) |
Basemark also offers Media version for established representatives of the media. Please contact us with the contact form in the end of this page or send us to email to marketing@basemark. com
com
Benchmark Development Program
The Basemark® GPU benchmarking tool has been developed in close cooperation with leading semiconductor companies. Our partners, such as Imagination Technologies, Intel, NVIDIA, Qualcomm, and Renesas, all participate in Basemark’s Benchmark Development Program (BDP). Our tight-knit collaboration with competing GPU and CPU development companies ensures that the Basemark® GPU benchmark offers optimal reliability and maintains objectivity through adherence to group standards.
Our benchmarks are built strictly to meet the specifications set by the industry. Neutrality and unbiased analytics is core to our philosophy, and we base our reputation on a lack of favoritism towards any specific manufacturer’s products.
We welcome all the interested to join our program as a partner, let us know and we will be in contact!
Recommendations
Interested?
If you need more detailed support, please let us know via social media or by email. We have a team in place to help you!
For licensing inquiries:
For technical support:
For media related questions:
Contact us
Radeon™ GPU Analyzer — GPUOpen
Analyze.
Adjust.
Accelerate.
Now available as part of the Radeon™ Developer Tool Suite.
Radeon™ GPU Analyzer is an offline compiler and performance analysis tool for DirectX®, Vulkan®, SPIR-V™, OpenGL®, and OpenCL™.
- RGA is now available as part of the Radeon Developer Tool Suite, together with RGP, RMV, and RDP.
- For the best experience, we encourage you to use the suite to ensure compatibility between the different tools.
Download the latest version — v2.6.2
Important!
Make sure you have the latest AMD Software: Adrenalin Edition driver installed.
RGA on GitHub
Read the documentation
This release includes:
- Added support for gfx1035 as a target in Vulkan®, DirectX® 12, DXR, DirectX® 11, OpenCL™ and OpenGL modes.
- DX12/DXR modes:
- DX12/DXR offline modes now support up to gfx1035 (previously supported up to gfx1032).
- Updated the DXC compiler package that is bundled with the tool to the latest public version.
- DXR and DirectX® 12 offline modes:
- You can now compile DXR and DirectX® 12 shaders and pipelines on machines that do not have an installed AMD card or driver by adding the –offline command line switch to your RGA command.
The tool ships with the latest released AMD DXR/DirectX® 12 driver at the time of the tool’s release, and it would use that driver if –offline is specified.
- Plug & play DXR/DirectX® 12 driver: force RGA to load amdxc64.dll from a specific location by using the new –amdxc command line switch. This option also works on machines which do not have an AMD DXR/DX12 driver installed.
- You can now compile DXR and DirectX® 12 shaders and pipelines on machines that do not have an installed AMD card or driver by adding the –offline command line switch to your RGA command.
- VGPR pressure GUI: the UI now visualizes VGPR pressure in the disassembly view at the instruction level, allowing you to spot areas in your code that have the highest VGPR pressure and helping you identify where to focus your optimization.
The UI shows the allocation and usage of VGPRs for each instruction, and hints on how many VGPRs need to be reduced to reduce the allocation. - You can now change where RGA project files are saved by the GUI app. This can be used as a workaround on Windows systems where the path to the default project folder uses Unicode characters.
- Shader analysis engine now supports
v_mad_mixlo_f16
andv_mad_mixhi_f16
instructions in live register reports and control-flow graphs.
- The RGA source code on GitHub.com can now be built with the Visual Studio 2022 compiler toolchain (v143).
- OpenGL mode is now an offline mode (-s opengl):
- Compile OpenGL shaders for any supported target, independently of the installed graphics card and driver.
- You can now generate static hardware resource usage information support for OpenGL shaders.
Latest RGA release info
Inspect your ISA…
Analyze the ISA for your shader stages within a Vulkan® graphics or compute pipeline.
…compile for many products…
Select target GPUs for the compilation process. You can search for available targets by using specific GPU architecture or even retail product names, like “SSG” or “WX 8200”.
…refine your resources…
View register pressure and LDS/scratch memory usage for your target hardware.
…and correlate your code!
For OpenCL™ kernels, the tool provides correlation from high-level source code to the disassembly, and from the disassembly to the high-level source code.
Visual Studio Code Extension for Radeon™ GPU Analyzer
Radeon™ GPU Analyzer – Visual Studio® Code Extension
This is a Visual Studio® Code extension for the Radeon GPU Analyzer (RGA). By installing this extension, it is possible to use RGA directly from within Visual Studio Code.
Using the Visual Studio® Code Extension for RGA
This is a Visual Studio® Code extension for the Radeon GPU Analyzer (RGA). This extension makes it possible to use RGA directly from within VS Code.
Requirements
General
For all non-offline modes (DirectX®12, DirectX®11, DXR, Vulkan®, OpenGL®):
- Latest AMD drivers (Adrenalin SW on Windows and amdgpu-pro on Linux).
Offline modes (Vulkan® offline and OpenCL™) can run without AMD driver or hardware installed.
Supported GPUs
To run the tool, any RDNA or GCN GPU is sufficient.
RGA supports the following as targets when compiling graphics shaders and pipelines:
- All RDNA-based architectures.
- Select GCN-based architectures: Vega™, Graphics IP v8, Graphics IP v7, and Graphics IP v6.
Supported APIs in GUI
- Vulkan®
- OpenCL™
Supported APIs in command line
- Vulkan®
- DirectX® 11
- DirectX® 12
- DXR
- OpenGL®
- OpenCL™
Supported OSs
- Windows® 10
- Windows® 11
- Windows® 7 (64 bit)
- Ubuntu 20.04
Version history
Version 2.6 (January 2022)
- Added support for gfx1034 as a target in Vulkan®, DirectX® 12, DXR, DirectX® 11, OpenCL™and OpenGL modes.
- DirectX® 12 mode: you can now extract AMDIL disassembly for DirectX® 12 compute and graphics shaders.
- DXR and DirectX® 12 offline modes:
- You can now compile DXR and DirectX® 12 shaders and pipelines on machines that do not have an installed AMD card or driver by adding the –offline command line switch to your RGA command.
The tool ships with the latest released AMD DXR/DirectX® 12 driver at the time of the tool’s release, and it would use that driver if –offline is specified. - Plug & play DXR/DirectX® 12 driver: force RGA to load amdxc64.dll from a specific location by using the new –amdxc command line switch. This option also works on machines which do not have an AMD DXR/DX12 driver installed.
- You can now compile DXR and DirectX® 12 shaders and pipelines on machines that do not have an installed AMD card or driver by adding the –offline command line switch to your RGA command.
- VGPR pressure GUI: the UI now visualizes VGPR pressure in the disassembly view at the instruction level, allowing you to spot areas in your code that have the highest VGPR pressure and helping you identify where to focus your optimization.
The UI shows the allocation and usage of VGPRs for each instruction, and hints on how many VGPRs need to be reduced to reduce the allocation.
Version 2.5 (July 2021)
- Added support for gfx1032 as a target in Vulkan®, DirectX® 12, DXR, DirectX® 11, OpenCL™, and OpenGL modes.
- OpenCL™:
- Added support for RDNA™, RDNA™ 2, and CDNA targets, including the Radeon™ Instinct MI100.
- Updated the Lightning Compiler package that is bundled with the tool.
- Added support for live VGPR analysis and control-flow graph generation (
--livereg
and--cfg
options). - Note: ROCM-CL mode (
-s rocm-cl
) was replaced with an “Offline OpenCL” mode (-s opencl
).
- DirectX® 12:
- Support for multi-GPU configurations where the primary display adapter is a non-AMD card. The tool will now use the driver that is associated with the first AMD display adapter on the system.
- Vulkan®:
- Live VGPR analysis and control-flow graph can now be generated from LLPC disassembly.

- Updated the SPIR-V tools that are packaged with the tool.
- Live VGPR analysis and control-flow graph can now be generated from LLPC disassembly.
Version 2.4.1 (February 2021)
- Support for DirectX® Raytracing (DXR) in a new mode of the command line tool (
-s dxr
):- Compile DXR HLSL code to generate RDNA™ 2 ISA disassembly, hardware resource usage statistics, live VGPR analysis, and control-flow graphs.
- The new mode does not require a raytracing-enabled AMD GPU. Installing the latest Radeon™ Adrenalin Software is sufficient.
- Improved performance in the GUI app to better handle shaders with large disassembly.
- Updated static analysis engine with support for the latest RDNA™ 2 instructions and bug fixes.
- (v2.4.2 only) Added support for gfx1031 (RX 6700 XT) in Vulkan®, DirectX®12, DirectX® Raytracing, DirectX®11, and OpenGL™ modes.
Version 2.4 (November 2020)
- RGA is now available as part of the Radeon™ Developer Tool Suite.
- Added support for RX6000 series in DirectX®12, DirectX®11, Vulkan®, Vulkan-Offline, OpenGL®, and OpenCL™ modes.
- Added support for Navi12 (gfx1011) and Renoir (gfx909) as targets in DX12, DX11, Vulkan, Vulkan-offline and OpenGL modes.
- Bug fixes and usability enhancements.
Version 2.3 (April 2020)
- Added support for DX12 graphics pipelines compilation in command line tool.
- Added support for Navi14.
- Live register analysis and control-flow graph generation support for RDNA targets.
- DX11 mode accepts DXBC binaries as an input.
- Vulkan mode reports when shaders were merged.
- Support for RDNA targets in OpenCL legacy mode.
Version 2.2 (July 2019)
- Add command line support for DirectX® 12 compute shaders.
- Support for RDNA targets in Vulkan, Vulkan offline, DX12, DX11 and OpenGL modes.
Version 2.1 (March 2019)
- Adds support for Vulkan® in the GUI.
- Shows a summary of the resources used by your shaders (VGPR, SGPR and LDS).
Version 2.0 (December 2018)
- Initial release.
Related to Radeon™ GPU Analyzer
Using Radeon™ GPU Analyzer v2.4.1 with DirectX® Raytracing
Radeon™ GPU Analyzer v2.4.1 introduces support for DXR shaders in a new mode of the command line tool.
AMD RDNA™ 2 – Radeon™ Developer Tool Suite – YouTube link
This video describes the benefits of bundling the Radeon™ GPU Profiler, Radeon™ Memory Visualizer, Radeon™ GPU Analyzer, and the Radeon™ Developer Panel into a single downloadable suite.
Curing Amnesia and Other GPU Maladies With AMD Developer Tools – YouTube link
This video introduces the new Radeon™ Memory Visualizer to help answer questions about memory allocations, resource bindings, page mappings, and more. Includes updates on RGP and RGA.
Using Radeon™ GPU Analyzer with DirectX®12 Graphics
With DirectX 12 comes the power of generating disassembly and hardware resource usage statistics that are closest to the real-world case, and therefore making better performance optimization decisions.
Using Radeon™ GPU Analyzer with Direct3D®12 Compute
Radeon GPU Analyzer (RGA) has support for DirectX12 compute shaders with the command line tool. This mode can generate GCN/RDNA ISA disassembly for your compute shaders, regardless of the physically installed GPU.
First Steps When Implementing FP16
Half-precision (FP16) computation is a performance-enhancing GPU technology long exploited in console and mobile devices not previously used or widely available in mainstream PC development.
Live VGPR Analysis with Radeon™ GPU Analyzer
This tutorial explains how to use Radeon GPU Analyzer (RGA) to produce a live VGPR analysis report for your shaders and kernels.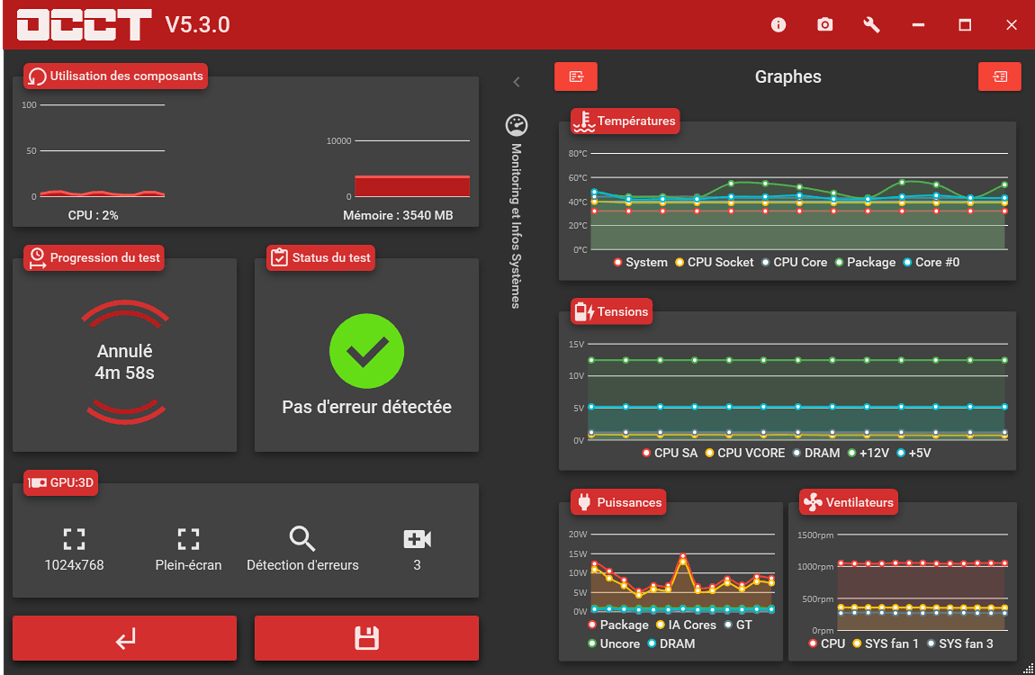 Basic RGA usage knowledge is assumed.
Barycentrics DirectX® Shader Extension Samples
The Barycentrics samples show how to enable intrinsic instructions in your DirectX®11 or DirectX®12 HLSL code.
Radeon™ Raytracing Analyzer (RRA) is a tool which allows you to investigate the performance of your raytracing applications and highlight potential bottlenecks.
The RDP provides a communication channel with the Radeon™ Adrenalin driver. It generates event timing data used by the Radeon™ GPU Profiler (RGP), and the memory usage data used by the Radeon™ Memory Visualizer (RMV).
Radeon™ Memory Visualizer (RMV) is a tool to allow you to gain a deep understanding of how your application uses memory for graphics resources.
RGP gives you unprecedented, in-depth access to a GPU. Easily analyze graphics, async compute usage, event timing, pipeline stalls, barriers, bottlenecks, and other performance inefficiencies.
Our other tools
If you want to know how well a game is performing on your machine in real-time with low overhead, OCAT has you covered.
Compressonator is a set of tools to allow artists and developers to more easily work with compressed assets and easily visualize the quality impact of various compression technologies.
6 Best Tools to Stress Test GPU in 2022
For PC builders, testing a PC thoroughly — from both inside and outside — is of paramount importance before they finally move to a new computer. That’s why, in this article, we bring you the best tools to stress test GPU so you can have a good idea about your machine’s graphics rendering capability. We have been very selective about the software and have only mentioned those programs which are reliable and do not carry a risk of hardware damage. Now having said that, let’s go ahead and unpack the best programs for GPU stress testing.
Software to Stress Test GPU in 2022
Here, we have included 6 programs to stress test GPU which are mostly free for personal use. However, if you want an extended period of loop test then you may have to buy an advanced edition of the program. Nevertheless, here are the software programs that will allow you to overclock your GPU and test its stability.
Table Of Contents
1. Unigine
Unigine creates one of the best gaming engines in the world. Apart from that, it also offers a few gaming tests that can stress test your GPU to no end. Few of the popular tests are Superposition, Heaven, and Valley. You can go with any of the mentioned tests, but if you truly want to stress your GPU, go with Superposition.
It’s a very demanding test that renders advanced visuals created by the powerful Unigine engine itself. Apart from that, the test includes 900 interactive objects with dynamic lighting technology and VR module testing. All the while, you can monitor GPU usage, temperature, power supply, cooling system, FPS count and more.
The best part about Unigine and Superposition, in particular, is that it renders an interactive environment that even the most detailed games don’t have. And on top of it, you can stress-test the graphically intensive environment for an extended time to check the GPU stability. Not to mention, Unigine also offers a benchmark score so you can easily compare your GPU score with other systems around the world.
Having said that, if you want to stress-test your GPU for more cycles, you can also go with Heaven and Valley. They are quite good and offer a beautiful yet testing environment. To sum up, Unigine is a complete stress testing tool that includes testing, monitoring and also benchmarking. So just go with Unigine and you won’t be disappointed for sure.
Check Out Unigine (Free, Starts at $19.95 for Advanced Editions)
2. 3DMark
3DMark is another popular way to stress test the GPU that also offers a benchmarking score. Similar to Unigine, it also brings a number of benchmark tests to measure your GPU’s capability. Some of the popular ones are Time Spy, Fire Strike, Tomb Raid, and more.
Of all the tests, I find Time Spy the most demanding because it takes full advantage of the new DirectX API such as asynchronous compute and multi-threading. As a result, 3DMark puts a ridiculous amount of load on the GPU to push it to extreme limits. It’s in fact so intensive that it brings even the powerful GeForce GTX 1080 Ti to its knees just after a few cycles of tests.
Apart from that, the tests have advanced graphical visuals with lighting and shadow effects. All this makes sure the GPU usage goes as high as 100% so that you can find your machine’s capability. And as I said, 3DMark offers a standard and cross-platform benchmark score which you can use to gauge your GPU’s ranking– irrespective of the graphics card manufacturer, be it Nvidia, AMD or Intel. So to conclude, 3DMark is an equally powerful stress testing software for GPU and you should definitely try it on your machine.
Check Out 3DMark (Free, Starts at $29. 99 for Advanced Editions)
3. FurMark
Many believe that FurMark is overkill for stress testing GPU and rightly so. It puts a tremendous load on the GPU to the point it can damage your hardware due to overheating. However, you can take its basic test which is a standard OpenGL test for measuring the GPU’s stability. You can even provide a custom preset such as resolution, dynamic background, screen mode, throttle time and more.
While the tests are highly advanced, you can’t monitor many essential metrics with the FurMark application. You will have to use a software like MSI Afterburner utility to keep an eye on GPU’s usage and temperature. To conclude, go with FurMark if you have the experience and expertise required in stress testing GPU.
Check Out FurMark (Free)
Note: Nvidia automatically underclocks its GPU the moment you run FurMark. So, if you are testing FurMark on an Nvidia GPU, you will not get a proper reading.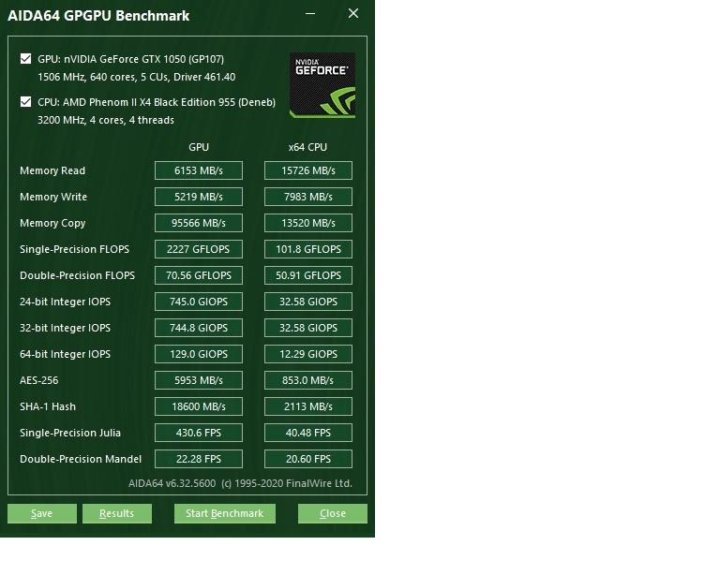 In that case, it’s advised to try another tool from this list.
4. MSI Kombustor
MSI Kombustor is MSI’s well-known tool for stress testing and benchmarking the GPU. It’s specially designed to push your graphics card to the absolute limit through several intensive simulations and demos. Among other things, MSI Kombustor also measures the thermal performance and tests the stability of the GPU.
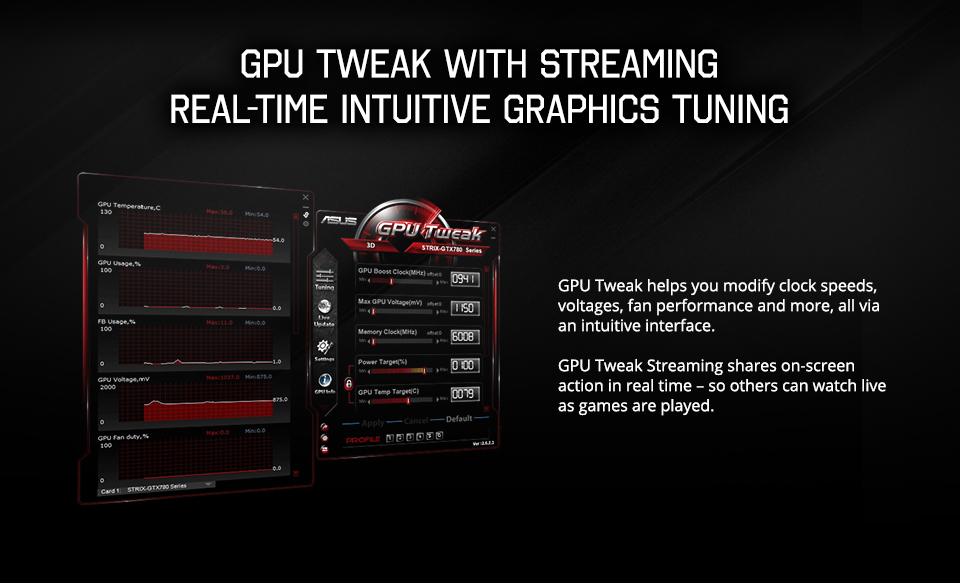
To take full advantage of MSI Kombustor, you should use another MSI utility called Afterburner. It’s an overclocking tool by MSI that gives you full control over your graphics cards. You can customize the fan profiles and adjust the GPU’s clock frequency and voltage. It will allow you to find the perfect balance between performance and temperature.
As for the Kombustor, it supports all major graphics API– DirectX, OpenGL, and Vulkan — to test GPU’s performance in all environments. Apart from that, MSI Kombustor puts a ridiculous amount of load on the GPU through many advanced tests which include Artifact scanning, PhysX 4 GPU stress test, Tessellation, Depth-of-Field test, Physically based rendering, and more.
In addition, it also leverages Furmark’s highly intensive tests to stress the GPU to its extreme. I would say, if you have a high-end graphics card then MSI Kombustor is among the best tools to stress test GPU.
Check Out MSI Kombustor (Free)
5. OCCT
While OCCT is popularly known for stress testing CPU, it can also torture the GPU to its absolute brink. You can use OCCT to test the stability of your overclocking parameters like voltage, frequency, and resolution. It deploys OCCT’s version of the GPU stability test which is called the furry donut. The graphics rendering engine is so powerful that historically it has blanked out screens of computers powered by a major graphic card. As a result, the test has revealed major design flaws in the architecture of the GPU chipset.
Having said that, the best part about OCCT is that it’s not just a stress testing software, but also allows you to detect GPU errors and monitor the active readings.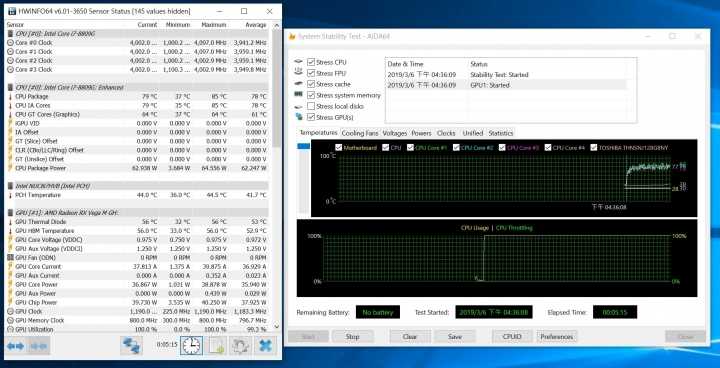 You can take advantage of the GPU: MEMTEST to find errors in the graphic’s card memory. All in all, OCCT is a multi-purpose tool to stress test the GPU and you should definitely give it a try. The only downside is that you don’t get a benchmark score, but that is passable.
Check Out OCCT (Free for personal use, Starts at $1 per month for Professional users)
6. AIDA64 Extreme
Besides the CPU test, AIDA64 Extreme also offers a GPU stress test known as the GPGPU Benchmark test. It has a system stability test that includes the GPU and you can run a series of graphically intensive tasks to drive the computer to its brink. AIDA64 Extreme deploys a 64-bit multi-threaded stress testing module and uses OpenGL API to push the GPU to its maximum capacity.
Having said that, the best part about AIDA64 Extreme is how user-friendly it is. You will get all sorts of information even under heavy stress like power consumption, GPU usage, frequency, temperature and more.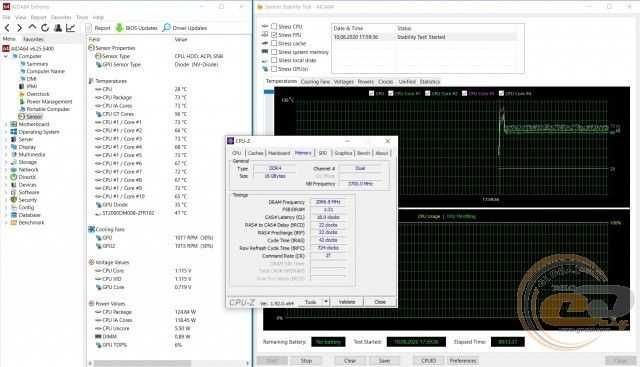 Simply put, if you are new to this world and want a simple tool to stress test the GPU then AIDA64 Extreme is a good start.
Check Out AIDA64 Extreme (30-days free trial, $39.95 for 3 PCs)
Frequently Asked Questions
Q. Is GPU stress test safe?
It is safe to stress test your GPU and push its limits. However, it is not recommended to repeat these tests for a prolonged time as it may affect the thermals of the graphics card.
Q. How long should I stress test my GPU?
An ideal duration to stress test your GPU would be an hour. You can also make short 15-minute stress test sessions to make sure everything is working as intended.
Q. How do I know if my GPU is failing?
The easiest way to find if your GPU is failing is to check if it crashes during a stress test. In addition, look out for glitches or frame drops in the process. You can also keep a check on the thermals to know if the GPU is getting overheated, which is an indication that your GPU is not in good condition.
Q. Can you fix a dead GPU?
That depends on why the GPU failed to function. For what it’s worth, you can try out the oven method in extreme cases if you have the resources.
Stress Test GPU with These Tools and Check Stability
So those were our 5 picks for the best GPU stress testing software. Almost all the tools mentioned in this list are safe to use so don’t worry about damaging your GPU. However, be slightly cautious while using FurMark as it can drive the GPU nuts if not configured properly. Anyway, if you want more such programs to test various hardware components then do comment below and let us know. We will definitely heed your suggestions.
TAGS
GPUStress Test
Here’s How to Test a Graphics Card (GPU)
There are many reasons why you’d need to test a graphics card (GPU).
Some gamers might want to test their GPU to see if they can play a particular game whereas others want to find out if their GPU is performing up to the level that it should and if not – find the reason behind the lack of performance.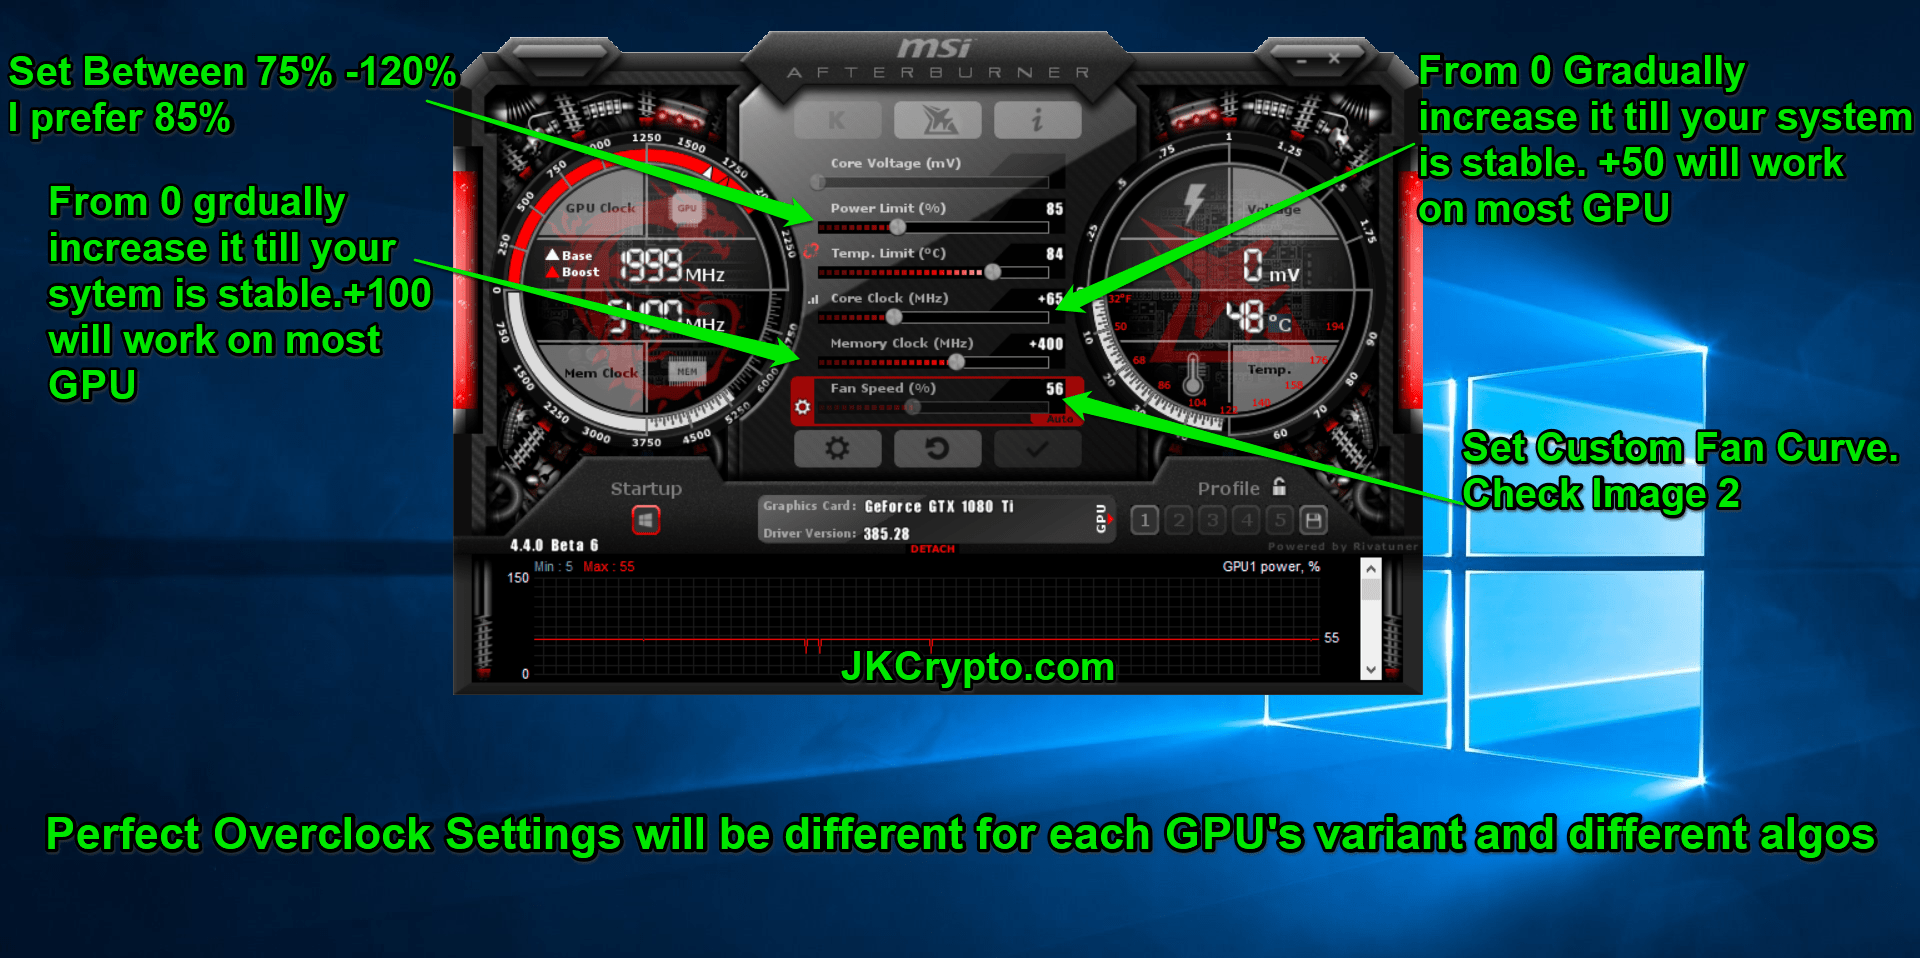
Whatever your reasoning might be, in this guide, we will show you how to test your graphics card.
What is a Benchmarking Test for GPUs?
The most common way of assessing GPU performance is by running a benchmarking test. These tests are designed to mimic graphic-intensive games that your PC might encounter.
The most common modern benchmark tests that you can run serve multiple purposes. Not only can they judge the capacity of a GPU unit but judge its stability when overclocked too. This is crucial because you do not want to push your GPU past its limits, which might result in the failure of the unit due to overheating.
By using a number of graphic tests for games that run at various resolutions and of different sizes, benchmark tests are a great way to judge how well your GPU can cope with strain and also monitor factors like temperature, duration, lag, most optimal resolution, and stress under higher frame rates, etc.
There are several different benchmark tests that you can run to gain info on in-game performance after you install a new GPU. In this post, we will discuss a few possible steps to take and programs you can run which will help you gain valuable information from the results to make an educated choice on your new GPU.
How to Benchmark a GPU
When it comes to benchmarking, you can either choose to test out your current hardware by playing a game or run one of the many benchmarking programs. Playing a game is actually a very effective way for beginners to judge their current setup.
If you have a particular genre in mind or have a set of games you will play frequently, running one of them at the highest setting will give you an accurate idea of what your GPU is capable of.
Playing Games
Open world games and expansive action and RPG games usually feature the most sophisticated graphics and demand more from your Graphic card.
To test them out, run a game like Red Dead Redemption 2 or The Witcher 3: Wild Hunt. Both these games feature a plethora of constantly generated textures and the ability to turn the graphic settings up really high.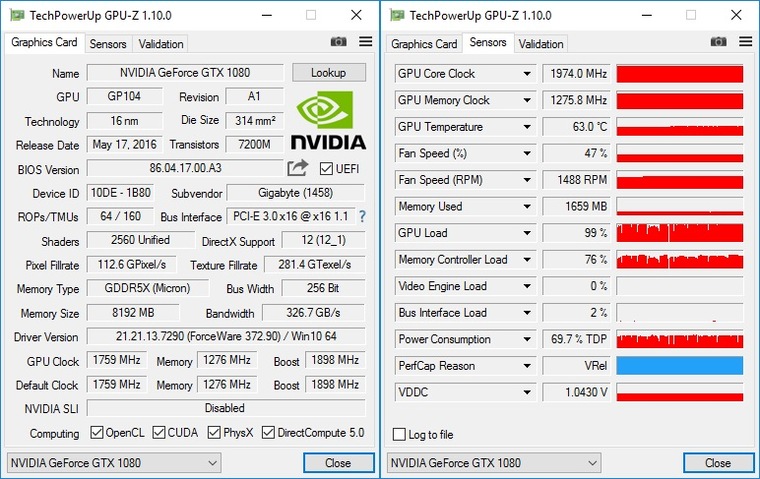
This is especially true for Witcher at the maximum graphic setting (all textures and effects enabled at 4K resolution). This game will push most graphic cards to the limit. Running this game without lag or frame tearing means your GPU is good to go for most games at a decent frame rate and high visual settings.
Remember, only the best graphic cards on the market like the NVIDIA GeForce RTX 2060 SUPER or the AMD Radeon VII (or higher) can run this game on 1440p and come close to that 60fps mark everyone craves.
You need to install the Open Capture and Analytics Tool (OCAT) for AMD GPU’s and FrameView for NVIDIA GPU’s to allow your PC to record data while the game is running.
These programs give you vital real-time stats on GPU temperature, frame rate, and other important factors that will help you make a wise choice on what works best for your requirements.
Running Synthetic Benchmark Programs
The most popular of all the benchmarking programs is the 3DMark benchmark tool. The free version of this software on Steam is enough to give you all the vital stats you need to learn about your GPU’s performance when forced to deal with high graphic settings with a lot of textures and animations.
The free version of this software offers graphs that display temperature changes during the test (keeping the GPU unit cool is crucial to longevity). It also monitors changes in the CPU and displays how both units are working in tandem and the amount of load distribution between the two.
3DMark displays detailed charts for temperatures (both CPU and GPU) and shows how the GPU’s clock speed and the frame rate within the gameplay simulation changes during the tests. This shows the upper limits of your CPU/GPU combo and gives you an accurate picture of games that you could run on your system.
Similarly, if you want to really take your GPU for a spin and really push its performance limits to see how well it holds up for long gaming sessions, the program Heaven UNIGINE is your best bet.
It features customizable presets that allow you to run programs that mimic games at various resolutions and frame rates. You can also choose the time period of the test to check if overheating or drop in framerate occurs with prolonged stress or multiple programs being run at the same time (Just open Chrome during the test).
Like the 3DMark, the Heaven UNIGINE gives you in-depth statistics of the GPU performance through graphical representations of fluctuations over the course of the test and in real-time. This gives you information while the test is running and allows you to stop a test when you think your GPU is being pushed too far.
GFXBench is a completely free tool that offers you quality GPU testing features.
The software allows you to run programmable tests and the benchmark scores that you obtain can also be compared to other similar GPUs available in the market.
This helps you make an informed decision about your future purchases and also shows you where your GPU stands amidst similarly priced products. If you are looking to upgrade your current GPU, the GFXBench software is your best bet.
How to Test if Your GPU is Failing
There are many common signs of a failing graphics card.
If your computer is crashing frequently and struggling to reboot, even if you’ve been able to play games very recently — even up until the moment of the crash — this could be a sign of a failing GPU.
If you’re seeing weird things happening in game-like screen tears or glitchy graphics that other players don’t see when spectating you, this is another potential sign.
Your computer could also be extremely loud, particularly from its fans, if your GPU is failing.
Before we tell you how to test if a GPU is failing, we first recommend updating all of your drivers. Graphics card drivers are released regularly so if you have extremely outdated drivers, this can be a common cause of the issues described above.
If all of your drivers are up to date, the best way to test for a failing GPU is to download and run the free tool FurMark.
FurMark is designed to max out your graphics card and will run a GPU health test. You’ll be able to tell very quickly if your GPU is the cause of your problems.
Conclusion
The tips and programs suggested in this post will enable you to analyze the performance of your graphic card and ascertain if you have the right hardware to run your favorite games. Based on the results of your benchmark tests, you can choose your new, upgraded GPU unit armed with the most relevant information.
5 Best Free GPU Benchmark Test Software for Windows
Here is a list of Best Free GPU Benchmark Test Software for Windows. Using these free software, you can perform GPU speed test in order to determine and analyze graphics card performance. The GPU benchmark test basically evaluates your video card’s capabilities and how well it is performing. It can be used by video gamers to check whether their graphics card is suitable for heavy duty games. Or, you can use these software generally to compare the GPU benchmark test results with other results and analyze your graphics card’s performance.
These GPU benchmark test software perform a series of tests which help in determining GPU performance. These tests include game performance test, geometry processing speed, pixel shading, etc. You can also save the results in a supported format in most of these software. Additionally, some of these software can help you determine system information including hardware, operating system, memory, storage device, etc. All in all, these are good system performance evaluation software which also include GPU benchmark test.
My Favorite Free GPU Benchmark Test Software for Windows:
PC Wizard is one of my favorite software for GPU benchmark test. It is a dedicated computer benchmarking software which can be used to view system information and run a lot of benchmark tests.
D3D RightMark is another good software to run a GPU benchmark test. It has a simple GUI, so you wouldn’t face any difficulty while using it.
You may also like some best free Benchmarking Software, Graphics Card Identifier Software, and System Performance Monitoring Software for Windows.
PC Wizard
PC Wizard is basically a computer benchmark test software which includes GPU benchmark test too. Using it, you can evaluate system performance with the help of a lot of benchmarking tests.
How to perform GPU benchmark test using PC Wizard:
To perform a GPU benchmark test, go to the Benchmark > Video/DirectX3D Benchmark option from the left panel. It will perform the test and as the test is finished, you will be able to view GPU benchmark test results on its interface. The test results include frame rate for texture, particles 3D, vertex, billboard, and others’ components. Plus, it displays a Chart (in Drivers section) which displays the same FPS. It also provides an option to compare your results with benchmark results for the same configurations.
Additional Features:
- It can be used for several benchmark tests including Windows Performance Rating, Latency Memory Performance, Hard Disk Benchmarking, MP3 Compression Benchmark, Video Card, etc.
- It also fetches and displays various system information related to hardware (IO port, drives, mainboard, multimedia, etc.), configurations, system files, and resources.
- You can also run process monitoring to view temperature and voltages of processors in real time.
- It lets you save the information or any test results in TXT, RTF, HTML, XML, and JSON formats.
- You can also check for BIOS or drivers updates.
Conclusion:
It is a feature-rich benchmarking software using which you can determine GPU speed and perform many other PC benchmark tests.
Home Page
Download Page
D3D RightMark
D3D RightMark is a free GPU benchmark test software for Windows. Using it, you can easily evaluate performance of your Direct3D graphics cards. To do so, it performs multiple tests which include geometry processing speed, hidden surface removal, pixel filling, pixel shading, and point sprites.
How to run GPU benchmark test using D3D RightMark:
- Launch this software and from the left panel, select the synthetic tests you want to perform and configure respective test properties. For example, to perform geometry processing speed, you can customize geometry profile, shader profile, lighting profile, renderer (adapter, device, etc.), timing, etc.
- Now, use the Add to batch button to add them to the Current Batch (tests to perform) list.
- Next, click on the Run batch button to perform all tests at once.
When the tests are done, it displays a Benchmark Results window from where you can save the GPU performance report in HTML or XLS format. In the report, you can view details like Refresh rate, Vertex processing, FPS, PPS, etc.
Additional Features:
- It lets you save screenshots of tests in BMP format. You can enable this feature while adding a test by going to the Screenshot section.

- You can view graphics card information including 3D capabilities, high order surfaces, pixel shaders, hardware shaders, etc.
Conclusion:
It is a great software to run a GPU benchmark test. It has a nice and clean GUI which makes the task quite easy.
Home Page
Download Page
UserBenchmark
UserBenchmark is the next free GPU benchmark test software for Windows. It is a dedicated software which is used to perform various benchmark tests on your PC including CPU test, GPU test, Drive test, RAM test, etc. It can identify your graphics card, show details, and perform a test on GPU speed.
Main Features:
- It generates a detailed analysis report of GPU speed test report with reviews. And, it also rates the performance of your GPU system.
- It tests your graphics card speed and compares the results with other users’ results having same components.
- You can view detailed GPU speed test report which includes information such as effective speed, effective 3D speed, peak overclocked bench, etc.
- It can also perform Game FPS Estimate to determine how well a game (e.g., Battlefield, PUBG, etc.) will run on your GPU.
How to test GPU speed using UserBenchmark:
This software is different than other software in terms of working. It has no GUI and it actually generates a detailed report on GPU, CPU, Drives, RAM, Processors, and other system components. The report is generated when you install this software. After installation, it creates a GPU speed test as well as other PC components’ speed test report and displays it in your default web browser. To check GPU speed report, go to the Graphics section of the generated report. You can use your browser’s Print feature to save the report as PDF or to directly print it.
You can run its application file whenever you need to perform GPU speed test.
Conclusion:
It is a great software to test GPU speed and for general system performance test. As it generates a comprehensive report, you can easily analyze and compare your graphics card’s performance.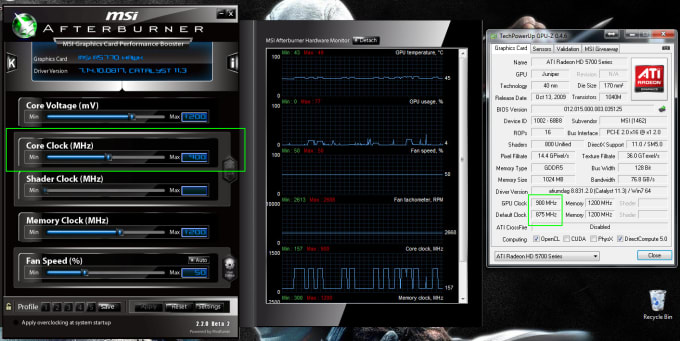
Home Page
Download Page
3DMark Vantage
3DMark Vantage is another free GPU benchmark test software for Windows. It is basically DirectX 10 video card benchmark test software. Using it, you can perform GPU and CPU benchmark tests to evaluate the performance of your system. Gamers can use it to test the capabilities of their system to play heavy duty games. Let’s see how you can perform GPU speed test using it.
How to test GPU speed using 3DMark Vantage:
This software contains two GPU tests; Jane Nash and Calico. Both the tests have their own sets of feature tests and techniques to evaluate GPU speed (read its guide to know more). You can select either one of them or both tests to evaluate GPU performance. After doing so, hit the Run Benchmark button, sit back, and let it perform the test. The test takes some time to finish, so you need to be patient. Also, during the test, you can’t perform any other activity on your system. As the test finishes, you get the Results in its dedicated section. The test results basically contain graphics test performance in frames per second (FPS).
Additional Features:
- You can save test results in its own native file format.
- It lets you view detailed system information which include GPU model, display information, memory information, storage device, monitor information, OS information, Mainboard information, etc.
- It provides few presets with specific configurations to perform tests. You can use them or customize configurations from Options section as per your requirements. These configurations include resolution, maximum anisotropy, texture quality, shadow shader quality, etc.
Conclusion:
All in all, it is a decent GPU benchmark test software. It is more suitable for previous versions of Windows than the newer ones.
Home Page
Download Page
SVPMark
SVPMark is yet another GPU benchmark test software for Windows. It performs a series of tests to evaluate graphics card performance. It uses real-time frame interpolation algorithms from SmoothVideo Project for GPU speed test.
How to test GPU speed using SVPMark:
It is very easy to perform GPU benchmarking test using this software. First, go to Additional test options to customize a few test specifications like test (SD video, HD video, Full HD video, etc.), number of threads, GPU acceleration, etc. After that, click on the Run benchmark button and it will perform different tests to determine GPU performance. As the test is finished, it shows results on its interface including speeds for parameters like decode video, vectors search, frame composition, fastest, good high, etc.
Additional Feature:
- You can copy the results to the clipboard or save it to a log file.
Conclusion:
SVPMark is a simple yet effective GPU benchmark test software which you can use without much hassle.
Home Page
Download Page
Related Posts
Write a Comment
Chromium Docs — GPU Testing
This set of pages documents the setup and operation of the GPU bots and try servers, which verify the correctness of Chrome’s graphically accelerated rendering pipeline.
Contents
- Overview
- Fleet Status
- Using the GPU Bots
- Running the GPU Tests Locally
- Bisecting ChromeOS Failures Locally
- Telemetry Test Suites
- Running the pixel tests locally
- Running Binaries from the Bots Locally
- Debugging a Specific Subset of Tests on a Specific GPU Bot
- Running Locally Built Binaries on the GPU Bots
- Moving Test Binaries from Machine to Machine
- Adding New Tests to the GPU Bots
- Adding a new test to one of the existing test harnesses
- Adding new steps to the GPU Bots
- Debugging Pixel Test Failures on the GPU Bots
- Updating and Adding New Pixel Tests to the GPU Bots
- Stamping out Flakiness
Overview
The GPU bots run a different set of tests than the majority of the Chromium test machines. The GPU bots specifically focus on tests which exercise the graphics processor, and whose results are likely to vary between graphics card vendors.
Most of the tests on the GPU bots are run via the Telemetry framework. Telemetry was originally conceived as a performance testing framework, but has proven valuable for correctness testing as well. Telemetry directs the browser to perform various operations, like page navigation and test execution, from external scripts written in Python. The GPU bots launch the full Chromium browser via Telemetry for the majority of the tests. Using the full browser to execute tests, rather than smaller test harnesses, has yielded several advantages: testing what is shipped, improved reliability, and improved performance.
A subset of the tests, called “pixel tests”, grab screen snapshots of the web page in order to validate Chromium’s rendering architecture end-to-end. Where necessary, GPU-specific results are maintained for these tests. Some of these tests verify just a few pixels, using handwritten code, in order to use the same validation for all brands of GPUs.
The GPU bots use the Chrome infrastructure team‘s recipe framework, and specifically the chromium and chromium_trybot recipes, to describe what tests to execute. Compared to the legacy master-side buildbot scripts, recipes make it easy to add new steps to the bots, change the bots’ configuration, and run the tests locally in the same way that they are run on the bots. Additionally, the chromium and chromium_trybot recipes make it possible to send try jobs which add new steps to the bots. This single capability is a huge step forward from the previous configuration where new steps were added blindly, and could cause failures on the tryservers. For more details about the configuration of the bots, see the GPU bot details.
The physical hardware for the GPU bots lives in the Swarming pool*. The Swarming infrastructure (new docs, older but currently more complete docs) provides many benefits:
- Increased parallelism for the tests; all steps for a given tryjob or waterfall build run in parallel.
- Simpler scaling: just add more hardware in order to get more capacity. No manual configuration or distribution of hardware needed.
- Easier to run certain tests only on certain operating systems or types of GPUs.
- Easier to add new operating systems or types of GPUs.
- Clearer description of the binary and data dependencies of the tests. If they run successfully locally, they’ll run successfully on the bots.
(* All but a few one-off GPU bots are in the swarming pool. The exceptions to the rule are described in the GPU bot details.)
The bots on the chromium.gpu.fyi waterfall are configured to always test top-of-tree ANGLE. This setup is done with a few lines of code in the tools/build workspace; search the code for “angle”.
These aspects of the bots are described in more detail below, and in linked pages. There is a presentation which gives a brief overview of this documentation and links back to various portions.
Fleet Status
Please see the GPU Pixel Wrangling instructions for links to dashboards showing the status of various bots in the GPU fleet.
Using the GPU Bots
Most Chromium developers interact with the GPU bots in two ways:
- Observing the bots on the waterfalls.
- Sending try jobs to them.
The GPU bots are grouped on the chromium.gpu and chromium.gpu.fyi waterfalls. Their current status can be easily observed there.
To send try jobs, you must first upload your CL to the codereview server. Then, either clicking the “CQ dry run” link or running from the command line:
git cl try
Sends your job to the default set of try servers.
The GPU tests are part of the default set for Chromium CLs, and are run as part of the following tryservers’ jobs:
- linux-rel, formerly on the
tryserver.chromium.linuxwaterfall - mac-rel, formerly on the
tryserver.chromium.macwaterfall - win10_chromium_x64_rel_ng, formerly on the
tryserver.chromium.winwaterfall
Scan down through the steps looking for the text “GPU”; that identifies those tests run on the GPU bots. For each test the “trigger” step can be ignored; the step further down for the test of the same name contains the results.
It’s usually not necessary to explicitly send try jobs just for verifying GPU tests. If you want to, you must invoke “git cl try” separately for each tryserver master you want to reference, for example:
git cl try -b linux-rel
git cl try -b mac-rel
git cl try -b win7-rel
Alternatively, the Gerrit UI can be used to send a patch set to these try servers.
Three optional tryservers are also available which run additional tests. As of this writing, they ran longer-running tests that can’t run against all Chromium CLs due to lack of hardware capacity. They are added as part of the included tryservers for code changes to certain sub-directories.
- linux_optional_gpu_tests_rel on the luci.chromium.try waterfall
- mac_optional_gpu_tests_rel on the luci.chromium.try waterfall
- win_optional_gpu_tests_rel on the luci.chromium.
 try waterfall
Tryservers for the ANGLE project are also present on the tryserver.chromium.angle waterfall. These are invoked from the Gerrit user interface. They are configured similarly to the tryservers for regular Chromium patches, and run the same tests that are run on the chromium.gpu.fyi waterfall, in the same way (e.g., against ToT ANGLE).
If you find it necessary to try patches against other sub-repositories than Chromium (src/) and ANGLE (src/third_party/angle/), please file a bug with component Internals>GPU>Testing.
Running the GPU Tests Locally
All of the GPU tests running on the bots can be run locally from a Chromium build. Many of the tests are simple executables:
angle_unittestsgl_testsgl_unitteststab_capture_end2end_tests
Some run only on the chromium.gpu.fyi waterfall, either because there isn‘t enough machine capacity at the moment, or because they’re closed-source tests which aren’t allowed to run on the regular Chromium waterfalls:
angle_deqp_gles2_testsangle_deqp_gles3_testsangle_end2end_testsaudio_unittests
The remaining GPU tests are run via Telemetry.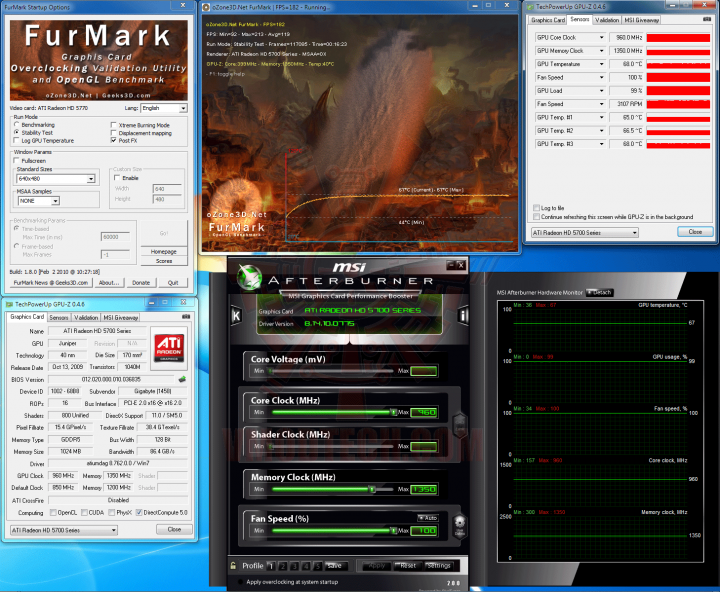 In order to run them, just build the
 telemetry_gpu_integration_test target (or telemetry_gpu_integration_test_android_chrome for Android) and then invoke src/content/test/gpu/run_gpu_integration_test.py with the appropriate argument. The tests this script can invoke are in src/content/test/gpu/gpu_tests/. For example:
run_gpu_integration_test.py context_lost --browser=releaserun_gpu_integration_test.py webgl_conformance --browser=release --webgl-conformance-version=1.0.2run_gpu_integration_test.py maps --browser=releaserun_gpu_integration_test.py screenshot_sync --browser=releaserun_gpu_integration_test.py trace_test --browser=release
The pixel tests are a bit special. See the section on running them locally for details.
The --browser=release argument can be changed to --browser=debug if you built in a directory such as out/Debug.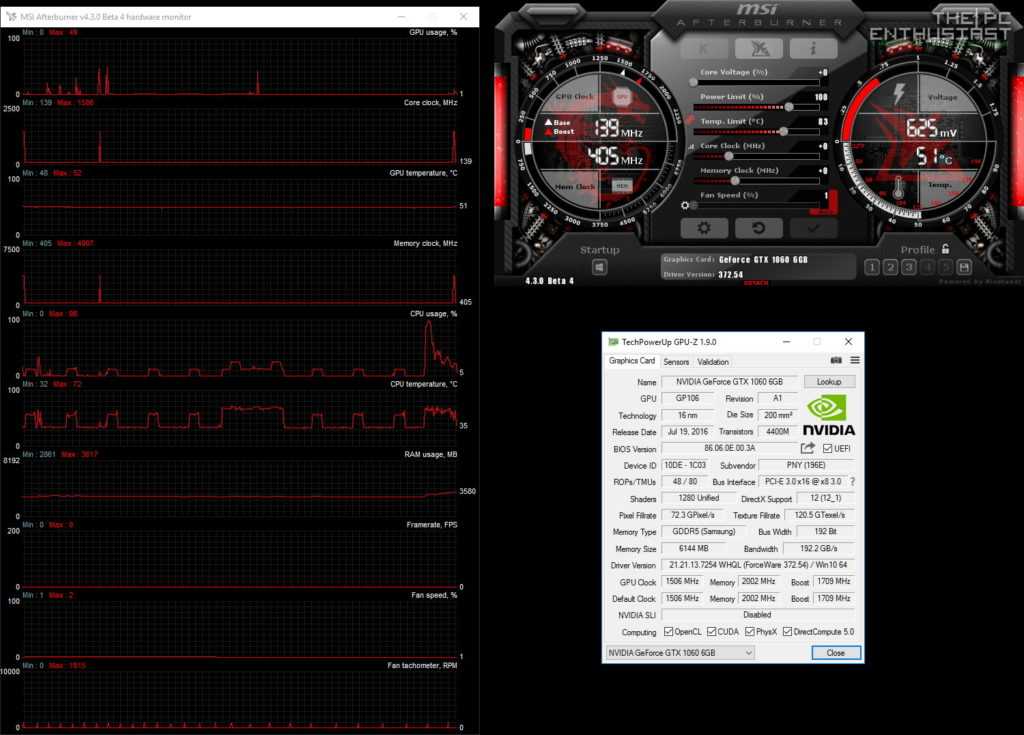 If you built in some non-standard directory such as
 out/my_special_gn_config, you can instead specify --browser=exact --browser-executable=out/my_special_gn_config/chrome.
If you’re testing on Android, use --browser=android-chromium instead of --browser=release/debug to invoke it. Additionally, Telemetry will likely complain about being unable to find the browser binary on Android if you build in a non-standard output directory. Thus, out/Release or out/Debug are suggested when testing on Android.
Note: The tests require some third-party Python packages. Obtaining these packages is handled automatically by vpython3, and the script‘s shebang should use vpython if running the script directly. If you’re used to invoking python3 to run a script, simply use vpython3 instead, e.g. vpython3 run_gpu_integration_test.py ....
You can run a subset of tests with this harness:
run_gpu_integration_test. py webgl_conformance --browser=release --test-filter=conformance_attribs
The exact command used to invoke the test on the bots can be found in one of two ways:
- Looking at the json.input of the trigger step under
requests[task_slices][command]. The arguments after the last--are used to actually run the test. - Looking at the top of a swarming task.
In both cases, the following can be omitted when running locally since they’re only necessary on swarming:
testing/test_env.pytesting/scripts/run_gpu_integration_test_as_googletest.py--isolated-script-test-output--isolated-script-test-perf-output
The Maps test requires you to authenticate to cloud storage in order to access the Web Page Reply archive containing the test. See Cloud Storage Credentials for documentation on setting this up.
Bisecting ChromeOS Failures Locally
Failures that occur on the ChromeOS amd64-generic configuration are easy to reproduce due to the VM being readily available for use, but doing so requires some additional steps to the bisect process. The following are steps that can be followed using two terminals and the Simple Chrome SDK to bisect a ChromeOS failure.
- Terminal 1: Start the bisect as normal
git bisect startgit bisect good <good_revision>git bisect bad <bad_revision> - Terminal 1: Sync to the revision that git spits out
gclient sync -r src@<revision> - Terminal 2: Enter the Simple Chrome SDK
cros chrome-sdk --board amd64-generic-vm --log-level info --download-vm --clear-sdk-cache - Terminal 2: Compile the relevant target (probably the GPU integration tests)
autoninja -C out_amd64-generic-vm/Release/ telemetry_gpu_integration_test - Terminal 2: Start the VM
cros_vm --start - Terminal 2: Deploy the Chrome binary to the VM
deploy_chrome --build-dir out_amd64-generic-vm/Release/ --device 127.0.0.1:9222This will require you to accept a prompt twice, once because of a board mismatch and once because the VM still has rootfs verification enabled.
- Terminal 1: Run your test on the VM. For GPU integration tests, this involves specifying
--browser cros-chrome --remote 127.0.0.1 --remote-ssh-port 9222 - Terminal 2: After determining whether the revision is good or bad, shut down the VM
cros_vm --stop - Terminal 2: Exit the SKD
exit - Terminal 1: Let git know whether the revision was good or bad
git bisect good/git bisect bad - Repeat from step 2 with the new revision git spits out.
The repeated entry/exit from the SDK between revisions is to ensure that the VM image is in sync with the Chromium revision, as it is possible for regressions to be caused by an update to the image itself rather than a Chromium change.
Telemetry Test Suites
The Telemetry-based tests are all technically the same target, telemetry_gpu_integration_test, just run with different runtime arguments. The first positional argument passed determines which suite will run, and additional runtime arguments may cause the step name to change on the bots. Here is a list of all suites and resulting step names as of April 15th 2021:
context_lostcontext_lost_passthrough_testscontext_lost_testscontext_lost_validating_tests
hardware_accelerated_featurehardware_accelerated_feature_tests
gpu_processgpu_process_launch_tests
info_collectioninfo_collection_tests
mapsmaps_pixel_passthrough_testmaps_pixel_testmaps_pixel_validating_testmaps_tests
pixelandroid_webview_pixel_skia_gold_testegl_pixel_skia_gold_testpixel_skia_gold_passthrough_testpixel_skia_gold_validating_testpixel_testsvulkan_pixel_skia_gold_test
powerpower_measurement_test
screenshot_syncscreenshot_sync_passthrough_testsscreenshot_sync_testsscreenshot_sync_validating_tests
trace_testtrace_test
webgl_conformancewebgl2_conformance_d3d11_passthrough_testswebgl2_conformance_gl_passthrough_testswebgl2_conformance_gles_passthrough_testswebgl2_conformance_testswebgl2_conformance_validating_testswebgl_conformance_d3d11_passthrough_testswebgl_conformance_d3d9_passthrough_testswebgl_conformance_fast_call_testswebgl_conformance_gl_passthrough_testswebgl_conformance_gles_passthrough_testswebgl_conformance_metal_passthrough_testswebgl_conformance_swangle_passthrough_testswebgl_conformance_testswebgl_conformance_validating_testswebgl_conformance_vulkan_passthrough_tests
Running the pixel tests locally
The pixel tests are a special case because they use an external Skia service called Gold to handle image approval and storage. See GPU Pixel Testing With Gold for specifics.
TL;DR is that the pixel tests use a binary called goldctl to download and upload data when running pixel tests.
Normally, goldctl uploads images and image metadata to the Gold server when used. This is not desirable when running locally for a couple reasons:
- Uploading requires the user to be whitelisted on the server, and whitelisting everyone who wants to run the tests locally is not a viable solution.
- Images produced during local runs are usually slightly different from those that are produced on the bots due to hardware/software differences. Thus, most images uploaded to Gold from local runs would likely only ever actually be used by tests run on the machine that initially generated those images, which just adds noise to the list of approved images.
Additionally, the tests normally rely on the Gold server for viewing images produced by a test run. This does not work if the data is not actually uploaded.
The pixel tests contain logic to automatically determine whether they are running on a workstation or not, as well as to determine what git revision is being tested. This should mean that the pixel tests will automatically work when run locally. However, if the local run detection code fails for some reason, you can manually pass some flags to force the same behavior:
In order to get around the local run issues, simply pass the --local-pixel-tests flag to the tests. This will disable uploading, but otherwise go through the same steps as a test normally would. Each test will also print out file:// URLs to the produced image, the closest image for the test known to Gold, and the diff between the two.
Because the image produced by the test locally is likely slightly different from any of the approved images in Gold, local test runs are likely to fail during the comparison step. In order to cut down on the amount of noise, you can also pass the --no-skia-gold-failure flag to not fail the test on a failed image comparison. When using
 --no-skia-gold-failure, you’ll also need to pass the --passthrough flag in order to actually see the link output.
Example usage: run_gpu_integration_test.py pixel --no-skia-gold-failure --local-pixel-tests --passthrough
If, for some reason, the local run code is unable to determine what the git revision is, simply pass --git-revision aabbccdd. Note that aabbccdd must be replaced with an actual Chromium src revision (typically whatever revision origin/main is currently synced to) in order for the tests to work. This can be done automatically using: run_gpu_integration_test.py pixel --no-skia-gold-failure --local-pixel-tests --passthrough --git-revision `git rev-parse origin/main`
Running Binaries from the Bots Locally
Any binary run remotely on a bot can also be run locally, assuming the local machine loosely matches the architecture and OS of the bot.
The easiest way to do this is to find the ID of the swarming task and use “swarming. py reproduce” to re-run it:
./src/tools/luci-go/swarming reproduce -S https://chromium-swarm.appspot.com [task ID]
The task ID can be found in the stdio for the “trigger” step for the test. For example, look at a recent build from the Mac Release (Intel) bot, and look at the gl_unittests step. You will see something like:
Triggered task: gl_unittests on Intel GPU on Mac/Mac-10.12.6/[TRUNCATED_ISOLATE_HASH]/Mac Release (Intel)/83664
To collect results, use:
  swarming.py collect -S https://chromium-swarm.appspot.com --json /var/folders/[PATH_TO_TEMP_FILE].json
Or visit:
  https://chromium-swarm.appspot.com/user/task/[TASK_ID]
There is a difference between the isolate‘s hash and Swarming’s task ID. Make sure you use the task ID and not the isolate’s hash.
As of this writing, there seems to be a bug when attempting to re-run the Telemetry based GPU tests in this way. For the time being, this can be worked around by instead downloading the contents of the isolate. To do so, look into the “Reproducing the task locally” section on a swarming task, which contains something like:
Download inputs files into directory foo:
# (if needed, use "\${platform}" as-is) cipd install "infra/tools/luci/cas/\${platform}" -root bar
# (if needed) ./bar/cas login
./bar/cas download -cas-instance projects/chromium-swarm/instances/default_instance -digest 68ae1d6b22673b0ab7b4427ca1fc2a4761c9ee53474105b9076a23a67e97a18a/647 -dir foo
Before attempting to download an isolate, you must ensure you have permission to access the isolate server. Full instructions can be found here. For most cases, you can simply run:
./src/tools/luci-go/isolate login
The above link requires that you log in with your @google.com credentials. It‘s not known at the present time whether this works with @chromium.org accounts. Email kbr@ if you try this and find it doesn’t work.
Debugging a Specific Subset of Tests on a Specific GPU Bot
When a test exhibits flake on the bots, it can be convenient to run it repeatedly with local code modifications on the bot where it is exhibiting flake.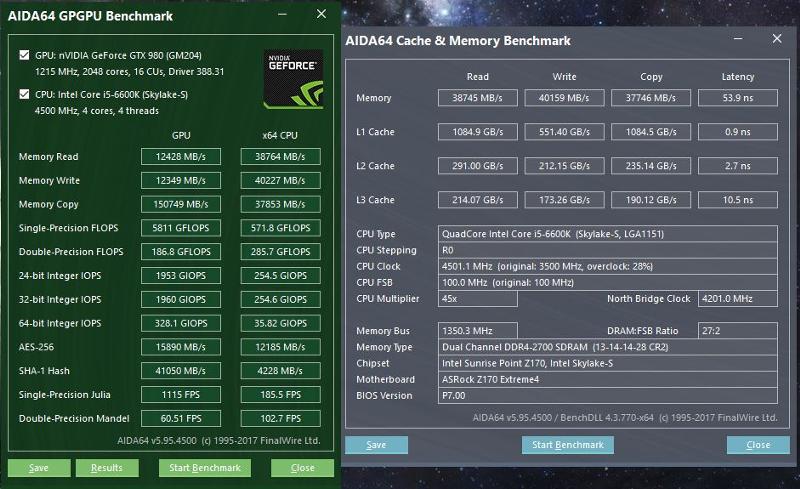 One way of doing this is via swarming (see the below section). However, a lower-overhead alternative that also works in the case where you are looking to run on a bot for which you cannot locally build is to locally alter the configuration of the bot in question to specify that it should run only the tests desired, repeating as many times as desired. Instructions for doing this are as follows (see the example CL for a concrete instantiation of these instructions):
- In testsuite_exceptions.pyl, find the section for the test suite in question (creating it if it doesn’t exist).
- Add modifications for the bot in question and specify arguments such that your desired tests are run for the desired number of iterations.
- Run testing/buildbot/generate_buildbot_json.py and verify that the JSON file for the bot in question was modified as you would expect.
- Upload and run tryjobs on that specific bot via “Choose Tryjobs.”
- Examine the test results. (You can verify that the tests run were as you expected by examining the test results for individual shards of the run of the test suite in question.
 )
) - Add logging/code modifications/etc as desired and go back to step 4, repeating the process until you’ve uncovered the underlying issue.
- Remove the the changes to testsuite_exceptions.pyl and the JSON file if turning the CL into one intended for submission!
Here is an example CL that does this.
Running Locally Built Binaries on the GPU Bots
See the Swarming documentation for instructions on how to upload your binaries to the isolate server and trigger execution on Swarming.
Be sure to use the correct swarming dimensions for your desired GPU e.g. “1002:6613” instead of “AMD Radeon R7 240 (1002:6613)” which is how it appears on swarming task page. You can query bots in the chromium.tests.gpu pool to find the correct dimensions:
tools\luci-go\swarming bots -S chromium-swarm.appspot.com -d pool=chromium.tests.gpu
Moving Test Binaries from Machine to Machine
To create a zip archive of your personal Chromium build plus all of the Telemetry-based GPU tests’ dependencies, which you can then move to another machine for testing:
- Build Chrome (into
out/Releasein this example).
vpython3 tools/mb/mb.py zip out/Release/ telemetry_gpu_integration_test out/telemetry_gpu_integration_test.zip
Then copy telemetry_gpu_integration_test.zip to another machine. Unzip it, and cd into the resulting directory. Invoke content/test/gpu/run_gpu_integration_test.py as above.
This workflow has been tested successfully on Windows with a statically-linked Release build of Chrome.
Note: on one macOS machine, this command failed because of a broken strip-json-comments symlink in src/third_party/catapult/common/node_runner/node_runner/node_modules/.bin. Deleting that symlink allowed it to proceed.
Note also: on the same macOS machine, with a component build, this command failed to zip up a working Chromium binary. The browser failed to start with the following error:
[0626/180440.571670:FATAL:chrome_main_delegate.cc(1057)] Check failed: service_manifest_data_pack_.
In a pinch, this command could be used to bundle up everything, but the “out” directory could be deleted from the resulting zip archive, and the Chromium binaries moved over to the target machine. Then the command line arguments
 --browser=exact --browser-executable=[path] can be used to launch that specific browser.
See the user guide for mb, the meta-build system, for more details.
Adding New Tests to the GPU Bots
The goal of the GPU bots is to avoid regressions in Chrome‘s rendering stack. To that end, let’s add as many tests as possible that will help catch regressions in the product. If you see a crazy bug in Chrome’s rendering which would be easy to catch with a pixel test running in Chrome and hard to catch in any of the other test harnesses, please, invest the time to add a test!
There are a couple of different ways to add new tests to the bots:
- Adding a new test to one of the existing harnesses.
- Adding an entire new test step to the bots.
Adding a new test to one of the existing test harnesses
Adding new tests to the GTest-based harnesses is straightforward and essentially requires no explanation.
As of this writing it isn‘t as easy as desired to add a new test to one of the Telemetry based harnesses. See Issue 352807. Let’s collectively work to address that issue. It would be great to reduce the number of steps on the GPU bots, or at least to avoid significantly increasing the number of steps on the bots. The WebGL conformance tests should probably remain a separate step, but some of the smaller Telemetry based tests (context_lost_tests, memory_test, etc.) should probably be combined into a single step.
If you are adding a new test to one of the existing tests (e.g., pixel_test), all you need to do is make sure that your new test runs correctly via isolates. See the documentation from the GPU bot details on adding new isolated tests for the gn args and authentication needed to upload isolates to the isolate server. Most likely the new test will be Telemetry based, and included in the telemetry_gpu_test_run isolate.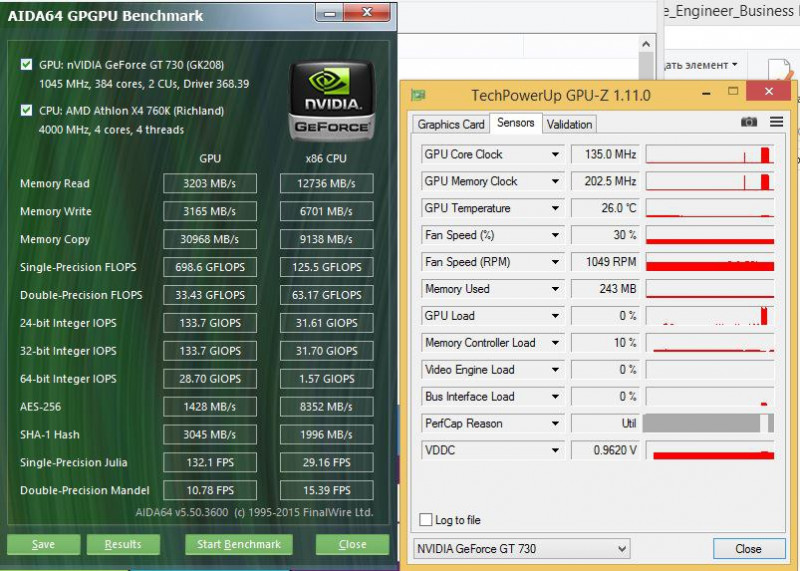
Adding new steps to the GPU Bots
The tests that are run by the GPU bots are described by a couple of JSON files in the Chromium workspace:
chromium.gpu.jsonchromium.gpu.fyi.json
These files are autogenerated by the following script:
generate_buildbot_json.py
This script is documented in testing/buildbot/README.md. The JSON files are parsed by the chromium and chromium_trybot recipes, and describe two basic types of tests:
- GTests: those which use the Googletest and Chromium’s
base/test/launcher/frameworks. - Isolated scripts: tests whose initial entry point is a Python script which follows a simple convention of command line argument parsing.
The majority of the GPU tests are however:
- Telemetry based tests: an isolated script test which is built on the Telemetry framework and which launches the entire browser.
A prerequisite of adding a new test to the bots is that that test run via isolates. Once that is done, modify
 test_suites.pyl to add the test to the appropriate set of bots. Be careful when adding large new test steps to all of the bots, because the GPU bots are a limited resource and do not currently have the capacity to absorb large new test suites. It is safer to get new tests running on the chromium.gpu.fyi waterfall first, and expand from there to the chromium.gpu waterfall (which will also make them run against every Chromium CL by virtue of the linux-rel, mac-rel, win7-rel and android-marshmallow-arm64-rel tryservers’ mirroring of the bots on this waterfall – so be careful!).
Tryjobs which add new test steps to the chromium.gpu.json file will run those new steps during the tryjob, which helps ensure that the new test won’t break once it starts running on the waterfall.
Tryjobs which modify chromium.gpu.fyi.json can be sent to the win_optional_gpu_tests_rel, mac_optional_gpu_tests_rel and linux_optional_gpu_tests_rel tryservers to help ensure that they won’t break the FYI bots.
Debugging Pixel Test Failures on the GPU Bots
If pixel tests fail on the bots, the build step will contain either one or more links titled gold_triage_link for <test name> or a single link titled Too many artifacts produced to link individually, click for links, which itself will contain links. In either case, these links will direct to Gold pages showing the image produced by the image and the approved image that most closely matches it.
Note that for the tests which programmatically check colors in certain regions of the image (tests with expected_colors fields in pixel_test_pages), there likely won’t be a closest approved image since those tests only upload data to Gold in the event of a failure.
Updating and Adding New Pixel Tests to the GPU Bots
If your CL adds a new pixel test or modifies existing ones, it’s likely that you will have to approve new images. Simply run your CL through the CQ and follow the steps outline here under the “Check if any pixel test failures are actual failures or need to be rebaselined. ” step.
If you are adding a new pixel test, it is beneficial to set the grace_period_end argument in the test‘s definition. This will allow the test to run for a period without actually failing on the waterfall bots, giving you some time to triage any additional images that show up on them. This helps prevent new tests from making the bots red because they’re producing slightly different but valid images from the ones triaged while the CL was in review. Example:
from datetime import date
...
PixelTestPage(
  'foo_pixel_test.html',
  ...
  grace_period_end=date(2020, 1, 1)
)
You should typically set the grace period to end 1-2 days after the the CL will land.
Once your CL passes the CQ, you should be mostly good to go, although you should keep an eye on the waterfall bots for a short period after your CL lands in case any configurations not covered by the CQ need to have images approved, as well. All untriaged images for your test can be found by substituting your test name into:
https://chrome-gpu-gold. skia.org/search?query=name%3D<test name>
NOTE If you have a grace period active for your test, then Gold will be told to ignore results for the test. This is so that it does not comment on unrelated CLs about untriaged images if your test is noisy. Images will still be uploaded to Gold and can be triaged, but will not show up on the main page’s untriaged image list, and you will need to enable the “Ignored” toggle at the top of the page when looking at the triage page specific to your test.
Stamping out Flakiness
It‘s critically important to aggressively investigate and eliminate the root cause of any flakiness seen on the GPU bots. The bots have been known to run reliably for days at a time, and any flaky failures that are tolerated on the bots translate directly into instability of the browser experienced by customers. Critical bugs in subsystems like WebGL, affecting high-profile products like Google Maps, have escaped notice in the past because the bots were unreliable.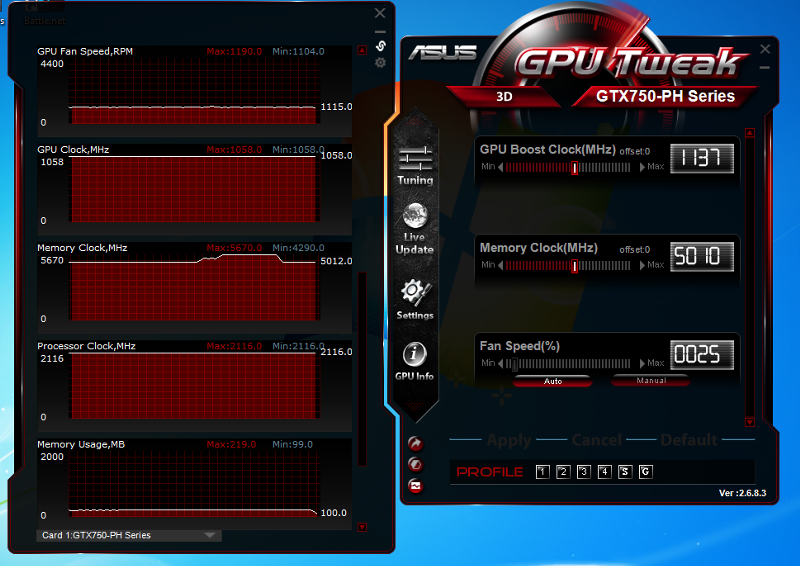 After much re-work, the GPU bots are now among the most reliable automated test machines in the Chromium project. Let’s keep them that way.
Flakiness affecting the GPU tests can come in from highly unexpected sources. Here are some examples:
- Intermittent pixel_test failures on Linux where the captured pixels were black, caused by the Display Power Management System (DPMS) kicking in. Disabled the X server’s built-in screen saver on the GPU bots in response.
- GNOME dbus-related deadlocks causing intermittent timeouts (Issue 309093 and related bugs).
- Windows Audio system changes causing intermittent assertion failures in the browser (Issue 310838).
- Enabling assertion failures in the C++ standard library on Linux causing random assertion failures (Issue 328249).
- V8 bugs causing random crashes of the Maps pixel test (V8 issues 3022, 3174).
- TLS changes causing random browser process crashes (Issue 264406).
- Isolated test execution flakiness caused by failures to reliably clean up temporary directories (Issue 340415).
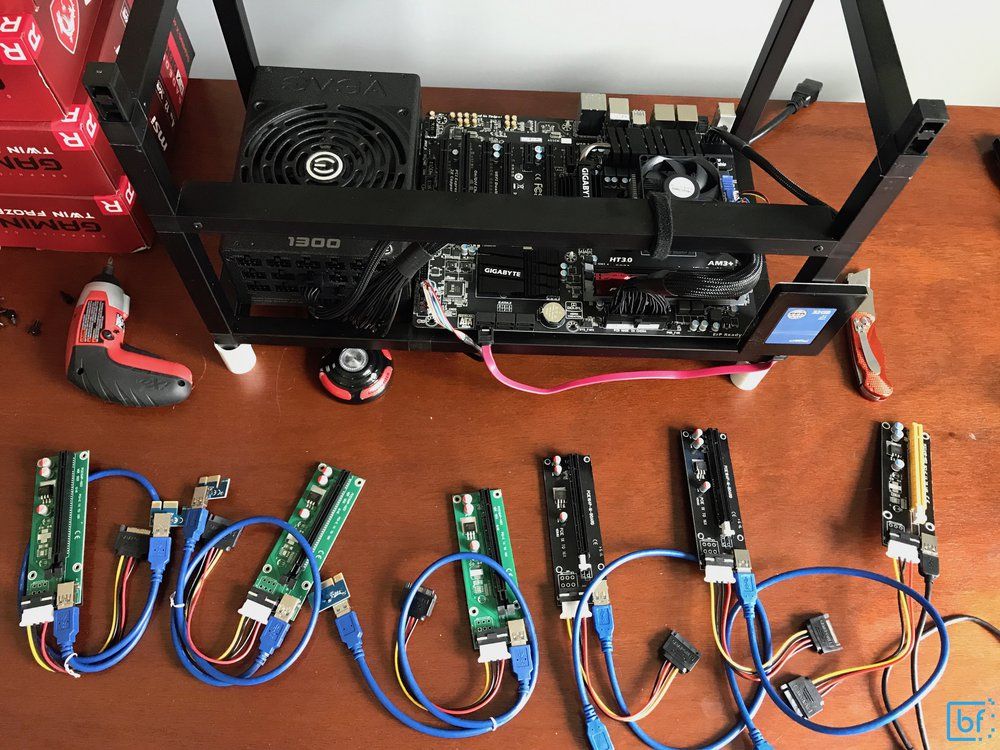
- The Telemetry-based WebGL conformance suite caught a bug in the memory allocator on Android not caught by any other bot (Issue 347919).
- context_lost test failures caused by the compositor’s retry logic (Issue 356453).
- Multiple bugs in Chromium’s support for lost contexts causing flakiness of the context_lost tests (Issue 365904).
- Maps test timeouts caused by Content Security Policy changes in Blink (Issue 395914).
- Weak pointer assertion failures in various webgl_conformance_tests caused by changes to the media pipeline (Issue 399417).
- A change to a default WebSocket timeout in Telemetry causing intermittent failures to run all WebGL conformance tests on the Mac bots (Issue 403981).
- Chrome leaking suspended sub-processes on Windows, apparently a preexisting race condition that suddenly showed up (Issue 424024).
- Changes to Chrome’s cross-context synchronization primitives causing the wrong tiles to be rendered (Issue 584381).
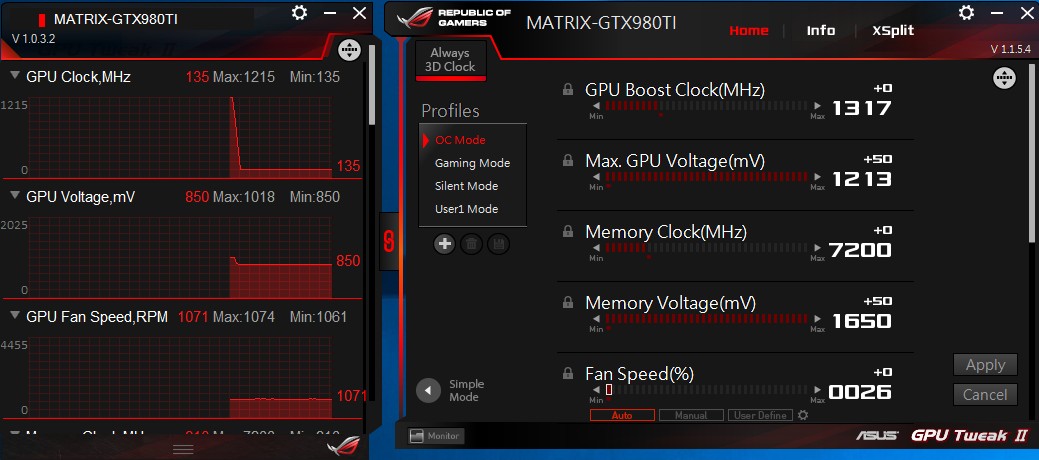
- A bug in V8’s handling of array literals causing flaky failures of texture-related WebGL 2.0 tests (Issue 606021).
- Assertion failures in sync point management related to lost contexts that exposed a real correctness bug (Issue 606112).
- A bug in glibc‘s
sem_post/sem_waitprimitives breaking V8’s parallel garbage collection (Issue 609249). - A change to Blink’s memory purging primitive which caused intermittent timeouts of WebGL conformance tests on all platforms (Issue 840988).
- Screen DPI being inconsistent across seemingly identical Linux machines, causing the Maps pixel test to flakily produce incorrectly sized images (Issue 1091410).
If you notice flaky test failures either on the GPU waterfalls or try servers, please file bugs right away with the component Internals>GPU>Testing and include links to the failing builds and copies of the logs, since the logs expire after a few days. GPU pixel wranglers should give the highest priority to eliminating flakiness on the tree.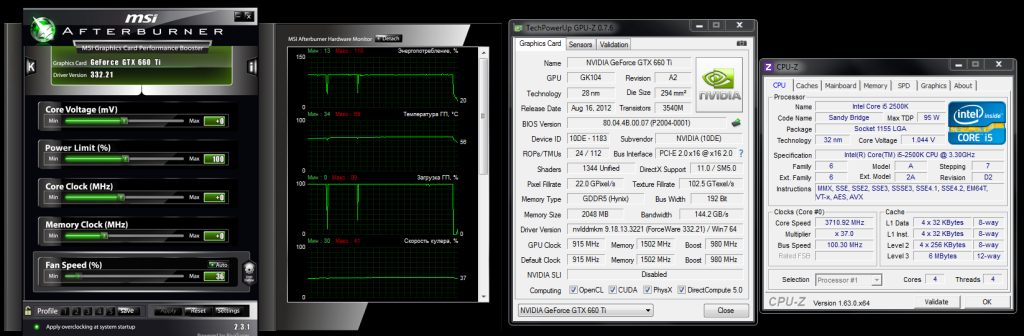
Top 10 Free Software to Test Your Computer
How to identify the components inside the computer and view their parameters? How to check the processor or video card for performance and the absence of overheating? It is enough to use program for testing and diagnostics .
The free applications presented by us allow you to determine the performance of components, operating temperature or fan speeds, as well as identify computer instability during prolonged use and under high load. Monitoring the operation of equipment and knowing its condition allows you to predict possible malfunctions. The capabilities of various programs can be combined, for example, by simultaneously checking the processor performance in the Cinebench test and the clock speed during the test using CPU-Z.
3D Mark — test video card
The most popular program to test the performance of video cards in 3D graphics and the ability of processors in the field of creating physical effects, that is, in other words, readiness for games.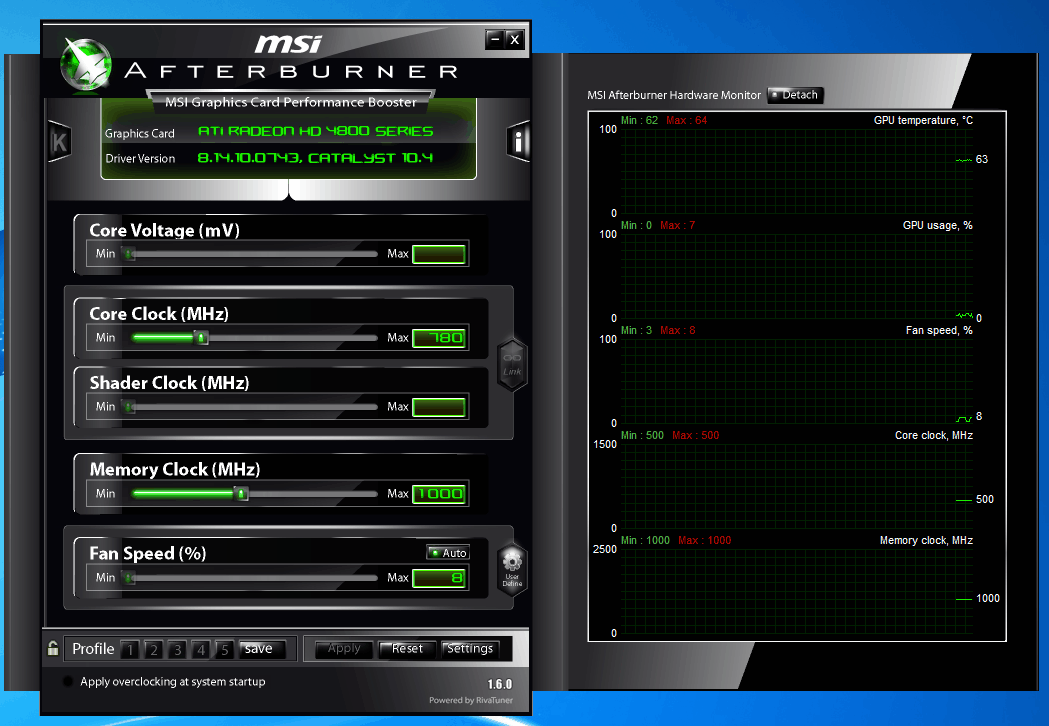 The results obtained can be easily compared with other machines.
3D Mark offers a variety of tests, including support for DirectX 12 and DirectX 11. The program also has a stress test. Only the Basic version is free.
Link to the program
Alternative programs : Catzilla, Unigine Superposition, Unigine Heaven, 3D Mark 11
PC Mark 10 — computer performance test
PCMark is, in turn, a popular tool for checking the overall performance of a computer. The tests include, among others, applications such as work in office sheets, 2D graphics operations, web browsing, and video conferencing.
In the latest version, however, the media test (SSD or HDD) has been dropped. Only the Basic version is free.
Download software
Alternative programs : PCMark 8, SysMark
VR MARK — virtual reality performance
If you want to check how your computer handles the task of virtual reality and serves games designed for Oculus Rift or HTC Vive glasses , You will need VR Mark.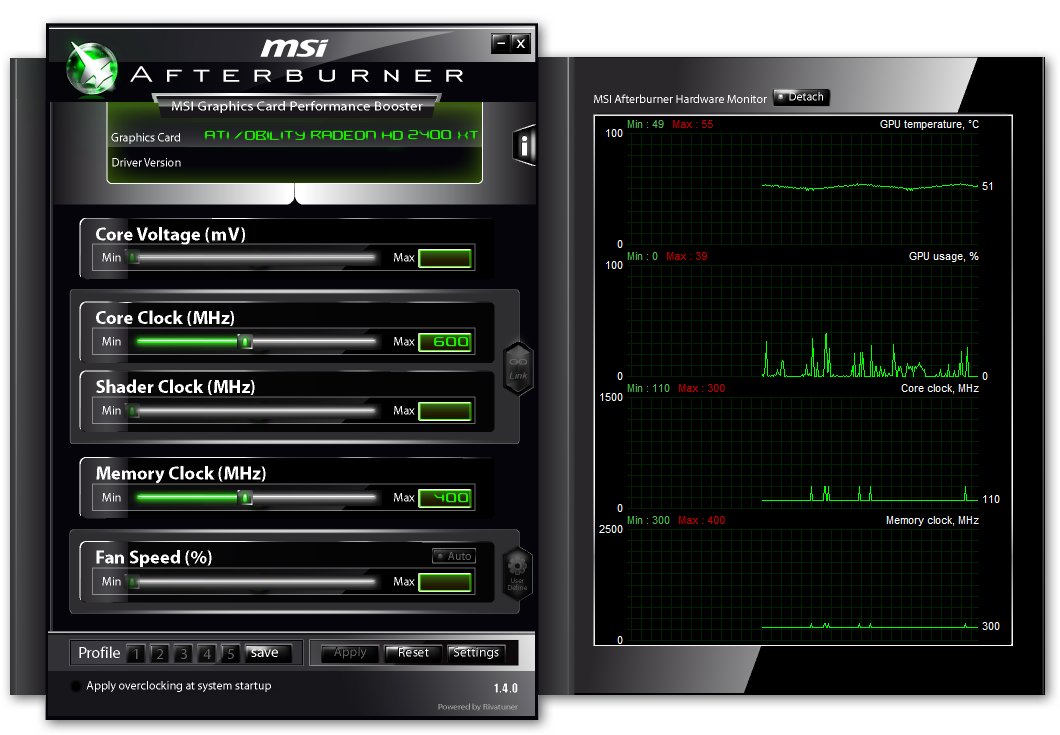 As with other Futuremark software, only the Basic version is free.
The tool is equipped with three tests, of which one is basic (Orange), for VR games using DirectX 12 (Cyan) and the most demanding ones (Blue).
Naturally, VR glasses are not necessary for the test — it’s only about checking the performance of your computer before buying such equipment.
Download software
Alternative software : SteamVR Performance Test
CPU-Z — for hardware identification
The main and most popular program for identifying processors, motherboards (including UEFI BIOS versions), memory (including SPD) or graphics cards. We get an accurate preview of the hardware data.
You can also test the processor in mono- and multi-threaded applications and compare the results with other processors in the database. If you want to know exactly what is on your computer and how it works, this is the first application you should install.
Thanks to CPU-Z, you can easily check, for example, the frequency and delays of the RAM, as well as the processor clock speed in real time. It is worth noting the fact that an Android version is available.
Download program
Alternative programs : Crystal CPU ID, Speccy
GPU-Z — to evaluate the video card
GPU-Z is the main program for determining video cards and their characteristics, including their current frequency. A basic test is available in the application, which allows you to «quickly» make sure that the video card is working correctly.
It should be noted, however, that the test in this program will not give confidence that, for example, during overclocking, the video card will work completely stably. For this, it is worth using more advanced products, for example, a stress test in the 3D-Mark program.
Download software
Alternative software : GPU Caps Viewer
Cinebench R15 — CPU performance tester
Cinebench is a benchmark tool based on the Cinema 4D engine to test CPU performance.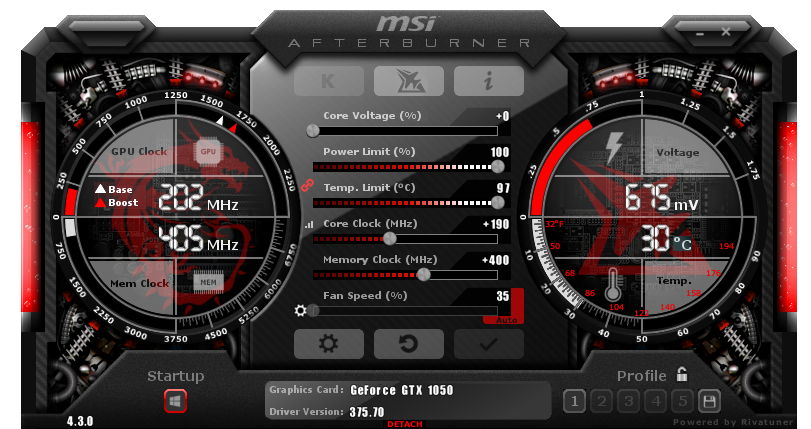 It does this by creating a 3D scene — the test can be run using all CPU threads or just one thread. This gives a good idea of the capabilities of the processors.
Cinebench also has a built-in graphics card benchmark that uses a complex 3D scene that, using the car chase example (by renderbaron), measures the performance of the graphics card in OpenGL mode.
Download software
Alternative programs : LuxMark (3D graphics rendering with CPU or GPU), CompuBench (3D graphics rendering with GPU)
OCCT 4.5.1 — stability and temperature test
An excellent program for checking the stability and temperatures of the computer through the maximum load of the processor or video card. OCCT creates automatic charts recording temperature, frequency, and node voltages during a test.
Note — if the power supply or another component in your computer is faulty, but still works, then the maximum load through OCCT can damage it, more precisely, the program will accelerate the failure (because the component was already faulty)!
Download software
Alternative software : FurMark, Prime95 or for temperature monitoring SpeedFan, RealTemp and CoreTemp.
MemTest86 — evaluation of computer memory
MemTest86 is an excellent program for checking the correct operation of RAM. This is one of those components whose stable operation is very important for the performance of a computer.
The program runs from a bootable flash drive (or CD/DVD if someone else is using them).
Download program
Alternative program : Prime95
Prime95 — stability or temperature test under load
Another great program for testing the stability or temperatures of computer components under high load. We can choose between tests that load the most, for example, RAM or CPU.
The
Prime95 is very popular among overclockers because it is ideal for testing the stability of overclocked components.
Download program
Alternative programs : OCCT, MemTest86
CrystalDiskMark — for testing storage media
then the favorite would be CrystalDiskMark. It allows you to check the performance of media, both in the case of reading / writing serial data, and for small files.
It gives a good indication of the actual performance of the node under test. If you are interested not only in performance (but, for example, also in SMART readings, the ability to download new firmware or perform Secure Erase operations), you should take an interest in the applications that come with manufacturers’ drives. For example, in the case of SanDisk, the SanDisk SSD Dashboard is available, and Samsung is Samsung Magician.
Download software
Alternative software : AS, AS SSD, manufacturer software included
How to test an nvidia video card — Build-Upgrade
When overclocking a video card, it is very important to know whether the adapter works stably with such parameters as the temperature of the chip at maximum load and whether overclocking brought the desired results. Since most overclocking programs do not have their own benchmark, you have to use additional software.
In this article, we will consider several programs for testing the performance of video cards.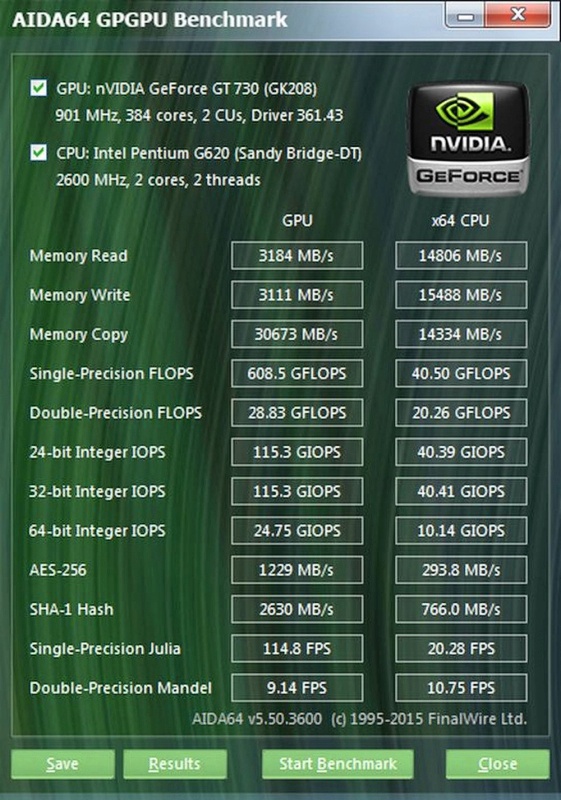
FurMark
FurMark is perhaps the most famous program for stress testing the computer graphics subsystem. It includes several benchmarking modes, and is also capable of displaying information about the video card using the built-in GPU Shark utility.
PhysX FluidMark
Geeks3D developers, besides Furmark, also released this software. PhysX FluidMark is different in that it tests the performance of the system when rendering the physics of objects. This makes it possible to evaluate the power of the combination of the processor and the video card as a whole.
This is another stress test program. The software contains scripts for testing the central and graphic processors, as well as a combined system stability check.
Video Memory Stress Test
Video Memory Stress Test is a small portable program for detecting errors and failures in video memory. It is distinguished by the fact that it incorporates a bootable distribution kit for testing without the need to start the operating system.
3DMark
3DMark is a large set of benchmarks for systems of different capacities. The program allows you to determine the performance of your computer in a number of tests for both the video card and the CPU. All results are entered into an online database and are available for comparison and analysis.
Unigine Heaven
Surely, many of you have seen videos that featured a scene with a «flying ship». These are pictures from the Unigine Heaven benchmark. The program is based on the original Unigine engine and tests the graphics system for performance in a variety of conditions.
Passmark Performance Test
This software is fundamentally different from everything described above. Passmark Performance Test — a collection of tests for the processor, graphics adapter, RAM and hard drive. The program allows you to conduct both a full check of the system and test one of the nodes. All basic scenarios are also divided into smaller, narrowly focused ones.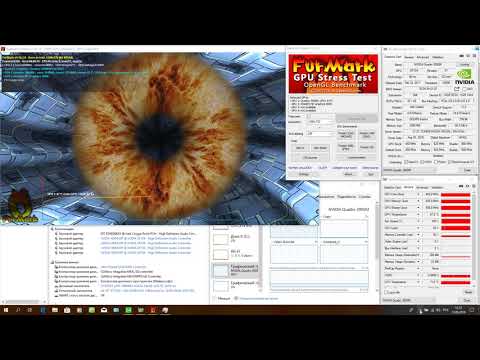
SiSoftware Sandra
SiSoftware Sandra is another combo software that consists of many utilities for testing and obtaining information about hardware and software. For the video card, there are tests of rendering speed, media transcoding and video memory performance.
EVEREST Ultimate Edition
Everest is a program designed to display information about the computer — the motherboard and processor, video card, drivers and devices, as well as the readings of various sensors — temperature, main voltages, fan speeds.
EVEREST, among other things, includes several tests to check the stability of the main PC components — processor, video card, RAM and power supply.
Video Tester
This little program is at the end of our list because of the obsolescence of the method by which testing is carried out. Video Tester uses the DirectX 8 API in its work, which does not allow you to fully evaluate the performance of new video cards. However, the program is quite suitable for old graphics accelerators.
We have reviewed 10 programs that can check video cards. Conventionally, they can be divided into three groups — benchmarks that evaluate performance, software for stress loading and stability testing, as well as complex programs that include many modules and utilities.
When choosing a tester, you should be guided primarily by the assigned tasks. If you need to identify errors and find out if the system is stable with current parameters, then pay attention to OCCT, FurMark, PhysX Flu >
Thank the author, share the article on social networks.
If heavy games are often played on the computer that use all the resources of the device, but from time to time dots appear on the screen, the overlay of a red background or any other, the image begins to twitch or slow down, then most likely the video card is in danger of failure soon.
Software and visual signs
The first thing to look for when the video adapter fails is the presence of various artifacts on the monitor. As described above, artifacts can appear as dots, twitches, the presence of squares of a different color, or half of the monitor screen changes color, and then returns to the original colors. To try to get rid of such symptoms, you need to inspect the cooler, whether it spins or not, clean the radiator, update the drivers. Check if the capacitors are swollen, if they are swollen, unsolder and replace. If all else fails, you should try to warm up the processor of the video card, as there is a possibility of it moving away from the board.
If you experience ghosting or distortion while playing, your GPU or video controller may be near failure. You should check the video card on another computer, and also test the cable connection . Perhaps they are not closely pressed to the interface.
If the image does not appear on the screen, but the computer is already running, and the monitor has nothing to do with it, the video card is most likely burned out. However, don’t throw it away right away. Required clean contacts interface with an eraser, try to turn it on on another computer.
The BIOS will also emit certain signals when turned on if the video card is faulty. Usually these are eight short beeps.
If you buy a used video card you should pay attention to the price. No one will sell a good card cheaply, even if it was used.
Before buying, you must use special programs and check it immediately on the spot. In order not to pay for repairs or not to buy a new one. How to do this will be described below.
Using Windows tools
First, you need to check for driver availability using Windows tools. To do this, right-click on « My Computer » and select the «Device Manager» menu.
Click on it with the left mouse button, in the window you need to find the item « Video adapters » and click on it.
If the brand of the installed card is displayed in the list, then the driver is installed.
To find out more about the video adapter, it is recommended to use utility DxDiag . To open it in the «start» button, find the search and type the name of the program (dxdiag). In the list that appears, click on it, and it will open. This is a built-in utility for checking the video card for serviceability, so it does not require installation.
Immediately after startup, the adapter is checked for various errors and problems. The utility shows normal, non-critical failures that are detected during the operation of the adapter.
Checking the load
In order to check the performance of the video card under load, it is recommended to start the game and enable the GPU Z utility.
The program is automatically downloaded with *.exe extension. We click on it LMB twice and the application starts.
Here displays the temperature of the GPU, cooler rotation speed and other parameters of the adapter.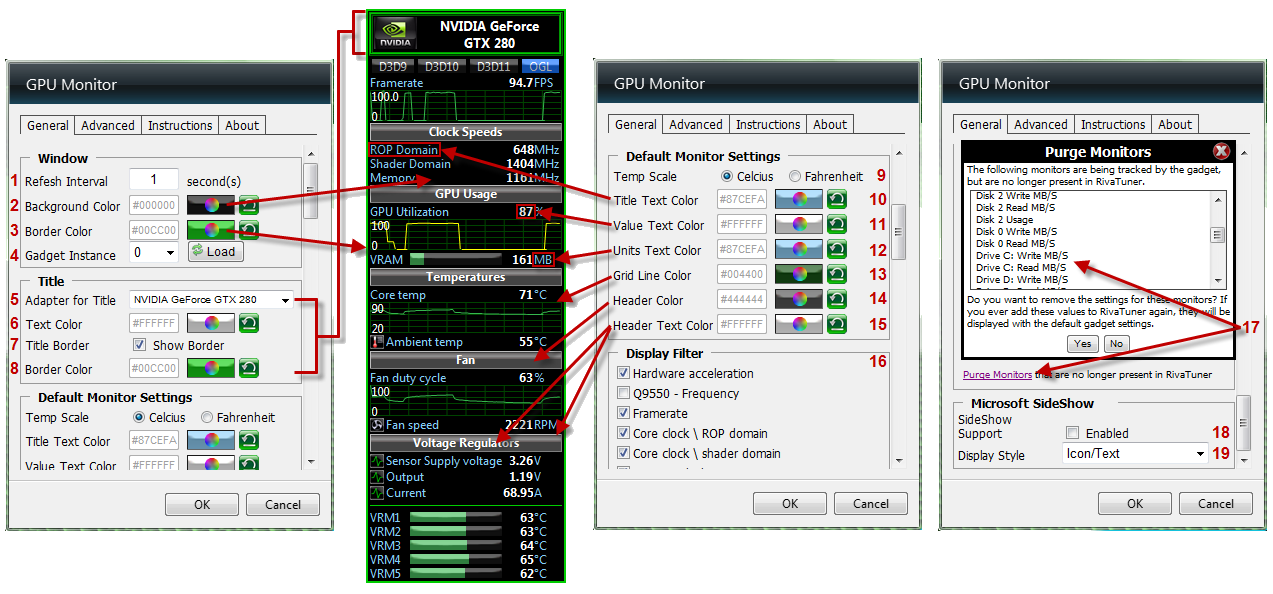 When you turn on the game, you need to play it for 5-10 minutes, minimize the game screen window using the Alt + Tab buttons and see how the temperature values \u200b\u200bhave changed. If it rises slightly, then everything is fine. If the temperature exceeds 80 degrees, then this indicates a problem with cooling. The thermal paste between the heatsink and the GPU has probably dried up.
Programs for checking the video card for performance
There are specialized utilities for checking the video adapter on Windows 7, 8, 10 computers or laptops. They allow you to perform a load test of the video card and identify problematic points.
Furmark
A popular utility for checking video cards. It is also called the «hairy donut», since the diagnosis takes place with a similar image on the screen. After you download Furmark, you need to install and run it. To do this, double-click on the downloaded program file, agree to the terms and license and click the «Next» button.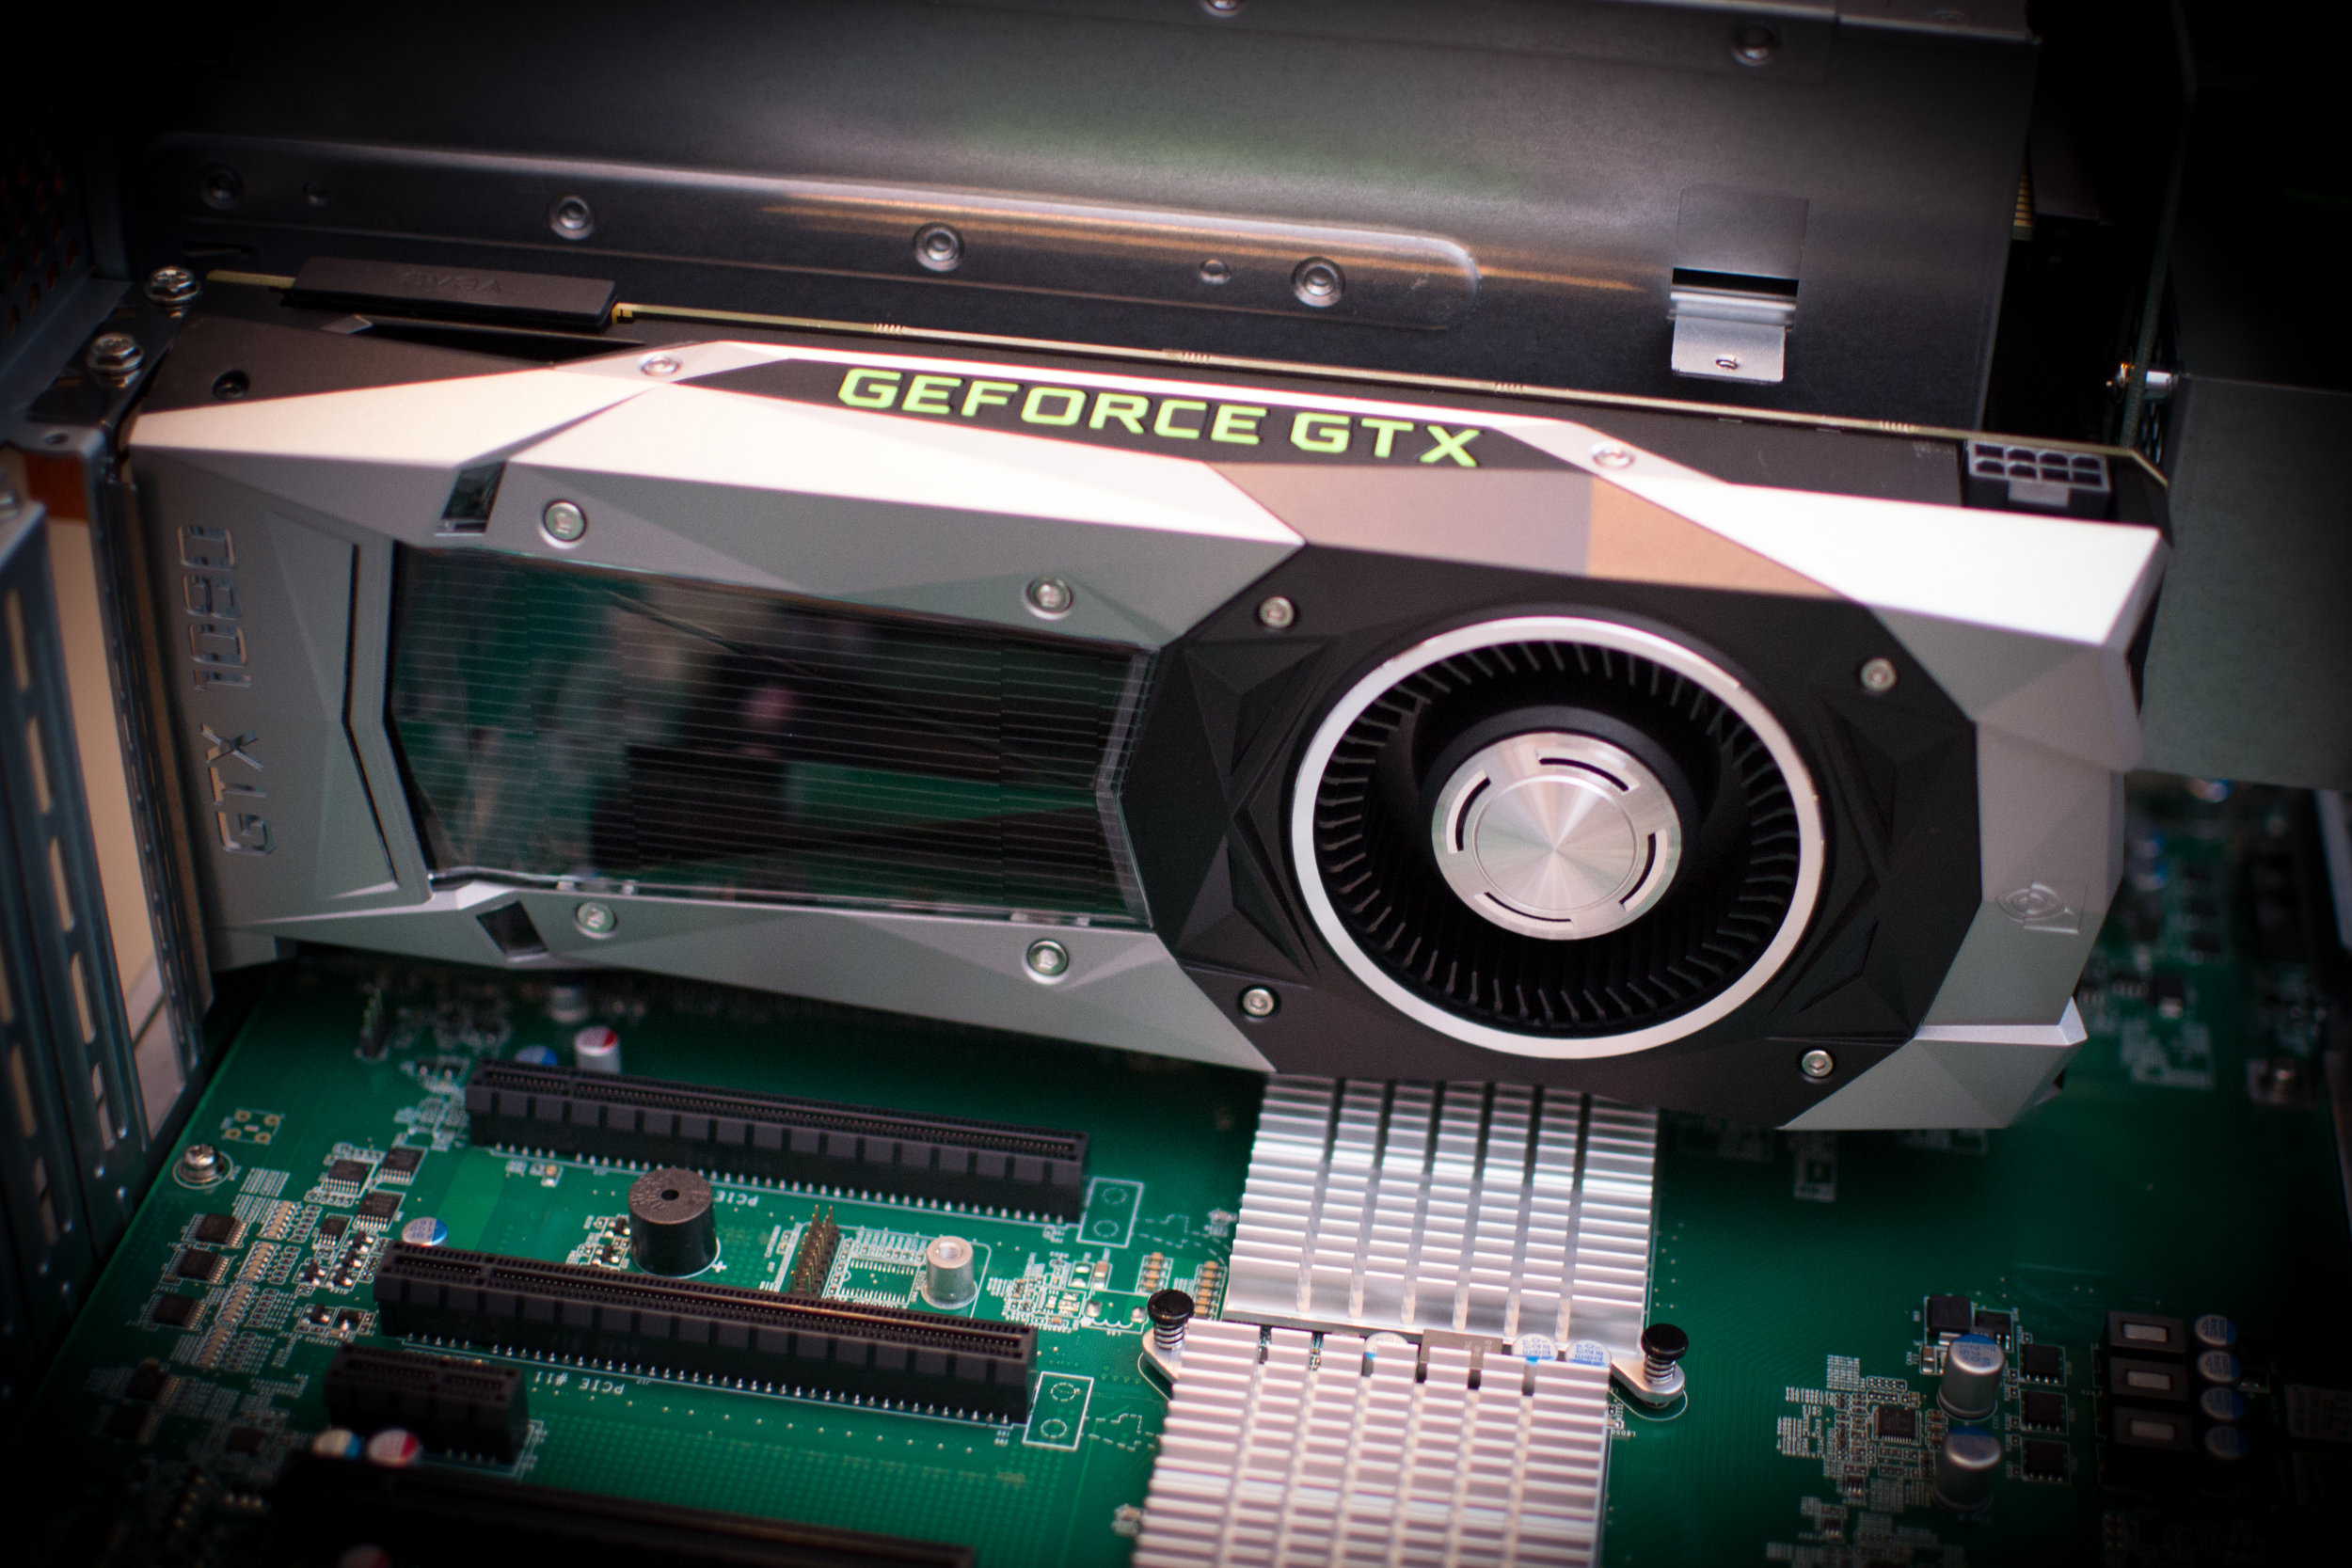
Application installed. Go to menu « Settings » or settings. You can specify the permission in it.
In the settings, set the items that are shown in the figure, except for «Xtreme burn in». This setting can bring the card out of the standing position, since the test will take place at maximum loads.
Click the « Burn in Test » button.
The utility will display a warning that the load will be large, which may cause the system to become unstable or even turn off the computer. However, we do not pay attention to this and click the «Go» button.
So, the process has begun.
Temperature may rise too high as a result of testing. Therefore, it is not recommended to test for more than 20 minutes. The utility immediately loads and tests the GPU, which dramatically raises the temperature. Testing with this program is not comparable even with the most powerful game.
If the adapter is OK, the temperature will begin to equalize after two or three minutes of utility operation. If the video card is faulty, then the temperature will rise above 100 degrees, the image will be hang or disconnect .
With this behavior of the computer, you should check the cooler and heatsink of the card. If they are clean, dust-free and the cooler spins freely, then it is recommended to unscrew the heatsink and check the thermal paste on the chip. It may have dried out and needs to be replaced. If the user does not know how to do any of the above, it is better to contact the workshop.
Stress test Aida 64
The next program to test the video card for a malfunction will be Aida 64.
After downloading, you need to install it in the same way as in the Furmark installation instructions. Click on the file with *.exe extension. Agree with the terms, click on the «Next» button. Now open the utility and go to the «Service» tab and go to the item » Test GPGPU «.
Run it, select your device and click on the button » Start Benchmark «.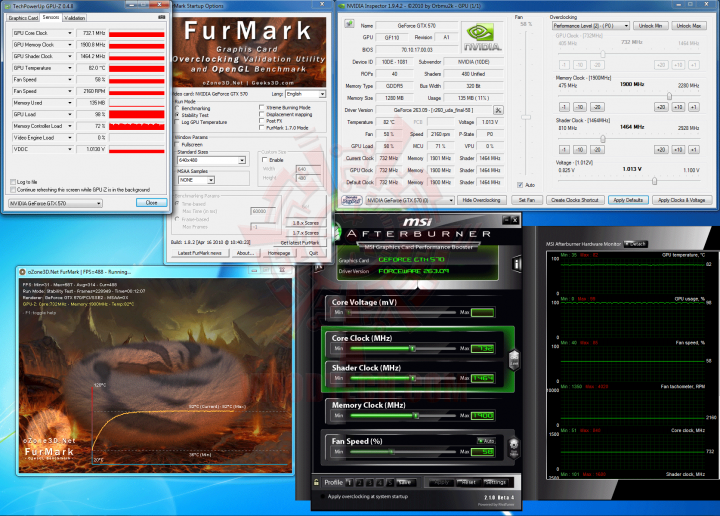
In addition, you can stress test the video adapter. To do this, again go to the «Service» tab, click on « System Stability Test » and select «Stress GPU».
At critical temperatures, a warning will be displayed and the graph bar will be red, and the system may reboot itself. If everything is fine with the video card, no failures will occur.
Using the Ati Tool
Despite the name, this utility can also check Nvidia video adapters. After you download Ati Tool, install it and run it.
This window will open.
Display temperature and frequency at which the adapter operates. The frequency can be changed with the sliders, but this should not be done without proper knowledge.
If you click on «Show 3D» you can see the number of FPS.
The program should test the video card for ten minutes. During this time, keep an eye on the temperature. If it exceeds 85 degrees, then stop the test immediately .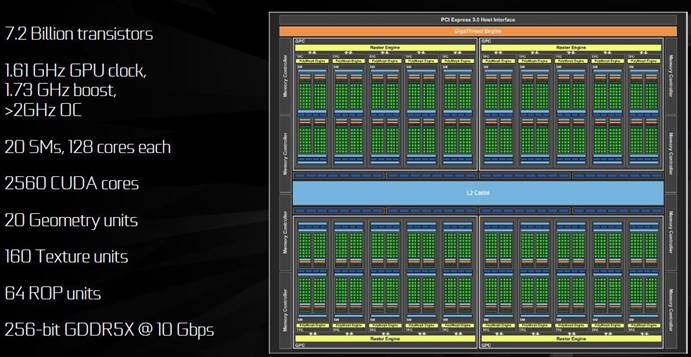 This means that your adapter is damaged.
If a lot of yellow dots appear in the 3D window, the card is also defective. Recommended to replace the thermal paste. If after that nothing has changed in the work, then it is better to buy a new one.
3DMark
You can download 3DMark from the official site.
The procedure is standard, the application is installed on the computer and diagnostics is started by clicking on the button “ Run 3 D Mark ”. After checking, the test result will be displayed. Information about the processor, texture filtering, memory, the operating frequency of the video adapter and much more will be provided.
OCCT can not be installed, but simply unpacked from the archive to the desktop and run.
The utility has a set of tabs for diagnostics under stress conditions, for testing the stability of a video card, and testing batteries. It is not recommended to use this utility to test a damaged video card on a laptop or computer, as the adapter may fail.
Is it possible to check the video card online
In fact, it will not work to check the video card for stress resistance online. It is not so much the stability of the connection that plays a role here, but the restrictions on the operation of applications from the browser with computer components. But whether this or that toy is suitable for your video card is possible.
To do this, go to the official NVidia website and click on the tab « Find out if your computer is ready for new games «. All details about the video adapter will be displayed.
For a more in-depth check, it is best to use the above programs.
What is the first thing to do after you have bought and installed a new video card in your computer? Of course, get to know her better.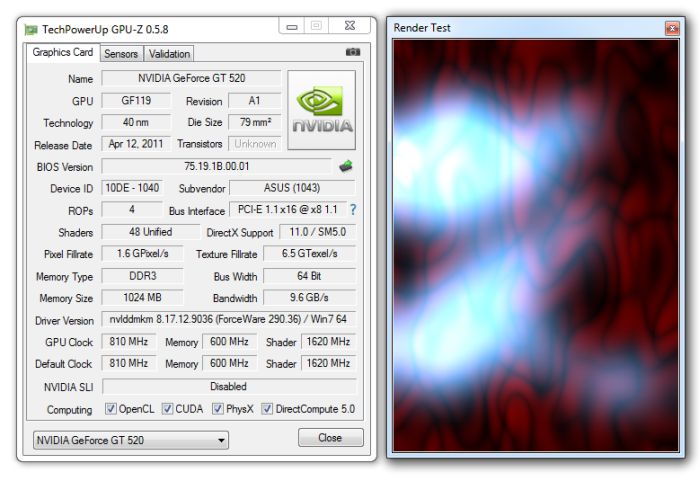 Find out what it really is, what kind of load it can pull and how it will behave in games. Or maybe you just want to know what state your card is in: is it in good condition, is it overheated, can it be overclocked … These and other properties of video cards are easy to determine at home using special testing programs. Today we’ll talk about how to test a video card for performance and stability, how to identify problems, and in general how to get the most information about the video subsystem of your computer.
Maximum useful information
Before proceeding with load tests, it would be nice to study the characteristics of the card. The free GPU-Z utility will help you get quite complete and detailed information about it. It displays almost everything that is important for the owner to know about his electronic «pet».
The main tab of the GPU-Z window shows:
- Name — under what name the card is defined in the current operating system.
- GPU is the code name for the graphics chip of a video card.

- Revision — GPU revision (NVIDIA only).
- Technology — technological process.
- Die size — core area.
- Release date — GPU release date.
- Transistors — the number of transistors in the chip.
- BIOS version — video BIOS version.
- Subvendor is the manufacturer of the final product (in our example, NVIDIA is the processor manufacturer, Gigabyte is the video card manufacturer).
- Device ID — identifiers of the GPU and chip manufacturer.
- ROPs/TMUs — number of rasterization/texturing units.
- Bus interface — PCI-e bus interface.
- Shaders — the number and type of pipelined (shader) processors.
- DirectX Support — Supported version of DirectX.
- Pixel Fillrate — pixel rendering speed.
- Memory type and bus width — video memory type and bus width for data exchange between memory and GPU.
- Memory size and Bandwidt — the amount of video memory and bus bandwidth.
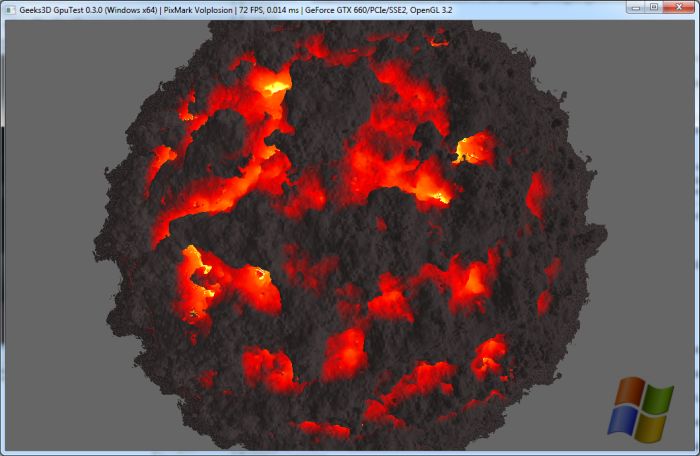
- Driver version — video driver version and operating system.
- GPU clock and memory — current system bus and memory clock speed.
- Default clock — the same without overclocking.
- Multi GPU (SLI/Crossfire) — support and use of video collaboration technologies.
- Computing — support for computing technologies.
The «Lookup» button will take you to the GPU-Z developer’s site, more precisely, to the description and comparison page of your video card.
The second tab of GPU-Z — Sensors, takes sensor readings.
By default, it displays the current GPU and memory clock speeds, GPU temperature, cooling system fan speed, GPU and memory controller usage, load on the data bus, GPU supply voltage, and reasons for its current performance degradation. If desired, you can change the setting so that the program displays not the real, but the maximum, minimum or average indicators of the sensors, and also enable the logging file.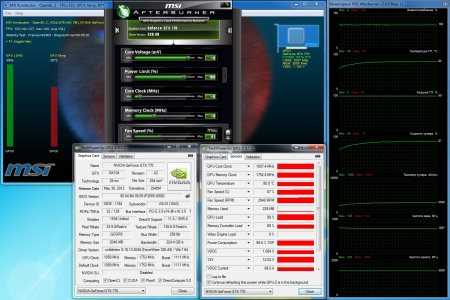
Information similar to GPU-Z is provided by many other programs that analyze hardware devices, for example, the free HWiNFO utility and the paid Aida64. By the way, the latter allows not only to obtain information about the equipment, but also to test it. For a video card, Aida has a GPGPU benchmark and a load test to check for stability. However, the tests will be discussed further.
3D Mark Performance Benchmark
Having determined the characteristics of a video card, you probably want to know what it can do in comparison with others. A classic of the genre will help satisfy curiosity — a set of synthetic tests for video of any 3D Mark models.
3D Mark is good because it allows you to check the performance of the entire structure of the computer’s video subsystem. By the way, its latest (12) version includes a new DirectX 12 health check module.
The program is available in several editions, one of which is free. It includes the same set of tests as the main ones — paid ones, but the user is deprived of the opportunity to change their settings and run them separately. The results in the free edition are evaluated not in the application, but online on the developer’s website (Futuremark).
Paid license holders are spared this inconvenience. However, the most budget version of 3D Mark today costs about $30, and you will have to spend about $10 to upgrade one of the previous ones. With constant use of the program, this is justified, but for a one-two-time launch, for example, before and after overclocking the video card, you can get by with the free version.
By the way, with 3D Mark you will not only know the true performance of your video card, but also check it for overheating and hidden defects. If flickering, ripples, loss of textures, twitching of the picture appear during the test, you should determine the temperature of the graphics chip, processor and other PC components. If it clearly tends to the maximum, stop testing and ensure that the devices are properly cooled. Insufficient heat dissipation can also cause the computer to shut down during a 3D Mark run.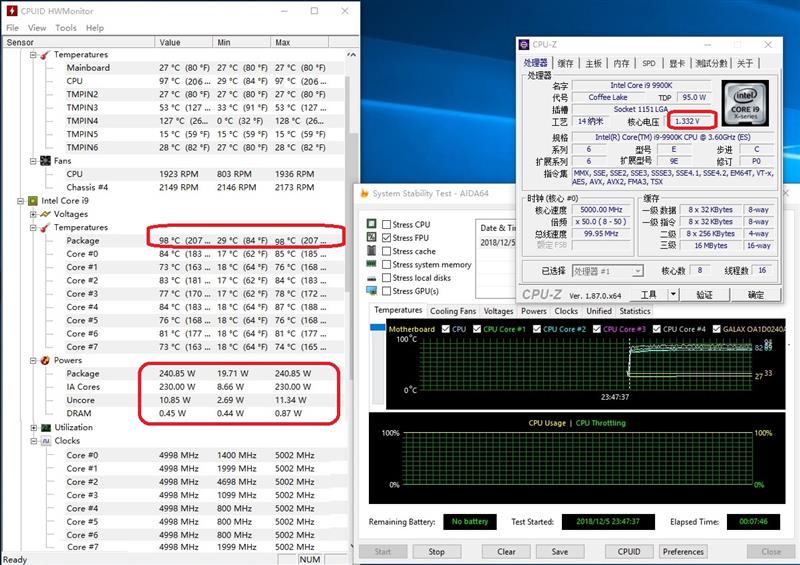 It is better not to allow this, because the hard drive may suffer from a sudden power outage.
If the appearance of artifacts is not accompanied by excessively high temperatures or other problems occur — blue screens of death (BSoD), freezes, loss of signal to the monitor, etc., you can suspect a hardware malfunction of the video system components. First of all — a graphics chip, video memory, elements in the circuits for forming the supply voltages of these nodes or the power supply itself. In the most favorable cases, this turns out to be a video driver error.
Stress stability test
Stress or load testing of a video card (as well as other devices) is carried out in order to identify errors in its operation. Based on the results of passing the test, they judge the stability of the system as a whole and make predictions about how the device will behave at a load close to the maximum.
Unlike benchmarks, stress testing is carried out for a short time, always under visual control and only after making sure that the cooling system is sufficiently efficient. The one who conducts it must be aware that this procedure can lead to damage to devices if they have hidden defects.
Consider several programs that can be used to stress test a video card. Let’s start with the one already mentioned.
Aida64 system stability test
Aida64 system stability test is launched from the Tools menu of the main application window. The window in which the type of testing is set and graphs of frequencies, temperatures, voltages, currents and other monitored parameters are displayed looks like this:
Here, as we see, there is a lot of superfluous. To remove unnecessary information from the screen, click the «Preferences» button and enable only what concerns the GPU in the settings.
After setting, return to the main window, check the box next to «Stress GPU(s)», click «Start» and observe the changes.
The program records only the start and stop times, you have to keep track of the rest. Clicking «Save» allows you to take screenshots at selected moments, there is no logging option here.
The main indicator that is important to monitor is the temperature of the video processor. Monitor cooling fan speed, CPU temperature, and more as needed. As for the duration of the stress test, usually 30 minutes is enough for it.
If during the test the system behavior is stable, and the temperature does not go beyond the norm (individual standards for NVIDIA and ATI Radeon (AMD) chips can be found on the manufacturers’ websites), the test is considered passed.
Furmark
Another popular benchmarking and error checking tool is called Furmark. The application is compatible with video cards of any models that support OpenGl and is distributed under a free license.
Furmark main window looks like this:
The green frame circles the main test settings: switching to full screen mode (Fullscreen), screen resolution (Resolution) and smoothing (Anti-aliasing).
In the purple frame are buttons for calling several built-in utilities.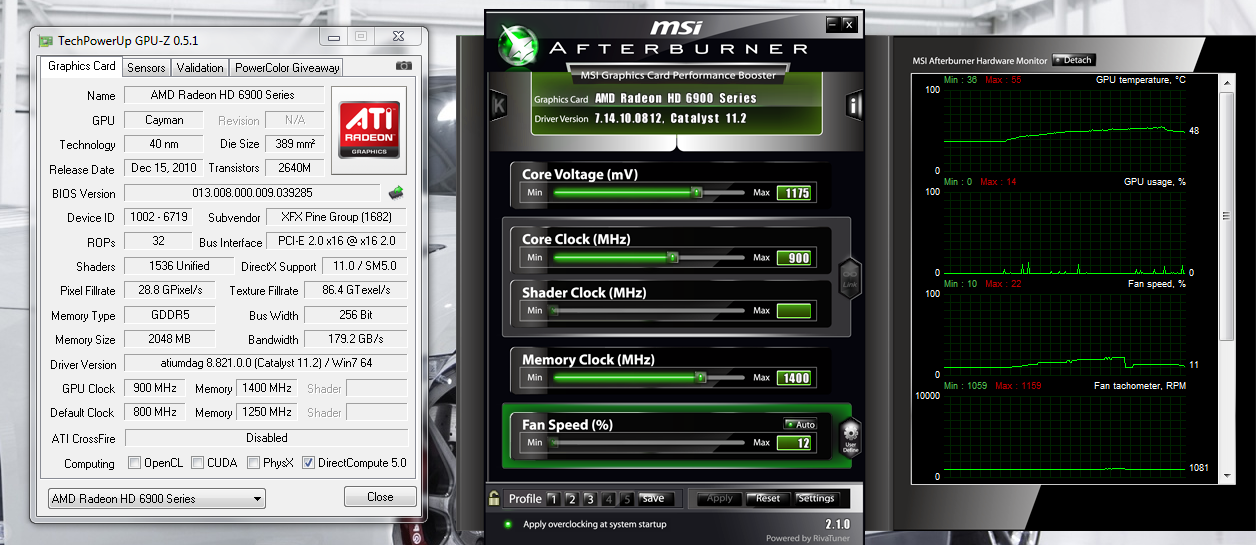 You are already familiar with GPU-Z, GPU Shrank also displays information about the video card, and CPU burner runs a small processor test.
Buttons for launching the GPU stress test and detailed settings (Settings) are highlighted in red.
Inside the orange frame are presets for GPU benchmarks with different resolution levels.
Before testing, you must specify the resolution of your monitor in the Resolution field. It is also desirable to check the box Fullscreen (full screen mode). Anti-aliasing is optional: some artifacts are more visible when it is disabled or set to a minimum.
In Settings it is important to specify the temperature of the graphics chip (GPU temperature alarm), at which the program should beep to prevent the computer from overheating. Optimally — 15-20 ° C below the maximum threshold.
In the Benchmark duration field, set the duration of the test in milliseconds. The checkbox next to the Log GPU data item activates the check log option.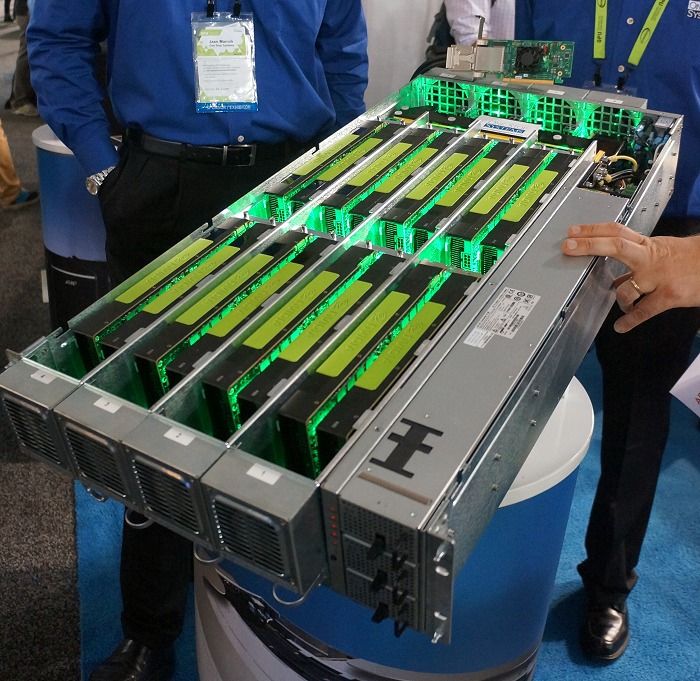
For maximum load on the video card during stress testing, check the Xtreme burn-in option in the «3D test option» section.
To start the test, return to the main window and click the appropriate button.
During the test, the screen will display a «hairy donut» and the main indicators of the computer’s condition. Artifacts, loss of signal to the monitor, and other symptoms of instability indicate a failure of the test.
To stop Furmark testing in an emergency and return to the desktop, just press the Escape key.
OCCT GPU:3D
The OCCT program is another popular free tool for evaluating the performance and checking the health of the main components of the computer, including the video card.
Using this program is no more difficult than the others. Video testing parameters are set in the main window — in the GPU:3D section.
- Check type — infinite or time limited (auto).
- Duration.
- Periods of inactivity at the beginning and end of the test.
- DirectX version.
- Screen resolution.
- Shader complexity (the higher, the more heat).
- FPS limiter (frames per second).
- Advanced: Full screen mode and limiting memory usage.
Monitoring and limiting options are configured in the section hidden behind the gear button. Instead of «Disabled» which means «not defined», set the options you need.
In OCCT GPU:3D, as in other stress testing utilities, the most important thing is to control the GPU temperature.
Press the green ON button to start the test.
In the first minutes, changes in indicators are displayed on graphs in the «Monitoring» window.
Next, a furry donut will appear on the screen, as in Furmark. Temperatures, FPS and so on will be displayed in a separate area in the left corner.
The appearance of something similar to artifacts and other problems indicate a failure of the test.
OCCT runs an error counter by default and saves test results as graphs in a separate folder. With their help, it is easy to determine what state the system was in when the failure occurred.
Just like in Furmark, just press Escape to abort the test.
Programs for testing video cards
When overclocking a video card, it is very important to know whether the adapter works stably with such parameters as the temperature of the chip at maximum load and whether overclocking brought the desired results. Since most overclocking programs do not have their own benchmark, you have to use additional software.
In this article, we will consider several programs for testing the performance of video cards.
Video Memory Stress Test
Video Memory Stress Test is a small portable program for detecting errors and failures in video memory. It is distinguished by the fact that it incorporates a bootable distribution kit for testing without the need to start the operating system.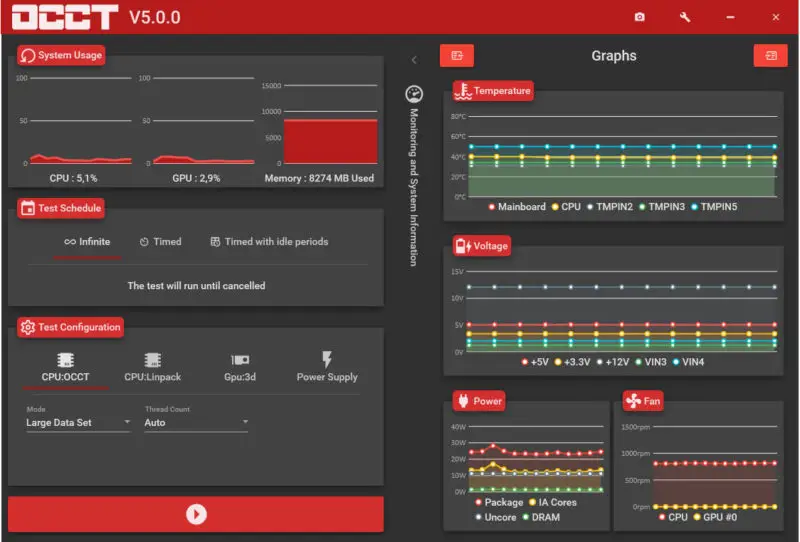
Checking video cards 3DMark
3DMark is one of the most popular stationary programs for conducting a detailed test of the capabilities of your video card. Many of the results of video card checks that you find on the net are made with the help of this program.
The program exists in several variations, has versions for different operating systems (Windows, Android, iOS), there is also a version of the program specifically for DirectX 11.0.
- Consider the basic version of the program for Windows OS.
- Download the product by clicking on «Download now» next to the version of «Basic Edition», unpack the archive, install and run this program.
- After the launch, the «Sky Diver» test for gaming and medium PCs is available to us (other tests are paid, and are available in the full version of the product).
- To activate it, click on «Start».
- The test will last a few minutes, including a demonstration of various graphic effects on the screen, and at the end of the test you will see the result with a certain number of points scored by your system.
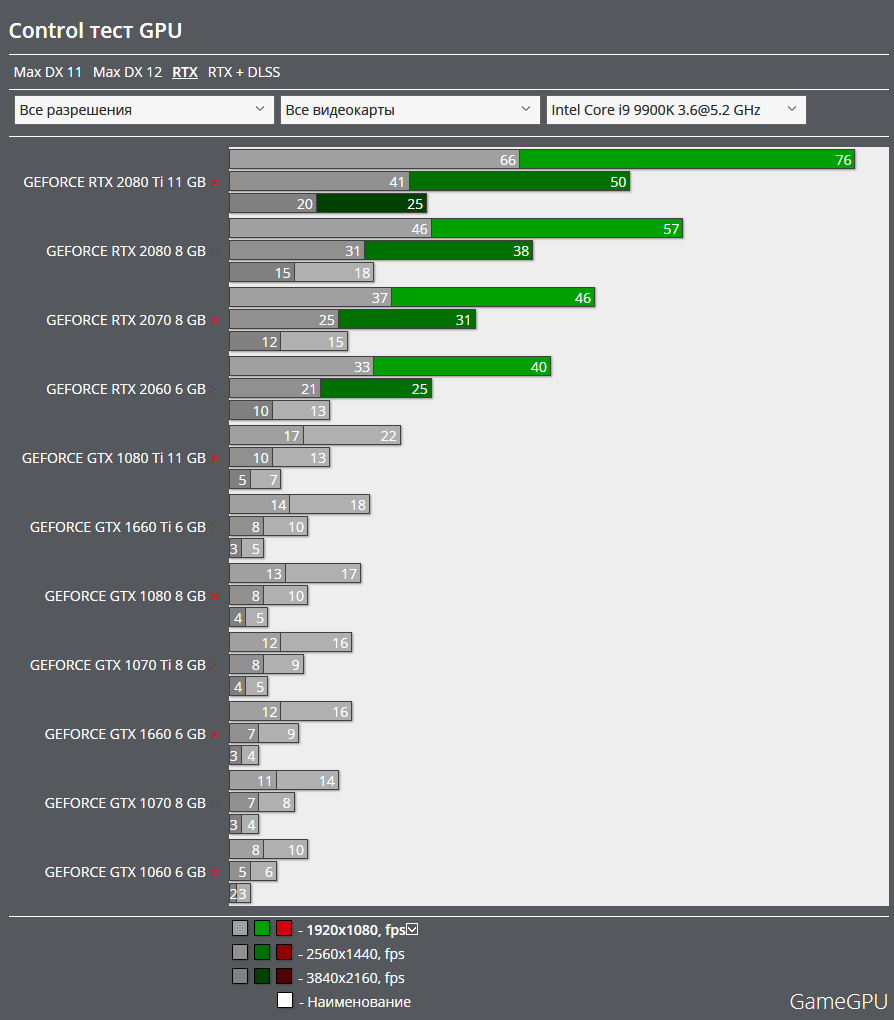
At the end of the test, your system will receive a score in the form of a certain amount of points
Passmark Performance Test
This software is fundamentally different from everything described above. Passmark Performance Test — a collection of tests for the processor, graphics adapter, RAM and hard drive. The program allows you to conduct both a full check of the system and test one of the nodes. All basic scenarios are also divided into smaller, narrowly focused ones.
Video card test in games
Quite often, the games themselves have a built-in tool to test the performance of your system. For example, in HITMAN, Metro, GTA, you can set the maximum graphics settings and run a special benchmark for the test. This way you will know not only how your game will go, but you can immediately see if there are any errors, artifacts or crashes.
Verification in games with GPU-Z
Address: GPU-Z
1.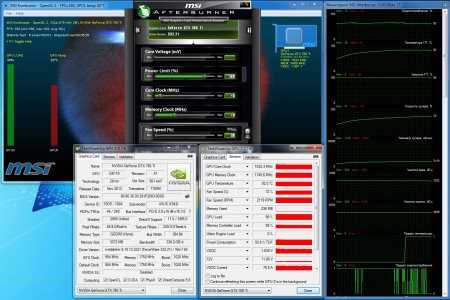 Install the utility on your computer or laptop and run it. In the main window, you will immediately see all the characteristics of the installed adapter, and the «Sensor» tab will show the current temperature and other parameters.
2. Start the game, set the desired graphics settings and play for at least 10 minutes. After that, minimize the game window by pressing ALT + TAB and see what the temperature is at the moment. It is important that it does not rise too much. If above 85, then you need to sound the alarm.
Important! Not all games allow you to minimize the window, in this case, look in the settings to see if you can start in windowed mode.
SiSoftware Sandra
SiSoftware Sandra is another combo software that consists of many utilities for testing and getting information about hardware and software. For the video card, there are tests of rendering speed, media transcoding and video memory performance.
EVEREST Ultimate Edition
Everest is a program designed to display information about a computer — motherboard and processor, video card, drivers and devices, as well as readings from various sensors — temperature, main voltages, fan speeds.
EVEREST, among other things, includes several tests to check the stability of the main PC components — processor, video card, RAM and power supply.
Aida64 how to check video card
After starting the program, select the «Service» section in the top menu. Then select the «Test GPGPU» section from the pop-up menu.
After that, a window will open, which will display the parameters monitored during the video card test. These parameters include: the frequency of the processor of the video card, the temperature of the processor, the supplied voltage, and the current strength. To prevent unnecessary information from being displayed on the screen, click the “Preference” button in the lower part of the window and configure the output of only those data that relate to the video card. After changing the settings, return to the main window and check the box ”Stress GPU(s)”. Then, at the bottom of the window, on the left side, click on the “Start” button and watch the changes in the video card parameters.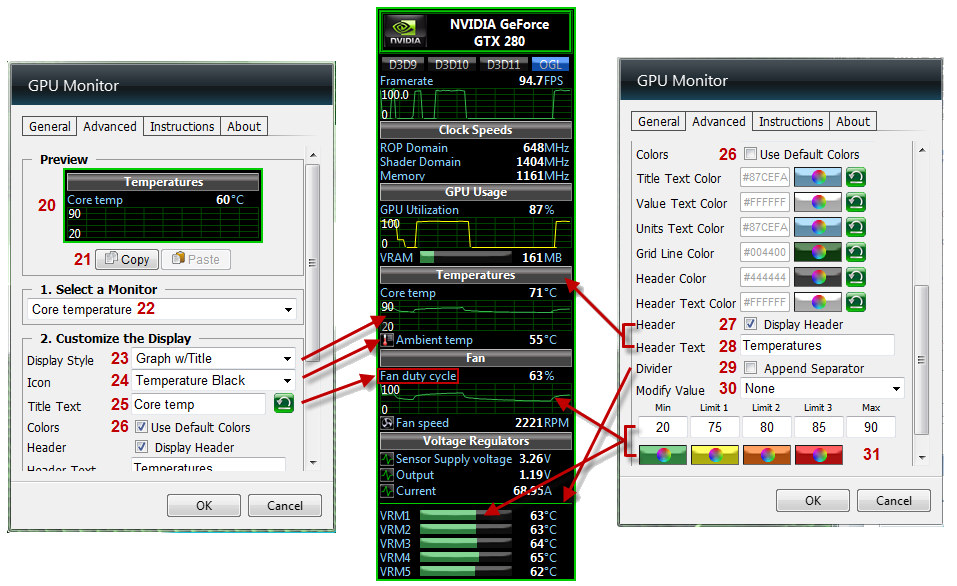
The aida64 program automatically remembers only the beginning of the testing time and the end of the procedure. Therefore, you must monitor the rest of the parameters of the video card yourself. In this case, the most critical and important are:
- Video card processor temperature;
- Video card cooling fan speed.
If necessary, you can monitor the temperature of the processor and other sensors installed on your computer. Typically, an nvidia video card test is carried out for no more than twenty minutes. This time is enough to identify the malfunction of the video adapter. If during the testing process the heating of the video card did not go beyond the permissible limits, then the test is considered passed successfully. You can find out the exact norm for the permissible temperature of the processor of your video card on the manufacturer’s website.
Video Tester
This little program is at the end of our list because of the obsolescence of the method by which testing is carried out. Video Tester uses the DirectX 8 API in its work, which does not allow you to fully evaluate the performance of new video cards. However, the program is quite suitable for old graphics accelerators.
We have reviewed 10 programs that can check video cards. Conventionally, they can be divided into three groups — benchmarks that evaluate performance, software for stress loading and stability testing, as well as complex programs that include many modules and utilities.
When choosing a tester, you should be guided primarily by the assigned tasks. If you need to identify errors and find out if the system is stable with current parameters, then pay attention to OCCT, FurMark, PhysX FluidMark and Video Memory Stress Test, and if you want to compete with other community members in the number of «parrots» typed in tests, then use 3DMark , Unigine Heaven or Passmark Performance Test.
We are glad that we could help you solve the problem. In addition to this article, there are 12312 instructions on the site.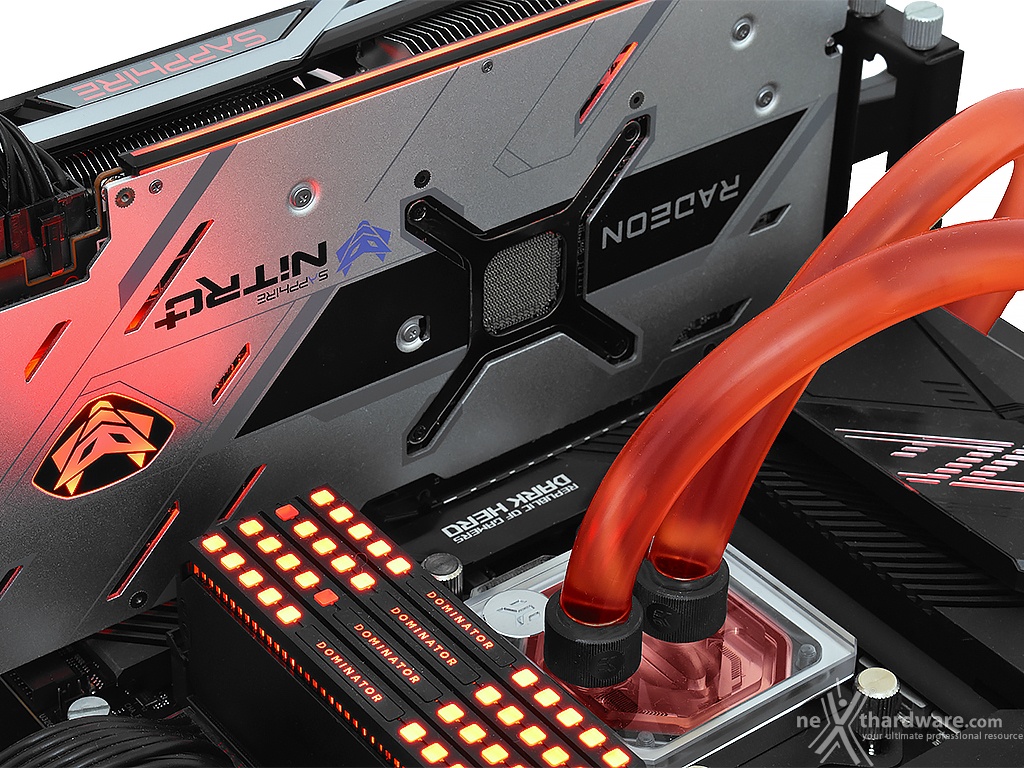 Bookmark Lumpics.ru (CTRL+D) and we will definitely come in handy for you. Thank the author, share the article on social networks.
Describe what did not work for you. Our experts will try to answer as quickly as possible.
Checking the video card — we determine the breakdown
Overheating — we solve the problem
If you see various artifacts on the screen, color distortions, incomprehensible dots, the picture can “fly”, then the problem lies in the adapter itself. And at 90% of cases are caused by overheating.
1. Install the AIDA64 program and run it. Go to the «Computer» — «Sensors» tab. In the right window, see what temperature the «GP Diode» shows. When idle, the temperature should be around 40 degrees.
If it is above 55, then most likely, when you play games, artifacts or other glitches appear on the screen, and the PC may simply freeze or restart.
2. Remove the cover from the system unit and see if the fan on the card is spinning at all. If not, then it is broken and needs to be replaced. It will not be superfluous to replace the thermal paste on the card processor. If you do not know how to do this, then take it to the nearest service, the service is inexpensive.
3. After checking the fan and changing the thermal paste, make sure that the system unit itself inside is clean, free of dust and dirt. If possible, install additional coolers for intake and exhaust to ensure good ventilation. Then turn on the PC and check the temperature.
Glitches in drivers / system
If the problem is not overheating, then it may well be that the drivers are “curved” or a system failure has occurred. In this case, reinstall/update your video card driver to a newer one.
If the problem persists, you might want to connect it to another computer and see how it works there. In some cases, you may need to reinstall Windows.
Glitches only in one game
If the problem occurs only in one game, then there are probably two options for the problem:
1. The game itself is simply poorly optimized and cannot work normally. For example, the same Dying Light can cause wild overheating and artifacts on AMD video cards.
The video card does not work at all
A fairly common problem when the video chip fails at all. Contacts have moved away from the processor and you will have to reball the video chip or buy a new card. It’s often better to buy a new one.
Only a service center can help you determine this. If you yourself cannot determine the cause, go there, diagnostics are usually free, with rare exceptions.
Video card test online (Nvidia, AMD)
Updated: Viktor Trunov 3 min.
To test the graphics adapter on a laptop or computer, it is not necessary to download and install specialized software. After all, you can test the video card using a special online service. How to do this quickly and efficiently, we will talk in this article.
Contents of the article
- Why test a graphics card?
- NVIDIA Online Test
- Software Testing
- ATITool
- Video Card Stability Test
- Related Video Tutorial
- User Comments
Why test a video card?
Some users don’t understand or don’t know why they need to test their graphics adapter for performance at all. So, if you began to notice that the performance of your device began to change not for the better, then this is the first reason why you should check it. You can detect these changes in any graphic utility or game, when even with minimal settings the game slows down.
During card testing, it is loaded to the maximum possible values by sending a large amount of memory. Thus, it is possible to determine the performance of the device in case of peak load, as well as to check the temperature regime and, accordingly, the state of the cooling system. Of course, testing should be carried out carefully, because extreme load can cause malfunctions or even failure of the device.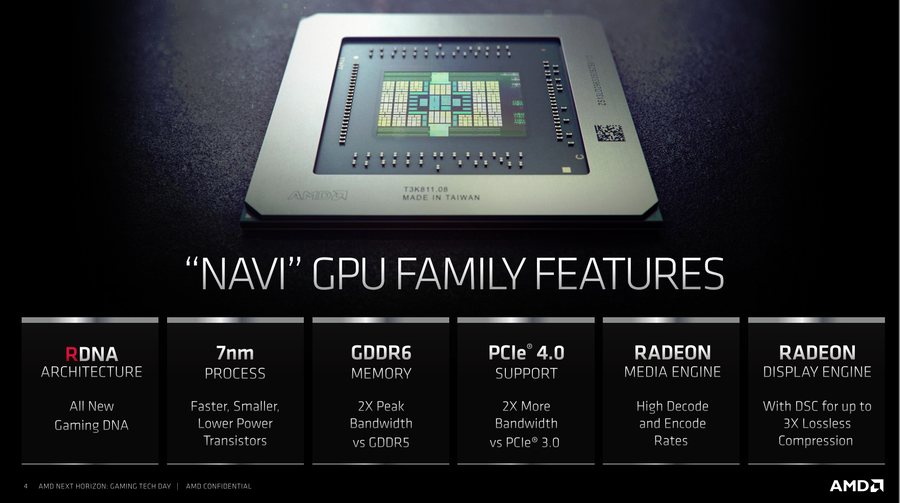
NVIDIA online test
If you don’t know any test programs, or are just afraid of downloading viruses, then you can check the video card from nvidia using a free online service from the developer. You can do this on the official page of the video card manufacturer. To do this, you need:
- Go to the official website;
- In the menu, select the item «Is your computer ready for new games?»;
- Click «Inquire Now»;
After finishing online testing, you will know if this game is suitable for your computer or not. This is the fastest and easiest way to test your graphics card.
For better and more detailed testing of a video card, you should use special utilities. It is about them that we will talk further.
Testing with software
However, the method of checking a video card online has one very significant drawback, it does not show the user more detailed information about the state of the card. In addition, if you have an AMD board installed, this method will not work for you at all.
Therefore, in order to check the video card as efficiently as possible and get more data, such as temperature, check power, find out about errors, other programs are often used. Let’s look at the most popular and effective ones.
ATITool
Quite a well-known program designed to test a video card for performance, performance and errors. Works great on Windows XP,7,8 and 10.
To start working with it you need:
- Download the utility, install and run.
- Find and click the «Show 3D View» button to start testing.
- A box will appear with a cube, also at the bottom we can see the frame rate per second (FPS) data.
- We leave the program to work for 2-3 minutes and all this time we monitor the progress of the test. The appearance of colored dots, horizontal or vertical stripes and other elements indicates a malfunction of the video card.
- We complete the first part of the test by pressing the «Close 3D View» button.
- Next, click the «Scan for Artifacts» button and a window with scanning for artifacts will open. The number of errors is displayed at the bottom of the window.
After the test is completed, all detailed information about the video card and the results of the test will be displayed on the screen. The only thing is that the ATITool utility does not determine the operating temperature of the device. It can be tracked separately through the 3dmark or RivaTuner applications, which we talked about earlier in this article.
Video Card Stability Test
Another small but good program designed to test the video card. During diagnostics, the application puts the device under maximum load, which allows you to understand under what conditions the video card functions most stably. It is worth noting that the utility supports testing with PixelShader and VertexShader.
The graphic test uses a 3D representation of the Earth as it rotates. After the end of the test, the user receives detailed and most accurate results. Moreover, a person has the opportunity to compare their performance with other cards.
- 17.1 Aida64 system stability test
- 17.2 Furmark
- 17.3 OCCT GPU:3D
results. Since most overclocking programs do not have their own benchmark, you have to use additional software.
In this article, we will consider several programs for testing the performance of video cards.
FurMark
FurMark is perhaps the most famous program for stress testing the computer graphics subsystem. It includes several benchmarking modes, and is also capable of displaying information about the video card using the built-in GPU Shark utility.
PhysX FluidMark
Geeks3D developers, besides Furmark, also released this software. PhysX FluidMark is different in that it tests the performance of the system when rendering the physics of objects. This makes it possible to evaluate the power of the combination of the processor and the video card as a whole.
This is another stress test program. The software contains scripts for testing the central and graphic processors, as well as a combined system stability check.
Video Memory Stress Test
Video Memory Stress Test is a small portable program for detecting errors and failures in video memory. It is distinguished by the fact that it incorporates a bootable distribution kit for testing without the need to start the operating system.
3DMark
3DMark is a large set of benchmarks for systems of different capacities. The program allows you to determine the performance of your computer in a number of tests for both the video card and the CPU. All results are entered into an online database and are available for comparison and analysis.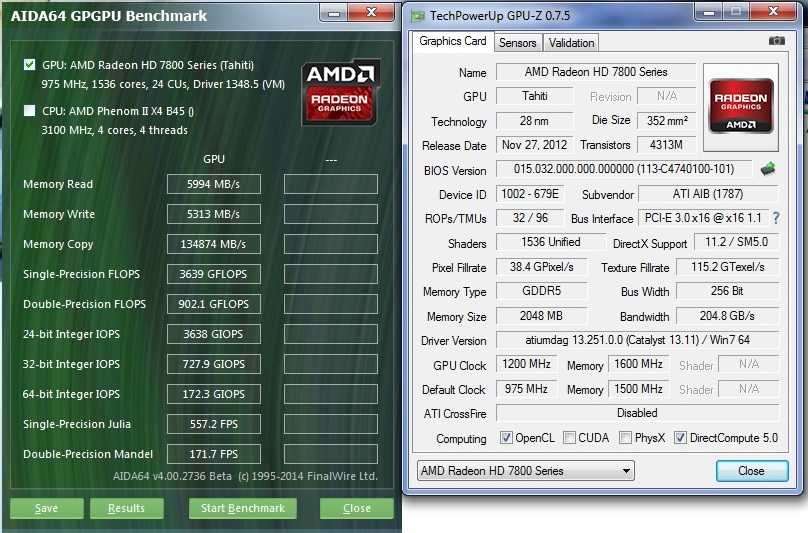
Unigine Heaven
Surely, many of you have seen videos that featured a scene with a «flying ship». These are pictures from the Unigine Heaven benchmark. The program is based on the original Unigine engine and tests the graphics system for performance in a variety of conditions.
Passmark Performance Test
This software is fundamentally different from everything described above. Passmark Performance Test — a collection of tests for the processor, graphics adapter, RAM and hard drive. The program allows you to conduct both a full check of the system and test one of the nodes. All basic scenarios are also divided into smaller, narrowly focused ones.
SiSoftware Sandra
SiSoftware Sandra is another combo software that consists of many utilities for testing and obtaining information about hardware and software. For the video card, there are tests of rendering speed, media transcoding and video memory performance.
EVEREST Ultimate Edition
Everest is a program designed to display information about the computer — the motherboard and processor, video card, drivers and devices, as well as the readings of various sensors — temperature, main voltages, fan speeds.
EVEREST, among other things, includes several tests to check the stability of the main PC components — processor, video card, RAM and power supply.
Video Tester
This little program is at the end of our list because of the obsolescence of the method by which testing is carried out. Video Tester uses the DirectX 8 API in its work, which does not allow you to fully evaluate the performance of new video cards. However, the program is quite suitable for old graphics accelerators.
We have reviewed 10 programs that can check video cards. Conventionally, they can be divided into three groups — benchmarks that evaluate performance, software for stress loading and stability testing, as well as complex programs that include many modules and utilities.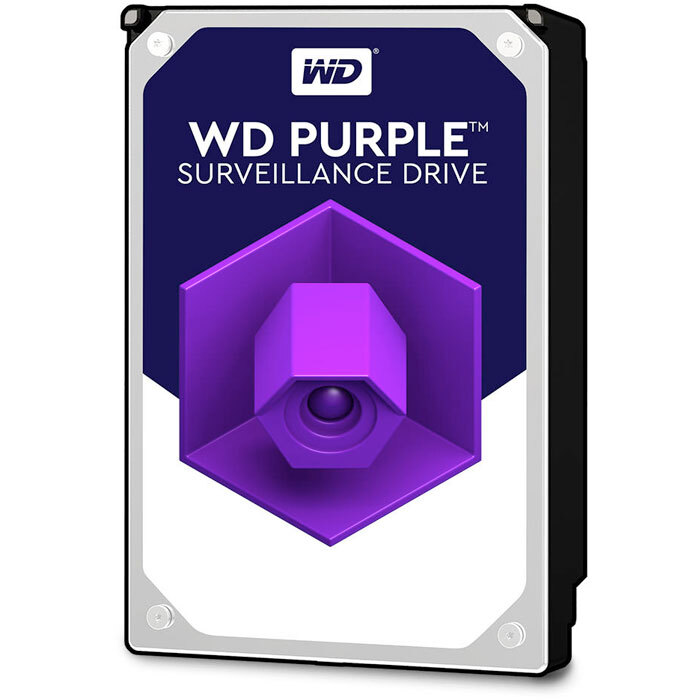
When choosing a tester, you should be guided primarily by the assigned tasks. If you need to identify errors and find out if the system is stable with current parameters, then pay attention to OCCT, FurMark, PhysX Flu >
Thank the author, share the article on social networks.
In modern PCs, the presence of a powerful video card is a necessary attribute of the effective functioning of the entire system. This is especially true for computers designed for gaming tasks, in which a powerful graphics card plays an almost decisive role. One of the most popular adapters on the international market is nVidia from nVidia Corporation. They are a fusion of many years of experience in the production of graphics cards, high quality, stability and durability. In order to test such adapters in practice, we turn to the help of special tools that allow us to perform various tests. Below we will analyze how to perform an online graphics card stress test from the manufacturer nVidia, and what tools will help us with this.
Features of the nVidia video card test
There are very few online services on the network that allow you to test the video adapter. This is due to the difficulties in implementing such network projects, which allow the maximum load on the video card, and then correctly calculate all its indicators at maximum load.
That’s why even the direct developer of graphic cards, NVIDIA Corporation, has curtailed its previously existing online testing service at nvidia.ru/object/gpu-analyzer. Previously, after switching to this resource, you could launch the performance analyzer and see how the video card behaves when you start a particular game (provided Java is required on the PC). Now, instead of game options, the user is greeted with a blank page. Apparently, Nvidia has recognized such a service as ineffective.
Blank page instead of Nvidia video card test service
In addition to the closed service, there are other network alternatives that allow you to test. While they are not capable of stressing your PC’s video adapter, they can provide us with information about your graphics card’s specifications and graphics capabilities. We will discuss a couple of such services below.
Gpuboss.com — online comparison of graphics cards
The gpuboss.com service is a fairly professional online tool that allows you to compare two graphics cards online.
It works quite simply:
- You are going to this site.
- In the «Graphics card One» field, enter the name of the first video card (in English), in the «Graphics card Two» field — the name of the second.
- Then click on the «Compare» button.
Enter the names of your graphics cards for comparison, and click on «Compare» (Graphics), performance per watt (Performance per Watt).
A little lower on the service, a description will be displayed showing how this or that video card is better than its competitor. Very educational.
Information displayed
Wirple.
com/bmark — BMark graphics card test
Wirple.com has an online nVidia graphics card test from «BMark». The check itself is performed in the browser window, and contains work with a small number of graphic objects. This allows you to check the hardware in HTML5 mode with the display of the FPS indicator. At the end of the test, you will see the points scored by your system, as well as a comparison of the points scored by your system with the performance of other users’ systems.
Video card testing service wirple.com
Stationary programs for testing video cards from nVidia
In addition to the listed network tools, we can also refer to the functionality of popular programs designed to test video adapters from Nvidia. When running such programs, we recommend that you close all other programs that can load your system. In the case of old video cards, we recommend not to subject them to maximum stress — for them this may not go unnoticed.
You can test your graphics card with the following programs:
- 3DMark is the industry standard for testing nVidia custom graphics cards.
The program offers a very simple graphical interface, as well as many opportunities to compare the results of the test with the results of users around the world;
- CPU-Z — provides the user with a lot of information about the hardware of your PC. Switching to the «Graphics» tab of the program will display detailed data about the graphics card, its operating temperature, memory and other parameters;
Graphics card characteristics displayed by CPU-Z
MSI Afterburner
Conclusion
Services that allow you to test your video card online from the manufacturer nVidia are rather limited in quantity and quality. Therefore, we recommend using stationary programs of the 3DMark, FurMark or Heaven level. Please note that in the case of older video adapters, it is not recommended to subject them to stressful loads in the form of such tests — this can cause them to significantly overheat and fail.
What is the first thing you should do after you buy and install a new graphics card in your computer? Of course, get to know her better. Find out what it really is, what kind of load it can pull and how it will behave in games. Or maybe you just want to know what state your card is in: is it in good condition, is it overheated, can it be overclocked . .. These and other properties of video cards are easy to determine at home using special testing programs. Today we’ll talk about how to test a video card for performance and stability, how to identify problems, and in general how to get the most information about the video subsystem of your computer.
Maximum useful information
Before proceeding with load tests, it would be nice to study the characteristics of the card. The free GPU-Z utility will help you get quite complete and detailed information about it. It displays almost everything that is important for the owner to know about his electronic «pet».
The main tab of the GPU-Z window shows:
- Name — under what name the card is defined in the current operating system.
- GPU is the code name for the graphics chip of a video card.
- Revision — GPU revision (NVIDIA only).
- Technology — technological process.
- Die size — core area.
- Release date — GPU release date.
- Transistors — the number of transistors in the chip.
- BIOS version — video BIOS version.
- Subvendor is the manufacturer of the final product (in our example, NVIDIA is the processor manufacturer, Gigabyte is the video card manufacturer).
- Device ID — identifiers of the GPU and chip manufacturer.
- ROPs/TMUs — number of rasterization/texturing units.
- Bus interface — PCI-e bus interface.
- Shaders — the number and type of pipelined (shader) processors.
- DirectX Support — Supported version of DirectX.
- Pixel Fillrate — pixel rendering speed.
- Memory type and bus width — video memory type and bus width for data exchange between memory and GPU.
- Memory size and Bandwidt — the amount of video memory and bus bandwidth.
- Driver version — video driver version and operating system.
- GPU clock and memory — current system bus and memory clock speed.
- Default clock — the same without overclocking.
- Multi GPU (SLI/Crossfire) — support and use of video collaboration technologies.
- Computing — support for computing technologies.
The «Lookup» button will take you to the GPU-Z developer’s site, more precisely, to the description and comparison page of your video card.
The second tab of GPU-Z — Sensors, takes sensor readings.
By default, it displays the current GPU and memory clock speeds, GPU temperature, cooling system fan speed, GPU and memory controller usage, load on the data bus, GPU supply voltage, and reasons for its current performance degradation. If desired, you can change the setting so that the program displays not the real, but the maximum, minimum or average indicators of the sensors, and also enable the logging file.
Information similar to GPU-Z is provided by many other programs that analyze hardware devices, for example, the free HWiNFO utility and the paid Aida64. By the way, the latter allows not only to obtain information about the equipment, but also to test it. For a video card, Aida has a GPGPU benchmark and a load test to check for stability. However, the tests will be discussed further.
3D Mark Performance Benchmark
Having determined the characteristics of a video card, you probably want to know what it can do in comparison with others. A classic of the genre will help satisfy curiosity — a set of synthetic tests for video of any 3D Mark models.
3D Mark is good because it allows you to check the performance of the entire structure of the computer’s video subsystem. By the way, its latest (12) version includes a new DirectX 12 health check module.
The program is available in several editions, one of which is free. It includes the same set of tests as the main ones — paid ones, but the user is deprived of the opportunity to change their settings and run them separately. The results in the free edition are evaluated not in the application, but online on the developer’s website (Futuremark).
Paid license holders are spared this inconvenience. However, the most budget version of 3D Mark today costs about $30, and you will have to spend about $10 to upgrade one of the previous ones. With constant use of the program, this is justified, but for a one-two-time launch, for example, before and after overclocking the video card, you can get by with the free version.
By the way, with 3D Mark you will not only know the true performance of your video card, but also check it for overheating and hidden defects. If flickering, ripples, loss of textures, twitching of the picture appear during the test, you should determine the temperature of the graphics chip, processor and other PC components. If it clearly tends to the maximum, stop testing and ensure that the devices are properly cooled. Insufficient heat dissipation can also cause the computer to shut down during a 3D Mark run. It is better not to allow this, because the hard drive may suffer from a sudden power outage.
If the appearance of artifacts is not accompanied by excessively high temperatures or other problems occur — blue screens of death (BSoD), freezes, loss of signal to the monitor, etc. , you can suspect a hardware malfunction of the video system components. First of all — a graphics chip, video memory, elements in the circuits for forming the supply voltages of these nodes or the power supply itself. In the most favorable cases, this turns out to be a video driver error.
Stress stability test
Stress or load testing of a video card (as well as other devices) is carried out in order to identify errors in its operation. Based on the results of passing the test, they judge the stability of the system as a whole and make predictions about how the device will behave at a load close to the maximum.
Unlike benchmarks, stress testing is carried out for a short time, always under visual control and only after making sure that the cooling system is sufficiently efficient. The one who conducts it must be aware that this procedure can lead to damage to devices if they have hidden defects.
Consider several programs that can be used to stress test a video card. Let’s start with the one already mentioned.
Aida64 system stability test
Aida64 system stability test is launched from the Tools menu of the main application window. The window in which the type of testing is set and graphs of frequencies, temperatures, voltages, currents and other monitored parameters are displayed looks like this:
Here, as we see, there is a lot of superfluous. To remove unnecessary information from the screen, click the «Preferences» button and enable only what concerns the GPU in the settings.
After setting, return to the main window, check the box next to «Stress GPU(s)», click «Start» and observe the changes.
The program records only the start and stop times, you have to keep track of the rest. Clicking «Save» allows you to take screenshots at selected moments, there is no logging option here.
The main indicator that is important to monitor is the temperature of the video processor. Monitor cooling fan speed, CPU temperature, and more as needed. As for the duration of the stress test, usually 30 minutes is enough for it.
If during the test the system behavior is stable, and the temperature does not go beyond the norm (individual standards for NVIDIA and ATI Radeon (AMD) chips can be found on the manufacturers’ websites), the test is considered passed.
Furmark
Another popular benchmarking and error checking tool is called Furmark. The application is compatible with video cards of any models that support OpenGl and is distributed under a free license.
Furmark main window looks like this:
The green frame circles the main test settings: switching to full screen mode (Fullscreen), screen resolution (Resolution) and smoothing (Anti-aliasing).
In the purple frame are buttons for calling several built-in utilities. You are already familiar with GPU-Z, GPU Shrank also displays information about the video card, and CPU burner runs a small processor test.
Buttons for launching the GPU stress test and detailed settings (Settings) are highlighted in red.
Inside the orange frame are presets for GPU benchmarks with different resolution levels.
Before testing, you must specify the resolution of your monitor in the Resolution field. It is also desirable to check the box Fullscreen (full screen mode). Anti-aliasing is optional: some artifacts are more visible when it is disabled or set to a minimum.
In Settings it is important to specify the temperature of the graphics chip (GPU temperature alarm), at which the program should beep to prevent the computer from overheating. Optimally — 15-20 ° C below the maximum threshold.
In the Benchmark duration field, set the duration of the test in milliseconds. The checkbox next to the Log GPU data item activates the check log option.
For maximum load on the video card during stress testing, check the Xtreme burn-in option in the «3D test option» section.
To start the test, return to the main window and click the appropriate button.
During the test, the screen will display a «hairy donut» and the main indicators of the computer’s condition. Artifacts, loss of signal to the monitor, and other symptoms of instability indicate a failure of the test.
To stop Furmark testing in an emergency and return to the desktop, just press the Escape key.
OCCT GPU:3D
The OCCT program is another popular free tool for evaluating the performance and checking the health of the main components of the computer, including the video card.
Using this program is no more difficult than the others. Video testing parameters are set in the main window — in the GPU:3D section.
- Check type — infinite or time limited (auto).
- Duration.
- Periods of inactivity at the beginning and end of the test.
- DirectX version.
- Screen resolution.
- Shader complexity (the higher, the more heat).
- FPS limiter (frames per second).
- Advanced: Full screen mode and limiting memory usage.
Monitoring and limiting options are configured in the section hidden behind the gear button. Instead of «Disabled» which means «not defined», set the options you need.
In OCCT GPU:3D, as in other stress testing utilities, the most important thing is to control the GPU temperature.
Press the green ON button to start the test.
In the first minutes, changes in indicators are displayed on graphs in the «Monitoring» window.
Next, a furry donut will appear on the screen, as in Furmark. Temperatures, FPS and so on will be displayed in a separate area in the left corner.
The appearance of something similar to artifacts and other problems indicate a failure of the test.
OCCT runs an error counter by default and saves test results as graphs in a separate folder. With their help, it is easy to determine what state the system was in when the failure occurred.
Just like in Furmark, just press Escape to abort the test.
Processor stress test to determine the performance of your computer
Author Petrov Denis Reading 5 min Views 7 Published
If you are having problems with your computer, if no troubleshooting on your Windows computer helps, if your computer does not work well even after a fresh installation of Windows, if your computer is overheating, then you need to run a stress test processor to determine the actual performance of your computer. The test shows whether the hardware can work properly or not. If the test shows an error, then you should worry about replacing the processor, GPU, or RAM of the computer, depending on the results of the test. It is also recommended that you periodically perform a CPU stress test, a GPU stress test, and a RAM stress test to monitor and control your desired computer performance.
When you run a Windows PC stress test, you should notice a few things.
When the user wants to check the load level on the PC, he definitely suspects a malfunction in the system. To make sure the PC is reliable, the stress test should be carried out for a long time (at least 3 hours) at maximum load. With the help of several tools, you can check and control the stability of the computer system — CPU, GPU and RAM stress test.
Table of Contents
- Stress Testing — What You Need to Know Before You Start
- Best CPU Stress Testing Software
- 1. CPU Stress Testing with Prime95
- 2. HeavyLoad — CPU Stability Tester
- 4. IntelBurnTest — Measuring CPU Load
- Closing Words:
3 AIDA64 Extreme — All in one System Stress Checker
Stress Testing — What You Need to Know Before You Begin
A computer stress test can be performed using certain software. Some programs are paid and some are free. But before you start, make sure that you have made all the necessary preparations for conducting a stress test.
- Close any programs you don’t need to put all your energy into stress testing.
- Disable sleep mode in power settings as computer stress test takes a long time.
- Monitor the system temperature (using HWMonitor or Speedfan) while stress testing your computer to avoid any damage. The maximum recommended temperature for CPU is 70°C and for GPU is 100°C.
The best CPU stress test software
1. CPU stress test with Prime95
Prime95 is the most popular free program designed to be used as a stress testing utilities for the processor. When overclocking your system, you can run Prime95 for a few hours to see if your PC’s processor is stable. If you look at the configuration of the Prime95 stress tester, you should notice that there are various preset configurations for measuring the performance of various components (by changing the FFT size) of the processor.
You need to run Prime95 for at least 3-4 hours before you can verify that all CPUs in your computer system are working properly. A PC with a stable processor can withstand the CPU Prime9 stress test5 indefinitely. However, if the system becomes unstable at any time during testing, the testing process will be stopped automatically by restarting the PC.
Remember to use CPU temperature monitoring software before running the test. Because stress testing the processor at full load causes the system temperature to rise. Therefore, be careful that the temperature rise does not harm your PC.
Steps to stress test your computer processor with Prime95 Freeware:
If you don’t have time to stress test CPU and RAM separately, then Prime95 is the best option for you.
2. HeavyLoad — CPU Stability Tester
HeavyLoad is the best comprehensive full load performance tester, which is very suitable for IT professionals and computer engineers. It can test everything including CPU, RAM, storage device memory, graphics, etc. You can run individual stress tests or all tests together to save time. The program does not have an option to automatically slow down the load when the processor overheats. Therefore, it is better to run CPU temperature monitoring software along with HeavyLoad when testing CPU load.
Download HeavyLoad from:
https://www.jam-software.de/heavyload/
3. AIDA64 Extreme — All in one System Stress Checker
engineers. The processor stress test is the main task of this paid utility. The utility is a complete diagnostic utility that offers a complete system stability check. You can test everything from the CPU to the GPU, including the disk drive test. The utility clearly shows if any violations occur during testing. With built-in intelligence, the tool can control the stress load when the temperature reaches a critical level. In addition, program AIDA64 Extreme can be used to test local drives and GPUs.
4. IntelBurnTest — Measuring Processor Load
IntelBurnTest (http://www.majorgeeks.com/files/details/intelburntest.html) is another popular option for stress testing any processor. It uses the Intel Linkpack Libraries, which are used by Intel’s own quality control department to stress test Intel CPUs. However, despite the name, the utility can also measure the load on AMD processors. Unlike the previous utilities mentioned here, the program runs the test in just a few minutes and gives you a complete picture of how your PC can handle single-threaded work. You don’t have to wait several hours. You can set the load standard depending on the available RAM required to run the test. IntelBurnTest is a portable stress tester utility that supports all modern Windows operating systems, including Windows 10, Windows 8/8.1 and Windows 7.
Closing words:
A computer stress test is a vital part of evaluating a PC’s performance under maximum load/stress. The test can be done at home using both free and paid software with care.