Top 20 Best Benchmarking Software For PC To Test Your CPU
Benchmark is a software program to assess the performance of the CPU. It compares the performance of various computers across the different architecture. After the advancement of computer architecture, the requirement of benchmark software arises radically. If you want to judge how fast your computer is running, you can install benchmarking software for PC. It is a great way to take a snap of performance, compare system setup, and troubleshoot the problem. Generally, it is more suitable for enterprise and Games PC. In light of this scenario, today, we will discuss the best ten benchmarking software for PC.
There are hundreds of benchmarking software for PC available in the market. It is challenging to find the best one. On the other hand, it is also complexed to use benchmarking software correctly. So we will discuss the top 10 best and comfortable benchmarking software for PC. We focused this article on Windows OS, but some of them can be used for MAC and other OS.
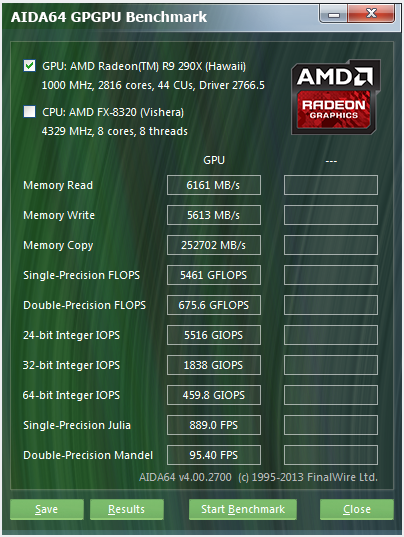
1. Everest Ultimate Edition
Everest Ultimate Edition is more than a benchmarking software for windows with maximum information. This software provides detailed information regarding the motherboard, operating system, and storage. It also tests the benchmark of CPU, memory, and FPU. The software is costly, but it has a free trial too.
2. CPU-Z Benchmarking Software for PC
CPU-Z is a benchmarking software for Windows OS which provides a plethora of information regarding the device system. It offers real-time measurement of memory frequency and core frequency. You can also know module specifications, timings, size, and memory type. Via the tool option, you can save the information in .txt format.
More Info and Download
3. SiSoftware Sandra
SiSoftware Sandra is a robust package to diagnostic the problems of your CPU. It can work for a standalone PC or any PC of the network. This software is a collection of the module which analysis the performance of software and hardware.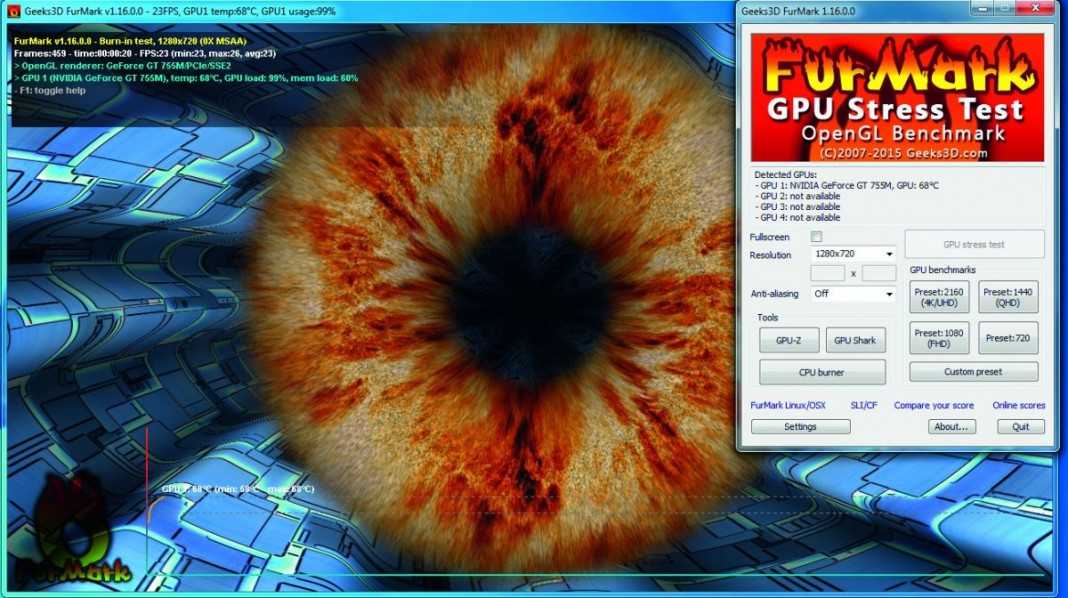 An additional module can be further extended based on the requirement. The unique feature of this software is the power consumption report. This software costs much, but there is a free option to use for private or educational purposes.
More Info and Download
4. PerformanceTest
PerformanceTest is another utility tool to measure the benchmark test. It is similar to Everest Ultimate Edition, providing several preset benchmarks and comparing them with other CPUs. The sophisticated analysis of several components provides expert-level data to analyze. Its unique user interface is crisp and shows 3D representation.
More Info and Download
5. Fraps
Fraps is another benchmarking tool that is used for gaming PC. It shows frame per second ( FPS) getting in the corner of the screen. It measures the frame between two points and can perform the customized benchmark. When the professional gamer makes a movie to upload on YouTube, they may use this benchmarking software for Windows OS.
More Info and Download
6. Fresh Diagnose Benchmarking Software for PC
Fresh Diagnose is such a utility software that diagnoses the performance of hard disk, CPU, video systems, etc. It can compare the performance with many types of hardware. With this software, you can scan the computer performance like PCI / AGP buses information, peripheral information, and network information. To increase the overall performance, you can use this free benchmarking software.
More Info and Download
7. CineBench
CineBench is famous for its real-world cross-platform test suites. It provides more accurate information regarding the performance of the PC. CineBench supports both Windows and MAC OS. Anyone who needs to evaluate hardware performance then they can use this free benchmarking software. When you run the CPU performance test, then the output will be published on points. From that point, you can easily access the system.
More Info and Download
8. RealBench
RealBench is an open-source benchmark software that provides the real-world performance of the PC system. If you upgrade your PC, then you can use this free benchmarking software. This software recommends anyone who uses the 64-bit Windows operating system. Besides the benchmark, it also works for a stress test of PC. A stress test finds out the weak point of your PC.
More Info and Download
9.MSI Afterburner Benchmarking Software for PC
MSI Afterburner is widely used and famous for overclocking utility and performance control. It is the best live monitoring GPU tool for your PC. It allows its user to overclock and monitor the system. MSI Afterburner tracks every parameter like clock speed, fan speed, CPU temperature, and other related tools. MSI Afterburner utterly free of charge, and you can use it for any brand PC.
More Info and Download
FutureMark Suite is a useful performance monitoring tool of Windows which is useable for all types of hardware. It is a high-quality benchmarking software similar to the Unigine suite. If you are a real professional gamer, you can use the FutureMark Suite to manage, evaluate and control your PC. FutureMark Suite is costly, but you can download the free demo version of 3D Mark.
More Info and Download
11. UserBenchmark
UserBenchmark is the wonderful software to test your PC within a minute. This pc benchmark software is a freeware testing tool. You can PCMark your component and compare it with others of the same component. It helps you to identify computer problems, size up your PC and explore for the best. This pc performance test can be applied to Desktop, Gaming, and gaming pro.
Important Features
- UserBenchmark allows you to test your CPU, GPU, SSD, HDD, RAM, USB, FPS, and EFPS.
- The CPU tests include integer, floating, and string.
- six 3D game simulations are tested in GPU
- If you are a gamer, you can run the PCMark test.
More Info and Download
12. Novabench Benchmarking Software for PC
If you want to run a free CPU benchmark test, you can use the Novabench. Since 2007, the software has been used by millions of users. Within a few minutes, you can get a computer performance test. Moreover, if you again think, benchmark my pc with your one Novabench PC mark is best.
Important Features
- Novabench Tune, upgrade, or repair your computer based on your results.
- It runs a benchmark test in 2 minutes.
- It allows all the modern tests for your whole system.
- You will get an instant comparison chart.
- You can run Novabench benchmark software directly from your pen drive, and there is no requirement for installation.
- Moreover, you need not an internet connection.
- In the free version, you will get Quickly Test Your Computer and Compare Scores Online.
- You will get Novabench Portable, CPU Temperature Tracking, Battery Tracking, Scheduled Tests, Private Profile Scores, Command-line Interface, Linux CLI, and Priority Issue Support in the Pro version.
More Info and Download
13. PassMark Software
PassMark Software is one of the best benchmark software. It allows your PC to compare thousands of PCs around the world. PassMark Software is the complete PC benchmarking tool that provides you confidence. It will provide you extra forensic data to pc benchmark test of your system.
Important Features
- PassMark Software shows the quickest way that your USB 3.0 port is working properly.
- Since 1998, it has been providing an industrial solution.
- This pc benchmark software is best for load testing for Windows.
- PassMark Software runs various benchmarks like PC, RAN, iOS/iPhone, video card, PC systems, Hard Drive and Android.
More Info and Download
14. PCGameBenchmark
PCGameBenchmark is a computer benchmark software that tells about your PC. This best online pc benchmark software supports all the operating system platforms like Windows, Linux, and macOS. You have to provide the details of your computer like OS, memory, processor, and RAM, and it will test your PC. It helps you to compare Graphics cards and CPUs a few times.
More Info and Download
15. 3DMark
3DMark is one of the best pc benchmark software used for all of your hardware. So we can call it Jack of all trades. It supports all of your devices: smartphone, tablet, notebook, or desktop gaming PC. 3D Mark is faster, easier, and flexible to use. The PCMark tool is a weapon for gamers. It has three types of prices. In the free pc performance test, 3D Mark offers Time Spy, Night Raid, Fire Strike, and SkyDiver. But if you use the 3DMark Professional Edition, you will also get Port Royal, Fire Strike, Fire Strike Extreme, Fire Strike Ultra, API Overhead feature test, PCI Express feature test, VRS feature test, NVIDIA DLSS feature test, and Stress Tests.
Important Features
- 3DMark helps with Hardware monitoring.
- You can manage custom benchmark settings.
- It helps to Install tests independently.
- You can Skip the demo option.
- There is an option to Save results offline
- More option for Private, offline results option
- Best Command line automation and Image Quality Tool
- You can Export result data as XML
More Info and Download
16. HWMonitor Benchmarking Software for PC
To benchmark my pc like voltages, temperatures, and fans speed, I prefer the HWMonitor. HWMonitor is a hardware monitoring program for CPU benchmark tests. Like the ITE® IT87 series, various sensor chips, most Winbond® ICs, and others are optimized by this tool. You can use both the free and paid version of this computer performance test.
More Info and Download
17. Unigine Suite
In your pc benchmark test, if you need Extreme performance and stability tests for PC hardware, you can use the Unigine Suite. This best benchmark software helps you to test your video card, power supply, cooling system. It finds the real-life load.
You can download the 247 MB software free. The pc benchmark software has various features like Extended stress-testing, Command line automation support, Reports in CSV format, and Commercial use licenses. Moreover, it shows GPU temperature and clock monitoring.
Important Features
- Unigine Suite offers extreme hardware stability testing.
- You will get accurate results due to 100% GPU-bound benchmarking.
- This PCMark test support DirectX 9, DirectX 11, and OpenGL 4.0
- It allows you a Comprehensive use of adaptive hardware tessellation
- Dynamic sky with volumetric clouds
- tweakable day-night cycle
- Real-time global illumination
- screen-space ambient occlusion
- It Supports stereo 3D
More Info and Download
18. Geekbench 5 Benchmarking Software for PC
Geekbench is a cross-platform computer benchmark software that measures your system with a single click from your computer. It has various functions like CPU Benchmark, Compute Benchmark, Cross-Platform, and Geekbench Browser. This is one of the best pc benchmark software because it applies the Augmented Reality and Machine Learning method for checking the performance of your PC.
Important Features
- GEEKBENCH 5 reflects the actual scenario of the PC and mobile.
- It is available in macOS, Windows, Linux, iOS, and Android.
- Various big organizations like Samsung, AMD, Microsoft, HP, and LG use the PCMark tool.
- It is a paid software, but you can also use the free version for a limited period.
More Info and Download
19. Prime95 Benchmarking Software for PC
Prime95 is a commonly used stability testing freeware software. The CPU benchmark tool performs tests like CPU stress, Torture Testing, and overclocking circles. This computer performance test is developed by George Woltman. It supports various Operating systems like Microsoft Windows, macOS, Linux, FreeBSD.
Important Features
- Because its end-user license agreement does not qualify for any open-source software criteria, but it is open source.
- The algorithms of Lucas–Lehmer primality test (LL)
- The algorithms of the Fermat primality test (PRP) with error checking
More Info and Download
20. Super PI
If you need a pc benchmark test based on a digit like PI, you can consider it the best benchmark software. It is prevalent for the overclocking community, performance tests, and stress tests. This Windows-based benchmark tool utilizes x87 floating-point instructions. It is to mention that Super PI is slower than other pc benchmark software.
More Info and Download
Final Thoughts
Out of various benchmarking software for PC, it isn’t easy to find out the best one. On the other hand, you may not expend the money unless you need it. So you can try out the free benchmarking software before going for any final buying decision. The real gamer and enterprise user use the pro benchmark software. If you are using Cloud Gaming Services, you can use some Google Chrome Extensions to evaluate the performance and speed of your system. Would you please take some time to recommend us and share your suggestion in the comment below? Your valuable suggestion is appreciated.
(GPU Tool) FurMark 1.9.0 Released
FurMark, the popular GPU burn-in utility, is, at last, available in version 1.9.0.
Webmasters: hotlinking is not allowed (it will cause an error message), please use the post url as download link.
[download#208#image]
Translation files
Just copy the following files in the localization folder of FurMark:
- Chinese by nhldp
- Polish by cienislaw
Remark: some strings are not translated: they will be fixed in the next update of FurMark.
You can also download FurMark 1.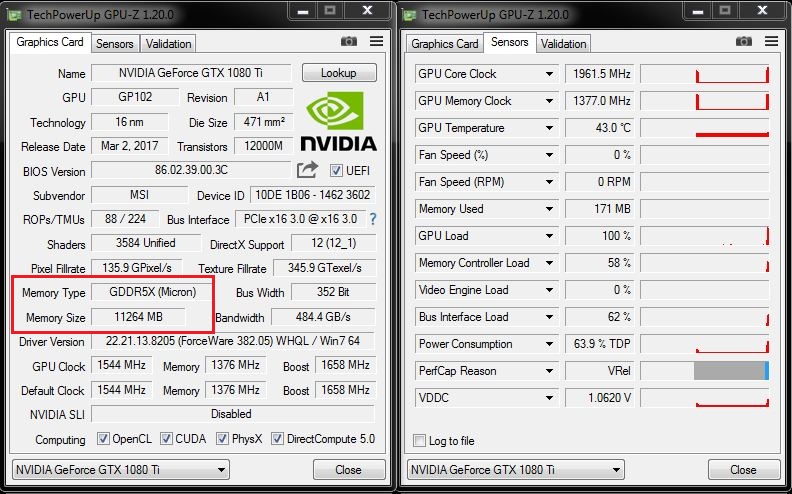 9.0 from FilePlanet.
First thing, FurMark is still an OpenGL 2.0 GPU stress test. That means all available GPUs can be tested with FurMark including:
– NVIDIA GeForce 6 to latest GeForce GTX 500
– AMD Radeon HD 2000 to latest Radeon HD 6000
– Intel Sandy Bridge GPUs HD 2000 / HD 3000
– S3 Graphics Chrome 400, 500
– and all other models I forget.
You can even stress test your GPU under Linux using Wine, waiting for the Linux version of FurMark ?
Okay, now let’s see the new features of FurMark 1.9.0.
The graphics workload is heavier than in FurMark 1.8.2 to follow the GPU power processing of recent graphics cards. For example, a GTX 480 has a score of 6478 points (108FPS) in FurMark 1.8.2 in 1920×1080 while in FurMark 1.9.0 the score of the same card is only 1769 points (29FPS).
FurMark 1.9.0 adds a dynamic background instead of an static image. But don’t panic, this is an option, and if you want to find your favorite dragon, just uncheck the dynamic background. I also added a mode with two interlaced furry torus and a moving camera.
To make benchmark process simpler, there are now two presets that allow to submit an online score: Preset:1080 and Preset:720. Just click on a preset button and the benchmark starts with predefined settings:
- Preset:1080 : 1920×1080 fullscreen, no AA, Post FX disabled, dynamic background, burn-in enabled.
- Preset:720 : 1280×720 fullscreen, no AA, Post FX disabled, dynamic background, burn-in enabled.
Two GPU monitoring utilities are now embedded in FurMark: GPU-Z and GPU Shark. For GPU-Z, I added the option to disable the OCP (over current protection) on GeForce GTX 500 cards.
OCP is not available on every GeForce GTX 500. For example, OCP is actived on EVGA GTX 580, while this protection has been disabled by ASUS on its GTX 560 Ti DC2.
Remark: NVIDIA power limiter / OCP is based on an application black list. FurMark 1.8.2 is black listed and you can easily see the impact of the OCP on a GTX 580: with OCP, the FurMark 1.8.2 score is 4256 points (71FPS) in 1920×1080 while with OCP disabled, the score jumps to 7772 points (130FPS). Currently the new FurMark 1.9.0 is not yet black listed so you won’t see differences between OCP enabled and disabled…
Another cool little feature is an audio alarm for the GPU temperature. You can set the max GPU temperature in the settings box:
As soon as the GPU temperature exceeds the max value, an atomic alert siren will be played.
Another important change is related to spikes in GPU temperature monitoring. These spikes occur when several monitoring utilities try to access to the same hardware at the same time. FurMark 1.9.0 includes a spike filtering module that clamps spikes when difference between two consecutive temperature exceed a threashold.
Temperatures spikes in FurMark 1. 8.2
8.2
Multi-GPU: SLI and CrossFire
And multi-GPU support like NVIDIA SLI or AMD CrossFire? Of course FurMark supports both technolgies but you have to apply some little tricks to properly enable the multi-GPU support. See these articles for more details:
- How to Enable SLI and CrossFire Support for OpenGL Applications
- MSI Kombustor: SLI and CrossFire Support
FurMark 1.9.0 stressing two GTX 480 in SLI
What is FurMark?
FurMark is an OpenGL-based GPU stress test utility. It makes it possible to push the GPU to the max in order to test the stability of the graphics card (and the PSU too!) leading to maximal GPU and VRM temperatures. That’s why FurMark is often used by overclockers and graphics cards fanatics to validate an overclocking, to test a new VGA cooler or to check the max power consumption of a video card.
FurMark 1.9.0 changelog
- New: support of all latest GeForce GTX 500 and Radeon HD 6000 Series…
- New: added /gtx500ocp checkbox for GPU-Z to disable GTX 500 OCP (over current protection).
- New: GPU-Z 0.5.1 and GPU Shark 0.4.1 are now embedded in FurMark.
- New: added programmble GPU temperature alarm. When GPU temperature exceeds a threshold, an alarm sound is played.
- New: added warming-up step to benchmarking.
- New: improved OSD (on-screen display data) readability (key V).
- New: added GPU monitoring in 3D window.
- New: added GPU-Z full GPU power consumption data (power, voltage and current) if available.
- New: caution message displayed before every burn-in test.
- New: score submission is now limited to two presets: Preset:1080 and Preset:720.
- New: increased graphics workload.
- New: added animated background image option based on iq’s code.
- New: added animated camera option with multiple furry torus.
- New: two burn-in modes are now available: normal burn-in mode and Xtreme burn-in mode
- Bugfix: spikes in temperature graphs are now filtered.
- Bugfix: many minor bugs…
I’d like to thank ASUS, Corsair and Sapphire for their hardware support.
GameGuru MAX System Requirements — Can I Run It?
GameGuru MAX System Requirements — full specs, system checker and the gaming PC setup you need.
GameGuru MAX recommended requirements
- Memory: 4 GB
- Graphics Card: NVIDIA GeForce GTX 1080
- CPU: Intel Core i5-2300
- File Size: 20 GB
- OS: Windows 10
GameGuru MAX minimum requirements
- Memory: 4 GB
- Graphics Card: NVIDIA GeForce GTX 960
- CPU: Intel Core 2 Duo T7250
- File Size: 20 GB
- OS: Windows 10
Can you run it? Test your computer against GameGuru MAX system requirements.
Can I Run It?
Test Your PC Automatically
Can I Run It?
Enter your system details
Can I Run GameGuru MAX?
Provided that you have at least an NVIDIA GeForce GTX 960 graphics card you can play the game. Furthermore, an NVIDIA GeForce GTX 1080 is recommended in order to run GameGuru MAX with the highest settings. The minimum memory requirement for GameGuru MAX is 4 GB of RAM installed in your computer. You will need at least 20 GB of free disk space to install GameGuru MAX. To play GameGuru MAX you will need a minimum CPU equivalent to an Intel Core 2 Duo T7250. However, the developers recommend a CPU greater or equal to an Intel Core i5-2300 to play the game.
GameGuru MAX will run on PC system with Windows 10 and upwards.
Looking for an upgrade? Try our easy to use GameGuru MAX set up guides to find the best, cheapest cards. Filter for GameGuru MAX graphics card comparison and CPU compare. We’ll help you find the best deal for the right gear to run the game.
GameGuru MAX System Requirements — Can You Run GameGuru MAX?
Player Count: |
7 Players (Last 24 Hours) |
|---|---|
Download: |
Via Steam |
Developer: |
TheGameCreators |
Publisher: |
TheGameCreators |
Categories: |
Animation & Modeling Design & Illustration Education |
|
GameGuru MAX Release Date : |
Expected release late 2022 |
GameGuru MAX PC price today:
$42. 49
49
15% saving
GameGuru MAX cheap deals:
The PCGB price tracker can try to predict the next official Steam GameGuru MAX discount. The last offer was a 15% saving on the 3rd of May 2022.
What is GameGuru MAX?
GameGuru MAX is a non-technical and fun game maker. It allows you to build your own game world, using creative and enjoyable tools. Populate your game by placing down characters and other game items, then press one button to build your game and it’s ready to play and share!
Looking for ready made system? We have 263 laptop computers in our database that can run GameGuru MAX.
We take over 68 gaming laptops under $1000.
Check our full compare laptops chart for the right systems or these best deals we’ve picked out below.
Latest Posts
-
FPS monitor: how to track your PC game frame rate with an FPS counter
23rd of August 2022
class=»small-header»>
FIFA 23 System Requirements
GTA 5 System Requirements
Valorant System Requirements
Elden Ring System Requirements
Marvel’s Spider-Man Remastered System Requirements
Call of Duty: Warzone System Requirements
Red Dead Redemption 2 System Requirements
Fortnite System Requirements
Genshin Impact System Requirements
Apex Legends System Requirements
CSGO System Requirements
Microsoft Flight Simulator System Requirements
Minecraft System Requirements
FIFA 22 System Requirements
Stray System Requirements
Fall Guys System Requirements
Tower of Fantasy System Requirements
Cult of the Lamb System Requirements
Farthest Frontier System Requirements
MultiVersus System Requirements
6950 XT Faster Than RTX 3090 For $1099, 6750 XT Faster Than RTX 3070 For $549, 6650 XT Faster Than RTX 3060 For $399
Today, we are bringing the final leak for the AMD Radeon RX 6000 Refresh graphics cards which includes the gaming performance and price positioning of all three variants including the RX 6950 XT, the RX 6750 XT, and the RX 6650 XT.
AMD Radeon RX 6950 XT, RX 6750 XT, RX 6650 XT Graphics Cards Gaming, Raytracing, RSR Benchmarks & Price Positioning Confirmed
In the previous two leaks, we have covered the official specifications and the official synthetic tests for all three cards. Now our final post will give a rundown on the Radeon RX 6950 XT, RX 6750 XT & RX 6650 XT gaming performance which includes results at various resolutions for each tier. We will also discuss the official pricing and how they compare to the competition and against AMD existing RX 6000 series cards.
Note: The following results are based on AMD’s official data which has been presented to the media. Test results in independent testing may vary.
Testing Methodology: AMD Ryzen 7 5800X3D (X570 motherboard) with SAM & Resizable-BAR enabled. AMD Driver Version (22.10-220411n) NVIDIA Driver Version (512.15)
AMD Radeon RX 6950 XT, The Fastest Graphics Card For 4K Gaming at $1099 US
Starting with the AMD Radeon RX 6950 XT, this will be the flagship offering on the Navi 21 GPU.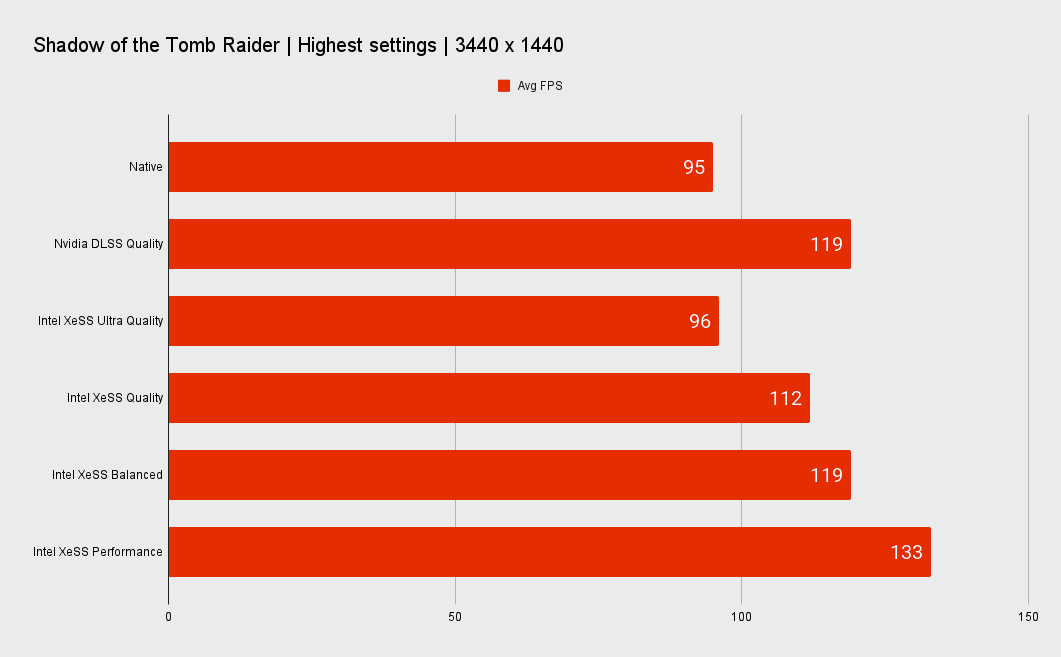 It has the same chip as the XTXH variants plus a binned design which helped the red team extract a little more performance out of the chip. As for the performance, we are looking at various games that were tested at 4K resolutions with max in-game detail,
AMD Radeon RX 6950 XT reference graphics card in Midnight Black flavor. (Image Credits: Videocardz)
Compared to the NVIDIA GeForce RTX 3090, this is a performance improvement of 11% which is the same performance level as the RTX 3090 TI. The RTX 3090 retails at $1499 US while the RTX 3090 Ti retails at $1999 US. So you are looking at a much cheaper price with higher gaming performance. At the same time, we are looking at a 4% performance boost over the Radeon RX 6900 XT for $100 US more (MSRP). So one could just overclock his Radeon RX 6900 XT and call it a day but for those who haven’t upgraded yet, if you are able to find an RX 6950 XT custom model with similar pricing as an RX 6900 XT custom model, then going for the former makes the most sense. But if you are looking at a lower price point for the 6900 XT, then just buying this graphics card and saving a few bucks is the way to go. To sum things up:
- RX 6950 XT vs RX 6900 XT = 4% Faster
- RX 6950 XT vs RTX 3090 = 11% Faster
50
100
150
200
250
300
Assassin’s Creed Valhalla (DX12 Ultra High)
81
77
67
Battlefield 5 (DX11 Ultra)
129
123
120
Borderlands 3 (DX12 Badass)
78
75
68
Cyberpunk 2077 (DX12 High)
64
61
65
Deathloop (DX12 Ultra)
77
74
76
Doom Eternal (Vulkan Nightmare)
159
152
144
F1 2021 (DX12 Ultra High)
152
151
120
Far Cry 6 (DX12 Ultra)
95
90
81
Forza Horizon 5 (DX12 Max)
69
66
65
GTA V (DX11 Ultra)
152
148
159
Hitman 3 (DX12 Ultra Dubai)
150
146
120
Metro Exodus (DX12 Extreme)
72
70
70
Resident Evil Village (DX12 Max)
140
135
115
The Riftbreaker (DX12 Ultra)
229
221
213
The raytracing performance for the AMD Radeon RX 6950 XT was tested in titles that run slightly better with AMD hardware. You are looking at an average 2-3% performance bump in the games tested but at the end of the day, there’s a reason why AMD didn’t focus that much on raytracing performance and that’s purely because NVIDIA’s RTX 30 series has a huge advantage in a majority of RT-enabled titles at the moment.
40
80
120
160
200
240
Deathloop (DX12 Ultra)
Far Cry 6 (DX12 Ultra)
123
107
F1 2021 (DX12 Ultra High)
139
138
Resident Evil Village (DX12 Raytracing Max)
147
149
AMD Radeon RX 6950 XT 4K Performance
| Game Title | AMD Radeon RX 6950 XT | AMD Radeon RX 6900 XT | NVIDIA GeForce RTX 3090 | 6950 XT vs RTX 3090 | 6950 XT vs 6900 XT |
|---|---|---|---|---|---|
| Assassin’s Creed Valhalla (DX12 Ultra High) | 81 | 77 | 67 | +21% | +5% |
| Battlefield 5 (DX11 Ultra) | 129 | 123 | 120 | +8% | +5% |
| Borderlands 3 (DX12 Badass) | 78 | 75 | 68 | +15% | +4% |
| Cyberpunk 2077 (DX12 High) | 64 | 61 | 65 | -2% | +5% |
| Deathloop (DX12 Ultra) | 77 | 74 | 76 | +1% | +4% |
| Doom Eternal (Vulkan Nightmare) | 159 | 152 | 144 | +10% | +5% |
| F1 2021 (DX12 Ultra High) | 152 | 151 | 120 | +27% | +1% |
| Far Cry 6 (DX12 Ultra) | 95 | 90 | 81 | +17% | +6% |
| Forza Horizon 5 (DX12 Max) | 69 | 66 | 65 | +6% | +5% |
| GTA V (DX11 Ultra) | 152 | 148 | 159 | -4% | +3% |
| Hitman 3 (DX12 Ultra Dubai) | 150 | 146 | 120 | +25% | +3% |
| Metro Exodus (DX12 Extreme) | 72 | 70 | 70 | +3% | +3% |
| Resident Evil Village (DX12 Max) | 140 | 135 | 115 | +22% | +4% |
| The Riftbreaker (DX12 Ultra) | 229 | 221 | 213 | +8% | +4% |
| Deathloop (DX12 Ultra RT) | 93 | N/A | 106 | -12% | N/A |
| Far Cry 6 (DX12 Ultra RT) | 123 | N/A | 107 | +15% | N/A |
| F1 2021 (DX12 Ultra High RT) | 139 | N/A | 138 | +1% | N/A |
| Resident Evil Village (DX12 Raytracing Max) | 147 | N/A | 149 | -1% | N/A |
AMD is also sharing the official RSR performance benchmarks of its Radeon RX 6950 XT graphics card. The results include scaling performance from 1800p to 4K and 1440p to 4K. The Ultra Quality preset allows for similar to the native image at higher performance while the Balanced preset allows for much higher performance with slight image quality loss. AMD didn’t share any FSR2 numbers which we will include in our review.
50
100
150
200
250
300
Assassins Creed Valhalla 4K Native
Assassins Creed Valhalla RSR 1800p-4K
Assassins Creed Valhalla 1440p-4K
Borderlands 3 4K Native
Borderlands 3 RSR 1800p-4K
Borderlands 3 1440p-4K
Doom Eternal 4K Native
Doom Eternal 1800p-4K
Doom Eternal 1440p-4K
F1 2021 4K Native
F1 2021 1800p-4K
F1 2021 1440p-4K
Forza Horizon 5 4K Native
Forza Horizon 5 1800p-4K
Forza Horizon 5 1440p-4K
Horizon Zero Dawn 4K Native
Horizon Zero Dawn 1800p-4K
Horizon Zero Dawn 1440p-4K
Metro Exodus 4K Native
Metro Exodus 1800P-4K
Metro Exodus 1440p-4K
RDR2 4K Native
RDR2 1800p-4K
RDR2 1440p-4K
Shadow of The Tomb Raider 4K Native
Shadow of The Tomb Raider 1800p-4K
Shadow of The Tomb Raider 1440p-4K
Watch Dogs Legion 4K Native
Watch Dogs Legion 1800p-4K
Watch Dogs Legion 1440P-4K
AMD Radeon RX 6750 XT, Taking on The RTX 3070 at $549 US at 1440p Gaming
For the Radeon RX 6750 XT, AMD is focusing on the 1440p gaming performance numbers. The card is positioned against the NVIDIA GeForce RTX 3070 which has an MSRP of $499 US so the red team is asking $50 US more for its offering. The RX 6750 XT does rock 12 GB memory (compared to 8 GB on the RTX 3070) and is slightly more power-efficient at running games. But the pricing is already absurd for the RX 6700 XT at $479 US which should’ve been set to $429-$449 US. So asking an extra $70 US over that makes no sense at all.
AMD Radeon RX 6750 XT reference graphics card in Midnight Black flavor. (Image Credits: Videocardz)
However, out of the three variants, the AMD Radeon RX 6750 XT gets the biggest jump over its replacement, offering a 7% performance boost over the RX 6700 XT. Compared to the RTX 3070, the card offers only a 2% performance boost on average. The performance difference doesn’t justify the cost here and it looks like AMD should be looking at their own marketing and testing results. Back when AMD introduced its RX 6700 XT, it was shown to comfortably beat the RTX 3070 8 GB graphics card whereas the performance numbers here show that the RX 6700 XT is not only slower but is also able to offer similar performance as the boosted 6750 XT which is a 7-8% gain over the original 6700 XT. To sum things up:
- RX 6750 XT vs RX 6700 XT = 7% Faster
- RX 6750 XT vs RTX 3070 = 2% Faster
50
100
150
200
250
300
Assassin’s Creed Valhalla (DX12 Ultra High)
93
85
77
Battlefield 5 (DX11 Ultra)
163
153
149
Borderlands 3 (DX12 Badass)
88
82
82
Control (DX12 High)
71
67
76
Cyberpunk 2077 (DX12 High)
73
67
77
Death Stranding (DX12 Very High)
209
193
179
Dirt 5 (DX12 Ultra High)
103
97
103
Doom Eternal (Vulkan Nightmare)
171
159
167
Far Cry 6 (DX12 Ultra)
105
98
102
Forza Horizon 5 (DX12 Max)
72
68
75
Hitman 3 (DX12 Ultra Dubai)
164
153
156
Metro Exodus (DX12 Extreme)
68
64
73
Resident Evil Village (DX12 Max)
154
145
146
Shadow of The Tomb Raider (DX12 Highest)
129
121
128
Overwatch (DX11 EPIC)
241
223
274
AMD Radeon RX 6750 XT 1440 Performance:
| Game Title | AMD Radeon RX 6750 XT | AMD Radeon RX 6700 XT | NVIDIA GeForce RTX 3070 | 6750 XT vs RTX 3070 | 6750 XT vs 6700 XT |
|---|---|---|---|---|---|
| Assassin’s Creed Valhalla (DX12 Ultra High) | 93 | 85 | 77 | +21% | +9% |
| Battlefield 5 (DX11 Ultra) | 163 | 153 | 149 | +9% | +7% |
| Borderlands 3 (DX12 Badass) | 88 | 82 | 82 | +7% | +7% |
| Control (DX12 High) | 71 | 67 | 76 | -7% | +6% |
| Cyberpunk 2077 (DX12 High) | 73 | 67 | 77 | -5% | +9% |
| Death Stranding (DX12 Very High) | 209 | 193 | 179 | +17% | +8% |
| Dirt 5 (DX12 Ultra High) | 103 | 97 | 103 | 0% | +6% |
| Doom Eternal (Vulkan Nightmare) | 171 | 159 | 167 | +2% | +8% |
| Far Cry 6 (DX12 Ultra) | 105 | 98 | 102 | +3% | +7% |
| Forza Horizon 5 (DX12 Max) | 72 | 68 | 75 | -4% | +6% |
| Hitman 3 (DX12 Ultra Dubai) | 164 | 153 | 156 | +5% | +7% |
| Metro Exodus (DX12 Extreme) | 68 | 64 | 73 | -7% | +6% |
| Resident Evil Village (DX12 Max) | 154 | 145 | 146 | +5% | +6% |
| Shadow of The Tomb Raider (DX12 Highest) | 129 | 121 | 128 | +1% | +7% |
| Overwatch (DX11 EPIC) | 241 | 223 | 274 | -12% | +8% |
AMD Radeon RX 6650 XT, The Mainstream RTX 3060 Series Rival For $399 US
While the pricing for the Radeon RX 6750 XT is bad, the RX 6650 XT isn’t impressive either even though it does cost just $20 US more than the 6600 XT but comes on par with the RTX 3060 Ti.
AMD Radeon RX 6650 XT reference graphics card in Midnight Black flavor. (Image Credits: Videocardz)
The former competitor ships with more VRAM, while the latter offers higher performance as the results posted by AMD, prove that the RX 6650 XT will be 2% faster than the RX 6600 XT. Now while the performance jump over the RTX 3060 is touted as a 20-23% gain which does bring the card to the same performance tier as the RTX 3060 Ti, the graphics card loses a lot at 1440p due to its limited bus interface and the respective bandwidth figures. AMD also might’ve forgotten the fact that the RTX 3060 costs $70 US less at $329 US (MSRP). To sum things up:
- RX 6650 XT vs RX 6600 XT = 2% Faster
- RX 6650 XT vs RTX 3060 = 23% Faster
50
100
150
200
250
300
Assassin’s Creed Valhalla (DX12 Ultra High)
100
98
73
Battlefield 5 (DX11 Ultra)
170
166
134
Borderlands 3 (DX12 Badass)
103
101
74
Cyberpunk 2077 (DX12 High)
77
75
70
Deathloop (DX12 Ultra)
100
98
79
F1 2021 (DX12 Ultra High)
176
172
123
Far Cry 6 (DX12 Ultra)
122
119
97
Forza Horizon 5 (DX12 Max)
73
71
60
Ghostwire Tokyo (DX12 Max SSAO)
126
123
100
God of War (DX11 Ultra)
64
63
55
GTA V (DX11 Ultra)
170
169
174
Hitman 3 (DX12 Ultra Dubai)
197
193
157
Metro Exodus (DX12 Extreme)
63
62
54
Red Dead Redemption 2 (DX12 Ultra)
63
61
52
Apex Legends (DX11 Ultra High)
201
197
166
Fortnite (DX12 EPIC)
126
124
119
AMD Radeon RX 6650 XT 1080p Performance
| Game Title | AMD Radeon RX 6650 XT | AMD Radeon RX 6600 XT | NVIDIA GeForce RTX 3060 | 6650 XT vs RTX 3060 | 6650 XT vs 6600 XT |
|---|---|---|---|---|---|
| Assassin’s Creed Valhalla (DX12 Ultra High) | 100 | 98 | 73 | +37% | +2% |
| Battlefield 5 (DX11 Ultra) | 170 | 166 | 134 | +27% | +2% |
| Borderlands 3 (DX12 Badass) | 103 | 101 | 74 | +40% | +3% |
| Cyberpunk 2077 (DX12 High) | 77 | 75 | 70 | +15% | +2% |
| Deathloop (DX12 Ultra) | 100 | 98 | 79 | +27% | +2% |
| F1 2021 (DX12 Ultra High) | 176 | 172 | 123 | +43% | +2% |
| Far Cry 6 (DX12 Ultra) | 122 | 119 | 97 | +26% | +3% |
| Forza Horizon 5 (DX12 Max) | 73 | 71 | 60 | +21% | +3% |
| Ghostwire Tokyo (DX12, Max SSAO) | 126 | 123 | 100 | +27% | +2% |
| God of War (DX11 Ultra) | 64 | 63 | 55 | +17% | +2% |
| GTA V (DX11 Ultra) | 170 | 169 | 174 | -2% | +1% |
| Hitman 3 (DX12 Ultra Dubai) | 197 | 193 | 157 | +25% | +2% |
| Metro Exodus (DX12 Extreme) | 63 | 62 | 54 | +17% | +2% |
| RDR 2 (DX12 Ultra) | 63 | 61 | 52 | +21% | +3% |
| Apex Legends (DX11 Ultra High) | 201 | 197 | 166 | +21% | +2% |
| Fortnite (DX12 EPIC) | 126 | 124 | 119 | +7% | +2% |
The AMD Radeon RX 6000 refresh feels a lot like the Ryzen 3000XT CPUs which were meant to offer a slight boost but at a higher price. It would have been better if the prices were kept the same and AMD offered a slight price drop on existing variants which seems to be happening by only in promo deals by retailers. With that said, the AMD Radeon RX 6000 refresh lineup will be available in range of custom models when they are made official to the public on the 10th of May.
AMD Radeon RX 6000 Refresh Graphics Cards Specs:
| Graphics Card | AMD Radeon RX 6950 XT | AMD Radeon RX 6900 XT | AMD Radeon RX 6750 XT | AMD Radeon RX 6700 XT | AMD Radeon RX 6650 XT | AMD Radeon RX 6600 XT |
|---|---|---|---|---|---|---|
| GPU | Navi 21 KXTX | Navi 21 XTX | Navi 22 KXT | Navi 22 XT | Navi 23 KXT | Navi 23 XT |
| Process Node | 7nm | 7nm | 7nm | 7nm | 7nm | 7nm |
| Die Size | 520mm2 | 520mm2 | 336mm2 | 336mm2 | 237mm2 | 237mm2 |
| Transistors | 26.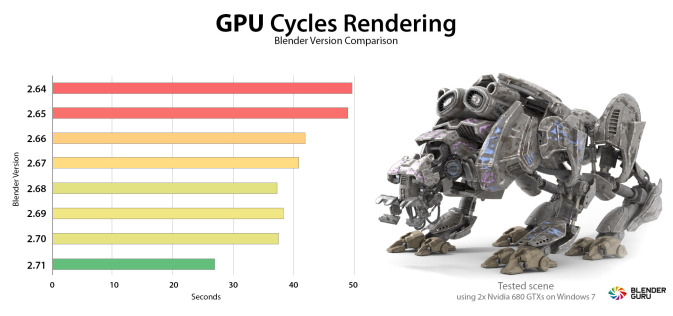 8 Billion 8 Billion |
26.8 Billion | 17.2 Billion | 17.2 Billion | 11.06 Billion | 11.06 Billion |
| Compute Units | 80 | 80 | 40 | 40 | 32 | 32 |
| Stream Processors | 5120 | 5120 | 2560 | 2560 | 2048 | 2048 |
| TMUs/ROPs | 320 / 128 | 320 / 128 | 160/64 | 160/64 | 128/64 | 128/64 |
| Game Clock | 2100 MHz | 2015 MHz | 2495 MHz | 2424 MHz | 2410 MHz | 2359 MHz |
| Boost Clock | 2310 MHz | 2250 MHz | 2600 MHz | 2581 MHz | 2635 MHz | 2589 MHz |
| FP32 TFLOPs | 23.65 TFLOPs | 23.04 TFLOPs | 13.31 TFLOPs | 13.21 TFLOPs | 10.79 TFLOPs | 10.6 TFLOPs |
| Memory Size | 16 GB GDDR6 +128 MB Infinity Cache | 16 GB GDDR6 +128 MB Infinity Cache | 12 GB GDDR6 + 96 MB Infinity Cache | 12 GB GDDR6 + 96 MB Infinity Cache | 8 GB GDDR6 + 32 MB Infinity Cache | 8 GB GDDR6 + 32 MB Infinity Cache |
| Memory Bus | 256-bit | 256-bit | 192-bit | 192-bit | 128-bit | 128-bit |
| Memory Clock | 18 Gbps | 16 Gbps | 18 Gbps | 16 Gbps | 17. 5 Gbps 5 Gbps |
16 Gbps |
| Bandwidth | 576 GB/s | 512 GB/s | 432 GB/s | 384 GB/s | 280 GB/s | 256 GB/s |
| Effective Bandwidth | 1728.2 GB/s | 1664.2 GB/s | 1326 GB/s | 1278 GB/s | 468.9 GB/s | 444.9 GB/s |
| TBP | 335W | 300W | 250W | 230W | 180W | 160W |
| PCIe Interface | PCIe 4.0 x16 | PCIe 4.0 x16 | PCIe 4.0 x16 | PCIe 4.0 x16 | PCIe 4.0 x8 | PCIe 4.0 x8 |
| Price | $1099 US | $999 US | $549 US | $479 US | $399 US | $379 US |
Are you looking forward to the RDNA 2 Refreshed graphics cards from AMD?
-
Yes
-
No
Poll Options are limited because JavaScript is disabled in your browser.
Products mentioned in this post
Best Computer for Blender (Workstation & PC-Build Guide)
Blender is a versatile digital content creation tool that has been used in a variety of high budget and low budget productions.
It’s free, it’s open-source, and it’s incredibly flexible — if you have the right workstation.
This guide will cover the ins and outs of building a computer tailored to fit Blender’s hardware requirements.
The end result won’t differ too much from your usual gaming or workstation setup, but there are a few factors we’ll cover that can have a big impact on Blender’s performance.
We’ll start out by taking a look at how Blender uses your computer hardware, and follow it up with a breakdown of what features you should look for when buying computer parts. After that, we’ll show you some finished builds that are great for Blender users with different budgets.
Finally, we’ll take a look at how Blender’s hardware requirements may change in the future and the things you can do to make sure your build will be ready when those changes happen.
If you already know what you’re looking for, feel free to skip ahead to our hardware recommendations or finished Blender PC-Builds. Otherwise, read on!
How Blender Uses Your Hardware
Blender is a versatile program that has been used to make everything from movies to 3D-printed dentures. It has modes dedicated to 3D modeling, 3D animation, 3D sculpting, 2D animation, rendering, shader editing, video editing, compositing, and even text editing!
Image-Source: Blender
This versatility makes it hard to pick a single performance scenario that’s more important than the rest, but there are a few common categories that are important for every user.
3D Modeling
While it’s theoretically possible to use Blender without digging into its 3D modeling system, most users work with it extensively.
Blender tries to split modeling workloads between the CPU and GPU. Using the former for high-precision tasks — modifiers, shape keys, drivers, etc — and python modules, and the latter for things like geometry selection, viewport rendering, and overlays.
This approach makes Blender a wonderfully undemanding tool for low-poly and mid-poly modeling, but you’ll still need a powerful workstation for high-poly work. You’ll need all the power you can get to take advantage of things like OpenSubdivision and parametric modeling.
3D Sculpting
Blender’s sculpting system was partially refactored for version 2.8, shedding a lot of unmaintainable code. The developers didn’t have time to implement all of the performance optimizations they wanted to before 2.8 hit release, but the features on the road map still show a lot of promise.
Blender 2.9 and subsequent Versions offer new features beyond sculpting improvements as well.
The current sculpting system is CPU-based, with decent multi-threading, and it relies on aggressive RAM caching to deliver consistent performance while working on high-poly models.
Image Source: Blender
Blender hits RAM capacity and CPU processing bottlenecks faster than other sculpting programs because of this, but it still delivers solid sculpting performance on the right hardware.
Cycles Rendering
Cycles is Blender’s production rendering engine. It’s been used in a variety of films and TV shows, like Next Gen and Man in the High Castle, as well as countless commercials.
Under the hood, Cycles is a cross-platform physically-based unidirectional path tracer that can run on CPU, GPU, and CPU+GPU hybrid mode in single-processor and multi-processor (CPU or GPU) configurations. In simple terms, it’s flexible, powerful, and surprisingly easy to work with.
Like all production engines, though, Cycles is demanding. It takes full advantage of multithreading where it can and it’s a popular benchmark tool for both CPUs and GPUs.
Cycles renders faster on GPU by a fair margin, but it has a larger feature set (including OSL support) on the CPU.
Because there are so many things that can improve rendering performance, do check out our in-depth article on How to render faster.
Eevee Rendering
Eevee can’t achieve the same fidelity as a production ray tracer like Cycles, but it isn’t meant to. Eevee’s built for real-time rendering and look development, with a PBR feature set that parallels real-time engines like Unreal and Lumberyard.
As you’d expect, Eevee is a GPU-only engine and that doesn’t run on multi-GPU configurations. Eevee supports bloom, ambient occlusion, depth of field, screen-space reflections, motion blur, volumetrics, and indirect light baking.
Eevee runs smoothly on mid-to-high-end consumer GPUs in most situations. It performs best when it has access to ample VRAM, and it can be bottlenecked by excessive draw calls. It performs a bit better on Nvidia cards than AMD, mostly due to the close relationship between Nvidia and the Blender development team.
Although there are a lot of other 3D Render Engines for Blender, these two are Blender’s very own and therefore also have superior integration.
Best Hardware for Blender Explained
Now that we’ve looked at Blender’s general hardware requirements, we can dig into the specific details that’ll influence how you’ll build your Blender workstation.
CPU
While Blender takes advantage of multithreading where it can, certain tasks have to be handled on a single thread. You can usually predict what is or isn’t multi-threaded, though, and striking a good balance isn’t too much of a challenge.
If you’re interested in all of Blender’s features, or you’re building a generalist workstation that doesn’t target a particular pipeline, pick a processor with a balanced feature set.
Blender is well-optimized for multithreaded CPU rendering, but not to the point that it struggles on processors that prioritize single-core performance.
| CPU Name | Cores | Ghz | Score (minutes) |
|---|---|---|---|
| AMD Threadripper 3990X | 64 | 2.9 | 00.35 |
| AMD Threadripper 3970X | 32 | 3.7 | 00.51 |
| AMD Threadripper 3960X | 24 | 3.8 | 01.04 |
| AMD Threadripper 2990WX | 32 | 3. 0 0 |
01.05 |
| AMD Ryzen 9 5950X | 16 | 3.4 | 01.26 |
| AMD Threadripper 2970WX | 24 | 3.0 | 01.28 |
| Intel i9 12900K | 16 | 3.2 | 01.31 |
| Intel i9 10980XE | 18 | 3.0 | 01.33 |
| AMD Ryzen 3950X | 16 | 3.5 | 01.34 |
| Intel i7 12700K | 12 | 3.6 | 01.54 |
| AMD Ryzen 9 5900X | 12 | 3.7 | 01.57 |
| AMD Threadripper 2950X | 16 | 3.5 | 02.04 |
| AMD Ryzen 9 3900X | 12 | 3.8 | 02.08 |
| Intel i9 10900k | 10 | 3.7 | 02.20 |
| AMD Threadripper 2920X | 12 | 3.5 | 02.24 |
| Intel i5 12600K | 10 | 3.7 | 02.24 |
| AMD Threadripper 1920X | 12 | 3.5 | 02.34 |
| Intel i9 9900X | 10 | 3. 5 5 |
02.43 |
| AMD Ryzen 7 5800X | 8 | 3.8 | 02.47 |
| Intel i9 7900X | 10 | 3.3 | 02.52 |
| Intel i9 9900K | 8 | 3.6 | 02.59 |
| Intel i7 10700k | 8 | 3.8 | 02.59 |
| Intel i9 9900KF | 8 | 3.6 | 03.06 |
| AMD Ryzen 7 3800X | 8 | 3.9 | 03.07 |
| AMD Ryzen 7 3700X | 8 | 3.6 | 03.14 |
| AMD Ryzen 7 2700X | 8 | 3.7 | 03.42 |
| AMD Ryzen 5 5600X | 6 | 3.7 | 03.53 |
| AMD Ryzen 7 2700 | 8 | 3.2 | 03.54 |
| Intel i5 10600k | 6 | 4.1 | 03.55 |
| AMD Ryzen 7 1800X | 8 | 3.6 | 04.01 |
| AMD Ryzen 5 3600X | 6 | 3.8 | 04.10 |
| Intel i7 8700K | 6 | 3.7 | 04.14 |
| AMD Ryzen 5 3600 | 6 | 3. 6 6 |
04.16 |
| AMD Ryzen 5 2600X | 6 | 3.6 | 04.51 |
| AMD Ryzen 5 2600 | 6 | 3.4 | 05.01 |
| AMD Ryzen 5 1600X | 6 | 3.3 | 05.05 |
| Intel i7 7700K | 4 | 4.2 | 06.17 |
| Intel i5 8400 | 6 | 2.8 | 07.14 |
| CPU Name | Cores | GHz | Score (minutes) |
The chart above is from our recent Blender Benchmarks article. The CPUs we tested run the gamut from basic consumer processors to dedicated workstation chips, covering both ends of the budget range.
The benchmark tool we used was built by the Blender Foundation, and it’s a part of their open data platform. If you’re interested in seeing more rendering benchmarks, take a look at their Top CPUs List.
If you aren’t specifically optimizing for CPU rendering, don’t worry too much about picking an expensive processor. You probably shouldn’t go for an Intel Core i3 or AMD Ryzen 1500x if you can afford something better, but there’s no need to break the bank here.
Image-Credit: AMD/Intel
Best CPUs for Blender – CPU Recommendations
- AMD Ryzen 9 5900X, 12-Core CPU for fast active work performance and good CPU rendering performance.
- AMD Threadripper 3970X 32-Core CPU for great CPU rendering performance.
- Budget picks include the 3rd gen Ryzen 7 and 5 Series, AMD Ryzen 5 5600X, AMD Ryzen 7 3700X, AMD Ryzen 5 3600.
If you’d like to stay on Intel’s side, the Intel i9 11900K is a good buy for Blender with fast active work performance, but it lacks behind in multi-core performance compared to many of AMD’s offerings.
GPU
Blender makes liberal use of GPU acceleration, which means that a good GPU can have an impact on just about everything you do in Blender. Not all GPUs are alike, however, and there are some important differences you should be aware of before you commit to a particular brand or price point.
CUDA vs. OpenCL in Blender
While CUDA and OpenCL are both programming architectures that can be used for general-purpose computing on GPUs, it’s hard to compare them directly.
CUDA is a proprietary architecture, toolkit, and API from Nvidia that only works with Nvidia graphics cards. Nvidia provides tons of resources and hands-on support for developers that use it, and it’s a powerful tool for users with the right hardware configuration.
OpenCL, meanwhile, is an open-source architecture for heterogeneous computing that was originally created by Apple. It’s a general-purpose toolkit for making different kinds of processors work together when they otherwise couldn’t, and it’s known for its flexibility.
Quad RTX GPU Setup – Image-Source: Bizon-tech
Blender renders faster and runs smoother on CUDA GPUs for obvious reasons; CUDA is built to be used the way Blender uses it. OpenCL isn’t designed to compete with CUDA, instead catering towards bootstrapped processing networks that mix in non-consumer processors like DSPs and FPGAs.
What About RTX?
“Does Blender use RTX raytracing?”, is a common question, and it deserves a thorough answer.
Nvidia’s ray tracing API isn’t called RTX. RTX cards have dedicated ray-tracing hardware, but the API itself is called OptiX.
OptiX isn’t a driver and it can’t be used to accelerate ray tracing tasks automatically. OptiX is more comparable to architectures like CUDA and OpenCL, albeit with a narrower focus.
Blender supports Nvidia’s OptiX Ray Tracing Engine
Blender’s development team is actively working with Nvidia to fully integrate OptiX features into Blender and OptiX accelerated CUDA rendering already is available alongside the existing CUDA and OpenCL implementations.
Blender 2.9 was the first Blender Version with OptiX support on compatible GPUs.
So What GPU Should You Use for Blender?
Blender’s heavy use of GPU acceleration and its rock-solid CUDA implementation makes an Nvidia graphics card a safe choice for most users. Non-CUDA cards (read: AMD cards) aren’t the best choice for rendering, but they’re still a good choice for users interested in consistent viewport performance.
If you navigate your Scene a lot by moving around the camera in Blender or playing back animations, Nvidia GPUs are a solid choice.
When it comes to looking at GPU specifications, pay attention to the number of compute-cores (CUDA or OpenCL, depending on what brand you buy) and the amount of VRAM.
Blender is just as hungry for VRAM as it for normal RAM, and a GPU with ample VRAM is worth paying extra for if you’re interested in sculpting, high poly modeling, or GPU rendering.
GPU Conclusion aka “Blender AMD vs Nvidia”
Blender can use both CUDA/OptiX and OpenCL for Rendering, and other Creative Software like the Adobe Creative Cloud, too, has both CUDA and OpenCL support.
That said though, the CUDA implementation in these Applications usually supports more features and performs better, so if you are undecided between AMD and Nvidia, go the Nvidia Route.
Best GPUs for Blender – GPU Recommendations
CUDA
- Performance Pick: Nvidia RTX 3090 or RTX 3080 Ti
- Value Recommend: Nvidia RTX 3060 Ti and RTX 3070
- Budget Choice: Nvidia GTX 1660 Super
OpenCL
- Radeon RX 6800XT or RX 6800
- Radeon RX 5700XT or RX 5700
RAM
While earlier versions of Blender were known to have a relatively modest memory footprint, Blender 2.8 reverses that trend.
Although you can generally get by in Blender with mid-range processors and graphics cards, insufficient RAM is a show-stopper that can’t be circumvented.
So why does Blender use more RAM than other programs?
Blender does a little bit of everything, and it isn’t optimized for narrow performance conditions like other modeling tools.
It has multiple data structures for meshes, operations that can run on both CPU and GPU, and a system for animating just about every object property you can imagine.
Blender juggles these operations and not-quite-identical data structures by caching and duplicating object data in your RAM, giving each system a clean instance to operate on.
This limits data loss and improves Blender’s stability, but only by consuming a significant amount of RAM.
This RAM caching system has a notable impact on Blender’s modifier stack, as it repeatedly re-caches objects for each active modifier.
It has a similar impact on sculpting, too, due to the differences between the sculpting and modeling mesh data structures.
Image-Source: G.Skill
If you’re using Blender for anything beyond low-poly modeling and simple scenes, you’ll want at least 16-32GB of RAM. If you tend to multitask and this isn’t your first workstation build, stepping up to 64GB isn’t a bad idea.
When it comes to RAM speed and how many sticks to get, check out this section of our general workstation guide. It’ll tell you everything you need to know.
Best RAM for Blender – RAM Recommendations
- Best Value Choice: Corsair Vengeance LPX DDR4 RAM 3200MHz CL16
- Performance Pick: G.Skill RipJaws 3600MHz CL16 or Crucial Ballistix 3600Mhz CL16
Storage
Data storage can have a surprisingly large impact on Blender’s performance, and investing in the right drives definitely pays off.
Blender is built with data preservation in mind, which means that it’s constantly writing temporary files and auto-saves to disk. This is great for most users, but it can lead to frustrating I/O bottlenecks in large projects.
To get the best performance, you’ll need to distribute your workload across multiple drives, preventing software and operating system I/O from bottlenecking data cache and storage I/O.
A 3-drive configuration, with your OS and software on one SSD, your active project files and data caches on a second SSD, and your archived files on an HDD, will give you the best performance when you’re working on projects with cached lighting, physics, and/or animation data.
This kind of configuration is commonly used by video editors, which shouldn’t be too surprising. The Blender Foundation has a long history, and much of Blender’s feature set caters to open source short film production.
For SSDs, we strongly recommend choosing an NVMe SSD. The price difference between SATA and NVMe SSDs isn’t negligible, but the performance gains are significant.
The size sweet spot will depend on how complex your projects are and how many of them you have going at once; if you tend to work on one project at a time, you can get away with using smaller SSDs and move your completed projects to an HDD as you go.
HDD prices are low enough that you should be able to get a high capacity drive for relatively cheap. If this is your first workstation build, you don’t need to worry about complex RAID configurations or NAS enclosures; you’ll know when you’ll need them.
Samsung 980 PRO NVMe PCIe 4.0 SSD – Image Source: Samsung
Storage Recommendations
- For Project Files: Samsung 970 EVO Plus or Gigabyte Aorus NVMe Gen4 SSD (Nvme M.
 2 SSDs)
 - For OS / Software: Samsung 870 QVO (SATA SSDs)
- For Backup / Archiving of Projects: Seagate Barracuda HDDs or Western Digital Blue Series
Cases
I’m going to focus on ATX cases here, as the build process for Micro-ATX and ITX form-factors are involved enough to deserve their own article.
For ATX cases, though, the rubric is simple.
Your case should be well-built, properly sized, and adequately vented, with mounting points for additional fans and a logical air-flow design. Tie-off points for cable management are always helpful, and front USB-C ports can be incredibly convenient.
Beyond those basics, though, choosing the right case is mostly a matter of aesthetics.
Image-Source: Corsair
If you’re going for an industrial vibe check out Lian Li. The PC-A75 is a large and sturdy case that’s the perfect case for an understated workstation build.
If you value airflow above all else, get a case from Cooler Master. My current workstation is in their HAF XB EVO, and, while it isn’t the prettiest case in the world, it’s a rock-solid test bench with excellent cooling.
For cases with more traditional aesthetics, I’ll defer to Alex. Here are a few of his recommendations:
Case Recommendations
Mid-Tower (Standard-Sized Build)
- Phanteks Enthoo Pro ATX Mid Tower Case
- Corsair Carbide Series 200R ATX Mid Tower Case
- Corsair Carbide Series 275Q ATX Mid Tower Case
Big Tower (For lots of GPUs)
- Fractal Design Define XL R2 Titanium Big Tower Case
Power Supplies
Picking the right power supply is pretty simple. Grab an online calculator (like this one!) and add up your system’s power draw. If the average draw lines up with the peak of the PSU’s efficiency curve, and you still have some headroom for future upgrades, you’re good to go.
If you care about cable management (and you should care about cable management), get a modular power supply.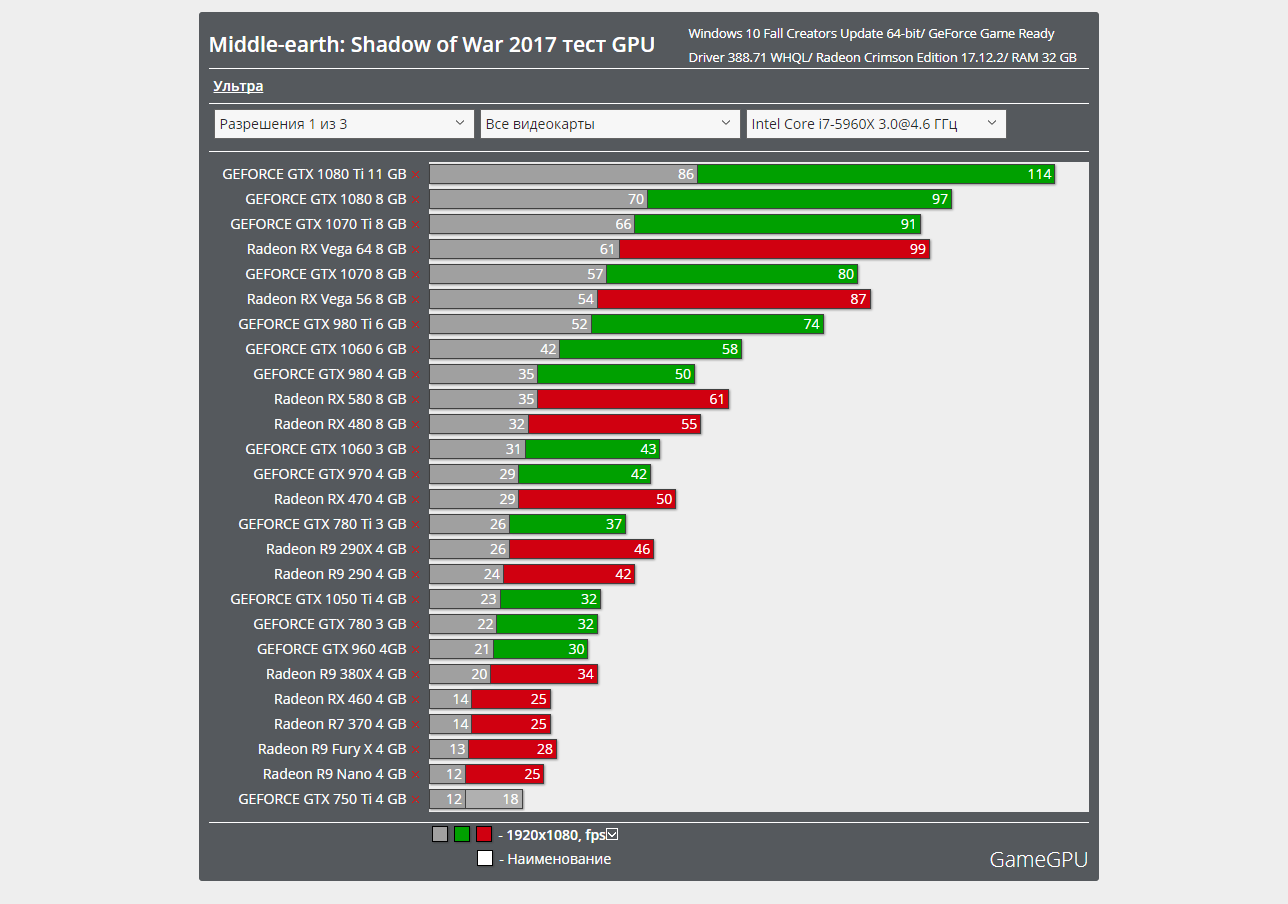 These PSUs cost a smidgen more than non-modular power supplies, but the convenience of only having to deal with the cables you need in your case is worth the premium.
A Modular PSU keeps your Blender PC clutter-free
Beyond that, it’s mostly a matter of budgeting. With that, and energy efficiency, in mind, here are a few PSUs we’d recommend:
PSU
- 550W: Corsair CX Series CX550 550W ATX 2.4 Power Supply
- 760W: Corsair Professional Series Platinum AX760 760W Power Supply
- 1000W: be quiet! Straight Power 11 1000W ATX 2.4 Power Supply
- 1600W: Corsair AX1600i 1600W ATX 2.4 Power Supply
Motherboards
The importance of a high-quality motherboard is hard to quantify, as the associated costs tend to be tied up in materials and quality controls that provide stability rather than direct performance improvements.
You’ll feel the impact of those materials and controls once you start overclocking, though, and you’ll appreciate the additional PCI slots, rear I/O, M.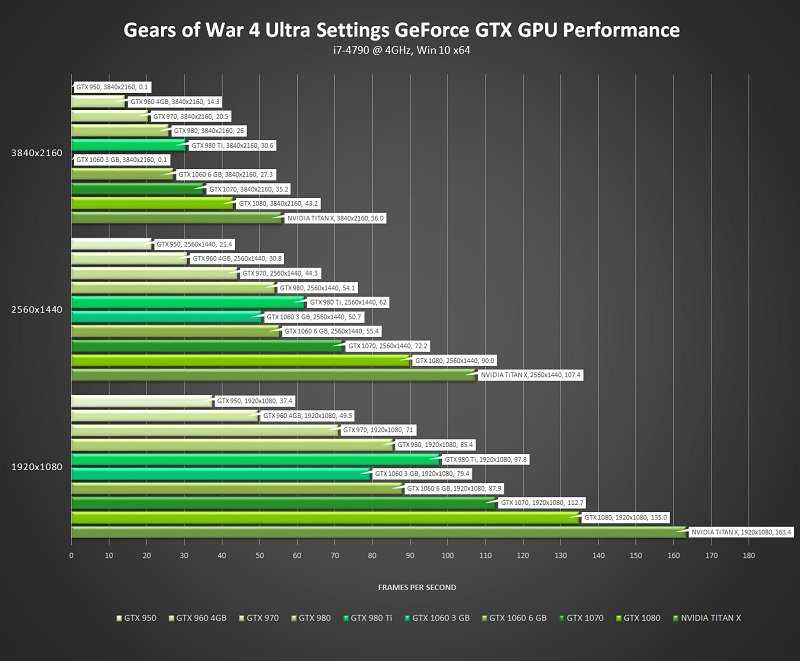 2 capacity, and power stability when it comes time to upgrade.
Image-Source: Gigabyte
The specific motherboard you choose will, of course, depend on the CPU socket and form factor and the amount of GPUs you are planning on using you’re interested in. Larger motherboards tend to have more internal expansion slots and rear I/O ports than smaller motherboards, and newer socket revisions tend to come with better features than older revisions (even when they’re compatible with the same hardware).
Check out this guide if you want to dive into the nitty-gritty details of buying the best AM4 motherboard; Find our Intel Motherboard Guides here.
Keep reading to see our current recommendations.
Motherboard Recommendations
- AMD Socket AM4: Gigabyte X570 Aorus Elite or MSI Tomahawk B550
- AMD Socket TR4: Gigabyte Designare Ex X399
- AMD Socket sTRX4: ASRock TRX40 Creator
- Intel Socket LGA-1151 v2: Asus Prime Z390-A II
- Intel Socket LGA-1200: Gigabyte Z590 Aorus Elite
- Intel Socket 2066: MSI X299 Gaming Pro Carbon ATX 2066
Monitor Choices
Picking the right computer monitor for Blender is fairly straightforward since Blender doesn’t require monitor features that other modeling programs don’t.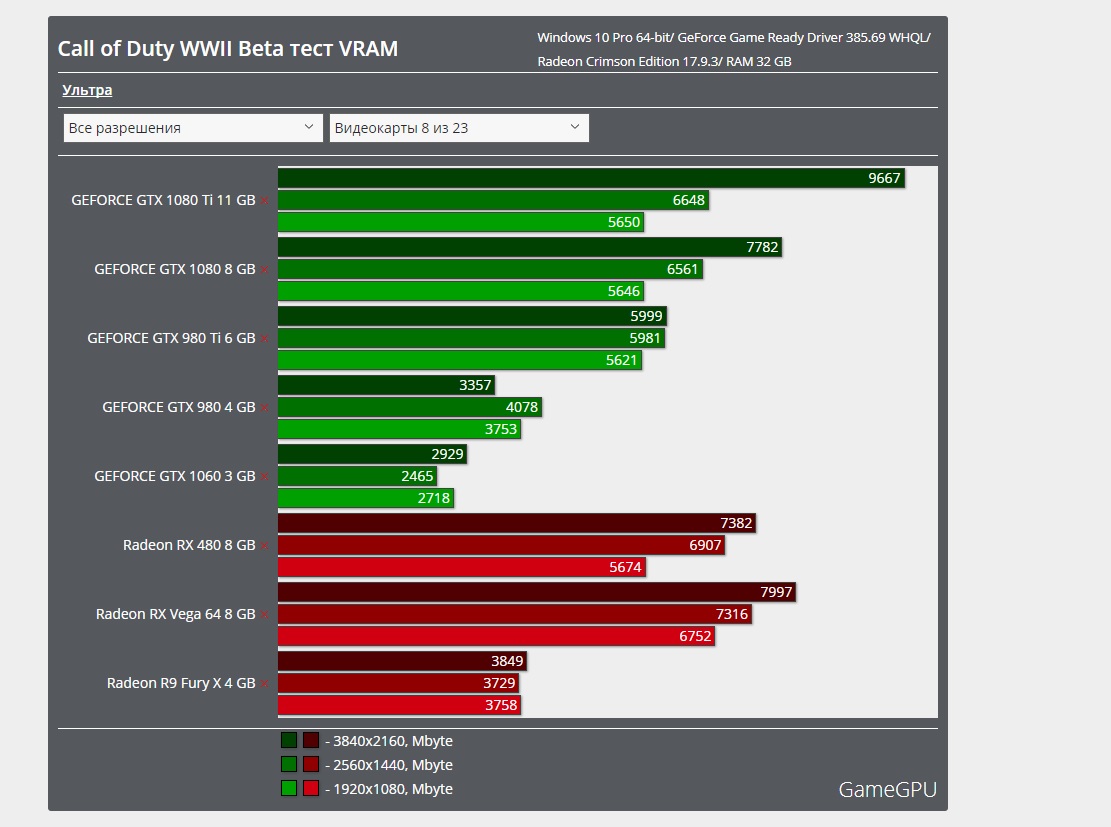
This lets you pick a monitor configuration that fits the overall workflow you like to use without worrying too much about how Blender will fit into it. Blender’s UI is functional on both small and large screens, with hiDPI support on all platforms, too.
We explore monitor choices in detail in this writeup, which is worth reading if you’re looking for a high-end screen. In general, though, you’ll probably want an IPS panel monitor with minimal light bleed and a broad color gamut. A 4k monitor isn’t mandatory, but the step from 1080p to 1440p is worth it if it fits your budget.
UHD for large Monitors & QHD is best for displaying Blender’s User Interface
When it comes to screen size, number, and aspect ratio, it’s mostly a matter of personal preference. Your productivity won’t scale linearly with more and/or larger monitors, and you’ll benefit more from a single high-quality screen if you’re doing any sort of texturing, rendering, or color grading.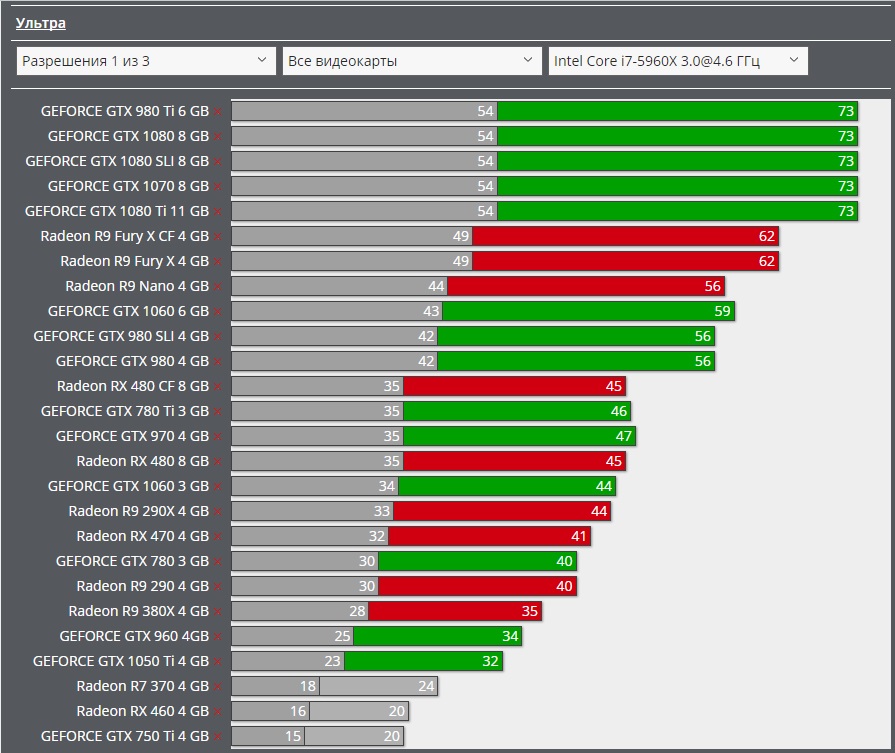
Curved Monitors for Blender can be a good option as well. If you’re still undecided if you should choose a curved or flat Monitor, this Article will help.
Image-Source: Dell
Here are a few monitors that fit that description:
Monitor Recommendations
- Best 27” All-Rounder: Dell UltraSharp UP2716D, 27″
- Serious Color Accuracy Work: Eizo ColorEdge CG2420, 24″
- Best 4K Budget Monitor: Philips 276E8VJSB
Future-Proofing
The PC hardware market changes quickly, and some hardware configurations are more upgradable than others. If you want to build a PC for Blender that you can upgrade later on, there are a few factors that’ll affect your hardware choices.
Hardware Considerations
The biggest factor is your motherboard’s CPU socket type. Some sockets are designed to be forward-compatible (with bios updates), while others aren’t.
Depending on when you build your computer, relative to hardware release cycles, a newer low-end CPU can be a smarter choice than an older high-end CPU if you’re intending to upgrade later on.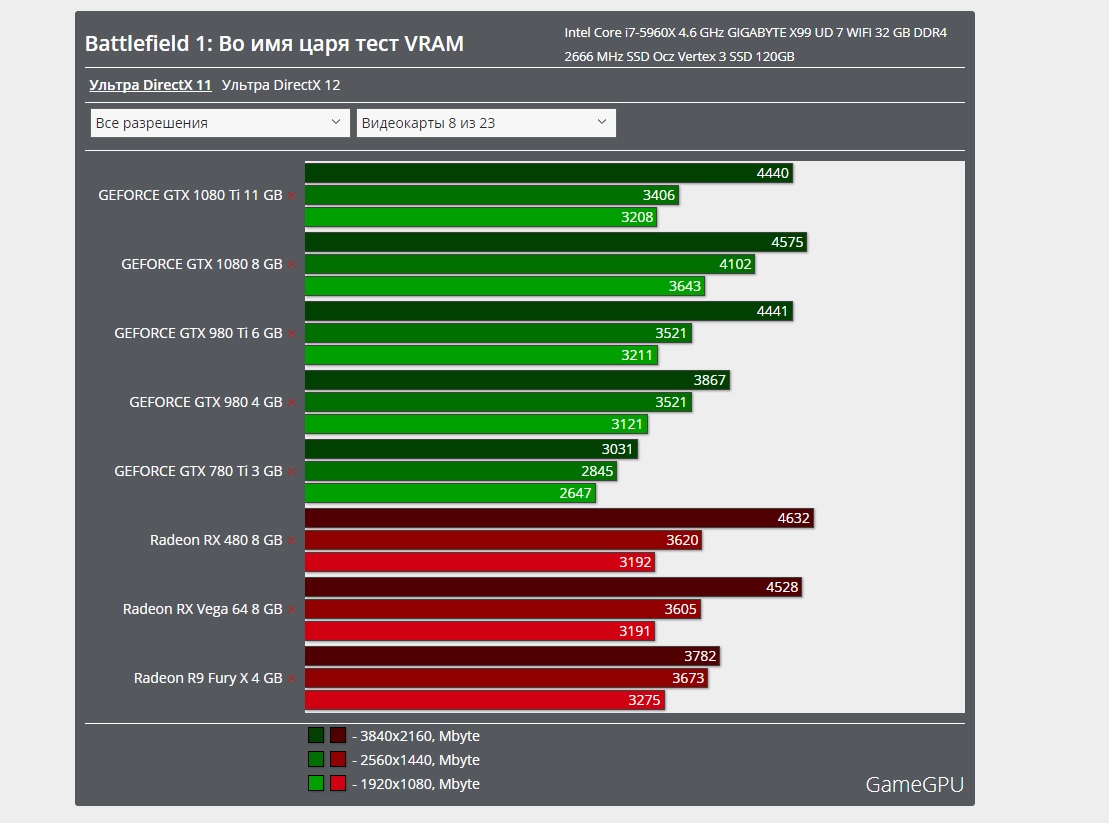
On the practical side of the equation, picking the right case can make upgrading a lot easier. I specifically chose my ugly brick of a case for its horizontally mounted motherboard, which makes upgrading a breeze. I can pop the top panel off and swap hardware out in minutes
The form factor of your build can also make upgrading harder; small cases don’t have a lot of wiggle room for longer GPUs and larger coolers, and compact motherboards have a limited number of PCI lanes and RAM slots.
Piecemeal upgrades in tight cases are challenging, and you’ll end up spending more time planning and installing hardware upgrades than you would in a larger case. PSUs should be strong enough from the start if you plan on getting more hardware later on, especially with multi-GPU setups that are planned to be expanded.
Building Your Workstation
This is a site for PC building enthusiasts, which means we really like the part where we get to put our workstations together. It’s fun, it’s amazingly easy, and it’s a great way to save money.
If you don’t know where to start, though, don’t worry; there are tons of guides online.
By now you should have an idea of what kind of parts you need to build a PC, putting it together is just one more step in creating your own specialized Blender PC.
We’ve found this video from Bitwit to be particularly helpful for first-time builders:
Putting your workstation together should only take a few hours; less, if you set up your workspace properly beforehand.
We also have a step-by-step Guide on assembling your first PC, if you prefer following a written Article.
Best PC-Builds for Blender at different Price Points
There are thousands of part combinations that you could choose from and making sure they are all compatible can be cumbersome. Here are a couple of Blender PC Builds in different price tiers that you can use as a baseline.
You can order the individual parts as-is at your preferred merchant or change some of the parts around if you want to customize the build further.
Best Computer for Blender, AMD at roughly ~700$
Some Build notes:
This very low-budget Build can be made even cheaper if you use the CPU Cooler that comes with the CPU. It doesn’t have as great a Cooling Power as the CoolerMaster Hyper 212, but this is not entirely necessary with such a CPU.
Some CPU upgrades include the Ryzen 7 2700 or 2700X if you have some extra cash. Of course, the 3rd gen Ryzen CPUs are an option too but will increase the money you have to spend some more.
Best Computer for Blender, AMD at roughly ~1500$
Some Build notes:
This is a great “all-rounder” AMD build that will make Blender run fast in all kinds of workloads – multi- and single-threaded.
The AMD Ryzen 5 5600X comes with excellent single-core speeds, but does only include 6 Cores. Chose this CPU if you do lots of active work but only occasionally render on the CPU.
Be sure to take a look at this article on the best motherboards for Ryzen 3rd Gen CPUs, to see which one exactly you will want to get.
The Nvidia RTX 3070 offers great CUDA GPU Rendering Performance at a reasonable price but can be interchanged with a 3060 Ti if you’d like to save some more money.
Best Computer for Blender, Intel at roughly ~2000$
Some Build notes:
Another AMD Build. Not because we are biased towards AMD, but because AMD CPUs currently just perform better at every price-point vs. the competition.
This is a top-of-the-line AMD build with an extremely well-performing Processor in Blender.
The AMD Ryzen 9 5950X is the currently leading CPU in single-core performance, meaning your viewport and active-work speed will not get any faster than with this CPU. In addition, the 16 Cores will keep your rendertimes low.
If you are planning on some extreme overclocking or demanding & sustained workloads, you might want to consider an AiO CPU cooling solution.
The Nvidia RTX 3080 has great CUDA/OptiX Performance for rendering in Cycles.
Best Computer for CPU Rendering in Blender, AMD at roughly ~3000$
This is an excellent Build that leans towards CPU Rendering Performance and less towards active-working performance in tasks such as 3D Modeling or Animating.
Some notes on this build:
As this build is focused on CPU Rendering, the other parts such as storage and GPU are proportionally low-end compared to the 24-Core Threadripper CPU. This build has an absolutely fantastic CPU Rendering Performance.
64GB of RAM is a lot. It should be more than enough for nearly any kind of scenes. You can save some cash by downgrading to 32GB though.
If you need even more CPU Rendering performance, you have the option to get a 3970X or even 3990X AMD Threadripper CPU. The 3990X has 64 Cores with extremely high multi-core Rendering performance but is quite slow for active workloads.
Best Computer for GPU Rendering in Blender, AMD at roughly ~7100$
This is an excellent Build that will bring you the maximum plug & play GPU Rendering Performance (on a single Consumer Mainboard) combined with an excellent CPU for good Workstation performance. But it comes at a steep price.
Some notes on this Build:
4 GPUs need a Motherboard with 4 PCIe Slots that are spaced far enough from each other to allow for 4 dual-Slot GPUs. This is possible with the Gigabyte X399 Designare EX Motherboard.
At ~$1,200 each, RTX 2080TIs are expensive. If you’re okay with slightly slower performance, but want to save a decent chunk of money, I recommend going with 4x RTX 2070, as these come in at around $550 each. You’ll only have 8GBs of VRAM per card, but the GPU rendering performance/price is much better.
The Case is big. It has room for 8 single-slot (or 4 dual-slot) Cards. The Power Supply should provide at least 1250W and I added some headroom here with the excellent 1600W Corsair Titanium Power Supply.
Threadripper CPUs are excellent for multi-GPU setups, as these CPUs have 64 PCIe-Lanes to drive all of those GPUs in 16x and 8x Mode.
Blender’s Cycles Rendering Performance scales almost linearly with added GPUs
– All of these builds will of course need a Keyboard, Mouse, Monitor, and Operating System to be complete, but I’ll let you figure those out on your own. –
Custom PC-Builder
If you want to get the best parts within your budget you should definitely have a look at our Web-Based PC-Builder Tool.
CGDirector PC-Builder Tool
If you are not quite sure yet what general kind of Computer, Desktop, Workstation, or Laptop you need and you are still looking for some beginner’s help, check out this article on finding exactly what kind of Computer you need.
Best Laptop for 3D Modeling and Rendering in Blender
Just a quick reminder for anyone who would like to get a Laptop instead of a Desktop PC or Workstation.
I have written an article on picking the perfect Laptop for Blender here.
If you’d like to read some more general Laptop Guides that are still relevant to Blender, check out the following: Laptop for Animation or Laptops for Video Editing.
A lot of the specs from 3D Animation will be exactly the same as for 3D Modeling. For CPU rendering, this article on the best CPU for rendering can help you out.
FAQs
Does Blender use the GPU or CPU?
Blender uses both. Which of the two you should spend more money on, mostly depends on if you’ll be doing GPU or CPU rendering.
Does Blender need a good CPU?
For active workloads such as modeling and animating, Blender needs a high-clocking CPU with good single-core Performance. For Multi-Threaded Workloads such as CPU-Rendering, you’ll need a CPU with lots of Cores.
Is 4 Cores enough for Blender?
4 Cores are sufficient for average Blender Performance. You’ll have slow CPU rendering performance with just 4 Cores, but active work performance in modeling and animation does not need more than 4 Cores.
Is Eevee or Cycles better?
Eevee is faster but less precise while Cycles is slower but more precise. Cycles has a larger feature set that allows for photorealistic results, while Eevee does a lot of approximation for fast results.
Over to you
What kind of Blender Computer or Workstation are you building? Let us know in the comments or ask some of our Forum experts!
CGDirector is Reader-supported. When you buy through our links, we may earn an affiliate commission.
Should Text Be On Instagram Image Posts: Yes or No?
Catching the attention of users on Instagram has never been more challenging.
Last year, the Social Media Lab ran a test comparing photos vs text-only graphic images. We found that photos outperformed the text-only images, but it brought up lots of follow-up questions regarding text on Instagram images.
During our weekly Social Media Lab LIVE show, a few viewers brought up the idea that photos with text overlaid on them were performing better for them or some believed that rumor. A rumor probably spread by some “guru” that tried it once and got success.
These comments led us to research Instagram activity and test whether or not adding text to an Instagram image post makes a difference.
You as the Social Media Manager need to figure out ways to get more eyeballs on your Instagram content. (After all, that’s why they pay you the big bucks!)
Keep in mind 90% of Instagram users follow at least one business account, maybe it’s yours.
I searched countless blogs to find some data-based research others had done testing photos with or without text on Instagram but came up empty.
You’ll find lots of articles on how to put text on photos and create eye-catching graphics, but nothing supporting or refuting the claim that photos with text on them outperform standard photos on Instagram.
Many sites recommend placing text on Instagram photos because it stands out, but have no data to back up such claims.
So, I’m basing my hypothesis on the results we saw on our former photos vs graphics test.
Subscribe to the Social Media Lab Podcast via iTunes | Stitcher | Spotify
Hypothesis: Instagram images without text receive more reach and engagement.
How We Tested Instagram Images With and Without Text
Across seven different Instagram accounts, seven posts with and without text on images were posted. This gives us 49 images of each category to compare the results.
The well-established accounts used for this test vary in industries:
- Animals
- Trucks
- 2 fitness accounts
- Paris tourism account
- Motorcycles
- Motivational quotes
Here’s a sample of some of the images with text:
Likewise, here are some examples of Instagram images without text:
We will adhere to a few guidelines regarding the posts:
- No hashtags will be used.
- No Instagram users will be tagged.
- Location tags will not be used.
- The posts will not be shared to Instagram Stories.
- The posts will not be shared with any other social network.
- These posts will not be used in Instagram ads.
- All posts were scheduled using Agorapulse.
- Posts will be scheduled at the same time per day, alternating days (schedule example below).
By adhering to these guidelines, I am removing any anomalies that might skew the performance of the Instagram posts.
We waited at least 7 days before pulling the data from Instagram, so that all organic reach and engagement was basically obtained.
Data Comparing Instagram Images With and Without Text
These data points will be evaluated to accurately compare the performance of Instagram images with text and without text:
- Reach (how many unique Instagram users saw the post)
- Likes
- Comments
Typically in the Social Media Lab, we focus purely on the Reach for the organic experiments, but engagement is possibly more important on this Instagram test.
Sure, we need to reach more people with our Instagram posts, but if they aren’t taking action on them what’s the point?
We really want to know if something as simple as adding basic text onto an image results in more Instagram engagement.
So did it?
The data from each account has been averaged together:
Instagram images with text:
- Reach: 471.69
- Likes: 45.92
- Comments: 0.90
Instagram images without text:
- Reach: 538.41
- Likes: 64.06
- Comments: 0.92
Instagram images without text win all three categories!
Here are the results in percentage differences favoring images without text:
- Reach: 14.14% higher
- Likes: 39.50% higher
- Comments: 2.22% higher
These results are completely opposite of the traditional train of thought we were seeing others claim during our research.
But, data doesn’t lie.
SHARE THIS DATA!Click To Tweet
This is why testing across multiple profiles, in varying industries is so crucial when testing social media marketing strategies. If I isolate just one of the accounts that saw the results favor images with the text I wouldn’t have been accurate in our conclusion.
Instagram Images Without Text Perform Better
The percentage differences of reach and likes are quite convincing and tell me Instagram images without text perform better.
To be certain, we evaluated the raw number of reach and likes in a statistical significance calculator. That allows us to determine whether the results were scientific or just a fluke.
Using Neil Patel’s A/B testing calculator, we find out our results are 100% certain that Instagram images without text will continue to outperform on our accounts:
I’m confident that if you tested on your accounts, you’ll see similar results.
Every account is different and will depend on your posting history and audience.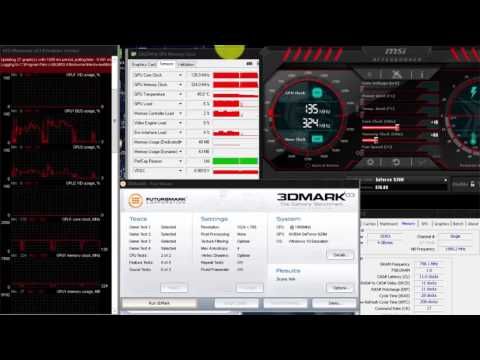 So make sure you test it and vary between posting with and without text on your Instagram photos.
On the quotes-related Instagram account, I had only posted motivational type images with text before this test, such as the image below:
This is the type of post the audience has only seen and become accustomed to. However, images without text actually performed better for this account!
Similar style image, but no text on it:
The fitness accounts surprised me as well. Both accounts have always seen a mix of images with and without text. I was shocked to see the accounts were split on which type did better, even though they were the same exact images and likely have a very similar audience.
Again, this emphasizes the need to be certain you are testing (or reading about tests) that are on multiple accounts in varying industries.
Users want to see faces. We proved that in another test comparing graphics vs photos, and Instagram users realize that images with text are more “marketing” in nature.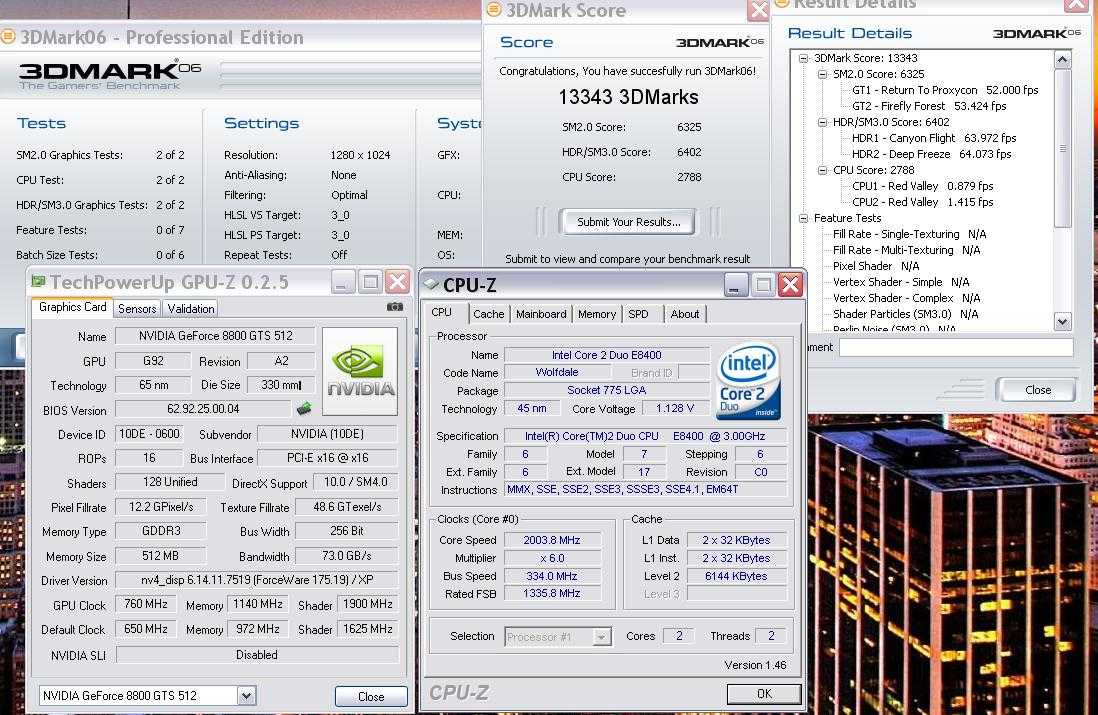
Or at least they feel more like marketing.
The more natural and less gimmicky your images seem, the more they appeal to Instagram users.
Want to test this? Alternate between images with text and without for a week and report back your results in our Social Media Lab Facebook group. We’d love to see your results.
Subscribe to the Social Media Lab Podcast via iTunes | Stitcher | Spotify
Don’t miss an experiment!
New experiments and exclusive content straight to your inbox
The page you requested was not found on our site.
-
ASRock motherboard specs leaked…
ASRock AMD B650, B650E Taichi Motherboard Specifications Leaked — E-ATX with 27-Phase VRM
-
Motherboard Intel Core i9-13900K…
Intel Core i9-13900K and premium Z790 motherboard now certified for DDR5-7600 XMP 3.
 0 memory
-
Intel Arc A770 GPUs…
Intel Arc A770 and A750 GPUs tested in OpenCL and Vulkan benchmarks
-
First MSI B650 Motherboards…
The first MSI B650 motherboards for Ryzen 7000 processors are now available for at least $199.
-
GPU-Z now supports GPUs…
GPU-Z now supports NVIDIA GeForce RTX 4090 and Intel Arc A770/A750 GPUs.
-
Integrated circuit manufacturing in South…
Integrated circuit production in South Korea declined for the first time in many years
-
ASUS DIY-APE Revolution project is…
The ASUS DIY-APE Revolution project is an attempt to improve PC cable management.
-
AMD Processor Roadmap Leaked…
AMD Desktop Processor Roadmap Leak Confirms Ryzen 7000 X3D Series
-
GeForce RTX 4090 at 60%…
GeForce RTX 4090 is 60% faster than RTX 3090 Ti in Geekbench CUDA test
-
Gigabyte Introduces GeForce RTX Graphics Card…
Gigabyte Introduces GeForce RTX 4090 Aorus Waterforce Graphics Card With 360mm AIO Cooler
-
MicroCenter offers a free memory kit…
MicroCenter Offers Free 32GB DDR5 Memory Kit with AMD Ryzen 7/9 Processors7000
-
Intel Arc custom graphics cards unveiled…
Intel Arc A770 and A750 custom graphics cards introduced
You requested https://gamegpu. com/rpg/%25d1%2580%25d0%25be%25d0%25bb%25d0%25b5%25d0%25b2%25d1%258b%25d0%25b5/myst-test-gpu-cpu , but no matter how hard our servers tried, we couldn’t find it. What happened?
- the link you clicked to come here contains a typo
- or this page was somehow either deleted or renamed by us
- or, which is of course unlikely, did you enter it manually and in doing so made a small mistake?
However, the world does not end there: you might be interested in the following pages on our website:
- action-/-fps-/-tps/cyberpunk-2077-2020-test-gpu-cpu
- action-/-fps-/-tps/battlefield-2042-open-beta-test-gpu-cpu
- action-/-fps-/-tps/cyberpunk-2077-v-1-5-test-gpu-cpu
- action-/-fps-/-tps/cyberpunk-2077-v-1-2-test-gpu -cpu
- action-/-fps-/-tps/gears-5-beta-test-gpu-cpu
Lara Croft and the Temple of Osiris GPU test
©
darkevil555
News
Year : 2014
Genre : Arcade (Platform) / 3D / Isometric
Developer
Lara 2560
During the settings, the acceptable FPS indicator showed video cards of the Radeon HD 7950 or GeForce GTX 770.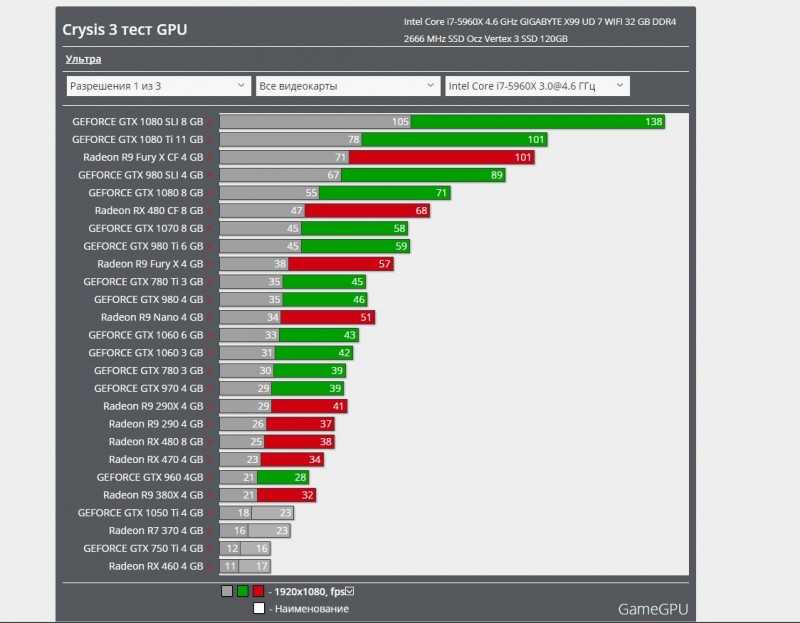 The Radeon R9 285 or GeForce GTX 780.
9000 9000 9000 9000 9000 ULT is the best solution.
lara 3840
With these settings, no solution shows an acceptable performance level.
Testing at maximum quality settings Memory GPU
LARA VRAM
The recommended volume of use of video memory for a resolution of 1920×1080 will be 2048 MB of video memory, to resolve 2560×1600 — 2048 MB of video memory and for the resolution of 3840×2160 about 3076 MB of video pamama.
Testing at maximum quality settings 1920×1080
lara proz
CPU performance in the game is sufficient on all tested models.
lara ram
As we can see, with various quality settings, the amount of RAM consumed in Lara Croft and the Temple of Osiris is at the level of 1 gigabyte.
Testing system RAM consumption
lara ram2
With a system with 6 gigabytes, Lara Croft and the Temple of Osiris consumes about 2.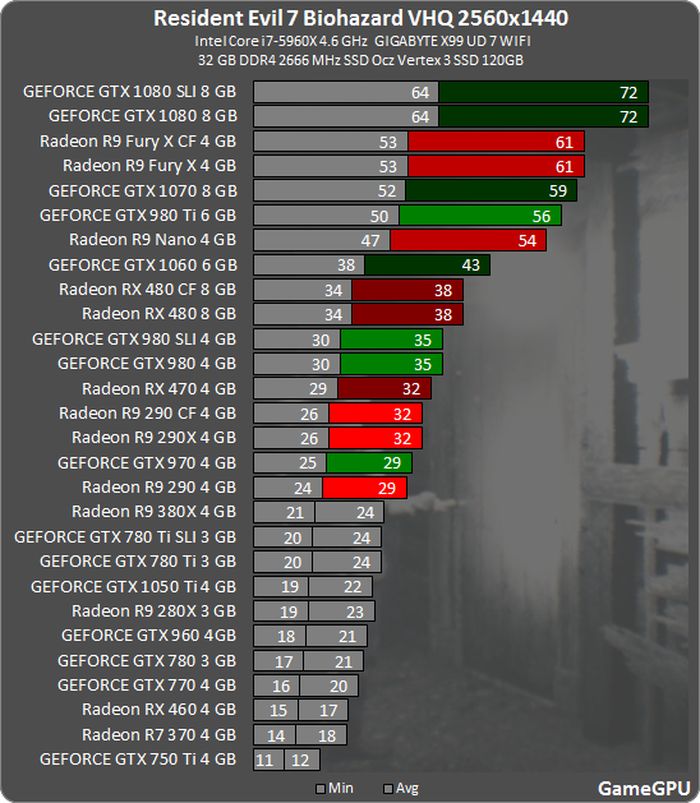 2 gigabytes of RAM. In the presence of a system with 8 gigabytes, the RAM consumption of all RAM was 2.5 gigabytes. With a 16 GB system, total memory consumption was almost 3.0 GB. And with 32 gigabytes of RAM, the system consumes 4.4 gigabytes of RAM.
Spoiler
Source
|
Screenshots
Blizzless hackers posted some screenshots from Diablo 4 with Russian language
|
Movies and series
A fan released a Cyberpunk Edgerunners comic in which Rebecca gets a well-deserved ending
|
Movies and series
Giancarlo Esposito thanked the fans for the resounding success of the anime Cyberpunk Edgerunners
|
Trailers
Trailer Warhammer 40,000: Darktide dedicated to one of the classes
|
Technology
Redditor drove pixel characters from Fallout 2 through Stable Diffusion neural network
Half meter statuette of Sylvanas Windrunner unveiled
|
Trailers
The creators of Scorn pushed back the release date — a spooky adventure will be released a week earlier
|
Movies and series
Are we waiting for the announcement of the new season? A mysterious countdown timer appeared on the Berserk official website
|
Movies and TV shows
Deadpool 3: Hugh Jackman posts sweaty gym photo of him working out to play Wolverine again
|
Screenshots
Atmospheric and creepy screenshots of The Callisto Protocol 9 horror0009
The developers promise that Forza Horizon 4 will not close «in the near future»
compare coding on graphics accelerators
Video Compression Guru
Intel vs Nvidia: comparing coding on graphics accelerators
Video transcoding is a very resource-intensive task. Sometimes it is quite expensive to perform it at the expense of the CPU, and to save resources, graphics accelerators are used. This is especially true in OTT broadcasting, when there are many profiles per channel.
In this article, we will look at the main advantages and disadvantages of these solutions using the example of QuickSync technology from Intel and NVENC from Nvidia. It is interesting that formally being competitors in the field of coding, both companies develop in parallel and even cooperate in the production of new chips.
First, let’s decide on the graphics that we will compare. We will consider only stable solutions for 24/7 work: in television broadcasting it is impossible otherwise. With Intel, it’s simple: take the latest generation of Coffee Lake Xeon processors with integrated Intel® UHD Graphics P630, the Intel® Xeon® E-2246G processor. With Nvidia, the choice of a video card for transcoding is a little more complicated. We chose the Quadro RTX 4000 (8GB) — this is the server counterpart of the GeForce RTX 2070 Super (8GB).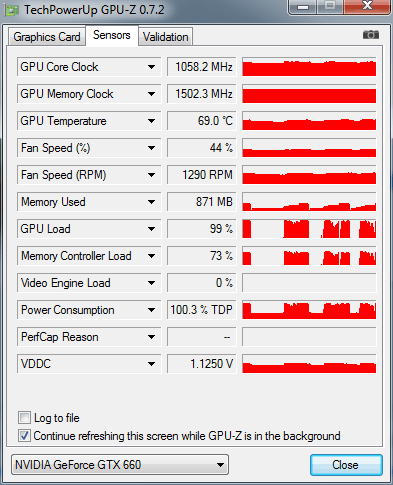 Unlike RTX, it has no official restrictions on processing more than 3 threads at the same time. This limitation can be removed by installing the patch created by the craftsmen, but, as we have already noted, we will consider only proven and official solutions. Earlier versions of video cards were immediately dismissed: they lose when working with HEVC, since they do not have the ability to encode B-frames.
The maximum number of transcodated channels
, perceive, dimensions. Let’s perform a load test for the maximum possible number of transcoded channels (fastest mode) on one server.
| Transcoding AVC FHD 10 Mbps — AVC FHD 8 Mbps 30 fps
At this point, we will stop the calculations and move on to the question of quality, since it will be much more honest to compare equally acceptable quality, and not obtained in fast modes. The quality of the output stream compared to the original Let’s consider another important issue — the quality of video compression. After all, there is no point in the number of channels if it is impossible to watch them. Below is a graph comparing quality by PSNR metric: Intel AVC with original stream (blue line) / Nvidia AVC with original stream (red line). Based on the graph, we see that the quality of the received streams is close in PSNR value. Let’s compare using VMAF metrics. In the following graph, consider comparing Intel HEVC with original stream (blue line) / Nvidia HEVC with original stream (red line). From the graph, we can see that our comparison was not entirely correct, since the maximum number of Nvidia encoded channels = 14, and their quality is almost 2 dB higher than 13 channels on Intel. Therefore, we made a few more changes, and with the highest possible quality on Nvidia and on Intel in GAcc mode (GPU Accelerated — when encoding takes place not only on the graphics, but also the CPU is connected), we got the following result. The encoding quality was almost the same, but the performance of both systems dropped significantly. Now Nvidia was encoding just 4 channels of FHD HEVC, while Intel was only 2. Let’s recalculate the price per channel based on the new data:
And, in fact, we got the same price per channel ratio as in the situation with AVC. Equal Load Power Consumption Let’s look at another important consideration when maintaining a production system: platform power consumption. From our tests with the maximum load of platforms by transcoding, we got the following values.
It turns out that the platform with Nvidia consumes 50 watts more for an equally performed work. Server rack space With large volumes of transcoded channels, the question of server placement often arises. Intel provides special blade-server platforms, where one 3U server can fit from 8 to 14 blades (full-fledged servers, modified form factor). Up to 168 FHD AVC channels can be transcoded in one 3U platform. If you use not a blade server, but a regular rack server, then for such a number of channels you will need a height of 14U. For Nvidia, this is a little more complicated: the cards themselves take up additional space in the platform. You can place 1 card per 1U server, then the space occupied by 168 FHD AVC channels will be 7U. You can place several video cards on one platform, which allows you to save on the price of platforms, but it is unlikely that you will be able to win a place: to place 2-3 cards, you will need a 3 or even 4U platform. Solutions for specific tasks In addition to video transcoding, there are tasks such as video decoding for visual monitoring and encoding from an SDI/NDI capture card. In such cases, the Intel solution is better suited: these tasks are often not voluminous, which means that it will not work to use all the resources of Nvidia. Even if you need to encode SDI, then most likely it will be several channels — it is difficult to find a project where you need to encode up to 24 signals. In addition, it is quite difficult to fit a PCI SDI capture card and a PCI video card into a 1U platform, you either need to choose a platform with a different height, or choose a platform with enough space for two cards, which is quite rare. There is also a technical limitation. The decoding process is less expensive than transcoding, and in theory more than 24 FHD AVC channels can be visually monitored on Nvidia. In fact, the number of channels is limited to 8, since it is not possible to transfer more decoded (uncompressed) video over the PCI bus. To be fair, Nvidia is more attractive for a high-definition UHD content transcoding solution because multi-profile transcoding can be deployed on a single card. Intel, on the other hand, cannot transcode UHD content into several profiles on one graphics core, and it is necessary to enable a stream distribution system between servers — this solution is called distributed transcoding. |

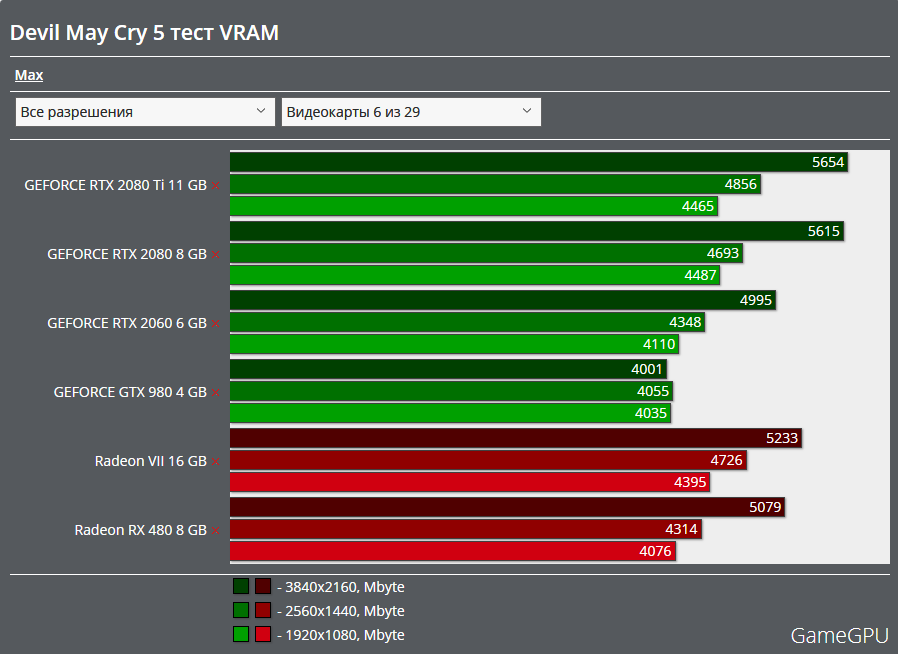 Intel HEVC GAcc with source stream (blue line) / Nvidia HEVC with source stream (red line):
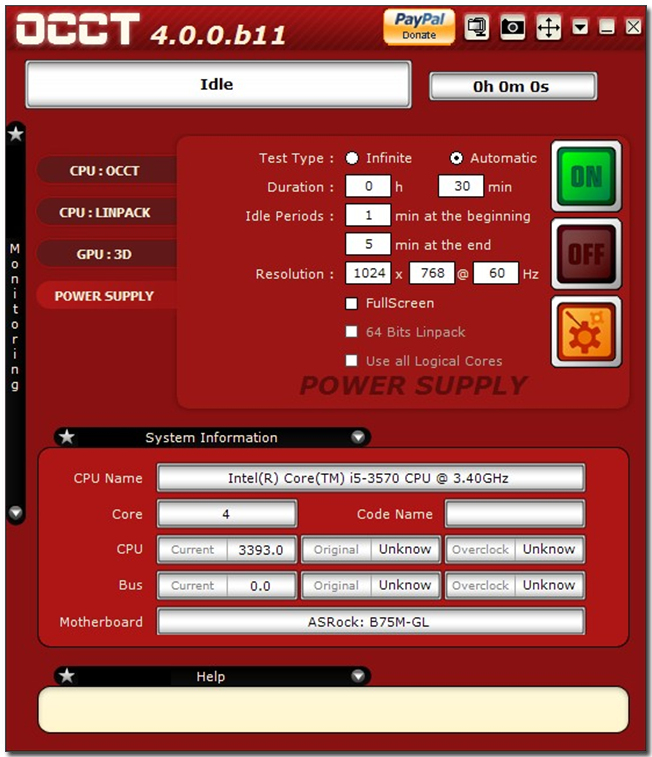
 With Intel, there is no such problem, since the graphics are built into the processor.
 So, comparing graphic solutions for all the parameters we are interested in, we can conclude that the solutions are close in terms of competitive characteristics and it is difficult to single out a favorite.
Software supplier can become a decisive factor in choosing a hardware complex for transcoding. For the choice, it is important how the use of tools offered by Intel / Nvidia companies is implemented, what additional functions the hardware-software complex can perform. Such moments as the price for a PACK, software functionality, warranty, successful projects, the possibility of refinement for a specific task, the ability to provide SLA, the competence of accompanying engineers, etc. also play a role. For example, Nvidia PACK often includes non-software implementation of tools. , provided by Nvidia, but a test sample built into the software, or an open implementation. On the one hand, this is not bad; on the other hand, an open-source project has its drawbacks, for example, it is impossible to add functionality or fix an identified bug, since there is no technical support for such implementations.
Request a demo of Elecard CodecWorks with Intel QuickSync and NVIDIA GPU acceleration.
Author
Vadim Blinov
Elecard CodecWorks product manager since 2016. Over 4 years of experience in video coding.
November 19, 2020
Test and Review: Intel Core i9-9900K is the first octa-core processor for the mass market .
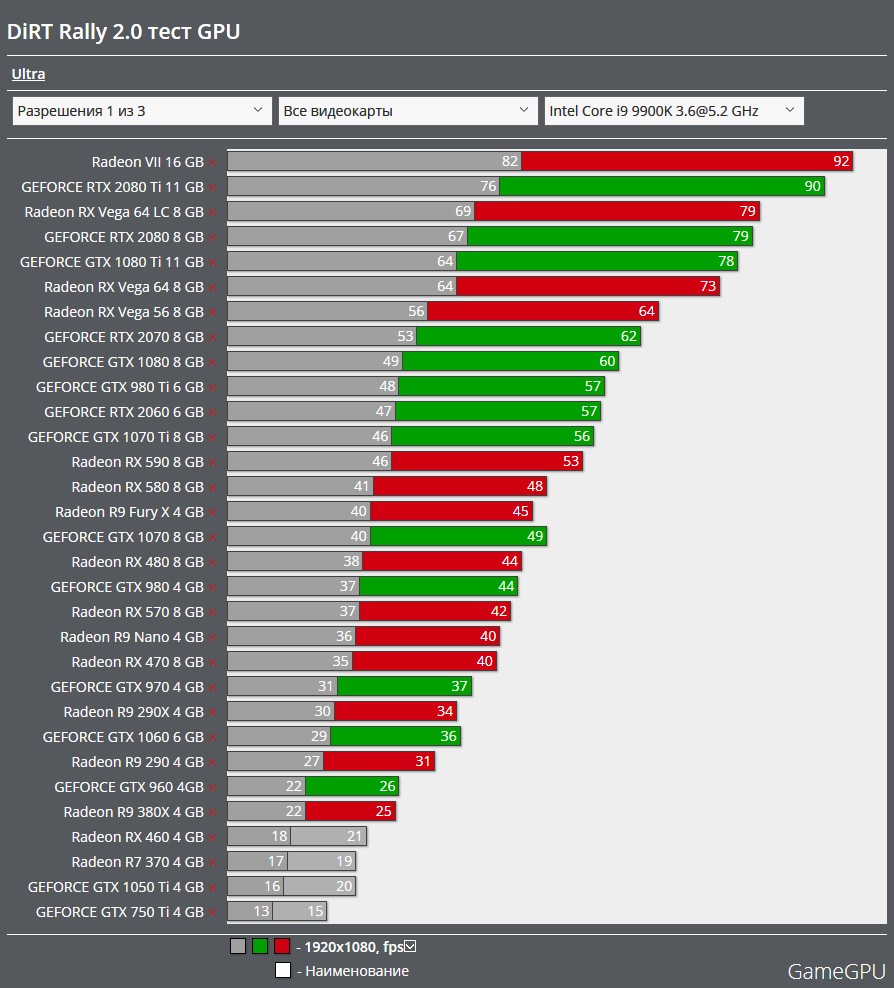 Namely, three new CPU Core i5-9600K, Core i7-9700K and Core i9-9900K, which are designed not only to replace previous models, some of which are a year old, but to increase pressure on AMD. The latter is just true for the flagship Core i9-9900K. But is the new processor the ideal choice for a gamer?
Intel itself promotes the Core i9-9900K as «built for gamers». Only casually mentioning other scenarios. Although, it seems to us, completely in vain. After the release of the second generation Ryzen processors, the same Ryzen 7 2700X (test), it became clear that AMD has again become a worthy competitor. Which proves the increase in AMD’s market share. So Intel had to work tirelessly. Nevertheless, the chip giant has somewhat relaxed in recent years and slowed down the innovation race due to the lack of a real competitor. However, the response to the new Ryzen processors, including the second generation Threadripper, was delayed for another reason. Problems with the 10nm process led to the fact that Intel had to adjust its plans, partially transfer production to the facilities of a third-party company, and even roll back from 14nm to 22nm process technology to release the h410 chipset.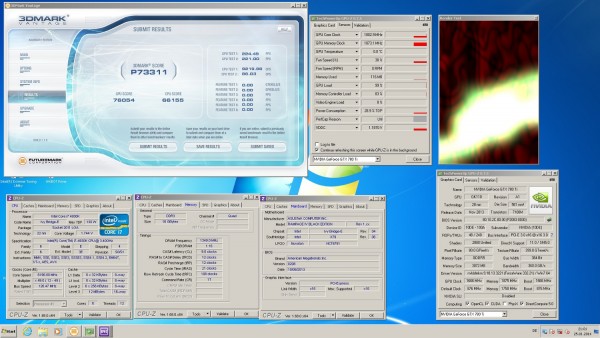 In general, on the way Core i9-9900K things didn’t go as planned.
At the beginning of the development of new CPUs, their technical specifications probably looked different than two weeks ago, during the official announcement. Evil tongues call the new CPUs the third Skylake Refresh, since a lot has been transferred since 2015. The ninth-generation Core processors, whose architecture is known as Coffee Lake Refresh, borrow heavily from the Coffee Lake S platform, which in turn relies on Kaby Lake. Which came out in 2016 and were largely based on the Skylake architecture. In terms of technical processes, the processors were manufactured using 14 nm technology (Skylake), then 14 nm + (Kaby Lake) and 14 nm ++ (Coffee Lake-S). In the case of the new generation, Intel again talks about 14 nm ++, except that some optimizations are mentioned compared to Coffee Lake-S. But there are no details, except that the L1TF vulnerability has been fixed by hardware.
903RAM
903RAMEN
Another change concerns the connection between heat spreader and crystal. Intel used thermal paste in recent generations of CPUs, for which it was fairly criticized, but now it has been decided to switch to solder. The news delighted many overclockers. The die and heat spreader are now bonded with Solder Thermal Interface Material (STIM), which should improve heat dissipation. Moreover, Intel took a similar step not only with the flagship, but also with the rest of the new CPUs. Together with an optimized manufacturing process, the solder allows higher clock speeds to be achieved compared to its predecessors.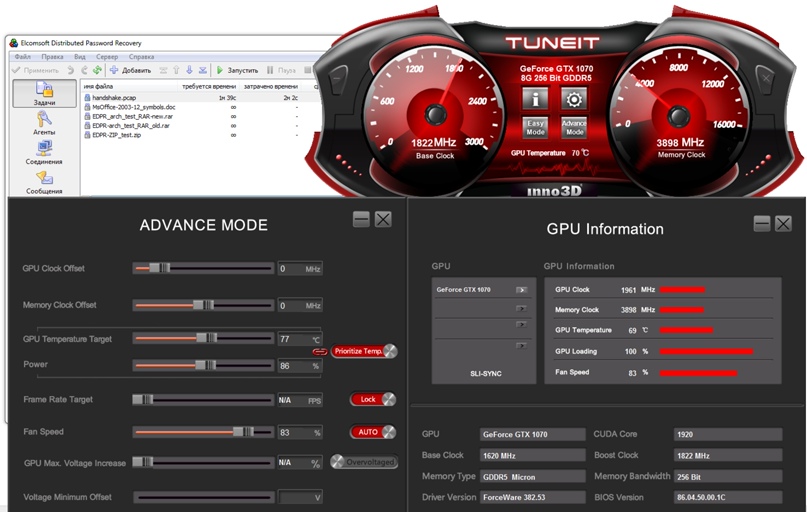 If the Core i7-8700K ran at just 4.7 GHz with a single core load, the Core i9The -9900K now hits 5.0 GHz, even when loaded with two cores. However, the increase cannot be called surprising, since we already received the same 5.0 GHz with the Core i7-8086K processor (test) with a single core load.
The
95W TDP is a bit misleading. Intel defines TDP at full load and running at base frequency. In other words, if all eight Core i9-9900K cores are loaded at 3.6 GHz, then the processor will consume 95 W. Interestingly, the same Core i7-8700K in the 95W scenario ran at a higher base clock speed of 3.7GHz. However, the solution is simple. Last year, the processor had six cores, now there are two more. The difference of only 100 MHz is probably due to process optimization.
| Model | Base clock | 1 core | 2 cores | 6 nuclei | 8 Nuclei | |
|---|---|---|---|---|---|---|
| I9-9900K | 3.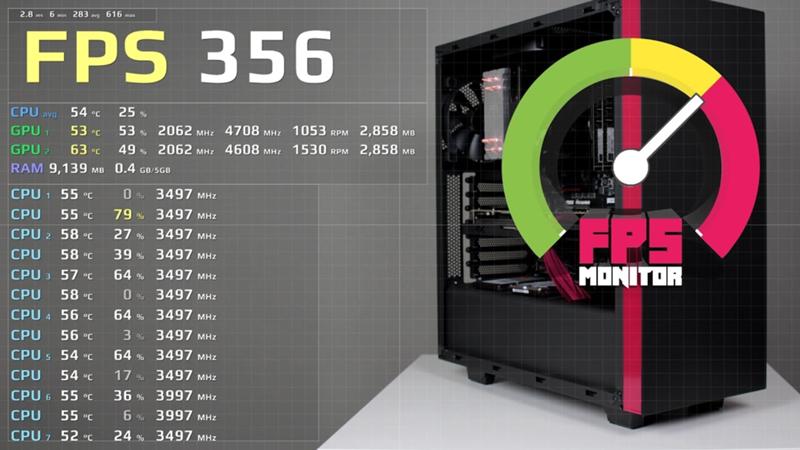 6 GHz 6 GHz |
5.0 GHz | 5.0 GHz | 4.8 GHC | ||
| i7-8086K | 4.0 GHz | 5.0 GHz | 4.6 GHz | 4.4 GHz | 4.3 GHz | — | I7575 | 4.6 GHz | 4.4 GHz | 4.3 GHz | — |
But it’s not just the extra cores that bring the performance boost, the larger L3 cache, which Intel habitually calls Smart Cache, also helps. While the Core i7-8700K and Core i7-8086K processors had to be content with 12 MB, in the case of the Core i9-9900K we get 16 MB of cache. But the cache is not distributed over individual cores, but is shared.
Otherwise, Intel did not make any changes that would have a positive impact on performance. Memory support is still limited to DDR4-2666, so AMD is back in the lead. Coffee Lake Refresh delivers 41.6GB/s of dual-channel connectivity, up to 5GB/s more on 2nd Gen Ryzen with DDR4-29 memory33. Integrated graphics are familiar. Namely, UHD Graphics 630, which is used in Coffee Lake (Core i-8000) processors, and the 3E92 and GT2 type is just present in the Core i7-8700K. Accordingly, we get 24 EU blocks with 192 stream processors, the base frequency is 350 MHz, in Turbo mode it increases to 1.200 MHz. There is support for DirectX 12 and UHD monitors, resolution is limited to 4.096 x 2.304 pixels and 60Hz (via DisplayPort) or 24Hz (HDMI 1.4). There is no dedicated graphics memory, the number of simultaneously connected displays is still limited to three. If you need higher GPU performance, then a discrete graphics card is indispensable. The ninth-generation Core processors once again offer 16 PCI Express 3.0 lanes.
In terms of functions, there are practically no changes between the eighth generation of Core (Core i7-8700K) and the ninth (Core i9-9900K). Intel VT-d and VT-x virtualization technologies are again supported, there is support for vPRO and Optane. Intel indicates the former dimensions of the processor 37.5 x 37.5 mm, which is again installed in the 1151 board. All motherboards based on the 300 line chipsets are compatible, but Intel recommends Z370 or Z390 models for overclocking. The last ones were just presented two weeks ago. The maximum temperature of the crystal is again 100 °C, the cooler must be able to dissipate at least 130 W of heat.
To be honest, it’s not entirely correct to consider the Core i7-8700K a direct predecessor. Nevertheless, the new processor not only provides two more cores, but is also located one step higher. But Intel itself compares the novelty with the i7. In any case, the previous naming scheme is changing with the release of the ninth generation Core processors. While desktop Core i7s used to offer both Turbo and SMT frequencies, this prerogative is now reserved for the i9 line.
<>Test and Review: Intel Core i9-9900K — the first octa-core processor for the mass market
Test configuration and power consumption
Social networks
Review Pages
- Page 1: Test and Review: Intel Core i9-9900K — First Mass Market Octa-Core Processor
- Page 2: Test Configuration and Power Consumption
- Page 3: Overclocking
- Page 4: Application Benchmarks Part 1
- Page 5: Application Tests Part 2
- Page 6: Application Tests Part 3
- Page 7: Application Tests Part 4
- Page 8: Gaming Tests
- Page 9: Conclusion
Tags
Intel Core i9-90 Lake Ref04 Ref0 comments (14) becomes a video card. Therefore, for games, you need to look first of all at the video card, and secondly at the processor.
A large number of games are still appropriate for testing video cards, not CPU. There are no revolutionary discoveries here.
CPUs were tested in normal mode. AMD and Intel memory worked in the maximum mode officially supported by the manufacturer — DDR4-2666 for Intel, DDR4-2933 for AMD. Except for the memory overclocking test.
Our CPU did not throttling. If we are talking about stable overclocking at 5.1 GHz, then there are no problems with throttling. Sobsno, why will it be 68 in stock and 86 in overclocking? In stock, it keeps 5 GHz only when loaded with 1-2 cores, then drops to 4.7-4.9.
quote — reply
10/21/2018 20:30
#6
kachaev
Posted by dchekanov;31547
different CPUs is reduced, the video card becomes the bottleneck. Therefore, for games, you need to look first of all at the video card, and secondly at the processor.
A large number of games is still appropriate for testing video cards, not CPU. There are no revolutionary discoveries here.
CPU tested in normal mode. AMD and Intel memory worked in the maximum mode officially supported by the manufacturer — DDR4-2666 for Intel, DDR4-2933 for AMD. Except for the memory overclocking test.
Our CPU did not throttling. If we are talking about stable overclocking at 5.1 GHz, then there are no problems with throttling. Sobsno, why will it be 68 in stock and 86 in overclocking? In stock, it holds 5 GHz only when loaded with 1-2 cores, then drops to 4.7-4.9.
Why detail and visibility on the low? Why reduce the load on the percent? Why reduce the number of drawcalls — precisely the most important part of the performance of a VK processor?
What about Spectromeltdown patches? What about forcing HPET in Windows on Intel?
And what is it —
Message
All tests were carried out at the memory frequencies declared by AMD and Intel for their processors
?
Really it was impossible to test at least for 3200 (in equal conditions)?
quote — reply
10/21/2018 20:45
#7
dchekanov
There are tests for 3200 in the overclocking section.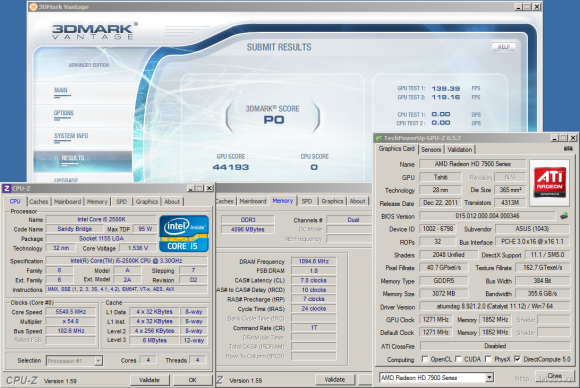 It makes no sense to do regular tests in this mode, since it goes beyond the manufacturer’s specifications. I understand what you want to say here, but we still focus on specifications. When they certify 3200, we will gladly move on. But for some reason, even AMD does not go for it. Apparently, not all systems work stably.
quote — reply
21.10.2018 22:09
#8
vorvort
Registered: 28.01.2015
Moscow
Resident
Posts: 615
Posted by dchekanov;31547
Low settings are explained by what you yourself know: as graphics settings increase, the processor means less and less, the difference between different CPUs is reduced, the video card becomes the bottleneck. Therefore, for games, you need to look first of all at the video card, and secondly at the processor.A large number of games is still appropriate for testing video cards, not CPU. There are no revolutionary discoveries here.
CPU tested in normal mode.
AMD and Intel memory worked in the maximum mode officially supported by the manufacturer — DDR4-2666 for Intel, DDR4-2933 for AMD. Except for the memory overclocking test.
Our CPU did not throttling. If we are talking about stable overclocking at 5.1 GHz, then there are no problems with throttling. Sobsno, why will it be 68 in stock and 86 in overclocking? In stock, it holds 5 GHz only when loaded with 1-2 cores, then drops to 4.7-4.9.
It is strange to see such an answer from a Runet guru in an independent review. 9900K is positioned by Intel as a top processor for games, so it is of interest to potential owners of top assemblies like 2080 Ti + 9900K. The owners of such a build will not play low in 720p or 1080p — this is nonsense. People are interested in gaming performance at ultra settings in 2K, 4K of the specified bundle, so that they don’t talk about focusing on the video card! You did not show this to gamers, which makes your review uninformative, and the choice of the GTX 1070 for review is puzzling.
Further: all users are well aware of the official modes of operation of components, which does not prevent owners and testers from studying the performance of hardware in overclocking. What prevented the editors from doing a test in games 9900K 5 GHz DDR4 3200 MHz for all cores in the air (or 4.7 GHz, if only there was a stable frequency in games without thermal throttling) vs 2700X 4-4.2 GHz DDR4 3200 MHz with fine tuning of memory timings for both platforms ? Is it that hard?
I will never believe that you or another experienced tester would have a hard time with this!
quote — reply
10/21/2018 22:19
#9
vorvort
Registered: 01/28/2015
Moscow
Guest
Posts: 615
Message dchekanov; 31552
At 3200 there are tests in the overclocking section. It makes no sense to do regular tests in this mode, since it goes beyond the manufacturer’s specifications. I understand what you want to say here, but we still focus on specifications.When they certify 3200, we will gladly move on. But for some reason, even AMD does not go for it. Apparently, not all systems work stably.
As for the specifications, the answer is far-fetched. For many years, the site has been testing hardware in overclocking and there have been no problems with specifications. When it came to testing the 9900K they suddenly showed up! The review will be incomplete and weak if it does not include the modes indicated by me above. The remarks of comrade Kachaev are also valid.
We are waiting for a full-fledged review from the editors, from you, Dmitry, and not an opus made according to the Intel manual, which causes fury and bewilderment of all PC gaming fans!
quote — reply
10/22/2018 03:09
#10
Wargen
Dmitry, thanks for the review. I would like to ask you to use a typical 4/8 Intel percentage, for example, 7700k, in game tests, because a lot of people sit on such processors and they need to understand whether the upgrade makes sense.
quote — reply
10/22/2018 06:59
#11
dchekanov
By patches — all the latest patches are installed, the influence of Meltdown / Specter is minimal. HPET has always been active with us since 2010. Unless the processors with the * sign on the new system are not retested, since they are not in the edition.
quote — reply
10/22/2018 07:02
#12
dchekanov
We will do a separate test on memory/CPU overclocking in the coming days. Thanks for the feedback, we’ll take it into account.
quote — reply
10/23/2018 15:55
#13
Thank you for the review!
quote — reply
10/23/2018 16:10
#14
Now, in general, those who took a decent mainland, such as Taichi, excellent RAM and a percentage of something like 1600 ryzen, are in trend. As a result, it will be possible to change with a minimum surcharge for the 3700th ryzen — and the performance at 1440r and 2160r will be no worse than at 9900k, and the price tag is several times lower.
quote — reply
Log in to comment
You might be interested in the following articles:
-
Best Intel and AMD Processor — Spring 2022
2021/22 has been a very eventful year for processors. With the new Zen 3 architecture at the end of 2020, AMD was able to catch up with Intel, as well as take the lead in the number of cores in the high-end… [read more]
-
Test and Review: Intel Core i9-12900K and Core i5-12600K -…
The long-awaited thing happened today: Intel hit back at AMD, with which it is planned to overtake the competitor not only in single-threaded… [read more]
-
Test and review: Intel Core i5-12400 — fast and…
A few days ago, Intel added 65W and 35W models to its earlier Alder Lake processors. Our test lab received a Core i5-12400 processor,… [read more]
-
Test and review: Intel Core i3-12100F — the best budget…
Today we’re looking at a budget processor in the Intel Alder Lake line, namely the Core i3-12100F.
 If open multiplier K models are not required, then the Core i5-12400 according to our tests … [read more]
 -
Test and review: Intel Core i7-12700K is great…
We’ve already tested the fastest and slowest K processor from the new Alder Lake lineup, today we’re rounding up the Core i7-12700K results. As we noted in the first… [read more]
-
Test and review: AMD Ryzen 7 5800X3D is a great upgrade…
A little over a week ago, the first tests of the Ryzen 7 5800X3D, a processor with a 3D V-cache cache that is aimed at gamers, appeared on the Web. Meanwhile, the CPU began to appear in… [read more]
How to recognize a video card after mining?
Now that the prices for video cards have skyrocketed, the secondary market has noticeably revived. Soon it should fill up with tempting offers — after all, sooner or later the owners of farms will begin to sell the graphics exhausted in the mines.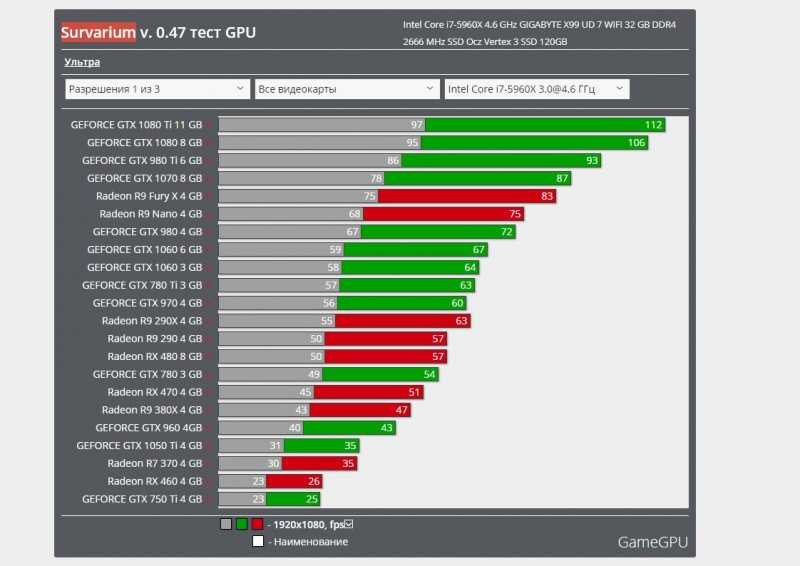 At Avito or Yulia, used chips are several times cheaper than new ones, but there is always a risk when buying from hand. Not to mention the lack of warranty, you can get a device from the farm, and this is a serious test for a card that runs at almost full capacity for months or even years. As a result, there is a loss of performance and an early failure. We’ll walk you through how to check the condition of your graphics and what to look for when buying a used GPU.
Why is it dangerous to buy a card that was used for mining?
All components of the PC wear out over time. The video card is no exception here: the stronger the load on it goes, the faster the owner can say goodbye to the device. If you take care of the card in a timely manner and observe the temperature regimes, it will work longer. But the problem is that the farm is not always cool enough, and several video cards sometimes heat up furiously under heavy loads in a confined space without proper ventilation.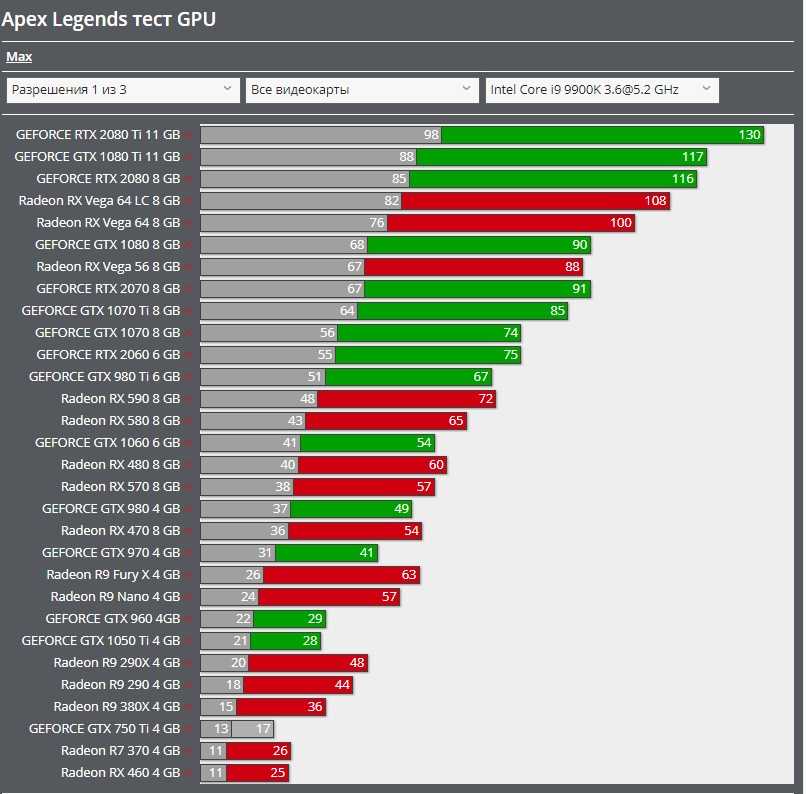 In addition, dishonest miners rarely care about the condition of their equipment: if something breaks down, they quickly “merge” it on announcement sites.
The consequences of prolonged mining can be very different. Most often, problems occur with fans, because they are constantly working for wear, so their electric motors or bearings can fail at any time. But this problem is easily solved by replacing the fans or installing liquid cooling. It is much worse if the semiconductor elements have already degraded and have lost the ability to operate at high frequencies. Because of this, the user will not be able to squeeze the maximum out of the card, which she was capable of in her best times. Another common problem is that due to exposure to high temperatures, the quality of soldering of electronic components is disturbed — in the future this promises to contact a service center for repair.
Check «by eye»
The first thing that can alert you in a video card after mining is discoloration of the printed circuit board.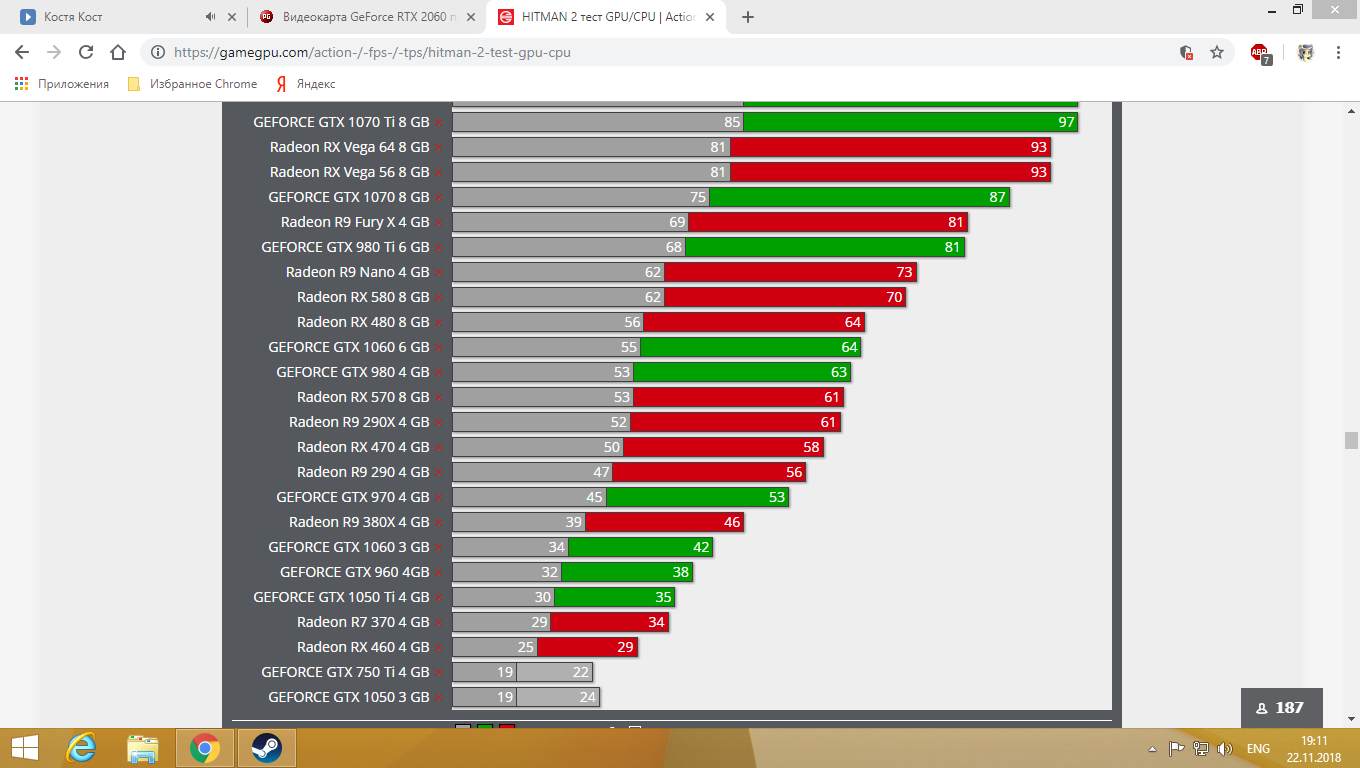 If you see any noticeable defects, then it is likely that the device has undergone thermal damage due to intense loads.
Secondly, you need to see if the video card was overclocked under the previous owner. It is important to understand that many miners prefer not to overclock the module frequency, but only the memory frequency. And if such manipulations were carried out, sometimes they are reflected in the state of the device. Therefore, before buying, the user needs to find the memory module on the card and see if there are discolorations or oil around it. If you see a yellow tint, your component has almost certainly been used for mining. However, such defects appear only after very intense loads.
At the end of the inspection, it is necessary to check the presence of silicone grease and thermally conductive thermal paste by removing the heatsink. The standard amount of paste and lubricant that comes from the factory is enough for at least two years of use.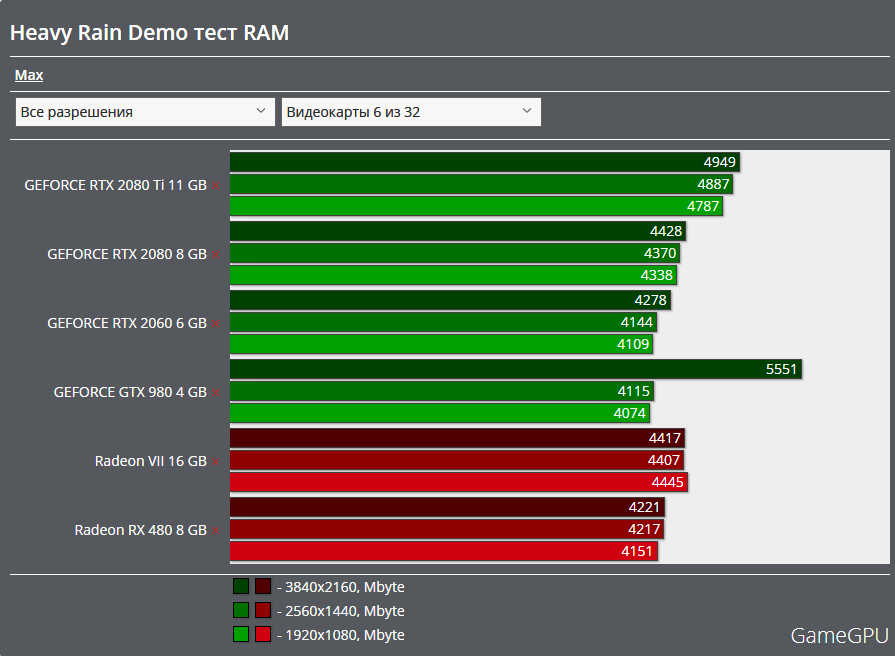 But the more intensively the GPU is used, the faster they dry out. So if they tell you that the video card is new, and the thermal paste on it has already dried up, do not believe the seller.
We climb into BIOS
After the external inspection is completed, you need to install the graphics in PC and enter BIOS . The fact is that for the most efficient mining, owners often change the default settings. Therefore, you need to check if someone has changed these parameters before.
Finding out this information is quite simple. First you need to google the standard settings for this GPU (easy to find by the name of the card in the search engine) and compare them with what you see in BIOS . Particular attention should be paid to the parameters «Frequency» ( Frequency ), «Clock frequency» ( Clock ) and «Memory» ( Memory ).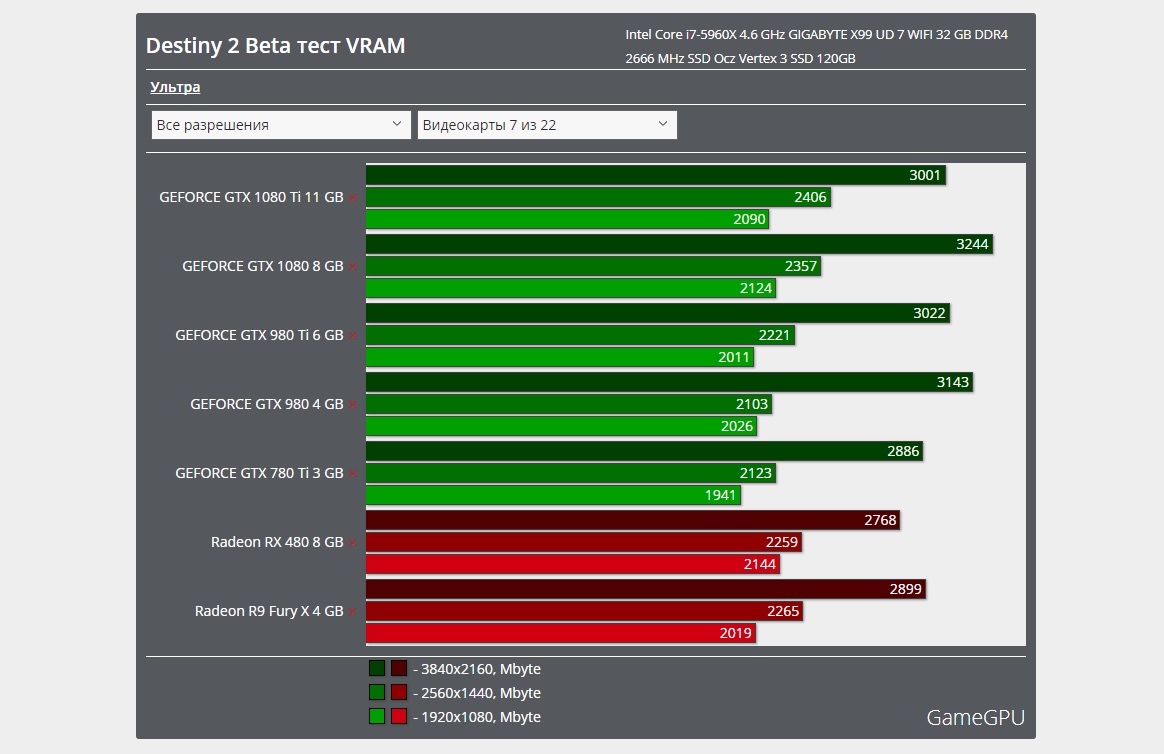 If you see the difference, the card could be used to mine cryptocurrency.
Stress test performance
The best indicator of what a graphics card is capable of is its performance in combat. Therefore, it will be ideal if you manage to conduct a full-fledged stress test. It will allow you to determine what tasks the GPU can handle and how well it performs in the most difficult scenarios: does it overheat, how does it keep the frequency, and so on.
One of the most convenient ways to perform this test is to download and run the FurMark software. The test only takes a minute. Its results will show the approximate state of the component: how high its performance is and whether it is stable under load.
If any errors appear during the stress test, or the card overheats, and the fans do not work correctly, feel free to get rid of it. Problems may mean that the “death” of graphics is already close.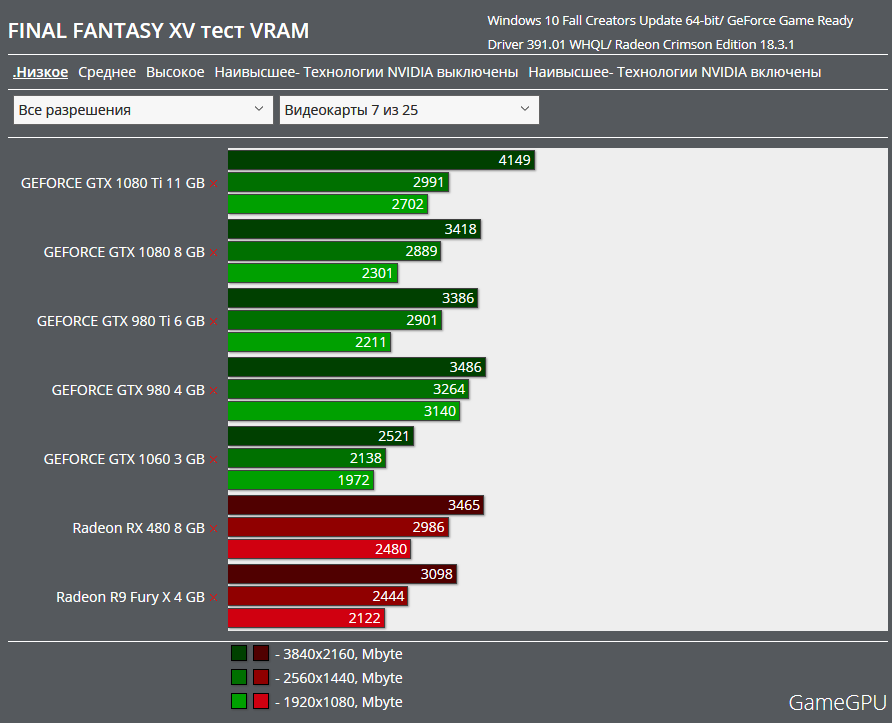
There is a possibility that the video card can handle the stress test well even after it has been sitting in the mining farm for some time. This means that the card still has some resource left for normal operation. In this case, the choice is yours — are you ready to take a risk in the hope that the card will work for at least a couple more years.
It is important to understand that the methods listed above cannot 100 percent save you from cheating. Not every seller will allow you to poke around in his device, let alone check its performance on a computer. But if you have the opportunity to negotiate with the former owner, be sure to use it. This will help to avoid senseless spending and fraud by intruders
Test | Benchmark — 3DMark + Port Royale | Computer Technology and Games
ElisovSlava
5FPS
-
-
#one
This is a free version from off site.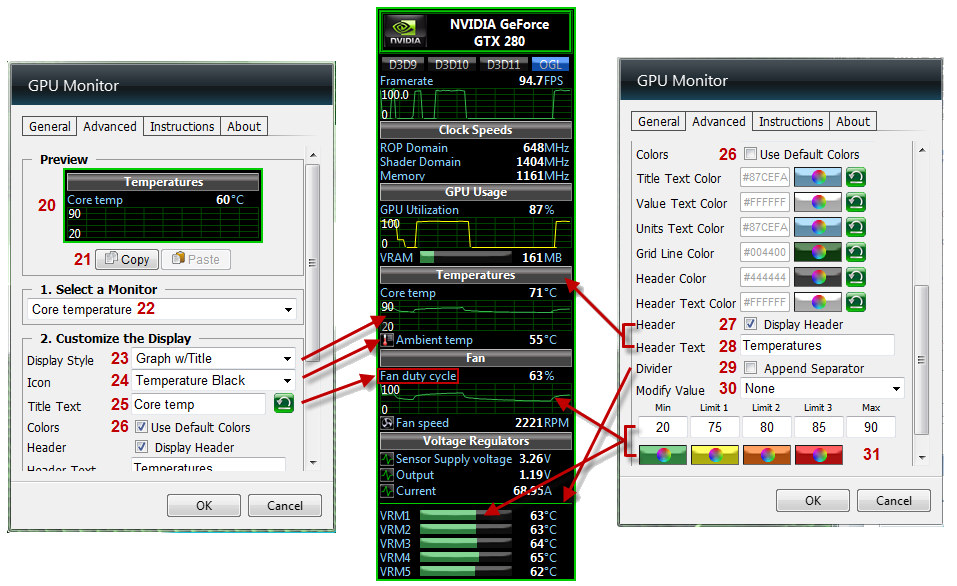 Licensed for home use only.
Let’s see how many parrots someone gives out
3DMark Basic Edition — PC performance test for home use.
View attachment 10244
View attachment 10243
3Dmark is a PC performance test developed by the Finnish company Futuremark. The tests in this series are focused primarily on the graphics components of a personal computer in order to determine the performance of the system in computer games.
….Click to expand…
Learn more about this resource…
We run this test on our PCs, where we play BATTLEFIELD most of the time. With this test, we do not want to prove anything to anyone. And we understand that it is done on a completely different hardware. If you have a desire to take this test, we will only be happy. You can download it from our website or in the STEAM free version and pass two tests Time Spy and Sky Diver .
Tests of our PCs Time Spy and Sky Diver
I5 6600 + GTX 1070 = 5493/0
I7 6700K + GTX 1070 = 5830/34169
FX-8300 + GTX 650 TI = 1030/10427
6300 + GTX 660 = 1451/13041
i5 2550K + HD7955 15985/1982
I5 3330 + GTX 980 = 3784/20211
Intel i7 6800k + 2way SLI GTX 1070 = 11017/52560
I5 4430 + GTX 760 = 1738/15215
I5 6500 + GTX 10/2881 90/2881 90/2881 91681 90GA + RX 480 = 4127/25917
i5 6500 + GTX 1060 6Gb = 4038/22997
i7 6700k + GTX 1080 = 6767/37550
i5 4430 + msi 1060 6gb = 3698/20448
FX 6300 + Palit 1060 3GB = 3413/19318
i5-3330 + ASUS GTX 980 Strix = 3784/20211
I5-7600 + GIGABYTE GTX 1070 8 GB = 5379/26063
i7 4790K + AS = 5615/32501
i5-7500 + gtx 1060 3 gb = 3771/22269
i5-7500 = 345/3838
i7-6700k + gtx 1060 6gb = 4310/30066
i7 6700k + sapphire R9 390 = 4047/26848
4460 + gtx 560ti 1gb = 0/9827
i7-3770k + gtx690 = 3635/24938
i7-3770k + Sli gtx690 = 5927/25907
i5 3340 + R9 270x = 1965/16300
I5 6600K + GTX 970 = 3805/24387
6700K + GTX 970 = 3749/28723
Athlon X4 870K + MSI 1050TI = 0/16650
I5 3570K + Gigabyte 970 4GB = 016762 9g 1060 3 GB = 0/19782
7600 + GTX 1060 Gaming X 3 G = 3985/24873
I7 7700K + GTX 1080 = 7077/39752
I7 6700K + GTX970 GAMING = 4010/29954
I7 3770 + GTX9 + GTX9 + 3758/26793
I5 3570 + GTX770 4Gb = 2141/18345
FX 8350 + GTX1050ti = 2359/18188
I5-6500 + MSI GTX1060 6GB = 3938/21367
I7 3770K + 1080TI = 7728/35365
I3-4130 + GTX 1050 TI = 2233/14712
ATHLON X4 870K 4500MHz + 1050Ti = 2487/15499
RYZEN 1700 3. 0GHZ + GTX 108/1207/20 + 1070 Strix = 5808/35880
i5-7500 + Palit GTX-1060 3GB = 3825/23270
I7 2600K + R9 290 = 3762/24933
6600K + 1050TI = 2767/20928
AMD Ryzen 1700 + 9820 AMD Ryzen 1700 + 9820 AMD 35919
I7 7700K+1080Ti = 7999/40256
i7 6700k + gtx 1080 = 7491/40315
Last edit by moderator:
ElisovSlava
5FPS
-
-
#2
ElisovSlava
5FPS
-
-
#3
i5 6600 + GTX 1070 processor test
ElisovSlava
5FPS
-
-
#four
i7 6700k + GTX 1070 CPU test
ilyxa_23Rus
I belong here
-
-
#5
Modest test FX-8300+GTX 650 Ti (not Full HD)
Resolution 1600*900
Sky Diver FX 8300+GTX 650 Titanium 2Gb
aleksey1490
I’m here
-
-
#6
AMD FX 6300 + GTX 660
ElisovSlava
5FPS
-
-
#7
Harkonnen can you and your friends run a test wondering what and how?!!
Galina64RUS
5FPS
-
-
#eight
i5 2550K + HD7950
ViVNsk
Local
-
-
#9
i5 3330 + GTX 980
ElisovSlava
5FPS
-
-
#eleven
Roman is also waiting for a test from you
GRU64rus
HARDWARE GURU
-
-
#12
I have already posted tests in 3DMark, but you have to look for it on the forum, but here everything is at once.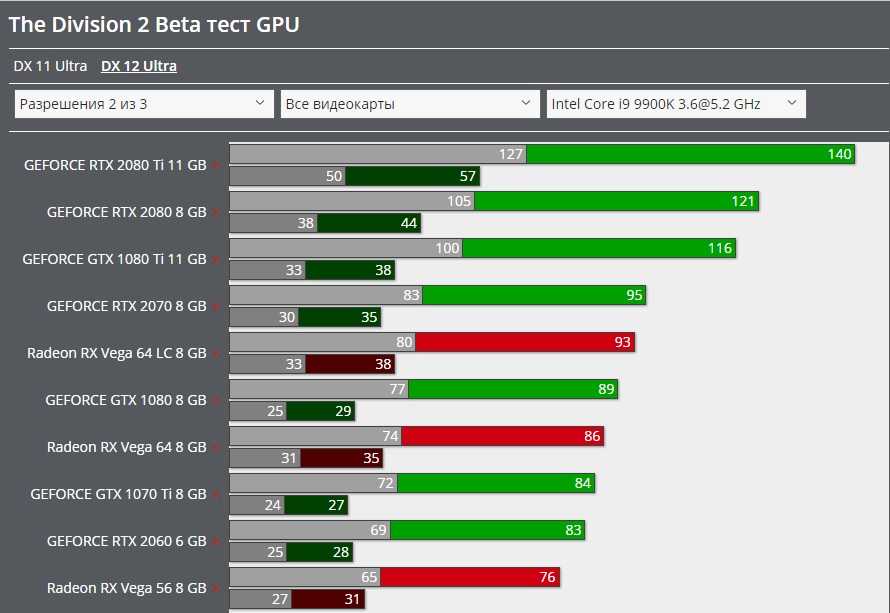
Intel i7 6800K + 2Way SLI GTX 1070
Something like this.
zver00000
I’m mine here
-
-
#13
i5 4430 + GTX 760
ElisovSlava
5FPS
-
-
#fourteen
GRU64rus, that’s what he did to everyone.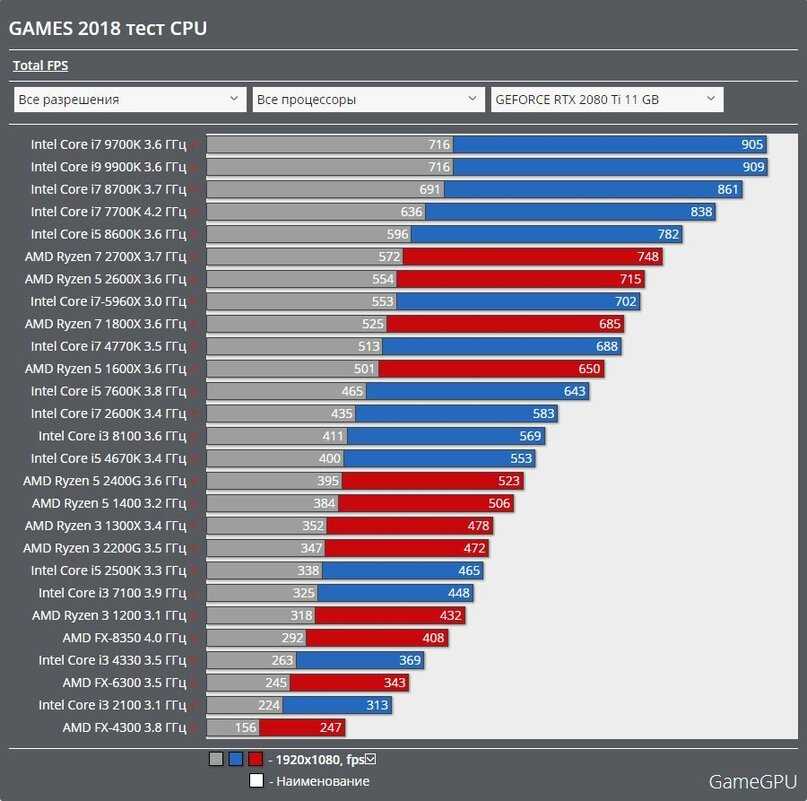
ElisovSlava
5FPS
-
-
#fifteen
dima_fedorov_64 let’s take the test take a look
BearFromRussia
I’m mine here
-
-
#16
I only drove Sky Drive, because did not find even Time Spy. System I5 6500 + GTX 1060 6GB
ElisovSlava
5FPS
-
-
#17
BearFromRussia, look at the screenshots carefully, they are under the spoiler for all
ElisovSlava
5FPS
-
-
#eighteen
I did not think that 1060 would be stronger 980
bad_drove
I’m mine here
-
-
#19
ElisovSlava wrote:
I didn’t think that 1060 would be stronger 980
Click to expand.