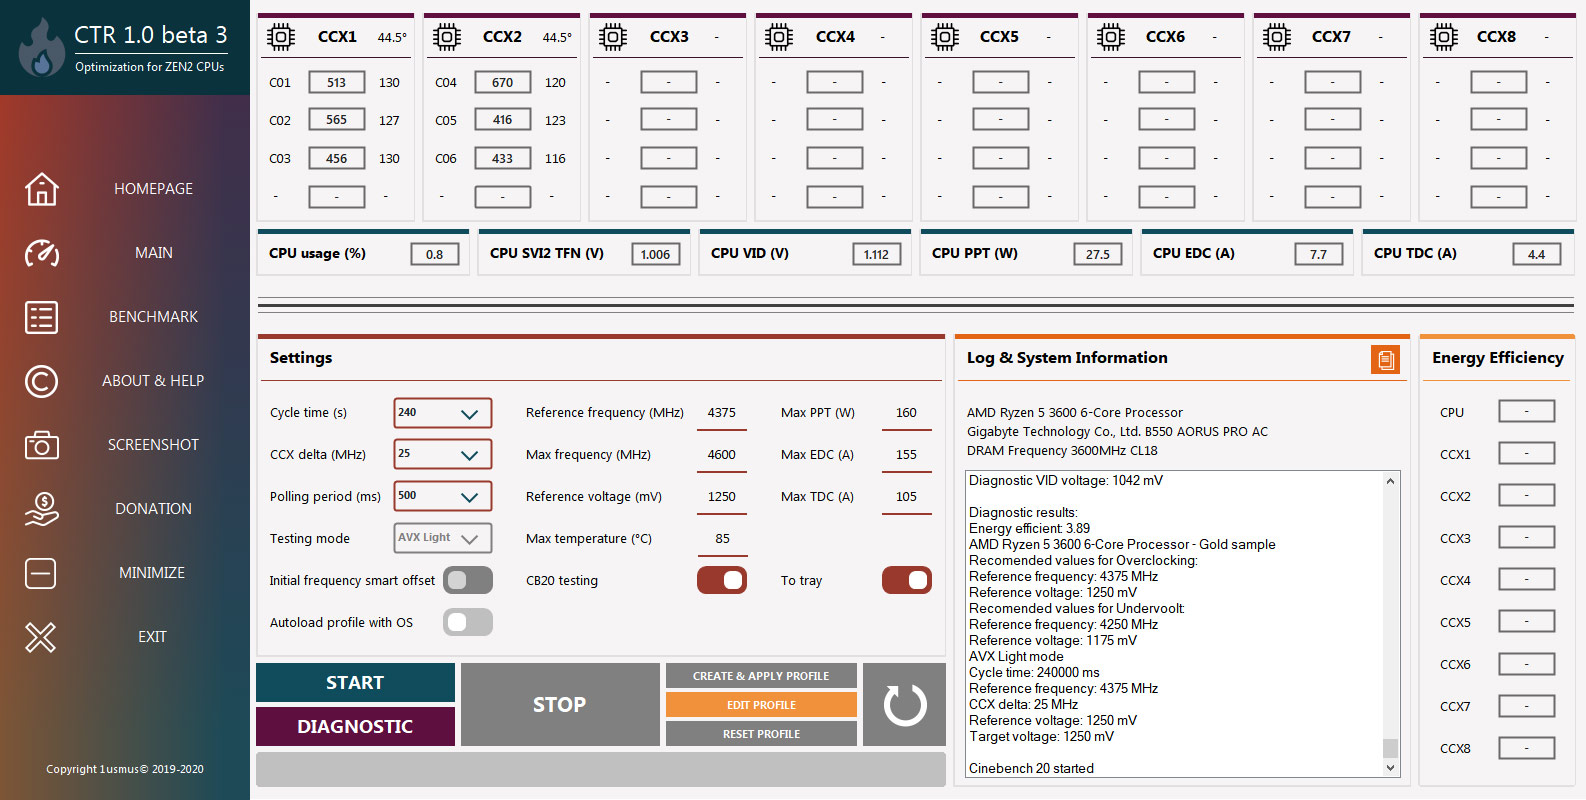
AMD Ryzen 3000 1usmus Boost Fix: Performance Tested with Fix
AMD’s Ryzen 3000 CPUs had a very smooth launch, with widespread acclaim from critics and fans alike. The chips offered never-before-seen levels of performance in the consumer market, making even Intel’s HEDT lineup obsolete. Not everything went according to plan, though. There was a discrepancy with respect to the boost clocks of the new processors. Very few Ryzen 3000 CPUs were able to hit the marketed boost clocks, even with TOTL AIO cooling. This was a widely discussed issue in the community, resulting in multiple third-party fixes, with 1usmus’ Ryzen 3000 boost fix being the most notable.
AMD ultimately launched an AGESA microcode update to try and address the issue. While it did raise the boost clock by a bit, there were still only a few select users who were able to hit the spec boost clock at stock conditions.
Even after AMD released the official AGESA fix, 1usmus’ mod didn’t become redundant. The modder claims his fix increases the boost clock by another 50-100MHz and optimizes the Windows thread scheduler.
This is done by running the primary threads on the best cores (ones that boost the highest) of the chip. Furthermore, it also makes sure that single-threaded applications run on a single core rather than distributed across various cores (that leads to worse performance as these workloads prefer higher clock speeds over core counts). In case a second thread is needed, it is chosen from the same CCX, to avoid any latency penalties.
- AMD Ryzen 9 3900X: Stock Cooler vs Water Cooler
- What is a CCX and CCD in AMD’s Ryzen Processor: Building Blocks of the Zen Architecture
In this post, we compare the performance of the official Ryzen 3000 boost fix to 1usmus’ mod. We’ll have a look at the clock scaling in single-threaded and multi-threaded workloads and see if the latter actually improves the boost clock or not.
Test Bed
- CPU: AMD Ryzen 9 3900X
- Cooler: NZXT Kraken X73
- GPU: NVIDIA RTX 2080 Super FE|Zotac GeForce RTX 2080 Ti AMP
- Memory: Trident Z Royal 8GB x 2 @ 3600MHz
- PSU: Corsair HX1000i
AMD Ryzen 9 3900X: Gaming Benchmarks
While Deus Ex: Mankind Divided doesn’t see any viable increase in frame rates, Assassins’ Creed does get a small boost. The average FPS is higher by 2 while the lows are up by 3 FPS. We repeatedly tested this title and found this result to be a good representative of the gains in gaming performance. Now, let’s have a look at the clock scaling in games:
As you can see, although the single-core boost is higher at the stock preset, the average boost clock of all the cores is still a notch above when using 1usmus’ boost fix. Four of the cores almost consistently run at 4,375MHz while in the former, they mostly stay at 4,300MHz. Considering that Assassins’ Creed Origins thoroughly leverages all twelve cores, it makes sense that it’d see a better score with 1usmus’ mod.
Content Creation: Cinebench R20 Benchmarks
In-line with the gaming performance, the multi-core score sees a healthy uplift. Surprisingly, it’s even higher than the AutoOC score (7218), all the while drawing less power. It’s remarkable what a small software/firmware optimization can achieve. The single-core performance is also marginally better.
Single-Core Workloads: Clock Scaling
The clock scaling in single-core applications is mostly identical. However, just as we saw in the other scaling chart, the clocks are much more consistent with 1usmas’ boost fix. The fastest core (Core 3) runs constantly at 4,450MHz while the other cores’ frequencies are also much more uniform through the entire benchmark without any frequency drops unlike the stock benchmark.
Multi-Threaded Scaling: Stock vs 1usmus
The multi-threaded clock scaling is quite different when using the 1usmus mod. Under stock conditions, the 4,150MHz mark serves as the ceiling while when using the Ryzen 3000 boost fix, the clocks regularly go as high as 4,175MHz, and even spiking as high as 4,200MHz at certain instants.
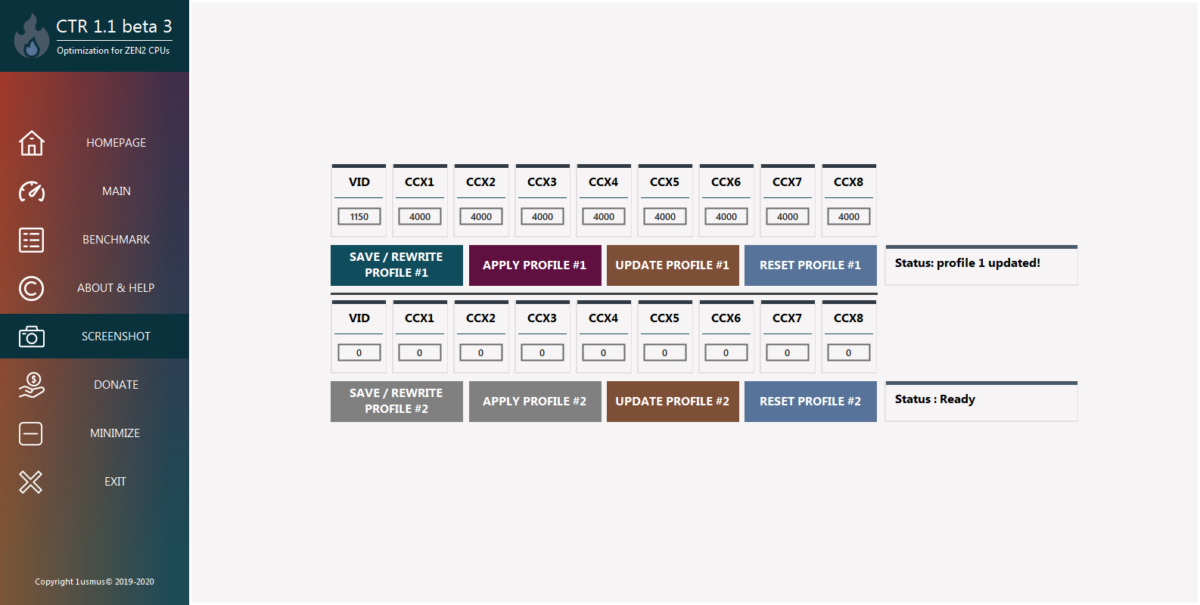
AMD Ryzen 3000 Boost Fix: Installation of 1usmus Profile
This is a two-part process, one requires you to install a custom power profile to improve the Windows thread scheduler and the other one to set PBO power and voltage limits:
Download and install the 1usmus power profile from here and from the Windows power plan select the 1usmus Ryzen Universal Power Plan.
Secondly, in your motherboard Precision Boost Overdrive setup, increase the PPT, TDC and EDC values as follows:
- 3900X> 160 105 160
- 3800X> 145 95 145
- 3700X> 105 70 105
- 3600X> 140 90 140
- 3600> 105 70 105.
You can do this by changing the PBO limits to manual mode. That’s it. You don’t need to modify anything else. Cheers!
- Related:
- AMD Ryzen 5 3600X vs 3700X vs 3900X Gaming Performance Benchmarks: Averages, 1% and 0.
 1% Lows
 - Intel Comet Lake vs Ice Lake vs AMD Zen 2: Comparing the Core and Ryzen Architectures
Related Articles
Ryzen Custom Power Plans for Windows 10 (Balanced and Ultimate) and Windows 11 (LowPower)
CPUDoc now features a custom dynamic power plan with ultra low power in standby:
These are the custom power plans I’ve made for my 5950x.
I have tested them as well on a 3800X and 5600G (not very thoroughly).
They should not interfere with PBO boost and provide same or very slightly lower performances but better thermals.
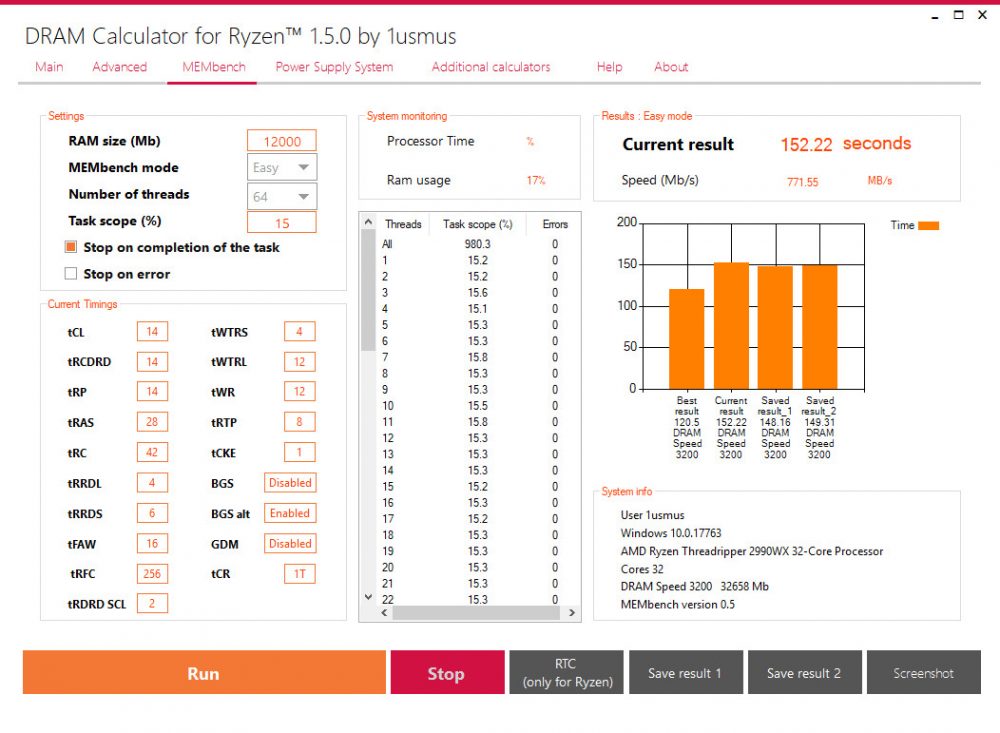
Please check before and after with AIDA64 memory benchmark; if there’s something wrong the latency could increase by 1 nanosecond.
Updated 25th October for latest Windows 10 and Windows 11 releases.
Window 10:
There are 2 different kinds of profiles, one is marked «(PP)» which stands for Performant Processors.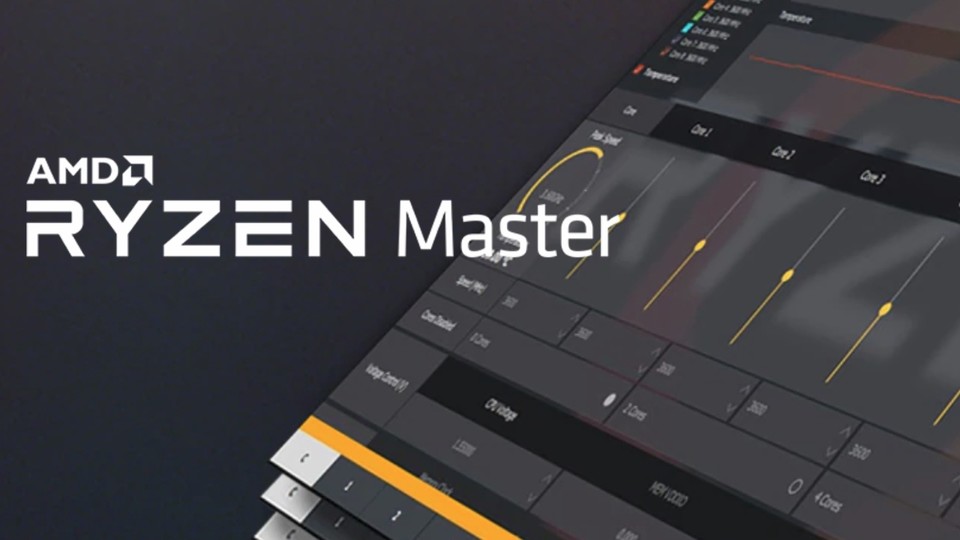
This version should only be used in very specific conditions or use cases.
You probably don’t need it so don’t use the PP version.
The only processor that could benefit from the PP versions could be the 5800X3D.
If you have a 5800X3D your best plan is probably the Balanced Snappy, test with the PP version.
The recommended for Performances is the Ultimate, followed by the Snappy which is an in-between the Balanced and Ultimate.
The Snappy can be very satisfying for benchmarks, especially in ST performances.
All the profiles are maintaining the peak performances in GeekBench 5 for my 5950X.
The LowPower can reduce the idle power usage by 5-10W and the temperatures by 4-5° C.
Plus overall reduced temperatures and much lower spikes.
Real world usage is something different and of course Snappy and Ultimate will deliver better responsiveness and performances.
But LowPower is just a notch behind.
Which are the specific conditions or use cases when it could be better to use the PP versions?
- Terrible binning of the non best cores
- Terrible binning of the 2nd CCD
- Static OC with 2nd CCD at a much lower frequency than the 1st
- Very specific competitive benchmarking
This is the effect of using the PP version with background threads:
While with the non PP version:
In practice nothing will scheduled on the 2nd CCD unless needed.
With 1 CCD processors everything will be scheduled on the best processors and nothing on the lower CPPC Perf cores.
This is because Windows Scheduler is considering a Ryzen Processor as an heterogenous architecture, despite not being one.
All the lower perf cores will be considered as Efficient and all higher perf as Performant.
The previous custom power plans where fixing the Scheduler issues forcing the policy for heterogeneous to prefer Performant Processors and prefer Efficient Processors for background threads.
With the latest Scheduler this is not needed anymore; now it’s finally doing it with the Automatic settings.
This means not anymore hacksaw temperature graphs and spikes.
There are some cases as mentioned above where it could be more convenient to force the background task policy to PP.
In general it’s not recommended; for a very small single thread performance increase in normal usage the temperature goes up a lot and the spikes are huge.
With some workloads, mainly benchmarks, could be useful because often the Scheduler is just mistaken an spawns an heavy thread on an Efficient Processor.
The EP is not only slower but once the Scheduler realizes the mistake it has to move it to a PP causing delay and additional loss of performances.
Tip: best would be to use Process Lasso to switch specific applications to use the Ultimate or Snappy profile only when needed.
Window 11:
The standard Power Plans in Windows 11 are pretty good. With some exceptions of course.
Microsoft as usual made one step forward and two backwards.
The Scheduler now works pretty well in terms of performances and core idling, impressive improvements versus the previous releases and Win10.
This is mainly because all the profiles are using Autonomous mode and it can finally properly drive a Ryzen CPU.
For instance the vCore is finally going up only when needed and the performances really great.
What is very disappointing is that basically many of the plan settings are completely disregarded.
Plus while running in Autonomous mode is worse, the Scheduler is disregarding even more.
The Autonomous mode in Windows 11 is a big improvement but it’s not perfect.
Temperatures and spikes are quite horrible.
That’s why I’ve created only one LowPower custom plan.
Unless you have a problem with the temperatures, just use the Balanced with slider in the middle or max.
Or the High Performance or the Ultimate.
They all are configured mostly the same and deliver mostly the same experience…
Maybe the High Performance has a drop of performances more but it’s really one drop in the ocean.
The LowPower will deliver 2-3° C less on idle, same power consumption as Balanced (Why? How? What…) and at least 4-6 °C less during load.
Temperatures spikes are quite decent with LowPower, absolutely awful for all the standard plans.
Microsoft has definitely something to fix there. ..
..
Just moving the mouse from one screen to another causes the CPU temperature to jump to 45-48 °C with the Balanced plan.
With the LowPower it’s slowly going up to 40-41 °C.
This is achieved mainly disabling the Autonomous mode, plus scheduling tweaking that actually works once not in Autonomous.
Of course the price to pay it’s measurable lower performances, about 10-20p ST and 50-60p MT in GeekBench 5.
All Windows 11 Power Plans have prefer PP for background threads.
Forcing otherwise is hardly taken into consideration by the Scheduler.
Let me know if you experience issues.
AMD Ryzen™ Balanced LowPower Win11
For Windows 11
Modified out of the Balanced plan so it has the Power Slider.
It’s a nice compromise between performance and power consumption in the middle setting for the slider.
Version v1:
https://drive.google.com/file/d/1Sw2b-mVodeb-9bxJR6FNU6J3nn6LZ-Q5/view?usp=sharing
AMD Ryzen™ Balanced LowPower
For Windows 10
Modified out of the Balanced plan so it has the Power Slider.
It’s a nice compromise between performance and power consumption in the middle setting for the slider.
Quite reactive to user input; should behave same as Balanced or better.
Slider to the max will keep the vCore high and will be a bit more reactive, in the middle vCore will drop down in idle.
NEW 25/10/2022 v10:
- Adapted for the latest Windows 10 release
Version v10:
https://drive.google.com/file/d/1SbcMmuTtyc_ZwgalrqXX3vy8BVfC-sZo/view?usp=sharing
Version v10 (PP):
https://drive.google.com/file/d/1Sd48xUBkWphV0MILmC3DMFbEmzK2iLce/view?usp=sharing
Version v8:
Version v7:
Version v6:
Version v5:
Version v4:
Version v3:
AMD Ryzen™ Ultimate Performance
For Windows 10
Modified out of the Ultimate Performance plan so it doesn’t have the Power Slider.
It’s an almost no-compromise for performances, slight increased power consumption but yet nice temperatures in idle.
NEW 25/10/2022 v6:
- Adapted for the latest Windows 10 release
Version v6:
https://drive.google.com/file/d/1SgEGx4nv54QL1IHop5WUUURe3-A_pPmP/view?usp=sharing
Version v6 (PP):
https://drive.google.com/file/d/1ShbD3irSoZtCXAURZ3EzRirFViV3ggD7/view?usp=sharing
Version v5:
Version v4:
Version v3:
Version v2:
AMD Ryzen™ Balanced Snappy
For Windows 10
Modified out of the Balanced plan so it has the Power Slider.
It’s a more power hungry profile focused on responsiveness with autonomous mode enabled.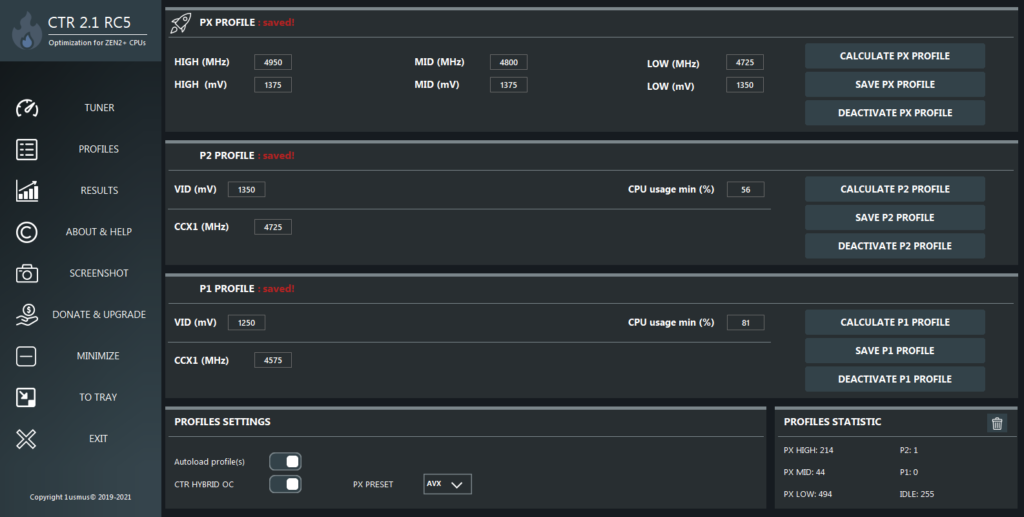
Less spikey than the Ultimate, sometimes with better ST performances.
Best suited for Audio/Video and Professional, lower IPC/DPC latency.
NEW 25/10/2022 v2:
- Adapted for the latest Windows 10 release
Version v2:
https://drive.google.com/file/d/1Sus-WKecwqBUP_dDPA81cmZaSmFRGB1a/view?usp=sharing
Version v2 (PP):
https://drive.google.com/file/d/1SnNr1r715N74oi8hwNogHRcHDPB3ZKi8/view?usp=sharing
Version v1:
How to install
Download the POW file.
Start a Command prompt with Administrative privilege (search for command prompt in start menu).
Import the plan with «powercfg -import filename.pow»:
Replace the directory name as needed.
Tools
QuickCPU
StackPath
Highly recommended if you want to make your own customizations or compare with other profiles
First versions (outdated):
The first one is modified out of the Balanced profile so it has the Power Slider.
It’s a nice compromise between performance and power consumption in the middle setting for the slider.
Min state on my 5950x: 2200 MHz and 0.9V
The second one is modified out of the Ultimate Power profile so it doesn’t have the Power Slider.
It’s a no-compromise for performances, slight increased power consumption but yet nice temperatures in idle.
Min state on my 5950x: 2880 MHz and 0.95V
Reactions:
The_King, ohyurr66, lestatdk and 10 others
JavaScript is disabled. For a better experience, please enable JavaScript in your browser before proceeding.
1 — 20 of 209 Posts
LionAlonso
·
Registered
ManniX-ITA
·
Old crazy guy
p2im0
·
Registered
-BoneZ-
·
Registered
des2k.
 ..
..
·
Registered
pcmaster69
·
Registered
ManniX-ITA
·
Old crazy guy
ManniX-ITA
·
Old crazy guy
ManniX-ITA
·
Old crazy guy
Veii
·
Overclock the World
ManniX-ITA
·
Old crazy guy
Veii
·
Overclock the World
ManniX-ITA
·
Old crazy guy
Veii
·
Overclock the World
ManniX-ITA
·
Old crazy guy
Veii
·
Overclock the World
ManniX-ITA
·
Old crazy guy
Latte
·
Registered
ManniX-ITA
·
Old crazy guy
1 — 20 of 209 Posts
Top
Reviews on Patriot Viper 4 DDR4 (PV416G320C6K) from buyers
- main
- Computer technician
- Complexes
- RAM
- Patriot
Write and reader reviews of buyers for Patriot RAM. (PV416G320C6K)
Donatan Deylan
- Pros
All cool
Alexander D.
Malyukov Dmitry
Shir Alexander
Beautiful appearance, solid. By default, it wound up at 2133 MHz after switching to XMP frequency 3200 MHz timings 16 16 16 36 in tests is stable, mother ASUS PRIME X470-PRO, percent. AMD Ryzen 5 2600 not currently available one of the best price-performance ratio
Magomedkhanov Murad
- Advantages
All of the above
- Defects
No
- Comment
On the motherboard msi z170a gaming m3 the situation is similar to the case of one of the speakers. Bios changed, nothing helps. The latest BIOS defines the maximum supported operating frequency as 2400 in dual chanel and 2133 in single.
 Xmp profile in flight. You can overclock to a maximum of 3100. BUT if you insert the brackets into the ASRock Z170 fatal1ty 4, 3200 takes it right away and chases up to 3400 with auto voltage. Processor 6770k.
Happy shopping everyone!
Roman K.
- Advantages
Acceleration, ergonomics, price-performance ratio
- Faults
Poor choice of colors
- Comments
I ordered this RAM for my Ryzen 1600, ASrock ab350m pro4 motherboard. I checked it in a typhoon burner, Hynix CJR chips, which means there will be good overclocking. By setting up the timing calculator, I got a frequency of 3400mhz in 10 minutes. Judging by the statistics, these dice take frequencies and higher, but obviously not at the first zen. For its price, a good alternative to AES ballistics, which cannot be found in the afternoon with fire.
 I took it for 5650r and they clearly beat this price. The only negative for me personally is the design, or rather the available colors, everything is clear and convenient, the comb is removed, the radiators do not look vyryglazny and they weigh just my respect, but only 2 colors (red and black) I would like to see other color solutions in the future, because it’s not such a big problem.
Damian
- Advantages
XMP profile, start and forget
Could get it to work at 3333 and minimum secondary and tertiary delays (Hynix rev C chips) - Disadvantages
They take a frequency above 3200, but this is random and this model is definitely not about overclocking, from the factory already squeeze a maximum of
from these chips
- Comments
@1usmus special thanks for the detailed explanation of how it’s done
Andrey Bubnov Dustinsk82la
- Advantages
Design. Volume. XMP 3200Mhz is set without problems. profile.
- Disadvantages
According to reviews, it falls on different memory chips. On some it runs well, on others it is no better than XMP.
- Commentary
I got a good option, on normal memory chips and ran to 4000 MHz. no problem. The system is now in its second year, AMD Ryzen 5 PRO 4650G processor and 550 chipset motherboard, Gigabyte b550m s2h. Firmware F12. The video is embedded and works without glitches and artifacts.
Mistizzz T.
- Advantages
I calmly took 3200, it may well be 3400.
- Disadvantages
High price.

- Comment
I paired it with Ryzen 5 1400, everything works flawlessly!
Alexander O
Den D.
- Advantages
One of the most budget options. Cost me 6400 for the set. Wound up immediately at 3200 via XMP. With the same pressure (1.35) I took 3600 with timings 16-19-17-36. Secondary did not touch.
- Disadvantages
Native timings leave much to be desired — 16 20 20 40.
- Comments
Black textolite. The most “successful” chips came across — from Nanya. I thought that everything, sailed, would not even take 3200. But in my case, the memory is single-rank, and not, like some owners from the same vendor, two-rank. Given that I didn’t expect anything at all.
 I consider the end result to be good.
Artem D.
Noke
- Pros
Low price
Good radiators
Overclocking potential available - Disadvantages
Radiator colors
Design
Random by chips (not sure what is relevant now) - Comment
R5 3600 + Asrock b450m Pro4, bios 3.90
Started by default at 2133, immediately turned on the xmp profile at 3200 at Cl16. Worked for a couple of months stably, without complaints.
Then I decided to overclock. The chips turned out to be Hynix c-die, they run well, on a black textolite. I read that I came across dies on Nanya chips, there is generally darkness there, even there is no stable work on xmp. But in recent reviews, everyone has hynixes, so I guess in the latest revisions the probability of getting bad chips is much lower (but this is not accurate)As a result, I achieved a stable 3600 MHz, primary 16-16-19-21-36, voltage 1.
 35 V. I did not touch the secondary, memtest, osst, prime95 passes without errors and bsod. Timings are calculated on the safe preset of the dram calculator. There is an idea that the primary can be slightly lowered + set the secondary, but I’m too lazy)
Approximate indicators of Aida (I will attach a screen later) reading 50, writing 30, delay 68.The result is a good memory for its price, as a replacement for folk ballistics, which you cannot find today — completely. Good chips for overclocking, good heatsinks,
Yarik Varlamov
- Advantages
Design, speed,
- Defects
Not for myself
Ivanov Roman
- Advantages
high speed, reliability, price is cheaper than others
- Disadvantages
does not chase (so-so disadvantage at such a base frequency)
- Comment
tried to overclock, but apparently it’s almost not chasing to raise the voltage, I don’t see the point, and so the frequencies are more than large and any memory bandwidth with a margin
It’s a shame I took another on 09/15/2016 for 6560 rubles (the dollar is almost the same +/-) I decided to buy the same 2 * 8 but the price is 2 times more expensive and this is after 2 years! (but I’ll probably take it by the new year)
Samir Hajiyev
Works like clockwork, radiator No I take the second game , now I have scored all the slots . Satisfied with this memory
Alexey K.
- Advantages
Really works at 3200. There is a radiator, it is inexpensive for 16GB.
- Disadvantages
Starts at 2133 by default. I had to watch the video.
- Comments
I bought some planks and put them in. Started up at 2133. Opened Yotube, typed in «RAM overclocking for dummies». According to the first video, I calmly did everything myself) In my case, I just had to change the profile)
I have an AMD 2700,
Motherboard GIGABYTE X470 AORUS ULTRA GAMING (rev. 1.0)
1.0)
Damian
- Advantages
XMP profile, start and forget
- Disadvantages
They take a frequency above 3200, but this is random and this model is definitely not about overclocking, from the factory already squeeze a maximum of
from these chips
Mikhail S.
- Advantages
Runs without problems in the XMP profile. Probably overclocking. I have had enough of the declared parameters.
- Deficiencies
Did not detect
- Comment
I chose from the RAMs that are at the office. the site of my motherboard, because I was afraid that it would not start in the XMP profile. In the end, everything fell into place, as it seems to me.
 When loading the BIOS, I didn’t even understand whether I myself turned on the XMP profile or it turns on automatically. Not very experienced PC builder.
Evgeny Bondarenko
- Advantages
Appearance
- Disadvantages
Orthodox Samsung b die, asus c6h works on 3466 (16.18.18.36) r5.1600.
- Comment
It’s sad, of course, but somehow, every day I struggle with this memory, it normally works only on 3066 and timings 16.18.18.38.
Update after a few months. I bought Asus crosshair 6 hero, with a couple of clicks I took 3466 on hmp timings, it also starts up at 3533 and 3600 (in the process of picking, there is no stability yet). So the memory is excellent for the money.
Sergey S.
warranty
Al’ruin Mavzdari
- Advantages
numbers in BIOS
- Disadvantages
wine 10 home base unit 750 watts I set the xmp 3200 profile (base 2133) in the BIOS, I load Windows and blue screens flew The system freezes, shutting down with errors. Possible reasons for the error are: the system stopped responding, a critical failure occurred, or an unexpected power outage. Kernel Power 41
- Commentary
timings not very good
Vladislav K.
- Advantages
Cheap, rather beautiful
- Defects
Fell off after 2 months
- Comment
This is the first time I’ve encountered such a defect — after all, the memory either starts right away, or it never starts.
 In my case, the bars worked flawlessly for 2 months, and then they started throwing BSODs. Ryzen 3600, XMP profile, everything is ok. But now, no matter how much I try, it refuses to work, throws it out on Firefox tabs. And memtest passes quietly. Passed under warranty, bought another company.
I am supplementing the review: the marriage was confirmed in the store and the money was returned.
Rusty
- Advantages
Price, nice appearance of radiators.
- Disadvantages
Bought 2 sets of this memory. At random, it turned out that one module was not working. Checked on two different motherboards — the result is reproduced. As a result, I use 3 modules of this memory, instead of the purchased 4x. Hynix chips soldered on these memory modules have a significantly lower factory clock speed than indicated on the Patriot box.
- Comment
I advise you to refrain from buying Patriot memory modules, especially this model (judging by the reviews, I’m not the only one who was so «lucky»). Overclocking potential is modest.
Geralt of the Ordo Malleus
Melnikov Anton
- Disadvantages
There may be a problem in the mother’s BIOS, but on the Asus Z270-k motherboard it is detected with a frequency of 2133, although it was inserted into the correct slots according to the motherboard instructions.
- Comment
Perhaps everything will be fine after updating the BIOS
Chasovskikh Ilya
- Advantages
Keeps the par value on MSI B450I GAMING PLUS AC with 2400g ryazan without any problems, just set the xmp profile.

- Disadvantages
Caught on a black textolite, Huniks chips, peer. Overclocking sucks (3333, or lower timings by 2 at 3200).
There are a lot of mentions in the reviews that the kit is two-rank — either people were very lucky and got completely different modules on old chips, or they confuse something. There are no modern 8GB dual-rank modules. - Comment
It was cheaper to buy default samsungs — also peer-to-peer, and look scarier — but 1.5k savings. I was afraid to play roulette with overclocking, in vain.
Alexandr V.
Andrey Polukhin
- Advantages
Price, I took it in the player for 6700, 3200 was declared, in the mother went the car 2666. stock corsairs / samsund would be more expensive.
 Not made in China which is nice.
 - Comment
I have AMD ryzen 7 4590g. I wanted to overclock to the declared 3200, it does not plow, because as it turned out, the xmp profile for Intel is larger. Has anyone taken something like this and overclocked it on amd?
Enthusiast claims his power plan boosts AMD Ryzen performance. We are investigating.
Enthusiast claims that his own homemade power efficiency algorithm can significantly improve the performance of AMD Ryzen processors, in addition to the standard algorithms that AMD itself distributed.
The idea of unlocking hidden performance with a quick software mod is inherently attractive. Also, the PC industry’s enthusiast side has a long history of discovering helpful tricks and tips like this one. From third-party utilities that offer access to various GPU features like Nvidia Inspector to the old third-party Rain utility that enthusiasts could use to lower CPU temperatures and reduce power consumption, regular PC users have often created projects that enhance or enhance the capabilities of various products.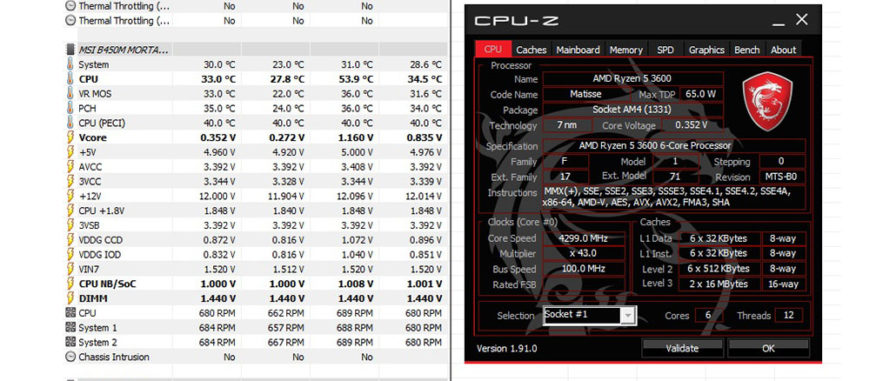 .
.
Power plan 1usmus
However, when I approached AMD, the company representatives we spoke to were unsure whether such manipulation would pay dividends. AMD’s outlook is similar to mine. I have made several attempts to improve Ryzen performance with UEFI settings and have generally found the effort not worth it. Overclocking headroom on Ryzen is very limited, and the processor tends to perform better when left on its devices.
But the whole point of a site like this is to explore what kinds of performance can be made available at the forefront. I ran Ryzen 93900X on our MSI X570 Godlike with 7C34v16 UEFI, a new fully patched install of Windows 10 1903, the latest AMD drivers (1.9.27.1033), and a Thermaltake Floe Riing RGB 360 cooler. Although this cooler is from 2017, it is a large heatsink design with room for three 120 -mm fans. We’ve relied on it for several generations of Threadripper and Intel HEDT testing, and it can handle a 12-core Ryzen 3950X without issue.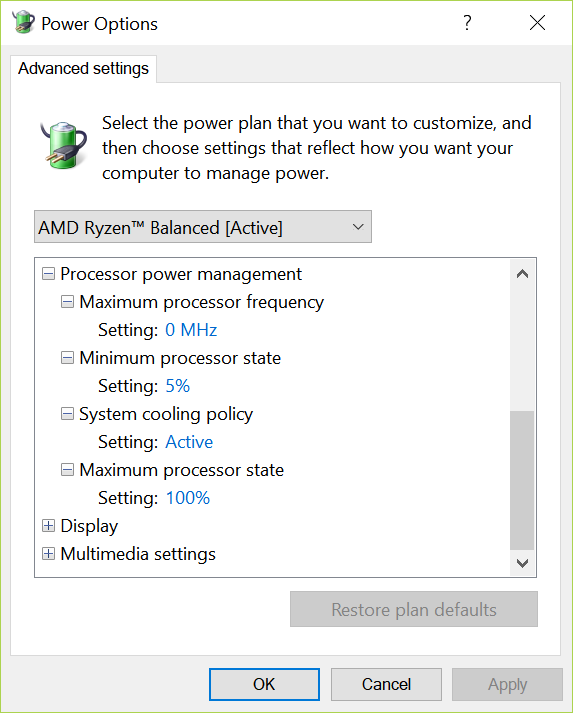 The maximum advertised CPU temperature for a 12-core processor was 67°C in Ryzen Master under constant load during the Blender 1.0 Beta 2 test.0016
The Windows 10 scheduler has some known weaknesses in how it handles processors with multiple NUMA nodes (we discussed some of them in connection with the 2990WX, which suffers severely in some workloads). 1usmus spends some time cataloging various problems with the Windows 10 scheduler, some of which he believes his own power plan can solve.
1usmus claims:
My approach to fixing this shortcoming in the Windows Scheduler is to use a custom power profile that provides better guidance for the scheduler to distribute workloads between cores. This should put the load on better (higher clocked) cores and result in higher and smoother FPS because workloads will no longer be mirrored between cores.
This should be a fairly simple set of improvements to test. He states that his maximum observed CPU frequency is up to 200 MHz.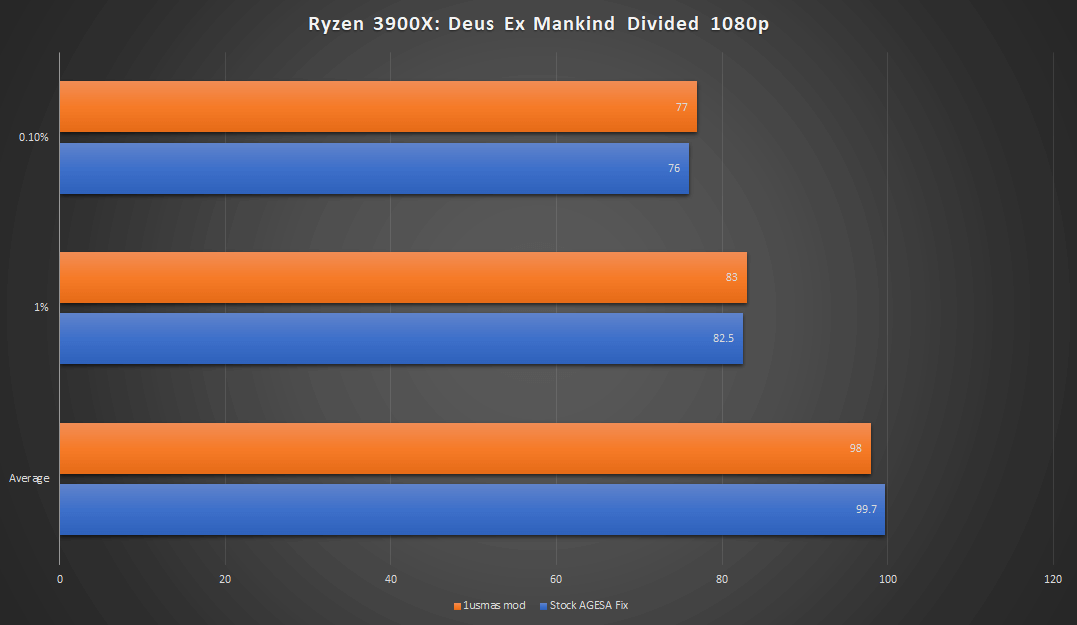 He claims a ~1.03x improvement in Cinebench R15 multi-threading based on actual benchmark results and writes: With the help of AGESA 1.0.0.3 ABBA, this modification was able to increase the maximum observed core frequencies by an average of 200 MHz, which should result in better performance across the board, especially for less parallelized workloads.
Test
1usmus writes that the following parameters must be changed for the power plan to work correctly: Preferred Cores = Enabled
We have made these modifications and launched the test platform. They definitely change the behavior of the processor, but it’s not entirely clear how useful they are.
According to AMD’s default power plan, most CPU cores remain active while the chip is running a load such as Cinebench, even though they run at low clock speeds.
Default kernel behavior, Ryzen 9 3900X.
According to the 1usmus plan, these cores are mostly sleeping.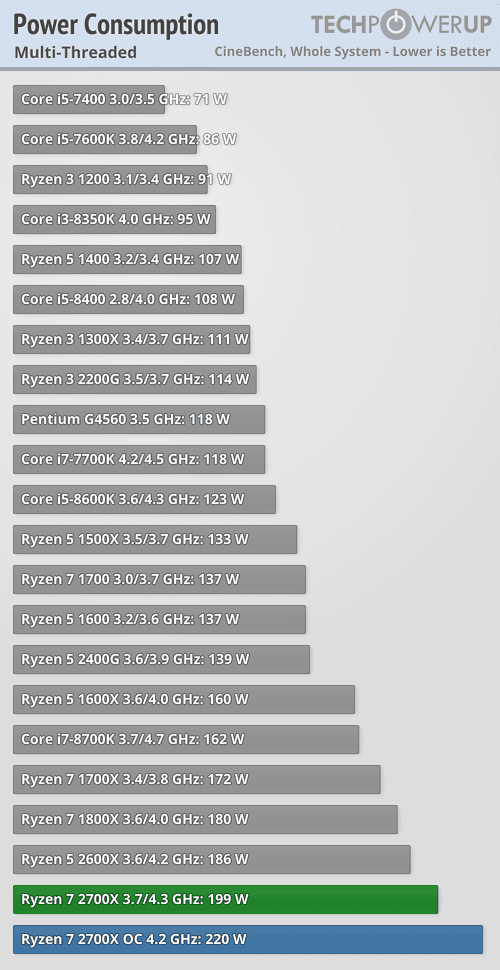 There is a trade-off here between system responsiveness and the lowest possible power state. Putting 10-11 other CPU cores to sleep during a workload allows full power to be diverted to one CPU core. In fact, we’re seeing some evidence that this allows the processor to run at slightly higher clock speeds in single-threaded workloads.
1usmus power plan. Pay attention to the number of cores that are sleeping.
For example, in Cinebench R20 Core 05, our 3900X runs at ~4.46GHz when using the AMD Ryzen Balanced plan. According to the 1usmus plan, this processor core tends to run a little higher, around 4.53 GHz. This is about 1.5% more clock speed than previously available.
Transfer time between C04 and C05. C05 is still the preferred core for ST workloads even under the 1usmus plan.
1usmus also claims that its power plan results in more frequent matching of workloads to the highest overclocked core as determined by Ryzen Master. We have not seen evidence of this. Windows 10 clearly prefers to run workloads on the Ryzen C05 core (as stated by Ryzen Master). If anything, he preferred this core more strongly when running the 1usmus power plan than AMD’s default.
Cinebench R15 performance did not improve in multi-threaded mode and only increased by 1.5 percent, at most in single-threaded mode. Maximum recorded clock speed increased from 4.49GHz up to 4.6 GHz, but the actual degree of performance improvement was only a fraction of that. Single threaded performance improved from 209 to 2012.
Cinebench R20 multi-threaded performance didn’t improve at all. Single-threaded performance improved by about 3 percent, from 512 to 526.
Finally, we ran the Barbershop_Interior test from Blender 1.0Beta2. This is a robust all-core test that gives the processor more time to show the impact of any performance improvements or minor clock speed changes. Barbershop_Interior rendering time improved from 13.35 minutes to 13.26 minutes, gain was 0.04 percent or no different from random error and noise.
Results
The 1usmus power plan does not appear to improve performance in any way that we can separate from margin of error, although there may be a very small (1. 5-3 percent) improvement in single-threaded tests. However, I usually assume a margin of error of 2.5-3% for any benchmark, and the best ST gain we measured was in 3% territory. There are no signs of any improvement in basic parking behavior; C05 is the preferred kernel for single-threaded workloads over time, and the 1usmus plan doesn’t change anything. It appears that any performance provided by the power plan depends on turning off the rest of the chip more aggressively. It takes longer for the cores to wake up from deep sleep, so there will be trade-offs anyway.
The truth is that as power consumption and scheduling continue to get more complex, the chances of an end user magically stumbling upon a combination of settings that magically improve performance are slim to none. The 1usmus plan does hit fast hours, but doesn’t translate into sustainably improved performance.
The wfoojjaec manual adheres to AMD’s default settings in all respects related to power management and processor clock speed.