How to monitor your PC’s CPU temperature
Once you know how to monitor your CPU temperature, you’ll be able to perform a vital health check on a PC component that you very, very much do not want to overheat and break. Luckily this isn’t a common problem, but if you’ve just built a PC from scatch, have installed a new CPU in your existing setup, or are attempting to overclock, checking the CPU temperature is a quick step that can reassure you that all is well – just as much as it can warn you of an overly hot chip.
Watch on YouTube
Excess heat is a PC’s natural enemy, and gaming systems – with CPUs tending towards higher clock speeds, plus dedicated graphics cards producing extra warmth inside the case – are especially at risk. So while overheating is usually caused by an over-ambitious overlock or improperly installed cooler, rather than being part and parcel of computer ownership, it’s worth understanding how to monitor CPU temperatures so that you can spot potential issues quickly. Left unattended, an overheating CPU can cause system shutdowns, performance throttling – less than ideal for gaming – and even permanent damage to the processor itself.
This guide will focus on a few different software tools that you can use to keep an eye on CPU heat. They’re all free and easy to use, and are distinct enough that you can pick the one that best suits your preferences. Just be sure to check in every now and then; even the best CPUs will suffer if they get to toasty.
Core Temp lets you see how individual CPU cores compare to others.
How to check your CPU temperature with Core Temp
Core Temp keeps everything nice and simple, and provides all you need if you just want to check your CPU temperature now and again to make sure it’s ticking along. It’s easily readable, updates in real time, is compatible with every CPU under the sun and shows you the temperatures of all your processor’s individual cores.
Installing it is dead easy too.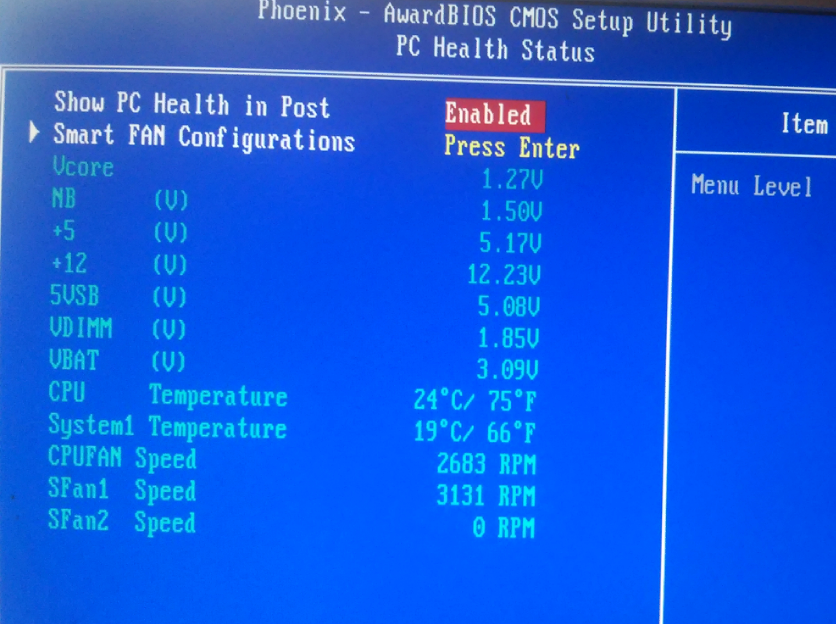 Simply click the big blue “Download” on the Core Temp site, then run the executable file once it’s downloaded. While clicking through the installation wizard you will need to uncheck some boxes to avoid adding some bloatware, but otherwise you can keep hitting “Next” until Core Temp is installed.
In the app itself, the temperatures of all your CPU’s cores are listed at the bottom. Another cool aspect of Core Temp – if don’t mind painfully stretching the definition of cool – is that it also lists the lowest and highest temperatures that each core has recorded during the current session. That might be handy if, say, you want to know how high your core temperatures peak during sustained play, but you can’t be bothered with constantly alt-tabbing out to monitor it.
HWMonitor lets you view or hide monitoring data for all your PC’s key components.
How to check your CPU temperature with HWMonitor
CPUID’s HWMonitor performs a similar role to Core Temp, providing both minimum and maximum CPU core temperatures as well as current readings, but goes into detail on a far greater variety of your PC’s trackable metrics. Want to know the speeds of every single on of your PC’s fans, while also monitoring the temperatures of your graphics card and SSD? HWMonitor tracks it all, including voltages, so it’s particularly well-suited to keen overclockers.
To install HWMonitor, head to its page on the CPUID site and click the purple ‘Setup’ button in the lower left. Simply run the installer once it’s downloaded, and then it’s just a case of finding CPU core temperatures in HWMonitor’s long list of sensors. They’ll be underneath your CPU, which is listed as its full product name, then under ‘Temperatures > Cores (Max).’ If you’re only interested in CPU temperature monitoring and nothing else, you can always collapse the motherboard, graphics card and storage device sections to make the whole thing easier to read.
MSI Afterburner offers a CPU temperature overlay you can view in-game.
How to check your CPU temperature with MSI Afterburner
MSI Afterburner isn’t just for overclocking your GPU. It’s on par with HWMonitor in how many different aspects of your PC it can keep tabs on, and makes it easy to add your choice of metrics to an unobtrusive overlay that you can check while playing games. That naturally includes CPU temperature monitoring, though setting it up is a little more involved, so let’s break it down into steps:
Step 1: Go the MSI Afterburner page and click “Download Afterburner.” You’ll begin downloading a .zip file.
Step 2: Extract the file and launch the setup application inside. Click through the wizard and on the “Choose Components” section, make sure you leave RivaTuner Statistic Server checked, as you’ll want this installed as well.
Step 3: Once both components are installed, launch Afterburner and click the cog symbol on the left sidebar to open up the properties menu.
Step 4: Open the Monitoring tab and scroll through the list of “Graphs” until you reach the CPU Temperature option.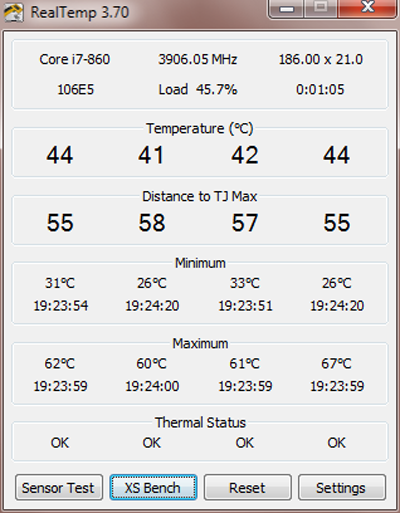 Click this, then check the “Show in On-Screen Display” box in the section below. The words “in OSD” should then appear next to “CPU temperature” in the graphs list.
Step 5: Optionally, you can enter the On-Screen Display tab and set hotkeys to toggle/display the overlay, so that you can control when it appears and when it’s hidden. Either way, click “OK” at the bottom of the properties menu to save your changes.
The next time you launch a game, Afterburner should then display a reading of your CPU temperature in the corner of your screen.
A lot of NZXT CAM’s features require NZXT components, but not its CPU temperature monitoring.
How to check your CPU temperature with NZXT Cam
If you fancy your CPU temperature readout in a more graphical style, NZXT Cam is a good bet. I wasn’t initially impressed when, several years ago, it launched in support of some broadly overpriced NZXT cases (even though you don’t actually need any NZXT hardware to install it). Nowadays, though, it’s a nicely comprehensive (and readable) set of tools for monitoring temps, speeds and loads, not to mention tinkering with compatible lighting and even overclocking.
For simply checking your PC’s CPU temperature, though, you can just take a peek at the default “PC Monitoring” tab, which appears as default whenever you open CAM. To install, simply hit “Download CAM” on the NZXT CAM site and run the executable once it downloads.
Frequently Asked Questions
What is a good CPU temperature?
Simply monitoring CPU temperatures won’t stop overheating, but does let you identify when it happens.
Generally, a CPU will be perfectly happy running at temperatures anywhere up to the 70-80°c range, even under sustained load. 80-90°c is a technically safe range as well, though anything above that can cause throttling, slowing your PC down in the process. Running at 95-100°c is just asking for trouble, as CPU manufacturers build their chips with heat limits so that they’ll shut down if they spend too long around boiling point. Try to persist with such high temps, and you risk doing terminal damage to your hardware.
Take note that different games put different amounts of strain on the CPU, so it might run hotter in some compared to others. That’s fine, but ideally core temperatures should avoid exceeding 80°c for any lengthy period of time. And if you can get them down even further than that, great – a cooler PC is a quieter one.
How do I lower my CPU temperature?
Fresh thermal paste can reduce CPU core temps — just don’t use too much. Or too little.
If your CPU is registering uncomfortably high temperatures even when it’s running at stock speeds, there are a few measures you can take. One is to re-apply the thermal paste between the CPU and its cooler; sometimes, the paste may have been applied too thinly or slathered on too thick, preventing effective heat transfer to the cooler in both cases. Thermal paste can also dry out a few years after application, so a fresh coat could help lower temperatures on older builds too.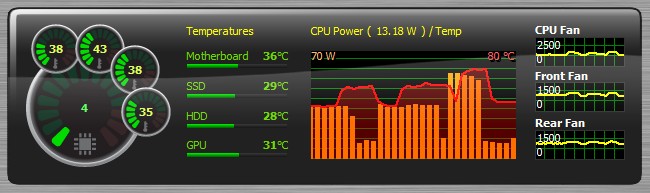 Our guide on how to install a CPU shows how best to apply thermal paste, but in short, you want a very thin, even layer that completely covers the top of the CPU.
If that doesn’t work, you may need to upgrade your CPU cooler. There’s no shame in this – some modern chips, like the Intel Core i9-12900KS, can get extremely hot even at stock speeds, and thus require a powerful liquid cooler to perform at their best.
You could also try lowering the overall temperature of your PC’s interior, such as by installing new case fans. This won’t cool the CPU directly, but it could reduce the ambient heat building up inside the case, which in turn makes everything – the CPU, the CPU cooler, the graphics card – hotter as well.
All three of these might help when overclocking CPUs, as well as when running stock speeds; if anything you should only start overclocking once you already have a highly capable cooling system. But if all that fails, and your OC’d chip is still overheating, you may have to bite the bullet and simply reduce the clock speeds and/or voltages until temperatures are back under control.
For more on keeping your gaming PC in tip-top condish, check out our guides on how to clean your PC, and how to test RAM and find errors. Our liquid cooling vs air cooling guide can also help you decide which kind of CPU cooler you’ll need.
How to Check the CPU Temperature in Windows
Keeping your CPU temperature in check is one of the foundations of looking after your computer. A hot CPU can result in throttling, which can impact the clock speeds of your CPU and therefore slow it down. It can also cause BSoD crashes and your CPU to deteriorate quicker, giving it a shorter lifespan than it deserves.
To help you check your CPU temperature in Windows 10 and 11, this tutorial shows you the best tools to monitor it.
Content
- But First – What’s a «Bad Temperature»?
- How to Check CPU Temperature in Windows
- 1. Using Ryzen Master (AMD Ryzen CPUs only)
- 2. Using Throttlestop
- 3. Using HWMonitor
- 4. Using Open Hardware Monitor
- 5.
 Using Core Temp
 - 6. Using Speccy
- 7. Using SpeedFan
- 8. Using HWinFO
- 9. Using MSI Afterburner
- 10. Using AIDA64 Extreme
- Frequently Asked Questions
But First – What’s a “Bad Temperature”?
Unfortunately, it’s not immediately obvious what a good or bad temperature for a processor is. If you see your processor’s idle temperature is 30°C (86°F), is that a good or bad idle temperature? What about 40°C (104°F), 50°C (122°F), 60°C (140°F), or 70°C (158°F)?
Let’s grab a quick summary of your CPU data by looking for “Device Specifications” under “Setting -> System -> About.” Take note of your processor name and details including the GHz frequency.
If you want to know what your processor’s max temperature is, search the Web for the product page of your specific CPU, then find where it lists the max ideal temperature for your processor. If the temperature is listed under something similar to “Maximum Operating Temperature” or “T Case,” then that’s the temperature that you should strive to keep your processor under most of the time.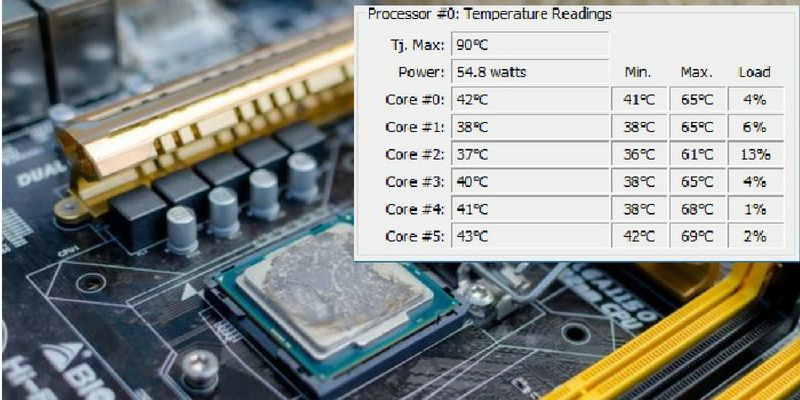
On the other hand, if it says, “T Junction” (as in the image below), the general advice is to keep things at least 30°C (86°F) under this stated temperature. (In this example, we are striving to stay under 70°C / 158°F.) Either way, if your PC is under this temperature for most (or, ideally, all!) of the time, you’re doing fine.
How to Check CPU Temperature in Windows
Now that we know what the temperature limit is, it’s time to find out how to check CPU temperature in Windows. This requires the aid of third-party programs, to help keep tabs on how hot the processor is getting. Any of the software listed below will allow you to easily check the CPU temperature.
1. Using Ryzen Master (AMD Ryzen CPUs only)
This may only apply to the lucky ones who own a Ryzen CPU, but if you do, then it’s by far the most accurate way to track your CPU temperature, as it uses an AMD proprietary method to read the CPU temperature that other CPU monitoring software doesn’t have access to.
This makes sense, as Ryzen Master is widely used as an overclocking utility, which makes CPU temperature readings all the more critical.
Image source: AMD
You can download the tool online from the official AMD page. To use it, open the app to see the temperature. It can be compared with the maximum temperature limits supported by your processor.
Tip: want to boost your PC’s performance? Consider getting an eGPU.
2. Using Throttlestop
We’ve discudsed the undervolting tool Throttlestop here at Make Tech Easier. (Check out our undervolting guide.) Briefly, the lightweight tool lets you undervolt your CPU to cool down temperatures and prevent throttling, which in turn allows your CPU to function more effectively.
It’s worth looking into undervolting if you want to cool down your CPU, but as an added bonus, you can also use Throttlestop as a CPU temperature monitor.
You can see each individual core temperature in the main Throttlestop window.
You can also get your CPU temperature to appear in the notification area on your PC. To do this, click “Options” at the bottom of Throttlestop, then in the middle, check the “CPU Temp” box. Now, every time you open Throttlestop, you’ll see a little number in your taskbar notification area showing your CPU temperature at that moment.
3. Using HWMonitor
HWMonitor does much more than just monitor CPU temperatures. On one screen, you’ll find all the information you need and much more.
- After installation, run the app as an administrator.
- In the main HWMonitor pane, scroll down to see your CPU listed with all its information.
You’ll see the voltage of each core, the amount of CPU being utilized, and – most importantly – the temperature of each core. It displays the current temperature as well as the minimum and maximum temperatures.
There’s not a ton to dig into here, as everything is displayed on that one screen. You can switch on a dark mode for those nocturnal monitoring sessions, switch on a status bar, and quickly save a log of your monitoring data with the Ctrl + S shortcut.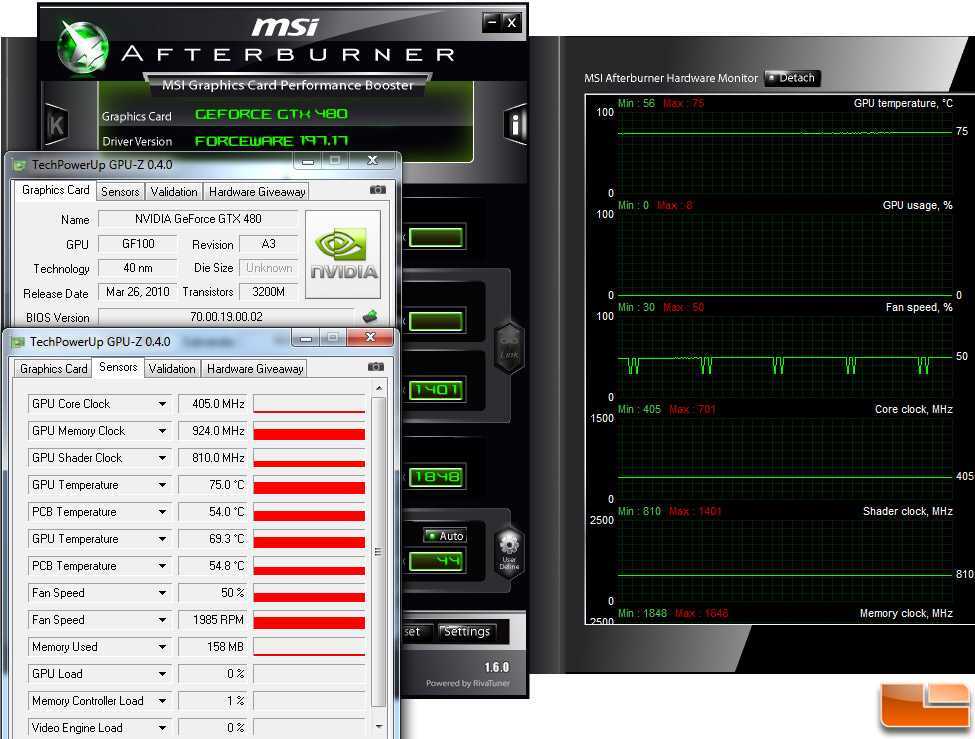
4. Using Open Hardware Monitor
Open Hardware Monitor is a nice solution for getting all of your needed statistics in one place. This includes your CPU’s temperatures as well as your GPU’s temperature, the voltages being used in your computer, and even how fast your system fans are going. This makes it a robust tool that allows you to keep an eye on all of your system temperatures.
You can find your CPU’s temperature under the category with your CPU’s name in it. It will list the temperature for each core your processor has.
Many of these temperature monitors allow you to put readings on your taskbar. This is particularly useful if you’re doing system-intensive tasks and want to keep an eye on your temperatures without darting back and forth between the active window and the system monitor.
If you’d like to see the CPU temperature in the taskbar, right-click the temperature itself and click “Show in Tray.”
If the reading ends up hiding in the “additional” icons section, you can drag it onto the main active tray so that it will always be visible as long as you can see the taskbar.
PC slower than usual? Learn how to fix “Windows Modules Installer Worker” high CPU usage with our handy tutorial.
5. Using Core Temp
If you’d like something a little more focused on the processor itself, Core Temp is a good choice when you need to check the CPU temperature in Windows.
Once installed, you can run the app to find everything you want to know about your processor, such as its name, the cores it uses, and its temperature.
It will even inform you of your processor’s T Junction limit, listed as “Tj. Max” above your temperatures. If you’d like to see the temperature in the system tray, it should be enabled by default. If it’s not, click “Options -> Settings.”
Click the “Windows Taskbar” tab, then “Enable Windows 7 Taskbar features -> Temperature -> OK.”
6. Using Speccy
Another all-in-one suite, Speccy, is a nice package of various systems diagnostics, including the ability to check CPU temperature in Windows.
As soon as you open Speccy, you’re shown all of the relevant temperatures you need to know for a healthy laptop. It’s also great for digging up information on your system, so make sure you remember this application, should you need information about your operating system or motherboard, for instance.
If you click on “CPU” on the left, you can get more focused information on your processor.
If you’d like the temperature to appear in the tray, click “View -> Options.”
Click “System tray -> Minimize to tray -> Display metrics in tray,” then select “CPU.”
Now when you minimize Speccy, you can keep tabs on how hot your CPU is running as you do other things.
Need to access Device Manager quickly? There are several methods to do so.
7. Using SpeedFan
This tool is a hardware monitoring software that can change fan speeds according to system temperatures. SpeedFan can read temperature values from your hard disks using your PC’S built-in temperature sensors.
This Intel-recommended system tool is available as a free trialware for 30 days. It supports older operating systems and CPUs as well as the latest versions. There are very few components to install. Always opt for the latest software version.
Once you launch the main SpeedFan screen, you will get a quick glance at all readings, including the hard disk temperature and CPU core temperatures, Core 0, Core 1, and so forth.
If you’re unable to view the temperature values, head to the “Charts” tab and check the labels for various temperature values. After you do this, the temperature readings are immediately visible in the “Readings” tab.
Click the “Configure” menu in the “Readings” tab. This will lead to a pop-up window where you can control the “desired” and “warning” limits for various temperature values. Apart from CPU temperature, you can configure fan speeds, voltage, and other actions on the motherboard.
8. Using HWinFO
HWinFO is one of the most comprehensive free Windows diagnostics software. It supports a complete range of Intel processors, from Xeon/Atom to Core i9 as well as most AMD processors except the latest Ryzen family.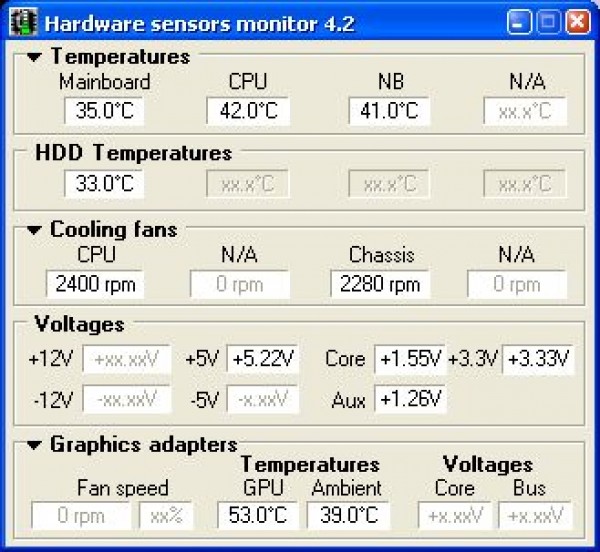 HWinFO offers amazing graphic visualization features to alert you when your computer is heating up unexpectedly.
While there is a Pro and a portable version of HWinFO, you get plenty of valuable information from the free download installer.
After launching the dashboard, navigate to the “Sensors” tab. The software will display a warning message, as it uses an embedded controller (EC) sensor on your motherboard. It is safe to disable this warning as you temporarily experience a little bit of latency and delay in performance.
Check the temperature values for the various CPU cores under the “Sensors” status readings.
With a right-click, you can add these temperature values to the system tray. If you want to monitor your CPU’s temperature rise over time, click “Show Graph.” A graph to monitor CPU heat levels will pop up. Any unexpected temperature rise (during a heavy game or application) will trigger spikes.
9. Using MSI Afterburner
Designed with gamers in mind, and for those who want to overclock their PCs, MSI Afterburner doubles as an excellent tool to monitor your PC temperatures. Note that MSI Afterburner doesn’t play nice with all CPUs and is known not to show temperatures for AMD CPUs in particular.
Once you’ve installed and opened Afterburner, you should see a graph on its home screen showing your GPU temperature, CPU temperature, and various other data.
If you don’t see the temperature as an option, then your CPU might not be supported, but there is still hope! Open the app’s properties from a Settings icon. Under the “Monitoring” tab, click the three-dotted menu icon below.
You’ll see a list of plugins and can link MSI Afterburner to another tool that monitors CPU temperatures or check the “CPU.dll” option to pull in CPU temperatures.
To reorder the graphs and prioritize CPU temperature so that it appears near the top, click “Settings” in Afterburner, then the “Monitoring” tab. You’ll see a menu where you can tick which things you want to be displayed on the home screen and drag to the top the things you want to appear near the top.
Drag “CPU1 temperature,” “CPU2 temperature,” and all of the other CPU temperatures near the top of the graph and click “OK.” They’ll appear on the home screen in the order you chose.
When you select the “CPU” temperature, you can also tick the “Show in LCD Display” box so that it appears in the corner whenever you enter the shortcut for bringing up the OSD. (You can choose what key you want this to be by going to the “Profiles” tab in Afterburner’s settings.)
10. Using AIDA64 Extreme
AIDA64 Extreme is another all-inclusive diagnostics software with a special focus on CPU temperature values. There is a trial and evaluation version, which is free for 30 days. Apart from Windows, it also supports Ubuntu, iOS, Google Play, and other operating systems.
The AIDA64 Extreme software supports both Intel Core 13000 and AMD Ryzen 7000 series processors. It is one of the best system tools on the market for the latest GPUs, RAM, and SSD level.
Once you’re able to view the AIDA64 Extreme home screen, click “Computer -> Sensor.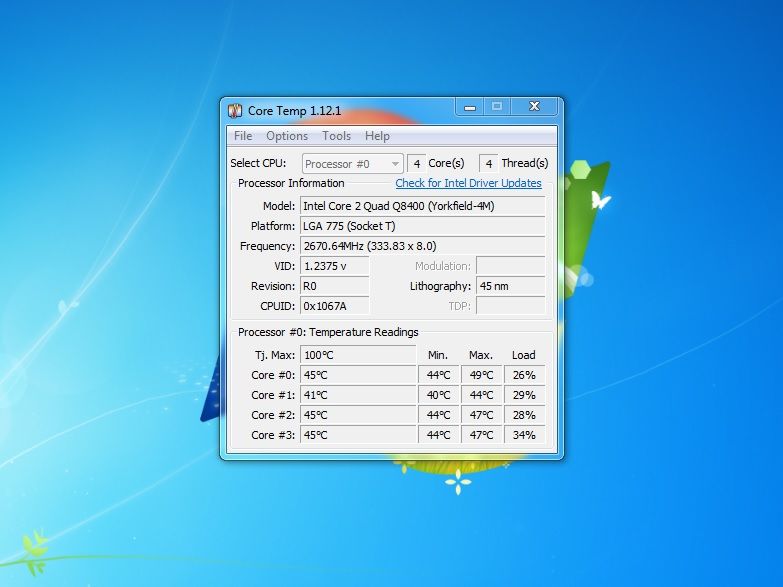 ”
”
Under “Sensor,” you can view various sensor properties including CPU temperatures, CPU package temperatures, CPU IA Core temperature, and CPU GT Core temperature. But due to the usage of sensors, the CPU temperature rises very quickly. It is not advisable to keep the processor overheated for a very long time.
Want to do more laptop maintenance? Read our guide on how to fix Wmpnetwk.exe high CPU and memory usage in Windows.
Frequently Asked Questions
How does gaming impact CPU temperature?
Gaming is an important variable when it comes to CPU temperature. If you’re playing graphically intensive modern games, then not only will your GPU be under load, but your CPU too.
Again, CPU temperature limits vary greatly, but under heavy gaming load, it’s not uncommon for temperatures to soar into the 80s (176 °F). In most cases, this is perfectly safe (if a little hot on the palms for laptop users), and you only need to start worrying if you’re creeping up into the 90s (194 °F).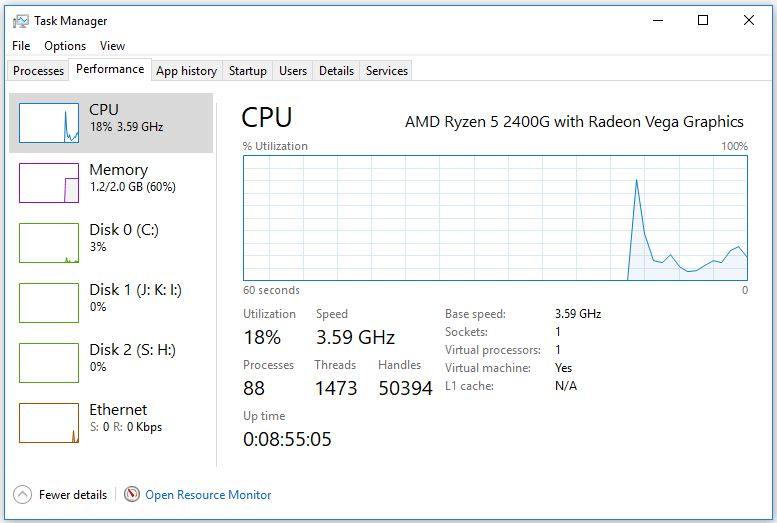
How long can a CPU run at high temperatures?
A healthy non-gaming laptop CPU is equipped to handle occasional spikes for several minutes when you’re performing a CPU stress test, playing GPU-intensive heavy games, or hooking your laptop to an external monitor. But prolonged exposure to very high temperatures can lead to thermal throttling, so it is not recommended to run a typical computer in this state for very long.
If you have a non-gaming laptop, try to avoid temperature rises beyond 80°C (176°F) for several hours at a stretch. Gaming laptops can take it up a few notches, but anything continuously over 90°C (194 °F) is not recommended even for these devices. Most gaming laptops have an internal safeguard mechanism to cool the CPU down to more manageable levels. You can operate them in their high 80s for much longer than a non-gaming one. You can also buy an external USB cooling pad to control an unpredictable temperature rise.
Can a CPU overheating damage it?
It is an urban myth that an overheated CPU can get permanently damaged. The CPU would shut itself off before that happens. But continuous high-temperature exposure surely leads to a decline in raw PC performance. That is why gaming laptops may become incredibly slow in just a few years’ time.
Being a vital part of your laptop, an overheating processor is a cause for concern. With third-party apps, however, you can easily check CPU temperature in Windows and ensure your processor is working as cool as it should.
How can I permanenly delete Ryzen Master from my PC?
Ryzen Master is one of those persistent programs that won’t remove itself from your Windows Apps or Control Panel. To uninstall it properly, open the Command Prompt in Administrator mode.
- Enter
wmic. This creates a command-line environment. - Type
product get name, which will give you a complete list of software and third-party apps installed on your device. - Type
product where name ="AMD Ryzen Master" call uninstall.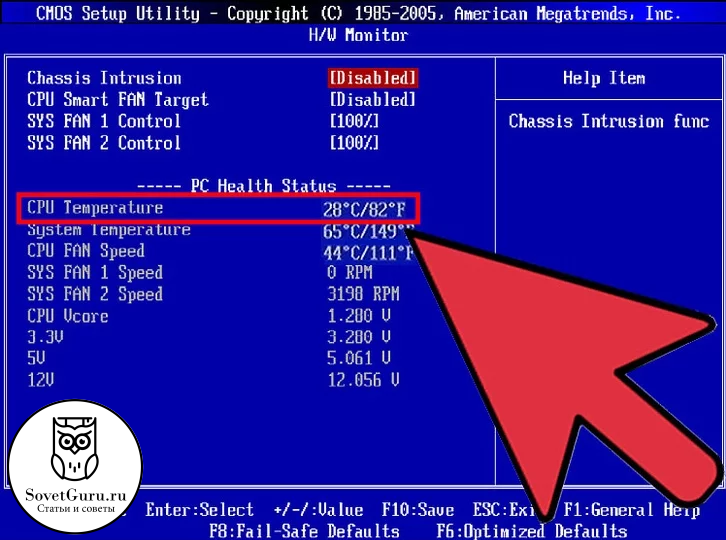
- If prompted for a further “Yes” or “No”, enter
Y.
Image credit: Pixabay. All screenshots by Sayak Boral.
Sayak Boral
Sayak Boral is a technology writer with over eleven years of experience working in different industries including semiconductors, IoT, enterprise IT, telecommunications OSS/BSS, and network security. He has been writing for MakeTechEasier on a wide range of technical topics including Windows, Android, Internet, Hardware Guides, Browsers, Software Tools, and Product Reviews.
Subscribe to our newsletter!
Our latest tutorials delivered straight to your inbox
Sign up for all newsletters.
By signing up, you agree to our Privacy Policy and European users agree to the data transfer policy. We will not share your data and you can unsubscribe at any time.
How to find out the temperature of the processor, video card and other parts of the computer
March 29, 2021
Likbez
Devices
It is enough to install a small program and compare its performance with the manufacturer’s recommendations.
Overheating of components shortens their service life, and in some cases immediately disables the computer. That’s why it’s important to keep an eye on the temperature, especially when you’re gaming, watching high-definition videos, or the room is hot. Notebook owners are also at risk, as this form factor often suffers from cooling problems. nine0003
How to check the temperature in Windows
Use one of the programs listed.
Speccy
Immediately after starting Speccy displays a list of components and the current number of degrees next to them. The utility is translated into Russian and presents information very clearly, so it is perfect even for those people who do not like to understand technology.
Download Speccy →
HWMonitor
Programs like HWMonitor are popular among power users. It works in the same way as the previous one, but does not contain detailed descriptions of components. But it displays more detailed data, including the maximum and minimum temperatures since the start of the program. nine0003
Download HWMonitor →
AIDA64
Professional utility for determining the status of computer components. Shows a lot of information about the processor, motherboard, video card, memory and other hardware, including temperature. The program is very popular, despite the fact that it costs money. You can use AIDA64 for free for 30 days.
Download AIDA64 →
How to check the temperature in macOS
The following utilities will help you to check the temperature in macOS. nine0003
Macs Fan Control
The program monitors the temperature of the processor, video card, motherboard and disks of your Mac. In addition, she can adjust the speed of rotation of the fans.
Download Macs Fan Control →
iStat Menus
More advanced program, but paid. It is located in the macOS system tray and displays detailed information about the temperature and load of the processor, video card, disks and other components.
Download iStat Menus →
How to view temperature in Linux
Install one of these options.
Psensor
A simple program found in the repositories of almost all Linux distributions. It can display the temperature of the processor, motherboard, hard drives and video cards, monitor system resources, and also control the fan speed. To install Psensor on Ubuntu and similar, enter the command sudo apt install lm‑sensors hddtemp psensor .
Glances
An extremely functional system monitoring tool that displays not only the temperature, but also a bunch of other useful information, such as the status of disks and network connections. Suitable for advanced users. It does not have a graphical interface and works from the command line. On Ubuntu, it can be installed with the command sudo apt install glances .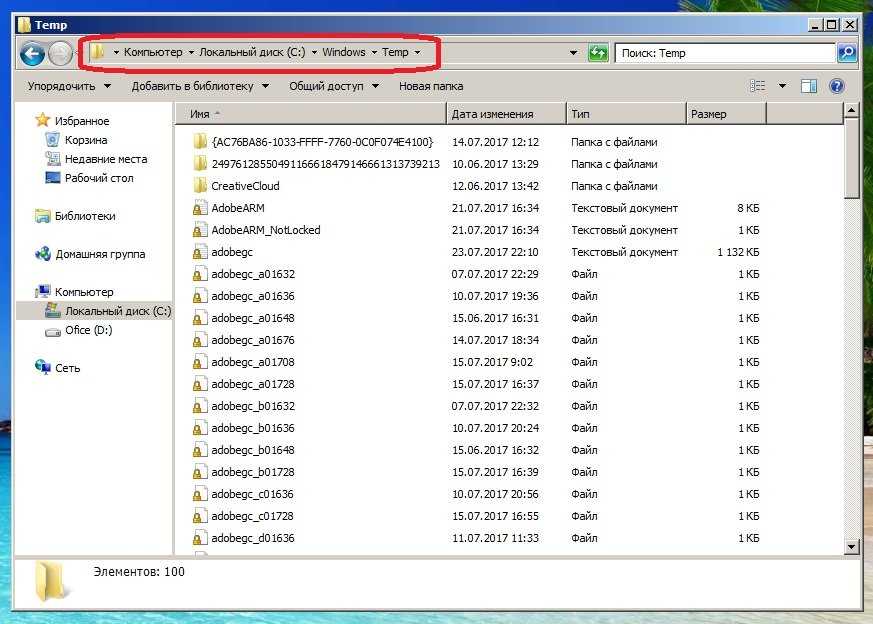 And run by simply typing 9 in the terminal0065 glances .
HardInfo
If Glances seems confusing to you or you don’t like the command line, try HardInfo. This program collects and displays system information in a user-friendly graphical interface. To find out the temperature of your components, go to the «Sensors» section in the main window of the utility. On Ubuntu and similar distributions, HardInfo is installed with the command sudo apt install hardinfo .
What temperature is considered normal
First of all, you should monitor the temperature of the video card, processor and drive. These parts of the computer are more prone to heat than others. Manufacturers call different conditions for the normal operation of components, but on average they are as follows:
- Processor — up to 95 ° C.
- Video card — up to 95°C.
- HDD drive — up to 50°C.
- SSD drive — up to 70°C.
Ideally, the temperature of the components should be well below these values for most of the working time and be kept in the region of 30-50 °C.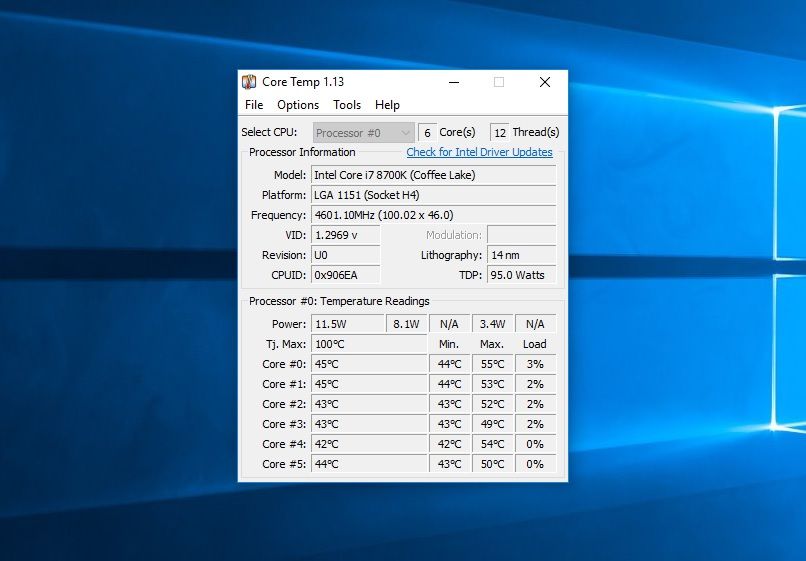 Especially when you do not load the system with resource-intensive tasks. nine0003
If the temperature of your components exceeds the manufacturer’s recommended values, consider cooling your computer.
Read also ???
- How to improve computer performance for minimal money
- How to quickly and easily clean the fan
- How to find out the specifications of your computer
- How to find out what motherboard is installed in your computer
- What to do if the computer makes a lot of noise
How to check the processor temperature — 7 ways
Now we’ll see how to check the temperature of the processor (CPU), because the stability of the computer depends on this value. Many of us may have encountered the fact that the computer began to suddenly restart on its own, or frequent freezes occur on the device. nine0003
Although this happens for various reasons, it is very common for the computer to turn itself off due to overheating of the processor. Problems with high CPU heat
are quite common among PC gamers and users who run resource-intensive animation and video editing programs.
Contents:
- Why check CPU temperature
- How to check CPU temperature in Windows
- How to view CPU temperature in HWMonitor
- View CPU temperature in Open Hardware Monitor
- Speccy to view CPU temperature
- How to check CPU temperature in AIDA64
- Monitor CPU temperature in RealTemp
- Check CPU temperature in Core2 Temp 9090
- Article Conclusion
- How to Check CPU Temperature (Video)
The Windows operating system also often contributes to the heating of hardware components, for example, when you open too many browser tabs. CPU power consumption issues cannot be ignored because excessive CPU temperature increases will shorten the life of the CPU, and may eventually damage the motherboard as well as other PC hardware components. nine0003
Why you need to check the processor temperature
To protect your Windows computer from overheating, you need to constantly monitor the processor temperature in order to reduce the processor temperature in time when it becomes high. Some graphics-intensive games and programs place a high load on the CPU while running.
How is the processor temperature considered acceptable? Under low load, the normal temperature of the CPU does not exceed 50 ° C, in some cases the temperature of the computer processor may rise up to 95°C. The maximum value should not exceed 100°C.
In addition to monitoring the device’s temperature, there are a few preventive steps you should take:
- Dust your computer regularly to clean the cooling system.
- If you have a laptop, use the special stand with cooler for it.
- Do not leave your computer in the sun.
- Replace thermal paste if necessary.
- Replace the old fan with a new one. nine0092
- Check the system for viruses.
The current temperature of the PC can be viewed in the BIOS or UEFI, but keep in mind that these values are obtained in a state where the computer is running with little to no load. Therefore, it is better not to use this method if you want to know the real parameters during the active operation of your device.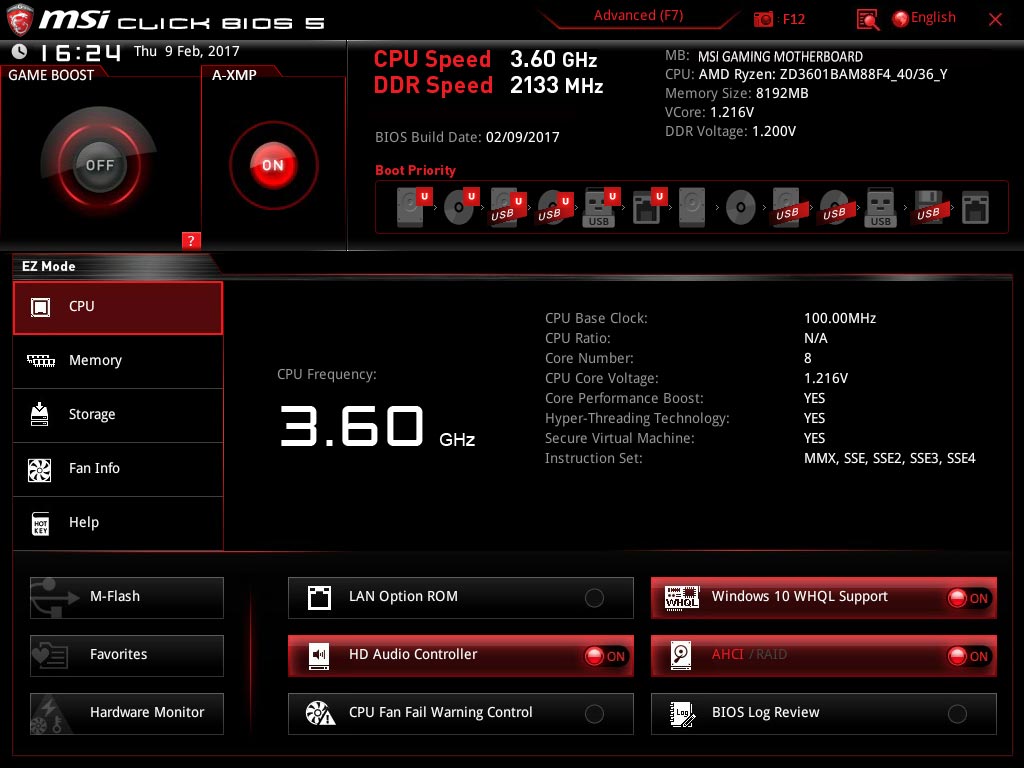
There are a large number of temperature monitoring programs that can measure the current temperature of your computer, but only a few applications can alert you when the processor temperature exceeds a threshold. When the processor temperature rises, you will receive regular notifications that the processor temperature has become higher than usual. nine0003
In this review, we will look at software for monitoring and checking processor temperature using Windows operating system tools and third-party applications.
How to check CPU temperature in Windows
The user can check the current temperature of the CPU using the built-in tools of the Windows operating system. Tools will help him with this: the command line or Windows PowerShell.
In both cases, the Kelvin temperature will be displayed. To get a reading in Celsius, do some arithmetic: divide the resulting figure by 10, and then subtract the number 273.15. nine0003
To show the CPU temperature in CMD, run the following:
- Run a command prompt as an administrator.

- In the command line interpreter window, enter the code, and then press «Enter»:
wmic /namespace:\\root\wmi PATH MSAcpi_ThermalZoneTemperature get CurrentTemperature
The value will be displayed in the «CurrentTemperature» field.
The PowerShell temperature measurement is as follows:
- Open Windows PowerShell as an administrator.
- In a shell window, run the command:
get-wmiobject msacpi_thermalzonetemperature -namespace "root/wmi"
The CPU temperature is shown in the «CurrentTemperature» field.
To get heating information in degrees Celsius, run the following command in PowerShell:
Get-WMIObject msacpi_thermalzonetemperature -namespace "root/wmi" | Select CurrentTemperature | ForEach-Object { ($_.CurrentTemperature/10)-273.15 }
How to view CPU temperature in HWMonitor
CPUID HWMonitor is a free program that displays various information about computer hardware from the developer of the CPU-Z utility. The application reads information from PC sensors: temperature, voltage, fan speed.
Installation or portable versions of HWMonitor are available for the user, which can be downloaded from the official website: https://www.cpuid.com/softwares/hwmonitor.html. nine0003
Do the following:
- Open HWMonitor.
- In the application window under the name of the processor, in the «Temperatures» option, indicators are displayed in general, in minimum and maximum values.
Read: 12 Ways to Find Out What Processor Your Computer Has
View CPU Temperature in Open Hardware Monitor
Open Hardware Monitor is a portable, free and open source application. The program shows the status of temperature control sensors, fan speed, voltage, load and clock speed of your computer. nine0003
Do the following:
- Download the program from the official website of the developer: https://openhardwaremonitor.org/downloads/.
- Extract the ZIP archive.

- Open the folder, run the «OpenHardwareMonitor» file.
- In the «Open Hardware Monitor» window, in the «Temperatures» option, the state of the temperature at a given time is shown in general and individually in the CPU cores.
Speccy CPU Temperature Viewer
Speccy is a free application that provides information about computer hardware specifications. The program can be used to obtain information about the temperature of PC components.
Go through the steps:
- From the Speccy main window, go to the CPU tab.
- Displays the average CPU temperature as well as the temperature of individual processor cores.
Read: How to see how many cores a processor has — 7 ways
How to check CPU temperature in AIDA64
AIDA64 is a powerful program that provides information about computer hardware and software. Along with other functions, here you can get acquainted with the state of the temperature mode of the device.
Do the following:
- In the left side menu of the AIDA64 program window, click on «Computer» and then on «Sensors».
- The «Temperatures» parameter shows the necessary information about the current values. nine0092
RealTemp CPU temperature monitor
RealTemp is a freeware CPU temperature monitor that reports the minimum and maximum temperature of each processor core. One of the features of this app, compared to other temperature monitoring programs, is that you can turn on the built-in option to notify you when the temperature reaches its maximum.
Applications will sound a siren when your CPU temperature exceeds the threshold limit and will continue to beep at regular intervals. nine0003
Go through the steps:
- Download Real Temp here: https://www.techpowerup.com/download/techpowerup-real-temp/.
- Unzip the archive with the application.
- Run the «RealTemp» file.
- Navigate to the settings options at the bottom of the window by clicking on the «Settings» button.

- Check the «Alarm Temperatures» box.
- Enter the CPU temperature limit to activate an alarm when your system exceeds the set limit. nine0092
- Click OK to save the settings.
Read: 10 Ways to Check Your Graphics Card (GPU) Temperature
Checking CPU Temperature
Core Temp
Core Temp is a free program designed to check CPU temperature. This tool is based on the digital temperature sensor (DTS), which is a component built into the system. The DTS is capable of providing highly sensitive and more accurate temperature readings than temperature sensors. nine0003
Core Temp runs on Intel, AMD, and VIA processors. In addition to reading the core temperature, the application provides data on the frequency, CPU load and RAM usage.
You can display real-time temperature readings in the notification area on the Windows taskbar.
Follow the steps:
- Download the program from the link: https://www.