GeForce Experience driver installation failed. How do I manually clean install the NVIDIA driver for my graphics card?
NVIDIA SUPPORT
GeForce Experience display driver installation failed. How do I manually clean install the driver for my graphics card?
A driver installation may fail for a number of reasons. Users may be running a program in the background that interferes with the installation. If Windows is performing a background Windows Update, a driver installation may also fail. This articles provides step by steps instructions for manually clean installing the driver using the NVIDIA Game Ready Driver/Studio Driver installer.
1. Click here to download the latest NVIDIA Game Ready Driver/NVIDIA Studio Driver for your graphics card from the NVIDIA Driver Downloads page. Choose the Product Type, Product Series, Product, Operating System, Download Type and Language. Next click on the «SEARCH» button.
Please note: All NVIDIA drivers provide full features and application support for top games and creative applications. If you are a gamer who prioritizes day of launch support for the latest games, patches, and DLCs, choose Game Ready Driver (GRD). If you are a content creator who prioritizes stability and quality for creative workflows including video editing, animation, photography, graphic design, and livestreaming, choose Studio Driver (SD).
2. Click the DOWNLOAD button to download the NVIDIA display driver installer. Save the file to your hard drive
3. Before starting the installation process, close any programs which you have open. This includes GPU monitoring utilities (eg. EVGA Precision X, MSI Afterburner, etc) that may be actively using the graphics card (eg. for performance tuning, overclocking, fan control). If you have an aggressive anti-virus/anti-malware program monitoring your PC, you may want to disable live monitoring as well. If these types of applications remain open during driver installation, it may prevent parts of the driver from registering correctly which could affect performance or stability.
4. Right-click over the NVIDIA display driver installer file and select Run as administrator as shown in the screenshot below.
5. If you are prompted by Windows User Account Control, click on Yes.
6. You will be asked to specificy where the temporary driver files will be stored. We recommend using the default path given by clicking on the OK button.
7. Choose which components you would like to install and then select AGREE AND CONTINUE.
8. Next choose Custom (Advanced). Then click NEXT
9. Select Perform clean install and then click on NEXT.
10. Once the installation has finished, reboot your PC to complete the installation.
Is this answer helpful?
Live Chat
Chat online with one of our support agents
CHAT NOW
ASK US A QUESTION
Contact Support for assistance
800.797.6530
Ask a Question
Do You Need to Uninstall Old Graphics Drivers Before Installing A New Graphics Card?
If you’re new to computer hardware, and you’re swapping out an old graphics card for a new one, then you might be wondering if you need to uninstall your old graphics drivers first. And it’s a valid question. If you look online, you’ll find conflicting answers—some say it’s imperative, while others say it’s unnecessary with today’s tech.
If you’re confused on whether you should or not, then keep reading. We’ll go over this age-old question and figure out if it’s actually necessary to uninstall your old graphics drivers before installing a new graphics card.
Is It Necessary to Uninstall Old Graphics Drivers Before Installing a New Card?
The quick answer to this question is: in principle, no.
Thanks to the plug and play nature of modern iterations of Windows, you can easily turn your computer off, swap cards, reboot, and it will detect the new card and install basic display drivers. From there, you can download the latest drivers for your new card from the manufacturer’s website, and you’re off to the races.
However, just because you can do it doesn’t mean you should. The crux of the issue lies in the intricacies of how drivers work.
Drivers are pieces of software that allow the operating system to communicate with the hardware that’s in your computer. And these instructions are stored in a multitude of locations, from files scattered across your hard drive to a plethora of registry entries.
In principle, when you swap cards, Windows Plug n Play manager should create a new profile of the new card, allowing for a seamless transition. But sometimes pieces of the old driver software can conflict with newer driver software.
These issues are particularly relevant if you’re switching from a card made by a different manufacturer than the one you’re putting into your system (so, from NVIDIA to AMD, or AMD to NVIDIA). Meanwhile, if you’re sticking with the same card manufacturer (e.g., swapping an older NVIDIA card for a newer one), this tends to be less of an issue.
What If I’ve Already Installed My New GPU?
If you’ve already installed your new GPU without uninstalling the old drivers, and you aren’t facing any issues, then there’s nothing to worry about. While it’s generally best practice to uninstall old drivers before swapping in a new graphics card, it clearly isn’t the end of the world if you don’t.
However, if you find your new card is under-performing, or you’re running into strange issues that only started after swapping in your new card, then you might have a conflict between the old drivers and the new ones. And that could mean you’ll need to uninstall both your old and new drivers, and start over fresh.
That’s why when swapping cards, you should uninstall the old graphics drivers first, to avoid any potential issues and save yourself the headache later.
How to Uninstall Old Graphics Drivers
There are a few different ways that you can uninstall your old graphics drivers. We’ll show you how to do that within Windows, as well as cover some helpful and trusted third-party tools to help do a more complete job to cleanly uninstall your old graphics drivers.
Uninstalling Graphics Drivers Through the Device Manager
The first and quickest way to uninstall old graphics drivers is through the device manager.![]() To start, first right-click on the Start menu and click on Device Manager.
To start, first right-click on the Start menu and click on Device Manager.
Now click on Display adapters to expand the list, and right-click the graphics card that you’re uninstalling the drivers for. On the context menu, click Uninstall.
On the Uninstall Device window, check the box next to Delete the driver software for this device., then click the Uninstall button.
Uninstalling Graphics Drivers Through the Control Panel
You can also uninstall graphics card drivers through the control panel, along with any other software that may come with your graphics card (such as NVIDIA GeForce Experience). To start, open the Run box (Windows key + R), type in control panel. and press Enter.
Now click on Programs and Features.
On the Programs and Features window, scroll down to find your graphics card drivers. Highlight the driver, then click on Uninstall/Change at the top to get started, and follow the instructions in the uninstall wizard.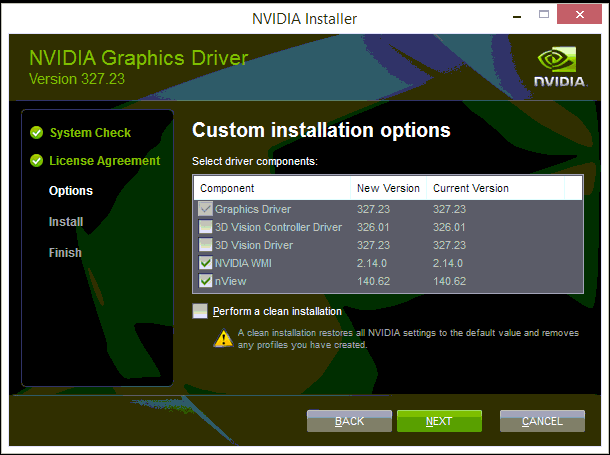
Uninstalling Graphics Drivers Through Third-party Software
While Windows offers built-in solutions for uninstalling graphics drivers, they aren’t the most complete solutions. In fact, uninstalling drivers through the built-in features on Windows can leave a lot of leftovers behind that can sometimes cause issues when installing a new graphics card.
This is why there are a few different trusted third-party tools you can use to completely uninstall graphics drivers. We’ll link to each one and briefly cover each of them below.
Display Driver Uninstaller
Display Driver Uninstaller (DDU) is a tool that’s been around for many years, and is a staple in any device administrator’s toolbox.
This program will uninstall any graphics and audio drivers you don’t need, and will clean up any leftovers like registry entries and files. And since it’s completely software and hardware-agnostic, this program is especially useful if you’re switching from NVIDIA to an AMD graphics card, or vice versa.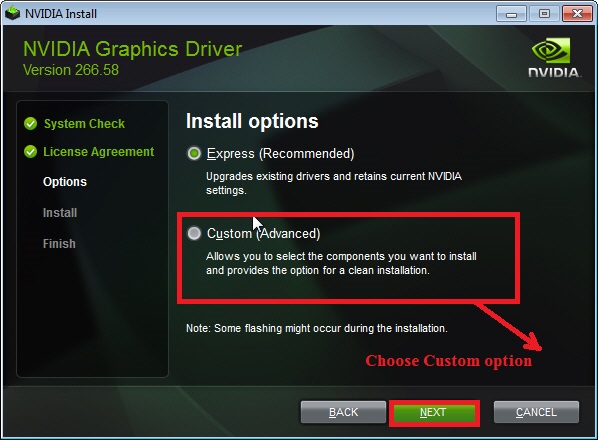
NVIDIA Geforce Experience
If you’ve had an NVIDIA graphics card, then you likely know what the GeForce Experience tool is. In addition to providing driver updates for NVIDIA cards, it also has the ability to do a clean install of your NVIDIA drivers, which will clear out any old NVIDIA drivers before installing newer ones.
AMD Cleanup Utility Tool
AMD also offers a standalone driver cleanup tool that will not only uninstall old AMD graphics and audio drivers, but also clean up residual files and registry entries missed by the standard Windows tools.
How to perform a clean install of the NVIDIA GeForce
driver
Sometimes there are situations when the newly installed driver “ crashes ” with error “The video driver has stopped responding and has been restored” , in this article we will tell you how to solve it.
As practice shows, in 99% of cases this and many other driver errors occur when it is installed incorrectly, when malware or antiviruses work, during the “treatment” process. Therefore, you need to perform a «clean install» of the latest driver for your graphics card.
To perform a clean installation, you need to go to the driver download page and, first of all, select the type of video card. For example, you have a GeForce GTX 1050 graphics card, so you need to select the type GeForce and the GeForce 10 Series (10xx).
Selecting a driver for the NVIDIA GeForce
video card After that, select the GeForce GTX 1050 product family, operating system, operating system bit depth and preferred driver language.
Please note that you may have a different video card model (different series or family).
Next, click « Find driver » and you will be shown a list of all versions of video cards available for download.
List of drivers for NVIDIA GeForce video cards, their versions and release dates
Select the required driver version ( we recommend the latest version of driver ) and go to the official page for downloading drivers for NVIDIA GeForce video cards.
Attention! By downloading drivers and programs from third-party sites, you can endanger the data on your computer, because, often, malicious software can be downloaded under the guise of drivers.
After downloading the driver installation file, run it and unpack it into the folder suggested by the installer.
Launching the NVIDIA GeForce
driver installer After unpacking, the installer checks for system compatibility and prompts you to install the graphics driver and the GeForce Experience application or just the graphics driver.
NVIDIA License Agreement
Select « NVIDIA Graphics Driver » if you already have application 9 installed0011 GeForce Experience and agree to the rules by clicking on the button » I ACCEPT, CONTINUE «.
Next, in the installation options, click on the item « Custom installation (Advanced options) » to enable you to select the driver installation options.
In a new window, we can choose which applications we will install or update and, you will need to check the box « Perform a clean install » under the list of driver components.
NVIDIA Installer Custom Install Options
In addition to the graphics driver, the NVIDIA Installer package includes NVIDIA GeForce Experience, HD Audio Driver, 3D Vision Driver, 3D Vision Controller Driver, and PhysX system software.
Click next and wait for the complete installation of the driver. It is recommended that you restart your computer after installation.
How to install drivers for Nvidia graphics card?
How to install drivers for Nvidia graphics card?
Catalog
Everywhere
Everywhere Auto Beauty and health Home and cottage Construction and repair Furniture Everything for the office Children’s goods Leisure and entertainment Pet products Computer equipment Products Sports and recreation Electronics Household appliances Services Equipment Clothes, shoes and accessories
Submit an ad
0
0
Moscow
- How to install drivers for Nvidia graphics card?
The question that all computer users ask is: how to install drivers on an Nvidia 9 video card0082? A complete overview of this topic will help you cope with such a simple task.
Everyone needs to know: how to install drivers on your video card. It depends on whether your frequent guests when working with a computer will be “freezes”, broken pixels, missing textures or stable FPS, smooth system operation, high-quality graphics.
Practice shows that each update contributes to an increase in performance, an increase in the stability of the system. Improvements can be clearly seen in the example of video games, when Nvidia releases the next patch and the FPS of gamers increases from 3 to 10 units.
Where can I download Nvidia drivers?
The answer is very simple. On the
official website of Nvidia
or from the disk that comes with the purchased video card. Drivers are not installed on the Nvidia video card from any other resource. Otherwise, there is a risk of harming not only the video card, but the whole PC (computer viruses are always ready to ruin users’ lives).
There are only three ways to download drivers for an Nvidia video card. The first is suitable for users who are used to controlling any process in their PC, the second for people who prefer automatic driver installation. The third method is the simplest, but not always applicable.
Manual driver installation
Don’t like the constant background load? Want to download drivers for your Nvidia graphics card yourself? Then this option is right for you, but when you need to download, update the driver, you will have to do the procedure described below yourself.
Note
If you already have an Nvidia driver but just want to download the new version, you must uninstall the old one first. You need to find the Start menu, open Programs and Features, and uninstall the Nvidia GPU application.
- Click on the top menu «Drivers»
- Fill in the fields (enter information about your video card).
- After that, the site itself finds the latest driver for the video card, click the «Download Now» button.
- Downloading the file.
- Unpack it, after which the automatic installation of the software will begin.
Driver installation using Nvidia GeForce Experience.
This method is much simpler than the previous one. The program understands without outsiders how to install the video card driver so that the components function normally.
- The first step is to follow the link.
- Press the «Download» button.
- Open a boot file that will install Nvidia GeForce Experience
- Start the program.
- Click «Check for updates», and if there are indeed updates, the program will offer to install the latest version of the software.
Driver installation from disc
The easiest way is to download the driver from the disk that comes with the purchased video card, but here lies the main catch. This option is only suitable for those who have an optical DVD-ROM drive, which is now a rarity.