How To Use Acrylic in Your PC Mod
Welcome back to Titan Rig’s Modding Series. It’s time to make your Personal Computer truly personal. Today we’re going to talk about one of the most useful materials out there for modders – acrylic.
When most of us hear the word acrylic we picture pretty shiny water blocks with a rainbow of lighting options, or maybe your mind goes to hardline acrylic tubing. Both are the same material, but while acrylic is indeed one of the best options for hardline tubing, that’s a big enough topic to earn its own post a little later. Today’s post is about acrylic sheet, what you can do with it and how to do it.
How It’s Made
The stuff we know as acrylic is technically polymethyl methacrylate, or PMMA. It’s a complex polymer type known as a thermoplastic – which means it can be heated and formed and retain the new form when cooled. Pretty handy for us.
Acrylic sheet it made in two ways: cell casting and extrusion.
Disclaimer: there is a third method of manufacture known as continuous casting, but as the end product is hard to find in small quantities and offered in very few colors we’ll leave it to the industrial applications it’s made for.
In cell casting, methacrylate syrup is poured into a mold between two sheets of high-quality glass and cured through heat and pressure.
Extruded acrylic is made by adding premade acrylic pellets to an extrusion machine. Those are melted into a syrup and forced through an extrusion die under extreme pressure to form pretty much any shape the die is made into.
How do I tell which it is?
You can usually identify cast vs extruded acrylic by the protective film on it. Cast acrylic will have a paper film, while extruded has plastic. This isn’t universal but nearly so. It’s also very rare to find extruded acrylic more than ½” thick.
Cast and extruded acrylic come with different protective material.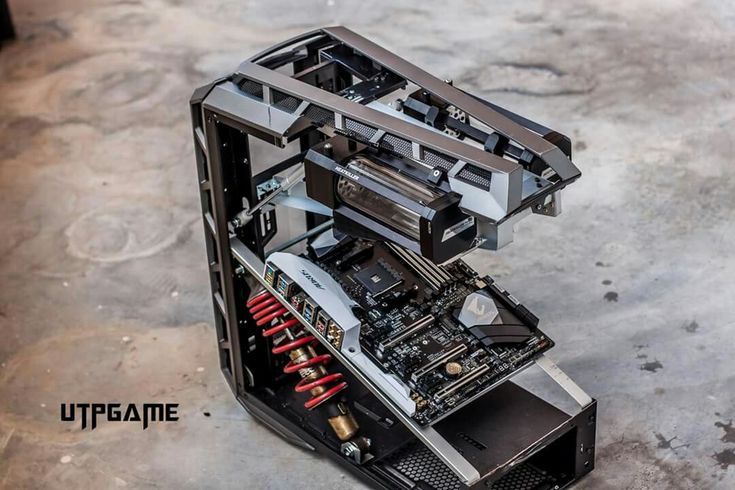
Physical properties
While cast and extruded acrylic will look identical, the two forms have very different properties. For our uses, the only ones that really matter are density and melting point.
Cast acrylic is denser than extruded acrylic and also has a higher melting point. This makes it easier to drill, cut, shape or machine in any way.
Cast acrylic can be machined with standard woodworking or metalworking tools and methods, provided the cutting edges are in good condition and sharp. Machining cast acrylic makes delicate white shavings – thin curls, flat strips or flakes depending on the cutting tool you’re using. Interestingly, these flakes are always white, regardless of the color of the acrylic.
Machining extruded acrylic requires the same tools but much different techniques. Its softness and lower melting point require lower cutting speeds and lubrication to avoid melting and gumming up cutting tools. While you can get the same results from either material, cast acrylic makes the job faster and easier in almost all cases.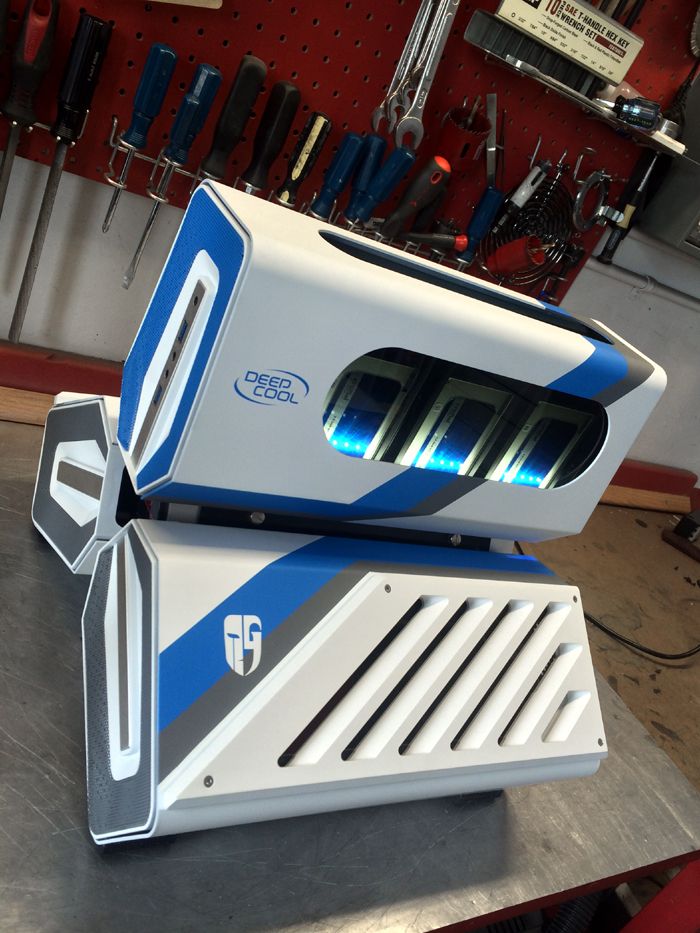
Two areas that extruded acrylic is better are bending and cutting with a laser.
Given the advantages that cast acrylic offers, we’ll be referring to that specific material for the rest of the post.
So how do we use the stuff??
There are five basic things we need to know how to do with acrylic to use it in PC modding: cutting, drilling, bending, sanding/polishing and etching or engraving.
Cutting
Cutting acrylic sheet can be done in a few different ways, each with their own advantages.
Score and Snap
Assuming you need your acrylic cut in straight lines, the simplest method is to score and snap it. This works well on thinner sheets (3/16” / 4mm or less) and is the easiest and least expensive method.
As with any cut, mark your line.
Marking the cut line.
Then, using a solid straight edge and a good grip, draw the point of a utility knife along your cut line, pressing firmly.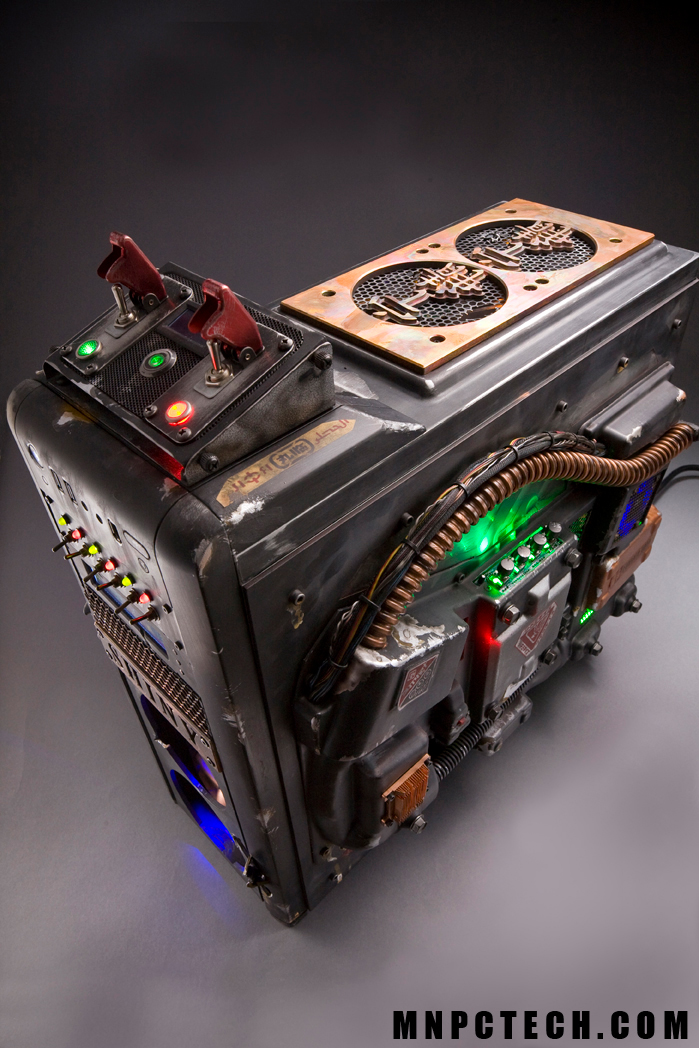
Scoring the acrylic.
Depending on the thickness of your sheet, you’ll probably have to do this step several times to get a deep enough score mark to snap it.
Once you have a solid score on the sheet, line your cut line up with a straight solid edge, like the edge of your workbench or a countertop.
Lining up your score to snap.
Hold both edges and press down sharply and your sheet should snap on the score line you made.
A clean snap.
While this is the easiest method of achieving a straight-line cut in acrylic, the edge it leaves behind is the hardest to clean up if it’s going to be visible.
Rough edge left behind by score-and-snap method.
Hand Saw
If you need a curved cut, or if your acrylic is too thick to snap, the right hand saw will do the job.
Hand saws made for wood should be avoided. While they will cut the material and make fast work of it, the edges they leave behind are very rough and it’s very hard to cut curves with one.
A saw with a thinner blade and more teeth is the goal when cutting acrylic. The ideal tool of this type is a coping saw. They have a high tooth count and the blade is very thin and narrow, making curve cutting simple.
A hacksaw with a typical blade will do a good job with the cut, but can be difficult to make curves with.
Jig Saw
Time to break out the power tools!
Jig saws are an excellent and fairly inexpensive addition to your tool arsenal. They can cut lots of different materials with the right blade, and cut curves well.
The top blade is a metal-cutting blade. The bottom blade is for wood — don’t use these.
For acrylic you’ll want a metal-cutting blade for your jig saw. These will have the most teeth with a less aggressive cut angle than a blade made to cut wood.
Simply make your cut line, clamp the acrylic to a solid surface with the line off of the edge and cut it. If there is a lot of material on either side of the cut line, you may need to support both sides with clamps to keep the offcut from sagging as its cut and pinching the blade of the saw.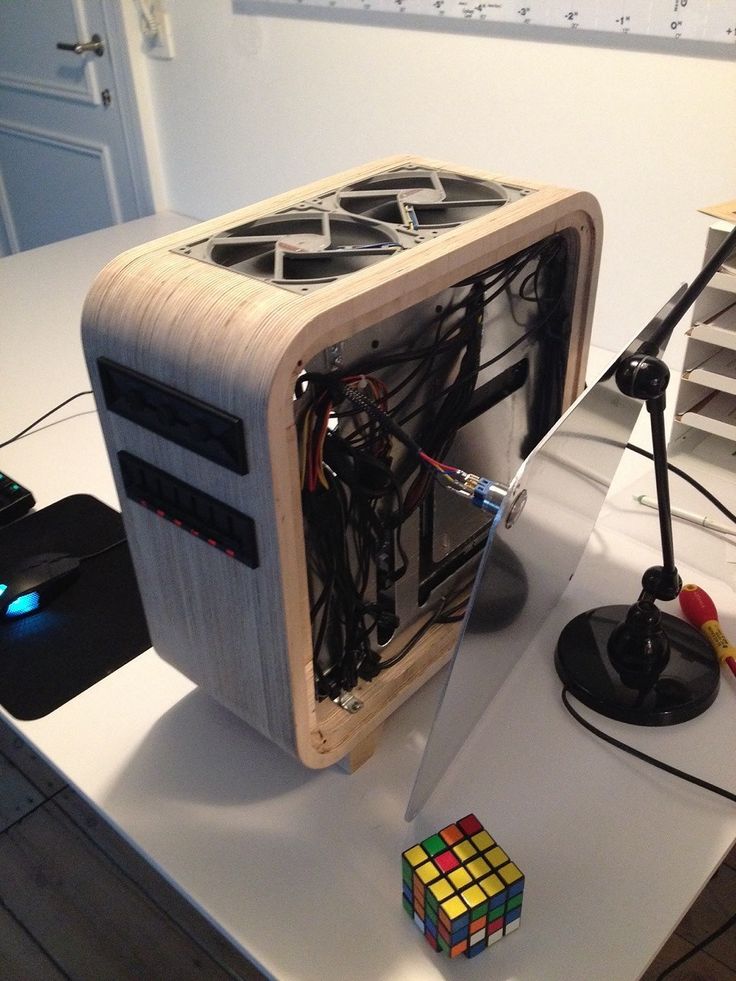
Acrylic clamped in place and cutting with a jig saw.
For straight cuts with a jig saw, a block of scrap wood can be clamped to the acrylic parallel with the cut line to guide the jig saw.
Cut edge left behind from a jig saw — much better than the snap and score method.
Cuts made with a jig saw with the right blade are very clean and make sanding/polishing a lot easier than the score-and-snap method.
Table Saw
The table saw is the ultimate tool for straight cuts in most materials. Like just about any cutting tool though, using the right blade makes all the difference.
Just like with the jig saw, for the table saw we’ll want a metal-cutting blade. In this case though, we specifically need a blade made to cut non-ferrous metals. Table saw blades for ferrous metals like iron and steel are grinding blades rather than cutting blades, and the results of using those on acrylic are… bad.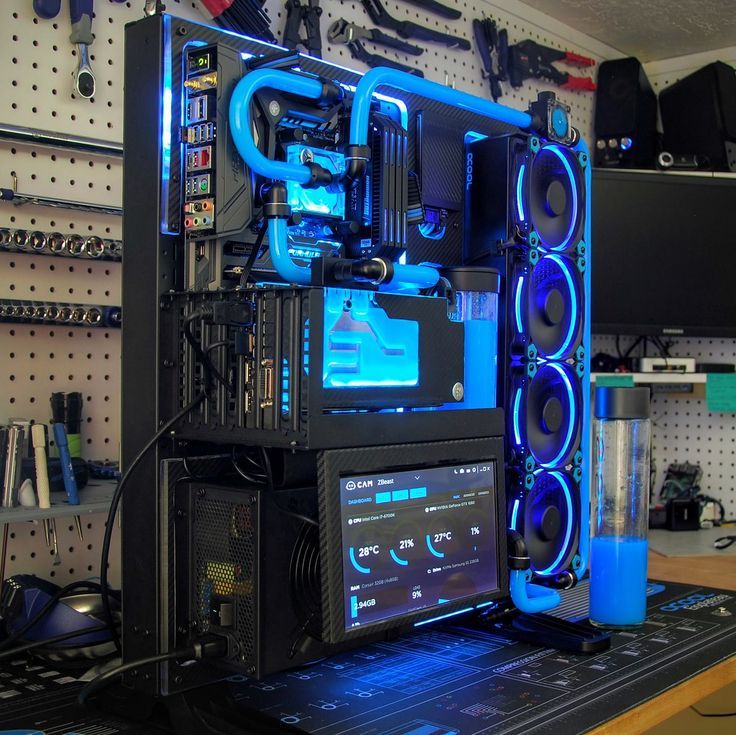
A 10-inch table saw blade made for cutting non-ferrous metals like aluminum. Perfect for acrylic.
While you can cut acrylic with standard wood-cutting blades, the cut isn’t very clean, and if you’re going to need to polish the edges it can make for a lot of extra time and effort. We want the edge to be as close to perfect as possible right off the saw.
When it comes to blades for table saws, circular saws, miter saws and the like, the main difference in a wood-cutting blade and a blade made to cut non-ferrous metals is the shape and angle of the teeth.
Non-ferrous metal blades have what’s known as a negative rake angle. Rake angle is the angle of the leading edge of each cutting tooth.
The image below has a non-ferrous metal-cutting blade on top and a typical wood-cutting blade on bottom
Different angles on saw teeth made for non-ferrous metals and wood.
The teeth on the bottom blade are clearly angled much further forward.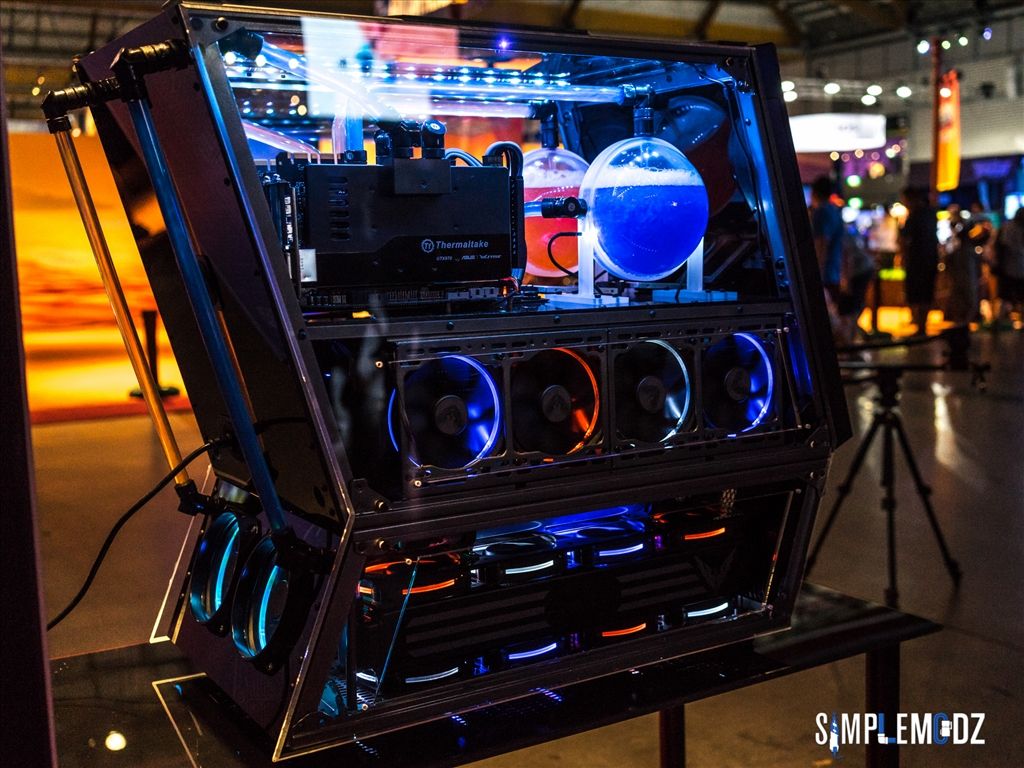 The teeth on the top blade actually angle backward – a negative rake angle.
One other thing you should look for in a good blade of this type for acrylic is known as “triple chip grind”, and refers to the cross-sectional shape of the individual carbide teeth on the blade.
Different tooth grinds are made for different materials.
The tooth on the left is a top-grind tooth. Many blades are made with nothing but these teeth. The right tooth is a triple-chip-grind tooth – the same as a top-grind tooth with the outer corners ground down to a bevel.
A blade made for non-ferrous metals will have both of these types of teeth in alternating order.
The edge left behind by these teeth is excellent and among the easiest to polish up after the cut.
Cut edge left from a table saw blade for non-ferrous metals — this will polish up easily.
Drilling
Drilling holes is easy. Drilling clean even holes dozens or more at a time can be hard.
Just like cutting, drilling acrylic can be made a lot easier and produces better results if the tool has the right geometry.
In the case of drilling, we ideally want to use drill bits that are specifically made for acrylic.
Different drill bit geometry for different materials.
A standard twist drill bit made for drilling metal and wood has a shallow tip angle and a forward-leaning cutting edge, just like the teeth on the wood-cutting saw blade earlier.
Acrylic drill bits have a very steep angle and the cutting faces are vertical in relation to the gullets (the shallow parts where the material that’s removed builds up).
Holes made in cast acrylic with different types of drill bits.
The hole on the left was made with a standard twist drill bit. I put quite a bit of effort into making that hole as clean as possible. The hole on the right was made with an acrylic drill bit – it took half as long and is a perfectly clean hole.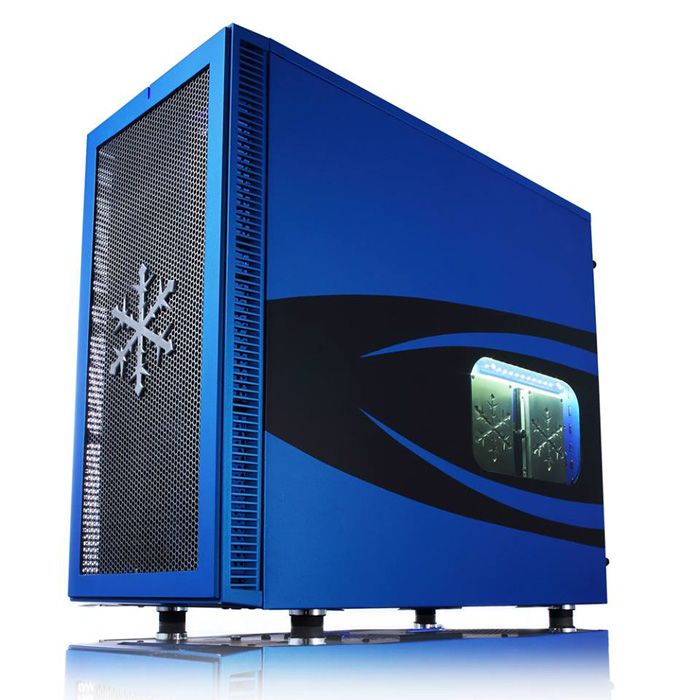
Note: Cast acrylic is brittle. When drilling, you want a minimum distance from the edge of the material equal to 1.5 times the diameter of the hole you’re making to avoid potential chipping and cracking between the edge of the material and the edge of the hole.
Here’s an example of why we don’t want to use extruded acrylic if we’re cutting, drilling or machining the material at all.
Delicate white shavings are left behind when machining cast acrylic.
These clean white shavings are what you get when machining cast acrylic.
Extruded acrylic is prone to melting and gumming up cutting tools.
And this is what you can expect when machining extruded acrylic. The material that came off in small flakes with cast acrylic stays behind with extruded acrylic, melted into a single blob of disappointment. It sticks to your tools also, and when it packs into a drill bit or saw blade and then cools down and hardens it can be a real pain to get off.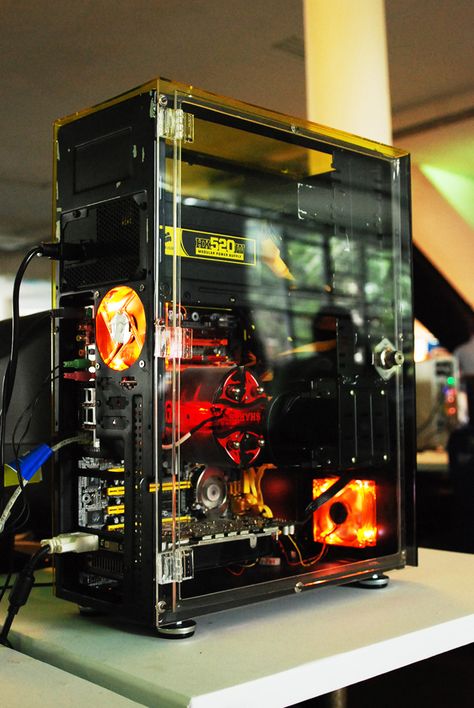
When You Need It Big
There will be times when you need to drill holes larger than most drill bits (or your drill’s chuck capacity) will allow. Those times call for a special tool called a Forstner bit.
Forstner bits have perfect blade geometry for drilling acrylic.
Forstner bits are unlike twist drills – in fact there’s no twist to them. They have a single small round or square centering spike on the end and two or more flat cutting faces. Typically used to drill flat-bottomed holes in wood, the geometry of the cutting faces on a Forstner bit makes them an excellent choice for acrylic, with one small preparation step.
The center guide spike on a Forstner bit has no twist and no cutting edges at all.
That small centering spike has no threads or cutting surface on it at all. In wood that’s not a problem, as the fibers will tear and compress and allow the bit to pass through. Acrylic is different.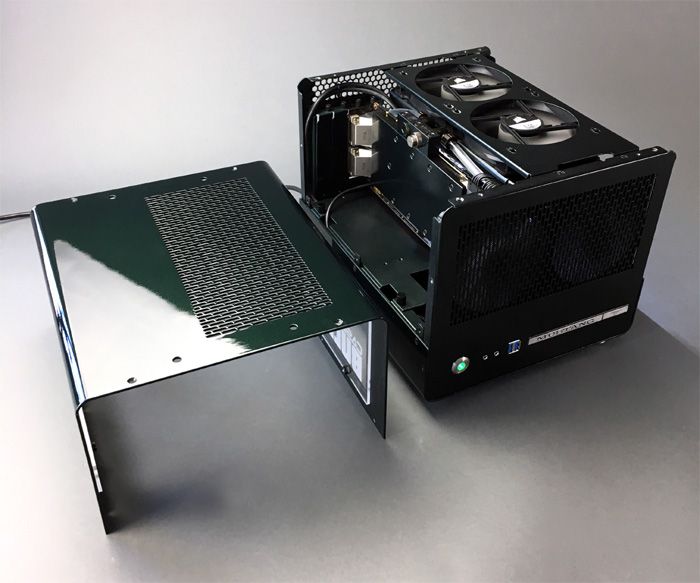
Using a Forstner bit on unprepared acrylic can be done but you run a very good chance of cracking it as that non-cutting spike is
forced though it ahead of the cutting edges.
Preparation to use one of these bits on Acrylic is simple. If you drill a small hole either the size of the centering spike or slightly smaller in the material, the spike meets no resistance during the process and you’ll end up with a very clean hole.
Making a pilot hole for the guide spike on a forstner bit is a must when drilling acrylic.
High-speed drilling cast acrylic with a sharp Forstner bit.
Large hole drilled in cast acrylic with a Forstner bit.
Forstner bits come in sizes as large as eight inches, but for a hole that size you’re better off using a hole saw or a Dremel. That’s a post for another day.
Bending
Acrylic is a thermoplastic, which is a fancy way of saying that if it’s heated up and bent it will hold its new form when it cools.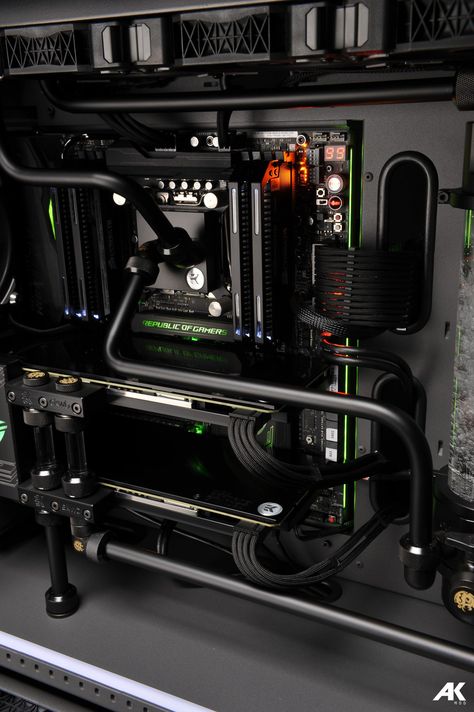
Heating acrylic sheet to bend it in a straight line can be done with any focused heat source, but too much heat will make it bubble and bend unevenly. A heat gun is the most common method, but a dedicated acrylic strip heater is the easiest.
Single-setting strip heater for bending plastics.
This one is a very simple example. It has a single heat setting and one simple on/off switch. These can be cost prohibitive if you don’t bend a lot of acrylic, but they will heat acrylic in a perfectly straight line – something that helps with straight bends and can be difficult with a handheld heat source.
Acrylic resting on top of a strip heater — heating evenly and thoroughly takes time.
Using a strip heater is as simple as turning it on and laying your sheet across the heating element, centered in your bend line.
Blocking the rest of the heating element keeps heat from escaping and can speed the process.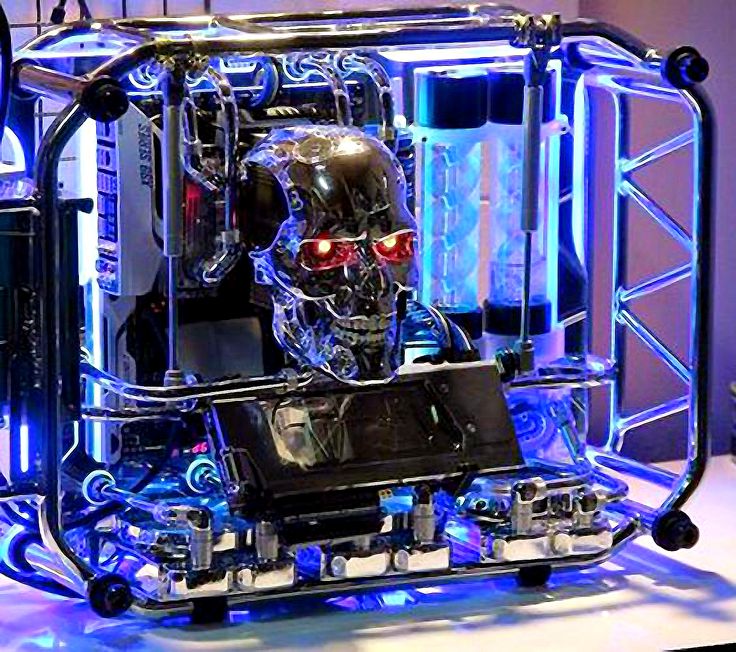
For smaller pieces, covering the rest of the heating element will focus more heat onto your work and make the process faster.
Once it’s heated properly, acrylic will bend around a form easily.
Regardless of the type of heat you use to bend your acrylic, testing its flexibility often is key to good results. Heat both sides of the piece evenly and gently try to bend it every so often as you’re heating it. Once it bends easily by hand, place the bend line on a form of some kind and fold the material over it.
In this example I made a simple 90-degree bend, but acrylic will form over anything. You can make curves by draping it over a cylindrical object like a large piece if PVC or bend it further than 90 degrees with the right form.
In the example of the curve, more material will have to be heated since more material is involved in the actual bend. The more material you have to heat, the more difficult it is to heat it all evenly.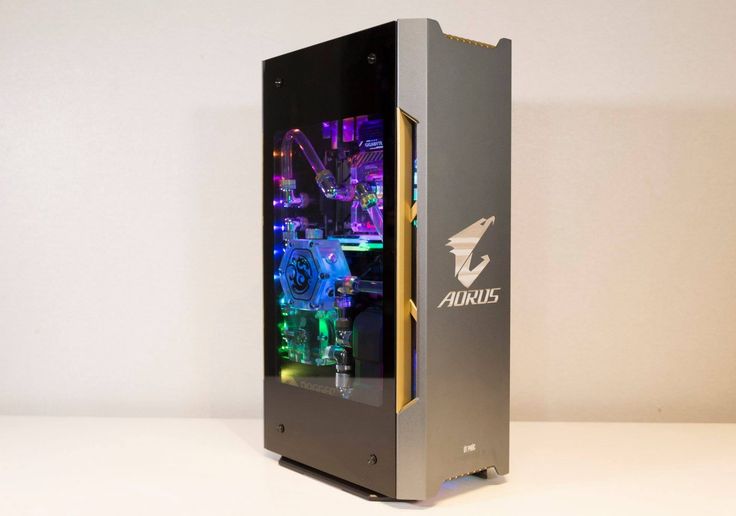
If you have the means, heating the form itself will help you get a good even bend also.
Acrylic sheet after making a 90-degree bend.
Once your acrylic is bent, let it stand for a few minutes to cool and harden into its new shape.
Visual distortion along the bend is common without a smooth form and proper heating.
Without a smooth form, more even heating and more careful application to the form, you’ll inevitably get some distortion along the bend line.
Shaping
Acrylic can also be shaped without bending it. In this case we’re looking at edge profile shaping. If you made an acrylic front for a water block for instance, you might want to add a curve or an angle to the exposed front edges to make it look better.
A table-mounted router or a dedicated shaper is ideal for this job.
A table-mounted router is a versatile tool.
The shape of the edge will match the shape of the cutter used to make it. With a bearing-guided cutter like this one, you can form the edge around curves in the overall shape of the acrylic also.
A bearing-guided roundover bit in the router.
In this case, I’m just making a small roundover on the corner of the edge using a 1/8” bearing guided roundover cutter.
Cutting a rounded shape into the square edge of a piece of cast acrylic.
Cutter speed should be fairly high, between 18000 and 24000 RPM. Since the cut I’m making here is shallow I can do it in a single pass. If I were making a larger roundover I would do it as two passes – cut the first pass shallow and a second for final depth. Trying to remove too much material at once is not only likely to fail, it’s dangerous. Take as many passes as you need to do the job.
Before and after shaping.
Here is a before-and-after look at the edge I rounded over. The small chip in the edge on the finished side is the result of feeding the piece into the bit too quickly. In a real piece it would be removed when you rounded the side we’re looking at.
Polishing
Polishing acrylic can be done by sanding or by what’s known as “flame polishing”. Flame polishing is a method of using high heat to melt the very outside surface of the acrylic so that uneven areas like scratches actually liquify and flow together before cooling and hardening.
Flame polishing is a useful tool, but it requires a lot of practice and no matter how good you are at it, a flame-polished edge will never look as good as a sanded-and-polished edge.
For sanding acrylic, several grits of sandpaper have to be used. What grit to start with depends on the condition of the edge. The rougher the edge, the lower the grit that will be required to get the roughness out for polishing.
As counterintuitive as it sounds, sanding is nothing but scratching. The lower the grit on sandpaper, the larger the grains of abrasive are on the surface, and the larger the scratches that are made with it.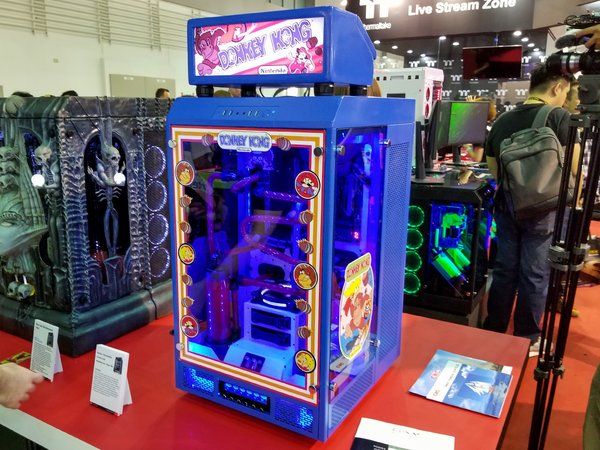 The lower-grit sandpaper serves to remove the cutting marks left behind and make the surface being sanded more uniform.
From there, the higher-grit papers simply make those uniform scratches smaller and smaller until they can’t be seen.
In this case, I started with 320 grit and went through 400, 600, 800, 1200 and 2000 grits.
Various grits of sandpaper used to bring a machined edge to a polished shine.
Machined edge shown in different stages of sanding.
This image shows the progression of the sanding process as it goes through higher and higher grits.
Once your sanding is done, usually at the 1500-2000 grit stage, polishing can be done. I do this on a buffing wheel mounted in a bench grinder, but it can be done with anything that will spin a polishing surface quickly. A Dremel is a good choice, whereas most drills don’t turn fast enough to do the job efficiently.
Bench grinder with mounted buffing wheel.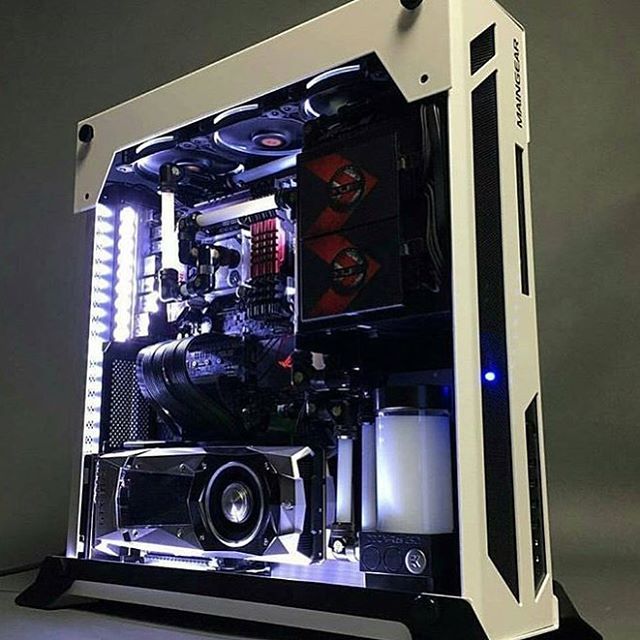
My buffing wheel needs to be replaced. It’s seen a lot of cleaning.
Blue polishing compound. Different colors indicate different grits.
The first step to polishing is to load polishing compound into the polishing tool. These compounds come in a lot of different grits also, but they will all do a fine job on acrylic. I’m using a stick of solid blue jeweler’s compound here.
Embedding polishing compound into the fibers of the buffing wheel.
Turning on the grinder and holding the stick of compound against the polishing disc causes the compound to get hot and soften and embed itself into the fibers of the disc. You can actually watch the disc change colors as it happens.
Polishing the edge of a piece of cast acrylic after sanding.
Since I sanded all the way to 2000 grit, polishing is quick. Two to three seconds held gently against the polishing wheel does the trick.
DANGER! Looking at the image above, this wheel is turning clockwise. If that top corner touches the polishing wheel with any force at all, the wheel will grab it and tear the material out of your hands so fast you won’t see it happen. Any corners to be polished have GOT to be on the downward side of the wheel as shown here.
These are before-and-after images of the edge I just polished. The after image is looking through the polished edge and the rest of the block of material.
Etching / Engraving
Etching and engraving acrylic is an excellent way to make some amazing additions to your PC. As with most things there are a few ways to do it.
The first and least expensive way to do engraving is by hand, either with a power tool like a Dremel or a simple scribe.
I’ve found that the best way to do this is with a template of some kind. I own a vinyl cutter, so I made a stencil for this piece out of vinyl to help me keep my etching where it should be.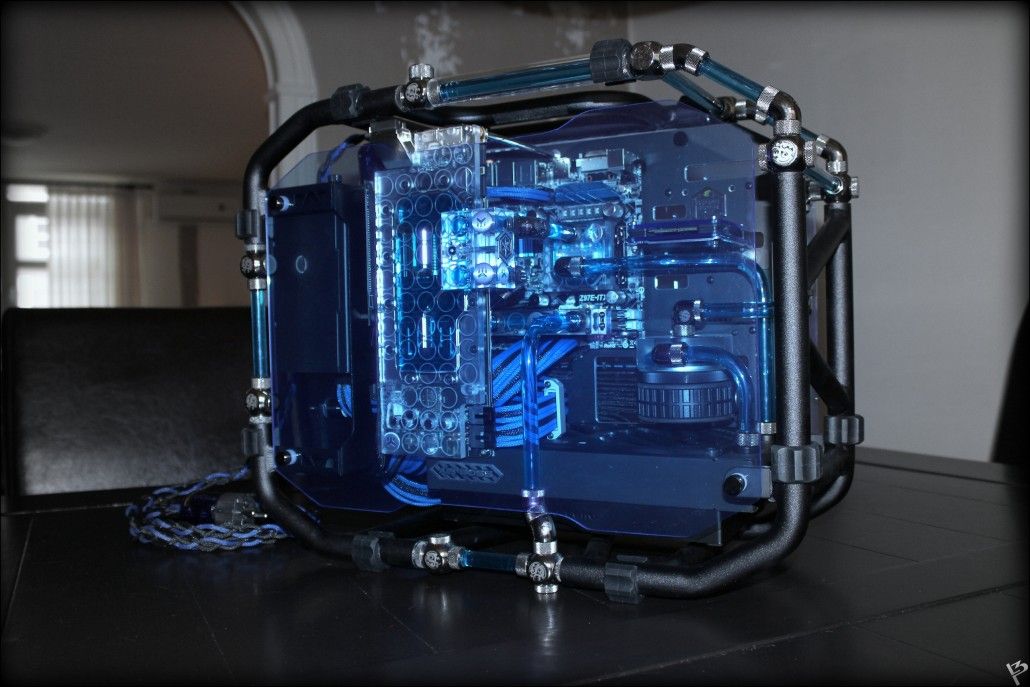
Hand Etching
Vinyl stencil for hand etching.
For the first method I’ll be using a Dremel with a round-head carbide burr. These remove a lot of material at once, which makes the job faster but also harder to control. A little too much pressure and the burr will gouge the acrylic or grab it and go where it shouldn’t.
The smaller the cutting/grinding teeth on the tool you’re using, the less material it will remove, but the easier it will be to control.
Filling in the stencil with black marker.
Filling in the stencil makes it visually easier to use, and shows you where you’ve removed material as you work.
Stencil filled and ready to etch.
Securing the workpiece is a must when using a handheld tool for this job. On a small piece like this where you’re doing shallow etching, tape is more than enough.
Stenciled material is secured to a work surface for manual etching.
The results of this part were… sad. If I had used a cutter with smaller teeth and a tougher material for my stencil it would have helped, but freehand work has never been easy for me.
The results of manual etching — I am ashamed.
Sandblast Etching
The next method of etching acrylic is sandblasting. I use a sandblasting cabinet, but a handheld sandblaster can be just as affective. Note that with a handheld unit your media (sand) is typically lost with a single use, so it is more expensive to use in the long run than a cabinet.
Vinyl stencil for sandblasting — this material has to be a lot stronger than the previous vinyl stencil.
I made a second stencil with strong permanent outdoor vinyl – Oracal 651.
Inside the blasting cabinet.
After masking off the rest of the piece with tape I put it in the blasting cabinet and sprayed it several times. Total etching time was about 40 seconds.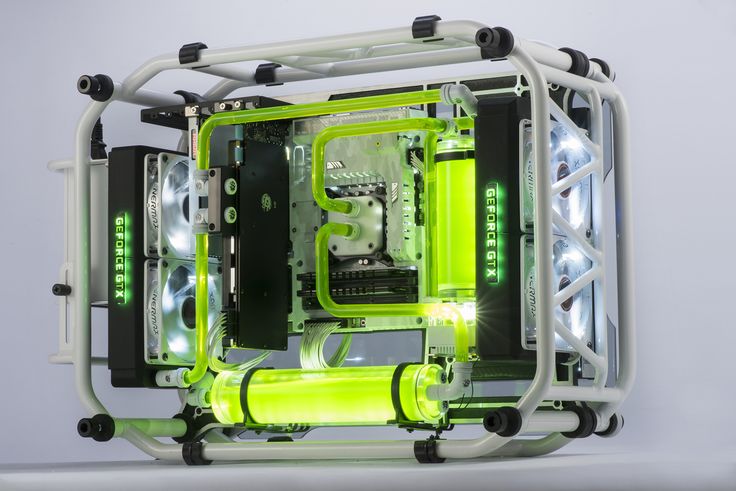
Once the mask is removed and the sand washed off, I had a perfect etching. Sandblasting has the advantage of leaving behind a perfectly even surface.
NOTE: All of your media should be washed off with running water before removing your stencil and edge masks. Otherwise you stand the very good chance of scratching your material in the process of removal.
A perfectly even etching.
Laser Etching
The last and best method of etching or engraving acrylic is with a laser. I have an 80-watt CO2 laser that I use for this, and it is an absolutely amazing tool.
Masking isn’t necessary with a laser. You should leave the protective paper on the acrylic when you engrave, simply because it makes it easier to clean up the dust afterward.
80-watt CO2 laser etching the acrylic. Memerizing to watch.
Like any computer-controlled tool like this, there is a leaning curve to it, but today’s software and machines have come a long way toward making them user-friendly.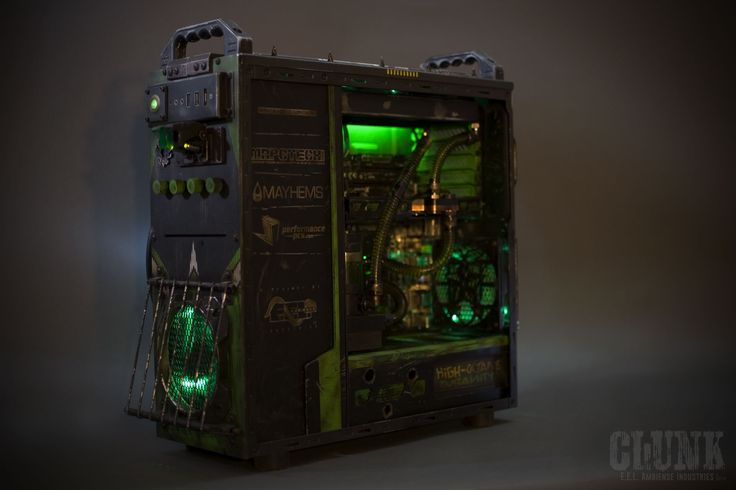
A laser gives perfect results to whatever pattern is programmed into it.
After peeling the paper that came on the acrylic. This is a perfect etching.
Acrylic is one of the most flexible and useful materials in a modder’s arsenal. It comes in colors across the rainbow, both opaque and transparent. It comes in mirrors both single-sided and double. It’s available in two-color variants, made to reveal the underlying color when the first is removed.
Acrylic is tough, beautiful, immune to moisture and completely non-conductive. Learning to work with it will give you options you never had before.
40 amazing case mods and custom PC builds from Computex 2018
Image 1 of 40
See <a href=»https://cdn.mos.cms.futurecdn.net/nahJqdFg67xjsdcoiUTmbA.jpg» target=»_blank»>the full-size image here</a>.
See <a href=»https://cdn.mos.cms.futurecdn.net/NS3YqxVtrc9isKieB6n7ND.jpg» target=»_blank»><u>the full-size image here</u></a>.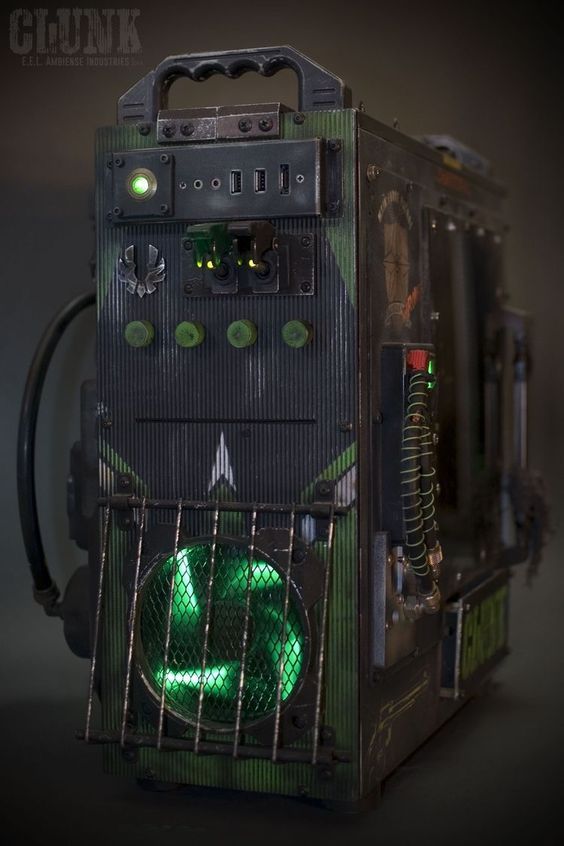  
 
See <a href=»https://cdn.mos.cms.futurecdn.net/Qvxwo76nMzyDFzVHd7AK5C.jpg» target=»_blank»>the fill-size image here</a>.
See <a href=»https://cdn.mos.cms.futurecdn.net/LPwp5Lrmjy3oC5pWscqW4C.jpg» target=»_blank»><u>the fill-size image here</u></a>. 
See <a href=»https://cdn.mos.cms.futurecdn.net/69fMkUWpiWcxFVGahzLi6C.jpg» target=»_blank»>the full-size image here</a>.
See <a href=»https://cdn.mos.cms.futurecdn.net/atVTQ6TCpuj62dwcZ2b63C.jpg» target=»_blank»><u>the full-size image here</u></a>. 
See <a href=»https://cdn.mos.cms.futurecdn.net/DAvNMWQTUyL79yZfFFyKvB.jpg» target=»_blank»><u>the full-size image here</u></a>.  
See <a href=»https://cdn.mos.cms.futurecdn.net/p8GGZcGYMNjNvhH6KQ22tB.jpg» target=»_blank»><u>the full-size image here</u></a>.  
See <a href=»https://cdn.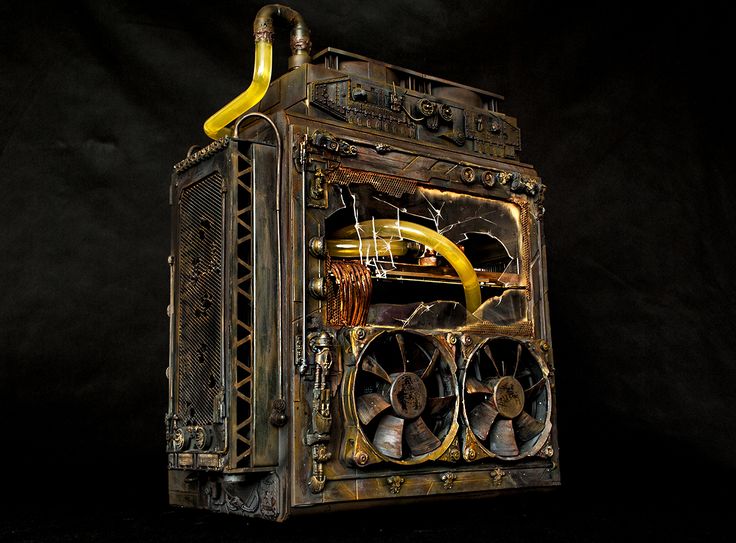 mos.cms.futurecdn.net/YqMeQLkqeMEfzN5Af2aqsB.jpg» target=»_blank»><u>the full-size image here</u></a>.   
See <a href=»https://cdn.mos.cms.futurecdn.net/PchUxympLNzhVCaV4TmxsB.jpg» target=»_blank»><u>the full-size image here</u></a>.
See <a href=»https://cdn.mos.cms.futurecdn.net/kqp24ASyRAGdhWUc2mAxjB.jpg» target=»_blank»><u>the full-size image here</u></a>.
See <a href=»https://cdn.mos.cms.futurecdn.net/cCmaTxKCN66qbhUQdgqWjB.jpg» target=»_blank»><u>the full-size image here</u></a>.
See <a href=»https://cdn.mos.cms.futurecdn.net/br3WyhVFcYvcFjbEHa5rjB.jpg» target=»_blank»><u>the full-size image here</u></a>.
See <a href=»https://cdn.mos.cms.futurecdn.net/qynVtVh4wA6R2UuveqqehB.jpg» target=»_blank»><u>the full-size image here</u></a>.
See <a href=»https://cdn.mos.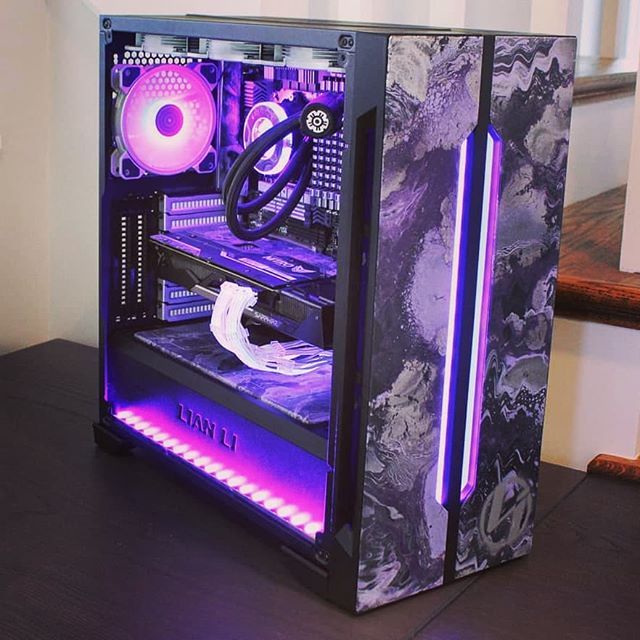 cms.futurecdn.net/r4u6bnwnz6hBTCKwpnz4bB.jpg» target=»_blank»><u>the full-size image here</u></a>.
See <a href=»https://cdn.mos.cms.futurecdn.net/StTY8RCkSq28eZkYSYviXB.jpg» target=»_blank»><u>the full-size image here</u></a>.
See <a href=»https://cdn.mos.cms.futurecdn.net/MrfZfgBAZ2dtcBLmGGeSbB.jpg» target=»_blank»><u>the full-size image here</u></a>.
See <a href=»https://cdn.mos.cms.futurecdn.net/tecc7ycKUk8nZTC5GDU3SB.jpg» target=»_blank»><u>the full-size image here</u></a>.
 See <a href=»https://cdn.mos.cms.futurecdn.net/poDs8TeDqxVPM7Q4ACucJB.jpg» target=»_blank»><u>the full-size image here</u></a>.
See <a href=»https://cdn.mos.cms.futurecdn.net/9vM9sKmACKLp3VVTtbgrLB.jpg» target=»_blank»><u>the full-size image here</u></a>.
See <a href=»https://cdn.mos.cms.futurecdn.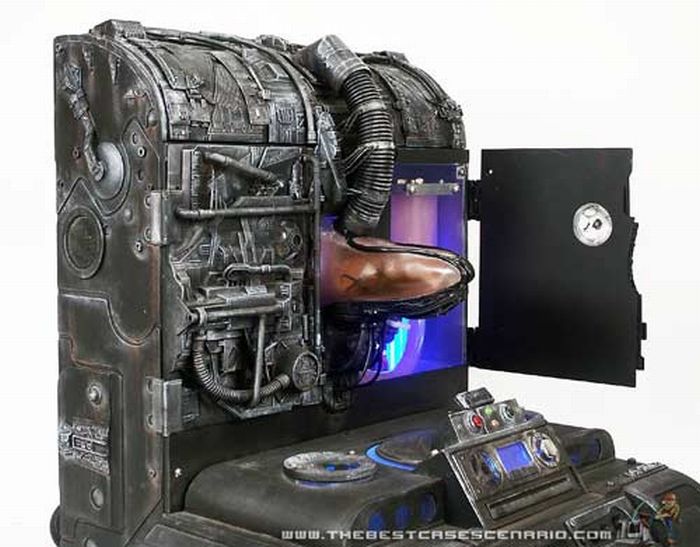 net/dtFitAftFzjtkyX5D2W2FB.jpg» target=»_blank»><u>the full-size image here</u></a>.
See <a href=»https://cdn.mos.cms.futurecdn.net/X4kjN3VL7G5qKjTifyBjHB.jpg» target=»_blank»><u>the full-size image here</u></a>.
See <a href=»https://cdn.mos.cms.futurecdn.net/C8PdSZ4FYFoi4m53LGV3FB.jpg» target=»_blank»><u>the full-size image here</u></a>.
See <a href=»https://cdn.mos.cms.futurecdn.net/cdetVt7ya3GhqVj7G5PE7B.jpg» target=»_blank»><u>the full-size image here</u></a>. 
See <a href=»https://cdn.mos.cms.futurecdn.net/ULLpGqS2gBDWMWxFJBrgBB.jpg» target=»_blank»><u>the full-size image here</u></a>.
See <a href=»https://cdn.mos.cms.futurecdn.net/x2NxrWLuYBNaV7fUk3eKxA.jpg» target=»_blank»><u>the full-size image here</u></a>.
See <a href=»https://cdn.mos.cms.futurecdn.net/rkdxCcRQ2ieN9o9cR3YHdA.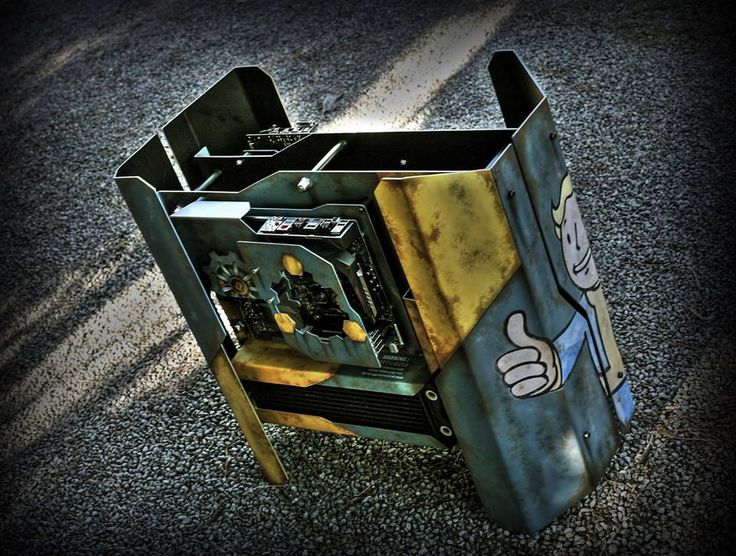 jpg» target=»_blank»><u>the full-size image here</u></a>.
See <a href=»https://cdn.mos.cms.futurecdn.net/qF3br4kPUP7CAbHkknKULA.jpg» target=»_blank»><u>the full-size image here</u></a>.
See <a href=»https://cdn.mos.cms.futurecdn.net/q9orF5mUCrFQ2dkuZtjGWA.jpg» target=»_blank»><u>the full-size image here</u></a>.
 See <a href=»https://cdn.mos.cms.futurecdn.net/mDUA26RKJr7c6HzYNyj8EA.jpg» target=»_blank»><u>the full-size image here</u></a>.
 See <a href=»https://cdn.mos.cms.futurecdn.net/WiXWQFAMRkxaistgYmzSYA.jpg» target=»_blank»><u>the full-size image here</u></a>.
See <a href=»https://cdn.mos.cms.futurecdn.net/b8R5KazPDzs36iSconuQQA.jpg» target=»_blank»><u>the full-size image here</u></a>.
See <a href=»https://cdn.mos.cms.futurecdn.net/R5dHPjAP52yHC2JwiAtTRA.jpg» target=»_blank»><u>the full-size image here</u></a>.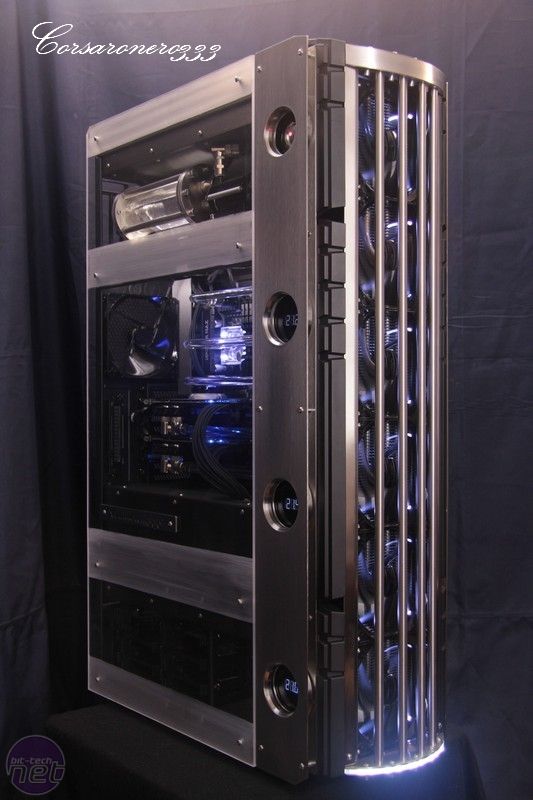
See <a href=»https://cdn.mos.cms.futurecdn.net/N7NaGak4QsJCDCTVGVQJCA.jpg» target=»_blank»><u>the full-size image here</u></a>.
See <a href=»https://cdn.mos.cms.futurecdn.net/ncYNnwM4yUTNkg4ySHoJJA.jpg» target=»_blank»><u>the full-size image here</u></a>. 
See <a href=»https://cdn.mos.cms.futurecdn.net/3eTosWjobSodWiXLorEb7A.jpg» target=»_blank»><u>the full-size image here</u></a>.
See <a href=»https://cdn.mos.cms.futurecdn.net/ZXFaz2WVHbkkWmp2Ya4F6A.jpg» target=»_blank»><u>the full-size image here</u></a>.
See <a href=»https://cdn.mos.cms.futurecdn.net/TG8wNrFD7Ai9PBJL6zQ37A.jpg» target=»_blank»><u>the full-size image here</u></a>.
See <a href=»https://cdn.mos.cms.futurecdn.net/EwkZwfdYZ35FdRZhew9B5A.jpg» target=»_blank»><u>the full-size image here</u></a>.
See <a href=»https://cdn.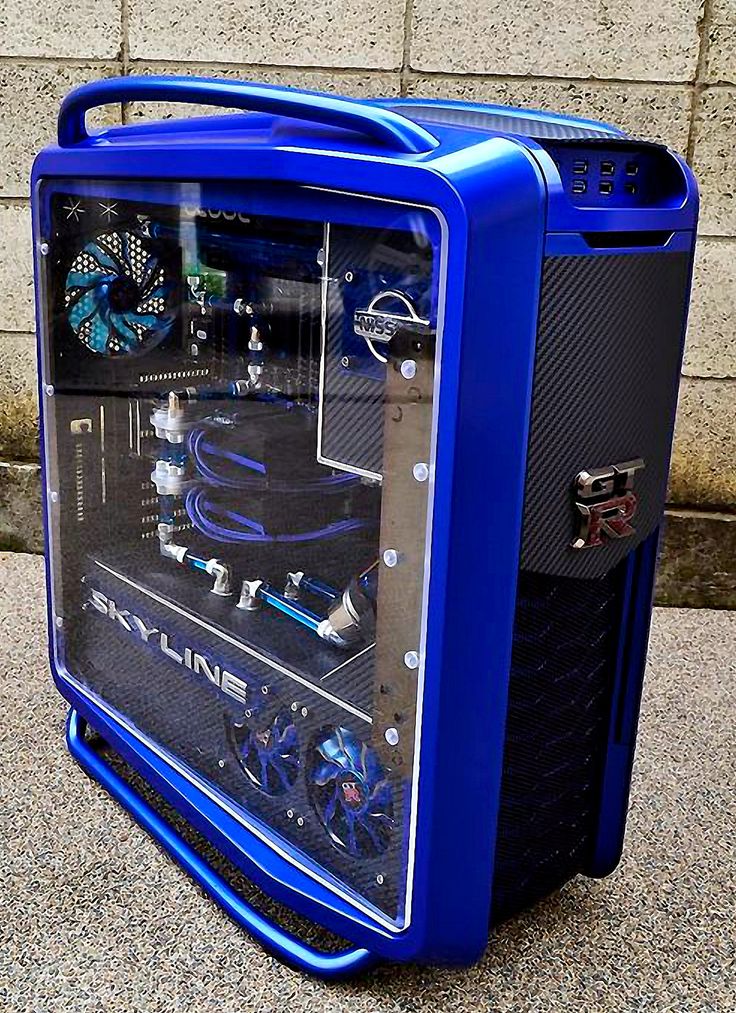 mos.cms.futurecdn.net/BsS54mtv5pAFvG3oYQ6S5A.jpg» target=»_blank»><u>the full-size image here</u></a>.
It’s that time again: I’ve had a few days to walk the exhibition floor of Computex 2018, on the hunt for every crazy case mod and amazing RGB-laden custom PC build I can find. Most of Computex’s PC hardware booths use amazing cases to lure in passers by, and it certainly works on me. One of my favorite things to do every show is put together a gallery of every build that caught my eye.
There’s nothing at the show this year that utterly wowed me like last year’s Donkey Kong arcade machine case mod, which was a true work of art. But the pickings this year aren’t too shabby. There’s a pirate ship, a mech, a working radio, and miles of gorgeous, painstaking custom watercooling in this gallery. Enjoy!
Wes has been covering games and hardware for more than 10 years, first at tech sites like The Wirecutter and Tested before joining the PC Gamer team in 2014.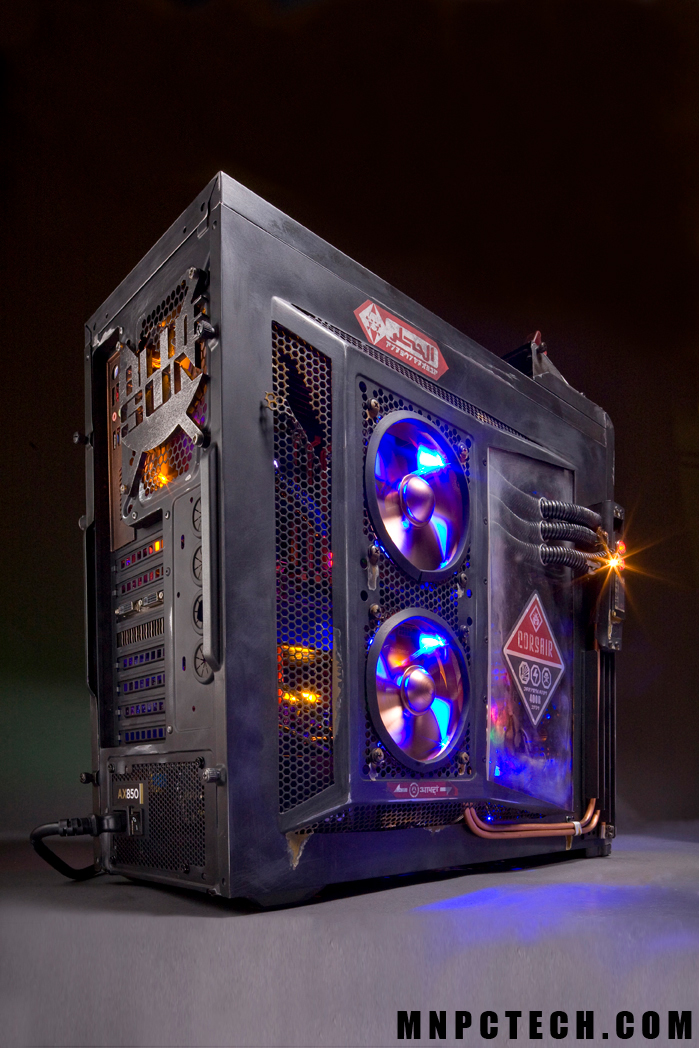 Wes plays a little bit of everything, but he’ll always jump at the chance to cover emulation and Japanese games.
When he’s not obsessively optimizing and re-optimizing a tangle of conveyor belts in Satisfactory (it’s really becoming a problem), he’s probably playing a 20-year-old Final Fantasy or some opaque ASCII roguelike. With a focus on writing and editing features, he seeks out personal stories and in-depth histories from the corners of PC gaming and its niche communities. 50% pizza by volume (deep dish, to be specific).
26 Computer Case Mods
26 Computer Case Mods
search
Ideas
Explore the world’s #1 largest database of ideas and innovations, with 422,654 inspiring examples.
Trend Reports
Discover why 1,125 brands rely on our AI-powered Trend Reports to get better, faster insights.
Newsletter
Join 310,070 subscribers who rely on our weekly newsletter to keep up with need-to-know trends and insights.
Consumer Insights
Uncover major shifts and emerging opportunities with our exclusive PRO research.
Trend Reports
Discover why 1,125 brands rely on our AI-powered Trend Reports to get better, faster insights.
Newsletter
Join 310,070 subscribers who rely on our weekly newsletter to keep up with need-to-know trends and insights.
Dashboard
Join 296,419 Trend Hunters with special access to premium content, topic tracking and customizable tools through our AI-powered Dashboard.
AI + Human Methodology
Learn how Trend Hunter harnesses the power of artificial intelligence.
Advisory & Services
Accelerate innovation and ignite disruptive thinking with our award-winning programs and research.
Trend Reports
Get fast, customized trend reports, presentations and deep dives 20x faster than traditional research.
Plans
Get started today with a free consultation, our self-serve tools, or a dedicated program.
Articles & Magazine
Get inspired with our 4,135 innovation strategy articles, keynote, videos and innovation tools.
Advisory & Services
Accelerate innovation and ignite disruptive thinking with our award-winning programs and research.
Innovation Assessment
Enhance your innovation potential with a deeper understanding of your unique innovation archetype and how your organization benchmarks.
FuturistU
Prepare for the years ahead with 100+ lessons, tactics, tools and frameworks with our full learning database.
Innovation Books
Join 20,000,000 people getting better and faster with our New York Times Bestselling books and keynote videos.
Jeremy Gutsche
Ignite your event or virtual event with our CEO, a NY Times Bestselling Author and one of the top innovation keynote speakers.
Our Team of Speakers & Virtual Presenters
Inspire your group with our most popular speakers on innovation, trends, change and futurism.
Custom Training & Events
Bring the Future Festival experience directly to your team or co-hosted custom event.
Contact
Get in touch to learn more, ask a question or submit a tip.
About Us
Learn more about Trend Hunter and how we accelerate innovation.
Follow-Us
Join our 3,500,000 social media followers, on the cutting edge.
FAQ
Get answers to common questions about Trend Hunter.
Community
Stay on the cutting-edge with the help of the Trend Hunter community.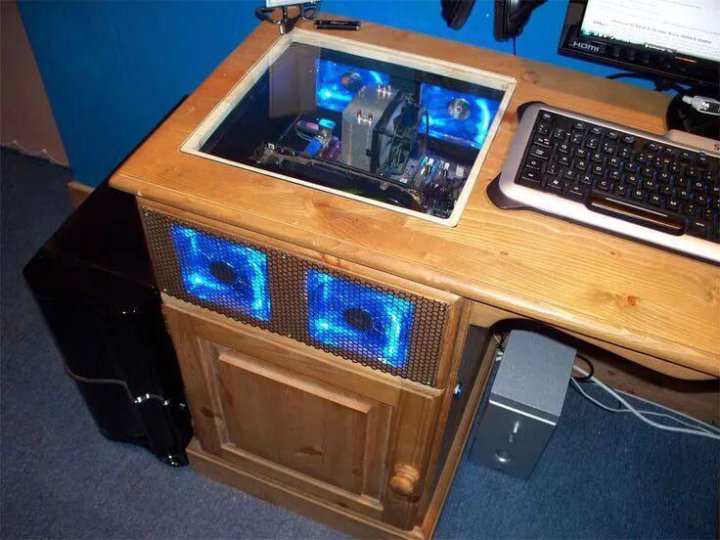
Team
Meet the team trusted by hundreds of leading businesses worldwide.
Jobs
Find opportunities to accelerate your career with the #1 Trend Firm.
News
Catch up on noteworthy Trend Hunter news and media mentions.
Join
Build a portfolio and put your trend-spotting abilities to the test.
Advertising
Supercharge your marketing by partnering with Trend Hunter.
Portfolio
Visit your public portfolio and browse your past articles.
Add a Trend
Write up an article and showcase your trend-spotting skills.
My Trends
Edit your articles and see how they stack up on the leaderboards.
Settings
Edit your profile, connect your social media accounts, and more.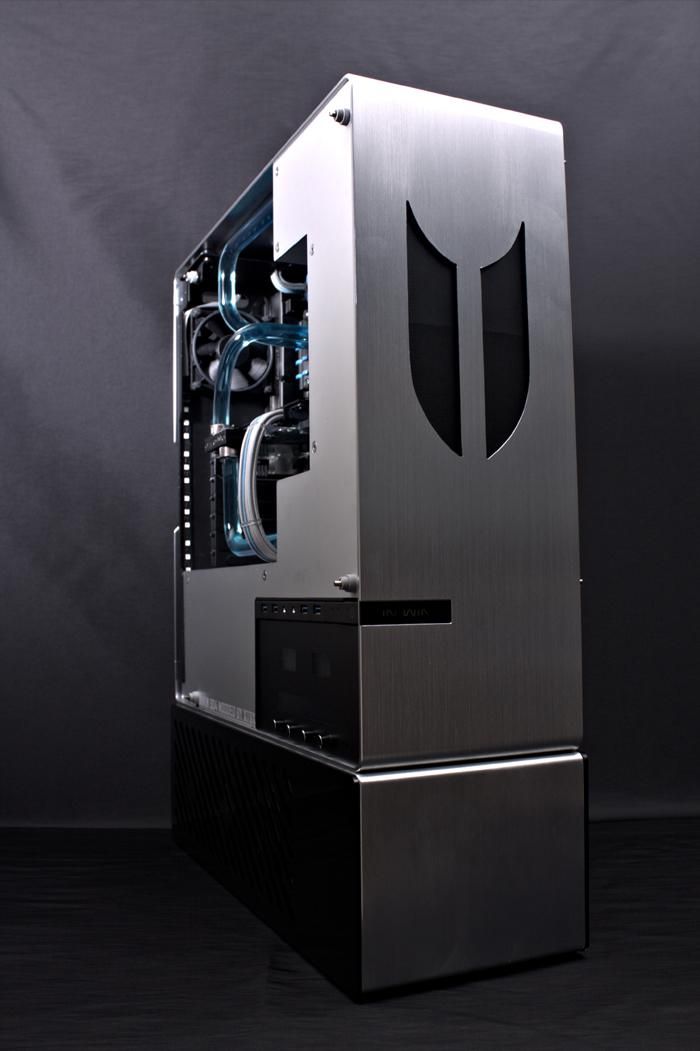
Login
Add a trend, customize your dashboard, or track topics.
Future Festival
Innovation Events
Join the world’s top innovators at our in person events.
Free Webinars
During COVID-19, learn to innovate through chaos, navigate the new normal and maintain work culture from home.
Custom Training & Events
Bring the Future Festival experience directly to your team or co-hosted custom event.
Search our database of 422,654 cutting edge ideas.
Join 310,070 entrepreneurs, innovators and CEOs who rely on our weekly trend report to stay ahead of the crowd.
You’ll get special access to premium content and trend research that cannot be found anywhere else.
View last week’s newsletter
Kyle Towers — April 13, 2013 — Art & Design
Computer case mods are the ultimate way to add a little flavor and personality to your desk and workspace. It involves covering your computer in a customized casing that adds style to the typically standard-looking PC.
The modifications come in all different styles and some of them are even a functional add on to give your computer more specs. Keeping with the nerdy computer user stereotype, there are several Sci-Fi and pop culture computer case mods like R2-D2 and TARDIS. There are also some pretty unique creations that include a realistic motorcycle and a tank design.
A lot of times these modifications are actually custom-made by everyday people with no intent for monetary gain. Luckily, a lot of these wonderful creations have been shared on the Internet for all to admire.
6.2
Score
Popularity
Activity
Freshness
26
Transporting Tech Cases
The Scooterputer is a Ride-Able Computer Case
25
Brewtastic Servers
The Mac G3 Beer Server is an Alcoholic Apple Creation
24
Comic Character Computer Mods
The Glowing Incredible Hulk Computer Case
23
Monstrous Computer Mods
The Bandi Scarab Makes the Insides of a Computer Look Evil
22
Armored Division PC Cases
The Rog-R is a Badass Remote-Controlled Gaming Rig
21
Miniature Cardboard Computer Models
The New Industrial Revolution by Kyle Bean is a Success
20
Droid-Inspired Console Mods
Major League Mods Cram Working Consoles into Custom Star Wars Cases
19
Tasty Computer Mods
The FIFA 10 PC Case Keeps Your Software Sizzling
18
Stripped-Down Desktops
The Hammerhead HMR989 Ditches the Case and Bares All
17
Supercar Computer Cases
The RC Corvette ZR1 Case is a Mobile PC
16
Custom Water-Cooled Consoles
The Wii UNLimited Edition is Perfect for Mario Party Marathons
15
Motorcycle Computer Cases
The Pocketbike I7 Casemod Runs as Fast as a Motorbike
14
Vintage Console Computer Mods
SEGA Saturn Laptop Revives an Old Gaming Classic
13
Musical Computer Cases
The Piano PC Case Mod from David Scothern Lets You Hide Your Workstation
12
Zombie Computer Cases
The Biohazard Computer Case is Perfect for Resident Evil Fans
11
Concrete PC Cases
The Concretronic Computer Case is a Construction-Quality PC Mod
10
Flaming Computer Cases
Chimera X58 & AM3 Super PCs for Gamers
9
DIY Robot Mods
The Morphius Casemod is for Animated Movie Fans
8
Robotic PC Cases
The Dreadnought PC Mod is an Epic Fan Creation
7
War-Ready Computer Cases
Skip Station’s Tank PC Case Mod Keeps Your Files Safe Under Fire
6
Gatling Gun Custom PCs
The Battlefield Case Mod is an Epic Computer Fit for Hardcore Gamers
5
Time-Traveller Computer Cases
This Doctor Who TARDIS PC Case is a Must-Have for Any Who Junkie
4
Cute Computer Mods
This Custom-Made ‘WALL-E’ PC is Adorable
3
Dazzling Computer Cases
Chiaroscuro by Nick Falzone Will Make Any Machine Look Hot
2
V8 Engine Computer Cases
Run Two PCS at Once With the Ultimate Gearhead Case Mod
1
DIY Computer Cases
Mission-Style PC Case Reduces Clutter and Beautifes Your Desktop Tower
10 PC Case Mods For Your Computer To Envy
A home-built PC is sort of like a project car.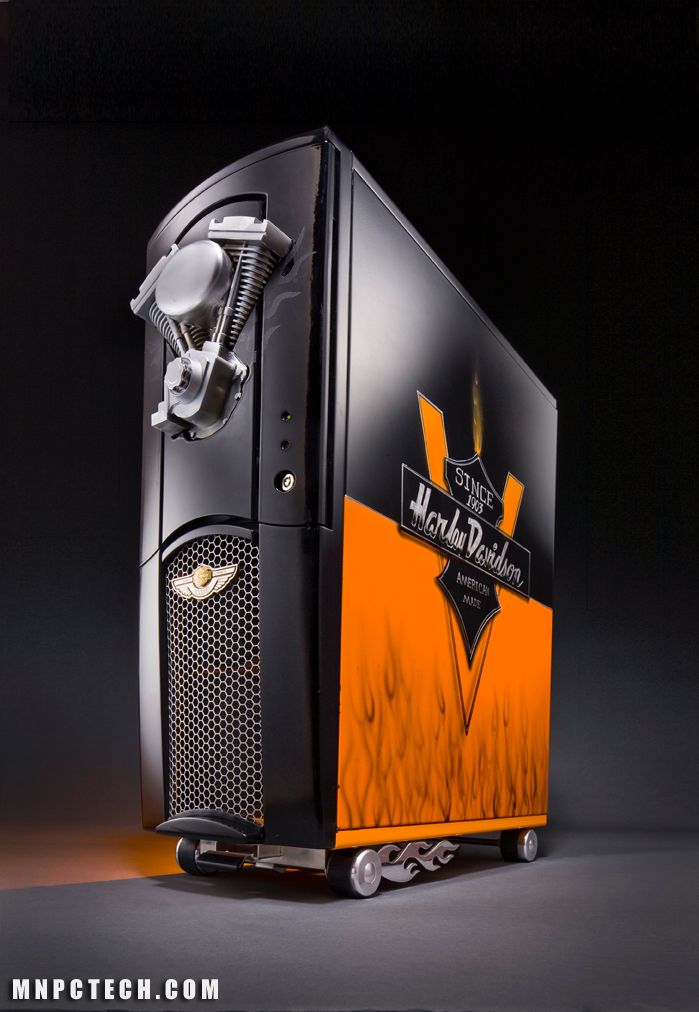 Once you’ve put every carefully-selected piece together, you get a huge sense of accomplishment. But for some enthusiasts, doing things by the book is never enough. And so we get tricked-out street racers and silky-smooth custom rides on the road, and — in smaller but no less obsessive applications — the PC case mod.
Case mods range from subtle to striking, from basic to bombastic. Most of the time the machines inside are running state-of-the-art hardware, but that’s just a means to an end — the true joy here is the simple “wow” that these computers get from a first glance. Let’s have a look at some of the more outrageous case mods shown off in trade shows or enthusiast sites.
TUF Rockcrawler X99 by Alexander Hede
This case and base pair is designed to look like a tough-as-nails military truck roughing it across inhospitable terrain. The motherboard and GTX Titan graphics card are cleverly stored in the truck’s “bed” — note the eight RAM DIMM modules fashioned like cargo rails and the water cooler and fan on the “cab.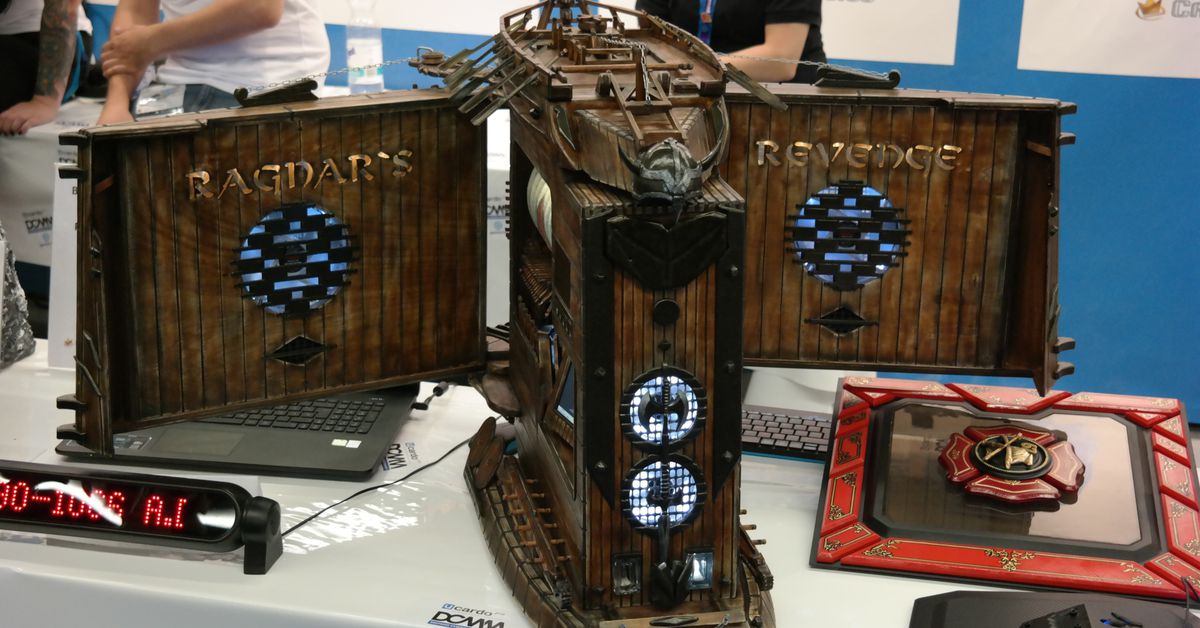 ” The name comes from the TUF series of motherboards manufactured by Asus. This build was created for promotional purposes and displayed at the Asus booth at Computex 2015.
Sputnik 0667 by “quizz_kid”
This unique wooden case uses modern components, including an embedded monitor and keyboard, to emulate the look and feel classic mid-century consumer electronics. The custom case folds up into a locked cabinet, making it look more like some family heirloom than a computer. Creator “quizz_kid” spent months designing and woodworking, and when he was done, he made his own custom “Sputnik” brand labels and retro-futuristic advertising for the project.
ThermalTHOR by Suchao Prowphong
In the world of Marvel’s Thor, technology and magic are the same thing. That’s easy to believe when you look at this case mod designed to resemble Thor’s battle hammer Mjolnir. The components are split between the hammer’s head and the base it’s crashed into (sorry, you can’t pick it up no matter how worthy you are).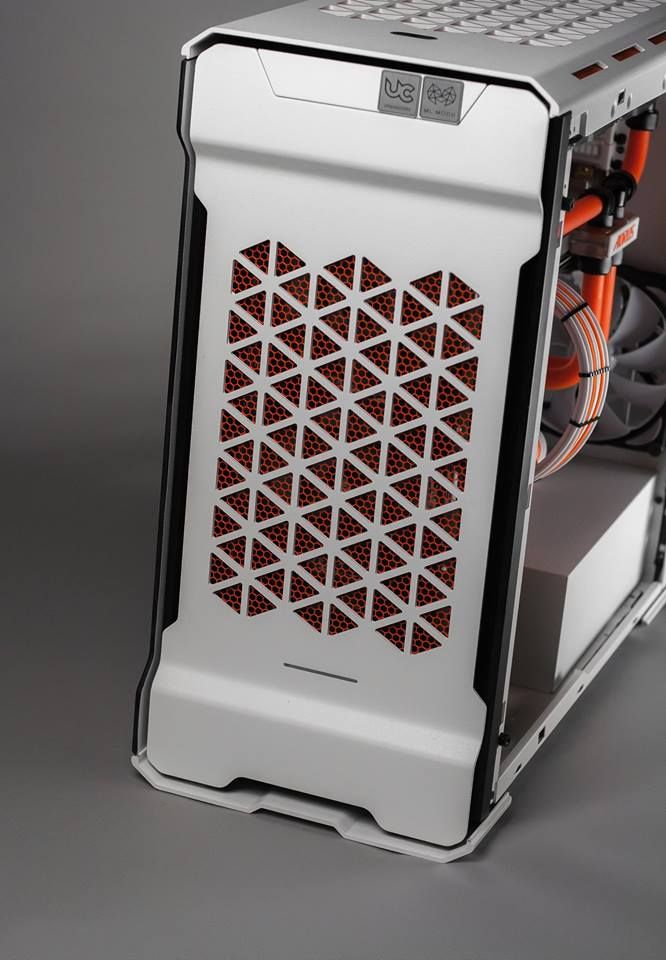 Details like the cracks and filigree aren’t just decorative: the case’s mutli-colored LEDs shine through all over. This is another promotional case mod, this time made for Thermaltake at Computex 2015.
FuG-01/ET by “Sheyr”
A case modder going only by “Sheyr” posted this exhaustive project to the TechPowerUP forums way back in 2005. In addition to a tower case heavily modified to look like a World War II field radio you might see while attacking Castle Wolfenstein, the case comes complete with a custom-painted mouse and keyboard set, and a real antique earpiece. The gauges on the front show the computer’s current power consumption.
GULF Performance by “_0Cool_”
This case mod is little more than an extremely thorough paint job, but it shows what dramatic effects you can achieve with skill, patience, and great design. It combines a Corsair case with internal components, mouse, and a headset painted in the iconic orange-on-blue shades of Ford’s GT40 Le Mans race car. This PC may only go fast in the figurative sense, but it turned heads at Corsair’s booth at the 2015 Gamer Assembly.
“Fish Tank” mineral oil cooled PC by Puget Systems
Most PC enthusiasts don’t let water anywhere near their precious electronics. It’s a good thing, then, that this project PC submerged in a fish tank is suspended in non-conductive mineral oil, which actually helps regulate the temperature of the computer. These computers require relatively little skill to build and operate – a company called Puget Systems sold them for years, and they’re easy enough to replicate with a standard aquarium and some salvaged parts.
L3p D3sk by Peter Brands
Eventually you’re going to have to put that magnificent custom PC on a desk… unless you cut out the middleman. Peter Brands has been doing just that for years. His “L3p D3sk” isn’t the only computer desk with components spread out across the interior, but the liquid-cooled, neon-soaked result is surely the most spectacular of its kind. The project won BitTech’s coveted Mod of the Year in 2011.
Transforming PC case by Asus and In Win
【Computex 2015】Asus ROG Certified with In Win chassis
Most of the more wild case mods dispense with practicality right away. Not so with this prototype case from Asus and In Win. At Computex 2015 the two companies showed off a motorized case that splits apart and raises the interior frame up at the push of a button, instantly granting access to the internal components. It’s a dream for PC gamers and overclockers who love to tinker, but they might not have to dream for long — representatives at the show said that the case may go into production for retail sale at some point.
Team Fortress 2 Sentry Mod by Ton Khowdee
Bit-Tech
For players of Valve’s Team Fortress 2 PC shooter, a Level 3 sentry is either a thing of beauty or death on a tripod, depending on whether you like to play as the engineer. One modder decided to make his favorite shooter toy into a PC in 2008, cramming the various components into a custom-made enclosure based on a Shuttle design. The heavily-modified original case is the top-mounted rocket launcher. The belt of bullets extending out of both mini-guns is — hopefully — decorative.
AzTtec by Dan McGrath
Some case modders start with a relatively simple foundation, like a Thermaltake 10 retail case, and build on until the result is all but recognizable. Take the AzTtec, for example: this foam-covered masterpiece looks like the kind of time-warped technology that would send the Ancient Aliens producers into a tizzy. Once you’re done admiring the case itself, check out the amazing custom work on the mouse and keyboard.
Editors’ Recommendations
-
The best mini-ITX PC cases for 2022
-
This PC case lets you draw in RGB right on the glass panels
-
PC troubleshooting: Where to start if your PC won’t turn on
-
Say hello to one of the most expensive PC cases in history
-
The best MacBook Pro cases and covers
Hello Kitty custom case mod is the cutest Sanrio-themed PC
Acer’s limited edition Hello Kitty laptop has all the kitty-lovers wanting to get themselves a new computer.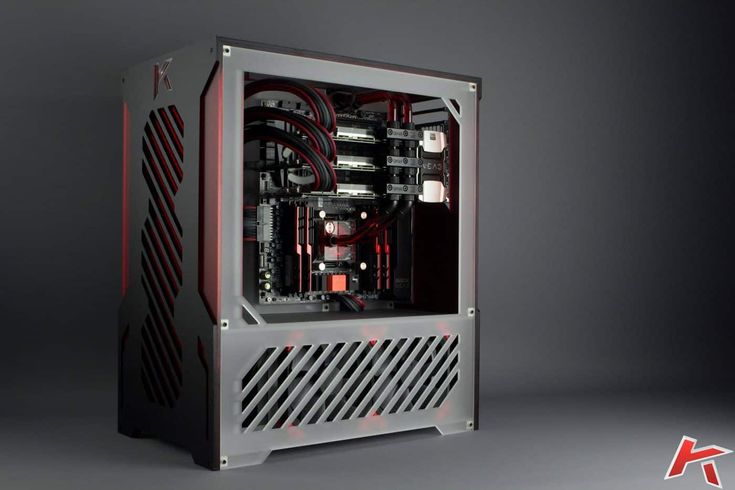 But, that’s not the only way you can get yourself a Sanrio-themed machine.
Well, at least not for Jennifer Martino, whose husband built her a Hello Kitty computer. Yes, you heard right: He built her a Hello Kitty-themed computer!!
This is the homemade Hello Kitty desktop PC
Custom PC by Anthony Martino
Even before the limited edition Acer Hello Kitty laptop, Jennifer has been repping our favorite Sanrio character.
Yes, what you see is a functioning computer
Red bows and all, it may seem cute and flashy but it’s a hardworking, fully operational machine. The cost is estimated at around US$ 2,200 for components and outsourced custom parts.
But, more importantly, it’s a labor of love <3
This PC is not only unique, it has a pretty sweet backstory. Anthony Martino was about to build himself a custom computer when he decided to build one for his wife, instead. Jennifer absolutely loved Hello Kitty and, well, it seemed that Anthony is a pretty sweet guy.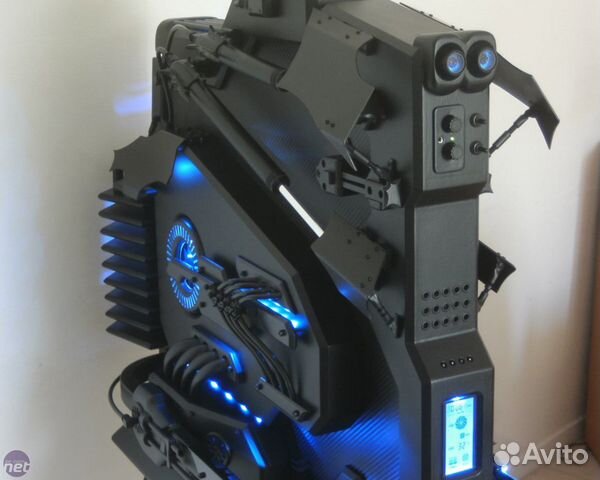 After a month of planning and designing, he had this desktop ready for Jennifer.
A GadgetMatch made in heaven!
When asked about Jennifer’s reaction to her new Kitty computer, Anthony said, “She hugs it everyday, LOL.” (Well, I would too, Anthony, LOL)
Anthony, however, claims that this is still a work in progress. He plans to add a few more Hello Kitty finishing touches. Presently, he’s building another custom PC, his own this time — and not Hello Kitty-themed (but also probably pretty awesome, judging by his work here).
The loving couple: Anthony and Jennifer Martino
Meantime, Jennifer enjoys her custom Hello Kitty GadgetMatch, and the other true match in her life, Anthony. <3
SEE ALSO: Acer Aspire V3 Hello Kitty hands-on: Adorbs!
SEE ALSO: GadgetMatch Giveaway: Win an Acer Hello Kitty laptop
[irp posts=”16057″ name=”Hello Kitty Acer laptop: Where and how to buy”]
Related Topics:Hello Kitty
Computers
Two new Think products
ThinkPad P16s
Lenovo continues to be in a league of its own.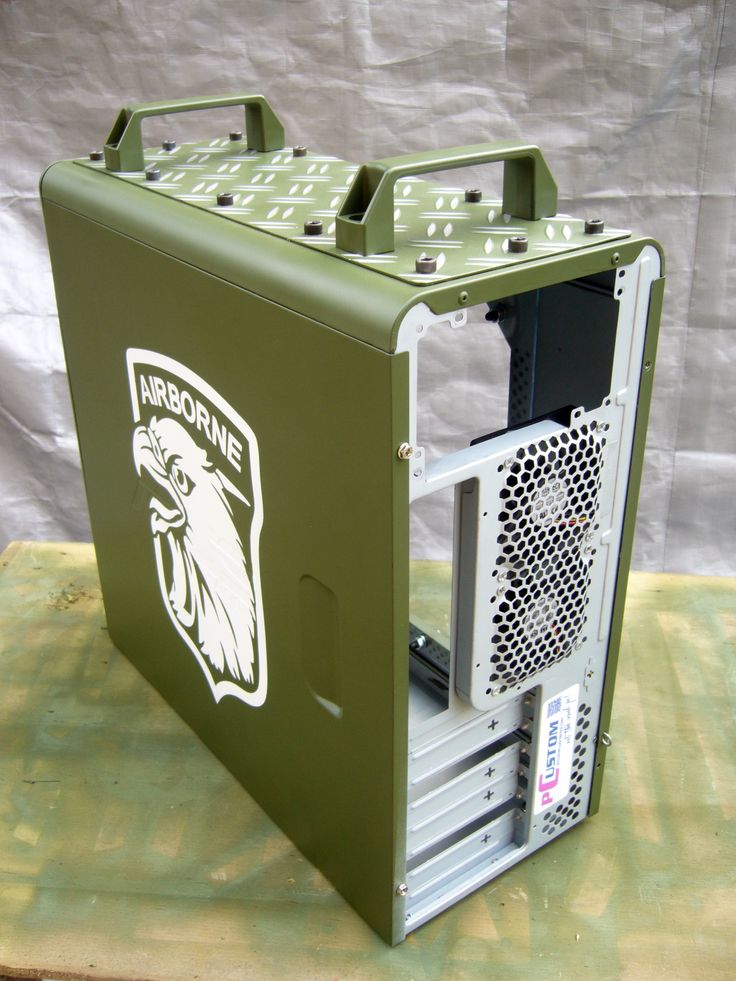 After making new IdeaPad and Yoga laptops available earlier this month, Lenovo has introduced two new products in their Think lineup: the ThinkPad P16s Gen 1 and ThinkStation P360 Ultra.
ThinkPad P16s Gen 1
Price — starts at PhP 95,999
The powerful and high-performance ThinkPad P16s Gen 1 is powered by up to the latest 12th Gen Intel Core i7 processors and NVIDIA T550 or Intel Iris Xe graphics.
It can support up to 48GB DDR4 memory and up to 2TB PCIe SSD Gen 4 storage, making it ideal not only for work but also gaming.
The display is 16-inch, 400 nits (2560 x 1600) screen. It has Intel WiFi 6E and Intel Thunderbolt 4, with a suite of ports and slots for seamless and high-speed connectivity.
While reliable and durable, the laptop also comes in a lightweight and slim design, weighing just 1.7 kilograms and with a thickness of 20.5mm for portable use.
ThinkStation P360 Ultra
ThinkStation P360 Ultra
Price — starts at PhP 114,799
On the other hand, the small but powerful ThinkStation P360 Ultra is boosted by up to a 12th Gen Intel Core i9 12900 vPro processor for a maximum power of up to 5GHz, and advanced graphics options such as the NVIDIA RTX A5000.
Half the size of traditional small form factor desktop workstations, the machine supports a wide range of tasks for professionals and even creatives, making it one of its kind for its size.
It has up to 64GB of DDR5 memory and up to 1TB of SSD PCIe Gen4 storage. The ThinkStation P360 Ultra also has seven (7) USB ports, including 2 Thunderbolt 4 ports.
Dual onboard ethernet and WiFi 6E options ensure access to superfast networking connectivity. Pair it with wireless keyboards, mice, and monitors, and you’ll be able to take productivity to a whole new level.
The release of these Think devices follows Lenovo’s release of three new Yoga laptops — the Yoga 9i, Slim 7i Pro X, and Slim 7i Carbon — and three new IdeaPads — Slim 3 and 3i, Slim 5i, and 5 Pro earlier this month.
Continue Reading
Accessories
No nonsense monitors
Dell has announced the availability of the new Alienware 25 and Alienware 27 gaming monitors in Singapore via their official website and exclusive stores in Funan Mall, NEX, Plaza Singapura, and VivoCity.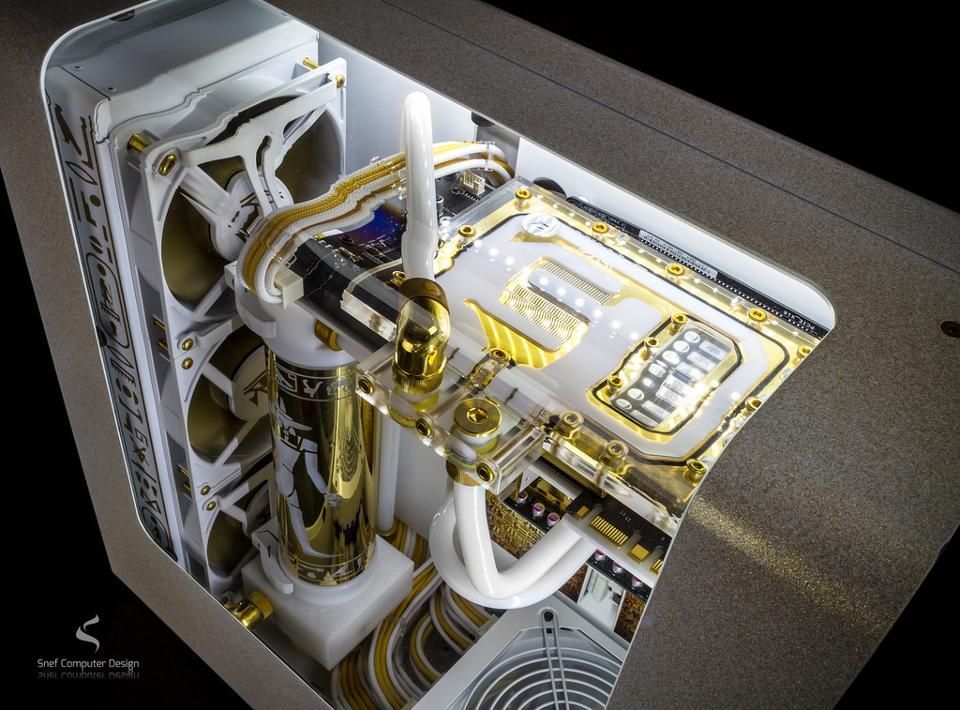
The 25 is now available online and will retail in Dell stores starting on August 19, 2022 for SG$ 669. The 27 is priced at SG$ 1,099 and can be purchased as early as September 6, 2022 online.
Both the 24.5-inch and 27-inch monitors support VESA Adaptive Sync and AMD Free-Sync Premium Pro. The latter is also NVIDIA G-SYNC compatible. They both have an Extreme Mode and are capable of 1ms GtG response rate.
The Alienware 25 has a slightly higher maximum refresh rate and response rate at 360Hz and 0.5ms (GtG), respectively although the Alienware 27 has a better maximum resolution at 2560 x 1440 along with an up to 280Hz refresh rate and VESA HDR10+ display.
In terms of comfort, both Alienware displays sport the new Legend 2.0 design. It has vast improvements for better comfort and a more seamless gaming experience. The monitors also have several certifications and features such as ComfyView, Flicker Free and Low Blue Light technologies, and more.
The Dell Premium Panel Exchange allows a free panel replacement during the Limited Hardware Warranty period. This is even if only one bright pixel is found.
Continue Reading
Accessories
New frontier in gaming
The next-level Samsung Odyssey Ark gaming screen is now official worldwide. Preorders are available starting on September 1 for Singapore and September 12 elsewhere.
It’s the world’s first 55-inch 1000R curved gaming screen. It features a 4K (3,840 x 2,160) resolution with a 165Hz refresh rate and 1ms response time (GtG). It’s also poised to deliver unrivalled picture quality and cinematic surround sound,
It sports Samsung’s Matte Display for anti-glare and anti-reflection, and has a Cockpit Mode and an exclusive controller called the Ark Dial. When activated, the Cockpit Mode allows the screen to rotate along with its height adjustable stand. You can tilt, and pivot for an entirely new dimension of immersed gaming.
The exclusive Ark Dial, meanwhile, lets users adjust the screen size, position, and screen ratio with just one touch, thanks to the Flex Move Screen function. Other settings include Multi-View, Quick Settings, and Game Bar which may all be toggled right from the dial.
When it comes to sound experience, the Odyssey Ark also has the Sound Dome Technology which features AI Sound Booster and Dolby Atmos for the best surround sound.
The screen itself has four speakers, one in each corner, and two central woofers. They deliver the best quality via a 60W 2.2.2 channel. It also has the lowest 45Hz notes of any gaming screen or soundbar.
Pricing, availability
The Odyssey Ark is priced at SG$ 4,999. The entire lineup will be available on the Samsung Online Store and major consumer electronics and IT stores.
From September 1 to 11, there will also be a pre-order promo where customers can enjoy free gifts such as a Galaxy Tab S7 FE 5G, 36-month warranty, and free delivery and installation.
Continue Reading
The 10 Coolest Star Wars Computer Case Mods
Image Source
If you’re a little bored with the look of your computer, then perhaps you could take inspiration from the case modding scene. Changing the appearance of your chassis might just make your PC look more appealing, and it can also show your friends and colleagues just how high-spec your machine is to boot.
Case mods may even act as a tribute to another passion, like the works created by the selection of computer-savvy Star Wars enthusiasts featured here. Inspired by the epic franchise, these modders have turned their desktop computers into everything from R2-D2 to the Death Star.
Fans of the franchise will well know George Lucas’ company of droid characters, starships and various other outlandish vehicles, and modders have seen the aesthetic possibilities of these creations as well. This list will hopefully serve as encouragement for anyone looking to transform their PC. Read on to explore a galaxy of invention.
10. 501st Legion Clone Trooper Case
Image Source
Here, some talented tinkerers produced a PC case mod in the shape of a 501st Legion clone trooper helmet.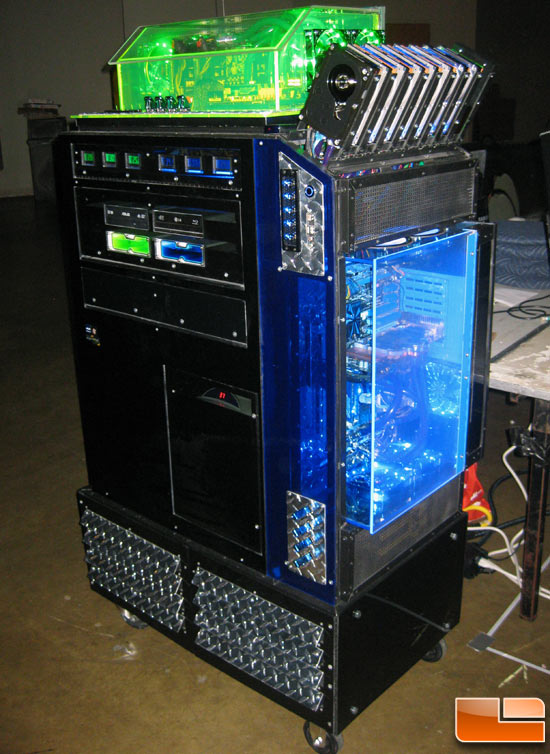 It’s titled “Order 66,” in reference to Emperor Palpatine’s dictate that the galaxy be purged of Jedis in movie prequel Revenge of the Sith. The awesomely realized mod seems to capture every detail of the trooper’s helmet – right down to the battle damage and scuffed paint – thanks to the artistic handiwork of Smooth Creations.
Mods, of course, often require the creator to reinstall the internal components of a computer inside a new, customized case. In this instance, Richard Surroz rebuilt his Dell Alienware Aurora ALX, with specs including an AMD Athlon 64 FX-60 dual core processor and two different water-cooling systems. A particularly nice touch is the laser-etched window in the side of the chassis, which shows the machine’s internal components. Such panels are something that may be fitted by modders as a way of displaying the power of their gear – hardware that in this case glows a brilliant blue.
9. Sandcrawler Case
Image Source
This Sandcrawler was one of the mods showcased at the Rods & Mods: The Kustom Kulture of Radical Computer Modification exhibition at San Francisco’s Exploratorium in 2010.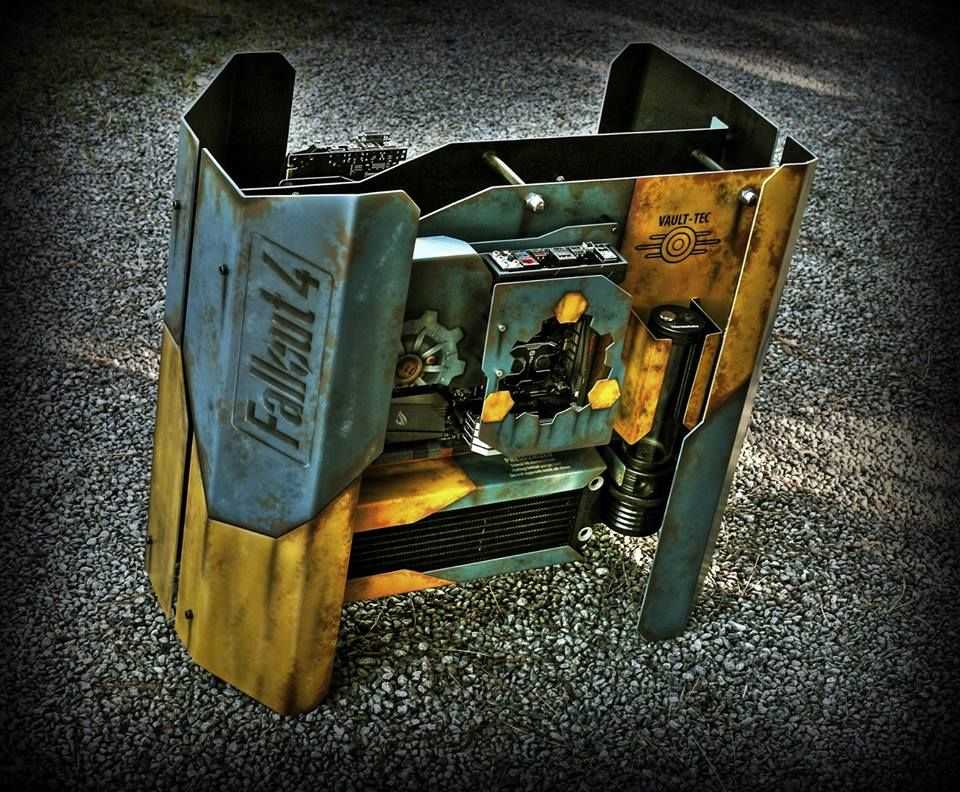 Built from scratch by David Benjamin, the meticulously constructed case houses an AMD Phenom II quad core processor and a solid-state OCZ Vertex 120GB hard drive, while its features include 143 LED lights and a miniature R2-D2 sat in the vehicle’s cockpit.
This is actually Benjamin’s third version of the Sandcrawler case mod, and it owes its own existence to several years of work – as well as the years that went into its maker’s previous builds. Amazingly, this mod is 18 inches tall and more than 36 inches long – roughly the same size as the original movie model. Benjamin, who posts as artoodeeto on the bit-tech.net forums, based his creation on shots and line drawings of the Sandcrawler model used in the films.
8. Republic and Dark Side Cases
Image Source
The dark and light sides of the Star Wars universe are both represented by these clever mods, which were inspired by the 2011 massively multiplayer online role-playing game Star Wars: The Old Republic. The white case mod depicts the helmeted face of a Republic trooper, while the black version shows the corresponding features of a Sith Warrior. The shape of each helmet was created by gluing pieces of cut-out acrylic in place and then filling the spaces between them with expandable foam, before attaching them to Thermaltake Chaser MK-1 (Dark Side) and Armor Revo (Republic) chassis.
The holograms you can see are actually 3D etched crystals lit from underneath. And as well as these and other contrasting decorations – standing for both the Republic and the Dark Side – the mods also incorporate some rather amazing-looking protruding lightsabers made from 12-inch cold-cathode fluorescent lamp tubes.
7. TIE Fighter Desk Case
Image Source
This brilliant TIE fighter desk mod was built by self-proclaimed “die-hard Star Wars fan” David Barry, from Brooklyn, New York City. The desk deservedly won ExtremeTech’s weekly science-fiction case mod competition in June 2005. The plywood wings were the first part to be made, while a cut-out made from the same material inside the cockpit contains all of the computer components, including an Athlon XP 1800+ processor and a FlexATX motherboard.
Barry notes that the cockpit – which glows thanks to red LEDs – was the most difficult part to replicate. After unsuccessfully attempting to create its spherical shape with Bondo filler, Barry finally came up with an unusual solution: he used a Jolly Ball, a play toy for animals. The mod may have taken him four months of work and cost around $300, but we think the result is well worth it.
6. Millennium Falcon Case
Image Source
Lando Calrissian famously described the Millennium Falcon as “the fastest hunk of junk in the galaxy,” but we suspect that a case mod like this won’t necessarily make your computer speedier. Even so, this 2012 creation is mightily impressive looking. The case is built around a 1979 Kenner Millennium Falcon model, which now contains the components of a desktop PC, among them a “low-profile” Intel Core i3-2100T processor.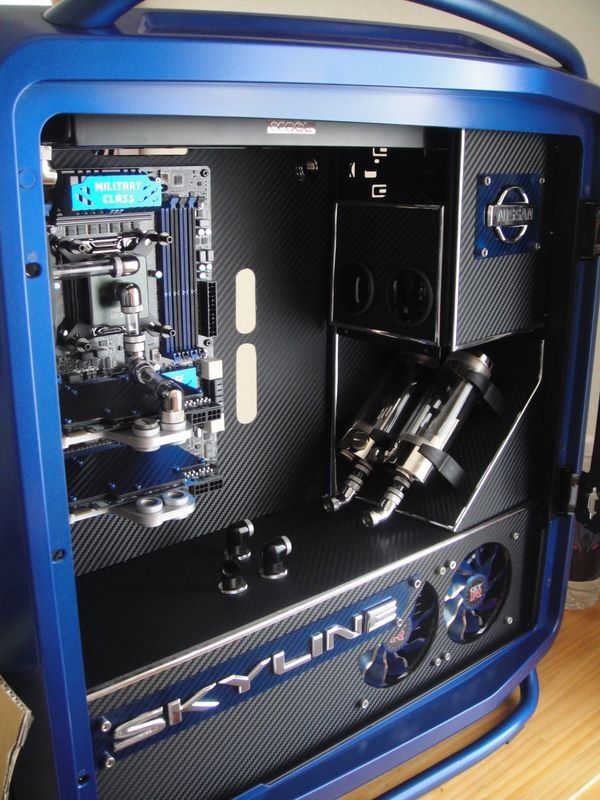
This is an awesome example of repurposing a classic toy in an innovative way – and we’re particularly fond of the glowing blue LEDs used in the fan setup. If you’re tempted to follow in maker Brad Jordan’s footsteps and make your own Millennium Falcon mod to house your CPU and motherboard, then you’re in luck: Jordan detailed the entire 11-step process on DIY website Instructables.com, including all the materials needed.
5. R2-D2 Case
Image Source
R2-D2 may have been unfairly referred to as a “virtual trashcan” by Giant Robot magazine, but this version of the droid is actually based around the use of a real one. Created by modder Frenk Janse, it was built from scratch using a home garbage bin, an old computer case, and various other odds and ends, and it even features speakers in its MDF legs. A webcam “eye” projecting through a hole in the case completes the effect.
Janse noted in 2009 that the mod only cost him around $120 to put together, although his sponsor SpacePromotion gave him crucial parts such as fans with LEDs.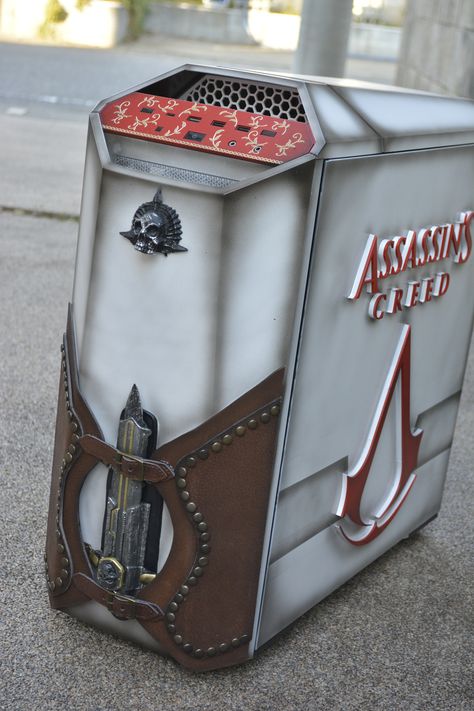 Elsewhere, hardware-wise, an old Pentium 4 2.8 GHz office computer was used. Now, if only this droid could hack into the Death Star’s system like R2 himself.
4. Scout Trooper Helmet Case
Image Source
This design was produced by a modder known as Nada, and in 2011 it won a competition hosted by Dutch website Hardware.info. It’s based around a Corsair Graphite 600T case, and the design showcases a Scout trooper’s helmet. The attention to detail is especially notable – particularly the worn effects, which make it seem as if it’s seen its fair share of battle.
Unfortunately, the design is only a concept and wasn’t created in the real world when it was entered into the competition. If it were put together, the mod might require the use of acrylic, expandable foam or other such materials to model the features of the trooper’s helmet. Hopefully, Nada has since gotten around to realizing his vision with his winnings.
3. Han Solo Carbonite Case
Image Source
Another winner of one of ExtremeTech’s case mod contests, this cool piece of customization picked up the spoils in July 2006. Depicting Han Solo sealed in carbonite, it’s the work of modder Russ Caslis. Although the hardware inside the mod is just spare bits and pieces Caslis “had lying around” such as a 2.4 GHz Pentium 4 processor, the detail on the outside more than compensates.
Laid out on top of a Shuttle Inc. small form factor case, the frozen figure of Solo looks much as he does when this cruel fate befalls him in The Empire Strikes Back. The control panels on the sides of the case feature flashing lights and LEDs and were designed to mimic the appearance of an actual prop used in the films. And with the whole thing painted silver, the overall effect is, well, almost chilling.
Interestingly, the Star Wars movies’ own computer science credentials are impressive – at least according to Commander Kevin Blenkhorn, who took up a graphics role at George Lucas-founded Industrial Light & Magic after serving a decade of active duty with the US Navy. Blenkhorn worked on The Phantom Menace and Revenge of the Sith, explaining that his colleagues “pushed computer science to the max, further than any other company. ” Blenkhorn himself is now an associate chair of the Computer Science Department at the United States Naval Academy.
2. Death Star Case
Image Source
This Death Star mod from 2009 might pay tribute to the infamous Imperial space station-cum-super weapon, but we’d hope, at least, it’s not as potentially destructive. It was created by modder Derek using two Perspex lampshades, which were joined together in the middle to produce one continuous case.
The computer’s hardware includes a water-cooled Intel Extreme quad-core processor and a DFI LANparty motherboard. Hundreds of tiny holes were drilled in the outer surface to allow air and light to escape, after which it was sprayed with glue and glitter – to give it texture – and then painted. A fan was also mounted inside an Imperial logo cut out at the back.
The small Imperial Star Destroyer in the foreground actually acts in part as the computer’s on/off switch: tapping the Rebel blockade runner at its base controls the power supply. And the smaller Destroyer model also features power and hard drive activity lights.
1. AT-AT Walker Case
Image Source
The Imperial AT-AT walker case pictured above is probably the most spectacular-looking mod we’ve seen yet. The assembly was created by Star Wars fan Asphiax and features a shell based around Hasbro’s 2010 Imperial AT-AT walker – a gigantic model around 24 inches tall and 28 inches in length.
This setup uses an Intel Core i7-2600K processor and a Sapphire 6870 graphics card and includes 8GB of RAM. It also incorporates an intricate water-cooling system, plus red LED lights that show off its internal components in the dark. Website CraveOnline describes the AT-AT walker as “one of the coolest mechanical monsters in the entire Star Wars legacy,” and in our opinion, this case mod more than does it justice.
Modding. The art of being different — ITC.ua
The times when a home computer was no different from its office counterpart are over.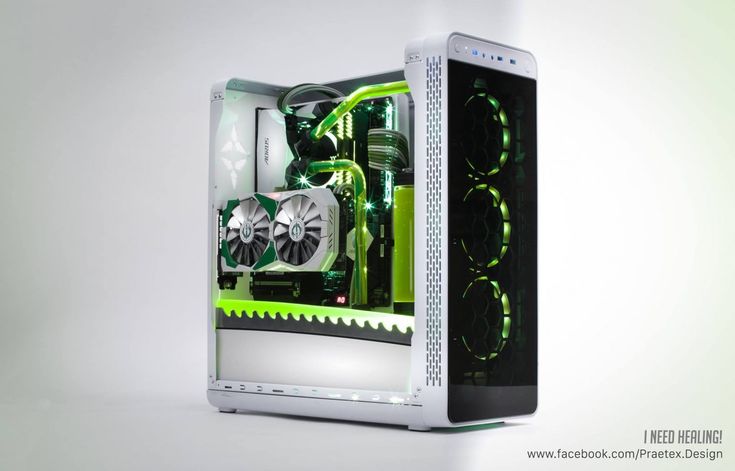 The PC has ceased to be just a working tool — with the right approach to the issue, it also becomes an element of the owner’s image.
Helping
But the image is created primarily by external attributes. And the gray box of the system unit under the table, albeit filled to capacity with the latest components, makes a rather dull impression. In the automotive industry, the concept of tuning has long existed, that is, the technical and aesthetic modification of a serial car to the individual needs of the owner. In the computer world, this phenomenon is called modding.
It is useless to even try to list all possible modifications, their number is almost infinite. The value of modding, like any creative work, lies precisely in the uniqueness of the result.
At the initial stage, enthusiasts were forced to make all the modifications exclusively with their own hands. But, as you know, demand creates supply. The industry responded to the desire of users to give their computer a personal touch, and serial modding products appeared on the market.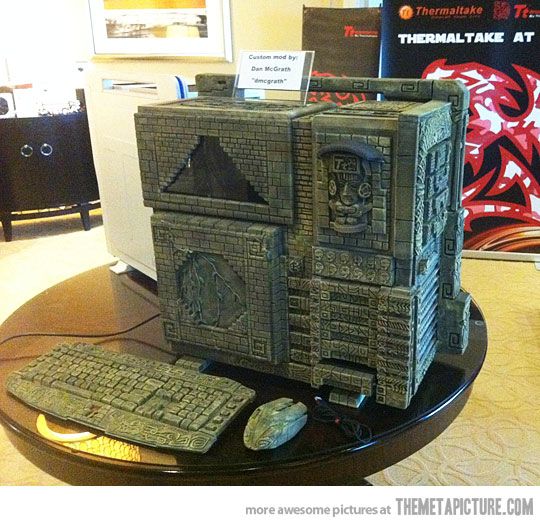 The boom of «designer» accessories, which began in the West two years ago, has reached us. Like car tuning, modding has gone from a hobby of a handful of enthusiasts to a mass hobby, which is another way of self-expression and emphasizing one’s own individuality. Manufacturers are trying to keep up with fashion, and not only mass-produced modder accessories are on sale, but also motherboards and video cards, on the appearance of which designers have worked.
Course
Development in Java
Introduce the popular Java programming language at your best hour, and earn $1000 per cob of career
REGISTER!
Cases deserve special attention. Just a year ago serial models with a window were a rarity, and now dozens of original products are presented even on the Ukrainian market. Today, the modding industry allows users to transform their computer, and now this does not require the skills of a painter, carpenter or electronics engineer, because the market offers a full range of devices and accessories for the system unit.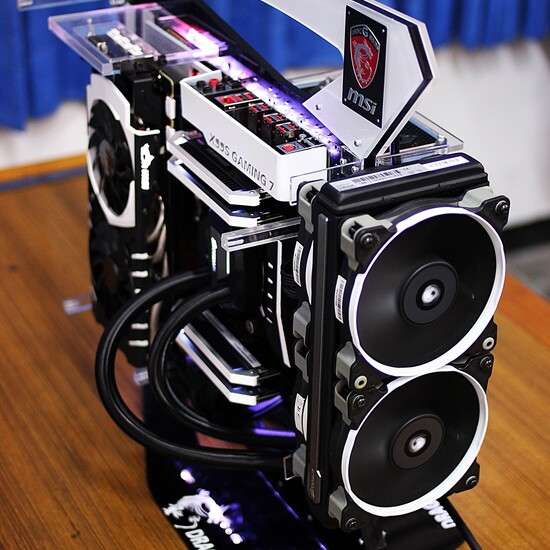 Most importantly, most of these products have quite democratic prices.
Of course, modding as an activity for enthusiasts has not exhausted itself. However, in conditions when everyone can effectively decorate the system unit with serial accessories, only real craftsmen are engaged in the manufacture of exclusive cases. High-tech materials are used, industrial methods and factory equipment are used. Many projects are developed from scratch, without using a serial case as a basis. As a result, masterpieces of contemporary art are born — the objects of lengthy discussions on specialized sites and forums.
Modding became widespread in the CIS somewhat later than in the West. But today we have formed a large enough community of professional modders to talk about the mass nature of this hobby. At the «New Year’s Computer Fair Intel and Samsung» held in Kyiv on December 19-21, the first modding contest in Ukraine was held, organized by «Home PC» with the support of Intel, Sam-sung and Eletek.
18 projects are presented in the «Most Fashionable PC of Ukraine» contest — it seems to be not so many, but among the participants there are almost the entire modding elite of the CIS, the most honored and respected masters of their craft. Ten finalists arrived at the Kyiv Palace of Sports with their works in order to demonstrate them to the visitors of the fair and the jury of the competition. Many of the modders who made it to the final are residents of other cities, moreover, three participants came from Moscow, and one from Izhevsk! The original exhibit was brought from Dnepropetrovsk by Valeriy Petrichenko, a representative of the UltraStyle studio (ultra-style.dp.ua), a Samsung monitor artistically painted with an airbrush. It is worth noting that monitor modding is much rarer than case modification. Two employees of Home PC, Kirill Balalin and Murat Prokopov, better known in the modding society as ALT-F13 and La1kr0diZ, the creators of the oldest Russian-language site about modding — www.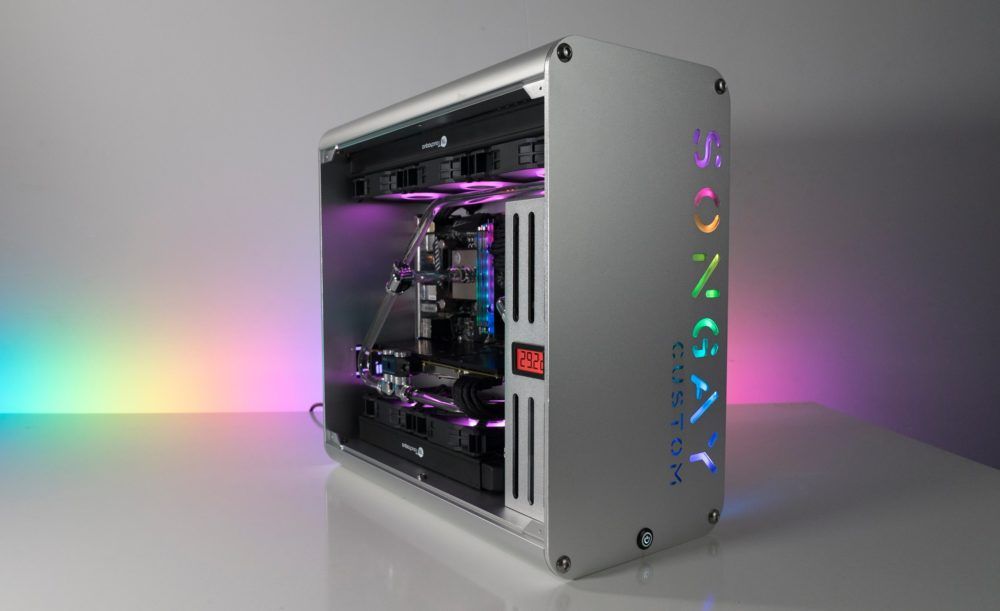 ModLabs.net, also reached the final of the competition.
Computers were placed on the main show floor of the fair, and all three days visitors could contemplate the original system blocks created by Ukrainian and Russian modding masters. During this time, the jury, consisting of the editors of «Home PC» and representatives of Intel, Samsung and Eletek, made the final verdict on who will receive the main prizes of the competition — an Intel Pentium 4 Extreme Edition processor with a frequency of 3.20 GHz and support for Hyper-Threading technology and LCD-monitor Samsung 172S. Of course, any of the finalist works deserves high appreciation and appropriate remuneration, so not a single participant left without a prize — in addition to two super prizes, eight more incentive ones were provided.
Aleksey Chistov was declared the winner of the contest for the Fallout Mod: A Post Nuclear Case project. The system unit, designed in the style of the game of the same name, won recognition due to the thoughtfulness of the concept and the author’s special attention to detail. The second place went to Murat Prokopov for two original works — LEGO Drag in the form of a car model from LEGO parts and Project Rufortina «upholstered» in fur. The rest of the places were very difficult to distribute among such different projects, so the participants were simply called to the stage for awards in random order. The prizes received by the finalists are indicated in the description of the projects on the next page.
We found a behind-the-scenes demonstration of a unique set of water-cooled heat exchangers made by ModLabs.net team craftsman David Khachatryan (aka Ver-Volf) as an interesting magazine-worthy moment. We were presented with a handmade chest, which contained five copper water blocks of an unusual design. These devices, covered with real gold and silver, decorated with engraving and luminous in ultraviolet, made a lasting impression on everyone. Even such a utilitarian thing as a heat exchanger, it turns out, can become a real work of art!
According to the contestants and observers themselves, the competition «The most fashionable PC in Ukraine» brought a lot of benefits to the development of the modding movement in Ukraine and the CIS countries. The participants, who came from different cities, were able to see the work of their comrades in reality and personally communicate with people whom they had known for a long time through online forums. And ten wonderful projects, standing in the center of the exhibition, gave an opportunity to all visitors to learn about what modding is, and see «live» examples of «the most fashionable computers». We dare to hope that our readers are also interested in the subject. Who knows, maybe your masterpiece will win the next contest? And we will return more than once on the pages of «DPK» to the topic of modding.
Fallout Mod: A Post Nuclear Case
| The side panel of the Fallout case is reminiscent of the entrance to the Fallout hideout. Quality art painting completes the look of |
Post-nuclear symbolism is present on the case from all sides. Even the window in the power supply is lit up with a red radiation sign. The author did a good job bringing his creation to full compliance with the chosen style Even the window in the power supply is lit up with a red radiation sign. The author did a good job bringing his creation to full compliance with the chosen style |
Author Aleksey «Be’Wise» Chistov
City of Moscow
Prize Intel Pentium 4 Extreme Edition 3.20 GHz
Playing my favorite Fallout game again, I felt: this world is so close to me that I want to see it all time. Thus the idea of Fallout Mod: A Post Nuclear Case was born. I still had no idea how this project should look like at the end (and, perhaps, I couldn’t — I had practically no experience), but I knew exactly what I wanted. And I wanted, as the name implies, a corps from the time of the «post-nuclear Renaissance» — a period of revival of culture and technology from the ashes of a nuclear war. I wanted from «nothing» to create an object of admiration. At that time, I only had a case, which was at the very beginning of modding experiments — and now work on the first project began.
At first, the power supply housing went into consumption. With the help of a dremel, windows were cut out in it, acrylic panels and red LED lighting were installed. After practicing on the power supply, I proceeded to cut through the window in the side panel of the case. Pictures of the post-nuclear world were born in my imagination: desert plains flooded with a burning sun, nuclear shelters that brought up several generations of people who had never seen this sun — but it was time to open the doors and meet their fate … The logical conclusion was the idea to make a window in the form of an entrance in the shelter, it took two days to implement it.
Right after that I cut through the window in the top bar as well. His form is a bomb with a nuclear warhead that created this new world. As the beginning of «everything» and «nothing» at the same time, she was worthy to be at the top of the corps.
Next, there was a need for some kind of «control panel». After three days of working with a soldering iron, I finished a four-channel device with several switches. Installing the LCD text display was a no-brainer. I needed a cable from an old printer, a soldering iron, and one of the many manuals that can be found on the web.
All that was left to do to complete the project was a few extra touches. I installed the legs and wheels on the bottom. On the one hand, I wanted to highlight the bottom, on the other hand, to facilitate the transportation of the hull. The ignition lock instead of the Power button looks spectacular and saves unauthorized intrusions into my nuclear shelter, and Coca-Cola corks (if anyone does not know) are money substitutes in the world of Fallout.
The gray color of the hull did not fit into the «sun-drenched desert plains» in any way, reminiscent rather of the «nuclear winter». I wanted art painting. This idea was brought to life by an excellent artist, known by the nickname Spider, to whom I am very grateful both for a piece of his soul invested in my body and for a wonderful drawing. The last step was to install a new backlight.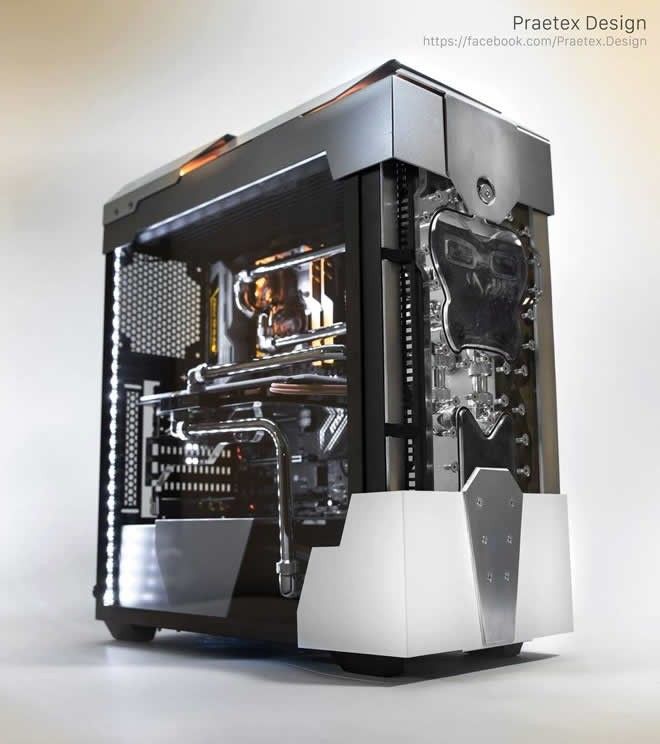 Having finally assembled the project, I realized that I had done exactly what I wanted, I had realized my dream, putting all of myself into this work.
| Comment
This work showed the greatest interest among the visitors of the New Year’s Computer Fair Intel and Samsung. In October 2003, she received the Audience Choice Award at the first modding exhibition in Russia. |
LEGO Drag and Rufortina
| Fur-covered Projekt Rufortina looks complete thanks to the author’s attention to detail. Engraving flaunts on the transparent side of the case, and a small plush sheep sits inside. The whole body resembles a large soft toy |
Author Murat «La1kr0diZ» Prokopov
City of Kyiv
Prize Monitor Samsung 172S
The idea to assemble a case from LEGO was born quite a long time ago, but there was no time and enough elements of the designer. The Home PC competition pushed me to put this idea into practice. The first and, in fact, the main problem was the lack of parts. For a week I called friends, finding out if anyone had a couple of boxes left from childhood. At that time, I did not even suspect that I could find incredible supplies from my little brother! I told him about the idea of the project, and we decided to assemble a system unit together, adding the material I had taken from my friends. However, the LEGO case itself, oddly enough, is not the most original thing. In world practice, there are dozens of various computer-houses built from this wonderful designer. Naturally, I wanted to implement some fresh idea. Since modding is ideologically strongly connected with car tuning, I decided to make a car. It took about 8 hours to assemble the unit. I wanted the result to look exactly like a car, and not like a pile of wheels, so I had to remember my childhood and assemble a car with a normal suspension and steering. My 11-year-old brother actively helped me with this.
Another competition entry — fluffy body Rufortina — was made more than a year ago together with my girlfriend (part-time «muse»). It was originally a white «full size» Chieftec. Such a case is very popular among modders, and therefore it is rather difficult to create something unusual with it. Most of the ideas that first came to my mind have already been implemented on this chassis more than once. At that moment, I liked large cases, and even the largest Chieftec I decided to visually increase a little more. Long synthetic fur fit just perfect — the body has grown just before our eyes. My friend made patterns and cut out the details, and I, using wide double-sided tape and glue, «dressed» the body in furs. Naturally, the dremel was not without work: neat holes were formed on the side, rear and front panels — a window, air intakes and an acrylic wall for a reservoir of a water cooling system. With the help of an engraving nozzle, I drew a girl’s face on acrylic. For the front, legs and side handle of the case, short-haired blue fur was used, since these parts are often in motion and access to them must be convenient.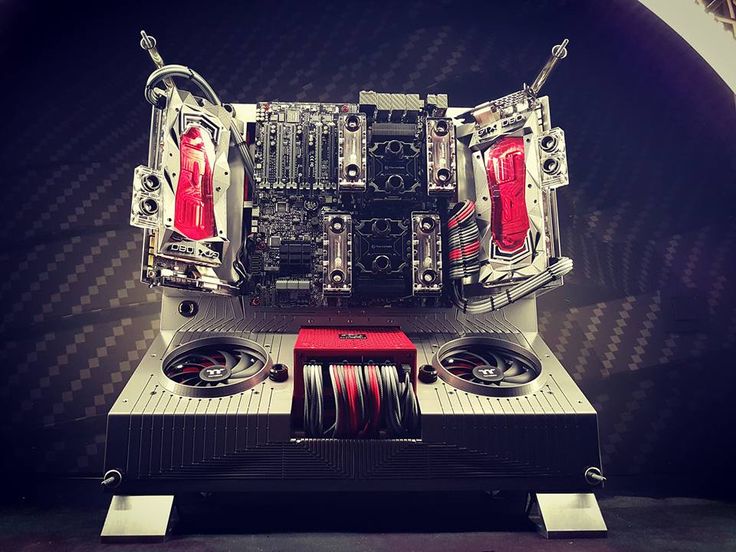 Naturally, all devices were also covered in blue fur. During the year of operation, the hull practically did not lose its presentable appearance, and to participate in the exhibition, it only had to be combed.
| Comment
Projekt Rufortina has taken part in four modding competitions during the year of its existence, winning prizes in each. All works are performed without the use of industrial technologies. |
Wood PC
Author Andrey Prokopchuk
Kyiv city
Zalman ZM400AAPF Prize
The computer has become such a familiar and necessary thing that it is perceived almost like furniture. So why not make it so that it fits into the overall atmosphere of the apartment?
For my system unit, I used the following materials: an inexpensive nameless case, pine board and planks, 7mm plywood, clear varnish. All holes were made with a mechanical drill and a jigsaw, the air intake hole is cut in the form of a paw of a beloved dog. The Power button is handcrafted from a double-sided ground lens with a built-in Power LED. Blue diodes are used as Power and HDD indicators. The 3.5″ drive is missing — I got rid of it when I discovered that I had only used it twice in three years. The Pioneer CD-ROM with direct disk loading (these are used in cars) came in very handy, on which the front panel was replaced Finally, to match the updated computer, I made a compact wooden table.0003
Kusabi
Author Alexander «Kolesy» Kolesnikov
City of Moscow
Prize Intel Pentium 4 3 GHz
Once it was an ordinary Chieftec DA01-BD case. Over time, I cut out a figured window in it and made an engraving in the form of a cobweb on the plexiglass. The transparent legs were then made from 20 mm Plexiglas. On the front panel, I removed everything superfluous (those who saw the Chieftec of this series will understand what exactly), installed windows from transparent plexiglass 2 mm thick with engraving and cut frames in the same style as the window on the side panel.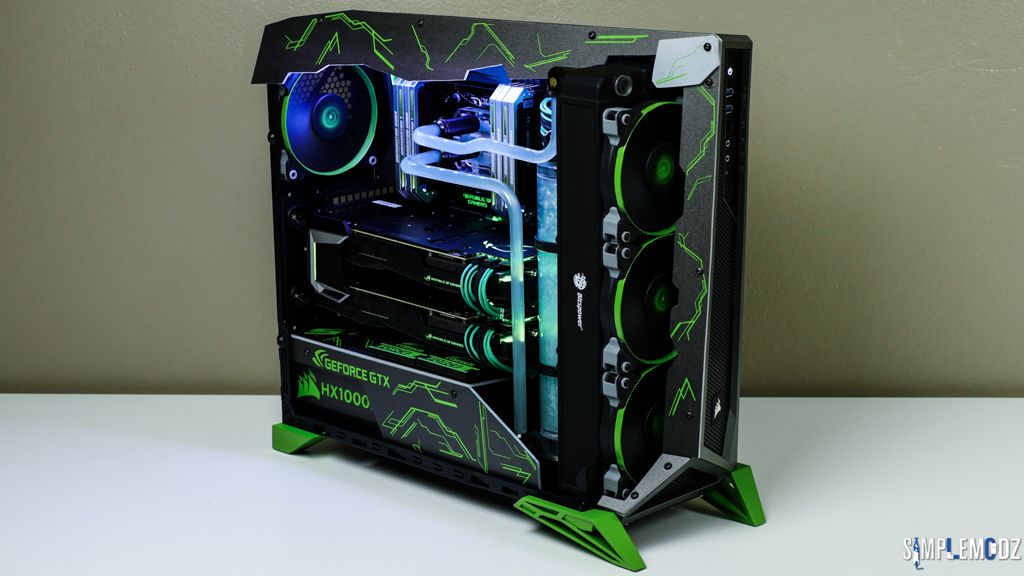 In addition, a panel under the PSU was made of plexiglass — again, with engraving. The power button is machined from aluminum. Installed Cooler-Master Muske-teer, Enermax A5 control panel, 3 blue LED fans, 2 blue round cathode fans and UV lamps — two 30 cm (illumination of the inside of the case) and two 10 cm (illumination of the engraved web on the front panel) ). Power LED has been changed to blue, HDD LED to UV. Round plumes were also used, glowing blue in ultraviolet light.
UltraStyle
Author Valeriy Petrichenko
City of Dnepropetrovsk
Prize Samsung 160 GB hard drive
Most modders try to give their system units a unique personality, but monitors tend to be ignored. But we look at them more often than at the body, so I decided to decorate my Samsung SyncMaster 765MB. A cloudy sky was depicted on the sides and top, and the front panel was decorated in a technogenic style. To apply the picture, the monitor had to be completely disassembled. This turned out to be not too difficult, except that the ground wire did not allow to disconnect, and subsequently return the board with buttons to its place.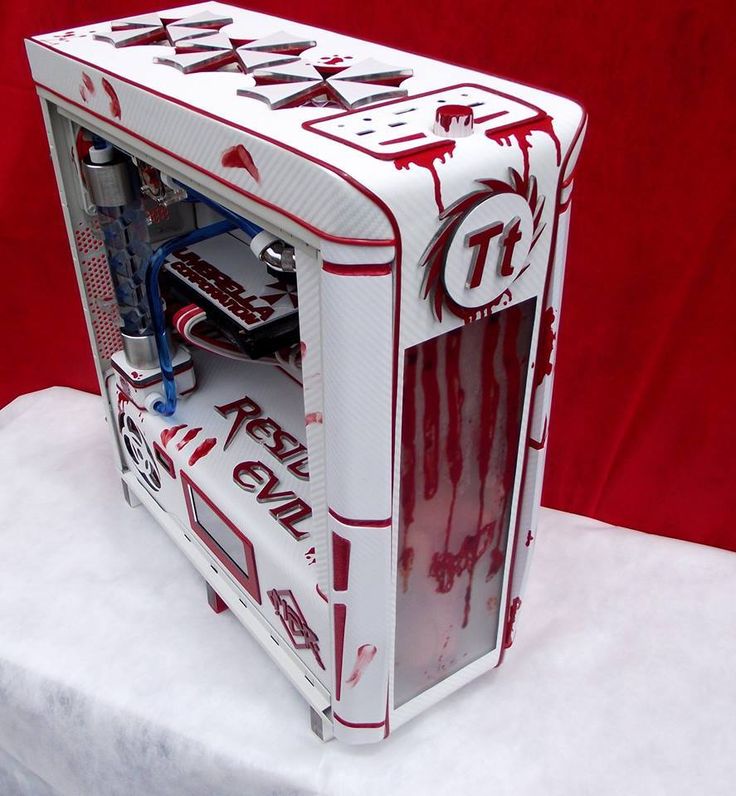 The plastic parts were then airbrushed, using automotive paint for best results. The whole work took a week, despite the fact that it was carried out very slowly. The author is a student of the 6th year of the Faculty of Architecture of the Construction Academy of the city of Dnepropetrovsk. He has been interested in airbrushing for three years.
Dragon Tower
Author Oleksandr «Dukem» Okseyuk
Kyiv city
Prize Samsung 120 GB hard drive
I wanted something stylish as opposed to the bright Christmas trees of traditional modding projects. After I saw Projekt Rufortina from www.modlabs.net, I got the idea to cover the system unit with velvet. Based on the Chieftec DX-01GND. Since the case is of the tower type and from the Dragon series, the project was called Dragon Tower. The system unit is designed in green, black and silver colors. «Upholstered» with dark green German velvet, and in too difficult places simply painted with black acrylic paint. The door is pasted over with a dark green tinted film.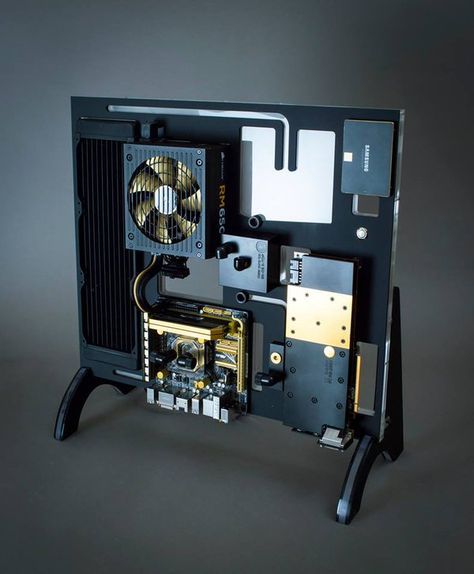 A silver wire is inserted into the grooves. The front panels of the CD/DVD drives are painted with black acrylic paint (the tray and button are white for contrast). The front panel has USB and FireWire ports. The inside of the case is treated with material from the AcoustiPack Deluxe kit, and a lot of effort has been put into making the noise level from the computer as low as possible.
Phaseshifter.Two
Author Kirill «ALTF13» Balalin
Kyiv City
Prize Case Lian Li PC70
The concept underlying the Phaseshifter has not yet been seen even in the West. In fact, this is the only system in the world that combines extreme performance with stylish looks, a record-breaking PC that is not ashamed to show at the exhibition. Based on the Asetek VapoChill XE cooling system in the original case. I wanted to show the richest equipment and the refrigeration unit as much as possible, so the side and top panels were replaced with similar acrylic ones, made by laser cutting and engraving. Instead of conventional fans, red illuminated Akasa are installed, including water-cooled Ko-olance EXOS on the «roof». The design used accessories from SunBeam and LCD-display L.I.S. The processor is cooled by Vapochill, the video card and the northbridge are cooled by separate water cooling systems. The computer is used as a benchmarking system by the ITC.ua/ModLabs.net team, it was on it that the record result was shown — 27384 points in 3DMark.
AIII Project
Author Eduard «DjEvis» Solovyov
City of Izhevsk
Prize 1 GB of GeiL RAM
More than a year has passed since the beginning of work on the project, and it has been constantly improved, in connection with which a huge number of modifications have arisen. Here’s a short list: snow white paint with varnish, side windows on both sides, top plane window with 120mm air inlet, window tinting, vertically mounted hard drive with window and backlight, window and backlight in DVD-ROM, image Lara Croft on the side, frosted acrylic inserts in the front panel, 80mm hole in the bottom front, built-in LCD text display in the door, homemade four-channel remote control, all LEDs replaced with ultra-bright blue, carrying handles, homemade LED lighting plus neon Thermaltake lamps, modified mounting of rear case fans on the chassis, modified Zalman CPU cooler, foam insulation, modified power supply unit with the ModLabs.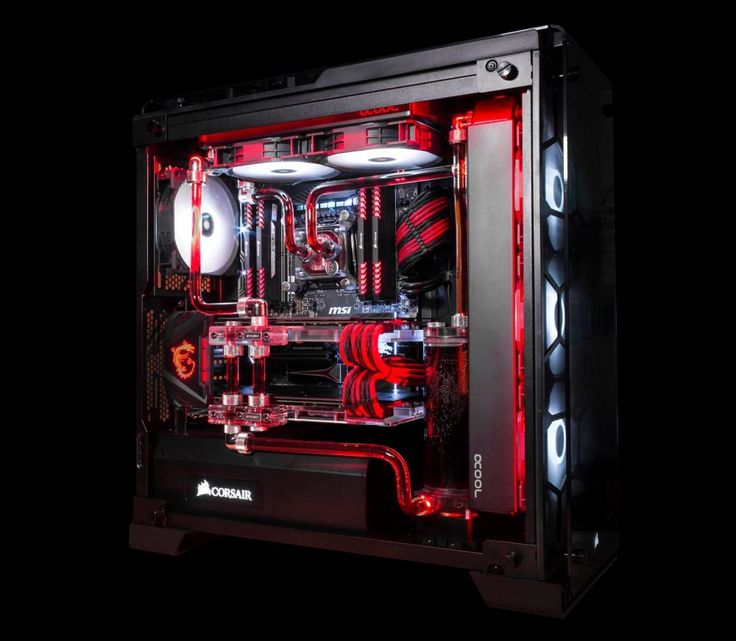 net logo.
Space Water
Author Sergei «Saddamka» Gridz
City of Moscow
Prize Water Cooling Aucma Coolriver
The main idea of the case is expressed in its name — the combination of space style with a «water» window. The upper figured window with a hole for an 80 mm fan in the center is traditional, made of acrylic. But the side, also of complex shape, is a real aquarium two centimeters thick. A tube is laid along the bottom, through which air bubbles pumped by an air pump enter the water. This enhances the illusion that the entire body is filled with water, which occurs at any angle. A round protrusion in the contour of the window hides a fan under the grate, which greatly complicates the shape of the aquarium. The artistic painting of the hull in the «space» style with the image of the planets was carried out by a Moscow airbrush artist, known in modding circles as Pauk, who also worked on the Fallout Mod project. A hard drive with a slotted window and blue LED backlight is installed inside the case.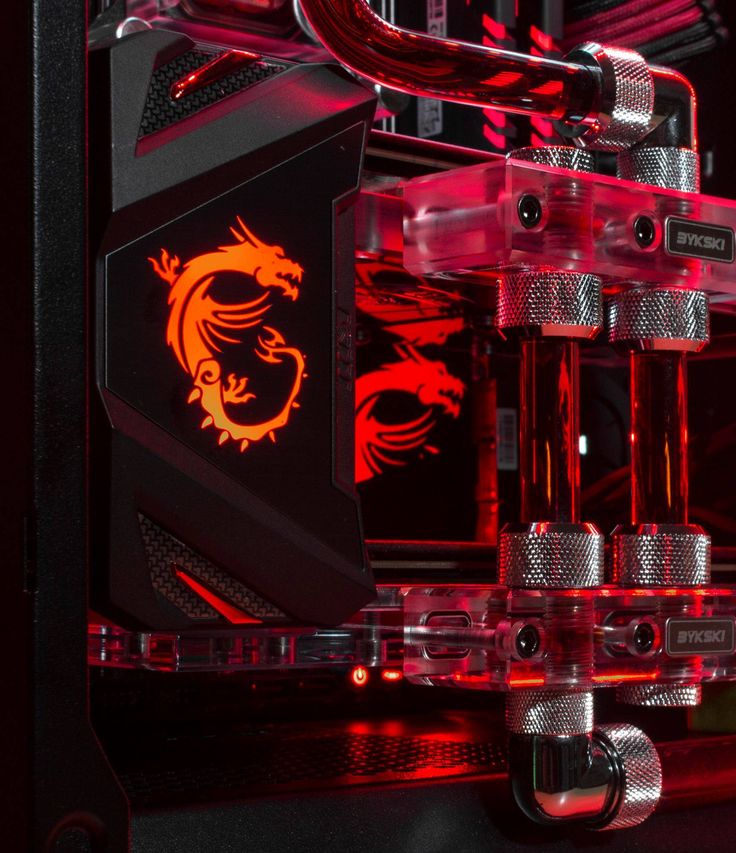
P4
Author Aleksey Lyushakov
Lvov city
Prize Intel D875PBZ motherboard based on Intel i875P
The idea behind this project is quite common in modding — to use a very cheap and initially unpresentable case to turn it into a «candy» . For the P4, one of the cheapest JNC case models was taken. Two triangular windows are cut into the side panel with the original riveted acrylic panels. There are carrying handles on the top. The case is painted and varnished with «automotive» quality, the chosen color scheme is Intel’s corporate colors. Most of the body modifications fit into the concept of «modding classics», but each of them is made with great care. Considering this project, you remember the tale of the ugly duckling: with a very modest base case and a traditional set of modifications, P4, thanks to the high-quality work of the author of the project, can be called a «platform for a serious PC» with confidence. So, the task was completed by 100%.
| Related links
www. forum.modlabs.net is a popular place for CIS modders to communicate www.itc.ua/modding — official page of the competition «The most fashionable PC of Ukraine» www.modding.ru — portal for modders from Russia www.eletek.com.ua — website of Eletek company specializing in modding and overclocking products www.coolcasegallery.net — the most representative gallery of modified cases, a project of the Virtual Hideout website www.virtual-hideout.net is the site that started the rapid development of modding in 2000. Somewhat deviated from the original theme, but remains a cult www.bit-tech.net, www.moddin.net, www.modthebox.com — the most popular and authoritative English-language modding sites www.metku.net — site of a Finnish modding enthusiast who has been publishing very original manuals for several years www. |
 ModLabs.net — the largest and oldest Russian-language site for computer enthusiasts, including professional modders
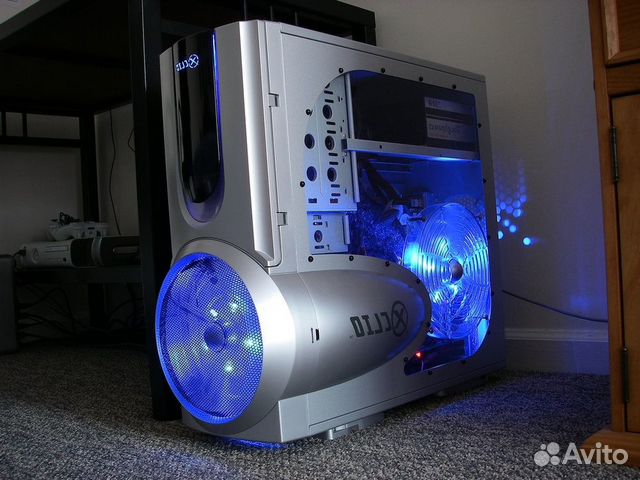 silentpcreview.com is a site entirely dedicated to silent computers and how to make them so. Representatives of «utilitarian» modding.
 What is computer modding and how is it improved
When did computer modding appear and what was it like
The concept of modding first appeared in 1226 BC in Egypt. People carried out various modifications of pyramids, statues, sarcophagi.
In fact, anything can be modified. Ranging from buildings to small household appliances. Computer modding is well established and popular nowadays. Everyone wants to create a unique design for themselves.
The word modding, as you know, came to us from America. But who exactly invented it is unknown. There is an opinion that it appeared from two words modern — modern and modify — modification or modification.
No one knows who coined the word, yet people know that it denotes some improvement in the qualities of certain physical objects.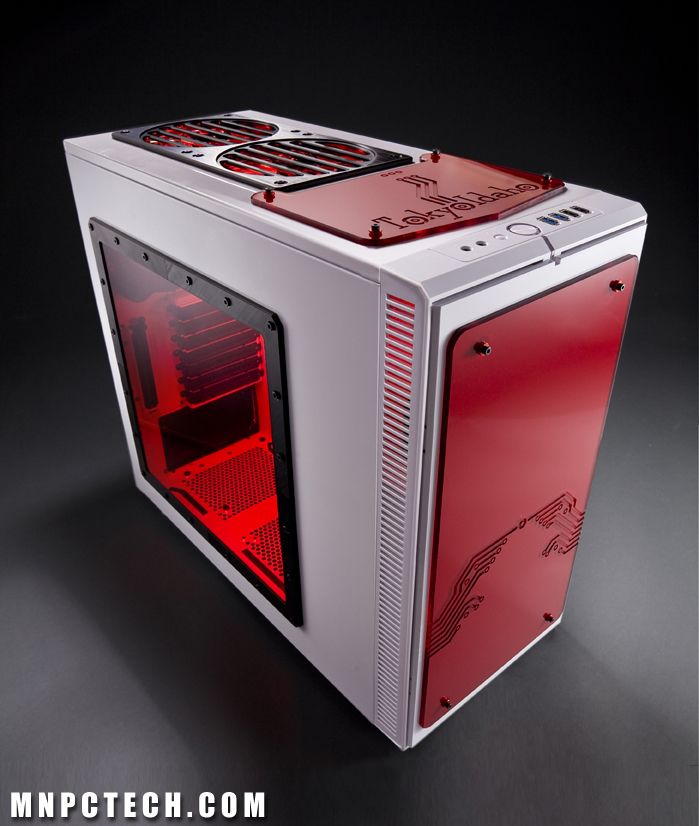 Simply put, the word modding can be applied to any thing that exists on our planet — something that can be modified.
Computer modding is almost the same as car tuning. A PC can be “pumped” both independently with the availability of equipment and components, and with the help of specialized services that provide PC modding services.
What is modded in a computer
From the above, any component of a computer or laptop can be modded. For example, keyboard, mouse, monitor. But this is mostly consumable, so no one will upgrade the same mouse.
On a laptop, you can improve the case, but the most common occurrence in modding is the modification of a desktop computer case.
A finished case, but subject to improvement, is called a casemod, or simply a mod. If the case of the system unit was made from scratch according to a unique scheme, then it will be a «custom case», in other words, a custom-made case. If modifications are made to small devices such as mice, keyboards or monitors, then this process will simply be called a mod.
Tools and materials
The choice of materials and tools for PC modding depends on the style and type of work performed. For the simplest and most affordable modifications of , which are painting, drawing and pasting, you need to buy powder paint and a brush or film for pasting and scissors.
Beginners use Stencils to create designs. If you have experience, you can use airbrush .
At least a hand drill and a file are required for body modifications. Advanced craftsmen use an electric jigsaw and drill, engraver, riveter.
Modding with a stencil
Why do we need computer modding and what are the directions
The need for PC modding arises for many creative people who want to do something original, different from others. But it’s not just about the appearance, where a simple white box can be turned into a cool and spectacular case, similar to a gaming one.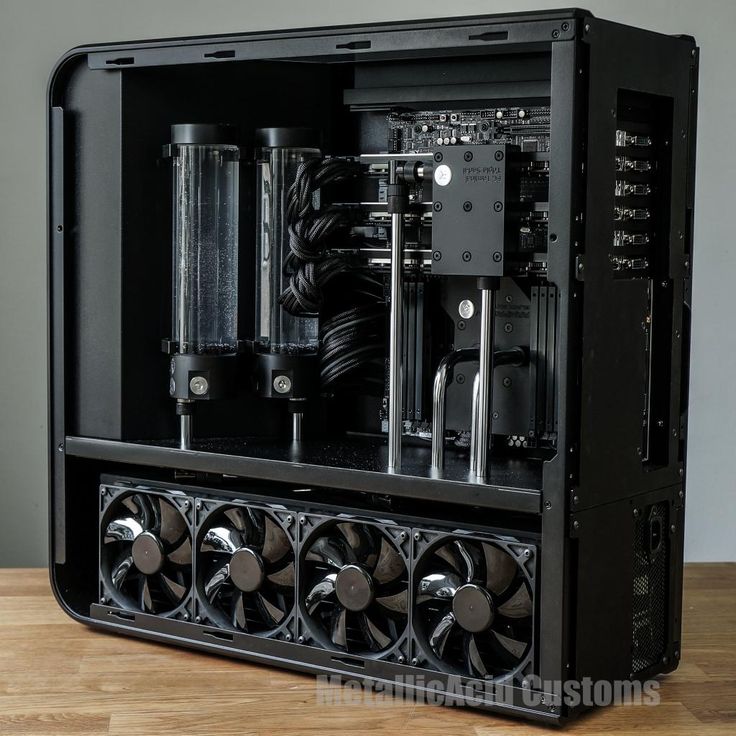
In addition to the appearance, modding includes changing or obtaining new technical characteristics:
- Efficient case cooling;
- Performance improvement;
- Noise reduction;
- Simplify portability;
- Implementation of new functionality.
As for performance improvement, overclocking (overclocking) of the processor, video card or RAM is also part of the modding. If the goal is to reduce noise, then the reverse operation can be carried out — downclocking, which means reducing the clock frequency of the component, which in turn reduces overheating.
In appearance, modding a computer, and specifically the system unit, can be very diverse. All components of the computer can be brought to a common appearance — the system unit, monitor, mouse and keyboard.
There are the following directions of PC modding:
- Post-apocalyptic is quite an interesting improvement. The appearance of the body changes completely, for example, it can be as if rusty, with various emblems.
 On the case, windows with gratings built into them can also be cut out. Just look at the example.
- Steampunk — Rarely used today. The computer can be improved using leather, wood, brass elements. Models of tubes or gears can be used.
- Hi-tech is a fairly common type of modding, when a computer is transformed into an ultra-modern look, like in films about the distant future.
In addition, there are many other areas where the stylization is based on a musical group, firm, game, book. Purposefully, the body can be made like a pile of rubbish, which is typical of the ghetto style.
But even more often they use technical, embedding and HTPC style, where the addition of new components, the creation of a silent system unit, an increase in performance, and an improvement in cooling predominate.
Modernization of a finished computer or to order is carried out by various computer companies.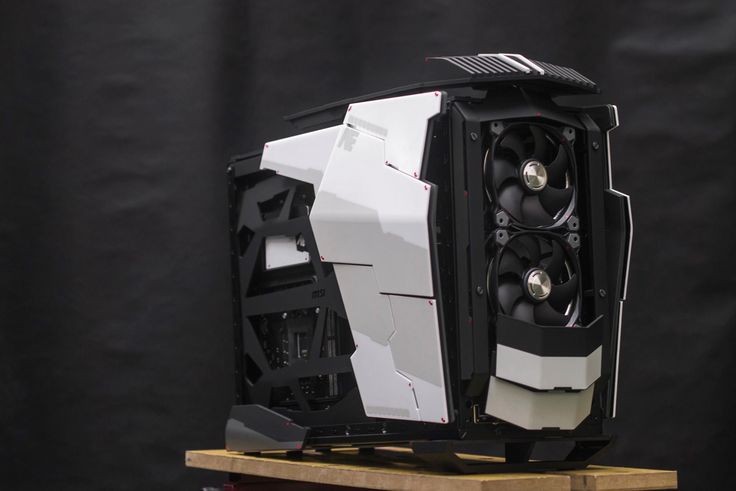 You can find it on the Internet.
Modding of computer components
(click on the picture to enlarge)
As a result, the concept of modding motherboards, modding RAM and video cards appears.
This inspires modders to modify motherboards, RAM and video cards. Everything you read up to these lines was written back in 2011. Now it’s 2013, it’s been a long time. New models of components have come out, a lot of water has flowed under the bridge, and now you can understand what the manufacturers have succeeded in, what modding of components it is. Motherboard modding. Asus Sabertooth Z77 is released, this board has a decorative overlay that covers most of the MB.
There are no more models with a single overlay, but the modding of individual elements on the MB «bloomed» rapidly. Basically, the modding of elements is expressed in the creation of original radiators (of an unusual shape and color) installed on the MB. The following examples show the most interesting points.
2013_04_04 MSI Launches Gaming Motherboard Lineup 2013_05_02 Gigabyte G1.Sniper 5 and G1.Sniper M5 Motherboards: Focusing on Sound 2013_06_05 Computex 2013. Day two. ASUS, Thermaltake and ADATA 2013_07_10 MSI Z87 MPower MAX 9 motherboard review and testing_14 Zotac gilded the «divine» version of the GeForce GTX 760 2013_10_07 The story of how the GeForce GTX 690 and Titan appeared 2013_12_28 The video card ASUS GeForce GTX 760 «MARS760-4GD5 » RAM modding was spotted in Japanese retail. It consists in installing unusual heatsinks on the modules
2013_05_28 ADATA offers XPG V2 series memory modules Sound card modding. For a long time the sound card looked like a rectangle made of textolite with chips. Very interesting externally video cards are being produced now.
You can and should discuss the note here.
Mobbing
Mobbing is a fundamentally different direction of modding, so to speak, an offshoot.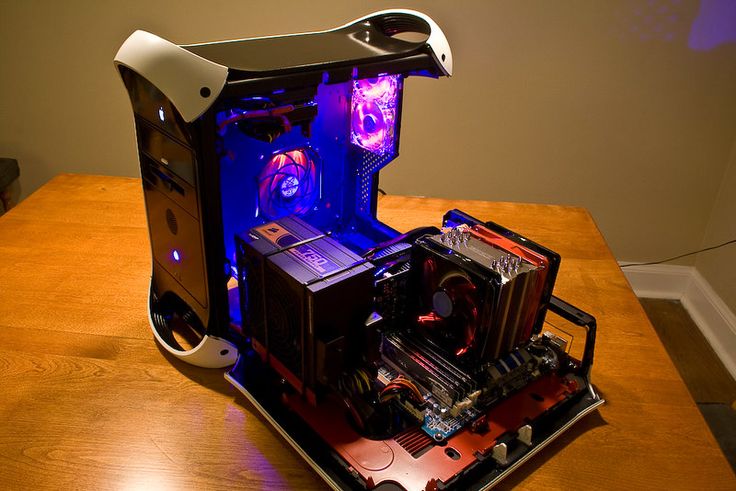 Mobbing is the same, but the victim here is not a computer, but a mobile phone. The scope for imagination here is also huge! This direction is quite new, but has already gained popularity. So far, mobbing is a banal replacement of a panel, a screen, airbrushing, acrylic painting, gluing rhinestones. You can do mobbing more serious and deep — this is the combination of a flashlight, router, alarm and other devices with a mobile phone. But the most common deed done to a phone is painting the case or access panel in a bodyshop.
An example of mobbing
Since you can’t surprise anyone with a mobile phone like ten years ago, therefore a person’s desire to be different from others is expressed in exclusive actions with his phone. Naturally, modding and mobbing differ from each other not only in methods, but also in prices. However, they prefer to do mobbing on cheap phone models. Trying the power of art on expensive models is not enough for anyone to think of. Mobbing can also develop independently, since everyone is quite capable of simply repainting their mobile phone (naturally, by removing the panel and painting it), or simply paint it.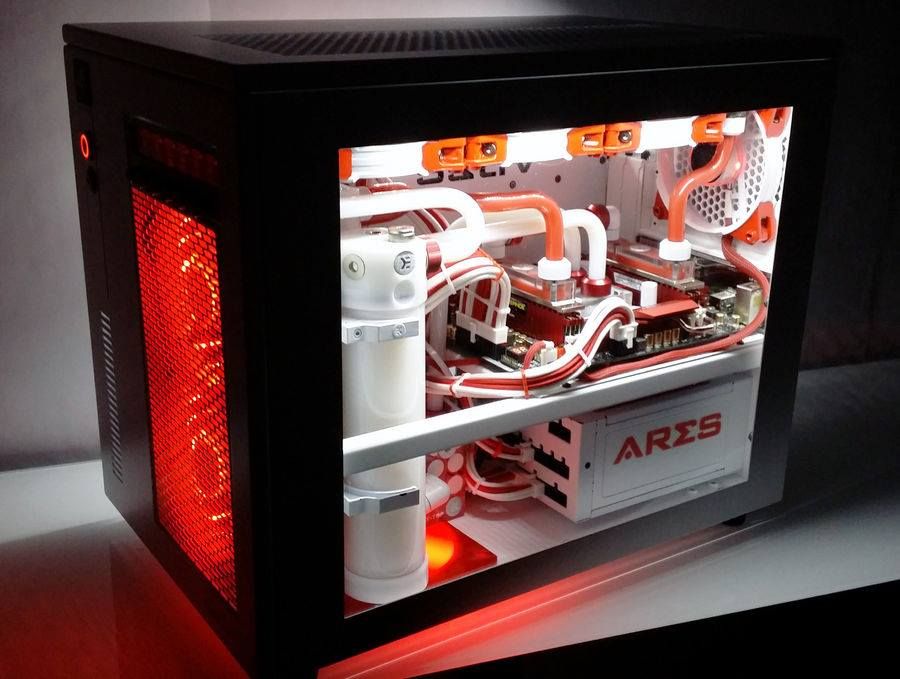
Summing up, I would like to say that the revolution in the modding industry is not expected. The emergence of truly original solutions will happen all the time, and the production of modding materials will function as long as modding itself exists as a direction. But there are fewer and fewer real masters of their craft, since with the advent of modding materials on the market, every schoolchild who is more or less enlightened in the field of computer can create his own unique modding. They call themselves modders. However, a real modder never resorts to the use of factory products — he makes everything himself!
In the West, the modding trend is very developed. This is because it does not require large investments. But in the CIS countries, things are much worse with this, because young people who are fond of modding do not have the opportunity to pay a tidy sum for upgrading their computer. In addition, if in big cities you can find everything or almost everything you need for decent modding, then in small cities you can only dream of it!
Coolest Half-Life 9 style modding project0063 But anyway, modding is alive! And will live! Let the scale of this life be small, but the projects are unique!
==============================================
MetalFish S3
is the smallest, lightest, cheapest case of all presented here.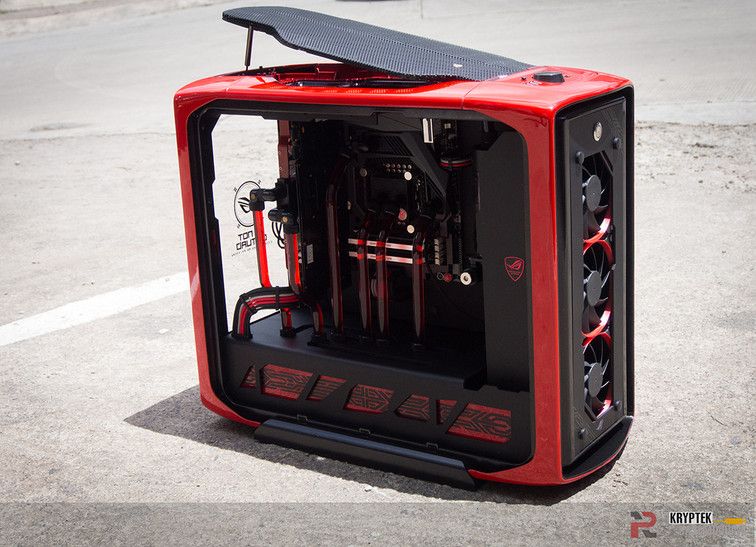 Fits in any average backpack. Its volume is just over 5 liters. Only low-profile coolers like Noctua NH-L9 and graphics cards up to 195mm long (maximum RTX2070). This case will no longer fit SFX power supplies, only 1U / FLEX, but what quality they are is an open question, since they are even smaller than SFX. By the way, when I first came across this small case, at first I thought it was a power supply.
Video:
(assembly)
Seller photo
Photo from reviews
Dimensions
-25x20x10.5cm
Building Material-Aluminum 1.5-2mm
up to 195mm
Cooler height
— up to 40mm
PCI-E riser
— needed
Motherboard dimensions
— up to 17x17cm (ITX)
Number of ports 9470063-1
Form-factor of power blocks
-1U / flex
Water cooling
—
Corps Fans
-1 pcs upstairs 9063 Vecks 笙 一 一 一 苏州 苏州 苏州 苏州 苏州 苏州 苏州 苏州 苏州 苏州 苏州 苏州 苏州 苏州 苏州 苏州 苏州 苏州 苏州 苏州 苏州 苏州 苏州 苏州 苏州 苏州 苏州 苏州 苏州 苏州 苏州 苏州 苏州 苏州 苏州 苏州 苏州 苏州 苏州 苏州 苏州 苏州 苏州 苏州 苏州 苏州 苏州 苏州 苏州 苏州 苏州 苏州 苏州S (body = 199 yuan) | (body + riser = 289 yuan)
======================================== =======
Sunmilo S01
is a compact and expensive case with a volume of 6.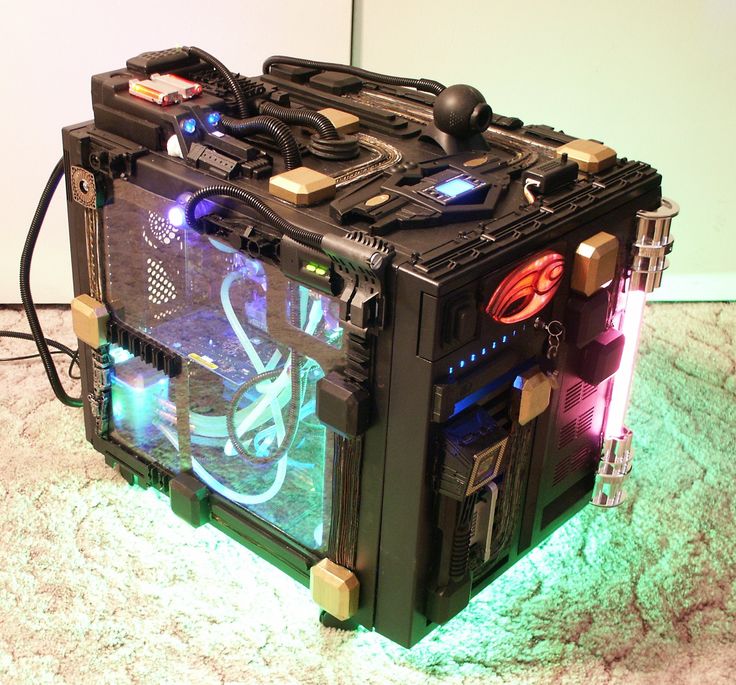 9L. Made to order, please be patient. The master can make a custom style of perforation of the walls of the case, if you send a CAD file when placing an order. The layout of the components assumes the “sandwich” type, you will need to purchase a cable riser (ADT R33UF-TU 200mm). Supports short graphics cards up to 190mm. Upstairs, you can install one fan for blowing. The case is available in three colors — black, white and blue.
Video:
(Assembly | Review and tests) Page on Chipsell
Seller photo
Photo from reviews
Dimensions
— 27.2x13x19.6 cm 9006 — up to 190mm
Cooler height
— up to 56mm
PCI-E riser
— need
The dimensions of the mat. Plant
-up to 17x17cm (ITX)
The number of ports
-no
Food forms
-SFX/SFX-L Water cooling
-no
-no
— up to 1 piece
Weight
— ??? kg Off.mag: (case = 739 yuan)
Making the case
I planned to make the case in the form of a cylinder truncated on both sides: there should be interface connectors at the back, a built-in screen at the front, and two case fans on the sides.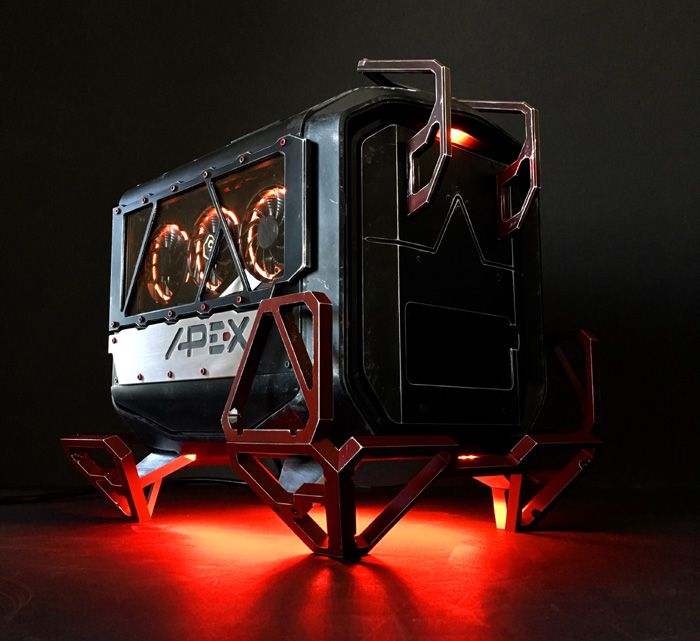
This shaped body can be made from several materials: cast from epoxy or bent from sheet steel. But, in my opinion, the easiest way to assemble the case is to string pieces of acrylic cut into the desired shape one by one, and then glue them together. I chose this option.
The next step is to create a drawing for cutting acrylic.
Drawing of the first version of the case
Then I started to assemble the case to try it on the hardware.
Top view
After trying on the first version of the hull, I decided to redesign the drawings: reduce the thickness of the hull walls to increase the interior space.
The main body of the body consists of parts cut from 5mm clear acrylic. The total thickness of the middle part of the case is 10 cm. I covered it with putty and smoothed it with sandpaper to get a perfectly smooth surface.
Sand with paper of different grain sizes, increasing the grain size each time.
Process
Result
To connect the main part of the body to the other parts, I drilled holes around the perimeter of the body with a step drill, and then glued M5 nuts.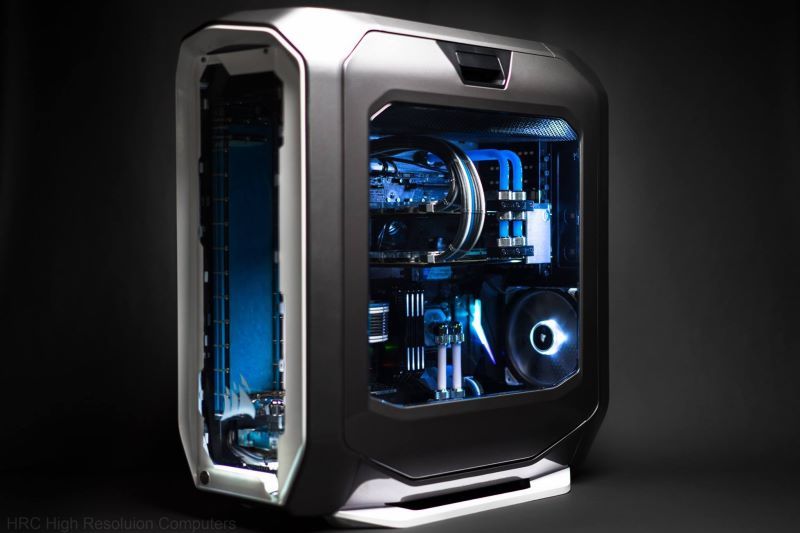
The main part of the body is ready! Now let’s start making the top, bottom and back covers.
Continuation is available only to members
Option 1. Join the Xakep.ru community to read all materials on the site
Membership in the community during the specified period will give you access to ALL Hacker materials, allow you to download issues in PDF, disable advertising on the site and increase your personal cumulative discount! More
=============================================
MetalFish G5 Plus 240
— the same case, but «grown» in height by 4 cm, which means that it is already officially possible to install two-section water cooling and two more fans at the bottom for blowing. If you do not plan to use the SVO, then you can put 4 fans for blowing in and blowing out. The power button and 1xUSB3.0 port have moved to the front panel in the lower left side. The rest of the characteristics remain the same.
— SFX
Water cooling
— provided数码体验店: (perforated aluminum cover = 99 yuan) 常州嘉硕电脑 store: (body + riser = 496 yuan) Tmall store: (body + riser + 2 fans = 499 yuan)
==== ===========================================
Jonsbo A4
— cute, roomy, but expensive and heavy body (> 5kg).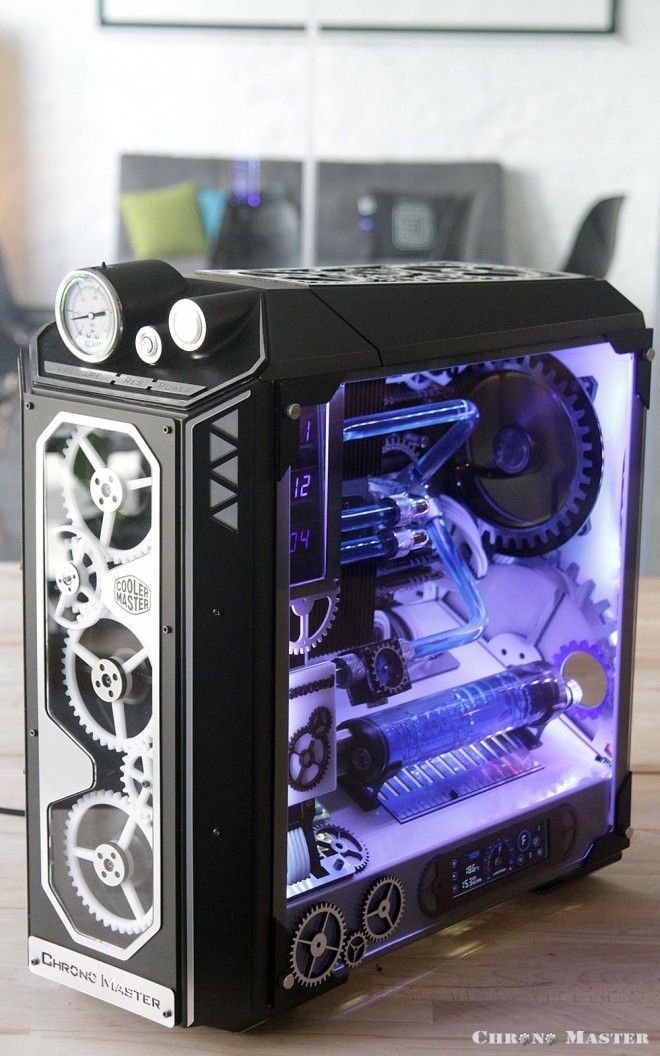 The Chinese offer 3 colors to choose from: light silver, gray and black. Material aluminium. Both side panels are transparent and made of tempered glass. It is possible to install water cooling.
Video
Jonsbo A4: (review | Assembly)
Seller photo
Photo from reviews
Dimensions
— 34 × 27.3cm
Building Material
-aluminum 3mm, hardened glass
The length of the video card
-up to 32.5cm
The height of the cooler
-up to 12cm
PCI-E-RIZER
-we need
. )
Number of ports
— 1USB3.0, 1USB-C
Power supply form factor
— SFX
Water cooling
— provided
case fans 9036 4 — 9036 up to 9036 4 — 9036 4 — 9036 up to
373 Weight
— 5.4kg Shop 常州嘉硕电脑: (body + bag = 749 yuan) Shop on TMall: (body = 799 yuan)
Personal computer modding
early 2000s. The essence of this hobby is the manual refinement of computer equipment, in order to change the design, add some unique features, express individuality.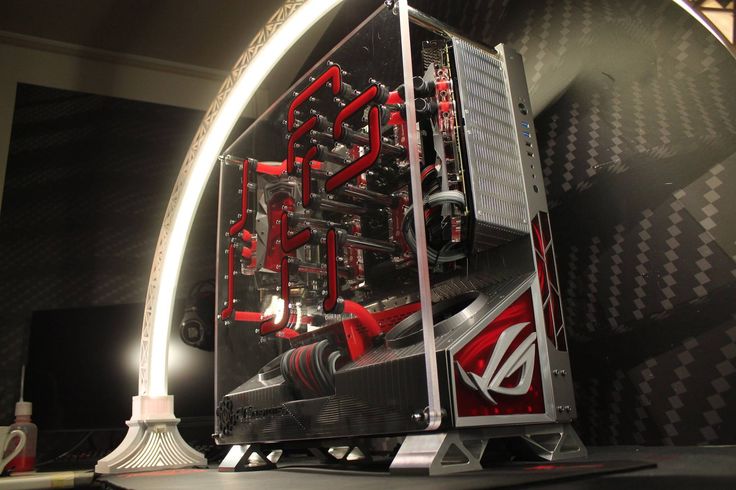 Most often, modding is done with a computer case, power supply, cooling system, as well as external equipment — mice and keyboards, flash drives, speakers, modems, etc.
Much less common is the modding of the internal components of a PC — video cards, for example. It should be noted that modding internal components is very dangerous for beginners, especially those who do not have sufficient knowledge in electronics. The result of such modding may well be the repair of computers at home and the complete failure of the computer. The case is another matter — it costs a little by itself, and everyone can experiment with its design and appearance, to the best of their ability and available materials. In general, any object can be subject to modding — a car, a mobile phone, and furniture. Different areas of modding use different materials and technologies for it, and most of them in one form or another can be used for computer modding — for example, airbrushing, which is a very popular technology for car modding, is quite applicable to PC cases.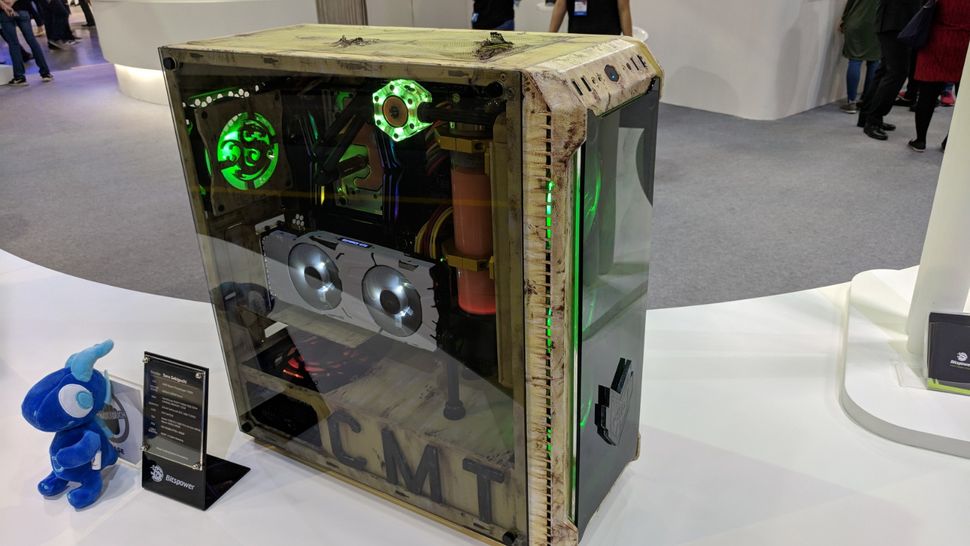 The same applies to sticking PVC films or carbon films. Most often, when modding a PC, common materials are used that are very easy to process at home — acrylic, plexiglass, wood, plastics, aluminum. Steel and various alloys are used less often; special equipment is needed for their processing.
The simplest modding techniques are applicable in principle for any computer components with a case (and for the system unit cases themselves) — this is making holes, windows into which plexiglass is then inserted, through which you can see the work inside the device, repainting, applying some special drawings or ornaments. The additional lighting with colored LEDs is very popular — in combination with an almost completely transparent body, it gives a very beautiful effect. Many ideas and trends in modding are eventually reflected in mass production — for example, cases with transparent walls can now be bought by anyone. There are also components on sale, with the help of which it is easy to achieve simple and very budgetary modding — luminous fans, for example.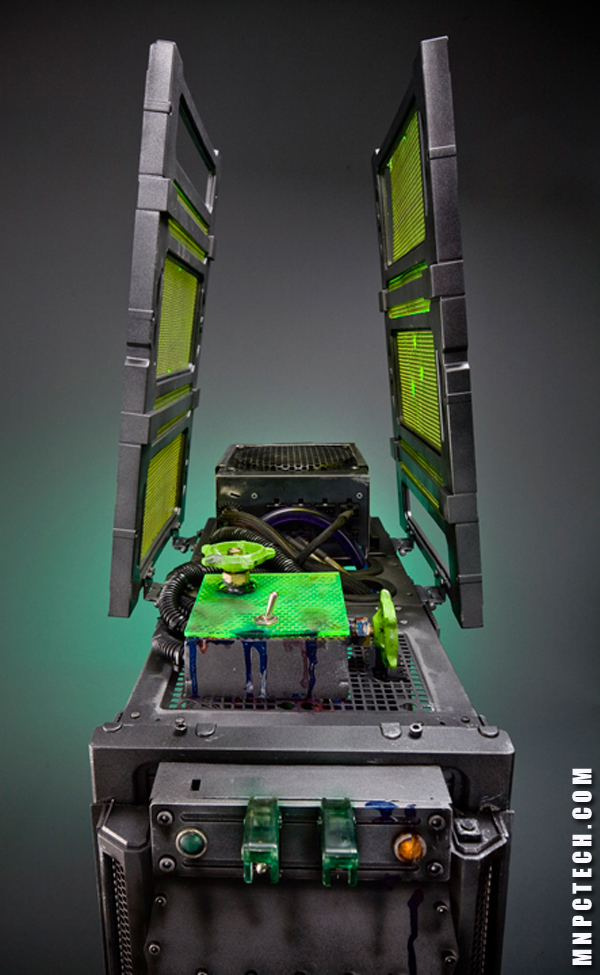 The air and water cooling systems themselves, which the owner will install manually, can also be considered modding components, and such installation involves a certain amount of creativity. Most of all, various lighting components are sold — case lamps, inverters, ultraviolet lamps, etc. Even fluorescent paints can be attributed to lighting elements, and a body painted with such paint will undoubtedly look exclusive in the eyes of friends and acquaintances.
Computer modding has a lot of directions, which allow, in principle, how to realize their creative potential to the owner of a PC. Drawings on the body are only a small part of the possible changes. Engraving of cases is also practiced, and changing the appearance by adding rivets or other fasteners, and manually making the case entirely from wood (this is also often used for acoustics), and performing without a case at all, on the wall, framed by whole garlands of LEDs. Functional modding is also very interesting, the purpose of which is to increase the capabilities of the PC.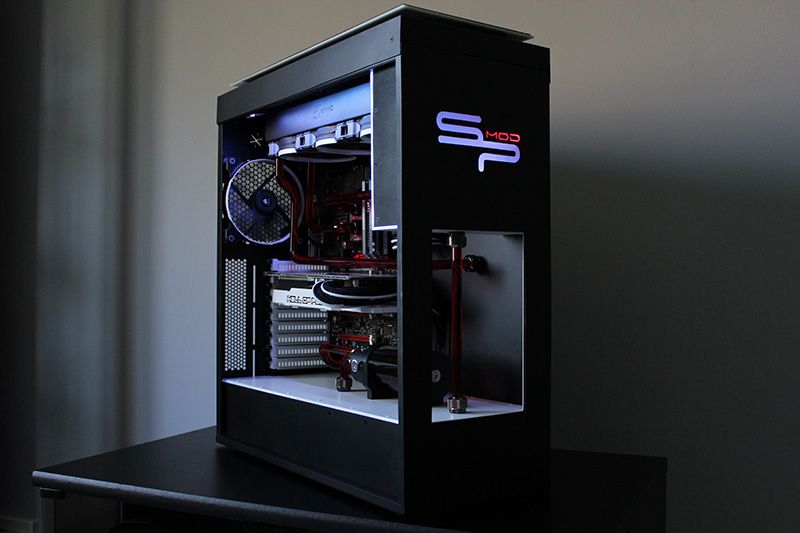 For example, this includes adding a small LCD display to the computer case that displays critical computer parameters, soldering a 3G modem directly into the laptop case, upgrading the keyboard with the addition of a passive USB hub, and much more. This approach requires sufficient skills in the field of electronics. But the most difficult modding is the so-called custom — it differs from others in that creativity there does not consist in remaking ready-made components (the same case), but in creating them from scratch, from improvised materials. By creating their own cases, both for computers and for external devices, modding professionals do simply incredible things that at first glance no one would consider a computer or computer equipment — from a system unit in a typewriter or an old gramophone to flash drives in sleeves or wristwatches and mice in the form of toys.
There are several thematic and constructive directions for which modders make their unique cases and other equipment most often.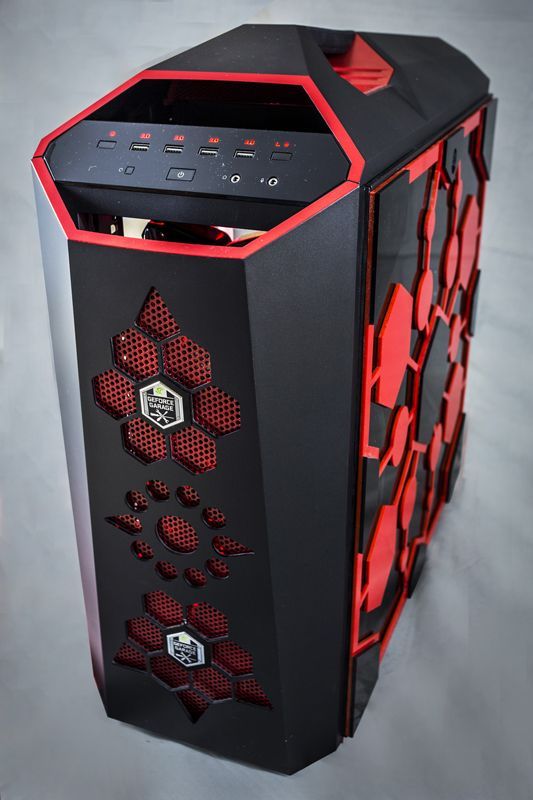 So, this is the so-called biohazard — modding, film modding (in its simplest form — gluing a film with posters of popular films, or applying such images with paint), space modding, cubic modding (rearranging the system unit in the form of a small cube, and not a classic parallelepiped) , suitcase modding (the same — but with the aim of minimizing the volume, making the computer look like a laptop), modding in the table (mounting the motherboard and other components in the drawer of the table), wall modding, retromodding, robomodding, steampunk, shooter modding ( or generally modding for the theme of a particular game).
Best World of Warcraft Mods
Use the WoW mods from the list below to fully customize the World of Warcraft user interface and make your journey to Azeroth much easier and more interesting.
The only thing that hasn’t changed in World of Warcraft since the game’s release in 2004 is the user interface. Luckily, modders have not been sitting idle and have created a plethora of add-ons for WoW that bring all sorts of functionality.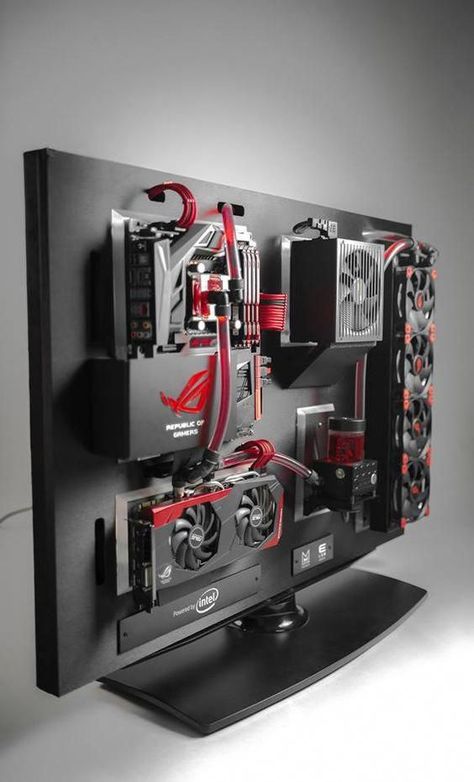 They range from mods that make inventory management easier to those that completely replace the user interface.
Downloading the Twitch app is the first step as it gives you easy access to the site where most of the mods on this list can be found. The application automatically detects World of Warcraft and makes managing and updating add-ons very easy.
Let’s look at some modifications that are worth attention. All of them (except ElvUI) can be found in the Twitch app, but we also link to sites where you can download mods manually.
Mandatory
Bartender 4
World of Warcraft hotbars are the oldest part of the game’s user interface. They are quite small by default and don’t show enough really important information. That’s why it’s worth downloading Bartender, a mod that gives the player full control over ten action bars, including their position, size, and even transparency.
If you’ve never played World of Warcraft, then Bartender is one of the first mods to install, as over time hotbars turn into a complete mess.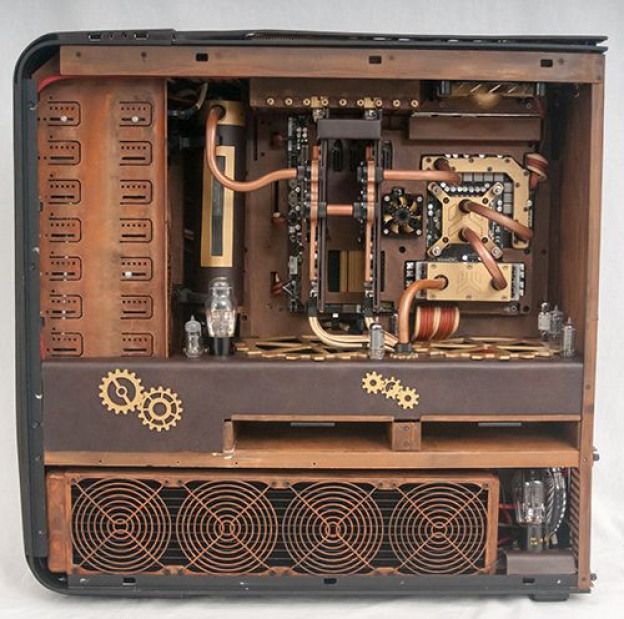 This mod allows you to set keyboard shortcuts and arrange them for optimal customization. More experienced users will appreciate the ability to program their own macros, which can also change the state of action bars.
Download
Deadly Boss Mods
Deadly Boss Mods is another important addon you can’t live without as it makes difficult World of Warcraft boss fights a little easier by reporting spell cooldowns, buff times and more. Camera alerts and effects warn the player of dangerous attacks or provide simple instructions. Raid and dungeon timers are synced between other members of your squad, ensuring everything works smoothly even if one of the players accidentally disconnects.
There’s another little feature here that automatically replies to in-game messages while you’re fighting the boss. This allows you to tell the other player that you’re a little busy and show them how much health the boss has left.
Download
Bagnon
The inventory system in the original World of Warcraft is a mess.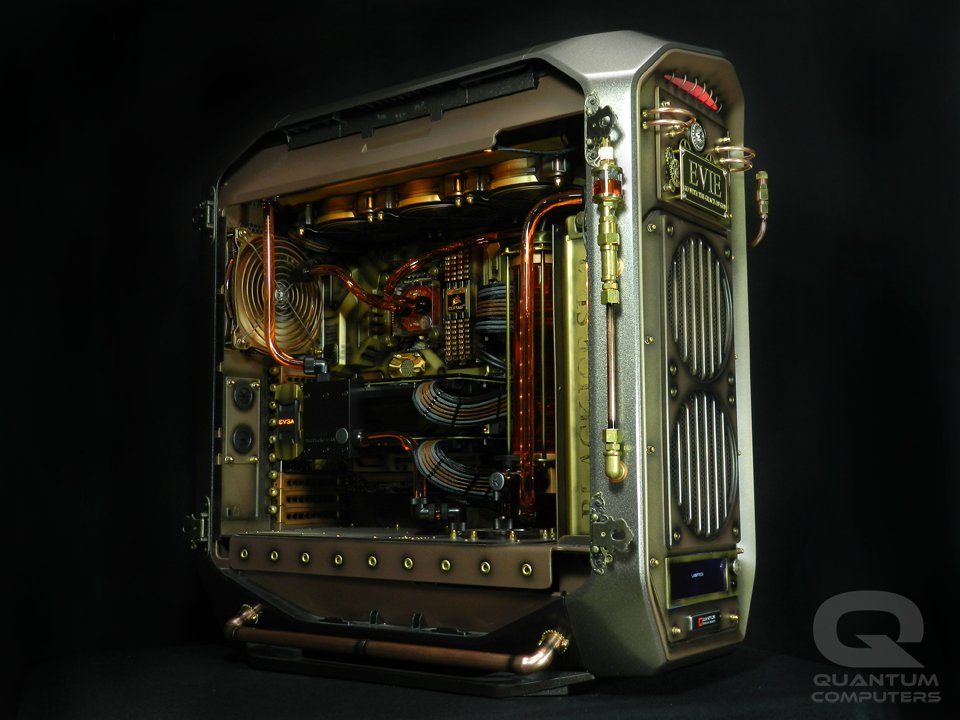 Instead of one large inventory, there are separate bags that store all the things that the player finds while exploring the game world. But Bagnon solves this problem. Now, instead of separate inventory windows, there is one large bag in which all items are stored.
For example, you can view the items (even if they are in the bank) of all alternate characters. Icons also have a special coloration based on the quality of the items, which helps to separate rare items from unnecessary ones. The search engine in the inventory window makes finding specific items even easier, and there’s also a useful item sorting option that clears bags and groups the appropriate item types together.
Download
MoveAnything
MoveAnything is a powerful tool that allows you to customize every element of the user interface, giving you full control over not only the action bars, but also the quest list, portrait location, minimap, and more. If you’ve ever wanted to completely overhaul WoW’s user interface, this mod is the way to go.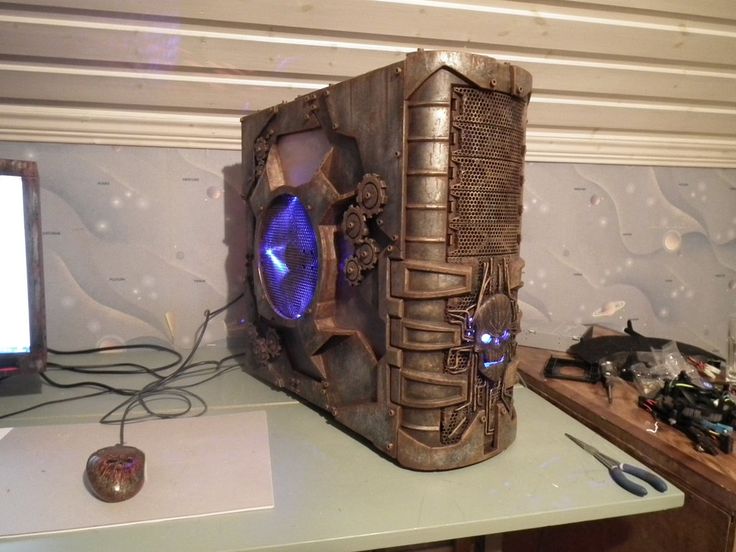
Download
Transformation Mods
ElvUI
This is one of the most popular mods for World of Warcraft. ElvUI replaces every element of the user interface with a new, more modern design. The trade-off, of course, is that you also get rid of the fantasy-style user interface altogether. You will have to install and update the mod manually, but this is not too difficult. ElvUI also offers a ton of customization and includes a set of add-ons like TidyPlates that help change the look and feel of the outdated WoW interface.
One of the best things about ElvUI is that there is an in-game customization process that helps tailor the user interface to the player’s needs.
Download
Dynamic Cam
In patch 7.3.5 for World of Warcraft, dynamic leveling was introduced for all of Azeroth, which completely changed the way new characters are leveled. This is a great opportunity to start a new hero and explore Azeroth from a new perspective. Using the Action Cam feature that was implemented in an earlier patch, Dynamic Cam changes the look to make WoW feel like a third-person game. The great thing is that Dynamic Cam automatically switches between different camera positions depending on what actions the hero performs.
This is a fantastic addition if you’re just starting out with a new character, as the mod will make exploring Azeroth more exciting and interesting.
Download
Mods for the combat system
OmniCC
This mod is small, but very effective. Basically, it adds text to the icons on the action bar so you can better understand how long the cooldown of this or that ability is. There are some nice customization options here, and OmniCC is kind of a mod that does one tiny thing and does it with a bang.
Download
Details! Damage Meter
Details! The Damage Meter is a very accurate graphical DPS meter that shows you how much damage is being dealt to your character and all squad members as it automatically scans the combat log.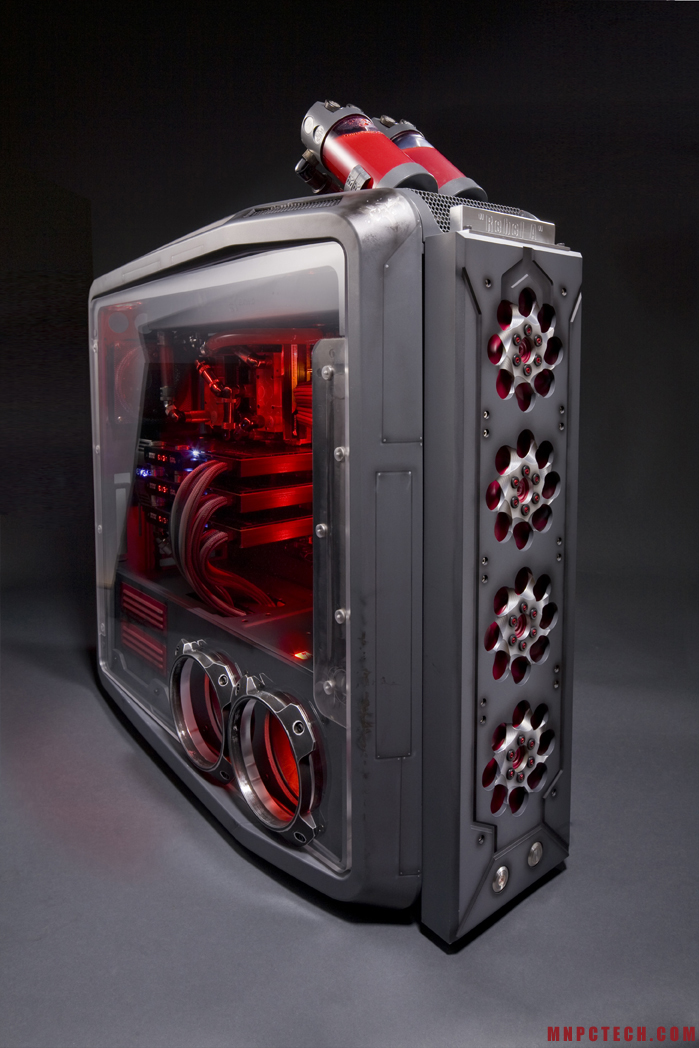 The mod not only improves the gameplay, but also additional tools, such as the ability to view items of squad members and much more.
Download
Omen Threat Meter
Omen Threat Meter helps healers and DPS by showing each party member’s relative aggro against whatever monster you’re fighting. This way you know if you risk stealing aggro from the tank or, God forbid, if the tank dies, you know who the monster will attack next. In high-level raids and dungeons, the availability of such information cannot be overestimated.
Download
WeakAuras 2
Weak Auras 2 is the most complex addition on this list: it is a framework that allows you to display special graphic elements on the screen to indicate buffs, debuffs and other related status effects. An insane level of customization is available here, from using custom sounds to visual cues. The great thing about Weak Auras 2 is that if you don’t feel like programming your own hints, you can easily import templates from other players.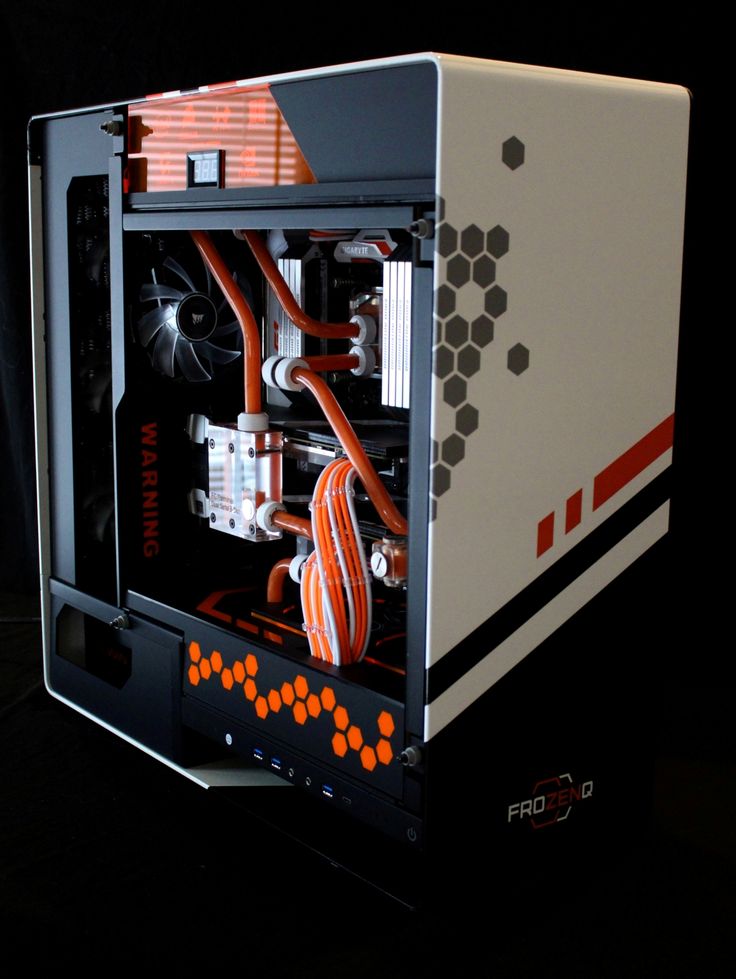 Here is a site with a huge list of ready-made Weak Auras 2 scripts.
Download
Other
World Quest Tracker
World Quests are a new type of temporary daily quest that first appeared in Legion. It’s a great system that suffers from the outdated World of Warcraft map interface, but World Quest Tracker solves that problem. The add-on shows the rewards available in each zone so you can quickly see if there are rewards that match your goals/needs. Then you just need to click on the reward icon to automatically track several world quests in a special window, instead of spending time checking the map over and over again.
World Quest Tracker also features a stats screen that tracks how many world quests you’ve completed, total rewards, and more.
Download
Azeroth Auto Pilot
Once you get your first character to level 120 in Battle for Azeroth, you probably don’t want to repeat this whole process with another character.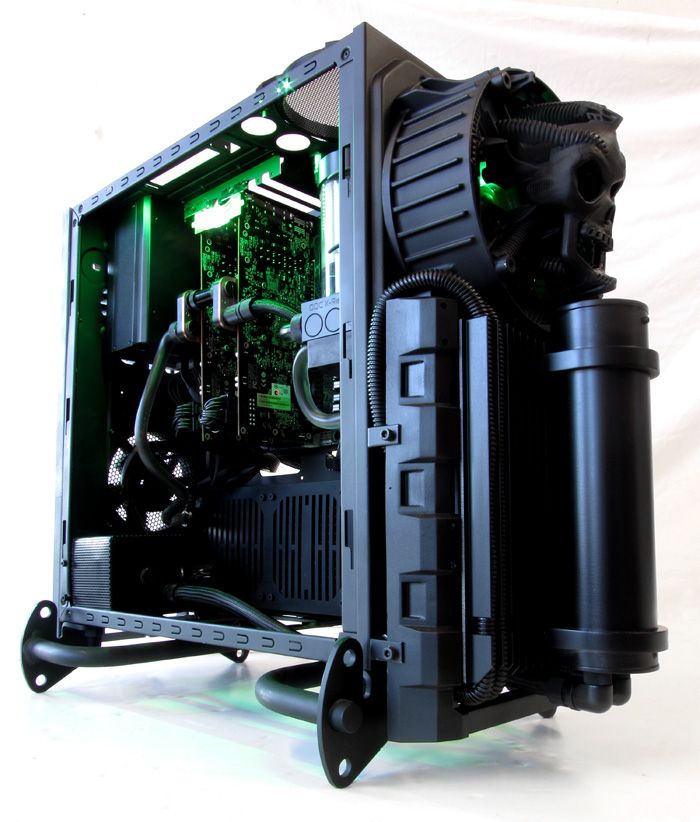 This is exactly what Azeroth Auto Pilot is for, a mod that increases the speed of pumping by automating dozens of minor, but quite important things. After installing the add-on, an arrow will appear on the screen that guides the player from quest to quest along the best path, and also takes into account all the little things, such as communicating with NPCs, interacting with objects, and much more. It’s kind of like leveling up a new character on autopilot.
Download
LookingForGroup
There has been a lot of controversy in the community that Blizzard is trying to restrict expansion packs that automatically put players in groups for world quests, pretty much eliminating the need to even complete it. LookingForGroup is a great compromise that makes it easy to find groups without having to open up a huge search. Once your character reaches level 120 in Battle for Azeroth, use this great tool to make your daily world quests easier.
Download
Gatherer
For those who like to craft and collect various items, Gatherer is a must-have mod.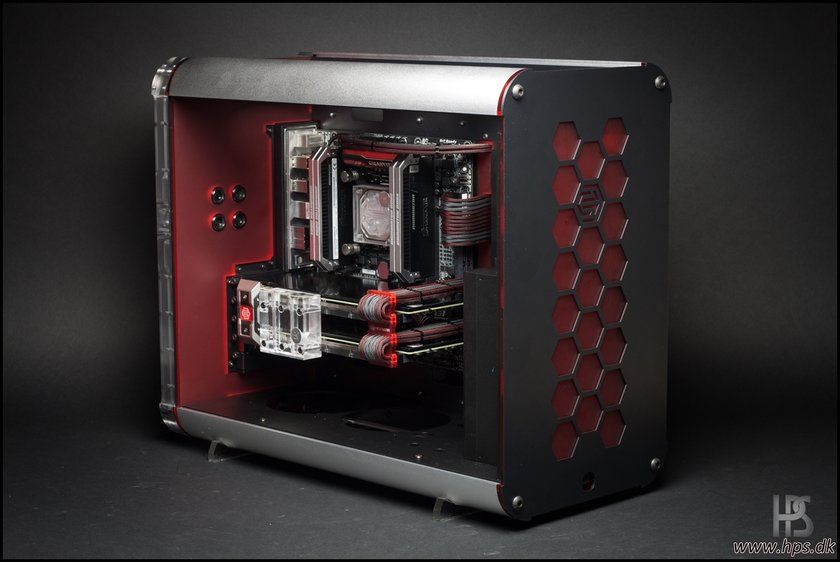 The add-on shows the location of mines, herbs and treasures on the minimap. It does this by remembering the location of previously found resource nodes. This is not very convenient, because you first need to find these nodes, so import GathererDB from WoWHead. It contains data on all possible node locations in Azeroth, and Gatherer will take care of the rest, since it will always indicate the location of precious resources.
Download
Auctioneer Suite
If you want to earn some gold in World of Warcraft, Auctioneer is your best bet. This mod completely overhauls the auction house interface and can scan the market to track bids, buyout prices and the number of items sold. Simply put, it provides all the information you need to make informed decisions about buying and selling items in the
auction. In addition, there’s a Bean Counter that tracks bids and posts to provide line-item profitability reports, helping you determine what’s really making money.
But that’s not all! There’s also an Enchantrix that tells you the likely value of an item after being disenchanted, and an Informant that tells you if the item is a quest or a class. SearchUI notifies you if there are auctions that match the criteria for buying or bidding. This list is endless.
Download
OPie
OPie creates a radial context menu so that you can easily use certain abilities on the action bar using the mouse. This is not a mandatory add-on, but it is very easy to use and convenient to use. RockBoard® or any other brand pedalboard — MOD 5 opens up completely new possibilities. The simulated acoustic booth and DI let you work directly, delivering YOUR sound, no matter what backline is provided where you play. Want to use your favorite cabin? No problem, load the impulse response of his audio into MOD 5 and he’ll be with you wherever you go. Part of the patch bay is designed to route connections from under the pedalboard to the front to give you a central access point to your setup and organize your connections.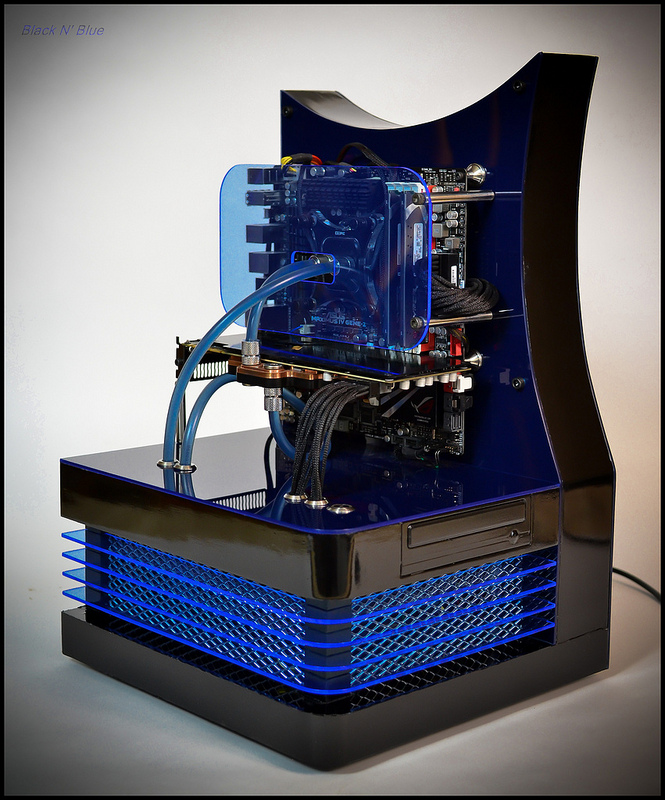 For silent workouts on the road, the MOD 5 also features headphones. amp jack with adjustable power output.
Precautions
Supply voltage
Connect the designated AC adapter to an AC outlet of the correct capacity.tage. Be sure to use only an AC adapter that provides 9V DC (-) central power. Unplug the AC adapter when not in use or during thunderstorms.
Wiring
Always turn off the power to the device and all other equipment before connecting or disconnecting. This will help prevent malfunction and damage to any of your devices. Interference with other electrical devices Nearby radios and televisions may experience interference with reception. Use this unit at a suitable distance from radios and TVs.
Cleaning
Clean only with a soft, dry cloth.
Control
Do not apply excessive force to switches or controls. Do not allow paper, metal, dirt or other objects to get into the device or its connections.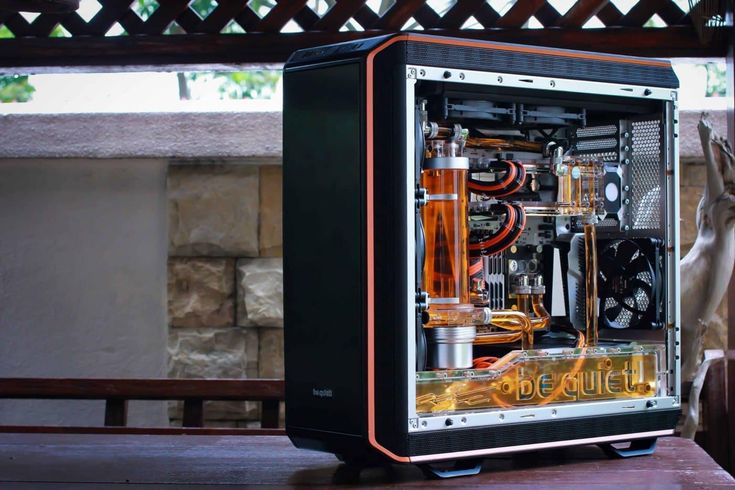 Be careful not to drop the device or subject it to shock or excessive pressure. To avoid deformation, discoloration, or other serious damage, do not expose this device to any of the following conditions:
The main features
- Imits of the Dynamics Cabinet based on IC
- 6 built -in IRs based on popular guitar and bass rooms
- Support for user IR (max. 1024 points)
- Active Block DII
- Selectable UN / BALANCED output
- Connects to PC / MAC editor via USB
RockBoard® Pedalboard Installation
Please follow the steps below to install your MOD 5 into the MOD slot of your RockBoard® Pedalboard.
- STEP 1
Remove the rubber frame of your RockBoard®’s Slot MOD. - STEP 2
Turn the RockBoards® pedalboard upside down.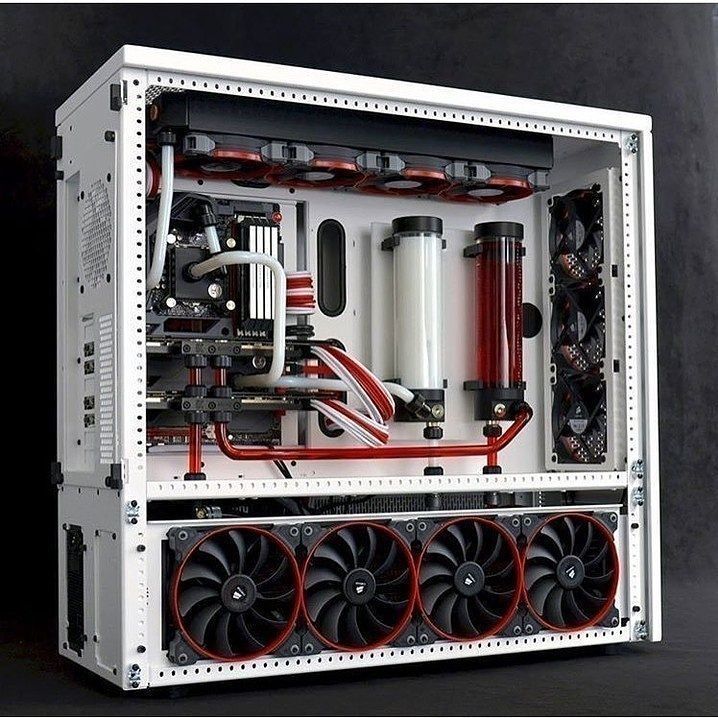
- STEP 3
MOD mounting screws are self-tapping screws that thread themselves into pre-drilled mounting holes in the chassis. RockBoard®’s front Use a TX10 screwdriver to drive in the fixing screws and cut the threads. If you don’t have a TX10 screwdriver, a wrench is included with the MOD. During the first two turns, the screws will have difficulty working as they must cut the threads into the surrounding material. Be careful not to screw them in at an angle. - STEP 4
As soon as the tips of the screws protrude from the other side of the holes and the screws become easier to turn, the threads are cut correctly. Now unscrew the screws again. - STEP 5
Then load your chosen mod from the front into the slot and screw in the mounting screws until the front plate of the mod is flush with the front of the board. - STEP 6
For added security, you thread the locknut on the back.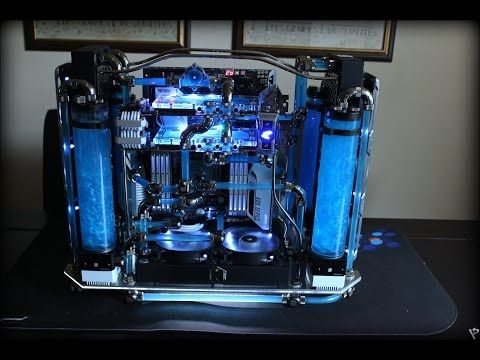 The mod is now ready to be connected to your rig!
Removing the MOD 5 front panel
To install the MOD 5 All-in-One patch bays on top or under the pedalboard, you will need to detach the front plate so that it fits flush on/under the surface of the board.
Remove the screws as shown below to remove the front panel from the MOD 5 using a Phillips head screwdriver Ph3. The fastening nuts of the jack sockets do not need to be removed!
Installation on a non-RockBoard® pedalboard
There are several ways to install your mod on a non-RockBoard® pedalboard. You can attach it directly to the board surface using sticky tape or other resealable fastener.
Optional The RockBoard® offers a MOD stand for mounting your mod in a variety of ways on, on or under other manufacturers’ pedalboards. To install your mod using the RockBoard® MOD Rack, please refer to the MOD RACK manual.

Please follow the steps below to install your MOD into the MOD slot of your non- RockBoard® pedalboard.
- STEP 1
Remove the front panel of the MOD by removing the screws indicated above. - STEP 2
Apply adhesive tape with hooks or other reclosable fastener to the bottom of the MOD. - STEP 3
Glue self-adhesive loop tape or other reclosable fastener to the spot on or under the pedalboard where you want to place your MOD 5. together and attach your MOD. The mod is now ready to be connected to your rig.
Setup & Operation
Setup example
Pass Through Connections
RockBoard® MOD 5 Cab SIM + DI Patchbay is designed to be used as a central access point to your effects setup.
TRS connectors A, B and C are connected through the connectors on the front panel of the MOD 5 to the corresponding connectors on its rear side.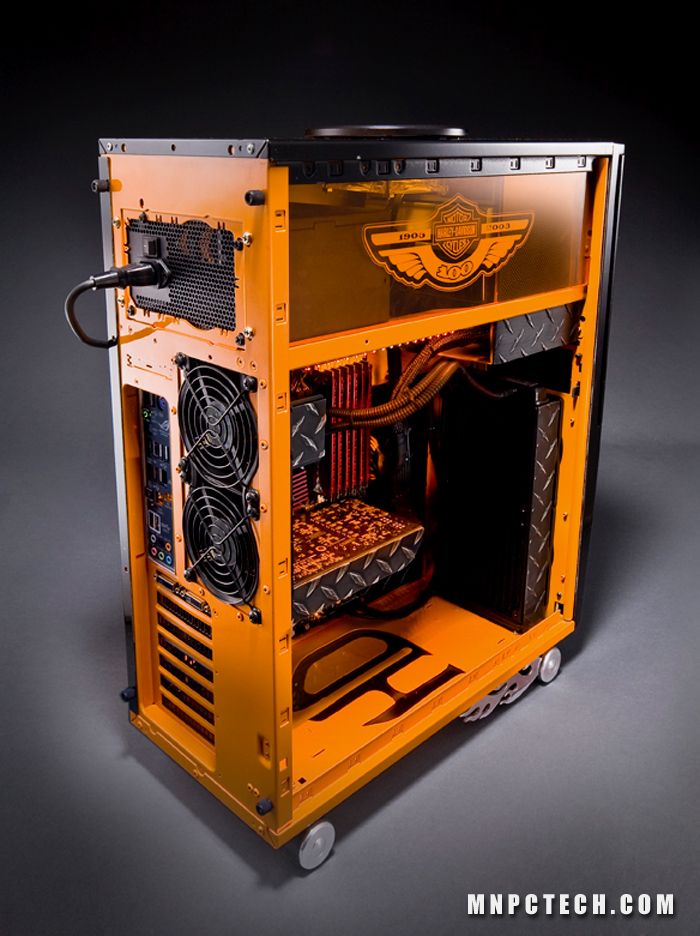 This allows you to set up your effects rig so that you only need to connect cables to and from the front of the board, instead of fiddling under it when setting up for a performance. All three loop-through connections can be used in either direction and for control, as well as for mono or stereo audio signals. There are many different installation options for sockets A, B and C. Please find the former sample with 4 cables in the sample setup section. However, many other ways to use the A, B, and C jacks are possible, depending on your effects setup. Feel free to experiment according to the specifications and intended use of other hardware you use the MOD 5 with.
 DI and SIM card in cockpit
Built-in MOD 5 emulation and DI output offer you realistic sound reproduction of various speaker models by using impulse response (IR) directly in the mixing console or recording interface:
- Connect your instrument or the last effects pedal in your signal chain to the IR / DI IN jack on the rear panel of the MOD 5.
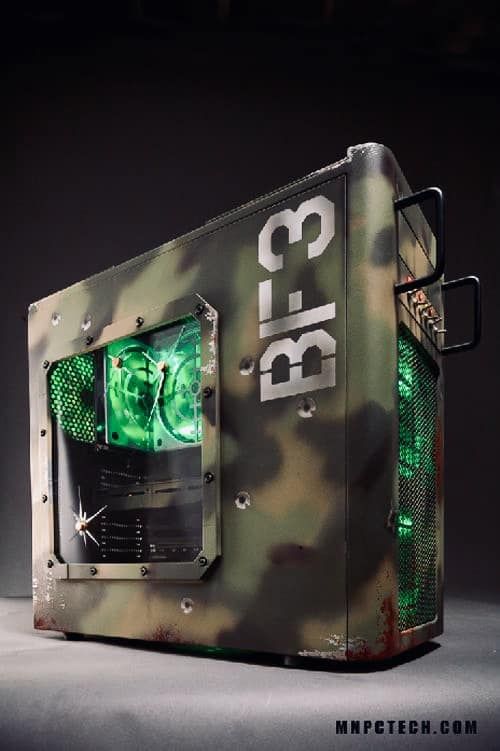
- Use the MONO / STEREO switch to select whether the input signal should be processed as mono or stereo.
If set to mono, any signal that enters the ring channel of the IR/DI IN jack will be routed to ground, not processed by cabinet simulation, and will not be output from the XLR output.
For stereo signals, both channels will be processed individually when modeling the cabinet. - Connect the XLR OUT to an audio interface, FOH mixing board, or other suitable PA equipment. Make sure the phantom power is turned off on the channel that the MOD 5 is connected to! MOD 5 will not work with phantom power.
- Use the BAL / UN switch to select whether you want to output a balanced or unbalanced XLR signal. For mono signals, we offer a balanced signal (BAL). If you are inputting a stereo signal, you can use UN to output an unbalanced stereo signal (tip on XLR pin 2, ring on XLR pin 3). When switched to BAL, the input signal will be converted to mono and output as a balanced mono signal through the XLR OUT jack.
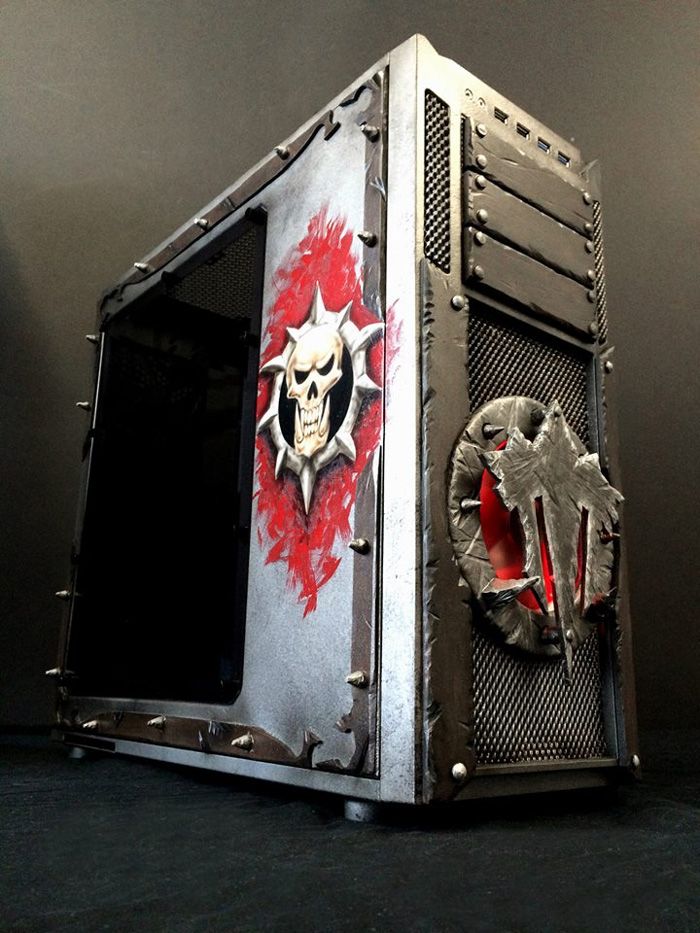
- If you hear a hum or ground loop hum, turn the GND LIFT switch up. This will interrupt ground loops and prevent current from flowing through the cable shield between the MOD 5 and the output device.
- For silent practice or headphone monitoring, connect headphones to the 3.5mm/1/8″ jack output on the front panel of the MOD 5. Please note: the Phones output will always be in stereo. When a mono signal is input, the same signal will be heard in the left and right channels. For stereo input, the tip will be left and the ring will be right.
- Headphone volume can be adjusted using the volume knob on the front of the device. Turning the knob counterclockwise decreases the volume, turning the knob clockwise increases the headphone volume. Note: Do not use the Phones output to connect to audio equipment other than headphones. Doing so may damage the connected device.
- The IR selector allows you to select the desired cabinet simulation IR slot from 1 to 6.
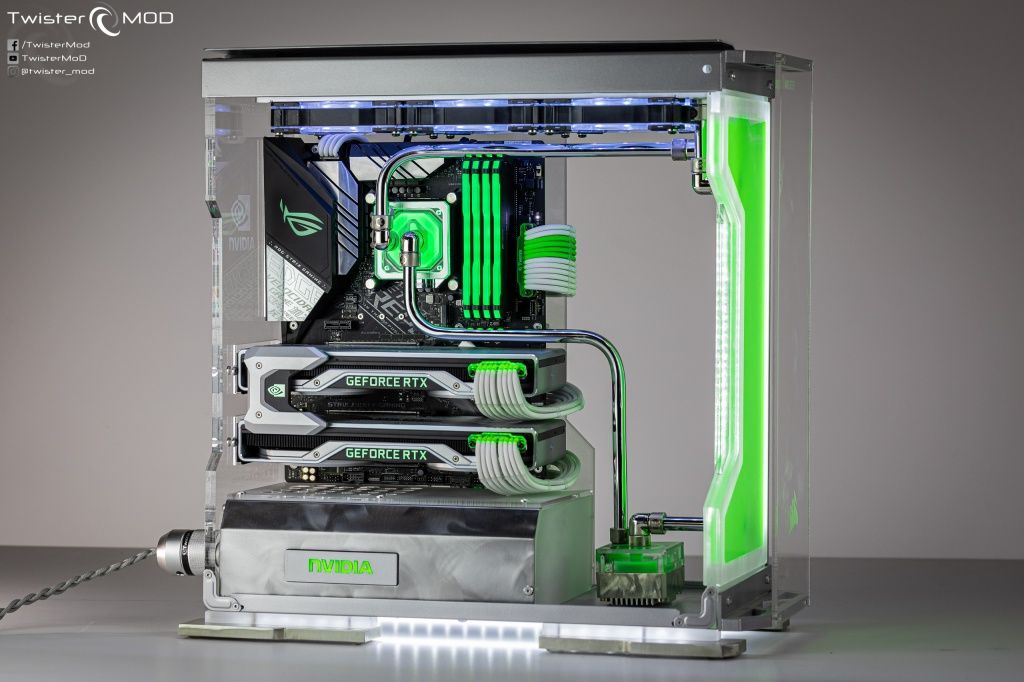 The seventh position disables cabinet simulation, outputting a dry signal through XLR and Phones Out.
Cabin models
The RockBoard® MOD 5 is equipped with 6 standard IRs that cover a wide range of popular speaker types. They are based on the following existing cabinet models:
Default IR Slot
IR (Impulse Response) Based on …
1
AC30.s 2 × 12 VOX AC30 JMI 212 Silver Bell 2 59BAMMEN Bassman Tweded 4 × 10 3
1960AG 4 × 12 Marshall 1960A green back 4 × 12 uk.citrus 4 × 12 900 × 12 9004 × 12 900 × 12 900 × 12 900 × 12 900 × 12 9004 × 12 900 × 12 900 × 12 900 × 120003 IR Loader Software
RockBoard® The MOD 5 IR Loader is available at www.
 rockboard.net for MAC and PC.
 It offers you a simple and fast user interface to upload custom IRs to your MOD 5. Download the software and follow the installation instructions. Once installed, connect the MOD5 to your PC or MAC using the included Micro USB cable. To load a custom third-party IR port, simply select the IR slot and click and select the desired IR port in file in the browser window that opens. Click OK to upload and the IR in the selected slot will be replaced with your custom IR.
Please note: IRs must be in .wav format with max. length 1024 pt.
To remove custom IRs and restore factory default IRs, simply press .
Firmware update
On our web site www.rockboard.net, we always provide the latest MOD5 IR bootloader. The IR Loader package also includes a firmware package that makes the MOD5 compatible with the IR Loader software.
IR Loader software automatically checks for MOD5 compatibility. If your MOD5 firmware is too old, you can do this.
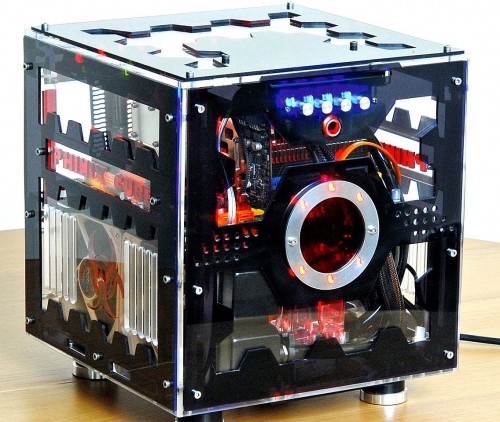 If your IR Loader software is outdated and does not work with the MOD5 firmware version, you will be informed that you need to download and install the newer version. The firmware update will not affect the custom IRs you have loaded into your MOD5. If you want to update the firmware version while working with IR Loader, just click on the button. Then confirm that you really want to update the firmware to the current version and the firmware will be installed on your MOD5. This may take a couple of minutes. 9Ol000 XLR nest (Resistance):
 - 1/4 ″ Mono -Exhibition (Resistance: 470 KOM)
- 1/8 ″ Stereo audio (Resistance: 10 Ohms)
- 44.1KHZ
SAMP 24bit User manual, USB connection cable, mounting screws, nuts and wrench
Note: The manufacturer reserves the right to change these specifications without prior notice.
US DISTRIBUTION: Framus & Warwick Music USA, Inc.
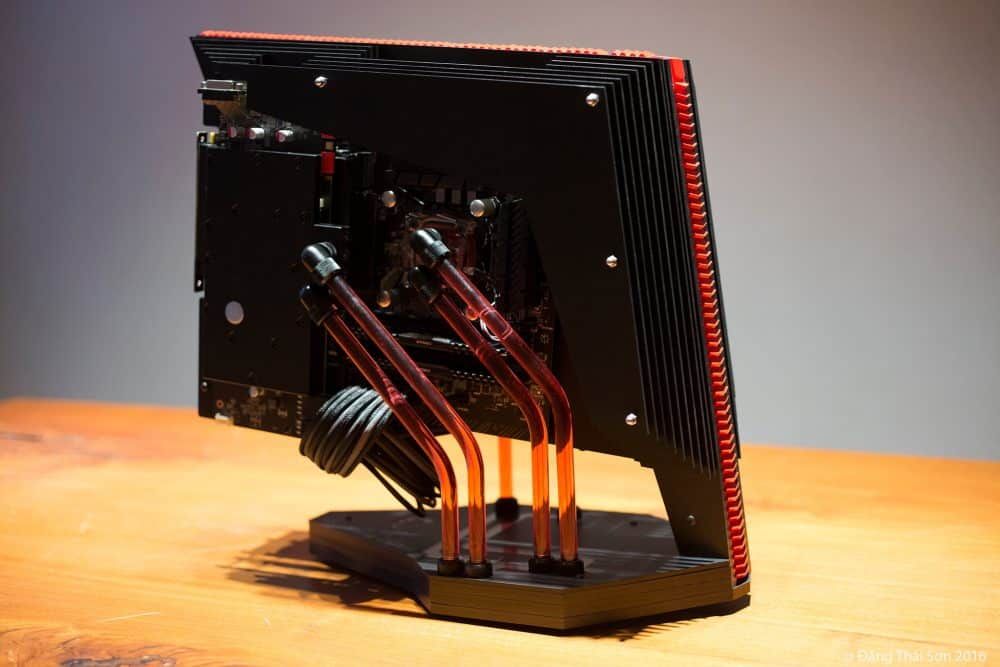 | [email protected] | 629.202.6790
 CHINA DISTRIBUTION: Musical equipment trade Warwick (Shanghai) Co. Ltd. | [email protected] | 862134060110+
NORTH EUROPEAN DISTRIBUTION: www.rockboard.de | [email protected] | www.w-distribution.de | www.facebook.com/warwickmusicdistribution
Headquarters: Warwick GmbH & Co. Music equipment KG | 08258 Markneukirchen / Germany | +49 (0) 37422/555 — 0
report this ad
Family owned • Solar powered • Sustainable production in a green environment
Documents / Resources
As you know, everything new comes to our country for a very long time. And modding is no exception. All sorts of modding exhibitions and competitions have been organized in the USA and European countries for a long time, and many of our users do not even know the meaning of this word.
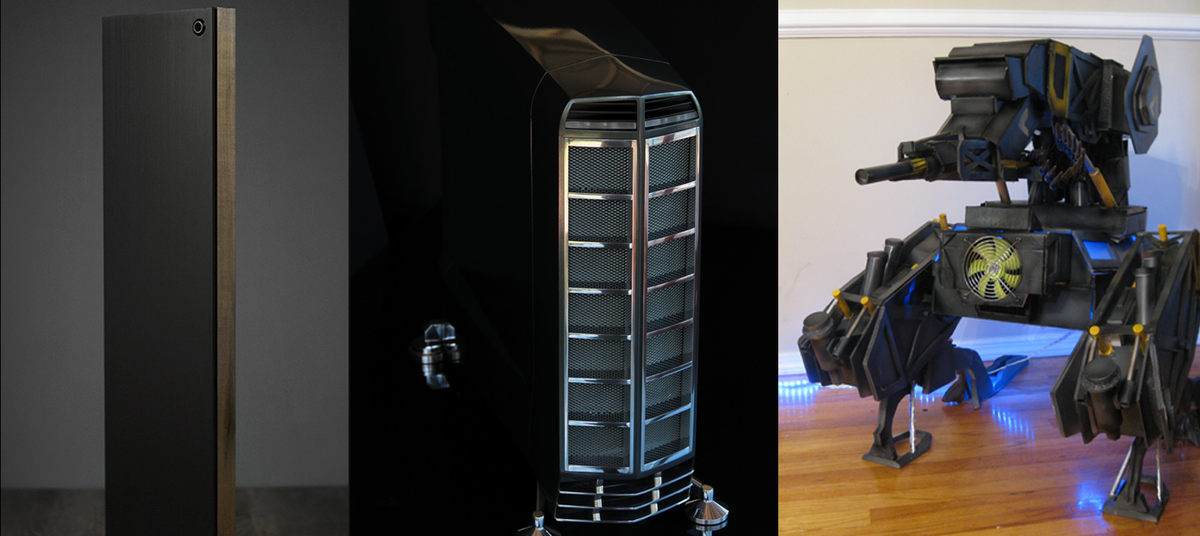 But lately there are more and more modders. And this is very good.
 Search for data on your request:
Schemes, reference books, Datashites:
Price lists, prices:
Discussions, Articles, Manuals:
Draw the end of the search in all bases.
Upon completion, a link will appear to access the found materials.
Content:
- Do-it-yourself backlight for a computer: diagrams, instructions, necessary materials
- Backlight for system unit
- DIY cabinet lighting guide
- Akasa LED Light
- 7 tips for building a beautiful RGB PC. Deepcool Quadstellar
- Illuminated PC fan 4
- Your browser has JavaScript disabled.

- NZXT Hue controller allows you to control the LED lighting of the PC case
- LED backlight for computer case (system unit)
- LED backlight for computer case (system unit)
case testing
WATCH RELATED VIDEO: COMP on RyZen 2600. Part 2 (assembly from scratch, do lighting and cooling!)
LED Backlit Computer The perfect PC for every mood We tend to be firm in our choices when it comes to PC internals, but we can get a little different when it comes to aesthetics.
There is no doubt that even in our laboratory everyone has their own opinion about how a computer should look. For example, choosing a case is a very difficult task. Forget about using a single highlight color if you want one at all.
In an ideal world, we would like to freely change color depending on our mood.
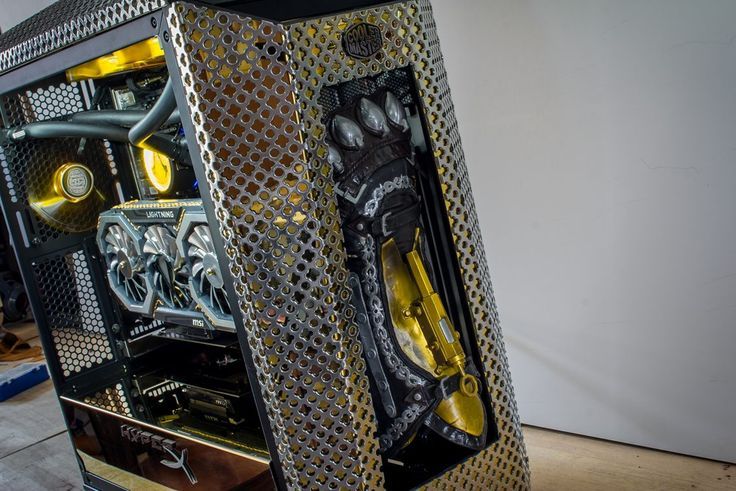 So the lighting will have to work. Artistic principles require that all PC components fit together. We cannot use green LEDs for the case, yellow LEDs for the mouse, and choose a keyboard with red backlighting. A few years ago, it would have been naive to expect components from different manufacturers to work well in this regard.
 It could take you hours to build a modding PC and find peripherals with customizable LED lighting. But now it’s not. Thanks to a host of enthusiast-friendly companies and the good old principle of capitalism, you can now find a wide range of cases, accessories and peripherals equipped with LED lighting that can provide any shade of the RGB range.
So we decided to build a modding PC with adjustable backlight. And, although it boasts excellent hardware, the real strong point of this system is bright colors and external showiness. Of course, we will discuss each individual component, explaining why we chose it and what role it will play. At the end of the article, you will see how complete and pleasing to the eye the system can be obtained using dissimilar components.
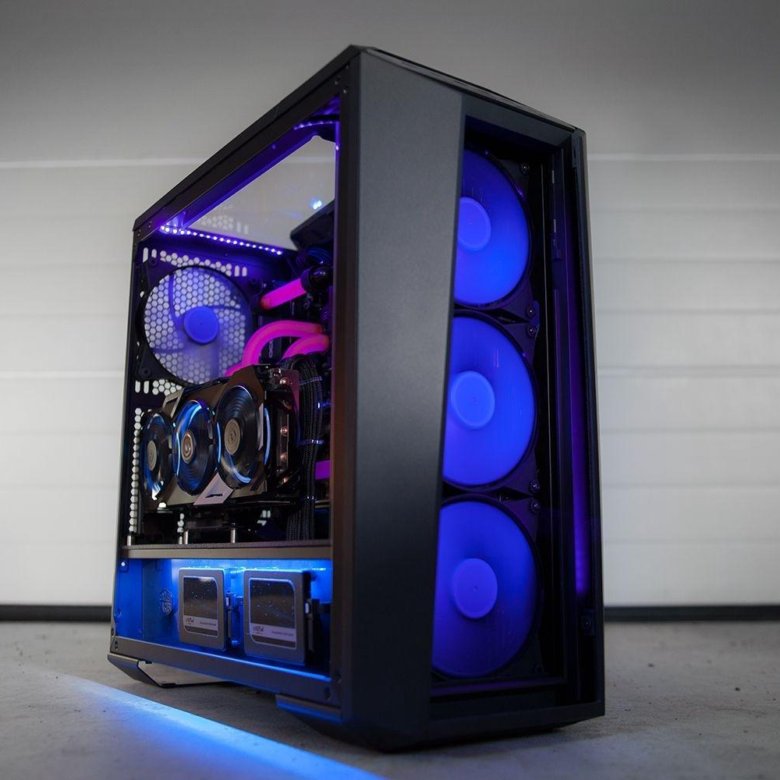
The NZXT Hue consists of simple sleeves just under two meters in length that illuminate the inside of the hull. Controls are housed in a 5.25″ bay controller that provides easy access to brightness, color, and even effects, listed here as lighting modes. Modes include flash, ripple, fade, and color cycling effects. Housing: Thermalktake Level 10 GT Keeping in mind that chassis selection is a subjective matter, we chose Thermaltake’s Level 10 GT as the most unique and eye-catching computer case we’ve ever seen.0003
It uses the same unique design of seven compartments on one common wall equipped with a handle, which makes the process of installing components an absolute pleasure. Five 3.5″ drive cages with external access provide the most convenient hot-swappable SATA drives, which is fully consistent with the ideology and aesthetics of a luxury case.
LED backlight.The fan backlight can be blue, green, red, can alternate between three colors, two modes, or be turned off.
 0003
0003 In addition, the case has a small window in front of the processor, which is ideal for displaying the illumination of the components inside the case. LED-backlit computer Fan control box, memory, and power supply Fan control box with LED touchscreen: Aerocool Touch While it may surprise you that we consider the fan control box to be one of the most eye-catching components in the build, it’s only one. a look at the Aerocool Touch LCD display should set things right.
Equipped with a backlit LCD touchscreen and occupies two 5.25″ drive bays, the Touch looks like something out of a Star Trek movie. , yellow, blue, purple, turquoise, white, or no backlight at all
But Touch is not only used as a decorative element, this controller allows you to control the speed of five fans, each using a separate temperature sensor. manually
However, if a user-defined temperature threshold is reached, Touch will automatically increase the fan speed to bring the temperature back within the set limits.
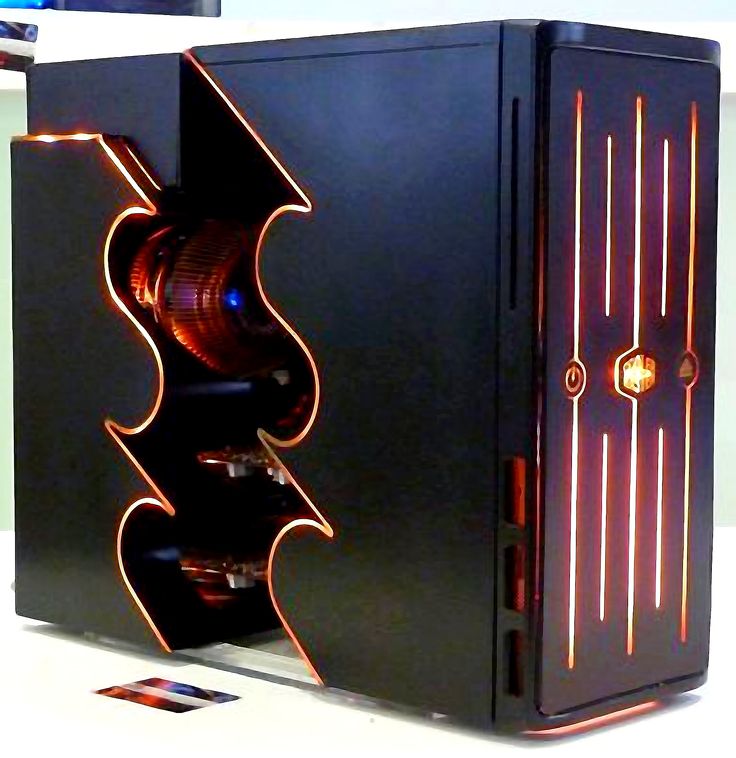 Directly below the screen itself are two USB 3 ports. Memory: Crucial Ballistix Tracer Crucial’s Ballistix Tracer memory kit is a perfect example of how a standard and visually inconspicuous PC component can be transformed into something striking with simple lighting effects.
 Each bracket has several LEDs located close to the pins that illuminate the area of the memory slots on the motherboard. At the top end of the modules there are also LEDs that react to the loading of the memory channel. There are four schemes for LEDs on the top end: stereo, inside out, lava and streamer. The visual effect it has on the system as a whole is actually stronger than you might think. The intricate lighting patterns reproduced by the Crucial memory LEDs are quite spectacular and can be easily seen through the case window.
Illumination color and effects are configured using the Ballistix MOD utility. Each bar can be customized individually by defining the color and lighting scheme. While we were initially skeptical about how much the backlit memory would add to the overall system performance, we don’t think our build would have been as compelling without them.
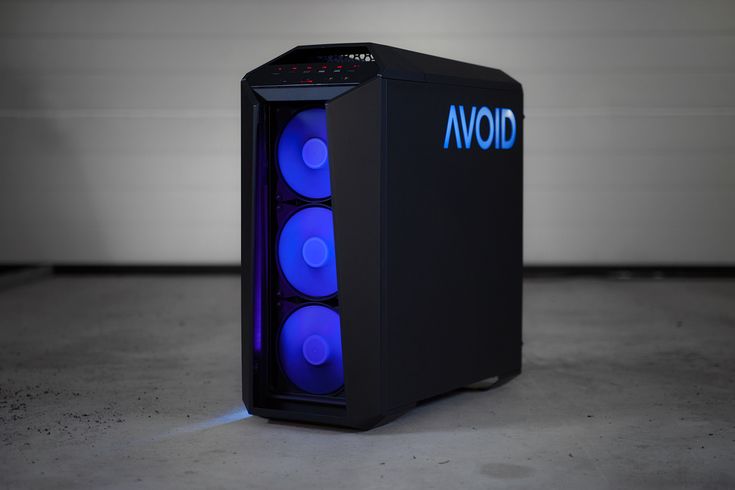
You can verify this at the end of the article by watching the video. Power Supply: Rosewill Lightning Rosewill is the only custom lighting power supply we could find. The large internal fan has LEDs that can be set to red and blue or turned off. Modular power loop connectors are also illuminated when cables are connected.
The Molex 4-pin and SATA power cables are highlighted in blue, two of the four 6-pin and 8-pin additional power cables for the video card are highlighted in green, and the other two are highlighted in orange. Because the internal fan is pointing downwards, the backlighting effect becomes much more dramatic in cases with the power supply located at the top of the case.
Unfortunately, in our assembly, the power supply basket is located at the bottom of the case, which significantly reduces the effect produced. However, the backlighting of the power cable connectors is still quite noticeable. The package includes a stylish zippered case for storing power cables.
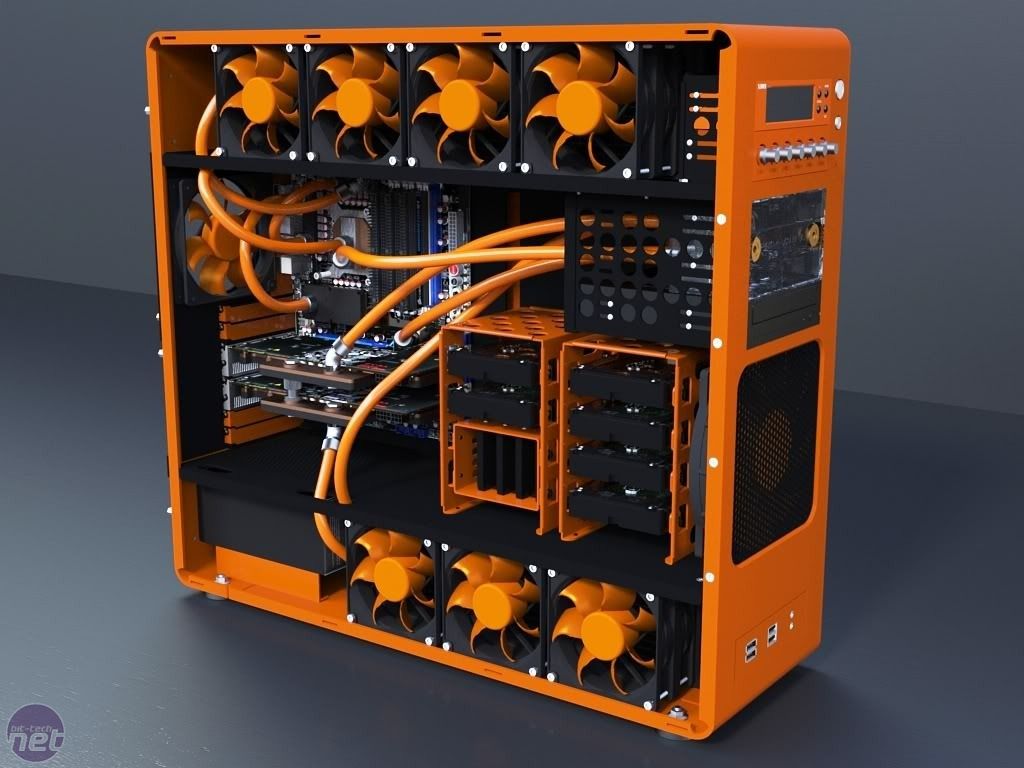
Rosewill Lightning series power supplies available from Newegg. And we found it in S. On the left side of the keyboard is a block of four large function buttons responsible for macros.
Attaches to the bottom left side of the stand, equipped with a Thumb Wheel and an Action Button , which turns this keyboard into a full-fledged gamepad. To the right, two more adjustable wrist rests are installed — one corresponds to the actual keyboard block, the second — to the block of numeric buttons, the latter, of course, can be detached if not needed.
Finally, there is a separate control module V. As you can see, there are too many components in the keyboard, and it’s hard to figure out what all this is for. So let’s first look directly at the modular structure of this product itself: the main keyboard, number pad, function button block, LCD touch screen, gamepad and wrist rests, which can be detached and rebuilt in several different configurations.
The only obvious limitation is that the gamepad is designed for left-handed operation only, and if you are left-handed, then you are out of luck.
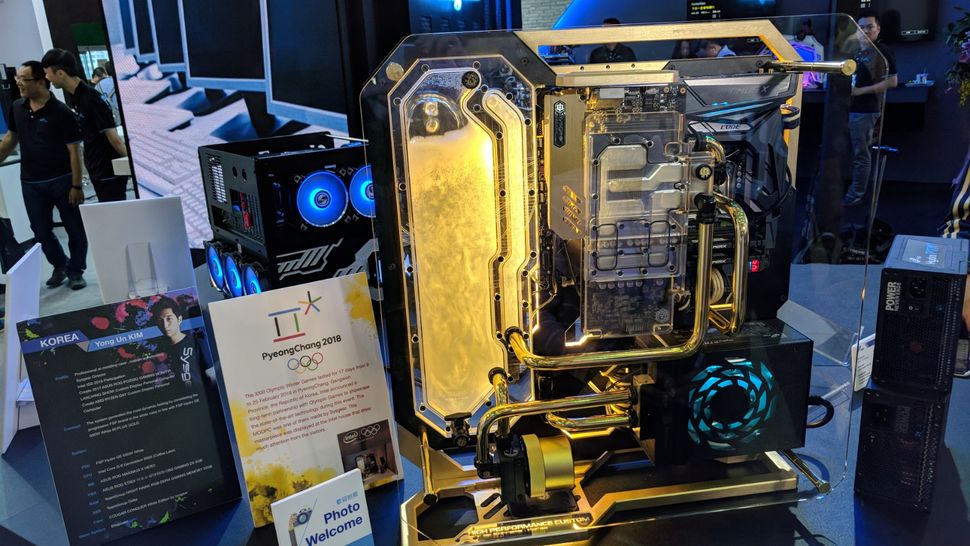 The wrist rests are not only modular, but also customizable. The gamepad can also be adjusted in height. Further customization of the keyboard is possible with the help of removable keys «W», «A», «S» and «D» and arrows.
 The kit includes two alternative sets: one with red rubber inserts, while the other has depressions in the center of the buttons themselves. If modularity isn’t exceptional in itself, then the control module is V. The control module’s eight screens are V. But the control module’s true strength lies in its ability to program game-specific macros using up to 12 touch icons.
This means that you have the ability to set both the functionality and appearance of the touch controls. The only remark is the lack of a choice of background.
It would be extremely helpful to change the original overall blue theme using game style themes. Mad Catz claims to be working on additional functionality for the V. The V.M’s LCD is about 8 cm diagonal. Although Mad Catz does not list the screen resolution, we believe it is x pixels, since that is the size of the image in Control panel software.
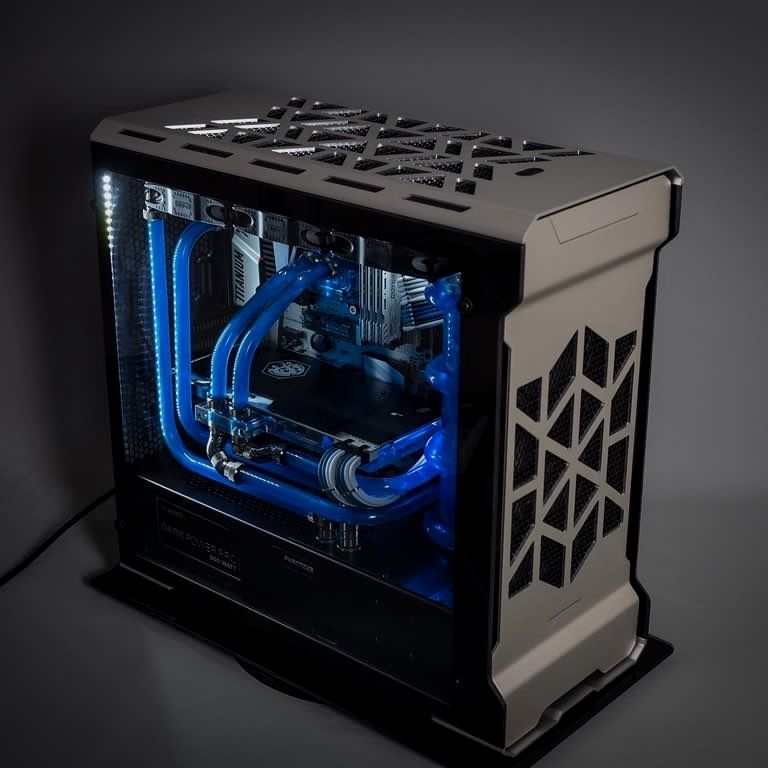 This is how a custom macro profile for World of Warcraft looks like with imported icons.
 The main elements of the keyboard are fixed on a metal frame, and even the guides for the keys are made of this material. The product is covered with rubber, which has a completely matte finish. The color and brightness of the backlight for the varnished buttons with laser engraving is configured through the corresponding menu section of the V control module. Considering the cost of this keyboard, we can hardly recommend it to every user. But, of course, it is great for our «dream computer».
But we still included it in our set, since it is much more comfortable to use a gameboard and a mouse during the game than a keyboard. In addition, the combined illumination of the keyboard, gameboard and mouse makes a strong impression.
In the end, this is the essence of this project. Logitech Gaming Software allows you to assign color and brightness to each profile, which can then be selected on the fly using three dedicated buttons.
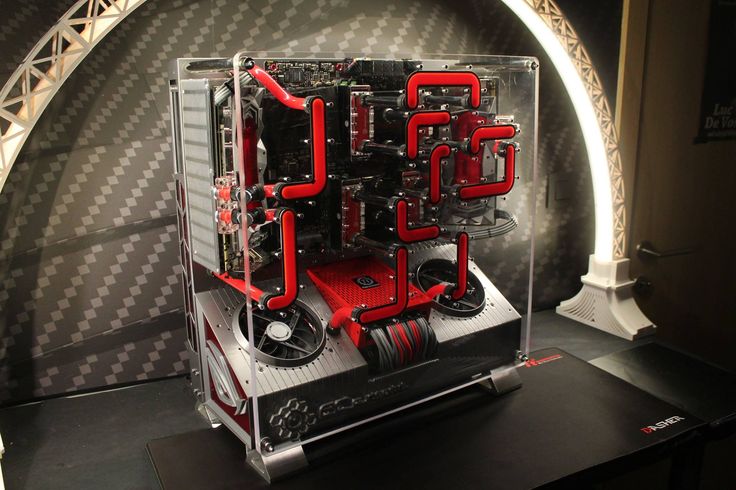 The color is applied not only to the backlight of the keys, but also to the built-in LCD display. The display can display system resources, a clock, a stopwatch, news, and various game information if the developers have created special applets for a particular game.
 Logitech also provides an SDK so you can create your own applet if you want. The G13 even has a built-in MB memory for storing profiles, allowing you to save your settings without having to access a PC utility.
G13 is equipped with 25 keys and a programmable mini-joystick. In combination with three function buttons, this provides access to 75 functions. And if this is not enough, you can use macros. Mouse: Roccat Kone XTD Keyboards with customizable backlighting are not uncommon these days, but mice with such functionality are much rarer. Thermaltake offers several models with customizable colors, but Roccat’s Kone XTD is the only mouse that provides full control over RBG colors, though there’s also the Mionix NAOS, which allows you to customize one of 24 colors.
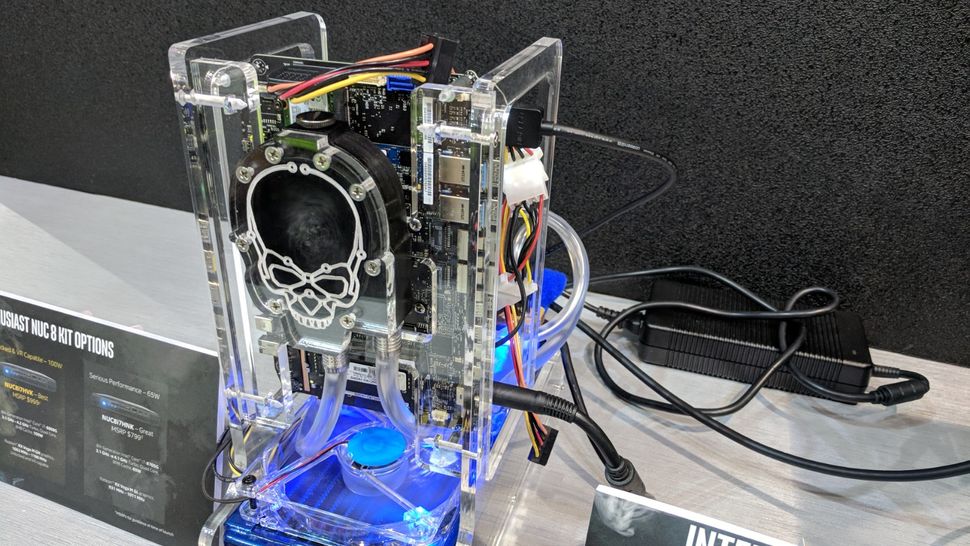
But the company didn’t stop at just one LED. The Kone mouse has four separate light sources, each capable of glowing in its own unique color. The mouse also supports lighting effects such as blinking, inhaling, heart beating, and a constant color stream that runs through all the LEDs. The speed of each effect is also configurable. Kone supports up to 22 features and has five gaming profiles that are configured through the most sophisticated control panel we’ve ever seen.
The resolution of the Pro Aim R3 laser sensor is dpi, the manufacturer says 10.8 megapixels.
Backlight for the system unit
Noordpool’s Smart RGB LightStrip — RF Remote, mm LED backlight modules are the most modern lighting option, with individually adjustable glow color for each specific LED. This backlight provides a bright, rich and uniform illumination of the computer case, with a variety of lighting effects. With a length of one meter, these modules are backlit by 60 ultra-bright three-chip RGB LEDs at once, each of which is equipped with a separate control chip that allows you to individually adjust the color of the glow of each LED.
 Noordpool’s LightStrip Pro — UV, mm LED Backlight Modules are a state-of-the-art, high-tech UV backlight option that provides bright, rich, and even illumination to your computer case, as well as illuminating UV-active and fluorescent parts. Price:
 As one of the best Chinese online stores, GearBest offers high quality LED PC backlight at low cost. Buy.
DIY case lighting guide
For computer modding fans, we recommend purchasing an LED strip. Highlighting the system unit is a great way to tune your PC. It will be useful not only as a decorative element, but will also highlight poorly lit areas on the motherboard. The backlight of the PC case is mounted both on the inside and on the outside of the system unit. The tape illuminates the components with blue lights. The backlight is connected to the computer’s power supply. The tape has good flexibility. Therefore, it can be mounted in various positions. At the end of the strip is a molex connector that powers the LEDs.
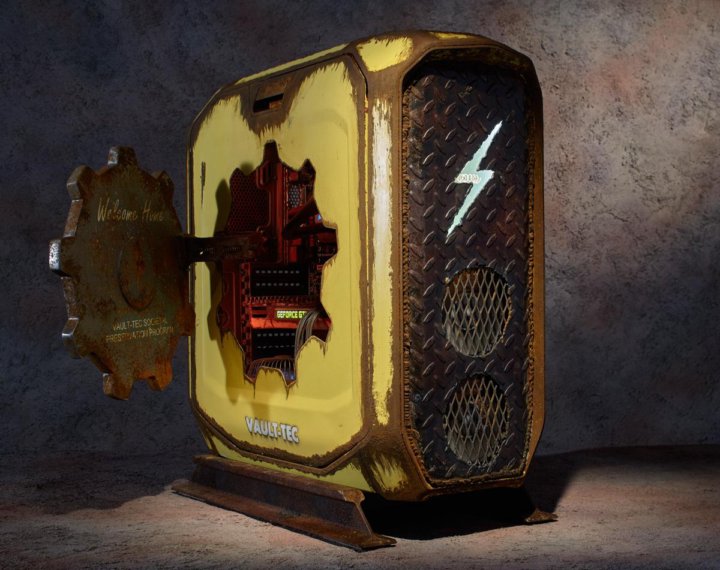
Akasa LED lighting
On the market you can see LED strips of different colors, they are sold in the required length. They are powered by 12 V, so it is quite possible to use them for backlighting. I’m looking at myself. LED strips?
Create and manage.
7 tips to build a beautiful RGB PC. Case testing Deepcool Quadstellar
The Taiwanese company Akasa is a leading manufacturer of cooling systems and accessories for personal computers. One of the main activities of Akasa is the release of devices for modding and personalizing the appearance of the PC. The company’s product range includes: single-color and RGB LED strips, LED strips with support for addressable control, panels and controllers for controlling LED backlighting, various cables and adapters. In addition, Akasa cooling systems and fans have built-in lighting. All of Akasa’s LED solutions are powerful and will allow you to achieve a truly spectacular and personalized PC look, which will be appreciated by gamers and modding professionals, as well as ordinary users.

Illuminated PC Fan 4
LED Computer The ultimate PC for every mood We tend to be firm in our choices when it comes to PC internals, but we can get a little different when it comes to aesthetics. There is no doubt that even in our laboratory, everyone has their own opinion about how a computer should look. For example, choosing a case is a very difficult task. Forget about using a single highlight color if you want one at all. In an ideal world, we would like to freely change color depending on our mood. So the lighting will have to work.
Do you look with envy at the backlight in computer cases and have already decided to make something of that kind with your PC? First decide what.
Your browser has JavaScript disabled.
New customer? Start here. By clicking this button, you agree to our privacy policy. Add to cart Buy now.
NZXT Hue controller allows you to control the LED lighting of your PC case
RELATED VIDEO: Ambilight DIY TV lighting
- STEP 1
Mono Mono.