THERMALTAKE DH 101 VF7000 SERIES USER MANUAL Pdf Download
Table Of Contents
3
-
page
of
25 -
Contents
-
Table of Contents
-
Bookmarks
Advertisement
Table of Contents
-
-
4
Chapter1 Product Introduction
-
5
Chapter 2 Case Mechanical Operation
-
11
Chapter3 Motherboard & Leads Installation
-
17
Chapter4 Front Buttons Instruction
-
18
Chapter 5 Dh201 Media Kits Quick Guide
-
25
Chapter 6 Other
2007 Thermaltake Technology Co. , Ltd. All Rights Reserved. 2007.07
C
www.thermaltake.com
All other registered trademarks belong to their respective companies.
Tested To Comply
With FCC Standards
FOR HOME OR OFFICE USE
Table of Contents
Previous Page
Next Page
Table of Contents
-
-
4
Chapter1 Product Introduction
-
5
Chapter 2 Case Mechanical Operation
-
11
Chapter3 Motherboard & Leads Installation
-
17
Chapter4 Front Buttons Instruction
-
18
Chapter 5 Dh201 Media Kits Quick Guide
-
25
Chapter 6 Other
Related Manuals for Thermaltake DH 101 VF7000 Series
-
Home Theater System Thermaltake VE1000SWA Manual
The ideal home entertainment center (14 pages)
Summary of Contents for Thermaltake DH 101 VF7000 Series
This manual is also suitable for:
Vf7000bnsVf7001bnsDh 101
ThermalTake VF7001BNS Dh201 | Overclockers Online
Print this article
ThermalTake VF7001BNS Dh201
Date
: 07/2/09 – 03:58:38 AM
Author
:
Category
: Cases
Page 1 : Index
Manufacturer:
Thermaltake
Thermaltake is well known for its range of PC cooling products, but probably better known for their large range of PC cases. Their Armor and Xaser lines remain popular and many of their newer cases like the Spedo and Element are receiving good reviews as well.
While the traditional PC enclosures receive most of the press, Thermaltake also has an outstanding line of home theater PC cases as well. With a growing popularity for digital media, many consumers are turning to HTPC’s to power their entertainment in the living room. With that in mind I have Thermaltake’s Dh201 HTPC case on the bench today for some testing. The Dh201 is equipped for full ATX duties so you can bring the power to your living room, but it offers quite a bit more. Is the Dh201 the case for your digital needs?
Page 2 : Package and Accessories
The packaging of the Dh201 is very classy and lacks the flash you typically see in case packaging. Front and back are identical with two cases on a light blue background. The box comes with a handle on top for easy carrying. As you can see the shipper did their best on the box, once we open it up we’ll get a look to see how the protection handled it.
The sides indicate the specific model inside, the VF7001BNS in this instance. The other side directs you to Thermaltake’s website for more detailed information.
Once we open things up, the Dh201 is protected by a cloth like bag and Styrofoam padding. No damage to the case, so the protection did its job.
Included are a user manual, warranty statement and a cloth to wipe off greasy fingerprints and smudges from the black finish.
The accessories are rounded out with an IR remote control (batteries included), Media Lab CD, Media Lab quick start guide, bag of screws and a lock ring for the case cover.
Page 3 : Specifications
I grabbed specifications straight from Thermaltake’s product page here. .
.
Specifications:
Features:
*Piano mirror coating with aluminum front panel design
*Built-in Media LAB LCD with hot keys module (Windows Vista Ready):
1. LCD capable of display any language
2.10 functional hot key buttons
3.Vol. Control Knob and remote control
*Compatible with Windows VISTA, MCE remote and keyboard
*High efficiency ventilation:12cm silent fan in front & dual 6cm fan in rear
*Supports ATX form factor & mATX form factor
*Supports ATX PS2 power supply
Page 4 : Exterior
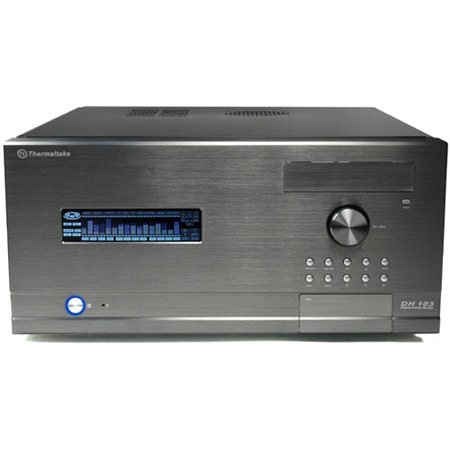
Right away the Dh201 is a classy looking case that will surely fit in most entertainment centers. The brushed black finish is complimented by a silver section along the bottom. Hard drive activity LED is along the bottom right and power LED is around the power button to the left. There is no reset switch. Next to the volume/mute button are 10 hot key buttons. Right above is the one external 5.25′ drive bay. The Media Lab LCD sits on the left and the top of the case is vented. While this offers greater ventilation, it also will allow any hardware you use more readily heard.
In the middle of the front is a cover that opens when you push on it, revealing USB, IEEE 1394 Firewire and mic/headphone jacks.
Both sides of the cover are also vented and you can see the mirror black finish of the top and sides as well.
The cover is held on with three thumbscrews. Power supply is mounted on the left, there are two 60mm exhaust fans above the I/O plate and 7 PCI expansion slots round out the backside. The levers you see above the PCI slots are part of the tool free mechanism that I will cover more later.
Case feet are wrapped in a gold colored metal and have rubber bottoms to prevent sliding and scratching the surface it sits on.
The Dh201 is surely set up to look good on the outside, but lets see what is hidden within.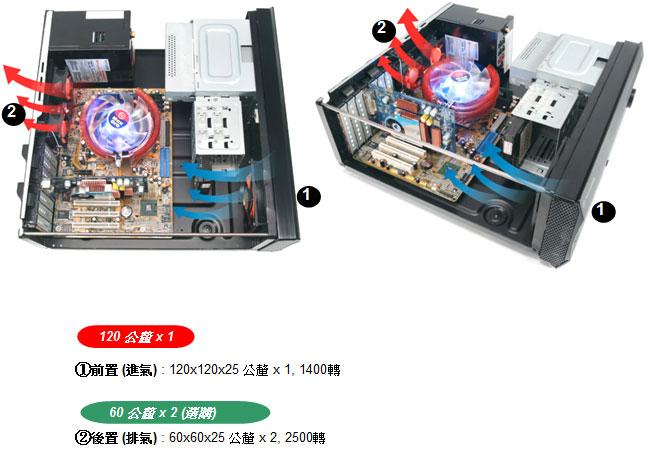
Page 5 : Interior
Removing the cover is just a matter of removing the thumbscrews, sliding it back slightly and lifting it off. Nothing out of the ordinary on the inside of the cover.
There really hasn’t been a whole lot of change inside HTPC cases in the overall layout, but it’s usually the small things that set different case makers apart. As you can see the general layout is very similar to the Ahanix D.Vine 4 that was reviewed here many years ago.
The Dh201 has a tool free mechanism that is used in both the 3.5′ and 5.25′ bays. There is room for up to three hard drives in the 3.5′ bay. While there is room for up to three 5.25′ devices, with only one opening the bottom two are really only useful for additional hard drives.
A little close look at the tool free devices in the drive bays. You simply squeeze together the plastic tabs and then line up the metal posts with the holes in the drives.
I like the tool free device for the PCI slots, it’s quite simple and effective. You pull a lever up, then simply lift the retention mechanism and remove the slot cover. Two 60mm fans will help exhaust out hot air from around the CPU area. Just above the exhaust fans is the intrusion alarm sensor.
There are three tabs along the top front that keep the front panel connected. Once you release these tabs the front springs forward and you can see where the Media Lab LCD and hot key panels are mounted at. Snapping the front panel back on was a little tricky, though luckily the only time it needs to be removed is when installing a 5.25′ device.
To round out the interior there is a 120mm intake fan that sits in the front right. No LED fans thankfully as the light from a fan is the last thing you want coming from your entertainment center while watching a movie.
Front panel connections include USB, Firewire and audio (both HD Audio and AC’97). Motherboard connections include power LED, HD LED, power switch, speaker and intrusion alarm.
For the Media Lab LCD, power goes through the 24pin motherboard connector and control comes from a USB connection. You have the option of using a motherboard USB header or routing it through the back and using a USB connection on the I/O panel.
The general tour is over, now let’s get down and dirty.
Page 6 : Installation
Installation was pretty standard with the hiccups that I expected which are quite minor and mainly deal with limited space. Installation of the hard drives was easy and the tool free mechanism works quite well, but you also have the option of screwing them down if you want to go old school.
The only issue I had with installing the DVD drive was getting the front to snap back on. As I stated earlier it took some concentration to get everything to line up and a little oomph to get it to snap back in.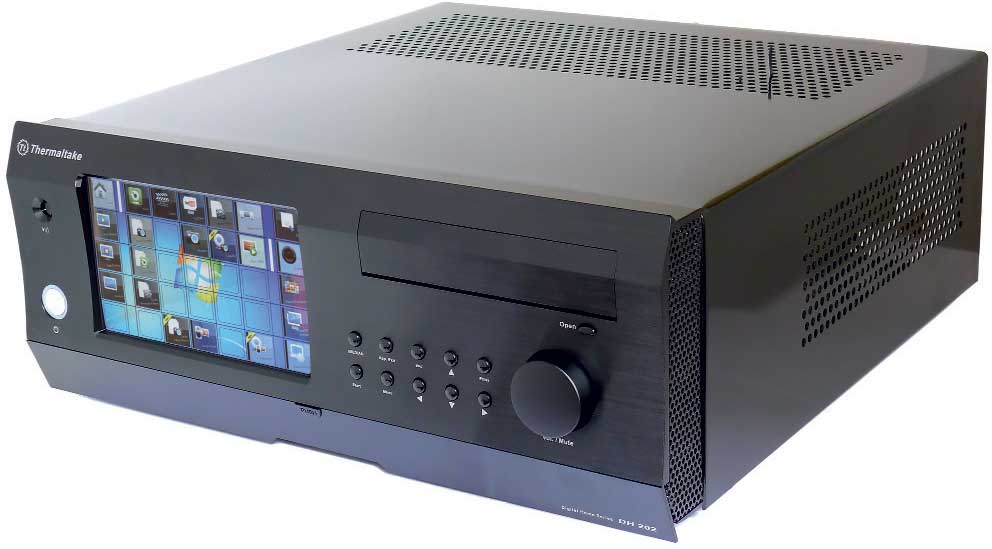
The biggest issue is just dealing with smaller areas. HTPC cases in general are better used with a modular power supply so you don’t have quite so many wires to try and hide.
With everything installed it doesn’t look too bad (yes I know there are some cable fu masters out there tsking at my messy wiring).
I did my best to show but it is a good thing that Thermaltake includes a nice cloth as the mirror black finish easily shows fingerprints and smudges.
Powered up and ready for some testing.
Page 7 : Testing
For testing I am going to do it in two parts, first off is temperatures followed by impressions of the included Media Lab hardware and user interface. The following system was installed and used to gather temperatures.
CPU: Intel E4300 w/stock cooler
MB: Gigabyte P35-DS3R
RAM: G.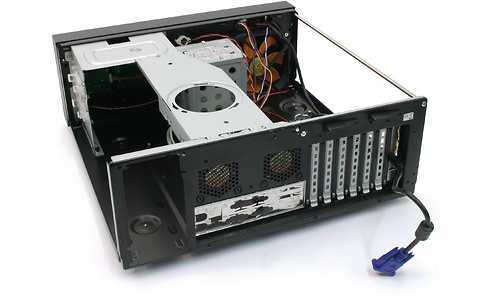 Skill 4GB PC6400 F2-6400CL4D-4GBHK
Video: Sapphire Radeon HD4550 512MB
PSU: Antec Earthwatts 450W
HD: Seagate 1TB 7200.11 SATA
DVD-Rom: Lite-On 18x DVD Burner – SATA
OS: Microsoft Windows XP w SP3
Ambient Temperature: 25-26C
Cases:
Ahanix D.Vine 4
Thermaltake Dh201
First up we’ll do some testing to see how well the Dh201 keeps things cool. To get idle temperatures I started the PC up and allowed it to sit at idle for 3 hours with no processes running and recorded temperatures using Everest Ultimate.
It’s clear even with idle temps that the fans along with the ventilated case cover go a long way in improving the temperatures.
Next was to load the PC and get some temperatures with a little more heat involved. To get load temps, I ran Orthos blend along with 3DMark06 in a continuous loop for 3 hours.
Under load the improvements that we saw in idle temps carry over here as well. While the Dh201 shares the same general structure as the D.Vine 4 the cooling improvements pay off in dividends.
While temperatures are always important with PC components, it isn’t the most important thing with HTPCs. Sound is an important factor and the Dh201 does a good job in this department. The included fans produce no mechanical noise but the air movement is noticeable up to about 5 feet away but shouldn’t pose a problem in most home theater setups.
Finally there is also the included Media Lab LCD (with iMon) and iMedianHD software. The front panel LCD is limited to what it can display such as system information, RSS feeds, time and a digital EQ. The included remote can be used to power on/off your PC as well as launch and control programs. The directional mouse stick is a little too sensitive and takes a little bit of getting used to.
The iMedianHD program is designed as a one stop shop to control all of your media files from one program. The interface is clean though it takes a bit to get used to navigating the interface. It easily played every file I threw at it from MP3’s to HD files. The only real issue I saw came with playing DVDs. They played smooth using a program like PowerDVD, but had a stuttering when using iMedianHD.
Page 8 : Conclusion
PC’s have been creeping into our living rooms for many years now. Recently there is a larger push for smaller form factor machines, but often with a smaller machine your options are limited. The Dh201 is a full size HTPC case that is stylish and provides a wide range of options for hardware. The piano black and silver finish should blend with most entertainment centers. With the included Media Labs LCD and remote control you can easily view your media files from the comfort of your couch.
There are a few things about the Dh201 that can be problematic though they really aren’t too big of issues as the first isn’t hardware related. The included iMedianHD can be a bit confusing to navigate and control. With a little practice it’s not too bad and you aren’t pigeon holed into using it if you don’t like it. The only real potential problem with the case is the open design of the cover. If you use any hardware that is a little bit loud it will be heard easier and may not work well in your living room.
These two minor issues aside, the Dh201 is an excellent case that I have thoroughly enjoyed using. It has found a permanent spot in my living room holding all of my music, pictures and movies.
Advantages
- Sleek styling
- Good cooling performance
- Includes Media Lab LCD and remote
Disadvantages
- iMedianHD controls can be confusing
- Open design could be noisy
Overclockers Online would like to thank Thermaltake for supplying the Dh201 HTPC case for review.
Thermaltake Dh201 Quick Review and Test Case
- Packing and contents
- Appearance
- Internal arrangement
- Testing
- Test Method
- Remote control system
- Conclusion
Introduction
Brothers overs, do you remember those antediluvian times when among computer cases the «lying» format (desktop) dominated almost everywhere? Over time, the size of components, and especially cooling systems, has grown significantly. Often it became necessary to install several hard drives, monitors have grown so much in size and weight that placing them ON the case has become simply risky. As a result, the system units migrated from the tables to special niches and just to the floor. Thus began a new era — the era of tower structures — the era of towers. What about desktops? They have not disappeared anywhere, they have simply evolved and received a new birth in the form of components of media systems.
A modern horizontal case, this is most often a neat case, carefully disguised as a component of an audio system or home theater. Often it would not even occur to you to suspect a system unit in such a device. But the presence of a full-fledged computer in the multimedia system opens up new opportunities for its owner.
First, the computer itself is a powerful multimedia device. Viewing photos and videos (moreover, a wide variety of formats), playing music in a sufficiently high quality and, most importantly, an almost unlimited amount of memory on board. 3-4 hard drives of maximum capacity can solve the problem of storing multimedia data for many years to come. In fact, the computer is able to become the only «bearing» component of the system.
Secondly, in terms of the openness of the system for modifications, upgrades and programming, the computer is simply not comparable to any other household devices. If necessary, most issues are resolved programmatically. In addition, the computer can be improved, keeping up with the times, installing additional hard drives, choosing the right audio / video card. In the end, you can replace the entire system in whole or in parts, in short — there is room for imagination.
You may also want to «shake the old days» by placing a similar case on a computer table. Or you will be attracted by the opportunity to create your own «game console» that will plug any X-box and PS into the belt and at the same time will be completely invisible in the composition of a home theater.
Today we’re going to do a quick review and test of a typical case with this layout: Thermaltake Dh201. The main goal: to try to understand — what is it all about? A serious case or just a beautiful case with an unusual layout, unable to provide proper cooling of components? Let’s check!
The body is supplied in a cardboard box 525x250x525 mm. Inside the box, the case is fixed using special foam molds. The Dh201 box is equipped with a convenient plastic handle, which greatly facilitates its transportation. Since the case has a glossy surface, it is additionally packaged in a cloth case that protects the coating from scratches.
recommendations
All accessories supplied with the housing are packed in a small cardboard box. Having opened it, inside we can find: a set of fixing screws and, what is much more interesting, a remote control and a disk with a proprietary utility for using it.
The kit also includes: instructions for the case itself and a small manual, in bourgeois «Quick guide», for the remote control. In the same box there is a disk with proprietary utilities for the operation of the display, remote control and key block on the front panel.
As I noted in the introduction, the case is very similar to a component of an expensive media system. The design is designed in the most strict style, no unnecessary decorations are observed.
The front panel of the case is made rough, the top and side surfaces, on the contrary, are covered with almost “piano lacquer”. In general, the case gives the impression of a solid and expensive thing.
Let’s take a closer look at the front panel — the first thing that catches the eye is the large display.
A useful thing, according to the manufacturer, it can display a huge amount of different data, and in any language. For the operation of the display and the programming of ten keys placed on the front panel, the proprietary utility MediaLAB, supplied on a disk included in the package, is responsible. We will dwell on its capabilities in more detail later. To the left of the display, you can see the hole under which the IR signal receiver from the remote control is located. Separately, I note that the case we tested belongs to the VF7001BNS modification — the oldest in the Dh201 series. In addition to this model, another one is produced — VF7000BNS, devoid of all programmable keys and a remote control system. Below, under a special cover, in the middle part of the front panel, there are two USB connectors, and one IEEE1394. In addition, here you can find two slots for mini-jack connectors for input / output of audio signal. I would like to note that the lid is spring-loaded — and leaves its place slowly, which creates an additional impression of solidity of the case.
To the right of the buttons is a large round knob, which by default is responsible for the volume. However, if desired, it can be endowed with other functions (in addition to direct rotation, the handle can also respond to pressing). It is disappointing that there is only one cover for the drive compartment on the front of the case. It’s no secret that in multimedia systems there are often several drives for various types of discs at once. In my opinion, this is somewhat inconvenient, not everyone wants to buy a universal «combine» that plays any media — often such models are unreasonably expensive.
Since the case has an «outdated» layout according to our concepts, it will not be possible to talk about the top and side covers separately. They are a single U-shaped piece.
The cover is fixed with three screws at the back of the case.
But its design is such that it sits very tightly. It is unlikely that this method of fastening can be considered a weak point of the case. Closer to the back of the case in the top panel is a through perforation across the entire width. Of course, this is very important to ensure air circulation, but such a placement of ventilation will certainly contribute to dust settling on the motherboard. On the other hand, we are overclockers! A person with “hands” can easily fix a pair of 120-mm fans under the grille, dramatically increasing the “ventilation” of the system.
The rear panel is quite interesting — we note a seat for an ATX standard power supply and small (60 mm) blowing fans peeping out from under the grilles.
Despite the unusual case, it has seven full-fledged plugs for expansion cards. The plugs are made detachable, if necessary, they can always be returned to their place.
The lower part of the case is also interesting in its own way. Namely, unusually high (after tower-type cases) legs.
They are about 2 centimeters high and have a soft rubber center part. The legs have a beautiful golden edging and contrast nicely with the black surface of the case.
When the top cover is removed, this is what we see:
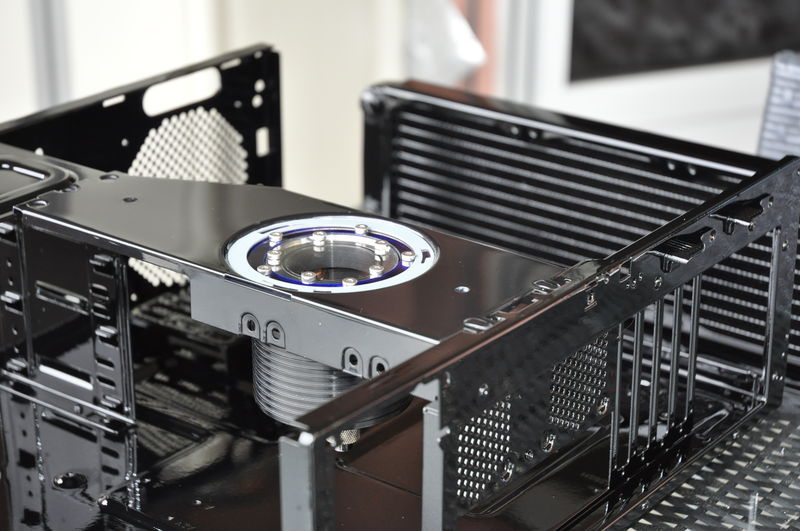
At first glance, the inside of the case looks rather unusual, but it is very easy to figure it out. Separately, I note that the removal of three walls at once “in one” greatly facilitates the installation of the system and makes it easy to attach various cords and tighten screws without looking for them by touch in the bowels of the case.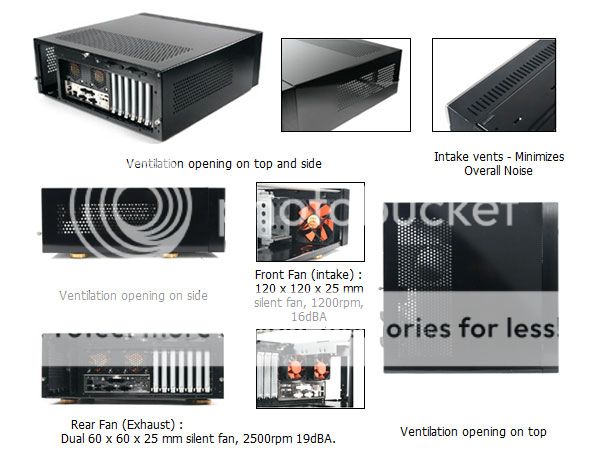 The rigidity of the case is increased with the help of a special air duct extension (a part with a round hole), which is attached to the drive cage on one side and to the rear panel on the other. To the left of it there is another stretch, which is an ordinary metal bar with a diameter of about 3 mm. If desired, the stretching duct can be easily removed so as not to interfere with the installation of the system. At the front of the case, we can see two separate cages for hard drives and drives. Both of them are equipped with branded latches made of transparent plastic for screwless installation of devices. According to my feelings, both hard drives and drives are attached with their help quite securely, but not too hard. Just in case, you can play it safe and use ordinary screws.
Particularly interesting is the cage for 5.25” drives – it is not clear what the designers were guided by when designing it, but it allows the installation of as many as three drives, with only one (!) plug on the front panel.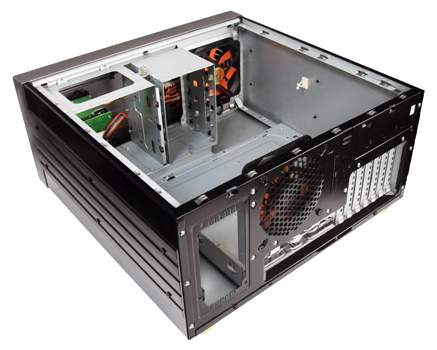
Moreover, two of them can be fixed with branded latches. What can be installed in two slots that do not have access to the front panel, to be honest, it is not clear to me. Perhaps with the help of special chassis, additional hard drives can fit here. However, the manufacturing company does not offer us any options, the buyer will have to solve this problem himself.
The hard drive cage has a similar design and allows the installation of two hard drives using the same latches. In my opinion — «not enough». To store multimedia data, sometimes you need a lot of space, and even two 1.5 TB disks may not be enough. In the working position, the hard drives operate standing on edge. It is difficult to say whether this is harmful to modern HDDs, so we will consider this just a feature of the case.
Chassis cooling system consists of three fans. The large 120mm in the front is blown. However, this fan is not installed very well — in fact, it draws air from a blank front panel, so we can’t talk about high efficiency here.
The manufacturer failed to place a similar fan on the back for blowing out due to the layout of the case, so two tiny 60-mm ones work out for it. Such a cooling system does not look impressive, but testing will better allow us to evaluate its effectiveness.
In addition, the abundance of wires coming from the front panel attracts attention. If desired, they can be carefully placed under the HDD cage, thereby optimizing the air flow.
In general, the case made a good impression with a fairly spacious interior. When installing the system, I had no problems even with the installation of the Scythe SCZP-1000 Zipang CPU cooler, which is large and slightly protrudes from the edge of the motherboard. Owners of tower coolers can be advised to check the height of their «towers». I specifically measured the distance from the surface of the motherboard to the top panel of the case — it was ~13cm, so installing many coolers of this type may cause problems. The Radeon 4850 video card was installed without any problems, but the length margin was literally 1.5-2 cm, so long boards are also contraindicated for this case. Although — this applies only to the upper PCI-E slot — NVIDIA GTX280, for example, can also fit into the lower one, since the HDD basket there is already «running out» and cannot interfere with installation. If an emergency arises, the basket can be completely removed by installing a hard drive in the drive bay (you need to “invent” an adapter, but this is possible) — then at least Quad-CrossFire X can be assembled in the case, there will be no constructive interference with this. My test system, not the weakest, was sheltered by the case quite successfully without any modifications.
Subscribe to our channel in Yandex.Zen or telegram channel @overclockers_news — these are convenient ways to follow new materials on the site. With pictures, extended descriptions and no ads.
Putting together a media center? Case review Thermaltake DH-101 VF7001BNS.
Introduction.
Recently, the question of choosing components for a media center has been raised on the forums. I think many would like to adapt an ordinary system unit to the needs of a media center or game console.
If the choice of components is quite large, then finding a decent case can be quite difficult.
In this article, I present to your attention a case worthy of a media center Thermaltake DH-101 VF7001BNS.
Complete set.
The case is shipped in a vertical orientation box, without a handle.
In the box were found:
1. Body.
2. Instruction.
3. Remote control.
4. Mounting screws.
5. CD with software.
6. Batteries.
External inspection of the housing.
The body has a horizontal orientation. All protruding parts are covered with a film — there are no complaints about the packaging.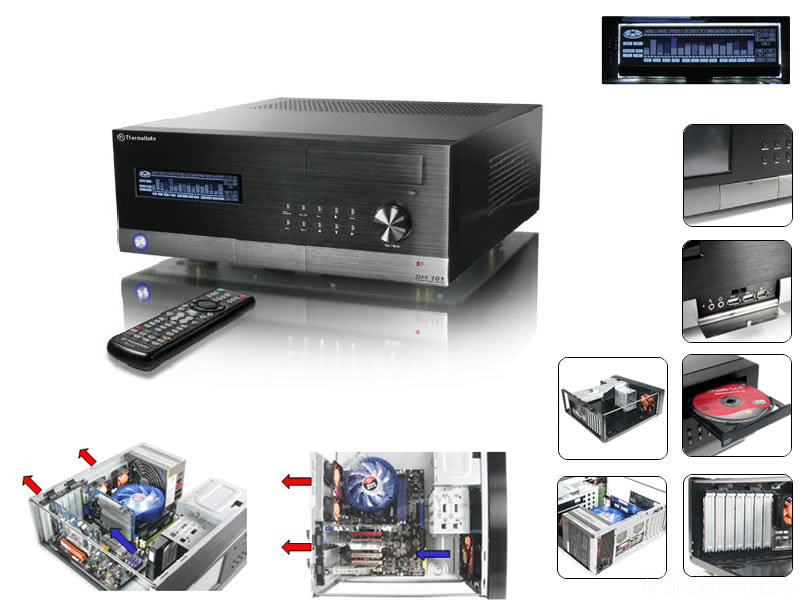 The top cover has perforated holes for ventilation. It is possible to install one 5.25 inch device.
There are also ventilation holes on the side surfaces, which is important, since the main problem with horizontal cases was poor ventilation.
It has a blue backlit LCD display. In the lower corner there is a silver start button, but the reset button could not be found.
There are function control buttons and a volume control. Buttons are configured using the program supplied on the disk.
There are also external ports covered with a plate: a microphone, an earpiece, two USB, FireWire.
On the back wall, everything is the same, if the hull of the tower was knocked on its side. There are two small fans that I did not connect.
Of particular note are the gold-plated legs with anti-vibration pads.
Internal inspection.
As you can see, only on the front wall there is a fan of decent size, which will need to be connected.
The basket of hard drives is located almost in front of the case.
You can install a fan on the upper transverse rack — it will be directly opposite the processor, or you can simply remove it.
This is what the assembled system looks like.
The external display is designed more to mimic turntables, but is fully functional once the software is installed.
Specifications.
1. Motherboard support: ATX and mATX
2. Device slots: 1 x 5.25″ external & 3 x 3.5″ internal
3. Expansion slots: 7
4. External input/output ports: microphone, earpiece, two USB, FireWire.
5. LCD display with 10 control buttons (programmable)
6.