Disable The Page File And Hibernation — Can You Get More Space Or Speed From Your SSD?
Skip to main content
When you purchase through links on our site, we may earn an affiliate commission. Here’s how it works.
Disable The Paging File
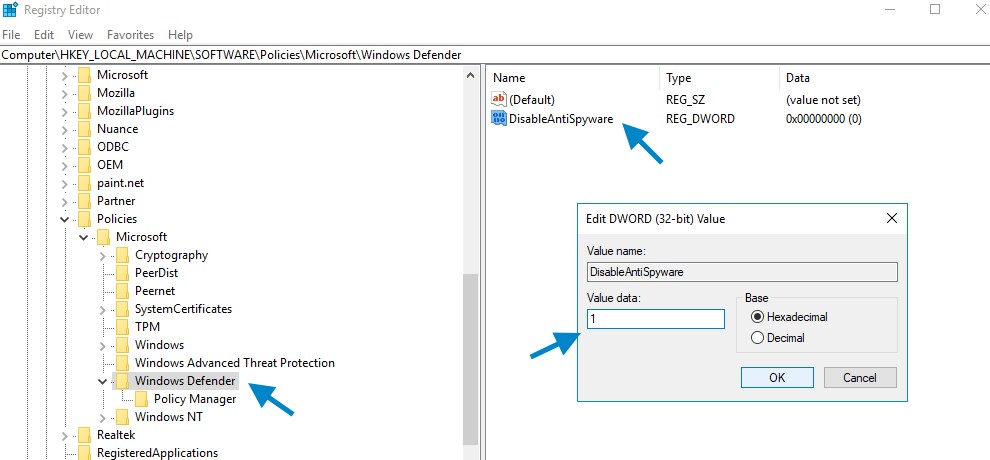
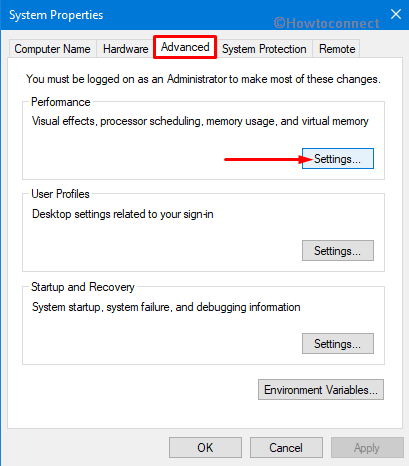
How to disable:
- Right-click Computer
- Select Properties
- Select Advanced system settings
- Select the Advanced tab and then the Performance radio button
- Select the Change box under Virtual memory
- Un-check Automatically manage paging file size for all drives
- Select No paging file, and click the Set button
- Select OK to allow and restart.
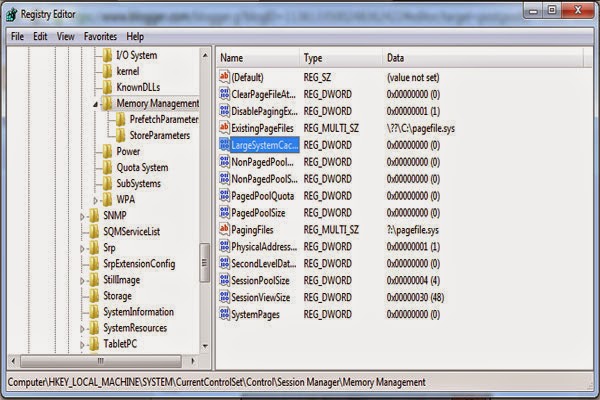
Per Wikipedia: «In computeroperating systems, paging is one of the memory-management schemes by which a computer can store and retrieve data from secondary storage for use in main memory. In the paging memory-management scheme, the operating system retrieves data from secondary storage in same-size blocks called pages. The main advantage of paging is that it allows the physical address space of a process to be non-contiguous. Before the time paging was used, systems had to fit whole programs into storage contiguously, which caused various storage and fragmentation problems.»
You can disable the paging file to free up space that would have otherwise been set aside on your SSD by the operating system. But bear in mind this move isn’t without risks. Should your system run out of physical memory, the fact that there is no virtual memory available to allocate means that subsequent crashes are quite likely. Really, this mostly makes sense if you have a ton of RAM and aren’t worried about the potential for data loss should an application crater in the event your system exceed what is installed.
Disable Hibernation
Per Microsoft support, «The Hiberfil.sys hidden system file is located in the root folder of the drive where the operating system is installed. The Windows Kernel Power Manager reserves this file when you install Windows. The size of this file is approximately equal to how much random access memory (RAM) is installed on the computer.» It follows, then, that disabling this feature returns as much storage capacity as you have installed RAM.
A desktop armed with an SSD doesn’t stand to gain much performance-wise from leaving hibernation on. Simply powering down and booting back up will happen fast enough. If you’re using a notebook, powering down and back up is also preferable to letting your machine drop to standby and continue draining battery power.
How to disable:
- In the Start menu search box, type «cmd» without the quotes
- Right-click the cmd program and select Run as Administrator
- In the command line, type «powercfg -h off», again without the quotes
- Once completed, the command prompt returns.
Hibernation was designed for for systems with conventional hard drives, allowing them to «wake back up» faster than a complete boot cycle would have otherwise allowed.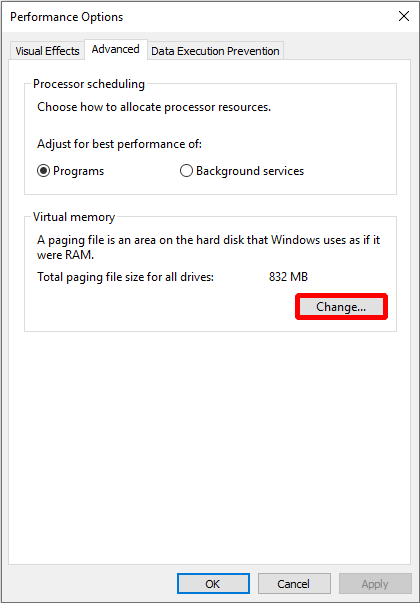 Given the access times of SSDs, though, the feature offers little to no benefit. Meanwhile, that extra capacity is much more valuable.
Current page:
Disable The Page File And Hibernation
Prev Page Disable System Restore And Drive Indexing
Next Page Disable Prefetch, SuperFetch, And Windows Write-Cache Buffer Flushing
Get instant access to breaking news, in-depth reviews and helpful tips.
Contact me with news and offers from other Future brandsReceive email from us on behalf of our trusted partners or sponsors
Tom’s Hardware is part of Future US Inc, an international media group and leading digital publisher. Visit our corporate site .
©
Future US, Inc. Full 7th Floor, 130 West 42nd Street,
New York,
NY 10036.
windows — Should I disable swap file if I have lots of RAM or should I move it to a virtual RAM drive?
Moving the pagefile to RAM is a ridiculous notion Just turn it off and by more RAM.
No matter how much RAM you have, you want the system to be able to use it efficiently. Having no paging file at all forces the operating system to use RAM inefficiently for two reasons. First, it can’t make pages discardable, even if they haven’t been either accessed or modified in a very long time, which forces the disk cache to be smaller. Second, it has to reserve physical RAM to back allocations that are very unlikely to ever require it (for example, a private, modifiable file mapping), leading to a case where you can have plenty of free physical RAM and yet allocations are refused to avoid overcommitting.
Consider, for example, if a program makes a writable, private memory mapping of a 4GB file. The OS has to reserve 4GB of RAM for this mapping, because the program could conceivably modify every byte and there’s no place but RAM to store it. So immediately, 4GB of RAM is basically wasted (it can be used to cache clean disk pages, but that’s about it).
Memory Management is handled by the CPU and whether the pagefile is on or off makes not one iota of difference to how pages are treated. It’s transparent to Windows.
The page priority doesn’t change, pages will be discarded just the same. Pagefiles are used by the CPU as secondary storage, not the OS. It’s nothing more than level two cache fwhen level one (RAM) runs out.
A quick and very dirty example:, my machine has 16GB of RAM and no pagefile. 5 mins ago with 13GB in standby and only 2GB free, I loaded Fallout 4.
The low priority pages were discarded as Fallout loaded.
Btw on a side note, the 2008 Technet Blog on Pushing Windows Memory Limits is very misleading — I would say to the point of deception.
I’m dubious as too whether even Mark wrote it, but I hope not, as it would change my perspective of him…..
Fwiw there are gaping holes in the article which I’m dumfounded no one has picked on considering how often that blog has been refer
- The pagefile and it’s location are handled by Windows, the trapping of memory access to locations that have been paged out to disk would be caught by the CPU, but handed to the operating system to retrieve the page from disk and load it in.
Anyway here is one not so vague description:
Windows cannot reach higher addresses than the CPU — it’s not possible.
No matter what the OS is capable of it still limited by the hardware it runs on.. because the OS is actually the CPU itself (internal registers).
OK, so pagefile is an area on the HDD which the CPU uses for extended physical address space when it can’t physically or architecturally use more RAM.
On segmented x86 32bit architecture for example there are two 2GB segments of RAM.
One is allocated to the kernel. The other 2GB is for user mode.
That’s all the RAM the CPU can use with 32 DRAM pins, but a 32bit process has 4GB available so what to do. Well luckily the CPU can use secondary storage AKA the hard drive for storing the extra 2GB of pages. Because it has internal registers
The physical locations where virtual pages referenced by the process don’t have to be stored in RAM. But they do have be stored somewhere by the CPU.
The CPU can’t give all 4GB RAM to the app, but it can give it 4GB of address by using the HDD as secondary cache (which is all the HDD really is)
The pages are moved in and out of RAM through it’s internal paging mechanism, but this is not the same as a pagefile. Paging always occurs….
The bottom line is really not that complicated. For the last 15 or so years many end users have been given the impression a pagefile is some integral part of the Operating System, it is not. It never has been. This misconception is partly fuelled by corporations like Intel and Microsoft.
RAM is a fast storage device, the Hard Drive is a slower storage device, so essentially RAM is level 1 cache, the Hard Drive is Level 2 (disregarding CPU cache for this analogy). Both can be accessed by the CPU.
If not enough RAM is available for the CPU to store the pages it needs to, the HDD can be used as an overflow. If there is plenty of RAM, then the PF is redundant.
Up until Core 2, Intel processors had a 32pin DRAM bus, and 32 registers meaning the CPU had access to 4GB of RAM, and 4GB of HDD space (pagefile). covers PAE,-more to come with links added).
http://www.windowsdevcenter.com/pub/a/windows/2004/04/27/pagefile.html
3rd screenshot source:
System V Application Binary Interface
AMD64 Architecture Processor Supplement Draft Version 0.99.7
I intend to continue improving this answer and adding source material and relevant info. I’d like to achieve a balance between not enough information and too much technical information.
Suggestions are welcomed. Please don’t downvote just because it may not be written so well.
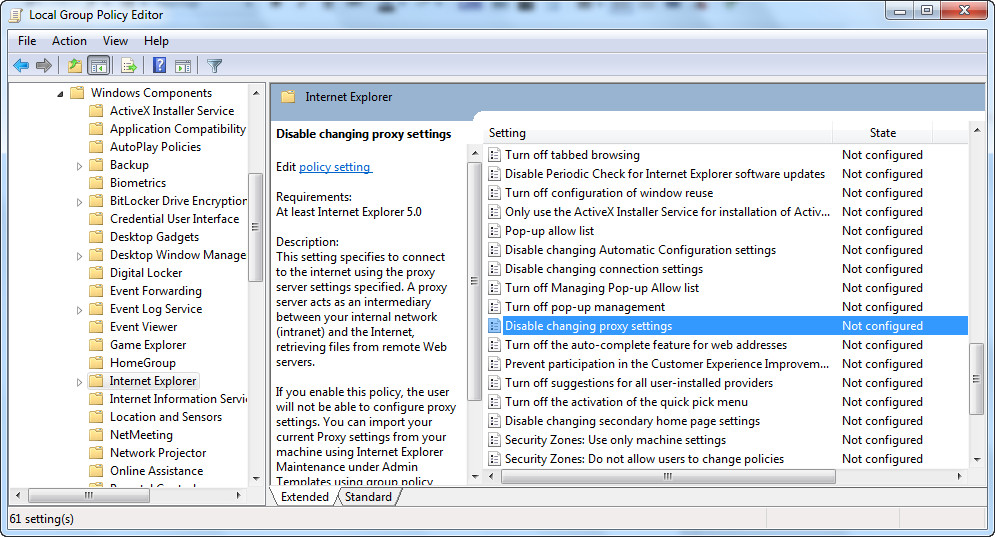
How to disable the paging file in Windows 10
If you are looking for information on how to disable the paging file on Windows 10, then this article has all the information you need. We will also talk about whether it is worth turning it off, and about cases when it is better to leave everything as it is. In addition, any more or less experienced user really needs to know how to work with this file.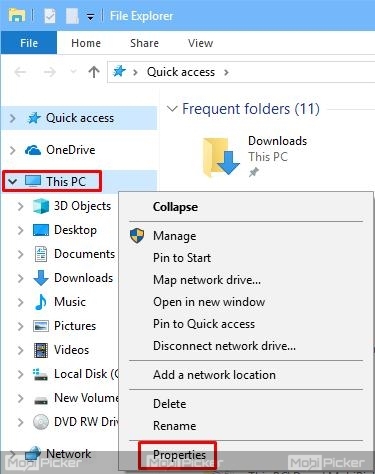
Disabling the paging file in Windows 10
Of course this will free up some hard drive space, but here’s how to determine if the system will work correctly without it. nine0003
Here are the cases when you should not disable the addition to the RAM:
- Too much RAM is used for the main computer processes, and, as a result, your device simply “freezes”
- You are used to using programs in the background, i.e. playing games and listening to music at the same time
- Your device simply has too little RAM. For example, if your device has 1 GB of RAM and Windows 10 Pro 64 bit is installed, pagefail will be required
By the way, you can read about the correct configuration of the swap file in our article.
And here are the options when pagefail can in principle be turned off:
- You installed an SSD drive and want to disable pagefail in order to extend the life of the new drive, because it has only a limited number of data rewrites and the price is much higher than a regular HDD.
 In this case, you can experiment with clearing the pagefail, but only if the amount of RAM on your device exceeds 8 GB. nine0014
- If the computer has 4 or 6 GB of RAM, then without a paging file, Windows 10 will work normally only in conjunction with ReadyBoost technology. This technology uses external drives such as flash drives and SD cards to place the system cache on them, which somewhat increases performance.
Learn how to change the paging file in Windows 10 in our other article.
Well, if all the pros and cons are weighed and the decision is made, let’s move on to the technical question — how to delete the paging file on Windows 10.
How to remove the paging file on Windows 10
This will take just a few simple steps:
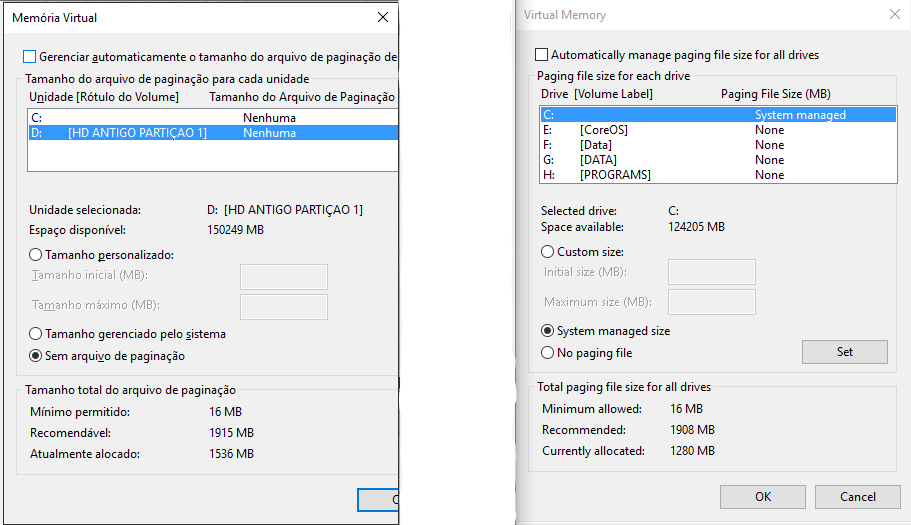
- Right-click on the Start menu icon and select «System» in the menu that appears
- Now select «Advanced system settings» in the left menu
- Click «Settings»
- Open the «Advanced» tab and click on «Edit»
- Disable «Select volume automatically», enable «No paging file», click «Set»
nine0014 - In the warning window, select «Yes»
- In the «Virtual memory» window, click «OK»
- Restarting the device
- After turning on the computer, make sure that our pagefail is deleted
And here is how to disable pagefail from the command line
- To disable one of the existing paging files, at the command prompt, type: wmic pagefileset where name= “C:\\ pagefail.
 sys”delete (name= “C:\\ pagefail .sys” is the location of your paging file, enter it according to your device data)
 - And in order to clear the computer of all files of this type, enter: wmic pagefileset delete
Discussions about whether pagefail is needed for the normal operation of the operating system can often be found on specialized forums, however, experts anyway do not recommend turning it off, it’s better to just leave the minimum size.
Not sure how to join Windows 10 hard drive partitions? Read all the details here.
Page File Windows 10, 8 and Windows 7
In Windows operating systems, the so-called paging file pagefile.sys is used for work (hidden and system, usually located on drive C), which is a kind of «extension» of the computer’s RAM (otherwise — virtual memory) and ensures the operation of programs even if when there is not enough physical RAM. Windows 10, 8.1, or Windows 7 also tries to move unused data from RAM to the swap file, with each new version doing better, according to Microsoft. nine0003
This manual details how to configure the paging file in Windows 10 and previous versions of the system: increase it, reduce it, disable it altogether, or move it to another drive. And also about the existing recommendations regarding the correct configuration of virtual memory.
- What happens when the paging file is disabled
- Windows 10 swap file
- How to increase, decrease, disable the swap file
- Instruction video
- Configuring the paging file in Windows 8.1 and Windows 7
- Video: Changing virtual memory settings
- Proper swap file setup
What happens if you disable the swap file
When the swap file is disabled, sometimes everything works as before. But if the amount of RAM is small (or when using processes that are demanding on the computer’s resources), you may receive a warning message: “The computer does not have enough memory. To free up memory for programs to run properly, save your files and then close or restart any open programs” or “Close programs to prevent data loss. ” Also, when the paging file is disabled, memory dumps are not saved during system crashes. nine0003
But not always: a common option is when programs simply “crash” or it can be difficult to associate an error with a virtual memory file that was once disabled (especially if it was a long time ago). Therefore, if you have disabled the paging file and you ever find that programs report their own errors (for example, an output error in OBS), or silently do not start (Premiere Pro), knock out a black screen (Photoshop), I recommend that you first try to turn it back on his.
By default, Windows 10, 8.1, and Windows 7 automatically determine the size of the paging file according to system needs and usage patterns. According to some users, in some cases changing the swap file manually can help optimize system performance, sometimes it may be advisable to turn it off altogether, and in some other situations, the best thing is not to change anything and leave the automatic detection of the swap file size.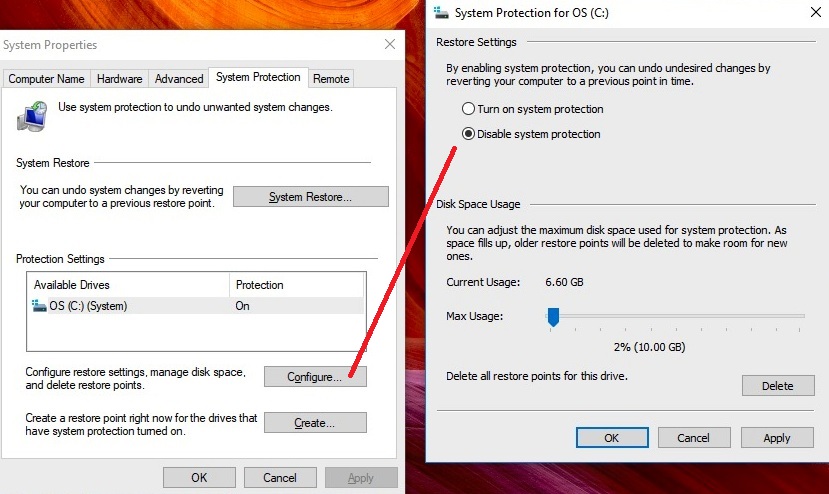 This guide explains how to increase, decrease or disable the paging file and remove the pagefile.sys file from the disk, as well as what are the recommendations for properly configuring the paging file, depending on how you use your computer and its characteristics . nine0003
Windows 10 paging file
In addition to the pagefile.sys paging file, which was also in previous versions of the OS, Windows 10 has a new hidden system file swapfile.sys, which is also located in the root of the system partition of the disk and, in fact, is also a kind of swap file used not for normal («Desktop App» in Windows 10 terminology), but for «Universal Apps» UWP.
A new swapfile.sys file was required due to the fact that universal applications have changed the way they work with memory and, unlike conventional programs that use the swap file as normal RAM, the swapfile.sys file is used as a file, storing the «full» state of individual applications, a kind of hibernation file for specific applications, from which they can continue working for a short time when accessed.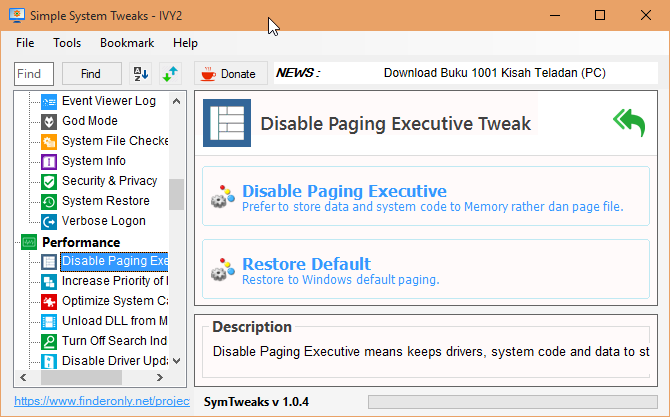 Anticipating the question of how to delete swapfile.sys: its presence depends on whether the normal swap file (virtual memory) is enabled, i.e. it is deleted in the same way as pagefile.sys, they are interconnected. nine0003
How to increase, decrease or disable the paging file in Windows 10
And now about setting up the paging file in Windows 10 and how you can increase it (although it is probably better to just set the recommended system settings here), reduce if you think that you have enough RAM on your computer or laptop, or turn it off completely, thereby freeing up space on your hard drive.
- In order to access the Windows 10 paging file settings, you can simply start typing the word «performance» in the search box, and then select «Adjust presentation and system performance.» The second option to get to the desired window is to press the keys Win + R on the keyboard, type sysdm.cpl and press Enter, then on the Advanced tab in the Performance section, click the Options button.
- In the window that opens, select the «Advanced» tab, and in the «Virtual Memory» section, click the «Change» button to configure virtual memory.
- By default, the settings will be set to «Automatically choose the size of the paging file» and for today, perhaps, this is my recommendation for most users. nine0014
- To increase or decrease, i.e. manually set the size of the paging file, uncheck automatic sizing, check the «Specify size» box and set the desired dimensions and click the «Set» button. After that, apply the settings. Changes take effect after restarting Windows 10.
- To disable the paging file and delete the pagefile.sys file from the C drive, select the «No paging file» option, then click the «Set» button on the right and answer yes to the resulting message and click OK. nine0014
- The paging file from the hard disk or SSD does not disappear immediately, and after restarting the computer, it will not be possible to delete it manually until this moment: you will see a message that it is in use.
 Further in the article there is also a video that shows all the operations described above for changing the paging file in Windows 10. It may also be useful: How to transfer the paging file to another disk or SSD.
Instruction video
Configuring the paging file Windows 7 and 8.1
Before I talk about the best paging file size for different scenarios, I’ll show you how you can change this size or disable the use of Windows virtual memory.
To configure paging file settings, go to «Computer Properties» (right-click on the icon «My Computer» — properties), then select «System Protection» in the list on the left. A faster way to do the same is to press the Win + R keys on your keyboard and type command sysdm.cpl (suitable for Windows 7 and 8).
In the dialog box, open the Advanced tab, and then click the Options button in the Performance section and also select the Advanced tab.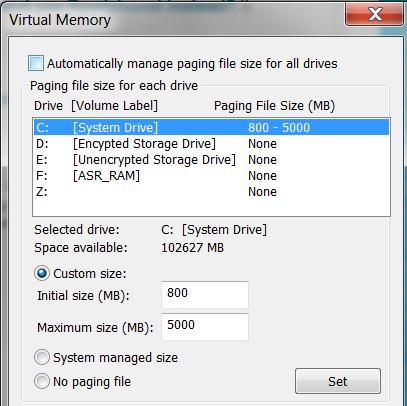 Click the «Change» button in the «Virtual Memory» section.
Just here you can configure the necessary virtual memory settings:
- Disable virtual memory (paging file)
- Reduce or increase the Windows 9 paging file0014
Changing the Windows paging file settings — video
Below is a video tutorial on how to configure the paging file in Windows 7, 8.1 and Windows 10, set its size or delete this file, and move it to another drive. And after the video, you can find recommendations on how to properly configure the swap file.
Properly configuring the swap file
There are many different recommendations on how to properly configure the swap file in Windows from people with different levels of expertise:
- For example, one of the Microsoft Sysinternals developers recommends setting the minimum paging file size equal to the difference between the maximum memory used at peak load and the physical amount of RAM.
 And as the maximum size — the same number, multiplied by two.
 - Another common recommendation, and not without reason, is to use the same minimum (original) and maximum size of the paging file in order to avoid fragmentation of the paging file and, as a result, performance degradation. This is not relevant for an SSD, but might make sense for an HDD. nine0014
- Well, the most common setting option is to disable the Windows paging file if the computer has enough RAM.
Most of my readers, I would not recommend doing this, because in case of problems when starting or running programs and games, you may not remember that these problems may be caused by disabling the paging file. However, if you have a strictly limited set of software on your computer that you always use, and these programs work fine without a paging file, this optimization also has the right to life. nine0003
Move the paging file to another drive
One of the options for configuring the paging file, which in some cases can be useful for system performance, is moving it to a separate hard drive or SSD. This refers to a separate physical disk, and not a partition on the disk (in the case of a logical partition, moving the paging file, on the contrary, can lead to a drop in performance).
How to move the paging file to another drive in Windows 10, 8, and Windows 7:
- In the paging file (virtual memory) settings of Windows, disable the paging file for the disk on which it is located (select the item «No paging file» and click «Set».
- For the second drive to which we are transferring the paging file, set the size or set it to the choice of the system and click «Set» in the same way.
- Click OK and restart your computer.
However, if you want to move the swap file from the SSD to the HDD in order to extend the life of the SSD, you probably shouldn’t do this, unless you have an old SSD with a low capacity. As a result, you will lose in performance, and the increase in service life may be very insignificant. Read more — Setting up an SSD for Windows 10 (relevant for Windows 8 as well).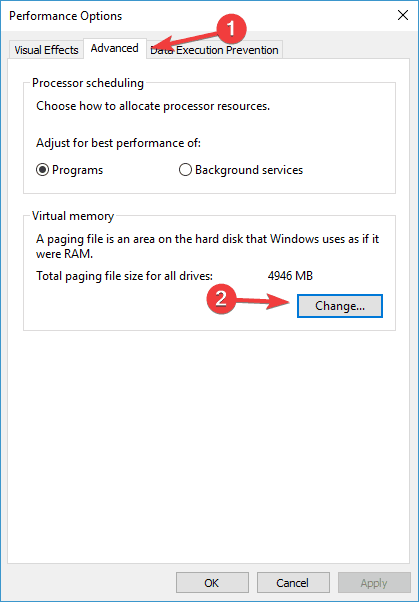 nine0003
Attention: the following text with recommendations was written by me about two years ago and in some points is not quite relevant: for example, for today’s SSDs, I no longer recommend disabling the paging file.
In various articles related to Windows optimization, you can find recommendations to disable the paging file if the RAM size is 8 GB or even 6 GB, and also not to use automatic selection of the paging file size. There is logic in this — with the paging file disabled, the computer will not use the hard drive as additional memory, which should increase the speed of operation (RAM is many times faster), and if you manually specify the exact size of the paging file (it is recommended to specify the initial and maximum size are the same), we free up disk space and remove the task of adjusting the size of this file from the OS. nine0003
Note: If you are using a SSD, it is best to take care to install the maximum amount of RAM and completely disable the swap file, this will prolong the life of the SSD.
In my opinion, this is not entirely true, and first of all, you should focus not so much on the amount of available physical memory, but on how exactly the computer is used, otherwise, you risk seeing messages that Windows does not have enough memory . nine0003
Indeed, if you have 8 GB of RAM, and the work at the computer consists of browsing sites and a few games, it is likely that disabling the swap file will be a good solution (but there is a risk of running into a message that there is not enough memory).
However, if you edit videos, do photo editing in professional packages, work with vector or 3D graphics, design houses and rocket engines, use virtual machines, 8 GB of RAM will not be enough and you will definitely need a swap file in the process of work. Moreover, by disabling it, you risk losing unsaved documents and files when you run out of memory. nine0003
If you are not sure how much RAM you need and what size of the swap file will be correct in your situation, there is the following approach to determine its size, I do not vouch for its truth and applicability for each user:
- Run on computer, all those programs that, in theory, you can run at the same time — office and Skype, open a dozen YouTube tabs in your browser, start the game (use your work script).
- Open Windows Task Manager while all this is running and on the Performance tab, see how much RAM is used. nine0014
- Increase this number by 50-100% (I won’t give the exact number, but I would recommend 100) and compare it with the size of the computer’s physical RAM.
- That is, for example, on a PC 8 GB of memory, 6 GB is used, doubled (100%), it turns out 12 GB. We subtract 8, set the swap file size to 4 GB, and you can be relatively calm that there will be no problems with virtual memory even with critical work options.
My personal view on the swap file as of the last update of this article is to leave its size automatically determined by the system and, if possible, on the SSD, provided that you need high performance. On the Internet, you can find recommendations that are significantly different from what I offer. Which one to follow is up to you. When using my option, you most likely will not encounter a situation where the program will not start due to lack of memory, but the option of completely disabling the paging file (which I do not recommend for most cases) can theoretically positively affect system performance in some cases.