Releases · Orbmu2k/nvidiaProfileInspector · GitHub
2.4.0.3
26 Nov 19:02
Orbmu2k
2.4.0.3
4c28abeCompare
2.4.0.3Latest
Latest
- renamed some settings
- added setting to disable Vulkan RT support
- added quick filter CTRL + F (ESCAPE to abort)
- added devmode view (CTRL + ALT + D)
- added support for descriptions in CSN for future use (sample description on Ultra Low Latency — CPL State)
- small fixes
2.4.0.1
13 Nov 13:15
Orbmu2k
2.4.0.1
acb5607Compare
2.4.0.1
Shadercache — Cachesize added #88
Background Application Max Frame Rate added #79
Disable Ansel setting is back and working #54 #87
Ultra Low Latency setting is back #49
added workaround for some settings throw errors when changed #46 #96 #94
AO High Quality removed from settinngs #101
updated settings to R520 and . NET Framework Version to 4.8 #102
Latency Indicator Overlay added to settings
GSYNC — Support Indicator Overlay added to settings
Enable DXR (Raytracing) added to settings
2.4.0.2
13 Nov 20:08
Orbmu2k
2.4.0.2
3f1d636Compare
2.4.0.2
Pre-release
Pre-release
rBAR options added #75 #103
2.3.0.13
19 Jan 00:46
Orbmu2k
2.3.0.13
d4ce1c9Compare
2.3.0.13
Pre-release
Pre-release
updated driver settings to R460, removed deprecated settings from CSN
2.3.0.12
24 Mar 18:58
Orbmu2k
2. 3.0.12
c2f71c5Compare
2.3.0.12
Pre-release
Pre-release
R445.75 removed restricted settings to avoid errors
2.3.0.11
04 Feb 19:33
Orbmu2k
2.3.0.11
a4ea01dCompare
2.3.0.11
Pre-release
Pre-release
R442.19 - increased limiter v3 range 20..1000 FPS
2.3.0.10
13 Jan 19:07
Orbmu2k
2.3.0.10
9adc3b9Compare
2.3.0.10
#38 enable wheel scrolling in toolstrip dropdownmenu & cleanups
2.
 3.0.9
3.0.9
12 Jan 15:09
Orbmu2k
2.3.0.9
57a8879Compare
2.3.0.9
added ShowCustomizedSettingNamesOnly & ShowScannedUnknownSettings to …
…user settings
2.3.0.2
23 Mar 15:14
Orbmu2k
2.3.0.2
854cc3dCompare
2.3.0.2
fix #13 remember window size, fix crash on closing app while scanning
NVIDIA Inspector Latest Version 1.9.7.8 Download For Windows
Download NVIDIA inspector latest version for windows. Overclock the NVIDIA Graphics card using this tool. Install the latest version 1.9.7.8 on your Windows P.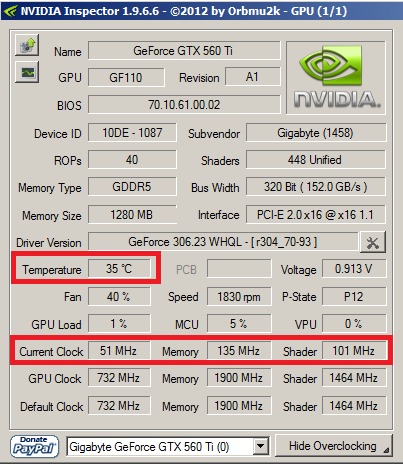 C. It reads all the GPU Related data from NVIDIA Driver. Create a custom graphics profile for your P.C. If your game is not supported SLI. Then use this tool to enable SLI For your games. It fetches all data from NVIDIA cards. Such as clocking speed, temperature, and fan speed. This software is specially build to customize the graphics profile for NVIDIA Graphics cards.
Go To Download Link
Table of Contents
Software Description
NVIDIA Inspector is a multi-functional tool for the video card. It can manage all the settings of Nvidia video cards. It reads all the data of Nvidia GPUs. If you are having trouble playing games. Or SLI is not supported by your game. Then you can use this utility to enable SLI. It helps to create a custom profile. You can set clock speed and fan speed according to your requirements. It comes with loads of features. The main feature of the Nvidia inspector is that you can overclock the NVIDIA Graphics Card using it.
Every game has different requirements.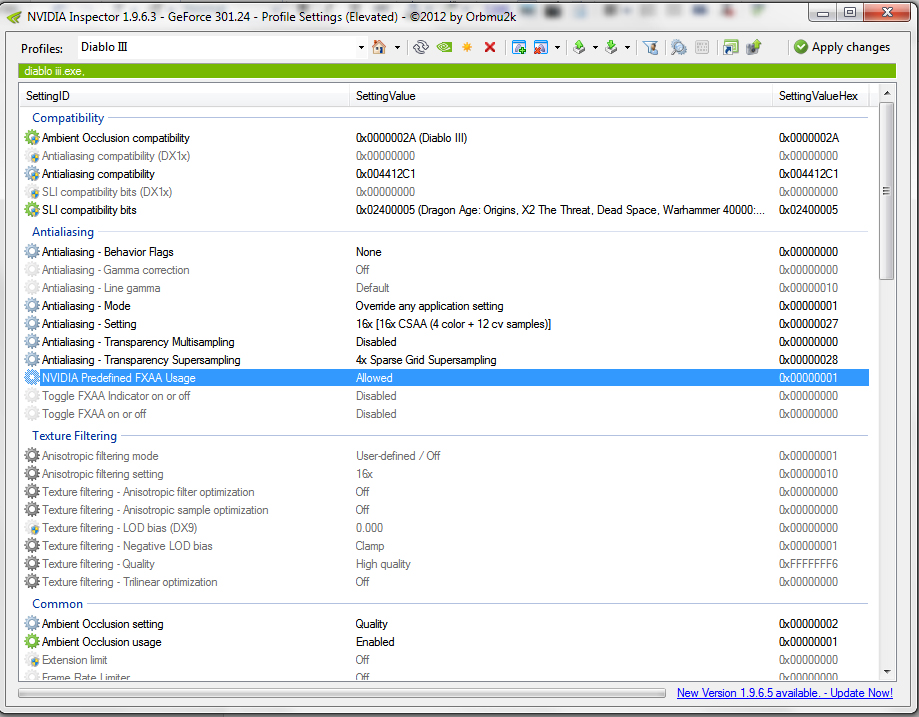 It is not possible to configure your PC for every game using hardware. Therefore we use software techniques. Which indirectly helps to interact with hardware. By doing this, you can configure your computer according to need. There is no change in hardware is required. Just for a few requirements, we cannot change hardware again and again. That’s why tools like NVIDIA inspector helps to interact with hardware.
NVIDIA Inspector is specially built for interacting with GPUs. It cannot configure your RAM, Processor Speed or Data Transfer Speed. Because it is a graphics profiler. You can configure the Graphics Card using this tool. Control the clocking speed, overclocking and Fan speed of NVIDIA Graphics Card. Sometimes it’s a good idea to overclock the Nvidia graphics card. Because of the requirements of different games. It can help to boost the performance according to your needs.
NVIDIA Inspector also includes the power saver. Which can help you to boost the battery? By using this feature, You can control power consumption.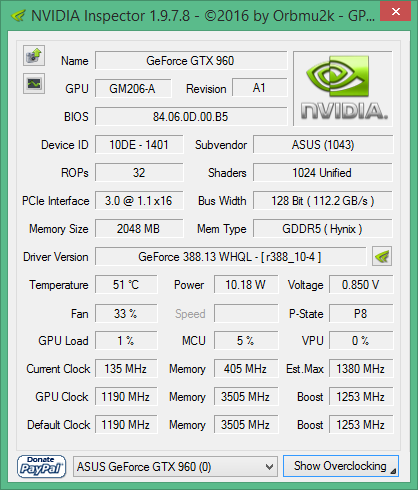 Avoid the heating of the Graphics Card using the Nvidia graphics profiler. Boost the FPS To increase the performance while playing the game. It comes with a special control panel. Where you can manage all the settings of your graphics card. The control panel also includes command-line options.
Nvidia Inspector File Information
| App Name | NVIDIA Inspector |
|---|---|
| File Size | 287 KB |
| Developer | NVIDIA Officials |
| Supported OS | Windows 10, Windows 8/8.1, Windows 7 and Windows XP |
| Downloads | 900000+ |
| Last Updated | November 3, 2020 |
Download NVIDIA Inspector 1.9.7.8 For Windows 10, Windows 8/8.1, Windows 7
Direct Download Link
Download Now
Related Downloads
- Download Nvidia Inspector For Windows.
- Download NVIDIA Control Panel For Windows 10.
- Download NVIDIA Profile Inspector For Windows.
Features Of Nvidia Inspector Latest Version
- Overclocking: You can overclock your graphics card using this awesome tool. Easily configure and control the clocking speed.
- Fan Speed: Control the fan speed of your video card according to your needs. Avoid the heating by configuring speed according to usage.
- Temperature: It will show the current temperature of your hardware. You can then manage the hardware using the tool.
- Battery Saver: Boost battery performance by enabling this feature. It reduces unwanted functions and boosts the battery.
- Boost FPS: Want to play the game without lag ?. Then boost the FPS from setting to play games in high quality.
- Limit FPS: If your device is lagging while playing HD Games. Then you can limit the FPS to avoid it. It will give you better gaming performance.
- Custom Profile: To play different games on the same pc.
 The different graphics setting is required. Therefore you can create a custom profile to play games. By using this method, you don’t have to configure your card again and again.
 - Control Panel: You will find every setting at one place called a control panel. Nvidia Inspector includes a control panel from where you can manage all the settings.
- Command-Line Options: Use this to give commands to your graphics card. Manage the performance of your video card using command-line options.
Requirements For Nvidia Inspector
Of course, the tool is specially built for NVIDIA Graphics Cards. Therefore it is useful for you only if you have a video card installed on your computer. There are some minimum P.C requirements. Which we have shared below. You need windows operating system to run this tool.
- Required O.S: Windows Operating System is required. (Windows 10, Windows 8/8.1, Windows 7 OR Windows XP).
- Size On Disk: Minimum 300 KB Is required to download and use this tool.

- Memory: Minimum 256 MB RAM is needed to run.
- Graphics Card: Use Nvidia Graphics Card to get the best performance by the tool.
Screenshots Of NVIDIA Inspector
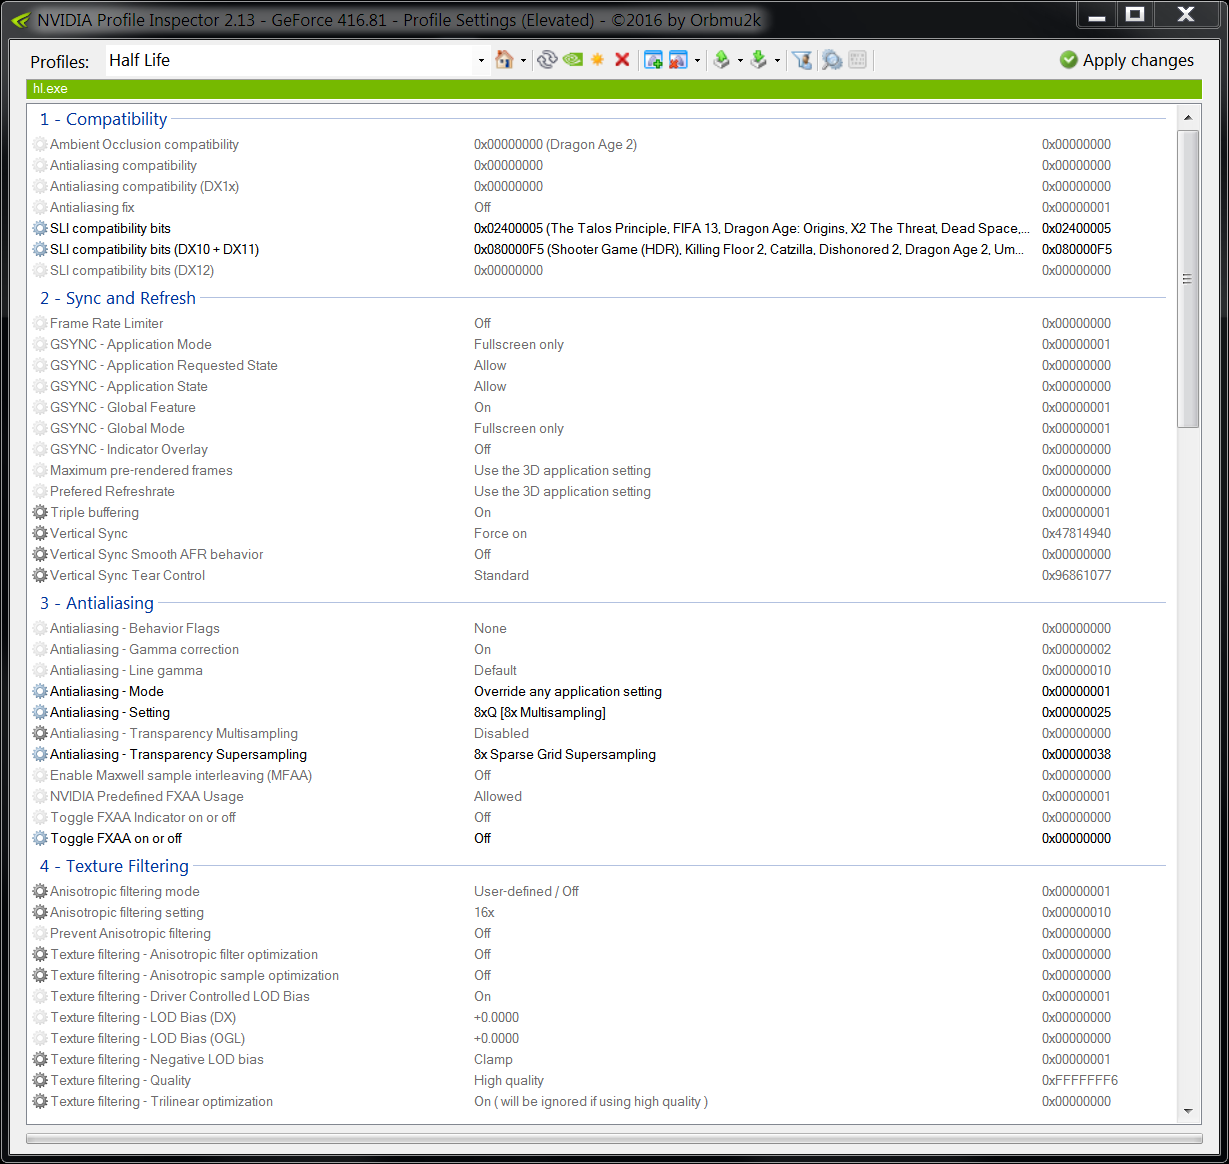
NVIDIA Inspector Best Settings
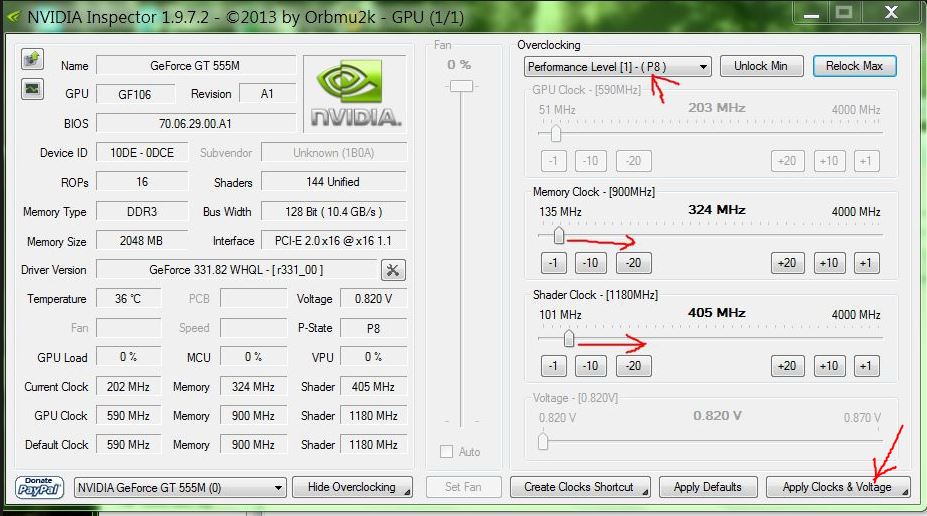
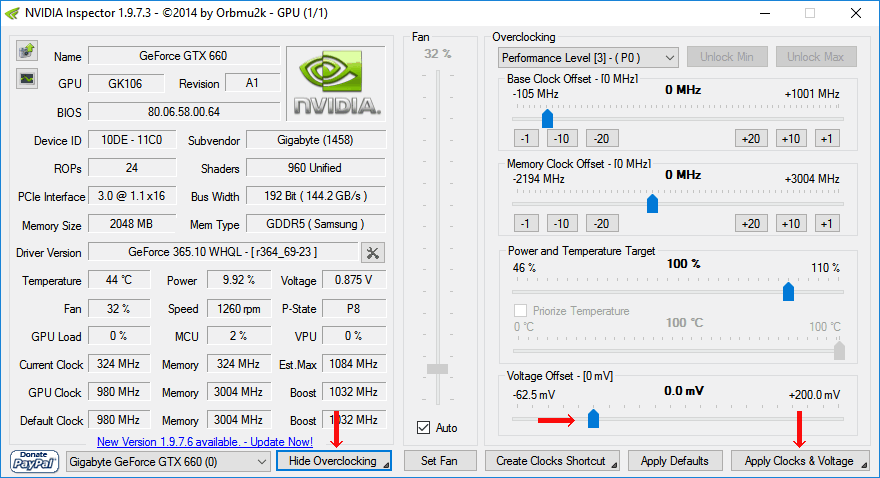
There are some best settings for the Nvidia inspector. Which can give you awesome performance? These settings are used to increase the gaming performance of the Graphics Card. You can follow the below instruction to configure your profile. In the below image. The vertical Sync refresh rate is 1/2. Toggle FXAA is off which can give you the best performance. Also remember, Use the single display performance mode. It will give you a fast speed. Keep power management to maximum mode.
Video Tutorial To Configure Nvidia Inspector For Best Performance
NVIDIA Inspector Command-Line Options
If you want to manage your graphics card using commands. It also includes command-line options. Manage advanced options of the card using the command.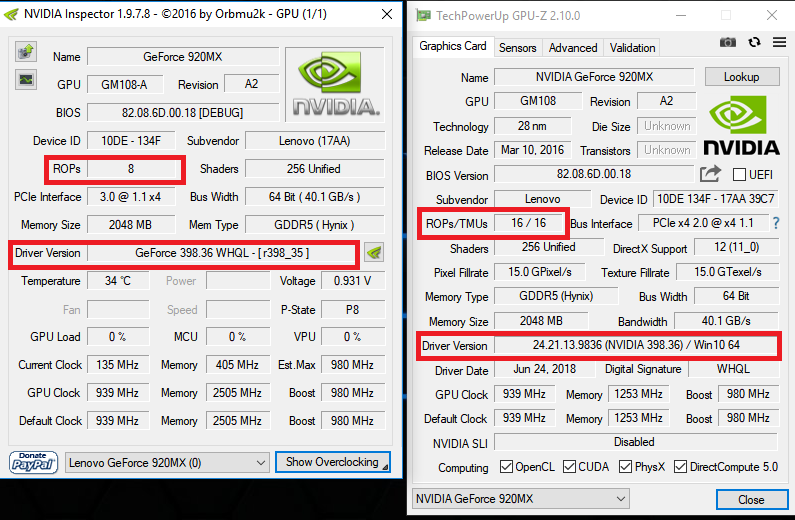 You can control fan speed, Clocking speed and other GPU Settings using the command line. It is for advanced users. If you don’t know about the commands of the Nvidia inspector. Then use the following method to configure your card. Below we have shared the best configuration for the Nvidia inspector.
- Open notepad and paste the following code in it.
-
SET VOLT=650000
SET MEMORY=500
SET CORE=100SET GPU0=-lockVoltagePoint:0,%VOLT% -setBaseClockOffset:0,0,%CORE% -setMemoryClockOffset:0,0,%MEMORY%
SET GPU1=-lockVoltagePoint:1,%VOLT% -setBaseClockOffset:1,0,%CORE% -setMemoryClockOffset:1,0,%MEMORY%
SET GPU2=-lockVoltagePoint:2,%VOLT% -setBaseClockOffset:2,0,%CORE% -setMemoryClockOffset:2,0,%MEMORY%nvidiaInspector.exe %GPU0% %GPU1% %GPU2%
- Save as the file in .bat format. Also, save in the location where Nvidia inspector is installed.
- Now run .bat file as administrator to check the more GPU data to configure.

- You can change the settings after running the .bat file. Set the values according to your needs.
NVIDIA Profile Inspector
It is a small part of the Nvidia Inspector tool. By using this, you can create a custom profile easily. If you just want to overclock your graphics card. Then use NVIDIA Profile Inspector. It is a small piece of full software. Therefore if you don’t want to use the full software. Or you just want to use the graphics profiler. Then Download NVIDIA Profile Inspector. Above we have shared the direct download link. Which also includes profile inspector. Or you can download from the below link.
The main purpose of using this is to avoid the extra settings. You don’t have to pass through the all settings tab. In just a single tab, you can get what you need. The NVIDIA Profile Inspector is a very lightweight tool for windows P.C. It is the best utility tool to configure video cards. If you don’t know how to use it. Then watch the video tutorial.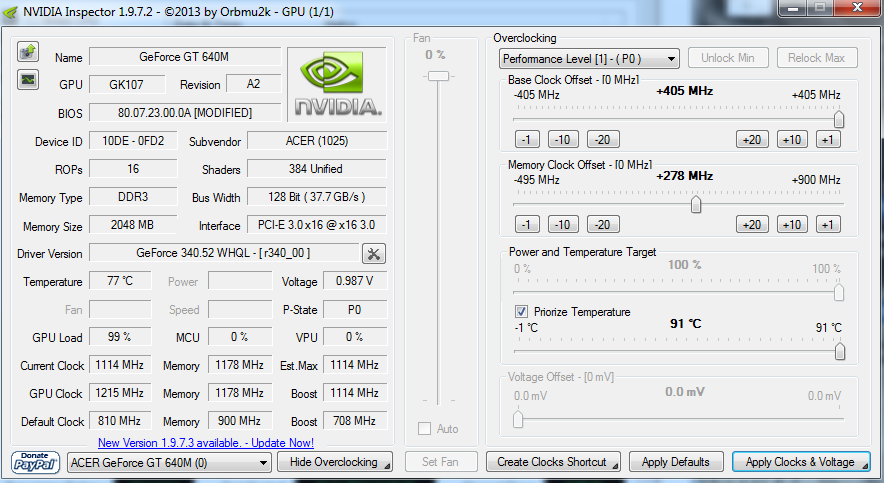 It perfectly works on windows 10, windows 8 or 8.1, windows 7 & windows x.p.
Download NVIDIA Profile Inspector
Download Now
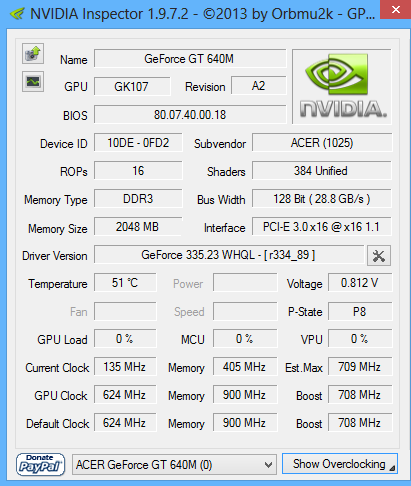
Screenshots Of NVIDIA Profile Inspector
F.A.Q
What Is NVIDIA Inspector?
It is a graphics profiler for the NVIDIA Graphics card. You can overclock your graphics card using this tool. This software works on Windows operating system. You can configure fan speed, clocking the speed of your video card without touching the hardware. This too indirectly interacts with the hardware.
How To Configure NVIDIA Inspector?
There are many ways to configure. We have shared the configuration tutorial above. You can watch the video and configure it easily.
How To Overclock NVIDIA Graphics Card?
Using the best settings which we have shared. You can follow that method to overclock the graphics card. No need to touch the hardware.
How To Boost FPS Using NVIDIA Inspector?
The tool includes the option to boost the FPS. You can put the desired value to boost FPS. But remember, Only put the values according to your system configuration.
How To Limit FPS In NVIDIA Inspector?
Same as above. You will get the option to insert values. Put the values to limit the FPS. Only use values according to your system configuration.
What Are The Best Settings For NVIDIA Inspector?
It depends on your system’s configuration. Although we have shared the best settings for the Nvidia inspector above. You can check the image and configure your setting according to it.
How To Create Custom Profile In NVIDIA Inspector?
You need NVIDIA Profile Inspector to create a custom profile. By using this, you can create different profiles for different needs.
How To Use Command Line Options?
You can create a .bat file to give commands. You can check the above-shared method to use command-line options. Save the code to .bat file and run it as administrator.
What Is NVIDIA Profile Inspector?
It is a small piece of NVIDIA Inspector tool.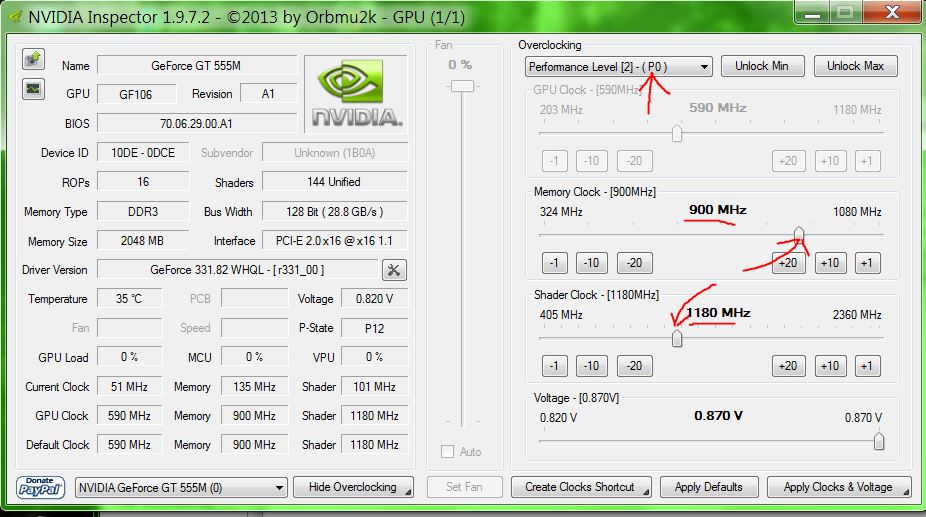 Using it we can create a custom profile for every game. No need to configure the profile again and again. You can save the profile and use it later.
Conclusion
So this is the best tool to configure your graphics card. You can make as many profiles for every game. No need to touch the hardware. Overclock the graphics card easily according to requirements. Enable SLI For unsupported games. No hardware change is needed for a few requirements. It will help you to control fan speed, overclock the card and check the temperature of your graphics card.
Question — NVIDIA Profile Inspector | BLASTHACK
-
-
#one
- SA-MP version
-
- 0.
 3.7 (R1)
- 0.
Guys please help! What is the point, settings from someone else’s profile will not be applied, it knocks out such an error « Some profiles could not be imported! Failed to import profile GTASA — DRS_SetSetting failed: NVAPI_SETTING_NOT_FOUND «. I set the same parameters manually, but it is not displayed in GTA, so everything remains. I have already tried everything:
— delete the DRS folder or create it;
— completely demolished the driver through the utility and reinstalled it;
— went in NVIDIA settings and set the quality to high and the highest anti-aliasing, but the result is the same.
-
KnightSampa
THE PROBLEM IS SOLVED FROM A FOREIGN FORUM — IF YOU HAVE THE LATEST NVIDIA DRIVERS AND THE LATEST WINDOWS VERSION, THEN THIS VERSION OF NVIDIA INSPECTORA
WILL SUIT
Press
DOWNLOAD AND REJOY02)
Sort by date
Sort by votes
-
-
#2
try to download and install your settings through this nvidia inspector — https://www. upload.ee/files/13043093/nvidiainspector.zip.html
Positive voice
0
Negative voice
-
-
#3
rvng wrote:
try to download and install your settings through this nvidia inspector — https://www.upload.ee/files/13043093/nvidiainspector.zip.html
Click to expand…
Didn’t help (It’s the same version.
Positive voice
0
Negative voice
-
- Solution
-
-
#four
THE PROBLEM IS SOLVED FROM A FOREIGN FORUM — IF YOU HAVE THE LATEST NVIDIA DRIVERS AND THE LATEST WINDOWS VERSION, THEN THIS VERSION OF NVIDIA INSPECTORA
WILL SUIT
Press
DOWNLOAD AND REJOY02)
Positive voice
one
Negative voice
Solution
-
-
#5
KnightSampa wrote:
PROBLEM SOLVED FROM A FOREIGN FORUM — IF YOU HAVE THE LATEST NVIDIA DRIVERS AND THE LATEST WINDOWS VERSION, THIS VERSION OF NVIDIA INSPECTORA 9 WILL SUIT0028 Press
DOWNLOAD AND ENJOY)Press to expand.
..
Listen, buddy, thank you for giving me this version, it runs without errors for me, but there is one problem: the settings that I set in it do not work in the game (in my case, gta sa-mp ). Can you help if you know the solution? Thanks in advance
Positive voice
0
Negative voice
-
-
#6
halayma wrote:
Listen, buddy, thank you for giving me this version, it runs without errors for me, but there is one problem: the settings that I set in it do not work in the game (in my case, gta sa-mp ). Can you help if you know the solution? Thanks in advance
Click to expand.
..
Did you set the OA anti-aliasing settings or changed something else? What is the driver version and what is the video card? What settings are in the nvidia control panel on the gta itself? Got a screenshot with your nvidia and inspectora settings
Last edit:
Positive vote
0
Negative voice
-
-
#7
KnightSampa wrote:
Did you set the settings for OA smoothing or changed something else? What is the driver version and what is the video card? What settings are in the nvidia control panel on the gta itself? Got a screenshot with your nvidia and inspectora settings
Click to expand.
..
Nvidia Inspector settings (2 and 3 photos):
Video card driver version: 465.89
Video card: Nvidia GeForce 1050 4gb
Settings of the GTA itself in the Nvidia control panel (1 photo):
I tried all the ways to solve the problem, nothing helps, my hands are already dropping =(
p.s. I use a laptop, I don’t have pc
Positive voice
0
Negative voice
-
-
#eight
halayma wrote:
Nvidia Inspector settings (2 and 3 photos):
Video card driver version: 465.89
Video card: Nvidia GeForce 1050 4gb
GTA settings in the Nvidia control panel (1 photo): omitted =( View attachment 96745p.s. I use a laptop, I don’t have a PC
View attachment 96743View attachment 96742Click to expand…
1. Completely uninstall the driver for the video card using the DDU utility (Don’t forget to check the uninstall PhysX box in the utility settings) Press
2. Install the latest drivers — 466.27 (Geforce Experience uncheck «Automatically optimize recently added games or applications) Press
3. You go to NVIDIA INSPECTOR, which you downloaded last and paste these settings into the profile (Importer File — Import file) dropped below .rar
4. Most importantly, apply the settings «Apply changes»
5. Manage 3D settings -> Global settings set these options:
— OpenGL rendering GPU-> Own GTX 1050 graphics card
— Power management mode -> Preference maximum performance
6. Installation PhysX configuration (It’s all there in the 3D settings management) -> Choose the PhysX processor for your video card!
After all these step-by-step instructions, it should work, try it)
Last edit:
Positive vote
0
Negative voice
-
-
#9
KnightSampa wrote:
1. Completely remove the drivers for the video card using the DDU utility (Don’t forget to check the delete PhysX checkbox in the utility settings) Press
2.Install the latest drivers — 466.27 (Geforce Experience uncheck «Automatically optimize recently added games or applications) Press
3. Go to NVIDIA INSPECTOR, which you downloaded last and paste these settings into the profile (Importer File — Import file) dropped below .rar
4. Most importantly, apply the settings «Apply changes»
5. Manage 3D settings -> Global settings set these options:
— OpenGL rendering GPU-> Own GTX 1050 graphics card
— Power management mode -> Preference maximum performance
6. Setting the PhysX configuration (It’s all there in the 3D settings management) -> Choose the PhysX processor for your video card!
After all these step by step instructions should work, try it)Click to expand…
Hello, absolutely all settings from Nvidia Inspector work for me, except for Ambient Occulusion. That is, all settings are applied, except for the ambient. Thank you, by the way, for trying to help somehow)
Positive voice
0
Negative voice
Login or register to reply.