NVIDIA Resizable BAR Firmware Update Tool
NVIDIA SUPPORT
This article explains how to update the GPU firmware for Resizable BAR compatibility on GeForce RTX 30 Series GPUs from NVIDIA and our partners. Contact your GPU vendor if you have further support questions not covered by this article.
Resizable BAR is an optional PCI Express interface technology. NVIDIA has created a downloadable GPU firmware update tool for GeForce RTX 30 Series GPUs to enable Resizable BAR. The tool will detect whether a firmware update is supported, and if supported, will give the user the option to update it.
Enabling Resizable BAR requires a compatible CPU, motherboard, system firmware (SBIOS), R465 or higher driver, as well as GPU firmware (VBIOS) support. Updating the GPU firmware should only be performed if the rest of the platform supports Resizable BAR.
Read our Resizable BAR article to learn more about supported CPUs, motherboards, GPUs, and games.
Running the Tool
Prior to running the tool, make sure the newest Game Ready Driver is installed. Ensure power is connected and stable during the update. Save open files and do not turn off your PC.
Once you have the tool downloaded, please run the tool and follow the on-screen instructions. When running the tool, a console window will be displayed with instructions. While performing the update, the screen may flicker or temporarily go blank.
A reboot is necessary for the new firmware to take effect.
The tool will detect all cards in the system and indicate one of the following statuses:
|
Status |
Meaning |
|
Update supported, will be applied |
The existing GPU firmware does not support Resizable BAR, and this tool can be used to update it. |
|
Already updated |
The GPU firmware has already been updated from this tool. |
|
Resizable BAR already enabled |
The GPU already has Resizable BAR enabled, and no update is necessary. |
|
Unsupported by this tool, contact card vendor |
The existing GPU firmware does not support Resizable BAR, and the card is not supported by this tool. Contact the card’s vendor for support. |
|
Unsupported |
The GPU is not capable of supporting the Resizable BAR feature. This update is only available for RTX 30 Series GPUs. |

If an update is performed, please restart your PC for the new firmware to take effect.
Confirming Resizable BAR is Enabled
After you’ve updated all your components, and installed our R465 or higher Game Ready Driver, you can verify Resizable BAR is working on your system by opening the NVIDIA Control Panel.
On the bottom left of the NVIDIA Control Panel, simply click “System Information”, and in the new window look for “Resizable BAR” on the right. If it says “Yes”, you’re set.
Additional Information
How do I enable Resizable BAR?
There are three components to enabling a higher BAR value.
1. Supported GPU including VBIOS
a. GeForce RTX 30 Series desktop GPUs — Support for a specific sku determined by GPU vendor
b. GeForce RTX 30 Series laptops
2. Supported Motherboard SBIOS
a. Users can obtain motherboard support and SBIOS information from their motherboard vendor
b. Within SBIOS, adjust the setting to:
1. Boot in UEFI mode
2. Enable “Above 4GB Decoding”
3. Enable “Resizable BAR” in the SBIOS
4. Disable Compatibility Support Module (CSM) in the SBIOS.
5. Ensure GPT partition type is used (and not MBR)
a. You can convert MBR to GPT using these guides
- https://docs.microsoft.com/en-us/windows/deployment/mbr-to-gpt
- https://www.windowscentral.com/how-convert-mbr-disk-gpt-move-bios-uefi-windows-10
3. Supported driver (Game Ready Driver or NVIDIA Studio Driver)
a. RTX 3080 NB, 3070 NB, 3060 NB: 461.40 or higher
b. RTX 3060: 461.72 or higher
c. All other supported RTX 30 series GPUs: version 465.89 or higher
I’ve walked through all the steps to enable Resizable BAR and I’m still seeing the setting show up as “No” in the NVIDIA Control Panel, or I am getting black screens when booting. What am I missing?
Here are three areas to confirm:
- Ensure the Compatibility Support Module (CSM) is disabled in the motherboard/PC BIOS
- Ensure the boot drive is using GPT partition type and UEFI BIOS mode
- Additionally, reconfirm the VBIOS updated successfully.
Can I update a multi-GPU system?
The updater will detect and update all the cards that can be updated in a system.
If the BAR value is set to the size of my GPU’s framebuffer (ie: 10GB), does that mean a game will be using all that (10GB) for BAR?
No. The BAR value is used as a cap or ceiling for the total amount of BAR that can be used by the game.
Why would I want to change the BAR values from whatever is default today?
In general, BAR allocations can have a positive impact on performance in certain games.
If the tool is unable to successfully update the firmware, a message will be displayed. Below are potential messages along with suggested actions.
Message:
«An error occurred while updating. Please restart your PC and try again. If the update fails, please contact the card’s vendor for support.»
Suggestion:
This message may occur if a problem occurs before attempting to update the firmware. Restart your PC and try again.
Message:
«An error occurred while updating. The GPU firmware may have been corrupted, please try again without restarting your PC. If the update fails, please contact the card’s vendor for support.»
Suggestion:
This message may occur if a problem occurs after starting to update the firmware. In this case, do not reboot your PC. The tool should be run again immediately, as the GPU firmware may have been corrupted. If an error occurs again, try to manually uninstall the NVIDIA graphics driver and run the tool again. If an error still occurs, please contact the card’s vendor for support.
Message:
«This tool is for use with add-in graphics cards only.»
Suggestion:
This message may occur if running the tool on a laptop. Please contact the laptop’s vendor for questions regarding Resizable BAR support.
Founders Edition Firmware Update Tool
The Founders Edition download link only supports Founders Edition versions of GeForce RTX 3090, GeForce RTX 3080, GeForce RTX 3070, and GeForce RTX 3060 Ti GPUs.
Click here to download the update for Founders Edition GPUs
Partner Firmware Update Tools
Below are the download links for partners’ custom GeForce RTX 30 Series graphics card update tools. The links to Add-In Card (AIC) manufacturer sites are provided for convenience only. Add-In Card Manufacturers are responsible for the testing, functionality and support of VBIOS updates for their products. NVIDIA does not control the content of the linked sites and makes no representations or warranties regarding such content.
Important: Please select the correct AIC manufacturer and model of your graphics card to get the proper Update Tool.
EVGA
Gigabyte
ASUS — (select RTX 30 series -> select model a Support -> Driver & Utility)
MSI — (select GPU -> Support -> Utility -> choose MSI Dragon Center or MSI Live Update)
Palit — (select GPU -> Tool)
Gainward — (select GPU -> Tool)
Colorful
Inno3D
Zotac
Galaxy
PNY
Is this answer helpful?
Live Chat
Chat online with one of our support agents
CHAT NOW
ASK US A QUESTION
Contact Support for assistance
Ask a Question
How-To Flash RTX Video Card BIOS To A Different Series
If you buy through a link on this site, we may earn an affiliate commission at no extra cost to you. Learn more
Guides » Video Cards, Overclocking
By ir_cow
—
» Discuss this article (2)
More
How-To Flash RTX Video Card BIOS: Introduction
For a few generations now, NVIDIA has been slowly changing how traditional overclocking has been achieved. It used to be a simple process of increasing the video card’s clock speed and that was it. With NVIDIA’s Turing generation of GPUs, that has changed for the worse. Not only is the BIOS encrypted, but NVIDIA has also gone to great lengths to make sure the Founders Edition and OC (overclocked) editions are the top performers on the market. On top of releasing two variants of the same GPU (A and Non-A), the BIOS restricts the Power Target Limit and makes a difference how far a card can overclock.
As much as I resisted the urge to write this article, I felt people have to right to do what the want with hardware they purchase. This is very risky and can easily result in a bricked video card. Just keep that in mind. If you feel that this may be too much, the RTX Overclocking Guide is always a good start in the overclocking scene.
DISCLAIMER!
WARNING! Flash the BIOS at your own risk. Flashing a video card BIOS to a different model and/or series WILL void your warranty. This process can also cause other permanent issues like video artifacts and premature hardware failure! OverclockersClub cannot and will not be held responsible for the misuse of the information provided in this guide. Please, if you have any questions, jump onto the forums and ask away! We do not suggest you attempt this EVER! The BIOS linked in this tutorial may not work for your video card!
How-To Flash RTX Video Card BIOS: Reason For Flashing the BIOS
The main reason to flash the BIOS is that many of the cards are artificially limited by having a low Power Target. This means the card can never reach its true potential. Whether this is NVIDIA doing or not, it’s hard to tell. Either way, NVIDIA has to sign off on every BIOS since it’s encrypted to stop outside modification. That brings me to the main selling point of flashing the BIOS to a different series. Many series have a basic, OC, and an extreme model. In previous generations, most people in the overclocking scene knew most of the time the base model could achieve similar results. Many of the base models for the RTX 2080 have a power limit of 250 watts and 280-300 watts for the 2080 Ti. In comparison, the top RTX 2080 at the time of writing this tops out at 300 watts and 450* watts for the 2080 TI. That is a drastic difference simply because either these AIB partners or NVIDIA decided to artificially limit the cards.
*The Highest 2080 Ti Reference PCB is 380 Watt Power Target
How-To Flash RTX Video Card BIOS: Step One — Software
For flashing the BIOS it is suggested to do this process in DOS to avoid any complications. However, if you have the Founders Edition or flashing to a different brand you will most likely need to use the NVFlash ID Mismatch Modified version that allows you to flash regardless of what you have. It adds a layer of risk because you must do it in Windows and the program won’t stop you for flashing a bad BIOS.
Software Used:
NVIDIA NVFlash 5.541
NVIDIA NVFlash 5.527 (ID Mismatch Disabled)
How-To Flash RTX Video Card BIOS: Step Two — Correct BIOS
This is the hard part of the guide since no one BIOS fits all. The first thing you should know is all these BIOS links listed below and in general, this guide is only for Reference PCB cards or cards the same VRM Controller as the Founders Edition. Second, if you have a Non-A variant of the GPU, you cannot flash it to the A variant. Example; TU104-400-A1, TU104-400A-A1. This is because NVIDIA has effectively classified it as a different GPU altogether, therefore the «A» video card BIOS will not work on a Non-A card. You will need to find out what card you have before flashing. Some have reported NVFlash will give a GPU Mismatch error, other times it will just blindly flash and brick the card. For those who do have an A variant, they can flash their cards by following this tutorial. Those who don’t are out of luck. This mainly because of the «OC» models of non-A variant cards also have a low power limit. Therefore making it pointless to flash those cards at all.
BIOS For Reference PCB / Desktop Only!
RTX 2060 BIOS:
TechPowerUp EVGA XC Ultra (217 watts)
RTX 2070 BIOS:
TechPowerUp EVGA XC Ultra (240 watts)
RTX 2080 BIOS:
TechPowerUp EVGA XC Ultra (292 watts)
RTX 2080 Ti BIOS:
TechPowerup KFA2 Gaming OC (380 watts)
Leaked BIOS Galax / KFA2 Gaming OC (380 watts)
How-To Flash RTX Video Card BIOS: Quick Video
Before I ever considered writing this article, I made a quick and dirty how-to video tutorial which got some backlash because I didn’t explain things in depth. To be fair I never intended to show people how to do it in detail. I fear someone will not listen to what I have to say and just blindly follow the guide and break their card. This might be a good visual aid, but it isn’t the best video honestly. In the video, I suggested you could flash a Non-A variant to an A variant GPU, which is now known to be false.
How-To Flash RTX Video Card BIOS: Ready, Set, Go!
For this guide, I will be using NVIDIA NVFlash 5.527 (ID Mismatch Disabled) version because my Founders Edition does not cross flash otherwise. Therefore I will be doing this in Windows. If you are doing this in DOS, the only difference is where your files are located at and not needing to use «protectoff» command. Hint: If you put it in the Root of the flash drive it will be easy to find. Now since I am using Windows I put my folder in the Root of C:/. You can name it whatever you want, but for this tutorial, I called it nvflash64.
Next, you will want to disable the NVIDIA drivers because it can crash when you flash the card and forcing the computer to restart. To disable the drivers go into Windows Device Manager > Display Adapters. Then Right Click > Disable Device.
Now open Windows Command Prompt as Administrator. You can type «CMD» in the search bar.
After opening you want to find that folder at the Root of C:/ and launch the program. You can follow my commands if you named the folder the same.
- «cd/» — Hit Enter.
- «dir» — Hit Enter
- «cd/nvflash64» — Hit Enter (Now you are in the folder)
- type «nvflash64 — Hit Enter (this will run the program called nvflash64.exe in that folder. If you have the program named differently, you will need to type that name in instead.
Now that we have established how the program runs, you can quit it by pressing «Q.» Next, we want to back up the current BIOS before doing anything else. Type «nvflash64 -b backup.rom» and hit Enter. Nvflash64 is the program, -b is the command to back up, and backup.rom is the name given to the backup BIOS. This can be any name, but I personally like to keep it simple. Once backed up, go check the folder to make sure it saved and make a copy on a flash drive in case you need to re-flash the card with a different computer. If you are doing this in DOS then you already have it on the flash drive.
Now the BIOS is backed up, it is time to flash the card. If you are using the modified version type «nvflash64 —protectoff» to disable the lockout (two dashes —). Otherwise, skip this step.
Now the actual flashing part. Type nvflash64 -6 (ROM NAME).rom and hit Enter. For this tutorial, my BIOS I wanted to flash was called EVGA. rom (EX: nvflash64 -6 EVGA.rom). It will ask you a few times if you really want to do this. Follow the prompts and wait for it to finish flashing.
Once you have flashed the card, before you restart the computer you can re-flash it back if you have any doubts. Once you restart the computer, if it didn’t work, the only way to flash it back is blindly in DOS or use a different VGA adapter to boot into windows and re-flash the card. But if all went well, just re-enable the drivers and you now have a «theoretically» faster video card due to a higher Power Target Limit.
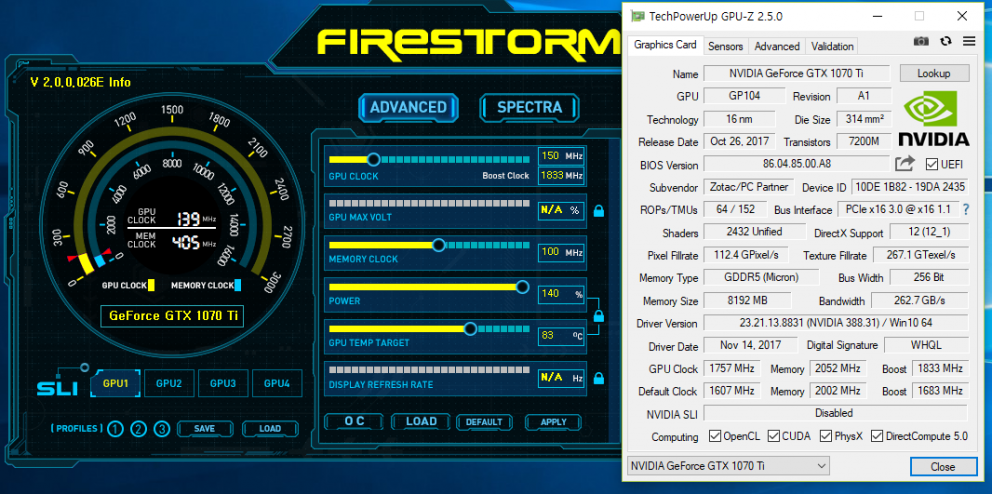
GPU-Z and EVGA Precision X1 think I am using an EVGA XC Ultra now!
Related Products
How-To Flash RTX Video Card BIOS To A Different Series
[Request] Modded BIOS for fake GTX 1050 (GTS 450) — BIOS Modding Requests
AAHC2012
#1
I recently got some fake GTS 450 cards being sold as GTX 1050TIs. These cards have a GF106-250-KA-A1 GPU and 8 Elpida W1032BBBG memory chips on it (1GB total) I’m having trouble finding a working GTS450 BIOS for this card, every GTS450 BIOS I tried has visual corruption on the screen or crashes when I try to load the drivers.
The fake BIOS however seems to work fine when I force-install the GTS 450 driver, so I think something is unique about this BIOS on how it accesses the VRAM. Perhaps these are defective memory chips that have been binned for a lower capacity? I am not sure. I successfully fixed the GTX 550TI variant of this scam before but after trying dozens of BIOSes I am at a loss on why none of them work on this card while the “fake” BIOS does work (although the GPU and VRAM amount are inaccurate and would no doubt crash if pushed over 1GB or however much memory is really in this thing)
So, I am wondering if someone can mod my “fake” BIOS that was originally on this card to accurately report the GTS450 GPU and the correct amount of VRAM? I dumped the BIOS that was originally on the card (included in zip folder) using my bios programmer. Thank you
fake bios 1.zip (44.5 KB)
Lost_N_BIOS
#2
@AAHC2012 — It may be best to ask for help with this in the GOP Update thread, even though you may not want GOP inserted, since many graphics vBIOS guru’s frequent that thread. Do you want me to move this there, or leave here?
@Sylar76 — “Strange Nvidia image was found after ROM! Please report it!”
And, can you help with the above, thanks
Sylar76
#3
@AAHC2012
Try this please, using your bios programmer.
It should report card now as GTS 450.
fake bios 1 — mod. zip (104 KB)
AAHC2012
#4
@Sylar76 — Thanks but with this BIOS the GTS 450 driver still won’t install and when I force install it GPU-Z still says the GPU is fake and has 4096 MB of VRAM.
So I think it says the chip is still a 1050 somewhere else in the BIOS
————————
If you think it can help feel free to move it, thank you!
Lost_N_BIOS
#5
Maybe Sylar76 can help you fix the VRAM issue too, once he has time and sees your reply, then no need to move (he’s who I expected might help you in the other thread)
Sylar76
#6
@AAHC2012
Try these please.
BIOS450.ZIP (103 KB)
BIOS4502.ZIP (103 KB)
AAHC2012
#7
Both BIOSes have corruption on the screen, one is all white boxes and the 2nd is random colors.
Went back to the original BIOS and the corruption is gone. Any idea what’s going on? Is the memory on this card weirdly configured or something?
Sylar76
#8
@AAHC2012
When you say “back to the original BIOS” are you referring to the fake bios ? I could try again to edit it in order to properly show GTS 450 ant the correct amount of RAM.
Anyway I’ve found the exact bios version of the fake bios coming from a Palit GTS 450 1 Gb VRAM. I modded it and added also UEFI GOP Table.
Try this please.
I’ve also found that your “fake bios” is the same on techpowerup vga bios collection taken from a NVidia GTX 1050Ti 4Gb mem size card.
There are many fake bios coming from that.
NEWBIOS.ZIP (103 KB)
AAHC2012
#9
Yes, the original fake BIOS works without corrupted display.
I tried the new BIOS you just gave me and unfortunately I’m still getting a corrupted display (lines through screen this time)
Sylar76
#10
@AAHC2012
Try this new one, which should now report GTS 450 with 1 Gb of VRAM size.
It is based to the fake bios you have, so it should not show any display
corruption anymore.
Please report feedback.
FIXED.ZIP (104 KB)
AAHC2012
#11
With this one the card isn’t recognized at all, my motherboard boots to onboard graphics.
Lost_N_BIOS
#12
Bummer to see all this hassle, but thank you for continuing to try and help here @Sylar76
I would have assumed your first edit would have sorted it all out, and then once I saw issues, I again assumed your last edit would be the one to get it… I wonder why they spend time to make fake boards, and then fake BIOS too, instead of just simple edit to OG BIOS?
Sylar76
#13
@AAHC2012
I’ve found the previous error. It is due to the lack of NVidia Subsystem ID and a wrong checksum.
Try the new one zipped file I’ve attached below please.
Anyway the correct bios size is 60 kb and not 256 (which is the eeprom size) but I’ve done mods in order
to properly flash via eeprom programmer.
BIOS450.ZIP (103 KB)
Sylar76
#14
@AAHC2012
Any news ???
AAHC2012
#15
Hi, sorry for the late reply.
It works without corruption but now it’s recognized as a GTX 960, NVIDIA installer installs the 960 driver
At least it says the correct VRAM this time.
Sylar76
#16
I can’t understand why it says GTX 960 if I’ve changed device ID and everything related to a GTS 450.
agentx007
#17
Have you tried forcing GTS 450 driver (from device list on advanced install option) ?
AAHC2012
#18
I can install the GTS450 driver manually, but the card will still be recognized as “fake” and again both Windows and Nvidia driver installer think it’s a 960 now.
Something in this BIOS must still be set wrong. Does anyone know how GPU-Z determines if a card is “fake” or not? That may be a clue to track down what it’s looking at.
Lost_N_BIOS
#19
That may also be what’s deciding it’s “960” too, whatever fake check ID’s it as? Does other tools like AIDA64 or HWINFO64, say it’s 960 too?
Sylar76
#20
It’s very very strange as I’ve edited any device id.
next page →
Nvidia GeForce GTX 1050 / 1050Ti Mining Performance Review
With the recent shortage of AMD GPUs, many people started to look for Nvidia alternatives.
While few miners would invest into Nvidia GPUs half year ago, times have changed and now even serious medium-sized mining farm owners is considering those GPUs.
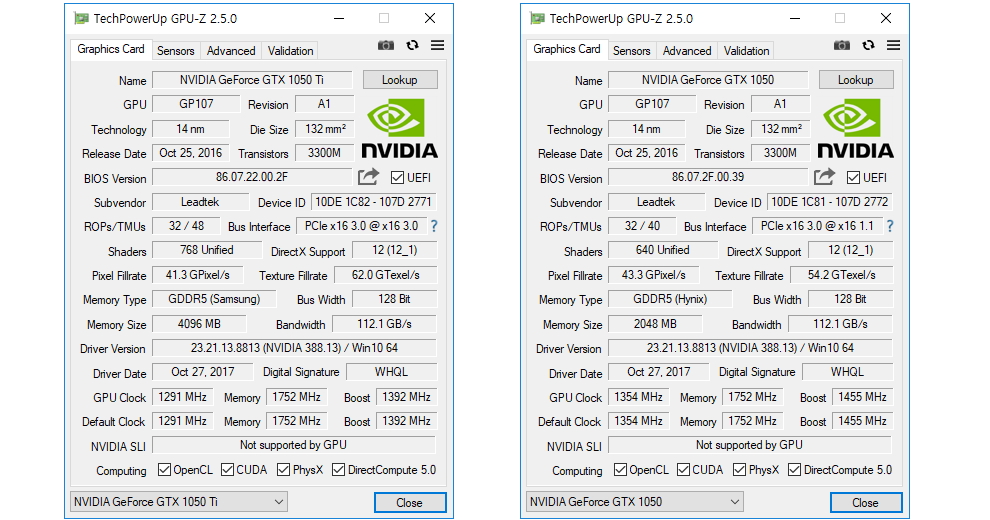
In this article I will review GTX 1050 / 1050Ti performance, which are two GPU models that came to replace the old GTX 750 Ti and the GTX 950. Both new GPUs have the Pascal architecture and share many things in common; that being said, there are some crucial differences between them too.
Common Ground and Differences
Both are the first two NVidia GPU models that are manufactured using 14nm technology. This means that both have great overclocking potential. The only thing that limits overclocking is the TDP.
Either model can be used to mine a number of algorithms, some of which can be rather profitable. I will get back to it in a minute.
Now, the main difference is in the VRAM size. GTX 1050Ti comes with 4GB VRAM, which makes it suitable for mining Ethereum. On the other hand, the GTX 1050 comes with 2GB VRAM, which means that it has no value for ETH mining whatsoever. Back in the day, when the DAG file size was less than 2GB people could use 2GB GPUs to mine ETH, but those days are gone.
In fact, according to calculations, in a couple of months 3GB GPUs will stop working for ETH mining too. But I won’t get into that here.
GTX 1050Ti Specs
- Graphics Processing Clusters: 2
- Streaming Multiprocessors: 6
- CUDA Cores (single precision): 768
- Texture Units: 48
- ROP Units: 32
- Base Clock: 1290 MHz
- Boost Clock: 1392 MHz
- Memory Clock: 3504 MHz
- Memory Data Rate: 7 Gbps
- L2 Cache Size: 1024K
- Total Video Memory: 4096 MB GDDR5
- Memory Interface: 128-bit
- Total Memory Bandwidth: 112 GB/s
- Texture Rate (Bilinear): 61.
 9 GigaTexels/sec
 - Fabrication Process: 14 nm
- Transistor Count: 3.3 Billion
- Connectors: 1 x DisplayPort, 1 x HDMI, 1 x Dual-Link DVI
- Form Factor: Dual Slot
- Power Connectors: None
- Recommended Power Supply: 300 Watts
- Thermal Design Power (TDP): 75 Watts
- Thermal Threshold: 97° C
GTX 1050 Specs
- Graphics Processing Clusters: 2
- Streaming Multiprocessors: 5
- CUDA Cores (single precision): 640
- Texture Units: 40
- ROP Units: 32
- Base Clock: 1354 MHz
- Boost Clock: 1455 MHz
- Memory Clock: 3504 MHz
- Memory Data Rate: 7 Gbps
- L2 Cache Size: 1024K
- Total Video Memory: 2048 MB GDDR5
- Memory Interface: 128-bit
- Total Memory Bandwidth: 112 GB/s
- Texture Rate (Bilinear): 54.2 GigaTexels/sec
- Fabrication Process: 14 nm
- Transistor Count: 3.
 3 Billion
 - Connectors: 1 x DisplayPort, 1 x HDMI, 1 x Dual-Link DVI
- Form Factor: Dual Slot
- Power Connectors: None
- Recommended Power Supply: 300 Watts
- Thermal Design Power (TDP): 75 Watts
- Thermal Threshold: 97° C
Follow
youtube
Mining Hashrate and Performance
There is a lot of info on the web about the mentioned card models. While most reviews are legit and real, you might see a huge difference in numbers when it comes to hashrate. It looks like hashrate depends a lot on the miner version. Make sure you keep an eye on the review date first!
Another fact that seems to affect hashrate is the type of miner you’re using. Some people noticed that EWBF performs better than Nicehash when it comes to zCash mining.
As it happens with most GPUs, hashrate is also affected by the type of VRAM used, which is defined by its manufacturer. So far, it is certain that Samsung memories usually perform slightly better than others.
Finally, some users speculate that 6-Pin models boost better. While I couldn’t prove this right or wrong, it might make sense. If you see any other review, I strongly encourage you to check that.
GTX 1050Ti
Here are some working configurations you can try:
Setup #1 MSI GeForce GTX 1050 TI GAMING X 4G Mining Performance
Recommended Hardware for 6x GTX 1050 Ti Mining Rig
- Motherboard: ASRock H81 PRO BTC, GIGABYTE GA-h210-D3A, Biostar TB250-BTC PRO
- CPU: Intel Celeron G1840 for ASRock H81 PRO BTC, Intel Celeron G3900 for Gigabyte h210-D3A & Biostar TB250-BTC PRO
- RAM: Kingston HyperX FURY 4GB 1333MHz DDR3 for ASRock H81 PRO BTC, Kingston Technology HyperX FURY 2400MHz DDR4 for Gigabyte h210-D3A & Biostar TB250-BTC PRO
- SSD: ADATA SU700 120GB
- PSU: EVGA SuperNOVA G3 80 Plus Gold 1000W
- USB Risers: USB Riser VER 008 PCI-E 16x to 1x 60cm USB 3.
 0 Extension Cable
 - Power Button: 2 Pin SW PC Power Cable on/off Push Button ATX Computer Switch Wire 45cm
- Energy Meter: TP-Link HS110 Smart Plug w/ Energy Monitoring
- Frame: https://1stminingrig.com/product/aluminum-mining-rig-open-air-frame/
Stock performance, mining hashrate and power consumption
POWER CONSUMPTION FOR SYSTEM IS AROUND 40W
Stock clocks
- GPU / Memory stock clocks
- Mining Hashrate 11.9 Mh/s on Ethereum
- 40w
Mining Ethereum Only with Overclock (Claymore Ethereum miner)
MSI Afterburner
- Mining Hashrate 14.6 Mh/s
- Clocks +150/+1000
- Power Limit 80%
- Power draw from wall 55w
start.bat file for ethereum only: EthDcrMiner64.exe -epool eu1. ethermine.org:4444 -ewal ETHEREUM_WALLET.WORKER_NAME -epsw x -tstop 80
Dual Mining Ethereum Decred / Siacoin with Overclock (Claymore Ethereum Miner)
Ethereum + Decred
- Mining Hashrate: Ethereum 14.2 Mh/s – Decred 140 Mh/s
- Clocks +150/+1000
- Power Limit 80%
- Power draw from wall 60w
Profits (ETH price $242)
Ethereum + Siacoin
- Mining Hashrate: Ethereum 14.2 Mh/s – Siacoin 140 Mh/s
- Clocks +150/+1000
- Power Limit 80%
- Power draw from wall 65w
Profits (ETH price $242)
start.bat file for ethereum + decred: EthDcrMiner64.exe -epool eu1.ethermine.org:4444 -ewal ETHEREUM_WALLET.WORKER_NAME -epsw x -dpool dcr.suprnova.cc:3252 -dwal USERNAME. WORKER-dpsw WORKER_PASS -tstop 80
start.bat file for ethereum + siacoin: EthDcrMiner64.exe -epool eu1.ethermine.org:4444 -ewal ETHEREUM_WALLET.WORKER_NAME -epsw x -dpool stratum+tcp://sia-eu1.nanopool.org:7777 -dwal SIACOIN_WALLET.WORKER_NAME -dcoin sia -tstop 80
Mining ZCash (EWBF’s CUDA Zcash miner)
Stock clocks
- Hashrate 145 Sol/s
- Clocks +0/+0
- Power Limit 100%
- Power draw from wall 50w
Overclocked Clocks
- Hashrate 175 Sol/s
- Clocks +150/+900
- Power Limit 80%
- Power draw from wall 60w
start.bat file for zcash: miner —server eu1-zcash.flypool.org —port 3333 —user WALLET_ADDRESS.WORKER_NAME —pass x
Profits (ZEC price $240)
Nicehash Mining Hashrate and Profits
- Lyra2REv2 (ccminer) 12.
 8 Mh/s = 0.00034073 BTC/Day
 - DaggerHashimoto (ethminer) 13/5 = 0.00053488 BTC/Day
- Decred (ccminer) 0.994 GH/s = 0.00031271 BTC/Day
- Lbry (ccminer) 0.100 GH/s = 0.00031802 BTC/Day
- Equihash (excavator) 154 H/s = 0.00040952 BTC/Day
- Pascal (excavator) 0.35 GH/s = 0.00013184 BTC/Day
- X11Ghost (ccminer) 2.5 Mh/s = 0.00016773 BTC/Day
- X11Ghost (ccminer_alexis) 4.5 Mh/s = 0.00031178 BTC/Day
Setup #2 — eVGA FTW Edition 1050Ti
- ETH: 14.063 MH/s (Claymore 9.3 – ETH)
- Core Clock: +125 MHz
- Memo Clock: +750 MHz
- -40% on Power (setting at 60%)
- zCash: 170 Sol’s (Nicehash Miner 1.
 7.5.12)
 - zCash: 189 Sol’s (Zec Miner 0.3.3b)
- Power Draw: 65W
Some other users claim that they were able to push the 1050Ti up to 16-17MH/s for ETH using Nicehash 1.7.5.12. However, they haven’t specified what exact overclock settings they used (“a bit of overclock” isn’t descriptive enough). Therefore, I’d take those claims with an ounce of salt.
GTX 1050
Most people consider the GTX 1050 a waste of money. It is understandable, considering the craze for Ethereum mining we see nowadays and the fact that 2GB GPUs cannot participate in the ETH mining fest anymore.
What about zCash? Here are some numbers:
zCash with EWBF 0.2.0b
Mining Performance and Overclock
- 138 Sol’s with stock settings;
- 155 Sol’s with the following:
- Core Boost +190
- Memory Boost +280
- Power Draw: <50W
Note that EWBF Zec miner 0. 3.3b might give slightly better results.
As per today, the ROI of a GTX1050 for zCash mining is about 3 months, with the condition that that electricity cost is $ 0.1 per KW/h.
Nvidia GeForce GTX 1050Ti in stock
MSI GeForce GTX 1050 TI GAMING X 4G
EVGA GeForce GTX 1050 Ti SC GAMING 4GB
EVGA GeForce GTX 1050 Ti SSC GAMING ACX 3.0 4GB
EVGA GeForce GTX 1050 Ti GAMING 4GB
EVGA GeForce GTX 1050 Ti FTW ACX 3.0 4GB
Gigabyte Geforce GTX 1050Ti G1Gaming 4GB
Gigabyte Geforce GTX 1050 Ti 4GB
MSI GeForce GTX 1050 Ti 4GB OC
MSI GeForce GTX 1050 Ti 4GB OC
ASUS Geforce GTX 1050Ti 4GB ROG STRIX OC Edition
ASUS Geforce Dual GTX 1050 Ti 4GB Dual-Fan Edition
ZOTAC GeForce GTX 1050 Ti Mini 4GB
6x GeForce GTX 1050 Ti Mining Rig Monthly Earnings
Ethereum Dual Mining Decred
- Ethereum hashrate: 85 Mh/s = $245/Month ; ETH 1.14 mined/month (1 ETH = $ 242.39)
- Decred Hashrate: 852 Mh/s = $20
- 6x GeForce GTX 1050 Ti Power consumption: around 400w
- Power Cost per Month: $29
Ethereum Dual Mining Siacoin
- Ethereum hashrate: 85 Mh/s = $245/Month ; ETH 1.
 14 mined/month (1 ETH = $ 242.39)
 - Siacoin Hashrate: 852 Mh/s = $21
- 6x GeForce GTX 1050 Ti Power consumption: around 400w
- Power Cost per Month: $29
Zcash Mining Rig Monthly Earnings with 6x GTX 1050 Ti
- ZCash hashrate: 1,050 Mh/s = $180 ; ZEC 0.8739 mined/month (1 ZEC = $ 240.00)
- 6x GeForce GTX 1050 Ti Power consumption: around 400w
- Power Cost per Month: $29
In conclusion
Due to recent stock shortages, Nvidia cards are becoming a decent alternative to AMD ones. Besides stock issues, it is inevitable that AMD most popular mining GPUs — the RX 4xx and 5xx series – will lose up to 35% of their ETH hashrate in the next 3-4 months. Nvidia cards, on the other hand, should remain strong for a while.
If you however are not enthusiastic about mining ETH, then you probably might want to check the dedicated AMD cards for mining we reviewed here not long ago.
-
Mining Performance
-
Power Consumption
-
Cooling
-
Price
Disclaimer: This is not financial advise, I am not a financial advisor, this is for educational purposes only. If you want to invest in cryptocurrency please do your own research and invest at your own risk, 1stMiningRig is never liable for any decisions you make. 1stMiningRig may receive donations or sponsorships in association with certain content creation. 1stMiningRig may receive compensation when affiliate/referral links are used.
Thank you for reading. As always, your comments, suggestions and questions are welcome.Subscribe and stay tuned for further updates!
join my weekly subscription & get exclusive tips.
Subscribe
Follow
youtube
Tags:1050, 1050Ti, Benchmark, claymore miner, Decred, Ethereum Mining, EWBF’s CUDA Zcash miner, GeForce GTX 1050 Ti, GTX 1050 hashrate, GTX 1050 mining, GTX 1050 Mining Hashrate, GTX 1050 Ti, GTX 1050 Ti hashrate, GTX 1050 Ti mining, GTX 1050 Ti performance, GTX 1050 Ti specifications, GTX 1050Ti Mining Hashrate, how to, mining benchmark, Mining Performance, Nicehash Mining, nVidia, Nvidia GeForce GTX, Nvidia GTX 1050, Nvidia GTX 1050 Ti, Nvidia Pascal, Pascal, Review, Siacoin, tutorial, ZCash mining
PCSX2 — PCSX2 Basic Setup Guide
Authored By:
Vaser
Published:
This article details everything you should need to get started using PCSX2.
If this article does not help solve your problem, reach out in the Discord or the forums for help.
Requirements to use PCSX2 #
System Requirements #
Minimum #
- Operating system
- Windows 8.1 or newer (64-bit)
- Ubuntu 18.04/Debian or newer, Arch Linux, or other distro (64-bit)
- CPU
- Supports SSE4.1
- PassMark single thread performance
rating near or greater than 1600- Note: Recommended single thread performance is based on moderately complex games. Games that pushed the PS2 hardware to its limits will struggle on CPUs at this level. Some release titles and 2D games which underutilized the PS2 hardware may run on CPUs rated as low as 1200.
- A quick reference for CPU intensive games: Wiki
, Forum - And CPU light games: Forum
- A quick reference for CPU intensive games: Wiki
- Note: Recommended single thread performance is based on moderately complex games. Games that pushed the PS2 hardware to its limits will struggle on CPUs at this level. Some release titles and 2D games which underutilized the PS2 hardware may run on CPUs rated as low as 1200.
- Two physical cores, with hyperthreading
- GPU
- Direct3D10 support
- OpenGL 3.
x support
- PassMark G3D Mark
rating around 3000 (GeForce GTX 750)- Note: Recommended GPU is based on 3x internal, ~1080p resolution requirements. Higher resolutions will require stronger cards; 6x internal, ~4K resolution will require a PassMark G3D Mark
rating around 12000 (GeForce GTX 1070 Ti).- Just like CPU requirements, this is also highly game dependent. A quick reference for GPU intensive games: Wiki
- Note: Recommended GPU is based on 3x internal, ~1080p resolution requirements. Higher resolutions will require stronger cards; 6x internal, ~4K resolution will require a PassMark G3D Mark
- 2 GB video memory
- RAM
- 4 GB
Recommended #
- Operating system
- Windows 10 (64-bit)
- Ubuntu 19.04/Debian or newer, Arch Linux, or other distro (64-bit)
- CPU
- Supports AVX2
- PassMark single thread performance
rating near or greater than 2100 - Four physical cores, with or without hyperthreading
- GPU
- Direct3D11 support
- OpenGL 4.6 support
- PassMark G3D Mark
rating around 6000 (GeForce GTX 1050 Ti) - 4 GB video memory
- RAM
- 8 GB
Required software #
- You need the Visual C++ 2019 x86 Redistributables
to run PCSX2.
Version deprecation notes #
- Windows XP and Direct3D9 support was dropped after stable release 1.4.0.
- Windows 7 and Windows 8.0 support was dropped after stable release 1.6.0.
- 32-bit support was dropped after stable release 1.6.0.
Downloading and configuring PCSX2 #
- Download the version suited for you from our Downloads
Section (for beginners, the full installer of the latest stable release is recommended) - Get the BIOS file from your PlayStation 2 console. This is not included with PCSX2 since it breaks copyright law, so you have to obtain it from your console. See below for how to do this
. - Configure the emulator using the provided instructions in the stable release download. Alternatively these can be found here in the GitHub repository
- Translated versions of this guide are available, but your milage may vary as many are not for the latest stable version. See below for links to these
- Launch your game using the ISO file that you have dumped yourself.
See below for how to do this
Translated configuration guides #
Below are links to translated versions of the guide to configure PCSX2 at various stable release versions.
If you wish to apply for a new translation or to update an existing one, visit the guide translation applications
- Arabic — 0.9.6
- By Squall
- Guide Here
- Bulgarian — 0.9.6
- By SonicXPS2
- Guide Here
- Simplified Chinese — 0.9.6
- By luopojianghu
- Guide Here
- Traditional Chinese — 1.2.1
- By pcsx2fan
- Guide Here
- Croatian — 0.9.6
- By vborovic
- Guide Here
- Czech — 1.0.0
- By Tsbook
- Guide Here
- Dutch — 0.9.6
- By ChronicNL
- Guide Here
- French — 1.2.1
- By PlaysGames11
- Guide Here
- German — 0.9.7
- By Mayonezo
- Guide Here
- Greek — 0.
9.6
- By DarkDante
- Guide Here
- Hungarian — 1.2.1
- By bmate
- Guide Here
- Indonesian — 0.9.7
- By ikazu
- Guide Here
- Italian — 1.2.1
- By IL CARTOLAiO
- Guide Here
- Japanese — 0.9.8
- By DeltaHF
- Guide Here
- Malaysian — 1.0.0
- By Ice Queen Zero
- Guide Here
- Persian — 1.0.0
- By ノーティーイヌ
- Guide Here
- Polish — 0.9.8
- By miseru99
- Guide Here
- Portuguese (European) — 0.9.7
- By Pauinho
- Guide Here
- Portuguese (Brazilian) — 1.2.1
- By josephg
- Guide Here
- Russian — 0.9.7
- By El_Diablos
- Guide Here
- Slovakian — 0.9.7
- By hellrider881
- Guide Here
- Spanish — 1.2.1
- By McCuñao
- Guide Here
- Swedish — 0.
9.7
- By SeeK
- Guide Here
- Thai — 0.9.8
- By xyteton
- Guide Here
- Turkish — 0.9.7
- By PyramidHead
- Guide Here
- Vietnamese — 0.9.7
- By climhz
- Guide Here
Still have problems? #
If your game is not working, there are a few things you can do:
- Check the compatibility page
to see if the game has been tested to run properly - Consult the wiki page
for the game for similar information - Check the GitHub issues page
to see if there are any reported issues
It works but it’s slow? #
This is the most common problem users experience. PCSX2 is a very hardware intensive program, especially on your processor.
It is highly recommended you read the first post of this thread: Will PCSX2 run fast on my computer?
and if you still have questions reply to the thread or in the Discord, there are many helpful members who will answer.
Reach out for help #
If none of the above suggestions help you solve your problem, consider reaching out in either the Discord or the forum.
How to dump your PS2 BIOS #
In order for PCSX2 to function properly, both a legitimate BIOS and copies of games must be obtained from your own PlayStation 2 console and original PlayStation 2 discs respectively. The following explains the recommended ways to accomplish both of these tasks.
Dumping your PS2 BIOS is conceptually a two-step process:
- Modify the operation of your PS2 so that it can run any program.
- Then you can run a “BIOS dumper” utility program on your PS2 that reads its BIOS and writes it to a USB drive.
There is a generally useful program, uLaunchELF, that lets you browse memory cards, DVDs, and USB drives connected to a PS2 and run programs from them. So for most of the approaches below, you use uLaunchELF to then run the BIOS dumper.
Popular approaches to modify PS2 operation #
- FreeMcBoot Memory Card
- Works for all but the newest (9xxxx serial number with a date code larger than 8B) slim PS2s.
Can be found online for ~10 USD.
- Works for all but the newest (9xxxx serial number with a date code larger than 8B) slim PS2s.
- FreeDVDBoot
- Works for many slim models, and some phat models. Slight effort, but free.
- You will require a blank DVD for this method to work!
- Disc swap exploits
- Technical in nature, involves hardware tampering. Guides can be found quickly by Googling.
- Mod chips
- Extremely technical, requires soldering skills. DO NOT ATTEMPT unless you are an electronics pro.
Downloading the BIOS dumper utility #
Our recommended BIOS dumper utility is biosdrain
. Therefore the instructions below will be for this tool.
- The download for the latest stable biosdrain is here
.
Option 1: Starting a PS2 with FreeMcBoot #
- Plug the FreeMcBoot memory card into memory card port 1
- Turn on your PS2 with no disc inside.
- Select uLaunchELF from the menu.
Option 2: Starting a PS2 with FreeDVDBoot #
- Download the ISO which matches your console from https://github.
com/CTurt/FreeDVDBoot/tree/master/PREBUILT%20ISOs
- Burn the ISO to a DVD.
- The most generally reliable media is a DVD-R disc, burned at a slow speed (4X speed should be fine).
- Insert the burned FreeDVDBoot disc, then reset/turn on your PS2. uLaunchELF should open.
Dumping the BIOS #
There are two options available when dumping the BIOS.
biosdrain supports USB and HOST through PS2link. If your console does not have networking support, please refer to the USB method, otherwise you can use the ps2client method.
- USB
-
Take the biosdrain.elf file that was downloaded above, and transfer it to a FAT32 formatted USB flash drive.
- Please note that some incompatibilities between certain USB drives and PS2 USB drivers have been reported throughout the years. If your USB drive is not detected by uLaunchELF (
mass:is empty) please try another one, preferably USB 2.0.
- Please note that some incompatibilities between certain USB drives and PS2 USB drivers have been reported throughout the years. If your USB drive is not detected by uLaunchELF (
-
Insert your USB flash drive into your PS2.
-
In uLaunchELF, navigate to the device named
mass:and open it. -
Locate and run
biosdrain.elf. -
You will know that it is finished when biosdrain says
Finished Everything. Please be patient, as USB on the PS2 is SLOW! -
Once the final message appears, you can now plug the USB drive back into your computer. You will know that the dump was successful if you see files ending in
.rom0,.rom1,.nvm, etc, prefixed by your console model ID in your USB drive.
-
- PS2client / XLINK & PS2link
- When using XLINK, simply execute the
biosdrain.elfwith the user interface. - When using PS2client, cd into the directory where you have
biosdrain.elf, and simply runps2client execee host:biosdrain.elf - biosdrain will automatically detect that the
hostdevice is present and will dump your BIOS contents to the root directory ofhost(Usually where you have the biosdrain.elf file).
- You will know that it is finished when biosdrain says
Finished Everything, either on screen or in your console log.
- When using XLINK, simply execute the
Dumping PS2 Discs via ImgBurn #
PlayStation 2 game discs are unencrypted DVDs and CDs. This means they can be dumped quickly using a standard optical drive that supports DVD and CD optical media and the ImgBurn software. Dumping discs does not harm optical media directly.
Where to get ImgBurn #
- Via Ninite (Recommended, safe and fast):
- https://ninite.com/imgburn
- Via ImgBurn themselves (Not recommended, comes with adware in the installer that must be manually unchecked during the install):
- http://www.imgburn.com/index.php?act=download
How it works #
- Install and run ImgBurn
- Put your game disc into an optical drive
- Create an image file from a disc inside ImgBurn (highlighted in screenshot below)
Alternative: Dumping PlayStation 2 discs with Media Preservation Frontend (more advanced) #
This is a GUI for several applications aimed at preserving optical media. It can be a bit more involved for non-PlayStation disc dumping, but for PS1 and PS2 its fairly simple.
Where to get MPF #
On GitHub: https://github.com/SabreTools/MPF
This tool is currently only available on Windows, but Linux support may be added in the future. It should be noted the command-line tools that are used for the backend of this tool are all free, open-source and available on all major operating systems.
How to use it #
- Extract and run MPF
- Put your game disc into an optical drive
- Select PS2 for system/media type
- Select whether it is a CD-ROM PS2 game or DVD-ROM PS2 game
- Select output file name and directory
- Select the appropriate drive letter for the drive with the optical media in it
- Select “Start dumping”
One quick note, the lower the drive speed of the optical drive the more likely you are to get a good dump of the disc. The fastest drive speed will take much less time, but may be incomplete, corrupted, or inaccurate. It could also be perfectly fine, so depending on your drive and your media, try different things and see what works best for you.
How To Install Nvidia Geforce Gtx 1050ti Graphics Card – Otosection
Zotac gaming geforce gtx 1660 graphics card user manual graphic card users manual dual fan zotac gaming geforce gtx 1650 graphics card user manual zotac gaming geforce rtxtm 2060 user manual item dimensions 6-83 x 4-38 x 1-39 inches 8-5 x 1-39 x 4-38 inches 8-82 x 4-76 x 1-57 inches 7-96 x 1-54 x 4-38 inches 8-3 x 4-7 x 1-6- How To Install Nvidia Geforce Gtx 1050ti Graphics Card
The following is a listing of image How To Install Nvidia Geforce Gtx 1050ti Graphics Card ideal By simply adding characters you can 1 piece of content into as much completely readers friendly versions as you like that we tell and also display Creating articles is a rewarding experience for your requirements. We all get amazing plenty of Cool article How To Install Nvidia Geforce Gtx 1050ti Graphics Card beautiful image although many of us solely present the particular image that people consider will be the best images.
How To Install Nvidia Graphics Card Gtx 1050 Ti Unboxing Install
Zotac gaming geforce gtx 1660 graphics card, user manual: graphic card, users manual: dual fan: zotac gaming geforce gtx 1650 graphics card, user manual: zotac gaming geforce rtxtm 2060; user manual: item dimensions: 6.83 x 4.38 x 1.39 inches: 8.5 x 1.39 x 4.38 inches: 8.82 x 4.76 x 1.57 inches: 7.96 x 1.54 x 4.38 inches — 8.3 x 4.7 x 1.6. nvidia geforce gtx 1050 : graphics ram type gddr5 : graphics card ram size 4 gb : graphics card interface straight into the pcie slot no fuss for an easy install, and needs no additional psu connections. with noise out of the way, it performs like a 1050ti, albeit a touch slower than other active cooled cards for obvious. If victory royale is your mission, the geforce fortnite bundle is just for you. for a limited time, when you upgrade your weaponry with a geforce gtx 1660 ti, 1660, 1650, 1070 ti, 1070, 1060, 1050ti or 1050 graphics card, gaming desktop, or gaming laptop, you’ll receive 2000 v bucks and the male fortnite counterattack set enjoy the ultimate battle royale experience with …. We would like to show you a description here but the site won’t allow us. Buy gigabyte geforce gtx 1050 ti 4gb gddr5 pci e graphic card (gv n105td5 4gd) online at low price in india on amazon.in. check out gigabyte geforce gtx 1050 ti 4gb gddr5 pci e graphic card (gv n105td5 4gd) reviews, ratings, features, specifications and browse more gigabyte products online at best prices on amazon.in.
Msi Geforce Gtx 1050 Ti 4g Oc Graphics Card Gtx 1050 Ti 4g Oc
Buy gigabyte geforce rtx 3050 gaming oc 8g graphics card, 3x windforce fans, 8gb gddr6 128 bit gddr6, gv n3050gaming oc 8gd video card with fast shipping and top rated customer service. nvidia ampere streaming multiprocessors 2nd generation rt cores 3rd generation tensor cores powered by geforce rtx 3050 integrated with 8gb …. If victory royale is your mission, the geforce fortnite bundle is just for you. for a limited time, when you upgrade your weaponry with a geforce gtx 1660 ti, 1660, 1650, 1070 ti, 1070, 1060, 1050ti or 1050 graphics card, you’ll receive 2000 v bucks and the male fortnite counterattack set enjoy the ultimate battle royale experience with geforce gtx graphics and be the last …. Msi gaming geforce gtx 1060 6gb gdrr5 192 bit hdcp support directx 12 dual torx 2.0 fan vr ready graphics card (gtx 1060 gaming x 6g) evga geforce gtx 1650 sc ultra gaming, 04g p4 1057 kr, 4gb gddr5, dual fan, metal backplate graphics coprocessor nvidia geforce gtx 1060 : chipset brand nvidia now with evga bios install control you.
Msi Nvidia Geforce Gtx 1050ti 4gb Gddr5 Pcie Low Profile Graphics Card
Asus Geforce Gtx 1050 Ti 4 Gb Cerberus Graphics Card Deals Pc World
Msi Nvidia Geforce Gtx 1050 Ti Aero Itx Oc 4gb Gddr5 Graphics Card
The following is a listing of image How To Install Nvidia Geforce Gtx 1050ti Graphics Card ideal By simply adding characters you can 1 piece of content into as much completely readers friendly versions as you like that we tell and also display Creating articles is a rewarding experience for your requirements. We all get amazing plenty of Cool article How To Install Nvidia Geforce Gtx 1050ti Graphics Card beautiful image although many of us solely present the particular image that people consider will be the best images.
How To Install Nvidia Geforce Gtx 1050ti Graphics Card
we show first time installers how to install a graphics card into a hp pavillion pc with windows 8 operating system. kind of like a do you need to give life to your old desktop computer? in this video i upgrade my asus desktop with the asus cerberus nvidia in this episode i will show you how to install the geforce gtx 1050ti graphics card. the install is super easy all you need is a thank you for watching my video. kindly consider to subscribe and help me grow my channel. thank you. to see the gameplay of sharing with you my knowledge regarding installation of video graphic cards. i need to upgrade some of my equipment in order asus geforce gtx 1050 ti unboxing & installation whats included in the video 1) gtx 1050 ti unboxing 2) gtx 1050 ti unboxing and hey lil ones!! in this video i did a awesome unboxing of my new gigabyte geforce gtx 1050 ti and did a installation with it! its time to install my brand new graphic card into my old full towel. an amazing quallity gpu with en extra option of rgb light with assalam o alaikum is video main nvidia geforce gtx 1050 ti studio driver ko download or install kerne ka trika btaya gaya hai. how to install a gforce gtx 1050ti graphics card into your dell optiplex 9020 sff. i picked up this card from amazon i ran into an download and install nvidia graphic card driver for windows! in this tutorial i show you how to install nvidia drivers on windows asus ph gtx1050 2g : how to setup & unboxing gtx1050 ▻ press subscribe to william kwey channel
Related image with how to install nvidia geforce gtx 1050ti graphics card
Related image with how to install nvidia geforce gtx 1050ti graphics card
How to update the BIOS of the motherboard on a PC and laptop
Before deciding to flash the BIOS, carefully analyze the data, because flashing the BIOS is a complex and risky operation, you should not resort to it once again. But if, for example, the motherboard refuses to work with a new processor or does not support a larger screw, then BIOS programmers are the only way to improve the system’s performance.
The process of flashing the BIOS of motherboards in most cases is simple and comes down to specifying a new file with microcode and confirming the operation
In order to flash the BIOS, you first need a flasher. Usually these are the AWDFLASH or AMIFLASH utilities (they are the most common). But they are not suitable for every motherboard, for example, Asus will need a different program, so before downloading the flasher, you need to find out if it is suitable for a particular machine.
It is possible to flash any BIOS, but some of them are protected from flashing, because the BIOS can be damaged by accident or due to a virus attack. Sometimes a special «BIOS Update» jumper is hung on the motherboard. In the «Disable» position, flashing will not work, you need to move it to the «Enable» position.
Other boards have a «BIOS Protect» item in SETUP, here «Enable» must be selected to disable flashing, and «Disable» means «the BIOS is not protected.»
So, the protection is removed, how to flash the BIOS? How to flash the BIOS without harming the motherboard in several ways?
How to flash the BIOS using the programmer?
The easiest and most reliable way is to go to a repair shop, where there is probably a programmer. You need to bring a flash drive there (if the flash drive is soldered, then the entire motherboard) and ask to reflash the BIOS. At the same time, you can ask to solder the block, in case you ever need to remove the USB flash drive from the motherboard.
Using a programmer to flash the motherboard BIOS at home is a very exotic way
You can purchase a programmer in a store. Here it is necessary to take into account that for some of them (for example, the SuperPro 280U programmer) there will be no more BIOS updates, that is, there will be problems with the new hardware, others (for example, Xeltek P500 programmer) for some types of flash drives will require additional capacitors. The Chinese programmer is unlikely to last long, but it will be inexpensive. In general, when choosing a programmer, you must immediately pay attention to the brand of the flash drive.
Then everything is simple. Unlike the first models, a modern programmer is connected to a computer. You need to find a suitable program on the official sites, load it into the programmer, insert the USB flash drive into the programmer slot (if necessary, after carefully unsoldering it), start the flashing program.
You can solder the programmer yourself. To do this, you need to find a “programmer” device diagram on the network, purchase parts (given that an expensive modern programmer has several different connectors), carefully assemble the device according to the diagram.
The role of the BIOS in the operation of the computer
The phrase “Windows is starting” sounds somehow more familiar than the same thing, only about the BIOS, nevertheless, this is how it happens. When the computer’s power is turned on, the processor still «does not know» how to work: how to display an image on the monitor, sound on the speakers, and finally, how to load Windows recorded on the hard drive. It doesn’t even «understand» what a hard drive is, since all the processor can do is execute programs. To begin to perform some meaningful actions, he needs to be given a special program for execution, which describes how and what to do with all the hardware connected to it.
When the BIOS system fails, the computer becomes inoperable. To restore its operation, you may need to replace the motherboard.
BIOS is written and located on microcircuits located on the computer motherboard
To understand the logical location of the BIOS in the overall computer system, you need to look at its work from the point of view of a technical specialist. The role of this program is outwardly imperceptible, and it is only touched upon when it becomes necessary to “fine-tune” the computer or, for example, a banal reinstallation of Windows. Everything else is at the hardware level, the maximum that can be seen or heard is sounds and texts in English on a computer monitor.
How to change the BIOS «to hot» (hotswap)?
This most common BIOS flashing method is applicable if you have a second identical motherboard, only a working one. By the way, it is not necessary to have exactly the same motherboard, it is enough to pay attention to some parameters of the flash drive. In general, there are two types of flash drives: hub (in a square PLCC32 package), ordinary, that is, rectangular (DIP3 package) and all the rest. But, before you start flashing the BIOS, you need to carefully study the topic.
Flashing the BIOS “hot” is possible if you have exactly the same motherboard model with a working chip
remove the bios chip from the working motherboard, carefully install another one that will be flashed, run the flash driver program and place the firmware file in the ROM.
Flashing lasts a few seconds, you must not turn off the machine during operation in any case.
![]()
How to swap flash drives? Yes, removing a flash drive from a working motherboard and putting a new one in its place is a difficult task. For these purposes, you can use threads, various tweezers, pieces of the old port, sometimes a “pen” made of a piece of plastic is glued to a flash drive. The second time you can change flash drives in places only when the computer is turned off.
When using this method to flash the BIOS, you must remember that:
- Without the BIOS, the board will not work, when turned on, the native ROM must be installed. That is why they have to be changed during operation, “hot”.
- Before turning on your native flash drive, you should try to pull it out of the motherboard so as not to go into a running machine with a screwdriver.
- The microcircuit must be installed according to the key, otherwise the polarity change will kill it immediately and irrevocably.
- If the BIOS is working and flashing is necessary for performance reasons, it is necessary to save the current BIOS version in case the flashing fails.
- Before flashing the BIOS, it is necessary to carry out preliminary research work, for example, to find information about the correspondence of flash drives and boards to each other.
- It must be understood that flashing the BIOS will not increase the frequency of the processor and will not add connectors to the motherboard.
- Some ROMs cannot be flashed for one reason or another.
- Flashing the BIOS with a programmer is the most reliable way to flash it, although there is a risk in this case.
- Flashing the BIOS «hot» stands on an empty table from which it is necessary to remove containers with liquid.
How to update — flash BIOS
Consider the flashing process using the example of the most popular manufacturers of motherboards and laptops. The flashing process for them will be almost identical except for a few minor nuances, so it will be easy for you to figure everything out.
Interesting! Almost every motherboard manufacturer offers two or more methods for flashing.
The article will describe just two options. Choose how to do a flashing only for you. You can download all the necessary files on the manufacturer’s website.
How to update BIOS ASUS
Official website: https://www.asus.com/en/
Go to the above address, find your laptop or motherboard, open its page and follow the link «Support» and further on the “Drivers and Utilities” taboo, this is where the new software, drivers and, of course, the BIOS will be.
AFUDOS
The method of flashing with this utility is already old, but still working, download Afudos from the link.
Make a bootable flash drive, transfer the files of the utility itself and the firmware to it. Reboot the computer with the USB flash drive inserted, in the BIOS, boot priority from usb media should be set. The utility will start, first make a backup copy of the installed firmware, for this: enter the command — “afudos / firmware_name” (without quotes), for example, afudos / oi7PWK. rom.
Then start the update, to do this, enter «afudos /new_firmware_name» (without quotes), for example, afudos /e3shj.rom.
A process will start and the PC will restart. Remove the flash drive from the USB port for normal boot.
ASUSTeK EZ Flash 2
Built-in BIOS utility to run it — go to settings and go to advanced settings — «Advanced Mode». In the «Tool» section, select «ASUSTeK EZ Flash 2». Specify the media in the left column, and the firmware in the right. Agree with the warning and the process will begin.
There will be an initial setup upon boot, you can configure everything as you wish or exit, leaving all the default settings.
How to update BIOS Gigabyte
Official website: https://www.gigabyte.ru/
Follow the link, find your laptop or motherboard, open its page and follow the «Support» link, it will be located here all new drivers, software and firmware.
Q-Flash
The best option for this manufacturer is to update with the Q-Flash utility, which is already built into the BIOS by default. Also, Gigabyte allows flashing online, directly from the system, but more on that below.
Reset all BIOS settings to the factory state — «Load Optimized Defaults» and restart the PC.
Insert flash drive. Again, go to the settings and to launch Q-Flash, press the «F8» key. Just in case, make a backup copy of the current «Save BIOS» firmware, and then click on the «Update BIOS» item. Select the media, usually the flash drive is displayed as «HDD 2.0», and then the update itself. We agree with all the warnings and the flashing will begin.
@BIOS
Online flashing is done using a special utility — @BIOS. Download it from the official site at the link — https://www.gigabyte.ru/microsites/74, also make a backup copy and update. The utility itself will download and install the necessary new versions.
How to update BIOS MSI
Official website: https://ru.msi.com/
for him.
MSI Live Update
Let’s start with the MSI Live Update utility, it is launched from Windows itself and, in addition to updating the firmware, you can also update the drivers of the motherboard, sound card, etc. with it. Download it — https://ru.msi.com/page/live-update-5-manual.
Install the utility and go to the Live Update tab in it. Check the checkboxes for the items that need to be updated and click on the “Scan” button.
When a new firmware version is found, click on the «Download» button. The download process will begin, after which the installer window will open — click on the «Next» button to save it. In the next window, also click on “Next” and select “In Windows mode”, after which the update will begin and, when completed, the PC will reboot.
You can also flash in DOS mode, for this you need a flash drive on which the firmware will be written. Select this item in the installer and follow the installation wizard.
M-FLASH
Download the required firmware, make a bootable flash drive and upload it there. Run the BIOS settings, there we need the «M-FLASH» utility built into it — select it. Next, specify your flash drive and the downloaded file.
The update will start and the computer will restart. Do not forget to pull out the flash drive.
Acer BIOS update
Official address: https://www.acer.com/ac/ru/RU/content/drivers
InsydeFlash
Follow the link and find your laptop, a page with a new one will open Software for it, download the firmware update.
Then run the utility in the «.EXE» format to start the update. A reboot will occur and the flashing process will begin. If an error message is displayed when starting the file, then this may be due to the fact that the laptop is simply not connected to charging.
How to update BIOS ASRock
Official address: https://www.asrock.com/index.ru.asp
Instant Flash
Find your motherboard on the website, open the «Support» link and download the file format «Instant Flash», download it to a USB flash drive (still do not forget that it must be in FAT32 format). Insert it into the PC and start rebooting it. Press «F2» when starting the PC to get into the settings, then go to the «Instant Flash» item, it will be in the «Advanced» or «Tool» section.
There you will see the firmware, click on it to start the update process.
Motherboard — Intel
Official address: https://downloadcenter.intel.com/ru
Express BIOS Update
Download the new update for your motherboard from the above address and run the installer. Agree to the terms of the update and then click «Finish».
A reboot will be made.
Iflash
The utility will be downloaded along with the firmware. Transfer their files to a bootable flash drive and reboot the computer with booting from the USB drive. DOS will boot, enter the command IFLASh3 /PF XXX.BIO and follow the instructions of the installer.
The computer will restart and the reinstallation will be completed. We turn on the PC without a flash drive plugged into it.
In conclusion
Now you have learned how the whole process works, do it carefully and only in extreme cases. I hope this post helped you, check back often, this section will be updated.
Tell friends
Similar entries How to enter BIOS (BIOS) on a laptop and computer disk
Comments — 0:
How to flash the BIOS from a floppy disk or screw?
It happens that the BIOS is injured, but not dead, then when you try to boot the machine grinds the disk, and the threatening “BIOS checksum error” glows on the screen. How to flash the BIOS in such an unpleasant case?
You can try burning a system drive containing only io.sys files; msdos.sys; command.com and write down the bios.bin bios itself, the flash driver and autoexec.bat with the command line corresponding to the flash driver.
This method is unreliable and will work 2 out of 7 times, but it is usually tried first and sometimes it works.
It is also worth adding that on the websites of some computer manufacturers, special files are offered for download that help restore the BIOS and the computer to working order.
Processes that occur when the computer is turned on
The sequence for starting up the PC after turning on the power is as follows.
- In the very first moments after power is supplied to the electronic components of the power supply and the motherboard, automatic testing is carried out for the absence of a short circuit, overload, etc. This happens without the participation of the processor, at the so-called hardware level, this test is built into the circuit power supply. If everything is in order, then a command is given to supply power to the motherboard, and through it to the central processor.
- After the appearance of the supply voltage, the «woke up» processor is able to perform only one operation — to read a small program block from a special microcircuit, in which the algorithm for further actions is described.
First of all, this block contains commands for the sequential launch of other programs recorded in the BIOS chip, which, in turn, bring Windows boot closer.
- If the programs in the BIOS chip are damaged, then the launch will be impossible until its contents are restored. Therefore, one of the priority programs that are executed at the initial stage is checking the checksums of the entire contents of the microcircuit. Some of this data is recorded permanently and changes only during firmware, while the other is variable settings that can be changed as needed. In case of a failure in the BIOS, there is a function to load factory settings.
- Small programs are then run in succession to test all the main components of the computer (eg RAM, video card, hard drive, etc.). It is these programs that cause squeaking sounds during PC startup if something is broken in it. If everything is in order, then control is transferred to the program from the hard disk, which already independently starts the operating system startup.
It becomes clear that the BIOS system is logically located directly next to the central processor. While the Windows operating system is running, it does not interfere with the operation of the computer, and during the reboot, the BIOS takes control of the Windows startup process. Now it would be interesting to see what the BIOS looks like physically.
ASUS new BIOS
How do you know that you have a new BIOS? It is very simple to do this: go to the BIOS menu when you turn on the computer, then pay attention to the external interface of the program. If in this window you can work with both the keyboard and the mouse, if the window does not look like a standard BIOS (gray or blue background with a frightening menu), but like a modern application, then you definitely have a modern motherboard with the UEFI standard. This standard replaced the old BIOS system to make it easier for the user to navigate the program space. Therefore, special thanks to programmers and developers for such care.
And this is what the new version looks like
So, you can consider that you are more lucky than those who will have to use the instructions below: you can update the firmware using a built-in program called ASUS EZ Flash 2. So, what to do?
- In the BIOS window, select the option at the bottom of the Advanced page. The program will clarify your action — click OK;
- Now in the top menu, find the «Service» tab and click on it. In this window, we will need just the ASUS EZ Flash utility mentioned above;
- Next, we find the previously recorded firmware file for your motherboard (if you don’t understand what we are talking about, run to read the points “What you need to know before flashing the BIOS” and “Preparing the necessary files”! Do not pretend to be a know-it-all, but better read the information provided). Left-click on the file;
- In a new window, the utility will ask you to read it. Click OK;
- A notification pops up again, where the BIOS update itself is specified — here we also agree with the OK button;
- We are waiting for the completion of the flashing.
This process may take some time, so be patient and do not touch anything. When everything is over, you will see a notification that the update was successful. Click OK again;
- The system will reboot with the BIOS reset and the new version. You can congratulate yourself, because you successfully completed the task!
Is an update required for my motherboard
The first thing to find out before proceeding is your motherboard revision and current BIOS version. It is not difficult to do this.
In order to find out the revision, you can look at the motherboard itself, there you will find the inscription rev. 1.0, rev. 2.0 or similar. Another option: if you still have the box or documentation for the motherboard, there may also be revision information.
In order to find out the current BIOS version, you can press the Windows + R keys and type msinfo32 in the Run window, and then see the version in the corresponding paragraph. Three more ways to find out the BIOS version.
Armed with this knowledge, you should go to the official website of the motherboard manufacturer, find the board of your revision and see if there are BIOS updates for it. You can usually see this in the «Downloads» or «Support» section that opens when you select a specific product: as a rule, everything is quite easy to find.
Note : if you bought an already assembled computer of a major brand, for example, Dell, HP, Acer, Lenovo and the like, then you should go to the website of the computer manufacturer, not the motherboard, select your model there PC, and then in the downloads or support section, see if BIOS updates are available.
How to update bios amd
Contents
- Flashing the BIOS of an AMD video card
- Rolling back to an old BIOS version
- What is a video card firmware, what is it for in mining
- What is needed for flashing
- Programs for flashing a video card
- What happens to a video card after changing the BIOS
- Which video cards can be flashed to increase production in mining
- Which BIOS to choose when buying a video card
- Video card firmware guide
- Possible firmware errors and how to fix them
- Conclusion
A video card BIOS update is required very rarely, this may be due to the release of important updates or a reset. Usually, the graphics adapter works fine without flashing all its life, but if you need to do it, then you need to do everything carefully and follow the instructions exactly.
Flashing the BIOS of an AMD 9 video card0017
Before starting, we recommend that you pay attention to the fact that all actions must be performed strictly according to the instructions. Any deviation from it can lead to serious consequences, up to the point that you will have to use the services of a service center to restore work. Now let’s take a closer look at the AMD graphics card BIOS flashing process:
- Go to the official GPU-Z website and download the latest version.
- Open it and take note of the video card name, GPU model, BIOS version, type, memory size and frequencies.
Select item «Load BIOS» and open the unpacked file. Verify that the firmware version is correct by viewing the information in window «Information» .
Go back to the GPU-Z program and save the old version of the firmware so that you can roll back to it if something happens.
Create a bootable flash drive and move two firmware files and the ATIflah.exe flash driver to its root folder, which can be downloaded from the developer’s official website. Firmware files must be in ROM format.
After a successful download, the command line should be displayed on the screen, where you should enter:
atiflash.exe -p 0 new.rom
Where «New.rom» is the name of the file with the new firmware.
Rollback to an older BIOS version
Sometimes the firmware is not installed, and most often this happens due to the inattention of users. In this case, the video card is not detected by the system, and in the absence of a built-in graphics accelerator, the image on the monitor disappears. To resolve this issue, you will need to roll back to a previous version. Everything is done very simply:
-
If booting from the integrated adapter is not successful, then you need to connect another video card to the PCI-E slot and boot from it.
atiflash.exe -p -f 0 old.rom
Where «old.rom» is the name of the file with the old firmware.
It remains only to change the card back and find the cause of the failure. It is possible that the wrong version of the firmware was downloaded or the file was corrupted. In addition, you should carefully study the voltage and frequencies of the video card.
Today we took a closer look at the process of flashing the BIOS of AMD video cards. There is nothing complicated in this process, it is only important to follow the instructions and carefully check the necessary parameters so that there are no serious problems that cannot be solved by rolling back the firmware.
Thank the author, share the article on social networks.
When using any equipment for mining, each user seeks to get the most efficiency of his work.
Sometimes you have to use overclocking for this or use modes of operation not provided by the manufacturer, which requires modification of the BIOS. This article addresses the question of how to flash the BIOS of a video card.
What is video card firmware, what is it for in mining
When using video cards from AMD, there is a practical opportunity not only to increase the frequency of the graphics processor and video memory, but also to use finer settings regarding the mode of operation of memory chips, as well as power consumption of the video card. This is possible due to a change in the settings specified in the BIOS of the video card, used by the operating system and application programs, which are read during hardware initialization immediately after the computer is turned on.
Optimization of video card settings for mining, as a rule, consists in achieving the following goals:
- reduction of timings on which video memory chips work, which allows to increase its performance without increasing the operating frequency;
- reducing the power consumption of the video card to a minimum (lowering the voltage on the graphics core, memory controller and reducing the power limit), while maintaining stability, which allows you to increase the profitability of mining by reducing electricity costs, as well as reduce the heating of components, which reduces wear .
In addition, knowing how the firmware for mining popular video cards is made, for example, RX480 allows, if necessary, to restore their performance. When buying a used video card, it happens that it was flashed by a not very experienced miner and, as a result, gives errors that can be found in various diagnostic programs, for example HWinfo (shows memory errors). Such a video card, as a rule, produces artifacts in image , may cause your computer to freeze. To fix these problems, you may need to flash the native BIOS, which can be downloaded from the manufacturer’s website, or, in case of significant memory degradation, you will need a modified BIOS firmware with reduced frequencies, which can eliminate problems with freezing, errors and artifacts.
What you need for firmware
Video card firmware is carried out on any computer that has slots PCI-Express directly in the operating system Windows . To do this, you need to have a specific set of programs , as well as knowledge on how to do it.
Programs for flashing the video card
To flash video cards from AMD, you need the program Atiflash , which allows you to backup, and also makes it possible to update the BIOS of the video card to an improved version if it is released by the manufacturer. It can be downloaded from https://www.techpowerup.com/download/ati-atiflash/ .
The archive contains program ATIWinflash for working with video cards using a graphical shell and utility Atiflash with a command line, which has wider functionality, but requires the introduction of text commands.
To flash AMD video cards of the Polaris family, it is best to use the free utility SRBPolaris BIOS editor , which is available for download at bitcointalk.org/index.php?topic=1882656.0 . This program allows you to set video card parameters by copying timings from low to higher frequencies, change the operating frequency of the GPU, change consumption limits, voltage, cooler settings.
The Polaris BIOS Editor utility performs similar functions. It is very convenient to use version 1.6.7 , which can be downloaded from the developer’s page at https://github.com/vanities/PolarisBiosEditor-1. 6.7 (you need to click on the Clone or download button and select download.zip). After downloading, you need to unzip the program to a convenient place and use the file PolarisBiosEditor.exe to run it. The program contains a database of memory chips from the most popular manufacturers, including Elpida , Hynix , Samsung and allows you to automatically flash the best timings.
After flashing video cards, you may need to patch operating system drivers , in which there is a BIOS check, using the program Atikmdag patcher (https://www.monitortests.com/forum/Thread-AMD-ATI-Pixel-Clock- patcher). This is usually required for RX400 series video cards, which, after modifying the BIOS, are detected by the system with error 43 . After flashing for mining newer video cards, for example, type RX 580 , this error usually does not occur .
What happens to the video card after changing the BIOS
With the correct BIOS modification, the video card works the same way as usual, but with improved parameters for mining.
As a rule, flashing a video card makes it possible to get better performance of the video memory and reduce power consumption. This is especially helpful when mining on algorithms that use video memory intensively, for example, when mining ether, ether classic, musiccoin, expansion and other coins on the Ethash algorithm.
Often miners have questions about whether it is possible to improve the performance of Nvidia video cards (for example, GTX1050Ti) by flashing them for mining. Let’s consider this question in more detail.
What video cards can be flashed to increase production in mining
Theoretically, it is possible to flash any video card, but practically it is possible only with video cards from AMD , because Nvidia BIOSes are encrypted and the process of upgrading them for the average user is quite complicated.
In addition, the Nvidia bios firmware for mining is not performed also because the overclocking of these cards is perfectly done by software tools, for example, the program Nvidia inspector . Firmware for Nvidia video cards, for example, GTX1060 , is sometimes carried out when the manufacturer releases updated versions of Bios, which can be useful for mining as well. In each specific case, information about updates appears on the manufacturer’s website and for this purpose the corresponding programs are posted there.
Which BIOS to choose when buying a video card
There are many different AMD graphics cards on the market today that have two or even four BIOSes. These products are best suited for mining and flashing because they allow you to easily recover a corrupted, incorrectly flashed BIOS by rebooting the computer with an uncorrupted program, switching to the corrupted version and re-flashing the original BIOS.
Video card models with four options ( Quad Bios ), as a rule, are already flashed for mining and allow the user to select the desired option from the following:
- Maximum performance mode with normal power consumption.
- Maximum performance mode with high power consumption.
- Reserve #1.
- Reserve #2.
Video card firmware guide
Flashing a video card for mining is very easy to do with a GUI application ATIWinflash and one of the BIOS modification programs. It involves doing the following:
1. Saving the BIOS contained in the video card to a file for modification and backup. Copying the original BIOS to a safe place is necessary so that you can return the card to its original state in case of unsuccessful firmware or for other reasons.
To do this, proceed as follows:
- Run as administrator application ATIWinflash .
To do this, click on the file icon with the right mouse button and select the appropriate command;
- In menu System V />
- Upon completion of copying the BIOS, a success message will appear. The resulting file can be upgraded, as well as copy the original for backup.
2. Upgrading the parameters of the factory BIOS, which is done by flashing straps (timings) from low frequencies to higher ones.
As a rule, when modifying a BIOS file, memory timings are written from a frequency of 1500 or 1625 megahertz to all BIOS lines with higher frequencies. When using PolarisBiosEditor-1.6.7 , timings can be modified automatically at the touch of a button. To do this, perform the following actions:
- run the program Polaris BIOS Edito r;
- press the button OPEN BIOS ;
- click button One click timing patch ;
- save the modified BIOS to the right place by pressing the Save as button under a new name, for example RX570-mod.
rom .
In addition, you can change other parameters of the video card, but it is more convenient to do it in the program SRBPolaris BIOS editor . They actually do not affect the speed of mining, but can reduce power consumption (which can be successfully done in the program for mining or overclocking directly in the operating system Windows and without flashing these values into the BIOS, which, if values are incorrectly selected, increases the risk of damaging the card ).
3. Writing a new version to the video card chip, which is done as follows:
- Run the ATIWinflash application as administrator. To do this, right-click on the file icon and select the appropriate command;
- In menu System V />
- Checking the operation of the video card for stability. It consists in a test run of the mining program, checking the voltage, frequencies and memory errors in HWinfo .
Possible firmware errors and how to fix them
When flashing Bios, the following errors may occur:
- Firmware file from the wrong video card or corrupted version of . This can happen when flashing in a rig with several different video cards. If a monitor is inserted into an incorrectly flashed card, the system will not start. If the monitor is inserted into another adapter, then the card simply will not be detected by the system or will be displayed as an unknown device.
- Flashing a file with incorrect settings, in which the system is unstable (strong overclocking, very small timings and very strong undervoltage). This error is easily fixed by flashing the factory BIOS.
If the video card is not detected, but it has a backup Bios, then it is enough to switch to the backup option, boot the computer from it, wait for the system to fully boot, switch the Bios to the corrupted version and flash the original file.
This will allow you to restore using an algorithm similar to the firmware:
- Run cmd as administrator.
- Go to the directory where the AtiFlash program was unpacked. To do this, enter the command C: AtiwinFlashAtiFlash (where C: Atiflash is the path to the folder where the Atiflash program is located) and press enter.
- Enter the command AtiFlash -i and press enter. A table should appear with information about all AMD adapters installed in the system, even those with corrupted BIOS.
- In column test there will be information about the initialization of video cards. If any of them did not pass the test, then this line will contain information about the error. You need to remember the adapter number (first column) that failed initialization, enter the command AtiFlash -f -p 0 bios.rom (where 0 is the number of the failed video card , and bios.
rom is the file with the correct BIOS , which must be in the same folder as the AtiFlash program) and press enter.
- At the end of the firmware, a success message will appear and a suggestion to restart the computer.
If AtiFlash does not see the video card or it is not even possible to force flash the BIOS, then you may have to replace it with a programmer with soldering the chip, for which will have to contact specialists.
Conclusion
Flashing an upgraded version of the BIOS, with careful observance of the necessary rules, does not pose a particular risk, but allows you to get much better performance when mining .
Subscribe to our resources and read the comments, sometimes smart people write smart things there.
Subscribe to AltCoin Log news on Vkontakte
In order to improve the performance and stability of AMD Radeon graphics cards, you should try flashing the BIOS. You can find out how to do this on our page!
Why update the BIOS of an AMD Radeon graphics card? Everything is very simple! If you want to achieve great stability, or if you want to overclock it a little from the start of the system, then you need to flash the AMD Radeon graphics card!
Below we have provided you with step-by-step instructions on how to do this!
See also:
- How to update the graphics card firmware Nv />
- Downloading the BIOS update utility for AMD Radeon video cards.
- Unpack the archive with the utility to drive C: and place the AMD Radeon firmware next to it. Run the command prompt as an administrator and go to the C: drive in it.
- Starting BIOS firmware for AMD Radeon video cards:
- We write the command AtiFlash.exe -p 0 File_name_BIOS.rom . 0 in this case indicates the number of the slot in which the Radeon graphics card is installed. You can find out the slot number using the AtiFlash.
exe -i command and looking at the first column adapter
Do you still have additional questions? Ask them in the comments, tell us what you did or vice versa!
That’s it! Stay with the site Android +1 , it will be even more interesting! For more articles and tutorials, see Windows Articles and Hacks.
step-by-step instructions in 4 sections
Games have become dull, and in general, the speed of the PC has fallen? There is no need to panic: it may not be a breakdown, but the GPU driver has crashed or is out of date. How to quickly update it yourself, the sections below tell.
Why do I need to update video card drivers
Drivers for components, including video cards, must be updated in a timely manner. To understand what this gives, you need to learn about the function of drivers: they are needed so that the software that accesses the PC can work comfortably with it. For example, so that when software interacts with the GPU, performance is not lost.
How to find out if drivers need updates
Identifying such a need is quite simple. There are the most common first signs:
- Stuttering and freezing in games, even if the computer configuration is much higher than the minimum required to run the game and comfortable gameplay.
- Unnecessarily high GPU temperatures: especially pronounced when using laptops.
- Next to the line «Display adapters» there is a yellow triangle icon with an exclamation mark in the middle.
See also: Which video card is better — NVidia GeForce GTX 1050 or AMD Radeon RX 560
Identifying the brand and model of a graphics card
Nvidia and AMD are a couple of the world’s most well-known GPU manufacturers. New software for them is released regularly. One way to determine the type of graphics card without third-party utilities is similar to the example above. Everything can be peeped in the «Video Adapters».
You can also understand which GPU is in a PC or laptop using third-party software, for example, «CPU -Z» or «System Specification». These programs also allow you to find out information about other components.
Special utilities for searching for drivers
There are two ways to install the software:
- Do it yourself — the manual method is relevant when you need to install a specific version of the driver.
- Set auto-update — the method is optimal when the latest updates are needed.
You can implement the second method in Windows, through the Device Manager (DU). This can be done by clicking on the name of the video chip in the «Video adapters». In the drop-down list, you will need to select the appropriate column. You can also use software like «Driver Updater» and «Driver Pack Solution».
Interesting: How to connect 2 monitors to a PC + setup and software for working with two monitors
How to update video card drivers
It is not difficult to update video adapter drivers, regardless of the version of Windows. This can be done manually using standard operating system tools, or through the website of the GPU manufacturer. Details are in the table.
Topic: How to assemble a gaming computer, what components to buy: 3 options to choose from
Drivers for the video card are not installed: what to do
Errors that occur when updating software for the graphics adapter are not uncommon. It’s annoying if you don’t know what to do. Below are 4 possible solutions.
Nvidia
Typically, these problems occur because the driver is incompatible with the OS version. The driver installer may not see the component and display a message on the monitor that the operation cannot be completed. In this situation, the user needs to:
- Log in to the remote control on your computer or laptop and find the tab that displays the video adapters.
- In this tab, the GPU will be shown as «Standard VGA graphics adapter» (this is how the system sees any GPU without drivers).
- Through a double click on the inscription, go to the «properties».
- In the menu that opens, select the «Hardware ID» item.
The next steps are in the table.
Then the software will recognize the card, so you can safely start the installation.
AMD
The notification that AMD Catalyst Mobility cannot be loaded because it is not compatible with the computer often scares owners of AMD devices. In fact, everything is not so scary.
The fact is that:
- First you need to install the chipset driver — the basic «firewood» on the motherboard.
- Software on the network card, audio and video equipment are installed after.
- When a device has two GPUs — an integrated one from Intel and a discrete one from AMD, then the drivers on the GPU are installed in order: first — on the built-in, then — on the discrete one.
Having reinstalled everything as it should, it is easy to fix the error.
See also: 3 best manufacturers of NVidia GeForce GTX 1060 + 5 cool models
Intel
If the required driver is not installed, the system may show the GPU as «Basic Video Adapter» (Microsoft). It is easy to manually install the software for the built-in video chip from Intel. The table below confirms this.
Windows 10
The licensed «ten» is updated to the latest version automatically, and with it all the drivers. All this happens if the user has not disabled auto-update. If the system auto-updates, but something went wrong and the drivers do not work, you should contact Microsoft support.
Find out who wins the battle: Comparison of 2 budget gaming graphics cards — GTX 1050 vs GTX 1050 TI
It takes very little time to manually update the drivers of any graphics card, whether nvidia or amd. This can be done both in Windows (by classical methods) and with the help of special utilities. It is also possible to download «firewood» (they are always on the official website), and then put them on a laptop or computer yourself.
AMD Radeon RX
bios firmware guide When using any equipment for mining, each user seeks to get the most efficiency of its work.
Sometimes you have to use overclocking for this or use operating modes not provided by the manufacturer, which requires modification of the BIOS. This article addresses the question of how to flash the BIOS of a video card.
Contents
- 1 What is video card firmware, what is it for in mining
- 1.1 What you need for flashing
- 1.2 Programs for flashing a video card
- 1.3 What happens to a video card after changing the BIOS
- 2 Which video cards can be flashed to increase production in mining
- 3 Video card firmware guide
- 4 Possible errors in firmware and how to fix them
- 5 Conclusion
What is video card firmware, what is it for in mining
When using video cards from AMD, there is a practical opportunity not only to increase the frequency of the graphics processor and video memory, but also to use finer settings regarding the mode of operation of memory chips, as well as power consumption of the video card.
This is possible due to a change in the settings specified in the BIOS of the video card, used by the operating system and application programs, which are read during hardware initialization immediately after the computer is turned on.
Optimization of video card settings for mining, as a rule, consists in achieving the following goals:
- reducing the power consumption of the video card to a minimum (lowering the voltage on the graphics core, memory controller and reducing the power limit), while maintaining stability, which allows you to increase the profitability of mining by reducing electricity costs, as well as reduce the heating of components, which reduces wear .
Flashing video cards for mining gives a significant increase in performance, for example, a flashed RX 570 gives 30-40% higher speed when mining ether than a similar non-flashed version.
In addition, knowing how the firmware for mining popular video cards is made, for example, RX480 allows, if necessary, to restore their performance. When buying a used video card, it happens that it was flashed by a not very experienced miner and, as a result, gives errors that can be found in various diagnostic programs, for example HWinfo (shows memory errors). Such a video card, as a rule, produces artifacts on the image , which can lead to a computer freeze. To fix these problems, you may need to flash the native BIOS, which can be downloaded from the manufacturer’s website, or, in case of significant memory degradation, you will need a modified BIOS firmware with reduced frequencies, which can eliminate problems with freezing, errors and artifacts.
What you need for firmware
Video card firmware is carried out on any computer that has PCI-Express slots directly in the operating system Windows . To do this, you need to have a specific set of programs , as well as knowledge on how to do it.
Programs for flashing video cards
To flash video cards from AMD, you need the program Atiflash , which allows you to backup, and also makes it possible to update the BIOS of the video card to an improved version if it is released by the manufacturer. It can be downloaded from https://www.techpowerup.com/download/ati-atiflash/.
The archive contains program ATIWinflash for working with video cards using a graphical shell and utility Atiflash with a command line, which has wider functionality, but requires the introduction of text commands.
To flash AMD video cards of the Polaris family, it is best to use the free SRBPolaris BIOS editor utility, which is available for download at bitcointalk.org/index.php?topic=1882656.0. This program allows you to set video card parameters by copying timings from low to higher frequencies, change the operating frequency of the GPU, change consumption limits, voltage, cooler settings.
The Polaris BIOS Editor utility performs similar functions. It is very convenient to use version 1.6.7 , which can be downloaded from the developer’s page at https://github.com/vanities/PolarisBiosEditor-1. 6.7 (you need to click on the Clone or download button and select download.zip). After downloading, you need to unzip the program to a convenient place and use the file PolarisBiosEditor.exe to run it. The program contains a database of memory chips from the most popular manufacturers, including Elpida , Hynix , Samsung and allows you to automatically flash the best timings.
After flashing video cards, you may need to patch operating system drivers , in which there is a BIOS check, using the Atikmdag patcher program (https://www.monitortests.com/forum/Thread-AMD-ATI-Pixel-Clock -patcher). This is usually required for RX400 series video cards, which, after modifying the BIOS, are detected by the system with error 43 . After flashing for mining newer video cards, for example, type RX 580 , this error usually does not occur .
After flashing, it is very convenient to control the parameters of the video card using the programs GPU-Z and HWinfo , which show voltages, frequencies, video card load and a lot of other useful information. The presence of overclocking can be checked in HWinfo by monitoring video memory errors. With a large number of these errors, you need to reduce overclocking by reducing the operating frequency of the video memory or flashing less aggressive timings.
What happens to the video card after changing the BIOS
If the BIOS is modified correctly, the video card works the same way as usual, but with improved parameters for mining.
As a rule, flashing the video card gives you the opportunity to get more performance of the video memory and reduce power consumption. This is especially helpful when mining on algorithms that use video memory intensively, for example, when mining ether, ether classic, musiccoin, expansion and other coins on the Ethash algorithm.
Often miners have questions about whether it is possible to improve the performance of Nvidia video cards (for example, GTX1050Ti) by flashing them for mining. Let’s consider this question in more detail.
Which video cards can be flashed to increase mining
Theoretically, it is possible to reflash any video card, but in practice it is possible only with AMD video cards , because Nvidia BIOSes are encrypted0008 and the process of upgrading them for the average user is quite complicated.
In addition, the Nvidia bios firmware for mining is not performed also because the overclocking of these cards is perfectly carried out by software tools, for example, the program Nvidia inspector . Firmware for Nvidia video cards, for example, GTX1060 , is sometimes carried out when the manufacturer releases updated versions of Bios, which can be useful for mining as well. In each specific case, information about updates appears on the manufacturer’s website and for this purpose the corresponding programs are posted there.
The easiest way is to produce firmware for mining video cards of the Polaris family (R400-500 series, for example, RX 560) and older AMD video cards, for which there are many utilities and related information on specialized forums.
What BIOS to choose when buying a video card
Currently, there are many different video cards with AMD graphics processors on sale, in which there are two or even four BIOSes. These products are best suited for mining and flashing because they allow you to easily recover a corrupted, incorrectly flashed BIOS by rebooting the computer with an uncorrupted program, switching to the corrupted version and re-flashing the original BIOS.
Video card models with four options ( Quad Bios ), as a rule, are already flashed for mining and allow the user to select the desired option from the following:
- Maximum performance mode with normal power consumption.
- Maximum performance mode with high power consumption.
- Reserve #1.
- Reserve #2.
Miners prefer video cards with samsung 9 memory0008 because it has the biggest dance for overclocking. But what type of memory is installed on a particular video card is difficult to understand, you have to be guided by personal experience and buy video cards from the same batch.
Video Card Flashing Guide
Flashing a video card for mining is very easy to do using the GUI application ATIWinflash and one of the BIOS modification programs. It involves the following actions:
1. Saving the BIOS contained in the video card to a file for modification and backup. Copying the original BIOS to a safe place is necessary so that you can return the card to its original state in case of unsuccessful firmware or for other reasons.
To do this, perform the following actions:
- Launch the ATIWinflash application on behalf of the administrator .
To do this, right-click on the file icon and select the appropriate command;
- In menu System Video Devices select the required video card;
- Press the button Save (the right button in the bottom row of three buttons) and indicate the path to save the file;
- Upon completion of copying the BIOS, a success message will appear. The resulting file can be upgraded, as well as copy the original for backup.
2. Upgrading the parameters of the factory BIOS, which is done by flashing straps (timings) from low frequencies to higher ones.
As a rule, when modifying a BIOS file, memory timings are written from a frequency of 1500 or 1625 megahertz to all BIOS lines with higher frequencies. When using PolarisBiosEditor-1.6.7 , timings can be modified automatically at the touch of a button. To do this, perform the following actions:
- run the program Polaris BIOS Edito r;
- press the button OPEN BIOS ;
- click button One click timing patch ;
- save the modified BIOS to the right place by pressing the Save as button under a new name, for example RX570-mod.
rom .
In addition, you can change other parameters of the video card, but it is more convenient to do it in the program SRBPolaris BIOS editor . They actually do not affect the speed of mining, but can reduce power consumption (which can be successfully done in the program for mining or overclocking directly in the operating system Windows and without flashing these values into the BIOS, which, if values are incorrectly selected, increases the risk of damaging the card ).
3. Writing a new version to the video card chip, which is done as follows:
- Launch the ATIWinflash application as administrator. To do this, right-click on the file icon and select the appropriate command;
- In menu System Video Devices select the desired video card;
- Press the button Load Image (left button in the bottom row of three buttons) and select the modified file;
- Press the middle button Program (TM) RX470 Grap and wait for the firmware to finish;
- At the end of the firmware of the new BIOS, a success message will appear and an offer to restart the computer ;
- Reboot the computer, if error 43 appears, then you need to run Atikmdag patcher , patch the drivers and restart the computer again.
- Checking the operation of the video card for stability. It consists in a test run of the mining program, checking the voltage, frequencies and memory errors in HWinfo .
Possible errors during flashing and how to fix them
When flashing Bios, the following errors may occur: This can happen when flashing in a rig with several different video cards. If a monitor is inserted into an incorrectly flashed card, the system will not start. If the monitor is inserted into another adapter, then the card simply will not be detected by the system or will be displayed as an unknown device.
If the video card is not detected, but it has a backup Bios, then it is enough to switch to the backup option, boot the computer from it, wait for the system to fully boot, switch the Bios to the corrupted version and flash the original file. If both Bios are corrupted, or there is only one BIOS, but there is another video card or a graphics core built into the processor, then it remains possible to boot into the operating system with displaying an image to another video card . This will allow you to restore using an algorithm similar to the firmware: After a reboot, the video card should be detected by the operating system. If error 43 appears, then you need to run Atikmdag patcher , patch the drivers and restart the computer again. This error is easily fixed by flashing the factory BIOS.