How to test RAM and find errors
Gaming PCs are, unfortunately, no more resistant to memory mishaps than any other type of computer. But if you learn how to test RAM for errors, you can at least figure out the true cause of a crash or a booting error, in turn opening up the chance to find a fix (or just letting yourself know that you need to buy new RAM).
Watch on YouTube
In this guide we’ll go over a couple of different RAM testing tools, both free to download and use. The first, Windows Memory Diagnostic, is built right into Windows (including Windows 11) and offers an easy option for finding possible RAM problems. For a deeper investigation, you can also try MemTest86, which requires a bit more legwork (including some BIOS changes) but will more thoroughly search your RAM for errors.
How to test RAM using Windows Memory Diagnostic
This is your simplest and easiest option if you don’t fancy installing any other tools, as everything is built into Windows. However, you’ll need to block out some time for it; the tool itself claims its usage “might take several minutes”, but can actually take close to an hour, and you won’t be able to use your rig normally during that time.
Step 1: Open Windows Memory Diagnostic by searching for it in the Start menu’s search bar. Then, click “Restart now and check for problems”.
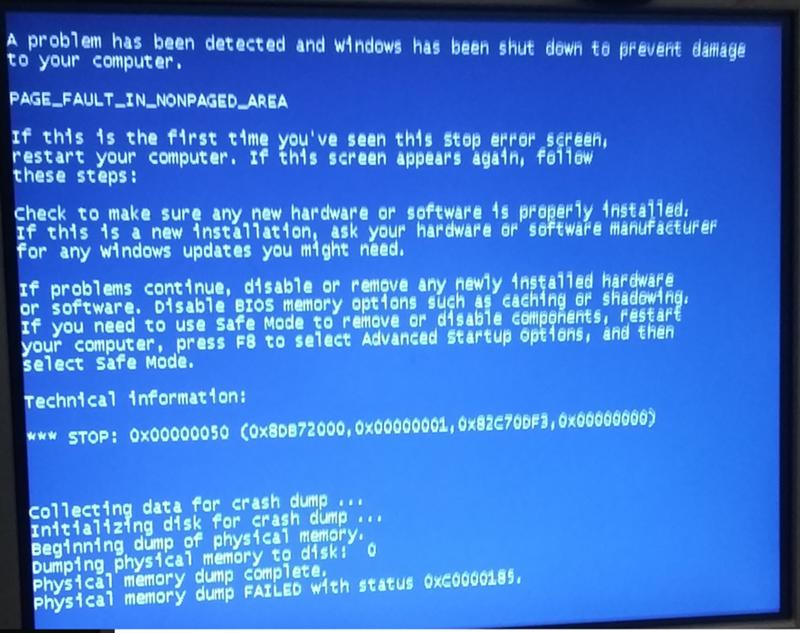
Step 2: Your PC will shut down and you’ll be treated to the sight of a blue screen for many, many minutes as Windows Memory Diagnostic searches for RAM issues. You can go off and do something more productive, as your input isn’t required at this stage, though it’s worth checking on it sporadically as the tool will say if it’s found a problem.
Step 3: Once the test pass is complete, you’ll return to your desktop. Windows Memory Diagnostic should apparently display its results automatically at this point, though it didn’t when I tried it. Luckily, you can find a recap in Windows’s Event Viewer.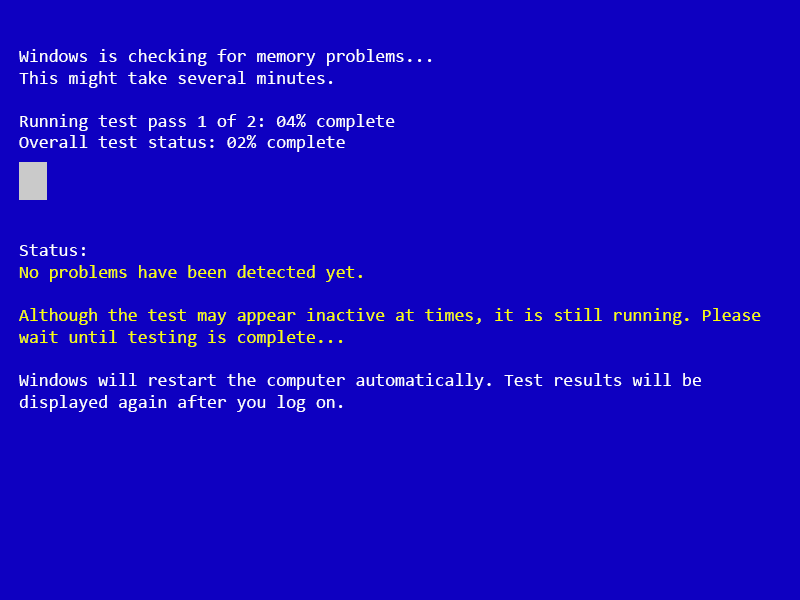
Step 4: Right-click the Windows icon then click “Event Viewer”.
Step 5: In Event Viewer, navigate to Windows Logs > System in the leftmost pane, then look in the “Source” column for an event named “MemoryDiagnostics-Results”. This will detail the results of the test in the pane at the bottom.
How to test RAM using MemTest86
Of all the free memory test apps, MemTest86 should be the only one you need. It runs a more thorough set of tests than Windows Memory Diagnostic and, because it boots from a USB drive, can bypass the OS entirely – handy if your crashing problems are so bad you can’t even reach your desktop.
Step 1: Head to the MemTest86 site and click “Download”.
Step 2: Extract the .zip file you’ve just downloaded and plug in a USB drive. Setting up MemTest86 will wipe everything else off the drive, so if it’s not already clean, back up its contents.
Step 3: Launch the “imageUSB” executable in the extracted folder. When asked if you want to allow it to make changes, click “Yes”.
Step 4: Select your USB drive from the list in the “Step 1” box. In the “Step 2” section, make sure “Write image to USB drive” is selected, then in the “Step 3” section, check that the memtest86-usb.img file is selected – it should be already. Finally, click the “Write” button, then “Yes” on the next two dialogue boxes to confirm.
Step 5: After a few moments the image will have been written to the USB – you’ll know because you’ll get a big flashing, slightly GeoCities confirmation message. Hit “OK” and either restart your PC, or if you’ve used a different computer to create the USB image, plug the USB drive into the PC you want to test and boot it up.
Step 6: Your PC will default to booting Windows rather than from the USB, so you’ll need to jump into the BIOS (or UEFI, if we’re being technical) and set the USB as the primary boot device. You can do this by pressing F2, F12 or the Del key as your PC boots up, depending on the motherboard manufacturer.
BIOS interfaces can differ but they usually have a Boot menu, so navigate to this and set any USB drive partitions to the top of the boot priority order list. You can always change this back after you’ve finished testing. Savr your changes and exit to restart.
Step 7: On restarting, your PC will load up MemTest86, which will start running automatically. It will take a while to finish the default four-pass testing run – two and a half hours when I tried it with 16GB of DDR4 – so let it do its thing, and upon completion, press any key to view the results. If you like, you can press the Y key when prompted to save a copy to an HTML file, for future reference.
Step 8: Press the X key to exit. You can choose to restart, shut down your PC or exit MemTest86, though remember that you’ll keep loading into it (rather than Windows) until you remove the USB drive or re-enter the BIOS to set Windows Boot Manager back to the primary boot option.
How do I fix RAM errors?
Sadly, not all memory errors are fixable. If there’s a serious hardware problem with one of your RAM sticks, you won’t be able to mend it with troubleshooters, and are best off just replacing it.
That being said, you can fix some lesser errors by reseating the RAM: the PC memory equivalent of turning it off and on again. Simply remove your RAM sticks from the motherboard, immediately re-install them, and try booting again to see if they behave better. Our guide on how to install RAM might help if you haven’t done this before.
And even when one of your RAM modules is terminally broken, if you have more than one stick in your motherboard you don’t need to throw them all out. Try repeatedly booting your PC while removing a different RAM stick each time; if you stop experiencing errors, you’ll know which module needs replacing and which one(s) you can keep.
How to test RAM: Troubleshooting to find bad RAM
RAM is one of the key components of any computer, so when it starts failing, things like crashes and performance issues start occurring — even if you have the best RAM you can buy. It might not even be obvious that RAM is unstable, which is why it’s important to know how to test your RAM.
Contents
- Windows Memory Diagnostic
- MemTest86
Difficulty
Moderate
Duration
3 hours
What You Need
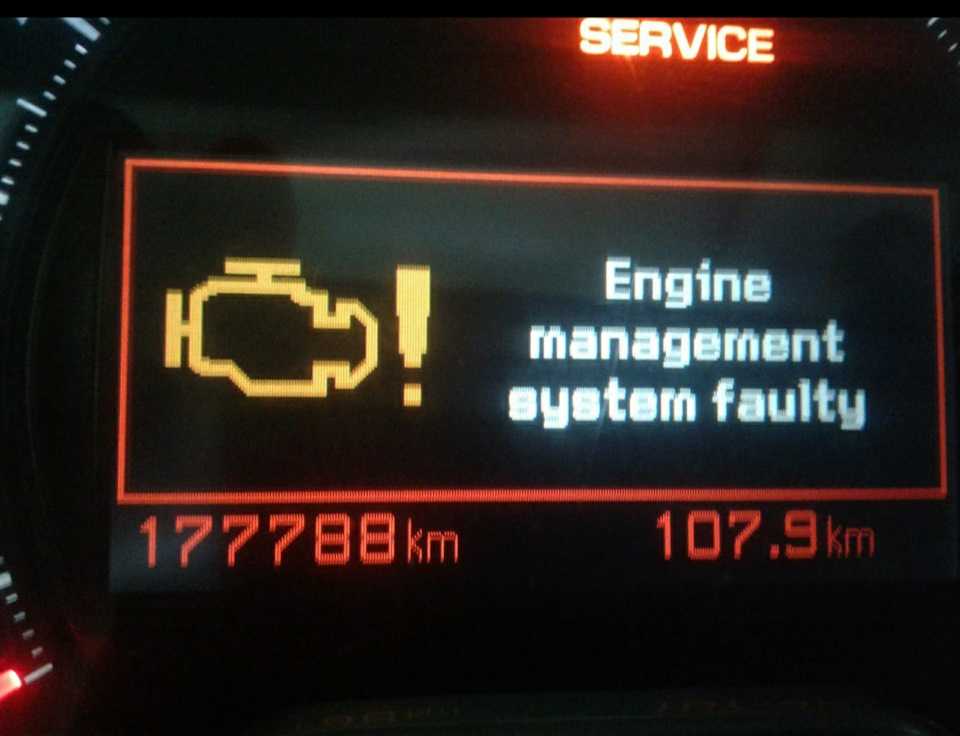
Instability is a spectrum, so depending on how unstable your RAM is, different things can happen. Slightly unstable RAM might perform a little worse than expected and could cause the occasional crash. More instability will cause more performance issues and more BSODs. For instance, the «page fault in non-paged area» BSOD error message is one you can expect if your RAM is unstable.
Windows Memory Diagnostic
Windows has a built-in memory testing tool called Windows Memory Diagnostic. It’s a simple but usually effective tool for finding RAM issues. Before you start, make sure you save all your data, because you will need to restart your PC.
Step 1: Go to the Windows search bar and type in Memory diagnostic. Select it.
Step 2: Then, you will see the window below. Click the first option, which will automatically restart your PC.
Step 3: When your PC reboots, you’ll be greeted with a blue-looking screen that tells you that your RAM is being tested. This takes about 15-30 minutes to complete.
Step 4: Once the test finishes, your PC will reboot back into Windows. Once you log in, you’ll get a notification that will inform you whether your RAM passed the test. A fail means the RAM is unstable, and you should replace your modules.
MemTest86
If your PC passed the Windows Memory Diagnostic but you still suspect you have a RAM issue, then you’ll want to try MemTest86, a much more comprehensive test by PassMark. Much like Windows Memory Diagnostic, it runs a test outside of Windows itself, so you’ll be unable to use your PC while the test is going. All you need to use MemTest86 is a USB storage device, which you will have to format, so make sure there’s nothing important on the device
Step 1: Download the free version of MemTest86 on PassMark’s website. You’ll receive a .zip file.
Step 2: Open the .zip file and copy/paste its contents into a new folder.
Step 3: Plug in your USB storage device and run imageUSB.exe. Again, your storage device will be formatted, so make sure nothing important is on it.
Step 4: At the top of the window, select the storage device you want to use for MemTest86, then find the Write button at the bottom and select it. The program will ask you if you’re really sure, since this part formats your storage device. After a minute, you’ll see an Imaging complete notification, which means your device is ready to use MemTest86. Before you move on, save all your data, because you will be restarting your PC soon.
Step 5: Now you’ll need to boot into your USB storage device. First, go to the Windows search bar and search Advanced startup, which should pull up Change advanced startup options.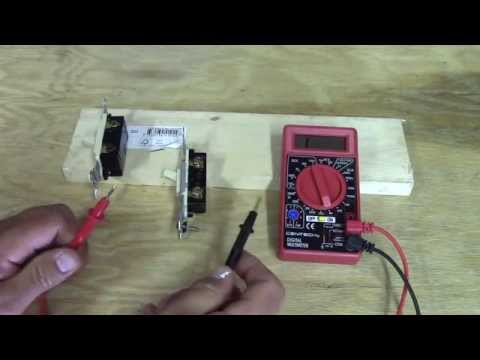 Select it.
Step 6: You should see a box labelled Advanced startup with a Restart now button. Select it and your PC will restart.
Step 7: Once your PC reboots, you should see the Windows recovery screen. Click Choose a device and select your USB device, which might be called something like UEFI: Removable Device.
Step 8: Your PC will then load MemTest86, which should start testing immediately. It can take around three hours to finish testing, so be patient.
Step 9: Once the test has finished, you’ll see a message that either says the RAM passed or that it failed. If it has failed, you need to replace your RAM — maybe with some of the best RAM for gaming.
If your RAM didn’t pass either test, then it’s unstable or bad. There are a few solutions that might work for you.
First, if you’re overclocking your RAM, you overclocked too hard and you’ll need to dial things back.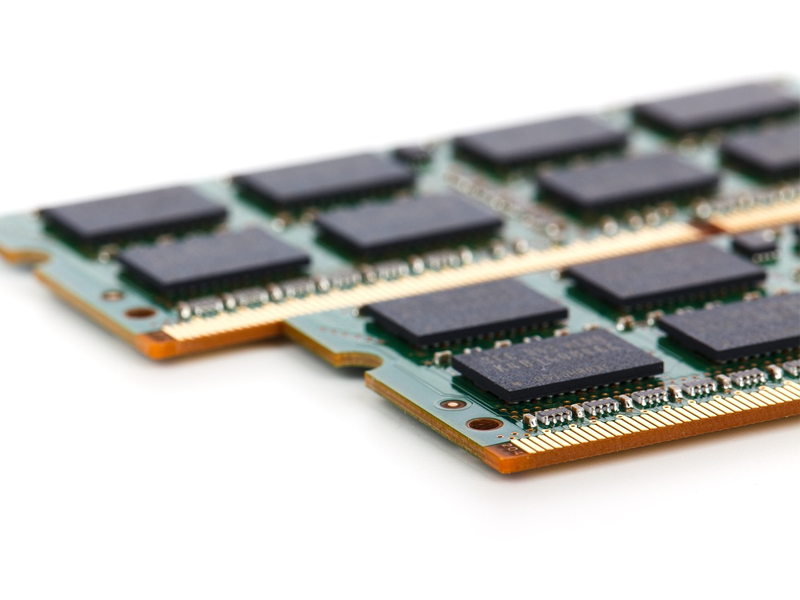 Either reset your RAM back to the default speed and timings, or reduce your overclock and test again. Overclocking RAM is difficult and finicky, so it’s entirely possible even a slight overclock can make your RAM unstable. If you’re having trouble overclocking, we have a guide for you.
If you haven’t messed around with your RAM, then there could be a system incompatibility. While all RAM can fit into any compatible motherboard, not all RAM plays nicely with every system, and every motherboard usually has a list of RAM kits that are confirmed to work well. If your PC is experiencing problems at stock settings, you can try to underclock your RAM to increase stability. Basically, follow our RAM overclocking guide and decrease the clock speed instead of increasing it. Obviously, you’re going to lose some performance doing this, but it’s better than having an unstable PC.
If your RAM is validated to work with your motherboard, if you’re on a laptop or a prebuilt PC that you haven’t modified, or if instability issues have appeared suddenly, then your RAM might be dying. If you bought your RAM and installed it in your own PC, and if it’s still under warranty, you should be able to get a new kit from the manufacturer. If you have a laptop or a prebuilt and you have never touched the RAM, you’ll probably have to get a replacement or repair from the place you bought your PC from.
You can also replace the RAM yourself. If you have a prebuilt desktop that uses off-the-shelf parts (Maingear and CyberPower desktops for example) or built your own PC, buy another kit of RAM, make sure it’s validated for your motherboard, and install it as you normally would. If you have a prebuilt that uses proprietary parts (such as HP’s and Dell’s desktops) or a laptop, then you’ll probably need an OEM-certified kit of RAM. These can be trickier to find, so make sure you do your due diligence before you buy.
Editors’ Recommendations
-
Best Apple iMac Deals: Get an Apple desktop for $539
-
Best desktop computer deals for September 2022
-
Best Microsoft Surface Pro deals for September 2022
-
What is ray tracing, and how will it change games?
-
Best HP Envy deals for September 2022
What are the signs of RAM failure and how to check faulty RAM?
RAM is an essential component of a computer. It is a volatile memory that stores all the CPU calculations required to run an app or software. If RAM is damaged, you cannot run your computer. There are some signs that indicate the system’s RAM is dying. This post lists some common symptoms of RAM failure.
What are the signs of RAM failure?
The following signs indicate that your computer’s RAM needs attention:
- Decreasing performance.
- Random restarts.
- Frequent BSOD errors.
- The computer displays incorrect RAM.
- Video Card fails to load.
1] Decreasing performance
Decreasing system performance is one of the most common faulty RAM symptoms. If you find that your computer runs perfectly when you first power it ON but with time, it becomes slower, you may have faulty RAM. But, there are other factors too that affect the performance of a system, like a misbehaving program, running multiple heavy software that require more RAM, etc.
So, how can you identify whether your RAM is healthy or not? If most of the apps or software installed on your computer crash frequently or take more time to load, you may have faulty RAM. In addition to this, you will also experience some other issues.
2] Random restarts
When your computer restarts randomly without any warning message, your RAM may be faulty. However, the computer also restarts randomly when the hard drive is damaged. But if you know that your hard drive is healthy and your computer is restarting frequently, especially after your desktop is initialized, it is a sign of bad RAM.
3] Frequent BSOD errors
A BSOD error occurs due to a corrupted software or faulty hardware. Therefore, it is not always an indication of bad RAM. Let’s understand it with an example. When you get a BSOD error every time you launch a particular software, it is likely that the software is triggering the error rather than hardware. But if you notice that your system crashes too often, especially when you try to install a new app or software, your RAM may be damaged.
4] The amount of RAM is displayed incorrectly
One of the symptoms of RAM failure is the system displays less RAM than it actually has.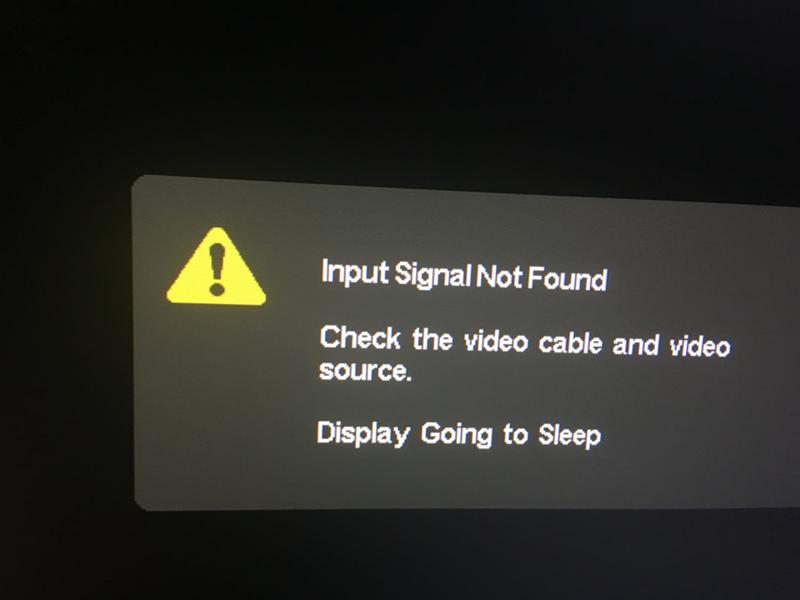 You can easily check how much RAM is installed on your system, but the process may differ for different Windows versions. In the case of faulty RAM, your system will display less memory than it actually has.
5] Video Card fails to load
You might have heard a beep sound when turning your computer ON. A single beep sound on starting a computer indicates that it has recognized the Video card successfully. But if your computer fails to load the Video card, you will not hear such a beep sound. You will also get a warning message in this case. The cause for this issue is either a defective system’s RAM or Video Card.
Read: Windows Memory Dump Settings on Windows 10.
How to check if RAM is faulty?
If you experience the above problems, your system’s RAM may have malfunctioned. But nothing can be said without a proper diagnosis. The following methods will help you diagnose the problem:
- Clean the RAM and insert it again.
- Run the Windows Memory Diagnostic tool.
1] Clean the RAM and re-insert it
A dirty or corroded RAM also causes many errors in a computer. Hence, if your system is showing the signs of bad RAM, the first step that you should take is to remove it from the slot and see whether it is dirty or not. If you find it dirty or corroded, clean it. You can use isopropyl alcohol to remove the corrosion.
Now, insert it again and check whether you get the above problems again or not.
2] Run the Windows Memory Diagnostic tool
Windows 10 comes with a built-in Memory Diagnostic tool. This tool checks the system’s RAM for errors.
To launch this tool, go to “Control Panel > System and Security > Administrative Tools > Windows Memory Diagnostic.” Double-click on it to run. You will get a prompt message on your screen. Select “Restart now and check for problems.”
The process will take some time. After completion, your system will be restarted automatically. The result of the memory diagnosis will be available in Windows Event Viewer after the scanning gets completed. Hence, you can do another task (if you have) rather than watching the test.
Follow the below-listed steps to view the RAM check report in Event Viewer.
- Type Event Viewer in the Windows search and click on the app to launch it.
- Expand the “Windows Logs” section on the left side and click on the “System.” Wait till the Event Viewer loads all Windows logs.
- Click on the “Find” option on the right side. A popup window will appear.
- Type “MemoryDiagnostic” in that window and click “Find Next.” It will show you the result of the memory diagnosis.
That’s it. Let us know if you have any questions.
Read next: Computer Beep Codes list and their meaning.
Date: Tags: Hardware
report this ad
[email protected]
Nishant is a tech enthusiast who loves writing about technology and gadgets. He has completed B.Tech. Apart from writing, he likes to spend his time on his plantation.
5 Signs and Symptoms That Your RAM Is About to Fail
If you look after your tech devices properly, most gadgets and components will keep working for a long time.
However, the delicate nature of electronic components means that a time will come when pieces start to falter—and nothing is more susceptible than your computer’s RAM.
Today, we will look at some of the signs of bad RAM. If you see any of these issues, it might be a sign that RAM failure is imminent.
Why RAM Failure Matters
Why does it matter if your RAM is about to fail? After all, people soldier on for years with broken smartphone screens or iffy keyboards.
Sadly, RAM isn’t something you can just ignore—it’s one of the most important parts of any computer (read our guide to RAM to learn more). It also has one of the highest failure rates out of all your machine’s components.
In simple terms, RAM is responsible for how many apps your machine can smoothly run at any given time. The biggest RAM hogs are typically your operating system and your web browser, but as a general rule, the more complex a program is, the more RAM it will require.
You can think of it as your computer’s short-term memory—it stores the data your computer is actively using. Hard drives are the long-term memory used to save stuff that you need to access between reboots.
Here are some of the most common faulty RAM symptoms that you might come across.
1. Diminishing Performance
One of the most tell-tale signs of RAM failure is diminishing performance over time.
If you find that your computer is running perfectly after you first power it up, but the longer you use it, the slower it becomes—you could be in trouble. The problem will be especially noticeable on memory-intensive apps such as Photoshop, complex video games, and web browsers.
Of course, faulty RAM might not be the cause of the problem: a misbehaving program could be eating through your machine’s CPU or leaking memory. But if you can’t pinpoint the cause of the performance degradation, it could be the RAM’s health.
One test you can use is to restart your machine but don’t fire up any apps. If the same thing keeps happening even without any apps running, it might be time to start shopping for new RAM modules.
2. Random Crashes
Like the point on performance degradation, just because your computer randomly crashes, it does not necessarily mean that your RAM is faulty. However, it does point to the possibility that it might be faulty.
This is especially true if there doesn’t appear to be any consistency to the crashes. For example, if you get the blue screen of death on Windows every time you try and open a certain app, it’s likely that the app is the culprit rather than your hardware. But if you find that the crashes occur without warning and at random times, your RAM could be responsible.
You might also find your machine will reboot the moment it displays the desktop or that it crashes every time you try to install something new.
3. Video Card Fails to Load
When you turn on your computer, you’ll almost always hear a loud beep. It indicates that your device’s video and media hardware has been correctly recognized and booted.
If you don’t hear the beep, it means it’s not loaded—and bad RAM could be the cause. You’ll also be shown an on-screen warning message as the operating system attempts to boot.
Again though, taken alone, it’s not a cast-iron guarantee of malfunctioning RAM. The problem could be the video card instead.
On a Mac, a triple beep at startup signifies a RAM error has been detected.
4. Corrupted Data Files
You might suddenly find that files you access and use frequently are corrupted and cannot be opened.
Aside from being a lesson about the importance of making regular backups, it’s another clear sign that your RAM is on the brink.
If you’re finding more and more files are becoming corrupted, and the problem is getting worse over time, RAM is almost certainly to blame. It’s because the defective RAM is causing your hard drive’s structure to degenerate; eventually, you won’t be able to boot your machine at all.
5. Incorrect System RAM Display
It’s easy to check the amount of RAM your system thinks it has on both Windows and Mac.
On Windows, right-click on the Start menu and navigate to System > About. You’ll be shown an overview of your machine’s vital statistics, including the amount of RAM theoretically installed.
If you’re on a Mac, navigate to Apple > About This Mac and make sure the Overview tab is selected. As with Windows, you’ll be shown a few of your computer’s stats, including the amount of RAM.
Does this amount tally with the amount your machine should have? If you’re not sure, do a Google search for your device’s product number.
How to Check Your RAM
As we alluded to a few times, having one of the above symptoms does not automatically point at a RAM problem. There could be hundreds of other causes, including a bad power supply, excessive heat, a computer virus/malware, a corrupted operating system installation, or another faulty hardware component.
However, if you’re experiencing several of these issues regularly, it’s prudent to run some diagnostic tests.
Check for Bad RAM on Windows
Windows comes with a built-in memory diagnostic tool. To run it, press Windows Key + R, type mdsched, and press Enter.
You’ll be prompted to restart your machine. It will then run some tests before automatically restarting and returning you to the desktop. Any problems it found will be displayed in a notification on the Taskbar.
Alternatively, you can try Memtest. It has been around for more than 20 years and is widely considered the most thorough RAM testing tool.
Check for Bad RAM on macOS
Macs also come with their own built-in memory tester. To use it, restart your device and hold down D while it boots, then you’ll be taken to the diagnostics screen.
On newer models, a memory test should start automatically. Users on older versions will need to select the Hardware Tests tab, tick the checkbox next to Perform extended testing (takes considerably more time), and hit Test.
Memtest will also work on Macs if you want a more thorough review. Check our full guide on testing your Mac’s memory for more.
Do You Have RAM Problems?
If you have defective RAM, there is only one solution: you must replace it.
Luckily, new RAM is not too expensive. You can pick up a 16 GB kit on Amazon for as little as $70.
If you’re not sure how to install it, take your computer to a professional. If you try to do it yourself and make a mistake, you might create more serious problems.
How To Check If Your Computer Has Bad Memory/RAM
Home
PC
Windows
How To Check If Your Computer Has Bad Memory/RAM
How To Check If Your RAM Is Working Properly In Windows 10
Watch this video on YouTube
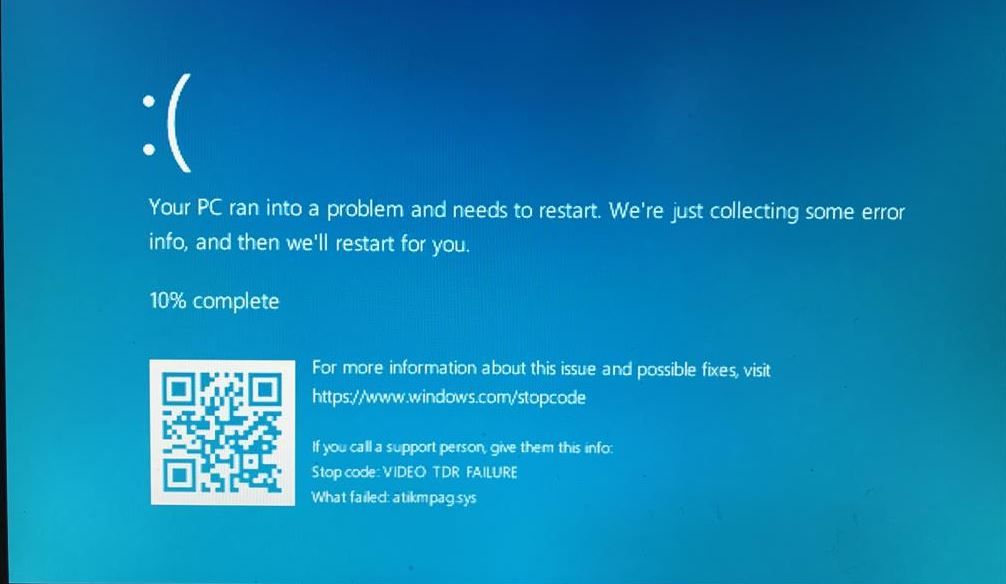
Bad RAM can cause a wide range of problems. You might experience a noticeable slowdown, file corruption, random reboots, and many other problems. In most severe cases, you might even get the Blue Screen of Death. Let’s see how to recognize the symptoms of bad RAM and diagnose the problem.
Symptoms of a Failing RAM
RAM is of vital importance for a computer’s proper functioning. It supplies the operating memory and its failure may manifest in many ways. Here are the most common symptoms of a failing RAM:
- If your computer reboots randomly in the middle of the game, a web browsing session, or a movie, it might be due to a wide variety of problems. If the restarting issue persists, it is more likely the result of a failing RAM.
- If you get the dreaded Blue Screen of Death literally out of the blue, you should check your computer’s RAM. If you haven’t installed any new programs or drivers and haven’t updated the system recently, chances are that RAM is giving up on you.
- Strange lines on the screen can also be a signal that your computer’s RAM is dying.
 Additionally, the icons and windows might get distorted and mixed up.
 - Your computer has slowed down and takes a long time to perform even the most basic tasks. Also, if the computer freezes randomly while you’re in the middle of something, it is a pretty reliable sign that there are RAM issues.
- If you hear strange beeps when you start the computer, it might be a signal that there are memory issues. Most commonly, you’ll hear multiple beeps or one continuous beep. This happens a lot with Dell computers that have failing RAMs.
- A large number of corrupt files on your system are usually a signal that either the hard drive or RAM are failing. If you’ve checked the hard disk and everything is OK, then you’re looking at a severe case of RAM failure.
How to Diagnose a Failing RAM
Once you’ve noticed the symptoms, you should inspect your computer’s RAM and check whether it’s failing or not. If you’re running a Windows OS, you can use the built-in Memory Diagnostic Tool. You can also opt for the good old Memtest86. Mac OS and Linux users can use Memtest86, as well.
Windows Memory Diagnostic
Windows Memory Diagnostic is your best bet if you’re using a Windows PC. Let’s see how to diagnose RAM with this handy little tool.
- Press the “Win” key on your keyboard.
- Once the Start Menu launches, type “Windows Memory Diagnostic” in the search field and press “Enter”.
- Click on the first result.
- Next, click on the “Restart now and check for problems” option.
- The computer will then reboot. It will automatically start the memory diagnostic program. When it’s done, it will launch Windows.
- Press the “Win” button on your keyboard and search for the Event Viewer app.
- When the app launches, expand the “Windows Logs” section on the left side of the window.
- Click the “System” section.
- Right-click the “System” section.
- Select the “Filter Current Log” option.
- Open the “Event Source” dropdown menu in the Filter Current Log dialog box.
- Find and check the “MemoryDiagnostics-Results” box.
- Click “OK” and go back to the Event Viewer.
- Double-click each of the two events in the top-middle section named “System”. Read the info.
If there’s an issue with RAM, you should turn off the computer and pull out all but one memory stick. Boot the computer again and repeat the process. Repeat it for every RAM stick you have in your computer.
Memtest86
To use Memtest86, you’ll need a USB stick. Let’s see how to test your RAM with Memtest86.
- Download the bootable USB version of the program for your operating system.
- Extract the archive.
- Plug the USB stick in.
- Double-click the “memtest86+ USB Installer.exe” file.
- Follow the installation instructions. Optionally, you can format the stick before the installation.
- Exit the installer when the installation finishes.
- Reboot the computer.
- Press the “Delete” button to enter BIOS once the computer starts booting up.

- Set USB as the primary boot device and save your settings. Usually, you can do it by pressing F10 and clicking “OK”.
- Reboot the computer again.
- Wait for Memtest86 to finish the tests. If you have a lot of RAM, it might take some time.
- Memtest86 will display the results when the tests are done. If there are any issues with RAM, you should repeat the test for each RAM stick that you have to find the faulty one.
Logging Off
Bad RAM can often cause problems similar to viruses and malware. However, you can diagnose the problem pretty quickly with Windows Memory Diagnostic if you’re a Windows user. Mac and Linux users should opt for Memtest86.
The Best Wi-Fi Extender For Gaming in 2022
Read Next
You May Like
How to Tell If RAM Is Bad? 8 Bad RAM Symptoms for You!
It is a serious pain to troubleshoot computer issues mainly because it’s hard to nail down what the exact problem is. In this post, MiniTool Solution will offer you methods to diagnose problems you may have with RAM. Also, you can know 8 bad RAM symptoms, how to fix RAM issues and some related information.
RAM, short for random-access memory, is one of the most important components of your computer. RAM is aimed at providing fast read and write access to storage devices. Usually, it is more durable than all other components on a computer since it uses very little power and doesn’t have moving parts.
Though rate, sometimes RAM can go bad. Due to its significance, any issues can manifest themselves in strange and confusing ways at once. Most PCs have multiple RAM chips and not all of them will fail immediately, so it is hard for you to diagnose a problem as an RAM issue.
What are the symptoms of bad RAM? How to tell if RAM is bad? You can get a lot of information from the following paragraphs.
8 Common Bad RAM Symptoms
What happens when RAM goes bad? This is the first thing you should know. Now, let’s see these signs of bad RAM below.
1. Infamous Blue Screen of Death
If a blue screen pops up and white text flashes directly after, it is likely that your bad RAM causes this issue. This is a pretty annoying warning sign since the text flashes so fast so that you don’t have a chance to read the error message. It is hard to determine any possible error code from that.
2. Sporadic PC Freeze
Your keyboard and mouse may become unresponsive abruptly. The PC also freezes without any warning, and sometimes Windows freezes for minutes no matter what app you are using. Even it takes 2 minutes to open Word, or 3-4 minutes to open Internet Explorer.
3. Declining PC Performance
When you first open your computer, you find it can run well. However, as the day progresses, you will find websites take much time to load and local apps run at a tortoise’s pace. The PC performance is degrading to an unusable crawl.
This phenomenon indicates your PC has a RAM problem.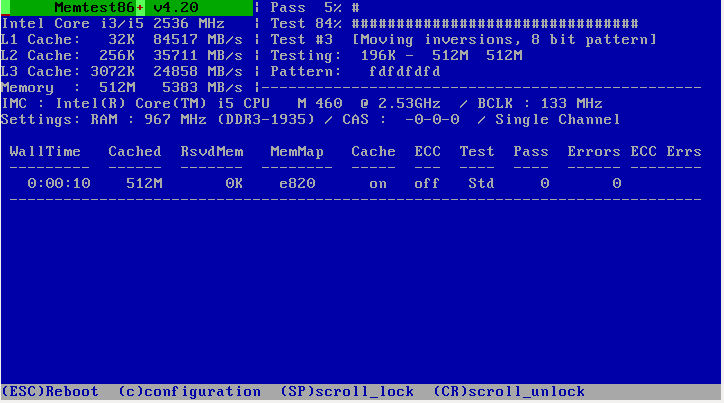
Tip: This post — Two Methods to Help You Test Computer Performance Windows 10/8/7 may be the one you are interested in.
4. Attempting to Install New Program Failed
When attempting to install a new program, the operation repeatedly fails. You may encounter these cases, for example, an error code without any obvious cause displays on the screen, a small program hangs on the loading stage for longer than normal, etc. If you reinstall the operating system, some odd error messages also appear.
These symptoms can be caused by many reasons, but the faulty RAM could be the underlying issue.
5. Random Reboot
Your PC keeps randomly restarting while you are performing a task. In addition, the computer just sometimes restarts. This symptom doesn’t always indicate a RAM problem. A hard drive problem can also cause a random reboot.
However, if your computer reboots almost immediately after the desktop initializes, this could be a bad RAM symptom.
6. Files Get Corrupted
You may notice that files, particularly the ones you frequently access and save appear to be corrupted inexplicably. Perhaps this is a sign of bad RAM. Even RAM issues could worsen over time. Eventually, the file structure of your hard drive will be compromised and your machine no longer boots up.
7. Missing RAM
Your Windows operating system may show you less RAM than you actually have installed on the motherboard. Usually, you go to Control Panel > System and Security > System to see the computer’s statistics, including RAM.
If you find the amount of RAM is not different, make sure your RAM chips are properly seated on the motherboard or you switch the slots that the RAM sticks sit in.
8. Computer Beep
When booting your computer, you may hear a beep, multiple beeps or a sequence of beeps. They indicate different issues, and RAM is included. Depending on different manufacturers, the beep codes are different.
According to users, it is almost a RAM problem when the Dell machines beep.
Tip: Sometimes your hard drive also beeps. If you have this issue, refer to this article — [SOLVED] Seagate Hard Drive Beeping? Here Is What You Should Do to get solutions.
Other Bad RAM Symptoms
In addition to these symptoms of bad RAM, you can experience other signs of faulty RAM:
- Video card fails to load
- No sound
- RAM isn’t recognized by your computer
“What happens when RAM fails? Here are 8 common dead RAM symptoms and you can share them on Twitter to let more people know!”Click to Tweet
Suggestion: Back up Your Important Files Immediately
If you are experiencing some signs of bad RAM mentioned above, for example, blue screen of death, PC freeze, random reboot, corrupted files or computer beep, we strongly recommend you to create a backup for your important files right away to keep your data safe. This is because things may worsen if the PC problems are caused by RAM issues.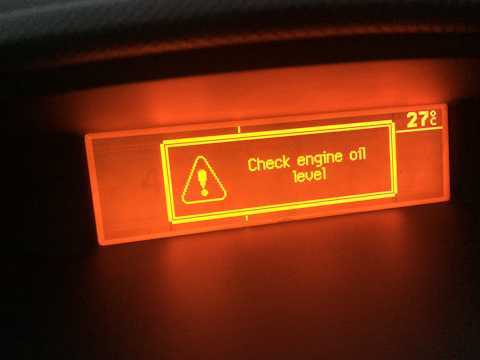
How can you back up your crucial files in Windows 10/8/7? Here, MiniTool ShadowMaker – a free and professional backup software, is worth recommending.
This program has the ability to back up the Windows system, files & folders, disks, and partitions. Also, you can easily sync files to other locations for backup. Disk cloning is also supported. When computer accidents happen unexpectedly and cause data loss, you can perform fast disaster recovery to get files back.
Its Trial Edition gives you full features compared to its Free Edition but you can only use it for free within 30 days. To get it, you can click the following download button and install this backup software on your computer.
Free Download
The following is how to back up files or folders easily using this software.
1. Run MiniTool ShadowMaker Trial Edition on your Windows 10/8/7 computer.
2. Go to the Backup window and click Source to choose files or folders that you need to back up.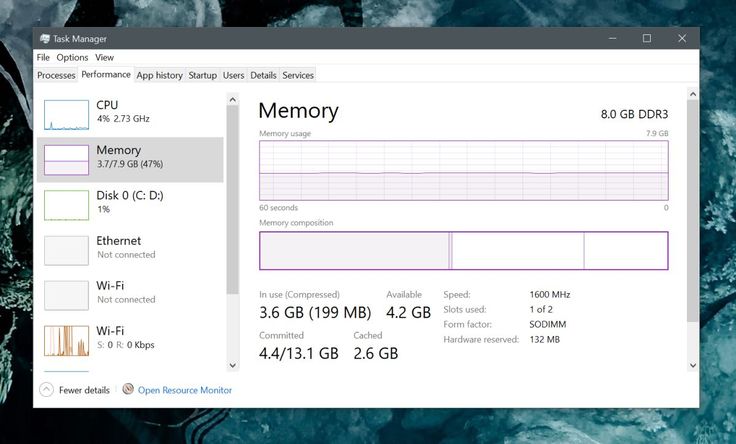
3. Click Destination to choose a path to save the backed up files, for example, a USB flash drive, external hard disk, SSD, HDD, NAS, etc.
4. Finally, click Back up Now right away to perform the file backup task.
Tip: In addition, you can use its Sync feature to sync folders for backup. This post — How to Sync Folders Windows 10 to External Drive can be the one you need.
“I suspected my RAM was bad. To keep my data safe, I used MiniTool ShadowMaker immediately to create a file backup since prevention is better than repair.”Click to Tweet
How to Tell If RAM Is Bad? Diagnose RAM Problems!
If you encounter some of the bad RAM symptoms, you may wonder if the issue is really caused by RAM. Now, the thing you should do is to diagnose RAM problems.
How to know if RAM is bad? Follow the guide below.
Windows Memory Diagnostics Tool
In Windows, there is a built-in tool called Windows Memory Diagnostics Tool.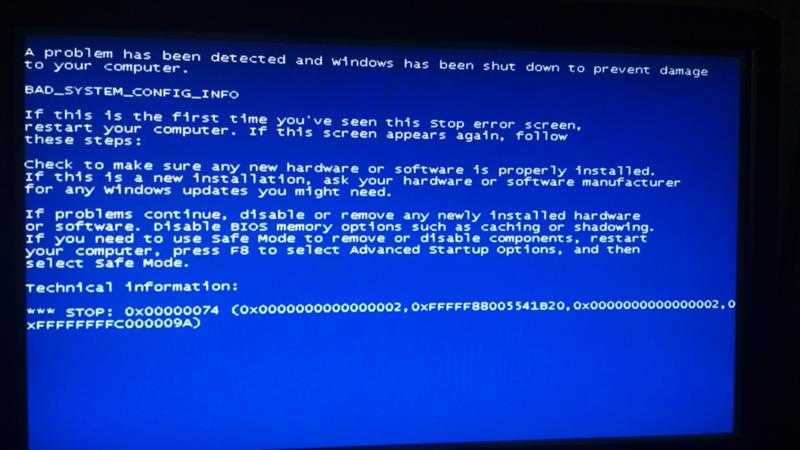 If you suspect a memory error, you can use it to have a check.
Tip: This post — 4 Ways to Open Windows Memory Diagnostic to Check Memory gives you much information about this tool.
- To get it, you can go to Control Panel (viewed by large icons) and click Administrative Tools.
- Choose Windows Memory Diagnostic.
- In the new window, two options are offered. You can either restart now and check for problems or schedule the test to begin the next time you start up Windows.
- If you choose the first option, the tool will start diagnosing during the reboot process.
Note: You can press F1 to change the test option – Basic, Standard or Extended.
The process will take some time. After finishing the test, Windows will restart and test results will be reported to you after logging on to Windows. If some errors are found, Windows will give you a suggestion that you should do.
To see the check results, you can also do these steps via Event Viewer:
- Go to the search box, input eventvwr.exe and run this command.
- Expand Windows Logs, right-click System and click Find.
- Input MemoryDiagnostics-Results to find it.
- If you see at least one error, this means one of the RAM modules may have problems and you need to replace it.
Memtest86
In addition, there is a very popular RAM test diagnostic tool – Memtest86. It is used by many users all over the world and always works well.
How to check if RAM is working or not?
To use it, you need to download it from its official website. You can burn it to a CD disc or USB flash drive and configure the computer to boot from the device. Then, you can use it to do a deep test.
If this tool finds some RAM errors, it will show you the result in red. If errors appear at the same or nearby addresses, it’s likely that the RAM stick is defective. You need to replace your faulty RAM.
Physical Test
Additionally, you can actually determine whether it is a physical RAM issue that is causing bad RAM symptoms. An ideal method is to take out one stick of RAM at a time from your computer and see if PC issues go away.
If you have two sticks, take out one and restart the PC. If you still encounter some issues, turn off your computer, put back the one and take another stick out. If you have installed multiple sticks of RAM, follow the same process to check.
After ensuring which RAM is causing the PC issues, replace it with a new one. Just purchase the correct RAM chip for your computer, open the computer and add it to the empty slot used for RAM chips or remove the old one and replace it.
“How to check if RAM is bad? This post shows you two tools and one physical way. If you meet some signs of bad RAM, just have a check. Also, share them with more people!”Click to Tweet
Causes of RAM failure are various such as soft errors (heat, magnetic interference, electrostatic discharge, power surges, etc.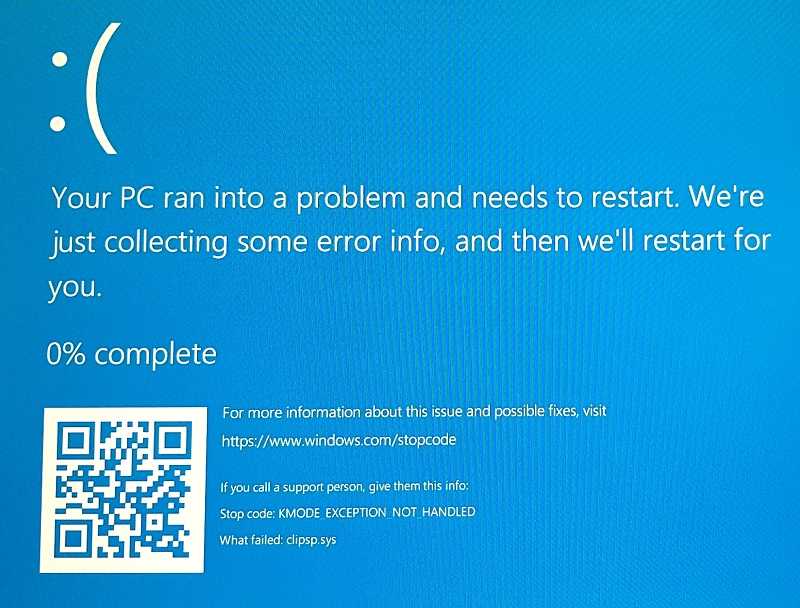 ), hard errors, flawed RAM modules, etc. And RAM issues sometimes happen unexpectedly.
What are the bad RAM symptoms? How to check for bad RAM? After reading this post, you know a lot of information. Just do the RAM troubleshooting as mentioned above if you suspect the RAM is faulty.
On the other hand, if you have any suggestions or questions, write an email to [email protected] or leave a comment below. We will reply to you as soon as possible.
How to check RAM? • CompBlog.ru
How RAM problems manifest themselves
The «clinical» picture of memory failures, unlike the reasons, is very, very diverse — from the complete inoperability of the computer to errors in the operation of applications that occur haphazardly and without connections to any action.
RAM problems usually manifest themselves with the following symptoms:
- The PC or laptop does not respond in any way to pressing the power button.

- After pressing the power button, the system speaker beeps that POST failed. Moreover, codes (combinations of short and long beeps) do not always indicate memory problems.
- The computer turns on and immediately turns off or restarts cyclically at any stage of the boot.
- Error messages are displayed after switching on. For example: «CMOS checksum error», «CMOS checksum bad», etc.
- During startup and operation, the operating system crashes with critical errors (blue screens). For problems with the RAM, PAGE_FAULT_IN_NONPAGED_AREA, UNEXPECTED_KERNEL_MODE_TRAP, DATA_BUS_ERROR, PFN_LIST_CORRUPT, KERNEL_STACK_INPAGE_ERROR, UNEXPECTED_KERNEL_MODE_TRAP are especially typical, but there may be others. Very often they are different.
- Screen disappears or is distorted (video memory defects). In the absence of discrete video with its own memory, the latter is allocated from the operational one.
- The computer freezes or freezes until the user restarts it.
- The file transfer and copy functions stop working.
- Errors occur when starting and running applications. For example, «Memory cannot be read\written» and others.
- Programs cannot be installed or removed.
- Files stop being saved. Or, once saved, they cannot be opened.
- Operating system components are damaged.
As you can see, this list contains almost everything that can be in case of a computer malfunction. And this is just because of a broken RAM!
By the way, often memory problems disguise themselves as other problems and declare themselves in the most bizarre way. There were cases when they were manifested by constant crashes of the antivirus program (gives a reason to “sin” for elusive viruses), unstable Wi-Fi connection, loss of device drivers (after installation, the driver only works until the computer is restarted), etc.
Sometimes the same fault appears constantly, sometimes they alternate. It is not uncommon to see a combination of several errors, such as blue screens of death and system function failures.
What are the consequences of using a faulty RAM? To the most deplorable. Namely, to the loss of data with which you work on a PC. During the process of opening and overwriting, errors will accumulate in the files, which sooner or later will make them unreadable and possibly unsuitable for recovery.
How to check the RAM of a computer or laptop?
How to check the RAM of a computer or laptop? / How to test and detect RAM errors?
It is believed that RAM is the least affected by time, and is one of the most wear-resistant parts of our PC. However, in the age of consumerism and the race for a low price, things are different. Therefore, if you are faced with the fact that,
- The computer is periodically rebooted by
- The computer freezes,
- Clues programs
- throws out
- The operating system does not install (as a rule, either freezing or giving various errors in different places)
- The browser, player, installer of a particular program, or the programs and games themselves, etc. do not start or do not start the first time.
- The blue screen of death periodically appears
- The first that we need for this is a free USB flash drive, of absolutely any size. The main thing is that it does not contain the information you need
- The second is not a mandatory item if you are sure that the flash drive does not contain «disk errors» (which occurs quite often, no matter how stable it is works). But, in order not to return to this later, , we recommend low-level formatting the flash drive. If you do not know how it is done, do not worry, there is nothing complicated. You can see in detail HERE , (low-level formatting of the device will 100% eliminate the possibility of errors when the system tries to boot from a USB disk)
- and troubleshooting RAM. Download it HERE (or from the server of the developer’s site HERE)
- Next , insert the flash card into any USB port, and double-click the left mouse button on the shortcut extracted from the downloaded archive
- Remove the strips from the slots and clean their contact groups with a school eraser. If the problem is oxide plaque, which breaks the contact, it will be solved.
- Reset the BIOS settings to default by removing the flash battery for 15-30 minutes or closing the Clear_CMOS jumper pins (other names are CLCTRL, CLR_CMOS, JBAT1, etc.).
- The first option is a set of tests. For in-depth diagnostics, select «Wide».
 Press Tab to move to the next item.
 - Next — the use or non-use of the processor cache. In order for the utility to access only RAM, it is advisable to disable the cache.
- The last option is the number of passes. The more of them, the higher the probability of discovering hidden errors, so if time is not running out, put at least 8-15.
- The «T» key controls the selection of the test mode.
- «C» — enables and disables the continuous test mode.
- «M» — allows you to change the method for determining the size of RAM.
- «B» — enables and disables the test benchmark.
- «F» — determines whether or not to save the report file.
- «A» — turns on and off the sound notification of found errors.
- «X» — determines whether to end testing when errors are detected.
- «E» — controls the transition to an accelerated test mode, which saves up to 50% of time while maintaining normal efficiency.
- Download the archive with the program. There are several versions and varieties of the utility. Based on the description provided on the sites where it is located, choose for yourself the one you think is necessary.
- Unpack the downloaded archive. You will receive an ISO image that you need to burn to a disk or flash drive. It is recommended to use the Ultra ISO program, as it performs these actions in the best quality.
- Next, depending on the media on which the utility image was recorded, set the corresponding device to the first place in the BIOS settings and boot from it.
- After downloading, the program window will open in front of us. Here you can find information about the processor, chipset and RAM. If you look at the upper right corner of the screen, there will be a report on the progress of the diagnostics of the RAM. If you need a more detailed check, press «s». This is a hot key to enter the utility settings. Enter the required values and repeat the test.
- Frequent occurrence of BSOD — Windows Blue Screen of Death. It is not always connected with RAM (more often with the work of device drivers), but its errors can be one of the reasons.
- Crashes during heavy use of RAM — in games, 3D applications, video editing and graphics, archiving and unpacking archives (for example, an unarc.dll error is often due to problematic memory).
- Distorted monitor image — more often a sign of video card problems, but in some cases caused by RAM errors.
- The computer does not boot up and beeps endlessly. You can look up the beep charts for your motherboard and see if the audible beeping sounds like a memory failure, see Computer beeps when turned on.
- The computer turns on but the screen is blank.
- Blue screen crashes with BSOD errors while booting or running the system.
- Constant crashes from memory-intensive programs: 3D applications, games, video editing, etc.
- An error occurs during Windows setup.
- Scan type — basic, normal or wide.
- Cache usage (on, off)
- Number of test passes
- by pressing F8 when booting the computer and selecting the «System Troubleshooting» mode, in which click the «Memory Diagnostics» item;
- launching the search console through the start menu and typing mdsched;
- The Memory Checker service can also be started from the Control Panel by selecting the Administrative Tools tab and the All Panel Items subsection.
- basic, which is short-lived, you do not need to select it;
- standard for about an hour;
- extended, lasting several hours.
- try testing each bar individually;
- If the program gives suspicious results, according to which all the strips are damaged, try inserting a known-good module into the PC.
 If there are errors in this case, most likely the problem is not in the modules, but in the motherboard;
 - sometimes it is worth making a visual inspection of the RAM modules and, if necessary, cleaning the contacts in the manner described above.
- The next step is to burn the ISO image with memtest (after extracting it from the ZIP archive) to disk (see How to make a bootable disk).
 If you want to make a bootable flash drive with memtest, then the site has a kit for automatically creating such a flash drive.
 - It is best if you check the memory one module at a time. That is, we open the computer, remove all the RAM modules, except for one, and perform its check. After the end — the next and so on. In this way, it will be possible to accurately identify the failed module.
- After the boot drive is ready, insert it into the disk drive in the BIOS, set the boot from the disk (flash drive) and, after saving the settings, the memtest utility will load.
- No action is required on your part, the check will start automatically.
- After the memory check is complete, you can see which RAM memory errors have been found. If necessary, write them down so that you can later find on the Internet what it is and what to do with it. You can interrupt the scan at any time by pressing the Esc key.
- its type;
- actual volume;
- operating frequency;
- interface type used.
- The computer freezes from time to time with a blue screen of death or spontaneously goes into reboot;
- some games and programs are forcibly closed, and in different places and under different circumstances;
- Artifacts are observed on the monitor, not necessarily in pure graphics mode;
- the computer has slowed down a lot, programs take a long time to load, the reaction to your actions is snail-like;
- The PC simply does not turn on, when you press the Power button, it only beeps and no longer shows signs of life.
- there is poor contact between the bar and the slot;
- The contact comb may oxidize if the bar has not been in the computer or in its original packaging for a long time.
 Such a problem is indicated by the darkening of the contact group;
 - brackets installed that are not compatible with other PC modules or components;
- memory slot has mechanical defects;
- you installed a factory defective RAM.
- by pressing F8 when booting the computer and selecting the «System Troubleshooting» mode, in which click the «Memory Diagnostics» item;
- launching the search console from the start menu and typing mdsched;
- The Memory Checker service can also be started from the Control Panel by selecting the Administrative Tools tab and the All Panel Items subsection.
- basic, which is short-lived, you do not need to select it;
- standard for about an hour;
- extended, lasting several hours.
- try testing each bar individually;
- If the program gives suspicious results, according to which all the strips are damaged, try inserting a known-good module into the PC.
 If there are errors in this case, most likely the problem is not in the modules, but in the motherboard;
 - sometimes it is worth making a visual inspection of the RAM modules and, if necessary, cleaning the contacts in the manner described above.
- its type;
- actual volume;
- operating frequency;
- interface type used.
- 1 Symptoms of RAM malfunction
- 2 RAM check for work capacity
- 2.1 Method 1. Diagnostics by means of Windows
- 2.2 Method 2. Diagnostics Memtest86
- 2.3 Method 3. Diagnostics TestMem5
9000 2.4 Method 4. Diagnostics 4. Diagnostics 4. Diagnosis motherboard using a tester
- 3 How to identify a faulty RAM module
- 4 What to do with a faulty memory module?
Complex not installed
- 0 9001 9001
- 0.
Make sure that the RAM is working, it’s even worth it!
In fact, there can be a huge variety of symptoms! And, above, only a few of them are listed. Just not many, because, in order to understand how faulty RAM can affect the operation of a computer, you can imagine a pipeline. Any pipeline in which everything goes in turn and the result, at the output, depends on each stage of processing. The RAM of a computer — it is also RAM (Random Access Memory), serves to quickly store and provide for use at any time, one or another information necessary for the operation of each process running in the system. Whether it is the installation of the operating system, or just its operation, or the operation and pairing of device drivers (which happens in the system kernel continuously while the PC is running). Everything, everything that works in our system, constantly and continuously requests information from the Random Access Memory (RAM). Those. — without stable operation of RAM, in principle, stable operation of a computer, both in general and in particular, is not possible.
So, if certain blocks of RAM are not working properly and, accordingly, distort the received and sent data, the information accessed by the worker process reaches it is also distorted. The process tries to use it as authoritative, causing it to fail. Leading to braking, an emergency stop of one or another action, and, as one of the options, a subsequent reboot or shutdown of the system as a whole. It’s like if you periodically insert sticks into the mechanism of a long and capacious conveyor. Although, for fairness, I would like to note that the same “sticks” can be put into the pipeline not only by RAM, although the result may look approximately the same. But, to check, in cases of obvious malaise of the system, RAM is worth it.
So how do you do that?
So, let’s check the RAM for errors and malfunctions:
We have one label, because , there will be nothing to confuse with. After opening, a program window appears with the terms of use
Agree with them by pressing the button «I Agree» highlighted with a red rectangle above.
We see the following window , where the program prompts you to select a disk from all removable media connected to the computer. We click on the small arrow opposite the default empty window, and select the drive letter corresponding to the letter of the flash drive we connected.
After that, almost nothing changes in the window, we see the following:
Put a tick in the field marked above, opposite the inscription «Recommended» and press the button «Great» .
The workflow of the program will start.
Upon completion, press «Next», and then further button «Finish» .
That’s it, the tool for checking the RAM for faults is ready!
Now, we need to turn off the computer and boot from the flash drive we made by setting up the boot in BIOS.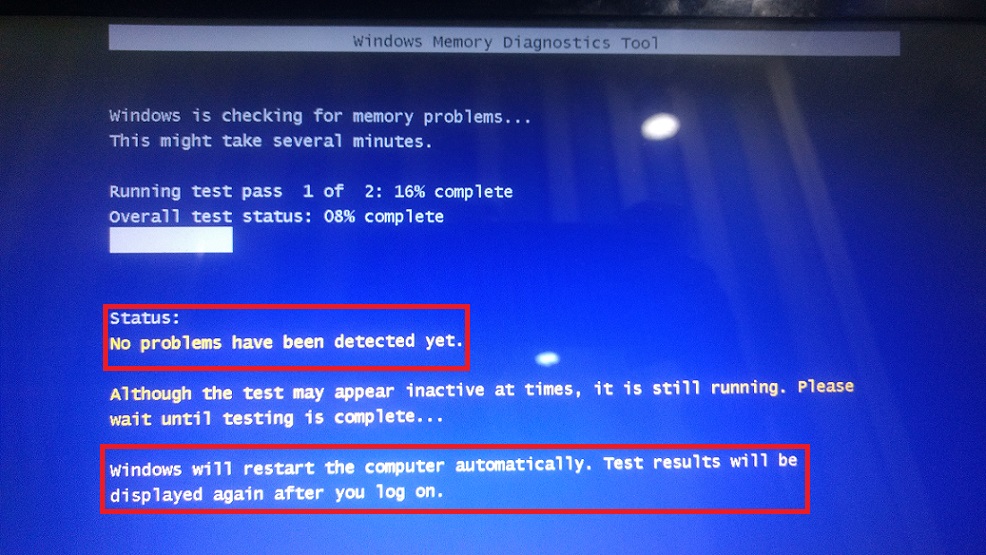 (i.e. — you need to put the USB disk first in the boot priority section) If suddenly you do not know how to do this, do not be alarmed, it is not difficult, and is done in 2-3 steps. Unfortunately, it is impossible to give a definition of how to do this in a nutshell, because The interface and navigation of the BIOS of equipment from different manufacturers and even series may differ slightly visually and in steps. Although, the algorithm, in fact, will be exactly the same. Therefore, in case of difficulty at this stage, we recommend that you refer to instructions «how to boot a computer from a flash drive» .
After USB boot is configured, reboot the system, saving the changes made. The computer will boot from our disk and automatically start checking the RAM.
You will see a working window of the RAM test:
You do not need to press anything here, the test will start automatically. The program will perform several types of checks, accessing each block of RAM in turn. If the RAM test reveals errors, they will be displayed like this:
If such a plan of red areas were displayed — undoubtedly, some memory blocks distort the information received.
Unfortunately, the RAM cannot be repaired. And, if you have identified, malfunctions , RAM should be replaced . However, if more than one RAM module is installed in your PC, but several, you should test with each “bar” separately, leaving only one of them in turn in the slot in order to identify the one whose performance is impaired, or to make sure that All installed memory modules are faulty.
Finally, I would like to note that the RAM test will last quite a long time, however, there is not much point in such a thorough analysis, and if, according to the result of 10-25 minutes after the start of the test, the program did not reveal any errors, the probability that that they are still there, falls below 0.1%. Therefore, testing, after this time, can be stopped without waiting for the end.
What to do first
Since RAM failure has so many faces, it should be ruled out for any obscure problems with the computer.
In cases where the computer does not turn on, shuts down or restarts before loading the operating system, and also before testing memory using programs, do the following: filter. Open the case cover and make sure the RAM sticks are properly and fully seated in the slots. If at least one module is not fully inserted, the computer will not turn on.
If a failure prevents the computer from starting, try turning it on with one RAM module installed in different slots. If there are several modules, check them one by one.
Using GoldMemory
Checking RAM for errors can also be done using other tools. For example, a commercial complex tool is recommended — Gold Memory. This utility can work with a huge number of modules from any manufacturer. The program supports any platform compatible with PC. With Gold Memory, each module can be tested.
The utility works from any media, and you can start it when you boot your computer. The program works in DOS-compatible systems, and there are several commands to set the scan parameters. At the end of the work, the user will see a detailed report.
This tool is best run from any medium. To copy the program to a flash drive, floppy disk or CD, there is a special installer — install.bat. Then you just need to restart your computer and the program will start.
After loading the computer, the user will see on the screen detailed instructions on testing modes, as well as keys to start. Problem messages will be shown in the center of the screen.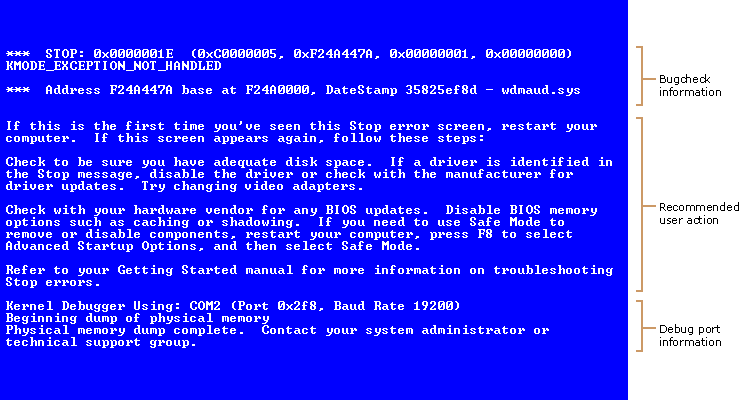 There is a “Normal” mode for automatic launch. Using these methods, you can check the operation of RAM. It is not difficult for users of any level.
RAM error detection using programs
RAM software diagnostics are carried out under the same conditions under which failures occur. When you’re not sure if memory is causing problems and want to find out, leave all RAM modules plugged in as configured. If you need to determine which of the bars is out of order, check them one by one.
If you are using Intel XMP Memory Acceleration Technology, select the profile that is having problems for the first check. If there are errors, do another check with XMP disabled.
Windows Memory Diagnostic Tool
Windows’ built-in memory diagnostic tool, the Windows Memory Diagnostic Tool, may not be the most popular tool for this kind of task, but it’s the most readily available. The utility versions included with Windows 7, 8.1, and 10 support DDR-DDR4 generations of RAM up to 64 GB (but in fact, possibly less).
Myths that the system tool can only detect obvious problems, while hidden and subtle problems are not, are made up by users who have not bothered to figure out how to work with the utility correctly. Yes, by default it runs a quick check and a minimal set of tests, but if you change the settings, its sensitivity will increase significantly.
To launch the Windows Memory Diagnostic Tool, press the key combination Windows + R and enter the mdsched command in the «Open» line.
Next, confirm your consent to restart. To have access to the entire RAM space, the utility will reboot the computer into DOS mode.
The test will start immediately after the restart. As already said, this will be a superficial scan, which reveals only obvious errors. You can either wait for it to finish, or stop it by pressing the F1 settings jump key.
The program has few settings, and they are intuitive.
Press F10 to exit the setup menu.
A full, deep check of the RAM by any means always takes a long time. As practice shows, the majority of defects are detected already in the first hour of the test, but some emerge only after multiple passes — after 6-8 hours from the start of the test.
Messages about found errors appear on the same screen in the «Status» section.
Memtest86
The Memtest86 utility (do not confuse with Memtest86+, which has ceased development since 2013) is a classic of the genre. Its first algorithms were developed over 20 years ago. To date, they have improved and meet all the standards of memory and platforms produced now.
Memtest86 seventh version (the latest), available in free — Free Edition, and two paid editions. The Free edition does not have the ability to save scan reports to disk, create configuration files that can be used to set test parameters for the program, and also exclude the processor cache from the scan. In addition, some tests are cut out of it, in particular, the use of SSE instructions for reading / writing 64-bit and 128-bit data and error simulation for checking the correction function (ECC) of server memory.
Despite the limitations, the capabilities of Memtest86 Free Edition are sufficient for the vast majority of home users. Searching for hacked paid versions or buying them is completely useless.
Unlike the Windows tool, Memtest86 is optimally configured by default so it’s easy to run. But before that, the downloaded file (iso image) will have to be written to external media — DVD or USB flash drive, and boot the computer from it. The tool for creating bootable USB flash drives, along with the utility itself, is also available for free download on the official website of the latter.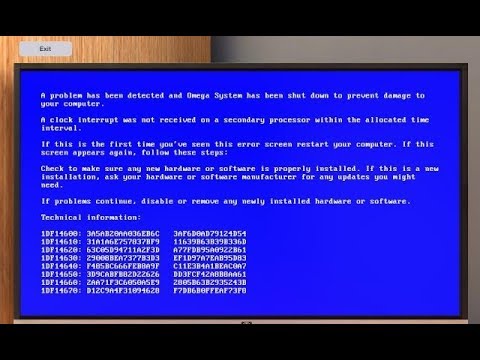
Memtest86 interface is English. The green cancer in the screenshot above circles the initial data: processor information — frequency, volume, cache speed, and memory information — speed and volume.
The area on the right — in a yellow frame, displays the current execution of the program: the sequence number of the test, the percentage of its completion, as well as the percentage of completion of the entire cycle (Pass).
Information about the time elapsed since the beginning of the test (Time), the number of passes (Iterations), the addressing mode (AddrsMode), the sequence number of the cycle (Pass) and the errors found (Errors) is circled in orange.
Error details, if any, are listed below. It is impossible not to notice them, since this area is highlighted in red.
The program control options are listed at the very bottom of the screen.
Information about testing methods and procedures, test descriptions, rules for creating configuration files and much more can be found on the Memtest86 official website.
The GoldMemory utility is another powerful RAM testing tool based on alternative algorithms. It often detects errors that cannot be detected by Memtest or other means, but, unfortunately, it is a paid solution. You can only use the 30-day demo version for free, which is essentially useless.
The full — registered version of GoldMemory allows you to test all types of modern DDR-DDR4 RAM up to 64 GB. It has 4 scanning modes — fast (the only one available in the demo version), normal, advanced and custom. Supports batch batch files. Saves reports and inspection history. It can work in continuous mode — until a manual stop.
Like the previously reviewed utilities, GoldMemory works in a DOS environment — it runs from a bootable DVD or USB flash drive (the paid version also includes media creation tools). Testing starts immediately after downloading.
The program interface, like Memtest 86, is in English. At the top of the screen are version and license information.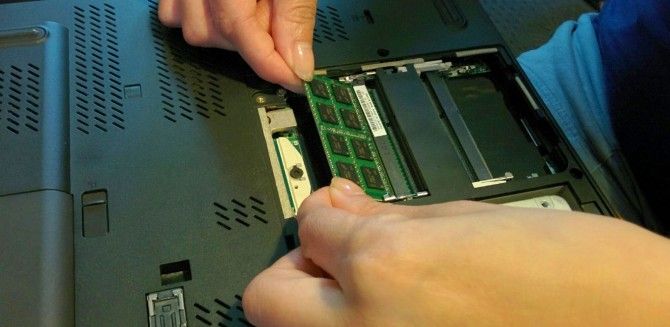 The block in the orange frame in the screenshot above displays information about the current execution of tasks and settings.
The settings menu has a red frame. Here:
By pressing the «T» key in user mode, you can select from a list of test groups to identify specific problems.
After starting the check, the area where the menu is located will display a list of found errors.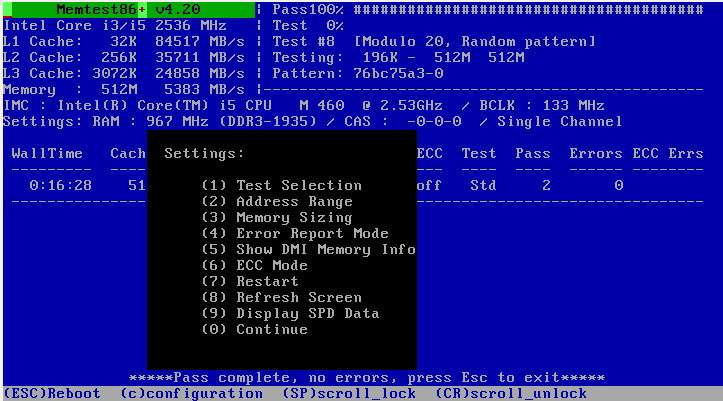 You can’t ignore them either.
Memtest86 RAM test
This program is a specialized tool used by system administrators. It is capable of not only diagnosing RAM, but also provides comprehensive information about the processor and chipset. It should be noted that the accuracy of the results obtained during diagnostics using Memtest is one hundred percent. The utility uses exclusive access to RAM, which completely eliminates the possibility of errors.
In order to check the computer’s RAM, you need:
Well, what to do with a faulty RAM?
The authors of the diagnostic utilities claim that not all errors that programs detect are related to a malfunction of the RAM itself. In addition to it, they respond to problems with the cache memory of the processor, motherboard, as well as hardware incompatibility. If you suspect the latter, it is advisable to repeat the memory test on another computer. If there are no errors on it, then this is the case.
Errors that are detected with non-standard timings and frequencies do not always indicate that the memory is no good. If it normally passes tests in normal mode, it can be installed in a computer that is used without overclocking. On it, most likely, it will work as expected.
Defective RAM modules must definitely be replaced. I think it will not be difficult for owners of stationary PCs to do this on their own. Another issue is laptops. If the model is equipped with removable RAM sticks, as in the photo below, this is also easy to do.
Cases of failure of non-removable RAM — soldered on the motherboard, are solved in different ways. Installing a bracket in an additional slot, if there is one, usually does not help, since the first BIOS accesses the non-removable module. If he «died», the additional one will not work either.
Discrete RAM modules, as you may know, are equipped with an SPD chip that stores information about operating frequencies and timings. Integrated memory does not have its own SPD, and all data about it is contained in the BIOS. In order for the laptop to see the bar in the slot, you need to remove information about the integrated module from the BIOS.
If the board does not have a connector for a discrete module, the only solution is to solder a new RAM chip to replace the failed one. If several chips fail, it is sometimes more profitable to replace the entire motherboard, since such repairs are not cheap.
Good luck checking!
More on the site: No computer «Alzheimer»: how to check PC and laptop RAM updated: May 2, 2021 by Johnny Mnemonic
Symptoms of RAM errors
highlight the following
Once again, the presence of any of these symptoms does not mean that the matter is in the computer’s RAM, but it is worth checking. The unspoken standard for this task is the small memtest86+ utility for checking RAM, but there is also a built-in Windows Memory Diagnistics Tool that allows you to check RAM without third-party programs. Both options will be discussed next.
RAM failure symptoms
RAM failure is indicated by the following symptoms:
If a blue screen periodically pops up during operation or when the system boots, then this is a reason to check the RAM for errors.
Blue screen in Windows 7
Blue screen in Windows 10
I had a case when installing Windows 7 on a laptop, an error 0x80070570 came out. After checking the RAM, it turned out that the cause was a malfunction of one of the RAM bars.
RAM failure — when installing Windows 7, error 0x80070570
appears How I found out the RAM failure in a laptop, read below in the article.
Join the VK group — https://vk.com/ruslankomp I will help you solve a problem with your PC or laptop
Windows 10, 8, and Windows 7 Memory Diagnostic Tool
The Memory Checker (Diagnostic) Tool is a built-in Windows utility that allows you to check RAM for errors. To launch it, you can press the Win + R keys on your keyboard, type mdsched and press Enter (or use the Windows 10 and 8 search and start typing the word “check”).
After starting the utility, you will be prompted to restart the computer to check the memory for errors.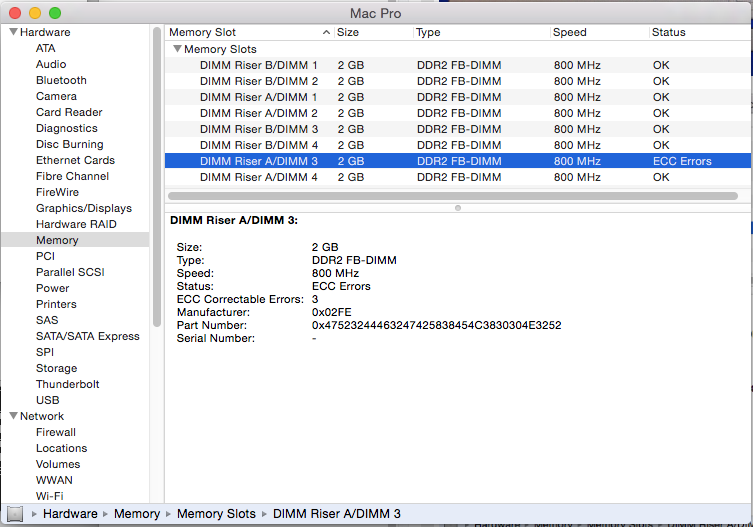
We agree and wait for the scan to start after the reboot (which in this case takes longer than usual).
During the scan, you can press the F1 key to change the scan settings, in particular, you can change the following settings:
When the verification process is completed, the computer will restart, and after logging in, it will display the results of the verification.
However, there is one caveat — in my test (Windows 10), the result appeared after a few minutes in the form of a short notification, it is also reported that sometimes it may not appear at all. In this situation, you can use the Windows Event Viewer utility (use search to launch it).
In Event Viewer, select «Windows Logs» — «System» and find information about the results of the memory test — MemoryDiagnostics-Results (in the details window by double-clicking or at the bottom of the window you will see a result, for example, «Computer memory was checked using the memory test tool Windows; no errors found. » long, from half an hour or more.If time is running out, it is better not to perform diagnostics.0007
Before you start testing the RAM on your computer, you need to take some precautions. First, close all running programs while saving the results of the work. Secondly, open this article on another PC or smartphone so that the instructions are at hand — testing usually occurs with a full load of memory, so it may not be possible to run any other programs.
In Windows 10 and other versions, there are several ways to check the RAM without resorting to third-party programs:
It remains to click the «run test» button, after which the computer will reboot and the initial memory test will start (corresponding messages will appear on a blue background, this is normal).
If the test showed no errors, you should not flatter yourself too much about this, especially if you have the symptoms described above. In such cases, you need to perform an in-depth check, for which you need to restart the PC and press F1. As a result, a menu will appear with three options for extended testing:
The modes differ only in the number of memory runs: there are three in the basic mode, 8 in the main mode, and 17 in the advanced mode. The testing process can be interrupted at any stage, the program will display the results of completed runs.
What should I do if the extended RAM check for errors also ended with positive results? It is worth using the following tips:
Checking RAM in memtest86+
You can download memtest for free from the official website https://www.memtest.org/ (download links are at the bottom of the main page). It is best to download the ISO file in a ZIP archive. This option will be used here.
Note: there are two sites on the Internet for memtest — with the memtest86+ program and Passmark Memtest86. Actually, it’s the same thing (except that the second site has a paid product in addition to the free program), but I recommend using memtest.org as a source.
Options for downloading memtest86
Checking RAM in memtest
If there are errors, it will look like the picture below.
RAM errors detected by the test
What should I do if memtest detects RAM errors? — If failures seriously interfere with work, then the cheapest way is to replace the problematic RAM module, besides, the price is not so high today. Although sometimes a simple cleaning of memory contacts helps (described in the article The computer does not turn on), and sometimes a problem in the operation of RAM can be caused by malfunctions of the connector or components of the motherboard.
How reliable is this test? — reliable enough to test the RAM on most computers, however, as is the case with any other test, you cannot be 100% sure of the correctness of the result.
Third-party RAM testing programs
A lot of such software has been written, and a good half of the utilities are free. Consider the most famous of them.
MemTest
A program that runs on all versions of Windows. Be able to check the RAM for operability and display the characteristics of the RAM installed in the computer:
Checking the RAM for operability is carried out in several stages, based on the results of testing, a list of bad blocks will be generated.
The number of test types is 9, but they are all performed in a cycle, and you need to manually set their number. In addition to memory diagnostics, MemTest allows you to overclock the system. The program is Russified.
RamSmash
If you are looking for a utility that allows you to check the RAM on a weak laptop, then RamSmash is the best fit for this — it can free up RAM if it is used by other unused applications, unloading background processes as well.
The program allows you to significantly increase the performance of your PC, as well as check the memory for bad blocks. She is able to synchronize with Windows, while using the backup resources of the OS.
Wise Memory Optimizer
Another great free utility for checking RAM in Windows 10, which also allows you to perform tasks to optimize the operation of the operating system. In particular, speeding up its loading. The extensive functionality of the program cannot but rejoice — with its help you can test the operation of the entire computer, up to checking individual files, or overclock the system.
FurMark
Very well known utility for comprehensive PC testing, including RAM diagnostics. The popularity of the program was brought by the «hairy donut» — a tool for performing a video card stress test.
As for the EP test itself, you can set the duration of the test and set other parameters. The utility is distributed free of charge and has, among other things, a Russian-language interface.
SuperRam
The utility specializes in checking RAM in Windows for errors, so it has a compact size and a simple and intuitive interface.
In addition to checking, the program allows you to fine-tune the memory operation. In case of detection of errors, it issues a detailed report and recommendations for troubleshooting.
SuperRam requires installation, there is no portable version. Immediately after launch, the program looks for bad sectors that reduce the frequency of swapping files. The user can choose one of two modes of operation: testing or monitoring. There is a paid version with advanced functionality.
Memtest86+
A very well-known specialized utility that provides the ability to test and check the speed of RAM. If there are several models, the check will be carried out separately with each bar. When bad patches are found, the RAM Recovery Tool will be automatically launched.
A cyclic algorithm is used with writing and then reading data. Test duration settings must be set manually. Memtest86+ is often used to overclock a PC. There is a Portable version that allows you to run diagnostics from a flash drive.
RightMark Memory Analyzer
A feature of the program is a low-level check of Windows 10/8/7 RAM. Despite the limited testing functionality, the utility is capable of diagnosing the entire PC, including the CPU and chipset.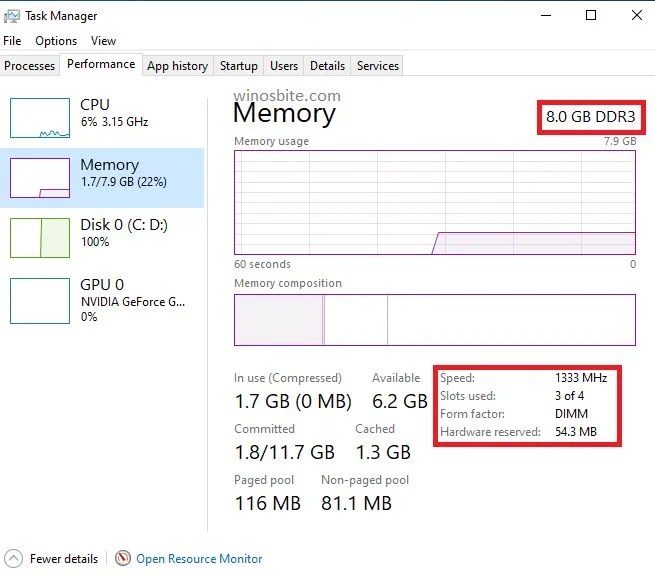 Test results are logged, logs are not automatically deleted.
Memory Analyzer can be used to determine the characteristics of hardware (memory capacity, disk subsystem, processor frequency, power supply parameters).
WinUtilities Memory Optimizer
Good software for checking how RAM works on weak computers / laptops. Allows you to perform RAM diagnostics in automatic mode or with user-defined parameters. Test results are logged.
Memory Optimizer has a good set of tools to speed up your PC by optimizing the use of the RAM. To do this, the utility should be run in the background — it can clear the unused cache and unload unnecessary processes.
There is even a mode that improves performance during the launch of «heavy» resource-intensive games.
GoldMemory
The program is considered one of the best in its class, because it checks the state of RAM using non-standard techniques and algorithms. This allows you to detect errors that other utilities are unable to detect.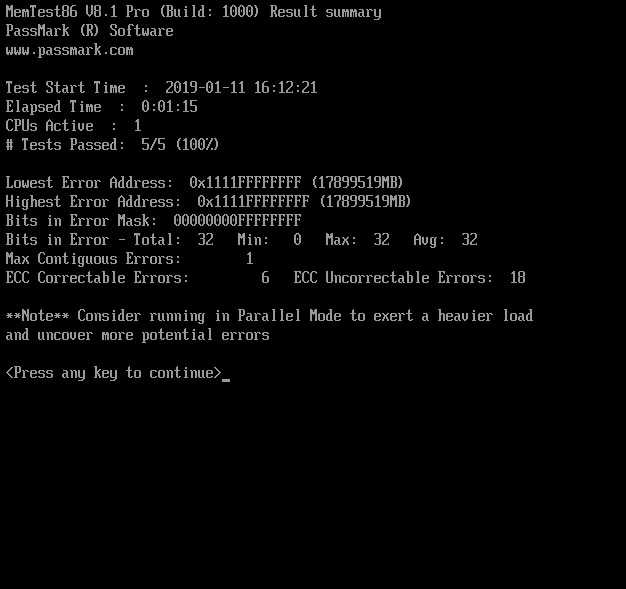
Since the utility works completely offline, you need to run GoldMemory from external media. Supports both 32-bit and 64-bit OS architecture. Recognizes all types of memory modules, including legacy DDR4.
It is possible to manually set test parameters (user mode), but you can also use automated modes, from quick to advanced.
You can run the utility from a bat-file specifying the required mode and characteristics of the memory check. The program is shareware, with a 30-day trial period.
Geekbench
Another specialized utility that is very popular. Takes up little space, has a simple, visual, easy-to-learn interface.
Allows you to check the RAM for stability and the presence / absence of errors. The results of the work are analyzed and recorded in the log in the form of a report. The demand for the program is due to its good functionality and versatility, which allows it to be used by both beginners and professionals.
So what causes computer memory problems?
RAM is a pair of chips located on the motherboard. It is one of the most reliable computer components. There is also a rather small chance that a RAM board with some kind of malfunction will go on sale, because board manufacturers conduct a thorough defect test before selling it, but this is still possible, since each manufacturer nowadays produces quite a large amount of RAM.
As already mentioned, under normal operating conditions, RAM is one of the most reliable components of your computer, but again, only under normal conditions. Despite its reliability, memory can be damaged very easily, enough static electricity. In addition to static electricity, the performance of the RAM strip is negatively affected by voltage drops, as well as problems with the power supply.
If you do not clean your computer from dust or if it is in a damp room, this can lead to damage to the contacts that are in the RAM slots on the motherboard of your computer. Also, the reason for this may be an increase in the temperature of the modules and other components inside the case of your computer.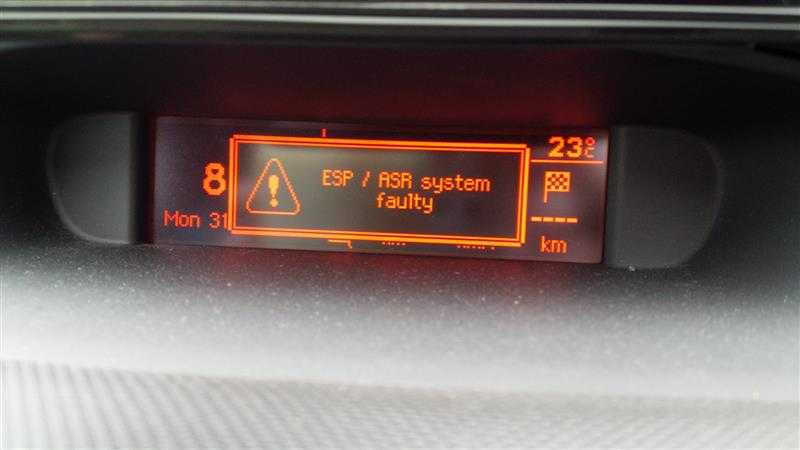 And the RAM module itself is not so «steel», so you need to handle it carefully, otherwise you can simply cause physical damage, which will lead to damage. To increase the strength of the RAM, «radiators» are used on the RAM modules, as well as radiators that they lower the temperature, but not much.
The minus of RAM is that in case of malfunctions it cannot be repaired (it can only be replaced with a new one), like other computer components, therefore, when buying RAM, pay attention to the warranty period and the manufacturer, since, in case of a defective bar it could be replaced with a working one.
Troubleshooting:
The main solution is to replace the damaged RAM stick.
If you have only one stick, then move it to another slot and do another test. If there are errors again, the RAM module is faulty, and if there is no error, then the problem is in the mounting connector.
If you have a pair of sticks of RAM, then do the following: take out all the sticks, and, in turn, test each stick in the same slot.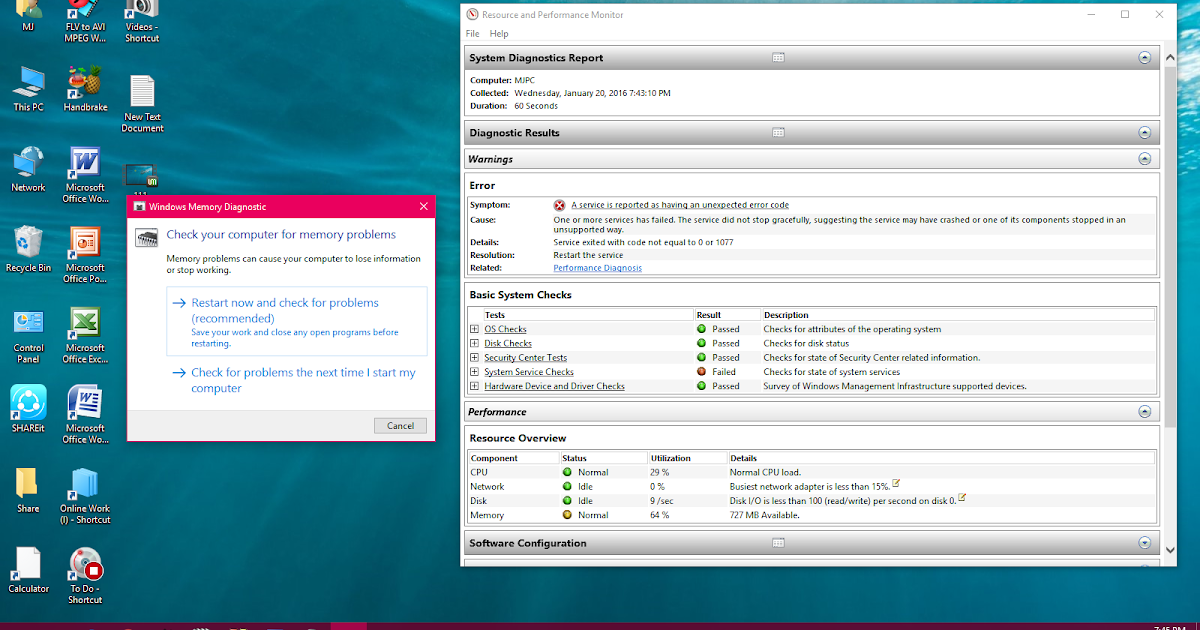 With an error with one RAM module, it is clear that the problem is in it, but with errors with all the bars, then this is most likely a connector malfunction.
If during testing there were no errors on any stick of RAM, and as soon as all the sticks were installed, errors appear, then, for sure, the problem is in the connector. Try to do the same operation only with a different connector.
All this will help you find out if the problem is a malfunction of the operational module in your computer or if it is, after all, a defective bar.
If you cannot cope with this problem on your own, please contact us for professional computer help by phone: 8-800-50-50-741.
What to do if there are errors
If errors are found, then the buggy RAM bar must be replaced with the same or with similar characteristics, but no worse. But if you have more than one bar, then you need to somehow determine which module has a defect. Yes, the test utility can report the ID of the memory module, and if the information is clear enough, then you can safely take out non-working memory and go to the store for another one.
But sometimes it’s easy to get confused, then it’s better to re-check with the same parameters, but for each bar separately. That is, you need to leave only one bar of RAM in the computer and run all the checks, then the same with the second, and so on. They say that sometimes cleaning the RAM contacts with a paper grater helps, but this is unlikely …
Good luck!
How to check RAM for operability
The fact that RAM plays an essential role in the operation of a computer is known to many. The speed of the PC depends on the amount and type of memory, with its help Windows multitasking is implemented. In a word, along with the central processor, «RAM» is the hardware that provides high computer performance.
And although the memory strips do not have mechanical components, and all the work of exchanging data with the processor and drives is carried out via an electronic interface, this component also does not last forever, troubles also occur with it, causing failures in the PC. Today we will look at ways to independently test RAM for errors in its operation.
Signs indicating a problem with the RAM
The idea to check the Windows RAM should come to your mind if you observe at least two of the following symptoms at the same time:
Any of these symptoms can have several causes, but if you observe several of them, your suspicions should be directed to the RAM.
Causes of malfunctions of the OP
We have already noted that RAM is a completely electronic component, therefore there are not so many memory malfunctions:
The easiest way to check the RAM on a PC is to visually inspect the bars. Side fasteners must be latched, the bar must not wobble in the slot. If there are signs of oxidation of the contacts, try to carefully clean them with a regular school gum. The problem has not disappeared — move the bar to another slot if available.
You can also try to enter the BIOS and reset to default settings.
If these measures did not bring results, you need to switch to software methods for diagnosing memory.
Methods for testing RAM using built-in Windows tools
Software testing methods work quite simply — the program repeatedly checks each memory cell for read / write errors, so get ready for the fact that such a procedure can be very long, from half an hour or more.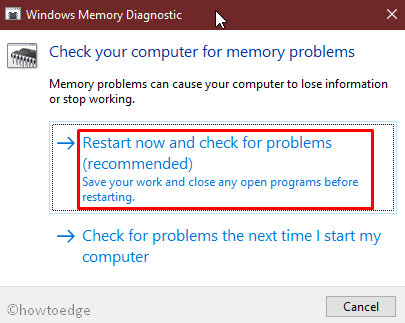 If time is short, it is better not to perform diagnostics.
Before you start testing the RAM on your computer, you need to take some precautions. First, close all running programs while saving the results of the work. Secondly, open this article on another PC or smartphone so that the instructions are at hand — testing usually occurs with a full load of memory, so it may not be possible to run any other programs.
In Windows 10 and other versions, there are several ways to check the RAM without resorting to third-party programs:
It remains to press the «run test» button, after which the computer will reboot and the initial memory test will start (corresponding messages will appear on a blue background, this is normal).
If the test showed no errors, you should not flatter yourself too much about this, especially if you have the symptoms described above. In such cases, you need to perform an in-depth check, for which you need to restart the PC and press F1. As a result, a menu will appear with three options for extended testing:
The modes differ only in the number of memory runs: there are three in the basic mode, 8 in the main mode, and 17 in the advanced mode. The testing process can be interrupted at any stage, the program will display the results of completed runs.
What should I do if the extended RAM check for errors also ended with positive results? It is worth using the following tips:
Third party RAM test programs
A lot of such software has been written, and a good half of the utilities are free. Consider the most famous of them.
MemTest
A program that runs on all versions of Windows. Be able to check the RAM for performance and display the characteristics of the RAM installed in the computer:
Checking the RAM for operability is carried out in several stages, based on the results of testing, a list of bad blocks will be generated.
The number of test types is 9, but they are all performed in a cycle, and you need to manually set their number.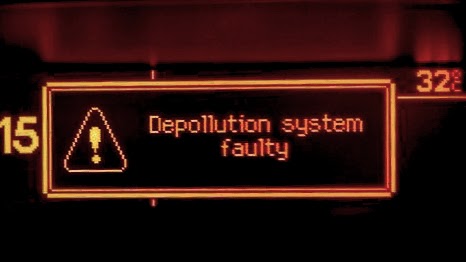 In addition to memory diagnostics, MemTest allows you to overclock the system. The program is Russified.
RamSmash
If you are looking for a utility that allows you to check the RAM on a weak laptop, then RamSmash is the best fit for this — it can free up RAM if it is used by other unused applications, unloading background processes as well.
The program allows you to significantly increase the performance of your PC, as well as check the memory for bad blocks. She is able to synchronize with Windows, while using the backup resources of the OS.
Wise Memory Optimizer
Another great free utility for checking RAM in Windows 10, which also allows you to perform tasks to optimize the operation of the operating system.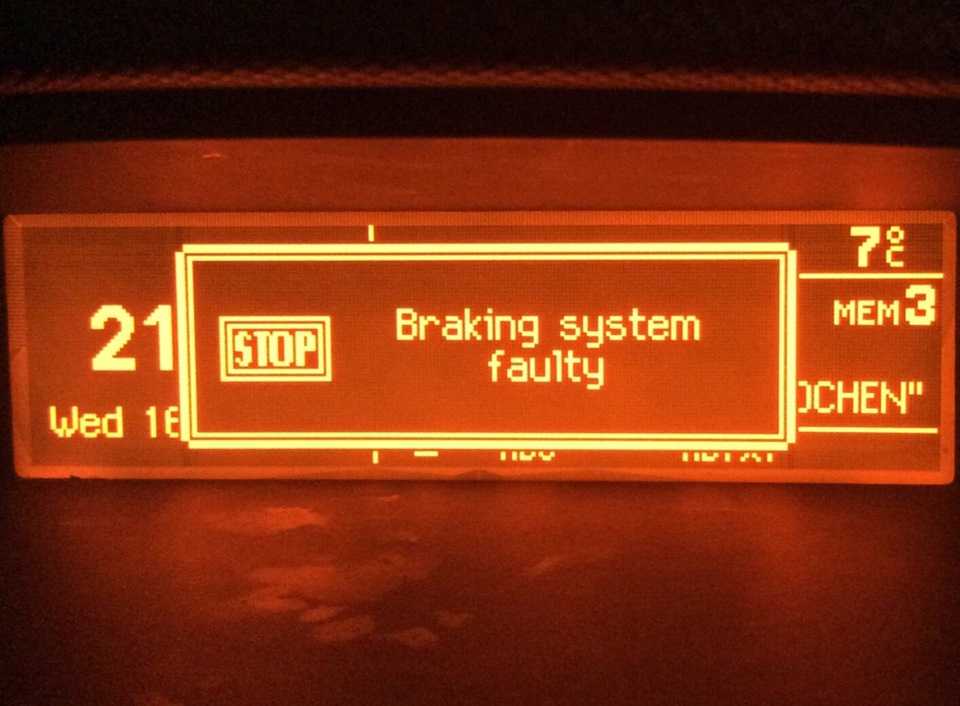 In particular, speeding up its loading. The extensive functionality of the program cannot but rejoice — with its help you can test the operation of the entire computer, up to checking individual files, or overclock the system.
FurMark
Very well-known utility for comprehensive PC testing, including RAM diagnostics. The popularity of the program was brought by the «hairy donut» — a tool for performing a video card stress test.
As for the EP test itself, you can set the duration of the test and set other parameters. The utility is distributed free of charge and has, among other things, a Russian-language interface.
SuperRam
A very well-known specialized utility that provides the ability to test and check the speed of RAM. If there are several models, the check will be carried out separately with each bar. When bad patches are found, the RAM Recovery Tool will be automatically launched.
A cyclic algorithm is used with writing and then reading data. Test duration settings must be set manually. Memtest86+ is often used to overclock a PC. There is a Portable version that allows you to run diagnostics from a flash drive.
RightMark Memory Analyzer
A feature of the program is a low-level check of Windows 10/8/7 RAM. Despite the limited testing functionality, the utility is capable of diagnosing the entire PC, including the CPU and chipset. Test results are logged, logs are not automatically deleted.
Memory Analyzer can be used to determine the characteristics of hardware (memory capacity, disk subsystem, processor frequency, power settings).
WinUtilities Memory Optimizer
Good software for checking how RAM works on weak computers / laptops. Allows you to perform RAM diagnostics in automatic mode or with user-defined parameters. Test results are logged.
Memory Optimizer has a good set of tools to speed up your PC by optimizing the use of the RAM. To do this, the utility should be run in the background — it can clear the unused cache and unload unnecessary processes.
There is even a mode that improves performance during the launch of «heavy» resource-intensive games.
GoldMemory
The program is considered one of the best in its class, because it checks the state of RAM using non-standard techniques and algorithms. This allows you to detect errors that other utilities are unable to detect.
Since the utility works completely offline, you need to run GoldMemory from external media. Supports both 32-bit and 64-bit OS architecture. Recognizes all types of memory modules, including legacy DDR4.
It is possible to manually set test parameters (user mode), but you can also use automated modes, from quick to advanced.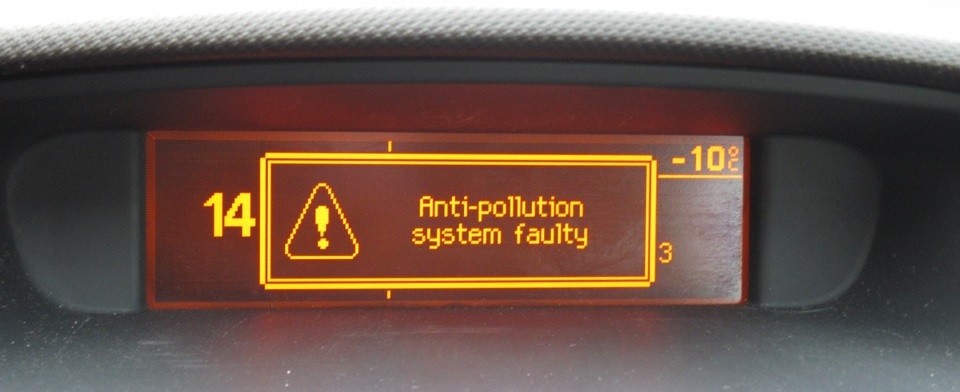
You can run the utility from a bat-file specifying the required mode and characteristics of the memory check. The program is shareware, with a 30-day trial period.
Geekbench
Another specialized utility that is very popular. Takes up little space, has a simple, visual, easy-to-learn interface.
Allows you to check the RAM for stability and the presence / absence of errors. The results of the work are analyzed and recorded in the log in the form of a report. The demand for the program is due to its good functionality and versatility, which allows it to be used by both beginners and professionals.
Results
As you can see, there are many ways and means to check the health of the RAM.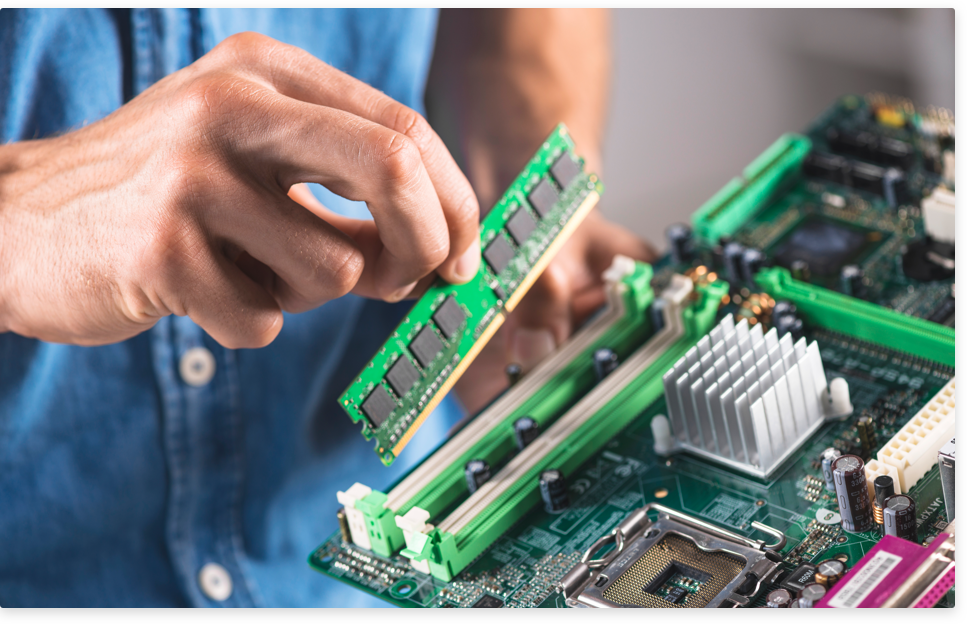 If you don’t want to bother remembering the built-in testing methods, use specialized or universal third-party programs, many of which perform testing better than Windows utilities.
How to check the RAM on your computer — TOP 4 ways
Hello. In my practice, there were cases when computer problems were due to RAM. Clients call with such a problem: it knocks out a blue screen, the system boots up every other time. When you try to reinstall Windows, you get errors.
In this article I will tell you how to check the RAM on your computer for performance and identify a faulty module.
Article content:
RAM failure symptoms
The following symptoms indicate a RAM (RAM) failure:
- The computer turns on but the screen is blank.
- Blue screen crashes with BSOD errors while booting or running the system.
- Constant crashes from programs that use memory intensively: 3D applications, games, video editing, etc.
- An error occurs during Windows Setup.
If a blue screen periodically pops up during operation or when the system boots, then this is a reason to check the RAM for errors.
Blue screen in Windows 7 Blue screen in Windows 10
I had a case when installing Windows 7 on a laptop, an error 0x80070570 came out. After checking the RAM, it turned out that the cause was a malfunction of one of the RAM bars.
RAM failure — when installing Windows 7, error 0x80070570
appears How I found out the RAM failure in a laptop, read below in the article.
Join the VK group — https://vk.com/ruslankomp I will help you solve a problem with your PC or laptop
I will help you solve a problem with a PC or laptop. Join the VK group — ruslankomp
Checking RAM for performance
In this article I will describe 4 methods:
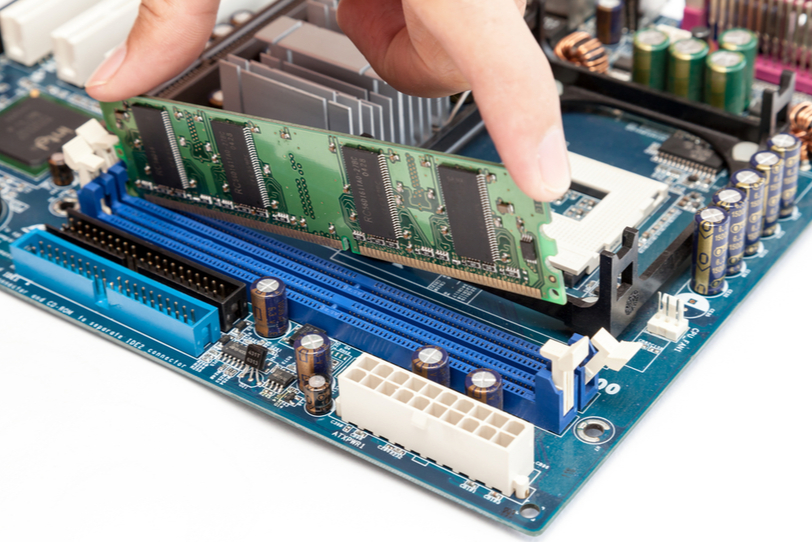 Can be used even if Windows does not boot.
 Method 1. Diagnostics using Windows
To run a RAM test, just use the Windows tools.
To do this, go to Start and enter in the search field: operational . A list of utilities appears, where we select Diagnosing computer RAM problems .
Running memory diagnostics in Windows 7
Or another option. Press Win+R
Hot keys Win+R
Enter in the field: mdsched , press ok.
The Windows Memory Tester opens. Select Reboot and check.
Checking the computer for memory problems
After that, the computer will restart and start the RAM diagnostics.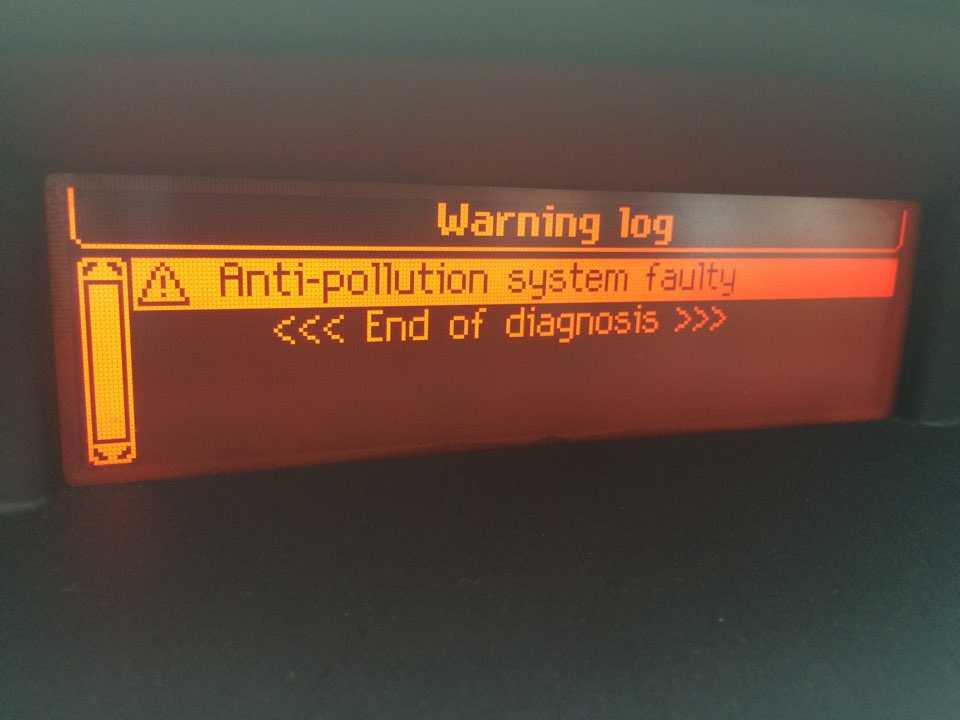 After two passes, if no problems are found, then everything is ok.
Diagnostics of RAM — no problems detected
If the message appears: hardware problems detected, then the RAM has errors.
Diagnosis of RAM — problems found
Method 2: Diagnose MemTest86
To check RAM for errors with MemTest86, you need to create a bootable USB flash drive.
This program runs from a bootable flash drive in a DOS environment. Therefore, you can use it on a computer without Windows installed or there are problems booting the system.
So, download memtest from the official site — http://www.memtest.org/
Find the file to download, as shown in the figure below.
Download MemTest86+ for a bootable flash drive
After unzip the archive, insert the usb flash drive and run MemTest86+USB Installer .
Create a bootable flash drive Memtest86
Select a flash drive, check the box next to — We will format E:\ as Fat32 and click Create.
Choosing a USB drive for Memtest86 A bootable USB flash drive with MemTest86 has been created
After writing the program, restart the computer and boot from the flash drive.
Depending on the motherboard or laptop model, the boot menu is called up with the key F8, F9, F11, F12 .
Select USB media in the boot menu
Or change the boot priority from USB media in the BIOS of the motherboard. To enter the BIOS on a laptop — this is done with the key F2 , on a PC — Del (Delete) .
Important! The corresponding key must be pressed several times quickly, immediately after turning on the computer or at the time of restarting the computer, as soon as the monitor is turned off.
After loading from a flash drive, the RAM test will start automatically.
MemTest86 RAM check — no errors found
If errors are found, it will look like the picture below.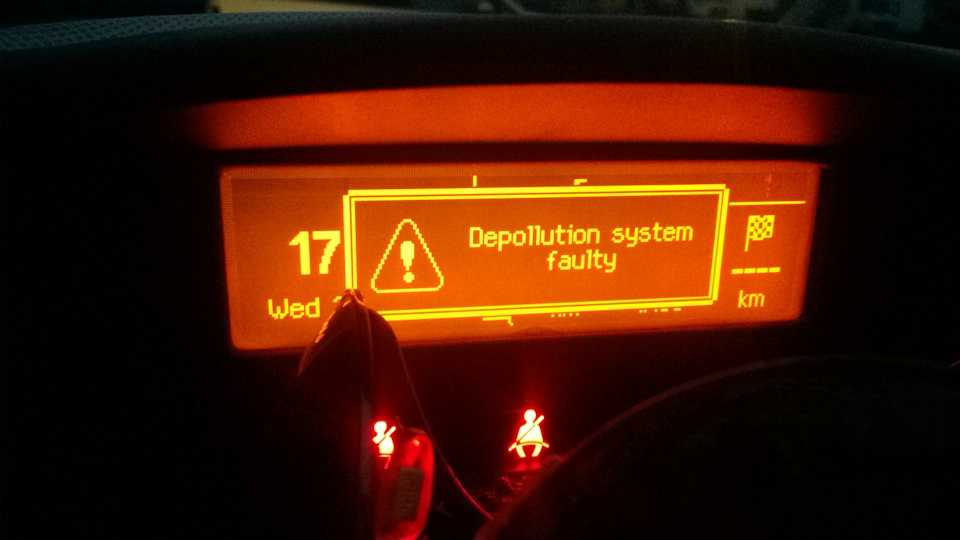
MemTest86 RAM test — errors found
If your computer is modern and supports UEFI boot, you can use a different version of Memtest86.
Download the archive, extract the contents, insert the flash drive into the computer.
- Run the file imageUSB.exe .
- Check the box next to the flash drive on which the program will be written.
- Press Write .
Creating a bootable Memtest86 USB flash drive
The process takes a few minutes. Everything, the image is ready.
Creation of Memtest86 bootable flash drive completed successfully
We also restart the computer and choose to boot from the USB drive.
After loading the flash drive, press Config.
Run Memtest86 Passmark — Config Button
Start the test by pressing the button Start test .
Starting the Memtest86 test — Start Test button
It is enough to go through at least 5-10 test cycles to identify RAM errors.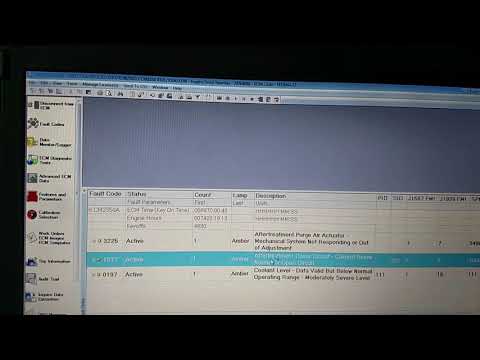
RAM diagnostics in Memtest86
If errors are found, the information will be displayed in line Errors: 0 . Accordingly, instead of 0, there will be another figure with the number of errors.
Method 3. Diagnostics with the TestMem5 program
Program for testing RAM in the Windows environment — download here.
It’s simple. Download, unzip the archive and run the program in administrator mode.
Run as administrator TestMem5
On the left in the program window is displayed:
- processor name;
- processor type;
- processor frequency;
- number of cores x2 x4, etc.;
- Supported SSE modes.
The right side of the program indicates the state of the system memory — how much is available and how much is occupied by the program.
TM5 RAM test
The progress of the test is shown in the middle left. When a failure is detected, cells 0-5 change color to red and the number of test run failures is displayed in the error section on the right.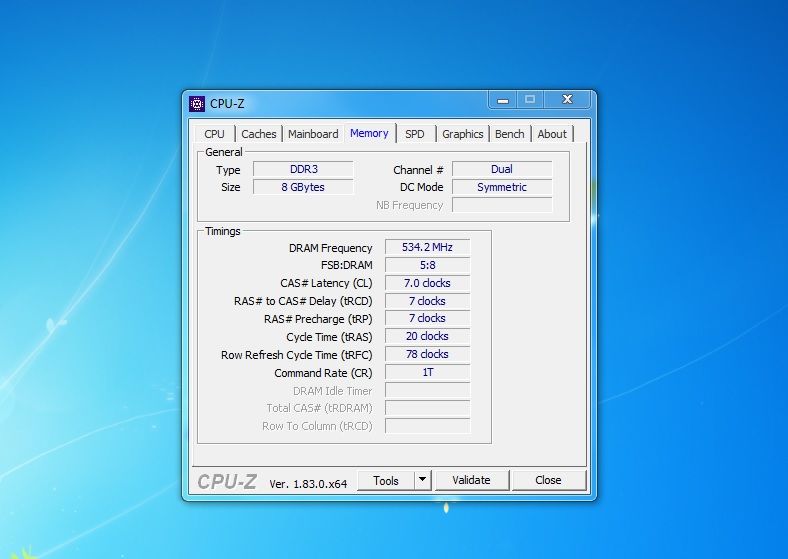
Method 4. Diagnostics of connectors on the motherboard using a tester
Sometimes there are problems associated with the RAM connector in the motherboard.
To determine the performance of the motherboard slot, a special DDR2 / DDR3 tester will help — buy here.
Insert the tester into the RAM slot and press the tester button. If all the LEDs are on and the brightness is the same for all, the signal is OK, there is no problem.
If any LED does not glow or glows weakly, then this indicates a problem in the motherboard circuit. In this case, it is recommended to replace the motherboard.
Tester of RAM connectors on the motherboard
How to identify a faulty RAM module
If the computer has one bar, then it is obvious that there is a problem with it — it needs to be replaced.
If the computer has two or four sticks of RAM, then you need to test each one in turn. To do this, leave one stick of RAM and run diagnostics again.
As soon as the test shows problems, it means that the bar being diagnosed must definitely be replaced.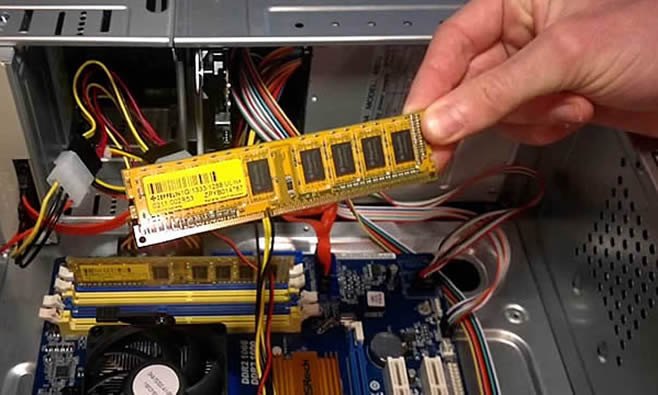
Or you can do this:
- Test four bars.
- If there are errors, leave 2 strips and pull out 2 strips.
- If there are no errors, then these strips are serviceable, we take them out and insert the remaining ones one at a time.
- Or if errors appeared on the first two, then we take out one and test again, until a faulty module is identified.
This way you can identify which bar is not working.
RAM strips in the motherboard slot
Important! Disconnect and connect RAM sticks only when the computer is turned off.
What to do with a defective memory module?
RAM failure can be caused by:
- Oxidation of strap contacts.
- Overclocking the RAM frequency.
- Failure of chips or memory controller.
When the RAM contacts are oxidized, you need to remove the bar from the motherboard slot and clean the contacts with an eraser.
We clean the contacts of the RAM stick with an eraser on this and the reverse side.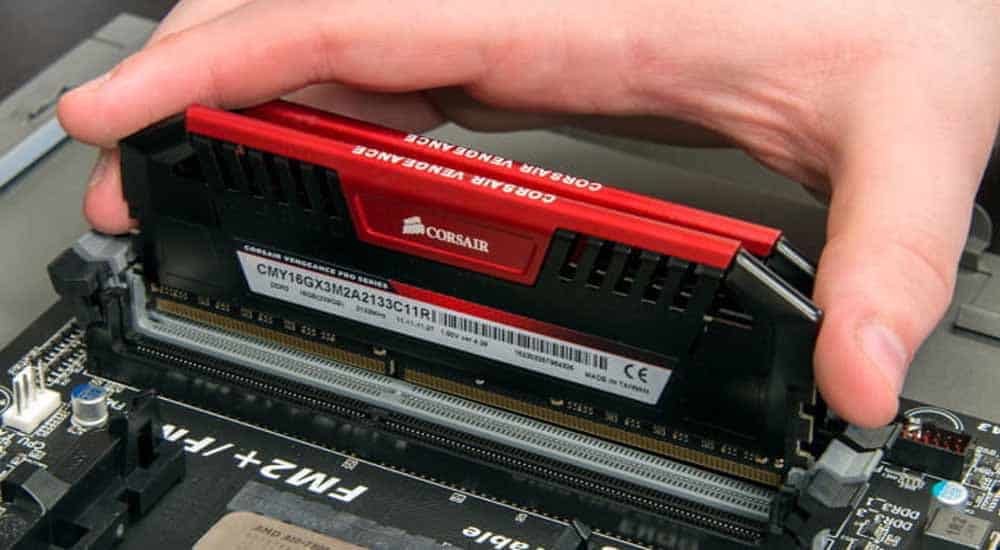 I think it makes no sense to describe how to do this in this article, if you overclocked the frequency, then you know how to lower it.
And the last reason for the failure of the RAM is the failure of the memory chips. In this case, there is only one way out — replacement with another bar with suitable characteristics.
To find out the characteristics of RAM, read the article — 6 ways to determine the frequency of the RAM of a computer or laptop.
That’s all for me. If you need diagnostics, cleaning a computer or laptop, join the VK group — https://vk.com/ruslankomp and leave a request for a consultation.
I will help you solve a problem with a PC or laptop. Join the VK group — ruslankomp
How to check if the RAM is working or not. How to check the status of random access memory (RAM). Checking the health of RAM using mdsched
RAM or RAM is one of the most important components of a personal computer. Module failure can lead to critical errors in the system and cause BSODs (blue screens of death).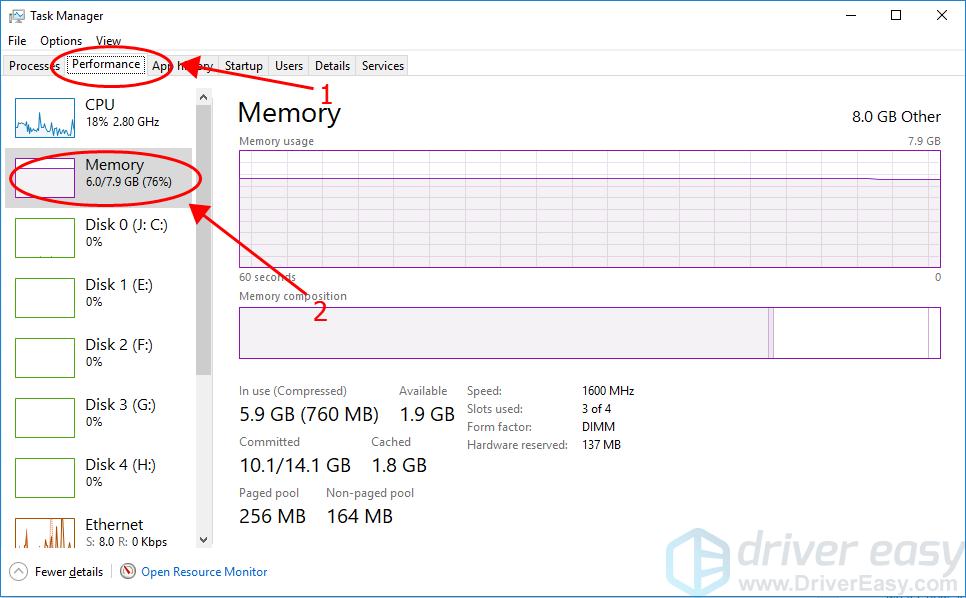
In this article, we will consider several programs that can analyze RAM and identify bad strips.
GoldMemory is a program supplied as a boot image with the distribution. Works without the participation of the operating system when booting from a disk or other media.
The software includes several memory test modes, can test performance, save test data to a special file on the hard drive.
MemTest86
Another utility that is distributed already written to the image and works without loading the OS. Allows you to select test options, displays information about the size of the processor cache and memory. The main difference from GoldMemory is that it is not possible to save the test history for later analysis.
MemTest86+
MemTest86+ is a revised edition of the previous program created by enthusiasts. It features higher testing speed and support for the latest hardware.
Windows Memory Diagnostic Utility
Another representative of console utilities that work without the participation of the operating system. Developed by Microsoft Corporation, Windows Memory Diagnostic Utility is one of the most effective solutions for diagnosing RAM errors and is guaranteed to be compatible with Windows 7 and newer and older systems from MS.
RightMark Memory Analyzer
This software already has its own graphical interface and works under Windows. The main distinguishing feature of RightMark Memory Analyzer is the priority setting, which makes it possible to check the RAM without loading the system.
MEMTEST
Very small program. In the free version, it can only check the specified amount of memory. In paid editions, it has advanced functions for displaying information, as well as the ability to create bootable media.
MemTach
MemTach is a professional level memory testing software. Conducts many performance tests of RAM in various operations. Due to some features, it is not suitable for an ordinary user, since the purpose of some tests is known only to specialists or advanced users.
SuperRam
This program is multifunctional. It includes a module for testing the performance of RAM and a resource monitor. The main function of SuperRam is RAM optimization. The software scans the memory in real time and releases the amount that is not currently used by the processor. In the settings, you can set the limits at which this option will be enabled.
Errors in RAM can and should cause problems with the operating system and the computer as a whole. If there is a suspicion that the cause of failures is RAM, then it is necessary to test using one of the programs listed above. In case of detection of errors, sadly, you will have to replace the faulty modules.
RAM failure is a common cause of . If your computer began to regularly demonstrate such a blue screen, then it makes sense to check the RAM for performance. Luckily this is very easy to do. In this article, we will consider two ways to test memory at once, using the built-in mdsched utility and using the third-party Memtest86+ program.
Checking the health of RAM using mdsched
The easiest way to test the RAM for operability is to check it with the mdsched utility. This utility is built into the Windows operating system and is present in all its modern versions, including Windows 7, Windows 8 and Windows 10.
In order to check the RAM using mdsched, you must first. To do this, press the key combination Windows + R. Next, you need to enter the command «mdsched» and press the Enter key.
This will launch the mdsched utility. This utility will offer you two options for checking RAM. If you select the first option, the computer will restart and the scan will start immediately, and if you select the second option, the scan will be scheduled for the next time you turn on the computer. You can choose any of these options, there is not much difference between them.
Either way, the next time you boot your computer, the Windows Memory Diagnostic Tool will start. By default, the memory will be checked in basic mode.
If you want to perform a more detailed test of the RAM performance, you can interrupt the current test using the F1 key and select another test mode. In total, the Windows Memory Diagnostic Tool offers three modes for checking RAM for performance, these are:
- Basic mode — the simplest and fastest check, includes MATS +, INVC, SCHCKR;
- Normal mode — more detailed test, including LRAND, Stride6, SCHCKR3, WMATS+ and WINVC;
- Wide mode — the most detailed RAM test, which includes MATS+, Stride38, WSCHCKR, CHCKR4, WStride-6, ERAND, WCHCKR3, Stride6 and CHCKR8 tests.
In addition, while the Windows Memory Diagnostic Tool is running, you can disable or enable memory cache checking. To do this, first press the F1 key, then the Tab key, and then select from three options:
- Enabled;
- Disabled;
- Default;
Keep in mind that the more detailed verification method you choose, the longer it will take.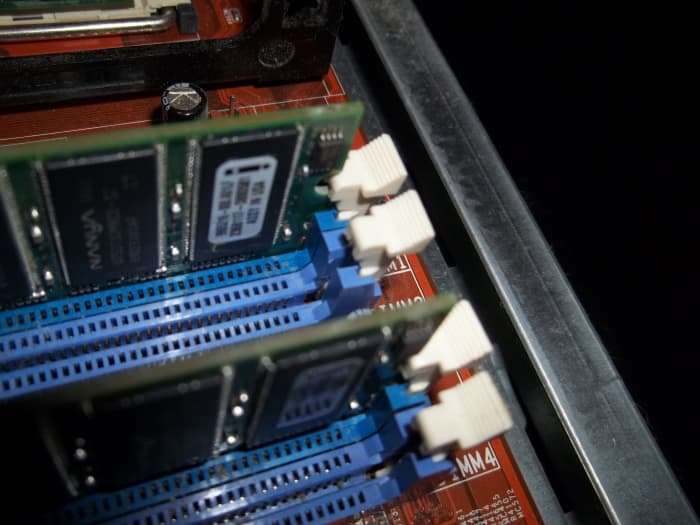
Memtest86+ RAM test
You can also check the performance of RAM using third-party programs. One of the most famous programs of this kind is Memtest86+. Memtest86+ runs exclusively from the boot disk, so it can be used even when the operating system is not installed or running.
You can download an ISO image of a boot disk with this program on the website. You can also download Hiren’s boot CD (), which includes Memtest86+. You can read about how to burn a bootable ISO image to disk.
Memtest86+ is very easy to use. We boot from the boot disk and run Memtest86+. Immediately after launch, the program starts checking your RAM for performance.
If any errors or malfunctions are found, red messages will appear on the screen. If there are no errors, the message «Pass complete, no error» will appear.
To access the settings of the Memtest86+ program, press the «C» key on the keyboard. To complete the check, press the «Esc» key.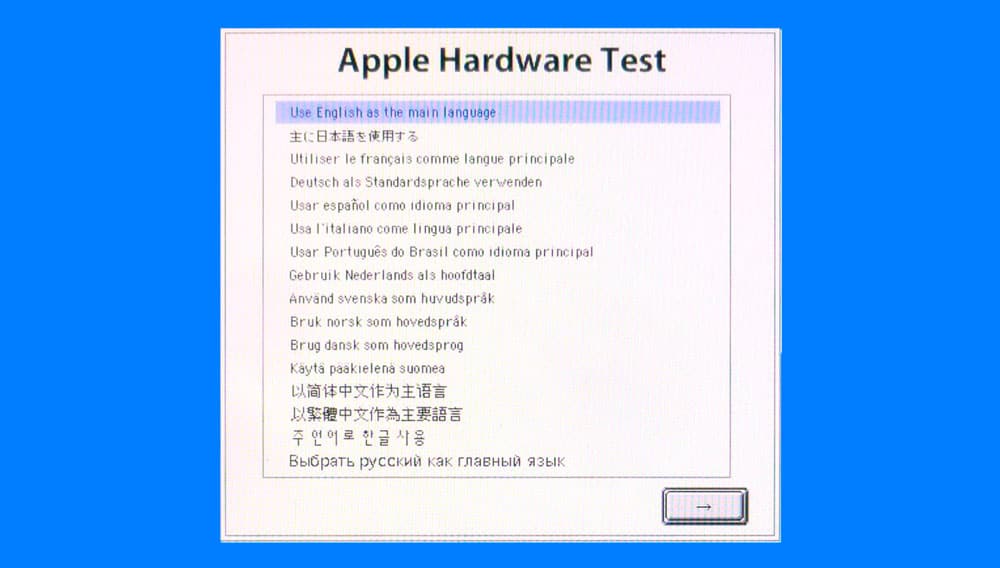
The need to check the random access memory (RAM) is dictated by the frequent occurrence of the following situations in Windows 7:
- The appearance of the «blue screen of death» (BSOD).
- Computer freezes.
- Unstable or incorrect operation of the computer.
- Critical errors while running applications.
In all such cases, RAM is the most likely culprit and needs to be checked. There are several ways to test RAM in Windows 7.
Unlike previous versions of the OS, which required the use of third-party applications to analyze the health of this computer node, the seven provides a built-in tool for this. It can be launched in two ways:
- From the command line.
- From the control panel.
To run this tool from the command line, click Start, type mdsched into the search bar, and press Enter. The following window will appear:
This window contains two options for performing the built-in RAM test:

Which option to choose depends on the user’s intentions. Needless to say, when choosing the first option, you need to save your work and close running applications, which is what the message in the window reminds you of.
To run this tool from the control panel, select «Administrative Tools» in it, and in the list that appears on the right side of the window, select «Windows Memory Checker»:
test from the command line.
Built-in memory checker settings
We recommend that you run this tool with the default settings first. If no problems with RAM were found, then a more detailed analysis can be carried out. To do this, you need to run the built-in test again and press the F1 key while it is running, after which the settings menu is displayed, which can be navigated with the arrow keys and Tab. This tool provides three analysis modes that differ in the set of tests and the completeness and time of passage:
- Basic — duration of several minutes.
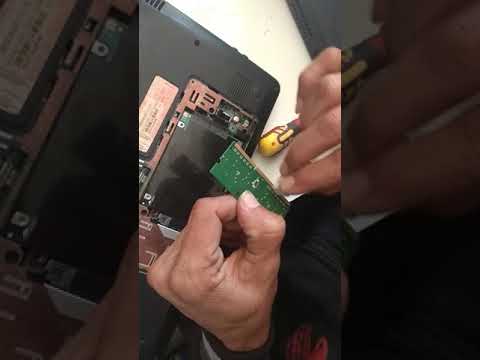
- Standard — takes about an hour.
- Extended — up to several hours.
At default settings, all tests are run in two passes. This value can be changed from 0 to 99. If set to 0, then testing will be performed indefinitely until it is stopped by the user, which can be done by pressing the Esc key.
The successful completion of the RAM test is indicated by the appearance of a window like this:
Boot memory test
This is another option to run a built-in test, which is used when Windows cannot even boot due to RAM problems. To start it after turning on the power of the computer, use the F8 key to achieve a menu with additional boot options, then press the Esc, Tab and Enter keys in sequence:
The built-in diagnostic tool will start:0005
Upon completion of the check, Windows 7 will automatically restart and its normal operation will begin.
Checking RAM using the Memtest86 utility
Many third-party utilities have been developed for RAM tests, but Memtest86 is deservedly considered the «king» among them. It differs from many similar programs in that it has its own bootloader and runs from bootable media (for example, from a USB flash drive or CD). This allows it to more thoroughly diagnose the performance of RAM. Unfortunately, this utility has two disadvantages:
- The need to obtain bootable media from the distribution iso file. It is hardly necessary to attribute this to shortcomings — that is why the program does not require any OS, and does not depend on it.
- Quite long test execution time (more than 1 hour).
In what cases it should be used:
- Of course, the first and most frequent case is that the OS does not boot up, or a BSOD appears.
- When the PC is unstable.
- Diagnostics of purchased and non-working RAM modules.
- To fine-tune timings when overclocking system components.
What to do if tests reveal problems
If errors were detected in any way during testing, or the tests could not even complete, then this is a clear sign that one or more RAM sticks are faulty. What to do in such cases:
- Do not rush to buy new trims. First, remove all the strips from the slots and reinsert. Just remember to turn off the computer before doing this and discharge static electricity by touching the computer case.
- If it takes a lot of effort to remove and install the slats, then either you forgot about the latches of the slats, or you insert them incorrectly.
- Gently wipe the contacts of the strips with an eraser to remove the deposits formed as a result of contact with air and subsequent oxidation.
- Install the brackets in the motherboard slots, turn on the computer and retest. It is possible that the test will end successfully.
Vkontakte
It may be necessary to check the performance of the RAM in cases where there is a suspicion that the blue screens of death of Windows, oddities in the operation of the computer and Windows are caused precisely by problems with RAM.
This guide will look at the main symptoms of failing memory and walk you through the steps to test your RAM to see if it’s the problem using the built-in memory test utility in Windows 10, 8 and Windows 7, as well as using the third-party free program memtest86+.
Symptoms of RAM errors
There are a significant number of indicators of RAM failures, among the most common symptoms are the following
- Frequent occurrence of BSOD — Windows Blue Screen of Death. It is not always connected with RAM (more often with the work of device drivers), but its errors can be one of the reasons.
- Crashes during heavy use of RAM — in games, 3D applications, video editing and graphics, archiving and unpacking archives (for example, an unarc.dll error is often due to problematic memory).
- Distorted monitor image — more often a sign of video card problems, but in some cases caused by RAM errors.
- The computer does not boot up and beeps endlessly. You can look up the beep charts for your motherboard and see if the audible beep is consistent with memory failures.
Once again, the presence of any of these symptoms does not mean that the matter is in the computer’s RAM, but it is worth checking.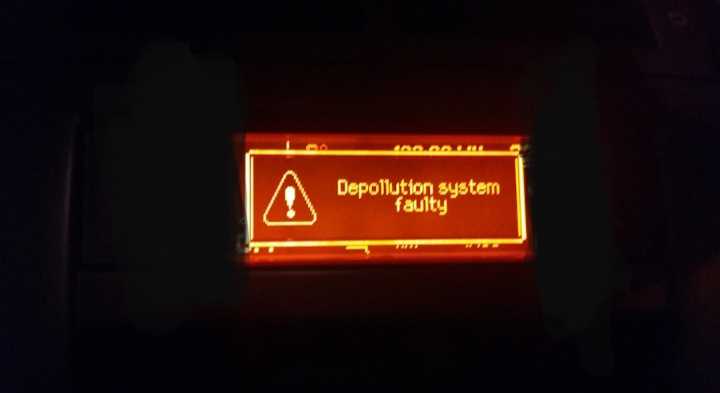 The unspoken standard for this task is the small memtest86+ utility for checking RAM, but there is also a built-in Windows Memory Diagnistics Tool that allows you to check RAM without third-party programs. Both options will be discussed next.
Windows 10, 8 and Windows 7 Memory Diagnostic Tool
Memory Checker (Diagnostic Tool) is a built-in Windows utility that allows you to check RAM for errors. To launch it, you can press the Win + R keys on your keyboard, type mdsched and press Enter (or use the Windows 10 and 8 search and start typing the word “check”).
After starting the utility, you will be prompted to restart the computer to perform a memory check for errors.
We agree and wait for the scan to start after a reboot (which in this case takes longer than usual).
During scanning, you can press the F1 key to change the scan settings, in particular, you can change the following settings:
- Scan type — basic, normal or wide.
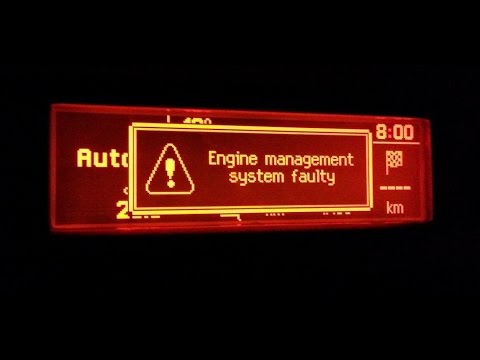
- Cache usage (on, off)
- Number of test passes
Upon completion of the verification process, the computer will restart, and after logging in, it will display the results of the verification.
However, there is one caveat — in my test (Windows 10) the result appeared after a few minutes in the form of a short notification, it is also reported that sometimes it may not appear at all. In this situation, you can use the Windows Event Viewer utility (use search to launch it).
In the Event Viewer, select «Windows Logs» — «System» and find information about the results of the memory test — MemoryDiagnostics-Results (in the details window by double clicking or at the bottom of the window you will see a result, for example, «Computer memory was checked using the memory tester Windows; no errors found.»
Checking RAM in memtest86+
You can download memtest for free from the official website http://www.memtest. org/ (download links are at the bottom of the main page). It is best to download the ISO file in a ZIP archive. This option will be used here.
Note: there are two sites on the Internet for memtest — with the memtest86+ program and Passmark Memtest86. Actually, it’s the same thing (except that the second site has a paid product in addition to the free program), but I recommend using memtest.org as a source.
- The next step is to burn the ISO image with memtest (after extracting it from the ZIP archive) to disk. If you want to make a bootable flash drive with memtest, then the site has a kit for automatically creating such a flash drive.
- It is best if you check the memory one module at a time. That is, we open the computer, remove all RAM modules, except for one, and perform its check. After the end — the next and so on. In this way, it will be possible to accurately identify the failed module.
- After the boot drive is ready, insert it into the disk drive in the BIOS, set the boot from the disk (flash drive) and, after saving the settings, the memtest utility will load.
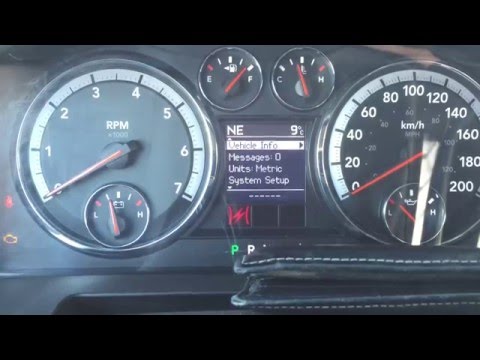
- No action is required on your part, the check will start automatically.
- After the memory check is complete, you can see which RAM memory errors have been found. If necessary, write them down so that you can later find on the Internet what it is and what to do with it. You can interrupt the scan at any time by pressing the Esc key.
Checking RAM in memtest
If there are errors, it will look like the picture below.
RAM errors detected by the test
What should I do if memtest detects RAM errors? — If failures seriously interfere with work, then the cheapest way is to replace the problematic RAM module, besides, the price is not so high today. Although sometimes a simple cleaning of the memory contacts helps, and sometimes a problem in the operation of the RAM can be caused by malfunctions of the connector or motherboard components.
How reliable is this test? — reliable enough to test the RAM on most computers, however, as is the case with any other test, you cannot be 100% sure of the correctness of the result.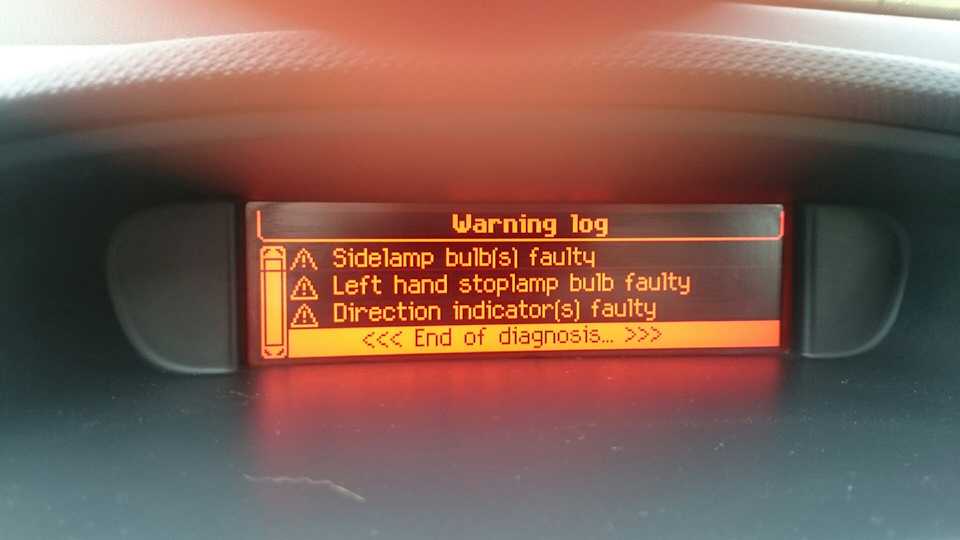
If you have Windows XP installed on your computer, you will need to use third-party software. For these purposes, the MemTest86 program has long proven itself, which you can download from the link at the end of this article.
Distinctive features of MemTest86 is that Windows XP RAM is checked not from under the system, but in a clean environment. Several advantages follow from this. Firstly, you can check the RAM even if no operating system is installed on the computer or it cannot be loaded. Therefore, MemTest86 does not need Windows. Secondly, running in a clean environment promises more accurate test results than similar programs running from under the system.
But there is another side of the coin — you will have to create bootable media for MemTest86 (disk or flash drive) in order to use the program. But these are trifles.
How to use MemTest86
So, first we prepare bootable media, for this we write the downloaded image of the program to a disk or USB flash drive.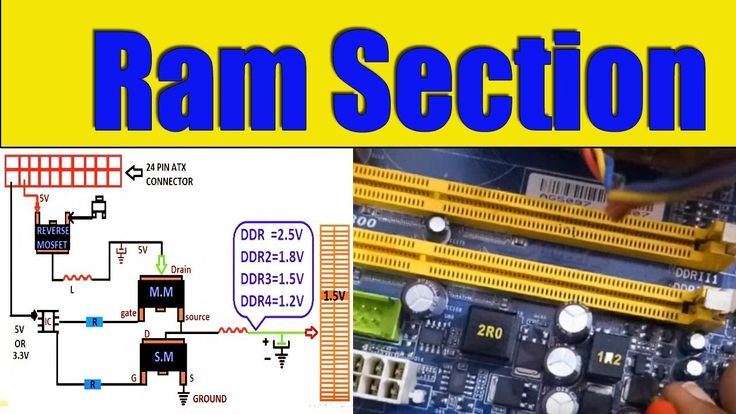
To write the MemTest86 image to a flash drive, you need to download the USB archive, unpack it, run the imageUSB.exe file, specify the path to the memtest86-usb.img file (also in the archive) and click on Write to UFD. The flash drive will be ready.
To burn the MemTest86 image to disk, you need to download the CD archive, unpack it, and simply burn the image to disk.
When the media is ready, set the BIOS to boot from a disk or flash drive (depending on where you wrote MemTest86). The BIOS should be configured in the same way as it is done when installing Windows. You can read about it. We boot from the desired media and MemTest86 immediately starts checking the RAM.
Additional settings can be called up by pressing the C key. But in principle, the default settings fully meet the requirements.
Asking a question about how to use MemTest86, you need to know only one thing — the test occurs cyclically, endlessly. That is, the program will check the RAM until you stop the check. The check is stopped using the Esc key. In order for the RAM test to be reliable, it is recommended to run two cycles of tests and stop. The number of cycles is indicated in the column of the Pass table. The number of errors is indicated in the Errors column and a list of found errors is displayed in the field below the table. Based on the data obtained, it is possible to adequately judge the performance of the RAM.
In order for the RAM Tester to give accurate results, it is recommended that you run the test with one RAM module connected. So, if there are errors, you will know exactly which module.
- Operating system — XP, Vista, 7, 8;
- Language — English;
- Designed by Chris Brady.
Thematic materials:
Scanning and removing viruses manually
Kaspersky Free is a new free antivirus from Kaspersky Lab
Handy recovery 5.5 serial. Pros and cons
Iobit malware fighter 4.4 expired license code. Instructions for activating IObit Malware Fighter Pro
License key for hitman pro 3
Iobit uninstaller 5.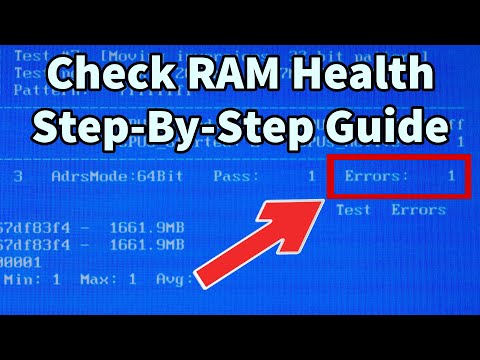 2 license key
Hetman partition recovery 2
Driver Updater activation key
Updated: 03/31/2021
103583
If you notice an error, select a piece of text and press Ctrl + Enter
How to check RAM for errors in windows 10?
Contents
- 1 How to fix windows 10 RAM errors?
- 2 Checking RAM on Windows 10 showed errors: cleaning contacts
To check the RAM in Windows 10, a built-in diagnostic tool is provided.
To run it, you need to type “Windows Memory Checker” in the start menu and run the found utility.
A window will open asking you to choose whether to run the scan now or the next time you boot your computer.
If you select the first item, the computer will restart immediately and the RAM diagnostics will start automatically. Therefore, if you choose the first option, then before rebooting, make sure that you save the changes in all programs.
The test will take some time, depending on the performance of the computer and the amount of installed RAM. The test screen will have a progress indicator that can be used to roughly estimate the remaining time until the end of the test.
If necessary, the test can be aborted by pressing the ESC key. Upon completion of testing, the computer will automatically reboot into the operating system and a message will appear in the system tray (lower right corner of the screen) about the results of testing RAM.
If the utility notifies you that no errors were found, then the RAM is absolutely good and if there are any problems with the computer, they should be looked for in another area.
How to fix windows 10 RAM errors?
If errors were found in the memory, then first you need to reset the BIOS / UEFI of the motherboard to the factory settings. This action will help reset the timings, voltages and frequencies of the RAM to the factory settings. After all, changing these parameters out of ignorance or, for example, for the purpose of overclocking, can cause errors in the RAM or even damage it.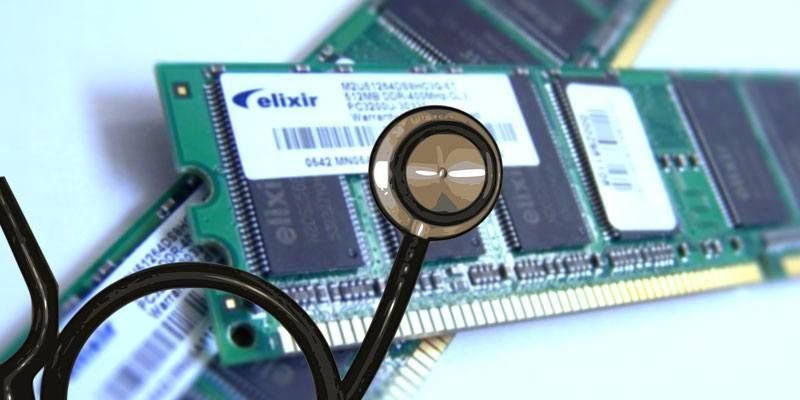
You can reset the motherboard by removing the CR2032 battery from the motherboard for a short time (usually one minute is enough).
If extraction is not possible (for example, you have a laptop), then you can reset the settings directly through the BIOS / UEFI.
To enter the BIOS / UEFI menu, you must press a special key before loading the computer’s operating system (immediately after pressing the power button). In the vast majority of cases, these will be the DEL or F2 keys.
You need to find a factory reset in the BIOS/UEFI. Usually it is located in the Service item and is called “Standard Settings” (Load Setup Defaults) or “Optimal Settings” (Load Optimal Settings).
The found reset button must be activated using the Enter key and accept the changes.
Next, you need to restart the computer by pressing the F10 key and yes to the BIOS / UEFI question about saving settings and restarting.
After this manipulation, testing the RAM can be repeated as described above.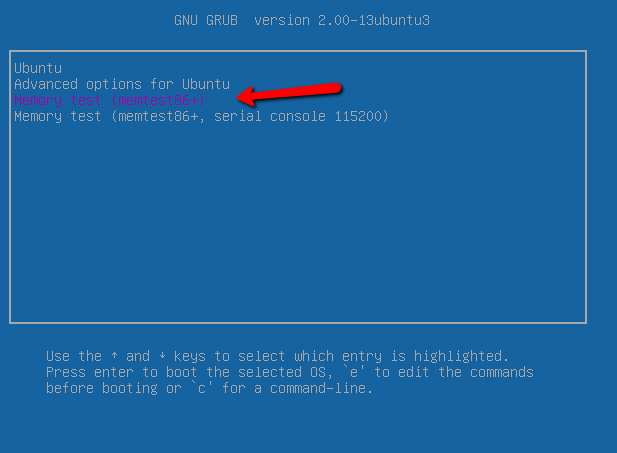
If errors are found in the memory again, then most likely the RAM is defective and will have to be replaced. But … You can try to clean the contacts on the RAM, as they tend to oxidize and poor contact caused by oxidation can lead to errors in the memory.
Checking RAM on Windows 10 showed errors: cleaning contacts
In order to clean the contacts on the RAM of a desktop computer, you must first remove it by removing the side cover of the system unit and opening the latches on the edges of the RAM slot.
Then you need to go over the golden contacts of the memory sticks on both sides with a regular eraser to clean the oxidation. After cleaning, you need to make sure that there are no traces and parts of the eraser left on the memory and install it in place — in the motherboard slots.
After this manipulation, the memory test must be repeated again. If the errors are gone, then the memory is working and it was the oxidation of the contacts, but if the errors remain, then the RAM will have to be replaced.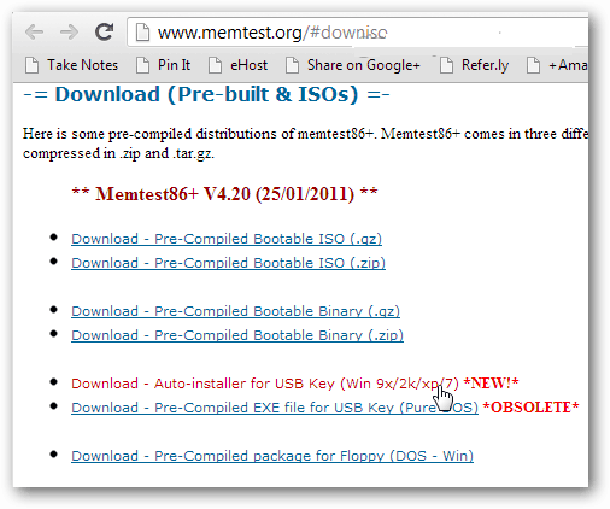
But! And here there is a nuance — if you have several sticks of RAM installed, then only one faulty stick can cause errors (for example, you have 2 sticks of memory of 4 GB each and one of them may be working and the other not).
To find out, you need to run a memory test with one stick left in the computer. In this way, you will be able to identify serviceable and faulty trims and, possibly, avoid unnecessary costs.
- Author: nix_u
Rate this article:
(0 votes, average: 0 out of 5)
Share with friends!
Signs of a failed RAM and how to check for a failed RAM
Good day… RAM is an important component of a computer. This is volatile memory that stores all of the processor’s calculations needed to run applications or software. If there are any signs of RAM failure or the RAM is damaged, you will not be able to start your computer…
There are some indications that the system’s RAM is dying. This post lists some common symptoms of RAM failure…
Contents
- What are the symptoms of RAM failure?
- Slow RAM performance
- Random RAM reboots
- Frequent BSOD errors
- RAM size displayed incorrectly
- Graphics card won’t boot
- How to check for bad RAM
- Clear the RAM and reinsert it
- Run Windows Memory Diagnostics
- Conclusion
What are the symptoms of a failed RAM?
These symptoms indicate that your computer’s RAM needs attention:
- Decreased PC performance…
- Random reboots…
- Frequent BSOD errors…
- Computer displays inaccurate RAM…
- Graphics card won’t boot…
Decreased RAM performance
Decreased system performance is one of the most common symptoms of RAM failure.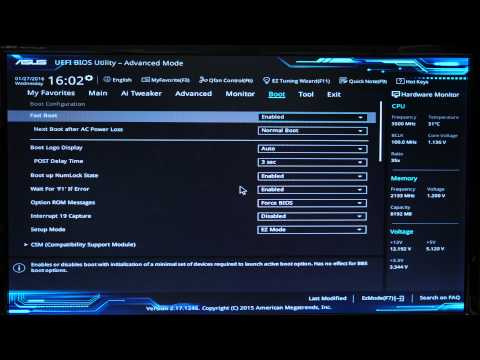 If you see that your computer is working perfectly, but after some time various failures occur and it starts to work more slowly, you may have faulty RAM. But there are other factors that affect system performance, such as programs misbehaving, running several heavy programs that require more RAM, and so on…
So how can you tell if your RAM is good or not? If most of the applications or software installed on your computer frequently crash or take longer to load, this indicates that you have problems with the RAM, and other problems may also appear …
Random reboots of the RAM
When your computer restarts randomly without any warning message, your RAM may also be faulty. However, the computer may restart randomly when the hard drive is damaged. But if you know that your hard drive is healthy and the computer restarts frequently, especially after the desktop has been initialized, this is a sign of poor RAM performance…
Common BSOD errors
A BSOD error occurs due to corrupted software or faulty hardware. Therefore, this is not always a sign of faulty RAM. Let’s understand this with an example. When you get a BSOD error every time you run certain software, it’s likely that the software is causing the error and not the hardware. But if you notice that your system crashes too often, especially when trying to install a new application or software, your RAM may be corrupted…
The amount of RAM displayed incorrectly
One symptom of a RAM failure is that the system displays less RAM than it actually has. You can easily check how much RAM is installed on your system, but this process is different for different versions of Windows. In the event of bad RAM, your system will display much less memory than it actually has…
Video card won’t boot
You may have heard a beep when you turned on your computer. One beep when the computer starts up indicates that it has successfully recognized the graphics card. But if your computer is unable to load the graphics card, you will not hear this beep. In this case, you will also receive a warning message. The cause of this problem is either the system’s faulty RAM or the video card…
How to check for faulty RAM
If you’re experiencing the above problems, your system’s RAM may have failed. But nothing can be said without properly diagnosing your PC. The following methods will help you diagnose this issue:
- Clean the RAM and reinsert it…
- Run the Windows Memory Diagnostic Tool…
Clean the RAM and reinsert it
Dirty or corroded RAM contacts also cause many computer errors. Hence, if your system is showing signs of bad RAM, the first step you should take. This is, unplug the computer from the mains, remove the RAM from the slot and see if it is dirty or not. If you find that it is dirty or the contacts are dirty, you need to clean it. Isopropyl alcohol can be used to remove corrosion. Now paste it again and check if you get the above problems again or not…0007
Read also interesting articles:
Computer memory usage, RAM assignment and selection
How to check the frequency of RAM on your computer
Run the Windows Memory Diagnostic Tool
Windows 10 comes with a built-in memory diagnostic tool. This tool checks the system RAM for errors. To run this tool, go to Control Panel > System and Security > Administrative Tools > Windows Memory Checker. Double click on it to run…
A message will appear on the screen. Select «Reboot now» and check for problems…
This process will take some time. Your system will restart automatically after completion. The memory diagnostic result will be available in the Windows Event Viewer after the scan is completed. about checking the RAM in the event viewer do the following.0007
Enter Win + R on the keyboard, in the window that opens, enter the eventvwr.msc command, expand the “Windows Logs” section on the left side and click on the “System” button. Wait while Event Viewer downloads all Windows logs. Click on the “Search” option on the right side. A pop-up window will appear. Type “Memory Diagnostic” in this window and click “Find Next” button. It will show you the memory diagnostic result.