Cooler Master MasterCase Pro 5 Review
Written by
Matthew Lambert
August 18, 2015 | 13:06
Tags: #atx #freeform #mastercase #mid-tower #modular-chassis
Companies: #cooler-master
1 — Cooler Master MasterCase Pro 5 Review2 — Cooler Master MasterCase Pro 5 Review — Interior3 — Cooler Master MasterCase Pro 5 Review — Cooling Performance4 — Cooler Master MasterCase Pro 5 Review — Performance Analysis and Conclusion
Cooler Master MasterCase Pro 5 Review
Manufacturer: Cooler Master
UK price (as reviewed):£109.99 (inc VAT)
US price (as reviewed): TBC
At Computex 2015, Cooler Master launched its Make It Yours concept and a design ethos termed The Maker Spirit, which together formed a company-wide approach to future products that would be upgradeable and customisable and which drew on its experience in the PC modding scene. That concept becomes a reality today with the launch of the MasterCase series. The MasterCase products utilise the new FreeForm modular system, inspired by the MasterConcept case that was developed with the help of world-renowned modders.
Click to enlarge
Launching today are two mid-tower cases; the MasterCase 5 and the MasterCase Pro 5 above it. The MasterCase Maker 5, the top-end model, is also incoming, although the current ETA is Q1 2016. While these cases constitute separate SKUs from a retail perspective, the whole idea is that users can upgrade from one to the other by buying and installing the necessary accessories to do so, or alternatively customise and tailor the case to their needs by only choosing the bits they need – hence, Make It Yours. Cooler Master says the MasterCase is designed to accommodate needs that change over the time. We’ll talk you through which parts of the case will be sold separately, but please note that Cooler Master has not set pricing for accessories, more of which will be added over time as the concept develops further.
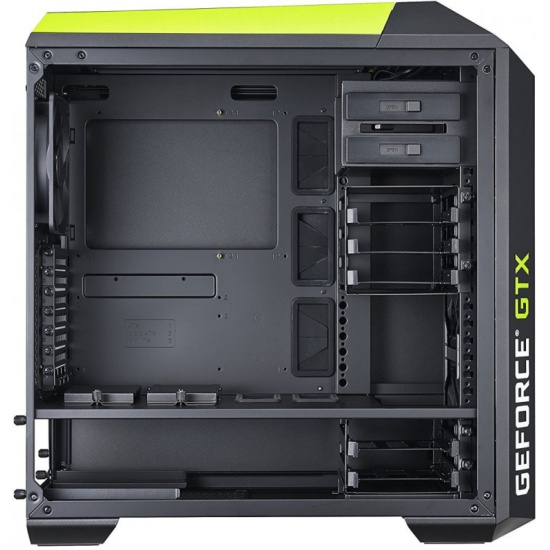
With that out the way, let’s look at the MasterCase Pro 5. Initial impressions are good; the front panel is plastic but it’s not excessive and it’s rather strong too. It includes a top-to-bottom mesh section split into three parts; the two ODD covers and the single lower section. This should provide ample airflow, especially as two 140mm intake fans are fitted behind it – this constitutes one of the upgrades over the MasterCase 5, which only ships with one fan here. The mesh sections, including the ODD covers, double up as dust filters too and are easily removed from the outside with no tools required. Note that a third 140mm fan can be fitted in this area (unique for a mid-tower), provided you remove the optical drive cage inside.
Click to enlarge
With the case’s mid-tower dimensions (albeit relatively large ones), the location of the front IO panel above the mesh section should make for easy access regardless of whether your case sits on the floor or desk. It offers the standard set of connections and that hole you see in the roof gives you some space to rest a charging device. There is no immediately obvious way of removing the front panel, which does call into question the claims of adapting to needs over time, but Cooler Master says it’s currently confirming the spec for ‘future changes/accessories’ related to USB 3.1, suggesting that some sort of upgrade path will be available eventually.
The left side panel features a full-size, clear window with a blacked out strip along the bottom to hide the PSU and its associated cables from view. This is one of the accessories that will be sold separately, as the basic MasterCase 5 will have a standard solid steel panel, as seen on the right side here. Both panels feel fairly durable and sturdy.
Click to enlarge
Like the front, the roof is equipped with plenty of mesh, and it’s again backed by dust filtering material.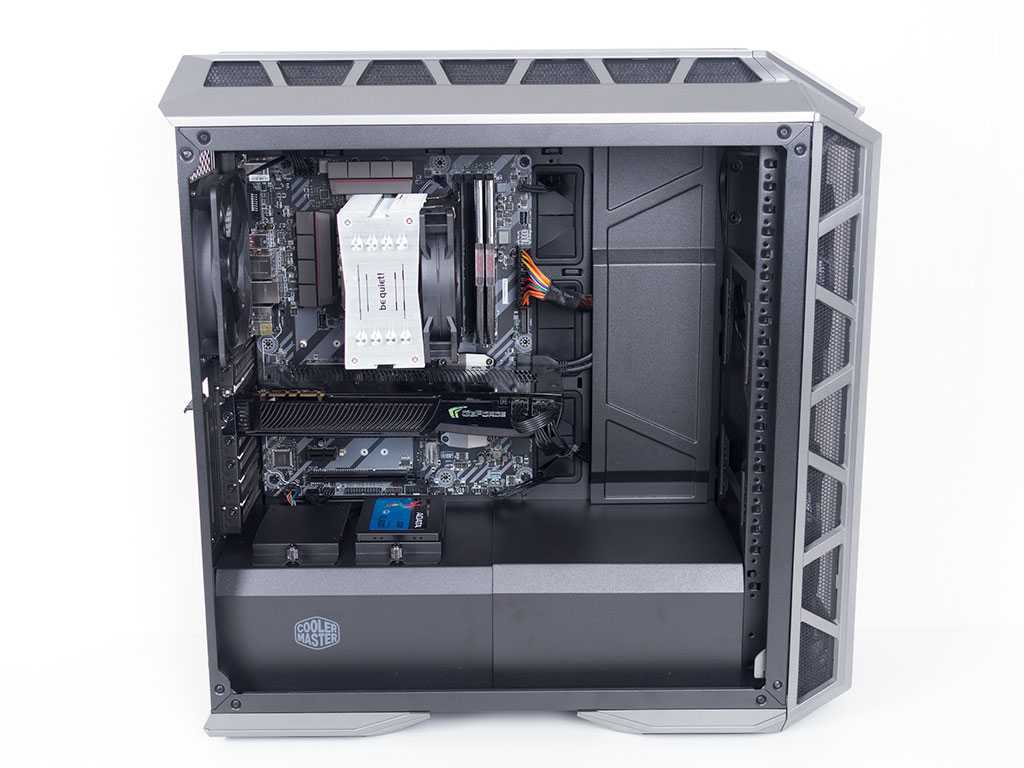 It’s extremely easy to remove the top cover by sliding it backwards, and doing this reveals the 280mm/240mm radiator mounting bracket. This couldn’t be easier to use really – simply loosen the four thumbscrews to release it. In most ways it’s a better design than the one Phanteks uses in the Enthoo EVOLV ATX, for example, as that requires a screwdriver and means you lose space above it. The radiator bracket and roof cover will be bundled together and sold as another accessory for upgrading the MasterCase 5, which simply comes with a rear handle and flat, ventilated steel cover with regular fan mounts. At some point, you should also be able to buy either the radiator bracket or the mesh roof cover completely separately as well.
Click to enlarge
Around back is a 140mm exhaust fan secured to adjustable height mounting struts, along with seven expansion slots. Rubber feet are always good to see as well, and the slide-out PSU dust filter is both easy to remove and to replace after cleaning. So far, this is a very user-friendly case; let’s delve inside.
Specifications
- Dimensions (mm) 235 x 548 x 512 (W x D x H)
- Material Steel, plastic
- Available colours Dark metallic grey
- Weight 10.7kg
- Front panel Power, reset, 2 x USB 3, stereo, microphone
- Drive bays 2 x external 5.25in, 5 x 3.5in/2.5in, 2 x 2.5in
- Form factor(s) ATX, micro-ATX, mini-ITX
- Cooling 3 x 140mm/120mm front fan mounts (2 x 140mm fans included), 1 x 140mm/120mm rear fan mount (140mm fan included), 2 x 140mm/120mm roof fan mounts (fans not included)
- CPU cooler clearance 190mm
- Maximum graphics card length 412mm (296mm with HDD bracket installed)
- Extras Expandable and modular design, removable dust filters
1 — Cooler Master MasterCase Pro 5 Review2 — Cooler Master MasterCase Pro 5 Review — Interior3 — Cooler Master MasterCase Pro 5 Review — Cooling Performance4 — Cooler Master MasterCase Pro 5 Review — Performance Analysis and Conclusion
Cooler Master MasterCase Pro 5 Review
Cases are essentially homes for all your components as they ‘house’ everything inside them.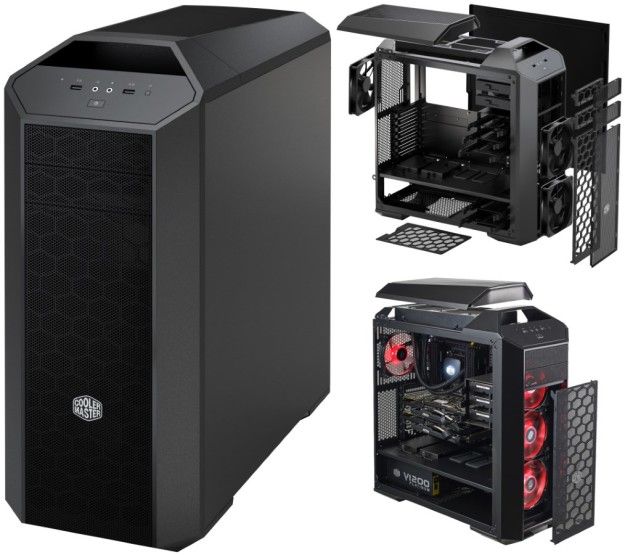 When it comes to picking a case, this is normally something I do last when it comes to a new build. The reason being is that I want to make sure everything I will be using will fit and sometimes it’s fun to build in different size cases. While I prefer massive full-size ATX cases, there is no denying that manufacturers have started to create some amazing smaller cases for the M-ATX and M-ITX form factors. One of the things that are always nice to see is what options cases will offer, what type of cooling is support? Are the drive bays removable? Does it have an inverted motherboard tray? There are so many things to think of and choose from when it comes to picking the case that is right for you that you can literally get a headache from it at times. While more choice is ultimately a great thing, it can make it hard to pinpoint your favourite from the crowd.
- Manufacturer Website: Cooler Master
- Product Page: MasterCase 5 Series (Pro model reviewed)
- Purchase on Amazon UK: £119.
 74 At the time of review
 - Purchase on Amazon US: $141.73 At the time of review
Today we will be taking a look at the Cooler Master MaterCase Pro 5. The MasterCase series features a modular concept that is designed to let users have as much control of the customization of their case as possible. The MasterCase Pro 5 sits atop the series and offers a plethora of features that we will check out here in a bit. The MasterCase series are full-size ATX cases and can accommodate a modest amount of hardware and feature plenty of cooling options. The pro model, as we will see soon, also has a nice big window on the main side panel that has a little trick up its sleeve.
Specifications
| Model | MasterCase 5 | MasterCase Pro 5 | |
| P/N | MCX-0005-KKN00 | MCY-005P-KWN00 | |
| Available Color | Dark metallic grey exterior with black interior | ||
| Materials | SECC, Plastic | ||
| Weight | 10.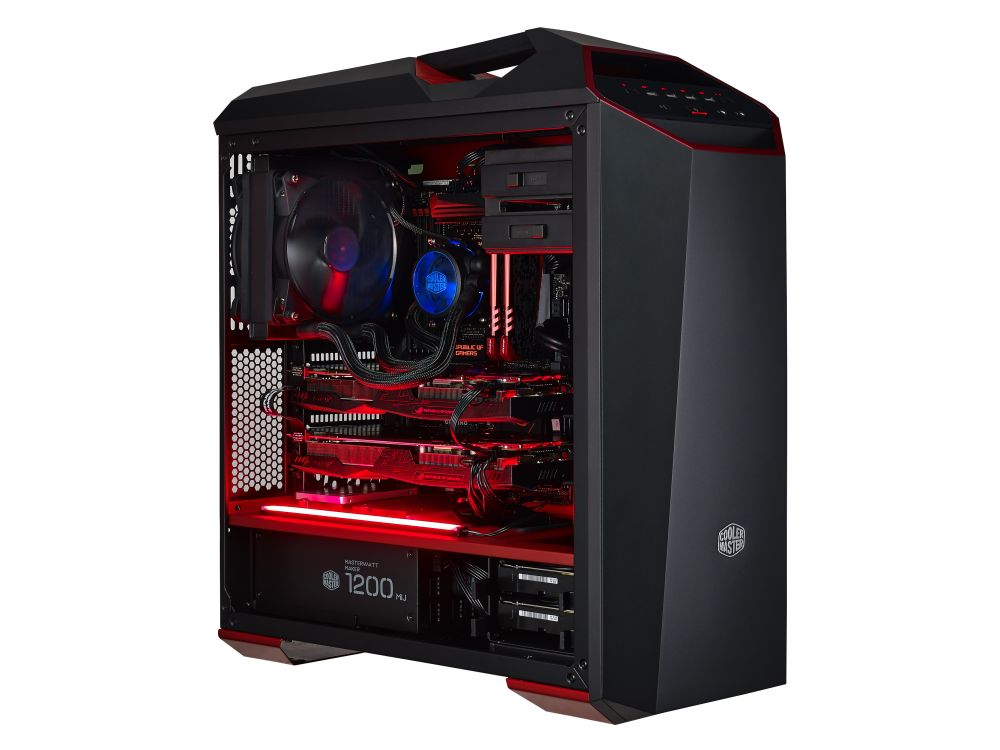 6 kg/23.4 lbs 6 kg/23.4 lbs |
10.7 kg/23.6 lbs | |
| Size (LxWxH) | All | 512(L) x 235(W) x 548(H) mm | 512(L) x 235(W) x 548(H) mm |
| Body | 460(L) x 235(W) x 460(H) mm | 460(L) x 235(W) x 460(H) mm | |
| Mother Board Support | ATX, m-ATX, M-ITX | ATX, m-ATX, M-ITX | |
| Expansion Slots | 7 | 7 | |
| Drive Bay | 5.25″ ODD | 2 | 2 |
| 3.5″ HDD | 2 | 5 | |
| 2.5″ SSD | 2+2 | 2+5 | |
| Electronics | I/O port | U3 x2, Audio | U3 x2, Audio |
| Fan speed control | N/A | N/A | |
| Pre-install fans | Front | 140mm x1 | 140mm x2 |
| Top | N/A | N/A | |
| Rear | 140mm x1 | 140mm x1 | |
| Fan Support | Front | 120/140mm x3 | 120/140mm x3 |
| Top | 120/140mm x2 | 120/140mm x2 | |
| Rear | 120/140mm x1 | 120/140mm x1 | |
| Water Cooling Support |
Front | 240/280mm radiator, up to 40mm thickness without fan | 240/280mm radiator, up to 40mm thickness without fan |
| Top | N/A | 240mm radiator, up to 40mm thickness without fan | |
| Rear | 120/140mm | 120/140mm | |
| CPU Air Cooling Support | 190mm/7. 5inches 5inches |
190mm/7.5inches | |
| VGA Card Support | w/ 3.5″ HDD Cage | 296mm/11.7inches | 296mm/11.7inches |
| w/o 3.5″ HDD Cage | 412mm/16.2inches | 412mm/16.2inches | |
| Cable Management | 25mm | 25mm | |
| Dust Filters | Front/Top/Bottom | Front/Top/Bottom | |
| Power Supply Type | Bottom Mount, ATX PS2 | ||
| Remark | No Top Cover No Front Door |
W/ Top Cover Top Water Bracket Side Window |
|
| Product Sheet Download | MasterCase 5 | MasterCase Pro 5 | |
| Manual Download | MasterCase 5 | MasterCase Pro 5 | |
One of the first things you will be greeted with when you open the box is the user manual. It is attached to very thick and sturdy styrofoam that keeps the MasterCase 5 safe during transit.
Tucked away inside one of the 3.5″ hard drive bays is a nice little accessories box. Here, we have all the screws we will need to get everything installed into the case, which includes the motherboard standoffs. There are also some zip ties and other cable management accessories as well as three 3-min to 4-pin molex converters so if your motherboard doesn’t have many 3-pin fan headers, you can hook the 3x pre-installed fans up to your PSU via 4-pin molex.
The front of the MasterCase Pro 5 features a nice mesh design to it. There are 2x 5.25″ drive bays at the top for all your optical or bay reservoir needs. the whole piece below the 5.25″ drive bays is actually removable by pulling from the bottom and allows users access to the 2x include front exhaust fans, this way you can change them or throw a 240/280mm radiator in there if you want to take the water cooling route.
As mentioned, there is a massive window on the main side panel. If you look closely at the bottom of it, you will notice there is a black strip across the whole length of it. This was that little surprise I was on about, this is designed to hide the PSU cables and a pair of 3.5″ hard drive bays, but it can also be easily removed and changed, or, if you desire, you could mod it to cut out some lettering and add some LEDs for a nice effect.
The other side panel is plain black and as you can see, does a great job of hiding all those nasty cables behind it!
The front IO consists of power and reset buttons, 2x USB 3.0 ports, and the mic/headphone audio inputs
The top of the MasterCase Pro 5 also features a nice ventilated area. This piece is easily removable by sliding it towards the back of the case and then it reveals the top mounts for fans and radiators (none included here) It can accommodate 2x 120m or 140mm fans or a 240mm radiator. The reason, for those who may not know, of why it can’t take a 280mm radiator but it can take 2x 140mm fans, is, while the radiator is measured at 280mm, there will be a bit of an extra piece on one side where the tubes connect, hence making it a bit longer than the 280mm as stated.
The top fan mounts can also easily be removed by undoing the thumb screws. This goes with the modular nature of the case and just allows users an easier chance at playing around and trying to make the case theirs as much as possible.
The back of the MasterCase Pro 5 is fairly standard. There are the 7x PCI expansion bays right below the motherboard’s rear IO panel cutout. One thing that isn’t seen in all cases is to mount the PSU, you actually need to remove the bracket VIA the 4x thumbscrews, secure it to the PSU then put the PSU back into the case and secure the bracket back to the case. This is more so seen with cases that have some sort of PSU shroud/cover pre-installed as it is supposed to make it a bit easier to install the PSU this way.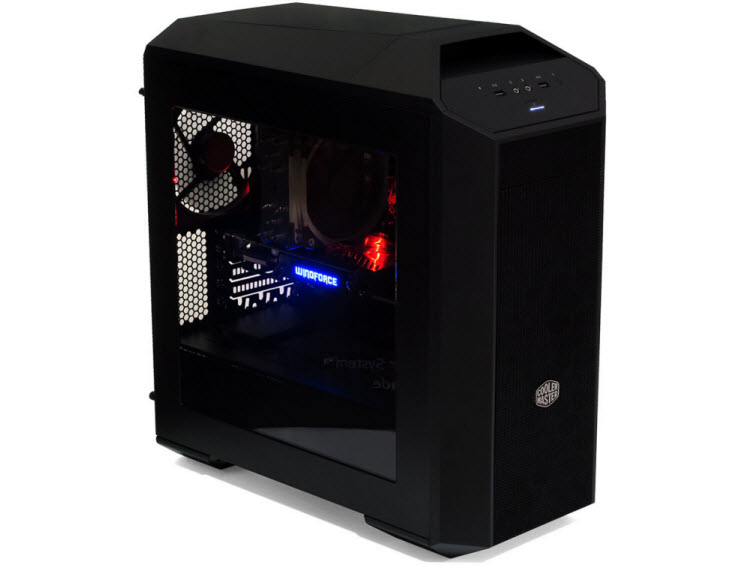
As we would have hoped, there is a nice and easily removable dust filter below the PSU to help keep things on the inside of the case nice and clean and as dust free as possible.
On the bottom, there are two fairly big feet, each with two non-slip pads on them. We can also get a look at the PSU’s dust filter.
Interior
The inside of the case as where things really start to get fun, at least for me. There is just so much going on it that it’s hard to know where to get started. My favourite part of the case is, hands down, the PSU cover/floor at the bottom that hides the PSU and all the cables! This is something similar to what we have seen a few other manufacturers do with their cases, but, of course, this is Cooler Masters take on it. This floor also has two holes with grommets for routing cables to the bottom of the motherboard and GPU, as well as two very unique SSD mounts.
Here we have a pair of SSD/2.5″ hard drive mounts.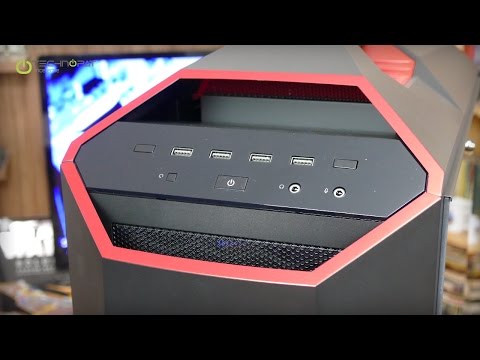 While they look like normal mounts, they have a nice hidden feature to them! You can either mount the hard drives on top as I have in the final build image or, you can actually slot your SSD inside them so it can’t be seen at all. Yet again, Cooler Master is trying to give their customers as many options as possible.
Taking a quick look at the radiator/fan mounting in the top of the case and we can see it actually pops out the top of the case a bit, this will allow for more clearance on things such as motherboard heatsinks without having to worry about fans getting in the way.
The rear exhaust is our third and final pre-installed fan. One of the nice things about this is thanks to the mounting, it can actually be slid up or down and positioned in a number of places. Again, this just helps give more clearance and room depending on what hardware you want to install inside the case. We can also see the MASSIVE cutout for installing CPU coolers without a need for taking the motherboard out of the case.
As we saw from the front, there are 2x 5.25 drive bays. Directly below these are 3x 3.5″ hard drive bays, which can also take 2.5″ hard drives. Again, Cooler Master had their thinking caps on and both of these drive cages are easily removed from the case if you do not require them. This would allow users room for a nice tall reservoir, longer GPUs or what have you! At this point, there is no denying that Cooler Master has done their best to make this case as easily customizable as possible.
Cooler Master have gone ahead and hidden 2x 3.5″ hard drive bays under the floor of the case. Why? Well, I would imagine it’s so users can throw a couple of storage drives down there without having them on display. Some may want to remove the upper drive bays for aesthetics or functional reasons but may still require a couple of drive be installed. As you will see by the thumb screws, this drive cage is also easily removed if you so desire.
Users will notice that not all the motherboard standoffs come pre-installed.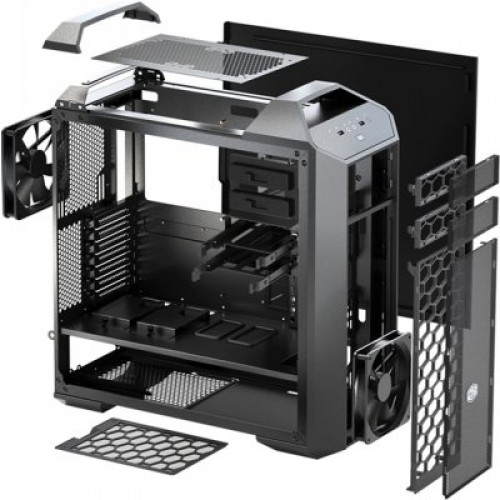 This is because the MasterCase Pro 5 is meant to accommodate a few different form factors. However, Cooler Master have included a nice legend so users will know which holes they will need to install standoffs in depending on the size of the motherboard they are planning on using.
On the backside of the motherboard tray, there is a bit going one. The first thing I noticed was the straps that are already in place and holding cables out of the way. Upon closer inspection I realized the cables are actually inserted into a little slot on the motherboard tray which not only helps keep them out of the way, it should allow for more cables behind the motherboard tray with less mess.
Here is a quick shot of under the flow from the backside, just for fun!
The MasterCase Pro 5 not only has some great cable management options, it also has a mass amount of room behind the motherboard tray, as you can see in the image below, there is around 20mm of room between the motherboard tray and where the side panel will be, absolutely amazing!
If you’ve read any of this review so far, you will have noticed that this case should be very easy to build in and it was! there is plenty enough room for everything and I didn’t run into any problems what so ever. Cooler Master really did do a good job at thinking of just about everything one would need to have an enjoyable experience when building in this case. Now, I may only have a fairly standard air cooled system, but this has been the easiest case for me to cable manage ever!, Yes, those who know me know I don’t tend to worry or go over the top with cable management, but with the MasterCase Pro 5 it is so easy that I couldn’t resist having a very tidy build once I was done.
I like how everything is on display as well, it all just looks nice and goes together perfectly in my opinion. The two SSD mounts with cutouts behind them for cable management and the two grommets to the right for the GPU cable management are a real treat. As far as cable managing goes, I don’t see how it can get much easier than this case, everything is just already there, laid out and set up for you to have an easy and great time building inside the MasterCase Pro 5.
Well, the time has come, another review to wrap up and thankfully, it was a good product.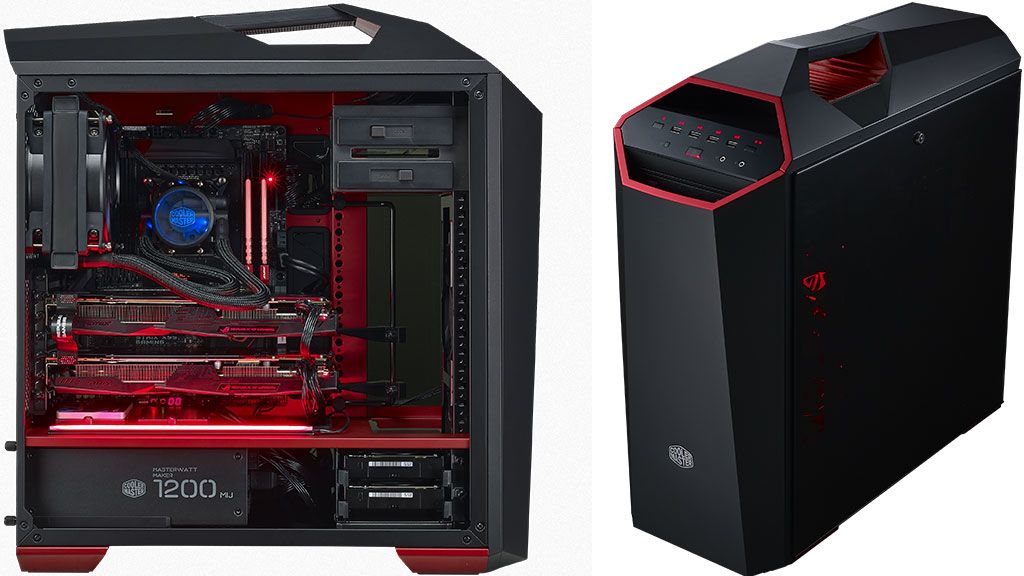 The Cooler Master MasterCase 5 definitely has loads of options and features to offer and is one of the most easily customizable cases I have ever seen. Cooler Master really outdid themselves with this case and it shows!
Performance
The MasterCase Pro 5 is designed to over amazing performance and functionality, which it does. Not only is there a decent amount of cooling support, for both air and water, things like having all the drive bays be easily removable also aids in the performance it has to offer as a whole. The MasterCase Pro 5 comes with 3x pre-installed fans, 2 intake and 1 exhaust which will do a great job at keeping most, more standard systems well within acceptable temperatures. However, as mentioned, there is room for more fans and cooling if need be. Having the PSU cover/floor also allows for a better and smoother airflow throughout the case which, of course, will equate to better performance as well.
Design
Cooler Master did a great job with this case and it is evident that they spent a great deal of time on the drawing board when it came to designing the MasterCase series. The Pro 5 model, as we saw in today’s review, is jam packed with features and options that offer both functionality and a pleasing aesthetic. The case itself is highly customizable and what’s even better is the fact that most things can be taking out by undoing a couple of thumb screws. Small things, such as the removable piece of black plexiglass on the main side panel window are among some of the features that really help make the MasterCase Pro 5 stand out from the others.
Value
The Cooler Master MasterCase Pro 5 comes in at around £120 here in the UK which is a fairly decent price for all that is on offer. The MasterCase Pro 5 gives users a chance at having an amazing looking build with minimal effort. Or, if you like to customize and mod your case and builds, it is more than ready for you to add your own personal touch to it. For the price, you are getting a case that offers plenty of options and will have you feeling like you have just built your best PC yet, once you’ve built in it, you will wonder why you didn’t get one sooner!
When all is said and done, the MasterCase Pro 5 offers everything we could want from a case of this size and price range without going overboard. It has plenty of features and customization options available and won’t let you down. Should you decide to purchase one, I don’t think you will be disappointed at all!
Thanks to Cooler Master UK for sending their MasterCase Pro 5 in for review!
Case overview Cooler Master MasterCase H500
Specifications
The H500 line, which belongs to the MasterCase case series by Cooler Master , continues to evolve: in addition to the already familiar MasterCase H500P model, other options are available, mainly differing in design: MasterCase H500P Mesh, MasterCase H500M, as well as case Cooler Master MasterCase H500 (MCM-H500-IGNN-S00), which we will consider in this review. nine0003
As a reminder: a feature of the series is modularity — a certain base is offered and it is understood that the owner will be able to equip it with various additions at his discretion, and not only with optional fans, but with a whole range of external and internal parts that allow the assembler to create a case with an interior and exterior, the most corresponding to his ideas about the necessary and sufficient for a particular computer. This modular ideology received its own name from the manufacturer FreeForm .
Almost a year ago, describing the H500P model, we criticized the presentation of information in the Russian-language section of the manufacturer’s website: the texts and inscriptions were given in English, and only some navigation elements were translated into Russian. We note with regret that the situation has not changed over the past time: for all four products mentioned, everything is exactly the same.
Did not appear in the «RU» section dedicated to housings, and the «Accessories» subsection, which is, for example, in the English section. And this calls into question the wonderful principle of modularity: it is not clear whether any additions will be available to Russian owners of MasterCase cases that would make it possible to give individuality to the design. nine0003
And this despite the fact that the range of accessories cannot be called rich in the English section.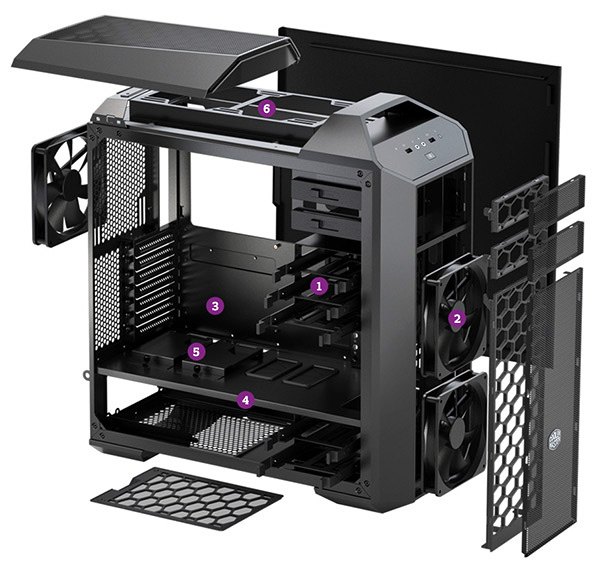 That was a year ago, and today there are no major changes. Therefore, it remains only to reiterate the hope that additional accessories will appear in the foreseeable future.
Let’s move on to the description of the MasterCase H500 case.
There is only one color available — a combination of black metal surfaces and gray-steel, almost black, plastic. There is less plastic in the design of the case than in the H500P: the H500 does not have a solid plastic lining on top, and the lower structures that form the legs are not as wide. nine0003
If we compare the dimensions, the H500 is slightly smaller in all three axes (due to this, the maximum size of installed motherboards has also decreased), and at the same time it is noticeably lighter than the H500P.
Tempered tinted glass wall for both cases is one — left, but the H500 has a decorative metal mesh in front, and the H500P has a transparent acrylic panel instead. A similar panel (only flat, not convex) is included in the H500 kit, and can be installed on the front instead of the mesh if desired. nine0003
Note: for the H500P in the list of accessories in the English section there is a front panel with a mesh, which is standard in the H500P Mesh model (the word «mesh» just translates as «mesh»).
In other respects, the design is very similar, especially if you do not take into account the top panel: the developers still actively use elements whose shape is somehow connected with the trapezoid — this is how the decorative grilles of ventilation slots located on the side faces of the front panel are designed. nine0003
More budget-friendly than the H500P: plain carton box with monochrome design and slits on the sides for hand grip when carrying.
Layout
The Cooler Master MasterCase H500 is a bottom-mounted power supply miditower designed to accept ATX/microATX/Mini-ITX motherboards and has seven slots for expansion cards.
Inside the chassis, a plastic L-shaped partition separates the power supply compartment. Unlike the H500P, this partition does not take up the entire length from the front to the rear wall, but slightly more than half at the back. nine0003
Toward the front is a two-place drive rack, very similar to the one found in the H500P, only without the 2.5″ drive tray on top. There are no places for such trays on the upper part of the partition either.
Storage options for a case of this size can be called minimal: the already mentioned rack allows you to place two HDD or SSD dimensions of 3.5 or 2.5 inches, there are two more places for 2.5-inch drives behind the base for the motherboard. For devices that require access to the front panel, there are no seats at all, which has become quite common in modern cases. nine0003
As in other cases of the series, the controls and external ports are located very well: on a wide sloping transition from the front panel to the top. That is, they will be easily accessible wherever the computer is placed — on the table, on the floor or on a low stand. But the angle of the control panel is such that it looks up rather than forward, and if the operator sitting next to the computer is shorter than average, then in a desktop installation, he will most likely have to rise.
The contents of the control panel are located in two rows, at the top there are ports — two USB 2.0 and USB 3.0 (no color coding, but with numbers on top). The connectors are oriented in one line, and the gap between them is 11 mm, so there may be problems when connecting wide devices to adjacent ports at the same time.
In the center of the bottom row is a large Power button, made in the form of a hexagon with a white framing backlight. To the left of it are a pair of audio jacks, to the right is a tiny Reset button and a disk activity indicator, also white. nine0003
The Power button is soft, but a significant free play will protect it from being triggered by accidental touches, and the Reset button is not only small, but also very narrow, and even pressing it is not so easy on purpose.
According to the manufacturer, video adapters and other expansion cards up to 410 mm long can be installed in the case, our measurement showed even 430 mm, but perhaps another possible way to install front fans is taken into account in the specification.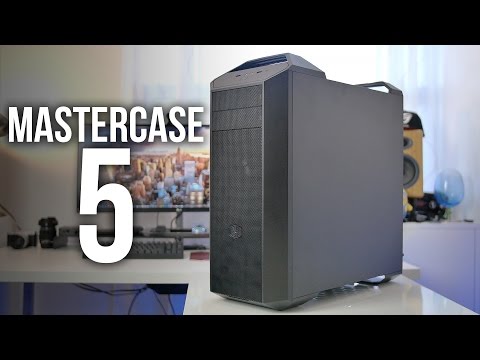 In any case, you can install any of the commercially available ones: even the most modern and high-performance video cards rarely exceed 300 mm in length. nine0003
There is another way to place expansion boards — vertical. But if the H500P had two vertical slots with plugs on the back wall for this, then the H500 has one such slot, its plug must be broken out.
The CPU cooler can be up to 167mm high according to the manufacturer, our measurement showed a distance of 186mm from the bottom of the motherboard to the left side wall.
The set includes a considerable amount of fasteners, ten disposable ties, an adapter for powering the fans from the power supply, a multilingual instruction booklet and a cleaning cloth for transparent surfaces. The speaker for the motherboard, which some other Cooler Master cases were equipped with, is absent in this case, but there is a backlight controller, which we will talk about in detail later, but for now we note: the H500P did not have anything like that. nine0003
Construction
Cooler Master H500P dimensions are 225(W)×502(H)×525(D) mm including protrusions. Net weight 9.2kg, recall: H500P weighed 11.3kg; of course, the size reduction affected, but the thickness of the steel elements for the H500 is also smaller: 0.75-0.85 mm, and for the H500P — 0.8-0.9 mm. However, due to the smaller size, this did not affect the rigidity of the structure, except that the top panel, devoid of a plastic lining, let us down a little in this regard.
As mentioned, there are no 5.25″ or 3.5″ front panel slots in the case. nine0003
For disk drives, there is a small rack at the front of the bottom of the chassis that can accommodate both sizes of HDD or SSD on a skid. The stand can be removed by unscrewing one screw, but it cannot be moved, as in the H500P.
Recall from the above, there are two more 2.5-inch slots behind the motherboard tray.
For a power supply with cables coming out of it, with the rack installed, 260 mm remains — modern PSUs generally have a length of 140 to 180 mm, and only the most powerful ones can reach 230 mm, but these are used very rarely.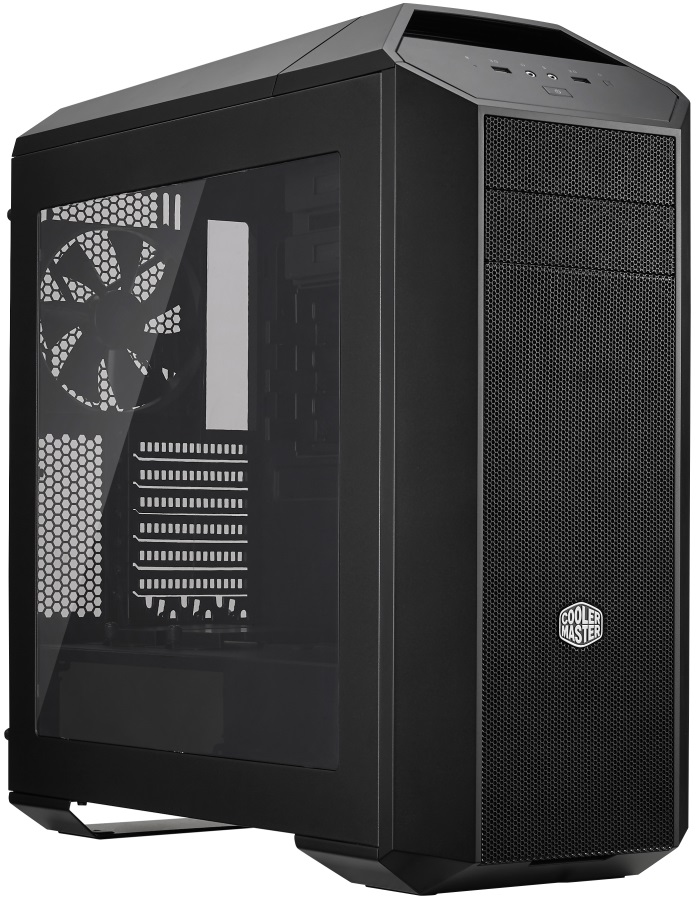 That is, there is enough space for the vast majority of available PSUs, and if you need to install a very powerful one, you will have to sacrifice a disk rack. nine0003
The legs of the case are plastic elements of complex shape, equipped with shock-absorbing rubber pads from below.
Ventilation system
The MasterCase H500 is equipped with three fans. Rear exhaust, dimension 120 mm, without illumination, equipped with a standard 3-pin connector.
There are two very large 200mm RGB fans on the front that act as blowers. Two cables come out of each: a three-wire cable for powering and controlling the fan itself, and a four-wire cable for backlighting. nine0003
The H500 does not have an integrated speed controller like the H500P. The fans can be connected to the system board or, using the supplied adapter, simply powered from the PSU — there is also a “multiplier” to which the front fans are connected and you can connect the rear one, but without the control function: only power buses are combined and activated.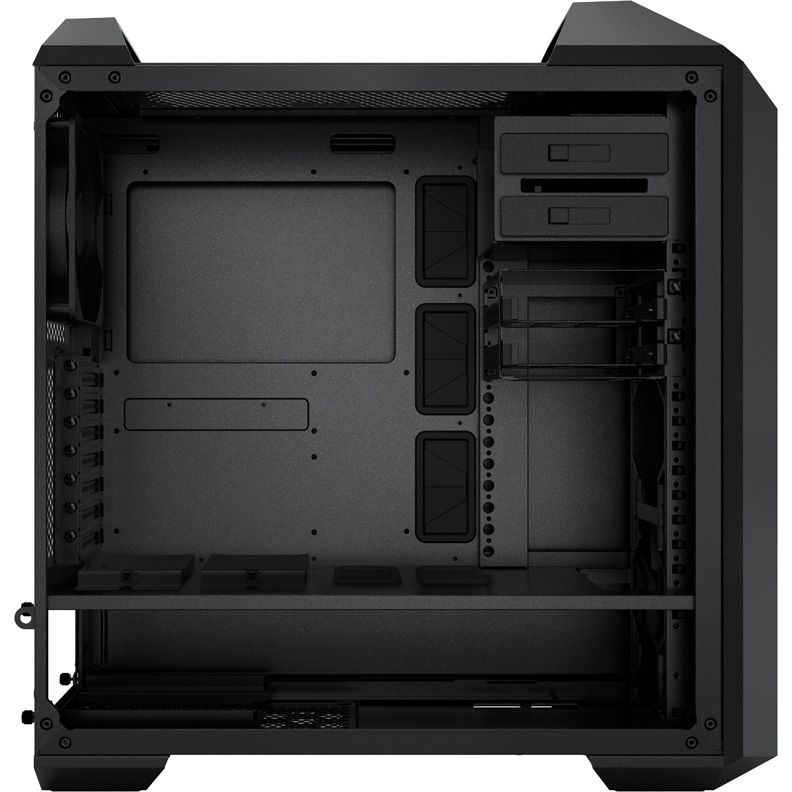
To get the most out of your RGB front fans, you need a controller. Such controllers with the appropriate control software are available on many motherboards, different manufacturers of which have different names for such functions, and the boards that support them are marked with the corresponding branded symbols. nine0003
In the absence of an RGB controller on the H500P motherboard chosen for computer assembly, you will have to look for such a device from a third-party manufacturer: Cooler Master does not offer anything like this. But it does not offer (and then, perhaps, only so far) only as an accessory: the H500 has an RGB controller in the kit!
This is a small box with a button on one side and a cable coming out of one end for connecting to the SATA connector of the power supply. On the other end there is a 4-pin connector for connecting the fan backlight, and it also has its own “multiplier” for three RGB devices — two standard ones and one additional one, for example, an RGB tape, which is available in the list of Cooler Master case accessories. nine0003
The lighting modes can be controlled by the just mentioned controller button, which must be placed inside the case. And this is far from always convenient, except that you need to select one mode and use only it.
It is theoretically possible to bring the controller outside, but it will be ugly. However, it is also possible to quickly change modes: the controller has a two-pin connector, to which you can connect the Reset button on the control panel of the case. This button for its intended purpose is usually used very rarely, and its use to control the backlight can be called an original, albeit budget, solution. nine0003
By successive pressing of one or another button, the modes are selected: constant glow in one of the colors (not only blue, red, green, but also several mixed ones), flickering in one color and iridescent colors.
The possibility of transforming the ventilation system is also provided. Up to three 120 mm fans or two 140 mm fans can be placed in front, and additional ones can be installed at the top — one 200 mm or two 120/140 mm.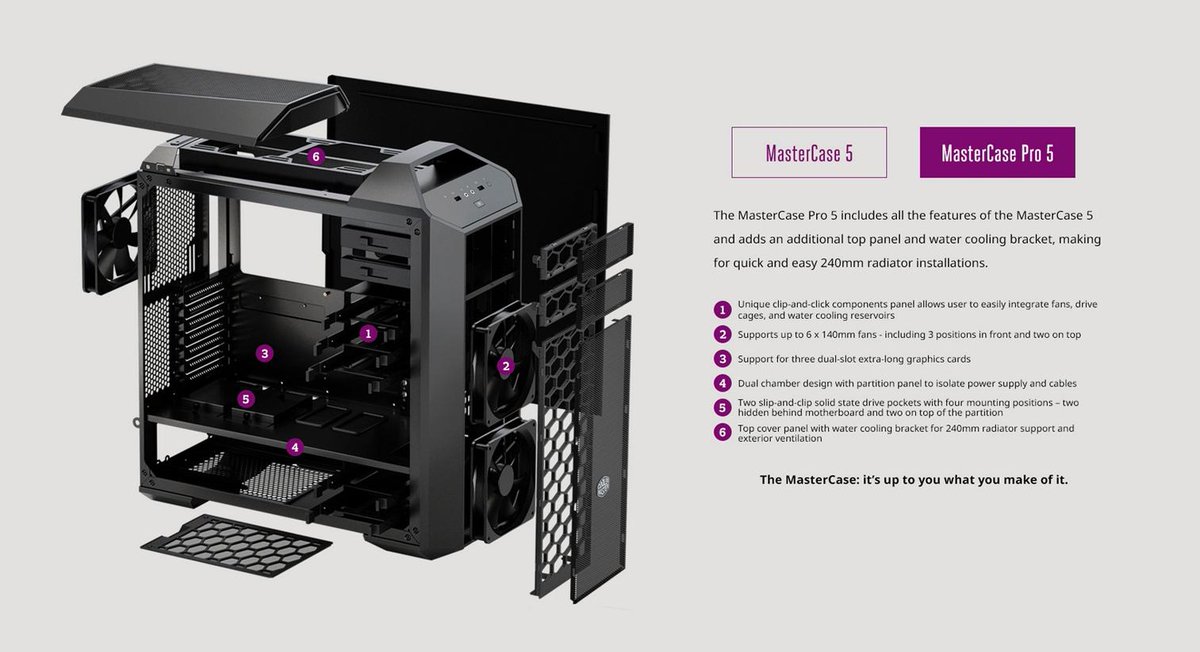
Standard front fans mounted on the outside of the chassis. Naturally, at the same time, they protrude forward, but they are covered by a voluminous front panel. nine0003
There are only holes on the bottom of the chassis where the power supply is located, and the size of the perforated area may be small for the largest 230mm PSUs. The side walls (both left glass and right metal) are solid, placing fans on them is also impossible.
In total, up to 6 fans can be placed in the case, usually this is quite enough. They can also be replaced with radiators for liquid cooling systems. The front dimension is limited to 360 mm, at the top — 240 mm. nine0003
Possible air inlets on the front panel are covered with fine mesh nylon mesh filters. It is most convenient to maintain this grid together with the panel itself.
Chassis bottom perforation at power supply location covered with a quick-release filter. It is removed by moving backwards from under the case, and its mesh is fixed on a plastic frame.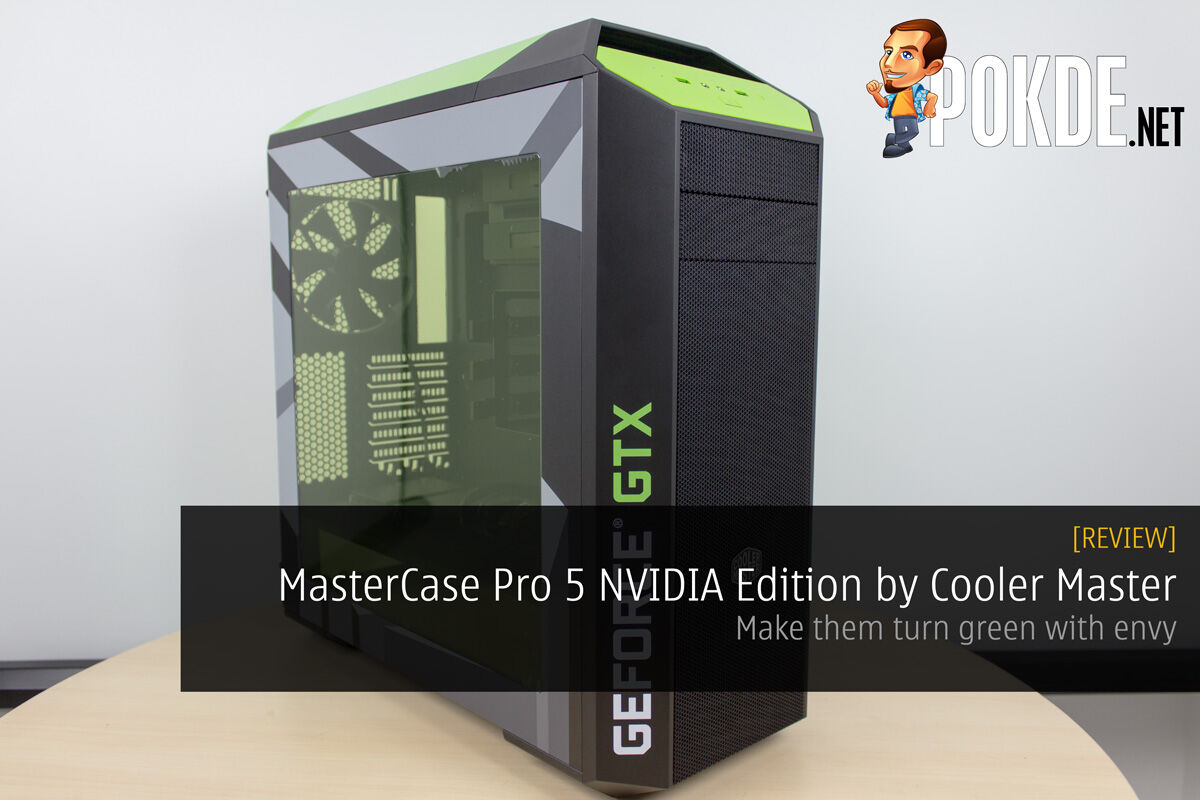
The holes in the top cover are covered from the outside with a sheet of plastic with small holes, which is held in place by flexible magnetic strips glued around the perimeter. nine0003
Of the additional holes, there are only slots in the expansion slot covers. There are no holes for external CBOs, which are often found even in the cheapest cases, in the MasterCase H500. Such cooling systems are not widespread, and therefore, this will not cause any problems for the vast majority of potential buyers.
Assembly of the system unit
The fastening of the side walls of the case, made of different materials, is also different. And slightly different from what we saw in the H500P. nine0003
The right metal wall is fixed with a pair of captive thumbscrews, after which it must be moved back a couple of centimeters (on the rear edge there is a stamped ledge for gripping fingers). But after that, it must be held so that it does not fall down, and in the H500P this was prevented by a specific shape of the hooks on the bottom edge.
The left glass wall is also not exactly the same as in the H500P. It also has a metal element, but only from below: this is a figured bar glued to the inside and having a hook for fixing on the lower edge of the corresponding chassis opening. At the top, the wall is fastened with two screws with large diameter heads and slots, it is better to unscrew them not with a screwdriver, but with a coin. After releasing the screws, the wall is held by the lower hook, it must be slightly tilted and removed by moving it up and out. nine0003
The holes for the screws in the glass are equipped with rubber inserts, which not only act as shock-absorbing pads, but also prevent the screws from falling out when the wall is removed.
The removable front cover is fastened with six plastic latches, nothing prevents its complete removal — the control panel with a bundle of wires coming out of it is made in the form of a separate unit mounted on the chassis and noticeably extending onto the top cover. This upper part at the back has a niche for a hand grip; Thus, we moved the case from place to place, but, frankly, a fully assembled computer would still not be worn like that: the strength of such a handle is questionable. nine0003
To remove the decorative grille (together with the mesh), you need to remove eight small screws from the inside of the front cover, after which it will be possible to install an acrylic panel in its place, fixing it with the same screws.
To install the power supply, you need to remove the L-shaped partition, for which we unscrew the knurled screw fixing it on the rear wall and move forward to release the hooks.
The PSU is screwed directly to the rear wall, and for proper positioning on the bottom of the chassis there are protrusions equipped with rubber shock-absorbing stickers. It is better to place the PSU with the fan down: from its upper plane to the solid horizontal part of the partition, the gap is only a few millimeters. nine0003
The universal dual-format sled used in the H500P drive rack has already been used in other Cooler Master cases we’ve seen. They are entirely plastic, the front face is decorated with a rotary part, which simultaneously serves as a handle for removing from the rack and a fastener: on one side it has a latch, on the other, a fixing ledge. The bottom has holes to help cool the underside of the drive, where the board with electronic components is located.
Mounting of 3.5-inch drives in the skid is carried out by side pins equipped with rubber shock absorbers to reduce vibrations. Additional fixation with screws is also possible, one on each side. 2.5-inch SSD / HDD are fastened with screws from the bottom, for them the plastic of the bottom of the sled will be the shock absorber.
Since the rack can be removed very easily, it would be logical to provide a place under it for a drive with screws fastened through the holes in the bottom of the chassis, which is done in this case, unlike the H500P. However, even here the matter has not been completed: the configuration of the holes implies the use of rubber inserts of a specific shape, but they are not included in the kit. However, it will not be difficult to drill small holes if necessary, and then there will still be not two, but three places for disks with a remote rack. nine0003
The separate 2.5″ drive trays we saw in the H500P are not here. Such drives will have to be attached to the holes in the base for the system board, and this can be done without removing the board: the holes are equipped with rubber seals, and the screws with specific shapes that are included in the kit should be screwed into the bottom of the drive, and then inserted with force from the right into seal holes.
Of course, there is enough space between the base and the right cover for both these drives and for running wires and cables. nine0003
SATA cables with both straight and L-shaped connectors can be used for sled for any drive size, for 2.5-inch drives located on the right — only with straight ones.
The motherboard I/O hole does not need to be broken out, and the horizontal slots for expansion cards are provided with reusable plugs secured with Phillips slotted screws.
The vertical slot can be used not only for any expansion boards, but also for placing additional brackets with I/O ports. nine0003
As is often the case with Cooler Master cases, only two motherboard stands are pre-installed. The rest (they are included in the kit) will have to be installed independently, and for convenience there is an adapter for a hexagon for a Phillips screwdriver.
There is a large cutout at the base of the motherboard that allows some types of CPU coolers to be removed without removing the motherboard. In this case, there is no plastic cover covering this hole on the right side of the MasterCase H500P case. nine0003
There is also no other cover — a metal one that closed the opening for cable routing on the right. Speaking about the H500P case, we said that the decorative function of this cover is doubtful: it is still closed by a solid right side wall, and in reality it only helps to hold the cables without the need to carefully fix them with cable ties, etc.
But one more cover, the left one, remained. Its function is obvious: it blocks the view through the transparent left wall of cables, wires, as well as a vertical row of holes for them, located at the base of the motherboard. This cover can be removed by unscrewing the two screws at the bottom (access to them from the right) and releasing the hook at the top. nine0003
There is a second row of these holes, which is not covered by the cover, but they are equipped with rubber plugs with split petals, and therefore look quite decent without the cover.
External chassis connectors connect with shielded cables with solid connectors, audio is HD Audio only, and USB 3.0 ports connect to internal motherboard connectors.
The edges of metal structures are either rolled or rounded to reduce the risk of injury to hands during assembly. nine0003
Acoustic ergonomics
Cooling system noise level varies from 22.6 to 36.8 dBA with the microphone in the near field.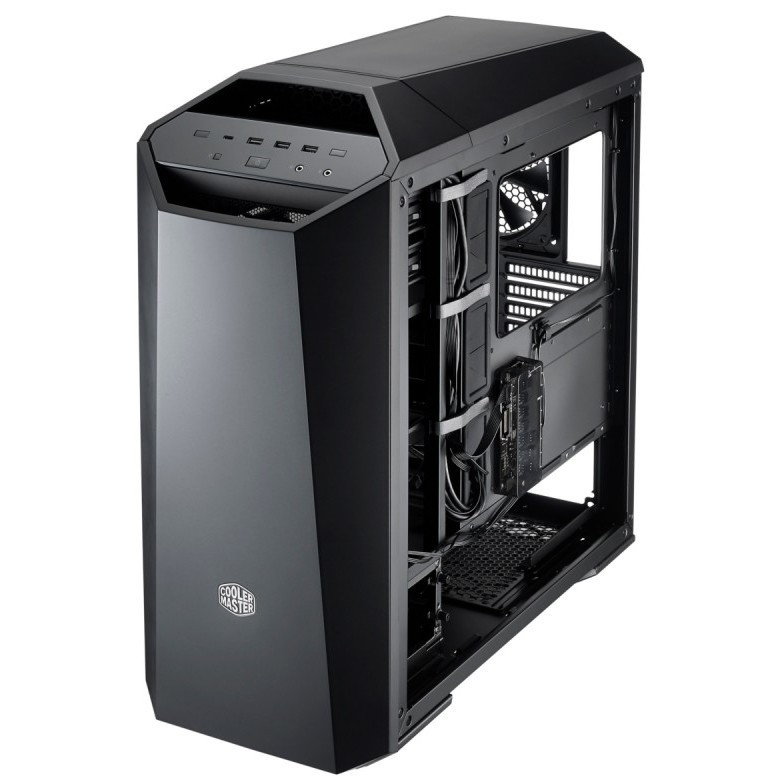 When the fans are powered by 5 V, the noise level is at the minimum noticeable level, however, as the supply voltage increases, the noise level increases. In the typical voltage regulation range of 7-11 V, the noise varies from low (26.3 dBA) to medium (34.7 dBA) levels relative to typical daytime residential values. However, even when the fans are powered by a nominal voltage of 12 V, the noise level of the cooling system does not reach the threshold 40 dBA and is in a comfortable range for most users. nine0003
If the case is further away from the user and placed, for example, on the floor under the table, the noise can be characterized as minimally noticeable when the fans are powered from 5 V, and when powered from 12 V — as reduced for a residential area during the daytime .
Positioning and conclusions
If we compare the models Cooler Master MasterCase H500 and H500P , it becomes clear: the first is a cheaper version of the second, and the price reduction was mainly due to a more modest design. The dimensions of the H500 are smaller, and this affected the range of sizes of installed motherboards, but I must say that today even ATX motherboards are rarely used, and even E-ATX, which are acceptable for the H500P, are completely rare. nine0003
The equipment is also a little more modest: a different mount for 2.5-inch SSD / HDD, a smaller rear fan, some internal elements are missing.
But there is a replaceable front panel in the kit: the mesh will provide better air supply to the front fans, and if this is not an urgent need, then you can install translucent acrylic, which will give an unusual appearance to the computer. You can change acrylic to mesh in the H500P only if the mesh panel can be found on sale. nine0003
Finally, let’s remember that the H500 has a standard backlight controller, which the H500P does not have. True, today almost most motherboards are equipped with such controllers.
These two factors, combined with a significantly lower price than the H500P, make the Cooler Master MasterCase H500 an interesting option for those computer configurations that do not require a large number of drives.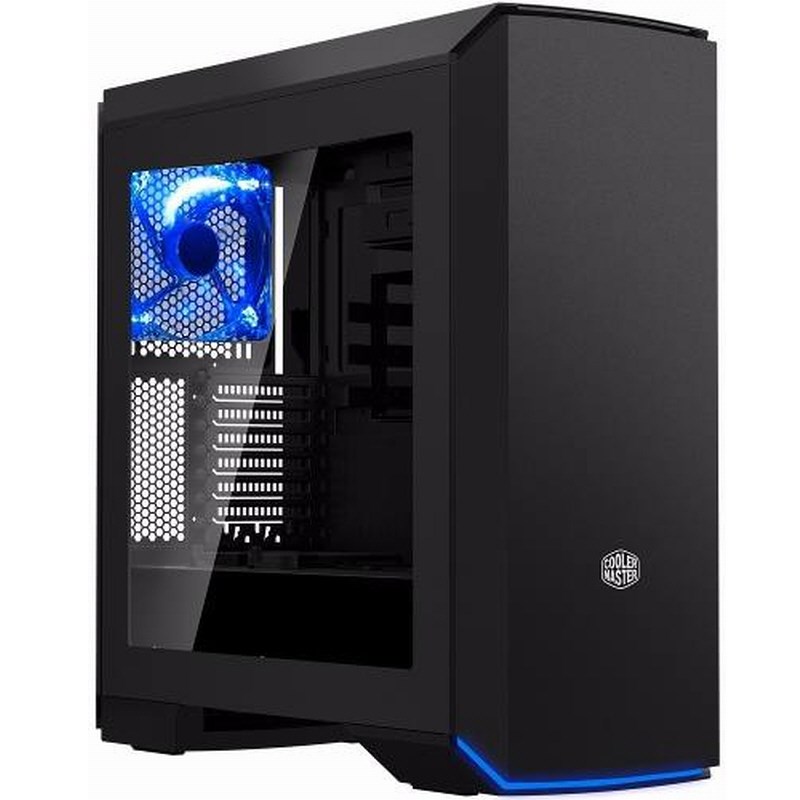
Review and testing of the power supply Cooler Master V750 Gold — V2 — i2HARD
Alexey Lalitin
February 25, 2021
Ideal 80 PLUS Gold certified 750W PSU — everything the user needs: reliability, stability, quietness and convenience at an affordable price.
The V Gold power supply line from Cooler Master has been updated to the second version. Most recently, we tested the first version, and we can immediately say that the changes are significant. Moreover, these are not external changes, but the design of circuitry — this is a completely different assembly, significantly improved in quality.
nine0003
Everything else remains the same: modular cables, hybrid fan modes, high efficiency, stable voltages and a ten-year warranty.
The line includes models for 550, 650, 750 and 850 watts. You can also note the manufacturer’s options for all models in white — White Edition, and not only the cases, but also the cables will be white.
Specifications
- Model: MPY-750V-AFBAG; nine0207
- Standard: ATX 12V v2.
 52, ErP 2014 Lot 3;
 - Maximum output power: 750W;
- Dimensions (W/H/D): 150 x 86 x 160 mm;
- Input voltage: 100 V — 240 V AC 50/60 Hz;
- Input current: 10 A maximum;
- Hold time: 17 ms at 100% load;
- Operating temperature: 0 to +50 degrees Celsius;
- Cooling system: 135mm FDB fan;
- Noise level: up to 32.5 dBA; nine0207
- Potency: 80 PLUS Gold;
- MTBF: over 100,000 hours;
- Protection: OVP, OPP, SCP, OCP, UVP, OTP;
- Weight: 1.61 kg;
- Warranty period: 10 years.
Load characteristics:
Packing and contents
The power supply is supplied in a cardboard box, decorated in the traditional colors of the manufacturer: gray and lilac.
On the front side there is a photo of the product, the name of the model and pictograms of key features. nine0199
On the reverse side, a more detailed description of the model’s capabilities is given: efficiency and fan operation graphs, product drawing, description of cables and connectors.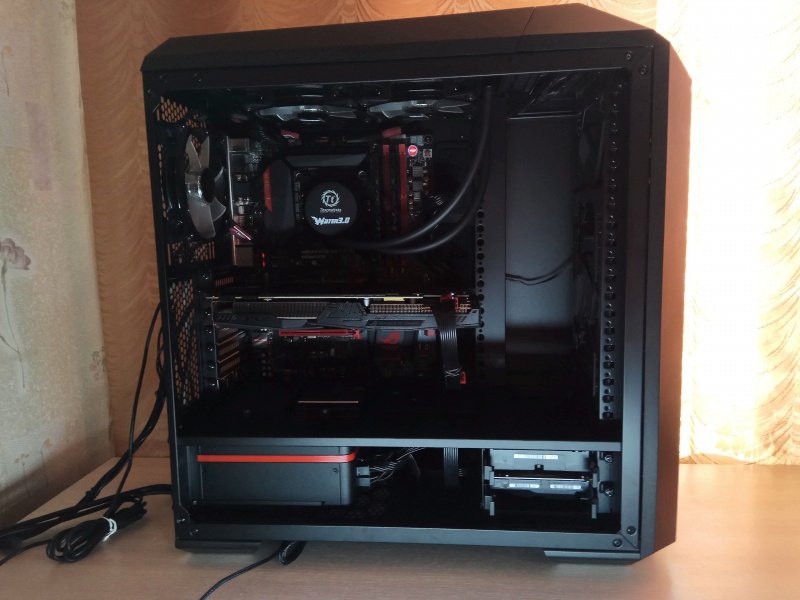
On one of the faces there is a specification table and load characteristics.
The power supply is in a fabric soft bag and fixed inside the box in a form of polyurethane foam. Another water-repellent fabric bag holds the entire set of cables. nine0199
Also in the kit, in addition to the fastening screws, there are ties: a dozen one-time plastic ones and three fabric ones with Velcro.
Cables
Includes 9 flat cables and power cord. The cords are soft enough, everything, even for powering peripherals, is wired with 18AWG wires (except for GPU power cables — they are based on 16AWG wires).
- Main 20+4-pin cable: 65 cm;
- Two CPU power cables 4+4-pin and 8-pin: 65 cm; nine0207
- Two PCI-E cables with two 6+2-pin connectors each: 55+12 cm.
- Three SATA cables for four connectors: 50+12+12+12 cm;
- One Molex cable 4-pin: 50+12+12+12 cm.
Appearance
The case is made of high-quality metal, covered with black powder paint, resistant to external influences.
On the back side, in addition to the usual power switch and power outlet, we see a button for switching fan operation modes. Two-thirds of the entire panel is perforated in the form of honeycombs. nine0199
The same perforation is on the bottom panel — an area with holes in the form of an octagon. In the center is a sticker with a silver logo of the manufacturer.
On the right side face there is a sticker with load characteristics.
On the left side, visible in the PC case, a relief in the form of the letter “C” is stamped and the PSU model is indicated.
On the front side there are connectors for connecting modular cables. The main ATX cable is divided into two blocks of 10 and 18 pins. Top row for 8-pin CPU and PCI-E headers. The bottom row for connecting cables of peripheral devices is made in the form of blocks for 5-pins in one row. nine0199
Cooling
11-bladed 135mm fan with hydrodynamic bearings. Marking — HA13525M12F-Z. Works at maximum speed 1500-1600 RPM.
There are two fan modes, both with semi-passive operation. In normal mode, the fan starts from a load of more than 40%, in our case from 300 W, quickly reaches high speeds.
In the second, hybrid, mode, the fan started up at a load of over 400 W and increased speed only to the maximum load. Throughout the entire range of rotation, the fan remains very quiet, at minimum speed it can be called silent (noise level is less than 32 dB). At maximum speed, it also remains within comfortable limits, no more than 40 dB.
nine0003
Circuitry
The power supply operates on the basis of a half-bridge LLC resonant converter in the primary circuit, a synchronous rectifier and a DC-DC converter in the secondary circuit.
A very popular modern circuit with high efficiency and voltage stability.
The EMI filter is soldered on the edge of the board, only two Y-capacitors are placed directly on the socket.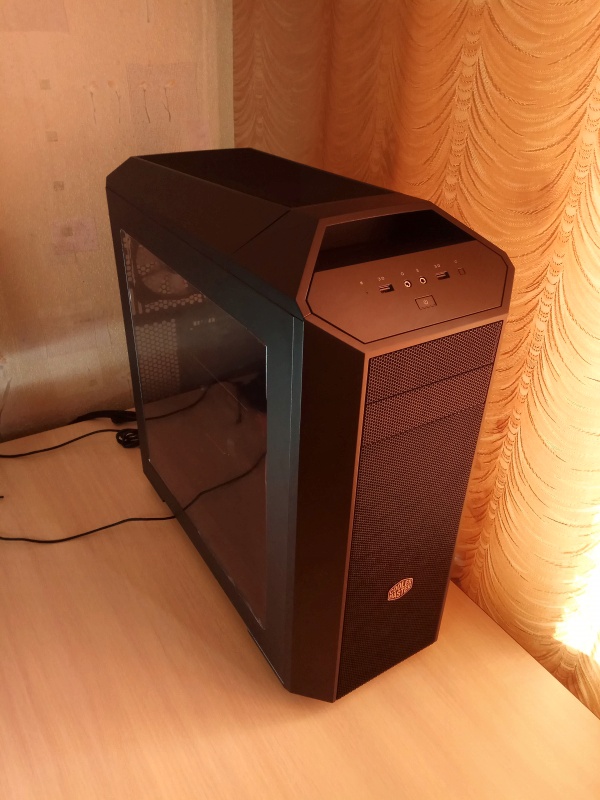
In total, the filter contains four Y- and four X-capacitors, as well as two chokes. nine0199
There is also protection for the PSU itself: a fuse and a varistor. On the back of the board there is an IC chip with resistors that is responsible for discharging the capacitors after a shutdown.
Two GBU diode assemblies are located on a common radiator with resonant converter mosfets.
On the extreme radiator there are APFC power elements: a diode and two mosfets. Due to the tight layout, it is impossible to read the marking of the power elements. The APFC inductor is large and wound with thick wire. nine0199
The CM8600 PWM control controller is located on the back of the board.
Nearby we see a massive jar of high-voltage capacitor from the Japanese company Toshin Kogyo. Capacitors from this manufacturer are rarely found in common power supplies. Capacity — 560 Mf, voltage — up to 450 V and temperature — up to 105 °C.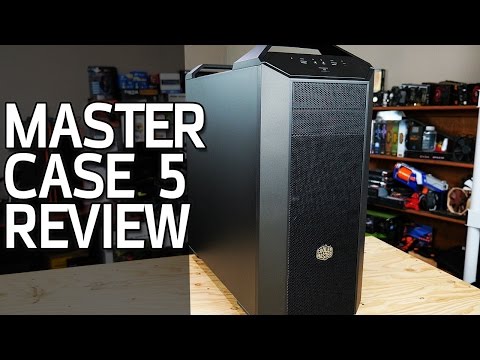
The transformer that forms the +12 V line is directly connected to the vertical board of this channel. nine0199
There are eight transistors on the board, cooled by their own heatsink, and an unmarked controller.
On a separate vertical board, a DC-DC converter: six 05N03NA mosfets, two PWM controllers and a couple of chokes.
A lot of electrolytic and solid capacitors are responsible for filtering noise at the output.
A large number of capacitors are placed directly on the modular board along the contour of the connectors. nine0199
On the reverse side of the board, we see neat soldering, the tracks are reinforced with solder. The APW7080 chip is also located here, which is responsible for all types of protection.
Testing
The test bench allows you to load the +12 V line in 100 W steps. The +3.3 V and +5 V lines were connected to a constant load of 50 W.
According to the requirements of the ATX12V standard, the deviation should not exceed 5%. Thus, the norm for the +12 V line lies in the range from +11.4 to +12.6 V.
nine0003
Deviations for minor lines fit within 1%. On the +12 V line, the deviations do not exceed 2%.
A very interesting behavior of the voltage depending on the load: at first it increases, then it starts to decrease.
The efficiency level fully complies with the 80 PLUS Gold standard for 230 V, the maximum 92% is demonstrated at a load in the range from 300 to 600 W. Below 90% efficiency does not decrease even at minimum load.
nine0003
The protection against short circuit and overload was also checked: if any of the lines were shorted, the power supply was safely turned off. Short-term load holds more than 850 watts without problems.
Conclusion
Cooler Master managed to create an excellent, high-quality and competitive product. The new version of the V Gold line is the ideal solution for building a gaming PC, especially with the existing models in white.