Asus Maximus VI Impact Review
Mini-ITX motherboards are becoming more and more popular nowadays. However, unlike the micro-ATX or full ATX motherboards, mini-ITX boards tend to become limited in terms of features and capabilities. Usually mini ITX motherboards are just entry level or mid-range boards, but Asus has pushed their mini ITX boards to the next level. Today, we are going to look at the Asus Maximus VI Impact, a high-end mini-ITX ROG (Republic of Gamers) motherboard based on the Intel Z87 Express chipset. The Maximus VI Impact is no ordinary board. It’s jam-packed with features that you wouldn’t think a mini-ITX board would have. The board is loaded with features like amazing and powerful audio, incredible power management and overclocking capability, and flexible connectivity options. Please continue reading my Asus Maximus VI Impact review below, and find out if this board is for you.
Asus Maximus VI Impact Review
The Asus Maximus VI Impact is a mini-ITX Z87 motherboard from the Republic of Gamers line. It’s a unique gaming motherboard, loaded with features that most gamers are looking for in a board. Its LGA1150 socket is compatible with all 4th Generation Intel Core Haswell processors.
Despite its small footprint, the Maximus VI Impact can deliver what most micro-ATX and ATX motherboards can in terms of performance. It features an 8+2 phase power design (8 for the CPU and 2 for the memory), with high overclocking potential. It also features 60A BlackWing chokes and 10K Black Metallic capacitors. The board is also capable of overclocking a DDR3 memory up to 3000 MHz+, and it also supports liquid nitrogen cooling for those extreme benchmarking sessions.
The Maximus VI Impact features a SupremeFX Impact audio processor featuring TI LM4562 Hi-Fi audio OP AMP, Sonic Radar and DTS Connect. It also has the mPCIe Combo II, just like in the Maximus VI Gene and Maximus VI Formula. But the Impact already comes with a Dual-band WiFi 802.11ac WiFi card with Bluetooth v4.0.
On the software side, the Asus Maximus VI Impact is bundled with software specifically designed for gamers and optimizing the system.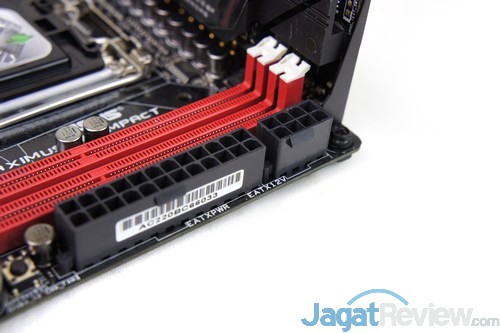 It features Asus’ Dual Intelligent Processor 4 with 4-Way optimization, optimizing your system with just one click of a button. It also has Sonic Radar dedicated to FPS gamers. But this feature is not allowed in tournaments since that would be cheating. It also features SSD Secure Erase (for securely erasing SSD) and ROG RAMDisk (for converting those unused memory to an ultra-fast storage drive). Both the SSD Secure and ROG RAMDisk are accessible via the Asus’ award winning UEFI BIOS.
I’ll discuss to you more of the features of this board as we take a closer look at the motherboard below. Below is also a detailed and complete specs of the Asus Maximus VI Impact.
Asus Maximus VI Impact Specifications
| Processor | Intel Socket 1150 for 4th Generation Core i7 / Core i5 / Core i3 / Pentium / Celeron Processors Supports Intel 22 nm CPU Supports Intel Turbo Boost Technology 2.0 |
| Chipset | Intel Z87 |
| Memory | 2 x DIMM, Max. 16GB, DDR3 3000(O.C.)/ 2933(O.C.)/ 2800(O.C.)/ 2666(O.C.)/ 2600(O.C.)/ 2400(O.C.)/ 2200(O.C.)/ 2133(O.C.)/ 2000(O.C.)/ 1866(O.C.)/ 1800(O.C.)/ 1600/ 1333 MHz Non-ECC, Un-buffered Memory 16GB, DDR3 3000(O.C.)/ 2933(O.C.)/ 2800(O.C.)/ 2666(O.C.)/ 2600(O.C.)/ 2400(O.C.)/ 2200(O.C.)/ 2133(O.C.)/ 2000(O.C.)/ 1866(O.C.)/ 1800(O.C.)/ 1600/ 1333 MHz Non-ECC, Un-buffered MemoryDual Channel Memory Architecture Supports Intel Extreme Memory Profile (XMP) |
| Graphic | Integrated Graphics Processor Multi-VGA output support : HDMI/DisplayPort ports — Supports HDMI with max. resolution 4096 x 2160 @ 24 Hz / 2560 x 1600 @ 60 Hz — Supports DisplayPort with max. resolution 4096 x 2160 @ 24 Hz / 3840 x 2160 @ 60 Hz Supports Intel InTru 3D, Quick Sync Video, Clear Video HD Technology, Insider |
| Expansion Slots | 1 x PCIe 3.0/2.0 x16 1 x mini-PCIe 2.0 x1 |
| Storage | Intel Z87 chipset : 4 x SATA 6Gb/s port(s), red Support Raid 0, 1, 5, 10 Supports Intel Smart Response Technology, Intel Rapid Start Technology, Intel Smart Connect Technology Intel Z87 chipset : 1 x eSATA port(s), red Intel Z87 chipset : 1 x M. 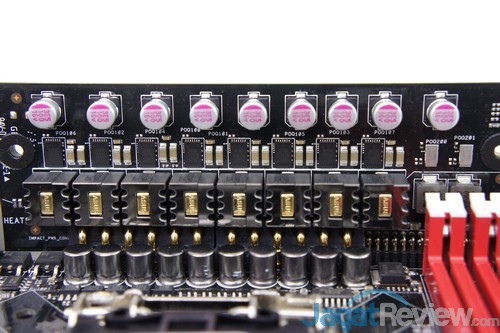 2 (NGFF) Socket 2 on mPCIe Combo II expansion card(s), black 2 (NGFF) Socket 2 on mPCIe Combo II expansion card(s), blackSupport M.2 (NGFF) Type 2242/2260/2280/22110 SSD card (up to 110mm in length), support PCI express 2.0 x1 and SATA 6Gb/s standards |
| LAN | Intel I217V, 1 x Gigabit LAN Controller(s) |
| Wireless Data Network | Wi-Fi 802.11a/b/g/n/ac Supports dual band frequency 2.4/5 GHz |
| Bluetooth | Bluetooth V4.0 Bluetooth V3.0+HS |
| Audio | ROG SupremeFX Impact 8-Channel High Definition Audio CODEC — Supports : Jack-detection, Multi-streaming, Front Panel Jack-retasking — Lineout DAC playback Signal-to-Noise Ratio (A-weighted, Differential output): 115 dB — Headphone DAC playback Signal-to-Noise Ratio (A-weighted, Differential output):110 dB — TI LM4562 high-fidelity audio OP AMP(s) Audio Feature : — SupremeFX Shielding™ Technology — ELNA premium audio capacitors — Blu-ray audio layer Content Protection — Sonic Radar — DTS Connect — Optical S/PDIF out port(s) at back panel — Music PnP |
| USB Ports | Intel Z87 chipset : 6 x USB 3. 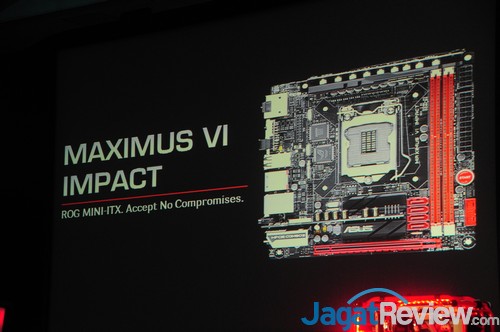 0 port(s) (4 at back panel, blue, 2 at mid-board) 0 port(s) (4 at back panel, blue, 2 at mid-board)Intel Z87 chipset : 6 x USB 2.0 port(s) (4 at back panel, black, 2 at mid-board) |
| ROG Exclusive Features | SupremeFX Impact mPCIe Combo II (mPCIe/M.2 combo card) Impact Power : — 8 + 2 phase power design — 60A BlackWing Chokes — 10K Black Metallic Capacitors ProbeIt UEFI BIOS features : — ROG BIOS Print — GPU.DIMM Post — Tweakers’ Paradise — ROG SSD Secure Erase ROG RAMDisk GameFirst II Extreme Tweaker |
| Special Features | ASUS Dual Intelligent Processors 4 with 4-Way Optimization : — The tuning key perfectly consolidates ASUS-exclusive DIGI+ Power Control, TPU, EPU, and Fan Xpert 2 optimize the digital power setting, system performance, power saving and whole system cooling configuration CPU Level Up ASUS Wi-Fi GO! — Wi-Fi GO! Function: Cloud GO!, Media Streaming Hub, Smart Sensor Control, Remote Desktop, Remote Keyboard & Mouse, File Transfer, Capture & Send — Wi-Fi Engine for network sharing and connection: Client Mode, AP Mode ASUS Exclusive Features : — USB BIOS Flashback — MemOK! — AI Suite 3 — Ai Charger — USB Charger+ — USB 3.  0 Boost 0 Boost— Disk Unlocker ASUS EZ DIY : — ASUS O.C. Profile — ASUS CrashFree BIOS 3 — ASUS EZ Flash 2 ASUS Q-Design : — ASUS Q-Shield — ASUS Q-Cable — ASUS Q-Code — ASUS Q-LED (CPU, DRAM, VGA, Boot Device LED) — ASUS Q-DIMM Overclocking Protection : — ASUS C.P.R.(CPU Parameter Recall) |
| Operating System Support | Windows 8 Windows 7 |
| Back I/O Ports | 1x DisplayPort 1x HDMI 1x eSATA 1x LAN (RJ45) port(s) 4x USB 3.0 (blue) 4x USB 2.0 1x Optical S/PDIF out 3x Audio jack(s) 1x Clear CMOS button(s) 1x ROG Connect On/ Off switch(es) 1x Q-Code LED 1x DirectKey button 1x MemOK! button |
| Internal I/O Ports | 1x USB 3.0 connector(s) support(s) additional 2 USB 3.0 port(s) 1x USB 2.0 connector(s) support(s) additional 2 USB 2.0 port(s) 1x TPM connector(s) 4x SATA 6Gb/s connector(s) 1x CPU Fan connector(s) 3x Chassis Fan connector(s) 1x 8-pin EATX 12 V Power connector 1x 24-pin EATX Power connector(s) 1x Front panel audio connector(s) (AAFP) 1x System panel(s) 1x DRCT header(s) 10x ProbeIt Measurement Points 1x Power-on button(s) 1x Reset button(s) 1x LN2 Mode jumper(s) 1x FastBoot jumper(s) 1x SupremeFX Impact connector(s) 1x ROG extension (ROG_EXT) header(s) 1x mPCIe Combo II connector(s) |
| Accessories | User’s manual 1 x ASUS Q-Cable 1 x SupremeFX Impact audio card(s) 1 x Optional 4-in-1 washers for CPU cooler backplate I/O Shield 4 x SATA 6Gb/s cable(s) 1 x ASUS 2T2R dual band Wi-Fi moving antennas (Wi-Fi 802.  11a/b/g/n/ac compliant) 11a/b/g/n/ac compliant)1 x 12 in 1 ROG Cable Label(s) 1 x mPCIe Combo II card(s) with dual-band WiFi 802.11 a/b/g/n/ac + Bluetooth v4.0/3.0+HS module |
| BIOS | 64Mb UEFI AMI BIOS, PnP, DMI2.7, WfM2.0, SM BIOS 2.7, ACPI5.0a Multi-Language BIOS |
| Manageability | WfM 2.0, DMI 2.7, WOL by PME, PXE |
| Support Disc | Drivers ROG GameFirst II ROG RAMDisk ROG CPU-Z ROG Mem TweakIt Kaspersky® Anti-Virus DAEMON Tools Pro Standard ASUS WebStorage ASUS Utilities |
| Form Factor | Mini ITX Form Factor 6.7 inch x 6.7 inch ( 17 cm x 17 cm ) |
Asus Maximus VI Impact: A Closer Look
The Asus Maximus VI Impact comes in a nice ROG-themed small box. A really small box. Behind you will see partial specifications of the Impact.
The box also has a flip covering, where you can see the highlighted features of the motherboard.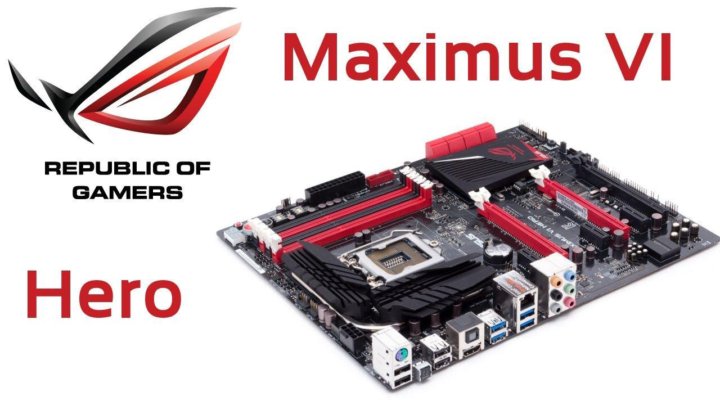
Opening the box reveals the Maximus VI Impact covered with a plastic covering for protection. As you can see, the size of the box is just slightly bigger than the board itself.
The picture above shows the contents of the box. You will get a user guide, a driver and software CD, quick installation guide, the SupremeFX Impact audio card, I/O shielding, mPCIE II Combo card with WiFi 802.11ac + BT 4.0 card, a WiFi antenna, 4x SATA cables (shorter in length), Q cable and some ROG sticker label.
Above is a photo of the ASUS 2T2R dual band Wi-Fi moving antennas, which is Wi-Fi 802.11a/b/g/n/ac compliant. You only need to twist the lower portion to make it stand.
Above is a closer look at the SupremeFX Impact. The card is able to deliver 115dB SNR (signal-to-noise ratio) audio, features premium ENLA audio capacitors and SupremeFX shielding with EMI cover. Since the card itself is physically separated from the motherboard, it can produce cleaner signal and audio quality compared to the ones that are onboard.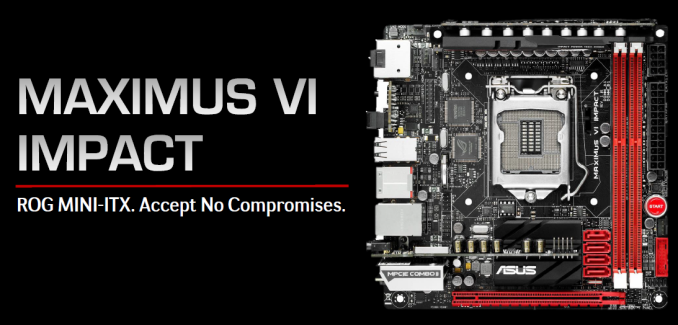 The SupremeFX also has a feature enabling the Impact to act as an amplifier for mobile devices.
Above is a photo of the mPCIe Combo II card, with dual-band WiFi 802.11 a/b/g/n/ac + Bluetooth v4.0/3.0+HS module.
Above is a photo of the mPCIe Combo II without the covering. The card supports M.2 NGFF SSD, but I was not able to test its performance since it’s still very hard to get an M.2 NGFF SSD at the moment. However I don’t expect the M.2 slot in the Impact to perform as fast as the onboard M.2 PCIE slots we see in the new Z97 and H97 motherboards. This one is limited to a single PCIe lane of 1x speed, where 500MB/s is pretty much the limit.
Here we have a bird’s eye view of the front and back of the Asus Maximus VI Impact. As you can see the board itself is really small (as expected from a mini-ITX). The 8pin and 24-pin power connectors are located beside the DIMM slots, since a vertical daughterboard (where the chokes and capacitors are located) is occupying that space.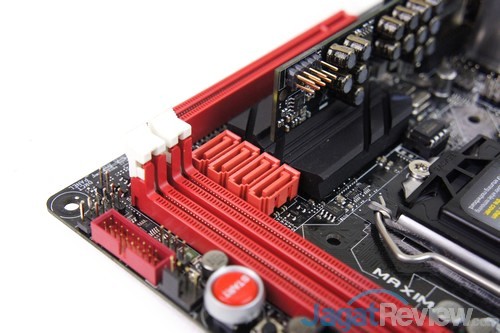
At the back of the Asus Maximus VI Impact you will find an Optical S/PDIF out port, an HDMI port, a DisplayPort, Debug LED, MemOK and CMOS reset button, DirectKey button, ROG Connect On/ Off switch, four USB 2.0 ports, four USB 3.0 ports, an eSATA port and an Intel Ethernet LAN port. Where are the audio ports? It’s with the SupremeFX Impact which I haven’t installed when I took the picture.
Basically the board itself is pretty compact. But there is one thing that I didn’t like about this board. I find it somewhat difficult to connect and disconnect SATA cables due to how the four SATA ports are placed together. If your SATA cables have locks (like the ones included in this package), you can’t easily remove the first cable from the top, without removing the others. I find it also difficult to remove a graphics card without removing the memory which is placed closely to the lock of the PCIE x16 slot.
Above is a closer look of the LGA 1150 socket along with other onboard chips and headers.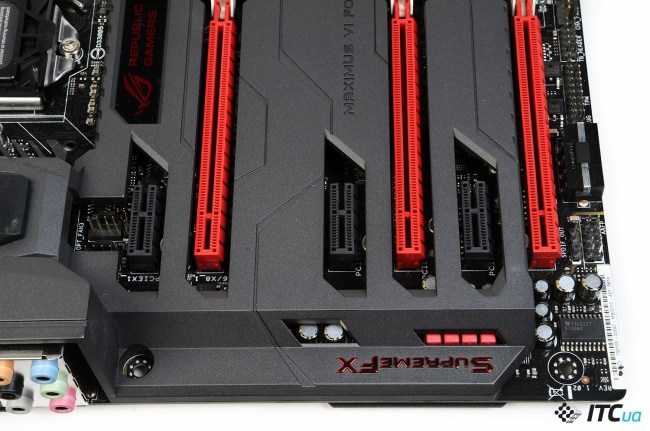 While the other picture reveals the Black Wing chokes, Capacitors and MOSFETs.
Asus Maximus VI Impact UEFI BIOS
Below are screenshots of the UEFI BIOS of the Maximus VI Impact. You will also see the same ROG BIOS on M6 Hero, Gene, Formula and Extreme models.
Asus Maximus VI Impact Software
The Asus Maximus VI Impact comes with bundled software which you can use to improve your system, improve your gaming experience and have a better control of your system. The software included are AI Suite III, ROG GameFirst II, Sonic Radar, ROG RAMDisk, ROG-themed CPU-Z, ROG-themed Mem TweakIt and ASUS WebStorage. The CD also includes Kaspersky Anti-Virus and DAEMON Tools Pro Standard. Below is a screenshot of the AI Suite III and Sonic Radar.
Test Setup
In testing the Asus Maximus VI Impact, I used an Intel Core i7-4770K processor, a 16GB Kingston HyperX Beast DDR3-2400, and an Asus ROG Striker GTX 760 Platinum. The rest of the components used to test the board are listed below.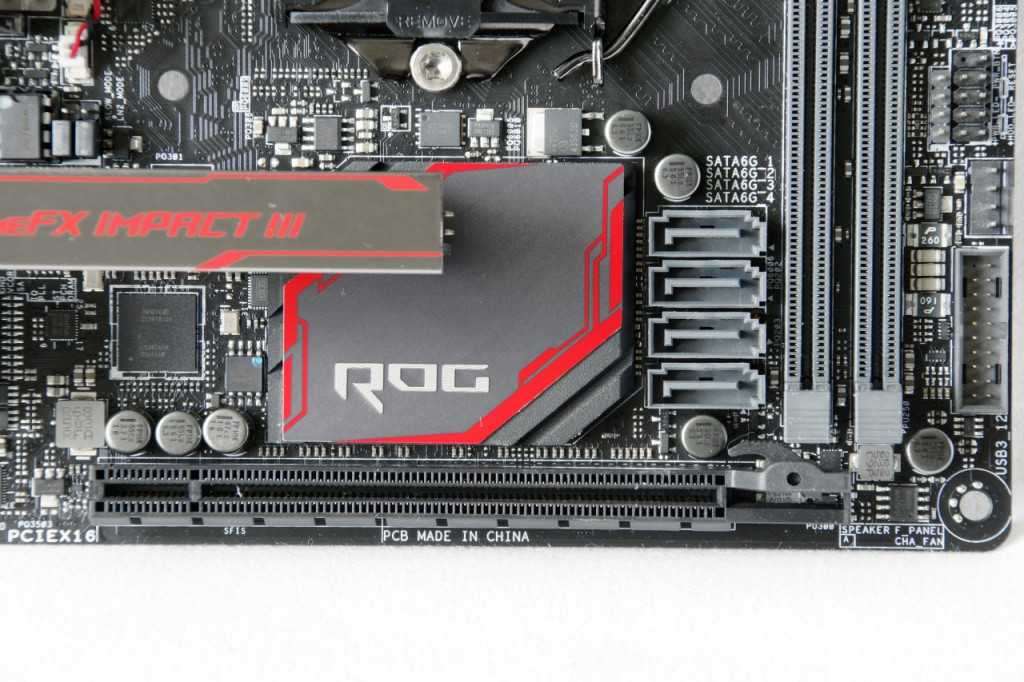
Operating System: Windows 8 Pro 64bit
Motherboard: Asus Maximus VI Impact
Processor: Intel Core i7-4770K
CPU Cooler: Corsair Hydro h205
Memory: Kingston HyperX Beast DDR3-2400 16GB
Graphics card: Asus ROG Striker GTX 760 Platinum 4GB
Hard Drive: ADATA XPG SX900 256GB for the OS and WD RE 4TB for game files
Power Supply: Corsair HX650 80 Plus Gold
Case: Cooler Master HAF XM
Case Fans Installed: 2x Cooler Master SickleFlow 120mm for intake and a Noctua NF-S12A PWM for exhaust
I also used AIDA64, Super Pi, CPU-Z, Asus RealBench 2.0, SiSoftware Sandra 2014, and CineBench R15. For game benchmarks I used Final Fantasy XIV A Realm Reborn Character Creation Benchmark, 3DMark 11, 3DMark Firestrike and Firestrike Extreme, Unigine Engine Heaven and Valley benchmarks, and several games like Crysis 3.
Please also take note that the motherboard’s performance is as good as the other components you install on it. Don’t expect that because of the Impact your system will perform ultra-fast, even if you installed entry level components. Don’t expect also that the other components will perform more than what they are expected just because you installed them on a high-end motherboard like this one.
But installing your components on high end motherboards, like the Impact, does offer an overall better system performance and stability.
Overclocking
One of the things that we usually think about mini-ITX motherboards is that they don’t overclock well. And they don’t have what it takes to handle high end components. But not the Maximus VI Impact. I’m no overclocking guru or tweak master, but I was able to overclock the i7-4770K to 4.6GHz easily, and pushed it even further to 4.7GHz. I also managed to overclock the Kingston HyperX beyond its 2600MHz speed.
Like I said, I’m no overclocking guru and I bet the motherboard could still push it further. The Maximus VI Impact supports L2N or liquid nitrogen cooling for extreme overclocking. Not many mini-ITX boards can do this. In fact, I think this is the only mini-ITX board with L2N support.
Asus Maximus VI Impact Benchmark Results
Below are the benchmark results I got while testing the motherboard.
Price and Availability
The Asus Maximus VI Impact is widely available right now for only $229 here. Since, the new Z97 motherboards are starting to replace the Z87s, and most probably its predecessor (the Maximus VII Impact), is on its way, we should be expecting to see a price drop anytime soon. Just continue to visit the link and it should give you the current price.
There is also a non ROG version of this – the Asus Z87I Deluxe which currently sells for a much cheaper price of $187 only. If you are planning to build a mini-ITX system or gaming machine and you feel that you really don’t need all those ROG features.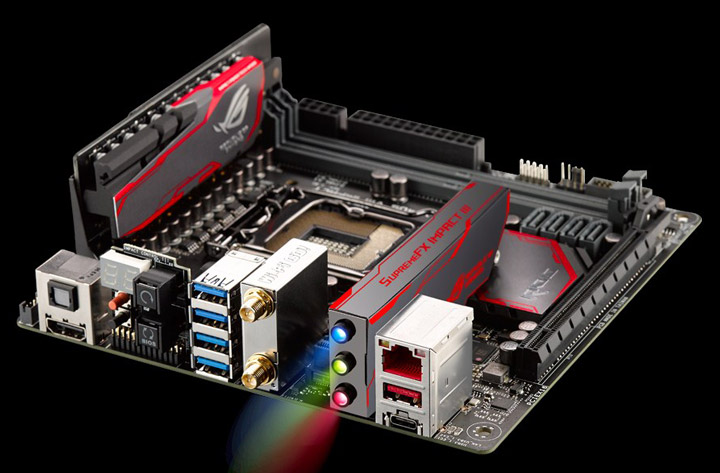 The Asus Z87I Deluxe is your best alternative.
Asus Maximus VI Impact Review: Conclusion
Based on my experience with the Asus Maximus VI Impact, there is no doubt that Asus has brought high performance computing into a smaller form factor. It’s true that the Impact might be limited in terms of connectivity options, SATA ports, PCIE slots and etc compared to a micro ATX motherboard. But despite its size, it can compete even with ATX motherboards in terms of performance, overclocking capability and functionality.
The Impact is also expensive compared to other mini-ITX motherboards, but you get what you pay for. And the Impact is just loaded with all those features. If there is one thing that I didn’t like about the Impact, it is how the SATA ports are placed. It’s literally impossible to remove the first SATA cable without removing the rest of the cables (starting from the fourth cable), specially if all the SATA cables have a lock. It’s also hard to remove a graphics card, specially if the graphics card is long and has completely covered the lock on the PCIE slot.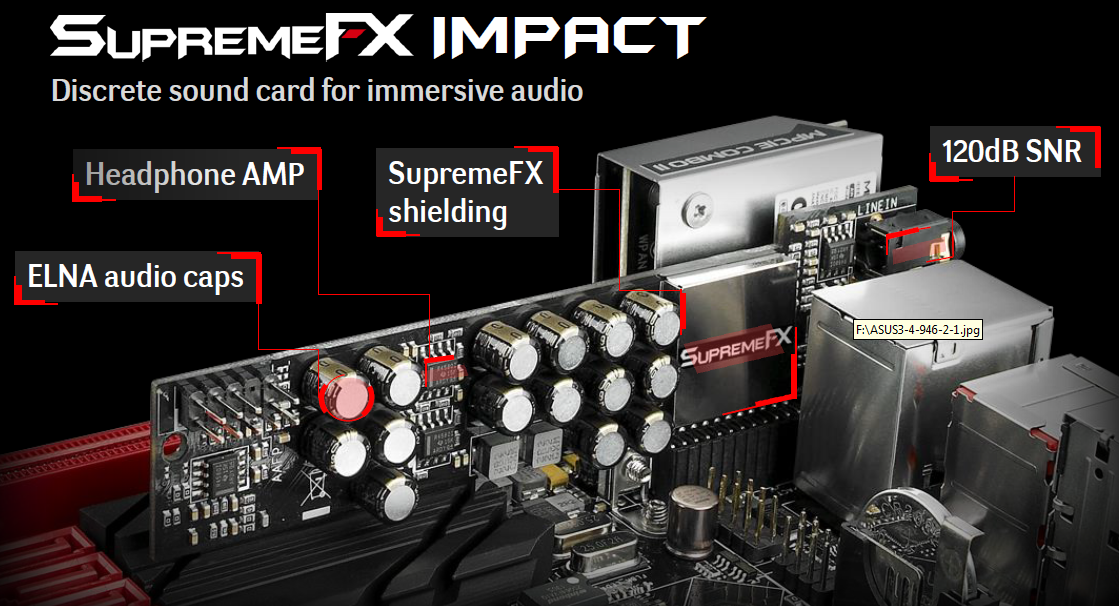 Other than that, I can’t find any reason why not to like the Maximus VI Impact.
Now that the Z97 motherboards are here, and you might think that this review is definitely late already. But it does not mean that you should scratch the Impact from your options list while building a mini-ITX system. I’ve seen the Asus Z97I-Plus and I think it’s nowhere near the performance of the Impact or even its predecessor, the Z87I Deluxe. The only motherboard that I can think of that could probably defeat the Impact is its successor – the Maximus VII Impact. Unfortunately, Asus hasn’t revealed it yet and we don’t know when. Probably next week during Computex 2014.
If you’re not one of those people who would always want to get what is the latest on the market, the Asus Maximus VI Impact is still very much capable of performing; specially if paired with other high performance components like a Core i7-4770K, a GTX 780 Ti and a high performance memory.
The Asus Maximus VI Impact (although a bit expensive) is a small beast and is able to deliver what most ATX motherboards can in terms of performance.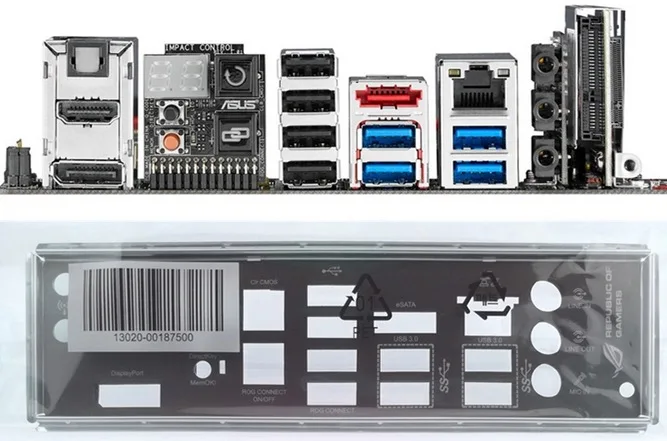 It’s the best and fully featured mini-ITX motherboard I’ve seen so far (perfect for enthusiasts and gamers), and this board definitely deserves the PC Enthusiast’s Editor’s Choice Award.
Asus Maximus VI Impact Review
Click to enlarge
Manufacturer:Asus
UK price (as reviewed):£169.99 (inc VAT)
US price (as reviewed):$224.99 (ex TAX)
Every now and then we get to look at products that make our ears deaf to the cries coming from our wallets and are so swoon-worthy that they make every other product in their category, in this case mini-ITX motherboards, pale in comparison. This is certainly true of the first Asus Republic of Gamers mini-ITX motherboard — the Maximus VI Impact, which we heard rumours about early this year from a contact at the company.
At the time we weren’t sure if Intel’s LGA1150 socket would be the landing pad for this fascinating product but when we saw the first images prior to the launch of Z87-based motherboards earlier this year, our hopes were confirmed.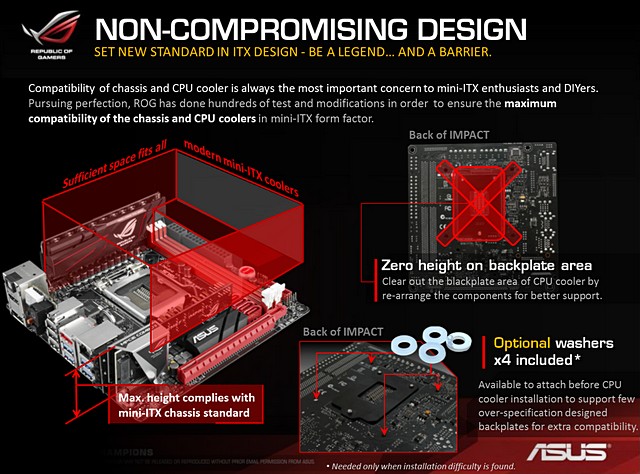 Apart from the fantastic looks and ROG pedigree, the Maximus VI Impact proved one thing — mini-ITX motherboards are here to stay and the worlds biggest motherboard manufacturer had pledged its ongoing support for enthusiast-orientated products in the dinky board category following the successful P8Z77-i Deluxe.
Of course part of the compromise for bagging an ROG-branded product is usually a hefty price tag. Initial launch prices had the Maximus VI Impact retailing for closer to £200 but can now readily be found for less than £170. Even so, it’s one of the most expensive mini-ITX motherboards we’ve ever seen and actually costs more than its micro-ATX sibling, the Maximus VI Gene, which sports extra PCI-E slots for sound cards and the like as well as supporting CrossFireX and SLI — usually the sticking point for those torn between a small or smaller system.
While the lack of PCI-E slots in addition to the main 16 x PCI-E 3.0 slot is a bitter pill to swallow for discrete sound card lovers, Asus has taken one giant leap towards appeasing you with what is essentially a discrete sound card attached at right angles to the main board PCB. This offers electronic shielding as a result, and the addition of TI LM4562 high-fidelity audio OP AMPs, 110dB SNR on the headphone DAC and 115dB SNR on the lineout jack mean that it’s not likely to fall too far short of your average mid-range sound card and is hopefully going to be noticeably better than your bog standard Realtek embedded offerings.
Click to enlarge
USB ports are fairly well catered for, although there’s only four at the rear panel backed up by another four USB 2.0, so this should should be ample for most scenarios. As per usual, there’s a USB 3.0 header on the PCB adding a further two USB 3.0 ports but sadly no breakout bracket to use it is included in the box, although most mini-ITX cases cater for this nowadays with front panel connectors.
Click to enlarge
However, the price tag isn’t totally unjustified. You get four SATA 6Gbps ports, all powered by the Intel Z87 chipset, as is an eSATA port on the rear I/O panel. These support RAID 0,1,5 or 10. New with some Z87 ROG boards is the mini PCI-E Combo II expansion card that supports M.2 SSDs, several of which are beginning to filter into retail channels from the likes of Intel and SanDisk. We do question how many enthusiasts would go this route, considering the extra cost, but at least the option’s there.
Dual-band WiFi and Bluetooth bring up the rear on communication devices, but of course there’s plenty more of note on the PCB. There are power and reset buttons, Probelt measurement points plus an LN2 mode jumper (mini-ITX extreme overclocking anyone?), and the rear panel has even more goodies such as a CMOS clear button, ROG connect switches and even an LED POST code readout. In short, the amount of features crammed into the PCB and indeed the rear I/O panel is staggering.
Click to enlarge
Despite this, the PCB is still impeccably laid-out with both the 8-pin EPS 12V connector and 24-pin ATX connector slap bang next to each other at the edge of the PCB as is the USB 3. 0 header while most of the fan headers are too. The CPU socket area is obviously a little constrained at lower levels thanks to the VRM daughterboard and sound card PCB, however for most tower coolers and waterblocks there shouldn’t be too many issues.
Speaking of waterblocks, for those of you considering dabbling with h30 and the Maximus VI Impact, Bitspower has a full-cover waterblock for it, similar to the one we reviewed for the Asus P8Z77-I Deluxe.
Specifications
- Chipset Intel Z87
- CPU support LGA1150 compatible
- Memory support 2 slots: max 32GB
- Sound ROG SupremeFX 8-Channel
- Networking Intel I217V Gigabit LAN, Dual-band WiFi 802. 11a/b/g/n/ac, Bluetooth 3.0+HS and 4.0
- Ports 4 x SATA 6Gbps via Intel Z87, 6 x USB 3.0 (2 x via header), 6 x USB 2.0 ( 2 x via header), 1 x LAN, audio out, line in, mic, Optical S/PDIF out, HDMI, DisplayPort, eSATA
- Dimensions (mm) 170 x 170 (mini-ITX)
- Extras WiFi Antennas, USB 3 breakout bracket
1 — Asus Maximus VI Impact Review2 — Asus Maximus VI Impact Review — Test Setup3 — Asus Maximus VI Impact — Image Editing and Video Encoding4 — Asus Maximus VI Impact Review — Multi-tasking and Overall Performance5 — Asus Maximus VI Impact Review — Gaming Performance6 — Asus Maximus VI Impact Review — SATA Performance and Power Consumption7 — Asus Maximus VI Impact Review — Overclocking, Analysis and Conclusion
Review and testing ASUS Maximus VI Formula
This article had a different introduction, but before submitting the material, an event occurred that forced me to rewrite it. This event, figuratively speaking, closes a whole chapter in the development of motherboards for enthusiasts — Peter Tan , known by his nickname Shamino , decided to leave the IT sphere. There are a lot of glorious names in the world of enthusiasts, but, in general, the modern generation of top overclockers calls three names their leaders: Taiwanese Shamino, American kingp|n and Greek hipro5. hipro5 was the first to leave the overclocking scene, but sometimes he still visits specialized forums and makes fun of others — and at one time he did not leave the top lines of the ratings and was known for his fantastic ideas for modifications to iron, which years later were put «on stream» by everyone us. Now it’s time for Shamino — he’s leaving Asus ROG’s development team, where he helped Asus create brilliant motherboards from the fifth and sixth line of Maximus (and before that he was the inspiration for Foxconn BlackOps and EVGA X58 Classified).
One of the creations of the Taiwanese genius came to my review — the motherboard manufactured by Asus, related to their top Republic of Gamers series — Maximus VI Formula . Not only does the board belong to the top line, but it ranks second from the top already within this top line — there are five boards in the ROG line based on the Z87 chipset: the older Maximus VI Extreme, my guest Maximus VI Formula, the small Maximus VI Gene, game Maximus VI Hero and miniature Maximus Impact.
Packaging, appearance and contents
To our great regret, the photos taken before testing the board were irretrievably lost
. The board had to be photographed again, but after tests with extreme overclocking,
which could not but affect the photos — there are traces of pink insulation on the board. Note. ed.
The motherboard comes in a moderately large box, designed in the now familiar Republic of Gamers style:
As you can see from the photo, the board is equipped with a hinged cover, under which you can see the motherboard packed in a box.
Opening the box, we see two box-cases, one of which contains the motherboard, the second contains the delivery kit.
The scope of delivery is quite consistent with the status of the motherboard:
- Instruction manual
- IO plug for rear panel
- 8 x SATA 6Gb/s
- 1 x ASUS 2T2R Dual Band WiFI Antenna (Wi-Fi Versions 802.11a/b/g/n/ac)
- 1 x SLI bridge
- 1 x Q-connector adapter kit (for simplified connection of front case panel buttons/lights to motherboard)
- 1 x set of 12 ROG cable tags (for avoiding wire tangles)
- 1 x mPCIe Combo II Dual Band WiFi 802.11 a/b/g/n/ac + Bluetooth v4.0/3.0+HS
- 1 x door plate ROG
The board immediately catches the eye with its unusual appearance. If earlier only Asus boards from the ultimate TUF line could boast of “armor”, today’s heroine has become the first board from the ROG line to try on ROG Armor — a special casing that, in addition to a decorative function, also performs the function of distributing surface air flows in order to optimization of cooling of key components. For the first time I came across such a solution on the Sabertooth P67 and after a close acquaintance with the technology I could not say anything bad about it — I won’t say this time either, the board does not overheat.
It is noteworthy that in addition to the shroud on the front, the board also has a metal (which is important!) backplate. This approach allows you to get rid of the fear of using the motherboard in an open stand — the board can be safely moved around the table without fear of damaging the tracks and without thinking that some kind of metal rubbish (for example, a screwdriver bit), rolling under the board, will close all sorts of importance. Another nice bonus is the fact that the backplate contacts the elements of the power converter through thermal pads — on many boards, even expensive ones, such elements do not come into contact with anything.
The processor power converter is built according to the classic 8-phase scheme for Asus. Taking into account the innovations that Haswell processors have brought with them, the solution is more than sufficient — offhand you can immediately estimate that the power system can feed the processor no less than 1 kW (for a “combat” Vrin 2.5v, only 400 A is required from all 8 phases , 50A per phase, which is more than possible for branded BlackWing chokes with a nominal value of 60A), although such figures for the power consumed by the processor will frighten even the developers of nuclear power plants. You can mention the use of new NexFET power transistors and 10K capacitors — but I won’t, it’s more like a marketing husk for really high-quality hardware.
The memory power converter is built according to a 2-phase scheme and is also not a revelation for top-end Asus products — everything, as always, is of high quality and in moderation.
The board is equipped with 4 DDR3 memory slots, two memory slots per channel. Promised support for memory operating at frequencies far beyond 3GHz in dual-channel mode. I checked — it works.
On the same top of the board is a dedicated connector for the bundled mPCIE board, which provides WiFi functionality and offers a mini PCI Express 2.0 format slot for connecting a particularly fast compact SSD. In the conditions of the apartment, WiFI worked fine, I especially liked the opportunity to position the WiFi antenna in the most convenient way to get a high-quality signal — note to lovers of the neighbor’s Internet))
For video game lovers, the board offers three full-size PCI-E slots, which will allow organizing the video subsystem as follows:
- One card in top slot, in x16 mode
- Two cards in the top two slots, each in x8 mode
- Three cards in three red slots, in x8/x4/x4 mode respectively
I foresee an outcry about x4 with three cards, but I must say that this will most often be enough. The absence of a dedicated splitter bridge will benefit 3D applications that are sensitive to PCIE latency — and there are many such applications. In general, I checked the CrossFire configuration based on 4870×2 + 4870 (respectively, red slots 2 and 3 were used for x8/x4 mode and red slots 1 and 2 for x8/x8 mode) — and, honestly pioneering, I did not notice the difference.
The back panel of the motherboard is quite in line with the trends of the time and the stuffing of the board:
- 1 x DisplayPort (maximum 4096 x 2160 @ 24 Hz / 3840 x 2160 @ 60 Hz)
- 1 x HDMI (maximum 4096 x 2160 @ 24 Hz / 2560 x 1600 @ 60 Hz)
- 1 x LAN (RJ45)
- 6 x USB 3.0 (blue) — it should be noted that 2 ports are implemented by the Z87 chipset, 4 ports are implemented by the additional ASMedia
- 4 x USB 2.0 (all implemented by the chipset, 4 more chipset ports can be found in the block on the motherboard)
- 1 x Optical S/PDIF out
- 6 x Audio
- 1 x Clear CMOS (for resetting settings made in UEFI)
- 1 x ROG Connect On/Off (to enable/disable ROG Connect functionality and BIOS disaster recovery technology)
controller
On this motherboard, it is quite possible to assemble a home file server — “pirate schooner of a pirate of the XXI century”, because the board offers as many as 10 SATA 6 Gb / s ports — 6 ports are implemented by the chipset (and they can be combined into RAID 0/1/ 5/10), 4 more slots implemented by controller ASMedia® ASM1061 . It should be noted that when using an mPCIE card to connect an SSD, port #5 will be disabled. Another important nuance is that ATAPI devices, such as a BD-ROM cutter, must be connected to the chipset port — the ASMedia controller does not support ATAPI.
The audio subsystem of this motherboard is another pride of marketers for the ROG engineering department — a mind-blowing 120dB signal-to-noise ratio is promised. The board is equipped with a built-in amplifier Texas Instruments TPA6120A2 for headphones up to 600 ohms the board should shake even the coolest headphones. The component base and the engineering solutions used, judging by the description, are more than worthy — here is the physical isolation of the board from interference sources, the separation of the «ground» and the use of an electromagnetic interference shield, the use of audiophile components like ELNA and WIMA capacitors, Cirrus Logic® CS4398 DAC . I checked the sound on the YouTube recording of Dima Bilan’s concert, made on the phone — and became a fan of Bilan.
By the way, another proprietary technology offered by the motherboard is connected with sound — Sonic Radar helps gamers to determine the source of the sound and deploy the plasmagun on the adversary as soon as possible. “Cheaters!”, you might think. “Asus)))”, the gamer will think.
And finally, about the cooling system. A powerful CrossChill power radiator is located on the power converter, which is quite sufficient in itself — but it is offered as an option to be included in the water cooling circuit, for which it has holes for standard G1 / 4 fittings. My opinion is that dropsy is in fact not needed — as will be indicated below in the text, even without airflow, the radiator does not heat up. Although such a beauty as Maximus VI Formula , a beautiful CBO in the system for modding will be quite to the face. The chipset has a huge passive heatsink, which is also more than enough.
Of the other goodies, I will mention the availability:
- 3 more slots PCI-E x1 version 2.
0,
- USB 3.0 socket for connecting two more connectors to the front panel
- three thermocouple connectors (thermocouples can be placed where desired)
- as many as 8 fan connectors
- voltage measurement points with multimeter
- power button, reset button
- Mem!OK button (to solve capricious memory problems)
- Fastboot switch (speeds up POST)
- Connector for OC Panel (available separately)
In general, finishing the description of the appearance, I will say the following — it is difficult to present something to the board. The equipment is quite sufficient, the functionality is just crazy, the performance is on top. On that positive note, it’s time to move on to the settings.
ASUS UEFI — galloping across Europe
In general, there are practically no differences between the UEFI interface previously reviewed on our website Maximus VI Extreme and the reviewed Maximus VI Formula — I recommend that you read the UEFI review at the following link. I will pay attention to a number of points that even I, a person with sufficient experience, at first caused amazement and point out a couple of minor differences between Extreme and Formula.
So, drum roll! The only difference that I can name offhand is not in favor of the more expensive Extreme. Formula can monitor the temperature of the power system at 3 points, while Extreme does not.
Another logical difference from Extreme will be a slightly different look of the GPU menu. DIMM post — of course, a different configuration of PCI-E slots leads to differences. Of course, in the same vein, differences are expected in the settings related to the operation of PCI-E (in which protocol they work, etc.).
The rest of the boards are twins. Those. we fully retain all the overclocking, tuning and monitoring capabilities inherent in the top board of the line. By the way, here are the parameters that can be monitored through UEFI:
The
UEFI shell also offers some nice features. For example, securely erasing an SSD (this can be useful for both the paranoid and those who have purchased an SSD with a poorly performing TRIM function — completely erasing the SSD via Secure Erase will restore the SSD performance to factory specifications, though not for long):
In addition, the board offers the opportunity to learn in detail about the capabilities of freshly purchased memory by showing you the data from the XMP profile:
The board, as is customary today, can work in two modes. I have already given screenshots of the standard mode above, but here is what the EZ Mode looks like:
Just like in the UEFI high-end board, you can keep a kind of notebook — save your ideas and thoughts about overclocking «on the spot»:
Well, now about the main thing, because «the devil is in the details.» Below the list I will give my comments / observations on a number of parameters that raise a number of questions from users.
CPU Core Ratio — in Sync All Cores mode, all cores will have the same multiplier. In Per Core mode, you can configure how TurboBoost works — what multiplier will be used for cores with a corresponding load of 1/2/3/4 cores. I often meet with the delusion that here you can adjust the multiplier of each individual core.
Fully Manual Mode — I would recommend leaving this item disabled until you are sure it is necessary. With the enabled position, it becomes possible to activate two items:
- Max Vcore — when Enabled, the voltage Vrin will be «thrown» on the processor cores. This is a guaranteed death of the processor with any non-extreme cooling. With extreme cooling (liquid nitrogen, dry ice, cascade freon), it makes sense to turn on this function only for Haswell engineering samples — only they love and can work at voltages above 1.95th century
- Max Cache Voltage — when Enabled, the Vrin voltage will be “thrown” to the processor ring bus.
This is a guaranteed death of the processor with any non-extreme cooling. With extreme cooling (liquid nitrogen, dry ice, cascade freon), it makes sense to turn on this function only for Haswell engineering samples — only they love and can work at voltages above 1.95V.
BCLK Recovery – if set to Enabled, the board will reset the BCLK frequency after an unsuccessful start attempt; if set to Disabled, the board will try to start at an unstable BCLK frequency several times. If set to Ignore, the board will ignore the BCLK settings, always starting up as if no BCLK settings were made.
Initial CPU Input Voltage — voltage set by the processor power converter at the POST stage. Sometimes it may make sense to set it slightly higher than the “combat” one — to make it easier for the processor to “start up”.
Eventual CPU Input Voltage – voltage set by the processor power converter when system control is transferred to the operating system loader code.
Eventual DRAM Voltage is the voltage set by the memory power converter after the POST procedure. Those. Initially, the board sets the voltage specified in the DRAM Voltage item, after passing POST, the voltage specified in the Eventual DRAM Voltage item is used. The function is very useful for memory sticks based on popular Hynix chips — oddly enough, these sticks cannot pass POST at high voltage (sometimes even 1.8V is too much for them), but in the operating system they may require higher voltages for stability (for example, 1 ,95c).
CMD Sense Amplifier is another setting that greatly affects memory overclocking. All the memory I had (PSC X-Series, Elpida BBSE, Hynix CFR and Hynix MFR based sticks) loved the -25/-29 settings.
DQ Sense Amplifier — also about memory, but more capricious. The main task will be to find a «window» in which the memory is chasing better. Setting it too high or too low will result in less stability than AUTO.
In general, the UEFI interface contains just a huge number of settings, most of which even an experienced user can safely leave in the AUTO position — unless you are chasing vanishingly small percentages of speed and every megahertz. I liked such an abundance of settings, it will seem superfluous to someone — but let there be such settings, right?
Practical test
Due to the fact that I have not had normal cooling for the CPU for a long time, I had to pre-isolate the system board from the condensate that falls during the operation of the freon. To do this, I removed the radiator from the power system and carefully isolated the points of potential condensation of the artistic nag. After installing the radiators of the power supply system and armor, the board acquired the following form:
As you can see, after such insulation, even splashes of water will not be able to damage the board — and this is not bad, because sometimes you have to use a household hair dryer to heat a glass and at the same time frost flakes scatter all over the board (this is approximately how I burned the Gigabyte Z87X-UD3H in the previous review).
For nitrogen testing, a system was assembled from the following components:
Motherboard: Maximus VI Formula (bios ver. 0038)
Processor: Core i7 4770K (3.5Ghz, 8MB cache, S-spec SR147, batch #L311B359)
RAM: Corsair Dominator 2x2GB (1600 8-8-8-24, 1.65v, double-sided sticks based on PSC X-series chips)
Storage: OCZ Vertex 3 (120GB, SATA3)
Video cards: Gainward Radeon HD 4870X2 ( 750/900) + MSI Radeon HD 4870X2 (750/900) or Asus GTX 780 DirectCu II
CPU Cooling: Freon (estimated -25C @250W)
Power Supply: CoolerMaster SilentPro Gold 1000W
As a result, the system acquired the following form:
After some preparation time, a UEFI settings profile was selected for cooling with liquid nitrogen — an archive with screenshots of the settings can be downloaded from the link:
As a result, I got the following results:
3Dmark01SE: 160,666 points on GTX780 @ 6 GHz
http://www. hwbot.org/submission/2420048
3Dmark01SE: 105,222 points on the Quad Crossfire system is eighth place in the 4-card category
http://www.hwbot.org/submission/2420055
Aquamark3: 507,258 points on GTX780 at 6GHz with 4 active cores
http://www.hwbot.org/submission/2420047
3Dmark05: 63,301 points on GTX780 @ 5.9 GHz
http://www.hwbot.org/submission/2420050
3Dmark06: 50,968 points on a GTX780 at 5.9 GHz — at the time of publication, this is 16th in the world in the Single Card category
http://www.hwbot.org/submission/2420051
During nitrogen tests, the motherboard proved to be a real fighter — I did not encounter problems with long operation at sub-zero temperatures. In the Quad Crossfire mode, the system was predictably stable, although this mode is extremely difficult in itself.
In preparation for the Asus Open Overclocking Cup final, I received the Maximus VI Extreme motherboard, which comes with a wonderful remote control for the OC Panel system — later I tested the combination of OC Panel and Maximus VI Formula on the freon and everything was extremely convenient.
So, for example, a result of 145,433 points was obtained on a freon in 3Dmark01:
http://www.hwbot.org/submission/2419384
This result would not have been possible without OC Panel with the ability to change the processor multiplier on the fly. So my advice to you — if you have Formula and are interested in sports benchmarking — be sure to look for OC Panel on sale. Moreover, this panel has many other advantages — it allows you to monitor at the hardware level, make convenient volt modes, monitor temperatures and control the fan mode.
Conclusion
Perhaps one of the Cozy Lurksea tiles should have been used for this article. For example this:
Heh, I’ve been a real fan of Asus products for a long time now. I have a whole collection of their top motherboards: CUSL2, TUSL2-C, A7N8X-Deluxe, P4P800E Deluxe, A8N SLI Deluxe, Maximus V Gene. But let someone throw a stone at me who does not consider these products outstanding for their time.