How to use MSI Afterburner
WePC is reader-supported. When you buy through links on our site, we may earn an affiliate commission. Learn more
Last Updated:
If you’re planning on getting the most out of your system then overclocking is a great method. For that, we show you how to use MSI Afterburner. It offers quick and simple methods to push your GPU past its default setting. And giving you the most out of it.
Of course, it comes with its own drawbacks and dangers. So we go through step by step on how to best utilize it and make sure you cause no long-lasting damage. Whilst pushing your hardware to its limits.
How to download MSI afterburner
Downloading and installing MSI Afterburner is a pretty simple process and one you’ve probably done a hundred times before. But for those that are new to the installing game – here is how it’s done.
You can either head to the MSI Afterburner download page or search for MSI Afterburner in you browser.
Only MSI and 3DGuru have permission to distribute the software and are the safest source to use.
Click the download button.
Download MSI Kombustor as well. Based on Furmark it integrates well into the ecosystem to push the card and test it well.
Once both softwares have downloaded you can install them.
What does MSI Afterburner do?
The easiest way to understand what MSI Afterburner does is to break the utility down into categories. Below, are the fundamental features that make up the software and exactly what they offer.
Overclocking
For many, overclocking is a daunting task which means walking a fine line between better performance and broken hardware. MSI recognizes this and has created its own overclocking utility within Afterburner which simplifies the process. The overclocking feature provides precision settings that allow you to push your GPU to its maximum potential while protecting your hardware from permanent damage.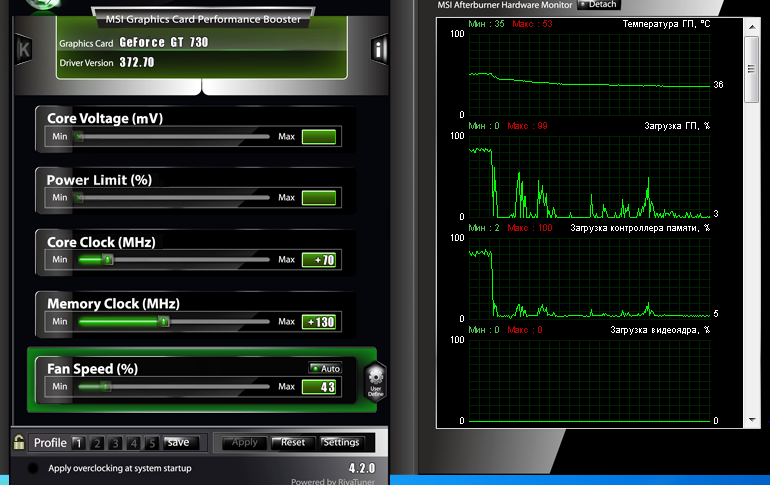
The software can tweak almost every aspect of a GPU, including clock speeds, core voltage, power limit, temperature limit, memory clock speed, and fan speed. Afterburner gives you all the necessary tools to tweak your GPU to your exact specifications, something other software applications don’t provide.
For Afterburner to work alongside every graphics card available, it uses OC Scanner. This utility uses an algorithm developed by Nvidia to determine any model of GPU (whether it’s a 960 or 3080). Once the OC Scanner has determined what card you are running, it will work out the highest and most stable overclocking settings for that specific card. Then, it applies the changes to your card for instantaneous performance gains.
Afterburner also lets users fine-tune their fan profile by allowing you to choose a customized fan speed curve that alters depending on your GPUs temperature. The higher the temp, the fastest the fan will spin, the lower the temp, the slower. Pretty straightforward.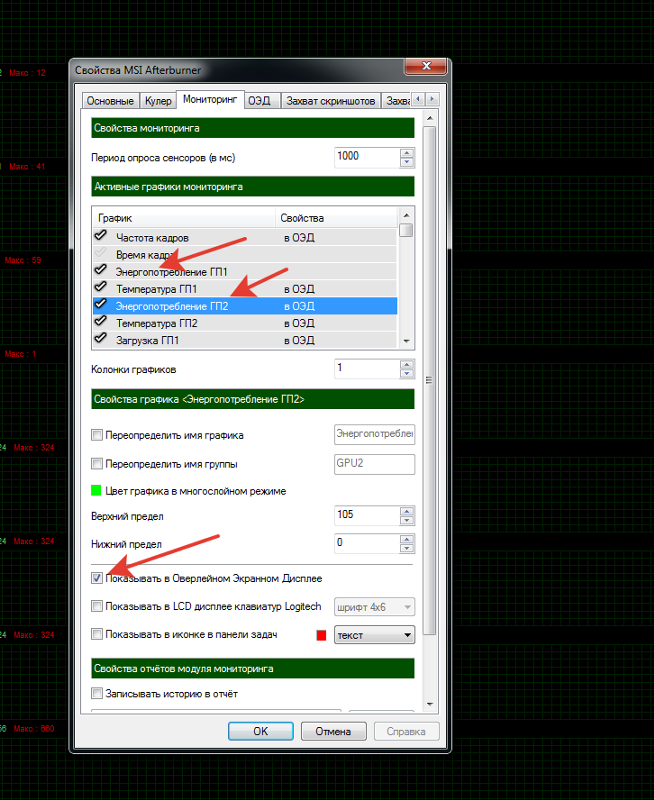
All your overclocking profiles can be saved onto the software and toggled with the click of a button. Find your desired settings, save them, and game on!
Monitoring
So, at this stage, you might be considering doing a little bit of tweaking yourself, maybe just a small boost in clock speed. Well, if you are, that’s great! Afterburner has a cool monitoring feature that allows you to see live changes made to your GPU and what they’re doing to every aspect of your graphics card.
The utility allows you to monitor everything from GPU temperatures, core and memory clock speeds, voltage, FPS, and usage percentage via a series of graphs and a full on-screen display.
The on-screen display also makes use of the Rivatuner statistics server, which can be pre-programmed for several different uses. Keeping track of your GPU activity whilst gaming is a large part of benchmarking today, and the monitoring feature allows you to do this with live, on-screen updates.
Benchmarking
Benchmarking is hugely popular amongst product testers and enthusiasts alike today, especially now that there is so much competition surrounding the GPU industry. People want to know which card is best and what better way of showcasing that than in a fair, level playing field, benchmarking test.
MSI Afterburner includes a benchmarking tool called MSI Kombustor which runs a series of stressful GPU processes to see how well your graphics card reacts to the pressure. It’s a great way to see whether or not your overclocking tweaks have made an impact on the performance of your GPU. It is based on Furmark and is more integrated into the MSI ecosystem. We will go into exactly how to use the software further down.
Video Capture
There are many video capturing methods out there, and you guessed it, Afterburner has its own unique capture software built right in. The application helps capture in-game footage, tutorials, benchmark results, and more. You can capture it in a number of different formats, qualities, and frame rates.
How to use MSI Kombuster
So, if you’ve decided to overclock your GPU, you’re going to need to know how to use Kombustor.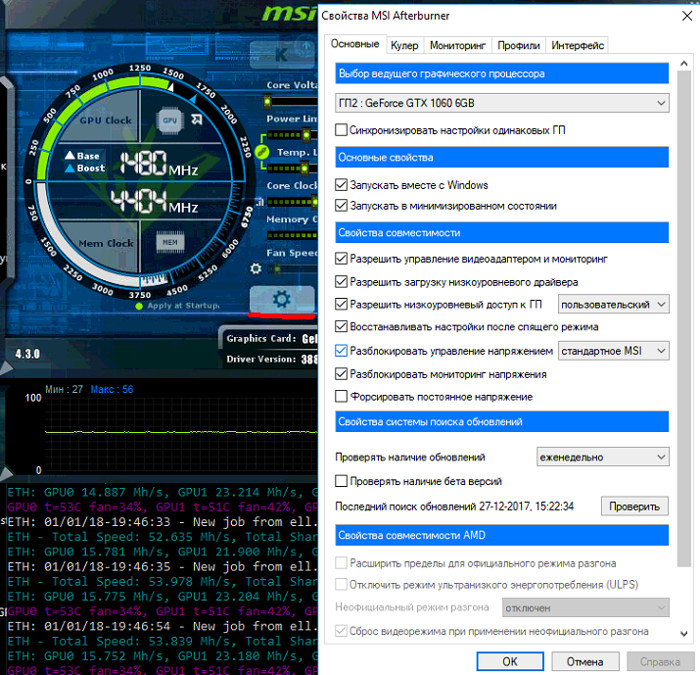 You need to understand how to use and read Kombustor because before we overclock our card, we need to know what performance we are currently getting at base levels.
The following short guide is going to walk you through how to do this.
It can either be found in your tray or an icon on your desktop to open.
The “K” stands for Kombustor and should be highlighted as the others are. If it isn’t highlighted and can not be clicked, you need to head over to the MSI Afterburner or 3DGuru website and download the Kombustor app.
Click the “K” Icon
MSI Kombustor should load up right away and give you options for what kind of test to run.
You can change which stress test to use, what resolution to run, what overlays to have, and then there are buttons to start the stress or benchmark.
You can now monitor your GPU temp, FPS, GPU load, and more. This will give you an idea of how your graphics card performs at base levels.
Once the test is complete, or before you close it off, record your performance scores so you can compare them with the performance-enhanced, overclocked settings
At this stage, you’re going to want to start your overclocking process. We would recommend researching what other users have achieved when overclocking the same card as you to make sure you are pushing yours to the limit.
Before you start
The first thing you need to realize when thinking about overclocking any hardware components is that overclocking is not risk-free by any means. You are running a serious risk of permanent damage when overclocking so don’t be foolish when entering this process.
If at any stage you feel something is wrong or doesn’t feel right, stop immediately, and seek advice from more knowledgeable sources before continuing.
When overclocking in MSI afterburner, remember to follow the tried and tested routine of – trying and testing. Make a small change; check the results. Make another small change; check the results. You get the gist.
How to use MSI Afterburner
The first thing you will need to do is set both the ‘Power Limit’ and the ‘Temp Limit’ sliders to the maximum. With these boosted settings, the GPU will now be more power-efficient and should reach higher temperatures than it would at the base. Worth noting – the GPU will never reach the upper limits unless there’s a hardware malfunction so don’t be shocked if the max temp seems ridiculously high.
Next, increase the core clock speed slider by small steps, i.e., 20-30Mhz per step. Each unit on the slider references a single MHz. If you push the slider in the positive position by 40, you are theoretically overclocking your core clock speed by 40Mhz. We highly recommend boosting your clock speed by 20-30Mhz each time and no more to ensure no damage is caused in the process. Always remember to hit the apply button after each incremental step.
Another tip is always to have Kombustor running in the background. This allows you to monitor how your GPU is handling the overclocked settings and you can pick up when your GPU is starting to crash under the strain. Any flickers, blackouts, glitches, or crashes usually means that the GPU is no longer stable at its current settings and will need reverting back to factory or the last known stable settings.
After a while, depending on which card you have, you will start to see a steady flow of graphical issues, and your card won’t be able to maintain a stable playing field. At this point, you know you have reached the limit of what your card can do. Don’t be shocked by this behavior; all graphics cards have their limits. If your GPU completely black screens or crashes, the card will reset the driver allowing you to reduce the clock speed.
Start by reducing the clock speed in increments of 5Mhz until all errors and glitches have dissipated. Kombustor should be stable and running perfectly when the settings are manageable. If Kombustor is stable, try running a game on high settings and stress the graphics card to see if it handles that scenario, if it does, you have successfully overclocked your GPU.
Next, is to overclock the memory clock speed, and the same method applies with slightly different incremental steps. We recommend increasing the memory clock speed by 50-100Mhz per step.
Again, once you experience regular errors and glitches in Kombustor, reduce the memory clock speed in small increments of 10Mhz until you find stable settings.
At this stage, you really want to test the new settings for a prolonged period of time to make sure the card is stable. I would recommend running Kombustor for a minimum of 10 minutes and monitoring the card as it does so. Just make sure there are no glitches, mishaps, crashes, and so forth. If there is, reduce the clock speed down by 10 and re-do the test.
Once you feel happy with the settings and everything seems stable. Save the settings as a profile by click on the floppy disk icon and selecting one of the profile options.
Enabling on-screen display
Using MSI Afterburner for on-screen display benchmarking is a great way of showcasing how good, or bad, your GPU actually is. You can easily set the software to display temp, workload, memory clock, clock speed, and everything else that comes with a GPU.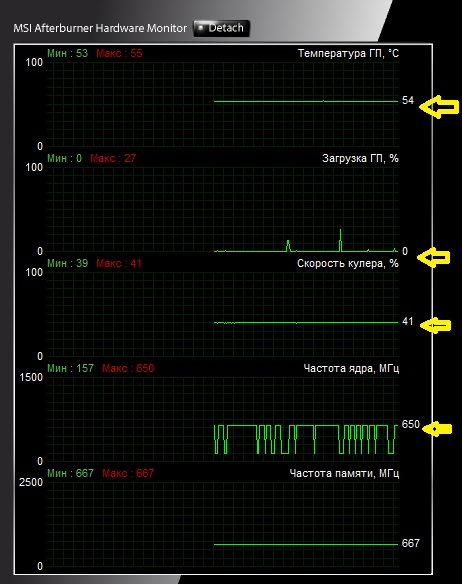
Without further ado, let’s dive into the process.
Click on the settings tab a cog on the pillar of buttons and find the monitoring tab.
Under “Active hardware monitoring graphs” select the information you would like to display on-screen by clicking the desired fields and checking the “show in on-screen display” box. If you’re doing a benchmark, for example, you can showcase the FPS, core clock speed, memory clock speed, and temps.
Whenever you load up a game, the OSD (On-screen display) will provide real-time details about your GPU’s performance.
You can assign in-game hotkeys to toggle the OSD on and off which is ideal for everyday use.
Setting a fan profile
Setting a fan profile is something I haven’t made great use of over the years because the GPU just does its thing and the world keeps ticking over. However, when overclocking, I feel customizing the fan profile is an essential part of how efficient your GPU will ultimately run.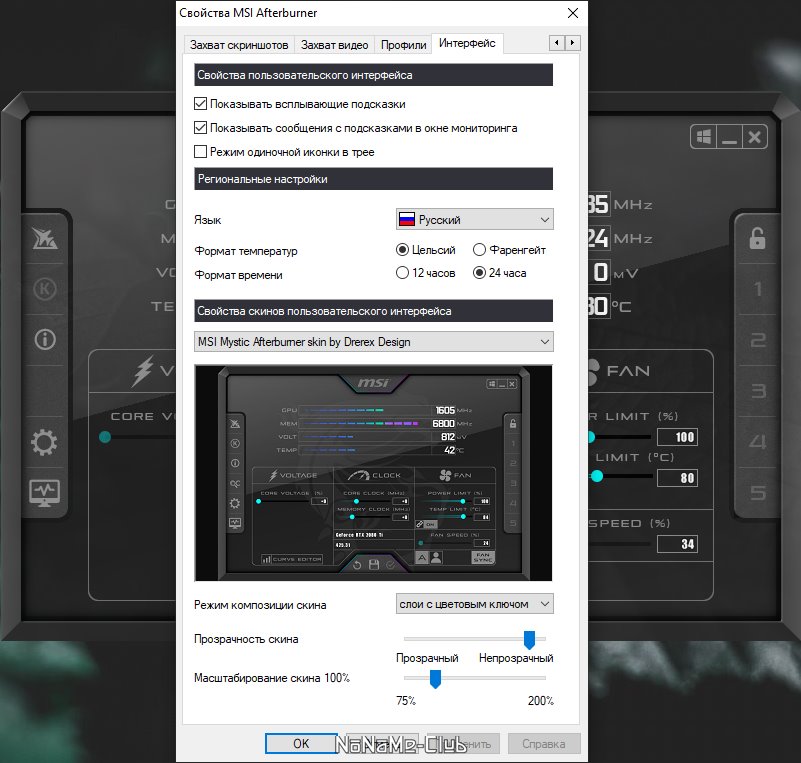
Click on the settings tab in MSI Afterburner and locate the “Fan” tab in the menu bar at the top.
Tick the “Enable user-defined software automatic fan control” tab so that you can start to customize the fan profile.
You will see a curve chart that has both “fan speed %” and “temperature” as values. You can alter the curve to meet your specific needs.
Once you have designed your ideal fan profile, click apply and close the window. Your new fan setup will be in full effect.
The scenario will depend on what fan profile you decide to go for. I mean, you might want to go from 60% fan speed right up to 100% as soon as the GPU goes over 50°C. Overclocking a GPU will, for me, always require a little extra fan juice because you want the card to be as stable and cool as possible.
It’s a learning curve so just play around and see what works best for you.
Compatibility
Finally, we have compatibility, we touched on this a little earlier, but we’ll go into more detail here.
MSI Afterburner is, for the most part, compatible with every GPU regardless of make, model, chipset manufacturer, or card manufacturer. If you have a GPU made within the last ten years, this thing will support it. This makes Afterburner the most versatile graphics tweaking tool out there. You can use Afterburner to tweak your Radeon Rx 570 or your Nvidia GeForce RTX 3090 Ti; it really doesn’t matter what you’re running.
The cross-brand support which features in Afterburner is different from other overclocking utilities out there (EVGA precision X1 or AMDs Overdrive) which only cater to their specific cards. Afterburner is also completely free of charge and very intuitive, as you’ve seen.
Does MSI Afterburner improve FPS?
Yes, MSI Afterburner will almost certainly improve your average FPS. In fact, it can help boost your frames per second in two distinct ways.
Firstly, MSI Afterburner has its own overclocking facility that can be used to automatically push your GPU, and even to a certain extent, your CPU, to their limits without the risk associated with manual tinkering.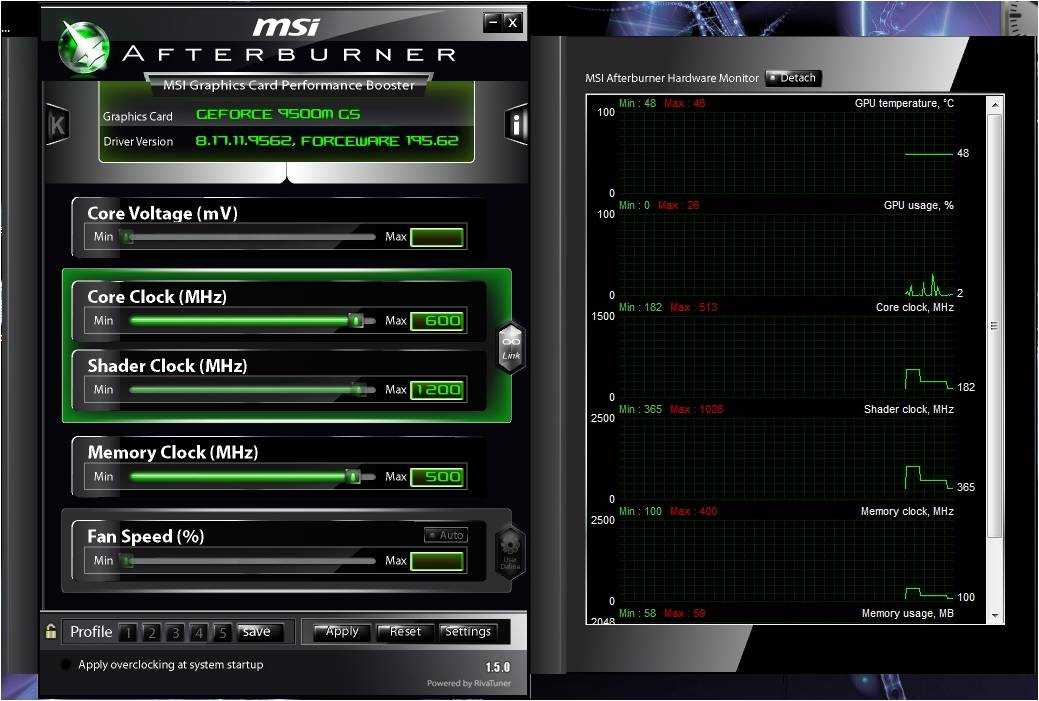
It’s an incredibly handy function that can be seen as a GPU equivalent of Intel’s TurboBoost CPU technology. It pushes things as far as possible without destabilizing your hardware, and it’s perfect for beginners looking to dip their toes into the world of overclocking.
The second way MSI Afterburner can help to improve your FPS is with its monitoring system that shows you live updates as you engage in a spot of manual overclocking. It essentially guides you through the process, ensuring you never push your hardware too, well…hard.
Does MSI Afterburner hurt GPU?
MSI Afterburner uses something called OC scanning to identify the exact GPU in your system, so the software knows what it’s dealing with.
In light of this, the settings suggestions it makes for an automatic OC should never damage your GPU. It simply won’t suggest any tweaks that push the voltage or thermals too far.
That said, overclocking is inherently risky, and will always have at least a minor impact on device longevity, so perhaps keeping this auto OC on 24.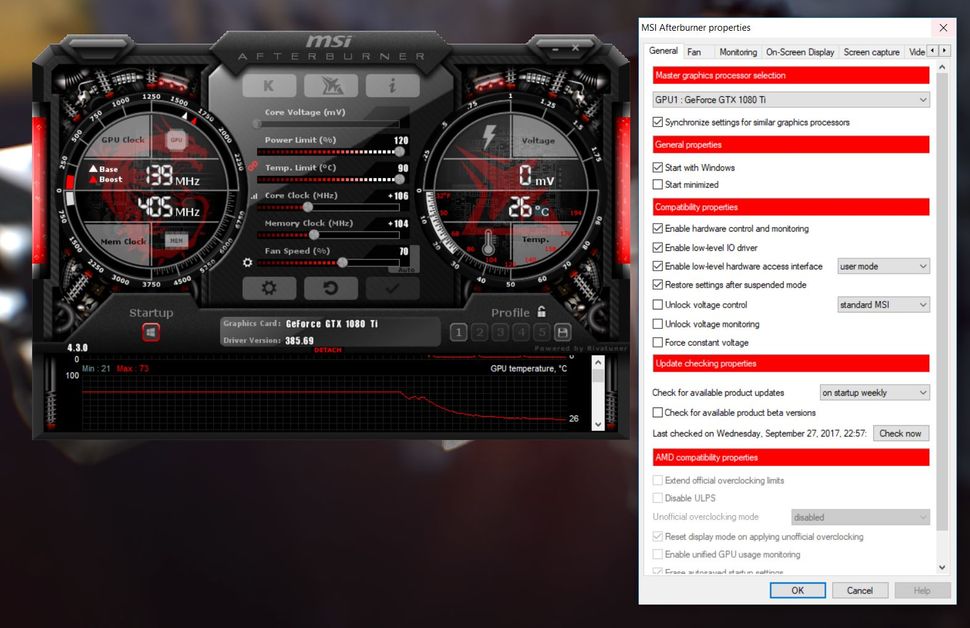 7 isn’t such a good idea if you really want to optimize the lifespan of your graphics card.
What can take some serious time off your graphics card’s life is using MSI Afterburner irresponsibly for manual overclocking. It gives you the tools to push your GPU as gradually and intuitively as possible, but users can still overdo it.
As an experimental process, pushing things too far is a big part of overclocking, so even though it can have a negative effect on our GPU, Afterburner doesn’t put a cap on OC parameters.
Share this article…
Chocolatey Software | MSI Afterburner 4.6.4.20211212
Requires Puppet Chocolatey Provider module. See docs at https://forge.puppet.com/puppetlabs/chocolatey.
## 1. REQUIREMENTS ## ### Here are the requirements necessary to ensure this is successful. ### a. Internal/Private Cloud Repository Set Up ### #### You'll need an internal/private cloud repository you can use. These are #### generally really quick to set up and there are quite a few options.#### Chocolatey Software recommends Nexus, Artifactory Pro, or ProGet as they #### are repository servers and will give you the ability to manage multiple #### repositories and types from one server installation. ### b. Download Chocolatey Package and Put on Internal Repository ### #### You need to have downloaded the Chocolatey package as well. #### Please see https://chocolatey.org/install#organization ### c. Other Requirements ### #### i. Requires puppetlabs/chocolatey module #### See https://forge.puppet.com/puppetlabs/chocolatey ## 2. TOP LEVEL VARIABLES ## ### a. Your internal repository url (the main one). ### #### Should be similar to what you see when you browse #### to https://community.chocolatey.org/api/v2/ $_repository_url = 'INTERNAL REPO URL' ### b. Chocolatey nupkg download url ### #### This url should result in an immediate download when you navigate to it in #### a web browser $_choco_download_url = 'INTERNAL REPO URL/package/chocolatey.
1.1.0.nupkg' ### c. Chocolatey Central Management (CCM) ### #### If using CCM to manage Chocolatey, add the following: #### i. Endpoint URL for CCM # $_chocolatey_central_management_url = 'https://chocolatey-central-management:24020/ChocolateyManagementService' #### ii. If using a Client Salt, add it here # $_chocolatey_central_management_client_salt = "clientsalt" #### iii. If using a Service Salt, add it here # $_chocolatey_central_management_service_salt = 'servicesalt' ## 3. ENSURE CHOCOLATEY IS INSTALLED ## ### Ensure Chocolatey is installed from your internal repository ### Note: `chocolatey_download_url is completely different than normal ### source locations. This is directly to the bare download url for the ### chocolatey.nupkg, similar to what you see when you browse to ### https://community.chocolatey.org/api/v2/package/chocolatey class {'chocolatey': chocolatey_download_url => $_choco_download_url, use_7zip => false, } ## 4.
CONFIGURE CHOCOLATEY BASELINE ## ### a. FIPS Feature ### #### If you need FIPS compliance - make this the first thing you configure #### before you do any additional configuration or package installations #chocolateyfeature {'useFipsCompliantChecksums': # ensure => enabled, #} ### b. Apply Recommended Configuration ### #### Move cache location so Chocolatey is very deterministic about #### cleaning up temporary data and the location is secured to admins chocolateyconfig {'cacheLocation': value => 'C:\ProgramData\chocolatey\cache', } #### Increase timeout to at least 4 hours chocolateyconfig {'commandExecutionTimeoutSeconds': value => '14400', } #### Turn off download progress when running choco through integrations chocolateyfeature {'showDownloadProgress': ensure => disabled, } ### c. Sources ### #### Remove the default community package repository source chocolateysource {'chocolatey': ensure => absent, location => 'https://community.
chocolatey.org/api/v2/', } #### Add internal default sources #### You could have multiple sources here, so we will provide an example #### of one using the remote repo variable here #### NOTE: This EXAMPLE requires changes chocolateysource {'internal_chocolatey': ensure => present, location => $_repository_url, priority => 1, username => 'optional', password => 'optional,not ensured', bypass_proxy => true, admin_only => false, allow_self_service => false, } ### b. Keep Chocolatey Up To Date ### #### Keep chocolatey up to date based on your internal source #### You control the upgrades based on when you push an updated version #### to your internal repository. #### Note the source here is to the OData feed, similar to what you see #### when you browse to https://community.
chocolatey.org/api/v2/ package {'chocolatey': ensure => latest, provider => chocolatey, source => $_repository_url, } ## 5. ENSURE CHOCOLATEY FOR BUSINESS ## ### If you don't have Chocolatey for Business (C4B), you'll want to remove from here down. ### a. Ensure The License File Is Installed ### #### Create a license package using script from https://docs.chocolatey.org/en-us/guides/organizations/organizational-deployment-guide#exercise-4-create-a-package-for-the-license # TODO: Add resource for installing/ensuring the chocolatey-license package package {'chocolatey-license': ensure => latest, provider => chocolatey, source => $_repository_url, } ### b. Disable The Licensed Source ### #### The licensed source cannot be removed, so it must be disabled. #### This must occur after the license has been set by the license package.
## Disabled sources still need all other attributes until ## https://tickets.puppetlabs.com/browse/MODULES-4449 is resolved. ## Password is necessary with user, but not ensurable, so it should not ## matter what it is set to here. If you ever do get into trouble here, ## the password is your license GUID. chocolateysource {'chocolatey.licensed': ensure => disabled, priority => '10', user => 'customer', password => '1234', require => Package['chocolatey-license'], } ### c. Ensure Chocolatey Licensed Extension ### #### You will have downloaded the licensed extension to your internal repository #### as you have disabled the licensed repository in step 5b. #### Ensure the chocolatey.extension package (aka Chocolatey Licensed Extension) package {'chocolatey.extension': ensure => latest, provider => chocolatey, source => $_repository_url, require => Package['chocolatey-license'], } #### The Chocolatey Licensed Extension unlocks all of the following, which also have configuration/feature items available with them.
You may want to visit the feature pages to see what you might want to also enable: #### - Package Builder - https://docs.chocolatey.org/en-us/features/paid/package-builder #### - Package Internalizer - https://docs.chocolatey.org/en-us/features/paid/package-internalizer #### - Package Synchronization (3 components) - https://docs.chocolatey.org/en-us/features/paid/package-synchronization #### - Package Reducer - https://docs.chocolatey.org/en-us/features/paid/package-reducer #### - Package Audit - https://docs.chocolatey.org/en-us/features/paid/package-audit #### - Package Throttle - https://docs.chocolatey.org/en-us/features/paid/package-throttle #### - CDN Cache Access - https://docs.chocolatey.org/en-us/features/paid/private-cdn #### - Branding - https://docs.chocolatey.org/en-us/features/paid/branding #### - Self-Service Anywhere (more components will need to be installed and additional configuration will need to be set) - https://docs.chocolatey.
org/en-us/features/paid/self-service-anywhere #### - Chocolatey Central Management (more components will need to be installed and additional configuration will need to be set) - https://docs.chocolatey.org/en-us/features/paid/chocolatey-central-management #### - Other - https://docs.chocolatey.org/en-us/features/paid/ ### d. Ensure Self-Service Anywhere ### #### If you have desktop clients where users are not administrators, you may #### to take advantage of deploying and configuring Self-Service anywhere chocolateyfeature {'showNonElevatedWarnings': ensure => disabled, } chocolateyfeature {'useBackgroundService': ensure => enabled, } chocolateyfeature {'useBackgroundServiceWithNonAdministratorsOnly': ensure => enabled, } chocolateyfeature {'allowBackgroundServiceUninstallsFromUserInstallsOnly': ensure => enabled, } chocolateyconfig {'backgroundServiceAllowedCommands': value => 'install,upgrade,uninstall', } ### e.
Ensure Chocolatey Central Management ### #### If you want to manage and report on endpoints, you can set up and configure ### Central Management. There are multiple portions to manage, so you'll see ### a section on agents here along with notes on how to configure the server ### side components. if $_chocolatey_central_management_url { package {'chocolatey-agent': ensure => latest, provider => chocolatey, source => $_repository_url, require => Package['chocolatey-license'], } chocolateyconfig {'CentralManagementServiceUrl': value => $_chocolatey_central_management_url, } if $_chocolatey_central_management_client_salt { chocolateyconfig {'centralManagementClientCommunicationSaltAdditivePassword': value => $_chocolatey_central_management_client_salt, } } if $_chocolatey_central_management_service_salt { chocolateyconfig {'centralManagementClientCommunicationSaltAdditivePassword': value => $_chocolatey_central_management_client_salt, } } chocolateyfeature {'useChocolateyCentralManagement': ensure => enabled, require => Package['chocolatey-agent'], } chocolateyfeature {'useChocolateyCentralManagementDeployments': ensure => enabled, require => Package['chocolatey-agent'], } }
How to Silently Install EXE and MSI setup applications (Unattended)
Written by Radu Popescu · April 28th, 2022
#MSI
If you are a System Administrator, IT Pro, or Developer, and want to find out how to perform a silent MSI or EXE installation – this article is for you!
In this article, we’re diving into silent installations and discussing the following topics:
- What is a silent install?
- Where and why do we need an application to be silently installed?
- Application installer types: MSI vs EXE
- How to create a silent unattended installation?
What is a silent installation?
A silent (or unattended) installation is the ability to install an application package without any user interaction. This means that the user will no longer need to go through the install wizard (and click Next multiple times). The application will be installed automatically by calling the installer with specific silent install parameters.
Where and why do we need an application to be silently installed?
Silent installations are often the most useful within Enterprise environments.
Imagine a company with more than 1000 users and computers where you need to install an application on all machines but most of the users are not necessarily tech-savvy. It wouldn’t make sense to use a CD/USB stick and manually install the application by yourself because it will take ages.
We can assume that in Enterprise environments, some users would be able to install the app, but the majority may not have the technical knowledge or administrative privileges to install software by themselves.
This is why we will see Configuration Management tools like Microsoft SCCM (MECM), Intune, Ivanti Landesk, Empirium Matrix42 often being used in Enterprise Environments.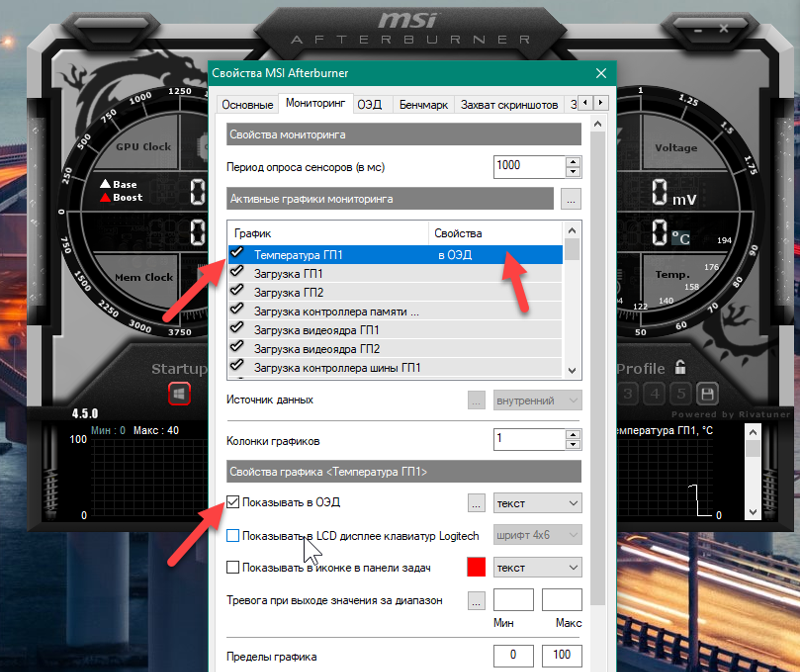
These configuration management tools help to automate the integration of application packages in the infrastructure with the corresponding install parameters and then deploy them to the user’s machine.
The user will just have to make a request for a specific software (usually in the ticketing system or in the application catalog if implemented) and it will be automatically installed on their machine.
Application installer types: EXE vs MSI
There are two main Windows installer package formats: EXE and MSI. Depending on the format, the way to install the application silently will differ and in some cases, you will not be able to silently install an application at all.
Don’t worry, we will cover those particular cases here in this article and what must be done in that situation.
Besides MSI and EXE, the newest format that Microsoft released, is the MSIX which is automatically installed silently when it is integrated into deployment tools such as Configuration Manager or Endpoint Manager.
If you want to learn more about MSIX, read out our MSIX Tutorial.
How to silently install an MSI Package
MSI stands for Microsoft Installer and it’s the Windows standard installer format. It uses msiexec.exe to install the setup and accepts the standard MSI parameters.
MSI’s silent install standard parameters are as follows:
- /quiet — quiet mode (there is no user interaction)
- /passive — unattended mode (the installation shows only a progress bar)
- /q — set the UI level:
- n — no UI
- n+ — no UI except for a modal dialog box displayed at the end.
- b — basic UI
- b+ — basic UI with a modal dialog box displayed at the end. The modal box is not displayed if the user cancels the installation. Use qb+! or qb!+ to hide the [ Cancel ] button.
- b- — basic UI with no modal dialog boxes. Please note that /qb+- is not a supported UI level. Use qb-! or qb!- to hide the [ Cancel ] button.
- r — reduced UI
- f — full UI
A regular command line to silently install an MSI should look like this:
Msiexec /i <applicationname.msi> /qb! /l*v install.log
The /l*v install parameter is used to create an installation log. Having an installation log is useful because when you run a silent installation, the GUI is hidden and the errors are not shown.
In addition to the silent installation parameters, an MSI accepts properties. So, for instance, you can tell your MSI application where the install location should be by typing the INSTALLDIR property.
Msiexec /i <applicationname.msi> INSTALLDIR=C:\MYDIR /qb! /l*v install.log
You can find more information on all MSI install parameters in the Advanced Installer MSIEXEC command line user guide.
If you are a developer and want to create an MSI silent installation package, you can check out our step-by-step guide on How to Create a Silent Installation MSI package?
How to silently install an .EXE file?
When it comes to the .exe format type of installer, compared to the MSI, there is no standard process regarding silent install parameters.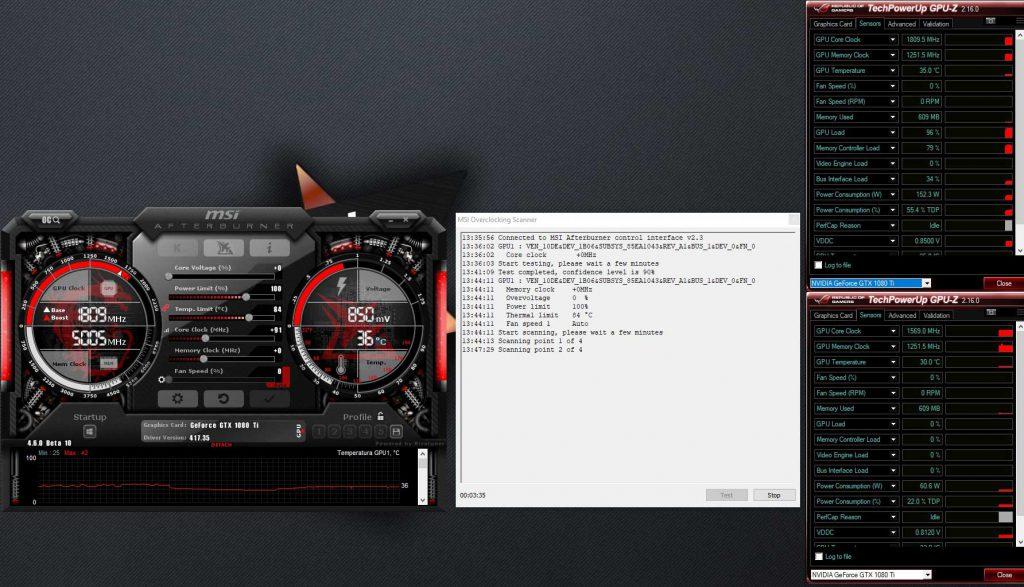 These parameters will vary depending on the software that was used to create the setup installer.
But, if there’s no standard process, how do we find the silent install parameters?
Here are a couple of methods worth trying:
1. Check if setup.exe has some install parameters by calling the setup.exe in a cmd and typing in the /? or /help. This will usually open a help/usage message box.
Setup.exe /? /help
//cmd photo of msg box
2. Access the vendor’s application support page or forum. There, you may find what install parameters the application supports and it might also give you full silent install instructions. That is if the vendor decided to create a support page.
3. If none of the above methods work, you could open the setup.exe by double-clicking on it until you see the installation wizard.
Usually, in the installation wizard, you can notice which tool/packaging program was used to package the installer. With this information, you can go to the official website of the tool and search for the default installation parameters.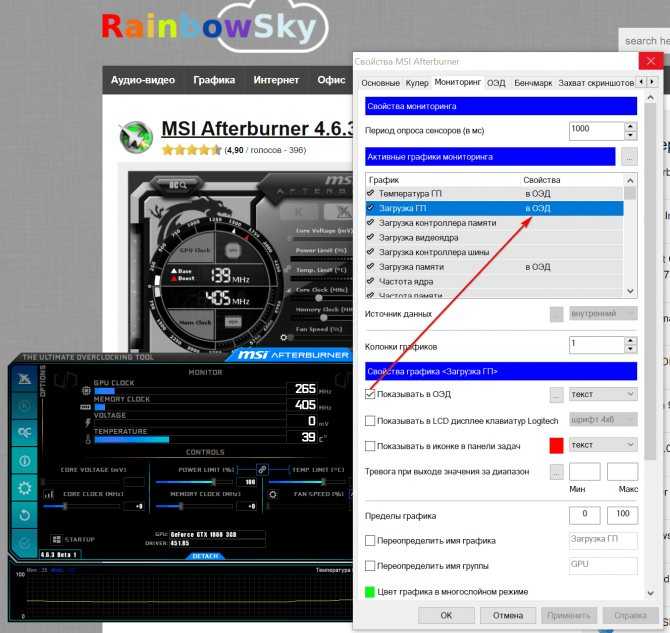
Regardless of the default parameters, some developers might choose not to include any silent install parameters for their installer – but this is NOT a recommended practice.
Which are the most common application packaging tools and their silent install parameters for setup.exe?
Advanced Installer’s silent install parameters for setup.exe
/? and /help
Both these commands will display a help dialog containing the command-line options for the EXE setup.
/exenoui
Launches the EXE setup without UI.
/exebasicui
Launches the EXE setup with basic UI. The UI level set using the above command-line options will overwrite the default UI level specified when the package was built.
<msiOptions>
Options for msiexec.exe on running the MSI package.
Command example:
Setup.exe /exenoui /qn /norestart
The full list of the supported parameters can be found in the Advanced Installer User Guide.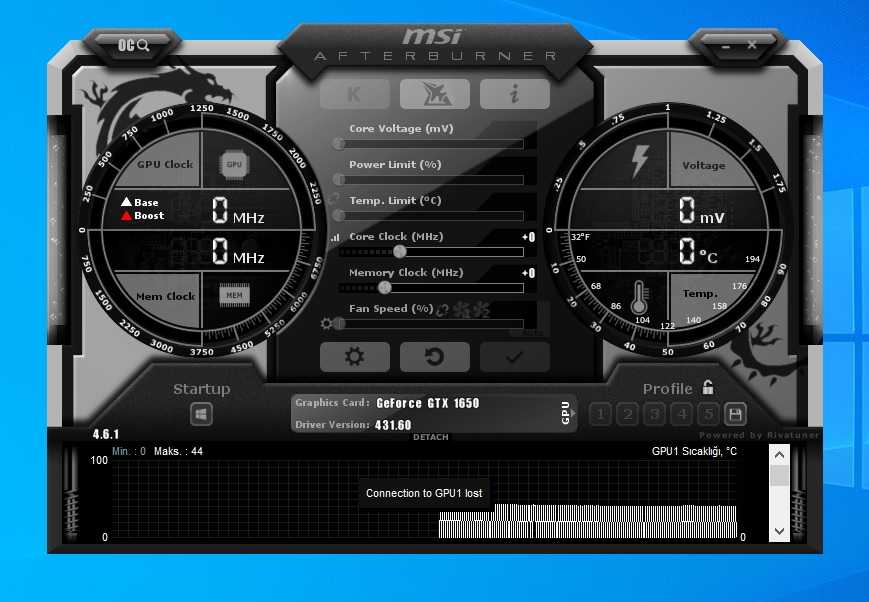
Installshield’s silent install parameters for setup.exe
Launches the EXE setup in recording mode, which will generate a response file that later will be called to perform a silent installation.
Launches the EXE setup in silent mode and uses the response file mentioned previously. The response file must be present in the same folder with the setup.exe.
/s /v/qn
Launches the Exe setup in silent mode and uses the Basic MSI install parameters.
Command example:
Setup.exe /s /v"/qn INSTALLDIR=D:\Destination"
WiX Toolset’s silent install parameters for setup.exe
/? ; /h ; /help
Launches the help message box which displays the other supported install parameters.
/q ; /quiet ; /s ; /silent
Launches the EXE setup in silent mode.
/passive
Launches the Exe setup in silent mode with a progress bar only, displaying installation progress.
/l ; /log
Creates an installation logfile.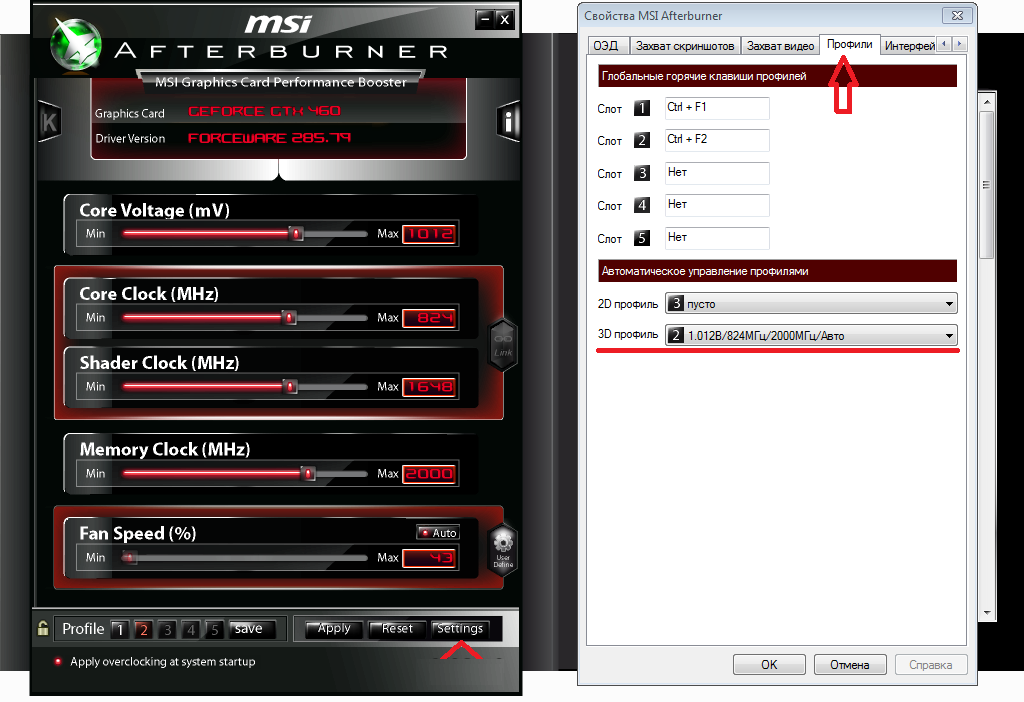
/norestart
Tells the setup.exe not to perform any required reboots.
Command example:
Setup.exe /q /log /norestart
Inno Setup’s silent install parameters for setup.exe
/? ; /HELP
Launches the help message box which displays the other supported install parameters.
/SILENT
Launches the EXE setup in silent mode with a progress bar only, displaying installation progress.
/VERYSILENT
Launches the EXE setup in silent mode with no display whatsoever.
Creates an installation log file in the user’s temp folder. For a custom log file location use:
/LOG=”filename”
/NORESTART
Tells the setup.exe not to perform any required reboots.
Command example:
Setup.exe /VERYSILENT /LOG /NORESTART
NSIS’s silent install parameters for setup.exe
Launches the EXE setup in silent mode.
Sets the default installation directory. It must not contain any quotes. Only absolute paths.
Command example:
Setup.exe /S /D=c:\My custom installdir
Use Application Repackaging When You Have No Support for Silent Installation
You have tried all the above methods for the setup.exe and unfortunately, you came to the conclusion that it does not support silent installation.
If there is no MSI version of the application or the EXE setup does not support silent installation, use application repackaging.
Repackaging your application with Advanced Installer into an MSI or an EXE will fully support silent installation.
The Advanced Installer Repackager allows you to capture software installation and/or OS changes by performing a comparison between an initial and a final system snapshot. The result can then be built into a new installation package (32 or 64 bit), as an MSI, MSIX, or App-V installer.
Get a full walkthrough on the repackager in our comprehensive blog article The Repackager or the Modern Technique of Application Packaging.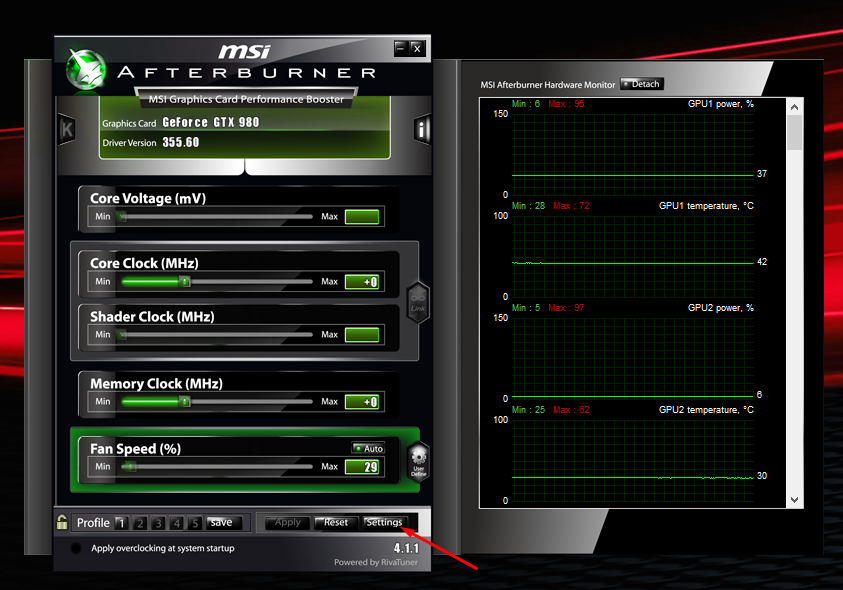
Also, check out this demo video to learn how to use the Advanced Installer Repackager.
How to silently install Advanced Installer EXE setups?
To trigger a silent installation of a setup.exe with Advanced Installer, you need to use the /exenoui install parameter. Besides setting the install display level of the main setup, this parameter also controls the display level of the MSI or EXE packages included as prerequisites in a bootstrapper Advanced Installer project.
Let’s assume you have three MSI packages that you need to install silently from a setup.exe.
To do that, follow these steps:
- Navigate to the Prerequisites page from your Advanced Installer project.
- Add each package as a Feature-based prerequisite.
You NEED to set up the corresponding install command lines from the Setup Files tab for each application.
You can see in the below screenshot that for the Silent (no UI) we have the /qb! Silent install parameter specific for MSI applications.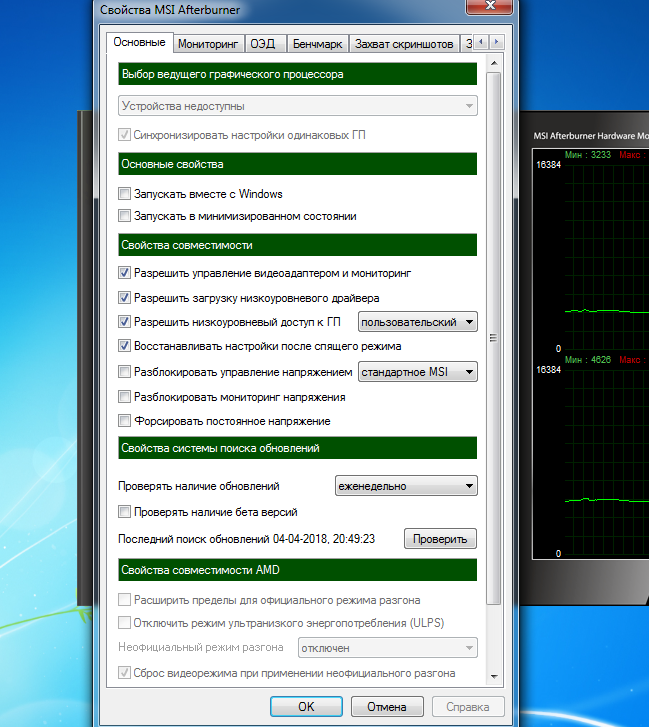
As mentioned earlier, when the main setup.exe is executed with the /exenoui parameter, it will take into consideration the silent (no UI) parameters of each application you added.
In case you want to add setup exes instead of MSI, you have to check the application manufacturer of each specific application for the supported silent install parameters.
For more details, you can check out our comprehensive guide on how to create a suite installation and how to silently install the SQL Server Express 2019 Prerequisite into the main installation package.
Conclusion
Silent installations are a great way to install software. This type of installation is especially useful for businesses that want to deploy their software on multiple computers without the need for user input or interaction.
Silent installations are automated and less time-consuming as they allow you to deploy your software more efficiently.
Let us know if you found this article useful and leave questions for us!
Get Advanced Installer 30-day full-featured Trial for your silent installations — Repackager included!
Comments:
Fix: «Some System Components Cannot be Hooked Right Now»
By Bilal Masood March 24, 2022
3 minutes read
This is one of the errors that have been popping up for a long time.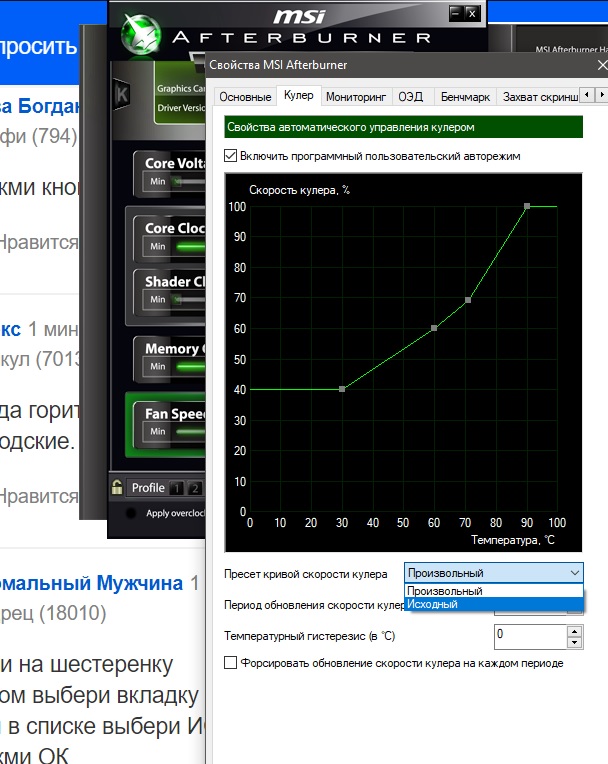 People tried to get rid of it but nothing was working. This error basically means one of your hardware components like your CPU, GPU, RAM, etc cannot be hooked up to MSI Afterburner.
Error
This can be a little frustrating as people try to monitor their hardware performance, and it does not show on MSI Afterburner. Causes of this can be multiple and can be fixed by doing some slight adjustments to your PC.
Luckily for us, the developers recently fixed this, and people got rid of it. If you are still getting this error on your PC, this can be your software problem as this has been fixed for most people after the company announced that they have fixed this error.
Restart the Application
This is one of the easiest and most effective ways of getting rid of an error. Restarting the application can reset the checking sequence of the application, resulting in fixing the problem. If you have recently installed a new piece of hardware, restarting the application is going to reset the application.
Make sure you restart the application from the task manager. If you just close the application from the top right then this is going to just minimize the application.
End Task
Remove Windows Update
Windows can be helpful for a lot of people. They usually fix bugs, improve performance, add new features. But this can also mess with some applications like MSI Afterburner. People have reported that this error occurred after performing a Windows Update.
Fortunately, windows allow us to delete the recent updates or changes that you made. This reverts any changes that you made, all the windows updates. For more details, you can click here and undo your changes
Reinstall the Application
Sometimes while installing the application, some files to fully download. This happens rarely as this is not the main reason why this problem occurs. Simply reinstall the application again from the setup you downloaded and then check if the error occurs.
Install the Latest Version
MSI Afterburner’s old application had this bug. Almost everyone who downloaded this version got this problem. Luckily for us, the developers came up with a solution and fixed this error. They released the new version which bugs free and better than before.
It has new graphics, UI, and much more. You can download the latest version by clicking here
If you already have MSI Afterburner downloaded then the process might be tricky. Follow these steps if you already have it downloaded
- Click on the link provided above
- download the setupDownload Setup
- install the application in the same folder where the older version was installedInstall on the same location
Now you can launch MSI Afterburner and this should solve the problem
Perform Clean Installation of GPU Drivers
People usually install the GPU drivers using the normal methods. These usually have a separate option called a Clean installation. This can help if your graphics drivers are creating the issue. While installing the drivers simply click on the clean installation box and it will perform a clean GPU drivers installation
Clean drivers installation
Hiding the Error
If none of the above methods work you can try this alternative method.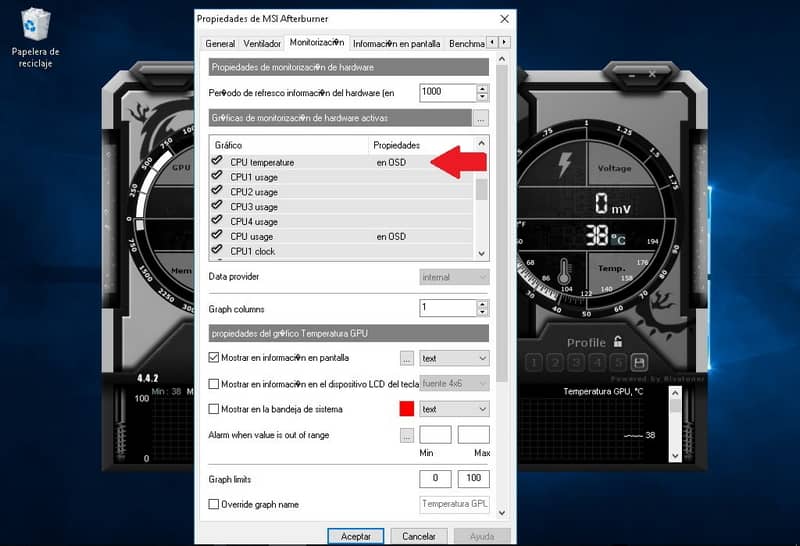 People tried to fix this method using multiple methods but all of those people repeatedly hit a roadblock. Then these people came up with a solution of hiding the error. This method hid the error and it did not pop up every time you launched the application
This is not a fix. It is a workaround if you are not able to fix the error.
- Open File Explorer
- On the resgestry paste this location “C:\Program Files (x86)\RivaTuner Statistics Server” (if have MSI Afterburner installed). Press enterFile Explorer
- Then click on Profile TemplatesOpen Profile Templates
- Now, find the folder named config, right-click on it, and open with Note Pad
- Now make sure MSI Afterburner is closed completely from the task manager as we told you above.
- From here find Silent and change the value from 0 to 1
Change Value - Now press ctrl + S to save the file
Now you can re-open MSI Afterburner and the error won’t pop up. Keep in mind this is not going to fix the problem. It is just going to hide the error and it won’t pop up ever again.
Reinstall Windows
This is one of the last methods as this can clear all of the problems that can be occurring on your PC. Re-installing windows can re-install all the files resulting in problems being fixed.
This is one of the easier tasks. But if you need more details and how to install it you can click here
How to Find the Best Fan Curve Settings – Voltcave
PC Fans
Written by Azzief Khaliq
Last updated Jun 11, 2022
Affiliate Disclosure: When you purchase products through our links, we may receive a commission at no additional cost to you.
Having trouble with fan noise? You’re not alone. Default fan settings often aren’t ideal, usually running too hot or too loud. And then there are those overly-sensitive fans that constantly speed up and slow down during everyday use. While there’s no perfect solution, this fan curve guide should help you strike a good balance between noise and cooling.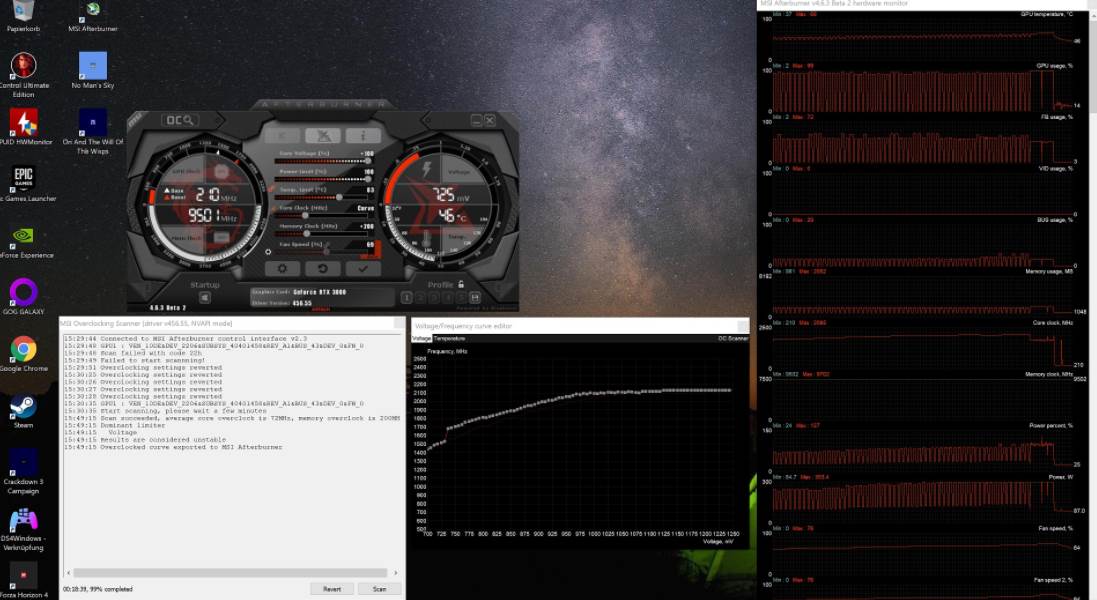
The idea is to create fan curves that reduce noise on the desktop while still offering adequate cooling when gaming. It’s not necessarily what everyone wants, but we feel it’s a good middle ground that should work for most users. So, if you’re struggling finding that balance, these fan curves might just be for you. Let’s get started.
How to Set Fan Curves
A quick note before we start. I’ve based this guide on my experience using and running air-cooled rigs in relatively airflow-friendly cases (such as the Fractal Meshify 2). You will have to experiment with temperature breakpoints and fan speeds yourself, depending on case airflow, fan setup, and ambient temperatures. So go through the step-by-step processes outlined to figure out the best temperatures and fan speeds for you.
Fan Control Software
Source: Voltcave
First off, you’ll want to install fan control software so you can set your fan curves without having to keep restarting your system and going into the BIOS.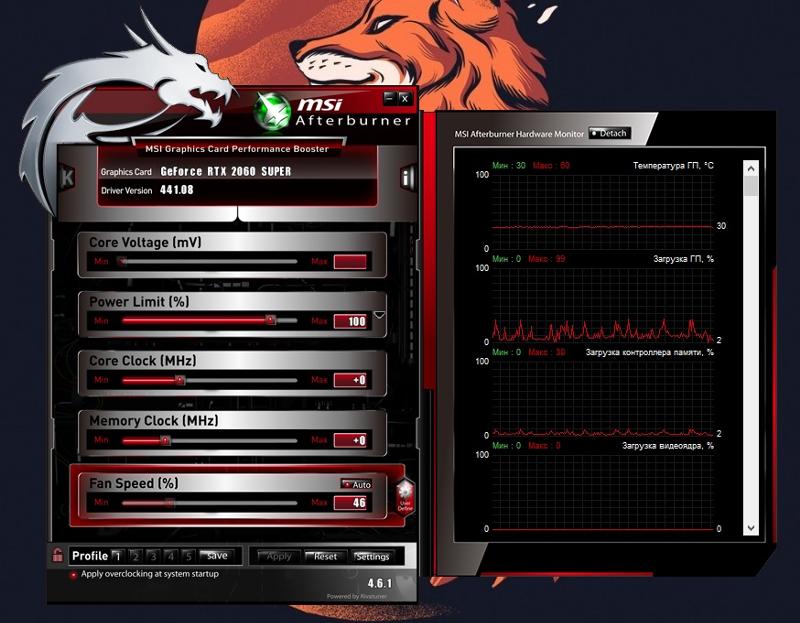 We highly recommend Fan Control: it’s free and open-source, and the developer’s constantly updating it with bug fixes and new features.
I’ll be using Fan Control and MSI Afterburner for this custom fan curve guide. However, most of this advice will apply even if you use other solutions.
Setting a CPU Fan Curve
A Noctua NH-D15 CPU cooler. Source: u/BladeScraper
The most important piece of advice we can give you about CPU fan curves is this: don’t set a linear, constantly ascending graph. CPU temperatures fluctuate a lot when doing basic tasks such as opening a new Chrome tab or launching a program, and you’ll often see momentary spikes of up to 10 degrees Celsius (or more) during daily use.
If you set a simple, linear fan curve, your CPU fans will ramp up and down constantly every time you do something on the desktop. This constant ramping up and down gets very annoying very fast. Not only that, but it’s also of no use since your CPU will be running at safe temperatures anyway, even when it does spike.
To avoid that, we recommend a fan curve that looks like this:
Source: Voltcave
Here, you can see that I have my CPU cooler fans to run at a static 45% up to 65 degrees Celsius. After that point, they ramp up to a maximum speed of 90% at 90 degrees Celsius. The idea with this curve is to keep CPU cooler fans at a constant speed during desktop loads so that they don’t keep speeding up and slowing down every time you do something basic.
These temperature settings work for me, but they probably aren’t ideal for you. So you’ll want to find the correct temperatures for your rig. Here’s a quick step-by-step guide to doing so:
- Decide on the idle fan speed you prefer. Set a fixed fan speed and increase/decrease it until you find a speed with an acceptable noise level.
- Monitor your CPU temperatures for 5 to 10 minutes while doing everyday tasks. My hardware monitor of choice is HWiNFO; if you use it, the reading to look out for is Tdie (or Tctl/Tdie), not Tctl on its own (if present).
- Check that the fan speed you’ve chosen is enough to keep your CPU at an acceptable average temperature (depending on your CPU, this should be around 40 to 50 degrees Celsius). Also, note the maximum temperature your CPU spikes to over the monitoring period.
- Create a fan curve. If you’re using Fan Control, set the temperature source to Tdie (or Tctl/Tdie), and use your idle fan speed as the first point on the curve.
- Add a few degrees Celsius to the max recorded temperature and use this as the second point on your CPU fan curve.
- After this point, you can start ramping up fan speeds under load situations. I prefer a linear increase from 45% at 65 degrees Celsius up to 90% at 90 degrees, but feel free to go higher or lower. You can also add more points to the ramp if you want, but it’s not essential.
Note that Modern AMD CPUs run hot by design, so there’s no need to go overboard and max your fans out at 70 degrees.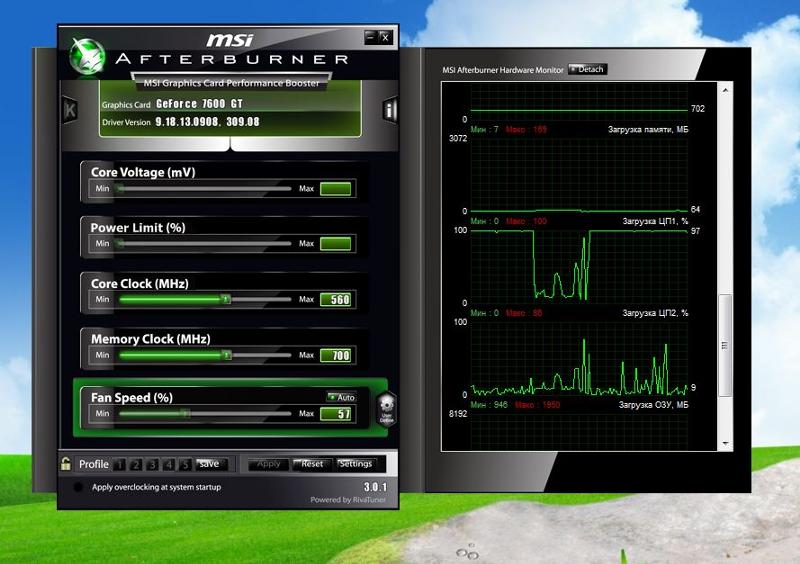 Ninety degrees Celsius is “typical and by design” for these Zen 3 CPUs under full load.
Setting Case Fan Curves
Lian Li Bora case fans. Pictured: MA Modified’s Desk PC Build
I set my case fans the same way I set my CPU fans: static up to a specific temperature before a gradual linear increase. This way, I get the airflow under load that I want while maintaining stable noise levels when I’m just browsing the internet.
After all, it’s much easier to tune out a static noise floor than ignore fans that are constantly ramping up and slowing down according to the slightest load.
It’s a roughly similar process here:
- Experiment with static fan speeds to find one that you’re comfortable with for everyday use. This will be your first point.
- Monitor your system temps with this starting fan speed to ensure that there’s enough cooling for components like your chipset and VRM.
- Determine how much airflow you want under load.
 You can figure out the right fan speed based on noise level or component temperatures; it depends on your priorities. It’s not an exact science, so feel free to experiment. Once you find it, this temperature will be the third point.
Now that you’ve identified the first and third points, it’s time to find the second point where your curve will start ramping up. The second point depends on the temperature source for your case fan curve.
What Temperature Source to Use for Case Fans?
While there is no correct answer, many users use their GPU temperatures as the temperature source for their case fans. Software fan control has a definitive advantage over BIOS fan control here, as you can’t map fan curves to GPU temperatures in the latter. The closest you get is PCIe slot temperature, which often has little relation to your graphics card temperature.
I use one of Fan Control’s advanced custom sensors called “Mix.” It lets me choose two (or more) sources and assign a fan curve to the average, maximum, minimum, sum, or difference between the two.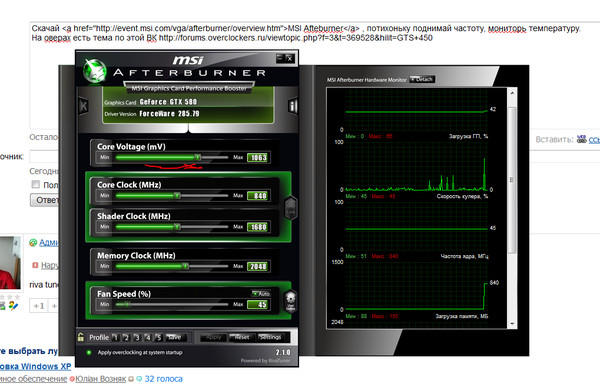
Source: Voltcave
I’ve selected CPU and GPU temps and chosen the “max” function. With this setting, my case fans ramp up based on the hotter of the two sensors, useful for those situations when a workload only stresses one of the two.
You want to take the same approach as when setting up your CPU fan curve with your chosen temperature source. Identify the maximum temperature your source hits during everyday desktop use and add a few degrees. This is to keep your case fans at a constant speed when not under load. That’ll be the second point in your case fan curve.
Source: Voltcave
I run uniform fan curves for both intake and exhaust, but you can go crazy with individual fan curves or different curves for intake and exhaust. Just make sure you plug your fans into separate motherboard fan headers so that they’re detected individually.
Setting a GPU Fan Curve
GPU fans on Nvidia GTX 1080 and RTX 2080 Founder’s Edition cards. Source: Nana Dua
More than the other curves we’ve discussed, figuring out your GPU fan curve is a case of thermals vs.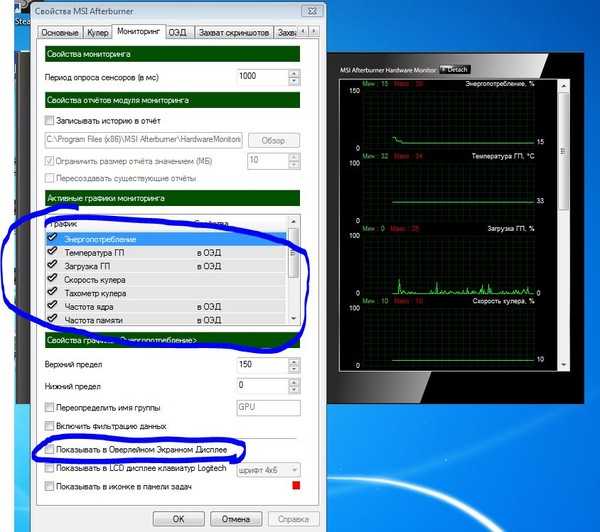 noise. GPUs are quick to reduce clock speeds based on temperature, more so than CPUs even. But GPU fans are also tiny and get really noisy once you crank fan speeds up.
I hate noisy GPUs, so I tend to set my GPU fans based on noise. And, unless you don’t care about how loud your graphics card gets, it’s what I’d recommend everyone do. Here’s another quick step-by-step guide to figuring that out:
- Find the maximum fan speed you’re willing to tolerate. It tends to be around 60% with most of the cards I’ve owned, but your mileage may vary.
- Load up a reasonably demanding game and monitor temperatures. You can use Furmark for a worst-case scenario test, but a Triple-A game at high settings and native resolution should be good enough if you’re only planning to game. If you’re using HWiNFO, pay attention to GPU Temperature and not GPU Hot Spot Temperature.
- If the temperatures are acceptable (ideally in the mid-70s at most), then you’re good to go with this particular fan speed.

- If your GPU goes past 80 degrees Celsius and starts thermal throttling to compensate, increase the fan speed until it stays under the thermal limit.
Once you find the right speed, treat it as your GPU’s new maximum fan speed and create a curve accordingly. How you do this will depend on whether you like GPU fan stop.
Source: Voltcave
If you, like me, appreciate GPU fan stop and want to retain that behavior:
- Open MSI Afterburner’s properties, go to the “Fan” tab, and tick the box next to “Enable user defined software automatic fan control.”
- Note the dotted white line on the graph (if present). That’s is the speed at which your fans shut off and will be the first point in your curve.
- Monitor your GPU temperatures with the fans off. Once you find the maximum, add a point a few degrees above that maximum temperature along the dotted line. This is the second point in the graph.
- Add another point at the maximum fan speed you identified earlier at around 70 degrees Celsius or slightly higher. Keep this at or below 80 degrees Celsius.
- If you’re using FanControl for your GPU fan curve, remember to select your GPU as the temperature source.
If you don’t care about fan stop, you’re free to go with whatever fan curve you prefer. But I still recommend checking the fan stop speed with MSI Afterburner, if only to identify how fast you need to set your fans to avoid them turning off.
Hysteresis
Hysteresis is the amount that the temperature source must change over a given periodbefore the fan increases (or decreases) its speed according to the curve you’ve set. In more simple terms, Hysteresis adds a bit of “lag” to your fans so that they don’t react immediately to any little temperature change along your fan curve.
It’s helpful in conjunction with the fan curves we’ve set to stop the fans from immediately ramping up if one of our temperature sources crosses the threshold for a split second.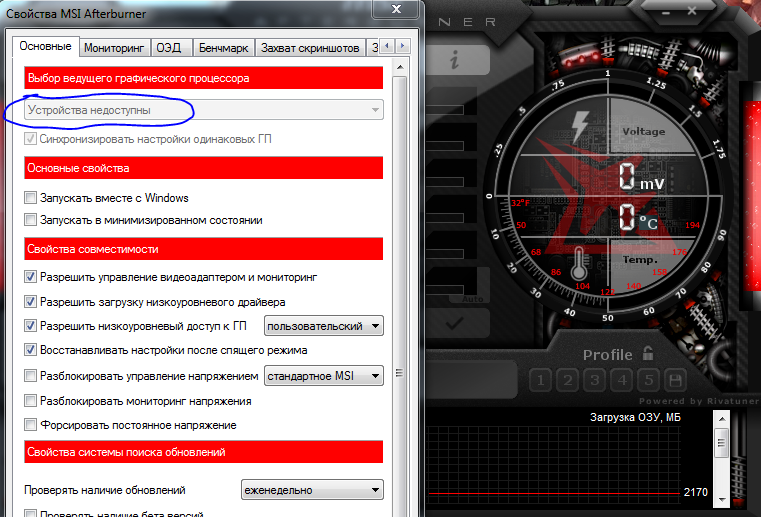 It also prevents fans from ramping up and down with minute changes in GPU or CPU temperature under load.
Source: Voltcave
Fan Control offers three hysteresis-related settings. The first setting, “hysteresis,” sets the amount of hysteresis. “Response time” sets the amount of time the fan curve takes to detect a temperature change. Finally, there’s a checkbox to specify whether hysteresis applies during temperature increases and decreases or only when temperatures decrease (MSI Afterburner’s standard behavior).
There aren’t any hard and fast rules here, but a hysteresis setting of around five degrees Celsius is a good place to start. Not every game or workload puts a constant strain on your components, and temperatures can fluctuate even when gaming. The idea is to set a large enough hysteresis so your fans don’t immediately slow down when the load (and temperature) reduces.
For example, I’ve seen component temps drop by two or three degrees Celsius during normal gameplay based on what’s going on in-game (or when I enter a menu).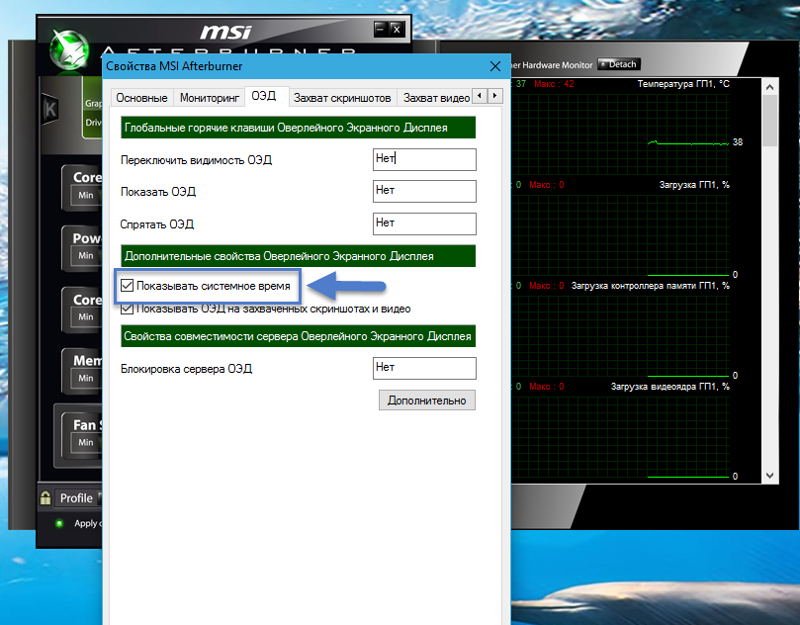 Suppose that happens at temperatures between your two points (during the “ramp”). In that case, your fans will start slowing down and speeding up constantly, putting us back at square one.
Fluctuating CPU temperatures. Source: Voltcave
Hysteresis keeps your fans going at the same speed even when the temperature drops slightly. It might seem less efficient (why keep the fans running faster than they need to?), but it also means that your fans won’t have to speed back up when there’s more work to do.
Whether to enable hysteresis only on the way down (applicable only to Fan Control) isn’t clear-cut and will require some experimentation. I tend to enable it for my GPU so that it reacts quickly to any significant increases in 3D workloads, but feel free to test it out with other curves to see what works noise- and temperature-wise.
Closing Thoughts
Finding the best custom fan curve settings for your rig is more of an art than a science, and it’s impossible to cover every single approach or philosophy behind fan curves.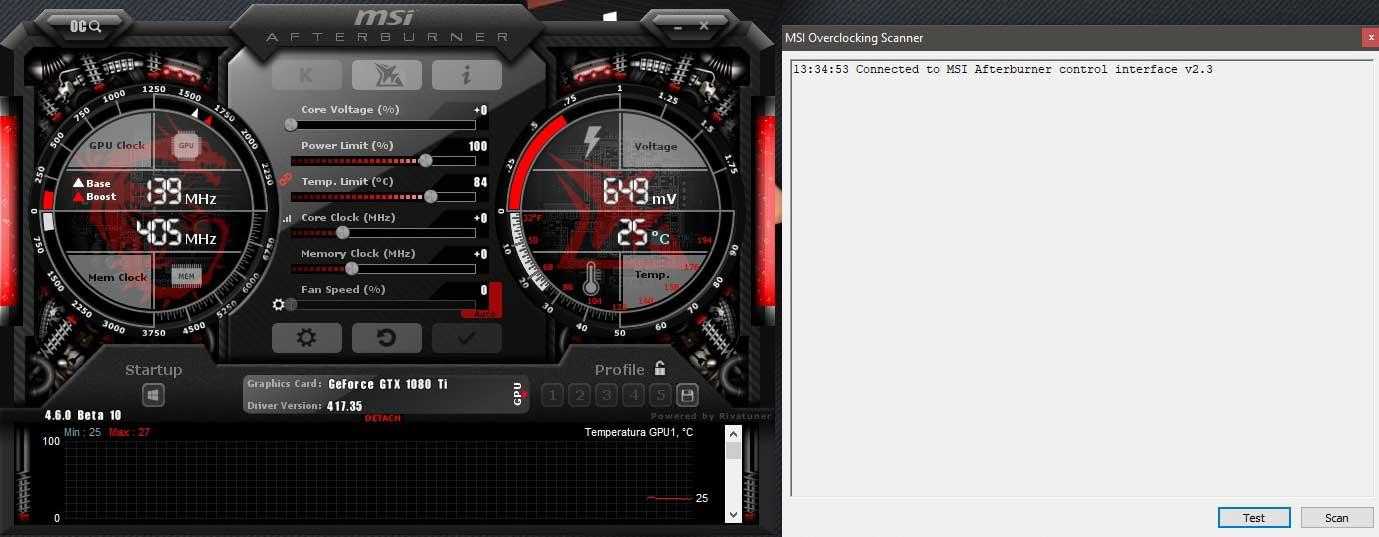 Some users don’t mind noise and max their fans out for the lowest possible temperatures. Others are even more noise-obsessed and run their fans as slowly as possible with less regard for temps.
We’ve outlined our favorite mid-point approach, aiming for unobtrusive fan noise on the desktop with enough airflow to keep things cool when you’re gaming or rendering. And while we think this is the overall best approach to take, you should experiment and use our guide as a jumping-off point for your own take on fan curves. Have fun!
Subscribe for an occasional dose of PC hardware inspiration and guides.
You’re in!
Subscribe
How to Install MSi Afterburner
Mason
Sometimes I believe playing a video game can’t be fun due to GPU ludicrous capabilities. So, I began to study. After that, I was able to find a suitable method for playing games. I’m wondering what if I share with you, what is that tool and how to use it? Well, the software is nothing but MSI Afterburner!
MSI Afterburner works with all graphics cards as an overclocking software. The primary objectives are GPU/Shader/Memory performance adjustment, low-cost fan speed control, and GPU voltage monitoring. MSI Afterburner allows users to personalize their PCs and ensure that gaming performance is always up to date. What sounds interesting? It’s time to focus on the tools and nitty-gritty of how to install Msi Afterburner.
Let’s jump right in.
What Is Msi Afterburner?
If you’ve learned of this software program, you’re probably familiar with what it is and what it is capable of. Evidently, for this powerful and helpful tool, knowing the whole scope of its features is simply the ability to utilize it to its greatest potential. MSI Afterburner, as stated in the article, is a great tool for monitoring and benchmarking. Its true potential, though, lies in its overclocking and underclocking capabilities.
MSI Afterburner is an excellent option since it allows you to slowly and carefully modify a certain GPU’s core clock, but also the memory clock, fan speed, power limit, and core voltage. Because it’s very easy to utilize, most of it offers it a fantastic tool, but the reason we would give it a gold star as the highest is its simplicity and ease of use.
How to Download MSI Afterburner?
As it was mentioned earlier, one of the most important reasons for MSI Afterburner being that it is such a fantastic resource is its easy to download and use. MSI’s website may vary from time to time, and at some point, may alter how you genuinely obtain the setup file, but the method is as follows for the time being:
Navigate MSI’s website and press the Download MSI Afterburner button on this link.
Because of regular redesigns, the exact layout or button may vary, but even if you search for the button that reads MSI Afterburner, you’ll most likely find it in that convenient format. Install the downloaded zip tool runs the setup file and you’ll need to be aware that some antivirus software may be troublesome, but if you open the URL above, you should be okay.
How to Install MSI Afterburner is easy and easy.
MSI Kombustor
Before taking a look at MSI Kombustor, take a look at MSI Afterburners features. This is MSI’s benchmark software, which is excellent for allowing you to perform benchmarks at a variety of configurations. It’s also excellent to show you the specifics of the test as you perform it. Of course, it may also preserve a log file for further inspection, and it is a highly reliable benchmarking software in context.
It had been free to download from MSIs website, but now you can access it through this link. Like MSI Afterburner, you should get the most current edition for optimal results.
When To Use Msi Afterburner (and How?)
All of it is set up and ready to dive into the realm of overclocking. However, while you visit, there are a few things you must be aware of.
They are-
- Bestcpus.com uses any sort of external change to any of your PC’s operating systems, such as the GPU and CPU.
- This indicates that you must overclock your GPU in moderate, relatively equal amounts instead of assuming the maximum performance.
A Glimpse On MSI Afterburner Feature
Design
In the top rank, Kombustor, Help, and Information are all shown under the Afterburner symbol. If you have it installed, the Kombustor button will be enabled. If you didn’t, you may still click it to get to the download button.
Here are a few simple notes –
- Kombustor is a benchmark tool that is appropriate for post-overclocking testing, as stated earlier.
- Nevertheless, there are a number of different, better, and more complete benchmark software systems available, such as FurMark, 3DMark, and Unigine Heaven, which are highly recommended for use.
- Despite the fact that the Help option allows you to go to the Afterburner webpage, this is most likely the result of a recent makeover and will be released in the future.
- The Information button, on the other hand, will provide you with basic CPU and GPU specifications, and nothing that can’t be better examined using a different tool such as CPU-Z.
The Essential Buttons are the words used by the essential elements.
- The primary component of the GPU’s usage is to increase or decrease the CPU’s power.
- if your card permits it, Power Limit will modify the primary GPU power limit.
- To get that performance boost with consistency, you must have different settings synced with Core Clock.
- Before executing Memory Clock, ensure that all else is set up.
- The Fan Speed slider located below is used to adjust the master GPU fan speed and is set to Auto by default, which is the best option.
Supplemental Buttons
1. There are three key buttons, the Settings, Reset, and Apply, among other things. 2. Tools for Monitoring 3. The scanner comes with it.
Following that, you may change the settings in Afterburner. It’s also a great idea to separate them in a different structure so you can switch between the two modes.
Final thoughts
While overclocking isn’t the most powerful component of MSI Afterburner, it’s the finest tool. It’s one of the most overclocking tools, and its easy to install. MSI Afterburner is easy to install on your PC. You only choose the installer language, confirm the license agreement, and modify the setup file if you are not satisfied with the default mode.
Sayonara!
Configuring MSI Afterburner for monitoring, overclocking and cooler
MSI Afterburner — A utility from MSI that is capable of overclocking an AMD or Nvidia graphics card to the highest possible settings without causing irreversible damage to the hardware.
In addition to GPU overclocking, there is also FPS monitoring, increase or decrease in GPU fan speed, core voltage, temperature and power limit. And in the latest version of the program, a new «Scaner» function has appeared, which automatically detects the video card model and sets up stable overclocking parameters.
MSI Afterburner Features:
- Overclocking — Allows you to use the GPU at its maximum potential without causing permanent damage to the hardware. You can fine-tune parameters such as core voltage, temperatures, power, fan speed, core and memory clocks.
- Monitoring — All parameters that can be overclocked can be monitored in a special monitoring graph to understand which parameter needs to be increased or decreased.
- Benchmarking — There is a built-in «Kombustor» that provides detailed information about overclocking and how it will affect performance. Compatible with OpenGL and DirectX.
- Video Capture — The Predator function allows you to record games without missing a single frame and even records in H.264 format. Also, it is possible to adjust the frame rate limit, quality and compression types.
- Fans — temperature must be taken into account when overclocking the GPU. By increasing the fan speed, critical overheating of the chip can be avoided. Also, if they are too noisy, and the GPU temperature is normal, then the rotation can be reduced to reduce noise.
- FPS counter — FPS is displayed in real time during the game. This is convenient, since you can compare the game before and after overclocking.
What do you need to know?
MSI Afterburner — positions itself as a safe overclocking for video cards, but it’s still a risk. I have described blue screen errors a lot on the site, and in some cases, it was overclocking a computer or laptop. If you encounter a BSOD in Windows 10, then you will have to roll back the default graphics card overclocking.
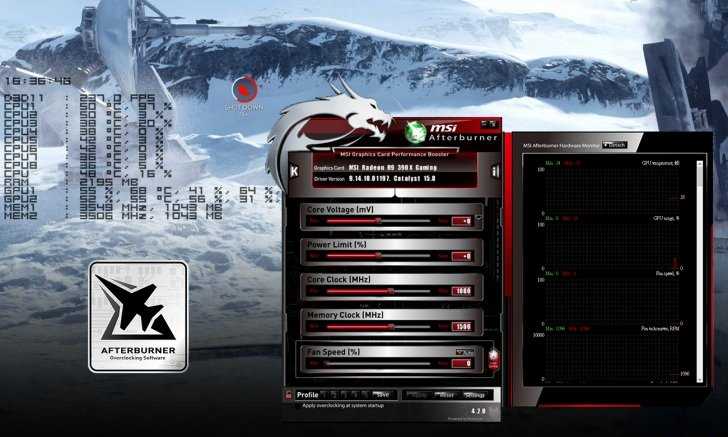
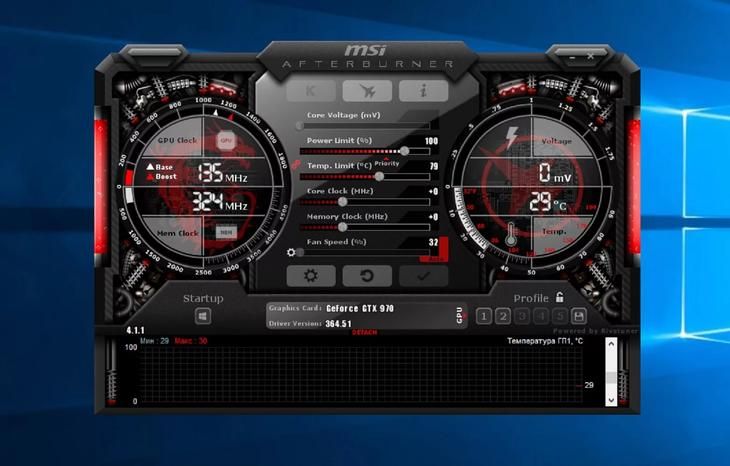
Three important buttons:
- Resets overclock settings to default. If you see a critical temperature, Windows 10 blue screen errors, then a quick default reset will save you.
- Applies overclocking parameter settings.
- Saves a profile with settings. You can create multiple overclocking configurations. For example, you can configure and save profile 2 as for games, and profile 1 can be created with minimal overclocking settings when you are just on the desktop.
Go to MSI official website and download Afterburner by clicking «DOWNLOAD AFTERBURNER», then unpack the archive and install the program by clicking «.exe».
1. Installing Kombustor in MSI Afterburner
Kombustor is not included in Afterburner by default and needs to be downloaded and installed separately. Go to geeks3d official website and download Kombustor and then install. Next, close the MSI Afterburner program if it was open and start it again.
MSI Afterburner now has a button K — Kombustor. Click on it to launch the benchmarking settings. Set the parameters for the test and click on » RUN stress test » to run the test. This will give you an idea of how your graphics card performs at a basic level.
These tests will help you test your overclocking settings without running games.
0005 Scaner
» (magnifying glass icon and C), which will automatically detect the video card, test it and select the optimal overclocking parameters.
- Click on the magnifying glass icon to launch the Scaner. In the window that appears, click Scan . The process can take from 30 minutes up to 1 hour
- After the test, you will see » Scan succeeded, average core.
.. «, which will mean the end of the test.
- Close the window and click «Apply» from the bottom of the program. (check mark icon).
Note : You will be shown the optimal overclocking settings under «Scan succeeded…». In my case, this is +117 MHz for Core Clock and +200 MHz for Memory Clock.
3. Manual overclocking
Running Kombustor in the background will help us here to track the improvements in the video card and the limit of its capabilities with all sorts of flickering, crashes, squares on the image and lags. I’ve seen +7 FPS gains when adding +65 MHz. My aisle was +179MHz, because if more, then the test crashed and sometimes showed squares. This is due to cooling, since I have a GTX1660 Supre video card with one fan.
- In the FAN column, set the sliders « Power limit » and « Temp limit » to maximum , then click apply.
- In the column « Core Clock » set each time +20 MHz .
- Press « Apply » each time after each addition.
Note: When there are crashes, lags and crashes during the test, but start reducing the Core Clock by -5 MHz until the crashes are eliminated.
I have determined the optimal core clock Core Clock for my card, now we can add the memory clock » Memory clock «.
- Add » Memory clock » by +100 MHz each time you press apply. When you get to glitches, crashes, flickering or stuttering in Kombustor, then start decreasing by -10 MHz until the glitches are cleared.
Recommendation : I advise you to wait at least 10 minutes for a test in Kombustor to see if there will be failures when adding overclocking options for a video card.
4. Displaying FPS and other parameters in the game
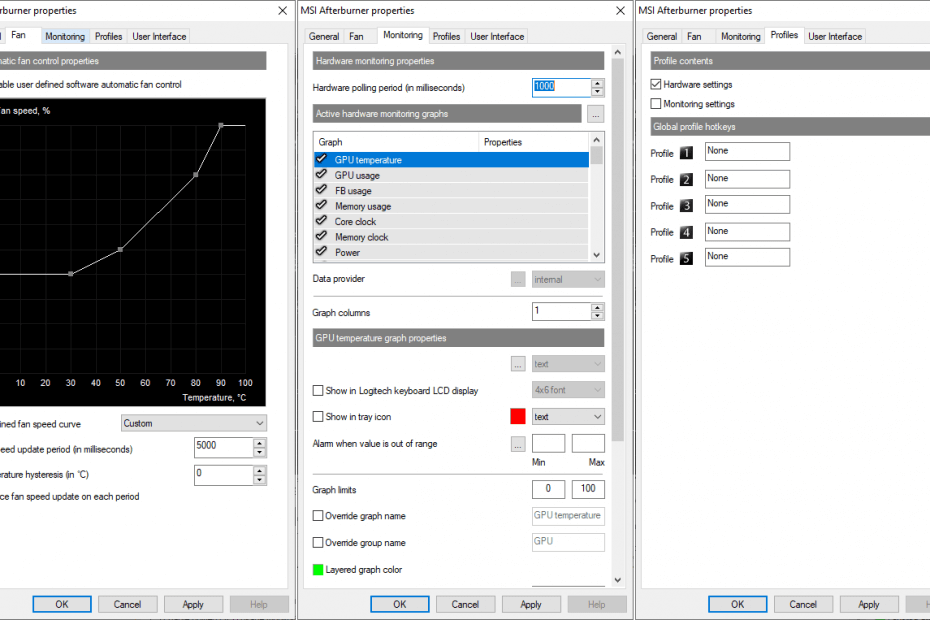
If you want parameters like FPS, GPU load, GPU temperature, etc. to be displayed during the game, then click on the gear icon and go to the «» tab Monitoring «. Here you will be able to configure a specific parameter that will be displayed during the game, set it to show as text or graphics.
- Select the option you want to display in the game.
- From the bottom, check the box « Show in OED «.
- You can also customize the color and display as text or graphics.
- If you select the «Show in taskbar icon» checkbox, the selected options will also be displayed on the Windows taskbar.
5. Adjusting the cooler rotation
If you are worried about the high temperatures of your video card at minimum load, you can increase the rotation of the cooler. Press « Parameters » and go to the tab « Cooler «, then check the box « Enable software user auto mode «.
You will see a graph where you can manually set the cooler rotation speed at a certain temperature. I set the fan speed to 90% at 60°C
[telegram | Support ]
Msi afterburner does not start automatically windows 10
Contents
How to Repair MSI Afterburner Not Working
MSI Afterburner is probably one of the best known and most popular overclocking tools for Windows. It wasn’t popular for no reason, but some users claim that it just doesn’t work on their computers. It may not open at all or may not be able to change the clock speed of your devices. In other cases, it’s the superposition of the game that doesn’t work.
Step 5: Save the file and restart MSI Afterburner.
Step 6: Go to MSI Afterburner settings and check the boxes under General > Enable voltage monitoring and Enable voltage monitoring, then click OK and restart the installation.
Final: GPU voltage control enabled and can now be used up to +100mV, as well as GPU voltage control in OSD.
Disable ULPS in AMD Crossfire settings
Disable NVIDIA overlay
This is the best way to try this if you find that the game overlay provided by MSI Afterburner is not working properly. Using several different overlay tools at the same time is never a good idea and one of them should be disabled. Follow these steps to disable NVIDIA overlay on your computer!
We hope you find this article helpful, and if you have any questions, please feel free to ask in the comments below.
https://steamcommunity.com/app/548570/discussions/0/1651043958648935813/
CCNA, web developer, troubleshooting PC
I am a computer enthusiast and practicing IT professional. I have many years of experience in computer programming, troubleshooting and equipment repair. I specialize in web development and database design. I also have a CCNA certification for network design and troubleshooting.
Source
Afterburner
Afterburner is the gold standard for overclocking utilities.
Overclockers
Exploring and pushing your graphics card’s limits may seem like a dangerous undertaking, but it’s actually not all that scary. The MSI Afterburner utility provides convenient access to all settings for the computer’s graphics subsystem.
By controlling the fan speed and increasing the frequency and voltage of the GPU, you can find the perfect balance between performance and temperature. Take control of your computer and unleash the full potential of your graphics card!
Hardware monitoring
The proverb that it’s better to see once is also great for overclocking. To keep your computer under control, you need to know its parameters. Hardware monitoring allows you to see that the system remains stable when starting games and during overclocking.
MSI Afterburner gives you all the critical information in real time: temperature, load level, operating frequency, power voltage. Moreover, the monitoring data selected by the user can be displayed on the screen even during the game, which allows you to constantly monitor the necessary system parameters.
Tri-Volt Adjustment
True overclockers appreciate being in complete control of everything, because overclocking success is sometimes down to the smallest details. That’s why MSI offers the ability to fine-tune the voltage of their graphics cards.
And you can change three parameters at once: the voltage of the graphics processor, memory and phase-locked loop.
Fan Adjustment
Cooling is a key factor in the operation of a graphics card. With the MSI Afterburner utility, you can manually change the fan speed control curve to achieve optimal cooling of the device.
Frames per second (FPS) counter
To understand the effect overclocking has on computer performance, you need to know the level of this performance. To do this, use the frame per second counter, which can be displayed in the corner of the screen on top of the game itself.
64-bit compatible
More and more games are being released for modern 64-bit operating systems, so MSI Afterburner fully supports 64-bit applications.
Personalization
Customize the program interface to your liking with visual themes. Several are already built into the MSI Afterburner utility (just select the one you need from the program’s settings menu), and many more can be downloaded from the Internet.
Multi-language interface
MSI Afterburner is used all over the world, so its interface is available in all major languages. The choice of language is carried out from the program menu.
Kombustor stress test
Kombustor is an exclusive stress test based on the popular Furmark app. It is designed specifically to create the maximum load on the video card in order to check its stability and temperature conditions. Kombustor is compatible with both the latest DirectX APIs and OpenGL.
Download KOMBUSTOR
Predator video recording module
Afterburner mobile app
You don’t need to leave the game to change overclocking settings or read hardware monitoring data, because the Afterburner mobile app, available for iOS and Android operating systems, allows you to do it all from your smartphone or tablet. For its operation, you just need to install on your computer and run a remote server MSI Afterburner
MSI Afterburner
Here you can download the latest version of the MSI Afterburner utility.
MSI Kombustor
Here you can download the latest version of MSI Kombustor utility.
Afterburner mobile app for Android
Here you can download the Afterburner app for Android devices.
Afterburner mobile app for iOS
Here you can download the Afterburner app for iOS devices.
MSI Afterburner Remote Server
Here you can download MSI Afterburner Remote Server.
MSI Afterburner
Click on the MSI Afterburner interface to get related help.
Shows you the graphics card product name and current driver version.
KOMBUSTOR
Run the KOMBUSTOR burn-in benchmark software and test your system performance.
Shows you key information of your system, from CPU to GPU to BIOS.
Core Voltage (mV)
Adjust GPU Core Voltage to increase overclocking capability.
Source
MSI Afterburner setup for monitoring, overclocking and cooler
In addition to GPU overclocking, there is also FPS monitoring, increase or decrease the speed of GPU fans, core voltage, temperature and power limit. And in the latest version of the program, a new «Scanner» function has appeared, which automatically detects the video card model and sets up stable overclocking parameters.
MSI Afterburner Functions:
What do you need to know?
Three important buttons:
Download MSI Afterburner
Go to the MSI official website and download Afterburner by clicking on «DOWNLOAD AFTERBURNER», then unpack the archive and install the program by clicking on «.exe».
1. Installing Kombustor in MSI Afterburner
Kombustor is not included in Afterburner by default and needs to be downloaded and installed separately. Go to geeks3d official website and download Kombustor and then install. Next, close the MSI Afterburner program if it was open and start it again.
These tests will help you test your overclocking settings without running games.
2.
Automatic overclocking
Launch Afterburner and click on « Scaner » (magnifying glass and C icon), which will automatically detect the video card, test it and select the optimal overclocking parameters.
Note : You will be shown the optimal overclocking settings in the “Scan succeeded. «. In my case, this is +117 MHz for Core Clock and +200 MHz for Memory Clock.
3. Manual overclocking
Running Kombustor in the background will help us here to track the improvements in the video card and the limit of its capabilities with all sorts of flickering, crashes, squares on the image and lags. I’ve seen +7 FPS gains when adding +65 MHz. My aisle was +179 MHz, because if more, then the test crashed and sometimes showed squares. This is due to cooling, since I have a GTX1660 Supre video card with one fan.
I have determined the optimal core clock Core Clock for my card, now we can add the memory clock « Memory clock «.
Recommendation : I advise you to wait at least 10 minutes for a test in Kombustor to see if there will be failures when adding overclocking options for a video card.
4. Displaying FPS and other parameters in the game
If you want parameters like FPS, GPU load, GPU temperature, etc. to be displayed during the game, then click on the gear icon and go to the “9” tab0005 Monitoring «. Here you will be able to configure a specific parameter that will be displayed during the game, set it to show as text or graphics.
5. Adjusting the cooler rotation
If you are worried about the high temperatures of your video card at minimum load, you can increase the rotation of the cooler. Click « Settings » and go to the tab « Cooler «, then check the box « Enable software user auto mode
Download MSI Afterburner if you want to customize the graphics chip. If you are just going to use this program, then you should carefully monitor the temperature of the GPU. Keeping this indicator within the optimal limits will help you maintain the performance of such a device. When you use gaming hardware with this application, make sure to purchase a decent cooling system as well. Although the utility itself monitors the state of the GPU and at some point it will be able to display a message about exceeding certain indicators. English
Downloads:
3980
Download
The utility is universal and allows you to fine-tune any Windows 10 computer. Its main functions include setting:
Configuring MSI Afterburner
The installation process of the application in question should not cause you any problems. At the end of it, it is important to restart the computer so that the program has the opportunity to determine the operating parameters of the video card. When the application starts, you can see the current status and settings of the video adapter in its interface. The program has a rather stylish interface, and you will find the call of parameters on the button with the gear.
Go to the tab with the main parameters and mark the device with which you will perform further manipulations. When two identical video cards are installed in your computer, you will need to make sure they are synchronized.
The central panel of MSI Afterburner has frames that can be adjusted using the sliders:
At the bottom of the interface, you can set frames that will display the temperature of the video card. This will allow you to quickly monitor the status of this device and reset all the parameters that were defined for overclocking at the right time.
The program has its own rules, which are very important to get acquainted with even before the start of operation. All this will allow you to improve system performance. Moreover, it will also allow you to increase FPS in games. Please note that if you carelessly configure your PC, you can break it, so be as careful as possible.
Source
How to use
To use the program, you must first download, install and configure it. Let’s consider all these points.
First you need to download the program.
To do this, go to the official website of MSI Afterburner and scroll down to the download section:
How to install MSI Afterburner
Click «next» everywhere.
After that, click «next» and wait for the installation to complete.
After installation, launch MSI Afterburner.
MSI Afterburner is very easy to use. In order to understand how the program works, let’s study the parameters and what they are responsible for.
MSI Afterburner Tuning
This overclock is needed to increase the hashrate of your video card during mining or to improve performance (FPS) in games.
Fan Speed - if your video card gets very hot, we still do not recommend setting 100% speed, as this will exhaust the cooler resource faster (and this is one of the most common breakdowns).
When increasing the overclocking of the video card in memory and in the core, it is best to add 10 units each.
You can also overclock video cards directly in the miners. Watch the overclocking examples:
Watch the video
Before we get started, remember that overclocking is not safe and there is a risk of irreparable damage when tweaking your graphics card.
MSI Afterburner makes overclocking easy, but a fair amount of common sense is highly recommended.
If you feel you are overclocking too far, stop immediately and seek advice from competent sources before continuing.
How to overclock your graphics card
Overclocking MSI Afterburner follows standard overclocking and testing techniques to find the highest and most stable settings. Don’t forget to click the «Apply» button after any changes.
Advanced settings
Clicking on the gear (settings) will open all settings of MSI Afterburner.
Configuration files can be used to apply locked and advanced settings.
To enter configuration editing mode, right-click on the MSI Afterburner shortcut and select «File Location».
The folder with the installed program will open. In it we will see a lot of files. We need to select the Profiles folder:
It contains configuration files:
You can edit them in any text editor in administrator mode. It is very convenient for editing to use the standard Windows 7/8/10 Notepad, or Notepad ++ (it is even more convenient).
This folder contains the following files:
Before editing, it’s a good idea to back up these configuration files to another folder so that you can restore everything if something goes wrong.
If there are syntax errors in the configuration files, both undervolting and overclocking will not work. And in the interfaces of the program, the sliders will be blocked.
How to unlock core voltage
To unlock voltage, in the main configuration file MSIAfterburner. cfg in the Settings section in administrator mode, specify the unit in the following options:
UnlockVoltageControl=1 (unlock voltage control) )
StartupDelay=0 (delay time to apply acceleration/undervolting)
ForceConstantVoltage=1 (“Forced constant voltage”)
For AMD
If you want to enable unofficial overclocking mode, then make or add changes to the following lines:
[ATIADLHAL] UnofficialOverclockingMode=1 UnofficialOverclockingEULA=I confirm that I am aware of unofficial overclocking limitations and fully understand that MSI will not provide me any support on it.0003
VFCurveEditorMinVoltage = 700 (lowest possible voltage, can be set to 650 mV)
VFCurveEditorMaxVoltage = 1250 (maximum possible voltage, in millivolts) VEN_1 … allow you to apply overclocking and downvolting for each card.
Example
The syntax of these files is as follows:
The last line will cause the program to access the video card controller through the voltage regulation module from nVIDIA.
How to understand which *.cfg file belongs to which card?
To do this, you can match the bus number ( BUS ), which is indicated in the name:
In the GUI, you can find out the bus number by clicking on the i icon:
Now we can make changes further.
In the *.cfg configuration files for each video card, we will specify the temperature limits (in degrees Celsius), Power Limit (power in percent), Core and Memory Clock (core and memory frequencies in megahertz), fan operation modes (Fan Speed ) cards and the frequency of their turnover.
Using the graphical interface, we can also specify the autostart of the application and the desired overclocking profile, core voltage, fan settings, etc.
It’s better to turn off the option to synchronize the settings of identical GPUs, because even cards from the same manufacturer usually have their own unique overclocking potential.
We recommend that you check the «Run with Windows» option.
How to enable fan control
When mining, we recommend setting the minimum rotation speed to 40-60%. Next, we will select acceptable settings that allow the card to operate at the optimal temperature, and at the same time not increase the noise and wear of the fan bearings.
To auto-control the fan speed of graphics adapters according to the configured rotation curve, you need to enable the “Auto” button in the graphical interface:
How to add MSI Afterburner to startup
To automatically apply overclocking options for all video cards, you must set the required parameters and save them to a profile.
To automatically apply the profile, click on the button with the Windows icon — «Startup».
The use of personal graphics settings will be performed every time the farm or computer is started.
You also need to click on the «Options» gear and turn on the «Run with Windows» checkbox.
How to unlock the Core Voltage, Power Limit and Temp Limit 9 sliders0307
An example of an inactive option:
To unlock core voltage, overclocking and fan speed, you must click on the settings gear:
Here we can tick the options we need — «Unlock voltage control» and «Unlock voltage monitoring».
If there are no such lines, then you need to insert them into each configuration file yourself.
The Core Voltage slider is now active.
Also do not forget to check the boxes «Unlock voltage control» and «Unlock voltage monitoring» in the settings.
Analogs
The analogs of this program include:
Conclusion
MSI Afterburner is a simple and easy-to-use program. It is very easy to overclock video cards with it. In the settings menu «interface» you can always change the skin of the program.
Also MSI Afterburner, shows the temperature and frequency of the video card.
This is a very convenient and indispensable program for mining!
Source
Video
MSI Afterburner autoload setting
The application failed to start because its parallel configuration is incorrect
MSI Afterburner resets settings
Autostart miner on Windows 10 from a Wi-Fi outlet.
msi afterburner does not see the video card / solution in 10 seconds
How to install and configure MSI afterburner and what to do if all indicators are not visible (2021)
WHAT TO DO IF THE ITEM (COOLER) DISAPPEARED FROM MSI Afterburner HOW TO INSTALL?
Configuring MSI Afterburner — Monitoring, fps, frametime, hardware in overlay
MSI AFTERBURNER DO NOT USE SLIDERS! Solution!
MSI Afterburner. Download, installation, configuration.
msi extension what is the installation file
msi extension what is the installation file
admin / 05/29/2018
Msi
MSI Afterburner is a free program for tuning, monitoring and overclocking video cards, built on the technologies of the popular RivaTuner utility. MSI Afterburner supports GeForce 8X00 or later (for NVIDIA), R3000 or later (for AMD), and MSI graphics cards. At the same time, it should be noted that some functions (for example, GPU voltage control) are made primarily for MSI branded video cards.
The advantages of MSI Afterburner compared to RivaTuner are friendly interface, visibility (all settings in one window) and automation of algorithms that are difficult to understand for an inexperienced user.
Content
-
- The main properties of MSI afterburner:
- attention:
- Changes in the latest version (Change History)
- Read all (1)
- Introduction
- Installing the MSI package using the command line
- MSI drivers
-
- Uninstalling the MSI package using the command line
- Types of installers
- MSI laptops
- SFX archives
- You can create *.
cmd files and write codes in them.
- User comments
Main properties of MSI Afterburner:
— Changing the supply voltage of video cards and video memory.
— Automatic tracking of 2D/3D mode switching using profiles.
— Setting the adjustment of the video card cooling system depending on the temperature.
— Creation of overclocking profiles with application by pressing a «hot key» (up to 5 pieces).
— Monitors frame rates in 3D applications and outputs metrics to overlay OSD menus and system tray.Attention:
The archive with the main MSI Afterburner utility also contains a stress test for the MSI Combustor video card (a video card stability test based on the engine of the well-known FurMark benchmark).
Changes in latest version
(changelog)
- Quick OSD setup from scratch with hotkeys and multi-functional features. This feature is not new for version 4.5.0, it was in previous versions, but a rather narrow range of users know about it (because no one reads the documentation :)).
And this ability greatly speeds up the setup.
- Control memory usage at the level of the desired process using the PerfCounter plugin.
- Selection of fragments of the monitoring history, detection of local minima / maxima.
- Use the Monitor Module Profiler to help identify and disable the most power hungry sensors.
Recent comments
read all (1)
Introduction
Our Windows installers contain a complete client side installation (MSI) package (built on Windows Installer v2.0). The network installation instructions assume that the user is familiar with the basics of the Windows Installer, in particular deploying MSI files. This package can be used with any Windows operating system that supports Windows Installer v2.0.
Installation on a network server
- Download MSI
- Double click on the resulting file ( Yenka_Setup_(MSI).exe )
- Install this package in your programs’ shared folder.
- Attention : The program must be activated BEFORE deploying the package to the network. To do this, run ‘Yenka.exe’ from the folder where you installed the program (
\program files\Yenka\Software\Yenka.exe) and follow the Activation Instructions.
installer
Installation
Installing an MSI package using the command line
- From the Start menu, select Run…
- In the command field, type:
msiexec /i»\YK.msi »
where:is the path to the Windows Installer package file.
Drivers MSI
For example, the line might look like this: msiexec /i»C:\Program Files\Yenka\YK.msi»
- Press the ENTER key
Attention: The Windows Installer service allows you to install in «invisible» mode, using the ‘/q’ key. For example: msiexec /i»C:\Program Files\Yenka\YK.msi» /q . To show the installation progress bar, you can use the switch ‘ /qb ’.
Removing an MSI package using the command line
- From the Start menu, select Run…
- In the command field, enter the following string:
msiexec /x»\YK.msi»
where:is the path to the Windows Installer package file - Press the ENTER key
How to make .exe from .msi?
From: Anonymous Date: 12.01.04 11:10 Rating: An .msi distribution has been made for a VC++ 7.0 project. However, you still need to make an .exe based on it, which includes InstMsi and all the necessary files. Is it possible to do this using Visual Studio, MSI SDK or some other means?
Re: How to make .exe from .msi?
From: Gollum Date: 12.01. 04 11:27
Rating: Hello,
, you wrote: For the project on VC++ 7.0 the distribution kit .msi is made. However, you still need to make an .exe based on it, which includes InstMsi and all the necessary files. Is it possible to do this using Visual Studio, MSI SDK or some other means?
for this you need to use windows installer bootstrapper.
All MSI laptops
Build, Configuration Properties, Deployment Project Properties Dialog Box
Today I say goodbye — the day after tomorrow I will be here again
Re[2]: How to make .exe from .msi?
From: Anonymous Date: 01/12/04 12:19 Rating: Hello, Gollum, you wrote:
G> for this purpose it is necessary to use windows installer bootstrapper.
As I understand it, setup.
exe is the same bootstrapper that, if necessary, launches the corresponding InstMsi to install MSI. And I need to make such a setup.exe so that both my .msi and bootstrapper and InstMsi are inside it. Alternatively, you can stuff all this into a self-extracting archive with setup.exe autorun, but you need everything to look like a normal setup and nothing left on the disk.
Re[3]: How to make .exe from .msi?
From: Ignoramus Date: 12.01.04 20:42 Rating: Hello Anonymous, you wrote:
As I understand it, setup.exe is the same bootstrapper that, if necessary, launches the corresponding InstMsi for installing MSI. And I need to make such a setup.exe so that both my .msi and bootstrapper and InstMsi are inside it. Alternatively, you can stuff all this into a self-extracting archive with setup.
exe autorun, but you need everything to look like a normal setup and nothing left on the disk.
I did just that. A self-extracting archive is one in which the CAB archive is pasted after the EXE file. (By the way, such archives can be unpacked by the right button with RAR etc.). At startup, the archive is “unstuck” into a temporary folder, everything is installed from there, and at the end the folder is deleted.
Re[4]: How to make .exe from .msi?
From: algol about:blank Date: 01/13/04 09:35 Rating: Hello Ignoramus, you wrote:
I> I did just that. A self-extracting archive is one in which the CAB archive is pasted after the EXE file. (By the way, such archives can be unpacked by the right button with RAR etc.). At startup, the archive is “unstuck” into a temporary folder, everything is installed from there, and at the end the folder is deleted.
A self-extracting CAB with autorun setup can be made using Internet Express (iexpress.exe) from the Internet Explorer Administration Kit (http://ieak.microsoft.com).
Re[5]: How to make .exe from .msi?
From: alekzander Date: 13.01.04 11:19 Rating: nsis did not try?
steering piece.As long as there are no replies to your own message, you can delete it.
MSI products
When installing a program with the .msi extension, it says that there is a problem with the Windiws Installer service, and when starting this service, it says: Failed to start the service on the local computer … Error 2: The specified file cannot be found. Or the service is not listed.
Follow these guidelines to restore the Windows Installer service.
How to restore Windows Installer
Check your computer for viruses
The first thing to do is to make sure that the computer is not infected with viruses.
To do this, we recommend that you check your computer with an anti-virus program installed on the system. And also download the cure utility from dr.web (dr.web cureit!®) and run the scan again with this utility.
Check the startup type of the Windows Installer 9 service0063
To do this, open Control Panel — Administrative Tools — Services. Find the Windows Installer service in the central part. Right-click on it and select Properties from the context menu. See what startup type is set. Change it to automatic, restart your computer and check if the problem repeats or not.
If the service is not listed, or the problem persists, read below.
Does the windows installer 9 program itself start?0063
If the problem persists or the startup type is already set to automatic, then check if the windows installer program itself starts. To do this, click Start — Run — Type msiexec and press enter. This should open a window in which the windows installer version and available commands will be written.
The files necessary for the Windows Installer to work may be corrupted
To check the integrity of the system files, open the command prompt as an administrator (click Start — All Programs — Accessories — Right-click on Command Prompt — Run as administrator) and in the command line run command
Sfc /scannow
Restart your computer and check if the error persists or not.
If this does not help, open a command prompt as an administrator and type the following commands in sequence, pressing enter after each one: /s %windir%\System32\msihnd.dllregsvr32 /u /s %windir%\System32\msisip.dllregsvr32 /s %windir%\System32\msi.dllregsvr32 /s %windir%\System32\msihnd.dllregsvr32 /s %windir %\System32\msisip.dllnet start msiserver
Restart your computer and check if the Windows Installer is working.
If the problem persists, compare the contents of the HKEY_LOCAL_MACHINE\SYSTEM\CurrentControlSet\services\msiserver registry branch with the same branch on another computer and, if necessary, correct the values on the problem computer.
MSI Russia
main —
Extract Adobe MSI from EXE
Tags: Group Policies files. It is far from always possible to find these same MSI files.
In order to distribute (and subsequently update regularly) the Adobe Reader program, you need to do a few simple steps:
- , c:\downloads.
- Change to this directory and extract the installation files:
where
- -nos_o»C:\Downloads\ExtractedAdobeFiles» — where to extract the files. Note that there is no space between -nos_o and the quoted folder name.
- -nos_ne — an indication that only the extraction of files will be performed, and not the installation of the program.
- We agree to unpack the file.
- Now in the folder «» you will have files for installing over the network.
- Well, what to do with MSI files, you can read in the article Automatic installation of programs in a Windows domain.
Article updated on 02/28/2011 in accordance with official guidance.
Log in to add comments!
Red-eyed Jedi
of the computer universe
is dedicated.UNATTENDED — Automatic silent installation of applications.
The Windows Post-Installation Wizard is of course DOWNLOADABLE. It will help you automatically install the necessary applications, but making installers for these applications to add them to WPI is a completely separate issue! In any case, you can search the net for ready-made application packages for their silent installation. This article provides information on how to silently install applications in Windows XP using WPI, the Windows Post-Installation Wizard (WPI). This abbreviation means a special software package for silent installation of applications.
Types of installers
In general, there is no universal solution. The key recognition utility built into WPI mainly helps. In addition, sometimes it turns out to turn off unnecessary questions when unpacking installers by adding the key -y , especially to Portable archives.
In general, you should try to use /s as a universal standard key, since it works in most cases.
SFX archives
Perhaps the easiest way to organize automatic installation of your software package is to create so-called self-extracting SFX archives in WinRar. They allow not only to correctly organize the order and place of unpacking your files, but also the subsequent automatic launch of application installers. At the same time, you can also pass parameters to applications for their installation by using the key -sp . For example, the key for unpacking the archive -d allows you to specify the path for unpacking the archive, and -p to specify the password for the archive.
In addition, if you select the «Unpack to temporary folder» option on the «Modes» tab when creating an archive, the installer will be deleted after the installation is completed. This keeps the disk clean.
An example command to launch an SFX archive from WPI with a silent installation key .
Moreover, if after unpacking setup.msi is launched (this must be specified when creating the archive) and the key 9 will be passed to it as a parameter0069 qb . In this case, when creating archives, we do not need to register all the keys at once — we transfer them later.
A bit of useful information: you will probably want to create a shortcut for the subsequent launch of the installed program. The full path to the executable file must be specified in the shortcut properties when creating the archive.
Example: «%ProgramFiles%\MyProgram\myfile.exe»
You can create *.cmd files and write codes in them.
Modern Russified versions of WinRar are supplied with Russian help, where all valid commands and parameters are indicated.
Sometimes you need to disable a service. Most often, this is necessary during the installation process in order to Russify the program or enter serial numbers into the registry.
An example of *.reg file code for these purposes: ;Disable remote access to the registry [HKEY_LOCAL_MACHINE\SYSTEM\ CurrentControlSet\Services\RemoteRegistry] «Start»=dword:00000004 In this case, the value 4 disables service after restarting the computer .
To turn it back on, you need to set the value 2 and reboot.
Sometimes it is necessary to disable the service immediately during the installation process, in this case it is disabled immediately and after reboot it is enabled automatically.
An example of the *.cmd file code for this purpose: net stop «Service name» You must accurately enter the «Service name» in quotation marks in Russian or English, as it is called in the services console! You can peek if My Computer-(right-click) Manage-Services and Applications in the properties of the service to find the «Service Name».
User comments
FILED UNDER : IT
admin
Find:
How to install msi autoburner
How to download MSI Afterburner from the official website
MSI Afterburner is an excellent program for graphic cards from various manufacturers, not just for MSI video cards. It allows you to adjust the frequency of the GPU on Windows systems and offers some advanced features.
Although many MSI Afterburner users use this program to unlock the potential of their graphics cards, you can also create different cooler profiles to reduce the noise from the graphics card cooling system.
Recently, the link to download the program has disappeared from the official MSI website. More precisely, the link itself remains, but it does not work, regardless of the browser and OS used.
The link points to a ZIP file that is now missing. You can verify this by checking the source code of the page. When accessing the file directly, the message «file not found» (Not found) appears.
However, it is still possible to download MSI Afterburner from our website:
But there is also a method suitable for those users who prefer to download software exclusively from official resources.
How to download MSI Afterburner for Windows from the official website
Although the download does not start on the main MSI Afterburner website, it does not stop on the other official MSI website.
You can use this site to download the latest stable version or beta version of MSI Afterburner. Let’s see how to do it:
- Open https://de.msi.com/Landing/afterburner in any browser. This is the landing page of the program in German. Unlike the English version, the live direct download links are listed here. The downloaded program will be in English, but you can switch to another language in the settings.
- Scroll down to the MSI Afterburner download section.
- Press the download button. You can download the stable or beta version of MSI Afterburner. The official zip-archive with the program will be downloaded.
- Unzip the archive and run the installer.
After that, MSI Afterburner will be installed on the device and you can start using the program.
Generally speaking, MSI Afterburner does not have the most user-friendly download page. However, a resource-intensive page with a non-standard cursor is one thing, and broken links are another.
MSI Afterburner — Overclock Video Card, FPS in games, Adjust and unlock sliders we will tell you more in this article.
Afterburner was originally developed with MSI cards in mind.
However, since its release, the software utility has been configured to work with all other graphics cards.
This is currently the most commonly used overclocking and monitoring software for games on the PC screen.
This article will discuss the main features of the utility, what they offer and how to use them.
Before we get into that, let’s download and install the software first.
How to Download MSI Afterburner
Downloading and installing MSI Afterburner is a fairly simple process that you have probably done a hundred times already. But for those who are new, here’s how it’s done:
- Step 1 — Google «MSI Afterburner Download» and click «Search»
- Step 2 — Find MSI official page and follow the link
- Step 3 — This should take you to MSI Afterburner official page, on this page scroll to the very bottom and you will see the download link.
See image below.
- Step 4 — Click on the link above and download the installer
- Step 5 — Once downloaded, run the installer and install Afterburner and Rivatuner.
- Step 6 — Restart your computer and run MSI Afterburner to start using the software
Watch the detailed video on how to install and download MSI Afterburner
What Does MSI Afterburner Do?
The easiest way to understand what MSI Afterburner does is to break it down into categories.
Below are the main features that make up this software and exactly what they offer.
Acceleration
For many, overclocking is a tricky task that involves a fine line between better performance and hardware failure.
MSI recognizes this and has created its own overclocking tool in Afterburner that makes this process easier.
The overclocking feature provides precise settings that maximize the potential of your graphics card while protecting your hardware from irreversible damage.
Clock speeds, core voltage, power limit
The software can adjust almost every aspect of the graphics card, including clock speeds, core voltage, power limit, temperature limit, memory clock, and fan speed.
Afterburner gives you all the tools you need to tune your GPU to your specifications, which is not available in other software applications.
In order for Afterburner to work with all available graphics cards, it uses OC Scanner, a utility that uses an algorithm developed by Nvidia to detect any graphics card model (be it 960 or 2080 Ti).
Once the OC scanner detects which card you are using, it will set the highest and most stable overclock settings for that particular card.
It then applies the changes to your map for an instant performance boost.
Fan Control
Afterburner also allows users to fine-tune their fan profile, allowing you to select a custom fan speed curve that changes based on the temperature of your graphics card.
The higher the temperature, the faster the fan will rotate, the lower the temperature, the slower. Everything is pretty simple.
All your overclocking profiles can be saved in the software and switched with the touch of a button.
Find the settings you want, save them and play!
Monitoring
Afterburner has a great monitoring feature that allows you to see changes made to your graphics card and what is happening with every aspect of your graphics card.
The utility allows you to monitor everything from graphics card temperature, core and memory clock speeds, voltage, FPS and usage percentage through a series of graphs and full screen display.
The screenshot also uses the Rivatuner statistics server, which can be pre-programmed for several different applications.
Tracking graphics card activity while games are running is an important part of benchmarking today, and the monitoring feature lets you do that with FPS numbers and on-screen graphs.
Benchmarking
What is MSI Kombustor? MSI Afterburner includes a performance evaluation tool called MSI Kombustor that manages severe GPU stress to see how well your graphics card responds to stress.
This is a great way to find out if your overclocking settings have affected the performance of your graphics card.
We will take a detailed look at how to use the software below.
Video Capture
There are many methods for capturing video, and you guessed it, Afterburner has its own unique capture software built right into it.
The app is called Predator and helps you capture in-game footage, tutorials, test scores, and more.
You can shoot in a variety of formats, qualities and frame rates.
How to Use MSI Kombuster
So, if you decide to overclock your graphics card, you need to know how to use Kombustor.
You need to understand how to use Kombustor because before overclocking our card we need to know what performance we are currently achieving at the base levels.
The following short guide will tell you how.
- Open MSI Afterburner
- Near the top, in the center, you should see three buttons. Select the letter “K” The “K” stands for Kombustor and should be highlighted like the rest. If it is not highlighted and cannot be clicked, go to the MSI Afterburner website and download the Kombustor app.
- Click on the «K» icon, which should be above the «core voltage» indicator.
- MSI Kombustor should launch right away and start stress testing your card
- Now you can monitor your GPU temperature, FPS, GPU load and more. This will give you an idea of how your graphics card performs at basic levels.
- After the test is completed or before the test is closed, write down the performance data so that you can compare it with the overclocked settings with improved performance.
At this point, you’ll want to start the overclocking process. We recommend looking into what other users have achieved by overclocking the same card as you, to make sure you push your card to the limit.
How to Overclock Your Video Card Safely?
The first thing you need to understand when you think about overclocking any hardware component is that overclocking is not without risk.
You are at great risk of causing irreparable damage when overclocking, so do not approach this process recklessly.
If at any point you feel something is wrong, stop immediately and seek advice from more knowledgeable sources before continuing.
When overclocking in Afterburner, remember to follow the tried-and-true method of testing your results.
Made a small change — check the results. We made one more small change — check the results again. That’s the essence of safe overclocking.
Anyway, let’s get started:
- The first thing you need to do is set the «Power Limit» and «Temp Limit» sliders to the maximum. With these higher settings, the graphics card will now be more power efficient and should run to higher temperatures than in base mode.
It’s worth noting that the graphics card will never reach its upper limits unless there is a hardware failure, so don’t be surprised if the maximum temperature seems high.
- Then increase the core clock slider in small steps, i.e. 20-30 MHz per step. Each unit on the slider refers to one MHz. If you move the slider to the positive position at +40, you will theoretically overclock the core clock by 40 MHz. We strongly recommend increasing the clock speed by only 20-30 MHz each time and no more to ensure that there is no damage in the process. Don’t forget to click the «Apply» button (tick) after each step.
- Another tip is to always run Kombustor in the background. This allows you to monitor how your graphics card handles overclocking settings and you can determine when your graphics card starts to shut down under load. Any flickering, dimming, crashing usually means that the graphics card is no longer stable at current settings and will need to revert to factory or last known stable settings.
After a while, depending on which card you have, you will start to see a constant stream of graphical issues and your card will not be able to maintain stable gaming performance
At this point, you will realize that you have reached the limit of your card.
Don’t be surprised; All graphics cards have their limitations.
If your GPU is completely black or crashes, the card will reset the driver, allowing you to reduce the clock speed.
- Start by decreasing the clock speed in 5 MHz increments until all errors and glitches are gone. A combustor should be stable and work flawlessly when you can control the settings. If Kombustor is stable, try running the game on high settings and load your graphics card to see if it handles this scenario, if so, you have successfully overclocked your graphics card.
Memory Overclocking
The next step is to overclock the memory clock, and the same method is applied with slightly different steps.
We recommend increasing the memory clock speed by 50-100 MHz per step.
- Again, as soon as you encounter regular bugs and crashes in Kombustor, reduce the memory clock in small steps of 10 MHz until you find a stable setting.
At this point, you should test the new settings over a long period of time to make sure the card is stable.
I would recommend running Kombustor for at least 10 minutes and watching the map as it does so. Just make sure there are no glitches, crashes, and so on. If there is, reduce the clock speed by 10 and repeat the test.
- Once you are satisfied with the settings, everything will work stably. Save your settings as a profile by clicking the floppy disk icon and selecting one of the profile options.
Watch the detailed video on how to install and download MSI Afterburner
Enabling FPS Screen Overlay
Using MSI Afterburner to display FPG on screen is a great way to show how good or bad your graphics card really is.
You can easily configure the software to display temperature, workload, memory clock speed, clock speed, and everything else that comes with the graphics card.
How to enable FPS in games:
- Click on the settings tab and find the «Monitoring» tab
- In the «Active Monitoring Graphs» section, select the information you want to display on the screen by clicking the appropriate boxes and checking the «show on screen» checkbox. For example, if you are doing benchmarking, you can demonstrate FPS, core clock, memory clock, and temperature.
- Whenever you load a game, the On-Screen Display (OSD) will provide real-time information about the performance of your graphics card.
- You can assign in-game hotkeys to turn the OSD on and off, perfect for everyday use.
Fan Profile Adjustment
Fan Profile Adjustment is something many people don’t use for many years because the automatic settings do their job well. However, when overclocking, we feel that fan profile tuning is an important part of how efficient your graphics card will end up running.
Here’s how to set up your own fan profile:
- Click on the settings tab in MSI Afterburner and find the «Fan» tab in the menu bar at the top.
- Check «Enable Custom Fan Auto Control Software» to start fan profile setup.
- You will see a curve graph with «% fan speed» and «temperature» as values. You can change the curve to suit your specific needs.
- Once you have designed your ideal fan profile, click Apply and close the window.
The scenario will depend on which fan profile you decide to use. What I mean is that you can go from 50% fan speed to 100% as soon as the graphics card temperature is over 60 degrees. GPU overclocking, for me, will always require a bit of careful work with the fans, because you want the card to run as stable as possible.
Stay connected.
Bookmark this blog because it contains the most truthful and expert information!
2 min to read
Cryptokarma — Anonymous Cryptocurrency Exchanger
6 min to read
also.
How to install MSI Autoburner
MSI Afterburner is primarily designed to overclock the video adapter in a computer system. Most often it is used by overclockers — enthusiasts in the field of overclocking computer components who achieve extreme performance. But it’s also suitable for casual users who need a slight boost in performance from their graphics card.
Using the program
In addition to overclocking the video card, MSI Afterburner has a number of additional functions, such as monitoring the system with temperature graphs and the load of the main computer components.
Installation
To start using the utility, you need to download it from the official website.
- Go to the Downloads tab and click on the Download Afterburner button.
- Run the installation file, select the language and follow the instructions.
- Then a small window appears — this is the RivaTuner statistics module installation window.
Select the language and install the module.
General view
After starting, we see the program divided into 2 sections. In the left section is the main overclocking panel, and on the right is the system monitoring window.
Consider the main panel.
Main board includes:
- Video adapter model.
- Video card driver version.
- Tab « Information » — information about the central processing unit and the video adapter.
- « Core Voltage » — core voltage control.
- « Power Limit » — power consumption limit.
- « Core Clock » — GPU core clock.
- « Memory Clock » — memory clock.
- « Fan Speed » — video card cooler speed.
- Button « Reset » — reset all settings.
- Option « Apply overclocking at system startup » — apply overclocking at system startup.
- Button «Settings» — utility settings.
The main points for overclocking a video card at home are the memory frequency and the GPU core frequency. By properly increasing the sliders, the performance of the video card increases. With standard settings, there are restrictions on increasing the frequencies for the correct operation of the video card. General users are not recommended to change core voltage and power consumption limit. You can also change the speed of the video card cooler to arbitrary, if necessary.
Monitoring Panel
The Monitoring Panel includes:
- Graphic processor temperature
- Graphic processor load
- Coiler
- Tachometer
Memory
- Uninstalling the MSI package using the command line
-
- CPU temperature
- Processor thread load
- Loading the processor itself
- Loading RAM
- Loading the swap file
Installation
rhiza CPU virtual threads
Also, the monitoring window can be detached from the main panel:
To do this, press the button « Detach «.
A window will appear that can be fixed anywhere on the screen.
Basic settings
Press « Settings » to open the settings menu.
The basic settings will open.
Here we can see that the control (Core Voltage, Power Limit) and voltage monitoring are disabled by default. Some graphics cards may not support these features. Under « AMD Compatibility Properties», there is a function « Extend Limits for Official Overclocking Mode», which increases the limits for overclocking GPU core and memory frequencies, as well as voltage management. Users who are not well versed in overclocking are not recommended to enable these features.
Cooler
In this item, you can set the dependence of the temperature and speed of the cooler:
Check the box next to the function « Enable software user auto mode «.
This option is useful for heavy overclocking to get the most out of the cooler. In no case should you set the fan speed to 100%, otherwise it will break. If overclocking is minimal, it is recommended not to check this option.
Monitoring
In this tab, you can remove unnecessary graphs from the monitoring window and leave only the main ones:
To do this, before the unnecessary item, uncheck the box and click « OK «.
By default, the data reading frequency is 1000 ms, it can also be changed:
Enter the number, press « OK «.
Another advantage of this utility is the ability to write a monitoring report to a text document. You can specify the maximum file size, as well as overwriting reports when starting a new session:
- Check the box next to « Write history to report «, select the save folder and click « OK «.
- To view the report, click « View «.
- Select the required file.
- After opening, the monitoring report for the period appears.
Profiles
In order not to spend a lot of time on overclocking, you can simplify it:
- You need to set the desired frequencies, then click « save » and select a number from 1 to 5.
Interface
If necessary, in the “ Interface ” tab, you can remove pop-up hints, change the language, change the temperature format, time format and customize the design of the main panel:
- UI skins «.
- Then select the design you like from the drop-down list and click « OK «.
- After these steps, a modified utility interface will appear.
Important to remember: before overclocking your video adapter, you should consult with knowledgeable users or read the overclocking guide on the Internet.
Types of installers and their keys for silent installation — Information portal TifloHelp.ru
Hello, dear readers.
Today, as I promised you, I will tell you about the most popular tools that create program installers.
Many of them are very simple, so they can be used not only by programmers and software manufacturers, but also by those who want to assemble the installer with their own hands.
However, the assembly of installation packages is not the topic of this article, the topic of my article is: what main keys are supported by certain installers, how to use them and how to determine which installer is used for a particular program.
InstallShield
Let’s start with the most voluminous, most beloved by major commercial software developers. InstallShield is a powerful professional tool for creating reliable installation packages.
With the help of Project Assistant, the developer goes through all the stages of creating an installer step by step. No training is required, all the basic features of InstallShield X Express can be learned within less than one day. Full integration with the Visual Studio .NET development environment, support for .NET, Linux, Web services and mobile applications.
You can meet him very often in paid products, for example:
- PLEXTALK Recording Software
As a rule, such installers do not cause difficulties, it is enough to run them with the “S” key, and the program will be installed in silent mode.
Note: If the “wait” parameter does not work, try using the “SMS” key
Example:
Start /wait setup.exe /s /sms
How to determine that Install Shield was used to package the installer
Open the file properties, on the «Details» tab in the «Description» and «Original file name» items, as a rule, the value «setup.exe» will be indicated, and in the «Product Name»: «InstallShield».
Also, if you run this installer for a typical installation, you will usually see the following words:
InstallShield Wizard
Welcome to InstallShield Wizard for xxxxxxx
InstallShield(R) Wizard will install etc.
Naturally, all this can be written in English.
Windows Installer Service (*.msi)
Well, what can I say about this … Windows Installer Service (MSI) technology is the de facto standard in the world of system administrators who distribute and support software for desktop and server versions of Windows. The MSI format is supported by all major configuration management systems (Microsoft SCCM, CA Unicenter, and many others), and for some software distribution systems, it is even the only supported format.
All installers packaged with the Windows Installer have the “*.msi” extension.
Program examples:
- 7-zip x64
This type of installer supports the following silent installation keys:
«qb» and «QN».
When using the «QB» key, the installation progress will be displayed, but no questions will be asked to the user, nor will the «Cancel» button be displayed.
Example:
Start setup.msi /qb
Next key: “qn”
Using this key will completely hide the installation process. Installation progress will also not be displayed.
Example:
Start setup.msi /qn
Please note that some programs require you to restart your computer after installation. To avoid this, use the properties (REBOOT=ReallySuppress) by enclosing it in quotes along with the key.
Example:
Start setup.msi "/qb REBOOT=ReallySuppress"
InstallShield using the *.msi extension
Starting with version 7, InstallShield can create files with the «*.msi» extension. they, in turn, can be separate files and in conjunction with setup.exe,
For example, as OBI
The latter, in turn, are of two types:
«InstallScript MSI» and «Basic MSI». InstallScript MSI uses traditional InstallShield keys. Basic MSI is a separate interesting story.
To automatically install an application using the Basic MSI, you need to specify the «/s /v»…» switches. The ellipsis must be replaced with keys that must be passed directly to the Windows Installer (msiexec). In other words, if you want to install the application completely invisibly and avoid rebooting, then use this command
Start setup.exe /s /v"/qn REBOOT=ReallySuppress"
Standalone Windows Update Installer *.msu it also has keys for *.msu.
msu are offline Windows update installers. Once you download updates, you can install them even without the Internet and you won’t have to download them again.
All of these installers have an *.msu extension and support the following command line switches.
/quiet — Quiet mode without user interaction. All windows will be hidden. If a reboot is required after the update, it will be done.
/norestart — Use this switch with quiet to avoid rebooting.
/warnrestart — When used with quiet, warn that a restart is about to take place.
/promptrestart — when used with quiet, you will be asked to restart the computer.
/forcerestart — When used with quiet, a so-called force restart will be performed, i. e., all applications will be forcibly closed and the computer will restart.
/log — Specifies logging and the path to the log file.
Example:
start c:\updates\kb3456246.msu /quiet /norestart /log:update.log
Inno Setup
Excellent free installer tool that supports PASCAL scripting and is quite simple easy to learn and easy to use.
Inno setup can register libraries and ActiveX components, create encrypted installers, change the registry, and launch external applications, but this is only a small part of what Inno Setup can do, even too small….
It should be noted that the help system is quite well written and supported by numerous examples.
Inno Setup is not inferior to many systems for creating installers, and leaves some of them far behind in terms of convenience and capabilities, although it is free, to tell the truth, I like it more than all those listed in this article, which helped me out many times.
Recently, Inno Setup has been increasingly used to create installation packages, not only by developers of free programs, but also by commercial products, for example:
- Download Master
- skype talking
- Malwarebytes Anti-Malware
- Shades of Doom
Hmm, I signed it, I’ll talk about the main thing.
Inno Setup supports two main keys for silent installation, they are «SILENT» and «VERYSILENT».
Example:
 Start setup.exe /verysilent
 Start setup.exe /silent
Sometimes there is a small problem: a window pops up asking if you want to continue the installation. To hide this window, use the «SP-» key.
Example:
Start setup.exe /VERYSILENT /SP-
How do I know if Inno Setup is being used to package a program?
Run the installer, in the window that opens, open the system menu ( ALT + SPACE «Space»)
Select the item «ABOUT Setup» or «About»,
A window will open with something like this:
About Setup
Inno Setup version 5. 4.0 (a)Copyright (C) 1997-2010 Jordan RussellPortions Copyright (C) 2000-2010 Martijn LaanAll rights reserved.Inno Setup home page:http://www.innosetup.com/RemObjects Pascal Script home page:http://www .remobjects.com/psInno Setup Preprocessor home page:http://ispp.sourceforge.net/
OK
Nullsoft Scriptable Install System (NSIS)
Nullsoft Scriptable Install System (NSIS) is a program designed for easy and fast creation of professional installation packages. The program allows software developers to create a compressed win32 exe file, with the ability to check its integrity. Has no limit on the number of files included in the distribution. Uninstall function is supported. Built-in own virtual machine turns this product into a full-fledged professional tool.
Examples:
- winamp
Installers created with the free NSIS run with the “S” key.
Example:
start setup.exe /S
Be careful, the key must be in uppercase, otherwise it may simply not work.
You can use the “D” key to specify the installation directory.
Example:
Start setup.exe /S /D=c:\myprogram
How to determine if NSIS 9 is being used0063
All installers created with NSIS have a very similar interface, study the Winamp installation process carefully and you will be able to easily determine if NSIS is being used.
WISE Installer
After digging around the web, here’s a nice description I found for it:
Wise for Windows Installer allows professional developers to quickly create robust .MicrosoftI packages using Microsoft’s latest Windows Installer technologies. The unique features of Wise for Windows Installer help both small and large development teams create installation packages for any type of platform, including workstations and handheld computers, application and web servers, and mobile devices Windows Mobile, Windows CE, Pocket PC, Microsoft . NET Compact Framework, Palm OS and smartphones.
The Wise Installation Studio program allows you to effortlessly create application installation packages for the Windows Vista operating system, 64-bit versions of Windows and the Windows Mobile 5 mobile platform. This package supports the Windows Installer format (MicrosoftI), and also has its own format — WiseScript (.EXE).
Users will also benefit from Wise Installation Studio’s innovative Altiris Software Virtualization Solution technology, which enables the creation of Virtual Application Archives (.VSA) and ensures that products being installed are completely conflict-free.
In addition, the new version of Wise Installation Studio integrates with Nalpeiron’s PRO-Tector Standard. This solution allows developers to create test versions of software products and provides reliable protection of intellectual property from illegal use.
But that’s bad luck, it looks like the project died…
oh well, let’s not talk about sad things…
Installers created using WISE Installer accept the standard «S» key.
Example:
Start setup.exe /S
I don’t know what type of installer or I can’t determine its type
In this case, use the «s» key, it usually works.
Example:
Start setup.exe /s
Manufacturers of software and drivers that supply a unique installer usually adhere to this standard
See also
How to create a silent installer for a program? or install Mozilla Firefox no questions asked
Packing *.exe with Win Rar
Any questions or comments?
Write below in the comments.
© Evgeny Poplavsky, 2014
Specially for TifloHelp.ru
Tell your friends!
Share VKontakte
Add to Odnoklassniki
Share on Facebook
Add to Twitter
Send to whatsapp
Send to Viber
Send to Skype
Send to Telegram
How to use MSI Afterburner: instructions for overclocking a video card
Sometimes 5-10 frames per second is not enough for a comfortable game, but your graphics adapter cannot give more. What to do in this case? This is what will be discussed in our article. Today we will tell you how to use MSI Afterburner, a well-received overclocking program for video cards. Well, in the process, you can download the new version of MSI Afterburner for Windows XP, 7, 8 or 10 x32 / 64 Bit in Russian for free from its official website.
9015 How to completely uninstall the program from PC Video instruction
Installing MSI Afterburner
We will start with installing the program, since this process contains a number of important points that should be focused on.
- Go to the official website of the application and download the latest Russian version of MSI Afterburner, then run MSIAfterburnerS
- Select the language that is most convenient for us and click the «OK» button.
- We start the installation by clicking on the «Next» button.
- Accept the MSI Afterburner license agreement and click the circled button.
- Leave both checkboxes active and click the «Next» button.
- If necessary, change the installation path. In our case, it will remain the default. Then click the button to move to the next step.
- Create shortcuts in the start menu and move on.
- After that, the actual installation itself will start. We are waiting for the process to complete.
- Next, we will start installing an additional utility represented by RivaTuner Remote Statistics Server. Select the Russian language and click «OK».
- Continue installation by clicking on the highlighted button.
- Set the license acceptance flag to the first position and confirm the choice.
- Specify the target directory for installing the program, then proceed to the next step.
- We are waiting for the installation to finish.
- If your computer or laptop does not have Microsoft DirectX, it will be installed automatically after downloading the latest versions of the libraries from the official website.
- The installation process can then be completed.
Next we move on to an overview of MSI Afterburner and instructions on how to use the program.
Program overview
Let’s take a closer look at the MSI Autoburner application. Here is its user interface, which contains the following main areas:
- GPU core frequency.
- Memory frequency.
- Chip temperature.
- A set of graphs that display all GPU parameters in real time.
In order for our program to start with the Windows operating system, you should automatically press the button marked in the screenshot.
This is also a very important part of MSI Afterburner. Here are collected all the graphs that show the various characteristics of the card. In order to detach them and expand them in the most convenient form, double-left click in any area of the dimensional grid.
This is what the window itself looks like. It includes the following video adapter parameters:
- GPU temperature;
- memory controller loading;
- GPU loading;
- video core loading;
- bus controller download;
- memory load;
- core frequency;
- no load limit;
- loading cores individually;
- single core temperature;
- frequency of all cores;
- energy consumption;
- paging file usage.
By moving the mouse over each of the graphs, we will see a line that allows you to determine the value of the measured parameter at a certain point in time.
The polling period of the sensors is adjusted in the settings.
Right click brings up the context menu, which contains the following functions:
- pause;
- clear history;
- status display;
- show profile panel;
- record history in report;
- fixing the program on top of all windows;
- connect;
- remove all markers;
- properties.
We can also select the «Properties» item and get into the MSI Afterburner settings.
The main application settings contain the functionality that the user needs most often and that needs to be accessed in the first place.
There is a field for selecting a graphics adapter (if the system has several video cards). At the same time, all the settings that we make can be applied to all chips at the same time or create excellent configuration profiles.
Next are the checkboxes for launching MSI Afterburner along with Windows and a number of other parameters, including:
- permission to control the video adapter and monitor data;
- work with low-level driver;
- allow low-level access to GPU;
- restore settings after waking up from sleep mode;
- voltage control release;
- DC voltage monitoring and boost;
- check for updates;
- and others.
The «Cooler» tab allows you to flexibly adjust the speed of the cooling fan depending on the temperature of the GPU. There are also several ready-made profiles for faster switching of the operating mode. Adjusting the fan is very convenient, you just need to move the key points on the rotation speed / temperature graph.
In the «Monitoring» section, you will find settings for the information overlay displayed in games, on which you can display a number of MSI Afterburner indicators. Among them are:
- GPU temperature;
- GPU loading;
- memory controller loading;
- video core loading;
- bus controller download;
- memory load;
- core frequency, etc.
We will write more about the output of auxiliary information in games a little later.
The OSD (On-Screen Display Overlay) tab contains the following options: visibility setting, showing and hiding the OSD, hot buttons, displaying the system time, enabling the OSD, screenshots, and setting the server lock.
Also in our application there is a benchmark that allows you to evaluate the performance of the overclocked adapter. We can set hotkeys for tool management and set the path to the program, which, in fact, will evaluate performance.
In the «Screenshot Capture» tab, the user will find the MSI Afterburner functionality that comes from the name of the section. We can assign a button for activation, specify the format of the final file, set the degree of compression and specify the target directory.
Similar to taking screenshots, we can capture a video and save it to a PC. But here, unlike the pictures, there are already many more functions:
- button to activate the video recording;
- pre-record mode;
- video format, container and quality;
- size, frame rate and frame limit;
- select a directory for saving finished clips.
Since you own a video card from this manufacturer, we recommend installing software that will maximize its performance.
The penultimate section of MSI Afterburner settings contains the configuration of profiles for quick switching between ready-made sets of settings that are appropriate in a given situation.
In the «Interface» tab you will find the following options:
- display tooltips;
- output of help messages;
- single icon mode;
- language, time format and temperature units;
- MSI Afterburner theme selection;
- skin composition mode;
- interface transparency and scaling.
The program has a huge number of themes, for example, we liked this one and we left it instead of the standard gray version.
There is a Help button on the main panel. It opens the help page for the MSI Afterburner App on the official website of the program.
The «Information» button shows all the data on your video card and related graphics subsystem moments.
To disable this program and RivaTuner simply reset the settings, apply the changes and exit.
This is how the detail window looks like.
For more detailed data on the graphics adapter, we recommend using the GPU-Z program, which we presented in detail in one of the recent articles.
How to overclock an nVidia video card
After MSI Afterburner has been discussed in detail, we move on to the instructions for working with it.
Carefully follow what the author does, the slightest deviation from the above algorithm may contribute to the failure of your adapter.
![]()
Before we start reviewing the instructions, take a look at a number of MSI Afterburner controls.
Power limit
This slider only works if your graphics card supports this technology. The essence of the regulator is to set the maximum power output by the graphics adapter. For example, we can set it to 90%. What does it give? It’s simple — this is how we insure the chip from overheating and failure during overclocking.
Temperature limit
The second controller is responsible for adjusting the temperature limit. As well as in the first case, we can set the maximum heating limit, after which the temperature will be limited by reducing performance.
Do not forget that there is such a thing as temperature hysteresis. That is, the heating comes with some delay and you need to increase it gradually.
Core frequency
This is a parameter that directly affects the overclock itself. How to work with it, we’ll talk a little lower.
Attention: if the program resets the frequencies, then you are doing something wrong.
Memory Clock
The parameter sets the frequency of video memory, which, accordingly, affects its performance, leading to a systematic increase in FPS in the game.
Attention: if the program does not see your video card and no devices are available, try restarting the software.
Fan Speed
One of the most important parameters in MSI Afterburner. It is the intensity of the cooling system that affects the quality of acceleration. Set the slider so that the temperature on the adapter chip does not exceed the recommended values.
Incorrect use of this setting can cause instant damage to your graphics card. Be careful, we recommend using the automatic mode!
Settings profiles
We can create several configurations for our video card and save each of them separately in its own profile. This can be useful, for example, for various applications or games.
Program settings are stored in the Windows user directory.
Default reset button
This feature is sure to come in handy for anyone new to overclocking. If you have configured something wrong and do not know how to reset all settings to their original positions, just press the indicated button and enjoy the stock settings.
Apply button
This softkey applies any changes made using the sliders. It must be pressed every time after we have changed something.
Graphics adapter overclocking procedure in MSI Afterburner
So, we have enough introductory information. Let’s proceed directly to overclocking:
- Download and install the FurMark program. We will use it to test the stability of the video card and check the frame rate. Run the test on a non-overclocked adapter to see nominal performance.
Afterburner is translated as an afterburner, so be careful!
- In our case, this is 68 FPS.
We remember and move on to increasing productivity.
- We add the frequency of the graphics adapter by about 10 units.
- Click the Apply Changes button.
- We run the test again and see that the number of frames per second has increased by 1. Well, we continue to “play around” with the settings.
- Add some more chip frequency and apply the changes.
- We run the FurMark run and see that the increase was already 4 FPS.
In the same way, we gradually add the memory frequency, as a result, achieving a combination that will achieve maximum performance, stability of the graphics adapter and the absence of any overheating.
Attention: add the frequency of the chip and memory little by little, remembering the last stable values. Run the stress test to the end in order to check the stability of the video card over time.
![]()
How to enable monitoring in the game
So, you already know how to use Gigabyte Afterburner, but it has one more useful feature. Right in the game, we can display a special overlay or counter that will display a number of useful parameters. It’s done like this:
- Go to the program settings.
- Switch to the «Monitoring» tab, then select the parameters that should be displayed, and activate the function marked with the number «2». Finally, click «OK».
- We go into the game and see our indicators in its upper left corner.
- By customizing the application, we can add many other options, including even frametime graphs.
Now you know how to enable in-game monitoring on MSI Afterburning.
How to unlock Core Voltage
By default, core voltage adjustment is locked and inactive, and the sliders do not move. To fix this, go to the settings and in the «General» tab, check the box next to the marked item.
If the program does not save settings, try running it as administrator.
How to completely remove the program from your PC
To completely remove this application from your computer or laptop, use the Revo Uninstaller application.
Video tutorial
Our author is overclocking his graphics adapter model nVidia GeForce GTX 1050 ti. We recommend that you see how he does it and draw your own conclusions. In the future, the information will definitely come in handy and the question of how to use MSI Afterburner will become much more understandable.
Attention, if you get the error «The application could not be started because its side-by-side configuration is incorrect», try reinstalling C++ Redistributable.