How to Check the Performance of Your PC and Speed It Up
So your PC is
running slower than usual. What can you do about it?
You’d be
surprised by the number of factors that contribute to a computer’s
sluggishness. To really dial in on the cause, you’re going to need to run
diagnostics. This is the only way you’ll get to the root of the problem.
Table of Contents
In this guide,
you’ll learn how to perform a benchmark test. We’ll also provide some tips on
how to improve your computer’s performance.
Windows Resource and Performance Monitor
Windows has a
built-in diagnostics tool called Performance
Monitor. It can review your computer’s activity in real time or through
your log file. You can use its reporting feature to determine what’s causing
your PC to slow down.
To access
Resource and Performance Monitor, open Run
and type PERFMON.
This will open
the Performance Monitor.
Go to Data Collector Sets > System. Right-click System Performance then click Start.
This action will
trigger a 60-second test. After the test, go to Reports > System >
System Performance to view the
results.
In the report
above, Performance Monitor noticed high CPU load from the top process running,
which in this case is Google Chrome.
This lets me know
that Chrome is stressing the PC out.
The diagnostic
tool can offer more detailed explanations. You just need to dive deeper into
the subsections if you need to know more.
Improve
Your PC Speed
There are several
actions you can take based on the results of your speed test. Below are just
some of the actions you could take.
PC Settings
Sometimes you PC
settings can get in the way of optimal performance. Take your power settings,
for example. Switching to high performance can give your PC the boost it needs
to run faster.
Open Control Panel and switch to View by: Category.
Go to Hardware and Sound > Power Options. Select High Performance.
Slow on Startup
If your PC is
only slow during boot up, then it’s possible that it’s being bogged down by
applications that launch on startup.
Right-click Start and select Task Manager. Go to the Startup
tab. Here you’ll find a list of programs that run as soon as you start your
computer. You can disable applications you don’t use frequently.
Right-click on an
unnecessary app and select Disable so it wouldn’t run during startup.
Slow Internet
If you find that
only the internet is running slow, turning off OneDrive could actually help.
OneDrive works by
constantly syncing your files to the cloud which can bottleneck your internet
speed. The same principle applies to other cloud-based services like Dropbox.
Go to your System
Tray and right-click on the OneDrive icon. Click Settings.
Under the
Settings tab, untick the Start OneDrive
Automatically When I Sign In to Windows option.
You can also
choose to unlink your OneDrive by clicking Unlink
OneDrive.
Full Hard Drive
Windows 10 has a
feature called Storage Sense. It automatically deletes files that you don’t
need so storage never causes your computer to slow down.
Go to Windows Settings > Storage. Turn on Storage Sense to activate the feature.
Clicking on Change How We Free Up Space Automatically
will give you control over how frequently it deletes files.
Windows Troubleshooter
When all else
fails, you can use Windows Troubleshooter to figure out what’s causing the
problem.
Open Control Panel and go to System and Security > Security and Maintenance. Expand the Maintenance section.
Click Start Maintenance under Automatic Maintenance subsection.
Christopher Jan Benitez is a freelance writer for hire who provides actionable and useful web content to small businesses and startups. In his spare time, he religiously watches professional wrestling and finds solace in listening to ’80s speed metal. Read Christopher’s Full Bio
Subscribe on YouTube!
Did you enjoy this tip? If so, check out our YouTube channel from our sister site Online Tech Tips. We cover Windows, Mac, software and apps, and have a bunch of troubleshooting tips and how-to videos. Click the button below to subscribe!
Subscribe
Test, fix and upgrade your PC’s performance
Benchmarking Guide
Still hankering for the day that you pulled your new PC out of the box, plugged it in and it just worked? Over time and use, your PC can slow down. This could be due to obsolete or corrupt hardware, software issues or all of these things. UserBenchmark.com can can identify many of these problems and help you to achieve the best performance possible from your Windows PC. This user guide answers the following questions:
QHow do I benchmark my PC?
QHow do I interpret UserBenchmark results?
QHow can I speed up my PC?
QHow can UserBenchmark help with hardware upgrades?
QHow do I measure what improvements have been made?
How do I benchmark my PC?
UserBenchmark.com can quickly establish whether your PC is underperforming and suggest likely hardware and software issues. Test how fast your processor, graphics card, storage drives and memory are by running the free UserBenchmark Speed Test.
Tip: Closing unnecessary programs and browser tabs before clicking ‘run’ will keep background CPU usage down and produce more accurate results.
The test may take a up to few minutes to run depending on your PC. After completion, your results will be available on UserBenchmark.com.
How do I interpret UserBenchmark results?
The following section explains how to interpret the results for an example UserBenchmark run.
Headline Results
This particular PC has a reasonable desktop score of 39% so it is suitable for most day to day activities such as using Microsoft Office and web browsing. Depending on exactly how the PC is used, it may also be sufficient as a minimal workstation PC 28%. However, the system is unsuitable for PC gaming as it only scores 17%.
Full details on each of the category calculations are available here.
High Level Summary
The high level summary at the beginning of the results page explains the relative performance of this PC compared to other PCs with the same components (PC Status). This is useful in highlighting whether there is a performance issue with this particular PC’s hardware. The summary also points out other significant items such as the type of tasks this PC is most suited to.
In this example, the PC is in reasonable condition, performing as expected and running the latest version of Windows. The processor is highlighted in amber, indicating that its performance is about average. The summary also suggests that the graphics capabilities are on the low side and that consideration should be given to incorporating a SSD boot drive.
Processor Score
This AMD FX-6300 processor scores a benchmark of 51.3% based on single, quad and multi-core speed tests. This is higher than the average of all other benchmarks for this processor (47%). The graph shows that this CPU is actually performing in the 86th percentile, which is way above expectations.
Graphics Card Score
As emphasized in the high level summary, the graphics for this PC are weak, scoring an underwhelming 9.81% which is a bit on the low side but still reasonably consistent with the average score for the HD 7750 (11%). Playing 3D games would be a struggle, if not an impossibility with this card and it may even be an effort to play some HD movies. This PC’s graphics score, and therefore gaming experience, could be improved by upgrading to a better GPU.
Hard Drive Score
In absolute terms, this Toshiba hard disk seems is performing reasonably well with a benchmark of 77.1% but the average score for all Toshiba DT01ACA100 drives (based on 108,253 samples) is 84% so this particular drive is in the bottom 31st percentile. It’s possible that there were some background processes accessing this drive during the benchmark or it may be that the benchmark was run on a slower innner partition. Re-running the test after a reboot would reduce the chances of background processes interfering with the benchmark results.
How can I speed up my PC?
You can take the following basic steps to improve the speed of your PC if your components are performing below their potential.
If poor performance is stemming from a low CPU or boot drive status, some free and effective ways of improving PC performance involve clearing out unwanted software and files. You may like to try the following:
a. Use Windows Tools
-
Uninstall redundant programs. Use Windows Task Manager and check disk load (Windows 8 onwards) to identify unnecessary active programs consuming processing power. Remove the programs via the Control Panel.
-
Reduce the programs that unnecessarily automatically start when the PC is powered up, thereby reducing the PC start up time. This can be accessed via the task manager ‘Start up’ section for Windows 8 onwards or by typing ‘msconfig’ in the startup menu for earlier versions.
-
Purge unnecessary files from the drives using Windows Disk Cleanup (user guide). Access hard disk cleanup via settings, control panel, administrative tools and then Disk Cleanup. Delete unnecessary program files and system files (e.g. previous Window installations) via this method.
-
Troubleshoot Windows via the control panel action centre to help identify Windows-related performance issues e.
 g. installing a Windows update may be advisable.
 -
Check Windows Event Viewer. This is a record of the PC’s alerts and notifications, that can be sorted in order of importance. In Windows 10, this can be found by right clicking the Windows start icon (or from the Win+X power menu) and selecting ‘Event Viewer’. A full log of ‘Administrative Events’ is listed under the ‘Custom Views’ directory, or for a more salient list of events, look under ‘Windows Logs’ then ‘System’.
b. Use free online tools, such as:
-
O&O ShutUp10 is a portable antispy tool for Windows 10 that helps to retain control over personal data as well as reducing bloatware that ships with default installations of Windows. Highly recommended for new builds.
-
LatencyMon checks a PC’s core responsiveness by measuring the latencies and hard page faults of installed drivers. Latency problems can result in audio distortion such as clicking and crackling as well as jerky graphics and an unresponsive system.

c. Practice good maintenance habits
-
Switch off the computer from time to time as opposed to just putting it to sleep (which maybe the default in your PC’s power plan). Switching the PC off forces all programs to close, including those which may be running surreptitiously in the background, and clears out the memory.
-
Keep the PC physically clean by clearing dust from air vents and the surrounding environment. Too much dust can cause hardware to overheat and work sub-optimally.
How can UserBenchmark help with hardware upgrades?
If you require greater performance from your PC or you suspect that your hardware is faulty, you may look to upgrade some components. Whilst the example PC discussed above is adequate for many desktop activities, it only scored 17% for gaming and did not have a SSD boot drive. Depending on how this PC is used, it may benefit from a new GPU and SSD. UserBenchmark can help identify the best options whichever PC component is being considered for upgrade.
UserBenchmark’s full list of components for: CPUs, GPUs, SSDs, HDDs, RAM and USB drives can be sorted by performance, value, popularity, budget, age etc. and filtered by brand, capacity, vendor etc. to help identify specifically which components are best for your needs.
Narrow down the selection and compare two components side by side, or one component against the average of the top tier components with UserBenchmark’s comparisons.
Comparing Components
As an example, a comparison between two mid-range popular GPUs: the Nvidia GTX 1050 Ti and AMD R7 370, instantly reveals that the GTX 1050 offers significantly better value for money.
To see how the upgrade may affect the UserBenchmark overall PC score before making a purchase, use the Custom PC Builder tool.
Using Custom PC Builder
From your User run results page, simply click on the ‘Add to PC Build’ button which conveniently adds the various components included in the results to the baseline build in the Custom PC Builder tool.
Play around with component upgrades in the ‘Alternative build’ column and see the prices and expected impact on PC benchmarks.
Also explore the real world benchmark results of your proposed PC by clicking on load baseline/alternative benchmarks. As well as showing real world performance, these benchmarks reveal popular, and unpopular, component combinations. An uncommon combination may show that there is little point in adding a cutting-edge component to an ageing PC and a wildly unpopular combination may indicate incompatibility.
Upgrade candidate one
In the following example, upgrading to a 1050 Ti would approximately double the gaming score to a respectable 33% at a cost of $155.
Upgrade candidate two
Spending a further $120 would buy the punchy NVIDIA GTX 1060-6GB and would raise the expected gaming score to 52% if so desired.
UserBenchmark of the month
The UserBenchmark Build tool quickly and freely allows the experimentation of any number of PC setups before making the ultimate purchase.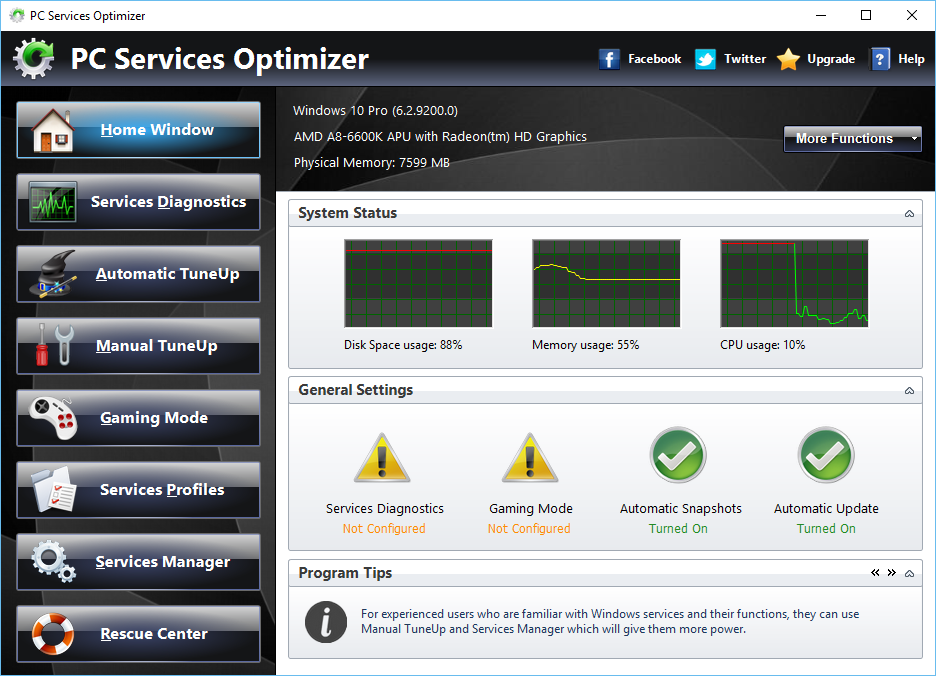 For inspiration, check out some of the great builds featured here:
How do I measure what improvements have been made?
So you’ve taken on board the suggestions: you’ve cleaned up your PC, and you’ve upgraded your graphics card. Now it’s time to measure the results of your hard work.
Run the Userbenchmark speed test again and compare the latest results to your previous run results which can be saved to your profile.
Good luck with your PC improvement journey and thanks for reading!
We sincerely hope you have found this guide helpful. If you have, why not share UserBenchmark.com with your friends: make sure their PCs are performing optimally and compare benchmarks.
Tips to improve PC performance in Windows
If your PC is running slowly, the following suggestions might help speed things up. The tips are listed in order, so start with the first one, see if that helps, and then continue to the next one if it doesn’t.
One of the best ways to get the most out of your PC is to make sure you have the latest version of Windows 11 installed. When you check for updates, your PC will also search for the latest device drivers, which can also help improve your PC’s performance.
To check for updates
-
Select the Start button, then select Settings > Windows Update > Check for updates.
Check for Windows updates -
Do one of the following:
-
If the status says «You’re up to date,» continue and check for optional updates.
-
Select the updates you want to install, then select Install.
-
Restart your PC and see if it seems to run better.
-
Sometimes an optional update, like a new non-critical driver, will be available that may help.
To check for optional updates
-
If additional updates are available, select them and then select Download & install.
-
Restart your PC and see if it seems to run better.
For more info about updates, including how you can have them installed automatically, see the Windows Update FAQ.
For Windows Update troubleshooting info, see Update Windows and Troubleshoot problems updating Windows.
If your PC still runs slowly, continue to the next tip.
Having many apps, programs, web browsers, and so on open at once can slow down your PC. Having a lot of browser tabs open at once can also slow it down quite a bit. If this is happening, close any apps, browser tabs, etc., that you don’t need and see if that helps speed up your PC. If it doesn’t seem to help, restart your PC and then open just the apps, programs and browser windows you need.
To restart your PC
-
Select the Start button, then select Power > Restart.
-
After your PC restarts, open just the apps you need, then close them when you’re done.
Sometimes apps that were made for an earlier version of Windows will still run on Windows 11, but they might slow down your PC. If this happens after you open a certain program, check the software company’s website for an updated version, or run the Program Compatibility Troubleshooter.
To run the Program Compatibility Troubleshooter
-
Select Search, type troubleshoot in the search box, then select Troubleshoot settings > Other troubleshooters.
-
Under Other, select the Run button next to Program Compatibility Troubleshooter.
-
Select the program that you’re having problems with, then select Next and continue through the troubleshooter.
PC still running slowly? Continue to the next tip.
ReadyBoost lets you use a removable drive, like a USB flash drive, to improve your PC’s performance without opening your PC and adding more memory (RAM). To use ReadyBoost, you’ll need a USB flash drive or a memory card that has at least 500 MB free and a high data transfer rate.
To use ReadyBoost
-
Insert the USB flash drive into a USB port on your PC.

-
Select File Explorer from the taskbar.
-
Press and hold (or right-click) the USB flash drive (or SD card if you used one instead), then select Properties.
-
Select the ReadyBoost tab, then select Use this device.
Windows determines if the device can use ReadyBoost. If it can’t, it’ll let you know. -
After Windows determines how much free space to use to optimize memory, select OK to reserve this space so ReadyBoost can use it.

When you look at the contents of the USB flash drive in File Explorer, you’ll see a file named ReadyBoost.sfcache on the flash drive. This file shows how much space is reserved for ReadyBoost.
Note: ReadyBoost can’t be used if Windows is installed on a solid state drive (SSD). An SSD is already fast, and ReadyBoost won’t be able to improve its performance.
The paging file is an area on your hard disk that Windows uses like memory. There’s a setting in Windows 11 that manages the page file size automatically, which can help improve your PC’s performance.
To make sure automatic page file management is turned on
-
Select Search on the taskbar, type advanced system in the search box, and then select View advanced system settings, which has Control panel listed underneath it.
-
In System Properties, select the Advanced tab, then select Settings in the Performance area.
-
In Performance Options, select the Advanced tab, then select Change in the Virtual memory area.
-
Make sure the Automatically manage paging file size for all drives check box is selected. If it is, continue to the next tip. If it’s not, select it and then restart your PC by selecting the Start > Power >Restart.
Use your PC and see if it’s running better. If it’s not, try the next tip.
You may improve performance if you free some disk space on your PC.
To check for low disk space
-
Select the Start button, then select Settings > System > Storage.
Open Storage settings -
Your drives will be listed in the Storage area. Note the amount of free space and total size for each drive.
Note: If your PC is not low on space, try the next tip.
You can use Storage Sense to delete unnecessary or temporary files from your device, which can also free up space.
If you turn on Storage Sense, Windows will automatically free up space by getting rid of unnecessary files—including files in your recycle bin—when you’re low on disk space or at intervals you specify. The instructions below show you how to delete temporary files and how to turn on and configure Storage Sense.
If you can’t find Storage Sense on your device using the following steps, see the «Free up space with Disk cleanup» section below instead.
Note: You may not want to delete temporary files to improve performance. While these files may not be used at the moment, they help your apps load and run faster.
To delete temporary files with Storage Sense
-
Open Settings, then select System > Storage.
Open Storage settings -
Windows will take a few moments to determine what files and apps are taking up the most space on your PC.
-
Select the items you want to delete, and then select Remove files.
To see what’s in your Recycle Bin before you empty it, open it from your desktop. If you don’t see the Recycle Bin icon on your desktop, in the search bar on the taskbar, type recycle bin, then select Recycle Bin from the list of results.
Note: Windows moves files you delete to the Recycle Bin in case you change your mind and need them again in the future. You might be able to free up a significant amount of space by deleting Recycle Bin files to permanently remove files you’ve previously deleted.
To turn on and configure Storage Sense
-
Open Settings, then select System > Storage.
Open Storage settings -
In the Storage management area, turn on Storage Sense.
-
Under Cleanup of temporary files, ensure Keep Windows running smoothly by automatically cleaning up temporary system and app files is checked.
-
Under Configure cleanup schedules, choose how often you want Storage Sense to run.
-
For the files you want Storage Sense to delete (your choices are files in your Recycle Bin and in your Downloads folder), select the preferred time intervals, or select Never if you want Storage Sense to leave those types of files alone.

-
Scroll down and select Run Storage Sense now.
-
Windows will take a few moments to clean up your files, and then you’ll see a message indicating how much disk space has been freed up.
If your system doesn’t have Storage Sense, you can use the Disk Cleanup tool to delete temporary files and system files from your device.
To run Disk Cleanup
-
Select Search, type disk cleanup, then select Disk Cleanup from the list of results.
-
Select the checkbox next to the type of files you want to delete. (To view a description of each type of file, select the name.) By default, Downloaded Program Files, Temporary Internet Files, and Thumbnails are selected. Be sure to clear those check boxes if you don’t want to delete those files.
-
To free up even more space, select Clean up system files. Disk Cleanup will take a few moments to calculate the amount of space that a can be freed up.
Note: If it’s been fewer than 10 days since you upgraded to Windows 11, your previous version of Windows will be listed as a system file you can delete.
 If you need to free up drive space, you can delete it, but keep in mind that you’ll be deleting your Windows.old folder, which contains files that give you the option to go back to your previous version of Windows. If you delete your previous version of Windows, this can’t be undone. (You won’t be able to go back to your previous version of Windows.)
 -
Select the types of files you want to delete, select OK, then select Delete files in the confirmation window to start the cleanup.
If your PC still runs slowly, try uninstalling apps you don’t use anymore.
To uninstall apps you don’t use anymore
-
Search for a specific app or sort them to see which ones are using the most space.
-
When you find an app to remove, select the More icon next to it and, if possible, select Uninstall.
-
Restart your PC and see if performance has improved.
If your PC still runs slowly, try moving files to another drive.
If you have photos, music, or other files that you want to keep but don’t use often, consider saving them to removable media, like a USB drive. You’ll still be able to use them when the drive is connected, but they won’t take up space on your PC.
To move files to another drive
-
Connect the removable media to your PC.
-
Select File Explorer from the taskbar and find the files you want to move.
-
Select the files, go to Home, then select Move to > Choose location.

-
Select your removable media from the location list, then select Move.
-
Restart your PC and see if performance has improved.
Get more info about freeing drive space in Windows.
If your PC still runs slowly, try the next tip.
Windows 11 includes many visual effects, such as animations and shadow effects. These look great, but they can also use additional system resources and can slow down your PC. This is especially true if you have a PC with a smaller amount of memory (RAM).
To adjust the visual effects in Windows
-
On the Visual Effects tab, select Adjust for best performance > Apply.
-
Restart your PC and see if that speeds up your PC.
Select Search, type performance, then select Adjust the appearance and performance of Windows in the list of results.
If your PC still runs slowly, continue to the next tip.
Your PC settings let you choose where files will be saved by default. You can save files on your PC or to OneDrive by default and sync files between the two locations. This lets you get to your files from any device that can connect to the internet, and it helps make sure your files are backed up in case your PC is ever damaged or lost. However, files must sync between your PC and OneDrive, and syncing can slow down your PC. You can pause OneDrive syncing temporarily and see if it helps improve your PC performance.
To pause syncing to OneDrive
-
On the taskbar, look for OneDrive near the notification area.
-
Select OneDrive > Help & Settings > Pause syncing, and then choose how long you want to pause syncing your files.
-
Restart your PC and see if your performance issues have improved with syncing paused.
-
To resume syncing your files, select OneDrive > Help & Settings> Resume syncing.
You can also visit Fix OneDrive sync problems to check for any sync issues.
When you turn on your PC, some programs start automatically and run in the background. You can disable these programs so they don’t run when your PC starts.
Many programs are designed to start automatically when Windows does. You don’t realize they’re running, but they’ll open quickly when you go to use them. This is helpful for programs you use a lot, but not for programs you don’t use often because it increases the time it takes Windows to start.
Find the programs that start automatically
Sometimes you can determine which programs start automatically by looking at the program icons in the notification area on the far right of the taskbar. Check there first to see if there are any programs running that you don’t want to start automatically. To try to find out the name of the program, point to the icon with your mouse pointer. Make sure you select Show hidden icons , so you don’t miss any programs.
Even after you check the notification area, you might still miss some programs that run automatically at startup. Here’s how you can find all the programs that start automatically, and stop the ones that you don’t want to start automatically when Windows starts.
To stop a program from starting automatically
-
In the Startup Apps area, find the program you want to stop from starting automatically and set it to Off.
Select the Start button, then select Settings > Apps > Startup.
Open Startup Apps settings
Note: If you turn off a program and it continues to start automatically when Windows starts, you should scan for viruses and malware. See the next section for more info.
A virus, malware, or malicious software could cause your PC to run slowly. Other symptoms include unexpected pop-up messages, programs that unexpectedly start automatically, or the sound of your hard disk constantly working.
The best way to handle viruses and malicious software is to try to prevent them by running antimalware and antivirus software and keeping it up to date. However, even if you take precautions, your PC can still become infected.
You can scan your PC for viruses or other malicious software by using Windows Security (formerly Windows Defender Security Center), which is included in Windows 11. For more info, see How to protect your Windows PC.
Notes:
-
If you’re using other antivirus or anti-malware software, see the documentation for that program to learn how to scan for viruses. Also, make sure multiple antivirus programs aren’t running at the same time. If they are, choose the one you want to run, and then disable or uninstall any others.
-
Select Start > Settings > Privacy & security > Windows Security, and then select Open Windows Security.
Open Windows Security settings -
Select Virus & threat protection, then select Protection updates under Virus & threat protection updates.
-
On the Protection updates screen, select Check for updates to make sure you have the most recent updates.
-
Select Virus & threat protection, then select Quick scan.
Wait for Windows Security to finish scanning for viruses and malware.
-
Do one of the following, depending on the results of the scan:
-
Run the recommended advanced scan.
 This scan takes longer but searches more extensively for threats on your PC.
 -
If Windows Security finds a virus or malware and can’t remove or quarantine it, contact Microsoft Support for help.
-
If no viruses are found, restart your PC and try to reproduce the performance problem you were having with your PC.
-
-
Select Start > Settings > Privacy & security > Windows Security, and then select Open Windows Security.
Open Windows Security settings -
Select Virus & threat protection, and then under Current threats, select Scan options > Microsoft Defender Offline scan > Scan now.
Your PC will restart, and Microsoft Defender Offline will run and scan for viruses and malware.
 The scan might take 15 minutes or so, and your PC will restart again after that.
 -
Try to reproduce the performance issue.
-
Restoring from a restore point won’t affect your personal files, but it will remove apps, drivers, and updates that were installed after the restore point was created.
-
System restore works for changes made in the last 7 to 14 days.
-
Select Search on the taskbar, type advanced system, then select View advanced system settings from the list of results.
-
On the System Protection tab, select System Restore.
-
If you chose to select a different restore point, select one, then select Next. Either way, select Finish to begin restoring.
-
Once the restore is completed, restart your PC and see if performance has improved.
-
On the System Protection tab, select Configure.
-
Select Turn on system protection > OK.
-
Select the Start button, then select Settings > Update & Security > Windows Update > Check for updates.
Check for Windows updates -
Do one of the following:
-
If the status says «Updates are available,» select Install now.
-
-
Select the updates you want to install, then select Install.
-
Restart your PC and see if it seems to run better.
-
Select the Start button, then select Power > Restart.
-
In the search box on the taskbar, type troubleshoot, then select Troubleshoot settings, which has System settings listed underneath it.
-
Select the program that you’re having problems with, then select Next and continue through the troubleshooter.
-
Select File Explorer from the taskbar.
-
Press and hold (or right-click) the USB flash drive (or SD card if you used one instead), then select Properties.
-
Select the ReadyBoost tab, then select Use this device.
Windows determines if the device can use ReadyBoost.If it can’t, it’ll let you know.
-
After Windows determines how much free space to use to optimize memory, select OK to reserve this space so ReadyBoost can use it.
When you look at the contents of the USB flash drive in File Explorer, you’ll see a file named ReadyBoost.sfcache on the flash drive. This file shows how much space is reserved for ReadyBoost.
-
In the search box on the taskbar, type advanced system, and then select View advanced system settings, which has Control panel listed underneath it.
-
In System Properties, select the Advanced tab, then select Settings in the Performance area.
-
In Performance Options, select the Advanced tab, then select Change in the Virtual memory area.
-
Make sure the Automatically manage paging file size for all drives check box is selected. If it is, continue to the next tip. If it’s not, select it and then restart your PC by selecting the Start button > Power >Restart.
-
Select the Start button, then select Settings > System > Storage .
Open Storage settings -
Your drives will be listed in the Storage area. Note the amount of free space and total size for each drive.
-
Select the Start button, then select Settings > System > Storage .
Open Storage settings -
Select Temporary files in the storage breakdown. Note: If you don’t see Temporary files listed, select Show more categories.
-
Select the items you want to delete, and then select Remove files.
-
Select the Start button, then select Settings > System > Storage .
Open Storage settings -
In the Storage area, turn on Storage Sense.
-
Select Configure Storage Sense or run it now.
-
In the Temporary Files area, select Delete temporary files that my apps aren’t using.
-
Select which files you want Storage Sense to delete (your choices are files in your Recycle Bin and in your Downloads folder), then select the corresponding time intervals.
-
Scroll down and select Clean now.
-
In the search box on the taskbar, type disk cleanup, then select Disk Cleanup from the list of results.
-
Select the checkbox next to the type of files you want to delete.
(To view a description of each type of file, select the name.) By default, Downloaded Program Files, Temporary Internet Files, and Thumbnails are selected. Be sure to clear those check boxes if you don’t want to delete those files.
-
To free up even more space, select Clean up system files. Disk Cleanup will take a few moments to calculate the amount of space that a can be freed up.
Note: If it’s been fewer than 10 days since you upgraded to Windows 10, your previous version of Windows will be listed as a system file you can delete. If you need to free up drive space, you can delete it, but keep in mind that you’ll be deleting your Windows.old folder, which contains files that give you the option to go back to your previous version of Windows.
If you delete your previous version of Windows, this can’t be undone. (You won’t be able to go back to your previous version of Windows.)
-
Select the types of files you want to delete, select OK, then select Delete files in the confirmation window to start the cleanup.
-
Select the Start button, then select Settings > Apps > Apps & features.
Open Apps & features settings -
When you find an app to remove, choose it from the list and select Uninstall.
-
Restart your PC and see if performance has improved.
-
Select File Explorer from the taskbar and find the files you want to move.
-
Select the files, go to Home, then select Move to > Choose location.
-
Select your removable media from the location list, then select Move.
-
In the search box on the taskbar, type performance, then select Adjust the appearance and performance of Windows in the list of results.
-
On the Visual Effects tab, select Adjust for best performance > Apply.
-
Restart your PC and see if that speeds up your PC.
-
On the taskbar, look for OneDrive near the notification area.
-
Select OneDrive > More > Pause syncing, and then choose how long you want to pause syncing your files.
-
Restart your PC and see if your performance issues have improved with syncing paused.
-
To resume syncing your files, select OneDrive > More > Resume syncing.
-
If you have Window 10 version 1709 or higher, you can use OneDrive Files On-Demand to choose which files you want to sync and always keep on your PC. This can help improve PC performance if you reduce the number of files that are synced to your PC. To see which version of Windows 10 your device is currently running, select the Start button, then select Settings > System >About.
Open About settings -
For more info on OneDrive Files On-Demand, see Learn about OneDrive Files On-Demand.
-
Select the Start button, then select Settings > Apps > Startup .
Open Startup Apps settings -
If you turn off a program and it continues to start automatically when Windows starts, you should scan for viruses and malware. See the next section for more info.
-
To use the procedure above to stop a program from starting automatically, you need to have Windows 10 (Version 1803 or higher) installed. To see which version of Windows 10 your device is currently running, select the Start button, then select Settings > System > About.
Open About settings -
If you have Windows 10 (Version 1709 or earlier) installed, press Ctrl + Alt + Delete, select Task Manager, select Startup, select the program you want to stop from starting automatically, then select Disable.
Note: If Windows Security doesn’t open, can’t update the definition file, or can’t finish scanning for viruses, try running Microsoft Defender Offline, which is explained below.
To scan for malware and viruses with Microsoft Defender Offline
Save any documents or anything else you might have open on your PC.
If your PC still runs slowly, continue to the next tip.
Restoring your PC undoes recent changes that might be causing problems. If you think a recently installed app, driver, or update for Windows could be causing problems, you might get things running normally again by restoring your PC to an earlier point, called a restore point.
Notes:
To restore your PC from a restore point
If you don’t see any restore points, it might be because system protection isn’t turned on.
To turn on system protection
In the search box on the taskbar, type create a restore point, then select Create a restore point from the list of results.
If your PC is running slowly, the following suggestions might help speed things up. The tips are listed in order, so start with the first one, see if that helps, and then continue to the next one if it doesn’t.
One of the best ways to get the most out of your PC is to make sure you have the latest version of Windows 10 installed. When you check for updates, your PC will also search for the latest device drivers, which can also help improve your PC’s performance.
To check for updates
For more info about updates, including how you can have them installed automatically, see the Windows Update FAQ.
For Windows Update troubleshooting info, see Update Windows 10 and Troubleshoot problems updating Windows 10.
If your PC still runs slowly, continue to the next tip.
Having many apps, programs, web browsers, and so on open at once can slow down your PC. Having a lot of browser tabs open at once can also slow it down quite a bit. If this is happening, close any apps, browser tabs, etc., that you don’t need and see if that helps speed up your PC. If it doesn’t seem to help, restart your PC and then open just the apps, programs and browser windows you need.
To restart your PC
PC still running slowly? Continue to the next tip.
ReadyBoost lets you use a removable drive, like a USB flash drive, to improve your PC’s performance without opening your PC and adding more memory (RAM). To use ReadyBoost, you’ll need a USB flash drive or a memory card that has at least 500 MB free and a high data transfer rate.
To use ReadyBoost
Insert the USB flash drive into a USB port on your PC.
Note: ReadyBoost can’t be used if Windows is installed on a solid state drive (SSD). An SSD is already fast, and ReadyBoost won’t be able to improve its performance.
The paging file is an area on your hard disk that Windows uses like memory. There’s a setting in Windows 10 that manages the page file size automatically, which can help improve your PC’s performance.
To make sure automatic page file management is turned on
Use your PC and see if it’s running better. If it’s not, try the next tip.
You may improve performance if you free some disk space on your PC.
To check for low disk space
Note: If your PC is not low on space, try the next tip.
You can use Storage Sense to delete unnecessary or temporary files from your device, which can also free up space.
If you turn on Storage Sense, Windows will automatically free up space by getting rid of unnecessary files—including files in your recycle bin—when you’re low on disk space or at intervals you specify. The instructions below show you how to delete temporary files and how to turn on and configure Storage Sense.
If you can’t find Storage Sense on your device using the following steps, see the «Free up space with Disk cleanup» section below instead.
Note: You may not want to delete temporary files to improve performance. While these files may not be used at the moment, they help your apps load and run faster.
To delete temporary files with Storage Sense
To see what’s in your Recycle Bin before you empty it, open it from your desktop. If you don’t see the Recycle Bin icon on your desktop, in the search bar on the taskbar, type recycle bin, then select Recycle Bin from the list of results.
Note: Windows moves files you delete to the Recycle Bin in case you change your mind and need them again in the future. You might be able to free up a significant amount of space by deleting Recycle Bin files to permanently remove files you’ve previously deleted.
To turn on and configure Storage Sense
If your PC still runs slowly, try uninstalling apps you don’t use anymore.
To uninstall apps you don’t use anymore
If your PC still runs slowly, try moving files to another drive.
If you have photos, music, or other files that you want to keep but don’t use often, consider saving them to removable media, like a USB drive. You’ll still be able to use them when the drive is connected, but they won’t take up space on your PC.
To move files to another drive
Connect the removable media to your PC.
If your PC still runs slowly, continue to the next tip.
Your PC settings let you choose where files will be saved by default. You can save files on your PC or to OneDrive by default and sync files between the two locations. This lets you get to your files from any device that can connect to the internet, and it helps make sure your files are backed up in case your PC is ever damaged or lost. However, files must sync between your PC and OneDrive, and syncing can slow down your PC. You can pause OneDrive syncing temporarily and see if it helps improve your PC performance.
To pause syncing to OneDrive
You can also visit Fix OneDrive sync problems to check for any sync issues.
Notes:
When you turn on your PC, some programs start automatically and run in the background. You can disable these programs so they don’t run when your PC starts.
Many programs are designed to start automatically when Windows does. You don’t realize they’re running, but they’ll open quickly when you go to use them. This is helpful for programs you use a lot, but not for programs you don’t use often because it increases the time it takes Windows to start.
Find the programs that start automatically
Sometimes you can determine which programs start automatically by looking at the program icons in the notification area on the far right of the taskbar. Check there first to see if there are any programs running that you don’t want to start automatically. To try to find out the name of the program, point to the icon with your mouse pointer. Make sure you select Show hidden icons , so you don’t miss any programs.
Notification area with mouse pointing to show hidden icons
Even after you check the notification area, you might still miss some programs that run automatically at startup. Here’s how you can find all the programs that start automatically, and stop the ones that you don’t want to start automatically when Windows starts.
To stop a program from starting automatically
A virus, malware, or malicious software could cause your PC to run slowly. Other symptoms include unexpected pop-up messages, programs that unexpectedly start automatically, or the sound of your hard disk constantly working.
The best way to handle viruses and malicious software is to try to prevent them by running antimalware and antivirus software and keeping it up to date. However, even if you take precautions, your PC can still become infected.
You can scan your PC for viruses or other malicious software by using Windows Security (formerly Windows Defender Security Center), which is included in Windows 10. For more info, see How to protect your Windows 10 PC.
Notes:
-
If you’re using other antivirus or anti-malware software, see the documentation for that program to learn how to scan for viruses. Also, make sure multiple antivirus programs aren’t running at the same time. If they are, choose the one you want to run, and then disable or uninstall any others.
-
If you have another antivirus program installed and turned on, Windows Security will be turned off by default.
To scan for viruses using Windows Security (Windows 10 Version 1809 or later)
-
Select Virus & threat protection, then select Check for updates under Virus & threat protection updates.
-
On the Protection updates screen, select Check for updates to make sure you have the most recent updates.
-
Do one of the following, depending on the results of the scan:
-
Run the recommended advanced scan. This scan takes longer but searches more extensively for threats on your PC.
-
If Windows Security finds a virus or malware and can’t remove or quarantine it, contact Microsoft Support for help.
-
If no viruses are found, restart your PC and try to reproduce the performance problem you were having with your PC.
-
Select Start > Settings > Update & Security > Windows Security and then select Open Windows Security.
Open Windows Security settings
Notes:
-
If Windows Security doesn’t open, can’t update the definition file, or can’t finish scanning for viruses, try running Windows Defender Offline, which is explained below in To scan for malware and viruses with Windows Defender Offline (Windows 10 Version 1809 or later).
-
To see which version of Windows 10 your device is currently running, select the Start button, then select Settings > System > About.
Open About settings
To scan for viruses using Windows Defender Security Center (Windows 10 Version 1803)
-
Select Virus & threat protection, then select Virus & threat protection updates > Check for updates to make sure you have the latest definition file.
-
Select the Virus & threat protection tab, then select Scan now.
Wait for Windows Defender Security Center to finish scanning for viruses and malware.
-
Do one of the following, depending on the results of the scan:
-
Run the recommended advanced scan. This scan takes longer but searches more extensively for threats on your PC.
-
If Windows Defender Security Center finds a virus or malware and can’t remove or quarantine it, contact Microsoft Support for help.
-
If no viruses are found, restart your PC and try to reproduce the performance problem you were having with your PC.
-
Select Start > Settings > Update & Security > Windows Security and then select Open Windows Defender Security Center.
Open Windows Security settings
Notes:
-
If Windows Defender Security Center doesn’t open, can’t update the definition file, or can’t finish scanning for viruses, try running Windows Defender in Offline Mode, which is explained below in To scan for malware and viruses with Windows Defender Offline (Windows 10 Version 1803).
-
To see which version of Windows 10 your device is currently running, select the Start button, then select Settings > System > About.
Open About settings
To scan for malware and viruses with Windows Defender Offline (Windows 10 Version 1809 or later)
-
Select Start > Settings > Update & Security > Windows Security and then select Open Windows Security.
Open Windows Security settings -
Select Virus & threat protection, and then under Current threats, select Scan options > Windows Defender Offline scan > Scan now.
Your PC will restart, and Windows Defender Offline will run and scan for viruses and malware.
The scan might take 15 minutes or so, and your PC will restart again after that.
-
Try to reproduce the performance issue.
Save any documents or anything else you might have open on your PC.
If your PC still runs slowly, continue to the next tip.
To scan for malware and viruses with Windows Defender Offline (Windows 10 Version 1803)
-
Save any documents or anything else you might have open on your PC.
-
Select Start > Settings > Update & Security > Windows Security and then select Open Windows Defender Security Center.
Open Windows Security settings -
Select Virus & threat protection, then select Run a new advanced scan > Windows Defender Offline scan > Scan now.
Your PC will restart, and Windows Defender Offline will run and scan for viruses and malware. The scan might take 15 minutes or so, and your PC will restart again after that.
-
Try to reproduce the performance issue.
If your PC still runs slowly, continue to the next tip.
Restoring your PC undoes recent changes that might be causing problems. If you think a recently installed app, driver, or update for Windows could be causing problems, you might get things running normally again by restoring your PC to an earlier point, called a restore point.
Notes:
-
Restoring from a restore point won’t affect your personal files, but it will remove apps, drivers, and updates that were installed after the restore point was created.
-
System restore works for changes made in the last 7 to 14 days.
To restore your PC from a restore point
-
On the System Protection tab, select System Restore.
-
Select Next, then choose the restore point related to the app, driver, or update that might be causing the problem. Then select Next > Finish.
-
Restart your PC and see if performance has improved.
If you don’t see any restore points, it might be because system protection isn’t turned on.
To turn on system protection
-
In the search box on the taskbar, type restore point, then select Create a restore point from the list of results.
-
On the System Protection tab, select Configure.
-
Select Turn on system protection > OK.
How to Run A Computer Performance (Benchmark) Test on Windows
By Kevin Arrows August 25, 2022
3 minutes read
Kevin is a certified Network Engineer
Benchmarking gives you a well-defined overview of the internals on your PC. It’s quite important to know everything about your PC: hard drive performance, RAM size, processor speed, GPU performance, etc. Whether you’re overclocking your computer or comparing it to another computer, benchmarking can help you translate your computer’s performance into numbers.
There is a wide array of benchmarking applications for the Windows ecosystem of which most are free. Before using any of the benchmarking software listed in this article, make sure nothing else is running on your computer. Running user applications and processes can slow down the benchmark and change the results. In this article, we’ll look at a few benchmarking software applications you can use to test the performance of your Windows PC.
Option 1: Using Performance Monitor
Every Windows distribution has this handy built-in diagnostics tool. You can use Performance Monitor to view performance either in real-time or from a log file. You can also configure how the results are outputted so you can analyze the results.
- Press the Windows Key + R on your keyboard and type “perfmon /report”.Run Perfmon
- A window will open with the message of “collecting data” for the next 60 seconds.Report Status of Resource and Performance Monitor
Under the Diagnostic Results tab, you’ll find the following subsections:
Warning: This section comes up if there are any warnings of issues the computer is facing. It provides related links to more information about the situation and how to solve it.
Informational: Provides some more information about the processor, network cards, etc,
Basic System Checks: This shows you the information of the OS, Disks, Security Center related information, System Services, Hardware, and Drivers.
Resource Overview: This section will give you an overview of the major parts of your system including the CPU, Disk, Memory, and Network. It uses red, amber or green lights to indicate the severity of the issues and provides details on the current status of the system.
There are several other reports available from the Performance Monitor providing advanced information. You can take time to read them but if you can’t, the results of the diagnostics will provide you with just the information you need.
Option 2: Using Prime95
Prime95 is a popular tool among overclockers for CPU stress testing and benchmarking. It features torture test and benchmark modules.
- Download Prime95, decompress the zip file and then launch Prime95.exe
- Click on the “Just Stress Testing” button to skip creating an account.
- On the next screen if click on “Cancel” to leave the Torture Test Mode.
- Go to the “Options” menu and click “Benchmark” to perform a benchmark
Using Prime95
To interpret the benchmark results, note that the lower values are faster, and therefore better. You can also compare your benchmark results with other computers on the Prime95 website.
Option 3: Using SiSoftware Sandra
SiSoftware Sandra is a common system profiling tool that includes benchmarking utilities. Though it is a paid software, the free version contains benchmarks you’ll need. You’ll find individual tests from parameters such as memory to an overall benchmark score.
- Download and run a copy of the software from here.
- Click on the Overall Score, which benchmarks your CPU, GPU, memory bandwidth, and file system performance. To begin benchmarking, click OK at the bottom of the windows.
- After the benchmark is completed, you’ll see detailed graphs that compare the results with reference computers.
Using SiSoftware Sandra
Option 4: Using NovaBench
NovaBench is one of the most popular and efficient benchmarking suites for Windows with provision for CPU, GPU, RAM, and disk speed. NovaBench is completely free – no trial or paid version with additional features.
- Get a copy of NovaBench from here and open it.
- Click on “Start Benchmark Tests”. It usually takes less than a minute to complete a benchmark using NovaBench.
Using NovaBench
NovaBench will display an overall score and then show the results of each benchmark – higher is better. You can also view and compare bench results from other computers on the NovaBench website.
Option 5: Userbenchmark
Userbenchmark is a freeware benchmarking tool that tests your hardware components and lets you compare them to other users online. It’s a really cool program, however, this program isn’t as aggressive as other programs so these numbers should be taken as a grain of salt and you should not really think about them that much. Also, keep in mind that if you are going to test your GPU’s overclock using MSI Afterburner that’s not an option here because the GPU benchmarks don’t load if you are running MSI Afterburner or RTTS.
You Might be Interested In: 7 Best Motherboards For i9 9900k
- You can simply download their Benchmarking tool (here).
- Once it’s downloaded you can simply run it and you can select the components you want it to benchmark.
- Now once the benchmarks are completed it should open a webpage on your Default Browser.
- You can share your results and compare them with other users online.Userbenchmark Website
Tags
benchmarkPerformance TestWindows
7 Ways to Improve Your Computer Performance
Copied link!
Daniel Horowitz
|
December 26, 2018
It’s inevitable that all computers will experience slower speeds at some point. As software becomes more demanding, the way in which your PC reacts to these changes can have a big impact on its performance. The operating system you have and whether you have chosen to upgrade to Windows 10 can also make a big difference.
While you can make some upgrades to your laptop to make it run faster, there are some improvements you can make that are more cost-effective and straightforward to do. These minor adjustments may not seem like they will speed up your computer performance, but combined they can make it possible to keep your PC functional for a number of years.
There are also several types of software available that can help you to get rid of old files while locating applications that you don’t use often and may want to uninstall. These programs can also alert you to files and software that may be the causes for a slow computer and may ultimately be worth deleting.
Here are seven ways you can improve computer speed and its overall performance.
1. Uninstall unnecessary software
Your computer comes preloaded with a number of applications that many people won’t use but that can eat up system resources. You can usually identify these when you see a pop-up prompting you to update a program you’ve never used before.
- Remove them from your computer and free up disk space
- Click on the «Start» button and visit the “All apps” menu
- Here you can view a list of the applications you have installed — and the ones you haven’t
- Once you find the program you want to uninstall, right-click on the icon to see the «Options» menu
Or, you can right-click on Start and visit Programs and Features. Windows assistant Cortana can also be helpful because it can perform a search for “Programs” in its search box. From there, you’ll find a record of which apps you’ve used recently and which take up the most space. After surveying what’s installed, you can decide which programs can be deleted to help improve system performance.
You’ll also want to know which programs are required for your computer to run properly and which can be discarded. One of the reasons these applications slow down your PC is because they often start up automatically when you boot up your computer.
If you aren’t sure whether you want these applications permanently erased, you can take a more an in-depth look at the applications you want to remove within the aforementioned menus.
2. Limit the programs at startup
Along the same lines, you can also determine which applications run when your PC boots up. Windows 10 has an updated Task Manager that makes it easier to determine what you want running in the background and what you can start on your own.
- To access Task Manager, press Ctrl-Shift-Esc
- A box will appear that lists all the applications you have installed on your computer
- It also gives you a detailed account of the amount of RAM each program uses when you start your PC
- To make an adjustment, just right-click on the application you want to change to tell it not to run until commanded
You can always change the settings if you notice that a program is no longer running that impacts how you use your PC. If in doubt, you can always restart your computer and see how it runs without certain applications available at startup.
3. Add more RAM to your PC
In terms of memory usage, Windows 10 uses less RAM than previous versions, but increasing RAM memory has been a tried-and-true way to speed up devices for years.
If you have a convertible or detachable laptop, you’ll likely need to settle for what came in the box. Some business and gaming laptops make it possible to add RAM, but it can still be tricky.
It’s much easier to add more RAM to desktop computers, and it’s much cheaper, too. Anyone with a basic idea of the interior of a desktop tower is capable of installing more RAM in an hour or so.
You can also take your computer into a professional shop to have more RAM installed. If you’re worried about potentially compromising your system or doing this incorrectly, then having an opinion from someone who knows what he or she is doing can ease your mind and make adding extra memory easy.
4. Check for spyware and viruses
It’s almost impossible not to pick up a virus at some point while browsing the web, but the new Windows Defender software has made it easier than ever to find malware that may be causing major issues on your PC. Third-party programs are also easy to install and can be just as effective in removing any spyware or viruses you may have picked up.
Some applications are better than others and some can take up more space, which can then cause issues with speed. Ideally, you want to find software that is efficient and removes malware completely, but that doesn’t take up too much space on your PC.
Consider installing two types of software for computer performance monitoring. Malware cleanup programs can solve lagging or blatant issues with speed or popups. However, you should also look into applications that offer ongoing protection and run in the background. Again, keep in mind that these antivirus programs take up space, so you want to choose one that is designed not to affect performance.
A little research can help you to find the software that works within your budget or with your specific type of operating system. There can be compatibility issues if you’re downloading free software, so double-check everything before installing it so you don’t run into additional performance problems.
5. Use Disk Cleanup and defragmentation
Every computer has a number of files and programs on its hard drive that haven’t been used in a while or are unnecessary. Disk Cleanup allows you to find which applications and files can be deleted from your computer, freeing up drive space for the programs you will use.
It is incredibly easy to access Disk Cleanup.
- From the Start button or Cortana search box, you’ll be sent to the program
- A quick scan will show you the temporary files, installer applications, and web pages that you haven’t used or no longer need
- From there, it will automatically delete them and clear up some space
Disk Cleanup’s effectiveness depends on how much RAM you have on your PC, which can also cause your computer to run slower than it normally would. If this is the case, it may be a good idea to install more RAM on your device.
You should also schedule disk defragmentation on a semi-regular basis so you can be aware of how much hard-drive space you have. Windows has an Optimize Drives tool, which you can access from the Start button or your Cortana search box. There are also a number of third-party programs that can be helpful in clearing out files that you don’t use anymore.
6. Consider a startup SSD
When you want better performance, a startup solid-state drive (SSD) can go a long way toward taking some of the pressure off the processor when your computer boots up. If you tend to run a number of applications at one time or use photo and video editing software, then a startup drive can go a long way toward making these programs run smoother and load faster.
While they’re most commonly installed on desktop computers, SSDs can be used on some laptop models as well. When you don’t have the option of using an internal SSD, you can always purchase an external drive that connects to your PC with a USB 3.0. This drive can give you the extra push you need at startup to accomplish tasks and give you a boost for apps that need more temporary memory to run properly.
You can find a number of SSD options that work within your budget depending on how you use your PC. Storage review sites online can be valuable sources of information when you want to choose the right drive for your computer and you need to know that it is compatible with your operating system.
7. Take a look at your web browser
Minor adjustments can often make a difference with the speed of your PC. Something as simple as which browser you use can slow down or speed up the rate at which web pages, videos, and images load. If you have been using a certain browser and notice that there is a lag time, consider an alternative to see if the loading speeds are better.
The type of browser you use is not only the thing that may be slowing down your computer when you’re using the web. If you have a full cache that has not been emptied in a while, then you’ll want to visit your settings and make sure that it’s empty.
Your cache comprises what you pick up when you are visiting various websites. Many sites use cookies in order to figure out your browsing habits and the ads you may click when you visit a site will leave one too. A cache holds these files as information and if you spend a lot of time online, these files can accumulate and cause your computer to run more slowly.
Fortunately, it’s an easy fix. There are two ways to do this in the more popular web browsers:
For Internet Explorer:
- Visit “Internet Options”
- Click on the “General” tab
- Look for the “Browsing History” option
- Select “Temporary Internet Files” and “Website Data”
- Hit “Delete”
For Google Chrome:
- Visit “More settings”
- Select “More tools”
- Click “Clear browsing data”
- Note that Chrome allows you to delete data within a certain time period
- If you’ve never deleted the files in your cache before, you’ll want to select “All time”
- Check the boxes “Cookies and other site data” and “Cached images and files”
- Hit “Clear data”
You should be warned that cookies also can also include the autofill function in your search bar, so it is a good idea to have your favorite websites bookmarked just in case.
In summary
If you are experiencing issues loading applications or simply dealing with slow computer performance, then it usually just takes some minor adjustments to make it run more efficiently.
Make sure to double check to see if there is malware, spyware, or a virus causing lags or slow speeds. After that, you can look into what else might be causing any issues so you can speed up, maintain, and check your computer performance to enjoy an overall better experience.
Check out HP’s Coupon Deals page to save money on select products including laptops, desktops, and printers with an HP Discount Code!
About the Author
Daniel Horowitz is a contributing writer for HP® Tech Takes. Daniel is a New York-based author and has written for publications such as USA Today, Digital Trends, Unwinnable Magazine, and many other media outlets.
Disclosure: Our site may get a share of revenue from the sale of the products featured on this page.
PassMark PerformanceTest — PC benchmark software
For Windows, Linux, macOS and, Android and iOS
- Compare the performance of your PC to similar computers around the world.
- Measure the effect of configuration changes and hardware upgrades.
- Industry standard since 1998.
Is your PC performing at its best?
Compare your results
PassMark Rating
Create your own tests
Compare your PC with over a million
computers worldwide through our searchable baseline database
as submitted by other PerformanceTest users.
After running the test, PerformanceTest provides you with an overall
“PassMark Rating” that has been a standard for quantifying PC performance since 1998.
Use the Advanced Tests to create your own benchmark scenarios.
This allows you to pinpoint and quantify the actual
performance differences from your hardware upgrades or configuration changes.
Standard Test Suites
CPU tests
2D graphics tests
3D graphics tests
Disks tests
Memory tests
Extensive CPU testing supporting hyper-threading and multiple CPUs.
Executes complex mathematical calculations involving compression,
encryption and physics simulations.
This suite tests the ability of your video card to carry out 2D graphics operations for
every day applications such as Word Processing, Web browsing and CAD drawing. This includes
rendering of simple and complex vectors, Fonts and Text,
Windows User Interface components, Image filters, Image Rendering, and Direct 2D.
Measure the performance of the 3D graphics hardware installed on your computer.
Supports DirectX 9 to DirectX 12 in 4K resolution, DirectCompute and OpenCL.
This suite will exercise the mass storage units (hard disk, solid state drives, optical drives, etc.)
connected to your computer.
Involves sequential read, sequential write, random seek read+write and IOPS measurements.
This suite exercises the memory (RAM) sub-system of your computer.
This includes database operations, cached and uncached reads, write,
latency, and threaded read tests.
Over a million computers compared
PassMark has collected the baselines benchmarks of over a
million computers and made them available in our network of industry
recognized benchmark sites such as
pcbenchmarks.net,
cpubenchmark.net,
videocardbenchmark.net,
harddrivebenchmark. net and more.
Using PerformanceTest, you can search and download these baselines, and submit your own benchmark to our site.
Run from USB
You can run PerformanceTest directly from a USB drive.
No network connection required. Perfect for IT admins, technicians and computer enthusiasts on the go.
No nonsense Licensing
Flexible, no nonsense licensing. Once purchased, you can move the software between computers as required.
No hardware locking.
No online activation process.
No time based expiry.
No annual fees.
Multi-user and site licenses also available.
See here for more licensing information.
Advanced testing
Seven advanced configurable tests allow experienced users to create their own test scenarios and conduct in-depth analysis of their hardware’s behavior.
Disk
CPU
3D graphics
Networking
Memory
Visualized Physics
GPU Compute
Test the speed of your disk using different file sizes,
block sizes and caching options. Test with multiple threads and measure IOPS.
Read more
Test the cabaility of your CPU by running our advanced individual CPU tests on a specified number of threads.
Read more
Test the speed of your 3D video card by selecting from options such as fogging,
lighting, alpha blending, wire frame, texturing, resolution, color depth, object
rotation and object displacement.
Separate tests for DirectX 9,10,11 & 12. Supports 4K resolution.
Read more
Measure the network speed between any two computers using TCP/IP.
The network speed test can be conducted across a company LAN or across the
Internet to determine the point to point throughput.
Adjust parameters such as the host name,
IP address, port number and block size. Works with dialup modems, ADSL, cable and LANs.
Read more
Measure the read and write speed of your RAM. Parameters include data size
(8 bits to 64 bits) and a selection of two test modes. Linear sequential
access across various block sizes or non sequential access with a varying step size.
This allows both the effect of RAM
caching and the optimizations in the memory controller to be investigated.
Read more
View a visual representation of what the standard CPU Physics test is doing.
You can also tweak the simulation parameters to get different effects.
Read more
Test your Videocard’s compute performance with a series of tests. Both DirectCompute and OpenCL.
Read more
Multi-Platform Support
Versions of Performance Test are avilable for FREE on Linux, Mac, Android, and iOS.
All CPU Tests have been designed to be fully comparable across all operating systems and CPU architectures.
Linux
Mac
Mobile
PerformanceTest Linux
Available for both x86 and ARM Linux systems.
Our full suite of CPU, and Memory Tests in a convenient command line tool.
PerformanceTest Mac
Both a Mac App and command line tool are available.
Support for Intel and Apple Silicon Mac Computers.
PerformanceTest Mobile
Our entire Suite of tests; CPU, Memory, Disk, Graphics.
Available on iOS and Android devices.
Understanding your PerformanceTest Results
In this video, we will look at understanding our PerformanceTest results through the various charts available in PerformanceTest.
Right-click to download in MP4 format. 49MB
Verify device performance and health in the Windows Security panel
Security More…Less
To help protect your device, Windows Security constantly checks your device for security issues and generates health reports that are available on the Device Performance and Health page. Health reports alert you to common problems in four main areas and offer recommendations for resolving them.
For more information about Windows Security, see Protect with the Windows Security panel.
Viewing a device health report in Windows Security
-
In the search box on the taskbar, type Windows Security and select the appropriate item from the list of results.
-
Select Device performance and health to view the health report.
Note: If your device is managed by your organization, your administrator may not have given you permission to view Device Performance and Health.
The health report starts with the date the device health scan was last performed. The displayed time should match the current time because Windows Security attempts to run a device health check when page 9 is opened0013 Device performance and health .
In addition to the date of the last scan, the health report shows the status of the main monitored areas:
-
Storage capacity — Is your system running out of disk space?
-
Applications and software — Is any of your software broken or in need of an update?
-
Battery level — Is something putting extra strain on your computer’s battery? This area may not be displayed if the desktop computer is always connected to the network.
-
For solutions to performance problems on a Windows computer, see Tips for improving the performance of your Windows computer.
-
For information about freeing up space on your device, see Free up disk space in Windows.
-
Make sure you have the latest updates installed; for this check Windows Update. Open Windows Update. Questions and answers
If nothing works, try a clean install of Windows using Fresh Start. Typically, the Fresh Start feature saves data, but it’s a good idea to check if a valid backup exists. For more information about the Fresh Start feature, see Start your PC from scratch.
Horsepower: computer performance test
TECHNO bigmir)net will help you conduct a computer performance test, which will let you know how powerful your “iron friend” is
Have you purchased a new computer or made a small improvement to it, buying, for example a fast graphics card or a new, more powerful processor. But how do you know how fast your computer got after the upgrade?
To do this, you need to test your computer for performance. This is helped by special programs — benchmarks. They are designed to test the power of the computer as a whole, as well as its individual hardware parts.
TECHNO bigmir)net will help you find the best applications for testing your computer for performance.
Windows 7 performance test
Horsepower: computer performance test / bigmir.net
Read also: How to build a computer. Instructions from the top model
The latest Windows operating system (Vista / 7/8) has a built-in performance test of the entire system, which is determined on an 8-point scale, although in fact, the maximum score is only 7.9.
You can run a computer performance test using Windows itself by going to Start → Control Panel → System and Security → System.
Then click on the «Windows Experience Index» button, and wait a few minutes while the system performs a hardware test and issues a score.
The number that will be returned at the end is the lowest performance score. At the same time, you can evaluate the power of its individual parts: processor, memory, graphics and hard drive speed.
Benchmark Windows 10
The easiest way to benchmark your Windows 10 computer is to use Windows 10 itself. Few people know that this operating system has a built-in resource monitor that allows you to check the status of your computer.
Read also: Advice: how to remove webalta from your computer
It is best to test when the computer is not busy with any tasks. It is best to close all running programs.
To start the test, click on the magnifying glass next to the “Start” icon.
If there is no such icon, right-click on the «Start» button. There we select «Run». The same process can be started by simultaneously pressing the Win + R keys.
Enter «perfmon / report» (without quotes).
The Resource and Performance Monitor is starting.
The window will say that data collection takes place within 60 seconds, but this time can be longer.
After the test, data about your system is issued.
Computer performance test online
Since many benchmarks (PC stress test programs) are paid and take up too much disk space, users often search Google for a computer performance test online. We immediately warn you that such tests do not check many PC parameters. In particular, they do not test video cards or a processor. Online tests are based on web technologies, so they will load your browser more than they will check the real state of your computer.
Read also: 25 tips for working with Google+
If you still want to check your computer online, use speed-battle.com. This service loads the browser with various web protocols. At the end, it will simply give you the result in the form of a description of your browser, operating system, and points that are awarded for browser speed.
LavaLys Everest
Horsepower: computer performance test / nnm.ru
Benchmark, which conducts a complete test of the computer (testing the ALU and FPU subsystems of the processor, cache, memory bandwidth, hard drive speed), up to a detailed description of its individual components.
PCMark
Horsepower: computer performance test / planetamd64.com
Also a benchmark for an integral test of all computer subsystems. The resulting score can be compared with all computers in the world.
3DMark
Horsepower: Computer Performance Test / ozone3d.net
A popular computer performance test in 3D gaming graphics. Roughly speaking, it will help you understand how your computer will cope with modern computer games.
PassMark PerformanceTest
Horsepower: PC Performance Test / benchmarkreviews.com
Benchmark, which conducts comprehensive testing of all components of your computer. Moreover, it analyzes almost any device — from the motherboard and memory to optical drives.
Do you want to know important and current news before anyone else? Subscribe to Bigmir)net on Facebook and Telegram.
- Tags:
- computer
- tip
- test
- computer performance test
PC performance test: TOP-3 programs
We will also talk about the general rules for their use.
This is very important information! Share it with your loved ones ?
I used to be sure that my computer was doing well and it was fast enough. However, once I decided to test the performance with special software and, to my surprise, found a very low result — only 43%! I did a few operations, changed the settings, overclocked the computer and did some optimization, as a result of which the figures rose to 76%. That is, I simply did not notice that my device was not even performing half of its working capacity.
Today I will tell you how to check your computer for the same problem. We will be working with a non-gaming PC.
FutureMark 3DMark
1
NovaBench
UserBenchmark
This rating is based on your likes and dislikes. Do you want to participate in the formation of the TOP? Read the article and vote using the Like or Dislike buttons for each app reviewed!
NovaBench
Official website: https://novabench.com/
This is a small program that performs basic system diagnostics in just a few minutes. It is very easy to use and you won’t have to deal with the interface for a long time. The results that are issued upon completion of the diagnosis are also understandable.
The software has paid and free versions. If you buy an advanced version, then in addition to general diagnostics, you can also monitor the temperature of the device and other parameters. True, not everyone needs such details — only those who deal with computers at a professional level.
To start general diagnostics, you need to install the program, and after opening it, click on «Start test». The program performs six tests, each of which lasts several minutes (the more powerful the system, the faster the test passes).
In the results window, the service will give you its own rating. It is subjective and you can ignore it. Much more important are the details that will be reflected in the detailed report. When you click on view graphs, a page in the browser will be opened for you, where details about the performance of your processor and other elements of the system will be written.
By the way, you can collect scores and build statistics on your device. This way you can keep track of when and under what conditions your computer is working most efficiently.
Helps you find weaknesses in your computer
Compares the status of your computer with other computers of the same configuration
Fixes problems
Tracks updates
Manufacturer’s website in English
UserBenchmark
- 4
40016
Official website: https://www. userbenchmark.com/
This is also a good program that can be easily downloaded from the official website. By the way, after downloading additional installation is not required. Just run the file and diagnostics will begin.
The test will take only a few minutes, after which a browser window will open with a report on the operation of your computer. You will be able to see the score:
- overall performance of the computer;
- detailed for individual elements;
- operating speed and other parameters.
The overall performance is displayed as a percentage. It is compared with other devices and their elements, so this assessment can also be very subjective. Pay attention not to the overall assessment, but to the diagnosis of individual parameters so that you know what to work on.
This software contains the best features of other benchmarks
Hardware recommendations based on user surveys
Engineers and scientists are constantly working on this software
Manufacturer’s English website
FutureMark 3DMark
Official website: https://www.
3dmark.com/
detailed diagnosis. By the way, this program is also great for checking a gaming computer.
You can use the free version, but then only 4 checks will be available. In the future, you can purchase the full version, if the need arises. But hardly any of us do diagnostics of our device every day or month.
I suggest using this service to check specifically gaming computers. The fact is that it has complex diagnostics and output graphics, which are simply not needed for testing conventional PCs, since even high performance is simpler. In order to check your laptop, it is better to use the first two programs that I described above.
After you download 3DMark to your computer and run it, you will see the first test. It is the most time-consuming, as it has a complex multi-stage diagnosis. When the check is over, you will receive detailed statistics.
This data will not give you a complete understanding of the situation until you compare it with others. The program itself offers you to compare statistics online. By the way, the results may surprise you! For example, older, well-maintained models can be far more efficient in terms of performance than those that were released recently.
Works not only with computers, but also with mobile devices
3D Mark works with manufacturers of PC components
3D Mark — a product that is used all over the world
Manufacturer’s website in Russian
Like it?
Windows 10 Experience Index | remontka.pro
Users who have upgraded to a new OS, especially if the upgrade took place from the seven, are interested in: where to look at the Windows 10 performance index (the one that shows a score of up to 9.9 in numbers for different computer subsystems). This information is now missing from the system properties.
Nevertheless, the performance index calculation functions have not gone away, and the ability to view this information in Windows 10 remains, both manually, without using any third-party programs, and with the help of several free utilities, one of which (the cleanest from any third party software) will also be shown below.
Viewing the Experience Index Using the Command Line
The first way to find out the Windows 10 Experience Index is to force the System Assessment process and then view the test report. This is done in a few simple steps.
Run a command prompt as an administrator (the easiest way to do this is to right-click on the «Start» button, or if there is no command line in the context menu, start typing «Command Prompt» in the search on the taskbar, then right-click on the result click and select Run as administrator).
Then type the command
winsat formal -restart clean
and press Enter.
The command will run a performance evaluation that may take several minutes. When the test is complete, close the command prompt (benchmark can also be run from PowerShell).
The next step is to view the results. To do this, you can do one of the following methods.
First method (not the easiest): go to C:\ Windows\ Performance\ WinSAT\ DataStore and open the file named Formal. Assessment (Recent).WinSAT.xml (the name will also have the date at the beginning). By default, the file will open in one of the browsers. If this does not happen, you can open it with a regular notepad.
After opening, find the section in the file that starts with the name WinSPR (the easiest way is to use the search by pressing Ctrl + F). Everything in this section is information about the system performance index.
- SystemScore — Windows 10 performance index calculated from the minimum value.
- MemoryScore — RAM.
- CpuScore — processor.
- GraphicsScore — graphics performance (meaning interface operation, video playback).
- GamingScore — performance in games.
- DiskScore — hard drive or SSD performance.
The second way is to simply launch Windows PowerShell (you can start typing PowerShell in the taskbar search, then open the result) and type Get-CimInstance Win32_WinSAT (then press Enter). As a result, you will get all the basic performance information in the PowerShell window, and the final performance index, calculated from the lowest value, will be indicated in the WinSPRLevel field.
And one more method that does not give complete information about the performance of individual system components, but shows the overall performance score of the Windows 10 system: ” (then press Enter).
As you can see, viewing this information is very easy without resorting to any third-party tools. And, in general, it can be useful for quickly analyzing the performance of a computer or laptop in cases where nothing can be installed on it (for example, when buying).
Winaero WEI tool
Winaero WEI Tool is a free performance index viewer that is compatible with Windows 10, does not require installation and does not contain (at least at the time of this writing) any additional software. You can download the program from the official website http://winaero.com/download.php?view.79
After starting the program, you will see the familiar Windows 10 performance index view, information for which is taken from the file in question in the previous way. If necessary, by clicking «Re-run the assessment» in the program, you can restart the system performance assessment to update the data in the program.
How to find out the Windows 10 Experience Index — video instruction
In conclusion — a video with two described ways to get a system performance score in Windows 10 and the necessary explanations.
And one more detail: the performance index calculated by Windows 10 is a rather arbitrary thing. And if we talk about laptops with slow HDDs, then almost always it will be limited by the speed of the hard drive, while all the components can be top-end, and the performance in games is enviable (in this case, it makes sense to think about an SSD, or simply not pay attention). attention to evaluation).
remontka.pro in Telegram | Other ways to subscribe
Support the author and the site
Windows computer performance score
In the Windows 7 system properties, you can quickly check the performance of your computer by various parameters and display the final value. This function was called — evaluation of computer performance. For some reason, this indicator was removed in subsequent versions of Windows. But if you want to know the performance of your computer, there are several ways. That’s what we’ll talk about now. 9Ol000 The performance index is the total score. The speed of each element (processor, memory, video card, hard drive) is measured and an index is displayed that corresponds to the lowest score. The maximum value of the indicator is 9.9 points.
All programs must be closed before evaluation. Then, the indicator will be more accurate.
For example, if the hard drive is the slowest of all, (5.9), then even though the other components score 9.7 or higher, the performance index will be 5.9. That is, the evaluation of computer performance is displayed by the lowest indicator. And if you want to change this, you will have to replace the hard drive with a faster one.
Viewing the computer performance index using Power Shell
PowerShell is a cross-platform system for task automation and configuration management, consisting of a command line shell and a scripting language.
Open Power Shell as administrator. We right-click on the button « Start » and find the item « Windows Power Shell (administrator) «. Enter the command Get — CimInstance Win 32_ WinSAT and press the “ Enter ” key on the keyboard.
After a second, a list with the performance index will appear. Where,
- CPUScore — Processor.
- D3DScore — 3D graphics index, including for games.
- DiskScore — Evaluation of the system HDD.
- GraphicsScore — Graphics so-called. desktop.
- MemoryScore — Rating of RAM.
- WinSPRLevel — Overall system score, measured by the lowest score.
Note: if in this menu instead of Windows PowerShell you have a command line, then you can replace it with PowerShell by right-clicking on the desktop — Personalization Windows Powershel l» (in the latest versions of Windows 10, the option is enabled by default).
![]()
Evaluate computer performance using the WEI utility
If you find it difficult to use PowerShell, then use the small utility Winaero WEI Tool. You can take it from the official site. This is a small file that does not require installation, but is simply launched by double-clicking the mouse. The only negative is that the utility is not Russified. But everything is clear there.
Download the file from the official site.
Unzip the archive. We only need file WEI. exe .
Run it. And we look.
My weakest link is the hard drive. Because of it, the performance index is only 5.9.
- Processor — Processor. The score is based on the number of possible calculations per second.
- Memory (RAM) — Random access memory. The estimate is similar to the previous one — for the number of memory access operations per second.
- Desktop graphics — Graphics. Desktop performance is evaluated (as a component of «Graphics» as a whole, and not a narrow concept of «Desktop» with labels and wallpapers, as we used to understand).
- Graphics — Graphics for games. The performance of the video card and its parameters for games and work with 3D objects in particular are calculated.
- Primary hard drive Primary hard drive. The speed of data exchange with the system hard disk is determined. Additional connected HDDs are not taken into account.
The test can be re-run by clicking on the link button » Re- run the assessment » at the bottom right.
There are also three buttons at the bottom right:
- Save to computer.
- Take a screenshot and send it to the specified address.
- Save as HTML file.
Computer performance evaluation video for Windows »
Benchmarking Windows 8.1 and 10
The application lacked a simple graphic display on these systems. The user will need to run the command line (Win + R and type cmd in the window) and enter the operator winsat formal -restart clean in it.
Next, go to drive C and go to the directory Performance \ WinSAT \ DataStore, in it you should find and open the file Formal.Assessment (Recent).WinSAT.xml, you can do this using any text editor.
In the text you should find data starting with WinSPR, there are several points: SystemScore shows the overall score, and MemoryScore is responsible for memory, CpuScore shows the processor index, and GraphicsScore is responsible for graphics testing. GamingScore and DiskScore show gaming performance and hard drive data transfer speed.
Using the task manager
The user has access to a shared method. First you should open the task manager (Ctrl + Shift + Esc), then go to the performance tab. A resource monitor is available here, thanks to which the user can determine the load on a particular hardware.
Performance test for games
To check the performance of your computer when using game applications , you should press win + r and enter the command shell: games.
A window will open in which you can see the index itself and performance in games.
Programs for testing a computer
However, standard tools are often not popular because they do not provide complete information, in this case one of the third-party utilities can be used. They are also called benchmark for a computer, because they allow you to diagnose equipment and compare with the reference result.
AIDA64
One of the most popular utilities for checking the status of computer hardware. You can download the utility from the site http://www.aida64.ru/download.
Here you can find out everything about your hardware , its name, operating speed, installed drivers and so on. The utility will help those who want to update their computer and find weaknesses in it.
SiSoftware Sandra Lite
The program can be downloaded from the official page http://www.sisoftware.co.uk/. She will allow you to test all I / O ports, it will also show data about the video card and processor, diagnostics of printing devices and a sound card are available.
3DMark
You can download it from https://www.3dmark.com/. This program is mainly focused on performance testing graphics and processor, during testing, many visual effects are used. Suitable for those who need to evaluate the performance of a video card and related components in case of a heavy load.
PCMark 10
The application can be found at https://benchmarks.ul.com/pcmark10?redirected=true. A good utility for diagnosing the state of computer hardware. A version for the eight (PCMark 8) and seven (PCMark 7) is available, the full functionality is revealed by only in the paid version .
CINEBENCH
Download available at https://www.maxon.net/en/produkty/cinebench/. This program evaluates the entire device in a complex and displays the results. Many large images are used for testing.
ExperienceIndexOK
A simple application found here http://www.softwareok.com/?seite=Microsoft/ExperienceIndexOK. It is very similar to a standard program, only it works in real time.
CrystalDiskMark
A good utility for checking disks https://crystalmark.info/en/software/crystaldiskmark/. However, this also has a drawback, only drives are available for testing .
PC Benchmark
A nice and free PC Benchmark that can be downloaded from http://www. userbenchmark.com/Software. Works in the background, the computer can be used during testing. After work will offer optimization methods , after which you can go to the web page and compare the results with other users, here you can also evaluate the chances of launching modern games.
Metro Experience Index
Fast and free application with a concise interface https://midoriapps.wordpress.com/apps/metro-experience-index/. We start and wait for the result of the check.
PassMark PerformanceTest
Paid program that can easily test all PC components. Available at https://www.passmark.com/products/pt.htm.
Winaero WEI Tool
This utility, in fact, replaces the input of commands in the eight and ten and gives the result immediately.
Online testing
Online testing is not carried out, because in order to find out the performance, you need to load the computer components, and this cannot be done over the network due to the protection of the system from attacks from the browser and the peculiarities of using and building sites.