How do I power my Raspberry Pi?
How do I power my Raspberry Pi? | The Pi Hut
Skip to content
Super Fast Shipping
from just £2.99
Your cart is empty
Start shopping
At The Pi Hut we offer a range of different micro-development boards, which all require slightly different power sources! Some are very stringent in their required input; for example, the latest Raspberry Pi recommends 5V @ 2A as a minimum for stability, but some are more flexible, the Arduino can accept a range of voltage inputs (6 – 20V), and regulates this to desired level internally on board. Not only that, the boards themselves have different power input ports, and some can be powered at multiple points on the board! We’ve got a simple breakdown of what each unit requires! You can check the below tutorials on how to best power each device:
How do I power my Raspberry Pi?
How do I power my Arduino?
How do I power my Beaglebone Black?
How do I power my Raspberry Pi?
The least complicated, but most stringent in terms of power requirement is the Raspberry Pi!
The latest version of the Pi 2 can be powered effectively in a couple of ways. Please note. Unlike the original Raspberry Pi Model B, the Raspberry Pi 2 Model B cannot be back-powered via the USB ports (or at least can’t be booted in this fashion).
Mode 1 – Micro USB Port (5V @ 2A)
The first, recommended and easiest way to power the Raspberry Pi is via the Micro USB port on the side of the unit. The recommended input voltage is 5V, and the recommended input current is 2A.
At The Pi Hut, our standard power supply for the Raspberry Pi is 5.1V @ 2.5A. The reason for increasing the voltage slightly is to negate any voltage drop caused by excessive current draw. This is well within tolerance for Micro-USB, and from experience, we have found that this give the best stability for most applications.
The Raspberry Pi can function on lower current power supplies e.g. 5V @ 1A. However, any excessive use of the USB ports or even heavy CPU/GPU loading can cause the voltage to drop, and instability during use. The latest versions of the Raspberry Pi B+/A+/2 have a “low voltage indicator icon” to notify the user if there is a problem with the power. This is demonstrated below:
Most “standard” 5V Micro-USB mobile phone, tablet, and digital camera chargers should work with the Raspberry Pi, although we (of course) would recommend that you utilise a high quality dedicated Raspberry Pi power supply to get the best results!
Mode 2 – Via the GPIO
A more technical (and of course dangerous) way to power the Pi is directly via the GPIO. It should be noted that, unlike the Micro-USB port, there is no regulation or fuse protection on the GPIO to protect from over-voltage or current spikes. If an incorrect voltage is applied, or a current spike occurs on the line you can permanently damage your Raspberry Pi. At best, you’ll “burn out” some or all of the GPIO pins, at worst you can fry your Pi! So be careful.
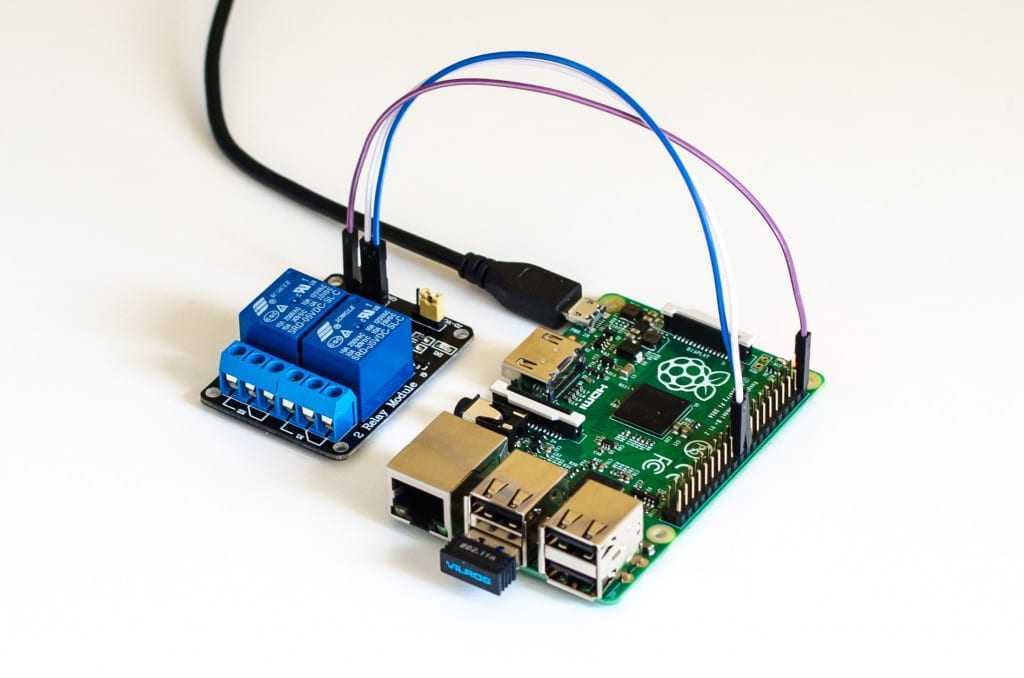
To power via GPIO, you only need to connect 2 pins:
1. ) Connect a 5V source to Pin #2 (5V)
2.) Connect the ground of that source to Pin #6 (GND).
A simple example of this is demonstrated in the image above. We’ve taken one of our USB to TTL cables and connected it to one of our USB power supplies. Just hook up the 5V to Pin #2 (Red cable), and the ground to Pin #6 (Black cable). The TTL cable’s 5V line is regulated and limited to 500mA, so there is some measure of safety using this device.
This process would of course be the same for a spliced USB to Micro USB cable, however we would recommend that you regulate the line voltage and current to negate any nasty stuff!
This method is useful for a range of applications, and a number of breakout boards offer this powering functionality via the GPIO using battery supplies. We therefore recommend that powering via the GPIO only be achieved via a protected source. An excellent example of powering via the GPIO is our own UPS PiCo HAT, an uninterruptible power supply.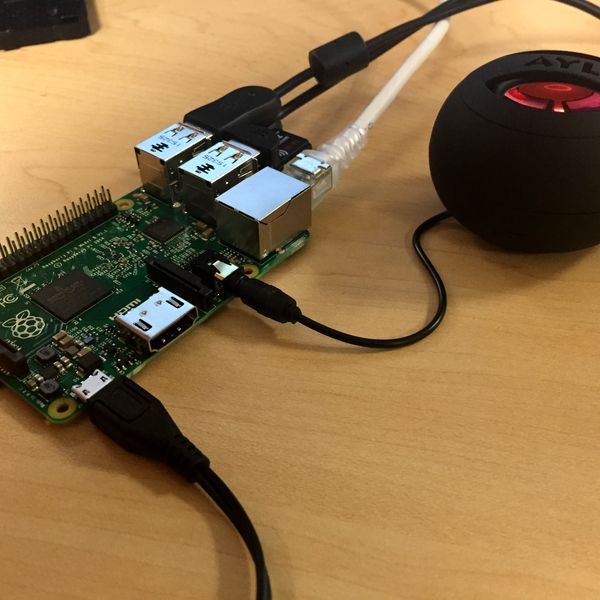
Mode 3 – Via the USB Ports
We did mention earlier that the new Raspberry Pi 2 & B+ can’t be back-powered via the USB ports due to new regulation on the boards. However, this is a bit of a half-truth, as it «can» be done in a roundabout way.
If you apply power to the USB port when you Pi is off, it will not boot. However, if you apply power to your Pi via one of the standard methods (e.g. the micro USB port), then apply power to USB ports and remove the original supply, it will stay on and functional.
It should be noted that USB ports have a current limit of 500mA, so we would not recommend you attempt to supply more than this via the USB!
Further Reading
Powering via the GPIO with Schematic Diagrams
Popular posts
-
Top 10 Raspberry Pi Pico Add-ons & Accessories
-
Top 10 Raspberry Pi 400 Accessories
-
Raspberry Pi Models
-
How to set up an SSD with the Raspberry Pi 4
-
Control your Raspberry Pi media centre with FLIRC
How do I Power My Raspberry Pi
How do I Power My Raspberry Pi — Robocraze
Skip to content
Hello! Welcome to this article.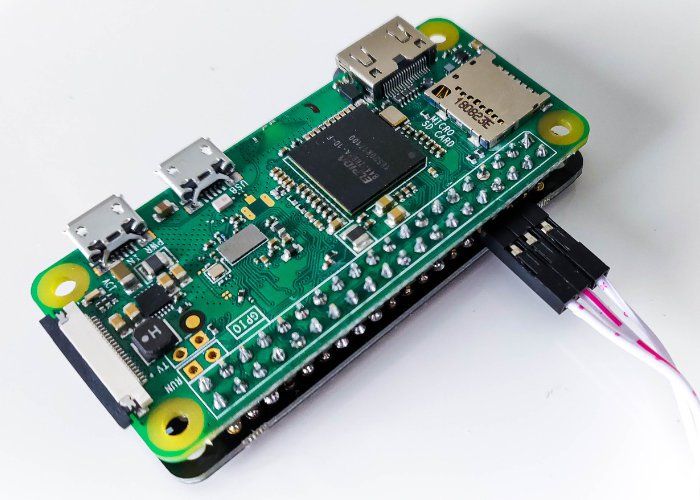 If you recently bought a Raspberry Pi and trying to figure out how to power it on? Which all different connectors on the board can be used for powering or can we use GPIO for powering the RPi? Can we supply extra current or voltage than rated? then this is the right blog for you. Here we will answer all these questions and a lot more by looking at different ways to power Raspberry pi. So stay tuned and let’s get started!
Different modes to Power Raspberry Pi
1. Using USB connector on RPI Board
This is the recommended and most commonly used way to power the Raspberry Pi.
2. Micro USB
You can use a Micro USB type cable to give power supply to the board. This connector is used on older versions of RPi.
3. TYPE-C
TYPE-C connector is used on the latest versions of RPI i.e models 4 and 400. The specialty of type C compared to micro USB is that it is a reversible connector ( can be connected in any orientation) and can be used for faster data transfer and powering the RPi.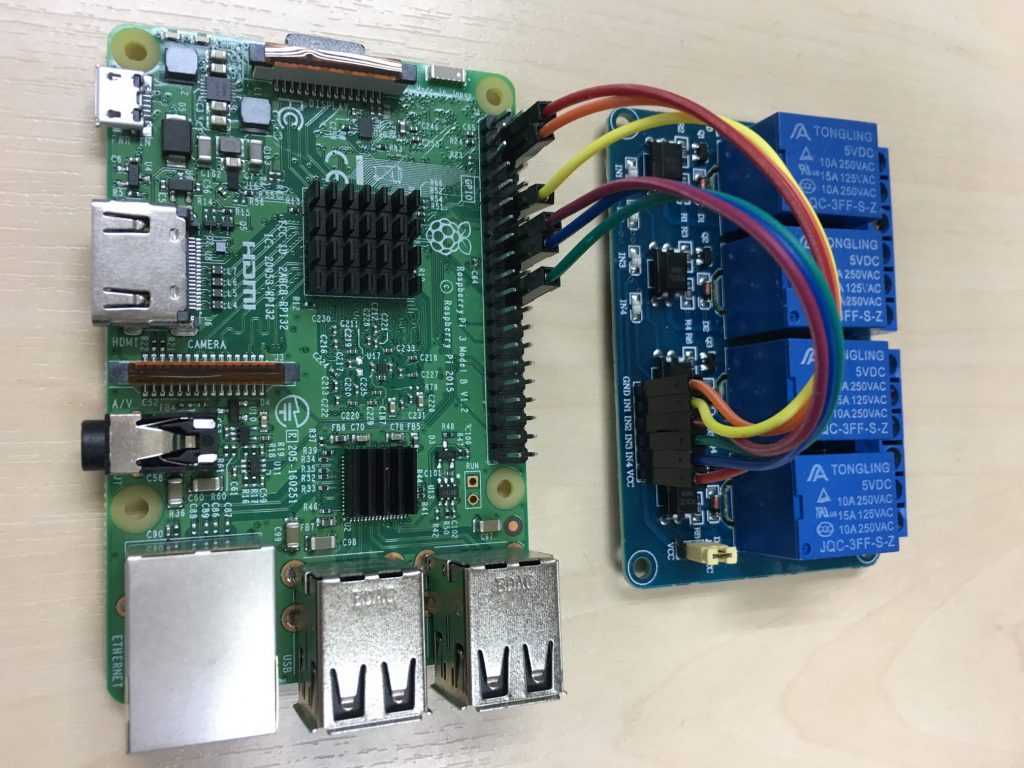
For best performance and stable supply use the official Raspberry pi power adapter from our robocraze store for powering Rpi 4 or 400. It gives a stable 5V and 3 A to the board.
Make sure you provide the recommended power supply as provided in the below table for different Rpi models.
|
Family |
Model |
Voltage |
Recommended Current |
Connector |
|
Raspberry Pi |
A, A+ |
5 V |
700 mA |
Micro USB |
|
Raspberry Pi B+, Rasberry Pi 2 B |
B |
5 V |
1.8 A |
|
|
Raspberry Pi Zero |
Zero, W/WH,2W |
5 V |
1.2 A |
|
|
Raspberry Pi 3 |
A+,B, B+ |
5 V |
2. |
|
|
Raspberry Pi 4 |
B,400 |
5 V |
3.0 A |
USB C |
|
Raspberry Pi Pico |
1-8 — 5.5 V |
— |
Micro USB |
 5 A
5 A2. Using onboard GPIO Pins
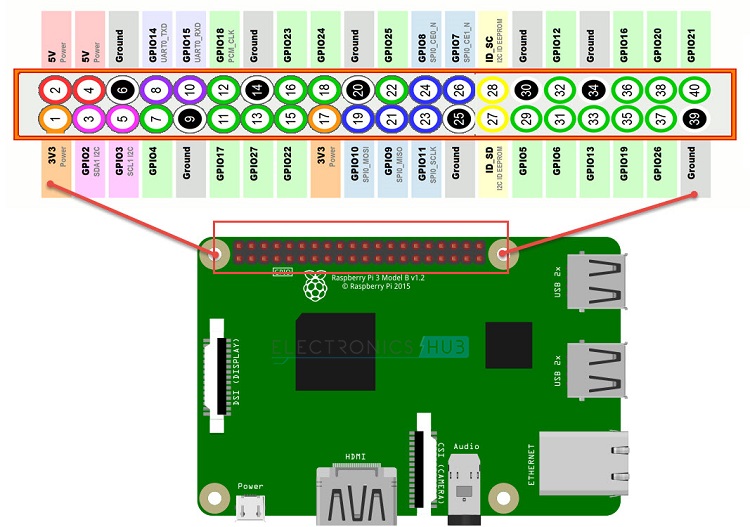
Yes, you can use onboard 5V and GND pins for powering the Rpi. PINs 2 and 4 correspond to 5V. PIN 6 is the ground pin. Connect the PSU power wires accordingly to power the RPi. Note that you would need a stable 5V and 3 A power supply (in the case of Rpi 4) since there is no protection circuit added in case of power fluctuations
3. Power over Ethernet (PoE)
There is one more way through which you can power your RPi i.e by providing a power supply through the ethernet port. But for doing this you will require an extra shield called Raspberry Pi PoE HAT.
PoE is a networking method through which we can send power over an existing data connection on a network cable.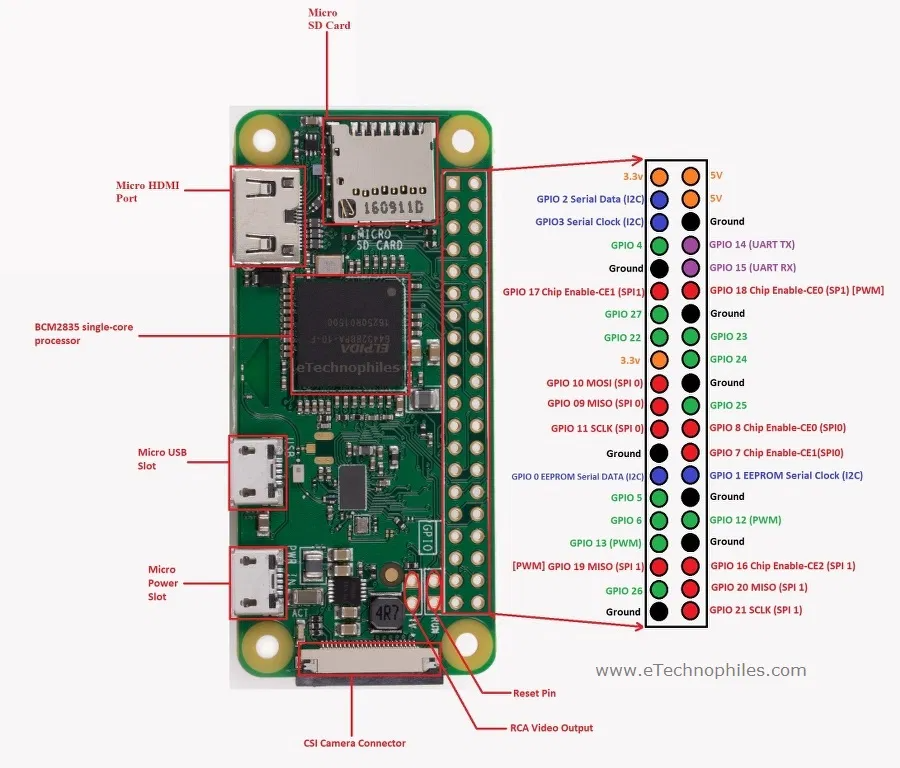
How to use the RPi PoE hat?
To use this just connect the shield on RPI and you are ready to go!
After connecting just plug in the ethernet and power the Rpi!! That’s it!
Note: There should be a power supply connected to the network adapter from which we are taking the ethernet connection.
What if your RPi still doesn’t work?
Check if your power supply wire is working properly. Also, check with a multimeter if the PSU is providing the required amount of Power to the Rpi. If you are using a mobile phone or cable charger it might not be providing the required amount of power. The best way is to use the official Raspberry PI adapter.
Check if you have plugged in your flashed Operating System SD card. If you haven’t installed OS then go to the Rpi official website and follow the steps for installing the Operating system on an SD card. This should solve the problem.
If the SD card is corrupted( unable to format) then you will need to get a new one.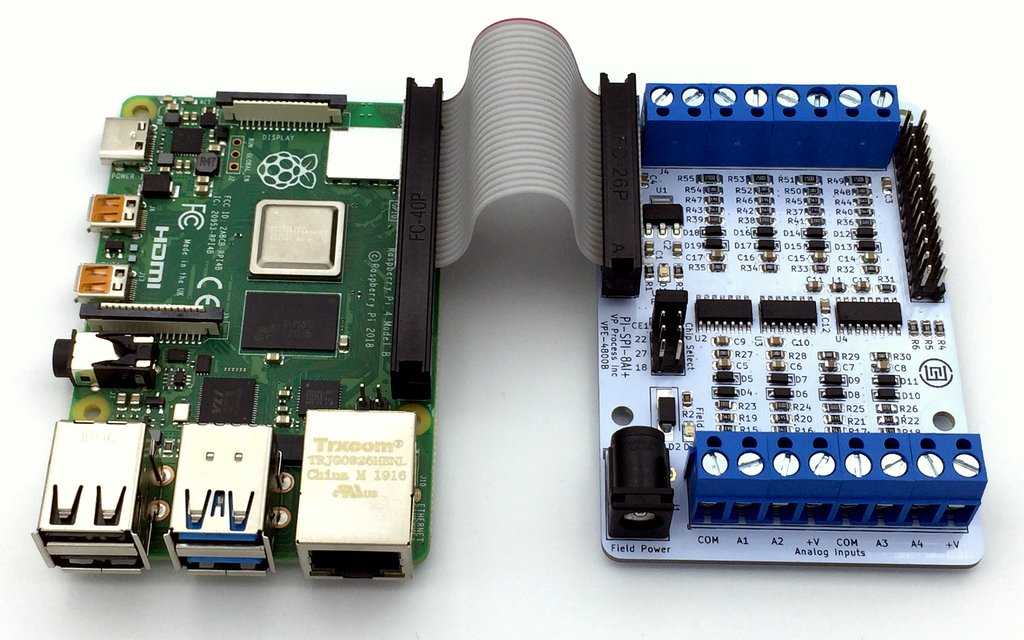 If there is no video output check the HDMI cable if it’s working.
Conclusion
In this article, we have seen how to power the Raspberry Pi board using different methods. If you have any doubts feel free to comment.
— Robocraze —
Robocraze is India’s most trusted Robotics and DIY store. We aim at fostering the growth of knowledge in Embedded Systems, IoT and Automation.
Frequently Asked Questions
1. Can you provide a power supply to Raspberry pi using standard USB ports?
No, You cannot provide a power supply unit (PSU) through the standard USB ports which are available for connecting the keyboard and mouse and getting the expected performance.
There is an indirect way of powering Rpi through USB ports. We can do this by powering the Rpi with a Micro USB or USB C port and then supplying power through USB ports. Then remove the Micro USB or USB C power supply and your Rpi will still work.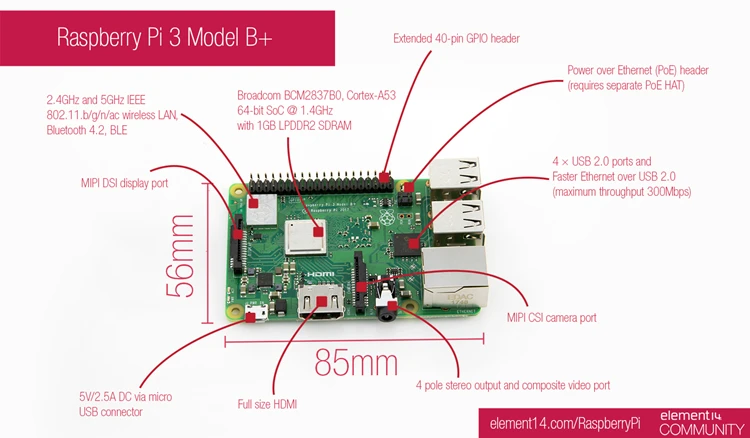 Since USB ports have a current limit of 500mA your Rpi may not work to its fullest performance or not work at all.
Except for Raspberry Pi PICO and Raspberry Pi Zero, the rest have standard USB ports.
2. Can you provide a power supply to Raspberry pi using an audio jack?
You also cannot directly power supply using the audio and video composite jack available on the board.
3. Can we use a PSU that can draw a higher current than 3 A for powering RPI 4?
You can use a 5V PSU which can provide a high current than 3 A since your RPi will only take the required amount of current since the voltage is fixed (5V) and resistance too.
Example: RPi 4 can draw a maximum current of 3 A. So even if we use a 5V PSU that can supply maximum current up to 4A, RPI 4 will only use the required amount of current i.e. up to 3A.
4. Can you use more than a 5V PSU unit for powering RPi 4?
You cannot use a PSU with more than 5V, it is likely to damage the board.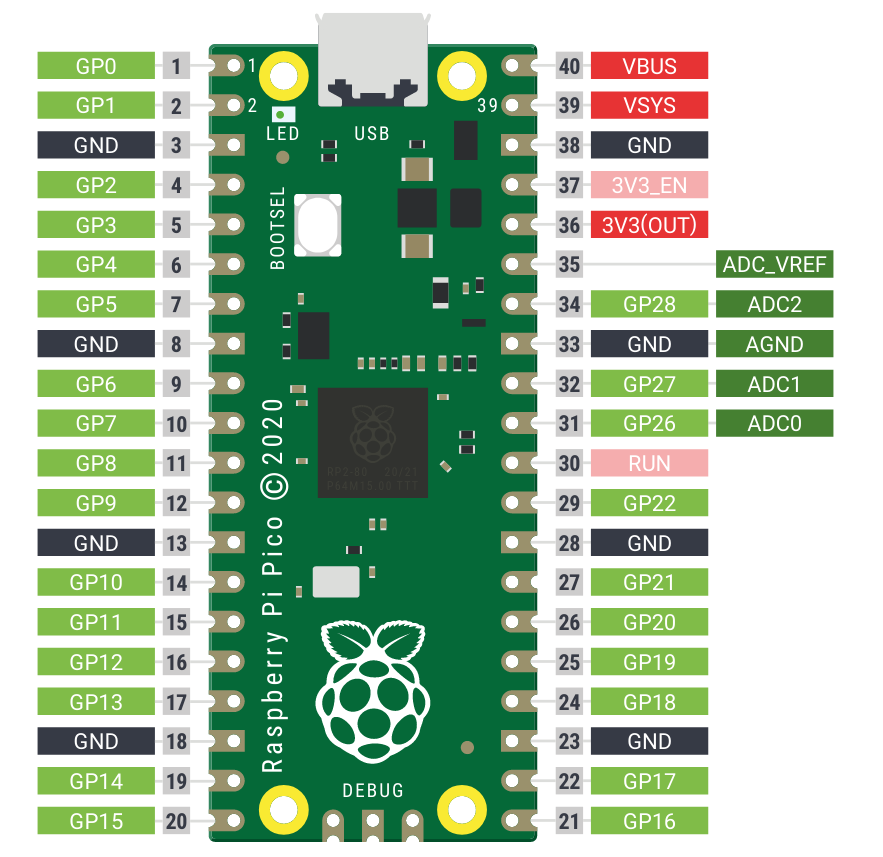 Since most of the boards are rated around a maximum of 5V.
5. What is the difference between powering RPi through GPIO and powering it through micro USB or USB C?
Micro USB or USB C is provided with an extra protection circuitry ( fuse and diode protect from power surges) whereas when your power supply is through GPIO, this circuit is bypassed.
Components and Supplies
Raspberry Pi 3B
Raspberry Pi 3B
- Regular price
- Rs. 3,217
- Sale price
- Rs. 3,217
- Regular price
-
Rs. 3,660
- Unit price
- /per
Incl. GST (No Hidden Charges)
5.1V, 2.5A Raspberry Pi 3B Stontronics Adapter (White)
5. 1V, 2.5A Raspberry Pi 3B Stontronics Adapter (White)
- Regular price
- Rs. 749
- Sale price
- Rs. 749
- Regular price
-
Rs. 919
- Unit price
- /per
Incl. GST (No Hidden Charges)
- Regular price
- Rs. 749
- Sale price
- Rs. 749
- Regular price
-
Rs. 919
- Unit price
- /per
Incl. GST (No Hidden Charges)
5.1V, 2.5A Raspberry Pi 3B Stontronics Adapter (Black)
5.1V, 2.5A Raspberry Pi 3B Stontronics Adapter (Black)
- Regular price
-
Rs.
 689
689
- Sale price
- Rs. 689
- Regular price
-
Rs. 807
- Unit price
- /per
Incl. GST (No Hidden Charges)
Official Raspberry Pi 4 Power Adapter
Official Raspberry Pi 4 Power Adapter
- Regular price
- Rs. 749
- Sale price
- Rs. 749
- Regular price
-
Rs. 918
- Unit price
- /per
Incl. GST (No Hidden Charges)
- Regular price
- Rs. 749
- Sale price
- Rs. 749
- Regular price
-
Rs.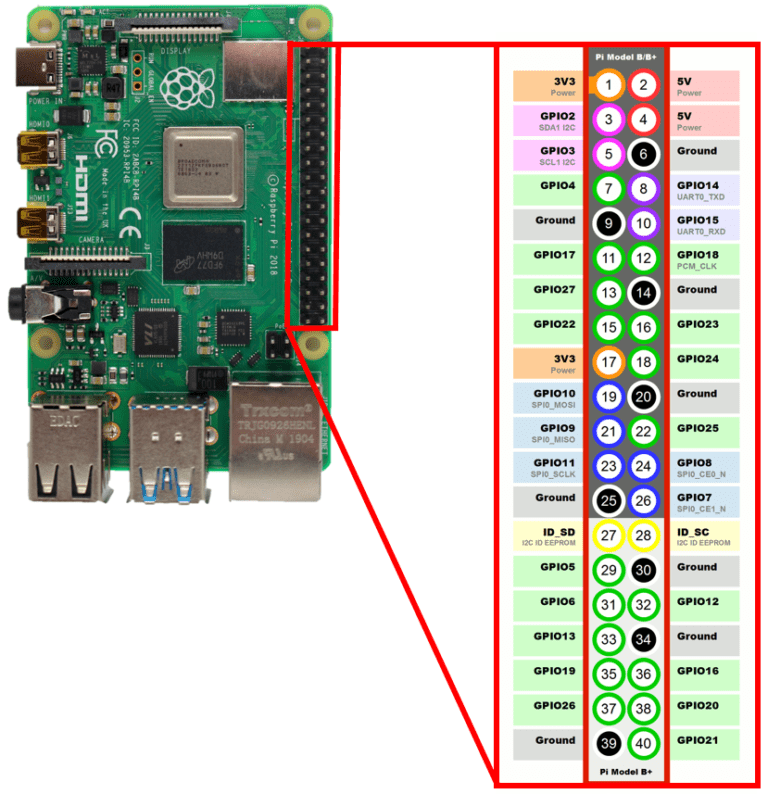 918
918
- Unit price
- /per
Incl. GST (No Hidden Charges)
5V 3A ERD Adapter with Type C Cable
5V 3A ERD Adapter with Type C Cable
- Regular price
- Rs. 355
- Sale price
- Rs. 355
- Regular price
-
Rs. 435
- Unit price
- /per
Incl. GST (No Hidden Charges)
- Regular price
- Rs. 355
- Sale price
- Rs. 355
- Regular price
-
Rs. 435
- Unit price
- /per
Incl. GST (No Hidden Charges)
Raspberry Pi 15W Official Black Power Supply (EU)
Raspberry Pi 15W Official Black Power Supply (EU)
- Regular price
-
Rs.
 749
749
- Sale price
- Rs. 749
- Regular price
-
Rs. 999
- Unit price
- /per
Incl. GST (No Hidden Charges)
- Regular price
- Rs. 749
- Sale price
- Rs. 749
- Regular price
-
Rs. 999
- Unit price
- /per
Incl. GST (No Hidden Charges)
Raspberry Pi 400 Official Kit
Raspberry Pi 400 Official Kit
- Regular price
- Rs. 10,298
- Sale price
- Rs. 10,298
- Regular price
-
Rs.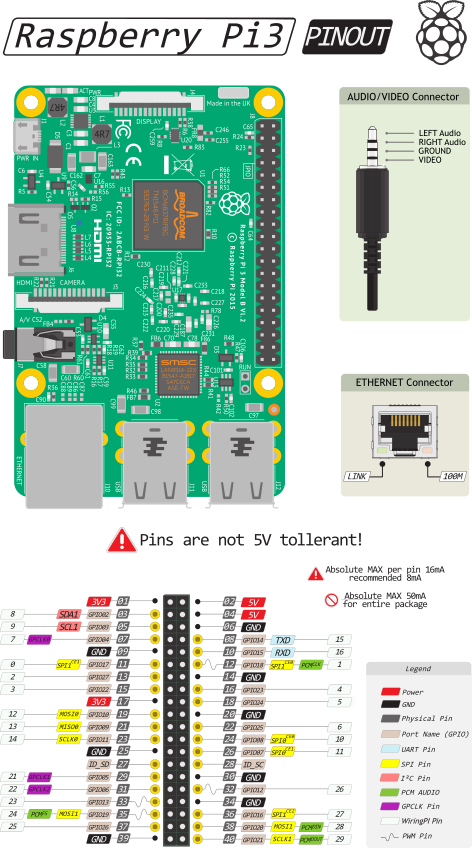 11,979
- Unit price
- /per
Incl. GST (No Hidden Charges)
You May Also Like To Read:
— Robocraze —
What Are Hot Glue Guns
— Robocraze —
NEMA 17 — The High Torque Stepper Motor Working Principle
— Robocraze —
Solenoid Valve — How They Work
Related Blogs
Turning on an LED with your Raspberry Pi’s GPIO Pins
Aug 5, 2022
Interfacing Ultrasonic Sensor with Raspberry Pi 4 GPIO
Jul 9, 2022
Frequently Asked Questions
1. Can you provide a power supply to Raspberry pi using standard USB ports?
No, You cannot provide a power supply unit (PSU) through the standard USB ports which are available for connecting the keyboard and mouse and getting the expected performance.
There is an indirect way of powering Rpi through USB ports. We can do this by powering the Rpi with a Micro USB or USB C port and then supplying power through USB ports. Then remove the Micro USB or USB C power supply and your Rpi will still work. Since USB ports have a current limit of 500mA your Rpi may not work to its fullest performance or not work at all.
Except for Raspberry Pi PICO and Raspberry Pi Zero, the rest have standard USB ports.
2. Can you provide a power supply to Raspberry pi using an audio jack?
You also cannot directly power supply using the audio and video composite jack available on the board.
3. Can we use a PSU that can draw a higher current than 3 A for powering RPI 4?
You can use a 5V PSU which can provide a high current than 3 A since your RPi will only take the required amount of current since the voltage is fixed (5V) and resistance too.
Example: RPi 4 can draw a maximum current of 3 A. So even if we use a 5V PSU that can supply maximum current up to 4A, RPI 4 will only use the required amount of current i. e. up to 3A.
4. Can you use more than a 5V PSU unit for powering RPi 4?
You cannot use a PSU with more than 5V, it is likely to damage the board. Since most of the boards are rated around a maximum of 5V.
5. What is the difference between powering RPi through GPIO and powering it through micro USB or USB C?
Micro USB or USB C is provided with an extra protection circuitry ( fuse and diode protect from power surges) whereas when your power supply is through GPIO, this circuit is bypassed.
Back to Post
` : «»}
`
const excerpt = document.querySelector(«.excerpt»).innerHtml
document.querySelector(«.excerpt-container»).outerHTML += doc
}
Use left/right arrows to navigate the slideshow or swipe left/right if using a mobile device
Raspberry Pi — First Run
A step-by-step guide to getting your Raspberry Pi minicomputer up and running.
It’s been a week since I received my Raspberry Pi minicomputer.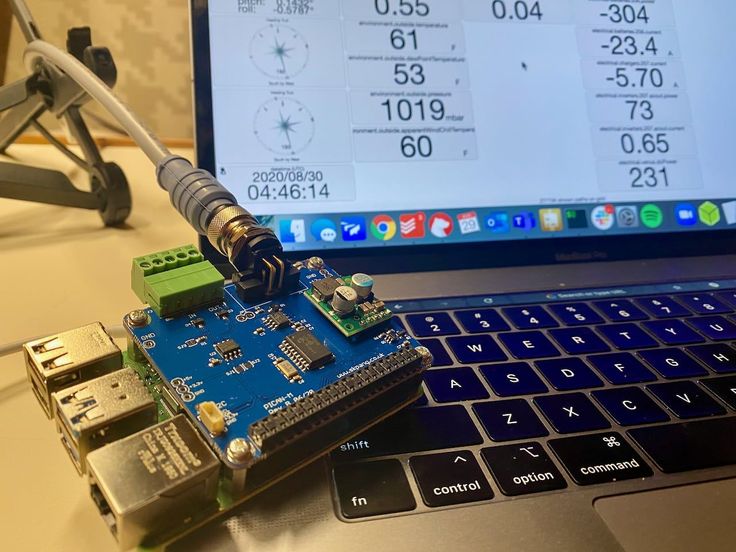 During this time, I have implemented almost all my ideas and now I am ready to share my experience. In this article, I’ll walk you through how to get your Raspberry Pi up and running.
To run we need:
- Raspberry Pi
- USB keyboard
- USB mouse (if you are going to work in the visual environment)
-
SD/MMC/SDIO memory card from 2 to 32 GB (buy class 6 or 10 cards if possible)
- Micro USB Power Adapter for Raspberry Pi
- Monitor with HDMI input or TV or TV tuner with RCA connectors
-
HDMI cable for connecting to a monitor or RCA cable for connecting to a TV or TV tuner
- Win32DiskImager program for writing a system image to a flash drive
- Raspbian “wheezy” 9 operating system image0010
- SD/MMC/SDIO card reader
If you have everything you need at hand, then continue.
Writing a Raspbian Image to a Memory Card for Raspberry Pi
To write a Raspbian system image to a memory card, you will need the Win32DiskImager program and the Raspbian «wheezy» image itself.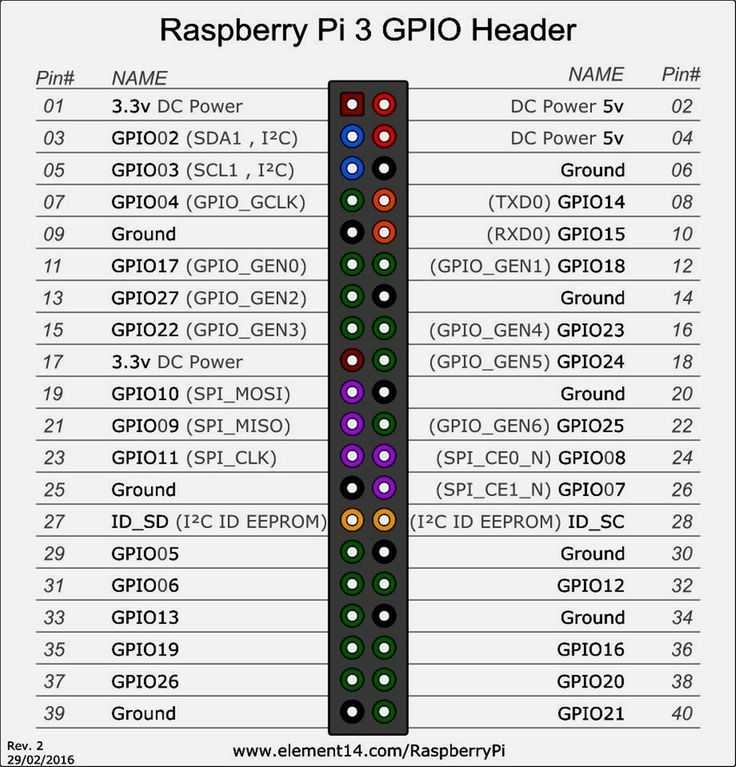 Download them to your computer.
You now have a USB flash drive with the burned Raspbian image ready to go.
Raspberry Pi connection
- Connect memory card to Raspberry Pi
- Connect USB keyboard (and USB mouse if needed)
-
Connect the HDMI cable to the monitor at one end, and the Raspberry Pi or RCA cable to the TV (TV tuner) and Raspberry Pi at the other end (only the yellow connector will be used in RCA)
- Turn on your monitor or TV (TV tuner)
- Connect Mini USB power adapter to Raspberry Pi
- Plug the Mini USB power adapter into a power outlet
When using the TV tuner as a monitor, you must select the composite input as the signal source.
Configuring Raspberry Pi
When you first boot Raspberry Pi, you will see the Raspi-config menu
If this does not happen, then type the command sudo raspi-config in the console
Through this menu, we can make basic settings for our future system.
Consider the menu items that we will use:
expand_rootfs — here you can increase the root size by the entire size of the memory card. I highly recommend doing this first.
configure_keyboard — at this point you can select the keyboard driver if the default option does not suit you.
change_pass — change password for user «pi». When you enter the password, it is not displayed. You must enter twice.
change_locate — setting the system language.
Select Russian localization in UTF-8 encoding. The choice is made by a space.
Then check it against the list of available localizations.
change_timezone — time zone selection. The Raspberry Pi does not have its own clock, so the time is taken from the Internet. Please select your region for convenience.
memory_split — Raspberry Pi memory allocation
You need to decide how much RAM you are willing to allocate to the GPU.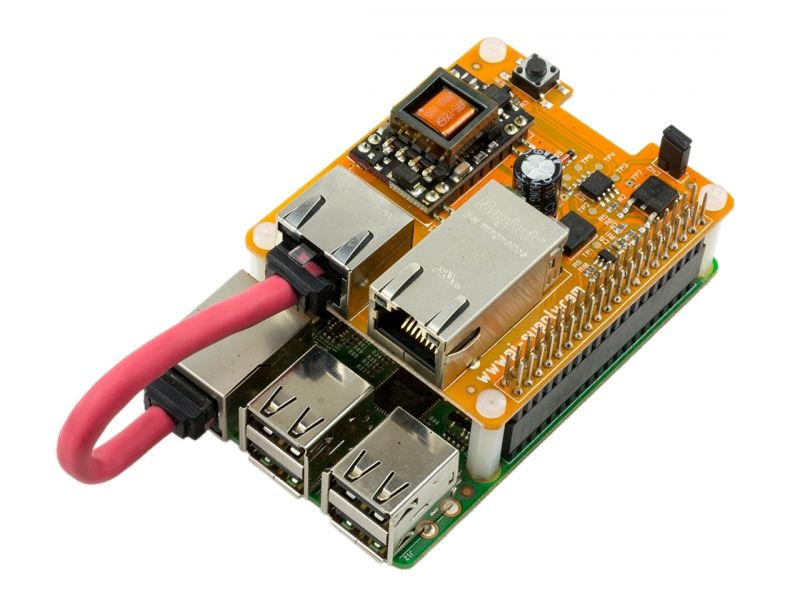 When working in the console, 16 MB will be enough, but to watch the video in the graphical shell, you will have to sacrifice 64-128 MB. Selected values can only be: 16, 32, 64, 128 or 256.
overclock — overclocking Raspberry Pi
For now, you can leave the default value, and then, if necessary, select the option that suits you. Here we should take into account the fact that as the frequency increases, the energy consumption also increases. That is, your power supply must supply enough current for normal operation.
ssh — enable or disable the SSH server. I recommend that you enable SSH if you intend to use remote control. nine0003
boot_behaviour — loading the visual shell on system boot. If you are going to spend more time in the console, then do not enable this feature. To load the visual shell, use the command startx .
After completing the settings, press Ctrl+F on the keyboard, select  The Raspberry Pi will need to reboot to make changes.
Raspberry Pi root password setting
Type 9 in the console0003
Linux Commands
In case this article will be read by users who have not worked with Linux before, I decided to describe a few commands that will be useful to you in your work.
Raspberry Pi backup
Now we have a minimally configured working system with a small set of programs. So that in case of any unforeseen circumstances we do not have to repeat all of the above, we will make a backup of our data.
Leave all questions and additions in the comments.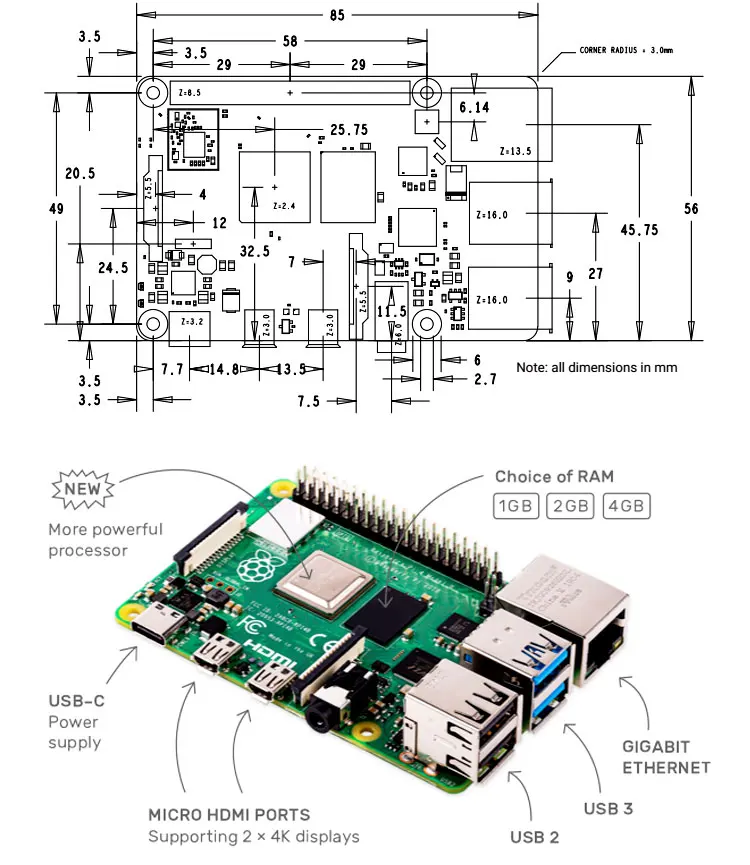 I would be grateful if you share the link to this article with your friends on social networks.
P.S. In the next article, I will describe the process of organizing remote access to the Raspberry Pi. SSH connection for console access and organization of remote access to files via SSH will be considered. We will also set up a local network.
nine0010
connection and setup [Ampere / Wiki]
To get started with your Raspberry Pi comfortably, you need to take a few steps:
-
Connect all necessary equipment.
-
Burn the Raspberry Pi OS image to a microSD card.
-
Make OS preset.
-
Customize your operating system.
Let’s start in order!
Views of Raspberry Pi
There are several main types of Raspberry Pi.
-
Versions A
-
Version B
-
Zero versions
-
Versions Compute Module
-
Pi 400 version
Versions A
The Model A form factor is more compact than the Model B boards: instead of a bulky USB hub, they left one USB port and saved 2 cm in length.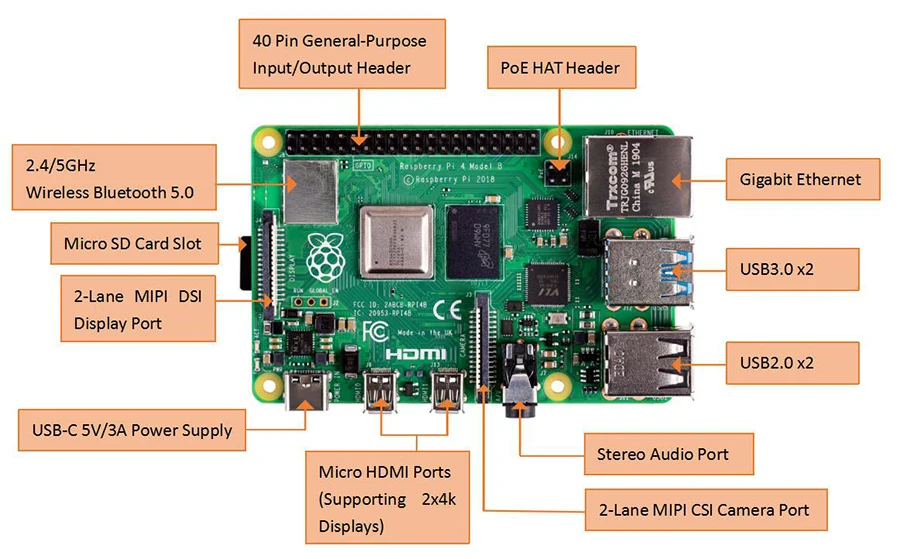
List of revision A boards
-
Raspberry Pi A
-
Raspberry Pi A+
-
Raspberry Pi 3A+
Version B
The board already has four USB ports, a full-fledged Ethernet connector and a 3.5 mm Jack output to immediately start comfortable work.
List of revision B boards
-
Raspberry Pi B
-
Raspberry Pi B+
nine0009
Raspberry Pi 2B
Raspberry Pi 3B
Raspberry Pi 3B+
Raspberry Pi 4 (1 GB)
Raspberry Pi 4 (2 GB)
Raspberry Pi 4 (4 GB)
Raspberry Pi 4 (8 GB)
Zero versions
The Raspberry Pi Zero, Zero W, and Zero WH are smaller and require less power. They are useful for portable projects or robots where increased energy efficiency is important.
nine0003
It’s easier to start a project with the Model B and move to the RPi Zero when you have a working prototype that would be better suited to a compact size board.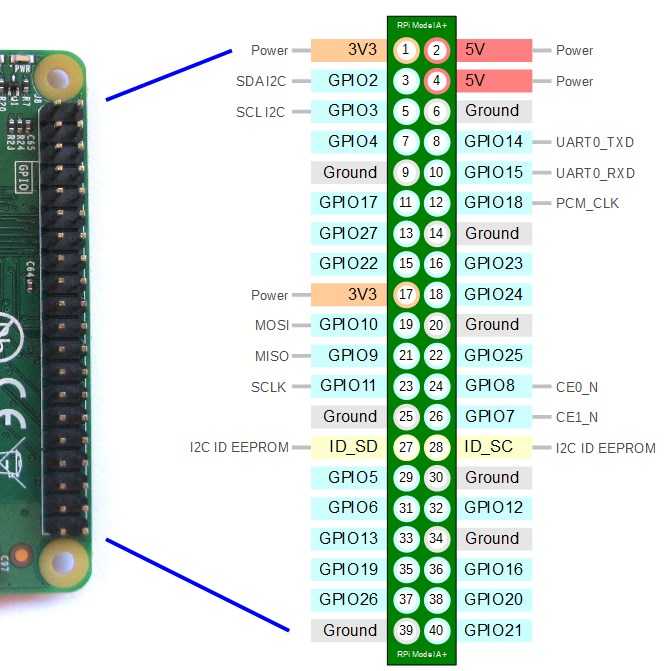
Zero Board List
-
Raspberry Pi Zero
-
Raspberry Pi Zero W
-
Raspberry Pi Zero 2W
Compute Module Versions
Compute Module versions do not have the usual connectors for peripherals. More precisely, all interfaces are brought to the edge connector of the board with hundreds of pins. The modules are intended for embedding into ready-made devices based on Raspberry Pi computing stuffing. I/O Boards help you work with the Compute Module and use traditional connections.
nine0003
List of Compute Module
Boards
-
Compute Module 1
-
Compute Module 3
-
Compute Module 3 Lite
-
Compute Module 3+
-
Compute Module 3+ Lite
-
Compute Module 4
Pi 400 version
The Raspberry Pi 400 is a complete RPi 4 based computer built into a compact keyboard. This allows you to save space on your desktop and get a ready-made Linux computer with the usual connectors for peripherals.
nine0003
Power supply
For power connection, a USB port is used (the same as on many mobile phones): either USB-C for the Raspberry Pi 4 or micro-USB for the RPi 1/2/3 and Zero.
You will need a USB Type-C or micro-USB cable and a power supply that provides:
-
Minimum 3.0 Amp for Raspberry Pi 4
-
Minimum 2.5 Amp for Raspberry Pi 3
nine0010
Memory card
To store the operating system and all files, RPi single boarders need a microSD card with a capacity of at least 8 GB and installed Raspberry Pi OS .
Burn the Raspberry Pi OS image to a microSD card yourself or use a card with a ready-made system.
Keyboard and mouse
To start using your Raspberry Pi, you will need USB Keyboard and USB Mouse .
After setting up your Raspberry Pi, you will be able to use a Bluetooth keyboard and mouse, but you will need a keyboard and mouse for the first setup USB .
Display
The easiest way is to connect a separate screen to the Raspberry Pi — a monitor or TV with HDMI. If the display has built-in speakers, the RPi will be able to play audio through them.
The Raspberry Pi also supports remote control via SSH and VNC.
HDMI
The Raspberry Pi has an HDMI output port that is compatible with the HDMI port of most modern TVs and computer monitors. Many computer monitors also have DVI or VGA ports.
nine0003
The Raspberry Pi 4 has two micro-HDMI ports, allowing you to connect two separate monitors.
To connect your Raspberry Pi 4 to your screen, you will need a micro-HDMI to HDMI cable.
You can use a standard HDMI to HDMI cable with a micro-HDMI to HDMI adapter.
The Raspberry Pi 1 , 2 and 3 have one full size HDMI port so you can connect them to your screen with a standard HDMI to HDMI cable.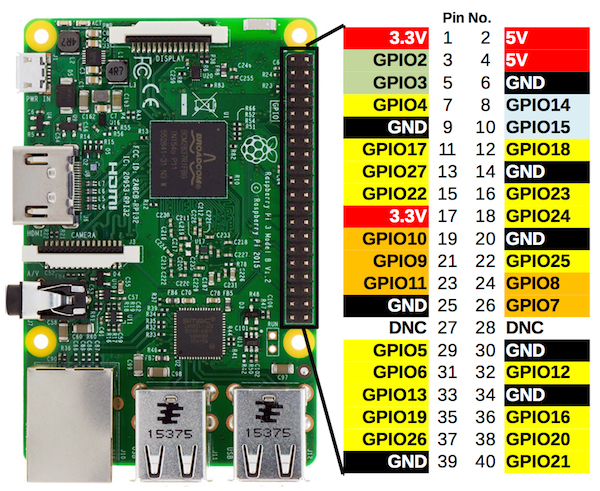 nine0003
Raspberry Pi Zero have one mini-HDMI port. You can connect them to the screen using the mini-HDMI to HDMI cable. Or you can use a standard HDMI to HDMI cable with the mini-HDMI to HDMI adapter.
DVI
If your screen has a DVI port, you can connect your Raspberry Pi to it using the HDMI to DVI cable.
VGA
Some screens only have a VGA port.
To connect your Raspberry Pi to such a screen, you can use an adapter HDMI to VGA .
Network connection
Larger Raspberry Pi models (non-Zero) have a standard Ethernet port for connecting to the internet via cable.
To connect the Zero board to the internet, you will need the USB-to-Ethernet adapter .
Raspberry Pi 3, 4 and Zero W also support Wi-Fi wireless networks.
Headphones or speakers
Larger Raspberry Pi models (non-Zero) are equipped with an audio output — this is a standard 3.