How To Fully Uninstall Creative Drivers & Solve Install Problems (Vista/XP/Windows 7)
I’ve recently been fiddling about with multiple Audigy Vista drivers. In the quest to find the best working driver, I was experiencing issues with left over files. I didn’t fancy reinstalling Vista every time I had a new driver to test, so I consulted the Creative oracle -Daniel Kawakami. (Tsk.. I’m such a name dropper.) We then looked at Daniel’s list and compared it to our list of problem files and entries. The amount of things needing deletion (before new driver install) was quite astounding. Creative really added a whole bunch of stuff to Vista drivers. There are 2 ways to remove these files; the easy way or the hard way.
…but before we start -lets take a moment to uninstall any Creative programs that are already installed.
Ok everything Creative in add remove programs uninstalled?
Download latest driver, extract the package using 7-zip or WinRAR, navigate to Drivers folder
Here you will find setup. exe, run it and select Uninstall and Delete all shared files below. After you’re done, restart.
Ok let’s try to get things really clean now.
The Easy Way: Guru3D Driver Sweeper
The automatic uninstall method is very easy, two steps in fact. First you need to kill the CTHELPER.EXE process in Window’s Task Manager if it’s running. It’s very important as files in use cannot be removed.
Next step, we need some help from the Gurus. FnF, from the Guru3D community, kindly added our lists of the problem files and registry entries into the latest version of Guru3D – Driver Sweeper.
Guru3D – Driver Sweeper is a fast tool to remove driver leftovers from your system. It’s very important to remove your drivers on a proper way, because driver leftovers can cause problems like stability and startup problems. You can use it if you want to update/remove drivers from your system. The current supported drivers are NVIDIA (Display and Chipset), ATI (Display), Creative (Sound) Realtek (Sound), Ageia (PhysX) and Microsoft (Mouse).
The Hard Way: Manual Removal Of Files
This Manual uninstall method is quite complex and isn’t suited for most users. Always backup your valuables, registry etc. If it goes wrong, don’t blame me. It’s worth noting too that UAC should be disabled, in case anyone out there is crazy enough to be using it. I don’t recommend this way -it’s really a last resort thing.
1) Firstly begin by totally uninstalling anything with the Creative tag on it.
Control Panel > Control Panel Home > Programs > Uninstall a program
2) Next we need to remove any tricky start up entries, again anything Creative must go.
Control Panel > Control Panel Home > Programs > Change startup programs
3) Now we need to remove Creative registry entries, and there’s quite a few.
- HKEY_CURRENT_USER\SOFTWARE\Creative Tech
- HKEY_LOCAL_MACHINE\SOFTWARE\Creative Tech
- HKEY_LOCAL_MACHINE\System\CurrentControlSet\Control\Creative Tech
- HKEY_LOCAL_Machine\Software\ASIO
4) Remove these files/folders:
- C:\Windows\System32\BMX*.
 rfx
rfx - C:\Windows\System32\Data
- C:\Windows\SysWOW64\Data *(64-bit only)
- C:\Windows\{*.BAK
- C:\Windows\{*.CDF *Under Vista, requires additional actions to be successfully deleted, see below.
- C:\Windows\CTDCRES.DLL
- C:\Windows\System32\cttele32.dll
- C:\Windows\System32\drivers\CTOSS2K.SYS
- C:\Windows\System32\drivers\CTSFM2K.SYS
- C:\Program Files\Creative (delete whole folder)
- C:\Windows\CTXFIRES.DLL
- C:\Windows\CTPRES.DLL
- C:\Windows\Updreg.EXE
To remove .CDF files, type the following two commands in the Command Prompt (requires Admin Privileges or UAC disabled)
takeown /f C:\Windows\*.CDF
and
cacls C:\Windows\*.
CDF /G User:F
User is your username, which must have admin rights. Answer Y (yes) to confirm the changes.
Now close the prompt, open Windows Explorer and delete the files with filenames like these:
{00000005-00000000-00000002-00001102-00000004-20021102}.BAK
{00000005-00000000-00000002-00001102-00000004-20021102}.CDF
After all of this, restart and begin to install your software. I noticed that after using this method, my Creative driver packages would install much quicker. It even solved a few little bugs I was having. Bonus.
I’d like to say a big thanks to Daniel Kawakami and RejZoR for providing us with further information, thus allowing us to compile this list of problems better. Without their hard work and will to help, many of us would have no sound.
I’d also like to say a big thanks to FnF from the Guru3D. com community for adding the huge list of entries to the Guru3D.com Driver Sweeper, thus eliminating much work.
Praise them.
02/07/08 EDIT: Updated, adding instructions for official Creative uninstall tool. Thanks to Tarkan2467 and RejZoR from the Guru3D.com community for the improvements.
31/07/08 EDIT: Creative have changed the installer programs. Some files may not be present -there also will be some new ones…. Some of the advanced removal details may be out of date and inaccurate. We will add more info when available on the new uninstallers.
Like this:
Like Loading…
Uninstall Creative Labs Sound Blaster 16/32/AWE Drivers from PC with Effective Removal Way
Creative Labs Sound Blaster 16/32/AWE Drivers removal has been a tough problem on your PC? Do you need an effective way to uninstall Creative Labs Sound Blaster 16/32/AWE Drivers quickly with simple steps? Don’t worry, you will be able to solve the problem via the following removing instructions of the program.
Get Bloatware Uninstaller Now
Creative Labs Sound Blaster 16/32/AWE Drivers may be great in providing its specific function for the users, but it also can turn out to be a problem when the program get some running issues or you don’t want to keep it on your computer any more. In this case, removing Creative Labs Sound Blaster 16/32/AWE Drivers will be the common and also effective means to resolve the problem, and the real difficulty just come out when people try to uninstall Creative Labs Sound Blaster 16/32/AWE Drivers from their PCs.
What usually make people to remove Creative Labs Sound Blaster 16/32/AWE Drivers
- Creative Labs Sound Blaster 16/32/AWE Drivers is not compatible with other installed applications
- Program gets a corrupted issue unexpectedly
- Creative Labs Sound Blaster 16/32/AWE Drivers is not as good as the user expected, and need to be erased from the computer
- Creative Labs Sound Blaster 16/32/AWE Drivers should be uninstalled first and reinstalled on the PC
- The application is regarded by the user and some websites as a suspect malware
Most common problems of removing the software
- Creative Labs Sound Blaster 16/32/AWE Drivers program is not available on the Windows uninstall panel
- Creative Labs Sound Blaster 16/32/AWE Drivers can’t be removed from the Windows and always receive a notification
- Nothing happen when click on the uninstall button on Windows
- Creative Labs Sound Blaster 16/32/AWE Drivers or the related process still keep running on the computer after removing it
- Some files and traces of the program still can be found
- Removing process running for a long time and does not come to the end
If must be a headache if encountering such a problem on the computer, and there are still many other problems people might come across when perform the program removal on their own computers. Therefore, you should know the right way about how to uninstall Creative Labs Sound Blaster 16/32/AWE Drivers from PC, or the way to fix/avoid the removing issue on the computer. Here are just several options that can support you to remove the application well.
Option 1: Use the product’s uninstall tool
There are many applications in nowadays provides an uninstall process on the program’s installation folder, or the publisher gets an uninstaller which is specifically used to remove its own products. To remove Creative Labs Sound Blaster 16/32/AWE Drivers in this way, please refer to the following uninstall instructions:
- 1. Right-click on Creative Labs Sound Blaster 16/32/AWE Drivers icon on the desktop, and select «Open file location»
- 2. Scroll down the list of files and find the uninstall process, usually named «uninst000», «Uninstall», or «Uninstaller»
- 3. Double click on the uninstall process to start the removal
- 4.
 Follow the uninstall wizard to finish the removal, and restart your computer
 - 5. Open the directory of the installation folder again, and make sure everything has been cleared well
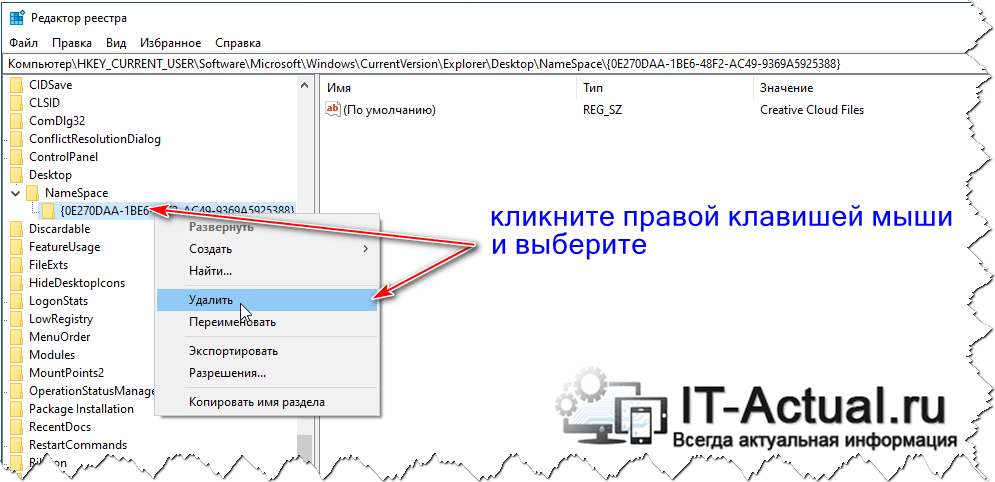
- 6. Click on the Windows button on the bottom-left-corner, and enter «regedit» on the search box
- 7. Click to open «regedit» or Registry Editor on the search result
- 8. Unfold the registry group inside, and find out those registry keys or entries which contains the program’s name
- 9. Back up these files, and then remove them from your computer system
Note: once problems occur after deleting the registry, please restore the back-up registry to Registry Editor.
When using the publisher’s uninstaller, you should download and install the uninstall application additionally, and choose to uninstall Creative Labs Sound Blaster 16/32/AWE Drivers from its interface. Similar to the above removal, you should restart your computer after finish the uninstall process, and clear its remnants again which are still staying on the PC.
Things you need to know about Registry Editor
Registry Editor is a place that stores many important registry keys and entries which closely related to the system operation and program’s performance on the computer, removing a wrong file inside usually cause serious problem for the system, so you should be very careful when you have to manually delete some registries inside.
Get Bloatware Uninstaller Now
Option 2:Remove it with Windows uninstall feature
Windows system provide an uninstall feature in Control Panel that support the user to remove unwanted program on the PC, to access this applet in different operating system, you can follow these instructions:
- 1. Open the uninstall panel on Windows system
- Windows XP: double-click on Start — Control Panel — Add/remove programs
- Windows 7: double-click on Start — Control Panel — Uninstall a program
- Windows 8/8.
 1/10: right-click on Start — Programs and Features
Option 3:Uninstall Creative Labs Sound Blaster 16/32/AWE Drivers with Bloatware Uninstaller
If you want to totally avoid the risky manual removal of registry, and handle Creative Labs Sound Blaster 16/32/AWE Drivers uninstall more easily and quickly, taking a professional uninstall tool will be a great help for you, because it can count all of the files (including registry keys and temporary files) and provide a complete and automatic removal, thus, many risky and annoying manual steps could be skipped can you can totally remove Creative Labs Sound Blaster 16/32/AWE Drivers on the PC more quickly.
Bloatware Uninstaller is an advanced uninstall utility that can give a good example about how uninstall Creative Labs Sound Blaster 16/32/AWE Drivers well:
- 1. Install and launch the uninstaller on PC
- 2. Find and select Creative Labs Sound Blaster 16/32/AWE Drivers from the programs list, and click on Scan button
- 3. When all of files being detected, click on the uninstall or remove button
- 4. Follow the uninstall wizard to remove all of components from the computer
- 5. Exit the uninstaller when finish, and reboot the computer system
Get Bloatware Uninstaller Now
This is a very effective way to uninstall Creative Labs Sound Blaster 16/32/AWE Drivers and other applications, while the manual removal usually resulted in an unsuccessful removal, and the most important point is it is much easier for the common user to take and get rid of the program they want. So it is currently the best way we found and would like to recommend you to remove unneeded programs with a good app uninstaller.
How to uninstall Creative drivers correctly and without problems?
Home / Questions to the wizard / Answer from the wizard
How to remove Creative drivers correctly and without problems?
Technician answer:
Creative often uninstalls and reinstalls when the sound on the computer stops sounding good. Well, or when the user wants to replace the sound card. And since the new card will already have its own sound driver, you will need to remove the old one. To do this, there is a special program Revo Uninstaller.
The easiest way to uninstall this driver is to use the standards. Click on the «Start» button. In its menu, select “Control Panel” and select “Add or Remove Programs”. You will see a list of programs installed on your computer. Find Creative among them. Click on it and select the «Delete» line. The Wizard window will pop up. Follow his instructions to uninstall Creative.
After this operation, restart your PC. The next time you turn it on, a warning message may appear stating that there is no sound driver on your PC and sound cannot be played.
Uninstalling Creative using Revo Uninstaller. The main advantage of this program is the complete removal of all components of the Creative program.
So, install the program on the computer and run it. The main program window will open. In it you will need to find the sound driver. Once selected, right-click on it once and select Delete.
In the next window that appears, you need to set the delete mode. Select the type — «Medium». After that, the program will start uninstalling Creative. After a while, a new window “Registry entries found” will pop up. In it, select the “Select All” item and click the “Delete” button. The last window that will appear in this program will be “Forgotten Files”. Do the same with it as with other windows. Click «Next». The program will notify you of the successful completion of the task. After that, restart your computer.
-
Weekends and public holidays
-
Warranties
for labor
and parts -
Highly qualified specialists
-
Competitive low prices
-
Instant help
-
Training and consulting
View all questions and answers
-
Self Install Software: How to install a pdf reader?
Your question:
How to install a pdf reader?
Master response:
Programs for reading pdf files are necessary for a modern person who often needs to download various materials from the Internet.
-
Self Install Software: How to install a second OS?
Your question:
How to install a second OS?
Master response:
To properly install the second Windows OS on one hard drive, you need to strictly follow the algorithm, otherwise one of the installed systems will not boot. Use the Windows installation discs to install.
-
Self Install Software: How do I disable software installation?
Your question:
How to disable software installation?
Master response:
In order to do this, there are several simple options. For example, users are encouraged to work by blocking an application called Windows Installer.
How to enable Microsoft Precision Touchpad drivers on your laptop
Microsoft is trying to improve the touchpad experience on Windows 10 laptops.
Precision touch panels
» Optimized by Microsoft, support standard gestures and can be customized in the Settings app. Unfortunately, PC makers may choose not to use Precision touchpads. Now there is a way to install Precision Touchpad drivers even on non-included laptops.
We tested this on a 13″ HP Specter x360 (2015 model) and a 14″ Dell Inspiron 14z (2012 model). In our opinion, this not only worked on both laptops, but also improved the performance of the touchpads. At CES 2017, an HP representative told us that HP is committed to allowing users to choose between using the touchpad as a Precision Touchpad or using manufacturer-provided drivers. It looks like it’s possible now — at least unofficially.
Refresh
: The
Fall Creators Update
broke this tweak on both laptops we tried it on. We had some click issues and then our touchpads became unresponsive shortly after loading. We currently do not recommend this configuration. If you already have, we recommend going to Control Panel > Uninstall a Program and uninstalling the Synaptics or ELAN drivers shown here. After that, go to your laptop manufacturer’s website, find the product page for your specific laptop, and download the latest touchpad drivers for your hardware. Install them and they should replace your previously installed Precision Touchpad drivers, reverting your laptop’s touchpad to the original manufacturer’s drivers.
How it works
RELATED:
What is a «precision touchpad» on a Windows PC?
This works because laptops, both Precision Touchpad and non-Precision Touchpad, usually have the same basic hardware. The touchpad is usually manufactured by Synaptics or ELAN, and manufacturers prefer to use either the Microsoft Precision Touchpad standard or manufacturer-customized drivers and configuration tools.
It is now possible to simply install the Microsoft Precision Touchpad drivers on many laptops, which will cause Windows to treat the touchpad as a Precision Touchpad. This will not work on every laptop. You may run into problems on some laptops; it just depends on the hardware.
Many people experience the overall motion and feel of a customized Microsoft Precision Touchpad better than the standard Synaptics or ELAN drivers.
Check if you have a precision touchpad
You can check if your Windows 10 PC has Precision Touchpad drivers installed by going to Settings > Devices > Touchpad. If you see the text «Your computer is equipped with a precision touchpad», you are already using a PC with a precision touchpad. This means that you already have the drivers, so you don’t have to do anything. Even if your touchpad isn’t working properly, the problem is with the hardware, not the drivers.
If you don’t see «Your computer is equipped with a precision touchpad» (like in the screenshot below), your computer does not have Precision Touchpad drivers installed. You can improve touchpad response by installing Precision Touchpad drivers by following the instructions below.
Just in case, prepare a physical mouse
We recommend having a physical mouse ready just in case. You probably won’t need it, but we’ve seen reports that this process can cause the touchpad to temporarily stop working while you change its drivers on the Razer Blade and possibly other laptops. A USB or Bluetooth mouse will do — just make sure you have something to do in case the touchpad stops working. Of course, you can always navigate your computer using the keyboard, or even the touch screen if you have one.
Download Precision Touchpad Drivers for Your PC
You will need a different set of Precision Touchpad drivers depending on whether your computer uses a Synaptics or ELAN touchpad. You can check it in device manager.
To open it, right-click the Start menu and select Device Manager.
Expand the «Mice and other hover options» category. Check if you have a «Synaptics» or «ELAN» input device. If the touchpad name does not appear in Device Manager, double-click the device to open its properties window and check the manufacturer in the list. Here we see that the device labeled simply «Dell Touchpad» is actually a Synaptics input device.
If you have a Synaptics device,
download Synaptics driver package
from Lenovo. If instead you have an «ELAN» device,
download ELAN driver
from Softpedia.
After downloading the drivers, extract them to a temporary directory on your PC.
How to Install Precision Touchpad Drivers
This process involves replacing the touchpad drivers and should be fairly straightforward. However, we recommend that you use caution when using Device Manager. If you follow the instructions below carefully, you shouldn’t have any problems. Even if this process breaks your touchpad or causes other problems, you should be able to reinstall the touchpad drivers from the manufacturer’s website to fix the situation.
RELATED:
How to use System Restore in Windows 7, 8 and 10
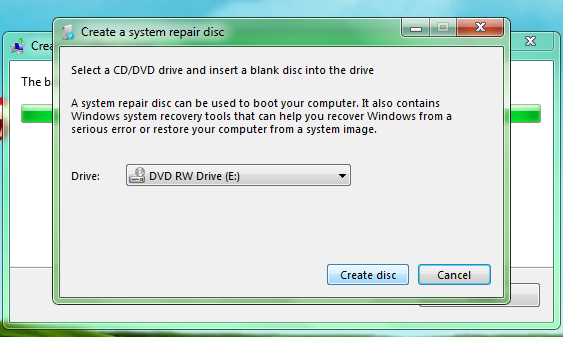
You can also go ahead and create a system restore point so you can easily revert to your old drivers if you need to. Follow the instructions in our
System Recovery Guide
to create a new restore point and then install the new drivers using the technique we are about to show you.
To get started, right-click your Synaptics or ELAN touchpad device under the Mice and other pointing devices category in Device Manager, and then select Update driver.
Click the option «Locate drivers on my computer».
On the next page, click «Let me choose from a list of available drivers on my computer».
On the next page, click the «Have Disk» button in the lower right corner of the window.
In the Install from Disk window that appears, click the Browse button.
Navigate to the temporary folder where you extracted the Synaptics or ELAN Precision Touchpad drivers.
Select the «Autorun.inf» file in this folder, and then click the «Open» button. After that, click «OK».
Select «Synaptics Pointing Device» or «ELAN Pointing Device» from the list of models, and then click the «Next» button.
You will see a warning that Windows cannot verify that the driver is compatible with your hardware. This is fine. To continue the process and see how well the Precision Touchpad drivers work on your laptop, click the Yes button.
Windows will automatically install the driver. Once the process is complete, restart your computer to activate the new Precision Touchpad drivers.
How to make sure the drivers are installed
When everything is ready, you can go to Settings > Devices > Touchpad. You should see the words «Your computer is equipped with a Precision Touchpad» which means that the Precision Touchpad drivers are working. Here you can use the touchpad settings screen to customize touchpad gestures, sensitivity, and other features.
Troubleshooting Tips
On the Razer Blade and possibly other laptops, the laptop’s touchpad is reported to stop working after restarting the PC after installing the Precision Touchpad drivers. You can fix this by searching for updated Precision Touchpad drivers.
To do this, go back to Device Manager, right-click on the touchpad device, and select Update Driver again. Under «How do you want to search for drivers?» In the window that appears, click «Search automatically for updated driver software» to download the latest Precision Touchpad drivers available from Microsoft.
On Razer Blade laptops, the touchpad stops working after the computer enters standby mode.