How to Totally Uninstall Nvidia, AMD or Intel Graphics Drivers
(Image credit: Shutterstock)
You’ve just taken your shiny new graphics card out of the box and you’re ready to pull the old one out and replace it with the more powerful alternative. But before you upgrade the hardware, or even if you’ve already done that, it’s never a bad idea to completely uninstall all the old Nvidia, AMD, and/or Intel drivers, getting rid of all the cruft and potentially freeing up a decent amount of storage in the process.
Whether you’re upgrading from one Nvidia card to another one or switching brands — going from Nvidia to AMD, vice versa, or even to an Intel Arc GPU — wiping out any remnants of the older card’s software is a good idea. The old drivers could harm performance or even lead to crashes. Also, if you’re currently experiencing problems with a graphics card you’ve had for a while — crashes, freezes, blue screens — nuking your drivers and starting over from scratch could solve your issues.
You might think that uninstalling old graphics drivers is a simple process and, on the surface, it is. All three major GPU manufacturers provide the option to uninstall their respective drivers via the Control Panel. Furthermore, you can elect to do a “clean install” when updating to the latest release. And a lot of the time, things will go swimmingly, with your PC and OS none the worse for wear.
But sometimes you end up with corrupted drivers that won’t uninstall properly, or perhaps they uninstall but leave behind undesirable remnants (cruft). We’ve experienced situations where performance in a game inexplicably drops, and the only way to ensure your drivers are clean is to really make sure they’re clean.
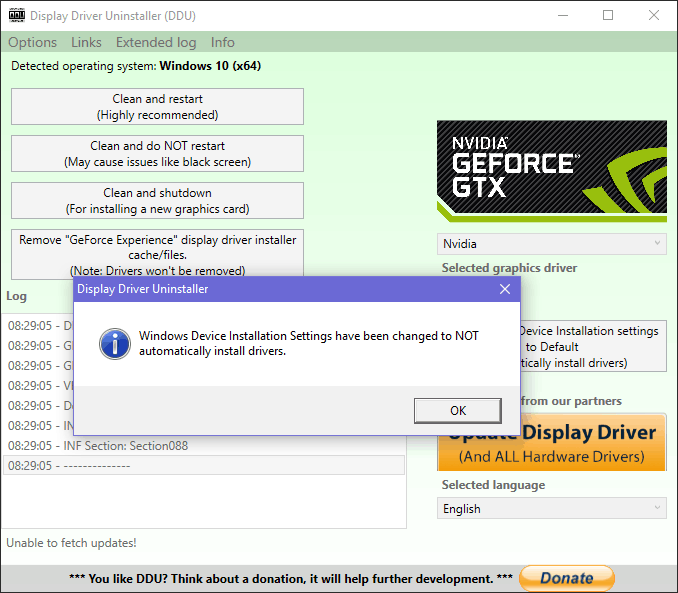
A handy utility appropriately called DDU (Display Driver Uninstaller ) will do all the dirty work for you. It’s been around quite a few years now and gets routinely updated. It also has support for removing audio drivers as well as graphics. The important thing is that it’s programmed with all the knowledge of where AMD, Intel, and Nvidia store the various registry settings and files, so it knows exactly where to look at what to delete.
Follow these steps to get rid of every last piece of your old graphics drivers.
1. Download and launch the DDU installer from the Wagnardsoft website . This is free software, but the company doesn’t make it easy to find the correct download link, because the pages are littered with ads that have «download» buttons in them that lead elsewhere.
The best bet is to find the «download and support» post for the latest version on Wagnardsoft’s forums and click the ***Download DDU Here*** link. At publication time, the latest forum post was for version V18.0.5.9 and going to that link would get you the download link.
(Image credit: Tom’s Hardware)
2. Extract DDU to the folder of your choice. It will create a subfolder with a name that contains DDU and the version number. You’ll get prompted when newer versions become available when you run the utility.
(Image credit: Tom’s Hardware)
3. Boot Windows into Safe Mode (optional). Wagnardsoft recommends that you boot into Safe Mode before running DDU, but this is not absolutely necessary. We have used it in regular mode many times without issue. However, if you’re concerned that the program might miss something, you can go into Safe Mode.
We have an article on how to boot to safe mode in Windows. (That applies to both Windows 10 and 11). The quick answer is to go to Settings->Recovery->Advanced Startup, click Restart Now, wait for it to restart, select Troubleshoot->Advanced Options->Startup Settings->Restart and then enter 4 to Enable Safe Mode.
(Image credit: Tom’s Hardware)
4. Launch Display Driver Uninstaller.exe from the folder the extraction created. Click Yes if prompted by Windows User Account Control. This will bring up the full program. If you are not in Safe Mode, the program will give a dialog box warning you that it recommends Safe Mode. You can click Ok and ignore it.
(Image credit: Tom’s Hardware)
5. Click Options if the program isn’t already showing you the Options menu (which it does the first time you launch).
(Image credit: Tom’s Hardware)
6. Uncheck «Show offers from our partners» and check «Prevent downloads of drivers from ‘Windows Update'» (under Advanced). We also recommend unchecking «Create a system restore point,» as that seems unnecessary and could be a waste of space. But if you’re concerned, you can leave it checked. Click Close when done.
(Image credit: Tom’s Hardware)
7. Select GPU from the device type menu.
(Image credit: Tom’s Hardware)
It should automatically detect the brand of GPU that’s currently installed and show it on screen. However, if it gets this wrong, you can choose the brand from another pulldown menu.
(Image credit: Tom’s Hardware)
If you have installed drivers from other vendors in the past, you can select these from the pulldown menu and then click «Clean and do NOT restart» for each of them.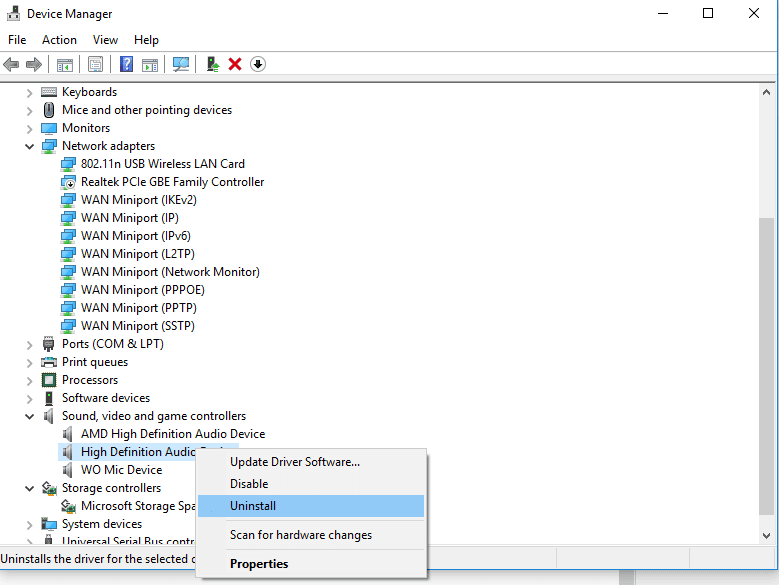
8. Click «Clean and shutdown» if you are planning to install a new graphics card right now. Click «Clean and restart» if you already have the GPU installed.
(Image credit: Tom’s Hardware)
DDU will take a minute or two to remove all the drivers and cruft from the brand of graphics card you selected. While it’s going, you will see status updates in DDU’s log box. It will typically close any open Windows Explorer widows as well, a slight annoyance at times if you’re like us and have half a dozen locations open.
(Image credit: Future)
Remember, if you select Nvidia, it will only remove Nvidia drivers so, if you have remnants of other branded drivers, you will need to perform the process on those as well.
9. Install your new graphics card (if you haven’t already).
10. Boot your PC and download and install the appropriate drivers. You can get them from the following locations:
- AMD Radeon drivers and software
- Intel Arc graphics drivers
- Intel integrated graphics drivers
- Nvidia GeForce drivers and software
Some text from the intro of this article also appeared in a recent issue of Maximum PC.
Get instant access to breaking news, in-depth reviews and helpful tips.
Contact me with news and offers from other Future brandsReceive email from us on behalf of our trusted partners or sponsors
Avram Piltch is Tom’s Hardware’s editor-in-chief. When he’s not playing with the latest gadgets at work or putting on VR helmets at trade shows, you’ll find him rooting his phone, taking apart his PC or coding plugins. With his technical knowledge and passion for testing, Avram developed many real-world benchmarks, including our laptop battery test.
How to Uninstall Drivers in Windows 11
By
Aman Kumar
Get rid of unwanted drivers with these tricks for WIndows 11.
A device driver is an important component that enables the computer to detect and manage the installed hardware. But at times, the installed drivers end up causing more issues than they solve.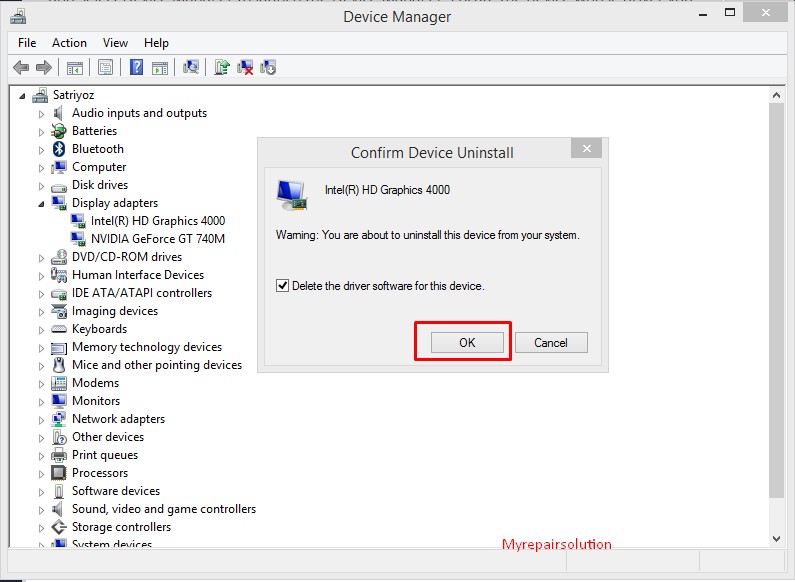
Fortunately, you can quickly uninstall drivers on your computer. Here are five ways to uninstall drivers in Windows 11.
When Should You Uninstall a Device’s Drivers?
As aforementioned, a device driver is an important component that tells your computer how to communicate with the associated device. For instance, to connect and use your webcam, a camera driver is needed to fill the gap between the computer and the webcam and deliver the result to you.
Without the camera driver, your webcam is just a gadget that doesn’t do anything. However, certain drivers can sometimes cause various issues on your computer. These issues can cause device failures and are one of the reasons why Windows sometimes crashes.
As such, if any of the installed drivers is causing problems on your system, you must uninstall it to solve the problem.
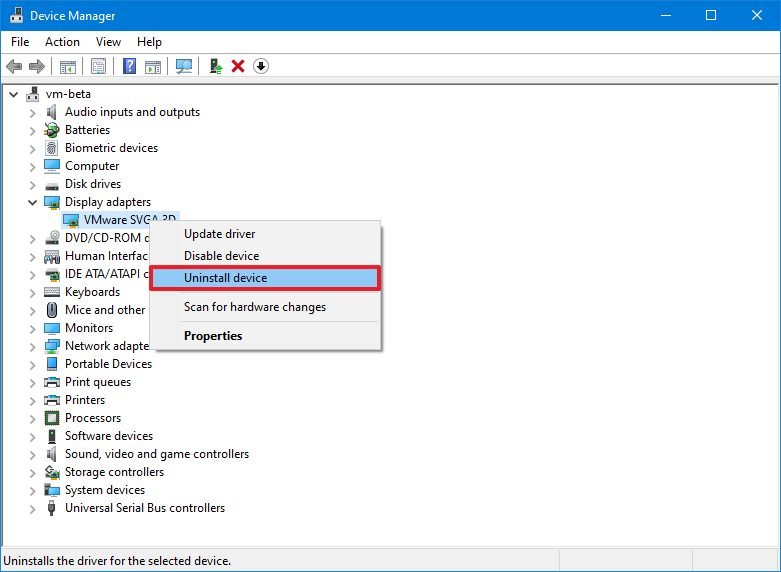
1. How to Uninstall Drivers Using the Device Manager
The Device Manager is one of the most commonly used tools on a Windows computer.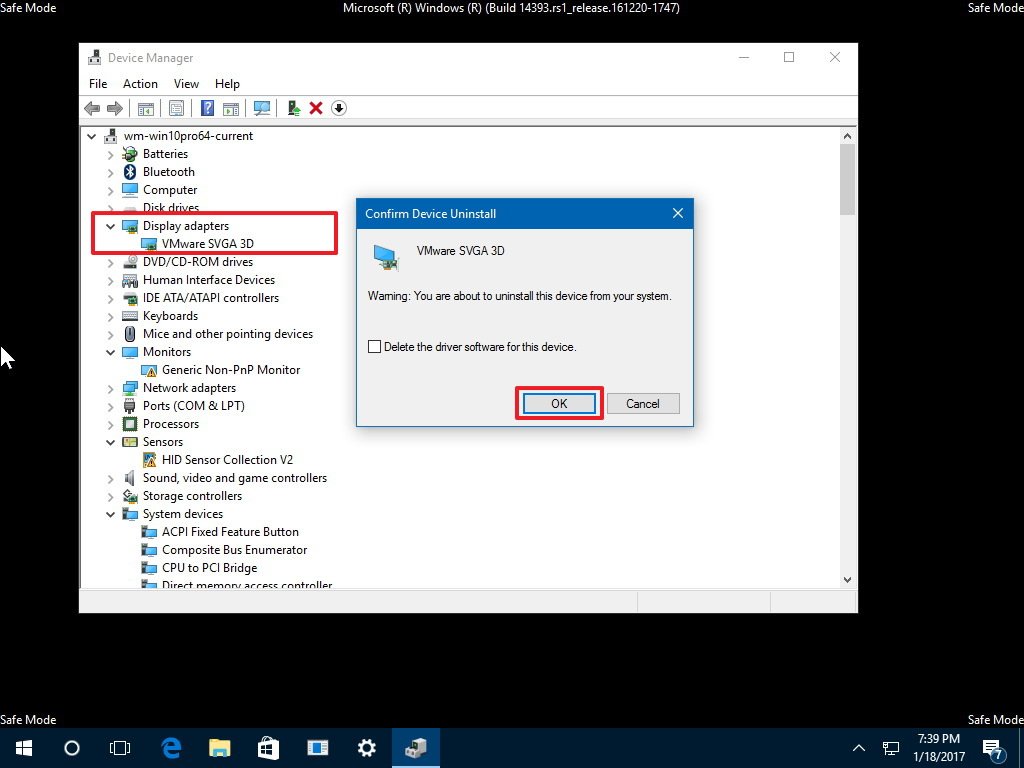 It lets you identify unknown devices, update, and uninstall drivers. You can also use it to enable or disable a device.
To uninstall a driver using the Device Manager, follow the below steps:
- Open the Power menu using the Win + X hotkey.
- Choose Device Manager from the menu.
- Double-click the category with the device driver you want to remove.
- Right-click on the device and choose Uninstall device from the context menu.
- Click Uninstall to the confirmation that crops up.
The selected driver will be entirely removed from your system.
The above steps will uninstall all the device drivers, excluding the printer driver. You can uninstall a printer driver by following the other methods in this guide.
2. How to Uninstall Drivers Using the Settings App
The Settings app is the central hub for almost all Windows settings.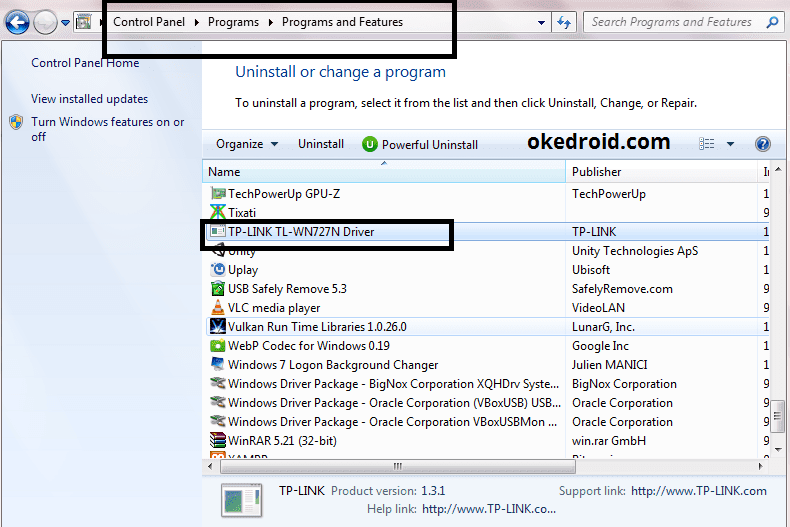 You can use it to manage preferences, configure the OS, and control the connected devices. The Settings app also lets you manually uninstall a device driver.
Here’s how to uninstall drivers using the Settings app:
- Open the Settings app using one of the many ways to open settings on Windows 11.
- Choose Apps from the left panel.
- Select Installed apps. Here you will find all the applications and drivers installed on your computer.
- Locate and click on the three dots next to the driver you want to uninstall.
- Choose Uninstall from the context menu.
- Click Uninstall again to the confirmation box that appears.
That’s it. Restart your computer to apply the changes.
3. How to Uninstall Drivers Using the Control Panel
The Control Panel is an important Windows component that lets you manage system settings. These settings control nearly everything about how your system works and looks, and you can use them to effectively set up Windows the way you want.
The Control Panel has a Program and features section from where you can manage all the installed applications and drivers. You can uninstall a device driver using the Control Panel by following the below steps:
- Open the Run dialog box by pressing the Win + R hotkeys.
- In the Run search bar, type Control Panel and press Enter.
- Change the View by to Category.
- Click Programs and then click Uninstall a program.
- Locate and right-click on the driver you want to uninstall.
- Choose Uninstall / Change from the context menu.
- Click Yes to the UAC that pops up.
Next, follow the on-screen instructions to uninstall the driver on your computer.
4. How to Uninstall Drivers Using the Command Prompt
Windows Command Processor, aka Command Prompt, is the command line interface of a Windows computer.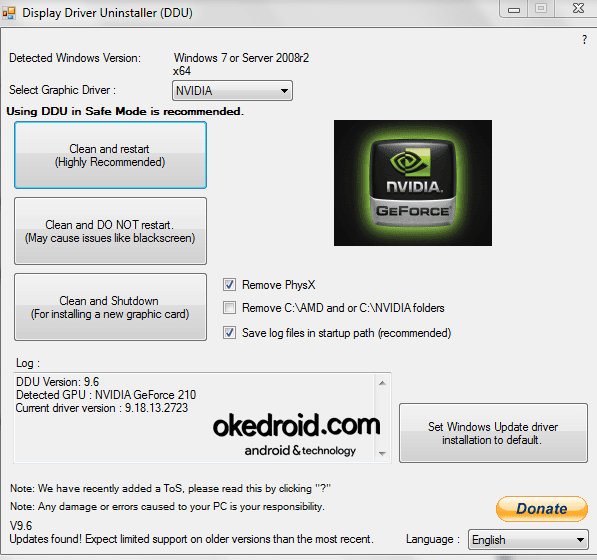 It is a way of interacting with your system through text commands.
You can use Command Prompt to perform various tasks, including uninstalling drivers on your computer. Here’s how:
- Open the Start menu by pressing the Win key.
- In the search bar, type Command Prompt and click the Run as administrator option at the right pane.
- Type the following command and press Enter. This command will display all the third-party drivers installed on your system.
Dism /online /Get-Drivers /Format:Table
- To view third-party drivers as well as system drivers of your computer, type the following command and press Enter.
Dism /online /Get-Drivers / all /Format:Table
- Note down the published name of the driver you want to uninstall. For instance, if you want to uninstall the NVIDIA driver, then its published name is oem28.
 inf.
inf. - To uninstall the driver, type the following command and press Enter. Replace <published name> with the published name of the driver you want to uninstall.
pnputil /delete-driver <Published Name> /uninstall /force
Running these commands will forcefully uninstall the driver from your computer.
The third-party driver list contains the names of even those drivers that are no longer installed on your computer. You will get an error if you try to uninstall such drivers using the above steps.
5. How to Uninstall Drivers Using Autoruns
Autoruns is a system utility that shows all the programs that are currently running on your computer. You can use it to close background applications, manage services, and even uninstall drivers.
Here’s how to uninstall drivers using Autoruns:
- Open a browser and visit the Microsoft Autoruns page.
- Scroll down and click on the Download Autoruns and Autorunsc link.

- Extract the downloaded file.
- Locate and double-click on Autoruns64.exe.
- Choose Run from the prompt that appears. The Autoruns window will crop up.
- Click the Drivers tab.
- Locate and right-click on the driver you want to uninstall.
- Choose Delete from the context menu.
- Click Yes to the prompt that appears.
Remove Problematic Drivers From Windows 11
A corrupt or problematic device driver can adversely affect your workflow and keep you busy all day. You can uninstall all such drivers using the above methods.
Another way to fix a corrupt or problematic driver is by downloading its latest update. Each update comes with new features and eliminates all the drivers’ issues.
How to uninstall AMD, Nvidia or Intel HD graphics card driver
Question about how to uninstall graphics card driver? occurs among personal computer users quite often. This is due to the fact that when updating or installing a new video card driver on top of the old one, so to speak, dangerous problems with the operating system can occur. This can slow down windows itself, the games we love to play so much, and even worse, the so-called blue screen of death will appear. nine0005
Since some uninstall methods cannot completely uninstall the drivers, this article will give some examples of uninstalling the video card driver. In my case, this video card is Nvidia Geforce GT440 , these methods are suitable for other models of video cards, you just need to do the same manipulations. In general, nothing complicated should be. Before removing all driver components, in case of failure, it is recommended to create a system restore point. nine0005
And so the most common way is to delete it through the device manager, go to the property of my computer. By clicking RMB (right-click) on the computer icon.
Go to Device Manager by clicking on the tab on the left side of the window.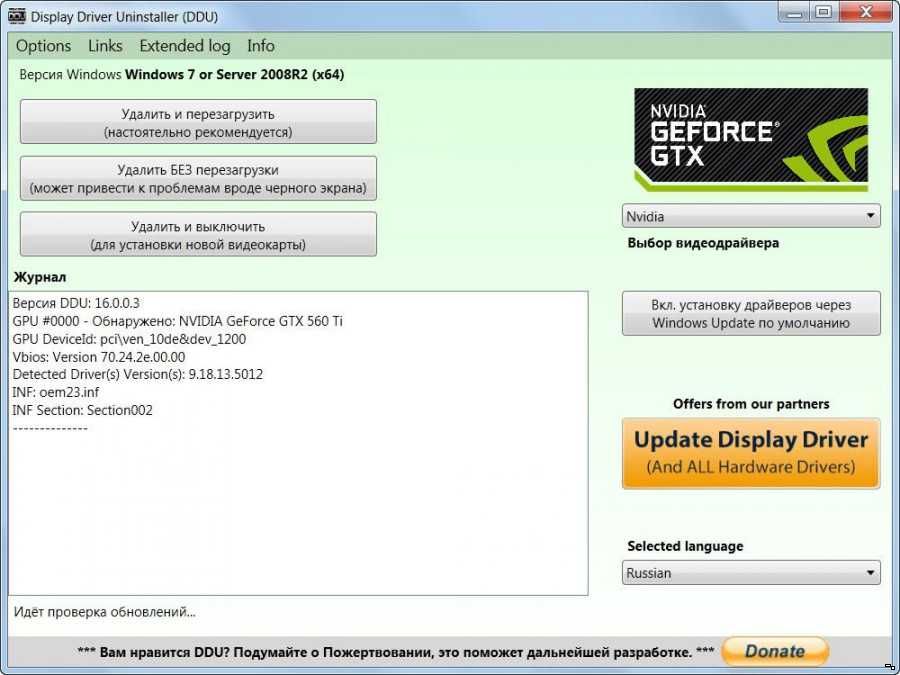
In the list of installed drivers, we find the driver of interest, namely, go to the video adapters tab, right-click on the name of the video card and press delete .
Check the box next to to remove driver programs for this device and click ok . The driver has been removed. But most likely it is not completely removed. You can install a new one, but there is a risk of errors. Therefore, we look at the following method below.
Go to control panel system, or as in windows 10 this item is called parameters, it is located in the start menu. Next, select tab programs and components or uninstall programs .
In the list of installed program components, we find the ones we need, because there may be several of them and delete them one by one. These may be nvidia drivers as in my case, in yours it may be amd radeon , catalyst , intel etc.
To uninstall, right-click and click delete / change.
A window will open where we click delete. There may be several options for working with this component of the uninstaller, but in any case, we need to get rid of it. nine0005
The third method, I think the most effective, because third-party software is used, which serves to completely remove video card drivers. The utility is called display driver uninstaller. To download, go to the official website www.wagnardsoft.com. In paragraph our softwares, select the latest version by clicking on it.
The browser will go to a new page, where we click on the item click here for download & support .
On the next open page, click official download here . The download of the program file will begin.
Run the downloaded archive, in the proposed path to save the folder with the program files, add the name of the folder into which the files will be unpacked.
Open the unpacked folder and run the program.
Select the startup mode, it is recommended to run the utility in safe mode , for better cleaning and avoiding possible problems. Click the Reboot to Safe button. After clicking, the computer should automatically restart and enter this mode.
When the system starts, the program window will open, where we select the model of our video card and click on the delete and restart button.
The process of getting rid of all driver files and components will begin.
To install a new video card driver, the articles How to install a driver on an Nvidia video card and How to install drivers on a Radeon 9 video card will help0005
About give your opinion about this article, and of course ask your questions if something suddenly went wrong.
Thank you for your attention!
Articles recommended for reading:
-
How to uninstall AMD, Nvidia or Intel HD graphics card driver
(10157)
-
How to uninstall drivers in windows
(8235)
nine0134
-
How to install driver for nvidia graphics card
(9458)
-
Install any driver using DriverPack Solution
(7559)
-
How to install drivers for radeon graphics card
(15298)
Would you like to thank the author? Share a link to the article! nine0005
Add a comment
How to remove video card drivers (from AMD, Nvidia) completely?
As soon as the user changed the graphics processor in his computer or decided to update its software support, he immediately faces the question of how to remove the video card drivers completely from the system. In order for a brand new video driver to successfully install and function correctly, there are at least three ways to properly perform this task. Let’s consider them in this article. nine0005
Method No. 1: uninstalling OS using standard tools
1. Go to the Start menu (click on the Windows icon in the taskbar or press the Win key).
2. Go to Control Panel.
3. In the Programs section, click Uninstall a Program.
4. In the list of installed software, remove all driver items (right-click → Uninstall/Change option).
If Nvdia drivers are used:
- uninstall all listed components one by one: PhysX, 3DVision, Experience, HD Audio Driver, etc.
If AMD (including for ATI Radeon video cards):
- enable the AMD Catalyst Install Manager and Quick Stream modules.
5. Carefully follow the instructions of the uninstaller.
Method #2: cleaning while installing a new driver version
(for Nvidia video drivers)
When you need to replace an old driver with a new one, that is, update, it is not at all necessary to completely remove its components using standard tools.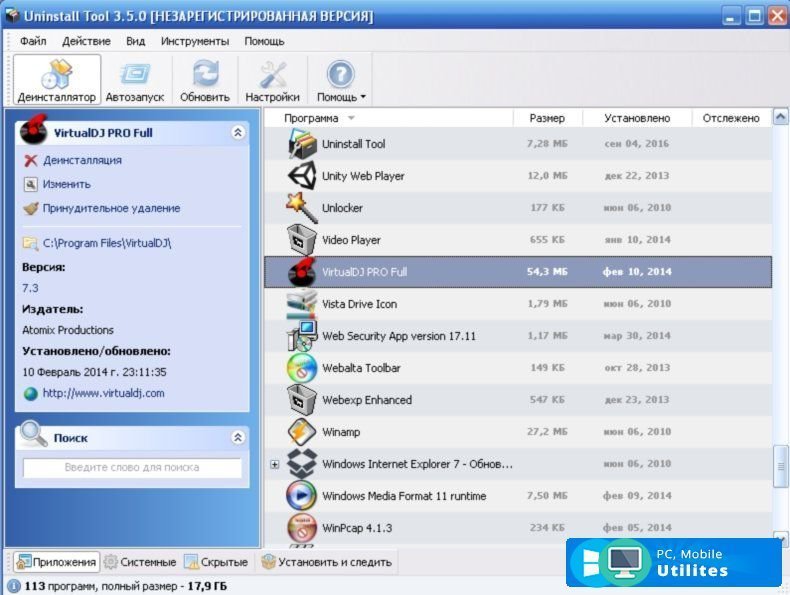 Uninstallation can be done by enabling special cleanup options in the installer. nine0005
For example, in the Nvidia installer, this procedure is performed as follows:
1. In the installer window, select «Custom installation …» (click on the radio button next to the option name).
2. Click Next.
3. Under the list of components, enable the «Perform a clean installation» option (check the box). When this mode is activated, the installer automatically destroys all profiles and restores the default settings.
4. Click Next, and then complete the installation. nine0005
Method #3: Uninstalling with the Display Driver Uninstaller
For those who don’t know how to uninstall video card drivers using standard functions and the installer and, in fact, are not going to master this skill, the Display Driver Uninstaller utility seems to be an excellent solution. It automatically finds video driver files and neutralizes them from the system.
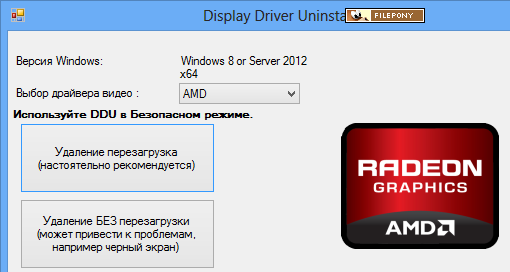
1. Open the page in your browser — wagnardmobile.com/forums/viewtopic.php?f=5&t=113 .
2. Click on the Official Download Here link in the forum topic.
3. Unzip the downloaded DDU archive using WinRAR or 7-Zip.
4. Run the Display Driver Uninstaller.exe executable as an administrator.
5. Set the display of the utility interface in Russian: in the lower right part of the window on the right, open the drop-down menu and select «Russian».
6. In the «Select video driver: (top left)» option, set the name of the software product (INTEL, NVIDIA or AMD). nine0005
7. Click the «Uninstall and restart …» button (recommended!).
Attention! If the driver does not uninstall, restart the operating system in safe mode and try cleaning again.
Method #4: cleaning with the uninstaller program
Uninstaller programs such as Uninstall Tool, Revo Uninstaller Pro, Soft Organizer, etc.