How to find graphics card information on a Windows 10 PC
Windows 10 graphics card specifications
(Image credit: Windows Central)
On computers, the graphics card is an essential component that makes it possible to render every pixel you see on the screen when you’re navigating the Windows 10 desktop, running an app, playing a game, etc. Usually, devices have a graphics card from one of the three leading manufacturers, including NVIDIA, AMD, or Intel. Check out our very best graphics cards roundup for tons of options.
Although for the most part, if you’re a regular user, you don’t need to worry about the graphics specifications on your device, it might be something important for users who work with graphics-intensive applications or play games. Typically, because if you don’t have a card with a powerful graphics processing unit (GPU), it may not be possible for an application to perform correctly. Or, if you’re a gamer, you may not be able to play games, or you may need to determine the hardware to adjust the settings accordingly to prevent affecting performance.
Whatever your reasons might be, Windows 10 includes multiple ways to quickly find out the graphics card specifications using Settings, Device Manager, System Information, DirectX Diagnostic Tool, and Task Manager, and, of course, using the card’s control panel software.
In this Windows 10 guide, we’ll walk you through the steps to check which graphics card is currently installed on your computer.
- How to find out graphics card details using Settings
- How to find out graphics card details using Device Manager
- How to find out graphics card details using System Information
- How to find out graphics card details using DirectX Diagnostic Tool
- How to find out graphics card details using Task Manager
- How to find out graphics card details using control panel
How to find out graphics card details using Settings
To find out the graphics card manufacturer and model using the Settings app, use these steps:
- Open Settings.
- Click on System.
- Click on Display.
- Under the «Multiple displays» section, click the Advanced display settings option.
Source: Windows Central (Image credit: Source: Windows Central)
- Under the «Display information» section, confirm the graphics card vendor and model.
Source: Windows Central (Image credit: Source: Windows Central)
Once you complete the steps, you will now have an understanding of the video card installed on your device.
How to find out graphics card details using Device Manager
To determine the graphics card installed on your computer with Device Manager, use these steps:
- Open Start.
- Search for Device Manager and click the top result to open the tool.
- Expand the Display adapters branch.
- Confirm the manufacturer and model of the video card.
Source: Windows Central (Image credit: Source: Windows Central)
After you complete the steps, the graphics card information will be revealed.
To check the graphics card on Windows 10 with System Information, use these steps:
- Open Start.
- Search for System Information and click the top result to open the tool.
- Expand the Components branch.
- Click on Display.
- Under the «Adapter Description» field, determine the graphics card installed on your device.
Source: Windows Central (Image credit: Source: Windows Central)
Once you complete the steps, you’ll know the graphics card make and model, as well as driver information and more.
How to find out graphics card details using DirectX Diagnostic Tool
To find out the video card installed on your PC using DirectX Diagnostic Tool, use these steps:
- Open Start.
- Search for dxdiag and click the top result to open the tool.
- Click the Yes button (if applicable).
- Click the Display tab.
- Under the «Device» section, check the manufacturer and processor type of the graphics card.
Source: Windows Central (Image credit: Source: Windows Central)
After you complete the steps, you’ll be not only able to understand the basic information about the video card, but also other details, such as the amount of memory built into the device and driver information.
How to find out graphics card details using Task Manager
To figure out the graphics card available on Windows 10 with Task Manager, use these steps:
- Open Start.
- Search for Task Manager and select the top result to open the tool.Quick tip: You can also use the Ctrl + Shift + Esc keyboard shortcut to open Task Manager.

- Click the Performance tab.
- Click on GPU.
Source: Windows Central (Image credit: Source: Windows Central)
- Confirm the brand and model of the graphics card on the top-right corner.
Once you complete the steps, the Task Manager will display the manufacturer name and model, as well as a dedicated amount of memory, DirectX version, physical location in the motherboard, and current utilization details.
How to find out graphics card details using control panel
Alternatively, if you have a GPU from Intel, NVIDIA, or AMD, you can also use their control panel software that allows you to check the graphics card specifications, including settings to adjust many preferences.
To check the specifications using the NVIDIA Control Panel, use these steps:
- Open Control Panel.
- Click on Hardware and Sound.
- Click on NVIDIA Control Panel.
- Click the System Information option from the bottom-left corner.
Source: Windows Central (Image credit: Source: Windows Central)
- Click the Display tab.
- Under the «Graphics card information» section, confirm the graphics model on the left side.
Source: Windows Central (Image credit: Source: Windows Central)
Once you complete the steps, you’ll know the exact graphics card model. On the right side, you’ll also find various other details, such as the number of CUDA cores, clock speed of the processor, memory data rate, bandwidth, type, amount, and the video BIOS version.
Mauro Huculak is technical writer for WindowsCentral.com. His primary focus is to write comprehensive how-tos to help users get the most out of Windows 10 and its many related technologies. He has an IT background with professional certifications from Microsoft, Cisco, and CompTIA, and he’s a recognized member of the Microsoft MVP community.
How to Auto Detect a Graphics Card | Small Business
By John Papiewski Updated March 12, 2019
Although many PCs come with video features built in, you may get better performance from your computer by adding your own graphics card. Because video technology has evolved rapidly, and card features vary widely, you may need to consider a few different strategies to get your computer to auto detect the card. Your computer’s BIOS setup provides the first avenue for detecting the card. You might also use Windows to detect it, or software provided by the card’s vendor.
Detect My Graphics Card (BIOS)
Restart the computer. In the first few seconds of startup, the PC will display a message telling you to press a function key (such as F1) to enter its setup mode. Press the key when you see the message.
Navigate through the setup menu using the arrow keys until you find a section such as On-board Devices, Integrated Peripherals, Advanced or Video. Look for a menu that enables or disables graphics card detection. If it’s disabled, use the menu to enable it; otherwise leave it alone. For example, you might press the left arrow key to change «Disabled» to «Enabled.» Save the changes and exit by pressing the Escape (Esc) key, and follow the on-screen instructions to quit the Setup mode.
Detect From Windows
Microsoft’s Windows 10 can also detect your video card and shows the information in the Device Manager. To see the card in Windows 10, perform these steps:
- Type Device Manager in the search box in the Task Bar.
- Click Device Manager from the results menu when it appears. When Device Manager opens, it displays a list of device categories.
- Click the icon for Display Adapters to expand it.
 Your card may appear as Microsoft Basic Display Adapter or it might appear with the video card vendor’s name and model number.
 - Right-click the appropriate Display Adapter icon and select Properties from the menu that appears.
- Click the tabs (General, Driver, Details, Events, Resources) to see the information for the graphics card. The Driver tab lets you update, enable, disable, uninstall or roll the card’s driver software back to a previous version.
- Click OK to close the Properties window.
Detect From Utility
Some graphics card vendors provide utility software on their website. This software may check your computer for suitability – it’s important to know the card will work with your PC before you buy. The utility software may also find the card if it’s installed and detect the GPU, or Graphics Processing Unit.
Vendor software typically comes in one of two forms: a simple web page button or a program you download from a link. Follow the instructions on the manufacturer’s webpage.
The web page button method is simple: just click the button, wait for the cloud-based software to analyze your PC, and read the informational message that appears.
For the installable program, perform these steps:
- Click the link for the software that matches your version of Windows, such as Windows 10, 64-bit.
- Save the downloaded file to your Downloads folder.
- Double-click the file to install it, and enter your password if prompted.
- Follow the installation instructions.
- Click the utility’s icon to run the program, and wait for it to display results.
Warning
Make sure you install an appropriate graphics card driver, if you haven’t already done so. The display may appear distorted until you do.
Tip
If you experience difficulties with your graphics card in the Windows Device Manager, you may need to remove the device driver for the card, then reinstall the driver.
References
- University of Wisconsin: Booting to the Boot Menu and BIOS
- Microsoft: Open Device Manager
- HP: Device Manager Information (Windows 10, 8)
Warnings
- Make sure you also install an appropriate graphics card driver, if you haven’t already done so. The display may appear distorted until you do.
Writer Bio
Chicago native John Papiewski has decades of IT consulting experience, and has worked with a wide range of businesses including finance, real estate, distribution and publishing. His articles have appeared in various outlets including azcentral. com and seattlepi.com. Please, no workplace calls/emails!
Best tools for checking Video Card info in Windows 10/11
by Ivan Jenic
Ivan Jenic
Troubleshooting Expert
Passionate about all elements related to Windows and combined with his innate curiosity, Ivan has delved deep into understanding this operating system, with a specialization in drivers and… read more
Published on
Affiliate Disclosure
XINSTALL BY CLICKING THE DOWNLOAD FILE
To fix various PC problems, we recommend Restoro PC Repair Tool:
This software will repair common computer errors, protect you from file loss, malware, hardware failure and optimize your PC for maximum performance. Fix PC issues and remove viruses now in 3 easy steps:
-
Download Restoro PC Repair Tool that comes with Patented Technologies (patent available here).
- Click Start Scan to find Windows issues that could be causing PC problems.
- Click Repair All to fix issues affecting your computer’s security and performance
- Restoro has been downloaded by 0 readers this month.
Diagnostic and monitoring tools are essential for proper tracking of system and hardware information. Especially, for video cards that are quite prone to overheat and malfunction, if you’re not careful.
So it’s highly advisable to keep track of GPU behavior, especially after extensive use and when it’s warm outside. For that purpose, we enlisted some of the best tools that should help you considerably in tracking changes and gathering essential information.
We hope you’ll find something to your liking with the information we provided below.
Top 5 video card info tools
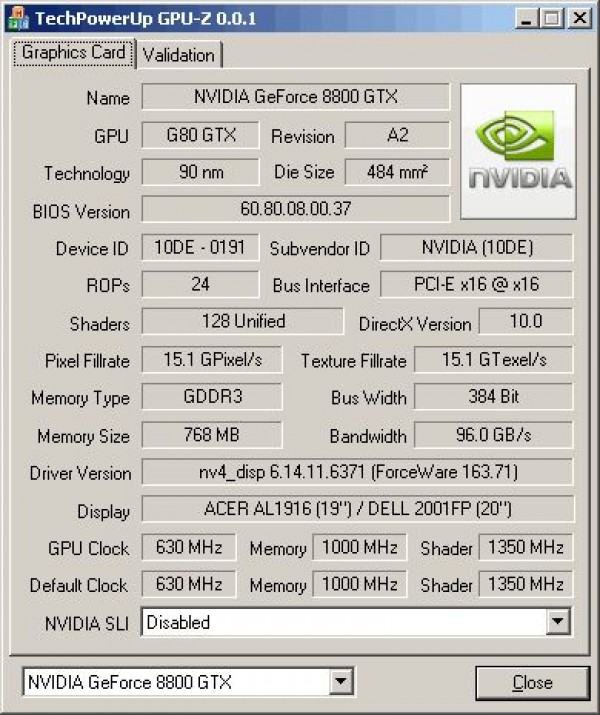
GPU-Z
GPU-Z is probably the best-known tool for monitoring your graphics card. It’s one of the oldest, too, so it’s not strange that people are prone to use it instead of the alternative solutions. GPU-Z is a simplistic tool that offers complete details of your GPU. It only covers Video Card information, but you can always download CPU-Z for additional information about your CPU. Also, it’s strictly developed for monitoring, so you won’t be able to make changes or overclock your graphics.
It supports all available cards and sensor readings, so you can use it for Nvidia, AMD, or Intel. Moreover, you can choose between portable and version that can be installed.
In the uncluttered interface, you can find out multiple pieces of information about your GPU, and these are some of them:
- Name
- Production
- GPU Memory
- Release Date
- GPU Clock with standard and overclocked values.
- GPU BIOS version
- BUS Interface
- GPU temperature
- Voltage
- Fan speed
- and many others.
Besides those, it packs the screenshot function if you need to share readings with someone else. In addition, you can backup GPU BIOS which can come in handy on some occasions. What else can you expect from the free and lightweight program?
You can obtain GPU-Z for free by following this link.
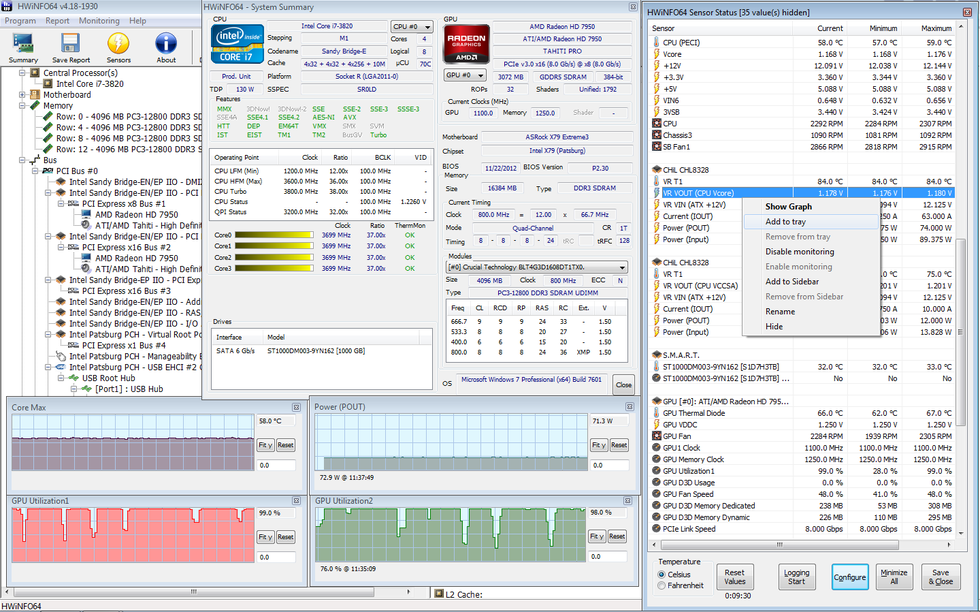
HWiNFO
While GPU-Z is strictly created for GPU monitoring, HWiNFO (Hardware Information) is an all-around tool that covers all of the hardware information you’ll ever need. If you’re in the mood for one tool that is the jack of all trades instead of a few individual tools, look no further. HWiNFO is probably as complete hardware monitoring tool as they come. Advanced users thrive the most in its surroundings, but even the newbies should have an easy time.
It supports all known GPUs and motherboards and functions on both 32bit and 64bit architectures. However, installation is mandatory.
With the System Health Monitoring feature, you can keep close track of behavior of various hardware parts, while the Reporting and Alerting feature will inform you if something goes wrong while the program is working in the background.
The interface is quite well-designed, and its best perk is Customizable Table that enables you to choose individual preferences. In this case, you can optimize it just for GPU monitoring. That way you’ll always have all information about your GPU. In addition, you can download various add-ons to enlarge already formidable base.
You can download HWiNFO here for free.
Speccy
Expert Tip: Some PC issues are hard to tackle, especially when it comes to corrupted repositories or missing Windows files. If you are having troubles fixing an error, your system may be partially broken. We recommend installing Restoro, a tool that will scan your machine and identify what the fault is.
Click here to download and start repairing.
Small in size but a powerful and well-designed tool. With the Windows-like interface and bundle of features, it’s a great tool for essential monitoring operations. As same as HWiNFO, it covers all hardware components and tracks software changes. One problem is that the distinction between premium and freeware version is too large. So, in order for this amazing small tool to resemble HWiNFO function-wise, you’ll need to pay. However, it still should satisfy your basic needs when it comes to GPU information.
It supports all the GPUs you can think of, including sensor readings of modern motherboards. We advise you to try this tool if you’re interested in design and simplicity more than the plethora of features and somewhat cluttered pieces of information.
You can download Speccy here.
Astra32
Another quite popular advanced monitoring tool that’s in the middle when it comes to features-simplicity ratio. It provides you with all the info you need, but it’s not as thorough and detailed as HWiNFO or GPU-Z, at least strictly in the GPU department. However, Astra32 should be enough to get the job done. With the real-time monitoring readings and relevant information, users should have an easy time tracing all-around PC behavior.
It supports every available GPU or motherboard, as expected. So, why would you use Astra32 instead of GPU-Z or HWiNFO? Well, it has some interesting tools that can prove helpful in various scenarios. Starting with HDD Diagnostics and reaching to a quite nifty Driver Troubleshooter. Additionally, it comes both in the installation and portable versions.
If you’re keen to try it out, Astra32 can be found and downloaded here.
EVGA Precision X
All of the previously enlisted tools support all or at least most GPUs you’ll ever encounter. However, EVGA Precision X is an elite tool exclusively developed for Nvidia GPUs. It’s underestimating to say this is just a monitoring tool. EVGA is a premium tool that covers everything you’ll ever need to know about your Nvidia GPU. Moreover, with its futuristic design, you’ll have an impression that you’re more of a pilot of a Star Wars-like battleship than just a vivid gamer.
Overclocking, monitoring, advanced scanning for optimal frequency and voltage and much more. However, in order to obtain this tool, you’ll need membership and GTX GPU variations produced by EVGA. That can be a dealbreaker for many users, but if you’re willing to take full control, this may be a great offer.
You can find more details about EVGA Precision tool, on this link.
That should be the end of the list. Don’t forget that the ATI Catalyst or Nvidia Control Center may suffice if you’re keen to know the elementary information about your GPU. But it’s advised to use them in combination with one of the above-mentioned tools for better insight and more detailed readings.
What tool do you use for checking video card info? Don’t forget to tell us in the comments section below.
RELATED STORIES YOU NEED TO CHECK OUT:
- Best DVD copy software for Windows 10
- 5 best media center software for Windows PC users
- 10 best free 3D design software
- 6 best old photo restoration software to use
- 10 Best Audio Recording Software for Windows 10
Was this page helpful?
Start a conversation
Share
Copy link
Newsletter
Software deals
Friday round-up
I agree with the Privacy Policy regarding my personal data
Download Graphics Card — Best Software & Apps
Advertisement
-
Free driver maintenance software
DriverPack Solution Online is designed to automatically update and check the status of your Windows drivers.
 If your computer is crashing unexpectedly…
 -
Boost GPU performance with free app
MSI Afterburner download PC is a free GPU overclocking tool that can help you boost the performance of your graphic cards. Designed for Windows, the program…
-
An open-source graphics library
OpenGL is an open-source graphics standard for generating vector graphics in 2D as well as 3D. The cross-language Windows application has numerous functions…
-
A free system utility tool to monitor your graphics card
NVIDIA Inspector is a system utility tool that can help you access information about your NVIDIA graphics card, drivers, and other hardware. With the help of…
-
Get the lowdown on your graphics card for free
GPU-Z is a simple but practical utility to find out which graphics card is installed on your computer.
 Its functionalities are detailed below.
 -
A free spider solitaire game
Free Spider Solitaire is a free downloadable game that lets you play spider solitaire on your computer or laptop. The rules are easy to learn but will take…
-
Stress tests for your 3D graphics card
Furmark is a popular, free Windows program, that belongs to the category Software utilities with subcategory Analysis & Optimization (more specifically…
-
Scans and updates old drivers
Driver Easy is a driver updater program designed for Windows devices. It scans all available device drivers, reports the ones that are missing or out-of-date…
-
Keep Your Intel Graphics Card Up To Date
Intel Graphics Driver is a catch-all name for a variety of drivers for an even bigger variety of graphics cards built right into the CPU that replace stand…
-
Yu-Gi-Oh card battle game
Yu-Gi-Oh! CROSS DUEL is a four-player card game developed by Konami.
 In this free mobile game, players will duke it out in real-time with duelists worldwide….
 -
A Hearts Game that Builds on the Classic Version
Hearts Deluxe for Windows 10 is a card game for Windows 10 wherein you would be trying to score minimum points possible by steering clear of Hearts…
-
Modify your NVIDIA graphics card
RivaTuner is an open-source overclocking and hardware debugging software for NVIDIA video cards. Created by Alexey Nicolaychuk in 1997, it was a…
-
Create your business cards with this app
Business Card Maker is a graphic and design software that allows entrepreneurs to create their business cards on their own. Not everyone has the time and…
-
Effective tool to run 3D games on older operating systems
3D-Analyze is a software package that enables users to run advanced three-dimensional games on older operating systems.
 This is often beneficial, for older…
 -
Free Pokemon-Based Competitive Game for Smartphones
Pokeland War is a great gaming choice for fans of Pokemon or the anime genre in general. Numerous user-generated options will provide hours of entertainment.
-
Free Game for Card Fans
Yu-Gi-Oh! Duel Links is a game that is based on the popular card game. this version comes with vibrant graphics that really help to bring the game to life…
-
It’s time to duel
Yu-Gi-Oh! Master Duel is a free card mobile video game that lets you play one of the most popular card game franchises of all time. Developed by Konami…
-
Play lots of different versions of your favorite card game
Full Deck Solitaire is an app that combines all of your favorite versions of the classic solitaire card game into one place for Mac users.Particularly for…
-
Keep Your Intel Graphics Card Up To Date
Intel Graphics Driver is a catch-all name for a variety of drivers for an even bigger variety of graphics cards built right into the CPU that replace stand…
-
Make Your GPU Run More Recent Games For Free.
NVIDIA GeForce Driver is a free update, provided by NVIDIA, to the base software that powers your graphics card. At least, assuming your graphics card was…
Advertisement
How to Check Your Graphics Card in Windows
Skip to content
When you sit down at your computer and fire up that graphically intensive program, you expect things to run smoothly.
Games are certainly one of the most common reasons your graphics adapter will get a good workout.
After you’ve checked the hardware requirements for whatever game you’re ready to play, you may need to verify that the graphics power of your computer is up to the task.
A Bit About Graphics Cards
All modern computers have the ability to handle graphics – at least to some extent. How much really depends on the hardware that lies beneath that case.
The onboard – also known as integrated – graphics are fine for more common tasks. However, if you plan to use graphically intensive software (such as 4K video games), you’ll want an adapter dedicated to the task.
Questions Regarding Your Graphics Card
You already know your computer has some form of graphics capability, but you may have other concerns regarding it. It might be details needed for comparison versus a game’s minimum requirements. There may also be scenarios where you wonder if your graphics are performing optimally.
Where Do I Find My Graphics Card Info?
If you’re asking yourself “how do I check my graphics card in Windows 10?”, then rest assured that the task is a straightforward endeavor.
One easy way is to type Device Manager into the search box on the taskbar and choose it. Once the Device Manager comes up, find the section for Display adapters and expand it. You should see the name of your device listed.
Right-click and select Properties. You’ll see a few tabs (General, Driver, Details and so on) that give details about your device.
Another way to find useful information is to type Display in the taskbar’s search box and click Change display settings. Under System, choose Display and then Advanced display settings.
How Do I Check if My Graphics Card Is Working Properly?
Let’s assume that, when your computer boots up, you see items on the screen. If so, the hardware is at least working. Whether it’s performing at its peak is another question.
If you see a blank or unreadable screen, you have more pressing issues. Before calling a professional technician or the manufacturer, there are some things you can check.
You can open the machine itself (assuming it’s a desktop) by sliding open the panel on the side. You may need a screwdriver to remove the cover if it’s secured with screws. Afterward, check to ensure the graphics card is properly seated into the board – typically in a PCI card slot.
Another item to check is whether the graphics board is being utilized via the system’s BIOS. While booting the computer (depending on the type of machine), you’ll hit a function key before Windows loads. The F2 and F10 keys are common ways to access the BIOS, but others are possible.
Once inside the computer’s BIOS, verify that the system is using the PCI slot and not the integrated graphics chipset. Always be aware of what changes you make in the BIOS – as the wrong one(s) can have adverse effects.
Ensure You Have the Latest Device Drivers
A common reason that graphics cards – or potentially any device on your computer – might stop working properly is the special software that runs it. This software, called device drivers, can become corrupt or outdated. When that happens, it’s time to update the driver to the latest version.
There is more than one way to install the latest drivers for your graphics card. You can give Windows a shot at finding the right one for you. Don’t be too surprised, however, if the most recent isn’t found and installed.
Manually Updating the Drivers
Before manually installing the driver yourself, you’ll have to find the correct one from the manufacturer’s website. To do so, the model number and possibly the serial number will be needed. If the necessary information isn’t found in the Device Manager, you may need to use the graphics card’s installed application (if applicable) or a third party tool to dig up better details.
Once you find the needed details, download and unzip the driver. Then go back into the Device Manager and right-click on the device. Choose the Update driver option. It’s here that you can either allow Windows to search or choose to locate the driver yourself.
Choose to search for the driver yourself and drill down to where you downloaded/unzipped it.
Automating the Task of Updating Drivers
There is an easier and more proactive way to update drivers.
Software, such as Driver Support, can automate the task and alleviate the burden of finding the right driver. This solution also ensures the driver is updated routinely – thus avoiding issues related to device drivers before they even begin.
Keep your PC Devices Up-to-Date and Improve Online Safety
For only $9.99 a month Driver Support | ONE can help you save time and frustration dealing with common Windows device issues as well as added optimization and safety features.
Give Driver Support a Try Today
Let Driver Support Keep Drivers Current
Driver Support software will inventory your computer and check for any supported devices. Once fully registered, the service will update any drivers that are missing or out of date.
You may still have reason to look up details about your graphics card – but it won’t because you’re wondering if they’re up to date or not.
Since 1996, Driver Support has been trusted to keep device drivers up to date. Give Driver Support | ONE a try today! to get started in minutes.
Page load link
How to Check Graphics Card on Windows 10/8/7 PC – 5 Ways
- MiniTool
- MiniTool News Center
- How to Check Graphics Card on Windows 10/8/7 PC – 5 Ways
By Alisa | Follow |
Last Updated
How to check graphics card? This post provides 5 ways to help you check the graphics card on Windows 10/8/7 PC or laptop. Detailed step-by-step guides are included.
Wonder what graphics card does the computer have, and how to check graphics card on Windows 10/8/7 PC/laptop? This post provides 5 ways to help you check Windows 10/8/7 computer graphics card easily and quickly. Find out the detailed step-by-step guide.
Tip: MiniTool Power Data Recovery — Professional free data recovery program enables you to easily recover deleted/lost files from Windows 10 computer, memory/SD card, USB flash drive, external hard drive, SSD, etc. 100% clean program.
Free Download
How to Check Graphics Card on Windows 10/8/7 with DirectX Diagnostic Tool
You can run Microsoft DirectX Diagnostic Tool to easily check the graphics card on Windows 10/8/7. Check the detailed guide below.
Step 1. You can press Windows + R key on computer keyboard to open Run window. Then type dxdiag and hit Enter to open DirectX Diagnostic Tool.
Step 2. Next you can tap Display tab, then you can check the detailed information of the graphics card on your Windows 10/8/7 PC/laptop, including graphics card name, manufacturer, its driver model/version/date, and more.
Recommended reading: 5 Best Free Photo Recovery Software to Recover Deleted Photos
How to Check Graphics Card on Windows 10/8/7 in Device Manager
You can also easily check graphics card in laptop or PC through Device Manager.
Step 1 – Open Windows Device Manager
You can click Start and type Device Manager. Then click Device Manager under best match result to open Windows Device Manager.
You can also press Windows + X key on the keyboard simultaneously, and click Device Manager to open it.
Step 2 – Check Graphics Card Detailed Info
Then you can find Display adapters, click and expand it. Then you will see the installed graphics card (s) on your Windows 10/8/7 PC/laptop.
Right-click on one graphics card and select Properties. Then it will pop-up a window which includes all the detailed computer graphics card information.
You can then check the general information, the driver information, device status and more of the computer graphics card.
Recommended reading: Top 5 Free Video Recovery Software to Recover Deleted Videos
How to Check Graphics Card on Windows 10/8/7 from Display Settings
Another easy and quick to check graphics card on Windows 10/8/7 laptop or PC is to view display settings. Check the operation below.
Step 1. You can right-click the blank space on the computer screen and choose Display Settings.
Step 2. Then you can scroll down and click Advanced Display Settings to find out what graphics card your computer has and view its detailed parameters.
Recommended reading: How to Use Windows 10 Photos App to Edit Photos and Videos
How to Check Graphics Card on Windows 10/8/7 from Task Manager
You can also find out the computer graphics card info by using Task Manager on Windows 10/8/7 PC.
Step 1. Open Windows Task Manager
You can press Windows + X keys on the keyboard at the same time, and choose Task Manager.
Or you can click Start and type Task Manager. Select Task Manager to open it.
You can also press the shortcut key Ctrl + Shift + Esc at the same time to open Task Manager quickly.
Then click More details to check the detailed information of running tasks in Windows 10/8/7 PC.
Step 2. Find Out Computer Graphics Card Information
Next you can tap Performance tab, and click GPU option to check computer GPU information. You can check the GPU model, current usage rate, the graphics card driver, the version and its performance, etc.
Recommended: How to Open & Use Windows 10 Camera App to Capture Video/Photo
The last easy and quick way to allow you to check out the graphics card (GPU) or Windows 10/8/7 laptop or PC is to use System Information.
Step 1. Open Windows System Information
You can also press Windows + R key on the keyboard to open RUN window, then input msinfo32 and hit Enter.
Step 2. Check Windows 10/8/7 Laptop/PC GPU
Next you can expand System Summary -> Components -> Display, to check the detailed computer graphics adapter information incl. adapter model, adapter description, adapter RAM, installed drivers, and more. You can also check full specs of Windows 10/8/7 in this System Information window.
If you want to find out what the graphics card your computer has, these 5 ways offered in this post can help you easily check graphics card in Windows 10/8/7 laptop or PC.
Video Guide:
About The Author
User Comments :
testing, overclocking, tuning and diagnostics
Last updated — June 9, 2020 at 20:38
My set of programs for overclocking, testing, configuring, managing, viewing, monitoring and measuring the temperature of video cards. I will also give several utilities for updating and uninstalling drivers, adjusting the speed of the cooler and flashing the bios of video cards.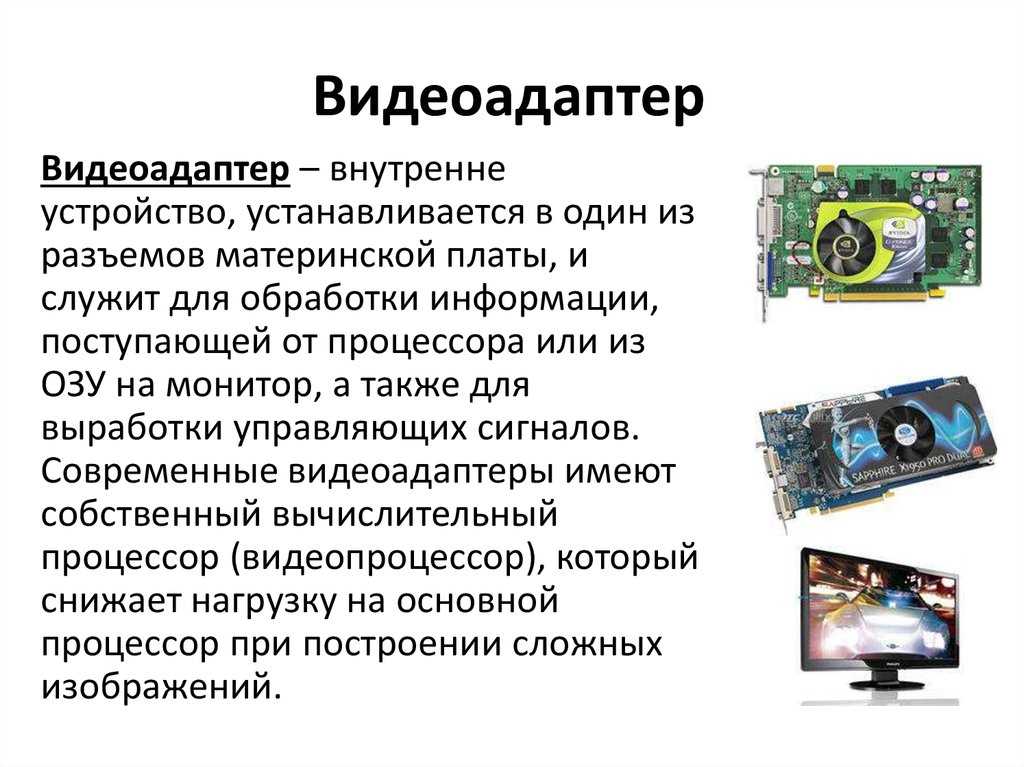 Most programs and utilities have many of these features. Both integrated and external video cards are supported.
With their help, you can adjust such parameters as antialiasing (Antialiasing), anisotropic filtering (Anisotropic Filtering), vertical synchronization (VSync) and many other undocumented functions.
Understanding these utilities and programs is easy, but for a quality setup you need to understand the parameters and technical capabilities of the custom video card in order to customize it to your needs and keep your computer in working condition.
Utilities and programs are listed in descending order of importance and usefulness.
Contents
- MSI Afterburner
- GeForce Experience
- GPU-Z
- Display Driver Uninstaller
- FurMark
- GPU Caps Viewer
- NVIDIA NV Flash
MSI Afterburner
A program from a well-known brand of various computer hardware. Assignee of the famous RivaTuner.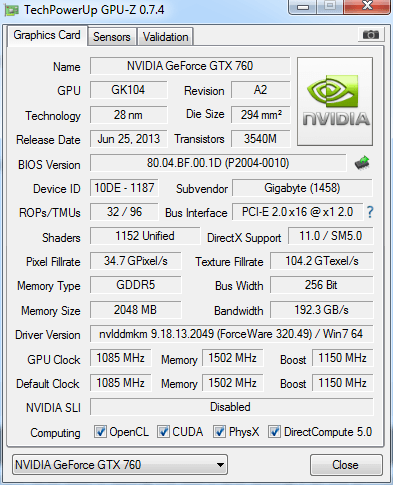 It is mainly used for overclocking video cards, but is also suitable for tuning and diagnostics. Works with video accelerators from both NVIDIA and AMD. It also does not fully support Intel graphics.
At the moment, this is the most popular utility for accelerating and fine-tuning most video card models.
Official website: MSI
Interface language: Russian, English and others
Distribution: free
System requirements: Windows XP | vista | 7 | 8 | 10
GeForce Experience
Program to automatically update drivers for NVIDIA video cards and set optimal graphics settings for games. Automatically notifies of new driver releases, downloads them and optimizes graphics settings in games, depending on the hardware configuration.
This utility can be installed together with new drivers or downloaded separately. I don’t use it, because when it appeared, because of it there were a lot of problems with the correctness of the work, and I don’t need an additional load on the computer. Now everything is in order with her work, and I advise only avid players to bet. For others, it is useless.
Official site: NVIDIA
Interface language: Russian, English and others
Distribution: free
System requirements: Windows 7 | 8 | 8.1 | 10
GPU-Z
Free program from TechPowerUp for displaying technical information about the video adapter running under Microsoft Windows. Displays the technical characteristics of the graphics processor, video memory. Identifies the manufacturer, name and model of the video card, date and version of the driver and BIOS, and also shows the graphics technologies and standards supported by the video processor (GPU).
Can determine the temperature and frequency of the core and video memory, the speed of the cooler. Conduct an online comparison of the device with other similar products.
Excellent and handy program. It is better to use the portable version, since it is very rarely needed and it is undesirable to install extra software. Suitable for everyone.
Official website: TechPowerUp
Interface language: English
Distribution: free
System requirements: Windows XP | vista | 7 | 8.1 | 10
Display Driver Uninstaller
This utility (abbreviated as DDU) will help you completely remove video card drivers from AMD, NVIDIA and Intel, as well as some sound card drivers from the operating system. At the same time, it will not leave a bunch of unnecessary files (including registry keys, folders and files).
DDU is intended for use in cases where the standard methods of the driver cannot be removed, or when you need to carefully remove the video card drivers. After using this tool, it will be as if the drivers were not there, as with a clean installation of the system.
For more information about working with DDU, see the article about the correct removal of video card drivers.
Official website: Wagnardsoft
Interface language: Russian, English, others
Distribution: free
System Requirements: Windows Vista SP2 to Windows 10
FurMark
A useful tool for stress testing video cards. In the settings, you can set the screen resolution, activate windowed or full-screen mode and adjust anti-aliasing, as well as specify the time of testing.
Overclockers will benefit from the burn-in test mode, which can be used to check the stability of the graphics card and the thermal performance of the overclocking system.
The test result can be published on the developer’s official website to be entered into the results database. Includes the latest GPU-Z and GPU Shark utilities.
FurMark is the most popular tool for checking the number of parrots that a particular video card produces. You can run this test on your PC or laptop and see how much your video card will score. And then compare your result with others.
Official site: Ozone3d
Interface language: English
Distribution: free
System requirements: All versions of Windows starting from XP (32 or 64-bit)
GPU Caps Viewer
GPU Caps Viewer is an information utility that allows you to get graphics card information, run multiple OpenGL and OpenCL tests, and monitor various GPU card parameters in real time.
The program displays OpenGL, OpenCL and CUDA information for all graphics cards available in the system, and also offers GPU monitoring of NVIDIA GeForce and AMD Radeon cards using the included GPU Shark utility (clock frequency, temperature, GPU usage, fan speed , rating of consumer processes, etc.).
You can also view information about the GPU online, by using the browser links from the program, or proceed to download the driver for the card. Working with the software does not require much computer knowledge.
Official website: Geeks3D’s
Interface language: English
Distribution: free
System requirements: Windows 7 / 8 / 8.1 / 10 (32/64-bit)
NVIDIA NVFlash
Used to flash the BIOS of Turing, Pascal and all old NVIDIA cards.
Supports BIOS flashing on NVIDIA graphics cards ⇒
- GeForce RTX 2080 Ti, RTX 2080, RTX 2070, RTX 2060, GTX 1660, GTX 1650
- GeForce GTX 1080 Ti, GTX 1080, GTX 1070, GTX 1060, GTX 1050
- and more, including flashing the BIOS on older NVIDIA GPUs.
The best utility for flashing the bios of nvidia video cards. For more information about the flashing process, see the official website of the developer.
Official website: TechPowerUp
Interface language: English
Distribution: free
System requirements: Win 10, 8, 7 (32-bit and 64-bit), Linux version
I will update and supplement the selection of software whenever possible. There are many small utilities for working with video cards, but some of them have not been supported for a long time, others do not work well. I talked about the main working versions of programs that cover most of the needs. If you know something else, please unsubscribe in the comments.
Developer — «Orbmu2k»
Program websiteRating — 5
MSI’s proprietary utility based on the RivaTuner «engine», in terms of functionality and interface convenience, has long gone ahead compared to RivaTuner itself and its «sister» — EVGA precision. Enhanced functionality includes support for AMD Radeon solutions, GPU and VRAM voltage adjustments, automatic 2D/3D mode switching tracking using profiles, and easy temperature-adjustment of graphics card cooling.
375 comments
Developer — «Unwinder»
Program websiteRating — 4.9
RivaTuner is the #1 tool for an NVIDIA GPU card owner.
-
2.24C
2.55 MB
32-bit60 HZ64-bitminal-language disclosgpu Boostoverclock monitoring processors.0003
290 comments
Developer — «Unwinder»
Rating — 5
One of the most powerful and oldest programs for collecting and receiving information in various types of reports about the hardware installed in the computer.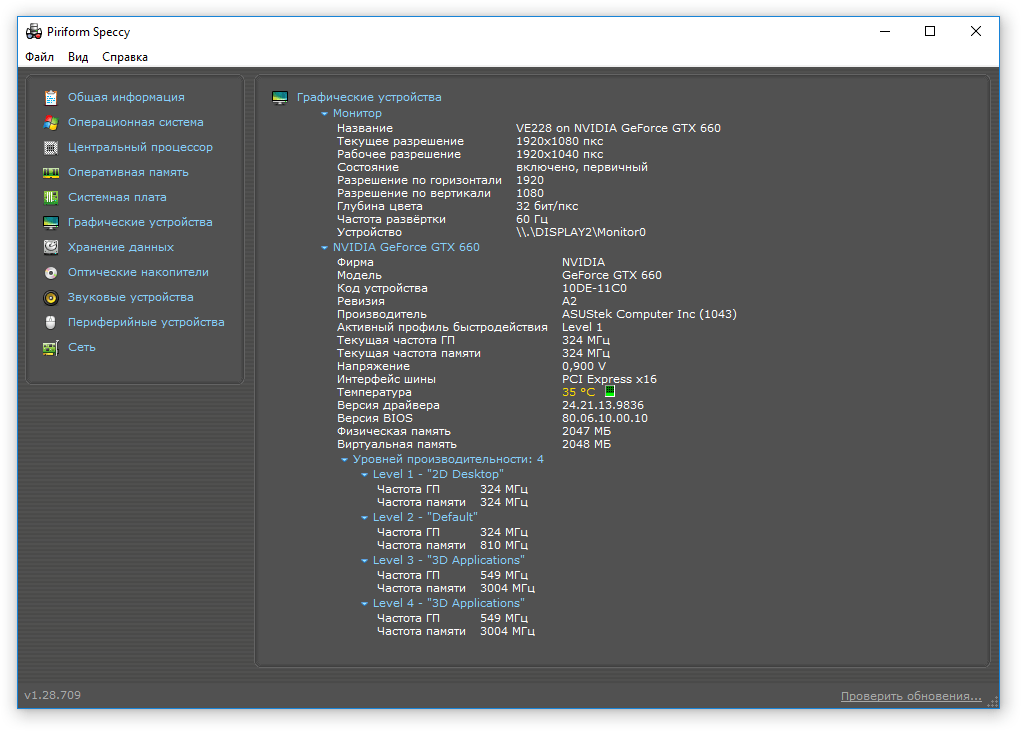 HWiNFO will provide all the information that can be “pulled out” programmatically from the bowels of a computer — both in the form of a detailed report on the component of interest, and in the form of a combined report with the ability to upload to one of the popular formats.
Rating — 5
Domestic competitor of the well-known Fraps program, which has support for multi-core processors and its own set of codecs, “sharpened” taking into account all the features of capturing game video in real time. The main functionality allows you to implement:
-
build 5303
69.46 MB
32-bit64-bitEnglishRussianFPSWindows XPVista7
0243 3 comments
Developer — «Sytexis Software»
Rating — 5
A miniature utility for controlling the brightness and contrast of the monitor without calling the display setup system menu by accessing the bidirectional DDC channel. The functionality of this software allows you to:0003
3.4.0
3.18 MB
64-bit Englishwindows XPVISTA7810 Monitor
1 Commentary
SOGSKY-“Realtime Soft” program
program programs program program Cooking NVIDIAvideo cards By now quite a lot of programs have already been developed that allow to increase the performance of NVIDIA video cards at the software level (ie by increasing the values of various operating parameters of video cards that were originally included in them by manufacturers). Consider the capabilities of the three most famous utilities from this category.
post sections:
-
MSI Afterburner — NVIDIA
-
EVGA Precision X1 — NVIDIA
-
ASUS GPU Tweak
MSI AFTERBURNER-NVIDIA
MSI AFTERBURNER (https://www. softSalad.ru/software/sistema/MSITEMA/MSITEMA/MSITEMA/MSITEMA/MSITEMA/MSITEMA/MSITEM designed for overclocking NVIDIA video cards. With its help, it is possible to increase the most significant operating parameters of the graphics core — voltage and frequency, as well as the clock frequency of the video memory. Additionally, with the help of MSI Afterburner, you can fine-tune the operation of video card coolers.
Here are the main functions of the utility with which the user will have to deal with the video adapter acceleration:
- The voltage supplied to the graphic processor (slides » core voltage»). Changing this parameter is possible only on AMD video cards that support the corresponding functionality.
- The operating frequency of the graphics core («Core Click» slider). This parameter, more than any other, determines the performance of the video card in terms of processing graphic data.

- Video memory frequency (“Memory Clock” slider). This parameter determines the performance of the video card memory and affects the speed of loading and unloading graphic data to / from it.
- Cooler rotation speed (cannot be changed on most low-end graphics cards). With MSI Afterburner, the user can automate fan speed switching depending on the current GPU temperature, or set it manually (in this case, the cooler rotation speed will not change at all). If the graphics card’s cooling system supports increasing the voltage supplied to the fans, it can also be adjusted through MSI Afterburner.
That’s what they would also like to add under the MSI AFTERBURner program:
- of manipulations with settings of video card parameters can be carried out directly during 3D- applications (games, for example) or high-resolution video playback. The changes made take effect immediately — immediately after clicking the «Apply» button.

- It is strongly not recommended to increase the operating parameters of the video card to the maximum values. This must be done gradually. Careless use of MSI Afterburner can lead, among other things, to the failure of the device (usually due to overheating).
- The program allows you to create profiles with settings that you can quickly switch between using hotkeys. This allows, for example, to activate high performance only at certain points in the game, and then return to the original performance in order to reduce the load on the video card and save its working life.
- A lot of additional functions, including, for example, displaying informational overlays (FPS and much more), become available after installing the RivaTuner utility on the computer. It is installed together with MSI Afterburner, if the user did not uncheck the corresponding item when installing the main program.
MSI Afterburner runs on computers running Windows XP and above (both 32-bit and 64-bit systems). Suitable for NVIDIA GeForce «6» series and AMD RADEON «HD 2000» series or higher.
Return to the table of contents ↑
EVGA PRECISION X1 — NVIDIA
EVGA PRECISION is the nearest analogue gaming devices of a certain model range). The similarity is noticeable, first of all, by the parameters of the video card that can be changed using this utility:
- GPU frequency.
- Video memory frequency.
- The voltage supplied to the GPU (unlike MSI Afterburner, EVGA Precision allows you to change this parameter for NVIDIA video cards).
- Cooler rotation speed (here you can also activate manual or automatic cooling system control mode).
Some other functions of EVGA Precision are also similar to those of MSI Afterburner, the program has its own unique features: The ability to set maximum values for the voltage and / or temperature supplied to the GPU, upon reaching which the overclocking stop function will automatically work.
- The ability to programmatically fix the maximum value of the number of frames per second (FPS), issued by the video card, regardless of whether it is currently under load.
- Display overlays on the screen.
- LED backlight control, if present in the design of the video card.
- Ability to create up to 10 profiles with settings (presets), between which you can switch using hot keys.
EVGA Precision is more demanding on the computer.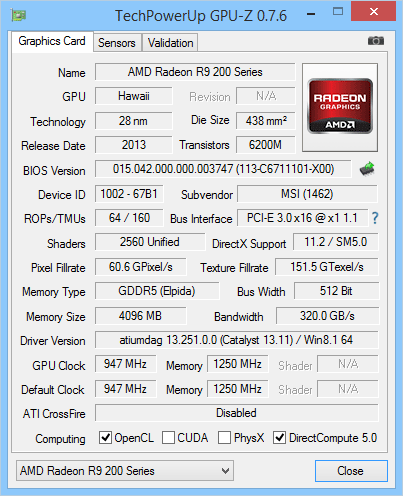 Only 64-bit Windows 8/8.1/10/11 operating systems are suitable for its operation. At the time of writing the review, the utility supported NVIDIA gaming video cards of the GeForce RTX, Geforce GTX 16 and GeForce GTX 10 series.
Return to the table of contents ↑
ASUS GPU Tweak
ASUS GPU Tweak is an all-in-one graphics card overclocking tool that supports both NVIDIA and AMD GPUs. In addition to the ability to change the main performance characteristics of video adapters, the ASUS GPU Tweak utility is also able to automatically optimize certain system parameters in order to reduce the load on the graphics card.
The program has two modes of operation — «Simple Mode» (simple) and «Advanced Mode» (advanced). The second mode is responsible for overclocking the video card, providing the ability to adjust all the same parameters that the two previous utilities can change:
- GPU frequency
- Voltage applied to the GPU.

- Video memory frequency.
- Cooler rotation speed (there is also an automatic speed control mode).
- Among the additional functions — setting the maximum FPS value in 3D applications and games, as well as the display refresh rate (both functions are initially hidden in the settings).
Regarding «Simple Mode». It serves to quickly switch between three (not counting user) profiles with the saved settings of the above parameters:
- «OC Mode» (OverClocking Mode). Increasing the operating parameters of the video card to completely safe values set by the manufacturer, with maximum emphasis on performance.
- «Game Mode». Overclocking video card settings to optimal values for playing games.
- Silent Mode. This profile, on the contrary, lowers the operating parameters of the video card in order to reduce the load exerted on it during idle time (when the computer is not running a game, video is not playing, etc.
 ). The profile also suggests a reduction in the rotational speed of the coolers to reduce the noise generated by them.
Each of the considered profiles can be changed by switching to the advanced mode of the program.
Last but not least, the “Gaming Boost” function. As mentioned above, it serves to optimize the operation of the operating system in order to free up computer resources for playing games. What exactly this function will optimize depends on the settings:
- Completely or partially disables the visual effects of Windows.
- Termination of system services and/or running processes, which, according to the developers of ASUS GPU Tweak, have a negative impact on the performance of the video card.
- Performing defragmentation of RAM in order to increase the speed of writing and reading data from it.
ASUS GPU Tweak can run on Windows 32 and 64 bit. The utility supports video cards with NVDIA 600 series or higher and AMD 7000 series or higher GPUs. Although the ASUS GPU Tweak utility was originally designed to work with ASUS video adapters, it also supports devices from other manufacturers.
Smartphones: Video: Which applications have access to the microphone and camera of my phone — Setting up for applications … … and much more …
9000
If something is not clear and you have questions, share them in the comments…
all articles: Alexandra Brik
author, co-author of the site Complitra ru — manager, web developer of studio ATs media — easily with WordPress
my website
The best programs for overclocking a video card
Hello, Guest!
Login
Home »
Blogs of Experts and IT Companies »
The best programs for overclocking a video card
The ability to post on the project has been stopped
The CNews editors are ready to receive press releases from companies at news@cnews. ru.
ru.
We invite you to share your comments about CNews materials on our Facebook, Telegram and Twitter platform pages.
In our today’s selection, we decided to highlight the best graphics card overclocking programs that can significantly increase the performance of your video device, improve graphics in computer games and speed up your graphics adapter.
Graphics card overclocking utilities can speed up memory, allocate additional power, control the speed of the cooler and much more. The user can programmatically influence the actual parameters of the hardware of the device and achieve an increase in its performance.
|
Programs |
Russian |
License |
Rating |
System Load |
Convenience |
| RivaTuner | Yes | Free | 10 | Low | 10 |
| GeForce Experience | Yes | Free | 10 | Low | 9 |
| MSI Afterburner | Yes | Free | 9 | Medium | 10 |
| SAPPHIRE TriXX | No | Free | 8 | Medium | 8 |
| GIGABYTE OC Guru 2 | No | Free | 9 | Low | 10 |
The utility is able to evaluate the performance of the video card and overclock it using a large selection of specific tools and low-level settings. It monitors, unlocks blocks of graphic processes, configures the cooling system and fan speeds. The user can not only access the OpenGL and Direct3D parameters, but also fine-tune each software from the «firewood» level to access to the hardware. RivaTuner also has a built-in registry editor, patch script interpreter and a unique diagnostic system. It has a clear Russian-language menu.
The developers of the program claim that their “brainchild” can optimize video games and update NVIDIA video card GeForce drivers, which, in general, the software performs with high quality. GeForce Experience monitors the state of «firewood», selects the optimal characteristics for a good display and automatically updates them in time. With the help of the SHIELD console on Wi-Fi, you can play computer games, integration with NVIDIA «cloud storage» and support for fifty games is also available. Menu in Russian. Of the minuses — the program does not work on XP.
The software overclocks the video card, monitors and corrects it. It will become relevant for active gamers who appreciate a colorful and clear picture in the game. In the settings, the user can «adjust» the parameters of the video card to the declared values, optimize the settings, adjust the temperature and operation of the cooler, change the voltage, memory and power of the video card, create profiles for «overclocking». MSI Afterburner supports NVIDIA GeForce and 3D video. It has an accessible menu with Russian localization.
The software improves the performance of video cards on computers with Radeon adapters. It overclocks the graphics card, which increases the performance of the device without failures and damage. The «duties» of the program include displaying detailed information about the adapter, managing memory and core frequencies, setting the speed of rotation of coolers. Sapphire Trix supports CrossFireX modes and systems with multiple adapters, adjusts processor, memory and CPU voltage frequencies.
Overclocks video adapters of the same name to improve performance, works with Radeon NVIDIA devices. In the functionality, the user can fine-tune the boost parameters without damaging the resources of the video device, change the frequency of the core, voltage, memory, shaders, adjust the rotation of the coolers, set up «hot keys» and create several profiles with a set of optimal settings. The software shows data about the graphics adapter, and also provides online support for problems or questions in working with the software.
This material is a private record of a member of the Club.CNews community.
The editors of CNews are not responsible for its content.
3 years ago
| categories:
System: Automation
System: Administration
System: Customization
System: Operating systems
System: Optimization
System: Registry
System: Control
System: Utilities
Comments
Other publications
CNews editors are ready to receive press releases from companies at news@cnews. ru.
ru.
We invite you to share your comments about CNews materials on our Facebook, Telegram and Twitter platform pages.
TOP 12 programs for checking the video card
-
Reviews
19 -
Questions
10 -
Articles
2
Rating
Rating of the selection
If you solve more capacious tasks on your computer than “surfing the Internet” and “typing in Word”, then you know that you need a powerful video adapter to work with complex graphics. A graphics card is one of the most expensive types of components, so often in the pursuit of excessive performance, users thoughtlessly “overclock” the device beyond the norm. This leads to the appearance of artifacts, freezing and equipment failure. In order to find out the status of the device, measure its characteristics and performance, there are special programs for checking the device. They can be especially useful when buying used equipment.
AIDA64 Extreme Edition
Download
One of the most popular programs for identifying computer characteristics, allows you to read information from almost all installed sensors. AIDA64 Extreme Edition integrates into the system tray, thanks to which you can quickly call up the interface and view data from the temperature sensors of the video device, find out the speed of the cooler. The utility has a number of tests to check the performance of individual components, but among them there are no algorithms for working with a video adapter.
AIDA64 Extreme Edition trial period — 30 days. The price of a license key is from $40.
-
Program interface
-
Program menu
-
Network tab
-
Information
-
The form
Download
A utility familiar to all professional gamers. Its main purpose is to record the process of passing games and taking screenshots. She got into our selection because of the overlay in the form of showing the number of frames per second.
Without buying a license, Fraps imprints the developer’s logo on the recorded videos, and also includes a limit on the recording duration. The cost of a license key is $37.
-
FPS
-
Video
-
Screenshots
-
Program interface
HWMonitor
Download
HWMonitor will show the rotation speed of the video card cooler, the current temperature, the workload of various components. It is convenient that the program displays not only the current state, but also the maximum and minimum values reached since the utility was launched. It is possible to save the data as a text file.
In addition to the standard free version of the program, there is also a Pro version starting at 20 euros. It has a remote connection function, charting tools are available, as well as the ability to display indicators in the form of an icon in the system tray.
Download
Software for checking NVIDIA/ATI Radeon video cards for a malfunction — monitors key performance indicators and prevents overheating (due to reading information from temperature sensors, it will allow you to understand the cause of artifacts and other factors affecting performance in a timely manner).
Like HWMonitor, GPU-Z shows not only the current values read from the sensors, but also the boundary values.
-
Installation Options
-
GPU-Z interface
-
Sensor information in GPU-Z
-
Advanced GPU-Z settings
MSI Afterburner
Download
A proprietary utility from a well-known hardware manufacturer that works with video adapters from all known vendors. It was originally created as a tool for overclocking and forcibly limiting the power of a graphics card, but it can be used to monitor key hardware indicators in real time, including FPS.
-
Program interface
-
Program settings
-
Monitoring
-
Information
-
Screenshot capture
-
Video capture
GeForce Experience
Download
A native program from NVIDIA that allows you to expand the functionality of the device and update drivers to the latest version, as well as test new beta software versions. GeForce Experience has a feature to show FPS.
Interestingly, AMD Radeon Software Crimson, a similar software for AMD devices, has not been updated since the early 2010s. Therefore, we did not consider this solution in the selection.
-
Arche Age Game Optimization
-
Game Background Optimization
-
Delayed smoothing optimization
-
Additional effects in WOT sniper mode
-
System information
-
Check for a driver update
-
WOT optimization
Video Memory Stress Test
Download
A tiny utility originally from the 2000s, but which is still relevant today. It allows you to reliably examine the state of the video card memory by conducting stress tests. Video Memory Stress Test supports three test modes — CUDA, DirectX, OpenGL. Export of test results is possible through the clipboard, in addition, the utility maintains a text log file. The program is fully compatible with adapters in which no more than 1 GB of memory is allocated.
FurMark
Download
The utility allows you to load the video adapter to the maximum by displaying a three-dimensional picture-ball in a separate window. It uses OpenGL technology. It is useful that in the program settings you can set a critical temperature indicator, upon reaching which the testing will stop.
We found the benchmarking function to be more interesting — FurMark allows you to test the performance of the machine by rendering the figure in different resolutions. The result obtained can be compared on the developer’s website with the indicators of other users.
Unigine Heaven Benchmark
Download
Powerful benchmark, when you launch it you don’t just follow the progress bar, but travel through a beautiful world with a hint of fantasy style. The mode of free movement is available, control is made from the keyboard.
The utility allows you to measure PC performance in various modes — with different resolutions, graphics quality and other parameters. Two graphics rendering methods are supported — DirectX and OpenGL.
There are three versions of the utility. The basic free version will meet the needs of most users. Overlockers will appreciate the capabilities of the advanced version with the ability to export reports to a spreadsheet file. The license price for this option is $15. For commercial organizations, there is a special professional version with a key price of five hundred dollars. Its main features are the ability to test at the level of «raw» software, as well as the function of in-depth performance analysis.
Geekbench
Download
A very popular cross-platform utility for checking the speed of the processor and video adapter. Geekbench can test video in CUDA mode, as well as scientific computing emulation method — OpenCL. The final result is uploaded to the website of the developer company, on the personal page you can find out how many points were awarded for a particular verification method.
The basic version of Geekbench is free, but there are a limited number of ways to test it. The cost of a license key is from $10.
-
Program interface
-
Program settings
CineBench
Download
This free utility cannot test the capabilities of the video hardware. But it evaluates the capabilities of the computer’s processor, aimed at rendering graphics. The PC core is used by many video editors, so the results of the benchmark are important for users involved in professional graphics processing. The program displays the final information as a result in points, they can be compared with the reference PC configurations.
3DMark Basic Edition
Download
Popular software for benchmarking, based on DirectX technology of different versions — 9, 10, 11. Its results are respected among overlockers, many users compete with each other for the right to score the maximum number of points in 3D Mark. During the standard testing method, the program launches several clips with spaceships, each subsequent clip has improved detail and uses more resources.
The trial version does not allow you to select custom settings. The standard license price is $30.
-
testing video cards and processors
-
report
-
Performance test
-
Video card test
To monitor the main indicators from the sensors, the GPU-Z utility is quite suitable, which allows you to monitor the current, average and boundary values. If you want to get detailed information not only about the video card, but about all the installed hardware, take a look at AIDA64 Extreme Edition.
Among the free programs for testing a video card, let’s highlight the Video Memory Stress Test program, which allows you to carefully check the device’s memory in different visualization modes. However, keep in mind that this software is not suitable for powerful video adapters.
When calculating performance, overlockers most often use the 3DMark solution, which «loads» the device, broadcasting graphics with varying degrees of detail.
Author:
Vladislav Shapoval
Author of the portal «Softobase»
10 monitoring, tuning, overclocking and stress testing utilities that are always installed on my PC
This material was written by a site visitor and has been rewarded.
Having bought my first PC almost 20 years ago, for a long time I did not think about the modes in which its components work and just played games on it, watched movies and listened to music. In those days, processors and video cards for the most part did not exceed the power consumption threshold of 50 watts, and few ordinary users thought about their temperature or fan speed. And the first time I ran into a processor overheating was a couple of years later, after an unsuccessful upgrade to an Athlon XP.
After a cold Pentium III, the Athlon XP turned my computer into an oven that overheated even the top cover of the case. At that time, few people thought about additional ventilation and the fan in the power supply handled the exhaust of heated air. After installing an additional fan in the case and replacing the processor cooler with a more powerful one, I managed to reduce the temperature of the processor, and the MSI Core Center utility was added to my set of programs for permanent installation on a PC, with which it was possible not only to monitor temperatures, voltages and frequencies of the processor and motherboard, but also overclock the processor directly from under Windows.
recommendations
After buying the ATI Radeon 9600 PRO video card, a handy PowerStrip utility was added to my set, with which it was possible to overclock not only the video card, but also the scan of the CRT monitor, and then the very convenient utility ATI Tray Tools using which could do with the video card and monitor everything that is possible. Since then, my set of utilities for monitoring, tuning, overclocking and stress testing PC hardware has grown and updated, and in this blog I want to tell you about 10 relevant, proven and useful utilities that I use all the time.
MSI Afterburner
MSI Afterburner has long been one of the main utilities on my PC, and I can’t imagine using a graphics card without this utility. MSI Afterburner does a lot for me: it ensures the operation of the video card in undervolting mode, runs a customized fan profile that gives a better noise / temperature ratio than the factory one. I also use MSI Afterburner to take screenshots in games and record gameplay video on graphics cards that do not support the Nvidia GeForce ShadowPlay function, such as the GeForce GT 1030. And the red MSI Afterburner icon with graphics card temperatures has been constantly hanging in the notification area for many years.
Link to the developer’s site.
HWiNFO
Together with MSI Afterburner in the notification area, I have long ago registered the icon of another popular utility for monitoring almost any component parameters — HWiNFO. This small and compact utility will show you absolutely everything, from processor temperatures and voltages, to the current data transfer rate in drives or a network card. It is very convenient that any HWiNFO indicators can be viewed in the form of graphs or displayed in an overlay over the game using MSI Afterburner.
Link to the developer’s site.
AIDA64
But AIDA64 is a heavyweight program that provides not only monitoring of any indicators, but also offers many tests for the processor, RAM and video card, including stability stress tests. One of the most convenient features of AIDA64 is the creation of a report that will literally contain everything about the PC under investigation.
Link to the developer’s site.
CPU-Z and GPU-Z
It would seem that if we have the three utilities described above, then nothing else is needed for monitoring, but a couple of similar simple CPU-Z and GPU-Z utilities are always on my PC, as on the PC of many overclockers. The main plus of CPU-Z and GPU-Z is the compact and visual display of information about the processor and video card, which is convenient to perceive in screenshots, for example, when a stress test is running. Therefore, despite the fact that there are enough other monitoring utilities on PC overclockers, CPU-Z and GPU-Z do not lose popularity.
Link to the website of the CPU-Z developer.
Link to the GPU-Z developer site.
HD Tune
In the same way, for working with hard drives and SSD drives, I still use the old HD Tune utility, which I will not exchange for the more popular CrystalDiskMark precisely because of the convenient and visual output of information in the form of graphs. In addition to speed tests and monitoring drives, HD Tune allows you to completely erase information from a disk and test its surface for bad sectors.
Link to the developer’s site.
OCCT
My AMD Ryzen 5 1600 AF processor and RAM are overclocking and a few months ago I noticed signs of degradation when the processor no longer holds a previously stable overclock. I lowered the voltage on the processor cores and its memory controller, which allowed me not to completely abandon overclocking and periodically check it for stability. I use the OCCT utility for this, which puts a stronger load on the processor than the AIDA64 stress tests, but less than Linpack, and due to this it has become the best overclocking utility for checking stability for me.
Link to the developer’s site.
Unigine Superposition
I prefer not to overburden not only the processor, but also the video card, so I practically don’t use the popular FurMark heating utility. Instead, I use the Unigine Superposition utility, which gives the video card a stable load that exceeds that given by games, and allows you to find instability in overclocking or undervolting. Do not forget that Unigine Superposition is a good benchmark for video card performance.
Link to the developer’s site.
3DMark
Traditionally, I also use the latest versions of the 3DMark utility for video card tests, and using the 3DMark stability test, it is easy to check overclocking and undervolt for stability. But I don’t forget older versions of 3DMark, like 3DMark 11, because it makes it easy to compare the performance of a new graphics card with the ones you had before. Or the performance of new budget video cards with powerful models of past generations.
Link to the developer’s site.
Display Driver Uninstaller
Despite the fact that modern video card drivers are noticeably different in stability for the better than those in the past, errors still occur during their removal, which I often read about on the forums. Yes, and a couple of times in recent years, I myself have encountered incorrect operation of the video card driver after the usual removal and installation of a new one. Therefore, I made a rule for myself, when installing a new video card driver, always uninstall the old one using the Display Driver Uninstaller utility, which thoroughly cleans out all the remnants of old drivers. It takes two or three minutes, but you can be sure that nothing will interfere with the new driver.