Windows 7 x64 — How can I test my memory?
Asked
Modified
6 years, 10 months ago
Viewed
123k times
People tell me that my computer may have some bad RAM. Is there a way to test it without special equipment?
- windows-7
- memory
- 64-bit
0
Memtest86+
The quickest and easiest way in 7 is to use the built-in memory diagnostic.
- Click Start or press the Windows key
- Type «mdsched.exe» (without the quotes)
- Chose one of the available options.
If you choose the second option, the scan will start the next time you boot the computer. If you choose the first option, the computer will reboot and start the scan immediately.
During the scan, you will see options to change the type of scan and how many times to scan. You should leave it alone unless you really suspect something wrong with your RAM and the normal scan does not find it.
Once the scan finishes, Windows will start, and within moments a bubble notification will appear, stating that the scan is finished. Click on this bubble to view the scan report.
Memtest86+ does have more options, but requires a separate download and has to be burned to a disc, and does not generate a printable report.
Right after BIOS, before windows starts, push F8. Select Memory Test from the options. Run the long test, it’ll take a long time.
If you have handy an Ubuntu CD, when booting from it, you get an option for running a memory test, that’s no other than MemTest86+, as Ignacio said…
That way maybe you avoid burning another CD just for that.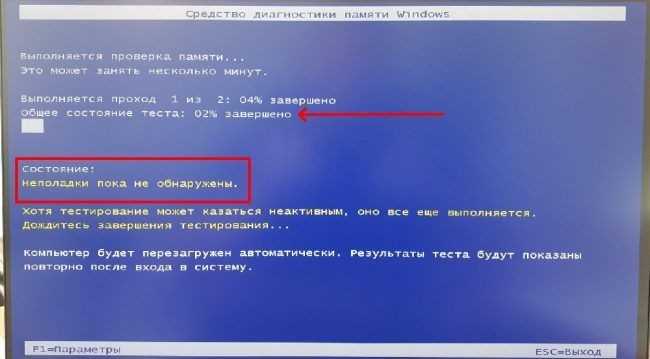 ..
..
1
If you are not able to Log into Windows:
After the POST screen keep tapping F8,you will get boot manager. Press Tab Key once Memory Diagonostic Tool highlighted Pres return. It checks for faulty RAM as well as hardware fault.
If you are able to login Windows:
Click On start in search box Type «memory test» you will see memory diagonistic tool highlight it and press return.
-
To Start from within Windows 7
A) Open the Control Panel (icons view).
B) Click on the Administrative Tools icon, and click on Memory Diagnostics Tool.
C) Go to step F below.
OR
D) Open the Start menu.
E) In the Start Menu search box, type
mdschedand press Enter.F) Select the Restart now and check for problems option.
Sign up or log in
Sign up using Google
Sign up using Facebook
Sign up using Email and Password
Post as a guest
Required, but never shown
Post as a guest
Required, but never shown
By clicking “Post Your Answer”, you agree to our terms of service, privacy policy and cookie policy
Does Windows Memory Diagnostics Tool scan RAM over 4GB?
Ask Question
Asked
Modified
6 years, 11 months ago
Viewed
7k times
Back in the Windows 7 days, Windows Memory Diagnostics Tool was unable to scan RAM beyond 4GB:
.
..the tool can address only up to 4GB of RAM and will not scan beyond that range.
Fast-forward to today. Windows 10 has, built in, a (presumably) later version of the Windows Memory Diagnostics Tool tool. I am running it now on a PC with 16GB RAM. But the GUI is extremely plain. It does not show what amount or range of RAM it’s scanning.
Does anyone know if this latest Windows 10 incarnation of the tool scans all 16GB of RAM, or is it still limited to the first 4GB like previous versions?
Extra info for the extra curious:
Windows Memory Diagnostics Tool does not run under Windows. It is a bare-metal app that has direct access to physical RAM (well, almost direct, but no need to get too technical). Without being privy to the source code, we can only speculate how it runs under the hood and why there was/is a 4GB limit. Clearly even 32-bit bare-metal apps can gain access to physical RAM above 4GB, so long as such apps utilize protected mode together with PAE.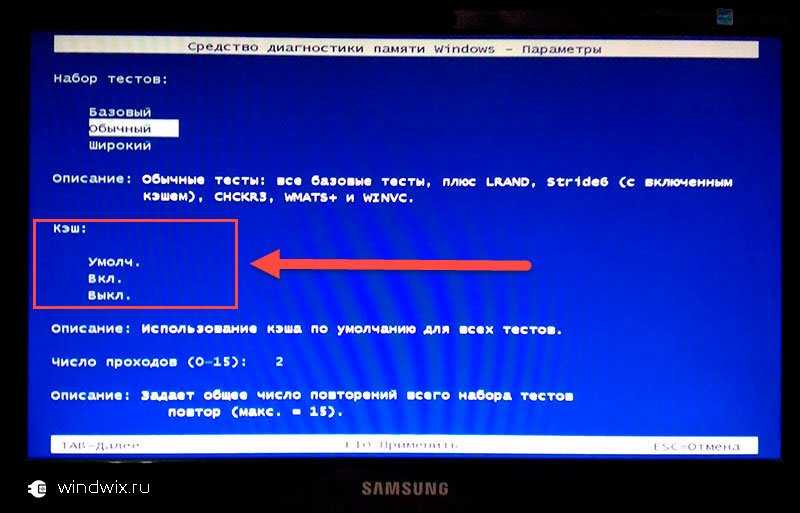 That’s exactly how Memtest86 used to do it, before native 64-bit support was introduced.*
Ultimately, this question is not about what is possible and how, but what Windows Memory Diagnostics Tool is capable of. Is the latest version that ships with Windows 10 still limited to the first 4GB of RAM?
- windows-10
- memory
6
This is how I went about examining the question :
I first opened the Windows 10 ISO :
And extracted the memtest.exe file, dating from 2015 (a good sign),
then examined it :
To find out to my great surprise that this is only a 32-bit program.
But of course it could still be using PAE to test more than 4 GB.
I then started the memory test on a VM with Windows 10 and 8 GB of RAM.
The test results are well-hidden, but I found them in the Event Viewer,
under Windows Logs -> System, as events which have «MemoryDiagnostics» in the Source column :
As you can see, Windows claims that the test on 8GB has passed.
So Microsoft’s answer to your question is : Yes, we can.
It would have been incredible had it been otherwise.
9
That tool above is too old and indeed it supports only up to 4GB of RAM.
But Windows built in memtest.exe is different. I opened Windows 7 64-bit c:\Boot\memtest.exe, and it shows me, that it’s 32-bit application. I guess Microsoft made one tool for both 32-bit/64-bit hardware. That will run instead of Your OS, in «pre-OS mode», PC «boots» into memtest instead of Your OS. Tool may work in its own mode, not linked to OS(64-bit mode or 32-bit or even 16-bit «real» mode). Tool doesn’t use any OS components, like DLLs, device drivers. I believe if we have same binary for 32-bit and 64-bit it should check all available memory including Your 16GB.
3
Sign up or log in
Sign up using Google
Sign up using Facebook
Sign up using Email and Password
Post as a guest
Required, but never shown
Post as a guest
Required, but never shown
By clicking “Post Your Answer”, you agree to our terms of service, privacy policy and cookie policy
RAM test in Windows 7 (64 bit)
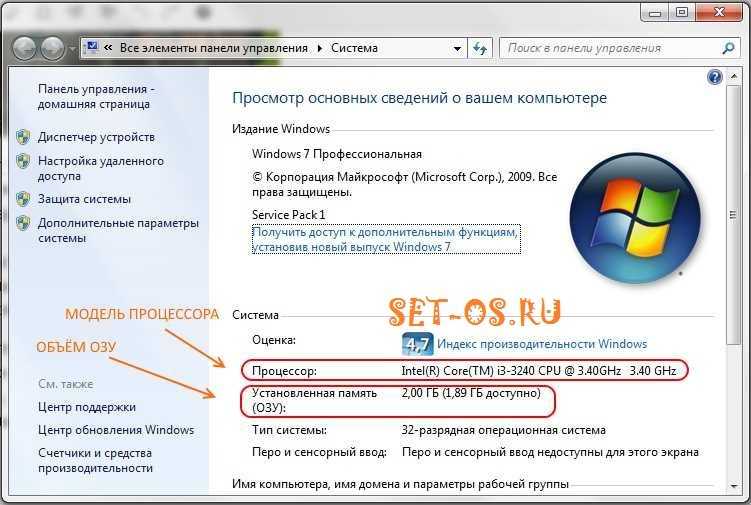
Random access memory (RAM) is rarely considered by the user as a possible cause of a malfunction. And it’s completely in vain, since RAM is not just a term and some kind of virtual space for storing programs and data, but also real physical equipment. Like any other equipment, it can start to fail and needs to be periodically checked for performance. Faulty RAM is a common cause of the blue screen of death in Windows.
A timely test of RAM can reveal existing problems and help to put Windows 64 bit in order. In Windows 7 64 bit, the RAM test can be performed by the system itself or by third-party software. How it all works, we will tell further.
The incentive to run a Windows RAM test can be regular system crashes into BSODs. If at the same time a new error is issued each time, then it is simply necessary to check the RAM. If you know how to get a small memory dump, then direct indications of this in the contents of the dump may be evidence of its malfunction. It looks something like this: memory_corruption(…). If you don’t know how, there is another reason to learn.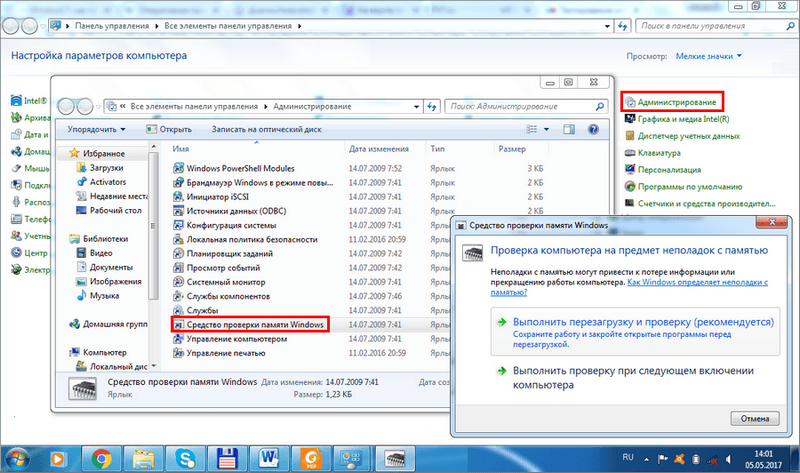 Having received such an unhealthy signal from Windows 64 bit, we proceed to the implementation of the RAM test. There are two ways to test the RAM and check it for errors:
- Using the built-in Windows utility «Microsoft Windows Memory Diagnostic».
- Using the well-known program Memtest86.com.
We will make the first pen test with a tool included in the operating system itself:
- We climb into the “Control Panel” -> “Administration”.
- Launching the Windows Memory Checker snap-in.
- The following window will appear:
- Feel free to reboot.
- After the reboot, the RAM test will start automatically and we just have to wait for its results. They will be displayed on the screen.
Another, much more interesting and informative way to monitor the state of the RAM, is provided by the mentioned Memtest86.com utility. Checking the RAM with its help is easy. The test is carried out as follows:
- An ISO image of a diagnostic disk is downloaded from the utility manufacturer’s website.
- This image is written to a disc and slipped into the computer during its boot.
- The program performs a RAM test and displays the results of its work.
The difference between this program and the standard OS component is that it allows you to check RAM for errors much more thoroughly. In addition, the program supports a huge amount of hardware. Even the most exotic or just rolled off the assembly line.
Its only drawback is the need to tinker, preparing a boot image disk. But this routine procedure should be familiar to every more or less qualified user.
In addition to this utility, you can find many more programs on the network with approximately the same functionality. So those who want to tinker with RAM will have something to use.
Checking the Windows 7 RAM
It will probably not be a discovery for any of the users of the century that most of the error messages that appear when working with Windows 7 arise from all sorts of problems with the computer’s RAM.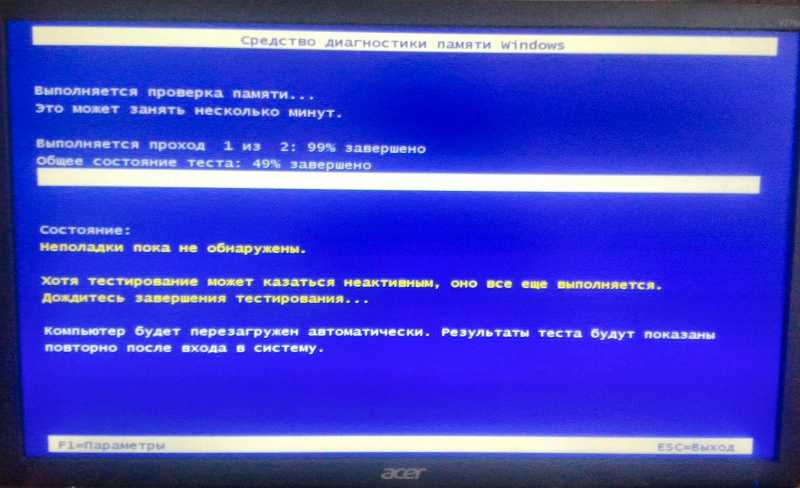 At the same time, it is not so difficult to detect them, as it seems at first glance, and even without resorting to the help of third-party programs. The point, in fact, is that Windows 7 itself already has a built-in utility for checking RAM, which is not much inferior to similar programs in terms of efficiency. Do you want to check it out? Then get to work!
Option #1: Microsoft’s System Method
It’s worth noting that testing RAM using Windows 7 itself can be done in different ways, depending on whether the computer is in working order or not. In particular, for a regular check of the health of the RAM on a PC, you can use this method:
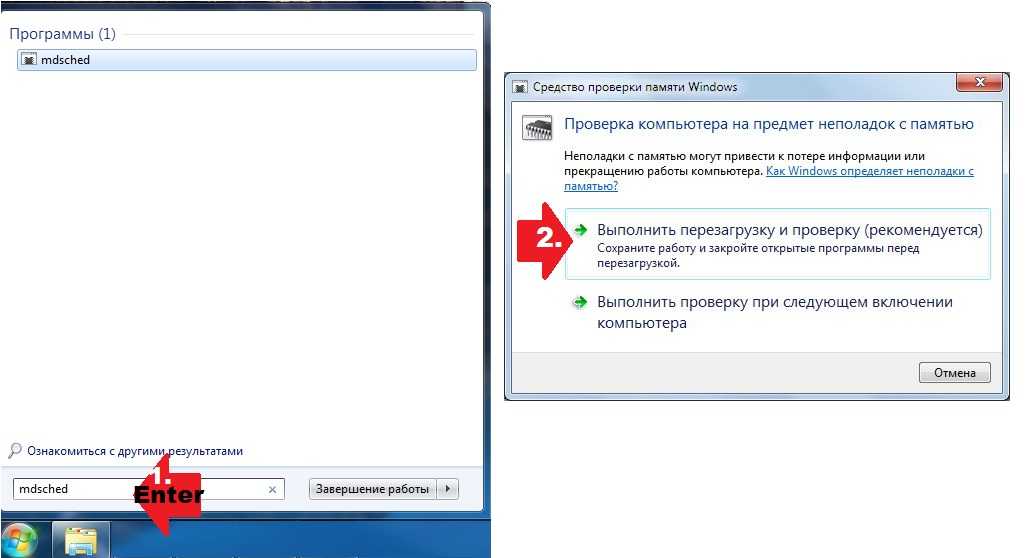
- enter the Start menu, write the word mdsched in the search line, and then press Enter on the keyboard;
- in the window that appears, find the item «Reboot …», click it and send the computer for verification:
In addition, it is also possible to check the operation of the RAM when starting Windows 7. In this case, when starting the computer, you will first need to press F8 in order to get to the menu of additional boot options, and then select Esc on the keyboard one by one (to access the Windows boot manager) , Tab (to select a memory test tool) and, finally, Enter (to start diagnostics):
we only need to open the system recovery options and select the memory diagnostic program among them. The whole process looks like this:0005
In any case, regardless of the method chosen, after starting the system diagnostics of the RAM, a blue window will appear, which will display the entire test progress:
. It provides, of course, a check that is quite quick in time, but of average efficiency:
In this case, for a more thorough analysis of RAM, after starting the utility, it is preferable to reconfigure the test scheme by choosing a wide set instead of the usual set. How to do it? Just press F1 first and then Tab to select the appropriate option and F10 to save the setting. Similarly, disable cache validation and increase the number of passes to at least 20 in order to increase the efficiency of passing the test.
One way or another, after the analysis of the RAM is completed, the testing tool built into Windows will notify you of all errors found in a report or in a system message after restarting the PC (depending on the selected diagnostic method).
Option number 2: RAM tester programs
At the same time, RAM on a computer with Windows 7 can be checked for errors using special RAM tester programs. They are presented today quite widely, but free software tools such as SuperRam, MemTest86 and SiSoftware Sandra deserve special attention among all of them.
The easiest to use among them is undoubtedly the Russian-language utility SuperRam. At the same time, in terms of the effectiveness of RAM tests, it is not much different from the well-known software “monster” MemTest86. This utility, in particular, allows you not only to test the RAM on your computer in different modes, but also automatically increases the productivity of its use.