How to Test RAM: Make Sure Bad Memory Isn’t Crashing Your PC
Skip to main content
Tom’s Hardware is supported by its audience. When you purchase through links on our site, we may earn an affiliate commission. Here’s why you can trust us.
(Image credit: Shutterstock)
Your computer’s RAM is key to its operation. Explained simply, RAM is your computer’s short-term memory, which it uses to work on its current task. However, like any computer part, even the best RAM can break, so you’ll want to know how to test whether your memory is stable or not.
One of the first signs of memory going bad is blue screens of death (BSODs). Memory issues often make themselves easily noticeable by their rapidly increasing severity. At first, you’ll only rarely experience crashes, and the system will still be workable. But before you know it, the system will crash during start-up. Therefore, it’s important to identify the problem quickly.
There are multiple ways of testing your computer’s memory. We’ll cover a few of them today.
How to Test RAM
(Image credit: HCI Design)
One option preferred by us at Tom’s Hardware is HCI Design’s MemTest . The good thing about this is you don’t have to any pre-booting and there are no directions. You just run it.
How to Test RAM With Windows Memory Diagnostic Tool
The next easiest way to test your memory is with Windows 10 ‘s built-in Memory Diagnostic tool.
1. Search for «Windows Memory Diagnostic» in your start menu, and run the application.
(Image credit: Tom’s Hardware)
2. Select «Restart now and check for problems.» Windows will automatically restart, run the test and reboot back into Windows.
(Image credit: Tom’s Hardware)
3. Once restarted, wait for the result message. This may take a few moments to appear as the system starts up. Be patient. It will show up, but keep an eye out for it, as it will disappear again quickly.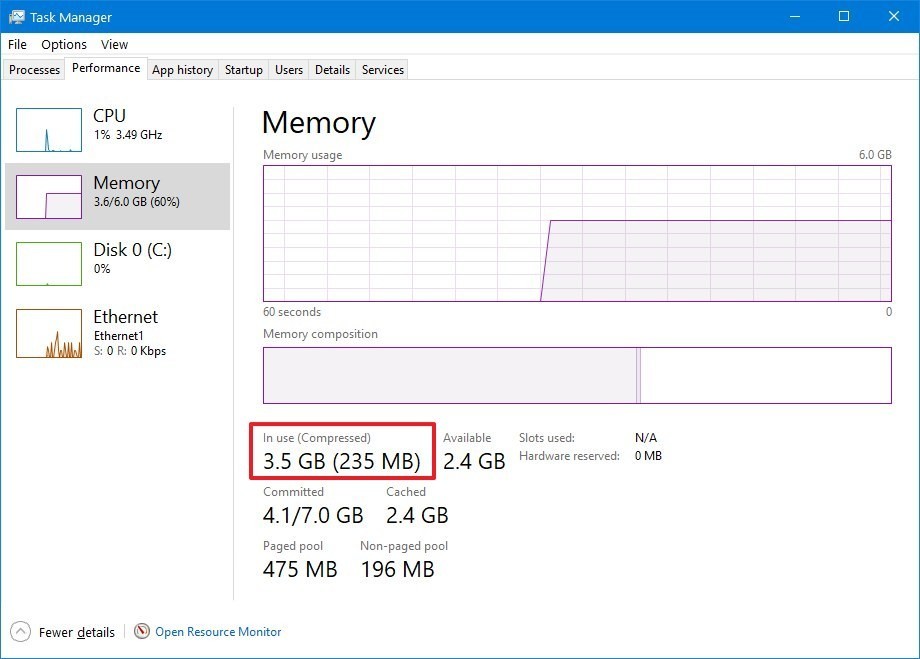
(Image credit: Tom’s Hardware)
How to Test RAM With Passmark Memtest86
PassMark’s Memtest86 is a reliable tool for testing memory without the need for an operating system, meaning it will work on Windows machines as well as Linux computers. It runs off a bootable USB stick, and although it looks complicated, it is very straightforward to use.
1. Download Passmark Memtest86 .
2. Extract the contents into a folder on your desktop.
3. Insert a USB stick into your PC. Back up any data on it, as Passmark’s tool will format the USB stick.
4. Run the «imageUSB» executable.
5. Select the correct USB drive at the top, and press ‘Write’
(Image credit: Tom’s Hardware)
6. Double-check whether everything is correct before proceeding. Writing will take a few moments, depending on the speed of your USB stick.
7. Restart your computer, and enter the boot menu through pressing F2, Del, F8, F10 or whichever key your system uses.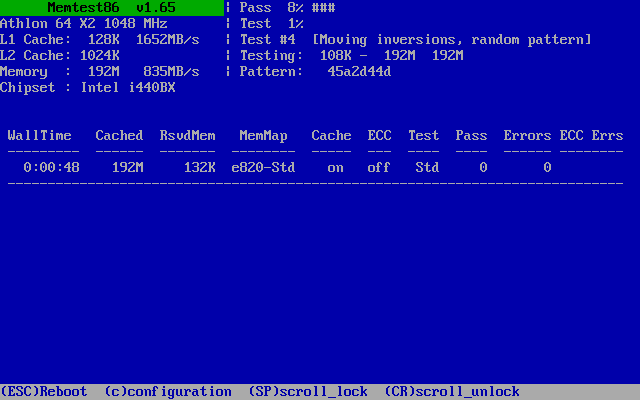 It will say on your post screen.
8. Boot off the USB stick.
9. Press «Config.»
(Image credit: Tom’s Hardware)
10. Select «(S)tart Test» in the Memtest86 home screen.
(Image credit: Tom’s Hardware)
Now let the application run the test until completion or until errors appear. You can monitor the progress of the test at the top of the screen.
Depending on your memory size, testing can take from 20 minutes to a few hours. If errors appear, there is no point in continuing testing. A screen with errors looks like this:
(Image credit: Tom’s Hardware)
What If My RAM Is Bad?
If you didn’t get any errors: congratulations. Your memory is in working order. You can either rest assured or, if you are having crashes, continue troubleshooting to figure out what else may be the cause now that RAM issues are ruled out.
If you do get errors, then also congratulations: you’ve found the culprit of your crashes. In 95% of cases, the only way to fix memory issues is to buy new RAM or replace it. If you have multiple RAM kits, be sure to test them independently to figure out which is causing problems and send it in for warranty. Luckily, a lot of RAM kits come with a lifetime warranty these days.
But there are three things you can do to try to get rid of these RAM-caused issues.
The first is to ensure that your RAM is running at the correct clocks for your system. All memory has its speed and timings written on its label or packaging, and you want to make sure that it runs at these speeds using the XMP profiles in your BIOS . It hardly ever happens, but it’s possible that the memory was set to run faster than it was capable of, which would naturally lead to errors.
If setting the right XMP profile in your BIOS doesn’t help, another trick that sometimes works is to underclock your memory — i.e. run it slower than the intended speeds. You can do this by reducing the frequency and backing off on the timings. However, this is often a temporary measure because if the RAM has degraded, the errors are likely to return soon.
Lastly, note that certain platforms do not play nicely with all memory configurations. If you’re running an especially high memory frequency, be sure to check whether this is supported by your CPU and motherboard . Out-of-spec combinations will make it appear like the memory is broken, when in actuality the memory controller on your CPU is unable to handle the RAM’s high frequencies.
Niels Broekhuijsen is a Contributing Writer for Tom’s Hardware US. He reviews cases, water cooling and pc builds.
Tom’s Hardware is part of Future US Inc, an international media group and leading digital publisher. Visit our corporate site .
©
Future US, Inc. Full 7th Floor, 130 West 42nd Street,
New York,
NY 10036.
How to check your Windows 10 PC for memory problems
Skip to main content
Windows Central is supported by its audience. When you purchase through links on our site, we may earn an affiliate commission. Here’s why you can trust us.
On Windows 10, if applications keep crashing or they’re running very slowly, or you’re experiencing weird things, such as random reboots, freezes, or sudden Blue Screens of Death (BSOD), it could be difficult to pinpoint the root of the problem because it could be a software or hardware-related issue.
However, usually, the memory is the first thing you want to check. This is because if it’s a problem with one of the modules, you’ll need to take care of the issue quickly, as it cannot only cause your computer to misbehave, but a bad memory module can also corrupt files, which is not a good thing.
While there are a number of tools you can download off the internet, Windows 10 includes its own Windows Memory Diagnostic tool to check if your computer has memory problems.
In this Windows 10 guide, we walk you through the steps to use the Windows Memory Diagnostic tool to find out if you have a faulty memory stick.
How to diagnose memory problems on Windows 10
Using these steps requires you to restart your computer, so make sure to save any files you may have open and close any running applications before proceeding.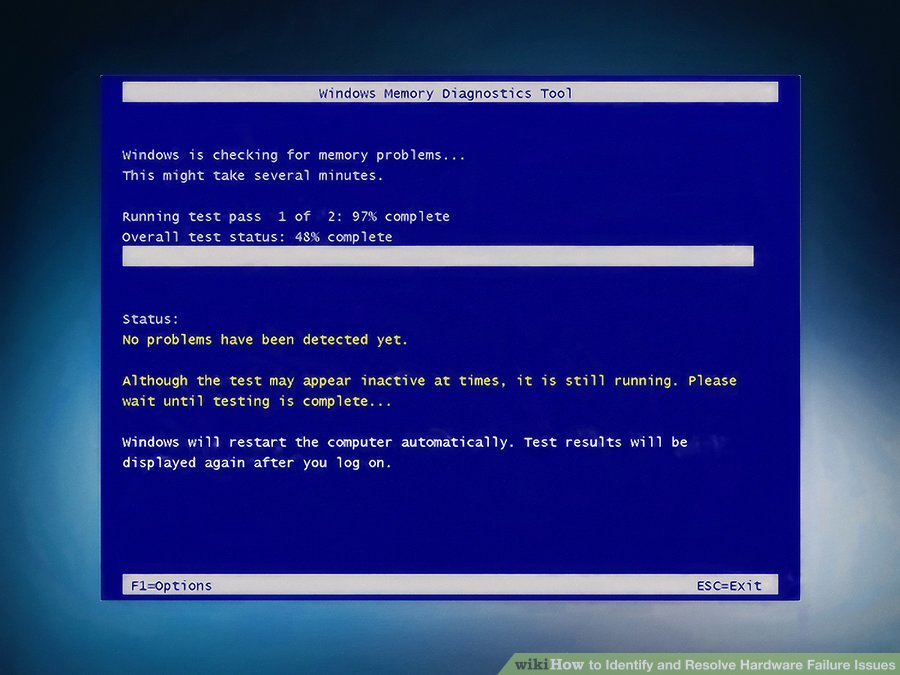 Here goes:
- Open Control Panel.
- Click on System and Security.
- Click on Administrative Tools.
- Double-click the Windows Memory Diagnostic shortcut.
- Quick tip: Alternatively, you can also use the Windows key + R keyboard shortcut, type mdsched.exe, and click OK to launch the tool.
- Click the Restart now and check problems option. (The tool also offers an option to schedule a test in the next reboot, if you can’t afford to close your applications and restart immediately.)
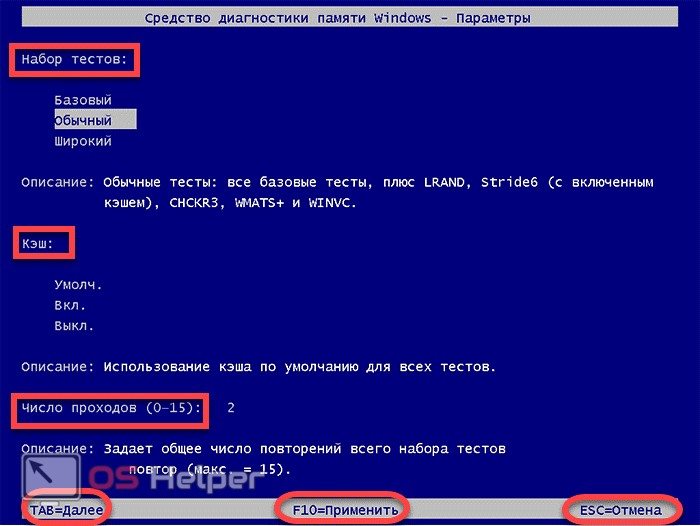
Once your computer reboots, it will start in the Windows Memory Diagnostics environment, and the tests will kick in the Standard mode right away. In this mode, the tool will run all the scans available in the Basic mode, in addition to LRAND, Stride6 (cache enabled), CHCKR3, WMATS+, and WINVC tests.
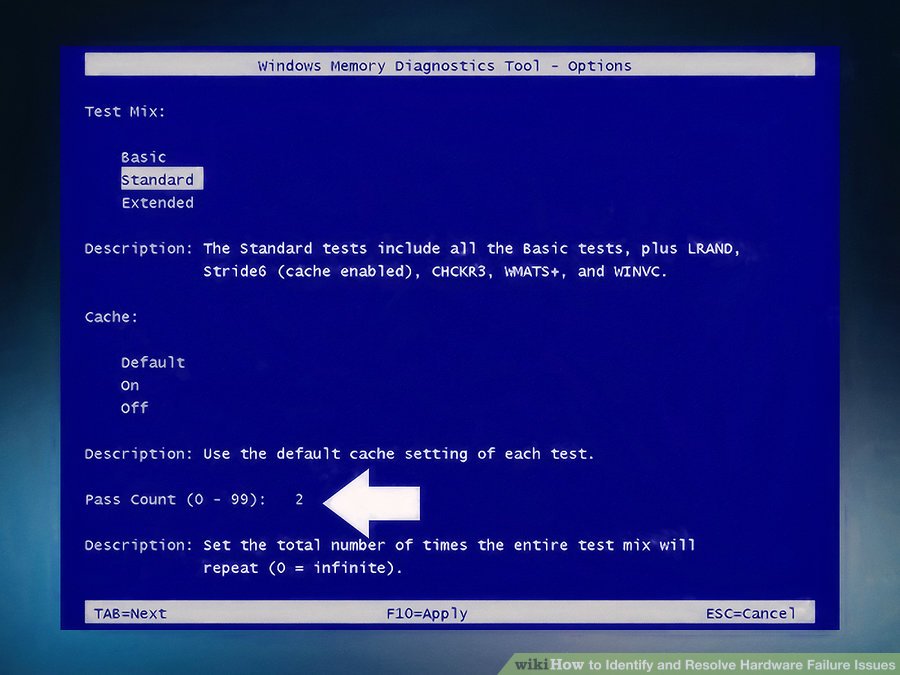
You can simply let the Standard mode test your computer’s memory, or you can also press the F1 key at any time to open the Windows Memory Diagnostic page to change the scan options.
On the options page, you can change the scan mode to Basic, which runs the MATS+, INVC, and SCHCKR (cache enabled) tests.
Or you can also select the Extended mode, which includes every test available using Standard mode, plus MATS+ (cache disabled), Stride38, WSCHCKR, WStride-6, CHCKR4, WCHCKR3, ERAND, Stride6 (cache disabled), and CHCKR8.
If necessary, you can navigate the different options using the TAB key to change cache settings. If you disable the cache, it’ll allow the tool to access the data in RAM directly, which ensures a complete test. In addition, you can also set a number of times the scan will be repeated to test your system’s memory modules.
After you’re done selecting your options, just press the F10 key to go back to the main page, and the scan will restart automatically.
Checking test results
While you can see the status during the scan process, as soon as the test completes your computer will restart automatically, and you’ll need to use the Event Viewer to see the test results to find out if you have a bad RAM module.
- Open Start.
- Search for eventvwr.exe and press Enter to open Event Viewer.
- Expand the Windows Logs folder.
- Right-click System, and click on Find.
- Type MemoryDiagnostics-Results, and click the Find Next button.
- Close the Find dialog.
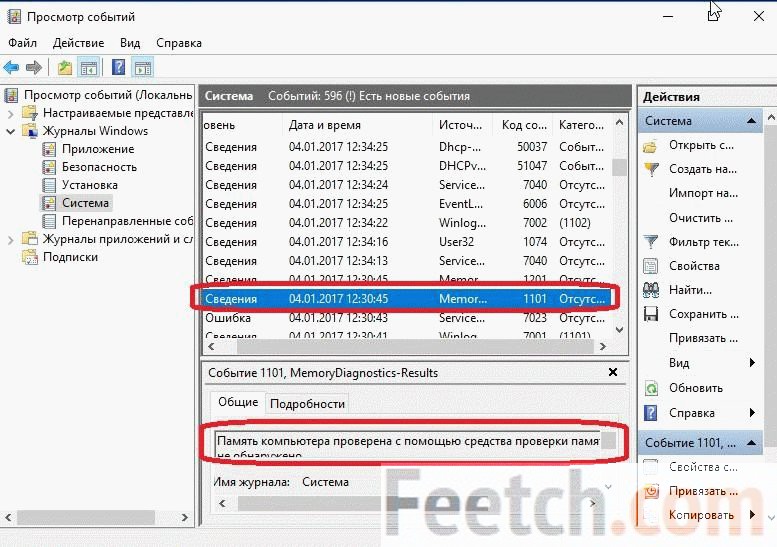
- On Event Viewer, double-click the MemoryDiagnostics-Results source, and see the message. If the result reads «The Windows Memory Diagnostic tested the computer’s memory and detected no errors,» then you can discard memory as the root of the problem.
If the result shows one or more errors, you can try running an extended memory test, and recheck the results. If you continue to see at least one error, one of the RAM modules probably has problems, and it may need to be replaced.
Sometimes, when the test fails, the tool will be able to indicate which module has the problem with the results. However, if it’s unable to provide that information, you may need to remove and test each memory module until you find out the one that is faulty.
Although we’re focusing this guide on Windows 10, the Windows Memory Diagnostic tool has been available for years, which means that you can also use it on previous versions, including Windows 8.1 and Windows 7.
More Windows 10 resources
For more helpful articles, coverage, and answers to common questions about Windows 10, visit the following resources:
- Windows 10 on Windows Central – All you need to know
- Windows 10 help, tips, and tricks
- Windows 10 forums on Windows Central
Mauro Huculak is technical writer for WindowsCentral. com. His primary focus is to write comprehensive how-tos to help users get the most out of Windows 10 and its many related technologies. He has an IT background with professional certifications from Microsoft, Cisco, and CompTIA, and he’s a recognized member of the Microsoft MVP community.
Windows Central Newsletter
Get the best of Windows Central in in your inbox, every day!
Thank you for signing up to Windows Central. You will receive a verification email shortly.
There was a problem. Please refresh the page and try again.
By submitting your information you agree to the Terms & Conditions and Privacy Policy and are aged 16 or over.
Windows Central is part of Future US Inc, an international media group and leading digital publisher. Visit our corporate site .
©
Future US, Inc. Full 7th Floor, 130 West 42nd Street,
New York,
NY 10036.
How to Test RAM with Windows Memory Diagnostic
How to test your RAM with Windows Memory Diagnostic
Bad RAM can cause a host of Windows problems: Crashing, freezing or the dreaded blue screen of death. In Windows 10 and Windows 11, you can test for defective physical memory with the Windows Memory Diagnostic tool.
Image: saikorn/Adobe Stock
Must-read Windows coverage
-
Learn QuickBooks for less than $50
-
Defend your network with Microsoft outside-in security services
-
How to reset your Windows 10 password when you forget it
-
How to clear the DNS cache on Windows 10
If your Windows machine is regularly crashing, freezing or giving you the dreaded blue screen of death, it could have defective physical memory. Luckily, Windows 7 through Windows 11 have a built-in tool to help you test for this.
If Windows detects that your RAM might be failing, it will automatically run the Memory Diagnostic tool when the machine boots. However, you can also run the tool yourself if you want the most immediate results.
SEE: Google Workspace vs. Microsoft 365: A side-by-side analysis w/checklist (TechRepublic Premium)
For Windows 10 and 11, right-click the Start icon and choose Run or click the Search icon, enter mdsched and press enter (Figure A).
Figure A
Image: Scott Matteson/Tech Republic.
Select Restart Now And Check For Problems or select Check For Problems The Next Time I Start My Computer. If you opt to restart and run the tool now, remember to save your work and close any open programs before doing so. Once the machine restarts, the tool will launch and run the memory test (Figure B).
Figure B
Image: Scott Matteson/Tech Republic
You can press F1 to change the test options or let it run with the standard settings (Figure C).
Figure C
Image: Scott Matteson/Tech Republic
The Standard test should work for most troubleshooting scenarios. Let the test run, which can take upwards of 20 or 30 minutes depending on your memory configuration.
Once the test is complete, Windows will continue to start and a pop-up will eventually appear showing the results.
You can also view the results by right-clicking the Start icon, selecting Computer Management, expanding Event Viewer, expanding Windows Logs, clicking System and then selecting the most recent log with MemoryDiagnostics-Results as the source (Figure D).
Figure D
Image: Scott Matteson/Tech Republic
If you’re lucky, you won’t see any errors. If any errors are listed, your RAM might be faulty. This may only require unseating and cleaning the memory and the related slots — compressed air works well for this — but if the issues persist, it may be time to replace your RAM.
If you have multiple RAM DIMMs, I recommend buying and then swapping each in turn before re-running the memory test to isolate the defective RAM. You may not need to pay to replace multiple DIMMs if only one is faulty.
If all else fails and you’re not sure how to proceed, contact your machine’s manufacturer for more help.
Scott Matteson
Published:
Modified:
See more Hardware
Also See
-
Checklist: How to manage your backups
(TechRepublic Premium) -
Windows 11 cheat sheet: Everything you need to know
(TechRepublic) -
Windows, Linux, and Mac commands everyone needs to know (free PDF)
(TechRepublic) -
Windows PowerToys: A cheat sheet
(TechRepublic)
Share: How to test your RAM with Windows Memory Diagnostic
-
Hardware
-
Microsoft
-
Software
Editor’s Picks
-
Image: Rawpixel/Adobe Stock
TechRepublic Premium
TechRepublic Premium editorial calendar: IT policies, checklists, toolkits, and research for download
TechRepublic Premium content helps you solve your toughest IT issues and jump-start your career or next project.
TechRepublic Staff
Published:
Modified:
Read MoreSee more TechRepublic Premium
-
Image: Adobe Stock
Innovation
Gartner identifies 25 emerging technologies in its 2022 hype cycle
The technologies could enable immersive experiences, accelerated AI automation and optimized technologist delivery in the next two to 10 years, according to the firm.
Esther Shein
Published:
Modified:
Read MoreSee more Innovation
-
Image: BillionPhotos.
 com/Adobe Stock
CXO
Top 10 ERP vendors 2022
Are you an IT manager or executive trying to make the case for a new ERP vendor? Compare the top ERP software solutions with our list today.
Brenna Miles
Published:
Modified:
Read MoreSee more CXO
- Image: Apple. At WWDC 2022, Apple announced the planned release of the next version of its Mac operating system, macOS Ventura, for the fall of 2022.
-
Image: elenabsl/Adobe Stock
Software
Top TechRepublic Academy training courses and software offerings of 2022
Get great deals on developer and Linux training courses, Microsoft Office licenses and more through these TechRepublic Academy offerings.

Brenna Miles
Published:
Modified:
Read MoreSee more Software
-
Image: iStock/phototechno
Cloud
Multicloud explained: A cheat sheet
This comprehensive guide covers the use of services from multiple cloud vendors, including the benefits businesses gain and the challenges IT teams face when using multicloud.
Matt Asay
Published:
Modified:
Read MoreSee more Cloud
How to run Windows Memory Diagnostics Tool in Windows 11/10
Windows 11/10 has a Memory Diagnostic Tool that you can use to check for possible memory problems, including testing the Random Access Memory (RAM) on your computer. The tool helps you figure out bad memory, memory issues, and usually takes 20 minutes to complete.
If Windows 11/10/8/7/Vista detects a possible memory problem, you will receive a notification. Click the notification to open it. If you wish to run Windows Memory Diagnostics Tool on-demand, do the following:
- Open Control Panel and type ‘memory‘ in the search bar. Click on ‘Diagnose computer memory problems’ to open it.
- Alternatively, you can also type ‘mdsched‘ in Start search and hit Enter to open it.
- Choose between two options for when to run the Memory Diagnostics Tool.
- You can Restart now and check for problems.
- Or you can select Check for problems the next time I start my computer.
If you choose to restart your computer and run the tool immediately, make sure that you save your work and close all of your running programs. The Memory Diagnostics Tool will run automatically when you restart Windows.
Two Test Passes will be run.
Advanced options for running the Memory Diagnostics Tool:
For most users, letting the Memory Diagnostics Tool run automatically is the recommended option. However, advanced users might want to adjust the tool’s settings. When the Memory Diagnostics Tool starts, press F1.
You can adjust the following settings:
- Test mix. Choose what type of test you want to run: Basic, Standard, or Extended. The choices are described in the tool.
- Cache. Choose the cache setting you want for each test: Default, On, or Off.
- Pass count. Type the number of times you want to repeat the test.
The default is Standard, and it includes all the Basic tests, plus LRAND, Stride6, WMATS+, WINVC, etc.
The Basic test covers MATS+, INVC, and SCHCKR.
The Advanced test includes all Basic and Standard tests plus Stride38, WSCHKA, WStride-6, CHCKR4, WCHCKR3, ERAND, Stride6, CHCKR8, etc.
If you change your options, press F10 to save and start the test.
Else you may press Esc to continue running the default test.
It might take several minutes for the tool to finish checking your computer’s memory.
Read: Windows Memory Diagnostic Tool stuck?
Once the test is completed, Windows will restart automatically. If the tool detects errors, you should contact your computer manufacturer for information about fixing them since memory errors usually indicate a problem with the memory chips in your computer or other hardware problem.
You may also want to try some Advanced Memory Diagnostic on Windows, with Memtest86+, and maybe check out some more PC Stress Test free software.
Is Windows Memory Diagnostic tool any good?
It’s an excellent program and a free tool to check if there is anything wrong with your RAM. If the tool shows any symptom of an issue, then you can further check with another program. Along with the standard checking tool, it also offers checks such as ERAND, Stride6, CHCKR8 to find problems with the installed RAM.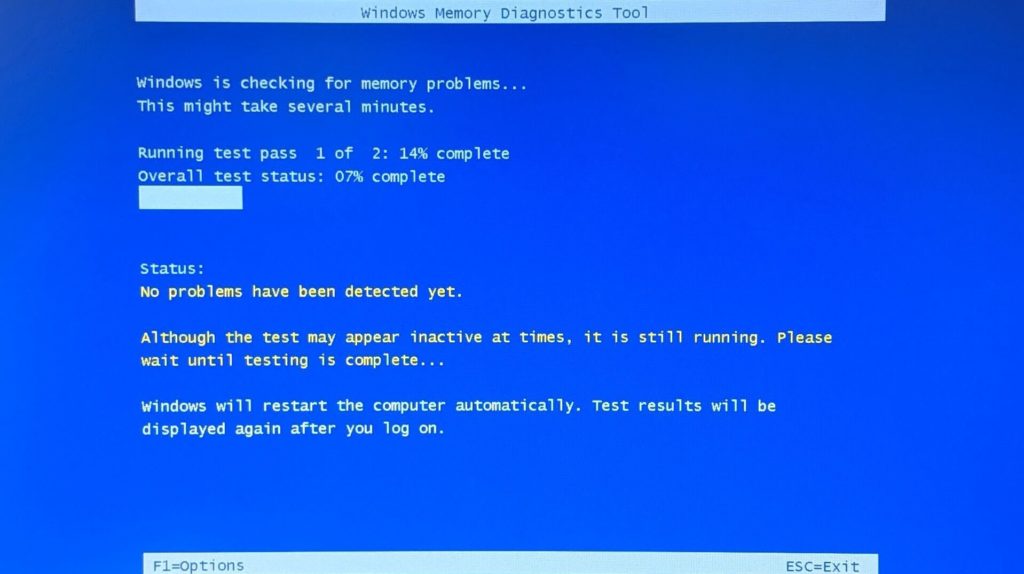
Why does Windows Memory Diagnostic Tool take so long?
It doesn’t perform one test and gives a result. Instead, it checks using multiple programs, and if there is a problem, you will know about it. Combine this with the amount of RAM, and it takes even more time. This tool should be used when you have an issue with the memory, and you want to be sure before replacing it.
Read: Windows Memory Diagnostic displaying no results.
Can I exit Windows Memory Diagnostic Tool?
It’s only testing the memory, and it should be fine even if you have exited in between. However, you will have to force shutdown the PC to exit the tool. I would still suggest that you better wait it out. Keep the PC plugged, and get something else done in the meantime.
Can RAM suddenly go bad?
Any hardware can go bad with time or if there is a manufacturing fault. The same applies to RAM. If everything looks good, the memory test can reveal if there is an issue with the RAM. If there is a fault, it would be best to replace it with a new RAM.
TIP: See this post if you receive Only part of a ReadProcessMemory or WriteProcessMemory request was completed message.
Date: Tags: Features, Memory
report this ad
[email protected]
Anand Khanse is the Admin of TheWindowsClub.com, a 10-year Microsoft MVP (2006-16) & a Windows Insider MVP. Please read the entire post & the comments first, create a System Restore Point before making any changes to your system & be careful about any 3rd-party offers while installing freeware.
How to Perform a RAM Check in Windows 10? – TheITBros
A RAM, also known as Random Access Memory, is an especially important part of any modern computer, tablet, or smartphone. It stores data that an operating system needs to access quickly to properly run itself and all your games, apps, etc.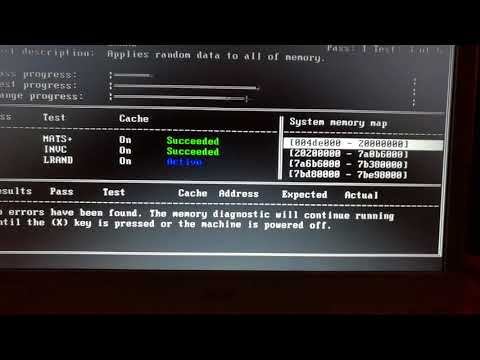 It is hundreds of times faster than regular hard drives or even the fastest SSDs. If RAM malfunctions, your computer will cause you lots of headaches. Often corrupt memory leads to system deadlocks (computer simply “hangs” and stops responding to any user input), blue screens of death (also known as BSOD), apps crashes, and other severe troubles that make any work with a computer virtually impossible.
If you suspect your computer has some problems with RAM, do not rush to the nearby store to get a pair of new sticks. Begin with performing a memory test in Windows 10. To run a memory test in Windows 10, you need a third-party tool or the one built-in directly into Windows. Since the Windows Vista times, the OS from Microsoft can run a built-in Windows memory diagnostic tool and discover troubles with RAM.
How do you know your computer needs to run a Windows memory check? As described above, the most obvious sign of malfunctioning RAM will be the constant blue screen of death. It will show stop codes such as MEMORY MANAGEMENT or something similar related to memory and its operating.
In this article, we will show you how to perform a RAM test in Windows 10 and share with you some tips that will help you learn that your computer needs a new memory kit.
How to Run Memory Check in Windows 10?
Running a built-in Windows memory check or diagnosing tool is easy and does not require any advanced knowledge. All you need to know is how to execute Windows 10 RAM check CMD command.
Before you start memory check in Windows 10, consider the following:
- Reset your BIOS to default settings. This will wipe any RAM overclocking. This step is particularly important as often users confuse malfunctioning RAM with incorrect overclocking settings;
- If possible, open your computer case and switch RAM modules. If they populate A1-A2 slots on your motherboard, insert them in B1-B2 slots. If you use all four slots or your motherboard has only two, skip this step;
- If possible, leave only one slot populated and check whether your PC performs well.
 Perhaps only one RAM stick has problems running;
 - Make sure you use identical memory sticks. Although memory mismatch nowadays rarely causes any issue, the best performance is achieved when you use identical memory sticks from one kit with identical clock speed, timings, and size.
If problems persist after you have done everything above, time to run Windows 10 memory check.
Windows 10 RAM test
On your keyboard, press Win + R and enter the following Windows 10 RAM check command: mdsched.
The next thing you will see will be a small windows prompt asking you to immediately reboot your system or wait until the next time you start a PC. Choose whatever suits you better.
Do note that after you execute Windows 10 memory test cmd, the scan will start immediately after your computer restarts. You can leave the default memory check settings or select one of the presets.
Windows offers three different kinds of RAM test:
- Basic Windows Memory test – the fastest option, which runs only three tests to check the RAM: MATS+, INVC, and SCHCKR.
- Standard memory test – the default option. Additional tests include LRAND, SCHCKR3, Stride6, WINVC, and WMATS+.
- Extended Windows 10 RAM check – all the standard Windows memory tests plus CHCKR4, CHCKR8, Stride6, Stride38, WSCHCKR, WCHCKR3WStride-6 and ERAND
Additionally, you can enable or disable the use of cache and select the pass count from 0 to 15. If you have time, select a few passes to ensure RAM withstands the prolonged load. By default, Windows runs the memory test run in two passes. If you specify 0, the RAM test will run until a user manually halts it.
You can navigate the Windows 10 memory test interface using keys described down below the screen.
Depending on the selected test and number of passes, the check will take from a few minutes to several hours. If during the scanning process error appears, a notification will be displayed. All the discovered problems and errors will also be saved in a Windows 10 RAM check log file you can access after the test is finished.
If your PC uses two or more RAM sticks, to achieve the most effective RAM check in Windows 10, we recommend pulling out all the sticks and leaving only one inserted. Run the Windows 10 memory check for each stick separately. This will help you to be 100% sure which memory stick works properly and which is not.
If the memory test discovered no errors with your RAM, a computer will restart automatically. After logging back into your account, you will see a notification in the lower right corner. There you can access the test’s log file.
Windows Memory Diagnostic
No memory errors were detected.
You can also find the scan results in the system events log. To open the Events Viewer, press Win + R and run eventvwr. msc command. Go to the section Event Viewer (Local) – Windows Logs – System. Find and open events from the source MemoryDiagnostics-Results.
In our case, an event description contains the following text:
The Windows Memory Diagnostic tested the computer’s memory and detected no errors
Here is a small tip. If Windows runs memory check every time you turn on a PC, what you need to do is disable automatic Windows RAM check. Run Command Prompt as Administrator and execute the following command:
bcdedit /bootsequence {memdiag} /remove
Another way to run RAM check in Windows 10
More advanced users may refer to a third-party tool called memtest 86. You can download it from the official website. Memtest runs memory check just like the built-in utility but you need a flash drive to run it. Also, it is not particularly useful in case your PC cannot operate normally.
What to do after you finished Windows 10 RAM check
Your next steps will depend on what memory test log file shows. Look for the solution of discovered errors and, if needed, replace your RAM. If there are no errors discovered but problems persist, try the following:
- Update your BIOS / UEFI. You will be amazed at how a simple BIOS update can improve RAM performance, especially on AMD Ryzen-based computers.
- Reinstall Windows. Yes, we know how stereotyped this tip is and how people are sick of every website telling them to reinstall Windows. But the sad reality is that often a fresh copy of Windows 10 miraculously solves all the mysterious bugs. Thank Microsoft for that.
- Troubleshoot other components or try to use your RAM in another computer and check whether it misbehaves. If possible, plug in different RAM sticks and check how your PC works. This is particularly important, since a bad motherboard may be another reason why your computers went crazy.
That’s it. We hope this little guide helped you to run the RAM test in Windows 10 and make sure it works properly.
- About
- Latest Posts
Cyril Kardashevsky
I enjoy technology and developing websites. Since 2012 I’m running a few of my own websites, and share useful content on gadgets, PC administration and website promotion.
Latest posts by Cyril Kardashevsky (see all)
How to Use Windows Memory Diagnostic Tool to Find Memory Problems
Random reboots and freezes, apps crashing, and even a Blue Screen of Death (BSoD) could be signs of a memory issue. Before you start replacing your memory or computer, use the Windows Memory Diagnostic Tool to figure out if the memory really is the problem. While Windows may sometimes suggest using the tool after a problem, you can also use the troubleshooter manually to diagnose issues.
Content
- How the Diagnostic Tool Works
- Setting Up the Tool
- Running the Memory Tests
- Reviewing Your Results
- Next Steps
- Frequently Asked Questions
How the Diagnostic Tool Works
Many Windows troubleshooting tools run quickly while you use your computer. However, this tool requires you to restart and then runs during the startup process. By default, it runs in Standard Mode and runs two test passes. After that, your computer restarts and provides you with the test results.
You can also run more advanced tests if you want. These allow you to customize the tests. Choose to run a Basic or Extended test versus the Standard. Select your cache options and how many passes (up to 15) you’d like to run. The more passes you select, the longer the test takes.
Setting Up the Tool
You have to schedule the Windows Memory Diagnostic Tool to run during your next restart. Go to the Start menu and type memory. Select the “Windows Memory Diagnostic.” If you have any issues getting the tool to run, repeat this process but select “Run as administrator.”
Next, choose whether to run the tool immediately, which will restart your computer, or wait until you restart your computer yourself. If you have any unsaved files, choose the second option. Make sure to save anything you’re working on and close open apps before restarting. If you don’t have anything else open, choose the first option.
Running the Memory Tests
If you restart, the Windows Memory Diagnostic Tool starts. Do not turn off your computer during this process. The computer will restart normally after the test is completely over. Since it can take a while to run in some cases, if you have a laptop, plug it in instead of using battery power.
By default, the tool jumps directly into the Standard Mode, which is ample for most issues. The test passes only take around ten minutes.
If you’re still having trouble and suspect a memory issue, run the tool again but press F1 on your keyboard as soon as your computer starts up. This takes you to the Advanced Options.
An Extended test takes longer and is more thorough. If you need a faster and simpler test, opt for Basic. If you’re not sure which test to run out of the three, here’s what each test scans for:
- Basic: this tool runs three types of tests including MATS+, INVC, and SCHCKR
- Standard: this tool runs Basic tests along with LRAND, Stride6, CHCKR3, WMATS+, and WINVC
- Extended: this tool runs all Basic and Standard tests along with MATS+ (cache disabled), Stride38, WSCHKA, WStride-6, CHCKR4, WCHCKR3, ERAND, Stride6 (cache disabled), and CHCKR8
As you can tell, Extended takes much longer due to the long list of tests to complete.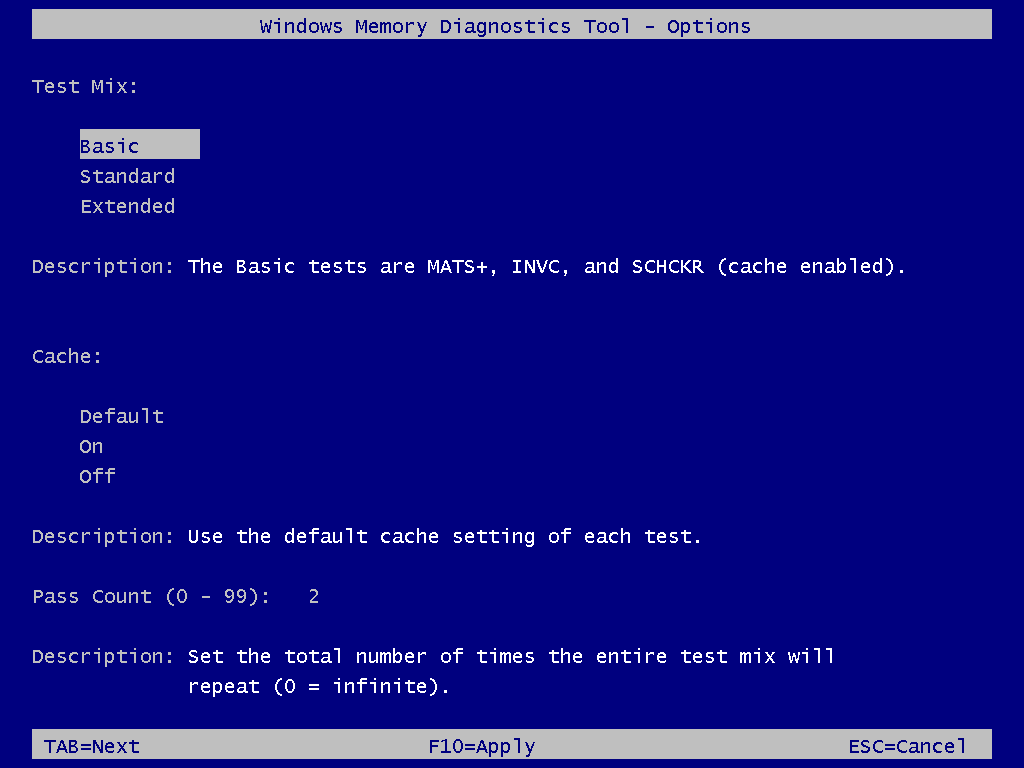 However, it really is the best option to check for the most issues.
Reviewing Your Results
The Windows Memory Diagnostic Tool provides you with your results after the restart finishes. You’ll see the results on your desktop. If nothing appears, view the results in Event Viewer.
- Open the Start menu and type
eventorevent viewer. Select “Run as administrator” under Event Viewer.
- Expand “Windows Logs” and right-click System. Select Find.
- Type or copy/paste the following into the search box –
MemoryDiagnostics-Resultsand click Find. The most recent result should now be highlighted with the details showing in the bottom pane of the Event Viewer window.
The above screenshot was taken from a Windows 10 PC. In Windows 11, the Windows Memory Diagnostic tool doesn’t generate an event if no errors are found. This means you won’t see any results when searching. However, if you search for MemoryDiagnostics, you’ll see when the test was scheduled to run.
Next Steps
If your results show that there are no errors, it’s probably not a memory issue. However, if there is an error, you can research the error description and details to determine if replacing the memory will fix the issue.
Depending on the type of computer you have, you can replace the memory chips yourself or take your computer in to be repaired. You can also take this as a great opportunity to get the newest model with all the bells and whistles you’ve been eyeing.
Frequently Asked Questions
1. Could I still have a memory issue if the tool doesn’t find anything?
It is possible, but unlikely. Odds are, it’s another issue that just has similar symptoms. For instance, a failing hard drive could result in slow performance, freezing, and random shut downs.
Of course, the way you use your PC could be the issue as well. For example, if you recently installed and started using graphic editing tools that require more RAM than your PC has or max out your RAM, this could lead to freezing and performance problems. Always use apps and tools with fewer memory requirements than what you have installed for best results. Also, for heavy RAM apps, close every other app you’re using to free up resources.
2. Will stopping the test midway hurt my PC?
No. This is simply a scan. While shutting down your PC in the middle of a Windows update could cause major problems, stopping the test won’t. However, it’s a good idea to just be patient and let the tool run. After all, if you’re having signs of a memory issue, the Windows Memory Diagnostic tool is actually quite good at uncovering the cause.
3. Why can’t I find any results?
The Memory Diagnostic Tool is inconsistent when it comes to displaying results. Occasionally, they neither show up after your PC restarts nor appear in the Event Viewer. If this happens, don’t panic. It’s just a Windows flaw that Microsoft hasn’t fixed yet, and in this case you might want to try a secondary test using free tools such as MemTest86 and MemTest. In fact, third-party tools can often find more complex issues that the built-in tool might miss and they’re also useful to validate results received from the latter.
4. Why am I suddenly having RAM errors?
While some issues might come on gradually, some RAM errors seem to come out of nowhere. One day your PC works great and the next it’s going crazy. This could be due to a variety of reasons, such as problems with a Windows update, new apps, a flaw in your hardware, and sudden excessive heat (such as using a laptop on your lap with no vent or overclocking).
Check your CPU temperature regularly to see if overheating could be an issue. Use this guide to help cool a high CPU temperature.
Is this article useful?
Subscribe to our newsletter!
Our latest tutorials delivered straight to your inbox
Sign up for all newsletters.
By signing up, you agree to our Privacy Policy and European users agree to the data transfer policy. We will not share your data and you can unsubscribe at any time.
- Tweet
Test to check RAM for errors in Windows 10, 8 or 7
When using a computer, you may encounter RAM errors. And in this guide, we will look at how to use the memory test utility built into Windows 10, 8 or 7.
Table of Contents
- Root of the Problem
- How to Diagnose Memory Problems in Windows 10
- Check Test Results
- Questions and answers
- Comments
View
How to find out how much RAM is installed, do a test or free up PC memory ?⚙️?
The essence of the problem
If programs crash while running or are very slow, or you notice various glitches in Windows, or the system suddenly reboots, freezes, gives a blue screen BSOD error, it is very difficult to determine the root of the problem. The cause of failures can be hidden both in software and in hardware.
RAM is the easiest thing to quickly check. In the event of a problem in the operation of one of the memory modules, it is urgent to replace it in order to return the computer to normal operation and avoid more serious problems associated with damage to system or user files.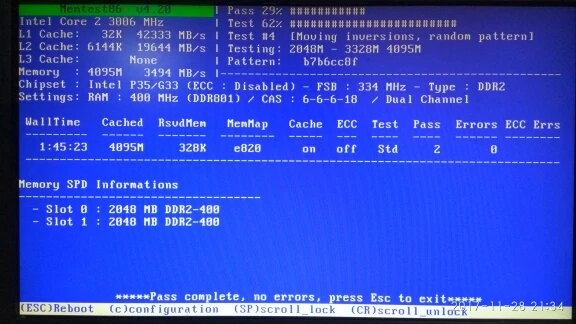
Despite the existence of third-party utilities available for download on the Internet, Windows 10, 8 or 7 operating systems have a built-in program for checking the PC’s RAM. In this guide, we’ll take a look at how to use the Windows Memory Diagnostics utility to determine if a memory stick is faulty.
How to diagnose memory problems in Windows 10
Go to view
Why does the blue screen of death appear, and what to do with the BSOD error ??️?
The following instructions require you to restart your computer, so close any open files and exit running applications. Next run:
-
Open Control Panel .
-
Press System and Security .
-
Press «Administration» .
-
Double-click the shortcut «Windows Memory Diagnostic» .
Important : Alternatively, you can use the key combination Windows + R , then type mdsched.
 exe and press OK to launch the tool.
 -
Press button «Perform reboot and test» to continue. (The utility also offers the option to schedule a test on the next reboot if you can’t afford to close your applications and restart at the current moment.)0005
After restarting, the computer will automatically start in the Windows Memory Diagnostics environment and the Standard Test will begin. The utility will run all checks available in Basic mode, as well as LRAND, Stride6 (with cache), CHCKR3, WMATS+ and WINVC.
You can wait until the end of Normal scan , or change the scan parameters using the F1 key.
On page of Scan Settings you can change the scan mode to Base , which runs MATS+, INVC and SCHCKR tests (with cache).
You can also select Advanced Mode which includes all tests available in Normal Mode plus MATS+ (no cache), Stride38, WSCHCKR, WStride-6, CHCKR4, WCHCKR3, ERAND, Stride6 (no cache), and CHCKR8.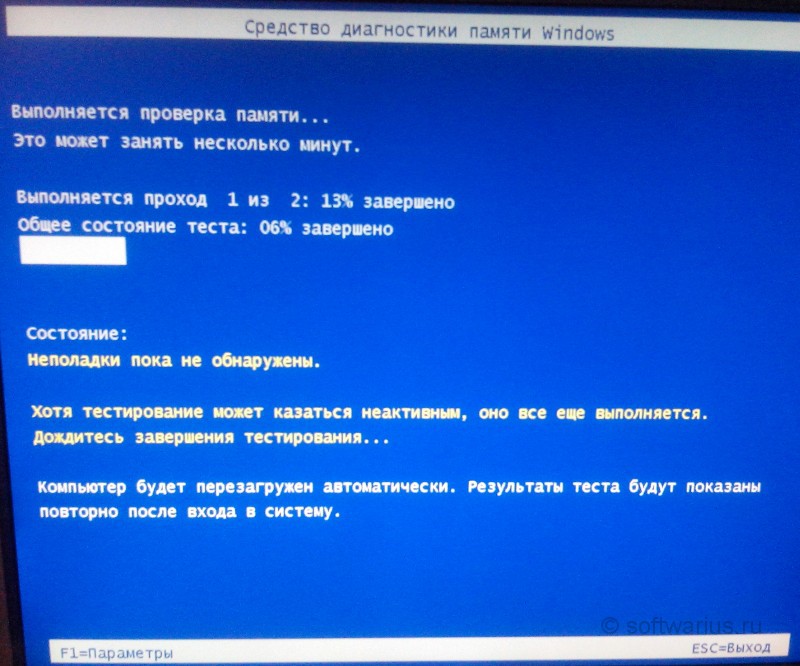
If necessary, you can navigate through the various options using the TAB key to change the cache settings. If you disable the cache, this will allow the tool to directly access the data in RAM, which provides a complete test. In addition, you can also set the number of scan repetitions to test your system’s memory modules.
To apply the settings, press F10 to return to the main page and start a new scan.
Checking test results
You see the status during the scan process, but as soon as the test is completed, the computer will automatically restart. You will need to use the event viewer to see the test results and find out if you have a bad RAM module.
-
Press Start .
-
Type eventvwr.exe and press Enter to open Event Viewer .
-
Navigate to the folder Windows Logs — System .
-
Right click on «System» and select «Find» .
-
Enter MemoryDiagnostics-Results and click the Find Next button .
-
Close window «Search» .
-
In the event viewer, double-click the source MemoryDiagnostics-Results and view the message. If the result is message “The computer’s memory was checked using the Windows Memory Tester; no errors found» , you can discard memory as the root of the problem.
If the result shows one or more errors, you can try running the extended memory test and recheck the results. If you are still seeing at least one error, one of the RAM modules is probably having problems and may need to be replaced.
Sometimes when a test fails, the tool may indicate which module has a problem with the results. However, if it cannot provide this information, you may need to remove and test each memory module until you find the one that is defective.
While we’re targeting this guide on Windows 10, Windows Memory Diagnostic has been available for years, which means you can also use it on previous versions, including Windows 8. 1 and Windows 7.
How to check RAM in Windows 10 — RAM test in Windows
If the PC suddenly began to crash or its performance decreased, it may be the RAM. To understand if this is the case, you need to test this component. How this can be done, the article tells.
Why test RAM
Preventive health tests of computer components, including RAM, are a useful procedure. If you notice the error in time, you can fix it at an early stage. So the user will save himself from the stresses associated with constant system failures and a general loss of performance. Diagnostics will also help to understand whether the user is buying a good bar (this applies to purchasing a used option).
Why errors appear in RAM
Memory consists of bits, which are denoted by zero or one. The binary system in the PC is trained to take this information and translate it into readable data adapted to the user’s perception.
If errors occur, the computer either corrects them or reads the information incorrectly, leading to malfunctions.
Common causes of RAM errors:
- Accumulation of dust, dirt inside the system unit.
- Internal and external damage, not only to the RAM itself, but also to the motherboard.
- Incompatible RAM modules: non-identical strips cause a conflict within the system, which leads to software failures, and sometimes even prevents the OS from starting.
- Factory defect or low-quality components. Here the way out is to buy models of only proven brands.
- Modules overheating or undercooling.
- Power supply malfunction.
See also: What is the computer’s RAM, types of RAM — a guide in 6 sections
Evidence of RAM failure:
- Notification of PC malfunction, error.
- Screen color changed by itself, without any user settings.
- Decreased system performance, this is especially noticeable when using resource-intensive programs, games.
- Launched applications crash and are accompanied by an error message, often containing a coded set of numbers.
- A blue screen (BSOD) that occurs at startup or during operation.
- Unscheduled OS restart.
Important! During defragmentation of a hard drive, an error warning that indicates the presence of corrupted files does not always mean that the matter is in the permanent drive. These kinds of signals sometimes indicate serious problems with the operative.
Likbez: What is a motherboard in a computer and what does it affect: 5 explanatory sections The last solution method is effective on versions of Windows 7-10.
Built-in RAM test tool
Integrated RAM test software is very easy to find. You need to use the combination Win + R to call the command line and type mdsched. Then you need to confirm the action. You can use search. What’s next — in the table.
Useful: How to set up RAM in BIOS: instructions in 4 simple sections One such tool, memtest86+, is powerful and free.
How to work with the program:
- Burn the image to media by creating a bootable flash drive/disk.
- Insert the drive into a drive or port so that it is read by the BIOS.
- Select boot device.
- Save settings.
- The application will load, and all you have to do is wait: all actions will be performed automatically.
Upon completion of the test, the user will receive a report.
Advice : it is better to check each memory bar individually. To do this, you will have to pull out one module from the PC.
0192
How to fix errors
The easiest solution is to replace the bar that is failing. But this is a drastic measure. It is needed if the RAM chips are damaged. Sometimes an ordinary eraser can help, which just needs to wipe the contacts: they may have oxidized. It also happens that the simplest antivirus application or cooling replacement fixes errors.
Find out: How to increase laptop RAM in 5 steps: ways and tips
It is not difficult to check the efficiency of the operative. You can use both the classic Windows utility and a separately installed application. The second method is preferable when you need to not only find an error, but also fix it: many programs can do this.
How to check RAM for errors
It may be necessary to check the performance of RAM in cases where there are suspicions that Windows blue screens of death, oddities in the computer and Windows are caused precisely by problems with RAM. See also: How to increase laptop RAM
This guide will look at the main symptoms of bad memory and walk you through the steps to test your RAM to see if it’s the problem using the built-in memory test utility in Windows 10, 8 and Windows 7, as well as using the third-party free program memtest86+.
Symptoms of RAM errors
There are a significant number of indicators of RAM failures, among the most common symptoms are the following
- Frequent occurrence of BSOD — Windows blue screen of death. It is not always connected with RAM (more often with the work of device drivers), but its errors can be one of the reasons.
- Crashes during heavy use of RAM — in games, 3D applications, video editing and graphics, archiving and unpacking archives (for example, an unarc.dll error is often due to problematic memory).
- Distorted monitor image — more often a sign of video card problems, but in some cases caused by RAM errors.
- The computer does not boot and beeps endlessly. You can look up the beep charts for your motherboard and see if the audible beeping sounds like a memory failure, see Computer beeps when turned on.
Once again, the presence of any of these symptoms does not mean that the matter is in the computer’s RAM, but it is worth checking. The unspoken standard for this task is the small memtest86+ utility for checking RAM, but there is also a built-in Windows Memory Diagnistics Tool that allows you to check RAM without third-party programs. Both options will be discussed next.
Windows 10, 8, and Windows 7 Memory Diagnostic Tool
The Memory Checker (Diagnostic) Tool is a built-in Windows utility that allows you to check RAM for errors. To launch it, you can press the Win + R keys on your keyboard, type mdsched and press Enter (or use the Windows 10 and 8 search and start typing the word “check”). A detailed overview of the utility: How to use the Windows 10 memory checker.
We agree and wait for the scan to start after a reboot (which in this case takes longer than usual).
During scanning, you can press the F1 key to change the scan settings, in particular, you can change the following settings:
- Scan type — basic, normal or wide.
- Cache usage (on, off)
- Number of test passes
Upon completion of the verification process, the computer will restart, and after logging in, it will display the results of the verification.
However, there is one caveat — in my test (Windows 10), the result appeared after a few minutes in the form of a short notification, it is also reported that sometimes it may not appear at all. In this situation, you can use the Windows Event Viewer utility (use search to launch it).
In Event Viewer, select «Windows Logs» — «System» and find information about the results of the memory test — MemoryDiagnostics-Results (in the details window by double-clicking or at the bottom of the window you will see a result, for example, «Computer memory was checked using the memory test tool Windows; no errors found.»
Checking RAM in memtest86+
You can download memtest for free from the official website http://www.memtest.org/ (download links are at the bottom of the main page). It is best to download the ISO file in a ZIP archive. This option will be used here.
Note: there are two sites on the Internet for memtest — with the memtest86+ program and Passmark Memtest86. Actually, it’s the same thing (except that the second site has a paid product in addition to the free program), but I recommend using memtest.org as a source.
Options for downloading the memtest86 program
- The next step is to burn the ISO image with memtest (after extracting it from the ZIP archive) to a disk (see How to make a bootable disk). If you want to make a bootable flash drive with memtest, then the site has a kit for automatically creating such a flash drive.
- It is best if you check the memory one module at a time. That is, we open the computer, remove all the RAM modules, except for one, and perform its check. After the end — the next and so on. In this way, it will be possible to accurately identify the failed module.
- After the boot drive is ready, insert it into the drive to read disks in the BIOS, set the boot from the disk (flash drive) and, after saving the settings, the memtest utility will load.
- No action is required on your part, the check will start automatically.
- After the memory check is complete, you can see which RAM memory errors have been found. If necessary, write them down so that you can later find on the Internet what it is and what to do with it. You can interrupt the scan at any time by pressing the Esc key.
Checking RAM in memtest
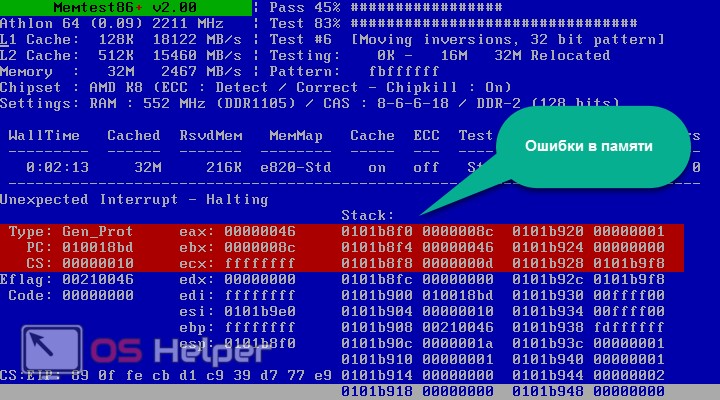
If there are errors, it will look like the picture below.
RAM errors detected by the test
What should I do if memtest detects RAM errors? — If failures seriously interfere with work, then the cheapest way is to replace the problematic RAM module, besides, the price is not so high today. Although sometimes a simple cleaning of memory contacts helps (described in the article The computer does not turn on), and sometimes a problem in the operation of RAM can be caused by malfunctions of the connector or components of the motherboard.
How reliable is this test? — reliable enough to test the RAM on most computers, however, as is the case with any other test, you cannot be 100% sure of the correctness of the result.
remontka.pro in Telegram | Other ways to subscribe
Support the author and the site
Test to check the RAM for errors in Windows 10, 8 or 7
If your computer began to experience frequent errors, then this problem may be related to the RAM. In this guide, I will show you how to check RAM for errors in Windows 10 using the operating system’s built-in memory diagnostic tools.
If your Windows 10 PC is experiencing frequent crashes, random restarts, freezes, BSOD errors, and applications are running very slowly, it can be quite difficult to determine the cause of the problem — it may be related to software or hardware.
However, RAM is the first thing to check. The fact is that a faulty memory module can lead not only to improper functioning of the computer, but also to damage to user files.
While there are third-party memory diagnostic tools available online, Windows 10 includes its own memory tester to help identify potential RAM issues.
This guide provides steps on how to use the Windows Memory Tester to locate a bad memory module.
When RAM diagnostics may be needed, symptoms of malfunction
Memory tests are not recommended to be done regularly and should be done only in cases where the computer starts to act up. There are several main symptoms that indicate errors in the OP:
If any of the above situations occur, run a memory test to check for errors.
What is RAM
This is the most important part of the system unit. Responsible for storing data that is directly used in the work. In particular, it contains executable machine code, intermediate data that is processed by the processor or coprocessor. Also known as RAM (Random Access Memory). The speed of the entire computer depends on the speed of work and the volume that are installed in the PC.
If the RAM is missing (or is faulty), then the computer will not be physically possible. There will not even be an initial boot to start loading the OS. Also, if errors are found in the RAM, then during execution, hangs or even arbitrary shutdowns and reboots may occur — because when accessing or reading from non-working sectors, an important part of the machine code or information may be lost.
Checking RAM using the built-in test in Windows 10
Windows has a built-in utility to test and fix RAM in case of software errors . The principle of its operation is quite simple: you need to run the program, restart the computer and wait until the application checks and corrects errors, if any. The downside of checking the RAM is the mandatory restart of the PC, since the RAM is busy with the system.
There are several ways to open the utility:
When launched, a window will open with a choice of two options:
If you select any of the options, the RAM will be scanned for errors twice. It is very important not to interrupt the RAM test under any circumstances, as this can lead to undesirable consequences and aggravate problems.
The RAM test runs outside the operating system and lasts for several minutes
Video: How to check your RAM for errors in Windows 10
Using the Windows Memory Checker to test your RAM 10, 8.1 or Windows 7 lead you to think that there are some problems with the computer’s RAM, it may make sense to check it, and you can start with the built-in Windows memory check diagnostic tool.
This guide details how to run the Windows Memory Test tool, even if you can’t log in, and what to do if the Memory Diagnostic tool reports problems as a result of the test. equipment. On a similar topic: Troubleshooting Windows 10.
Using third-party programs to diagnose RAM
In addition to the standard utility for checking RAM, there are several «freelance» ones that also diagnose errors. The best representative of this group of programs is Memtest86+. To check the RAM, it is best to use a bootable USB flash drive or disk:
- Go to the official site to download Memtest86+.
- Download the image from the link with the name ISO (.zip).
Download the utility from the official site
Unpack the downloaded file. After that, we write it to bootable media:
- Download, install and run the Windows 7 USB DVD Download Tool.
- With its help, we write the image of the Memtest86+ program to the media.
Burn the image to removable media using Windows 7 USB DVD Download Tool
- Next, in the BIOS settings, change the setting for booting the PC from the HDD to the program media (USB-HDD or CD-ROM) and turn on the PC.
- The program test will start automatically and will continue until you finish it manually. The developers recommend closing the test after the second run (the Pass line shows the number of tests).
Memtest86+ runs outside the operating system
Using the Windows Memory Tester and viewing the results
After running the memory tester, you will be prompted to restart the computer, after agreeing, the process will be as follows:
After the test is completed, the computer will automatically restart. The next steps are to view the results.
Be aware that errors, crashes, blue screens and freezes are not always related to RAM problems: if the diagnostic tool shows that everything is in order, there are other possible causes: a disabled swap file, problems with the HDD or SSD (or with their connection, for example, a faulty cable), third-party antiviruses or, conversely, malware, incorrect operation of hardware drivers.
What to do if errors are found during memory diagnostics
As mentioned earlier, the RAM test removes simple software errors, but it is powerless against physical deformations and dust. Often, errors occur in cases of poor contact between the memory bar and the connector. Then it is necessary to physically clean the board, especially at the contact points. To do this, pull the bar out of the socket and clean the contacts with an eraser (rubber band) or a soft brush.
In addition, the memory should be examined for other physical damage. There should be no damage on the chips and the bar itself: cracks, scratches and other deformations will render the RAM unusable and the bar will have to be replaced with another one.
How to check the RAM of a computer or laptop
It may be necessary to check the performance of the RAM in cases where there is a suspicion that the Windows blue screens of death, oddities in the operation of the computer and Windows are caused precisely by problems with RAM. See also: How to increase laptop RAM
This guide will look at the main symptoms of failing memory and walk you through the steps to test your RAM to see if it’s the problem using the built-in memory test utility in Windows 10, 8 and Windows 7, as well as using the third-party free program memtest86+.
Contents:
- Symptoms of incorrect RAM operation.
- Checking RAM using built-in tools.
- How can I find out the test results?
RAM is an important and fairly reliable component of a computer, on the correct operation of which depends performance and system stability . Unfortunately, over time, even the most reliable components begin to malfunction , which can lead to big problems.
In addition, RAM may malfunction due to incorrect drivers or malware infections on the computer .
Helpful Hints
We know how to test RAM. Now, in which case, it is much easier to establish the cause of the system freezing and the blue screen popping up. But there are a few more aspects, the knowledge of which will not be superfluous.
Characteristics of RAM
Sometimes it happens that you have to buy a new bar of RAM. God grant that you buy it because of the desire to add performance to your computer, and not in connection with the death of one of the established lines. One way or another, you can’t just go and buy a RAM. First of all, we are interested in volume. This is a good indicator. But frequency is much more important. After all, it is she who determines how many RAM operations will be performed per second. Therefore, remember that the amount of RAM is only responsible for the size of the data that will fit in it. But the frequency is also important for the reason that if it is different for two or more bars, a conflict may arise between them. Let’s find out how to check the RAM frequency.
This can be done using special programs, for example, Aida 64. To find out the characteristics of the RAM, you must:
- Open the program;
- Wait for the initialization of all functions and go to the «computer» item, open it and select «DMI».
- Before us are many different devices, the purpose of which seems completely incomprehensible. You should not be afraid. These are all the components of our PC, only they are not named here the way we used to call them in everyday life. Here we need the item «memory devices». We open it and read in turn the contents of each slot, called «DIM». The number of slots listed is equal to the slots for installing RAM on the motherboard.
We find the inscription «speed», remember the value. Everything, now when buying a new RAM, you will definitely know the characteristics that you need to focus on.
Troubleshooting RAM problems at home
When there are any problems with RAM, almost all users immediately run to the service and pay money for something that they can do themselves in 5 minutes, and not wait 2 weeks. What problems occur most often:
- Clogged contacts. If you have not disassembled the system unit for more than a year, this is quite likely. Dust is such a fine muck that it can penetrate anywhere. And if the machine worked in a room with high humidity, the contacts of the RAM and not only could oxidize. The solution to the problem is simple: remove the side part from the computer, carefully remove the RAM. Next, carefully wipe the contacts with a cloth soaked in alcohol, or remove the blockage with an eraser. I repeat once again, all actions must be carried out with the utmost care, otherwise you risk becoming the owner of a new bar of operatives.
- Incorrect installation of RAM modules. If you bought a new memory, or for some reason removed the old one, then there is a chance that you will not be able to insert it correctly the first time. You don’t have to go to the service! Experiment, swap the bars. After a while you will achieve the desired result!
- Failure of one of the RAM sticks. Also, do not worry about service workers. It is easy to find out about the malfunction (this was described above). If the sad assumption was justified, we buy a new line in accordance with the necessary characteristics and continue to enjoy the working computer.
Checking Windows 10 RAM for errors: total testing
Home » Windows
Hello everyone! In this article, we will talk about checking RAM in Windows 10 for errors. In general, why check the RAM? — In fact, it is checked in two cases:
- You bought a new or used computer or took RAM chips separately and want to check them.
- The blue screen of death often appears on your computer, programs crash, the system hangs and slows down, there are lags in games.
I gave three methods that I tested on my computer. If something doesn’t work out for you or you have questions, then immediately write to me in the comments under this article. Go!
Contents
- Method 1: Standard tools
- Method 2: MemTest86
- Method 3: TestMem5
- What should I do if a faulty RAM is detected?
- Ask the author of the article
Method 1: Standard tools
Almost all versions of Windows have a regular program that allows you to test the RAM. The check occurs after the computer is restarted, since in this case the RAM should be as free as possible, and this cannot be done with the operating system running.
- We need to run the mdsched.exe system utility. This can be done in two ways. First — open the Windows 10 search by clicking on the magnifying glass icon in the lower left corner of the screen, and type in this name there.
- The second way is to hold down the button on the keyboard, and then click on the letter R.
A small window will pop up where you will need to enter the name of the utility and click OK.
- Next, you have two choices — either run the scan right now, or do it the next time you turn on the PC. If you check now, close all applications and save the data you need.
- The computer will restart and you will see the progress of the check on the screen. Do not turn off or touch the computer.
- Once the test is completed, the system will boot up and you will see the RAM test score in the lower right corner of the screen. If you missed this evaluation, or it did not come out, then you can see the results in system events. It starts in the same way through and R and the command:
eventvwr
- When the window opens, select the main section «Windows Logs» on the left. Inside we find the subsection «System».
Now we look in the main central window. Usually events are sorted by date and time, and our diagnostics will be at the very top. If the date does not match, then sort the column by clicking on the top label «Date and time».
- Open the event and view the test results.
Method 2: MemTest86
MemTest86 is a stand-alone, more advanced utility that allows you to more thoroughly test RAM sticks. Many system administrators, engineers and programmers prefer MemTest86 over the built-in utility from Windows, as they believe that it is more advanced. The disadvantage of this method is that for verification you will need to make a bootable USB flash drive.
- Download the archive from the official site.
- Insert the flash drive into the computer’s USB port.
- Open the archive and run the exe file.
- In the first step, select your flash drive. If you don’t see it, click on the «Refresh Drivers» button.
At the end, click «Write».
- Once the flash drive is ready, restart the computer and launch the «BOOT menu» — for this you need to press the auxiliary button on the keyboard several times. The button may differ depending on your BIOS version. Frequently used keys: F11, F12, F8, Esc. If the BOOT-menu BIOS does not start, go to the «BIOS» itself (buttons: Del, F2, Esc, F10), find the «BOOT» section there and install your USB flash drive in the first place. After the procedure is over, do not forget to return everything to its place.
- Once the program starts, you don’t have to press anything. Testing will run constantly in a cycle, so at the end you need to press the Esc button yourself to end it all. You need to pass at least 6 tests. If the RAM has any errors, you will see them below — they will be highlighted in red.
Method 3: TestMem5
Another interesting homemade RAM test program. It was very helpful at the time. You can download the program from this link. The advantage of this program is that it has completely different algorithms than the previous two options. After starting, the test will immediately begin. The most important thing is to run the utility with administrator rights by right-clicking on the exe file. Everything is the same here — the more verification cycles, the better.
What should I do if a faulty RAM is found?
First we need to find a broken plate — for this we pull out all the RAM. It is enough to inspect them visually. I also had a burning memory. If in this way it is not possible to detect the culprit, then you will have to do everything by the “poke method” — by installing one memory chip at a time. We need to pass separate tests for each.
As soon as you find it, it should be immediately replaced with a new one. If the RAM memory is under warranty, then run with a receipt and give it to the store. If it is already out of warranty, repairing it is impractical. You need to buy exactly the same die. The most important thing is not to make a mistake and choose the right replacement operative. The topic is quite scrupulous, so I bring to your attention the video below.
Did this article help you?
1 708 3
Author of the article
Borodach 1371 articles
Sensei on solving problems with WiFi.
The owner of a deer sweater, a twisted pair quiver and a charismatic beard.
A lover of soulful gatherings behind tanks.
How to Test RAM — Test Methods
RAM or Random Access Memory is the memory used to store temporary files and processes on your computer. In other words, RAM is used to store data and information needed for real-time tasks on your PC. It’s like short term memory in our brains, while storage (hard drives and solid state drives) is more like long term memory where we store our memories.
Because RAM is used to store data required for real-time operation of the PC , bad RAM sticks can prevent you from using your computer. Fortunately, it is very easy to perform the RAM test .
BSOD (Blue Screen of Death) is a common consequence of faulty RAM, and if you encounter this infamous screen on a regular basis, you should check your computer’s RAM . There are many reasons for the instability of RAM drives. RAM overclocking, physical failure, motherboard incompatibility, etc.
Today we will explain how to check the RAM and what applications you can use . Each method mentioned here is free, you will need a USB drive for one method.
Let’s start with a tool that comes with every Windows machine, the Windows 9 Memory Diagnostic Tool0192 .
How to test RAM using Windows Memory Diagnostic
Windows Memory Diagnostic is a great RAM test tool, and the best thing about it is that every Windows computer has access to it.
To run it, press Win+R (to open the Run command window), type mdsched.exe and press OK or Enter to run the tool.
After running the tool, simply click the Reboot and test (recommended) button and wait for the computer to restart and complete the test. Once the test is complete, it will stop and the computer will restart again.
Wait for the process to complete (this may take some time) and check the error reports after receiving the results. If there are no errors, great. If there are errors, you have a faulty RAM stick.
Now let’s take a look at the RAM testing process with probably the most popular RAM testing tool, Memtest86.
Testing RAM with PassMark Memtest86
This tool from PassMark is quite old, but still is the best way to test RAM in detail. The advantage of Memtest86 is that this tool can test RAM on both Windows and Linux.
- First of all, you need to download the Memtest86 tool.
- Then extract the resulting zip package to a separate folder.
- When finished, plug in the USB stick and run the imageUSB.exe file located in the Memtest86 folder.
- Then select the USB stick and click the «Burn» button.
Your USB drive will be formatted, so make sure it is empty or contains no important data.
Now that you have the Memtest86 USB drive, restart your computer. After restarting your computer, launch the BIOS menu or boot order menu by pressing the appropriate button (Del, F12, F2, F8, F10, or another key, depending on your motherboard).
Select USB as the primary boot device in the BIOS or boot order menu. Save and exit the BIOS and wait for the tool to launch. Once launched, you will see a «config» icon on the Memtest86 boot screen. Click on it and then click the «Start Test» button.
Now wait. Either until the test completes, or until it shows at least one error. If this happens, your RAM is unstable. If the test ends with zero error detection, everything is fine, at least in terms of RAM.
Other RAM testing tools — Prime95 and MemTest
Of course, there are other RAM testing tools, and below you can learn how to test RAM with Prime95 and MemTest. The good thing about these apps is that you don’t have to restart your computer, both can work while the OS is running.
In Prime95 just select «Large FFTs test» and let the application run all night or at least a couple of hours. If you get zero errors, your RAM is fine. If you have an overclocked CPU and RAM, you can select the «mix» option to test the CPU and RAM at the same time. Just remember to close all applications before running the test so that the tool can use all the available RAM on your system.