Configuring Software RAID within Windows 10
Table of Contents
Introduction
Most computer users have no need for more than a single drive in their computer, or perhaps a few individual drives if additional storage space is required. There are certain workflows and use cases where features of a RAID – like larger total volume capacity or data redundancy – may be extremely helpful. For large arrays, redundant boot drives, or advanced RAID modes we strongly recommend using a dedicated hardware controller card, but for simple configurations like mirroring or pooling there are options within Windows 10 which can be used without needing special hardware. This guide will cover a couple of those options and how to set them up.
Option 1 – Storage Spaces
Storage Spaces are an elegant solution to basic drive pooling and redundancy that Microsoft introduced into earlier versions of Windows, and which has continued into Windows 10. It can be easily set up through the Storage Spaces user interface, and offers three modes:
- Simple spaces pool the capacity of two or more drives, and can increase performance, but don’t protect against drive failure.
If you are familiar with RAID modes, this is akin to RAID 0 (though not exactly the same). It is best for temporary data that you have other copies of, like cache or scratch files.
- Mirror spaces provide data redundancy and can increase read performance, similar to a more traditional RAID 1. There are options for two-way mirroring, which can handle a single drive failure without data loss, or three-way mirroring for protection against two drive failures (though requiring more drives in the space as well).
- Parity spaces also guard against drive failure, but with a more efficient storage method than simple mirroring. This means you lose less total drive capacity, but need more drives to utilize it.
Here is a chart showing the failure safety offered by each mode, and the number of drives needed as well as the capacity lost:
| Storage Space Mode | Minimum # of Drives | Failure Safety | Capacity Loss |
|---|---|---|---|
| Simple | 2 | None | None |
| Two-way Mirror | 2 | 1 Drive | 50% |
| Three-way Mirror | 5 | 2 Drives | 67% |
| Parity with Single Drive Redundancy | 3 | 1 Drive | 1 Drive |
| Parity with Dual Drive Redundancy | 7 | 2 Drives | 2 Drives |
Setting up a Storage Space is pretty straightforward as well:
-
Make sure all of the drives you want to use are connected to the computer and properly configured in Disk Management
-
Open the Start Menu / search bar, type «Storage Spaces», and select the Storage Spaces result
-
Click on Create a new pool and storage space
-
Select the drives you want to use in the new storage space, and then click Create pool
-
Name the new volume and assign it a drive letter, then choose which type of Storage Space you want to make
-
Enter the available capacity you want for this volume, then click on Create storage space
Microsoft also has a good guide about Storage Spaces on their website, with more details and information about upgrading pools, removing drives, and conducting maintainence.
Option 2 – Disk Management
Storage Spaces is definitely the way Microsoft is trying to push folks who want software-based, multi-drive arrays – but they haven’t yet removed the older method which dates all the way back to Windows 2000. This approach uses the Disk Management interface and offers similar configuration options:
- Spanning basically just combines the capacity of multiple drives, but keeps each individual file on a single drive
- Striping combines drives as well, but splits each file across the drives to increase performance (at the risk of greater data loss if a drive fails)
- Mirroring duplicates all data across two drives, guarding against data loss with a single drive failure
- RAID-5 stripes data across multiple (3+) drives along with parity, so that if a single drive fails the missing data can be reconstructed from what remains – offering similar protection to mirroring, but without losing as much drive capacity (in trade for much longer rebuild time if a drive fails and is replaced)
Not all of these modes are available on every version of Windows 10, with the Home version being especially limited. Here is a chart showing information about each volume type, minimum number of drives, drive failure safety, and capacity loss:
| Disk Management Volume Type | Minimum # of Drives | Failure Safety | Capacity Loss |
|---|---|---|---|
| Spanned | 2 | None | None |
| Striped | 2 | None | None |
| Mirrored | 2 | 1 Drive | 50% |
| RAID-5 | 3 | 1 Drive | 1 Drive |
Setting up a new array through Disk Management is a little more complex than using Storage Spaces, but not too bad:
-
Open the Start Menu / search bar, type «Disk Management», and select Create and format hard disk partitions
-
Review the list of disks to ensure that all of the drives you want to use are being displayed
-
Right click on one of the disks you want to include in the array and select New Spanned/Striped/Mirrored/RAID-5 Volume
-
In the new volume wizard window that opens, click Next
-
Select which disks you want included in the array
-
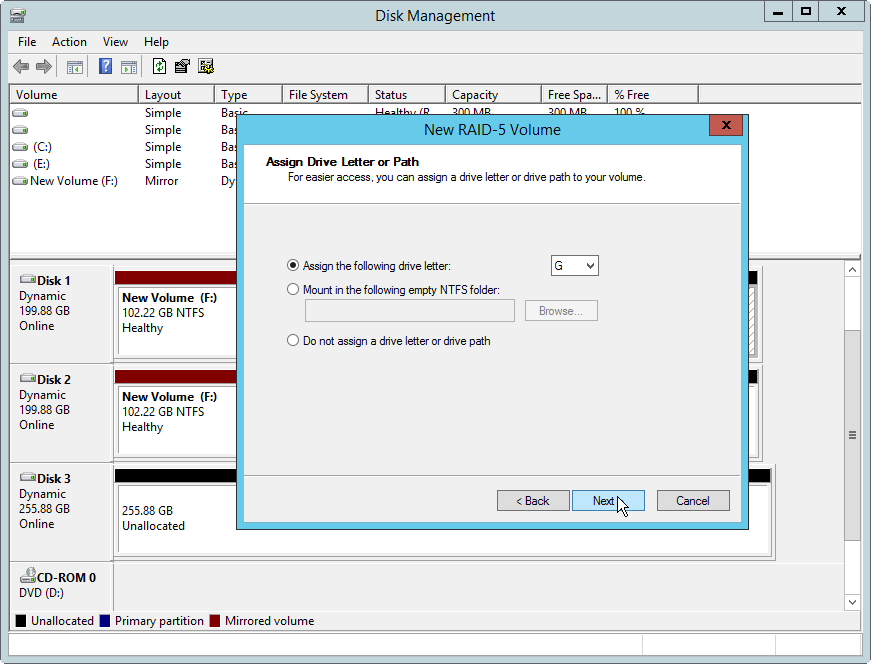
Assign a drive letter or mount point for the new volume
-
Name the volume and select a format, then click Next
-
Lastly, review all of the settings before the disks are formatted and the new volume is created
Many other websites have created in-depth guides for using Disk Management, often including screenshots, and several such pages were consulted in the creation of the short instructions above. Here is an example that was based on Windows 7, but it is effectively the same as Windows 10.
Closing Thoughts
There are several other ways to make a drive array on a modern computer, depending on what hardware you have available, which are beyond the scope of this guide. Dedicated hardware controller cards are the most advanced, and an option that we offer on many of our workstations here at Puget Systems. Some motherboards / chipsets also offer basic RAID capabilities, but those are usually dependent on drivers within the operating system which can sometimes be problematic. We cannot support that approach, and while the software options described above are pretty reliable they don’t persist through resealing Windows 10 before shipping a new system out – meaning that we cannot set up these types of arrays for our customers, which is the reason why we made this guide.
Please keep in mind that no matter what method and array type you use, though, none of these are substitutes for regular data backups. It is reasonable to use a multi-drive volume like these to minimize downtime if a drive fails, for example, but you should still maintain separate copies of all your important files that are kept outside of your computer – on an external hard drive, another computer, or even better off-site (another physical location or in the cloud).
Tags: disk, Hard Drive, RAID, SSD, Storage, Windows, Windows 10
Best free RAID software for Windows 11/10
RAID stands for Redundant Array of Inexpensive Disks. It is used to enhance the performance, data availability, and capacity of the storage devices.RAID technology is used either as Software RAID or Hardware RAID.
In Hardware RAID, drives are connected to the motherboard through special hardware called RAID controller whereas in software RAID the drives are connected directly to the motherboard whose configuration is managed by the utility software in the host computer’s operating system. The type of RAID that best suits your application depends on where you want to configure the drives.
Hardware RAID is an attractive option for applications that require complex RAID configuration whereas Software RAID is more affordable and is mostly suited for the workstation with limited data storage requirements. Software RAID best suits the entry-level servers which don’t require boot protection.
Read: Software RAID vs Hardware RAID – Differences explained.
In order to create and manage RAID infrastructure, you will be needing special RAID software. The RAID software allows for dynamic disk management and manages RAID partition. In this article, we two free RAID software picks that manages every aspect of data partition and distribution of contents in the storage devices.
1] Storage Spaces
Storage Space is a built-in technology in Windows OS which allows you to protect data in RAID hard disk from disk failures.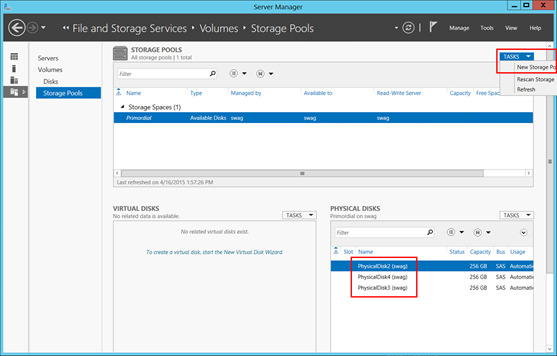 The built-in software allows you to add as many disks as you want and ensures data protection from disk failures.
Storage Space groups two or more drives in a single storage pool and create a virtual drive called storage spaces. In simple terms, this built-in Windows feature is used to virtualize and provide space for storage. The virtual drives store copies of data from the actual drives so that if any of your drives fails, you still have a backup copy of actual data in the virtual drive.
Additionally Storage Spaces allows you to extend capacity by adding more drives to the storage pool. One major advantage of using this built-in technology is that it doesn’t require any installation yet manages disk and offers better data recovery.
Storage Spaces has limited features and hence it is an attractive option to use on a Windows PC, a stand-alone server with all storage in a single server, and on a clustered server with one or more shared SAS storage enclosures holding all drives.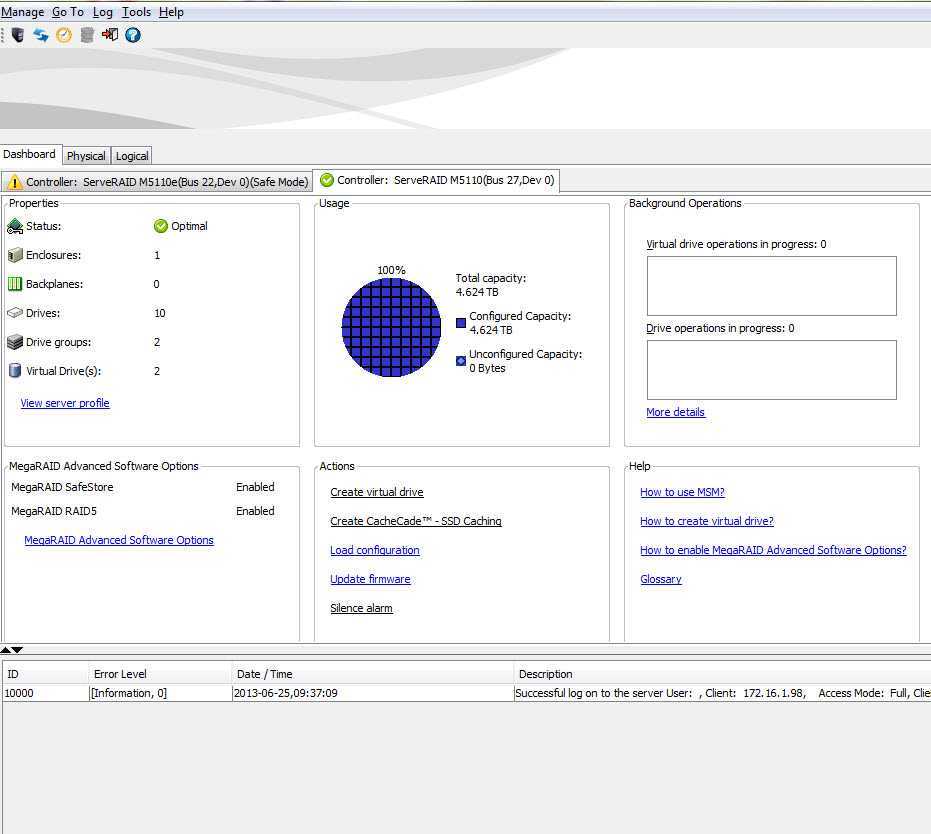
2] SnapRAID
SnapRAID is a RAID software that allows you to make a backup of your disk arrays. It is a backup program that stores all the data information and recovers them in case of disk failures.
The software stores parity information, to avoid data corruption and keep the data integrity intact. In the case of disk failures, Snap RAID ensures data recovery from up to six disk failures. If there are too many disk failures, you might lose some data on the failed disks however it ensures that all the data in other disks are kept safe.
One of the key features of this software is that it allows you to recover the deleted files on the disk. With SnapRAID you can use storage disks of varied sizes and also scale up whenever you want.
One of the major advantages of using SnapRAID for disk arrays is that it doesn’t lock in user’s data. You can quit SnapRAID any time without reformating or shifting the data. This software uses very fewer system resources and power to access files hence makes less noise.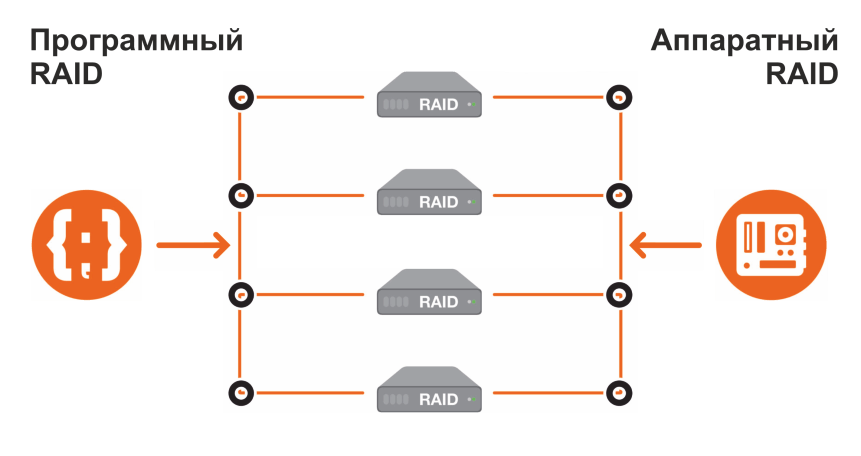
This software is most suitable for a home file server that does not have small files that keep changing frequently.
Let us know about your RAID software in the comments section below.
Date: Tags: Disk
report this ad
[email protected]
Mahit Huilgol is a Windows enthusiast, a blogger & a keen follower of everything Microsoft. He loves to keep a track of the Windows ecosystem and enjoys covering Windows 10 features & freeware.
Set up software RAID on Windows
Setting up a software RAID array in a Windows environment has its own peculiarities, unlike setting up under Linux systems.
Software arrays can only be created on dynamic disks. Installing or booting Windows from a dynamic volume is only possible if the disk has been converted from a system or boot volume. That is, if several instances of the OS are installed, then after converting the disk to dynamic, you can boot only the instance that is located on the boot partition. For boot and system volumes, it is possible to create only a mirror array (RAID1), creating other types of array is impossible, since they imply installing the system on a pre-created partition.
Working with software arrays and dynamic disks is done through the link Storage — Disk management in Server Manager.
This operation is irreversible, it will not work to repartition the boot disk, since after that it will no longer be bootable, and it will be possible to expand the volume using unallocated space.
- To convert disks to dynamic, right-click and select 9 from the menu that opens0007 Convert to dynamic disk . You can convert multiple discs at once.
- To create an array, right-click on the desired volume and select the desired option from the drop-down menu. In the case of system and boot volumes, there will be one option — a mirror.
- Select a drive to host the mirrored volume. Upon completion of the array creation, its resynchronization will immediately begin.
- You can combine several disks into a separate volume, or create RAID0, 1 or 5.
BIOS
The procedure for manually configuring disk mirroring (RAID1) on Windows Server is described below:
- Select Create and format hard disk partitions .
- Right click on Disk 0 and select Convert to dynamic disk .
- Repeat procedure for Disk 1.
- In Disk Management right click on drive C: and select Add mirroring from the drop down menu.
- In the next menu select Disk 1 and click Add mirroring .
After completing the steps, disk synchronization will begin. Synchronization will take some time, depending on the size of the disks.
UEFI
Every UEFI system contains a UEFI System Partition. This partition cannot be mirrored automatically by Windows and requires manual copying and configuration on the second drive:
- Create UEFI System Partition on the second drive and format it to FAT.
- Copy the UEFI System Partition data from the first drive to the second.
- Other partitions can be mirrored as described above ( Disk Management → Add mirroring ).
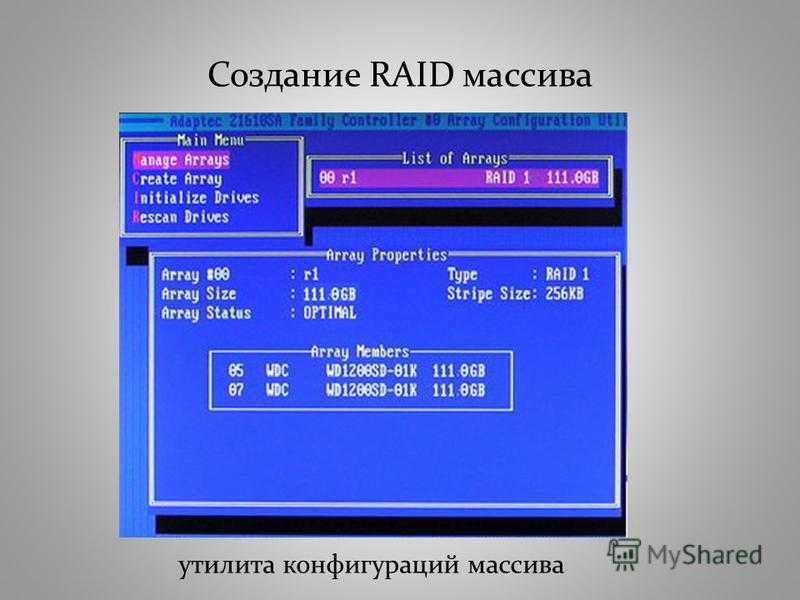
How to create a software RAID on Windows Server
Read about How to create a software RAID on the Windows Server 9 operating system0008 . Describes how to create a RAID inside Windows Server and using the utility Intel rapid storage technology .
In the articles we have already discussed what RAID is, how to assemble a computer for RAID and how to create it using the BIOS of the motherboard. In the same article, I will describe how to create a RAID in the Windows Server operating system with a graphical interface.
Creating a RAID inside Windows Server
Creating a software RAID in Windows Server is very easy. First you need to decide what type of RAID you need, then make sure you have the right number of drives for this type. After that, you can start creating.
I’ll show you how to create a RAID 5, creating other types is essentially the same with some minor differences. So this example is generic.
Open Disk Management, right-click on the start menu and select this menu item from the list.
The system can create RAID Ø (striped volume), RAID 1 (mirrored volume), RAID 5 and JBOD (spanned volume). To create the type of RAID we need, in the Disk Management menu, right-click on one of the available unallocated disks and select the required type.
Add all the necessary disks, and click Next.
Assign a letter to the new volume and format it.
After closing the New Volume Wizard, a message will appear stating that you need to convert disks, which will permanently delete all information . Since in our example the disks are empty, we press «Yes» .
If you have the information you need stored on disks, you must first save it somewhere else.
After the conversion and creation of RAID 5, the disks will start the resynchronization process. The duration of this process depends on the volume of disks, it is quite long.
Once the resync is complete, we have our RAID.
The same way to create a RAID is available in the Windows 10 operating system. Or you can create it through the «Storage Spaces Management».
Learn more about how to create software RAID in Windows 10 in our other article.
How to create a RAID using the Intel rapid storage technology utility
There are also special utilities that help you create and maintain a RAID. For example, the Intel Rapid Storage Technology utility.
Download, install and run the application.
Menu «Status» — shows the status of the system and your drives.
Menu «Create» — allows you to build a RAID from your disks.
Click create, select the type of RAID. The program allows you to create the following types: flexible data protection, RAID 1, 0, 5 and 10. The program has a brief description of each type. Select the one you want and click Next.
Specify the name of the volume, and select the disks for the array. We mark all the necessary disks and parameters and click Next. Set additional options if necessary. Volume size and data stripe size, I leave «default» .
Next you will see a warning that «This action will permanently delete existing data on the following drives…» . If you have important data stored on them, then first save them to another location.
Put a checkmark in front of item «Continue and delete data» and click the Create volume button.
Volume creation completed. But the program says that before adding any data to your volume, you must create partitions on it using Disk Management.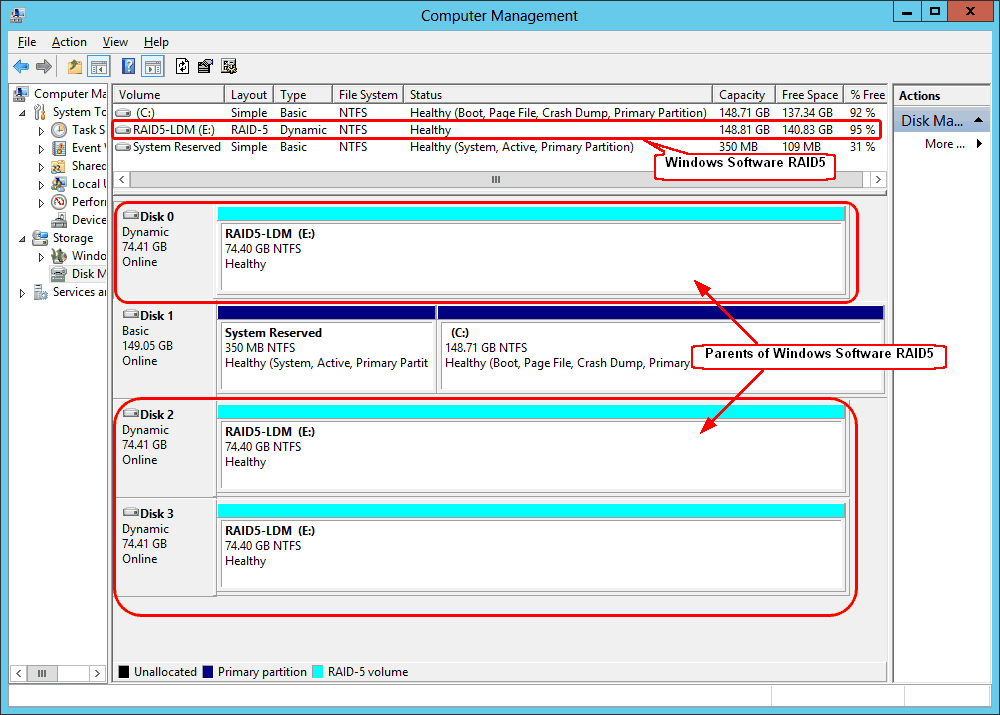
Therefore, open Disk Management. And immediately the utility reports that in order for the local disk manager to access it, you need to initialize the disk. Select the section style and press the button «Ok» .
Next, right-click on our disk and select «Create a simple volume» . We follow the instructions of the wizard.
Done The RAID is ready to use.
When you open Explorer, you will see your drive.
The program shows that the disk is still undergoing Initialization, the duration of the process depends on the size of the disks.
This utility will make it easier for you to monitor the status of your RAID. And if one of the disks fails, you will immediately see it. In this program, it is easy to identify a failed disk, you can do this by the serial number. Each disc (on a sticker) has its serial number.
In the «Settings» tab, you can configure alerts for any malfunctions, and even specify an email address to automatically send the next alerts.