How To Set Up RAID On Your Windows 10 PC
Copied link!
Dwight Pavlovic
|
March 7, 2020
When it comes to storage for your PC, there’s no longer a one-size-fits-all solution. However, if you want to improve redundancy or increase efficiency then the need for a stable and secure RAID (redundant array of independent disks) setup still frequently comes up. Fortunately, getting a Windows 10 RAID system up and running is actually relatively simple.
In this article, we’ll provide a primer on RAID systems, starting with some general information about what they are, how they work, and which configurations are most popular. We’ll also help you choose the right configuration for your situation and offer detailed instructions on how to set up two of the most popular options: RAID 5 and RAID 10 (sometimes known as RAID 1+0).
What is a RAID setup?
A RAID setup uses multiple storage drives to create a single workable storage system. This can help improve overall storage efficiency as well as protect against drive failure by incorporating backup drives. There are several different types, and how yours works depends on your specific RAID configuration.
RAID array
RAID setups are commonly called arrays or configurations, with the type identified by a numeral. A RAID array is simply a collection of synced drives, while the type denotes how a particular configuration works.
Data striping and mirroring
Some rely on data striping, a process that spreads your information across multiple drives to improve efficiency and responsiveness. Another simple format involves data mirroring, which replicates stored information across multiple drives. Unlike striping, mirroring is used specifically to improve redundancy to help safeguard your data.
Parity
More complex Windows RAID systems incorporate multiple systems, with parity being another factor. Parity refers to error-checking code, and it can be dedicated (one drive) or distributed (multiple drives).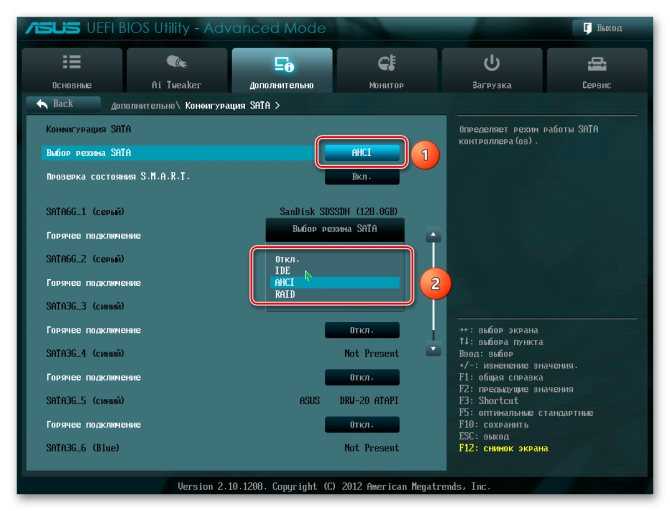 Generally, configurations with parity are slower because the process increases the number of operations your system performs.
What is the best RAID configuration?
The simplest RAID configurations are designed to provide a solid foundation of basics. RAID 0 arrays allow for more efficient operation, but they also increase the risk of drive failure. RAID 1 systems build redundancy against potential malfunctions but limit efficiency. These are great setups to experiment with, particularly if your storage load isn’t too cumbersome. Ultimately, the best RAID configuration for you depends on your situation.
RAID 5 and RAID 10 offer strong combinations of efficiency and redundancy, with many users favoring RAID 10 for pure performance. However, RAID 5 only requires 3 drives for striping and parity, while RAID 10 requires a minimum of 4 drives to properly set up mirrored striping. As a result, RAID 10 can also be more energy-intensive.
How to configure a RAID 5 drive array
Since a RAID 5 configuration involves at least 3 drives, it offers the security of redundant drives and the additional efficiency that comes with data striping. Here’s how you’ll set everything up in Windows 10 once your hardware is ready:
- Open the Settings tab from the Window Start button in the lower-left corner of your display
- Select the System tab
- Select the Storage tab from the left sidebar
- Look for the More Storage Settings heading and select Manage Storage Spaces
- In the new window, select the “Create a new pool and storage space” option (Click Yes if prompted to approve changes to your system)
- Select the drives you want to pool and click Create pool. Together these drives will make up your RAID 5 array
- Enter the necessary information under the name and drive letter heading
- Under the Resiliency heading, click the resiliency type dropdown and select Parity
- Under the Size heading, enter your desired capacity and size settings
- Click the Create storage space button to activate the array
How RAID 10 works
RAID 10 is a nested RAID system. It’s designed to quickly recover lost information and offers an efficient, robust system for secure data storage. As a type, it relies on striping and mirroring at least two pairs of drives to form an array.
To set up a RAID 10 configuration with Windows 10, you’ll follow many of the same steps as above. But you’ll actually be creating at least two RAID 1 stripes and tying them together, hence the alternative name for this setup (RAID 1+0). That’s why these configurations are typically called nested RAID systems.
- Open the Settings tab from the Window Start button in the lower-left corner of your display
- Select the System tab
- Select the Storage tab from the left sidebar
- Look for the More Storage Settings heading and select Manage Storage Spaces
- In the new window, select the “Create a new pool and storage space” option (Click Yes if prompted to approve changes to your system)
- From the drive selection menu, create two separate pools, each a pair of drives
- Select a pair of drives and click Create pool to set up your first mirror
- Enter the necessary information under the Name and Drive letter heading
- Under the resiliency heading, click the Resiliency type dropdown and select Two-way mirror
- Under the Size heading, enter your desired capacity and size settings
- Click the Create storage space button to activate your first mirrored drive pair
- Repeat the same steps to create a second mirrored drive pair, or for as many mirrored pairs as you plan to include in your array
- Now, visit the Windows Disk Management system by pressing the Windows + X keys at once
- Look toward the bottom of the window for more information on the two or more mirrored pairs you created, then right click the first pair and select Delete volume to clear out file systems
- Repeat step 10 for the second drive, or for however many other mirrored pairs you want to configure
- Right click one of the drive pairs you want in your array and select New Striped Volume
- In the new window, select the other mirrored pairs you want in your array and click Next
- Enter your preferred settings and click Next
- Review your choices and click Finish
To wrap up, click through any prompts and wait for Windows to format the new volume. Your RAID 10 array should now be running.
Other types of RAID configuration
There are lots of other RAID types still in use besides RAID 5 and 10, including RAID 0 and 1. There are even more beyond those as well, including a huge range of proprietary setups that require their own unique configurations. If you need more information, there is plenty of user-generated material on more niche RAID types.
Get to know your hardware
Beyond properly configuring a RAID setup in Windows, it’s important to know your hardware and accessories. Research everything that goes into your physical storage arrangement, and consider mixing drives from different manufacturers.
Mix it up
What does that accomplish? A mixture can lower your overall risk of failure by removing the chance that both drives suffer from a batch fault. While it may seem cumbersome, especially with larger setups, it can be a way to hedge against certain issues.
In conclusion
Sometimes users require more than just a standard storage solution.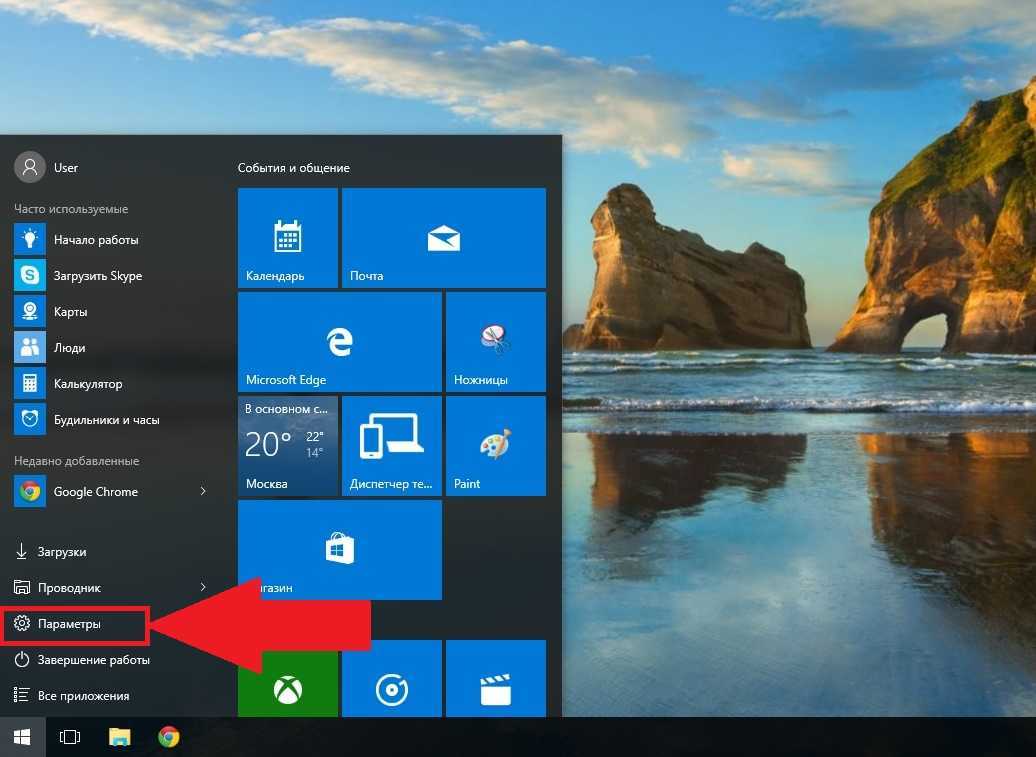 If equipped and configured properly, RAID offers an easy way to add redundancy and speed to your system. Whether you’re most worried about data loss or just want a faster system, the right RAID setup can supplement your hardware and maintenance routine.
About the Author
Dwight Pavlovic is a contributing writer for HP® Tech Takes. Dwight is a music and technology writer based out of West Virginia.
Disclosure: Our site may get a share of revenue from the sale of the products featured on this page.
Configuring Software RAID within Windows 10
Read this article at https://www.pugetsystems.com/guides/2124
Share:
Table of Contents
- Introduction
- Option 1 — Storage Spaces
- Option 2 — Disk Management
- Closing Thoughts
Introduction
Most computer users have no need for more than a single drive in their computer, or perhaps a few individual drives if additional storage space is required. There are certain workflows and use cases where features of a RAID — like larger total volume capacity or data redundancy — may be extremely helpful. For large arrays, redundant boot drives, or advanced RAID modes we strongly recommend using a dedicated hardware controller card, but for simple configurations like mirroring or pooling there are options within Windows 10 which can be used without needing special hardware. This guide will cover a couple of those options and how to set them up.
Option 1 — Storage Spaces
Storage Spaces are an elegant solution to basic drive pooling and redundancy that Microsoft introduced into earlier versions of Windows, and which has continued into Windows 10. It can be easily set up through the Storage Spaces user interface, and offers three modes:
- Simple spaces pool the capacity of two or more drives, and can increase performance, but don’t protect against drive failure. If you are familiar with RAID modes, this is akin to RAID 0 (though not exactly the same).
 It is best for temporary data that you have other copies of, like cache or scratch files.
 - Mirror spaces provide data redundancy and can increase read performance, similar to a more traditional RAID 1. There are options for two-way mirroring, which can handle a single drive failure without data loss, or three-way mirroring for protection against two drive failures (though requiring more drives in the space as well).
- Parity spaces also guard against drive failure, but with a more efficient storage method than simple mirroring. This means you lose less total drive capacity, but need more drives to utilize it.
Here is a chart showing the failure safety offered by each mode, and the number of drives needed as well as the capacity lost:
| Storage Space Mode | Minimum # of Drives | Failure Safety | Capacity Loss |
|---|---|---|---|
| Simple | 2 | None | None |
| Two-way Mirror | 2 | 1 Drive | 50% |
| Three-way Mirror | 5 | 2 Drives | 67% |
| Parity with Single Drive Redundancy | 3 | 1 Drive | 1 Drive |
| Parity with Dual Drive Redundancy | 7 | 2 Drives | 2 Drives |
Setting up a Storage Space is pretty straightforward as well:
-
Make sure all of the drives you want to use are connected to the computer and properly configured in Disk Management
-
Open the Start Menu / search bar, type «Storage Spaces», and select the Storage Spaces result
-
Click on Create a new pool and storage space
-
Select the drives you want to use in the new storage space, and then click Create pool
-
Name the new volume and assign it a drive letter, then choose which type of Storage Space you want to make
-
Enter the available capacity you want for this volume, then click on Create storage space
Microsoft also has a good guide about Storage Spaces on their website, with more details and information about upgrading pools, removing drives, and conducting maintainence.
Option 2 — Disk Management
Storage Spaces is definitely the way Microsoft is trying to push folks who want software-based, multi-drive arrays — but they haven’t yet removed the older method which dates all the way back to Windows 2000. This approach uses the Disk Management interface and offers similar configuration options:
- Spanning basically just combines the capacity of multiple drives, but keeps each individual file on a single drive
- Striping combines drives as well, but splits each file across the drives to increase performance (at the risk of greater data loss if a drive fails)
- Mirroring duplicates all data across two drives, guarding against data loss with a single drive failure
- RAID-5 stripes data across multiple (3+) drives along with parity, so that if a single drive fails the missing data can be reconstructed from what remains — offering similar protection to mirroring, but without losing as much drive capacity (in trade for much longer rebuild time if a drive fails and is replaced)
Not all of these modes are available on every version of Windows 10, with the Home version being especially limited. Here is a chart showing information about each volume type, minimum number of drives, drive failure safety, and capacity loss:
| Disk Management Volume Type | Minimum # of Drives | Failure Safety | Capacity Loss |
|---|---|---|---|
| Spanned | 2 | None | None |
| Striped | 2 | None | None |
| Mirrored | 2 | 1 Drive | 50% |
| RAID-5 | 3 | 1 Drive | 1 Drive |
Setting up a new array through Disk Management is a little more complex than using Storage Spaces, but not too bad:
-
Open the Start Menu / search bar, type «Disk Management», and select Create and format hard disk partitions
-
Review the list of disks to ensure that all of the drives you want to use are being displayed
-
Right click on one of the disks you want to include in the array and select New Spanned/Striped/Mirrored/RAID-5 Volume
-
In the new volume wizard window that opens, click Next
-
Select which disks you want included in the array
-
Assign a drive letter or mount point for the new volume
-
Name the volume and select a format, then click Next
-
Lastly, review all of the settings before the disks are formatted and the new volume is created
Many other websites have created in-depth guides for using Disk Management, often including screenshots, and several such pages were consulted in the creation of the short instructions above.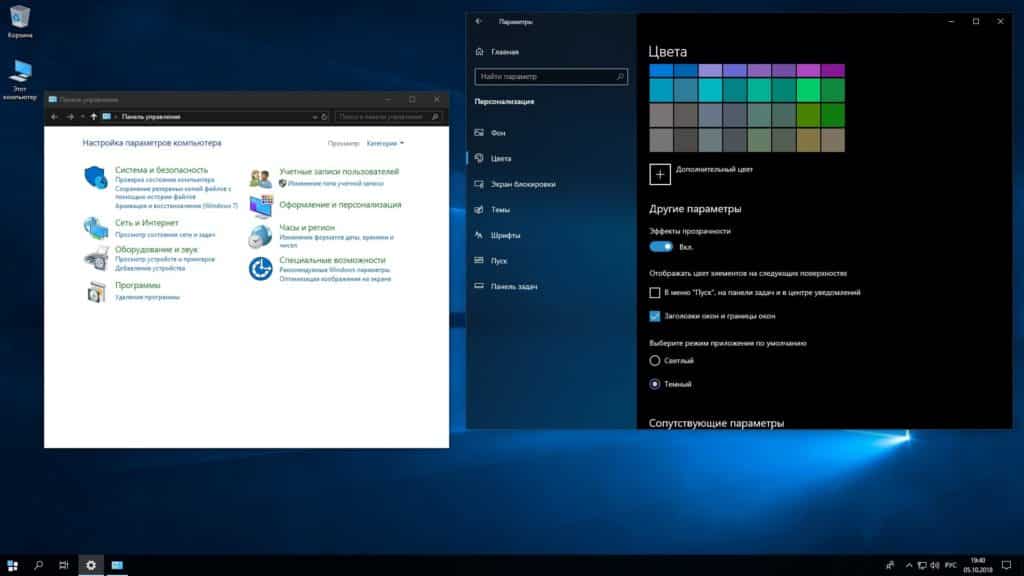 Here is an example that was based on Windows 7, but it is effectively the same as Windows 10.
Closing Thoughts
There are several other ways to make a drive array on a modern computer, depending on what hardware you have available, which are beyond the scope of this guide. Dedicated hardware controller cards are the most advanced, and an option that we offer on many of our workstations here at Puget Systems. Some motherboards / chipsets also offer basic RAID capabilities, but those are usually dependent on drivers within the operating system which can sometimes be problematic. We cannot support that approach, and while the software options described above are pretty reliable they don’t persist through resealing Windows 10 before shipping a new system out — meaning that we cannot set up these types of arrays for our customers, which is the reason why we made this guide.
Please keep in mind that no matter what method and array type you use, though, none of these are substitutes for regular data backups. It is reasonable to use a multi-drive volume like these to minimize downtime if a drive fails, for example, but you should still maintain separate copies of all your important files that are kept outside of your computer — on an external hard drive, another computer, or even better off-site (another physical location or in the cloud).
Tags: RAID, Storage, Windows, Windows 10, disk, Hard Drive, SSD
How to Setup RAID (0 and 1) in Windows 10
What should you do before setting up RAID? How to setup RAID in Windows 10? If you are still trying to find the answers, this post of MiniTool is what you need. From here, you can get 3 applicable ways to setup RAID 0/1 in Windows 10.
What Is a RAID Setup
RAID, also called Redundant Arrays of Independent Disks, is a type of data storage virtualization technology that combines multiple disks into a logical unit for data redundancy or performance improvement. This disk combination is often used by professionals or enterprises to manage different data in different drives.
There are different standard levels of RAID setups, including RAID 0, RAID 1, RAID 0+1, RAID 3, RAID 4, RAID 5, RAID 6, RAID 7, and RAID 10. Among them, the most frequently asked question is how to setup RAID 0 and RAID 1 in Windows 10. So, here we will start with introducing the definition and prerequisites of RAID 0 and RAID 1.
Overview of RAID 0
RAID 0 is also known as a striped volume that’s composed of two or more hard disks. And the space you take from each disk should be equal. One of the biggest merits of RAID 0 is that it greatly improves the performance and throughput of a hard drive.
However, RAID 0 provides no fault tolerance and parity information redundancy. That means you will lose all the data on the entire array once any disk fails and the whole system will be affected. So, it’s not recommended that you use RAID 0 for any critical system. Well, you need to make sure that each disk you added to the array is not more than the smallest disk size when setting up RAID 0 Windows 10.
Overview of RAID 1
When it comes to RAID 1, we often think of the mirrored volume that is a technique of writing the same data to more than one drive. Each drive on the RAID 1 array contains an identical copy of the data. This configuration owns high data security because it provides fault tolerance and redundancy. That is to say, if an individual drive fails, the second one can continue to work.
When creating a RAID 1 array, you need to make sure the array is as big as the smallest disk. Since the data is mirrored on all disks of the array, this array can still work normally as long as one disk is operational. Of course, you should replace the failed hard disk timely in case the whole operating system crash.
Further reading: Do you want to know more differences between RAID 0 vs RAID 1? This post tells you the answer and helps you make a wise choice.
What You Need to Prepare Before Setting up RAID
Here comes a new question, what do you need to do before setting up RAID 0/1 Windows 10. Both RAID 0 and RAID 1 configurations require at least 2 hard disks, while you’d better use the disks with the same sizes, types, and manufacturers on the RAID 1 setup.
Another important thing you need to do is to make sure you back up all of your data on the hard drives. This is because all the data on the hard disks will be erased during the RAID setup. How to back up hard drives easily and quickly? MiniTool Partition Wizard can achieve that with a few clicks. It’s a powerful partition manager that can migrate OS and even copy the whole disk. Here’s how to use it.
Free Download
Step 1. In the main interface, click on the Copy Disk Wizard feature at the left pane and click on Next in the pop-up window.
Step 2. Select the hard disk that you want to back up and click on Next.
Step 3. Select the target disk that you want to copy disk to and click on Next. If you are prompted to confirm this operation, click on Yes to continue.
Step 4. Then you can review the changes you have been made. Here you can select the default copy options if you haven’t special demands.
Step 5. Read the information and click the Finish button in the next window. Finally, click on Apply to execute the pending operations.
Once you backed up these important data, you need to install all hard disks that you want to use for setting up RAID 0 Windows 10. If you don’t how to do that, you can refer to this post “How to Install a Second Hard Drive in Your Laptop and Desktop PC”.
How to Setup RAID in Windows 10
Now, I believe that you have prepared everything for the RAID setup. How to setup a RAID 0 and RAID 1 in Windows 10? You can choose one from the 3 applicable ways.
Note: The following operation will be performed on a disk array with 3 unformatted hard drives that have the same size and speed.
Way 1. Setup RAID Using the “Storage Spaces” Utility
As you might know, Windows 10 provides the “Storage Spaces” utility to configure the RAID drives. This tool can help you combine 3 or more drives into a storage pool. It is a software-configured RAID setup in OS. Here we will show you how to setup RAID 0 Windows 10 using the Storage Spaces feature.
Step 1. Type control in the Windows Search box, and then select Control Panel from the top result.
Step 2. Change the View by type to Large icons and select Storage Spaces from the listed icons. Click on Yes in the UAC window when you’re prompted to access this app.
Step 3. In the pop-up window, click on the Create a new pool and storage space link.
Step 4. Then Windows 10 will check all hard drives installed on your computer and select the disks that you want to use for setting up RAID 1 Windows 10 and click on Create pool.
Step 5. Now, you can name the Storage pool, and select a Drive letter and File System from the drop-down menu. Then go to the Resiliency type section, select the RAID type under it. The Simple (no resiliency) option pools the disks, the Two-way mirror and three-way mirror options are similar to RAID 1, and Parity is similar to RAID 5. Once confirmed, click on Create storage space.
Step 6. Now, wait for the process to finish and you should see a single disk in Windows File Explorer.
As shown above, you can set up RAID 1 and RAID 5 with the Storage Space tool, but it can’t configure RAID 0. So, we recommend you use the following 2 methods.
Way 2. Setup RAID in BIOS
In addition, you can set up RAID in BIOS. Here we will show you how to setup a RAID 0 Windows 10 based on the Intel motherboard
Step 1. Restart your computer, and then press the Delete key to enter BIOS.
Step 2. In the BIOS Utility window, press F7 to go to Advanced Mode and select PCH Storage Configuration from the listed options.
Step 3. In the Advanced tab, go to the SATA Mode Selection option and set it to Intel RST Premium With Intel Optane System Acceleration (RAID), and set SATA Controllers to Enabled.
Step 4. Go to the Boot tab and set the Launch CSM option to Disabled.
Step 5. Press F10 and click OK to restart your system. And press Delete after the system reboots and enter BIOS again.
Step 6. Press the F7 key to enter Advanced Mode, and then go to the Advanced tab and select Intel(R) Rapid Storage Technology from the listed options.
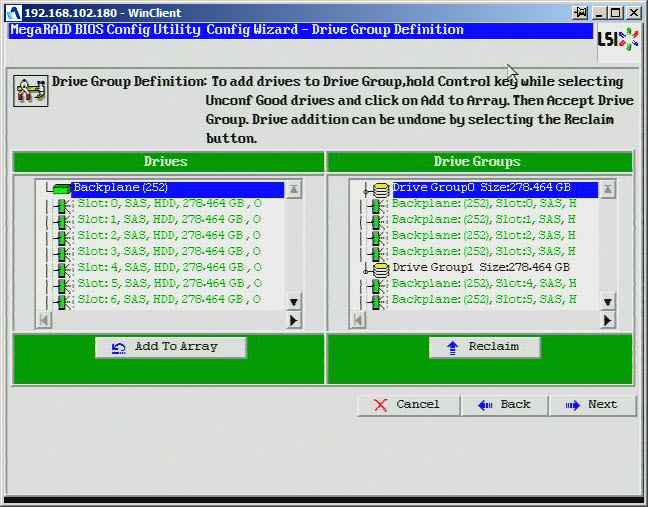
Step 7. Tap on Create RAID Volume. Then you can set the RAID name, RAID level (like RAID 0 stripe), and select the disks you want to use and set it to X.
—images from asus.com
Step 8. Set the RAID capacity and click on Create Volume to save the changes.
According to the above information, you may find some limitations on using the Storage Space and BIOS utilities. Therefore, we highly recommend you use a professional RAID partition manager like MiniTool Partition Wizard.
Way 3. Setup RAID Using MiniTool Partition Wizard
With MiniTool Partition Wizard, you can not only create a striped volume (RAID 0) but a mirrored volume (RAID 1) easily. In addition, this program can help you move/resize, or extend volume if you need. Here’s how to setup RAID 0/1 using the MiniTool software.
Note: Before you create a striped or mirrored volume, you need to convert the basic disks to dynamic.
Free Download
Step 1. Launch the MiniTool software to enter its main interface, right-click the dynamic disk that you want to create the striped volume or mirrored volume, and select Create Volume.
Step 2. In the pop-up window, you will sell all supported volume types according to your present situation. Select Striped or Mirrored and click on Next to go on.
Step 3. Select the target disk where volume is to be created and click on Add to add the disk to the right box. Then click on Next.
Step 4. Now, you can set relevant parameters, including Volume Label, File System, Driver Letter, Cluster Size, and Volume Size/Location. Then click on Finish to confirm that.
Step 5. Click on Apply to execute the pending operation.
How to setup a RAID 0 and RAID 1 in Windows 10? This post provides you with 3 simple ways to achieve that. Get them now!Click to Tweet
Now, the top 3 methods on how to setup RAID in Windows 10 have been illustrated. If you have any ideas on this topic, write them down in the following comment zone. Also, you can send us an email to [email protected] when you have difficulty in using MiniTool Partition Wizard.
How to Set Up RAID in Windows?
A single defined storage capacity on a Windows PC cannot meet the requirements of every user. Moreover, every user has a different expectation of the performance level provided by a PC.
So how can you enhance the data redundancy or performance of the same system without adding to its built-in hardware? Well, there are two ways to do it. You can either get extra storage through a new storage device or set up a secure and stable RAID on your Windows PC.
This blog talks about how to set up RAID in Windows 10 and 8. In addition, you will get an additional tip to recover any data lost or deleted on a RAID array.
What is a RAID setup on Windows?
RAID or Redundant Array of Independent Disks is a method of data storage to improve data redundancy and PC performance.
Data redundancy refers to a system of data storage whereby a single piece of information is stored in more than one place. It is conducive to maintaining backup and safeguarding data on your Windows PC.
The RAID setup accomplishes data redundancy within a single database by using multiple storage drives to create a single database and storing the same information at two separate locations.
If the data is lost or damaged at one place, the user can still access it at the secondary storage location.
Methods to set up RAID using Windows in-built tools
There are specific in-built tools provided on Windows to set up RAID. You can easily understand how to set up RAID on Windows 10 and 8 using these tools without any third-party software or app.
Let’s see what these tools are and how you can use them to set up RAID on Windows.
Method 1: Create RAID using Storage Spaces on Windows 10 & 8
The Storage Spaces tool was first introduced with Windows 8, and it has evolved to be a valuable tool in Windows 10.
The tool helps users combine HDDs or SSDs into a RAID array. Although, before you proceed, you must define the RAID type and its usage.
Windows 10 supports RAID 0, RAID 1, and RAID 5. It is noteworthy that you should choose the drives with the same storage capacity and other attributes.
It will help you avoid any issues in the future. Now, connect all the drives to your Windows system and follow the steps below:
Step 1: Type ctrl in the search bar and select Control Panel from the search results.
Step 2: Click on Storage Spaces from the items listed in Control Panel.
Step 3: Click the Create a new pool and storage space option under the Manage Storage Spaces section.
Caution: The drives you will use for the RAID setup will be wiped, and all the data on them will be deleted. If you need the data saved on these drives, save them at another location within your system or preferably on an external storage device.
Step 4: Check the boxes against all the drives you want to add to the RAID setup and click the Create Pool button at the bottom right.
Step 5: In the new window, assign a name, drive letter, and file system to the RAID array in the designated field under the Name and drive letter section.
Step 6: Choose the Resiliency type under the Resiliency section. Use the following information to select a suitable option:
- Simple (No resiliency) – RAID 0
- Two-way mirror – RAID 1
- Three-way mirror – RAID 1
- Parity – RAID 5
Note 1: The only thing that differentiates two-way from three-way mirror resiliency is the number of copies of the main hard drive. Moreover, Parity resiliency works only on Windows servers.
The wizard will automatically set the maximum available capacity on the disk array based on your resiliency choice.The set capacity is a little less than the actual capacity of the array.
However, it’s done deliberately to allow the user to install an additional hard disk without rebuilding the RAID array when the full storage capacity of the array is exhausted.
Step 7: Click the Create storage space option at the bottom of the wizard window.
Once the process is complete, the created RAID will be available as a separate drive on your PC, and you can access it like any other drive through the This PC window.
Method 2: Create RAID using Disk Management on Windows 10 & 8
Disk Management is one of the most useful utilities on your Windows system. You can use it to set up a RAID array on your Windows 10 & 8 devices.
Moreover, the app requires no specialized knowledge of the OS.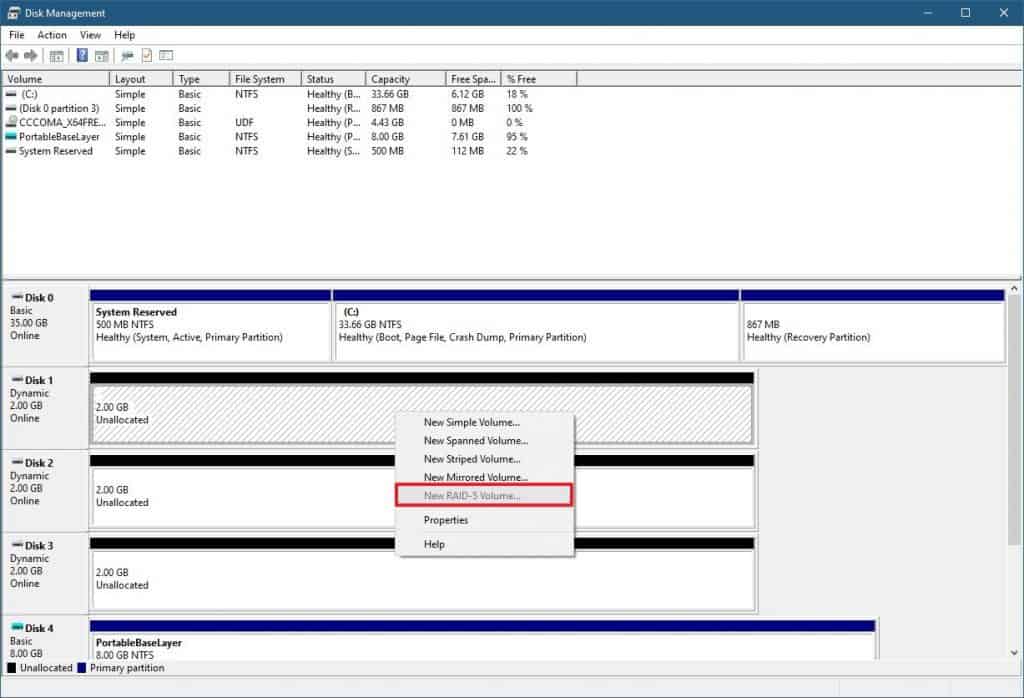 Here is how to set up RAID 0 using Disk Management.
Step 1: Right-click the Start menu and select Disk Management.
Step 2: All the connected drives will appear in the Disk Management window. Right-click any drive and select New Striped Volume.
Note: You must right-click on the disks and not the partitions shown in the Disk Management window.
Step 3: The New Striped Volume Wizard will open. Click Next.
Step 4: Select the drives you want to add to the RAID array. Click on the drives listed in the left box and click Add. It will appear in the right box. Click Next once you have added all the drives.
Step 5: Assign a letter to the array by choosing from the list and clicking Next. You may also leave the automatically selected letter assigned by the wizard and click Next.
Step 6: Select NTFS in the file system section to be assigned for the RAID and click Next.
Step 7: Verify the settings and click Finish.
Step 8: A dialog box will appear to warn you that the selected disk(s) will be converted to a dynamic disk(s), and all the data on the selected disk(s) will be erased. Click Yes to proceed.
The formatting of the disks will commence, and once the process completes, your RAID 0 array will be ready to use.
You can similarly create the RAID 1 array; all you need to do is select New Mirrored Volume instead of New Striped Volume in Step 2 above.
Method 3: Create RAID using Command Line on Windows
You can also use Command Prompt or Windows PowerShell to set up RAID on Windows 10, and 8 PC.
Command Prompt and Powershell are command-line tools, and you need to be careful while using them.
Any incorrect command could cause damage to the task you’re trying to do. So let’s proceed with setting up RAID 5 using Command Prompt.
Step 1: Right-click the Start menu button and select Command Prompt (Admin) or Windows PowerShell (Admin).
Step 2: Insert the command diskpart and press Enter.
Step 3: Now, insert the command list disk and press Enter. A list of all the connected drives will appear.
Step 4: Select the drives one by one and convert them into dynamic drives using the commands below.
- Insert command select disk 1 (Replace the digit 1 with the disk number you want to add to the RAID) and press Enter.
- Insert command convert dynamic and press Enter.
Repeat the above command for each drive you want to add to the RAID array.
Step 5: Once all the drives are converted to dynamic drives, insert the following commands to set up RAID.
- Insert command select disk 1 (replace the digit with your first drive’s digit) and hit Enter.
- Insert command Create Volume RAID Disk 1, 2, 3 and hit Enter.
Note: To ensure that the array creation is complete, type list volume in the command line and press Enter. All the selected drives will be shown as a single unit.
Step 6: Now, use the following commands to format the disk and assign a letter to it.
- Place the command select volume 2 (This is the new volume created by the combination of drives you selected earlier) and hit Enter.
- Now, type Format FS=NTFS Label=MyNewVolume and press Enter.
- Lastly, insert Assign letter=F and hit Enter (You can replace the letter F with a letter of your choice).
Step 7: To exit the command line, type Exit and press Enter.
Your disks will be combined to create a RAID 5 array.
For RAID 0:
Enter the following commands one by one.
- list disk
- create volume stripe size=n disk=1,2,3 ( n is the disk size in MB, and 1, 2, 3 denote the disks to be included in RAID).
For RAID 1:
Enter the following commands to create a RAID 1 array
- list disk to display all the disks connected to your PC.
- select disk 0 – use the disk number for which the mirror is to be created.
- convert dynamic – to turn the disk to a dynamic drive.
If prompted, Restart your PC; otherwise, continue normally, and enter the following command.
- Select volume 0 – choose the desired disk number.
- Add disk=1 – add the suitable disk for mirroring.
Let the process complete for the RAID 1 array to be set up.
Additional Tip
Now that you have learned how to set up a RAID array on your Windows 10 and 8 PC, let us inspect any collateral damage.
This tip is for you if you have lost data while setting up RAID due to accidental deletion or file system change.
Using the Stellar Data Recovery Technician software, you can easily recover any lost data on a RAID array. It’s a DIY tool with powerful data recovery algorithms to recover any lost or corrupted data on a failed RAID array.
Moreover, it has an built-in feature to repair corrupt photos and videos and is compatible with Windows 11, 10, 8, and 7.
Conclusion
Each of the above-discussed processes is suitable to set up software RAID on your Windows PC. You can choose any of them at your convenience.
You should try the RAID set up using Command Prompt or PowerShell only if you are well-versed with the command line and have used it earlier; otherwise, go for Methods 1 and 2.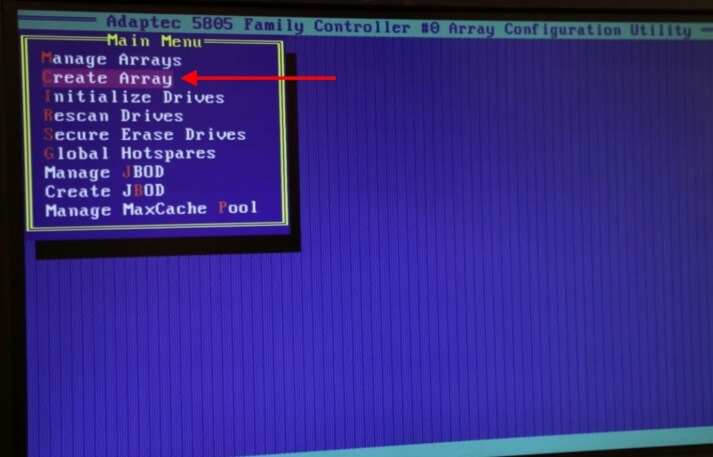
We hope you have got your system up and running. Share your thoughts with us in the comment section below.
FAQ
1. Does Windows 10 have a built-in RAID?
No, Windows 10 does not have a built-in RAID. However, Windows 10 and 8 do have a feature known as Storage Spaces that allows you to combine multiple HDDs or SSDs into a single RAID array.
2. How do I know if RAID is set up in Windows 10?
Right-click the Start button and open Disk Management. If all the listed disks show Basic, you haven’t configured any RAID array or are using a hardware RAID. If you have software RAID configured, then each drive that is a part of the RAID array will show Dynamic and will be represented with the same drive letter.
3. How do I know if my RAID 1 is working?
You can check your RAID status from Disk Management. Right-click the Start button and select Disk Management from the list to access it.
How Does RAID 5 on Windows 10 Work?
Here you will find out:
- how does RAID 5 on Windows 10 work
- methods how to set up RAID 5 on Windows 10
- when DiskInternals may help
Are you ready? Let’s read!
About RAID 5 on Windows 10
RAID is a combination of several drives to improve file performance and security.
This article will discuss RAID 5 on the Windows 10 operating system, as additional issues may arise with setting up such an array. In general, RAID 5 can be configured with three or more disks with a fairly efficient mechanism for distributing data: volume striping with parity. If a hardware failure occurs, you can easily replace the drive; then the data will be created again from the data on the other drives. RAID 5 works with a wide variety of file systems, including FAT, FAT32, and NTFS. In principle, arrays are most often used in a commercial environment, but if you, as an individual user, are interested in data security and improving system performance, you can create for yourself a RAID 5 on Windows 10.
In this article, you will learn how to set up a RAID 5 on Windows 10 in different effective ways.
What you need to set up a RAID 5
Basically, RAID 5 is not a very expensive array: you should have 3 or more dynamic disks.
If you want everything to be perfect, then use 4 dynamic disks. Remember that IDE, SCSI, or mixed architecture is also valid. The system files and the boot operating system must be on a different volume. A RAID 5 volume can take up only 20 MB per drive or the entire drive.
If you have disks that you want to upgrade to a dynamic disk, then they must contain at least 1 MB of free space at the end of the disk. Otherwise, a successful update will not occur. These are the basic requirements for a RAID 5 setup.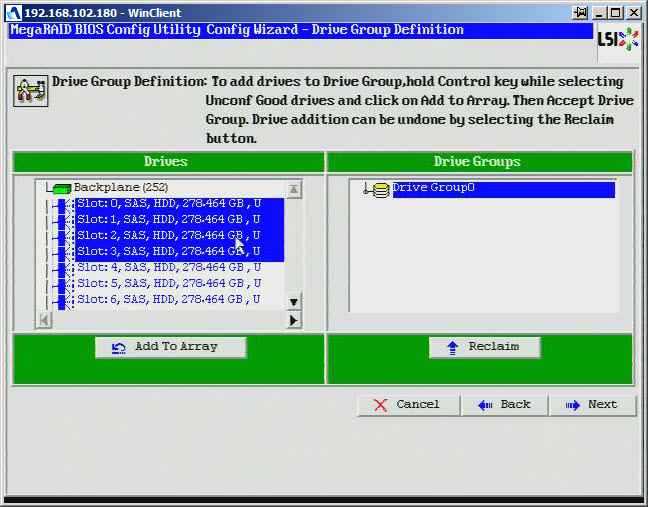 Next, you can begin the process of creating an array.
How to set up a RAID 5 on Windows 10 via Storage Spaces
Using this method to create an array is not difficult even for a novice. But it is important to follow all the recommendations.
To get started, you need to properly install the hard drives on your computer and then boot into Windows 10. It is recommended that you back up important data from the drives. Now click on Start and, in the search bar, type “Disk spaces” and press Enter.
In a new window, click the «Create a new pool and storage location» button. In the «Name and drive letter» section, specify the necessary parameters for the storage array. Next, Windows 10 will check all the drives and select them in the next window.
In the «Stability» section, select the «Parity» option, which is equivalent to RAID level 5.
Next, set the disk size correctly in the «Size» field. It is recommended that you select the default size, in which case it should be correct (keep in mind that the pool may be larger than the actual physical capacity, and if you run out of space, you will need to add more disks).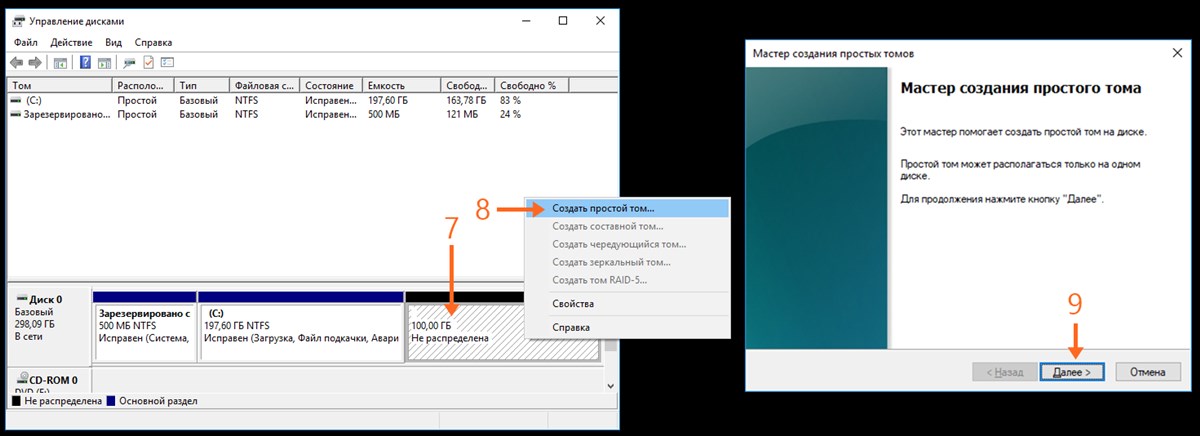 Select the «Create storage location» section and wait for the process to finish. To monitor the array, enter “Manage Storage Spaces” in the search field on the Start menu.
How to set up a RAID 5 Windows 10 via Disk Management
To get started, go to Disk Management and right-click on one of the dynamic disks designed to create a RAID 5.
From the list provided, select «Create Volume». The Wizard will help you; click «Next». Then click on the line “RAID 5 volume” and also click «Next». Now you have to select the drives to create the array and click on the Add button. Pay attention to the “Disk size” field; here you can adjust the size of the disks as you wish. Next, the Wizard will let you select a few more parameters of the array (Assign a drive letter, mount this volume in an empty folder, etc.).
Next, select «Format this section», where you may select the following parameters:
- Select the FAT32 or NTFS file system
- The unit size is selected by default
- In the Volume Label field, select the default label «New Volume»
- You can also select “Quick formatting” and the “Compress files and folders” checkbox, or postpone both of these tasks
- Finally, in the Summary window, click Finish
As a result, the status of the disks is displayed as “Good” and RAID 5 is ready for use even without rebooting the system.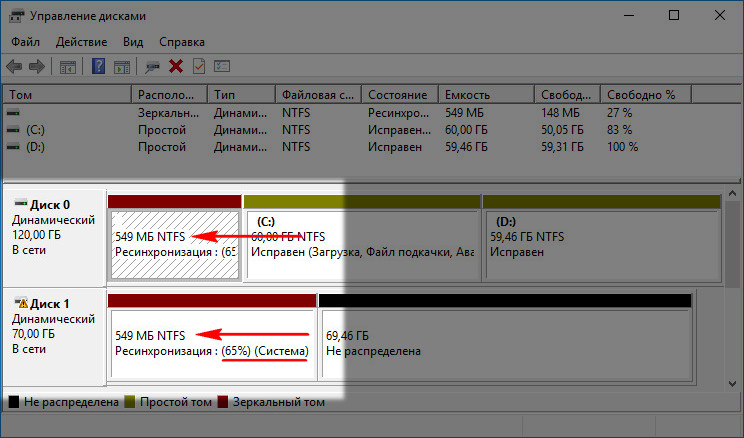
Despite the fact that RAID 5 is fault-tolerant, there are cases when the array capabilities are not enough to recover certain missing files. In such cases, you must use the special application DiskInternals RAID Recovery. It is designed specifically to recover files from any level of arrays. For beginners, there is a built-in Recovery Wizard, and for your peace of mind and confidence there is a free preview of the data found. It also automatically determines the necessary parameters of the array and its subsequent deep scan.
Before using the application, read the instructions:
Install DiskInternals RAID Recovery. Next, launch the Recovery Wizard, if necessary.
Choose which array will be scanned and which scanning mode you prefer (fast, deep or reader).
Then you just have to wait for the search results and view them for free.
This is a prerequisite, as the company cares about its reputation and will not offer you the purchase of a license without your confidence.
Once you understand that the application is excellent and all the files are in place, acquire a license and export the data to any other drive.
That’s all, your mission is over. Enjoy unrivaled results — congratulations!
RAID 0, 1, 3, 5, 10 data recovery software for Windows 10
This article will help users recover files from any raid levels in Windows 10. Also, here you can learn more about raids (types, levels, and creating a software raid) and storage spaces, you can compare these two technologies.
Restoring the raid files itself can be very easy for you. For this, there is specialized software that will solve your problem in a matter of minutes.
Article content:
- About RAID
- About Storage Spaces
- How DiskInternals can help you
About RAID
RAID technology allows you to connect multiple disks in a disk array to provide huge capacity, improve the performance of the disk array, including MTBF (mean time between failures) and fault tolerance.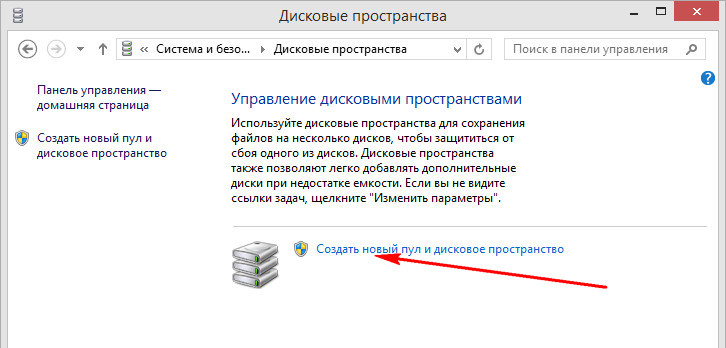
RAID Types
The following are the main types of raids:
- Hardware RAID
Hardware RAID requires a RAID card to connect disks to the computer, and it also includes a special I/O processing chip and an array buffer. This provides better performance.
However, this type of array is expensive, so it is most often used on servers.
- Hardware-assisted RAID
This RAID requires a RAID card and drivers, but does not have a dedicated I/O processing chip, so it will consume CPU resources. You will have excellent fault tolerance and performance, but this RAID is only suitable for RAID 0 and RAID 1.
- Software RAID
This array combines multiple drives into a logical volume using the disk management feature provided by the operating system. Data redundancy will be great, but the performance of the disk subsystem will decrease by about 30%.
Guide on how to create software RAID on Windows 10
- 1. Press «Windows + R», enter «diskmgmt.
 msc» and open «Disk Management»;
- 2. Next, create a RAID.
To do this, right-click the entire disk to convert it from a basic disk to a dynamic disk.
Right-click the unallocated space and choose New Volume.
Now follow the wizard’s instructions: select the drives and set the drive letter, volume size, file system, and cluster size. After that, click Finish and the software RAID creation process will be completed.
RAID Levels
Common RAID levels include: RAID 0, RAID 1, RAID 5, and RAID 10.
RAID 0 (striping) has at least two disks combined into a large volume. By distributing contiguous data across multiple disks for access, this results in an increase in disk capacity, improving performance.
RAID 1 (mirroring) implements data redundancy by forcing a drive to back up data on another drive. This consequently results in the usable space being only half of the disk array.
Unfortunately, the write speed slows down due to backup and error checking.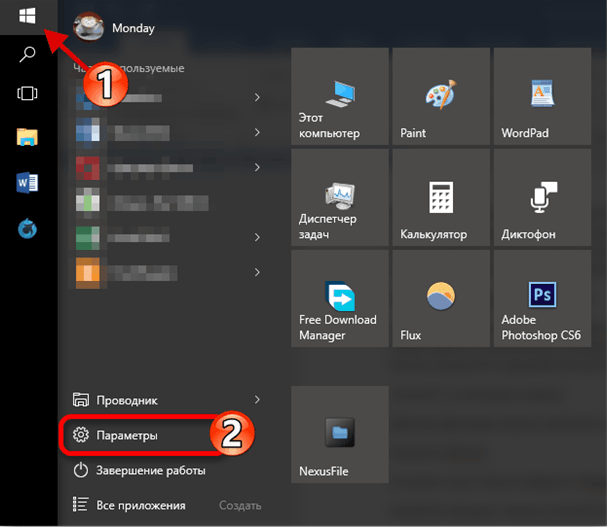
RAID 10 is a combination of RAID 0 and RAID 1, it can not only read/write data to multiple disks in parallel to improve access speed. In addition, this array provides data redundancy by backing up each source drive.
RAID 5 requires a minimum of three drives and the write speed of RAID 5 is slower than that of a single drive. This is because RAID 5 will read the old data and write additional parity information when the data is written.
Windows 10 Storage Spaces: closer look
Windows has built-in Storage Spaces technology, it is necessary to group multiple disks into a storage pool. You can then use the pool’s capacity to create virtual disks with storage space names. This is necessary to protect your data from disk failure by data mirroring and to increase storage by adding drivers.
Here’s how to use Windows 10 Storage Space:
- 1: You need to create a storage pool.
To do this, click the «Manage storage spaces» button, then click «Create a new pool and storage. » In order not to lose information, first create a backup copy of your data.
- 2: Need to create Storage Space.
To do this, select the file system (NTFS/ReFS), also select the persistence type:
(non-persistent, 2-way/3-way mirror, or parity)
Note:
The ReFS file system is compatible with most NTFS and can automatically check for data corruption and even attempt to recover data. Keep in mind that the combination of ReFS and Windows 10 Storage Spaces can give you better data protection and improved performance when working with large amounts of data.
Simple (no failover): At least one drive is required, so it won’t protect data from drive failure, but it can improve read/write performance by adding drives.
Two-way mirror, similar to raid 1, uses at least two disks and writes two copies of the data, and will also protect data from a single disk failure.
Three-way mirror uses at least five disks and will write three copies of the data. This disk space option will protect data from two simultaneous disk failures.
Parity , similar to raid 5, uses at least three disks, and data is written with parity information. Data protection in the event of a single disk failure is provided to you.
How does Storage Spaces compare to RAID?
The built-in Windows 10 Storage Spaces feature can implement software RAID to some extent, but still has some differences from RAID, which will be discussed below.
- 1. Number of sockets.
Hardware RAID has a limit on the number of sockets, the number of which is determined by the physical RAID controller. Windows 10 Storage Spaces and software RAID do not have this disadvantage.
- 2. Usable space and management.
If the disks in a hardware RAID have different capacities, there will still be wasted space. Windows 10 Storage Spaces will not result in capacity loss as the system can still run on a single drive. Storage Spaces also has ReFS, which makes it easier to manage and save users the hassle of data validation.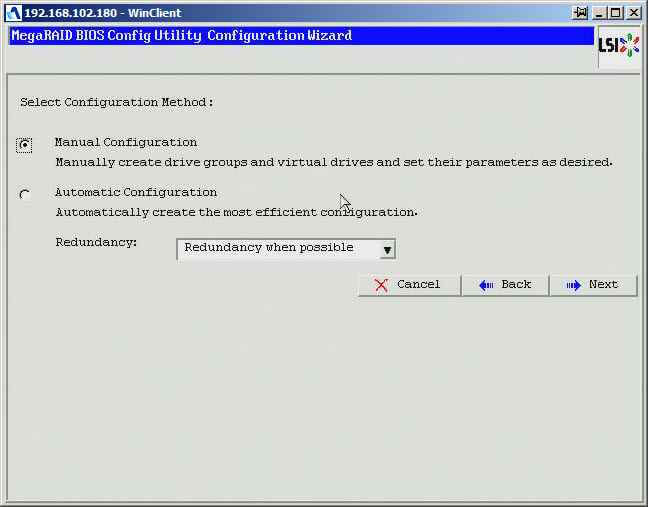
- 3. Read and write speeds.
In RAID 0 are about twice as fast as in simple Storage Spaces mode, while their 4K read/write speed is almost the same. At the same time, the sequential write speed in RAID 1 is half that of two-way storage space mirroring. In Storage Spaces parity mode, the read/write speed will be much slower than in hardware RAID 5.
However, the Windows feature still has its advantages, such as no board and data protection. And if you’re using an SSD, Storage Spaces is still recommended.
RAIDs files recovery on Windows 10
If you do lose some files from your array, you should pay attention to the professional DiskInternals RAID Recovery™ utility. It has thousands of positive reviews due to its qualities, functions and capabilities. Let’s dwell on this in more detail:
- The tool is designed to restore both software and hardware RAIDs.
- Ability to use both manual and automatic recovery. It is the built-in step-by-step recovery wizard that makes the application as automated as possible.
- Any recovered files and folders are exported to local or remote spaces.
- The application supports Unicode filenames and multi-level folders, while Windows restrictions are bypassed to simplify the recovery process.
- RAID Recovery™ is suitable for disk imaging.
- Recovers data from badly damaged pools which no longer mount.
- Automatically figures out pool and filesystem parameters, including disk order.
- Works even if a new blank pool was created over the original one.
- Recovers deleted files; recovers previous versions of files whenever possible.
- Verifies checksums to see if file data is correct.
1. To start recovering RAIDs Files on Windows 10,first download RAID Recovery™ to your PC or server computer. Then install the software on Windows 7-11 or Windows Server 2003-2019.
2. Open the RAID Recovery™ application, activate the Wizards if required, and be sure to select the target array.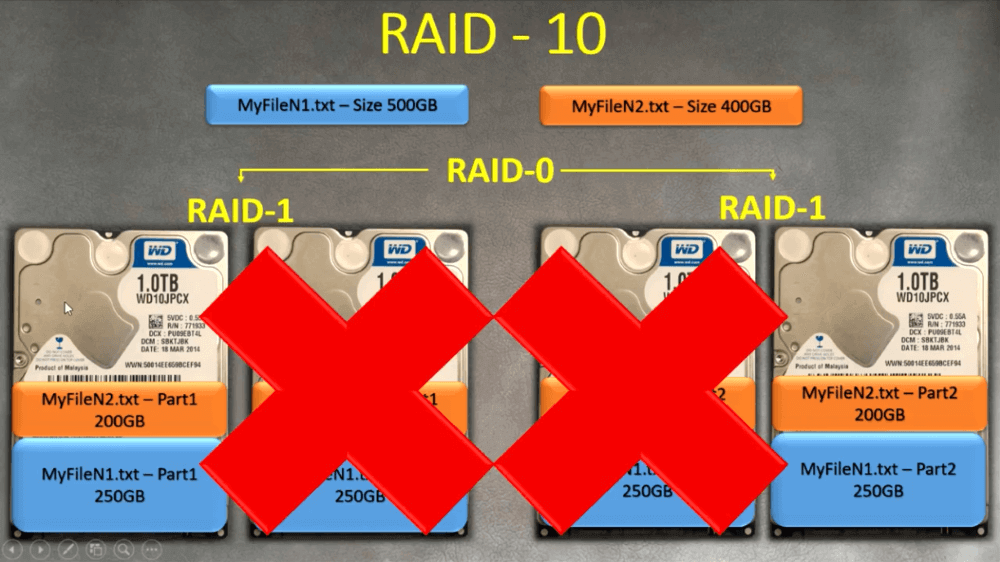
DiskInternals RAID Recovery — RAID WizardDiskInternals RAID Recovery — RAID WizardDiskInternals RAID Recovery — RAID Wizard
3. Then decide on the recovery mode:
- Quick recovery mode (try it first, it will be fast)
- Full recovery mode (deeper scan and will take some time, but the results will be much better)
4. Then RAID Recovery™ automatically checks the status of the RAID array, the controller , file system and disks and restores files at the slightest opportunity.
DiskInternals RAID Recovery — RAID WizardDiskInternals RAID Recovery — RAID WizardDiskInternals RAID Recovery — RAID Wizard
5. You get read-only access to the files — this is necessary so that you can use the preview function and check how successful the data recovery procedure was.
6. When you are sure that your data is back and restored in a proper way, purchase a license for RAID Recovery™ and you will have unlimited access to your files. You will be able to export the selected files to any suitable storage device, and you can also get technical support for a year after purchasing the license — that’s great.
7. If the necessary files are restored and you are satisfied with the result of the RAID recovery, congratulations and sincerely happy for you!
Recovery tips:
- 1. Never rush and be patient until each step is done properly.
- 2. When choosing a disk for a quick scan, carefully select the correct disk; otherwise you won’t find your files.
- 3. Review all data before restoring it.
- 4. Do not save data again on the same drive.
Frequently asked questions
1. How can I create storage spaces in Windows 10?
To get started, connect your drives to your Windows 10 PC and after that type «manage storage spaces» in the Windows search box.
Select the «Storage Space Management» utility and click «Create a new pool and storage».
Next, select:
- file system: NTFS or ReFS
- stability type: simple (no stability), two-way mirror, three-way mirror, or parity.
And complete the process of creating storage spaces using the Setup Wizard.
2. Does Windows 10 support RAID?
Yes, this OS is compatible with hardware and software RAID.
To create a software RAID, you just need to press Windows + R and type «diskmgmt.msc». In the Disk Management app, right-click on the entire drive to convert it from basic to dynamic.
Next, right-click Unallocated Space and select New Volume x (X can be Mirrored, Striped, or RAID-5).
After that, follow the wizard to optimally select disks and set the volume size, file system, drive letter, and cluster size.
Conclusion
Although arrays and storage spaces are protected from data loss to some extent, unexpected situations can happen to every user. However, this is not critical. You probably already understood by reading this article. DiskInternals RAID Recovery™ will not leave you in trouble, it will not only recover all the lost information from your array, but it can also be suitable for disk imaging and 24/7 technical support for a year after purchasing a license.
Thus, you will be protected from all sides; you will not have such protection in any other similar offer.
Creating a RAID or Mirroring Drives in the Latest Windows 10 Fall Creators Update
Category: Windows Features / Hard Drive
Added by: admin
access_time Published: 30-10-2017
visibility Views: 85 785
chat_bubble_outline Comments: 72
Hello friends! If you look at the comments of readers on our website in the section on repairing hard drives, you will be amazed at how many people were not ready for the fact that their storage device suddenly failed and all important files: projects, plans, diplomas, drawings, calculations, over which a person worked for several months in a row, simply disappeared into nowhere. Restoring files from a failed hard drive is difficult even for a professional repairman, let alone a simple user. Therefore, if you care about personal data, then be sure to read today’s article. In it, we will show you how to create a dual HDD RAID-1 array in the latest Windows 10 Fall Creators Update. It is very easy to do this, because the «disk mirroring» technology is built into the operating system.
This article differs from previous publications on this topic in that we will create «Mirror » directly for the system drive (C 🙂 and right in a running Windows 10!
At the beginning of the article, let me remind you that a RAID array or «Disk Mirroring» is a parallel recording of data on two hard drives. If one HDD fails, all information remains safe and sound on the other hard drive. That’s the whole secret! For a better assimilation of information, we will consider everything on a specific practical example, so you will understand everything much better than I would now begin to tell you the theory.
Let’s take an ordinary computer in the organization where I work.
Right-click on the Start menu and select Disk Management.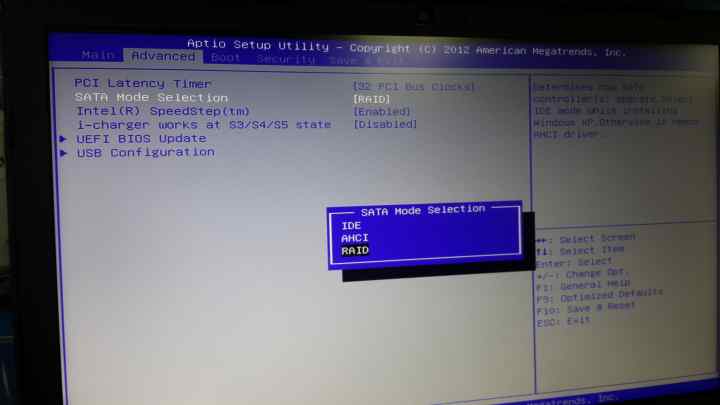
In this window, you can see two hard drives connected to the PC.
The first disk (Disk 0) contains two partitions: (C:) and (D:). Windows 10 is installed on the (C:) drive. Important working folders are located on the OS desktop. If the folders disappear for any reason, then the work of the entire organization will stop for several days, and I am even afraid to imagine all the consequences. There is no serious information on the (D:) disk, only movies and photographs. Therefore, I will create a mirror for one system partition (C:).
The second hard disk (Disk 1) is absolutely clean and contains no partitions, its entire area is unallocated. It is on it that we will create a disk mirror (C:). All information recorded on the system disk will also be duplicated on the mirror disk.
It is important that the HDD from which we want to create a mirror is unpartitioned and no smaller than the original disk on which the operating system is installed.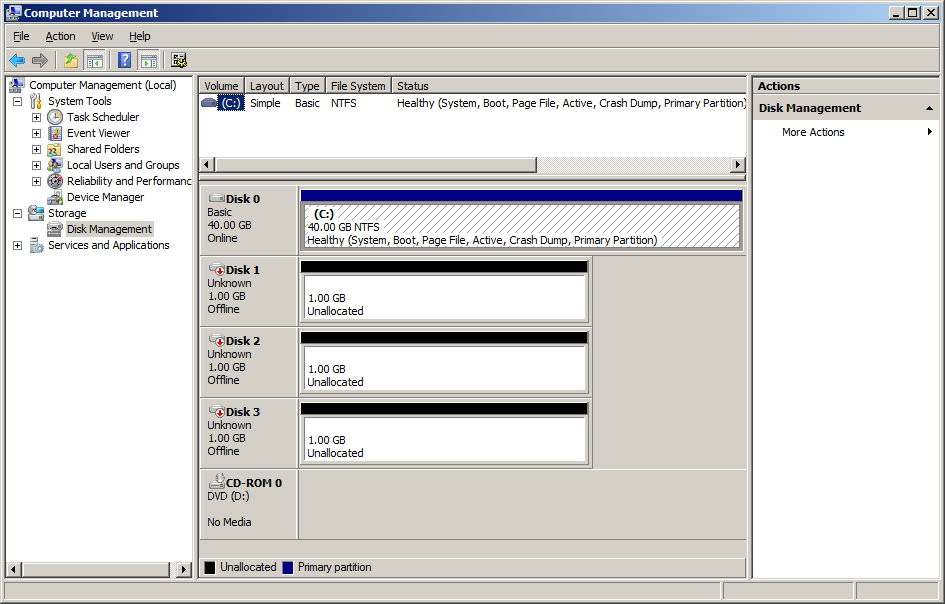 In our case, both hard drives are exactly the same.
Right-click on the drive (C:) and select «Add Mirror…»
Windows 10 will prompt you to select the drive that we want to use as a mirror. Select the blank Disk 1 with the left mouse button and click «Add Mirrored Volume».
A warning appears that the disks will now be converted to dynamic and if your PC has multiple operating systems installed, then after conversion you will be able to boot only the current operating system. Will explain.
It is better to set up a RAID-1 array or «Disk Mirroring» only if you have one operating system installed on your computer that has one bootloader. If you have several operating systems installed on your PC, for example, Windows 8.1 and Windows 10, then you can mirror disks in the Windows that was installed last. That is, you installed Windows 8.1, then Windows 10, in this case we set up a RAID-1 array in Windows 10 and after that only Windows 10 will boot on the computer.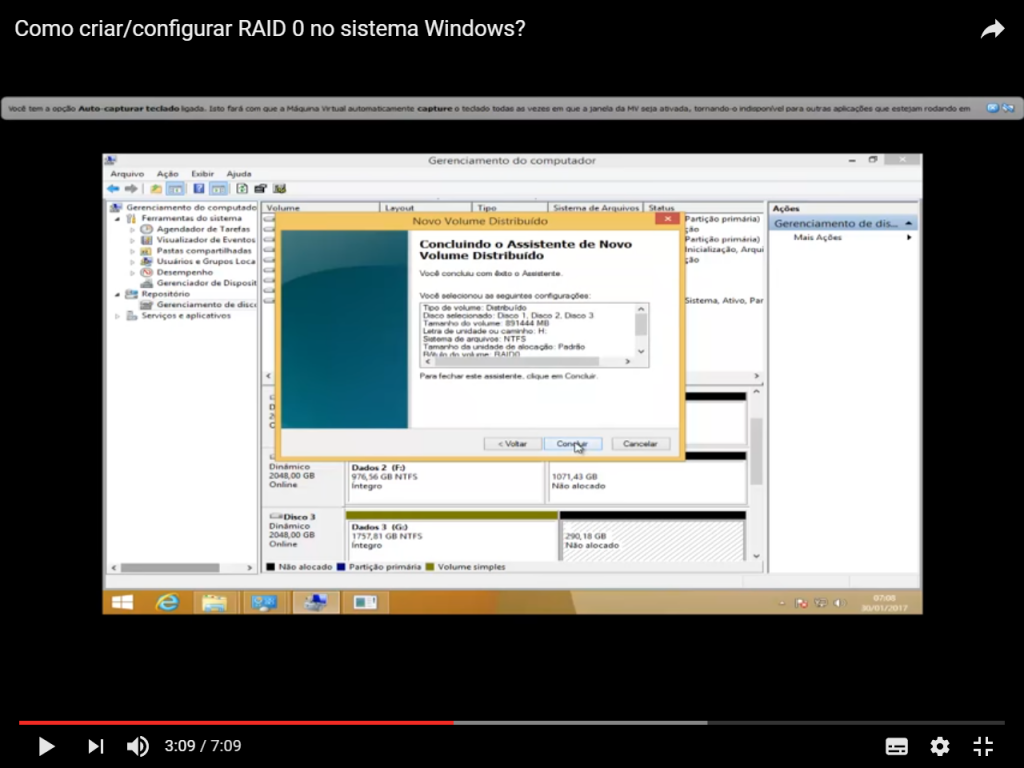 If you set up a RAID-1 array in Windows 8.1, then there is no Windows will not load. This problem is connected with the peculiarity of the work of dynamic disks, about which it would be nice to write a separate article, but all hands do not reach.
I only have one OS installed on my computer. I press «Yes».
Disk resynchronization process begins when mirror is created. In simple terms, Windows 10 creates an exact copy of the drive (C:) on the second hard drive (Disk 1). From the unallocated space, you can create a partition and use it without any problems.
The resynchronization process has ended and the OS is ready to go.
Now all changes on the drive (C:) will be mirrored on its copy that we created on the second hard drive. If you create any file on the drive (C:), it will immediately be created on the mirror drive. If you change one or another file on the disk (C :), then it will immediately change on the mirror. If the HDD with Windows 10 installed fails, then all your files will be available on the mirror.
Removing a mirror is as easy as creating it. Right-click on the drive (C:) and select «Delete mirror …» In our case, select Disk 1.
Articles on this topic: 1 array in case there is already information on one hard drive
Installing windows 10 on raid. From AHCI to RAID without reinstalling Windows
Despite the power level of a computer device, it has one weak point, represented by a hard drive. It is this element of components that has built-in mechanics. All parameters of the processor and other elements will be invalid if the computer has an HDD with operating principles that have long since become a thing of the past.
Today, there are two methods to speed up the operation of a computing device. One of them is to purchase an expensive and high-quality SSD, or to use the capabilities of the motherboard to the fullest. It may be required to set up a Raid 0 array for a pair of hard drives at once.
Setting up a Raid 0 array and installing Windows 10 on it. How to make the operating system run faster
In order to create a Raid0 array and install Windows 10, we need two hard drives. Even the most inexperienced users with the help of modern motherboards were able to cope with this task without much difficulty.
Note that hard disks of various sizes can be used for this procedure. It can be hard drives with a capacity of 1 TB and 250 GB each.
Raid0 array is a disk array of several hard drives at once. It has no redundancy. In simple terms, this is the combination of several hard drives at once into one disk array. Both of these disks will receive all the data almost simultaneously. This increases the speed of the system. One of the conditions for using this technology is that the motherboard of a particular computer device has support for Raid0.
Many may wonder about the lack of redundancy. The use of Raid is due to the fact that it is necessary to secure the personal data of users that are stored on the computer’s hard drive. Creating a Raid 1 array immediately provides double data protection, because if one hard drive becomes unusable, copies of them are stored on the second. Raid 0 does not write all data to multiple hard drives at once. She divides them into sections and writes them to different hard drives. The speed of the computer is high, but at the same time, after the failure of one of the hard drives, the second will not have copies of the missing information.
Those who developed the Raid technology simply could not consider Raid 0 safe because there is no redundancy in it. Therefore, she was assigned the number 0.
However, it should be noted that it is not very often that you have to deal with the problem of a hard drive failure. In addition, if you combine two hard drives at once in Raid 0, then you can use them as one hard drive. If you copy your personal data to media from time to time, you can avoid losing them in the future.
To begin with, we can install one of the hard drives that we are going to use and check what its read/write speed is. There are several programs available for this purpose. For example, CrystalDiskMark and ATTO Disk Benchmark.
You must first connect the hard drive to the motherboard and then turn on the computer device.
After checking, you can start setting up Raid 0 in BIOS and install node. operating system.
Raid0 array setup
First you need to connect two hard drives that we have to the motherboard at once.
After turning on the computer device, you must go to the BIOS. While the computer is booting, press the Del key on the keyboard.
In the new window, select the Advanced section at the top and find the SATA Configuration item in the list.
In order to enter the Raid configuration, you must press the combination of buttons on the keyboard CTRL + I in BIOS.
In the window that appears, select Raid Volume and press Enter.
It is on this page that you need to make the main settings for the array created by Raid 0.
To enter the name Raid 0, you must first press the spacebar and then enter it.
By using the Tab button, you can navigate to the items below.
Raid Level must be set to Raid (Stripe).
In the section where the size of the hard disk is indicated, everything must be left unchanged.
In the Capacity parameter, leave the automatically configured volume and press Enter.
No further changes need to be made. Just scroll down and click on Create Volume and Enter.
On the warning page, select Yes and press the Y button on the keyboard. To exit, press Esc.
In a new window, click on Y.
In this case, after each turning on the computer device, you will be prompted to press the Ctrl + I key combination to go to the Raid control panel.
Installing Windows 10 on a Raid 0 array
First you need to connect a USB flash drive to your computer device to boot. Next, you should reboot it and enter through the BIOS. There you need to set the boot priority of the USB flash drive.
Installing Windows 10 should be done in the most common way.
After installation, you need to go to the partition with hard drives. It shows that the system sees two hard drives as a single whole 500 GB.
This is a mirror image of your data on several hard drives, if one drive fails, then all the information remains safe on the other. You and I bought two identical hard drives and combined them programmatically into an independent array of inexpensive drives, but this instruction will not work if you want to install a Windows operating system on RAID 1, in which case you will have to act a little more complicated.
How to set up a RAID 1 array and install Windows 7, 8.1, 10 on it
After reading the previous articles on creating a software RAID 1 array using the operating system, you will certainly ask the question: “How to install the system itself on a RAID 1 array, or maybe it is possible to transfer a ready-made and configured Windows with programs to a raid array. After all, a hard drive with an installed operating system can suddenly break down, and not just a secondary hard drive with files? The loss of an operating system with all installed applications, in the absence of a backup, can disable any organization for several days, so I consider it mandatory to create a RAID 1 array at the workplace and install Windows on it.
- Note
: Friends, in addition to RAID 1 array, still exists.
In today’s article, we will build a RAID 1 array of two hard drives on an ASUS motherboard and install Windows 10 on it
Friends, of course, you can not install anything again, but simply enable RAID technology in the BIOS, and then transfer the existing Windows to it using various programs, but we will do this in the following articles, and today we will perform a simple installation of the system.
If you want to build a RAID 1 array and install an OS on it, then again you need two hard drives or two SSDs, and your motherboard must support RAID technology. For example, let’s take two hard drives with a capacity of 250 GB each.
We install hard drives in the system unit.
To set up a system with a RAID array, the first step is to enable the appropriate option in the BIOS and this is very easy to do. It is impossible to describe the corresponding settings for all existing BIOS types in one article, in this article I will enable RAID on an ASUS motherboard, and in the following articles I will try to show similar settings on GIGABYTE and ASRock motherboards.
We turn on the computer and enter the BIOS by pressing DEL at boot. Go to tab Advance
d, option SATA Configuration
SATA Mode Selection
set to RAID
.
HotPlug
— (hot plug) set to Enabled
for arrayed hard drives.
To save the changes, press F10
and select
After enabling the RAID technology in the BIOS, on the monitor screen when loading for a few seconds, you will be prompted to press the keyboard shortcut (CTRL-I
) to enter the RAID configuration settings.
Two hard drives connected to ports 4 and 5 are also visible.
SATA:
Maxtor and WD, which are not yet in a RAID array (Non-RAID Disk
). Click
CTRL-I.
In the initial settings window, select using the arrows on the keyboard Create a RAID Volume
( Create RAID Volume
) and press Enter.
In this window, we make the basic settings of the RAID array.
Name
(name of the RAID array). Press the spacebar and enter a name
e.g. «RAID 1 new»
and click
Enter.
Scroll down with the Tab key
.
RAID level
: (RAID level). We will create RAID1(Mirror)
— «mirroring» — if one of the disks fails, an exact copy of the data will remain on the other disk and the controller will immediately switch to using a duplicate disk. Select this level using the arrows on the keyboard.
Capacity
(volume) is set automatically. Our two 500 GB hard drives turn into 250 GB because we use the RAID1(Mirror) level and our two hard drives work as one.
We don’t change anything else and move to the last item Create Volume
and press Enter.
Warning:
WARNING: ALL DATA ON SELECTED DISKS WILL BE LOST.
Are you sure you want to create this volume? (Y/N)
:
WARNING: ALL DATA on the selected drives will be lost.
Are you sure you want to create this volume? (Y / N):
Press Y
(Yes)
on keyboard.
RAID 1 has been created and is in the Normal status. To exit, press the key Esc on the keyboard
Are you sure you want to exit
(Are you sure you want to exit? Press Y
(Yes).
The computer is restarting. We enter the boot menu and select boot from the Kingston installation flash drive containing Windows 10 files.
If you cannot get into the boot menu of the computer, then
in BIOS.
As you can see, the RAID 1 array we just created with the name »
RAID 1 new» is also in the boot menu.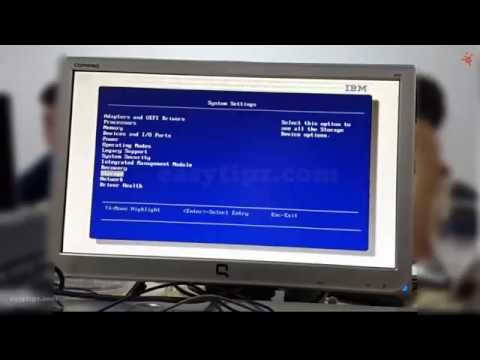
We boot from a USB flash drive into the Windows 10 setup program. Then we proceed as if we were installing the operating system normally.
Windows installation only
Win 10 installer sees two hard drives combined in a RAID array as one.0012
Skip this step
Use default settings
Create a local account
Windows 10 is installed on a RAID 1 array.
Device Manager.
Disk management.
RAID 1 array and flash drive with Windows 10.
Friends, if one hard drive in an independent array fails, then the operating system will boot from the second working hard drive, that is, nothing will happen to your data, but we’ll talk about how to recreate a RAID array in the next article.
I have a computer whose motherboard is based on the AMD 780G chipset and the SB700 south bridge (MSI 760G-P33). This motherboard has a built-in RAID controller (AMD AHCI Compatible RAID Controller). The whole problem is that additional disks appeared and it was decided to combine them into RAID. To do this, it was necessary to change the type of operation of the SATA controller from AHCI to RAID and configure the disk subsystem, which, in fact, I did. Troubles were not long in coming, Windows Server 2008 R2 did not want to start without additional drivers. I did not find a method on the net how to solve this problem without reinstalling windows, because the controller drivers are supplied as preinstall, and cannot be introduced into the installed system. There was no desire to reinstall windows, so an idea was born how to solve the problem.
The first thing I did was to set up a windows backup, then create a system restore image. I rebooted the computer, changed the controller parameters, started booting from the windows server 2008 r2 installation disk and chose system restore from the image created earlier. After the installer got to the disk, I clicked the install drivers button, selected the RAID controller drivers, and clicked OK. The drivers have been integrated into the system and the recovery process has begun.
All this action took me about 40 minutes, Windows successfully started and installed the necessary drivers.
As a result, without actually reinstalling windows, I was able to change the controller type from AHCI to RAID. If you have any questions, welcome to the comments!
This is a mirror image of your data on several hard drives, if one drive fails, then all the information remains safe on the other. You and I bought two identical hard drives and combined them programmatically into an independent array of inexpensive drives, but this instruction will not work if you want to install a Windows operating system on RAID 1, in which case you will have to act a little more complicated.
How to set up a RAID 1 array and install Windows 7, 8.1, 10 on it
After reading the previous articles on creating a software RAID 1 array using the operating system, you will certainly ask the question: “How to install the system itself on a RAID 1 array, or maybe it is possible to transfer a ready-made and configured Windows with programs to a raid array. After all, a hard drive with an installed operating system can suddenly break down, and not just a secondary hard drive with files? The loss of an operating system with all installed applications, in the absence of a backup, can disable any organization for several days, so I consider it mandatory to create a RAID 1 array at the workplace and install Windows on it.
- Note
: Friends, in addition to RAID 1 array, still exists.
In today’s article, we will build a RAID 1 array of two hard drives on an ASUS motherboard and install Windows 10 on it
Friends, of course, you can not install anything again, but simply enable RAID technology in the BIOS, and then transfer the existing Windows to it using various programs, but we will do this in the following articles, and today we will perform a simple installation of the system.
If you want to build a RAID 1 array and install an OS on it, then again you need two hard drives or two SSDs, and your motherboard must support RAID technology.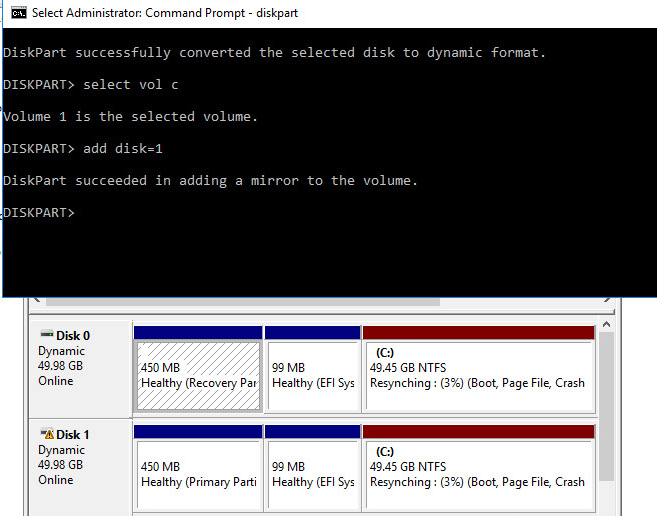 For example, let’s take two hard drives with a capacity of 250 GB each.
We install hard drives in the system unit.
To set up a system with a RAID array, the first step is to enable the appropriate option in the BIOS and this is very easy to do. It is impossible to describe the corresponding settings for all existing BIOS types in one article, in this article I will enable RAID on an ASUS motherboard, and in the following articles I will try to show similar settings on GIGABYTE and ASRock motherboards.
We turn on the computer and enter the BIOS by pressing DEL at boot. Go to tab Advance
d, option SATA Configuration
SATA Mode Selection
set to RAID
.
HotPlug
— (hot plug) set to Enabled
for arrayed hard drives.
To save the changes, press F10
and select
After enabling the RAID technology in the BIOS, on the monitor screen when loading for a few seconds, you will be prompted to press the keyboard shortcut (CTRL-I
) to enter the RAID configuration settings.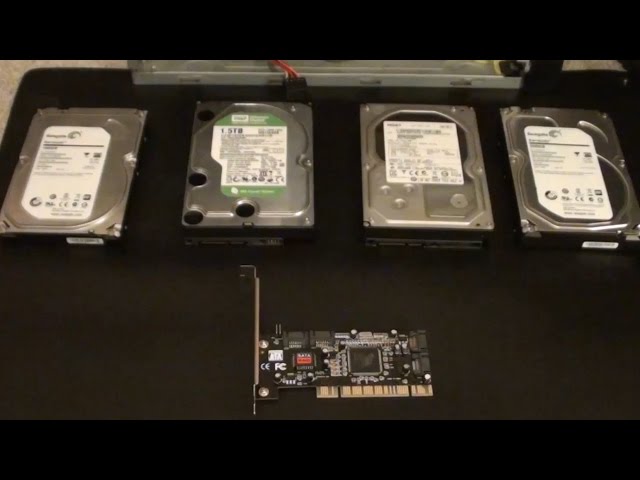
Two hard drives connected to ports 4 and 5 are also visible.
SATA:
Maxtor and WD, which are not yet in a RAID array (Non-RAID Disk
). Click
CTRL-I.
In the initial settings window, select using the arrows on the keyboard Create a RAID Volume
( Create RAID Volume
) and press Enter.
In this window, we make the basic settings of the RAID array.
Name
(name of the RAID array). Press the spacebar and enter a name
e.g. «RAID 1 new»
and click
Enter.
Scroll down with the Tab key
.
RAID level
: (RAID level). We will create RAID1(Mirror)
— «mirroring» — if one of the disks fails, an exact copy of the data will remain on the other disk and the controller will immediately switch to using a duplicate disk. Select this level using the arrows on the keyboard.
Capacity
(volume) is set automatically. Our two 500 GB hard drives turn into 250 GB because we use the RAID1(Mirror) level and our two hard drives work as one.
We don’t change anything else and move to the last item Create Volume
and press Enter.
Warning:
WARNING: ALL DATA ON SELECTED DISKS WILL BE LOST.
Are you sure you want to create this volume? (Y/N)
:
WARNING: ALL DATA on the selected drives will be lost.
Are you sure you want to create this volume? (Y / N):
Press Y
(Yes)
on keyboard.
RAID 1 has been created and is in the Normal status. To exit, press the key Esc on the keyboard
Are you sure you want to exit
(Are you sure you want to exit? Press Y
(Yes).
The computer is restarting. We enter the boot menu and select boot from the Kingston installation flash drive containing Windows 10 files.
If you cannot get into the boot menu of the computer, then
in BIOS.
As you can see, the RAID 1 array we just created with the name »
RAID 1 new» is also in the boot menu.
We boot from a USB flash drive into the Windows 10 setup program. Then we proceed as if we were installing the operating system normally.
Windows installation only
Win 10 installer sees two hard drives combined in a RAID array as one.0012
Skip this step
Use default settings
Create a local account
Windows 10 is installed on a RAID 1 array.
Device Manager.
Disk management.
RAID 1 array and flash drive with Windows 10.
Friends, if one hard drive in an independent array fails, then the operating system will boot from the second working hard drive, that is, nothing will happen to your data, but we’ll talk about how to recreate a RAID array in the next article.
Drive numbers may not match SATA channel numbers when installing Windows on a computer with multiple SATA hard drives or RAID
Support for Windows Vista Service Pack 1 (SP1) ended on July 12, 2011.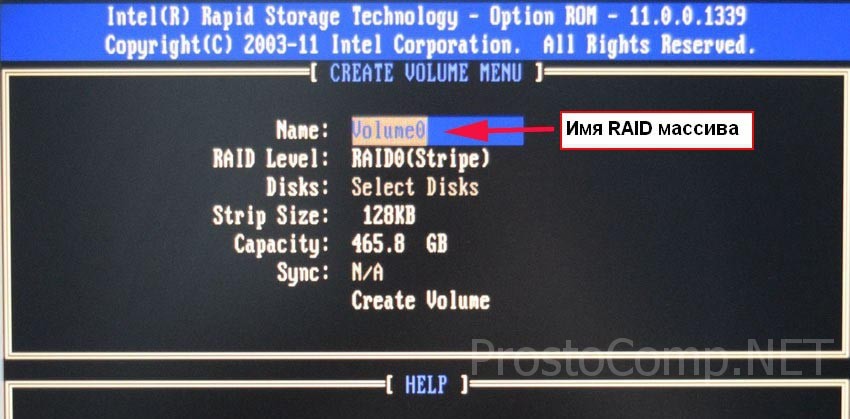 To continue receiving security updates for Windows Vista, make sure you are running Windows Vista Service Pack 2 (SP2). For more information, see the Microsoft webpage: Support is ending for some versions of Windows.
Symptoms
Consider the following scenario:
-
You have a computer that is running one of the following operating systems:
-
You have added two SATA (Serial Advanced Technology Attachment) or RAID hard drives to your computer.
-
SATA or RAID hard drives are attached to channels 0 and 1.
In this case, Disk 0 might not be assigned to a hard drive on channel 0, and Disk 1 might not be assigned to a hard drive on channel 1.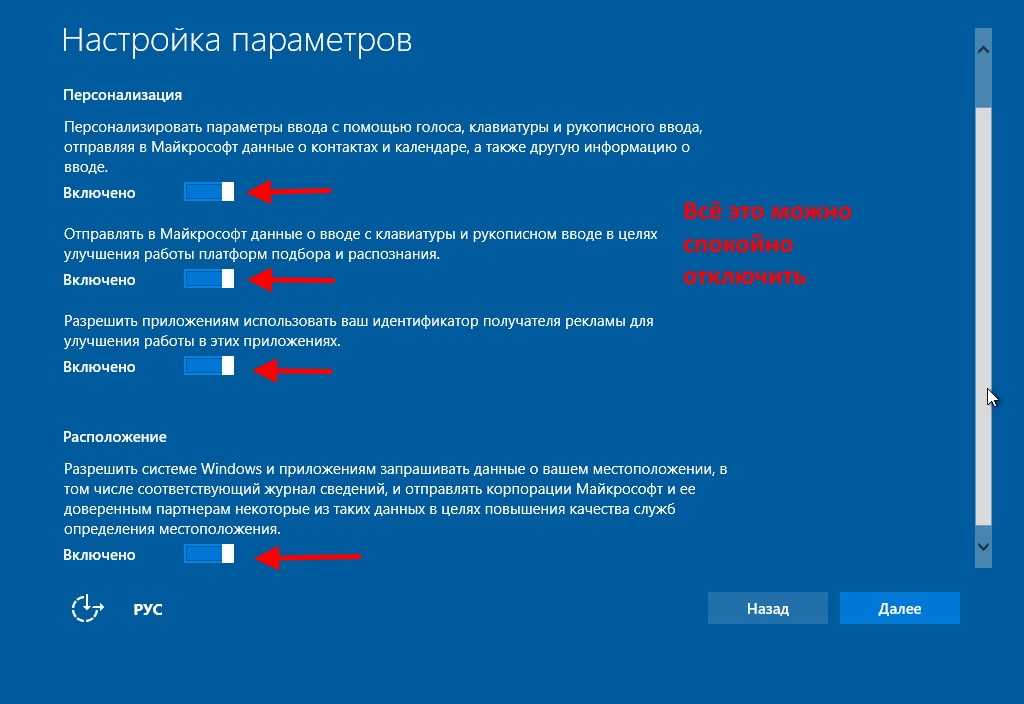 It is assumed that the drive numbers are assigned according to SATA or RAID channel numbers.
This issue may occur when you configure the operating system during installation or when you perform a recovery process provided by the computer manufacturer. Also, this problem can occur during normal booting of the computer. Thus, after several system startups, hard drives may receive different numbers. In addition, disks may be listed in a different order when the hard disk controller mode is changed in the BIOS (for example, in RAID mode and without RAID mode).
Cause
Numbers assigned to drives may not necessarily correspond to SATA or RAID channel numbers.
The BIOS may or may not list drives in a specific (user expected) order. There is no direct relationship between BIOS ordering and the order in which Windows disk numbers are. Switches support native Windows drivers for disk access during Windows startup using BIOS INT13.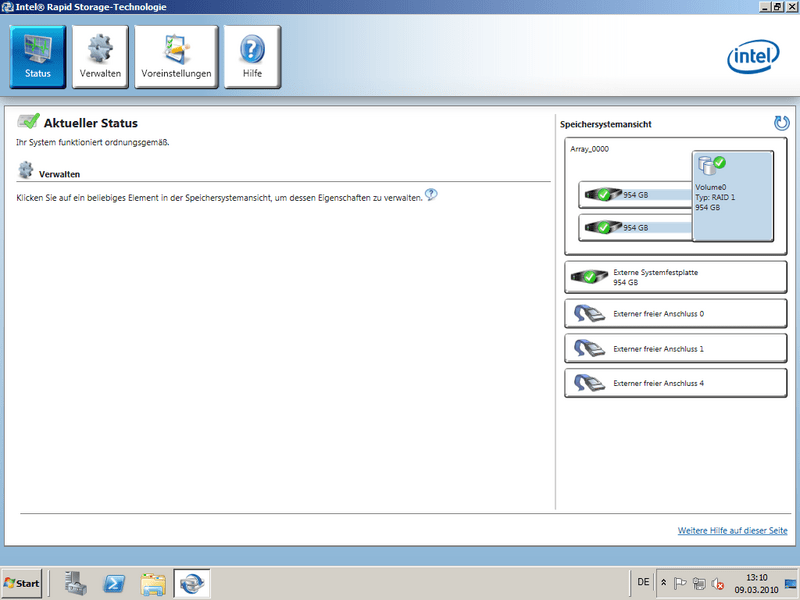 Windows waits for a few seconds for the system drive to enumerate Plug and Play. If a match is found before the timeout expires, a Normal startup will be performed. Otherwise, the system will run error checking with a Stop 0x7B error code. Windows uses other mechanisms to distinguish between drives, as Windows does not provide control over the drive numbering process prior to boot. Windows is not aware of any hardware changes when the computer is turned off. Therefore, Windows starts its own request to enumerate the device.
The drive numbers assigned by the Windows operating system after switching to native Windows disk controller drivers during startup depend solely on the order in which the drives are listed and handled by Plug and Play. Windows will enumerate the available hard drives, removable drives, and then assume that native Windows drivers are already present and installed on the system. Various uncontrollable time factors can affect the order of enumeration. For example, most IDE controllers are specifically designed to enumerate the sample channel, wait two seconds, and then enumerate the slave channel. This acts as a provision for an apparently consistent enum order, but this is actually a side effect of the hardware implementation. SATA controllers have different behavior and do not experience this same side effect.
Devices are presented in the order in which they are listed. Thus, the assignment of the disk number may differ in different launches. For example, suppose you are running a Windows or Windows Server installation on a computer that has two raw RAID or SATA hard drives. In this case, Windows may present the second hard disk as disk 0 when the operating system installation disk appears. The order of the enumeration may change over time between system bootups, depending on time factors such as slightly longer spin-up cleaning hard drives.
Solution
If you are installing any of the operating systems (listed in the «Symptoms» section) on a computer that has multiple SATA or RAID hard drives, check the details of that drive to verify the drive on which you intend to install the system. For example, on the screen you can select the disk to install the installation, check the volume name and free space.
To view the numbers assigned to drives, use any of the following methods:
-
Start the Disk Management console. To do this, click the Start button, type diskmgmt.msc in the Start Search box, and click the diskmgmt.msc button in the Programs list.
-
Run the list disk command using the command line utility Diskpart.exe.
-
When installing Windows or Windows Server, the assigned disk numbers are specified during the selection of disk and partition for installation.
In some cases, it may be difficult to notice that the drive numbering does not match the corresponding SATA or RAID channel number.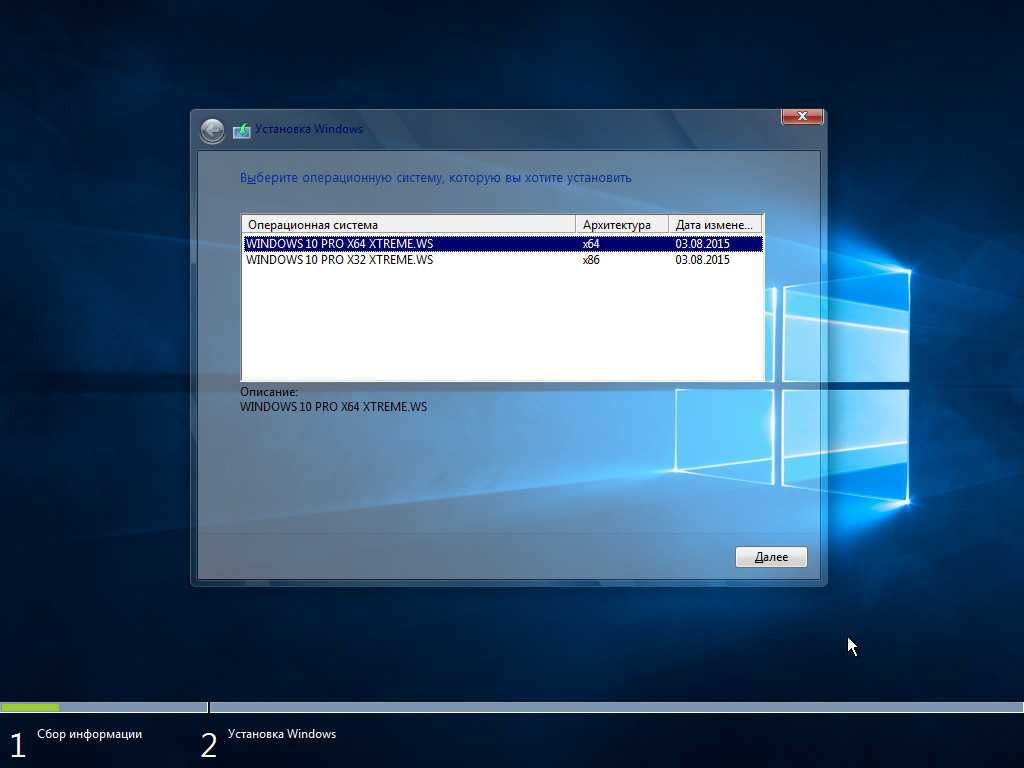 For example, if the size of the hard drive is identical to the SATA or RAID size, it is difficult to determine the identity of the drives using these methods.
Additional information
When you install one of the operating systems (listed in the «Symptoms» section) on a computer with multiple hard drives, the number assignment is assumed to be the same as the corresponding SATA or RAID channel number. If you encounter channel mismatch assignments, you may be installing an operating system on the wrong drive, or you may be trying to format a partition on the wrong drive. Therefore, you may lose important data.
Additionally, when installing Windows Server 2012, Windows Server 2008 R2, Windows 8, or Windows 7, the installer creates a system partition by default along with the Windows partition. The system partition is created as required by BitLocker. BitLocker requires boot files and Windows files are on different partitions. If the default presets on the hard drive have not been changed, a system partition is created on the drive that is recognized as drive 0.
Microsoft has confirmed that this problem occurs due to limitations in the design of Microsoft products that are listed in the «Applies to» section. This issue occurs because the drives are numbered in the order they are listed in the operating system through Plug and Play. All obviously, disk numbering consistency is random and/or used as a side effect of hardware and drivers.
Links
For more information about a similar issue, click the following article number to view the article in the Microsoft Knowledge Base:
937252 Volume numbers in the «Volume ###» columns may change each time you run the «List Volume» command in the Diskpart.exe utility in Windows
For more information about PnP enumeration and hard drive letter assignment in Windows Server 2003 and Windows XP, click the following article number to view the article in the Microsoft Knowledge Base:
825668 Overview of PNP enumeration and hard drive letter assignment in Windows Server 2003 and Windows XP
Setting up a RAID 0 array and installing Windows 10 on it
Even if a computer has the fastest CPU, the latest video card, and it has impressive amounts of RAM, this will not guarantee that it will really use all this power.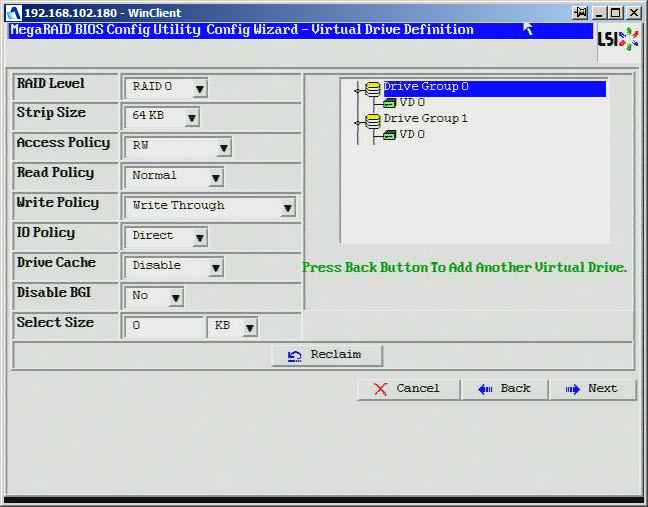 And all because there is one detail that will not allow everyone else to “walk around” properly — this is a hard drive. Like it or not, a hard drive always reads data for quite a long time, compared to the processing speed of their processor. This takes a lot of time. Therefore, the computer will not be as fast as it could be.
But this situation can still be improved. There are two ways to do this, one of which is to buy an expensive solid-state and faster SSD, and the other is to create a RAID 0 array, from two hard drives. The second option is cheaper and allows you to use your motherboard at 100%. Due to this, data reading speed can be doubled.
RAID 0 array for Windows 10
First, let’s figure out what it is, a RAID 0 array? This is an array in which several hard drives are combined, with no redundancy. In this case, the data will be written and read from them simultaneously. The concept of «lack of redundancy» refers to the method of writing data to disks: all information is divided into fragments, some of which go to one disk, and the other to the second.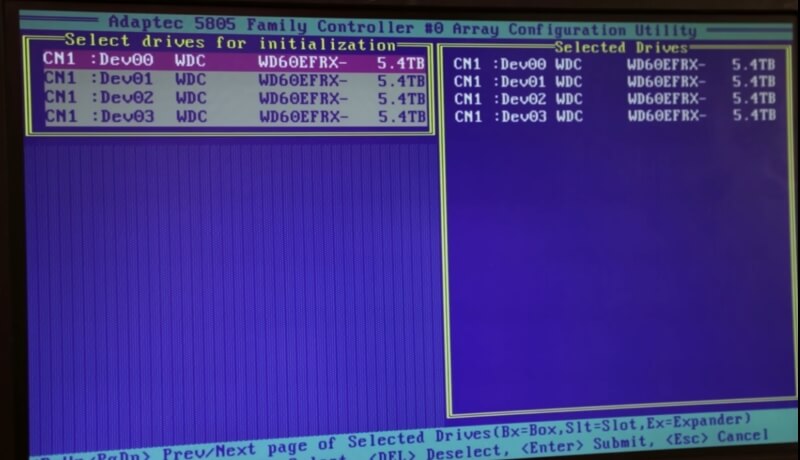 Thus, the processing speed of all operations that will involve hard drives will double.
Before creating RAID 0, you need to make sure that the motherboard you have can work in this mode. And you should also be aware that in the event of a breakdown of one of the hard drives, the data on the second will be irretrievably lost.
But not everything is as scary as it seems. Does anyone remember from their personal experience cases of hard drive failure? And if this happened to someone, then this event still remains an extremely rare occurrence. Therefore, you can safely create a RAID 0 array. If necessary, you can make backup copies of the operating system and all important data, and then you will not be afraid of anything at all.
Two 250 GB SATA III (6 Gb/s) drives and an ASUS P8Z77-V PRO motherboard were used in this article. The peculiarity of this board is that it is based on the Intel Z77 Express. Like the boards based on Intel Z87, H87 and B87, during its development the possibility of creating a RAID 0 array from both hard drives and SSDs was laid.
Let’s make speed measurements for the purity of the experiment. The first time with one hard drive and the second time after creating a RAID 0 array. Thus, we can make sure that the speed of the computer has really doubled. To do this, we will connect one of our disks to the motherboard and use the speed test programs: CrystalDiskMark, and / or ATTO Disk Benchmark, measuring the speed of the hard drive for reading and writing data.
We take one of our disks, in my case it is SATA III WDC WD2500AAKX 250 GB, we connect it to the SATA III port. Then we turn on the computer.
Testing with CrystalDiskMark
Quite an old program, which does not diminish its usefulness. It is relevant to this day. In it you need to select the required drive for the test. After that, just click the «All» button. After the hard disk test, the program will show the results of the maximum write speed and maximum read speed.
ATTO Disk Benchmark speed test
The program is very similar in principle to the previous one. The setup before testing is the same as in the previous one. After the test, statistics are displayed, with maximum speed levels.
Creating and configuring the array itself
Connecting two identical hard drives to the motherboard.
The board used for this article has 4 SATA III (6 Gb/s) ports. We connect hard drives to port number 5 and number 6.
Now, turning on the computer, go to the Bios settings (for those who forgot how to do this: press DEL while the computer boots up). Open Advanced and go to SATA Configuration.
On the contrary, the SATA Mode Selection parameter must be set to RAID. We save all the changes made by pressing F10 and then «Yes».
If you managed to complete the previous steps, then after rebooting the PC, a table with disks (which are not yet included in RAID 0) will be displayed on the monitor. Go to settings by pressing CTRL-I.
The RAID configuration opens. Go to the first item (Create a RAID Volume) by pressing ENTER.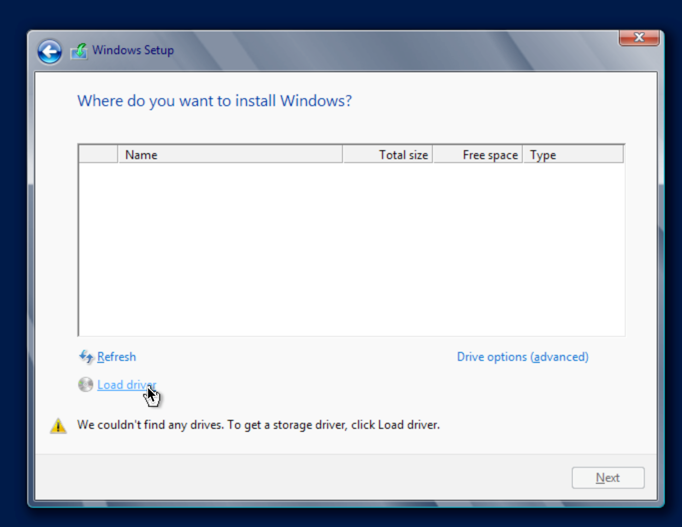
We are configuring a RAID 0 array.
In the «Name» field, you need to enter the name of the future array. To enter, press the spacebar.
After setting the name, press ENTER and using the Tab key, go to the next parameters.
In the «RAID Level» field, set the type (or in other words, the level) of RAID. Using the arrows, select the RAID0 (Stripe) parameter — an array of two hard drives without redundancy. Press the ENTER key
Navigate by pressing Tab again. The «Stripe Size» parameter is not changeable. We go further.
The «Capacity» value determines the total size of the array. It is determined automatically, so just press ENTER.
There is no need to change anything further. Just go to «Create Volume» and press ENTER.
Now we see the warning. It states that all data on the involved hard drives will be lost and requires your consent. Press «Y», confirming further actions.
That’s it, we have created a RAID 0 array. If the “Normal” status is lit, then everything is fine, and it is already functioning.
Exit settings by pressing the Esc key.
To be confirmed by pressing «Y».
Every time you turn on your PC, a table with the status and status of the RAID 0 array will be displayed for a couple of seconds.
The array has been created, now we will install Windows 10
We connect a bootable flash drive with Windows 10 to our PC. We reboot and go to the Bios settings. In the Boot boot settings, we set the first priority for our flash drive. Please note that in addition to the flash drive, there is already a newly created RAID 0 array in the list of disks.
Reboot and start installing Windows 10.
Click «Install».
As with any software installation, you must accept the license agreement.
Need to go to custom installation.
Select a disk. You can create partitions on it. Click «Next», thereby starting the installation of Windows 10.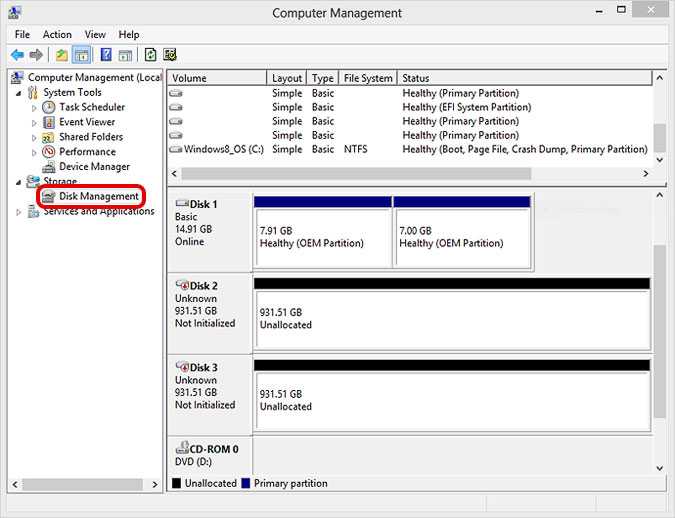
All. Windows 10 successfully installed on a RAID 0 array.
If you go to Disk Management, you can see that the system recognizes two disks in the array as one.
Let’s look at the device manager.
Moving on to speed tests
As you can see in the screenshot, CrystalDiskMark shows write / read speed almost twice as much as the previous time.
The speed value for writing, in the case of ATTO Disk Benchmark, has become even a little higher than that of CrystalDiskMark.
Summing up
Tests have shown that by creating a RAID 0 array, we were able to double the speed of working with data on hard drives. At the same time, Windows recognizes an array of disks as a whole — one disk. And the main plus is that today, motherboards make it quite easy to create arrays of different variations and with different RAID levels, which even beginners can handle.
Software RAID1 (mirror) for bootable GPT disk in Windows 10/Server 2016
In this article, we will look at how to create a software mirror (RAID1) from two GPT disks in Windows Server 2016/Windows 10 installed on a UEFI system. We will consider a complete configuration of the BCD bootloader, which allows you to ensure the correct boot of Windows and protect data from the failure of any disk.
So, we have a simple UEFI computer without a built-in RAID controller with two identical 50 GB disks. Our task is to install an OS (Windows Server 2016, Windows 10 or a free Hyper-V server) on the first GPT disk, and then assemble a software mirror (RAID1 — Mirroring) from two disks.
In the vast majority of cases, when choosing between software or hardware RAID, you should choose the latter. Now motherboards with a built-in physical RAID controller are available even for home users.
Burn the Windows installation image to a DVD/USB stick, boot the computer) from this bootable device (in UEFI mode, not Legacy) and start installing Windows Server 2016.
that the first disk uses the GPT partition table (disk properties -> Volumes tab -> Partition style -> GUID partition table ), and the second disk is empty (not partitioned).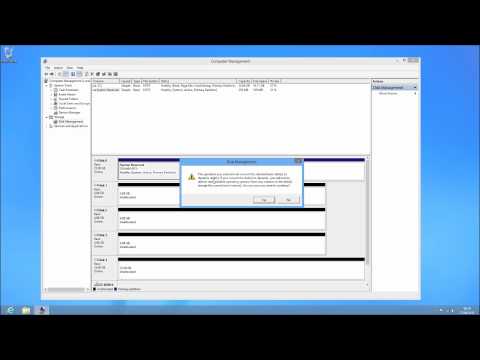
Contents:
- Preparing the partition table for the mirror on disk 2
- Converting disks to dynamic, creating a mirror
- Preparing the EFI partition on the second disk in the mirror
- Copying the EFI and BCD configuration to the second disk
- Disk 0 is a disk with a GPT partition table on which Windows is installed
- Disk 1 is an empty unpartitioned disk
- Recovery — 450 MB recovery partition with WinRE
- System — 99 MB, EFI partition (more about the partition structure on GPT disks)
- Reserved 16 MB, MSR partition
- Primary — 49 GB, main partition with Windows
Preparing the partition table for a mirror on disk 2
Open a command prompt with administrator rights and run the diskpart command. Dial:
DISKPART>List disk
As you can see, there are two disks in the system:
Just in case, clean the second disk again convert it to GPT:
Select disk 1
clean
Convert GPT
Enter the list of partitions on the second disk:
List part
If there is at least one partition (in my example it is Partition 1 — Reserved — Size 128 Mb), delete it:
Sel part 1
Delete partition override
List partitions on disk 1 (disk 0). Next, you need to create the same partitions on Disk 1.
Select disk 0
List part
There are 4 partitions:
Create the same partitions on Disk 1:
Select disk 1
Create partition primary size=450
format quick fs=ntfs label=»WinRE»
set id=»de94bba4-06d1-4d40-a16a-bfd50179d6ac»
create partition efi size=99
create partition msr size=16
list part
Converting disks to dynamic, creating a mirror
Now both disks need to be converted to dynamic:
Select disk 0
Convert dynamic
Select disk 1
Con dyn
Create a mirror for the system disk (drive C:). You need to select a partition on the first disk and create a mirror for it on disk 2:
 Select volume c
 Add disk=1
A message should appear:
DiskPart succeeded in adding a mirror to the volume
Open the Disk Management console, and make sure it starts syncing partition C to (Recynching). Wait for it to finish (may take up to several hours depending on the size of the C: partition).
When Windows boots, the Windows Boot Manager menu will now appear, prompting you to select which disk to boot from. If you do not select a disk manually, the system will try to boot from the first disk after 30 seconds:
- Windows Server 2016
- Windows Server 2016 — secondary plex
actions. Essentially, you’ve only protected the data (but not the Windows bootloader) from a second disk failure.
Windows software RAID cannot be used to create a normal mirror of an EFI partition. Because the EFI partition stores the files necessary to boot the OS, then when they fail of the first disk, you will not be able to boot the computer from the of the second disk without manually restoring the EFI bootloader on it in the recovery environment. These operations are quite difficult to do for an unprepared administrator, and also require additional time (which may not be available if you have a crowd of angry users behind you).
Next, we’ll show you how to copy an EFI partition to a second drive and change the BCD bootloader configuration so that you can boot Windows from either the first or second drive.
Preparing the EFI partition on the second disk in the mirror
Now we need to prepare the EFI partition on the second disk in the mirror so that the computer can use this partition to boot Windows. Let’s assign the letter S to the EFI partition on Disk 1 and format it in the FAT32 file system:
Select disk 1
Select part 2
assign letter=S
format fs=FAT32 quick
Now assign the drive letter P: to the EFI partition on Disk 0:
select disk 0
select partition 2
assign letter=P
exit
Copy the EFI and BCD configuration to the second disk
Display the current BCD bootloader configuration with the command:
bcdedit /enum
When creating a mirror, VDS automatically added an entry to the BCD configuration for the second mirror disk (labeled Windows Server 2016 — secondary plex).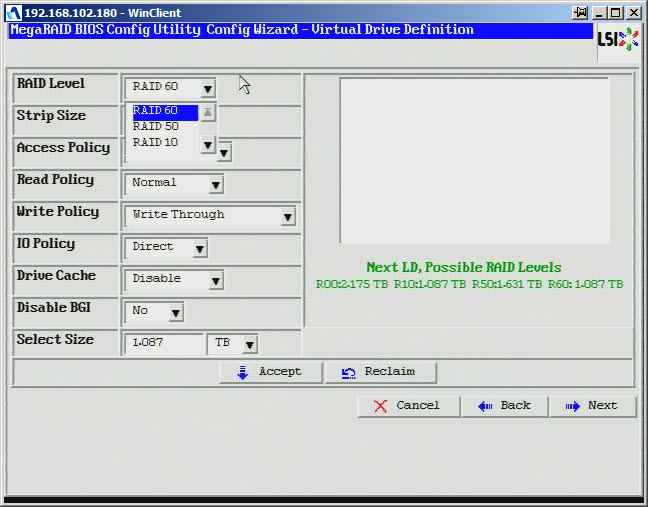
In order for EFI to boot from the second disk if the first disk is lost, the BCD configuration needs to be changed.
To do this, copy the current Windows Boot Manager configuration
bcdedit /copy {bootmgr} /d "Windows Boot Manager Cloned"
 The entry was successfully copied to {44d1d6bf-xxxxxxxxxxxxxxxx}

  bcdedit /set {44d1d6bf-xxxxxxxxxxxxxxxx} device partition=s:

 If everything is correct, the line The operation completed successfully should appear.

 Display the current Windows Boot Manager configuration (bcdedit /enum). Please note that the bootloader now has two options for booting EFI from different disks (default and resume object).

 Now you need to make a copy of the BCD storage on the EFI partition of the first disk and copy the files to the second disk:

  P:
 bcdedit /export P:\EFI\Microsoft\Boot\BCD2
 robocopy p:\ s:\ /e /r:0


 It remains to rename the BCD storage on the second disk:

  Rename s:\EFI\Microsoft\Boot\BCD2 BCD

 And delete the copy on Disk 0:

  Del P:\EFI\Microsoft\Boot\BCD2


 Now, when the first drive fails, you need to select the "Windows Boot Manager Cloned" device and then "Microsoft Windows Server 2016 - secondary plex" when booting the computer.
 When booting from failed disks, you will see a Failed Redndancy message in the Disk Management Manager.

 In this case, you must replace the failed drive, delete the mirror configuration, and recreate the software RAID from the beginning.
 How to set up a RAID 1 array and install Windows 7, 8.1, 10 on it
 Hello friends! In previous articles, we learned that a software RAID 1 array is a mirror image of your data on several hard drives, if one drive fails, then all the information remains safe on the other. You and I bought two identical hard drives and combined them programmatically into an independent array of inexpensive drives, but this instruction will not work if you want to install a Windows operating system on RAID 1, in which case you will have to act a little more complicated.
 After reading the previous articles on creating a software RAID 1 array using the operating system, you will certainly ask the question: “How to install the system itself on a RAID 1 array, or maybe it is possible to transfer a ready-made and configured Windows with programs to a raid array.  After all, a hard drive with an installed operating system can suddenly break down, and not just a secondary hard drive with files? The loss of an operating system with all installed applications, in the absence of a backup, can disable any organization for several days, so I consider it mandatory to create a RAID 1 array at the workplace and install Windows on it.
- Note: Friends, besides the RAID 1 array, there is also a RAID 0 array that can double the performance of your operating system.
In today's article, we will assemble a RAID 1 array of two hard drives on an ASUS motherboard and install Windows 10 on it Friends, of course, you can not install anything again, but simply enable RAID technology in BIOS, and then transfer the existing Windows to it using various programs, but we will do it in the following articles, and today we will perform a simple installation of the system. Firstly, we create a bootable Windows 10 USB flash drive in the simplest way. If you want to assemble a RAID 1 array and install an operating system on it, then again you will need two hard drives or two SSDs and your motherboard must support RAID technology. For example, let's take two hard drives with a capacity of 250 GB each. Install the hard drives in the system unit.
To set up a system with a RAID array, the first step is to enable the appropriate option in the BIOS and this is very simple. It is impossible to describe the corresponding settings for all existing types of BIOS in one article, in this article I will enable RAID on the ASUS motherboard, and in the following articles I will try to show similar settings on GIGABYTE and ASRock motherboards. Turn on the computer and enter the BIOS by pressing DEL at boot . Go to the Advanced tab, option SATA Configuration
SATA Mode Selection set to RAID.
HotPlug - (hot plug) set to Enabled for hard disks to be combined into an array.
To save the changes, press F10 and select Yes. A reboot is in progress.
After enabling RAID technology in the BIOS, on the monitor screen at boot for a few seconds you will be prompted to press the keyboard shortcut (CTRL-I) to enter the RAID configuration settings.
You can also see two SATA hard drives connected to ports 4 and 5: Maxtor and WD, which are not yet in a RAID array (Non-RAID Disk). Press CTRL-I.
In the initial settings window, use the arrows on the keyboard to select Create a RAID Volume and press Enter.
In this window, we make the basic settings of the RAID array.
Name (name of the RAID array). Press the "space" key and enter the name,
for example "RAID 1 new" and press Enter. Scroll down with the Tab key.
RAID Level: (RAID level). We will create RAID1 (Mirror) - "mirroring" - if one of the disks fails, an exact copy of the data will remain on the other disk and the controller will immediately switch to using a duplicate disk. Select this level using the arrows on the keyboard.
Capacity is set automatically. Our two 500 GB hard drives turn into 250 GB because we use the RAID1(Mirror) level and our two hard drives work as one.
We don’t change anything else and move to the last item Create Volume and press Enter.
Warning:
WARNING: ALL DATA ON SELECTED DISKS WILL BE LOST.
Are you sure you want to create this volume? (Y/N):
WARNING: ALL DATA on the selected drives will be lost.
Are you sure you want to create this volume? (Y / N):
Press Y (Yes) on the keyboard.
RAID 1 has been created and is in the Normal status. To exit, press the Esc key on the keyboard
Are you sure you want to exit (Are you sure you want to exit? Press Y (Yes).
The computer restarts. you can’t get to the computer menu, then change the boot priority to a USB flash drive in BIOS.
As you can see, the RAID 1 array we just created with the name “RAID 1 new” is also in the boot menu.