windows 10 — Whenever I install Rivatuner or Ccleaner (along with avast) my Internet stops working
Ask Question
Asked
Modified
4 years, 3 months ago
Viewed
113 times
Literally what the title says, and I’m starting to get annoyed about it.
It started a while back ago, my Internet (Ethernet) just stopped working for my pc. I tried everything to get it to work but nothing worked.
I reinstalled my PC, installed everything I needed and just about when I installed MSI Afterburner with Rivatuner the Internet stopped working again. So I thought for myself that either or both Afterburner and Rivatuner was the problem.
I reinstalled my pc again, installed everything again. I tried installing Afterburner without Rivatuner this time and guess what, the Internet worked fine. Until four days ago when the same problem appeared.
I reinstalled my PC once again, but this time I didn’t install CCleaner. Because I thought I wouldn’t need it.
And Just now, today, when I installed CCleaner (with avast along with CCleaner) to clean my pc a bit, and my Internet stopped working…
I didn’t want to reinstall my PC this time because I already had done that four days ago and I was tired of it, so I tried to restart my pc a couple of times but nothing happens.
I uninstall both CCleaner and Avast, restart my PC, and now the Internet works fine while I’m typing this post trying to figure out what the heck is wrong with my PC.
- windows-10
- internet-connection
1
First, how did you use CCleaner? If you used the default settings for the Windows tab, and did nothing else, that should not affect internet access.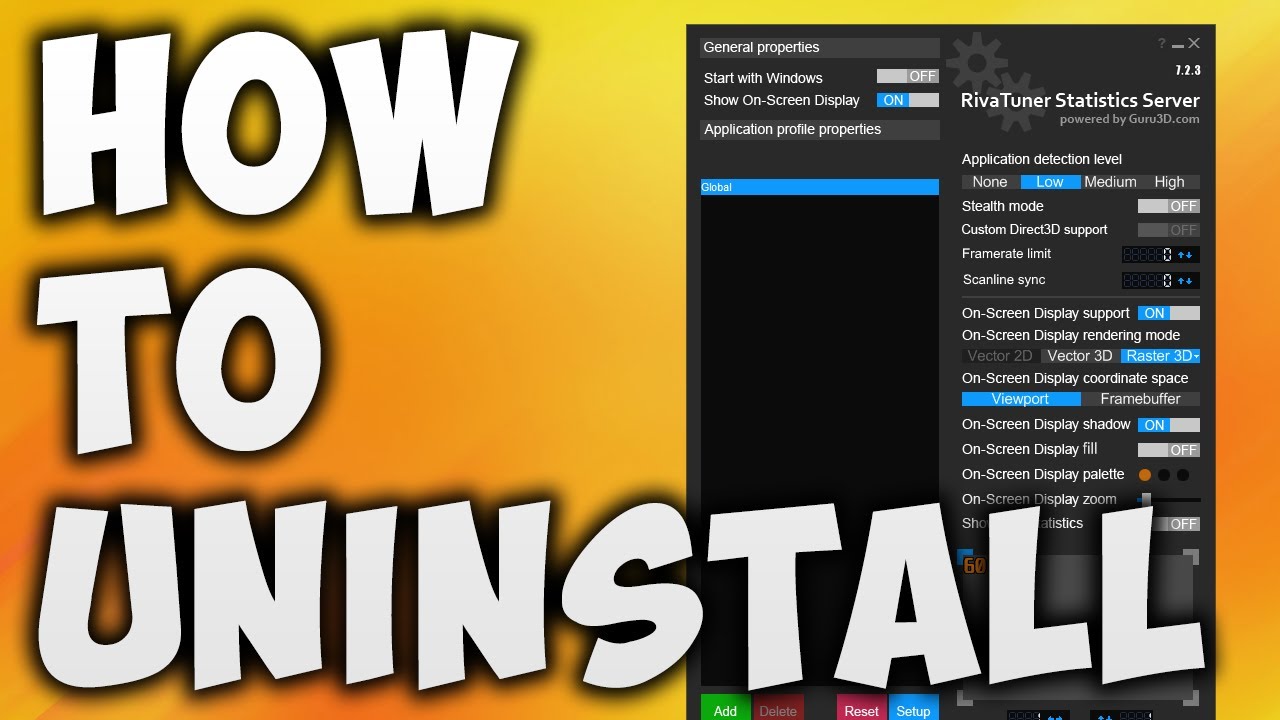 If you’ve checked some options such as DNS Cache or Environment Path, or use additional
 Tools such as Duplicate Finder, it’s possible to damage system files. The Registry cleaner might remove settings needed by the video card utilities.
Second, CCleaner does not need to be installed to work, if that is any part of the issue.
- Uninstall CCleaner completely.
- Open the CCleaner installation file, e.g.
ccsetup554.exewith an archive utility such as 7-Zip. - Extract
CCleaner64.exeand theLangfolder to a new folder. - Move the folder to
C:\Program Files. - Create a shortcut to
CCleaner64.exefor your Start Menu and/or Desktop.
If you do not open it, there should be no impact at all on PC operation.
Finally, Avast! may be problematic in your particular setup. Try a different malware suite, such as the MS Defender that comes with Windows or any of the many alternatives
Sounds like you need to take a step back.
I would start by installing one of the applications you believe to be proplematic, allow sufficent time to test before moving on to install the next.
Have you tried to give your computer a static IP address?
What networking troubleshooting have you done? As when you say the internet stopped working, are you still able to ping your router?
So many unanswered questions I can think of.
Take your time, try not to let the frustration get the better of you.
Sign up or log in
Sign up using Google
Sign up using Facebook
Sign up using Email and Password
Post as a guest
Required, but never shown
Post as a guest
Email
Required, but never shown
By clicking “Post Your Answer”, you agree to our terms of service and acknowledge that you have read and understand our privacy policy and code of conduct.
MSI Afterburner Not Starting With Windows 2022
Want to know MSI Afterburner Not Starting With Windows? It’s not always easy to get your software up and running the way you want it to. When it comes to MSI Afterburner, some users are reporting that the program won’t start automatically with their Windows operating system. If this is a problem you’re experiencing, don’t worry – we’ve got a few solutions for you.
MSI Afterburner Not Starting With Windows 2022
1. Verify that MSI Afterburner is installed.
To do this, just go to your Start menu and type in ” MSI afterburner “, then hit enter:
If the “MSI Afterburner” application does not appear in the list, it means that you do not have it properly installed and configured on your machine. To fix this, please consult the MSI Afterburner manual.
2. Check your Windows startup type.
Another thing you need to check is whether or not MSI Afterburner launches automatically with your system startup configuration. To do this, follow these steps:
1) Press “Start” and go to “Control Panel”.
You should now see a list of all your installed programs.
2) Double-click on “MSI Afterburner”.
This will open up the MSI Afterburner application.
3) Click on the “Settings” tab.
4) In the “Startup type” drop-down menu, select “Automatic”:
5) Click on “OK”.
Now close the MSI Afterburner application.
ALSO READ: How To Cap FPS With MSI Afterburner
3.
Disable your antivirus software.
If you’re using any antivirus software, it’s possible that this is causing the problem. To rule this out, try disabling your antivirus and then launching MSI Afterburner. If it starts up correctly, you should re-enable the antivirus and uninstall MSI Afterburner – your antivirus software is probably trying to protect your system from it.
4.
Make sure it’s not a permissions issue.
If you still can’t get MSI Afterburner to launch, try giving yourself full control over this program:
1) Press “Start” and go to “Computer”.
2) Double-click on the “C:” drive.
3) Double-click on the “Program Files” folder.
4) Scroll down and double-click on the “MSI Afterburner” folder.
5) Right-click on the MSIAfterburner.exe file and select “Properties”.
6) Go to the “Security” tab.
7) Under “Group or user names”, click on “Edit”.
8) In the “Enter the object name to select” field, type in your username:
9) Click on “OK”.
10) Check the box next to “Full control”:
11) Click on “OK”.
12) Close all open windows and try launching MSI Afterburner again.
5.
Try a different version of Windows.
If you’re using a very old or outdated version of Windows, it’s possible that MSI Afterburner is not compatible with it. Try upgrading to a newer version of Windows and see if that solves the problem.
6.
Try a different MSI Afterburner profile.
Sometimes, your issue might be caused by a faulty MSI Afterburner profile or preset that you’ve installed using the “Import” button in the profiles tab:
To fix this, try removing all outdated profiles from your list and then re-importing fresh copies of them.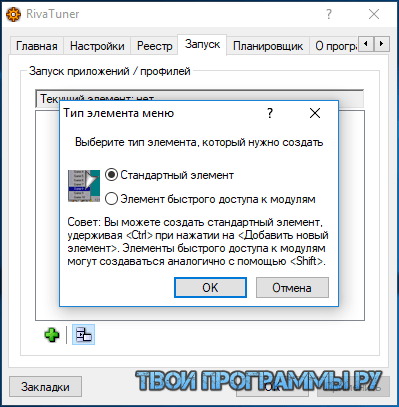 You can learn how to do this by consulting the MSI Afterburner manual.
7
. Try running MSI afterburner as administrator.
If you still can’t get it to work, try right-clicking on the MSIAfterburner executable file and then selecting “Run as administrator”. Note that you might need to re-install MSI Afterburner for this fix to work.
Note: If you’re on Windows 7, you might need to click the “Start” button and then go to the “Control Panel” menu option before being able to see the “Programs and Features” options.
If you have a different version of Windows, these steps might vary a little.
FAQ:
Q:
I can’t find the MSI Afterburner executable file. Where is it located?
It’s usually in your C:\Program Files\MSI Afterburner folder, or something similar to that. If you have trouble finding it on your computer, try consulting the MSI Afterburner manual.
Q:
I’ve tried all of the solutions listed in this article but MSI Afterburner still won’t start up. What do I do?
If you’ve tried everything and nothing has worked, your last resort might be to uninstall MSI Afterburner and then re-install it. Make sure you have the latest version of MSI Afterburner from the official website before you do this.
Q:
How can I give myself full control over the MSI Afterburner program?
To do this, you need to go to the “Security” tab in the Properties window of the MSIAfterburner.exe file and then add your username to the list of users with full control over the program.
Q:
How can I change my username?
To do this, you need to go to the “Computer” menu option in your Start menu and then double-click on your main hard drive (usually “C”). You should see a window that has an option for changing your username in it; follow the instructions on how to do this.
Q:
I’m using a very old or outdated version of Windows and MSI Afterburner is not compatible with it. What can I do?
Try upgrading to a newer version of Windows and see if that solves the problem. Compatibility issues are usually fixed in new updates to the software.
Conclusion :
MSI Afterburner is a powerful overclocking utility that can be used to increase the performance of your computer. It’s not uncommon for people who are new to overclocking their computers to run into difficulties with installation.
I hope you now understand how to fix MSI Afterburner not starting Windows If you have still any questions or comments, please feel free to leave them below.
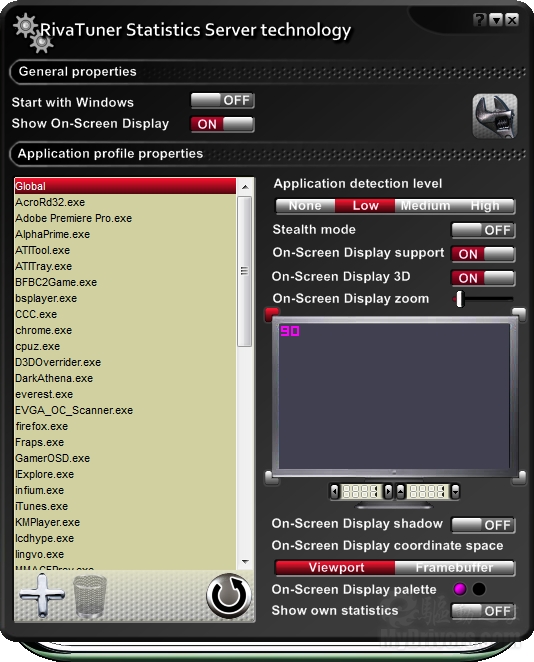
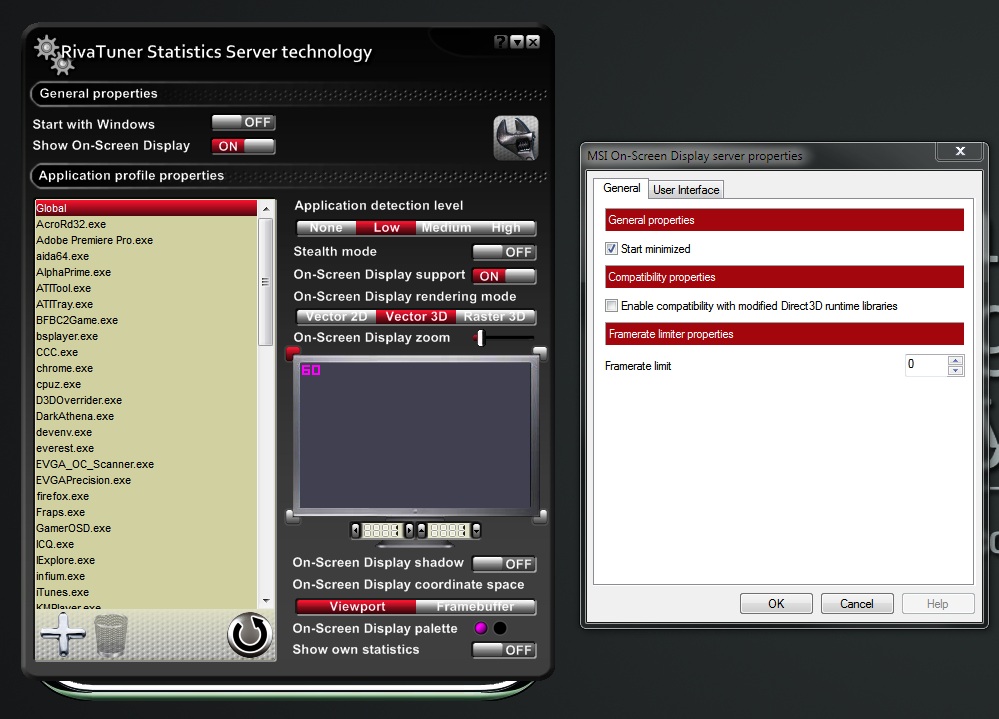
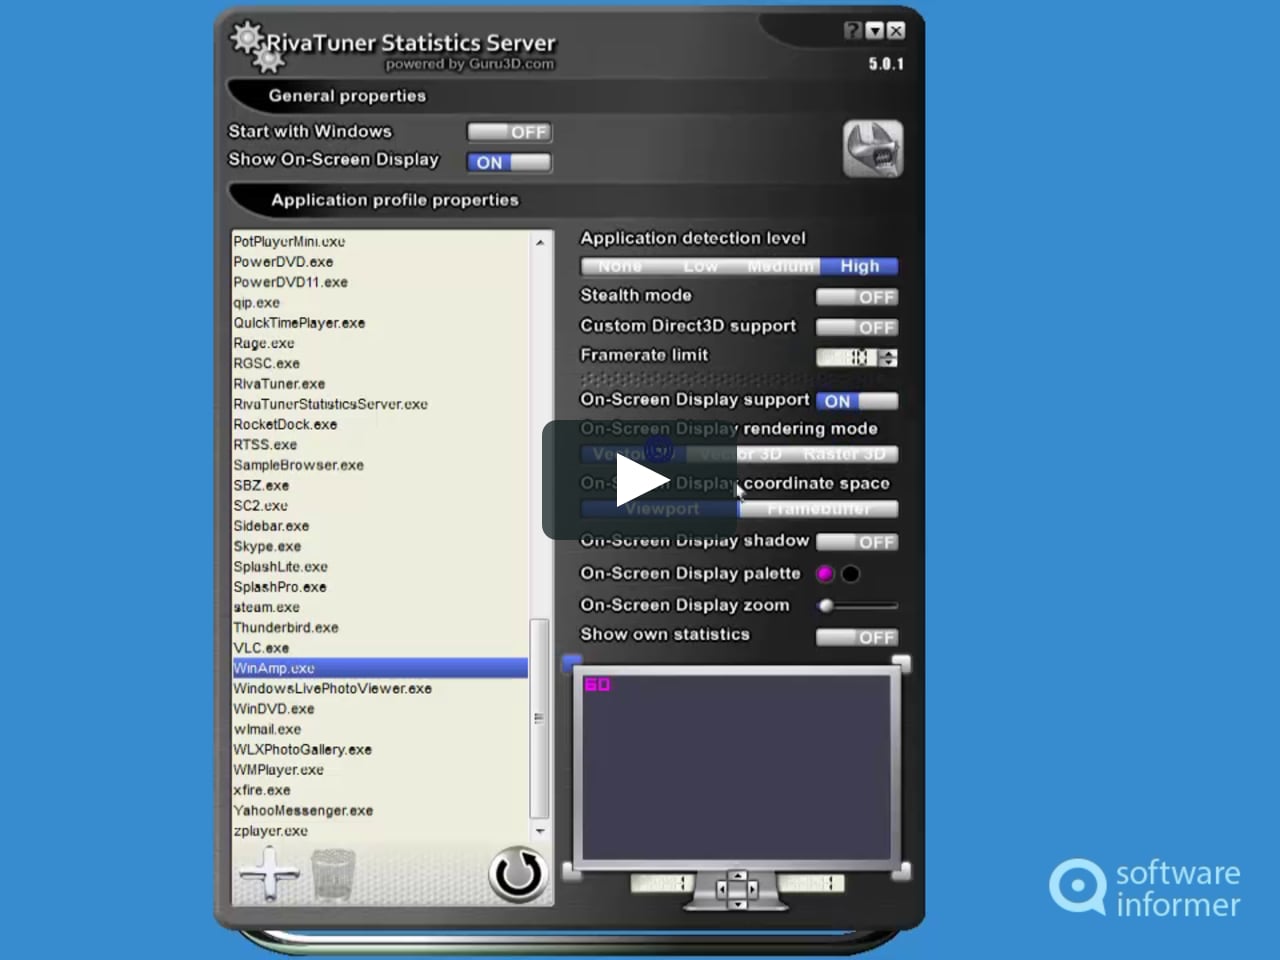
RivaTuner 2.07 — utility for overclocking and tuning graphics cards with support for the latest drivers and new features
Edition
Software News QNX
recommendations
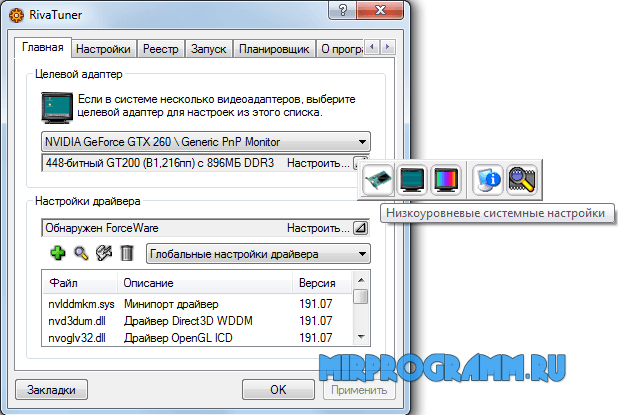
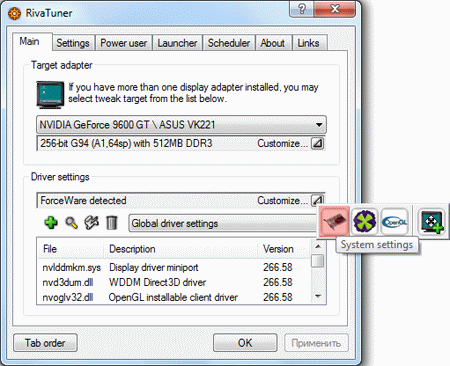
A new version of the well-known utility for configuring video cards by Alexey Nikolaychuk (known under the pseudonym
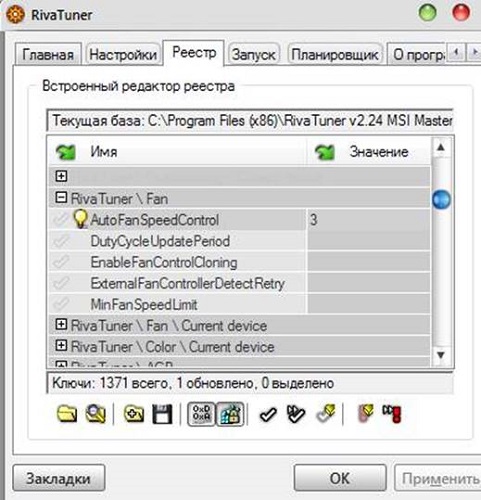
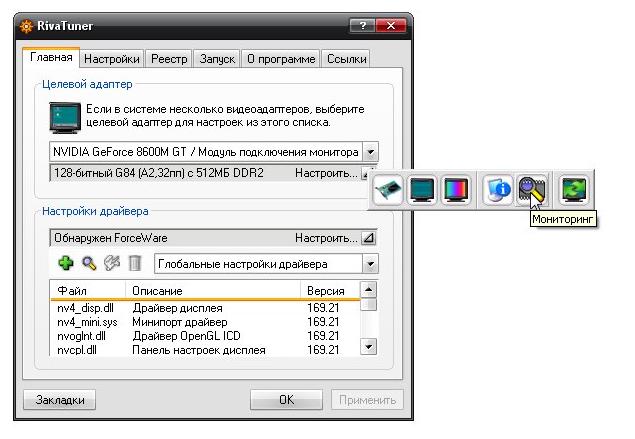
Unwinder) called RivaTuner. The program is the best tool among such solutions. It combines ease of use in terms of using a graphical shell, as well as all the power of hidden settings that are available through a section that resembles in some way the Windows registry editor. At the same time, almost all modern video cards from both nVIDIA and ATI (AMD) are supported. The new release adds support for the latest drivers, the ability to work with the latest available graphics cards, and also implements new features (for example, a scheduler).
Changes are as follows:
- Corrected:
- Fixed default values for Intellisample slider in Direct3D settings and ‘Disable negative LOD’ option.
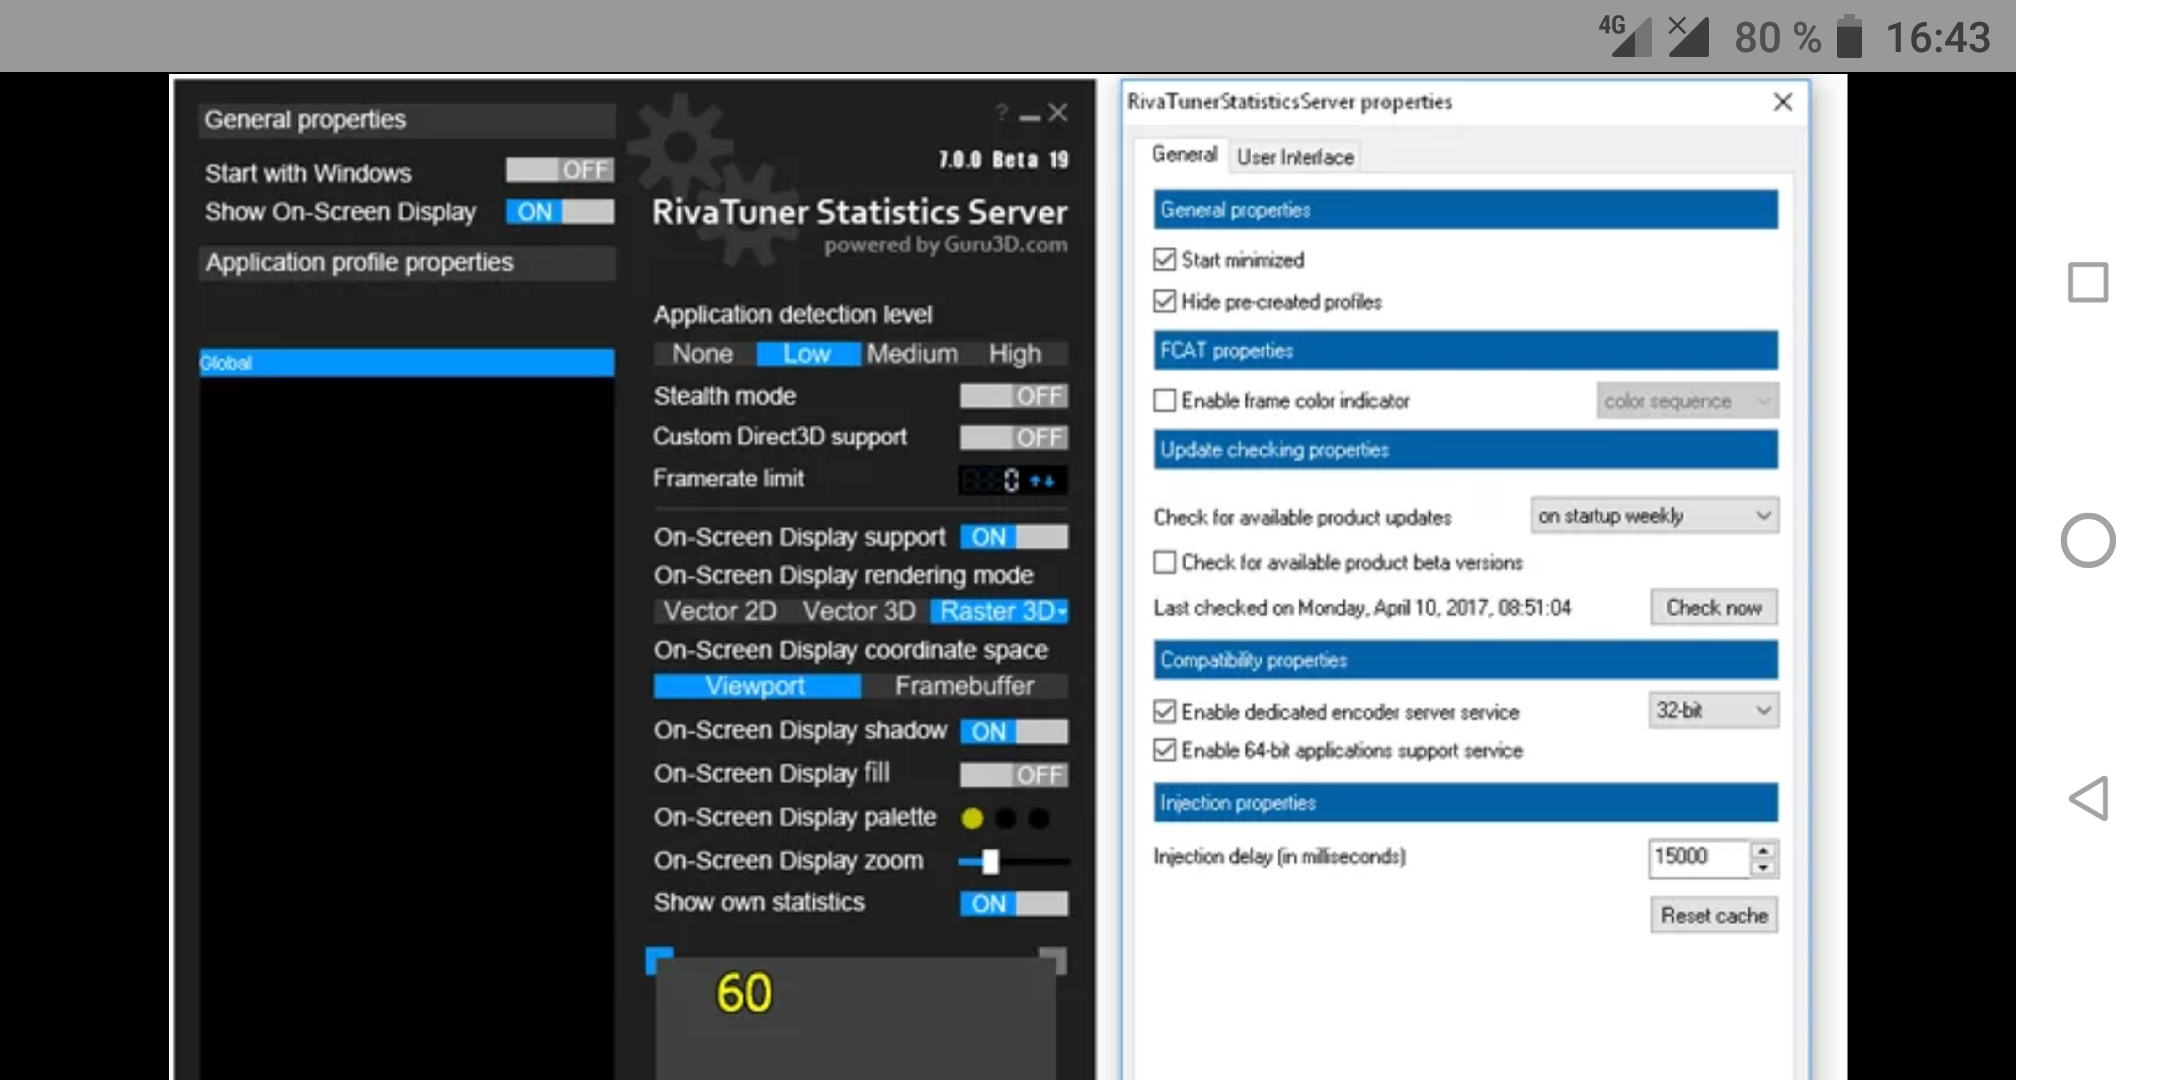
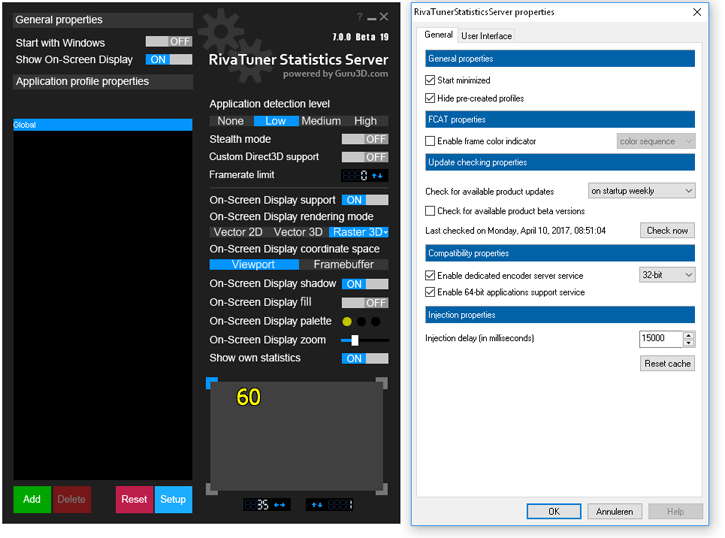
- The state of the global visibility setting of the Overlay Screen Display is no longer lost when any other setting is changed immediately after changing the global visibility setting of the EOS in the properties of the RivaTunerStatisticsServer utility distributed as part of the distribution kit.
- Minor UI and localization fixes.
- Added:
- Added support for ForceWare 171.xx, 173.xx, and 174.xx driver families.
- Updated databases for Detonator and ForceWare family drivers. Added databases for ForceWare drivers 169.09, 169.13, 169.17, 169.21, 169.25, 169.28, 169.32, 169.38, 169.39, 171.16, 171.17, 171.23, 173.65, 173.80, 174.12, 174.13, 174.16, 174.23 and 174.31.
- Catalyst 7.11, 7.12, 8.1, and 8.2 driver recognition has been added. Please note that Catalyst 8.1 and 8.2 drivers have the same binary versions, so both Catalyst 8.1 and Catalyst 8.2 will be recognized by RivaTuner as Catalyst 8.1 or older.
- Updated Catalyst 7.11, 7.12, 8.1 and 8.2 certified patch scripts SoftR9x00 (for Windows 2000/XP drivers only).
- Updated the PCI DeviceID database for ATI and NVIDIA GPUs. Added PCI DeviceIDs for RADEON 2600XT AGP, RADEON 29 models00GT, RADEON HD 3870 X2 and GeForce 8800GTS 512.
 Please note that RivaTuner does not provide official support for Crossfire, so RADEON HD 3870 X2 support may be limited to accessing only one GPU under certain conditions.
 - Previously available experimental support for RV635 GPUs has been unlocked.
- Added experimental support for G94 GPUs.
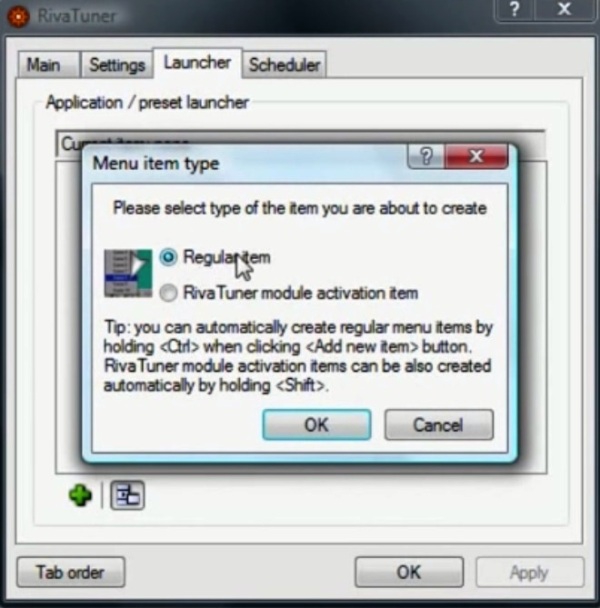
- A powerful built-in task scheduler has been added. The task scheduler was developed as a more flexible and programmable replacement for the previously available threshold programming technology in the monitoring module, providing the following functionality:
- Ability to automate the launch of any desired application (for example, RivaTunerStatisticsServer) or launch element (for example, a combination of cooler and overclocking profiles, or a shortcut for quick access to the user interface of the RivaTuner monitoring module) according to a specified schedule. The following types of task launch schedules are currently supported:
- Run a task when Windows boots.
 This type of schedule can be used as an alternative to the native ‘Load settings… with Windows’ options by loading the desired overclocking / cooler / color profile, as well as for programming additional complex tasks (for example, programming the voltage regulator of the video adapter by directly accessing the registers GPU via RivaTuner CLI).
 - Launch task when RivaTuner is loaded. This type of schedule can be used to automate the launch of some applications that need to be launched only at the same time as RivaTuner (eg RivaTunerStatisticsServer) or to activate some user interface windows (eg monitoring window) when RivaTuner starts.
- Launch task when closing RivaTuner. This type of schedule can be used to automate the closing of some applications that need to be run only at the same time as RivaTuner (eg RivaTunerStatisticsServer).
- Run a task when entering sleep mode. This type of schedule can be used to work around problems with some drivers and video adapters (for example, some older ATI video adapters do not wake up when entering sleep mode in overclocked state).
- Launch task when waking up from sleep mode. This type of schedule can be used as an alternative to the native ‘Recover… from sleep’ options by loading the desired overclocking / cooler / color profile, as well as for programming additional tasks (for example, to automate the connection of RivaTuner to the LCD display of the G15 keyboard on exit from sleep mode).
- Start the task when the monitoring module schedule crosses the specified threshold. This type of schedule replaces the previously available monitoring module threshold programming technology and can be used to create dynamic overclocking algorithms, cooler and gamma control depending on various parameters monitored by the monitoring module (for example, dynamic cooler control depending on temperature thresholds or dynamic frequency control in hardware acceleration thresholds).
- Start the task when the schedule of the monitoring module is within the specified range. This type of schedule provides an alternative way to create dynamic overclocking, cooler and gamma control algorithms depending on various parameters monitored by the monitoring module, which can be more convenient when using multiple thresholds (for example, when setting a dynamic cooler control rule based on three or more temperature zones).
- Run a task when Windows boots.
- Standard precautions that allow you to skip running scheduled tasks if necessary (for example, if a profile is programmed to load with too high clock speeds when Windows starts, or if you programmed RivaTuner to close when it starts). You can hold the key
pressed when logging into Windows to skip tasks scheduled to start with Windows, or you can hold down the key
pressed when loading RivaTuner to skip tasks scheduled to start with the utility.
- Improved threshold visualization compared to previous technology:
- Now the visualization of the threshold on the monitor module chart can be optionally disabled in the properties of the corresponding schedule.
- The programmed threshold crossing direction is now displayed on the graph.
- Ability to automate the launch of any desired application (for example, RivaTunerStatisticsServer) or launch element (for example, a combination of cooler and overclocking profiles, or a shortcut for quick access to the user interface of the RivaTuner monitoring module) according to a specified schedule. The following types of task launch schedules are currently supported:
- Improved built-in launcher:
- The list of predefined applications has been removed from the editor window of the standard launch item.
 Now the list of predefined applications is integrated directly into the file system browser window, accessible by clicking on the ‘Browse’ button.
 - Improved experimental SLI support. Please note that I don’t have an SLI bench for development and testing, so all SLI-related changes are made blindly and RivaTuner still doesn’t declare official SLI support:
- Added a workaround for leaking GPU handles in the NVAPI library under Windows XP. Now you no longer need to disable the use of NVAPI and lose the functionality of separate control of the shader domain frequency to ensure overclocking of the SLI system under Windows XP.
- Added cooler control in SLI mode based on NVAPI driver libraries. Now RivaTuner synchronously applies the same cooler settings at the driver level to all GPUs combined in an SLI configuration. Please note that the above applies only to driver-level cooler control, low-level cooler settings (for example, custom fan speed rule settings) still apply only to the video adapter physically selected in the main tab.

- Now synchronous overclocking and control of the cooler in SLI mode via the NVAPI libraries can be disabled if necessary using the NVAPIMultiGpuClockControl and NVAPIMultiGpuFanControl registry keys.
- Improved User Account Control (UAC) compatibility under Vista:
- Now RivaTuner can be launched at Windows Vista startup using a special helper middleware application that does not require full administrative privileges and is not blocked by the UAC startup system infrastructure. Please be aware that RivaTuner itself still requires full administrative privileges and user confirmation each time it is launched; the helper middleware only changes the RivaTuner startup confirmation method every time the operating system is loaded. Now you can see the standard UAC window, which requires confirmation of launching RivaTuner at Windows startup instead of a pop-up message about applications blocked at system startup in the taskbar. Please note that the system’s standard UAC confirmation window is automatically timed out after 120 seconds of inactivity, so don’t use the new mode if the system boots itself out of control.
 The previous mode can also be enabled by setting the RivaTunerWrapperUsageBehavior registry key to 0.
 - Added the RequestedExecutionLevel registry key, aimed at advanced users, that allows changing RivaTuner’s launch privileges without having to edit the manifest file. This feature may be useful for those who run RivaTuner with full administrative rights through other applications, such as the Vista Task Scheduler.
- Now RivaTuner can be launched at Windows Vista startup using a special helper middleware application that does not require full administrative privileges and is not blocked by the UAC startup system infrastructure. Please be aware that RivaTuner itself still requires full administrative privileges and user confirmation each time it is launched; the helper middleware only changes the RivaTuner startup confirmation method every time the operating system is loaded. Now you can see the standard UAC window, which requires confirmation of launching RivaTuner at Windows startup instead of a pop-up message about applications blocked at system startup in the taskbar. Please note that the system’s standard UAC confirmation window is automatically timed out after 120 seconds of inactivity, so don’t use the new mode if the system boots itself out of control.
- Improved support for RV6xx family GPUs:
- The list of configurable parameters for the automatic cooler control rule for controllers built into RV6xx GPUs has been extended. Now, in addition to editing the previously available table of dependence of cooler operation cycles on temperatures, RivaTuner can also be used to change the automatic control mode and select the speed control mode either in a table way or using the temperature conversion function, as well as to edit the parameters of the conversion function (minimum operation cycle, minimum temperature, temperature coefficient, etc.
 ). These settings allow advanced users to fix the infamous automatic cooler speed adjustment error in the BIOSes of the HD 38×0 BIOS family of video adapters without having to flash the so-called fan fix BIOS.
 - Direct access to flash memory chips used on ATI RADEON HD 2xxx/3xxx has been added. Now you can use the RivaTuner /BI command line switch to save the VGA BIOS image to a file on ATI ATI RADEON HD 2xxx/3xxx series video adapters.
- Now RivaTuner uses additional reference frequency dividers to ensure correct core frequency monitoring on ATI RADEON HD 3870 series video adapters when flashing BIOS with corrected PLL VCO divider calculation.
- Now RivaTuner restores original frequencies when low-level overclocking is disabled by resetting the PowerPlay table using the driver, if possible.
- The list of configurable parameters for the automatic cooler control rule for controllers built into RV6xx GPUs has been extended. Now, in addition to editing the previously available table of dependence of cooler operation cycles on temperatures, RivaTuner can also be used to change the automatic control mode and select the speed control mode either in a table way or using the temperature conversion function, as well as to edit the parameters of the conversion function (minimum operation cycle, minimum temperature, temperature coefficient, etc.
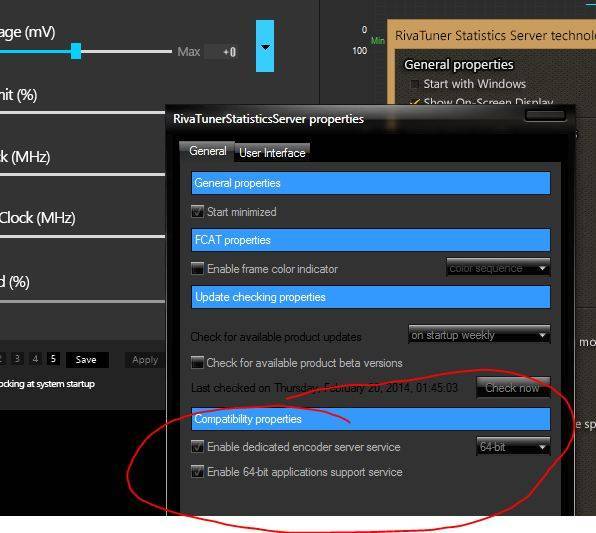
- Updated RivaTunerStatisticsServer v2.5.0 utility:
- The server now supports the %FRAMERATE% macro in OSD Overlay text slots, which allows it to display application-specific framerate and 3D API usage name instead of the generic framerate and 3D API usage name sent directly to the server by the client application.
 Advanced users can optionally disable RivaTuner from using the %FRAMERATE% macro using the EnableFramerateMacroEncoding registry key.
 - The server is now able to recognize a request to display the frame rate from the client application and can disable displaying its own statistics in the Overlay Screen Display to prevent frame rate duplication in the OED.
- Added support for capturing screenshots under Direct3D10 (only for frame buffers that do not use multisampling).
- The list of supported formats for captured screenshots has been extended. Now the server supports capturing screenshots in *.jpg and *.png formats for Direct3D9and Direct3D10 applications. Please note that these formats can also be specified when capturing screenshots of the desktop, DirectDraw, Direct3D8 and OpenGL applications, however, in fact, this will result in capturing a screenshot in .bmp format with *.jpg or *.png extension.
- Server can now capture multiple screenshots at once if multiple 3D applications are running at the same time.
- The server boot procedure no longer tries to precache information about Direct3D10 runtime libraries under Windows XP to reduce server startup time under this OS and to prevent the server from potentially stealing focus from other running applications.
- Improved compatibility with applications using multi-threaded 3D engines. Reduced risk of server crash when attempting to unload it while such 3D applications are running (eg Lost Planet : Exteme condition).
- The server can now provide frame-by-frame statistics on the frame duration of any 3D application to third-party automated benchmark applications (eg TPUBench) via a named «pipe».
- Updated the list of pseudo 3D applications.
- The server now supports the %FRAMERATE% macro in OSD Overlay text slots, which allows it to display application-specific framerate and 3D API usage name instead of the generic framerate and 3D API usage name sent directly to the server by the client application.
- Improved monitoring module:
- The ‘Frame Rate’ graph now displays the frame rate of the focused application when multiple 3D applications are running at the same time.
- Added exception handlers for frequency monitoring routines to provide improved protection against incorrect emulation.
- The initial ranges of the core and memory frequency charts have been extended from 1.5GHz to 2GHz.
- Improved monitoring module NVThermalDiode.dll. The module now supports thermal diodes for G84, G86, G9 GPUs2 and G94. Please note that the hardware logic for calibrating the thermal diode readings is not functional in the G92 family of GPUs, so the module uses an approximate conversion of the «raw» readings of the G92 thermal diode, similar to the one executed by ASUS SmartDoctor software. This approximate conversion can be quite inaccurate, so it is strongly recommended to use the module only on non-reference design G92-based video adapters that are not equipped with an external ADT7473 sensor.
- Improved cooler control module at the driver level:
- Driver-level cooler profiles can now be used to remember and then restore automatic cooler operation.
- All low-level profiles are now bound to the target video adapter using the physical video adapter location ID instead of the logical video adapter name.
 Due to these changes, all previously created low-level profiles will be invisible to the new version, and they will need to be recreated.
 - Improved basic RivaTuner file format. Now all RivaTuner data files based on this format (i.e. database generation scripts, databases, presets and patch scripts) can use automatically incrementing global indexes similar to previously available local indexes and greatly simplify editing and updating large files.
- Improved context help source format. Now all new context help topics added in each new version are packaged as a separate file to simplify the process of translating the context help system by third-party localization pack authors.
- The message about automatic disabling of the protection of allocated for I/O memory ranges is no longer displayed on any failure to allocate the memory range for I/O. Added a separate warning message about a failure to allocate an unprotected I/O memory range.
- Now advanced users can configure the range of scanned PCI buses to enable RivaTuner to run on some non-standard motherboards with more than 16 physical PCI buses.
 By default, RivaTuner only scans the first 16 PCI buses looking for video adapters, however advanced users can expand the range of scanned buses using the MaxPCIBusNum registry key.
 - Protected bookmarks (i.e. bookmarks such as ‘Home’ in the main properties window that cannot be hidden) are now displayed in the preview area of the custom bookmark order setting window.
- Updated ‘Easter Eggs’.
- Minor UI changes and improvements.
You can download the program along with a certified driver for Windows Vista from our file archive:
- RivaTuner 2.0.7 (2.0 MB, freeware).
recommendations
Discussion, with the active participation of the author, is in this thread of our conference.
Parallel configuration incorrect | remontka.pro
Updated windows
» (The application has failed to start because its side-by-side configuration is incorrect — in English versions of Windows).
This guide is a step by step guide on how to fix this error in several ways, one of which will most likely help and allow you to run the program or game that reports problems with parallel configuration.
Correcting an incorrect side-by-side configuration by swapping the Microsoft Visual C++ Redistributable
The first way to fix the error does not involve any diagnostics, but is the easiest for a novice user and most often works on Windows.
In the vast majority of cases, the cause of the message “The application could not be started because its parallel configuration is incorrect” is incorrect operation or conflicts between the installed software of the Visual C ++ 2008 and Visual C ++ 2010 redistributables required to run the program, and problems with them are relatively easy to fix .
- Go to Control Panel — Programs and Features (see How to open the Control Panel).
- If the list of installed programs contains the Microsoft Visual C++ 2008 and 2010 Redistributable Package (or Microsoft Visual C++ Redistributable, if the English version is installed), x86 and x64 versions, remove these components (select, click «Remove» at the top).

- After removal, restart your computer and reinstall these components from the official Microsoft website (download addresses — below).
You can download Visual C++ 2008 SP1 and 2010 packages from the official website (for 64-bit systems install both x64 and x86 versions, for 32-bit systems — only x86 version). Please note: the packages are not interchangeable — that is, installing versions 2015-2022 will not fix errors related to the lack of previous versions of Visusl C ++ Redistributable. There are other ways to download the Visual C++ libraries.
After installing the components, restart the computer again and try running the program that reported the error. If it doesn’t run this time, but you have the option to reinstall it (even if you’ve done it before), try it, it might work.
Note: in some cases, although rare today (for older programs and games), you may need to perform the same steps for Microsoft Visual C++ 2005 SP1 components (easily searched on the official Microsoft website).
Additional ways to fix error
The full text of the error message in question is «The application could not be started because its parallel configuration is incorrect. For more information, see the application event log, or use the sxstrace.exe command-line tool for more information.» Sxstrace is one way to diagnose which module’s parallel configuration is causing the problem.
To use the sxstrace program, run a command prompt as an administrator, and then follow the steps below.
- Enter the command sxstrace trace -logfile:sxstrace.etl (you can specify another path to the etl log file).
- Run the program causing the error, close (click OK) the error window.
- Enter the command sxstrace parse -logfile:sxstrace.etl -outfile:sxstrace.txt
- Open the sxstrace.txt file (it will be located in the C:\Windows\System32\ folder)
In the command execution log, you will see information about what kind of error occurred, as well as the exact version (installed versions can be viewed in «programs and features») and the bitness of the Visual C ++ components (if that’s the case) that is needed to work this application and use this information to install the desired package.