What is SVM Mode in your BIOS?
What is SVM Mode in your BIOs? Are there other, similar options you should keep an eye out for?
What even is this “Virtualization” that’s being thrown around alongside SVM?
In this article, I’m going to walk you through everything you need to know about SVM Mode.
What is SVM Mode In Your BIOs?
SVM Mode is an option within an AMD motherboard’s BIOS to enable what’s called a Secure Virtual Machine.
In addition to providing a secure virtual machine environment, SVM also allows for more direct access to the hardware than without. This means increased performance when using Virtual Machines, which is the main benefit of enabling specialized BIOS options like this.
Besides being called SVM, AMD also calls the technology AMD-V, so it may be listed in your BIOS under that name.
Of course, this begs the immediate question if you’re an Intel user: do you have an equivalent in your BIOS?
Is There an Intel Equivalent to SVM Mode?
Yes, there is an Intel equivalent to AMD-V/SVM Mode called Intel VT-x, or Intel Virtualization.
Pretty much, just look for a virtualization-related option in your BIOS and you should be able to find it.
What Is A Virtual Machine?
A Virtual Machine basically serves as an isolated instance of another operating system being run within a program on your main operating system.
It isn’t the same as a separate operating system entirely, since that requires an entirely separate disk partition.
Using Virtual Machine applications like VMWare or VirtualBox, you can run an isolated OS within your main OS without needing to reboot to switch partitions or need to set up a separate OS install partition at all.
For instance, you can use this to run a Mac or Linux Virtual Machine within a Windows OS.
Does Enabling Virtualization Impact Performance?
Outside of using the virtual machine itself, performance for the rest of your PC running normally, shouldn’t be impacted by enabling virtualization.
However, there are mixed reports about some virtualization options taking up extra performance or causing minor issues when they’re enabled, so I wouldn’t recommend enabling virtualization when it isn’t in active use.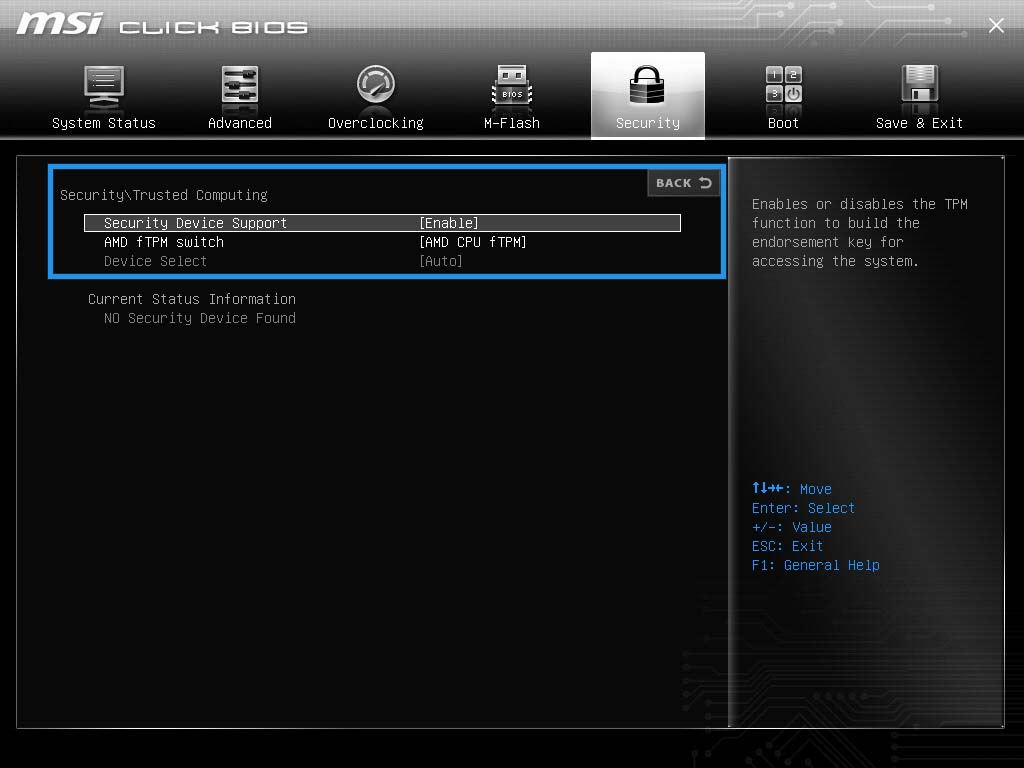
Now, within the Virtual Machine itself, how is performance impacted compared to a proper operating system installation?
This can vary depending on numerous factors, but overall since Virtual Machines have little (if any) direct access to the hardware, there is a significant performance penalty when running something in a VM compared to not using virtualization at all.
Virtualization has some commonalities with emulation in this and other regards, but the two aren’t quite the same. Where emulation uses software to emulate hardware, virtualization is more about creating an independent operating environment for a separate OS that has part or all of the host machine’s hardware resources assigned.
The performance overhead from virtualization is quite minor compared to the cost of emulation.
What Kind of Use Cases Need Virtualization?
So, when do you actually need to start considering Virtualization?
Let’s talk about some scenarios where virtualization can come in handy.
In servers and data centers, virtualization is used fairly often to divide resources.
If you’ve ever used a service like Google Stadia or GeForce Now, you’re actually streaming the game from one of many virtual machines in a particular server farm.
In scenarios like this, resources like total CPU cores are usually divided evenly between however many VMs are present.
Outside of those server-grade scenarios, here’s where you might need to use virtualization:
- For testing or developing applications for other operating systems. For instance, an Android or macOS VM on a Windows machine can be extremely handy for an Android app developer.
- For fun and games…from other operating systems. If you’re a hardcore PC gamer and need access to play that hot Android game all your friends are playing without using a phone? An Android VM like BlueStacks is an ideal choice for you.
- For using productivity software from another OS.
 Say you’ve recently switched to Windows from Mac OS and are missing your favorite OS X tools. With virtualization, you can still access those applications, allowing you to skip learning a new workflow for a new application.
 - For when you have multiple people use one machine and want something more secure than Windows User Accounts or Users in need of different Operating Systems. Use a solution like Unraid to preserve hardware performance if you’re using a solution like this, though.
FAQ
What if SVM Mode isn’t in my BIOS?
Well, first verify that you aren’t using an Intel processor.
If you’re using an Intel processor and motherboard, you’ll need to enable Intel VT-x or another Enable Virtualization option in your Intel BIOS.
If you are using an AMD processor, it may also be called AMD-V instead of SVM Mode.
Basically what you’re doing is looking for your relevant BIOS option for enabling virtualization.
How do I check if virtualization is enabled?
A pretty easy way to do this is to open the Performance tab in Task Manager on Windows (CTRL+SHIFT+ESC).
Select CPU, and near the bottom where your various CPU specs are listed, you should see if Virtualization is enabled or not under “Logical processors”.
Is a Virtual Machine less powerful than a regular Operating System?
Yes.
For one, virtualization by its very own nature is going to introduce some overhead.
It’s hard to pin down exactly how much since it can change depending on a variety of factors, but expect at least somewhere in the range of a 5% performance deficit for your CPU and memory. This deficit shouldn’t stack per-VM, though.
Depending on the solution, virtual machines can operate surprisingly close to the original hardware.
For example, Unraid can be used to turn a single PC into two or more by dividing up available resources.
This is good enough at utilizing the hardware that it’s used for gaming purposes, and LinusTechTips infamously managed to get 10 gaming rigs running off of a single machine using this Virtualization software:
SVM mode is a technology that allows your system to run virtual machines. It does not affect gaming or regular performance. However, if need to run virtual machines or gaming emulator like Bluestacks, it will definitely allow them to run more efficiently.
Should You Enable SVM?
As long as you are not using any virtual machine or gaming emulators, it’s better to keep the SVM mode disabled. Some people claim that SVM mode negatively impacts regular performance when it’s on, but in reality, you should not experience performance degradation when you are not using any virtual machine or other programs that use SVM technology.
Pros
SVM (Secure Virtual Machine) allows you to use programs like VMware and emulators at fast speed. As mentioned before, Android emulators like Bluestacks recommend users to enable SVM mode for better performance.
It creates a safe environment where you can simultaneously use multiple operating systems. Just enabling the SVM mode will not offer plenty of advantages, but the programs SVM lets you run can be used to do things that are impossible without this tech.
Cons
According to some people, SVM has disadvantages because it divides the hardware resources so multiple programs can utilize them and run simultaneously.
But it’s not a disadvantage; that’s the whole point. Even if you don’t use any virtualization software when your SVM mode is on, it does not cause any performance issues.
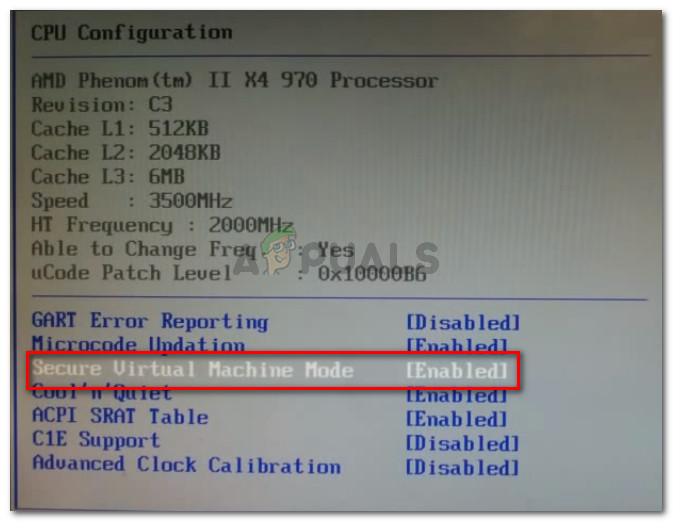
If you can find SVM mode in your BIOS settings, you are probably looking in the wrong menu. The User interface of BIOS can be different depending upon your motherboard manufacturer and series.
BIOS -> Advanced -> CPU Configuration -> SVM Mode -> enabled
If you still can’t find the SVM mode option, use Speccy to check if your hardware is virtualization compatible or not.
Sometimes computers refuse to boot up after enabling SVM mode and only show a black screen. There can be multiple reasons that can cause this issue, including outdated BIOS and chipset drivers.
In some instances, the computer boots up normally after enabling SVM, but once you attempt to use programs like Windows Sandbox, it throws a dialog with “Virtualization is disabled in the firmware” message. Below we have mentioned two solutions to fix the black screen issue, hopefully, they will fix the issue.
Solution 1) Update BIOS and Chipset Drivers
If your PC is unable to boot up right after enabling the SVM mode in BIOS settings. Disable the SVM mode, and your PC should boot up normally. Then update your BIOS and chipset drivers.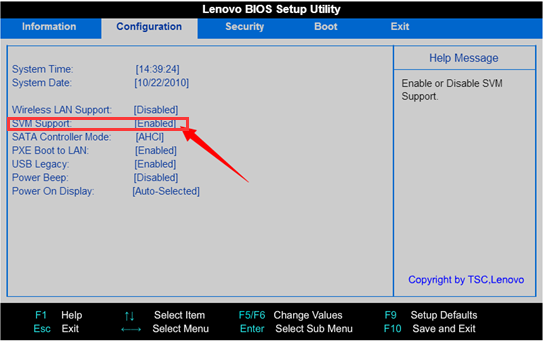 Also, upgrade to a newer version of Windows 10 and try enabling the SVM mode again.
Solution 2) Disable and Re-enable the Program You Are Using
If you are using a corrupted program, it may also cause black screen issues.
For example, if you are using Windows Sandbox, follow the steps mentioned below:
- Go to Control Panel.
- Click on Programs and features.
- On the left-hand side, click on Turn Windows features on or off.
- Now in the dialog box, scroll down and uncheck the option: Windows Sandbox.
- Finally, restart the computer.
Once your PC turns on, try to enable the Windows Sandbox again with SVM enabled.
If you are using a third-party program, uninstall and reinstall to fix the issue.
Read More
- What Is D-Ram Frequency?
- How to Change CPU Fan Speed Without BIOS?
- What Is D.O.
 C.P? and How to Enable/Disable It?
 - What Is Launch CSM Option?
- What is Microsoft Virtual WiFi Miniport Adapter?
- What is FCLK Frequency?
- What Does Erp-Ready Mean in Bios?
- What is XHCI hand off? Should you enable it?
Enable virtualization on Windows 11 PCs
Virtualization lets your PC emulate a different operating system, like Android™ or Linux. Enabling virtualization gives you access to a larger library of apps to use and install on your PC. If you upgraded from Windows 10 to Windows 11 on your PC, these steps will help you enable virtualization.
Note: Many Windows 10 PCs—and all PCs that come preinstalled with Windows 11—already have virtualization enabled, so you may not need to follow these steps.
Before you begin, determine your device model and manufacturer. You’ll need this info later in the process.
Before you begin, we recommend opening this page on a different device. Here’s how to get to the UEFI from Windows:
-
Save your work and close any open apps.
-
Select Start > Settings > System > Recovery > Advanced startup, then select Restart now.
-
Once your PC restarts, you’ll see a screen that displays Choose an option. Select Troubleshoot > Advanced options > UEFI Settings > Restart.
-
Your PC will restart again and you’ll be in the UEFI utility.
 At this step, you might see the UEFI referred to as the BIOS on your PC.
The way the UEFI (or BIOS) appears depends on your PC manufacturer. Once you’ve enabled virtualization and exited the UEFI, your PC will restart.
Important: Only change what you need to in the UEFI (or BIOS). Adjusting other settings might prevent you from accessing Windows.
Instructions based on your PC manufacturer
Choose your PC manufacturer for specific instructions on enabling virtualization. If you don’t see your manufacturer listed, refer to your device documentation.
These are external links to the manufacturers’ websites.
|
|
|
|---|---|
|
Acer
|
|
|
Asus
|
For PCs with AMD processors:
For PCs with Intel processors:
|
|
Dell
|
|
|
HP
|
|
|
Lenovo
|
|
|
Microsoft
|
Virtualization is already enabled on Surface devices.
|

Instructions based on your UEFI (or BIOS)
If your PC manufacturer isn’t listed or you’re unsure who it is, you may be able to find instructions for your UEFI (or BIOS). Choose your UEFI firmware developer for specific instructions on enabling virtualization. If you don’t see your firmware developer listed, refer to your device documentation.
|
AMI
|
Refer to your device’s firmware documentation
|
|
Phoenix
|
Refer to your device’s firmware documentation
|
These instructions may apply if you upgraded your PC from Windows 10 to Windows 11.
Note: Many Windows 10 PCs—and all PCs that come preinstalled with Windows 11—already have Virtual Machine Platform enabled, so you may not need to follow these steps.
Here’s how to turn it on:
-
Select Start, enter Windows features, and select Turn Windows features on or off from the list of results.
-
In the Windows Features window that just opened, find Virtual Machine Platform and select it. -
Select OK. You might need to restart your PC.
For more advanced info or help with troubleshooting, go to Microsoft Docs.
Android is a trademark of Google LLC.
Related topics
-
Install mobile apps and the Amazon Appstore -
More help on Microsoft Docs
What is SVM Mode In BIOS? [Explained Under 2 Minutes 2021]
Some motherboard manufacturers like to bury their features in BIOS menus, which is strange considering that most of them will be useless to the majority of users. SVM (Super VGA Mode) is one of those features; it is a mode designed for overclocking and testing, and it cannot be activated after a system has been set up and assembled. This guide will show you how to activate it in BIOS, just in case you have a motherboard that has SVM Mode hidden in BIOS.
BIOS is the silicon that controls the computations of the system. BIOS is often bundled into a separate small package that can be switched to different modes such as SVM, EZ Mode, and so on, to suit different needs. These modes can be activated in BIOS by pressing a specific key.
If you come across the SVM mode in your BIOS settings, it may be perplexing.
So don’t be concerned.
I’m going to break it down for you in this article.
I’ll go through all there is to know about the SVM mode, including how to activate it and the dangers it poses.
So, what does SVM mode entail?
SVM mode is a safe virtualization technique that lets your PC serve as a host system while sharing its hardware resources with numerous virtual machines. As a result, you may effectively run several operating systems on the same computer at the same time.
Continue reading to learn all there is to know about the SVM mode.
Also, check out our separate article on how to adjust mouse acceleration in FPS games if you want to improve your shooting experience.
What Does BIOS SVM Stand For?
Secure Virtual Machine is abbreviated as SVM. A virtual machine is a computer that you may host or operate on your own personal computer. It divides and distributes your PC hardware across the many virtual machines you’re operating.
Let’s suppose you wish to install Windows 7 on your Windows 10 computer. You may accomplish so with the assistance of a virtual machine.
Here’s how to repair it if you can’t hear anybody of discord.
When you start your virtual machine, you’ll see that the various hardware resources (CPU cores, RAM capacity, and so on) are split between your Windows 10 host and your Windows 7 virtual machine.
Furthermore, and most crucially,
Your Windows 7 virtual machine will operate as if it were a real computer with its own hardware.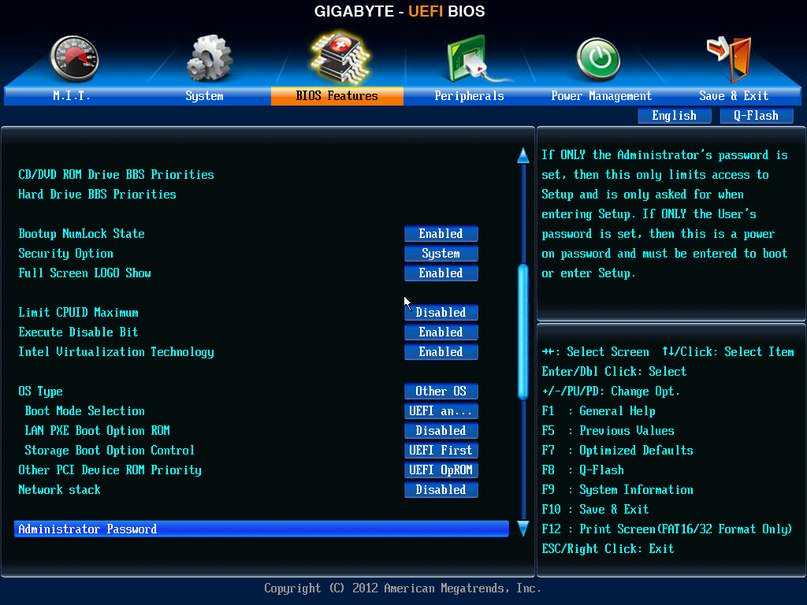
Turning on the SVM mode in BIOS will enable you to setup and operate virtual machines on your PC. Also, learn how to set your display to 144hz.
Does SVM Have an Impact on Performance?
SVM mode affects performance solely when running virtual machines or emulators since it is a feature for operating virtual machines (like BlueStacks). So, until you run them, your PC won’t suffer any performance degradation.
Also, learn how to go to the Steam Screenshots folder.
Regardless of whether you run a virtual machine or not, if you’ve enabled the Hyper-V Windows Feature, your PC will operate as a privileged guest.
In such case, your PC’s performance may suffer minor setbacks. The Hyper-V Windows Feature has a fault or, more accurately, an architectural weakness.
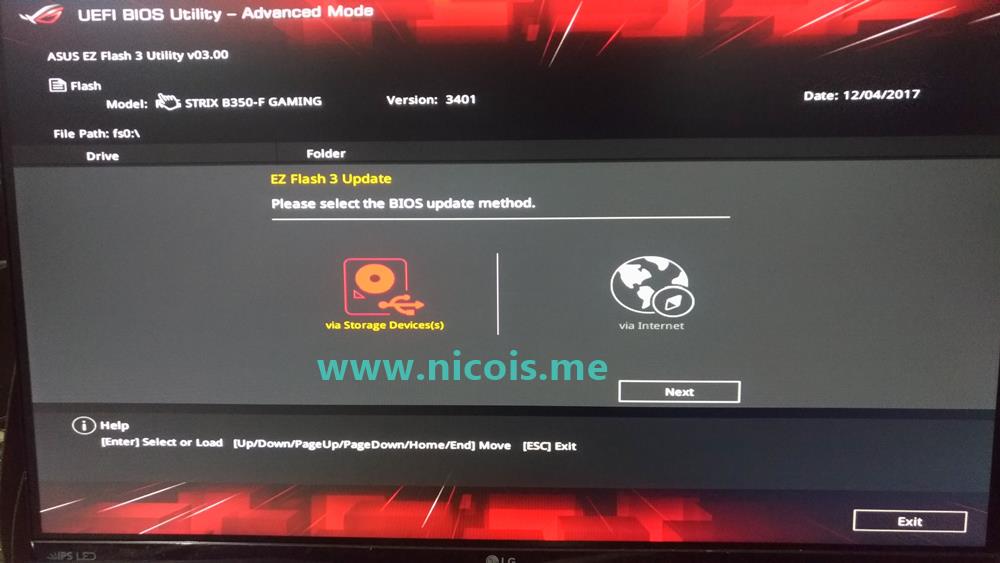
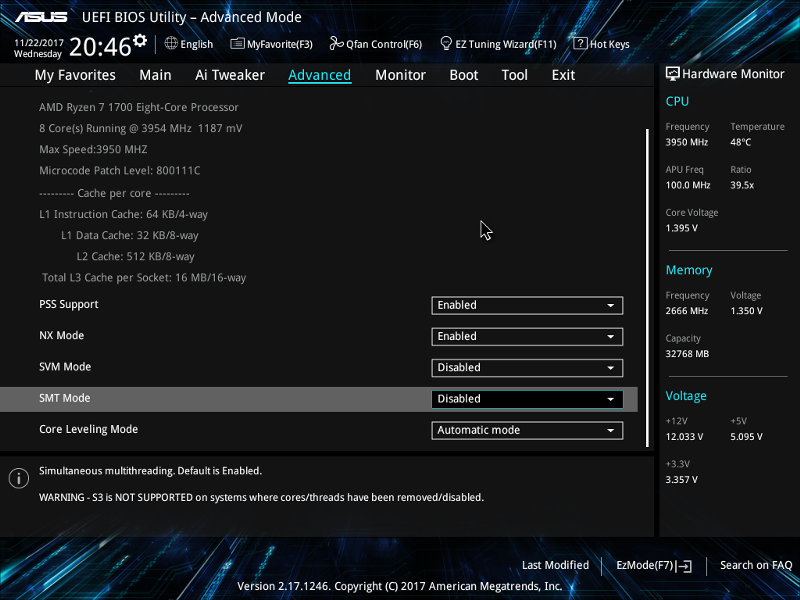
In the BIOS, where is the SVM Mode?
SVM mode may be hidden under various sub-menus depending on the motherboard manufacturer. Follow the procedures below to locate SVM mode in BIOS:
For Asus motherboards, go to http://www. asus.com/support
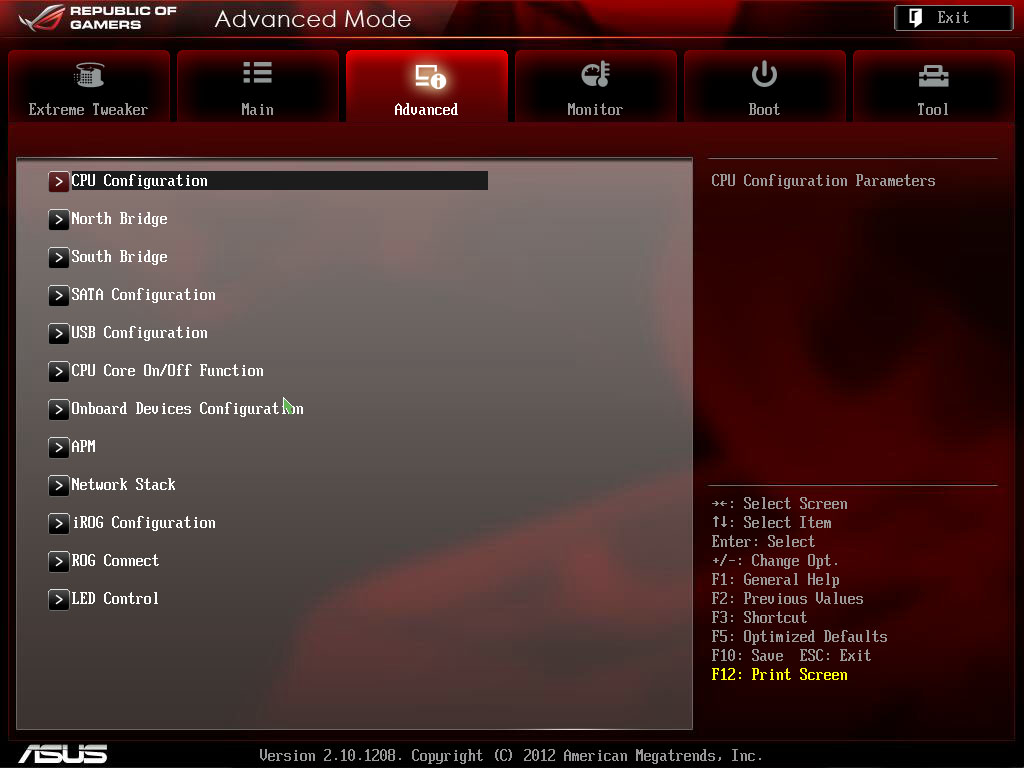
- Turn on your computer.
- Continue to hold down the Del key until the BIOS appears.
- To enter Advanced Mode, press F7. (On ROG series motherboards, Advanced Mode may be accessed without hitting F7).
- Select Advanced CPU Configuration from the drop-down menu.
- Look for SVM mode.
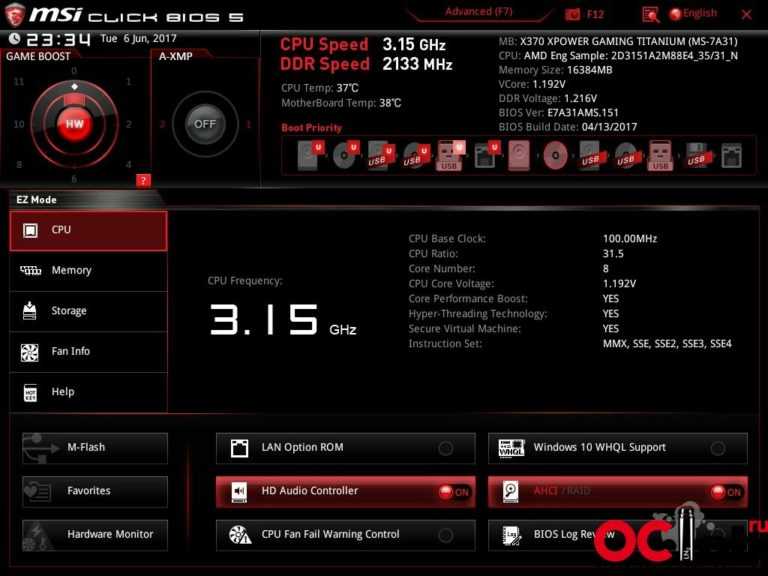
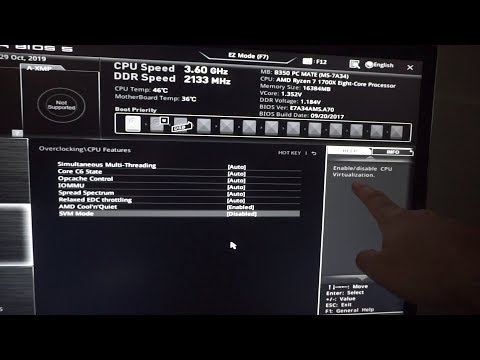
For MSI motherboards, follow these steps:
- Turn on the computer.
- Continue to hold down the Del key until the BIOS appears on the screen.
- Go to the Advanced tab.
- SVM mode may be found there.
For Gigabyte motherboards, follow these steps:
- Turn on the computer.
- Continue hitting the Del key until the BIOS appears.
- Go to the Advanced tab.
- Select Advanced CPU Settings from the drop-down menu.
- Look for SVM mode.
For Asrock motherboards, go to http://www.asrock.com/support
- Turn on the computer.
- Continue pressing the Del key until the BIOS menu appears.
- Go to the Advanced tab.
- Navigate to the CPU Configuration page.
- Look for SVM mode.
What Does AMD SVM Stand For?
The AMD SVM was the first virtualization solution for the x86 architecture. It was later called AMD-V. (AMD Virtualization).
It’s important to remember that this is only one of the numerous names for virtualization technology.
Check your power supply as soon as possible.
Is It Safe To Use SVM?
As previously stated, using SVM while also enabling Hyper-V Windows Feature may result in minor performance degradation.
As a result, unless you’re doing virtualization activities like virtual machines or emulators, there’s no need to activate SVM.
Make sure you have adequate hardware resources before turning on SVM to operate virtual machines.
As I previously said, a virtual machine functions as if it were a distinct computer. To function, it requires its own dedicated CPU, GPU cores, storage, and free RAM.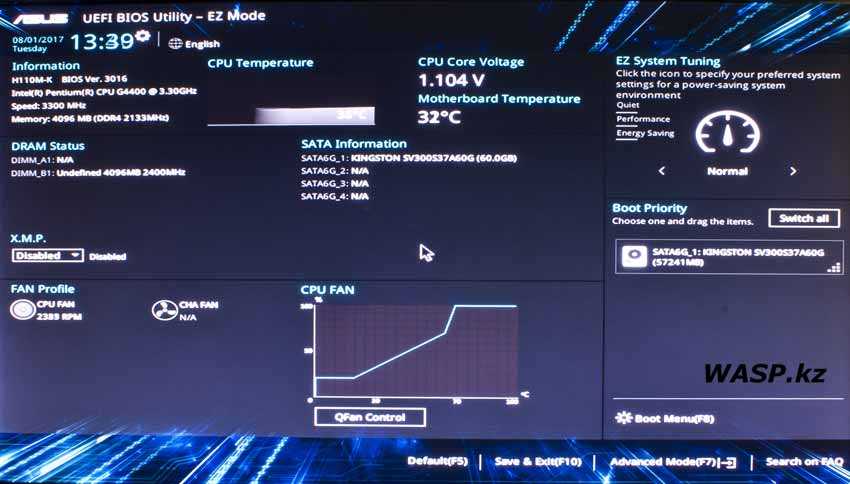
Here’s a comprehensive tutorial to using Twitch’s host mode.
So, how do you turn on SVM in BIOS?
To activate SVM in BIOS, follow these steps:
- During a fast reboot, click F2 to bring up the BIOS screen.
- Go to Advanced > CPU Configuration.
- Select Enable SVM Mode from the SVM Mode drop-down menu.
- Press Save & Exit, and select Save Changes and Reset option.
Why is SVM turned off by default?
SVM is turned off by default for security concerns.
If a malicious hypervisor infects your computer and manages to operate beneath your main operating system, the hypervisor effectively takes control of your computer.
So, if you’re sure you want to enable virtualization, you’ll have to go into BIOS and turn it on. Check to see if pximouse tiltwheel exe is a virus.
What Should You Do If Your BIOS Doesn’t Have SVM Mode?
Hardware-based virtualization is a feature. You won’t be able to use SVM mode in BIOS if your hardware doesn’t support virtualization.
There’s more to come.
Virtualization technique is known by many names depending on your hardware, including:
- VT-x
- AMD-V
- SVM
- VT-d (Intel Virtualization Technology)
- AMD IOMMU (Intelligent Memory Management Unit)
As a result, don’t give up if you can’t locate SVM mode. Look in your BIOS for the names listed above.
How to Fix a Black Screen in SVM Mode
Depending on the nature of the problem, there are many options for dealing with the black screen. See our other article on how to solve VLC’s inability to open MRL files.
The methods to solve SVM Black Screen Error are as follows:
1. Drivers must be updated.
If you see a black screen after activating SVM mode, it’s possible that the outdated BIOS or chipset drivers are to blame.
Consider the following:
- SVM mode should be turned off.
- Turn on the computer.
- Install the latest BIOS and chipset drivers.
- Update your operating system.

- Switch to SVM mode and try starting again.
2. Uninstall and reinstall the virtualization software
If you can boot into the OS but your virtualization program/software crashes, the issue is almost certainly with the software.
Follow the steps below to get started:
- Remove the virtualization software from your computer.
- Ensure that SVM mode is enabled.
- Install the virtualization program from scratch.
The key takeaway from approach 2 is to install the virtualization software after activating SVM mode and ensuring that it has all of the necessary rights and functionality.
Reconfigure shared memory if necessary.
The UMA (Unified Memory Architecture) settings on an AMD CPU with integrated graphics may be the issue. Because integrated graphics don’t have their own graphics memory, it deals with memory (RAM) sharing between the PC and the GPU.
The steps of reconfiguring shared memory are as follows:
- Go to the BIOS menu.
- Select Advanced from the drop-down option.
- Look for the UMA option.
- It should be set to auto.
- Save your modifications and restart your computer.
4. Install Windows again
If all other options fail, the only option is to reinstall the Windows operating system from scratch. Many people discovered that reinstalling Windows fixed their problems and allowed them to utilize virtualization. Before you begin, make sure you have a backup of your data.
Check out how to combine two Microsoft accounts as well.
FAQ
Is it safe to enable virtualization?
Answer: Turning on virtualization poses a security risk because it allows low-level access to other programs. As a result, only enable it if you’re using virtualization.
Is it true that virtualization causes computers to slow down?
Virtualization divides hardware resources among the virtual machines in use. If you run one or more virtual machines, the computer will slow down.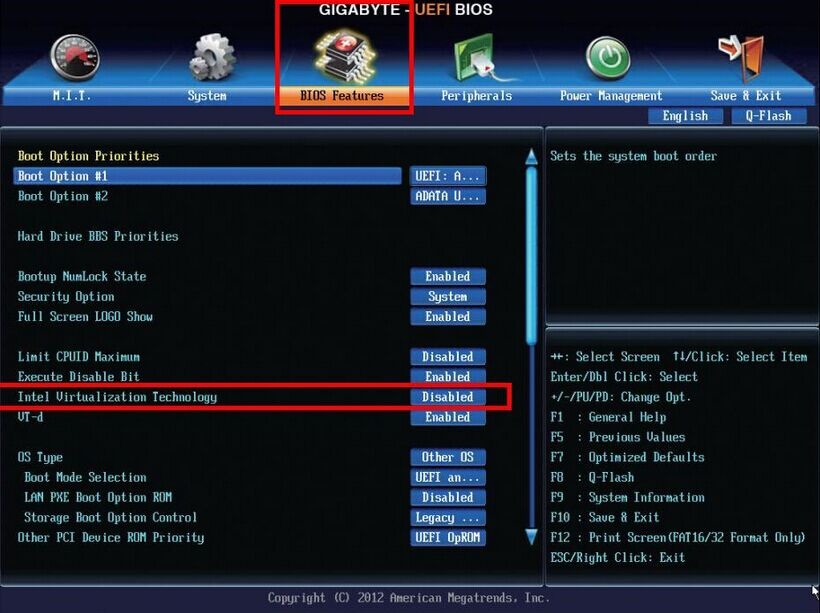
Is it legal to use virtual machines?
Virtual machines are legal, according to the law. They’re mostly used for running and testing multiple operating systems on a single piece of hardware. Emulators are also run on it.
Last Thoughts
SVM mode is a fantastic feature for running virtual machines. It expands the capabilities of your computer.
You can run multiple operating systems, emulators, and other programs.
You should, however, utilize it with caution. It may cause you problems if you don’t.
Frequently Asked Questions
What is SVM mode in BIOS?
SVM stands for Supervisor Mode and is a mode that can be enabled on the BIOS. This mode will allow you to boot from a USB device, such as a flash drive or CD/DVD.
What is SVM mode?
SVM mode is a special mode that was created to make the game harder for players who are skilled.
Does SVM mode affect performance?
No, SVM mode does not affect performance.
Corey Holmes
Graphic Designer and Blogger
Indiana — based graphic designer for more than 6 years. Creator of multiple awesome print and web designs. Interested in blogging as a second addiction since 2019. 100% animal lover.
AMD Secure Encrypted Virtualization (SEV)
AMD EPYC Hardware Memory Encryption
Hardware accelerated memory encryption for data-in-use protection. Takes advantage of new security components available in AMD EPYC processors
- AES-128 encryption engine embedded in the memory controller. Automatically encrypts and decrypts data in main memory when an appropriate key is provided.
- AMD Secure Processor. Provides cryptographic functionality for secure key generation and key management.
Feature Overview
AMD Secure Memory Encryption (SME)
Uses a single key to encrypt system memory. The key is generated by the AMD Secure Processor at boot. SME requires enablement in the system BIOS or operating system. When enabled in the BIOS, memory encryption is transparent and can be run with any operating system.
AMD Secure Encrypted Virtualization (SEV)
Uses one key per virtual machine to isolate guests and the hypervisor from one another. The keys are managed by the AMD Secure Processor. SEV requires enablement in the guest operating system and hypervisor. The guest changes allow the VM to indicate which pages in memory should be encrypted. The hypervisor changes use hardware virtualization instructions and communication with the AMD Secure processor to manage the appropriate keys in the memory controller.
AMD Secure Encrypted Virtualization-Encrypted State (SEV-ES)
Encrypts all CPU register contents when a VM stops running. This prevents the leakage of information in CPU registers to components like the hypervisor, and can even detect malicious modifications to a CPU register state.
Product Briefs
White Papers & Specifications
| Document | Description | Revision | Date |
|---|---|---|---|
| SEV Secure Nested Paging Firmware ABI Specification |
Documents the API available to the host hypervisor for management of SNP-active guests.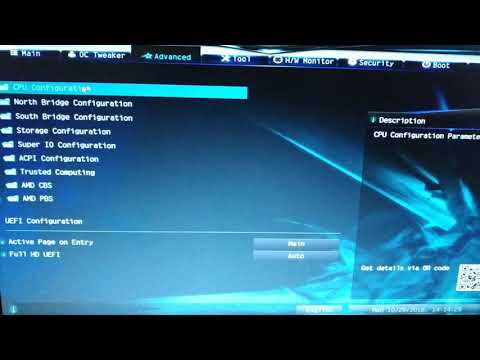 |
1.51 | January 2022 |
| Secure Encrypted Virtualization API | Documents the API available to the host hypervisor for management of keys and secure data transfer between host hypervisor and guest VM memory | 0.24 | April 2020 |
| AMD64 Architecture Programmer’s Manual Volume 2 | Describes the AMD64 architecture’s resources and functions that are managed by system software. Note sections
|
3.33 | April 2020 |
| Guest Hypervisor Communication Block (GHCB) Standardization | Standardizes the Guest-Hypervisor Communication Block (GHCB) format and specifies the required exit support and associated guest state to be provided in the GHCB to allow interoperability between hypervisors and SEV-ES guests. | 2.01 | July 2022 |
| SVSM Draft Specification | Secure VM Service Module (SVSM) for SEV-SNP Guests | 0. 50 50 |
August 2022 |
| AMD SEV-SNP | Strengthening VM isolation with integrity protection and more. | January 2020 |
|
| OpenStack: libvirt driver launching AMD SEV-encrypted instances | Proposes work required in order for nova’s libvirt driver to support launching of KVM instances which are encrypted using AMD’s SEV (Secure Encrypted Virtualization) technology. | January 2019 |
|
| Protecting VM Register State With SEV-ES | Technical overview of the SEV-ES feature, the principles behind the architecture, and protections offered to further isolate encrypted VMs. | February 2017 |
|
| AMD Memory Encryption | Introduction to Secure Memory Encryption (SME) and Secure Encrypted Virtualization (SEV). | 9 | October 2021 |
| Versioned Chip Endorsement Key (VCEK) Certificate and KDS Interface Specification | Introduction to the VCEK certificate and the KDS interface used to retrieve the certificate. |
0.50 | October 2021 |
Links & Downloads
| Link | Description |
|---|---|
| https://github.com/AMDESE/AMDSEV | Setup scripts useful for running SEV guests. Site also hosts Linux open source code under development (note SEV support has been accepted in upstream projects) |
| Using AMD Secure Memory Encryption with Oracle Linux | Oracle UEK support for SME and SEV. |
| SUSE: AMD Secure Encrypted Virtualization (AMD-SEV) Guide | Provides a basic understanding of how SEV works, how to enable and configure it, and some of the limitations and restrictions that its use causes as compared to non-encrypted virtualization. |
| ask_ark_naples.cert | ASK/ARK certificates for EPYC 7xx1 (Naples) |
| ask_ark_rome.cert | ASK/ARK certificates for EPYC 7xx2 (Rome) |
| ask_ark_milan.cert | ASK/ARK certificates for EPYC 7xx3 (Milan) |
amd_sev_fam17h_model01h_0.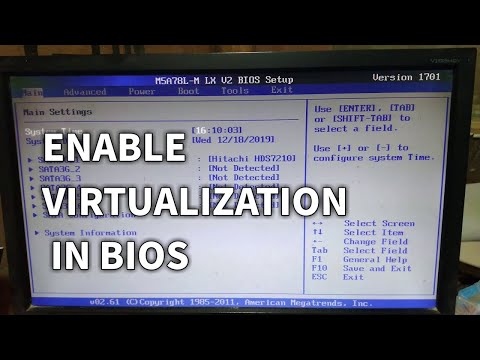 17.48.zip 17.48.zip |
SEV Firmware | SEV firmware 0.17.48 [hex 00.11.30] for EPYC 7xx1 (Naples) |
| amd_sev_fam17h_model3xh_0.24.15.zip | SEV Firmware | SEV firmware 0.24.15 [hex 00.18.0F] for EPYC 7xx2 (Rome) |
| amd_sev_fam19h_model0xh_1.51.03.zip | SEV Firmware | SEV firmware 1.51.03 [hex 1.33.03] for EPYC 7xx3 (Milan) |
| CEK certificate web page | Interactive tool for obtaining CEK certificate. Also available as https://kdsintf.amd.com/cek/id/<GetIDValue> |
| https://github.com/AMDESE/sev-tool | AMD SEV Tool for managing SEV platform certificates |
| https://github.com/AMDESE/runtime | SEV runtime for Kata Containers |
Technical Presentations
| Forum | Presentation | Date |
|---|---|---|
| Linux Security Summit (2019) | Upcoming x86 Technologies for Malicious Hypervisor Protection | November 2019 |
| KVM Forum (2019) | Secure Encrypted Virtualization – What’s Next? | November 2019 |
| Linux Security Summit (2019) | Enarx – Attested, Secured Execution with AMD’s SEV | August 2019 |
| Linux Security Summit (2018) | AMD Encrypted Virtualization Update | November 2018 |
| KVM Forum (2018) | Extending Secure Encrypted Virtualization with SEV-ES | October 2018 |
| Linux Security Summit (2017) | Protecting VM Register State with AMD SEV-ES | September 2017 |
| Linux Security Summit (2016) | AMD x86 Memory Encryption Technologies | December 2016 |
| KVM Forum (2016) | AMD’s Virtualization Memory Encryption Technology | September 2016 |
| Xen Summit | AMD’s Virtualization Memory Encryption Technology | September 2016 |
| Usenix Security Symposium | AMD x86 Memory Encryption Technologies | August 2016 |
Virtualization in the spirit of AMD SVM
Modern Intel Virtualization Technology and AMD Virtualization Technology use the same principle, but if the 32-bit 80386 allowed virtualization only of the 16-bit 8086 operating in real mode, then today the virtualization object can be a full-featured 64- bit processor.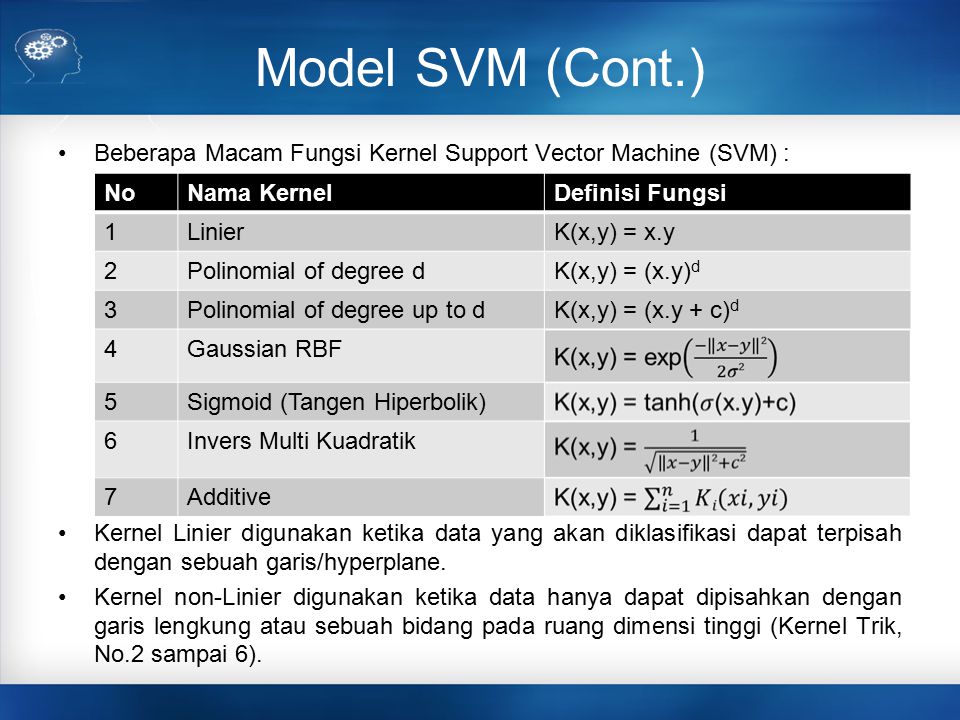 Virtualization technologies from Intel and AMD are quite similar, but at the level of machine code they are incompatible.
A lot has been said about off-the-shelf software products that use virtualization. The proposed article has a slightly different focus. It is intended for professionals who want to study this issue from the inside, that is, at the level of assembly code and experiment with writing their own programs using these technologies. The material is supplemented with the source texts of the simplest virtual mode monitor in assembler, capable of allowing and forbidding calls of guest procedures to given hardware resources.
AMD SVM Basic Definitions
AMD SVM technology defines two special processor states for executing two kinds of software modules. Virtual Machine Monitor (VMM) or Hypervisor has unlimited authority when accessing system resources. Coordinates the work of the entire system and creates a specified number of virtual machines to run guest programs. Guests or guest programs are restricted from accessing system resources. When a guest program tries to access a resource that the hypervisor has denied access to, the execution of the guest program is interrupted and control is transferred to the hypervisor to process this event. Such a mechanism provides emulation of a given number of virtual machines according to a scenario determined by the hypervisor. It is also important that a failure in a virtual machine does not lead to a failure of the entire system.
Hypervisor and its permissions
To enable SVM mode and gain hypervisor permissions, the program must set the SVME (SVM Enable) bit. This is bit 12 of the IA32_EFER MSR register (MSR address C0000080h). Then, after preparing the structures needed to run virtual machines in RAM, the program can start guests using the VMRUN instruction. If the guest has accessed a system resource, access to which is denied for him or the time quantum allocated for his work has expired, control is transferred to the hypervisor. This operation is called #VMEXIT.
Note that after setting the SVME bit, the program must read the IA32_EFER MSR register and check that SVME=1. This is because SVM mode may be blocked. The blocking is controlled by the SVMDIS (SVM Disable) bit. This is bit 4 of the VM_CR MSR register (MSR address C0010114h). To enable the setting of the SVME bit, the SVMDIS bit must be set to zero.
The processor allows you to set protection against unauthorized activation of the SVM mode. If the LOCK bit (bit 3 of the VM_CR MSR register) is set, the SVMDIS bit can only be reset after the password has been written to the SVM_KEY MSR register (MSR address C0010118h).
AMD SVM Resource Identification
By executing the 80000001h function of the CPUID instruction, we can get a bitmap in the EDX and ECX registers, in which each bit indicates the support of a certain technology by the processor: 0=not supported, 1=supported (CPU Extended Feature Flags). SVM technology corresponds to bit 2 of the ECX register.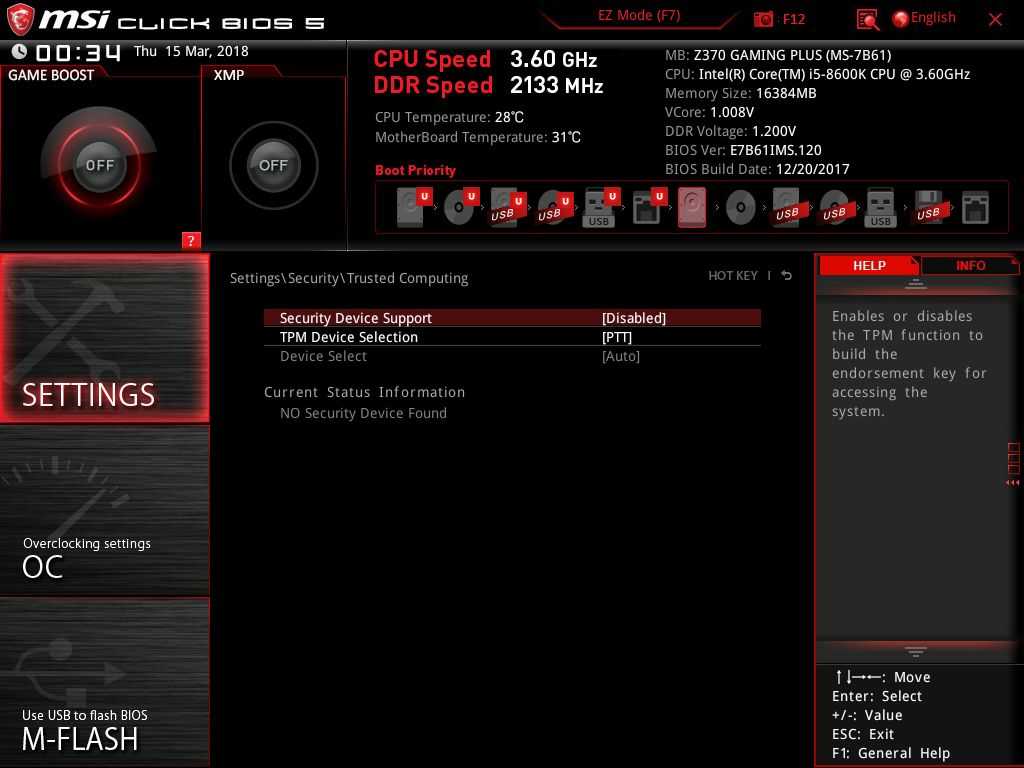
If SVM is supported, function 8000000Ah of the CPUID instruction is available. It allows you to read the revision number of the SVM, a number of parameters and the presence of modes supported optionally.
Host Save Area and VMCB regions,
used in AMD SVM
AMD SVM technology defines the following two special memory areas:
Host Save Area state when returning from the guest program to the hypervisor. Presumably, the size of this block does not exceed 4KB (unfortunately, the exact value of the size is not indicated in the AMD documentation). Its 64-bit physical address is in the VM_HSAVE_PA MSR register (MSR with address C0010117h). The address must be 4KB aligned, and within the maximum physical address supported by the processor. The Host Save Area is used by the processor in hardware, and program access to this region is not recommended for two reasons: its formatting may vary depending on the processor model, its contents are cached in the processor’s internal buffers, and the contents of these buffers and the memory region are not guaranteed to be coherent. Note that Intel has a similar situation with the VMXON region.
VMCB ( Virtual Machine Control Block ) — This region is used to control the virtual machine and the guest program running on it. Its size is 4 KB, and the base physical address is specified in the EAX (for 32-bit mode) or RAX (for 64-bit mode) register when the VMRUN instruction is executed. This instruction starts the virtual machine. The base physical address requirements are the same as for the Host Save Area. Unlike the Host Save Area, and unlike Intel’s VMCS region, the formatting of the VMCB region is documented. It consists of two logical groups:
- The Control Area is used to control the operation of the virtual machine and set lists of system resources and machine instructions that the guest cannot use. When the latter accesses these resources, its work is interrupted, and control is transferred to the hypervisor to emulate or generate an error message. It also contains status fields that are hardware-updated by the processor when the virtual machine shuts down.
 Based on their contents, the hypervisor can determine the reason for the termination of the guest.
 - State Save Area is used to load the state of the guest when it starts and save its state when returning to the hypervisor.
AMD SVM instructions
AMD SVM technology defines the following processor instructions.
VMRUN — This instruction is used by the hypervisor to start the guest on the virtual machine. The EAX (for 32-bit mode) or RAX (for 64-bit mode) register contains the base physical address of the VMCB that will be used by the running virtual machine. The hypervisor context is stored in the Host Save Area block. The guest context is loaded from the VMCB. The execution of the guest on the virtual machine continues until one of the events to be intercepted by the hypervisor occurs. The list of such events depends on the contents of the Control Area in the VMCB block. When the trapped event occurs, the #VMEXIT operation is executed. The execution of the guest is interrupted, its context is stored in the State Save Area in the VMCB block. The hypervisor context is loaded from the Host Save Area block. The hypervisor starts running. Based on the contents of the status fields in the VMCB block, the hypervisor can determine the reason for terminating the guest.
VMMCALL — This instruction is used by the guest to explicitly transfer control to the hypervisor. It initiates the #VMEXIT operation described above. Note that for the VMMCALL instruction to function properly, the Intercept VMMCALL Instruction bit in the VMCB block must be set to 1.
VMSAVE — Stores in the VMCB a number of additional processor context parameters for the guest program that are not automatically saved when a #VMEXIT operation is performed. The base physical address of the used VMCB is in the register EAX (for 32-bit mode) or RAX (for 64-bit mode). The list of saved parameters is as follows: registers FS, GS, TR, LDTR, model-specific registers KernelGSbase, STAR, LSTAR, CSTAR, SFMAS, SYSENTER_CS, SYSENTER_EIP, SYSENTER_ESP.
VMLOAD — Loads a number of additional processor context parameters for the guest program from the VMCB that are not automatically loaded when the VMRUN instruction is executed. The base physical address of the used VMCB is in the register EAX (for 32-bit mode) or RAX (for 64-bit mode). The list of loaded parameters is the same as in the VMSAVE instruction.
CLGI — resets the global interrupt enable flag (GIF). If GIF=0, all types of hardware interrupts (NMI, SMI, INTR) are disabled, the perception of the INIT soft reset signal, the control of the A20 line, and a number of other operations are prohibited, a complete list of which is given in [8].
Note. Anyone who has dealt with x86 assembler is familiar with the IF (Interrupt Flag) interrupt enable flag and the instructions for resetting it and setting the CLI and STI. The GIF (Global Interrupt Flag) flag and the associated CLGI and STGI instructions work on the same principle, with the only difference that when GIF=0, the perception of not only maskable interrupts, but also a number of other asynchronous events listed above is prohibited.
STGI — Sets the Global Interrupt Enable Flag (GIF). See the CLGI instruction comment.
INVLPGA — Invalidates the specified elements of the page translation buffer (TLB). The instruction takes in register EAX (for 32-bit mode) or RAX (for 64-bit mode) the linear address of the memory location. Those TLB elements that are involved in the translation of this address are cleared. The instruction also receives in the ECX register the number of the virtual address space (ASID — Address Space Identifier) for which the operation is performed.
SKINIT ( Secure Init and Jump with Attestation ) — provides hardware support for protecting software modules from unauthorized modification. Uses an external Trusted Platform Module (TPM) device. The processor is initialized to execute a secure fragment (Secure Loader), the memory region containing the specified module is protected from external access, its contents are verified using TPM, then control is transferred to this program module. The instruction accepts in the EAX register the base physical address of the secured Secure Loader module, the address must be 64 KB aligned. Module size 64 KB.
Note. Not all processors that support AMD SVM support the SKINIT instruction. Before using it, you must execute the CPUID 80000001h function and check bit 12 of the ECX register (SKINIT feature).
How the program works
The program demonstrates the capabilities of AMD SVM virtualization technology. In subsequent publications, the author plans to consider a similar example for Intel VMX. For the purpose of exclusive and unhindered interaction of the debugged program with the hardware, the ancient technology of debugging under DOS is used. The rationale for such a step and recommendations for organizing the workplace are given in one of our publications.
At the same time, the acquired knowledge and skills are universal, so they will be useful when writing similar procedures for any OS. The same article describes in detail the procedure for switching the processor to 64-bit protected mode, which is also needed in this example. Recall that to use AMD SVM technology, the processor must be running in protected mode.
In this example, the hypervisor program starts the guest program. The guest outputs a byte to port 0080h and ends with a VMMCALL instruction. If the hypervisor has allowed the guest to access this port, output occurs and control returns to the hypervisor when the VMMCALL instruction is executed. If the hypervisor has denied the guest access to the port, no output occurs and control returns to the hypervisor when an OUT instruction is attempted. You can allow or deny access to the port by modifying the fragment executed at step 10 of the algorithm discussed below. Visualization of status information occurs in step 34.
Port address — 0080h was not chosen by chance. If the experimenter has a POST card, the output result of a byte can be observed on its indicators. The author used the IC80 V5.0 device manufactured by IC Book Labs, described in [17]. It supports a 16-bit data port, which expands the possibilities for experimentation. The choice of an output port with indication as an object of virtualization makes our experiments simple and visual.
Note. The simplest POST card is an 8-bit port with address 0080h. The data output to this port is displayed on the indicators. The main purpose of such a device is to display POST codes that the BIOS outputs for diagnostic purposes when the platform starts.
Program structure
Attached WORK directory contains the following files:
ASM_TD.BAT — assembles, links and runs the program under the debugger. When TASM and TLINK are launched, options are used to add debugging information to the EXE file and debug with viewing the source code of the program.
ASM_EXE.BAT — performs assembly and linking. EXE file is generated.
MAKE_SVM.ASM is the main program module. Checks the program launch conditions, prepares the context for working in protected mode with paging and calling a guest procedure using AMD SVM technology.
CODESEGS.INC — code segments for protected mode. The CODE_32 segment contains the Transit_32 procedure from which the guest procedure is called. The TARGET_32 segment contains the procedure Guest_Routine_32. The TARGET_64 segment is reserved for 64-bit guest procedures. The INTERRUPTS_16 segment is reserved for interrupt handling in protected mode.
DATASEGS.INC — data segments. DATA_16 contains variables and text strings. GLOBAL_DESCRIPTOR_TABLE — global descriptor table. PAGING_AND_VMCONTROL — dynamically created page tables and tables to support virtual mode. STACK_16 — stack segment.
A20.INC — A library of procedures for managing the A20 address line.
DOSMSG.INC — procedure for outputting text strings using the DOS service.
NUMPRINT.INC is a library of procedures for visualizing hexadecimal and decimal numbers.
Description of the program operation
Consider the execution of the main module. The numbering of the paragraphs of this description corresponds to the numbering of the comment paragraphs in the source text — the WORK\make_svm.asm file.
1) Setting the stack address, loading the SS and SP registers.
2) Issuing a message about the start of the configuration check procedure.
3) Checking the support of the 32-bit instruction set. We check the availability for writing bit 14 (NT-Nested Task) of the flag register. Such a check is needed so that when you try to run it on computers below 80386, the program will display an error message, and not hang.
4) AMD SVM technology support check. First, we check the support of the CPUID instruction, then, using the functions 80000000h (Processor vendor and largest extended function number) and 80000001h (Processor family, model, stepping and features) of the CPUID instruction, we check that the AMD processor and SVM are supported.
5) Checking the operating mode of the processor. The program uses direct access to system resources, so the processor must be running in real mode at the time of its launch.
6) Read and visualize the AMD SVM version and support for the SKINIT instruction. Functions 80000001h (Processor family, model, stepping and features) and 8000000Ah (SVM Revision and Feature Identification) of the CPUID instruction are used.
7) Enable SVM mode. To do this, first set the VM_CR .SVMDIS bit to zero, then set the IA32_EFER.SVME bit to 1. A check is made to see if the SVM is blocked. The contents of the modified registers are saved for later restoration when exiting the program.
8) Initialization of pointers for special memory areas: Load_CR3 — pointer to the root page table, used to load the CR3 control register. Load_VM_HSAVE_PA is a pointer to the Host Save Area block, in which the hypervisor context is saved when the guest program starts. The pointer is used to load the low 32-bit word of the 64-bit VM_HSAVE_PA MSR. Load_VMCB is a pointer to the Virtual Machine Control Block that is used to control the execution of the guest program and from which its context is loaded. The pointer is used to load the operand of the VMRUN instruction into the EAX register. Load_IOPM is a pointer to the Input/Output Permission Map block, which is used to control the guest program’s access to I/O ports. All pointers contain 32-bit physical addresses aligned at 4 KB according to the processor’s requirements for the location of the corresponding memory areas.
9) Preliminary cleaning of special memory areas. The page table, Host Save Area and VMCB blocks are set to zero. The Input/Output Permission Map block is filled with the constant FFh.
10) This is a commented out snippet used in debugging. Resetting the bit corresponding to port 0080h in the IOPM table. If this bit is set to zero, guest access to port 0080h is allowed. If this bit is set to 1, then when the guest tries to access port 0080h, the guest’s execution is interrupted, control is transferred to the hypervisor. Based on the contents of the status fields of the VMCB block, the hypervisor can determine the reason for the termination of the guest, the address of the intercepted port, the bitness of the intercepted operation, and other parameters.
11) Load the VM_HSAVE_PA MSR register, which specifies the address of the Host Save Area. The original value of the register is saved for restoration when the program exits. The original and loaded values are visualized.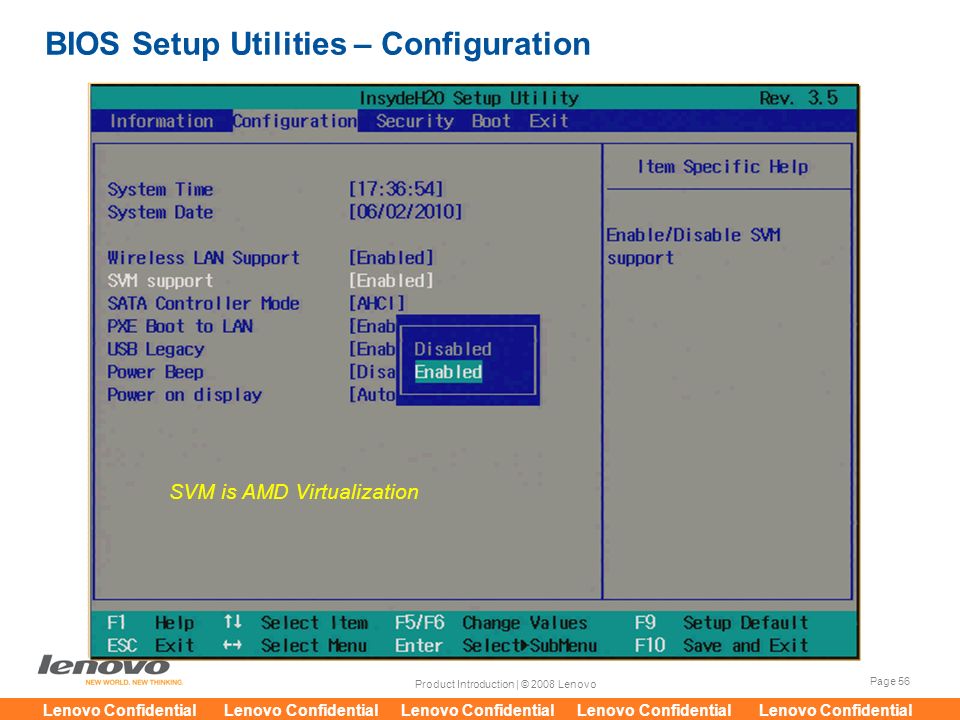
12) Issuing a message about the beginning of the context preparation procedure for the hypervisor and guest to work in protected mode.
13) Load register CR3, which defines the base physical address of the root page table.
14) Building PML4, PDP, PDE page tables. See [8] for details. Since the memory area in which the tables are built was zeroed in step 9, on here we write the values of only those fields that must be non-zero.
15) Initialize register CR4. Set the bits responsible for paging options: PSE (Page Size Extension), PAE (Physical Address Extension).
16) Load the base address of the global descriptor table (GDT) into the GDTR register.
17) Building a global descriptor table that describes all segments used when working in protected mode.
18) Prepare an address for an inter-segment call to the Transit_32 subroutine located in the 32-bit CODE_32 code segment.
19) Preparation of parameters in the virtual machine control block (VMCB) that will be used to load the processor context when calling the guest procedure, including fields from which the values of the CS registers are loaded, RIP addressing the entry point to the guest procedure. Since the memory area in which the VMCB is built was zeroed in step 9, on here we write the values of only those fields that must be non-zero.
20) Enable address line A20. We save the initial state A20 for restoration when exiting the program.
21) Issuing a message about the beginning of the guest call procedure.
22) Saving registers SS, SP for subsequent restoration of the real mode context.
23) Disable hardware interrupts.
24) Switch to protected mode. The program is currently running in a 16-bit code segment.
25) Inter-segment jump to the next instruction to load code segment attributes.
26) Loading of data segment selectors DS and ES.
27) Loading the SS stack segment selector. The SP value is not reloaded because the same stack is used as in real mode, with the only difference that the SS register is not the base address, but the stack segment selector.
28) Inter-segment call of the Transit_32 subroutine, located in the 32-bit code segment CODE_32, located in the CODESEGS. INC file of the source text. This subroutine adjusts the values of the SS and RSP registers in accordance with the rules of the 64-bit mode, turns on page translation and the IA-32e mode, which allows the execution of 32 and 64-bit code segments. A selector is loaded into the FS register to access the DATA_16 segment.
Then, using the VMRUN instruction, we start the guest procedure Guest_Routine_32, located in the TARGET_32 segment. The EAX register contains the address of the VMCB prepared in step 19.
The guest procedure context is being loaded from the VMCB. After its completion, the status fields of the VMCB block will be overwritten by the processor; their contents can be used to determine the reason for the termination of the guest and other parameters, the set of which depends on the termination reason.
As can be seen from the CODESEGS.INC file, the Guest_Routine_32 guest routine consists of outputting byte 55h to port address 0080h and a VMMCALL instruction to explicitly return to the hypervisor.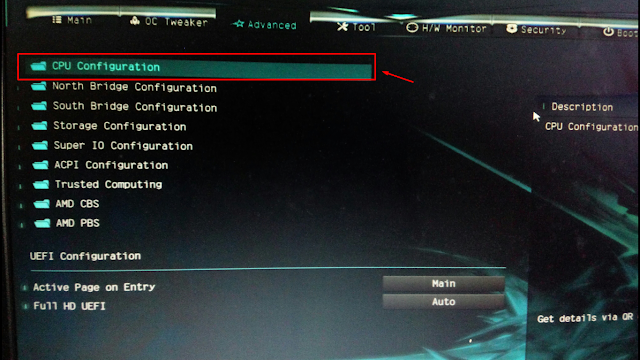 If access to port 0080h is allowed, the output of the byte will take place and the procedure will end with the VMMCALL command. If access is denied, the procedure will terminate when an OUT command is attempted and no byte will be output. Next, at step 34, information about the reason for terminating the guest will be rendered. Recall that access permission on port 0080h is set in step 10.
Guest returns to the instruction after the VMRUN instruction. After that, the TARGET_32 subroutine turns off page translation and IA-32e mode. 16-bit access to the stack segment is restored.
29) Control returned from subroutine TARGET_32. We load 16-bit segment selectors into the segment registers, clear the page translation buffer and switch to real mode.
30) Real mode context recovery. We perform an inter-segment transition to the next instruction to load the attributes of the code segment. Restore the values in the SS and SP registers.
31) Enable interrupts.
32) Restore the initial state of the address line A20.
33) Restore values in system registers: VM_HSAVE_PA MSR, IA32_EFER MSR, VM_CR MSR.
34) Displaying a message about the return of control from the guest procedure. Visualization of status information, which can be used to determine the reason for the termination of the guest procedure: fields Exit Code, Exit Info 1 of the VMCB block. Waiting for a key press. Then we output 00h to port 0080h and exit to DOS with exit code 00h.
35) Control is transferred here if the program terminates due to errors that occurred while checking the configuration or setting the context. The BP register contains the address of the line to display the error message. We display an error message. Waiting for a key press. Then we output 01h to port 0080h and exit to DOS with exit code 01h.
Analysis of results
If in the IOPM table, the bit that allows access to port 0080h is set to 1, then the output to the port is not performed, the OUT instruction is intercepted and causes the guest to terminate.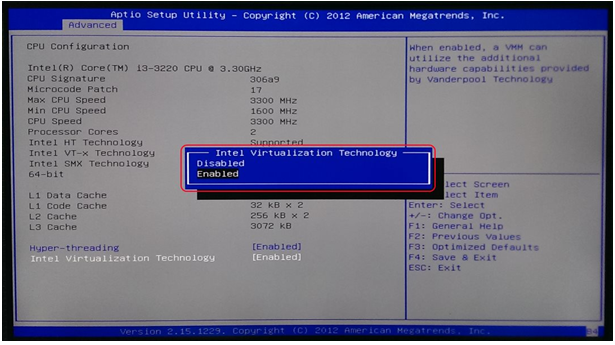 The result is visualized: Exit Code = 0000007Bh, Exit Info 1 = 00800110h.
If in the IOPM table, the bit that allows access to port 0080h is set to zero, then the output to the port is performed, the guest does not end at the OUT instruction, but reaches the VMMCALL instruction. The result is visualized: Exit Code = 00000081h, Exit Info 1 = 00000000h.
You can control the state of the specified bit of the IOPM table by editing step 10 of the above algorithm. If the experimenter has a POST card, the byte output can also be observed on its indicators.
Using the SVM Intercept Exit Codes table given in document [8], let’s decipher our results:
- Exit Code = 0000007Bh means exit when a guest tries to access a prohibited I/O port (VMEXIT_IOIO).
- Exit Code = 00000081h means exit when the guest executes the VMMCALL instruction (VMEXIT_VMMCALL).
Using the I/O Intercept Information table given in the document [8], let’s decode the additional parameter generated when intercepting a port call: Exit Info 1 = 00800110h.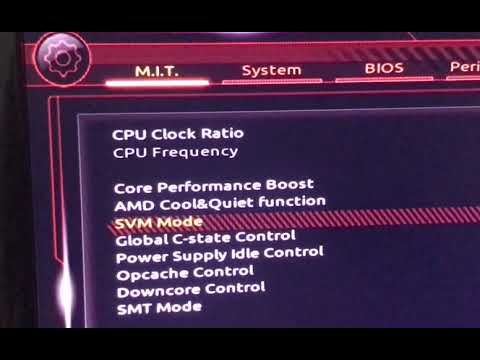
- Bits [31-15] = 0080h, this is the port address that was intercepted.
- Bit[8] = 1 means 32-bit addressing.
- Bit[4] = 1, means 8-bit data.
Information sources
Electronic documents available from developer.intel.com
- Intel 64 and IA-32 Architectures Software Developer’s Manual. Volume 1: Basic Architecture. Order Number 253665-034US.
- Intel 64 and IA-32 Architectures Software Developer’s Manual. Volume 2A: Instruction Set Reference, A-M. Order Number 253666-034US.
- Intel 64 and IA-32 Architectures Software Developer’s Manual. Volume 2B: Instruction Set Reference, N-Z. Order Number 253667-034US.
- Intel 64 and IA-32 Architectures Software Developer’s Manual. Volume 3A: System Programming Guide, Part 1. Order Number 253668-034US.
- Intel 64 and IA-32 Architectures Software Developer’s Manual. Volume 3B: System Programming Guide, Part 2. Order Number 253669-034US.
- Intel Processor Identification and the CPUID Instruction.
 Application Note 485. Order Number 241618-033.
Electronic documents available from developer.amd.com
- AMD64 Architecture Programmer’s Manual. Volume 1: Application Programming. Publication no. 24592.
- AMD64 Architecture Programmer’s Manual. Volume 2: System Programming. Publication no. 24593.
- AMD64 Architecture Programmer’s Manual. Volume 3: General Purpose and System Instructions. Publication no. 24594.
- AMD64 Architecture Programmer’s Manual. Volume 4: 128-Bit Media Instructions. Publication no. 26568.
- AMD64 Architecture Programmer’s Manual. Volume 5: 64-Bit Media and x87 Floating-Point Instructions. Publication no. 26569.
- AMD64 Architecture Programmer’s Manual. Volume 6: 128-Bit and 256-Bit XOP, FMA4 and CVT16 Instructions. Publication no. 43479.
- BIOS and Kernel Developer’s Guide for AMD NPT Family 0Fh Processors. Publication no. 32559.
- BIOS and Kernel Developer’s Guide (BKDG) for AMD Family 10h Processors.
 Publication no. 31116.
 - BIOS and Kernel Developer’s Guide (BKDG) for AMD Family 10h Processors. Publication no. 41256.
- AMD CPUID Specification. Publication no. 25481.
Electronic documents available on the website icbook.com.ua
- IC80 V5.0. Diagnostic board. User’s manual. Revision 1.5. IC Book Labs, © 2006.
You can download the ZIP-archive
with an example of programming
in
assembler here.
AMD SVM Support — what is it in the BIOS — enable or not? (Support Vector Machine, SVM Mode)
Greetings dear ones! There are new motherboards, processors, memory .. all hardware is getting better and faster. New features are coming. The old ones remain. But today we will talk about one of the old functions that has existed for a long time .. I don’t know when AMD introduced it, but Intel introduced it back in Pentium 4 model 662/672 — there was simple VT-x virtualization.
Understanding
SVM Support (Support Vector Machine) — the option allows you to enable or disable the AMd SVM (Secure Virtual Machine) technology. This technology is AMD hardware virtualization, which is necessary for some programs to work.
This technology is present in almost all modern AMD processors, Intel has its own — Intel VT.
Older processors may not support virtualization.
Another description of the option — helps to offload the processor during the use of virtual machines, most likely this description is not entirely accurate. Although in fact the effect is exactly the same — if you use virtual machines and do not enable the option — there will be really wild brakes.
How it works — in simple terms
In fact, there is nothing complicated:
- Virtualization allows some programs to send commands to the processor directly so that it processes them faster. Applicable only to special programs that emulate the environment — for example, Android, Windows, Linux and others.
- There is a regular virtualization and advanced. The first one provides direct access to the processor.
 The second is access to devices on the PCI bus (for example, an audio / video card).
 - Theoretically, hardware virtualization can also be used by some conventional programs, such as Chrome or a video player. Why? You’ve probably heard somewhere — hardware acceleration. I about it. It may run faster with virtualization enabled. Such acceleration seems to be in Chrome, and may be in some video players.
Should it be included?
And here, too, everything is very simple:
- To answer this question, I will say differently — there is no point in turning it off. The technology does not load the PC in any way, does not change the principle of the processor, it simply includes some instructions in it and that’s it.
- With this option disabled, sometimes there may be problems installing some programs — they may simply tell you that virtualization technology is needed, sometimes they call it Hyper-V (although this is hypervisor-based virtualization).

Bios option:
ADVERTISING
Also known as SVM Mode:
ADVERTISING
What programs need this technology?
There are few programs and they all have a common focus — emulation of the environment (OS):
- VMware Workstation/Player. Allows you to create a real virtual PC with its own processor, RAM, hard drive, and so on. Requires virtualization enabled, with it disabled, there will be terrible lags. By itself, a virtual PC represents a window in another PC — Windows can be installed there, there will be a start menu, everything is as usual. But this Windows is completely isolated from the real one.
- VirtualBox. An analogue of the previous program, but completely free. In most cases, the functions are the same, the difference is in the interface.
 In my experience, VMware is faster.
 - BlueStacks/NOX. Allows you to emulate the Android environment — you can install applications, test them, even play games. And all this on a regular Windows PC. A significant drawback is resource requirements, virtual Android will not work smartly on the PC where virtual Windows works smartly. At least 2 cores (better with high frequency and the latest generation) and 4 gigs of opera.
- Well, as I wrote above — perhaps virtualization will help those programs that use hardware acceleration to work faster. But this is a theory, I will not lie — I did not test it.
Output
We found out that SVM Support:
- Must be switched on. Just because it doesn’t hurt in any way — nothing, absolutely. There is not a single problem in the world in which, in order to solve it, you need to disable virtualization. So feel free to turn it on — set Enabled / Enable in the BIOS.
- When using software that emulates a virtual PC, it must be enabled.
- Present on almost all modern processors, both Intel and AMD, but can be disabled by default.
I hope the information helped. Good luck.
To main!
15.02.2019
Ctrl+C Ctrl+V — what does it mean? (control+c control+v)
Grizzly folder — what is it?
Mb3install — what folder?
PORT. IN on the music center — what is it?
Windows10UpgraderApp — what is it?
scoped_dir — what is this folder?
Windows10Upgrade — can it be uninstalled?
im_temp — what folder?
after_tag_2
Amd svm support in bios what is
Computers admin 0 comments
Contents
- 0.1 Intel VT (Intel Virtualization Technology) — what is intel virtualization technology?
- 1 AWARD Software International Inc BIOS setup program on GIGABYTE TECHNOLOGY motherboards
-
-
-
- 1.
 0.0.0.1 Virtualization default value [Disabled]
- 1.
6
-
-
-
- 8.1 Add a comment Cancel reply
In the BIOS settings, you can see the SVM Support option, which has the Disabled value by default.
This feature is required to enable hardware virtualization technology and reduce processor load when using virtual machines. For example, you can install several more operating systems with their own drivers on the Windows 7 operating system, for example, Windows 2000, XP, Ubuntu, an Android emulator, etc. and work with each one. If you do not use virtual machines on your PC, then you do not need to enable this option.
SVM Support is an abbreviation made up of the words Support Vector Machine, which in English means Support Vector Machine.
Also hardware virtualization can be designated in the BIOS as
- Virtualization Technology,
- Vanderpool Technology,
- VT Technology,
- Virtualization.
Option Virtualization Technology . Enabling this option enables hardware virtualization technology based on a special processor architecture. Unlike software virtualization, using this technique, it is possible to use isolated guest systems (virtual machines — VMware, Virtual PC, etc.) controlled directly by the hypervisor. The guest system is independent of the host platform architecture and virtualization platform implementation.
This option has almost no effect on the operation of user programs in the standard operating system.
Option values:
- Enabled,
- Disabled
The option may also have other names:
- Virtualization Technology
- Vanderpool Technology
- VT Technology
- Virtualization
Note 1 . Hardware virtualization virtualization with support for a special processor architecture. Hardware virtualization provides performance comparable to the performance of a non-virtualized machine, which makes virtualization practical and leads to its widespread adoption. The most common virtualization technologies are Intel-VT and AMD-V.
- V Intel VT (Intel Virtualization Technology) virtualization of the real addressing mode is implemented (compatibility mode with 8086). The corresponding hardware I/O virtualization is VT-d. Often abbreviated as VMX (Virtual Machine eXtension). Codename: Vanderpool.
- AMD-V is often abbreviated as SVM (Secure Virtual Machines) . Codename: Pacifica. The corresponding I/O virtualization technology is IOMMU. AMD-V is simpler and more efficient than Intel VT. AMD-V support was introduced in Xen 3.3.
Intel VT (Intel Virtualization Technology) — intel virtualization technology what is it?
VT-x On November 13, 2005, Intel released two Pentium 4 models (models 662 and 672), which were the first processors to support VT-x («Vanderpool»). VT-x is Intel’s virtualization technology for real address mode on the x86 platform — VMX (Virtual Machine eXtension).
Real addressing mode virtualization implemented (8086 compatibility mode).
VT-d (Virtualization technology for directed I/O) is a hardware I/O virtualization technology created by Intel in addition to its VT-x compute virtualization technology. I / O virtualization allows you to pass-through devices on the PCI bus (and more modern similar buses) to the guest OS, so that it can work with it using its regular tools. To enable this, the motherboard logic uses a dedicated I/O Memory Management Unit (IOMMU) that works similarly to the CPU MMU, using page tables and a special DMA remapping table (DMAR) that the hypervisor receives from the BIOS via ACPI. DMA mapping is necessary because the hypervisor does not know anything about the specifics of the device with memory at physical addresses that are known only to the driver. Using DMAR, it creates mapping tables in such a way that the guest OS driver sees the IOMMU virtual addresses in the same way as it would see physical ones without it and the hypervisor.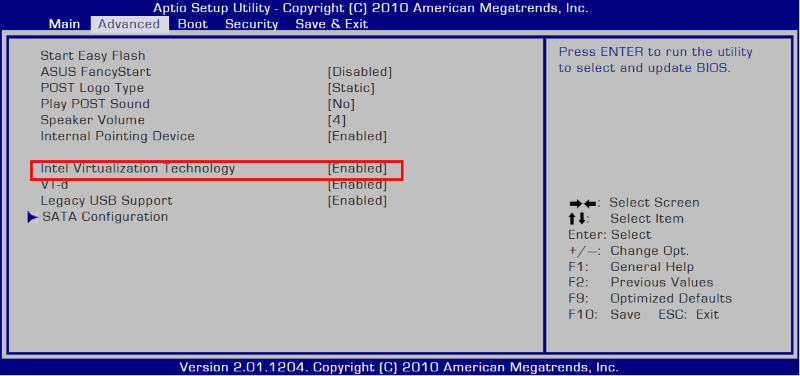
Intel Virtualization Technology for Directed I/O (VT-d) is the next major step towards comprehensive hardware support for Intel-based platform virtualization. VT-d extends the Virtualization Technology (VT) found in IA-32 (VT-x) and Itanium (VT-i) and adds virtualization support for new I/O devices. You can learn more about the technical side of the issue here https://ru.wikipedia.org/wiki/
Setup BIOS program from AWARD Software International Inc on GIGABYTE TECHNOLOGY 9 motherboards0009
The name of this option from this manufacturer in this BIOS version:
Hardware assisted VirtuaIization Technology which help improve performance of system running VirtuaI Machine Softwares.
Virtual Machine allows multiple OS on one conputer simultaneously.
Hardware to help VirtuaIization is a technology that helps improve the performance of a system running on a VirtuaI machine.
The virtual machine allows you to run multiple operating systems more efficiently on one computer at the same time.
Do not enable hardware virtualization technology based on a custom processor architecture.
Enables hardware virtualization technology based on a special processor architecture.
Aptio Setup Utility — BIOS from American Megatrends Inc on Dell Inc motherboards.
The name of this option from this manufacturer in this BIOS version (laptop):
Virtualization default value [Enabled]
This option determines whether the Virtual Machine Monitor (VMM) uses additional hardware capabilities provided by Intel (R) Virtualization Technology.
The factory default setting is Enabled.
Enabled = Enable Virtualization Technology.
Factory default setting — Support enabled.
Insyde Software’s Insydeh30 Setup Utility BIOS on Hewlett-Packard Company (HP) motherboards
The name of this option from this manufacturer in this BIOS version:
Virtualization Technology default value [Disabled]
This option is on the tab: «System Configuration»
Hardware VT enables a processor feature for running multiple simultaneous virtual machines allowing specialized software application to run in full isolation of each other. HP recommends that this feature remain disabled unless specialized unless specialized application are being user.
VT hardware includes processor features to run multiple virtual machines simultaneously, allowing specialized applications to run applications in complete isolation from each other. HP recommends that this feature be left disabled unless the user is using a dedicated application specifically designed for this purpose.
Navigation and setting of BIOS values Insydeh30 Setup Utility by Insyde Software is carried out as standard, using the following keys:
Hello dear ones! There are new motherboards, processors, memory .. all hardware is getting better and faster. New features are coming. The old ones remain. But today we will talk about one of the old functions that has existed for a long time .. I don’t know when AMD introduced it, but Intel introduced it back in Pentium 4 model 662/672 — there was simple VT-x virtualization.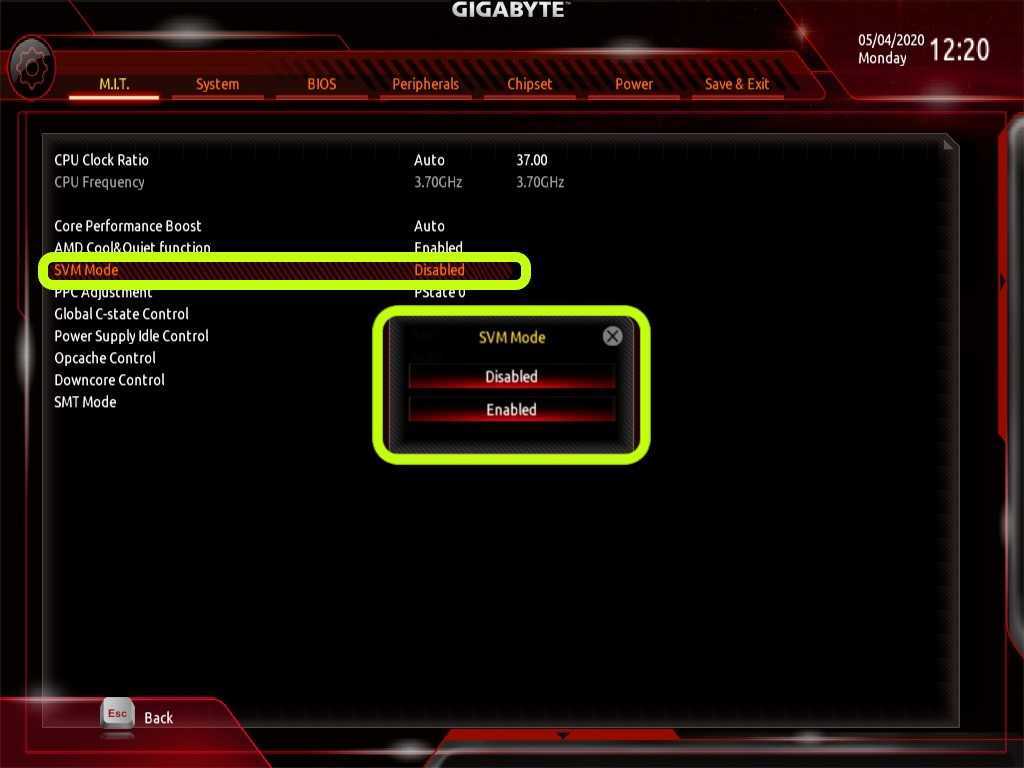
Understanding
SVM Support (Support Vector Machine) — the option allows you to enable or disable AMd SVM (Secure Virtual Machine) technology. This technology is AMD hardware virtualization, which is necessary for some programs to work.
This technology is present in almost all modern AMD processors, Intel has its own — Intel VT.
Older processors may not support virtualization.
Another description of the option — helps to offload the processor while using virtual machines, most likely this description is not entirely accurate. Although in fact the effect is exactly the same — if you use virtual machines and do not enable the option — there will be really wild brakes.
How it works — in simple terms
Actually, nothing complicated:
- Virtualization allows some programs to send commands to the processor directly — so it processes them faster. Applicable only to special programs that emulate the environment — for example, Android, Windows, Linux and others.
- There is a regular virtualization and advanced. The first one provides direct access to the processor. The second is access to devices on the PCI bus (for example, an audio / video card).
- Theoretically, hardware virtualization can also be used by some conventional programs, such as Chrome or a video player. Why? You’ve probably heard somewhere — hardware acceleration. I about it. It may run faster with virtualization enabled. Such acceleration seems to be in Chrome, and may be in some video players.
Should it be included?
And here, too, everything is very simple:
- To answer this question, I will say differently — there is no point in turning it off. The technology does not load the PC in any way, does not change the principle of the processor, it simply includes some instructions in it and that’s it.
- With this option disabled, sometimes there may be problems installing some programs — they may simply tell you that virtualization technology is needed, sometimes they call it Hyper-V (although this is hypervisor-based virtualization).
Also known as SVM Mode:
What programs need this technology?
There are few programs and they all have a common focus — emulation of the environment (OS):
- VMware Workstation/Player. Allows you to create a real virtual PC with its own processor, RAM, hard drive, and so on. Requires virtualization enabled, with it disabled, there will be terrible lags. By itself, a virtual PC represents a window in another PC — Windows can be installed there, there will be a start menu, everything is as usual. But this Windows is completely isolated from the real one.
- VirtualBox. An analogue of the previous program, but completely free. In most cases, the functions are the same, the difference is in the interface. In my experience, VMware is faster.
- BlueStacks/NOX. Allows you to emulate the Android environment — you can install applications, test them, even play games.
And all this on a regular Windows PC. A significant drawback is resource requirements, virtual Android will not work smartly on the PC where virtual Windows works smartly. At least 2 cores (better with high frequency and the latest generation) and 4 gigs of opera.
- Well, as I wrote above — perhaps virtualization will help those programs that use hardware acceleration to work faster. But this is a theory, I will not lie — I did not test it.
Output
We found out that SVM Support:
- Must be enabled. Just because it doesn’t hurt in any way — nothing, absolutely. There is not a single problem in the world in which, in order to solve it, you need to disable virtualization. So feel free to turn it on — set Enabled / Enable in the BIOS.
- When using software that emulates a virtual PC, it must be enabled.
- Present on almost all modern processors, both Intel and AMD, but can be disabled by default.
I hope the information helped. Good luck.
Add a comment
Cancel reply
This site uses Akismet to fight spam. Find out how your comment data is processed.
what is amd svm support?
By Milena Anderson Reading 4 min. Views 7 Posted by
Short answer
- AMD SVM (Secure Virtual Machine) support is a set of features that allow you to create and run secure virtual machines.
- These virtual machines can be used to run untrusted code in a secure environment, preventing any damage or information theft.
enable amd processor svm virtualization technology | smooth PC gaming
Does AMD SVM affect performance?
No, AMD SVM does not affect performance. This is a security feature that helps protect your system from attacks.
What is AMD SVM support in BIOS?
AMD SVM support in BIOS is a security feature that allows you to create and run virtual machines on your computer. This can be useful for testing software or running different operating systems on your computer.
What happens if we enable SVM mode?
SVM mode stands for «support vector mode». This is a feature that can be enabled on some routers to improve performance. With SVM enabled, the router will create a virtual network interface for each of your devices and assign each device its own IP address. This will help ensure the best possible performance of each device from the router.
Should I enable AMD virtualization?
AMD Virtualization is a technology that allows you to run one or more operating systems simultaneously on a single physical computer. It is typically used to improve the performance and efficiency of data centers, but it can also be used by individual users.
There are a few things to consider before enabling AMD virtualization. First, you need to make sure your computer’s hardware supports it. Second, you need to decide which operating systems you want to run in virtual mode.
Does SVM reduce performance?
There is some debate about whether support vector machines (SVMs) actually slow down performance. Some people claim yes, while others argue that the benefits of using SVMs more than outweigh any potential performance penalty. The bottom line is that if you are using SVM and it works well with your data, there is no reason to switch to a different machine learning algorithm.
What does SVM mode do?
SVM mode is the mode of operation of the support vector machine. In SVM mode, the support vector machine operates as a binary classifier.
What is CPB mode in BIOS?
CPB mode is a BIOS setting that can be used to improve the performance of the computer system. When CPB mode is enabled, the system uses a faster memory access method, which can result in better performance.
Should I disable virtualization?
There is no one-size-fits-all answer to this question, as the decision to disable virtualization will depend on your specific needs and settings. However, in general, it is generally recommended to leave virtualization enabled as it can provide a number of benefits, such as increased security and performance.
Is SVM the same as AMD V ?
No, SVM (Support Vector Machines) and AMD V are two different algorithms. SVM is a machine learning algorithm used for classification or regression and AMD V is a computer architecture developed by AMD to improve the performance of its processors.
Should I disable SMT?
There is no definite answer to this question. Some people find that disabling SMT (or reducing the number of threads used) improves system stability or reduces heat, while others see no difference. Ultimately, it’s up to you whether to disable SMT or not.
Should I disable AMD in cool and quiet mode?
AMD Cool and Quiet is a technology that dynamically adjusts the speed of your processor to save power. If you do not use your computer for heavy tasks, you can disable this feature to save power.
Why is virtualization disabled by default?
There are several reasons why virtualization is disabled by default. One reason is that virtualization can affect system performance. Another reason is that some hardware may not be compatible with virtualization.
Does virtualization slow down my computer?
No, virtualization does not slow down your computer. In fact, virtualization can speed up your computer by allowing you to run multiple operating systems on the same computer.
What are the disadvantages of virtualization?
There are several drawbacks to virtualization. First, it can be more difficult to troubleshoot since the problem might not be on the physical server. Second, virtualization can use more resources than running applications on a physical server. In addition, virtualization can be more difficult to set up and manage.
What is VT in the emulator?
VT in the emulator means virtual terminal. This is a mechanism that allows you to access a text console from a graphical environment. This can be useful for troubleshooting or for running commands that are not available through the GUI.
What is SVM mode in computer BIOS — how to start
What is SVM mode in your BIOS? Are there other similar options worth looking into? What is this «virtualization» that is used with SVM?
In this article, I will tell you everything you need to know about SVM mode .
What is SVM mode in BIOS
SVM mode is an option in AMD motherboard BIOS that allows you to enable the so-called0036 secure virtual machine .
In addition to providing a secure virtual machine environment, SVM also provides more direct access to hardware. This means better performance when using virtual machines, which is the main benefit of enabling these specialized BIOS options.
In addition to SVM, AMD also refers to the technology as AMD-V, so it may be listed in your BIOS by that name.
Of course, if you are an Intel user, the question immediately arises: do you have an equivalent in the BIOS?
Is there an Intel equivalent for SVM mode?
Yes, Intel has an analogue of the AMD-V/SVM mode called Intel VT-x or Intel Virtualization.
Just look for the virtualization related setting in the BIOS and you can enable it.
What is a virtual machine?
A virtual machine serves as a stand-alone instance of another operating system that runs in a program on your main operating system.
This is not the same as a completely separate operating system because it requires a completely separate disk partition.
Using virtual machine applications such as VMWare or VirtualBox, you can run a standalone OS in your main OS without having to reboot to switch partitions, or without having to create a separate partition to install the OS at all.
For example, you can use this to run a Linux virtual machine on a Windows OS.
Does enabling virtualization affect performance
Other than using the virtual machine itself, enabling virtualization should not affect the performance of the rest of your PC .
However, there are mixed reports that some virtualization options require additional performance or cause minor issues when enabled, so I would not recommend enabling virtualization when not actively using it.
Now, regarding the virtual machine itself, how does this affect performance compared to having the operating system properly installed?
This can vary depending on a variety of factors, but in general, because virtual machines have little if any direct access to hardware, there is a significant performance hit when running something in a virtual machine compared to no virtualization at all.
Virtualization has some similarities with emulation in this and other respects, but they are not exactly the same. Where emulation uses hardware emulation software, virtualization is more about creating an independent operating environment for a separate OS to which some or all of the host machine’s hardware resources are assigned.
The performance overhead of virtualization is negligible compared to the cost of emulation.
When do you need virtualization
When do you really need to start considering virtualization? Let’s talk about some scenarios where virtualization can come in handy.
Servers and data centers often use virtualization to share resources. If you’ve ever used services like Google Stadia or GeForce Now, you’re actually streaming a game from one of the many virtual machines in a specific server farm.
In these scenarios, resources such as the total number of CPU cores are usually distributed equally among any number of virtual machines.
Outside of these server-level scenarios, here is where you might want to use virtualization:
- To test or develop applications for other operating systems .
For example, an Android or macOS virtual machine on a Windows machine can be very handy for an Android app developer.
- For fun and games… from other operating systems . If you’re an avid PC gamer and need access to play that hot Android game that all your friends play, then an Android virtual machine like BlueStacks is the perfect choice for you.
- To use productivity software from another OS . Let’s say you’ve recently moved to Windows from Mac OS and you’re missing your favorite OS X tools. With virtualization, you can still access these applications, allowing you to skip learning a new workflow for a new application.
- When multiple people use the same machine and want something more secure than Windows user accounts or users who need different operating systems . Use a solution like Unraid to save hardware performance if you are using a similar solution.
Frequently Asked Questions about Virtualization
What if the BIOS does not have SVM mode?
First make sure you are not using an Intel processor.
If you are using an Intel processor and motherboard, you need to enable Intel VT-x or another «virtualization» option in the Intel BIOS.
If you are using an AMD processor, it may also be called AMD-V instead of SVM mode.
Essentially, you need to find the appropriate BIOS option to enable virtualization.
How can I check if virtualization is enabled?
A fairly easy way to do this is to open the Performance tab in the Windows Task Manager (Ctrl + Shift + Esc).
Select a CPU and at the bottom where the various CPU specifications are listed you should see if virtualization is enabled or not under Logical Processors.
Is the virtual machine less powerful?
Yes.
First, virtualization by its very nature will introduce some overhead.
It’s hard to pinpoint exactly how much as this can vary depending on a lot of factors, but expect at least a 5% performance hit for your CPU and memory. However, this reduction will not add up for every virtual machine.
Depending on the solution, virtual machines can run surprisingly close to the original hardware.
What hardware is suitable for use with hardware virtualization?
If you want to use hardware virtualization to run one or more virtual machines on your PC, be sure to check out the right hardware.
The main hardware «taxed» in virtualization is the CPU and RAM.
So if you want good results with your VM, be sure to choose a high performance processor (Core i7 or Ryzen 7 or better) with at least 16GB of RAM, ideally more if you plan to use your VM alongside your main OS daily or regularly.
Not sure exactly how much RAM your workload needs? Read How Much RAM Do You Need for a detailed analysis!
What is amd svm
AMD SVM Support — what is it in the BIOS — enable or not? (Support Vector Machine, SVM Mode)
Greetings dear ones! There are new motherboards, processors, memory .. all hardware is getting better and faster. New features are coming. The old ones remain. But today we will talk about one of the old functions that has existed for a long time .. I don’t know when AMD introduced it, but Intel introduced it back in Pentium 4 model 662/672 — there was simple VT-x virtualization.
Understanding
SVM Support (Support Vector Machine) — this option allows you to enable or disable AMd SVM (Secure Virtual Machine) technology. This technology is AMD hardware virtualization, which is necessary for some programs to work.
This technology is present in almost all modern AMD processors, Intel has its own — Intel VT.
Older processors may not support virtualization.
Another description of the option — helps to offload the processor while using virtual machines, most likely this description is not entirely accurate. Although in fact the effect is exactly the same — if you use virtual machines and do not enable the option — there will be really wild brakes.
The principle of operation — in simple words
In fact, there is nothing complicated:
- Virtualization allows some programs to send commands to the processor directly — so it processes them faster.
Applicable only to special programs that emulate the environment — for example, Android, Windows, Linux and others.
- There is a regular virtualization and advanced. The first one provides direct access to the processor. The second is access to devices on the PCI bus (for example, an audio / video card).
- Theoretically, hardware virtualization can also be used by some conventional programs, such as Chrome or a video player. Why? You’ve probably heard somewhere — hardware acceleration. I about it. It may run faster with virtualization enabled. Such acceleration seems to be in Chrome, and may be in some video players.
Should it be included?
And here, too, everything is very simple:
- To answer this question, I will say differently — there is no point in turning it off. The technology does not load the PC in any way, does not change the principle of the processor, it simply includes some instructions in it and that’s it.
- With this option disabled, sometimes there may be problems installing some programs — they may simply tell you that virtualization technology is needed, sometimes they call it Hyper-V (although this is hypervisor-based virtualization).
Also known as SVM Mode:
What programs need this technology?
There are few programs and they all have a common focus — emulation of the environment (OS):
AMD SVM support what is it
How to enable hardware virtualization in UEFI and BIOS settings
Virtualization is needed to create a virtual machine with its own operating system that can be run in the current OS window. What to do if the option in the BIOS / UEFI settings is disabled. Let’s learn more about how you can enable virtualization based on Intel and AMD processors.
Enable hardware virtualization technology
Virtual machines are used to test operating systems, test programs in a Sandbox environment, and to experiment with system functions without worrying about any consequences. There are some popular programs, such as VirtualBox, that can work without this feature, but then we can’t count on very good performance. Enabling hardware virtualization will make the actions of virtual machines much more powerful.
Hardware acceleration technologies built into AMD and Intel processors are known as «AMD-V» and «Intel VT-X». In many cases, virtualization is disabled by default. When attempting to power on the virtual machine, the feature throws an error warning informing the user that the software requires hardware acceleration, which is currently disabled.
The virtualization feature can be enabled or disabled at will and all you have to do is access the BIOS or UEFI.
Step 1: Entering the UEFI or BIOS settings
The power on procedure is slightly different from the installed I/O interface.
If Windows 10 is installed, then the easiest way is to use the built-in option to launch the UEFI firmware from the recovery environment.
Expand the Start menu and press the Power button. Hold down the Shift key and click on the Restart button.
A blue screen will open with options to choose from. Navigate path:
Troubleshooting — Advanced Settings — UEFI Firmware Settings .
After the reboot, the UEFI screen will open.
If this option is not available in Windows 10 or a previous operating system is installed, you can enter the settings by pressing the corresponding key after turning on the computer. In most cases, these are the Del, F2, F10, F11, or F12 keys. It is displayed on the first screen at the bottom in the text «Press _ enter to Setup». You can also find it on request on the Internet, indicating the model of the motherboard.
Step 2: Enable Virtualization in Intel / AMD Processor Options
After entering the UEFI or BIOS, you need to find and enable the virtualization feature. In many cases, it is located in the «Advanced Settings» section, in the CPU Configuration settings. In some cases, it is located on the overclocking (OS) tab.
For Intel processors, hardware virtualization is enabled by the Intel Virtualization Technology option.
If an AMD processor is installed, enable SVM Mode or SVM Support.
To enable the setting, change the value from «Disabled» to «Enabled». Save the changes and exit the settings, the computer will boot in normal mode.
Lazy admin’s blog
What is SVM Support in BIOS?
Going into the BIOS of an HP Pavilion dm1 laptop with an AMD processor, I found an interesting SVM Support parameter. The default is Disabled.
As it turned out, this is a function that helps to offload the processor when using virtual machines. It doesn’t affect anything anymore. And the translation sounds like the Support Vector Machine (eng. SVM, support vector machine).
2 thoughts on “What is SVM Support in BIOS? ”
Rather Secure Virtual Machine.
Add a comment
Cancel reply
This site uses Akismet to fight spam. Find out how your comment data is processed.
Hardware virtualization
The possibility of hardware support for virtual machines has brought the latter immense popularity among home PC users. Hardware virtualization has significantly increased the speed of the control system.
Hardware virtualization technology is supported by the two largest processor manufacturers. Intel has VT-x (Virtual Technology extensions, aka Vanderpool), AMD has SVM (Secure Virtual Machine, aka Pacifica). The principle of operation of both technologies is almost identical, but their software level is not compatible. The principle of hardware virtualization is based on the division of the real processor state into two parts: guest (non-root mode) and monitor (root mode). They work like this, for example, when switching from the main operating system to the guest processor, it automatically switches to the guest state and shows the system the register values \u200b\u200bthat the OS wants to see, which it needs for stable operation. That is, here the processor itself acts as a deceiver, which in turn relieves the system of the need to create its virtual copy and other tricks. At the same time, the guest operating system works directly with the processor and analyzes its data, due to which the virtual machine runs much faster than on computers without hardware support for virtualization.
For the reason described above, all developers and vendors of virtualization software explicitly state support for VT-x and similar technology from AMD in their system requirements. By the way, if you are going to work with a Parallels Workstation virtual machine, make sure that your hardware supports hardware virtualization.
Not everything is as good as it might seem at first glance, as some computer manufacturers deliberately disable VT-x support for security and system stability reasons. For example, Sony, in particular Avio, Intel virtualization technology is disabled at the BIOS boot stage. In this case, the transformation of a “dangerous” code (capable of damaging the main operating system) into a safe code completely falls on the shoulders of binary translation, which, by the way, we will talk about in the next article.
How do you know if your hardware has hardware support for virtualization?
In general, all modern processors have support for hardware virtualization, but for those who have a computer that is not quite modern, it is somehow necessary to find out if this technology is supported by their processor. How to do it? It’s really simple:
- Try to find lists of processors that support hardware virtualization on your processor manufacturer’s website and compare them with the available hardware.
- You can use a free utility from Microsoft — Hardware-assisted virtualization (HAV) detection tool. This utility is able to determine in a matter of seconds whether a particular processor supports hardware virtualization, and whether this feature is enabled. And of course, he will recommend his user to use the services of Windows Virtual PC.
Hardware virtualization
Hardware virtualization — virtualization with support for a special processor architecture. Unlike software virtualization, this technique allows the use of isolated guest systems managed directly by the hypervisor. The guest system is independent of the host platform architecture and virtualization platform implementation. For example, with the help of hardware virtualization technologies, it is possible to run 64-bit guest systems on 32-bit host systems.
Hardware virtualization provides performance comparable to that of a non-virtualized machine, making virtualization practical and widespread. The most common virtualization technologies are Intel-VT and AMD-V.
- Intel VT (Intel Virtualization Technology) implements real address mode virtualization (8086 compatibility mode). The corresponding hardware I/O virtualization is VT-d. Often abbreviated as VMX (Virtual Machine eXtension). Codename: Vanderpool.
- AMD-V is often abbreviated as SVM (Secure Virtual Machines). Codename: Pacifica. The corresponding I/O virtualization technology is IOMMU. AMD-V is simpler and more efficient than Intel VT. [1] AMD-V support was introduced in Xen 3.3.
How to check if your processor supports Intel VT-x/VT-d and AMD-V hardware virtualization
It is now known that Intel VT-x/VT-d and AMD-V hardware virtualization support is required for running virtual machines such as VirtualBox and VMware Workstation , as well as for the operation of so-called mobile operating system emulator programs, for example for Android OS.
Nowadays, almost all modern computers support this technology, but of course there are some that do not. And in order to find out if our processor has support for this technology, we first go into BIOS of our computer and see if there is a setting that interests us. I added to the article a few examples of what the virtualization enable item looks like in different BIOS versions.
Basically, enabling this option is on the tab advanced, further as you can see in the picture below, called intel virtualization technology and hiding the proof that this computer supports this technology.
In this BIOS version , go to the tab advanced BIOS features, where we also see support for this technology in item virtualization .
And here in paragraph advanced BIOS features shows that hardware virtualization is supported by the processor.
Well, the last option, where in the tab advanced in paragraph secure virtual machine mode, we can also enable this technology.
But there are also cases that in the BIOS of our computer there is no option to enable hardware virtualization secure virtual machine mode or intel virtualization technology , although they say that the processor that is in your computer supports this technology . In order to make sure of this, we will be helped by a small utility called SecurAble, which will accurately show whether our processor supports hardware virtualization. We go to the official website of the manufacturer at the link https://www.grc.com/securable.htm, where at the bottom we click on the item Download Now. The download will start, after we launch the program, you do not need to install it, since this is a portable version.
After starting, the program will immediately show information about whether your processor supports or does not support virtualization technology. You can see this in the third block. As you may have guessed, if there is an inscription yes means there is support.
If Locked OFF, is written, this means that this technology is supported, but it must be enabled. And it turns on, as we already know, in BIOS of our computer.
Well, if the block has the inscription NO, , then the hardware virtualization technology is not supported by your processor.
About give your opinion about this article, and of course ask your questions if something suddenly went wrong.
AMD SVM support what is it
AMD SVM Support — what is it in BIOS — enable or not? (Support Vector Machine, SVM Mode)
Greetings dear ones! There are new motherboards, processors, memory .. all hardware is getting better and faster. New features are coming. The old ones remain. But today we will talk about one of the old functions that has existed for a long time . . I don’t know when AMD introduced it, but Intel introduced it back in Pentium 4 model 662/672 — there was simple VT-x virtualization.
Understanding
SVM Support (Support Vector Machine) — the option allows you to enable or disable AMd SVM (Secure Virtual Machine) technology. This technology is AMD hardware virtualization, which is necessary for some programs to work.
This technology is present in almost all modern AMD processors, Intel has its own — Intel VT.
Older processors may not support virtualization.
Another description of the option — helps to offload the processor while using virtual machines, most likely this description is not entirely accurate. Although in fact the effect is exactly the same — if you use virtual machines and do not enable the option — there will be really wild brakes.
The principle of operation — in simple words
In fact, there is nothing complicated:
- Virtualization allows some programs to send commands to the processor directly — so it processes them faster.
Applicable only to special programs that emulate the environment — for example, Android, Windows, Linux and others.
- There is a regular virtualization and advanced. The first one provides direct access to the processor. The second is access to devices on the PCI bus (for example, an audio / video card).
- Theoretically, hardware virtualization can also be used by some conventional programs, such as Chrome or a video player. Why? You’ve probably heard somewhere — hardware acceleration. I about it. It may run faster with virtualization enabled. Such acceleration seems to be in Chrome, and may be in some video players.
Should it be included?
And here, too, everything is very simple:
- To answer this question, I will say differently — there is no point in turning it off. The technology does not load the PC in any way, does not change the principle of the processor, it simply includes some instructions in it and that’s it.
- With this option disabled, sometimes there may be problems installing some programs — they may simply tell you that virtualization technology is needed, sometimes they call it Hyper-V (although this is hypervisor-based virtualization).
Also known as SVM Mode:
What programs need this technology?
There are few programs and they all have a common focus — emulation of the environment (OS):
- VMware Workstation/Player. Allows you to create a real virtual PC with its own processor, RAM, hard drive, and so on. Requires virtualization enabled, with it disabled, there will be terrible lags. By itself, a virtual PC represents a window in another PC — Windows can be installed there, there will be a start menu, everything is as usual. But this Windows is completely isolated from the real one.
- VirtualBox. An analogue of the previous program, but completely free. In most cases, the functions are the same, the difference is in the interface. In my experience, VMware is faster.
- BlueStacks/NOX. Allows you to emulate the Android environment — you can install applications, test them, even play games.
And all this on a regular Windows PC. A significant drawback is resource requirements, virtual Android will not work smartly on the PC where virtual Windows works smartly. At least 2 cores (better with high frequency and the latest generation) and 4 gigs of opera.
- Well, as I wrote above — perhaps virtualization will help those programs that use hardware acceleration to work faster. But this is a theory, I will not lie — I did not test it.
Output
We found out that SVM Support:
- Must be enabled. Just because it doesn’t hurt in any way — nothing, absolutely. There is not a single problem in the world in which, in order to solve it, you need to disable virtualization. So feel free to turn it on — set Enabled / Enable in the BIOS.
- When using software that emulates a virtual PC, it must be enabled.
- Present on almost all modern processors, both Intel and AMD, but can be disabled by default.
I hope the information helped. Good luck.
Add a comment
Cancel reply
This site uses Akismet to fight spam. Find out how your comment data is processed.
BIOS Virtualization Option — How to Enable Virtualization in BIOS
Option Virtualization Technology . Enabling this option enables hardware virtualization technology based on a special processor architecture. Unlike software virtualization, using this technique it is possible to use isolated guest systems (virtual machines — VMware, Virtual PC, etc.) controlled directly by the hypervisor. The guest system is independent of the host platform architecture and virtualization platform implementation.
Note 1 . Hardware virtualization virtualization with support for a special processor architecture. Hardware virtualization provides performance comparable to the performance of a non-virtualized machine, which makes virtualization practical and leads to its widespread adoption. The most common virtualization technologies are Intel-VT and AMD-V.
- V Intel VT (Intel Virtualization Technology) virtualization of the real addressing mode is implemented (compatibility mode with 8086). The corresponding hardware I/O virtualization is VT-d. Often abbreviated as VMX (Virtual Machine eXtension). Codename: Vanderpool.
- AMD-V is often abbreviated SVM (Secure Virtual Machines) . Codename: Pacifica. The corresponding I/O virtualization technology is IOMMU. AMD-V is simpler and more efficient than Intel VT. AMD-V support was introduced in Xen 3.3.
Intel VT (Intel Virtualization Technology) — what is intel virtualization technology?
VT-x On November 13, 2005, Intel released two Pentium 4 models (models 662 and 672), which were the first processors to support VT-x (“Vanderpool”). VT-x is Intel’s real address mode virtualization technology on the x86 platform — VMX (Virtual Machine eXtension).
Real addressing mode virtualization implemented (8086 compatibility mode).
VT-d (Virtualization technology for directed I/O) is a hardware I/O virtualization technology created by Intel in addition to its VT-x compute virtualization technology. I / O virtualization allows you to pass-through devices on the PCI bus (and more modern similar buses) to the guest OS, so that it can work with it using its regular tools. To enable this, the motherboard logic uses a dedicated I/O Memory Management Unit (IOMMU) that works similarly to the CPU MMU, using page tables and a special DMA remapping table (DMAR) that the hypervisor receives from the BIOS via ACPI. DMA mapping is necessary because the hypervisor does not know anything about the specifics of the device with memory at physical addresses that are known only to the driver. Using DMAR, it creates mapping tables in such a way that the guest OS driver sees the IOMMU virtual addresses in the same way as it would see physical ones without it and the hypervisor.
Intel Virtualization Technology for Directed I/O (VT-d) is the next major step towards comprehensive hardware support for Intel-based platform virtualization. VT-d extends the Virtualization Technology (VT) found in IA-32 (VT-x) and Itanium (VT-i) and adds virtualization support for new I/O devices. You can learn more about the technical side of the issue here https://ru.wikipedia.org/wiki/
Setup BIOS program from AWARD Software International Inc on GIGABYTE TECHNOLOGY 9 motherboards0013
Name of this option from this manufacturer in this BIOS version:
Virtualization default value [Disabled]
Virtual Machine allows multiple OS on one conputer simultaneously.
Hardware to help VirtuaIization is a technology that helps improve the performance of a system running on a VirtuaI machine.
The virtual machine allows you to run multiple operating systems more efficiently on one computer at the same time.
Do not enable hardware virtualization technology based on a custom processor architecture.
Includes hardware virtualization technology based on a special processor architecture.
Aptio Setup Utility — BIOS from American Megatrends Inc on Dell Inc motherboards.
The name of this option from this manufacturer in this BIOS version (notebook):
Enabled = Enable Virtualization Technology.
Factory default setting — Support enabled.
Insyde Software’s Insydeh30 Setup Utility BIOS on Hewlett-Packard Company (HP) 9 motherboards0013
Name of this option from this manufacturer in this BIOS version:
Virtualization Technology default value [Disabled]
This option is on the tab: machines allowing specialized software applications to run in full isolation of each other. HP recommends that this feature remain disabled unless specialized unless specialized application are being user.
VT hardware includes processor functionality to run multiple virtual machines simultaneously, allowing specialized applications to run applications in complete isolation from each other. HP recommends that this feature be left disabled unless the user is using a dedicated application specifically designed for this purpose.
Navigation and setting of BIOS values Insydeh30 Setup Utility by Insyde Software is carried out as standard, using the following keys:
Intel Virtualization Technology in BIOS: enable or not?
Almost any PC owner, sooner or later, will find out that there is a special BIOS section on his computer that allows you to change various settings. And studying this place, many come across such an interesting item as Intel Virtualization Technology.
Naturally, a person immediately has questions and assumptions:
- What is this?
- What happens if you connect this technology?
- Is it possible to speed up the computer in this way, to increase its performance?
That is, the user sits and contemplates whether or not to enable IVT. Well, let’s take a closer look at this issue.
History and features of technology
For the first time, processors with this technology were released by Intel in 2005. The manufacturer immediately offered two options to users — the 662nd and 672nd models.
Initially, the technology was given the mysterious, promising name «Vanderpool», but to most users it is known as VT-x.
I would like to note right away that not all branded central processors from this manufacturer are produced with support for this technology. Its presence is confirmed by the presence of the so-called «vmx» support flag. To check this flag on Linux and Mac operating systems, there are special commands:
- For the first one, it is grep vmx /proc/cpuinfo;
- For the second OS, sysctl machdep.cpu.features.
In 2013, Intel came up with a solution that accelerates this technology. It became available with the Haswell architecture and is called VMCS. VT-x was originally created for the Pentium 4 series processors. More modern models use a more advanced analogue — VT-d.
Intel’s competitor, AMD, has a similar technology. It is called AMD-V and also has a second code name — «Pacifica».
For most processors, VT-x is initially inactive by default. That is, it must be included. And this is done just through the BIOS. But before you take this step, you need to understand why it is needed at all.
Does the average PC user need VT-x?
The essence of Intel Virtualization Technology lies in the fact that the technology allows you to create so-called virtual machines on an ordinary personal computer. And that’s it. That is, there is absolutely no question of any acceleration, increase in productivity.
Naturally, the question immediately arises — does an ordinary PC user use these same virtual machines. Yes, most often they are used by various highly specialized specialists who are engaged in programming, commissioning and other processes. But such a VM can also come in handy for an ordinary layman. For what? Here are just a few of the most popular examples:
- Installation and full use of several different operating systems on one personal computer at once. For example, Windows and Linux OS. It is convenient when you need to run some specific program for which there is no need to completely change the operating system;
- Use of software, the reliability of which, for some reason, is suspicious. Perhaps they contain viruses, various spyware or hacks. And it is very undesirable to run such software on a regular computer. And using a virtual machine will ensure that the main system is not affected. And at the same time get the desired result;
- Software testing. Sometimes it is necessary to create special conditions for this. For example, to have a PC with a certain number of cores in the processor, a specific CPU frequency, amount of memory, and so on. Using a VM makes it easy to set the desired configuration and check the result. And you don’t need to physically change something in the equipment for this.
For example, a person wants to run and often use some kind of program. But the characteristics of his PC are not enough. Hardware upgrade required. Initially, you can choose the optimal system configuration in this way, and only then go to the store and purchase everything you need.
There are many programs that require a specific version of the operating system. This is especially true for fairly old products. For example, you have Windows 10 or 7, but you really want to run some software (for example, a game) that only functions normally in XP or earlier versions. Install a VM and the problem will be quickly resolved.
Another interesting option is to work with websites. Yes, the VM allows you to create network emulation. Imagine the situation:
- You are an inexperienced user who really wants to have his own website. But has no experience in their creation;
- There is not much money for this to attract third-party specialists. Plus, I really want to learn everything myself.
You can go the classic way:
- Contact a hosting company;
- Pay for the domain and pay for remote server services;
- And then — start creating a personal Internet resource.
What if it doesn’t work out? Or in the process of creation will you want to? Does that mean the money was wasted?
Having installed a virtual machine, you can safely create a network emulation and start creating a prototype of your site in a completely identical real mode. And, if everything works out and suits the person, repeat everything in the classical way.
Which virtual machines do you prefer to use today?
There are quite a lot of them. But the most popular options are the following:0003
VirtualBox
This product integrates easily with almost all modern operating systems. That is, it can be run if Windows, Linux, Mac OS and so on are initially installed on the computer.
Supports both 32-bit and 64-bit systems.
VMware
Considered one of the best VM options available today. Supports all major modern technologies. For example, it works quietly with USB 3.0.
The only drawback is that it is paid. You can use the free version, but the main functionality will be pretty curtailed in it.
Microsoft Virtual PC
Completely free shell. True, based on the name, you can immediately identify one drawback. Namely, the ability to work only with Microsoft Windows. No Linux or Mac can be installed this way.
How to activate VT-x technology
So, you have decided that Intel Virtualization Technology is a necessity for the intended purposes Naturally, the question arises — how to enable it? This is done as follows:
- Initiate reboot of the personal computer in the standard way.
- While turning on the computer, have time to press «Del» or «F2».
- This will take you to the BIOS settings menu.
- You need to go to the section called Advanced BIOS Features.
- In it, find the item Virtualization or Virtualization Technology.
- Switch next to «Disabled» to «Enabled».
It remains only to remember to save the changes and restart the computer again.
Virtualization vSphere, Hyper-V, XenServer, and Red Hat
More than
5000 virtualization and virtual machine notes VMware, Microsoft, Citrix, Red Hat
AMD Hardware Virtualization Technology (AMD-V).
AMD Hardware Virtualization Technology (AMD-V).
Author: AMD64 Team
Date: 02/19/2007
Virtualization technology allows you to combine and abstract the physical resources of servers and workstations for the user by creating several independent virtual machines. Each of these virtual machines is capable of running its own operating system and application environment.
The traditional x86 software implementation of virtualization is driven by the need to use high performance systems with reduced security and unnecessary complexity. AMD hardware virtualization technology solves these problems.
Software virtualization
• Virtualization software manages operating system host resources for virtual machines
• Application performance may decrease, application security may be compromised
AMD hardware virtualization
• Virtualization software (Hypervisor) works directly with host computer resources using processor hardware modes
• Application performance remains high, application security is provided by hardware
Hardware virtualization is a logical development of the AMD Direct Connect architecture, which implements virtualization technology in silicon. This technology gives software manufacturers more options by not having to worry about software emulation of virtualization on the processor.
AMD virtualization technology, developed in partnership with Microsoft, VMware, and XenSource, allows multiple operating systems to run simultaneously on a single computer. Each of the operating systems will work in an independent virtual partition, which will allow you to reboot it or completely disable it without affecting other software platforms. At the same time, the AMD implementation provides control flexibility, high speed and reliability.
• Virtual machines are isolated from the hardware, which increases the reliability and flexibility of the solution
• Applications run in separate, isolated software environments, which increases security
• Virtualization hides the complexity of the hardware infrastructure, which helps to simplify system management
• Virtualization abstracts IT services from hardware, allowing better control and user access
AMD hardware virtualization is implemented by introducing new processor modes and additional instructions:
• New processor mode: Guest Mode
• New data structure: Virtual Machine Control Block (VMCB)
• New instruction: VMRUN
• New memory mode: Real Mode w/ Paging
In addition, a number of AMD-V technology features simplifies software development, speeds up virtual machines and improves security:
• Two-level virtual memory translation tables — make it easier for programmers to work with RAM and improve application performance
• Virtualization-enabled memory controller — provides true security for the address space of virtual machines
• Tagged TLB — tagged virtual address translation cache that optimizes the process of converting a virtual memory address to a physical one
• DMA controller hardware protection — provides a high level of security when exchanging data with peripheral devices
• SVM (Security & Virtual Machine) — secure launch of the virtual OS, authenticated by the hardware module TPM (Trusted Platform Module)
AMD hardware virtualization technology opens up wide opportunities for flexible use of computer system resources not only in large data centers, but also in small and medium businesses. Software developers, IT administrators, testers, scientists and businessmen will take advantage of the new technology.
Key features of server virtualization technology:
• Consolidate workloads to reduce hardware and disk space requirements. For example, tasks that require a small amount of system resources (domain controllers, DNS, DHCP) can be placed on one physical server.
• Increase system flexibility by running multiple operating systems at the same time
• Run applications on more reliable, energy efficient hardware
• Isolate operating environments to increase security and resiliency
• Provide redundancy to increase fault tolerance and reduce recovery time
Main uses of virtualization technology for client systems:
• Develop and test software on multiple operating systems on a single computer
• Isolate business and personal OSE environments with enhanced security and reliability
• Provision and manage client computers without interfering with user experience
• Support for AMD technologies in popular virtualization packages
Support for AMD technologies in popular virtualization packages:
All-Audio .
pro
Articles, Schematics, References
Svm mode what it is
Virtualization is needed to create a virtual machine with its own operating system that can be run in the window of the current OS. Let’s learn more about how you can enable virtualization based on Intel and AMD processors. Virtual machines are used to test operating systems, test programs in the Sandbox environment, and to experiment with system functions without worrying about any consequences. There are some popular programs, such as VirtualBox, that can work without this feature, but then we can’t count on very good performance.
Search for data on your request:
Wait until the end of the search in all databases.
Upon completion, a link will appear to access the found materials.
Go to search results >>>
WATCH RELATED VIDEO: How to enable virtualization in BIOS on AMD or Intel
AMD SVM support what it is
Business and market. Laptops and tablets. Networks and WiFi. Projectors and monitors. Audio and video. Home computer. Games and industry. Software and utilities. Expert section. Advertising on THG. Addresses, smartphones, advertising on THG, about the site and other information. One page Printable version. Summary of the article: AMD didn’t take care to provide enthusiasts with enough information before the launch, so a lot of time is spent learning the various settings.
But when we collected all the necessary data, overclocking Ryzen seemed child’s play to us. Increase the multiplier, adjust the data transfer rate — everything is intuitive. Advertising from YouDo. Follow the link how to install the amd radeon graphics driver — reviews.
Here repair of speakers neva rostov — choose YouDo! Here iPhone 4s repair Moscow is inexpensive, we recommend! Main page. Collect yourself. Silent Loop mm. Motherboard. Asus Crosshair VI Hero. Cooler Master – MasterWatt Maker Idle. Under load. LLC 1 Auto. LLC 2. LLC 3. LLC 4. LLC 5. Recommended air cooling. Maximum air cooling. Recommended cooling LN2. Maximum cooling LN2. CPU core voltage. Up to 1.45 V.
Up to 1.95 V. SOC voltage. Up to 1.30 V. RAM voltage1. Up to 1.90V. Voltage 1.8V PLL. Up to 2.10 V. Up to 3.20 V.
Voltage 1.05 V SB. Up to 1.40V. Up to 1.40 V. Standby voltage 1.8 V. Up to 2.30 V. Voltage 2.5 V SB. Up to 2.80 V. Single core. Multiple cores. Mode: Normal Offset: Auto. Mode: Performance Offset: Auto. Mode: Performance Offset: Geekbench 4. Part 1. Reviews in the THG Expert Club [ 18 reviews]. Today you work on a small personal computer, but once you could only dream of such a thing.
We invite you to plunge into history and get acquainted with the most iconic mainframes of recent decades. Fifteen Intel x86 processors that made history Intel has released many x86 processors over the years since the heyday of the PC, but not all of them have left an unforgettable mark on history. In our first article in the series, we’ll take a look at fifteen of Intel’s most curious and memorable processors, from up to the Core 2 Duo. Advertising from YouDo Follow the link how to install the amd radeon graphics driver — reviews.
AMD SVM Support — what is it in the BIOS — to enable or not? (Support Vector Machine, SVM Mode)
Virtualization technology allows you to combine and abstract the physical resources of servers and workstations for the user by creating several independent virtual machines. Each of these virtual machines is capable of running its own operating system and application environment. AMD hardware virtualization technology solves these problems. This technology gives software manufacturers more options by not having to worry about software emulation of virtualization on the processor. AMD virtualization technology, developed in partnership with Microsoft, VMware and XenSource, enables multiple operating systems to run simultaneously on a single computer. Each of the operating systems will work in an independent virtual partition, which will allow you to reboot it or completely disable it without affecting other software platforms.
What is SVM Support in BIOS?
Please come in. Habr Geektimes Toaster My circle Freelance. Megaposts: Crime Quest HR Stories Geek Travels. Log in registration. Breaking the BIOS: enabling VT-x virtualization support on an Acer Aspire One netbook DIY or Do it yourself 2 in MSR 0x3A — simply put, you have virtualization support in the processor, but it is blocked by the BIOS. Everything at your own peril and risk! If you are not sure, do not try this at home. So what’s the problem?
How to enable hardware virtualization in the UEFI and BIOS settings
Both can work without this option enabled, but if you need high performance while using the emulator, you will have to enable it. Initially, it is advisable to make sure that your computer has support for virtualization. If it is not there, then you risk simply wasting your time trying to activate through the BIOS. Many popular emulators and virtual machines warn the user that his computer supports virtualization, and if you enable this option, the system will run much faster.
Enable virtualization in BIOS
I have enabled virtualization in the BIOS settings, but when I try to start the emulator, I get the error «your processor does not support vt-x or svm». For better performance with Android Emulator 2. I would suggest using the ARM image for the emulator instead of the Intel image. I’ve been trying to track this down for a while, a very similar setup, but Windows 10, and haven’t seen anyone offer a solution beyond “You only know HAXM for Intel, don’t you? The best information I’ve found so far is that the «Custom» edition of Genymotion free for personal use seems to be the best bet for emulation on AMD chips and an almost hidden reference in the official docs that Android Studio only works with SVM on linux. I’m not even sure I’m reading the latter correctly, given the complete lack of references elsewhere to what should be an important fact, but it could be why this error is showing up — although if it is, it’s definitely poorly worded.
How to enable virtualization AMD-V Aspire One AO725 from BIOS or otherwise
Registration Login. Mail answers. Questions — leaders Box and video card for MB Pro 15 1 bet. When will the i9 go on sale in the world? Is there any information?
How to check if your processor supports Intel VT-x / VT-d and AMD-V hardware virtualization
Hidden text: Why then do manufacturers put mounts for them there, and some cases already come with fans? The following users thanked this post: Rim iXBT Conference. Rim,
Hello dear ones! New motherboards, processors, memory come out. New functions appear. The old ones remain. This technology is AMD hardware virtualization, which is necessary for some programs to work.
I’m trying to use virtualbox to render a 64 bit system, but the error I get is: For those who don’t know Spanish, google translate gives:. I checked the AMD V processor virtual machine extensions with the following command:. Running the lscpu command. Execute command:. How to fix the error?
When choosing a new server, few people think about how efficiently its resources will be used in virtualization tasks that have become so fashionable lately. Therefore, we suggest that you take a look at modern platforms in terms of running a large number of virtual machines on them. Over the past two years, the role of standard two-processor x-architecture servers has changed radically. There were two reasons for this: economic and technological.
AMD SVM support what is
AMD SVM Support — what is it in the BIOS — enable or not? (Support Vector Machine, SVM Mode)
Greetings dear ones! There are new motherboards, processors, memory .. all hardware is getting better and faster. New features are coming. The old ones remain. But today we will talk about one of the old functions that has existed for a long time .. I don’t know when AMD introduced it, but Intel introduced it back in Pentium 4 model 662/672 — there was simple VT-x virtualization.
Understanding
SVM Support (Support Vector Machine) — this option allows you to enable or disable AMd SVM (Secure Virtual Machine) technology. This technology is AMD hardware virtualization, which is necessary for some programs to work.
This technology is present in almost all modern AMD processors, Intel has its own — Intel VT.
Older processors may not support virtualization.
Another description of the option — helps to offload the processor while using virtual machines, most likely this description is not entirely accurate. Although in fact the effect is exactly the same — if you use virtual machines and do not enable the option — there will be really wild brakes.
The principle of operation — in simple words
In fact, there is nothing complicated:
- Virtualization allows some programs to send commands to the processor directly — so it processes them faster. Applicable only to special programs that emulate the environment — for example, Android, Windows, Linux and others.
- There is a regular virtualization and advanced. The first one provides direct access to the processor. The second is access to devices on the PCI bus (for example, an audio / video card).
- Theoretically, hardware virtualization can also be used by some conventional programs, such as Chrome or a video player. Why? You’ve probably heard somewhere — hardware acceleration. I about it. It may run faster with virtualization enabled. Such acceleration seems to be in Chrome, and may be in some video players.
Should it be included?
And here, too, everything is very simple:
- To answer this question, I will say differently — there is no point in turning it off. The technology does not load the PC in any way, does not change the principle of the processor, it simply includes some instructions in it and that’s it.
- With this option disabled, sometimes there may be problems installing some programs — they may simply tell you that virtualization technology is needed, sometimes they call it Hyper-V (although this is hypervisor-based virtualization).
Also known as SVM Mode:
What programs need this technology?
There are few programs and they all have a common focus — emulation of the environment (OS):
- VMware Workstation/Player. Allows you to create a real virtual PC with its own processor, RAM, hard drive, and so on. Requires virtualization enabled, with it disabled, there will be terrible lags. By itself, a virtual PC represents a window in another PC — Windows can be installed there, there will be a start menu, everything is as usual. But this Windows is completely isolated from the real one.
- VirtualBox. An analogue of the previous program, but completely free. In most cases, the functions are the same, the difference is in the interface. In my experience, VMware is faster.
- BlueStacks/NOX. Allows you to emulate the Android environment — you can install applications, test them, even play games.
And all this on a regular Windows PC. A significant drawback is resource requirements, virtual Android will not work smartly on the PC where virtual Windows works smartly. At least 2 cores (better with high frequency and the latest generation) and 4 gigs of opera.
- Well, as I wrote above — perhaps virtualization will help those programs that use hardware acceleration to work faster. But this is a theory, I will not lie — I did not test it.
We found out that SVM Support:
- Must be enabled. Just because it doesn’t hurt in any way — nothing, absolutely. There is not a single problem in the world in which, in order to solve it, you need to disable virtualization. So feel free to turn it on — set Enabled / Enable in the BIOS.
- When using software that emulates a virtual PC, it must be enabled.
- Present on almost all modern processors, both Intel and AMD, but can be disabled by default.
I hope the information helped. Good luck.
Add a comment
Cancel reply
This site uses Akismet to fight spam. Find out how your comment data is processed.
Amd svm support in the BIOS what it is
In the BIOS settings, you can find the SVM Support option, which has the Disabled value by default.
This feature is required to enable hardware virtualization technology and reduce processor load when using virtual machines. For example, you can install several more operating systems with their own drivers on the Windows 7 operating system, for example, Windows 2000, XP, Ubuntu, an Android emulator, etc. and work with each one. If you do not use virtual machines on your PC, then you do not need to enable this option.
SVM Support is an abbreviation made up of the words Support Vector Machine, which in English means Support Vector Machine.
Hardware virtualization can also be designated in the BIOS as
- Virtualization Technology,
- Vanderpool Technology,
- VT Technology,
- Virtualization.
Option Virtualization Technology . Enabling this option enables hardware virtualization technology based on a special processor architecture. Unlike software virtualization, using this technique, it is possible to use isolated guest systems (virtual machines — VMware, Virtual PC, etc.) controlled directly by the hypervisor. The guest system is independent of the host platform architecture and virtualization platform implementation.
Note 1 . Hardware virtualization virtualization with support for a special processor architecture. Hardware virtualization provides performance comparable to the performance of a non-virtualized machine, which makes virtualization practical and leads to its widespread adoption. The most common virtualization technologies are Intel-VT and AMD-V.
- V Intel VT (Intel Virtualization Technology) virtualization of the real addressing mode is implemented (compatibility mode with 8086).
The corresponding hardware I/O virtualization is VT-d. Often abbreviated as VMX (Virtual Machine eXtension). Codename: Vanderpool.
- AMD-V is often abbreviated SVM (Secure Virtual Machines) . Codename: Pacifica. The corresponding I/O virtualization technology is IOMMU. AMD-V is simpler and more efficient than Intel VT. AMD-V support was introduced in Xen 3.3.
Intel VT (Intel Virtualization Technology) — what is intel virtualization technology?
VT-x On November 13, 2005, Intel released two Pentium 4 models (models 662 and 672), which were the first processors to support VT-x («Vanderpool»). VT-x is Intel’s virtualization technology for real address mode on the x86 platform — VMX (Virtual Machine eXtension).
Real addressing mode virtualization implemented (8086 compatibility mode).
VT-d (Virtualization technology for directed I/O) is a hardware I/O virtualization technology created by Intel in addition to its VT-x compute virtualization technology. I / O virtualization allows you to pass-through devices on the PCI bus (and more modern similar buses) to the guest OS, so that it can work with it using its regular tools. To enable this, the motherboard logic uses a dedicated I/O Memory Management Unit (IOMMU) that works similarly to the CPU MMU, using page tables and a special DMA remapping table (DMAR) that the hypervisor receives from the BIOS via ACPI. DMA mapping is necessary because the hypervisor does not know anything about the specifics of the device with memory at physical addresses that are known only to the driver. Using DMAR, it creates mapping tables in such a way that the guest OS driver sees the IOMMU virtual addresses in the same way as it would see physical ones without it and the hypervisor.
Intel Virtualization Technology for Directed I/O (VT-d) is the next major step towards comprehensive hardware support for Intel-based platform virtualization. VT-d extends the Virtualization Technology (VT) found in IA-32 (VT-x) and Itanium (VT-i) and adds virtualization support for new I/O devices. You can learn more about the technical side of the issue here https://ru.wikipedia.org/wiki/
Setup BIOS program from AWARD Software International Inc on GIGABYTE TECHNOLOGY 9 motherboards0013
The name of this option for this manufacturer in this BIOS version:
Intel Virtualization Technology in BIOS: enable or not?
Almost any PC owner, sooner or later, will find out that there is a special BIOS section on his computer that allows you to change various settings. And studying this place, many come across such an interesting item as Intel Virtualization Technology.
Naturally, a person immediately has questions and assumptions:
- What is it?
- What happens if you connect this technology?
- Is it possible to speed up the computer in this way, to increase its performance?
That is, the user sits and contemplates whether or not to enable IVT. Well, let’s take a closer look at this issue.
History and features of technology
For the first time, processors with this technology were released by Intel in 2005. The manufacturer immediately offered two options to users — the 662nd and 672nd models.
Initially, the technology was given the mysterious, promising name «Vanderpool», but to most users it is known as VT-x.
I would like to note right away that not all branded central processors from this manufacturer are produced with support for this technology. Its presence is confirmed by the presence of the so-called «vmx» support flag. To check this flag on Linux and Mac operating systems, there are special commands:
- For the first one, it is grep vmx /proc/cpuinfo;
- For the second OS, sysctl machdep.cpu.features.
In 2013, Intel came up with a solution that accelerates this technology. It became available with the Haswell architecture and is called VMCS. VT-x was originally created for the Pentium 4 series processors. More modern models use a more advanced analogue — VT-d.
A similar technology exists in Intel’s competitor, AMD. It is called AMD-V and also has a second code name — «Pacifica».
For most processors, VT-x is initially inactive by default. That is, it must be included. And this is done just through the BIOS. But before you take this step, you need to understand why it is needed at all.
Does the average PC user need VT-x?
The essence of Intel Virtualization Technology lies in the fact that the technology allows you to create so-called virtual machines on an ordinary personal computer. And that’s it. That is, there is absolutely no question of any acceleration, increase in productivity.
Naturally, the question immediately arises — does an ordinary PC user use these same virtual machines. Yes, most often they are used by various highly specialized specialists who are engaged in programming, commissioning and other processes. But such a VM can also come in handy for an ordinary layman. For what? Here are just a few of the most popular examples:
- Installation and full use of several different operating systems on one personal computer at once.
For example, Windows and Linux OS. It is convenient when you need to run some specific program for which there is no need to completely change the operating system;
- Use of software, the reliability of which, for some reason, is suspicious. Perhaps they contain viruses, various spyware or hacks. And it is very undesirable to run such software on a regular computer. And using a virtual machine will ensure that the main system is not affected. And at the same time get the desired result;
- Software testing. Sometimes it is necessary to create special conditions for this. For example, to have a PC with a certain number of cores in the processor, a specific CPU frequency, amount of memory, and so on. Using a VM makes it easy to set the desired configuration and check the result. And you don’t need to physically change something in the equipment for this. For example, a person wants to run and often use some kind of program. But the characteristics of his PC are not enough.
Hardware upgrade required. Initially, you can choose the optimal system configuration in this way, and only then go to the store and purchase everything you need.
There are many programs that require a specific version of the operating system. This is especially true for fairly old products. For example, you have Windows 10 or 7, but you really want to run some software (for example, a game) that only functions normally in XP or earlier versions. Install a VM and the problem will be quickly resolved.
Another interesting option is to work with websites. Yes, the VM allows you to create network emulation. Imagine the situation:
- You are an inexperienced user who really wants to have his own website. But has no experience in their creation;
- There is not much money for this to attract third-party specialists. Plus, I really want to learn everything myself.
You can go the classic way:
- Contact a hosting company;
- Pay for the domain and pay for remote server services;
- And then — start creating a personal Internet resource.
What if it doesn’t work out? Or in the process of creation will you want to? Does that mean the money was wasted?
Having installed a virtual machine, you can safely create a network emulation and start creating a prototype of your site in a completely identical real mode. And, if everything works out and suits the person, repeat everything in the classical way.
Which virtual machines do you prefer to use today?
There are quite a lot of them. But the most popular options are the following:0003
VirtualBox
This product integrates easily with almost all modern operating systems. That is, it can be run if Windows, Linux, Mac OS and so on are initially installed on the computer.
Supports both 32-bit and 64-bit systems.
Considered one of the best VM options available today. Supports all major modern technologies. For example, it works quietly with USB 3.0.
The only drawback is that it is paid. You can use the free version, but the main functionality will be pretty curtailed in it.
Microsoft Virtual PC
Completely free shell. True, based on the name, you can immediately identify one drawback. Namely, the ability to work only with Microsoft Windows. No Linux or Mac can be installed this way.
How to activate VT-x technology
So, you have decided that Intel Virtualization Technology is a necessity for the intended purposes Naturally, the question arises — how to enable it? This is done as follows:
- Initiate reboot of the personal computer in the standard way.
- While turning on the computer, have time to press «Del» or «F2».
- This will take you to the BIOS settings menu.
- You need to go to the section called Advanced BIOS Features.
- In it, find the item Virtualization or Virtualization Technology.
- Switch next to «Disabled» to «Enabled».
It remains only to remember to save the changes and restart the computer again.
IT Knowledge Base
— Find out the IP — address of a computer on the Internet
— Online strong password generator
— Online subnet calculator
— IP installation calculator — Asterisk PBX
Manual — FreePBX Administrator’s Guide in Russian
—
Cisco UCM/CME Administrator’s Guide in Russian
— Linux/Unix Administrator’s Guide
Server Solutions
FreePBX and Asterisk 9Ol000 in the company
What to do? This host supports Intel VT-x
3 minutes read
Hello friend! If you are reading this article, then most likely you have encountered error VT-x/AMD-V hardware acceleration is not available on your system or something similar when working with a different virtualization environment. Keep reading and you will definitely find the reason!
First, let me briefly explain what VT-x and AMD-V are.
VT-x is a technology developed by Intel in 2005 that allowed Intel’s processors (CPUs) to support hardware virtualization. Roughly speaking, it became possible to have one computer, create another inside it and even with a different operating system!
AMD-V is a hardware virtualization technology from AMD. The first processors from the manufacturer AMD appeared on the market a year later, in 2006.
So, now here are the top 3 reasons why you might encounter the above errors:
- The processor of your «computer» simply does not support VT-x/AMD-V virtualization technologies.
Perhaps you are the owner of a very old or, on the contrary, a very specific device, the CPU of which simply does not know how to virtualize. In this case, you will not be able to fix those errors and run the virtual machine in any virtualization environment. But do not worry, there are many ways to spin virtual machines, for example, use the services of a VDS / VPS hosting provider!
Hyper-V is a proprietary virtualization technology from Microsoft that disables VT-x/AMD-V support by default to avoid conflicts. In short, you will have to choose between Hyper-V and another conflicting virtualization environment.
- VT-x or AMD-V technology is simply disabled and needs to be enabled.
By default, virtualization support is disabled in the BIOS, and in order to defeat the errors from the beginning of the article and finally start the coveted virtual machine, you just need to go into the BIOS and enable VT-x / AMD-V!
Depending on the manufacturer of your computer, there may be several options for entering the BIOS. Usually, you just need to restart your computer and wait for the inscription on the screen: Press to enter BIOS , but some button may be different.
Here are some examples for you for different manufacturers:
- Asus, Lenovo, DELL
- As a rule, they ask you to press F2
- Go to the tab Advanced , select
Subscribe to our weekly newsletter and we will send you the most interesting publications.
Just leave your details in the form below.
Virtualization vSphere, Hyper-V, XenServer, and Red Hat
More than
5010 virtualization and virtual machine notes VMware, Microsoft, Citrix, Red Hat
AMD Hardware Virtualization Technology (AMD-V).
AMD Hardware Virtualization Technology (AMD-V).
Author: AMD64 Team
Date: 19/02/2007Virtualization technology allows you to combine and abstract the physical resources of servers and workstations for the user by creating several independent virtual machines. Each of these virtual machines is capable of running its own operating system and application environment.
The traditional x86 software implementation of virtualization is driven by the need to use high-performance systems with reduced security and unnecessary complexity. AMD hardware virtualization technology solves these problems.
Software virtualization
• Virtualization software manages host operating system resources for virtual machines
• Application performance may decrease, application security may be compromisedAMD hardware virtualization
• Virtualization software (Hypervisor) works directly with the resources of the host computer, using the hardware modes of the processor
• Application performance remains high, application security is provided by hardware
Hardware virtualization is a logical evolution of the AMD Direct Connect architecture that implements virtualization technology in silicon.
This technology gives software manufacturers more options by not having to worry about software emulation of virtualization on the processor.
AMD virtualization technology, developed in collaboration with Microsoft, VMware, and XenSource, enables multiple operating systems to run simultaneously on a single computer. Each of the operating systems will work in an independent virtual partition, which will allow you to reboot it or completely disable it without affecting other software platforms. At the same time, the AMD implementation provides control flexibility, high speed and reliability.
• Virtual machines are isolated from the hardware, which increases the reliability and flexibility of the solution
• Applications run in separate, isolated software environments, which increases security
• Virtualization hides the complexity of the hardware infrastructure, which helps to simplify system management
• Virtualization abstracts IT services from hardware, allowing better control and user accessAMD hardware virtualization is implemented by introducing new processor modes and additional instructions:
• New processor mode: Guest Mode
• New data structure: Virtual Machine Control Block (VMCB)
• New instruction: VMRUN
• New memory mode: Real Mode w/ PagingIn addition, a number of AMD-V technology features simplifies software development, speeds up virtual machines, and improves security:
• Two-level virtual memory translation tables — make it easier for programmers to work with RAM and improve application performance
• Virtualization-enabled memory controller — Provides true security for the address space of virtual machines
• Tagged TLB — Tagged virtual address translation cache that optimizes the process of converting a virtual memory address to a physical one
• DMA controller hardware protection — Provides a high level of security when exchanging data with peripheral devices
• SVM (Security & Virtual Machine) — secure launch of the virtual OS, authenticated by the hardware module TPM (Trusted Platform Module)AMD hardware virtualization technology opens up wide opportunities for flexible use of computer system resources not only in large data centers, but also in small and medium businesses.
Software developers, IT administrators, testers, scientists and businessmen will take advantage of the new technology.
Key features of server virtualization technology:
• Consolidate workloads to reduce hardware and disk space requirements. For example, tasks that require a small amount of system resources (domain controllers, DNS, DHCP) can be placed on one physical server.
• Increase system flexibility by running multiple operating systems at the same time
• Run applications on more reliable, energy efficient hardware
• Isolate operating environments to increase security and resiliency
• Provide redundancy to increase fault tolerance and reduce recovery timeMain uses of virtualization technology for client systems:
• Develop and test software on multiple operating systems on a single computer
• Isolate business and personal OSE environments with enhanced security and reliability
• Provision and manage a client machine without interfering with the user experience
• Support for AMD technologies with popular virtualization packagesSupport for AMD technologies with popular virtualization packages:
How to activate hardware Intel VTx/AMD SVM acceleration on Windows 10
Virtual machines (or VMs as they’re commonly called) are an amazing thing.
You can use a virtualization program to create a virtual machine, and on it you can run the entire computer in virtual mode, with its own operating system — in a window on your existing system. Virtual machines are usually used to test various operating systems, test programs, using system functions, without worrying about possible consequences. However, in order for virtualization programs such as VMware and Hyper-V to run on a computer, they need access to hardware acceleration technology that is built into almost all modern and old processors.
The hardware acceleration technology built into Intel processors is known as Intel VT-X hardware acceleration, while other processor manufacturers (such as AMD) equip their processors with different hardware acceleration technologies. In many cases, VT-X is disabled by default on Intel processors. Attempting to run a virtual machine on a computer with such a processor results in an error message appearing when the virtualization application starts running, which notifies the user that the program needs hardware acceleration, this is similar to the fact that currently, the technology is disabled.
Intel VT-X hardware acceleration technology can indeed be enabled and disabled at will, and all the user needs to enable or disable is access to the computer’s BIOS or UEFI settings. This works for all versions of Windows currently supported by Microsoft, including Windows 10, the latest and greatest Windows operating system.
The process you need to follow to enable VT-X hardware acceleration on a computer may vary slightly depending on whether the computer has a BIOS or UEFI. Computers that have versions of Windows older than Windows 8 will almost always have a BIOS, while computers running Windows 8 or newer will most likely have UEFI settings. Gradually, all computers are moving to UEFI, so the newer the computer, the better its UEFI settings will be. In order to enable VT-X on a Windows 10 computer, you need to first enter the BIOS or UEFI settings. Here is how you can do it:
On a computer with BIOS
- Restart the computer.
- On the first screen you see when you boot your computer, press the key indicated on the screen to enter your computer’s BIOS or setup program.
The key you need to press will be clearly visible on the first screen you see when your computer boots up.
On a UEFI computer
- Go to the power options menu in settings mode (if you’re using Windows 8 or 8.1) or the start menu (if you’re using Windows 10).
- On the keyboard, press and hold the Shift key.
- Hold down the Shift key and click Restart. This will cause the Boot Options menu to appear when the computer boots up.
- When you see the Boot Options menu, click Troubleshoot.
- Click Advanced Options.
- Click UEFI Firmware Settings.
Once you are in your computer’s UEFI settings or BIOS, you can start working on determining the option for VT-X hardware acceleration and you can also enable this feature. Just look through all the tabs and sections of the BIOS or UEFI settings for the VT-X hardware acceleration option — this option will be labeled, similar to this » Intel VT-X «, «Intel Virtualization Technology», «Virtualization Extensions», or «Vanderpool».