How to benchmark your PC laptop for real-world gains
Everybody wants to know how well their laptop performs, but usually for different reasons. Was that high-end processor you optioned worth the extra money? Can your inexpensive clamshell run the latest, hottest PC games? Is it time to give up on that old laptop for something with a little more capability? A good way to find out is to run a few benchmarks.
Benchmarks put your machine through a set of fixed, predetermined tasks, and then provide scores that can be compared to the results of other PCs. Comparison is the key here, as a benchmark lacking context tells you very little. Indeed, no matter how high the score, if it can’t be contextualized against other PCs (or to a minimum performance requirement), then the benchmark won’t tell you much.
Which laptop benchmarks should I run?
There are tons of benchmarks out there and some are more popular than others. Ideally, you want a benchmark to be challenging enough to to get a sense of your system’s performance under typical loads.
The benchmark doesn’t necessarily need to be a so-called “torture test” that pushes your system to run flat out. Those are wonderful if you want to test system stability while overclocking, but for general system performance, they’re not necessary.
The benchmarks we suggest below are widely used, which makes it easier to find scores online for comparison purposes. These tests are also free, making them accessible to the widest possible audience.
For best results, keep your laptop plugged in for all but the battery test. You should also shut down as many background processes as possible to see what your system can truly do. It’s also a good idea to shut off Wi-Fi and Bluetooth by putting the laptop into airplane mode, and unplug ethernet. That said, some benchmarks (such as Geekbench 5) do require an active Internet connection.
For all of the following benchmarks, a higher score is better.
Benchmark your laptop CPU
IDG
Cinebench R23 for Windows after testing an Intel Core i3-7100U.
For benchmarking CPUs, Cinebench is a solid choice. It’s a quick and easy test that takes about 10 minutes to run, and you’ll often find it mentioned in PCWorld CPU reviews. Cinebench has a ranking panel in the left rail that shows how one system compares to another, and includes your system’s score after the initial run. There are also sites like CG Director and CPU-Monkey that list results from other users.
As of this writing, the latest version of Cinebench is R23, which has both a multi-core and single-core test. Modern CPUs have multiple cores (up to eight cores in the most advanced mobile chips, like Ryzen 5000), and each core can handle an independent processing load. This is important, because some applications can only tap into a single core, while others are optimized for multiple cores.
Try running both tests, as that provides a more complete picture. The multi-core test in R23 is more of a stress test than it was in earlier versions, but as long as you compare your results to other PCs also using R23, you’ll get an accurate picture of how your system stacks up.
Compared to other systems, your PC might shred it on the multi-core test but come up short on the single core. That’s instructive as poor single-core performance may hint at issues with programs that rely heavily on a single core, such as many productivity applications.
A second test to try is Geekbench. The demo version of this benchmark is free, and it will automatically upload scores to the Geekbench results site where you can compare results to other Windows systems (don’t waste your time comparing your score to phones). Geekbench also has a GPU test.
Benchmark your laptop productivity performance
IDG
PCMark 10 is a standard performance test for PCs.
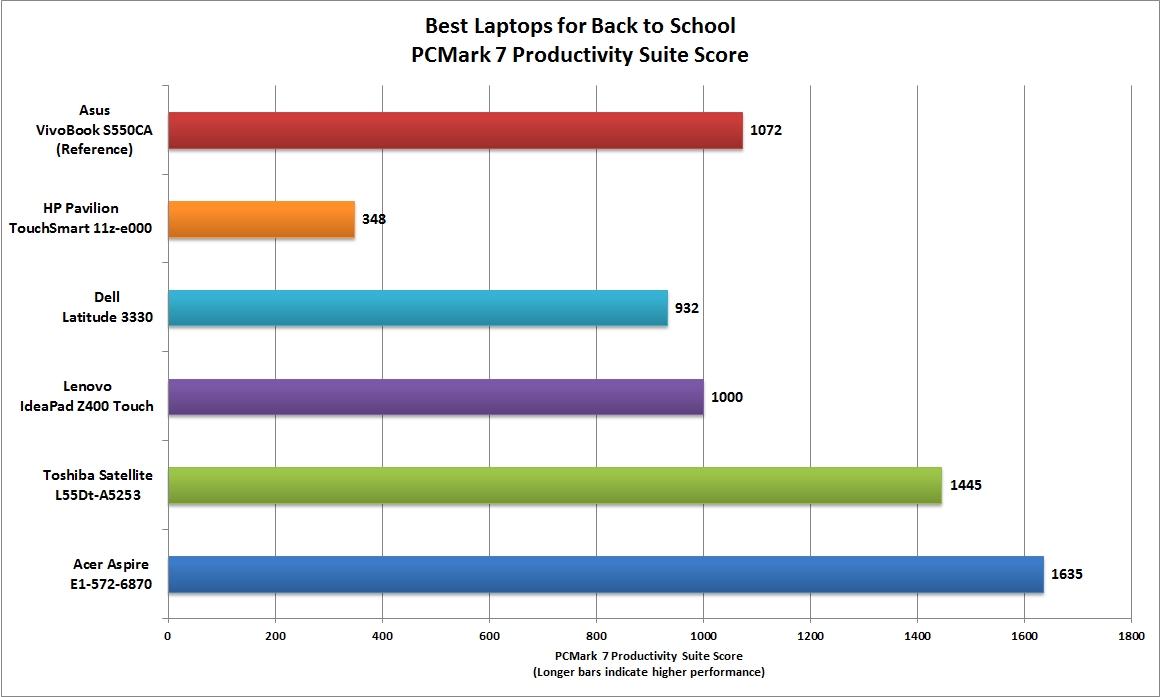
Beyond the Cinebench single-core CPU test, you’ll want to know how well a system specifically handles spreadsheets, web browsing, launching applications, photo editing, and video chat. For that, try the PCMark 10 Basic test, which runs the laptop through open-source productivity applications such as Gimp or LibreOffice, among other tasks. PCMark 10 is one of the most commonly used benchmarks to test system performance for general computing tasks, and we use it quite often at PCWorld for testing laptops.
PCMark also includes a section that uses a 3D ray-tracing modelling application. But for most people, the resulting score under Essentials (which covers browsing and video conferencing) and Productivity (which covers editing spreadsheets and text documents) probably matters the most.
You can download the official version from Steam by clicking the Download Demo button.
Benchmark your laptop gaming performance
IDG
Heaven 4.0’s launch screen.
For gaming, let’s start with Heaven 4.0. Heaven won’t push a modern discrete GPU to the max, because it’s several generations behind the cutting-edge in terms of graphics. Nevertheless, it’s challenging enough, it’s dead easy to set up, and it’s free.
For Heaven, a score close to or above 60 frames per second is best for discrete GPUs, and around 30 fps is good for most integrated graphics.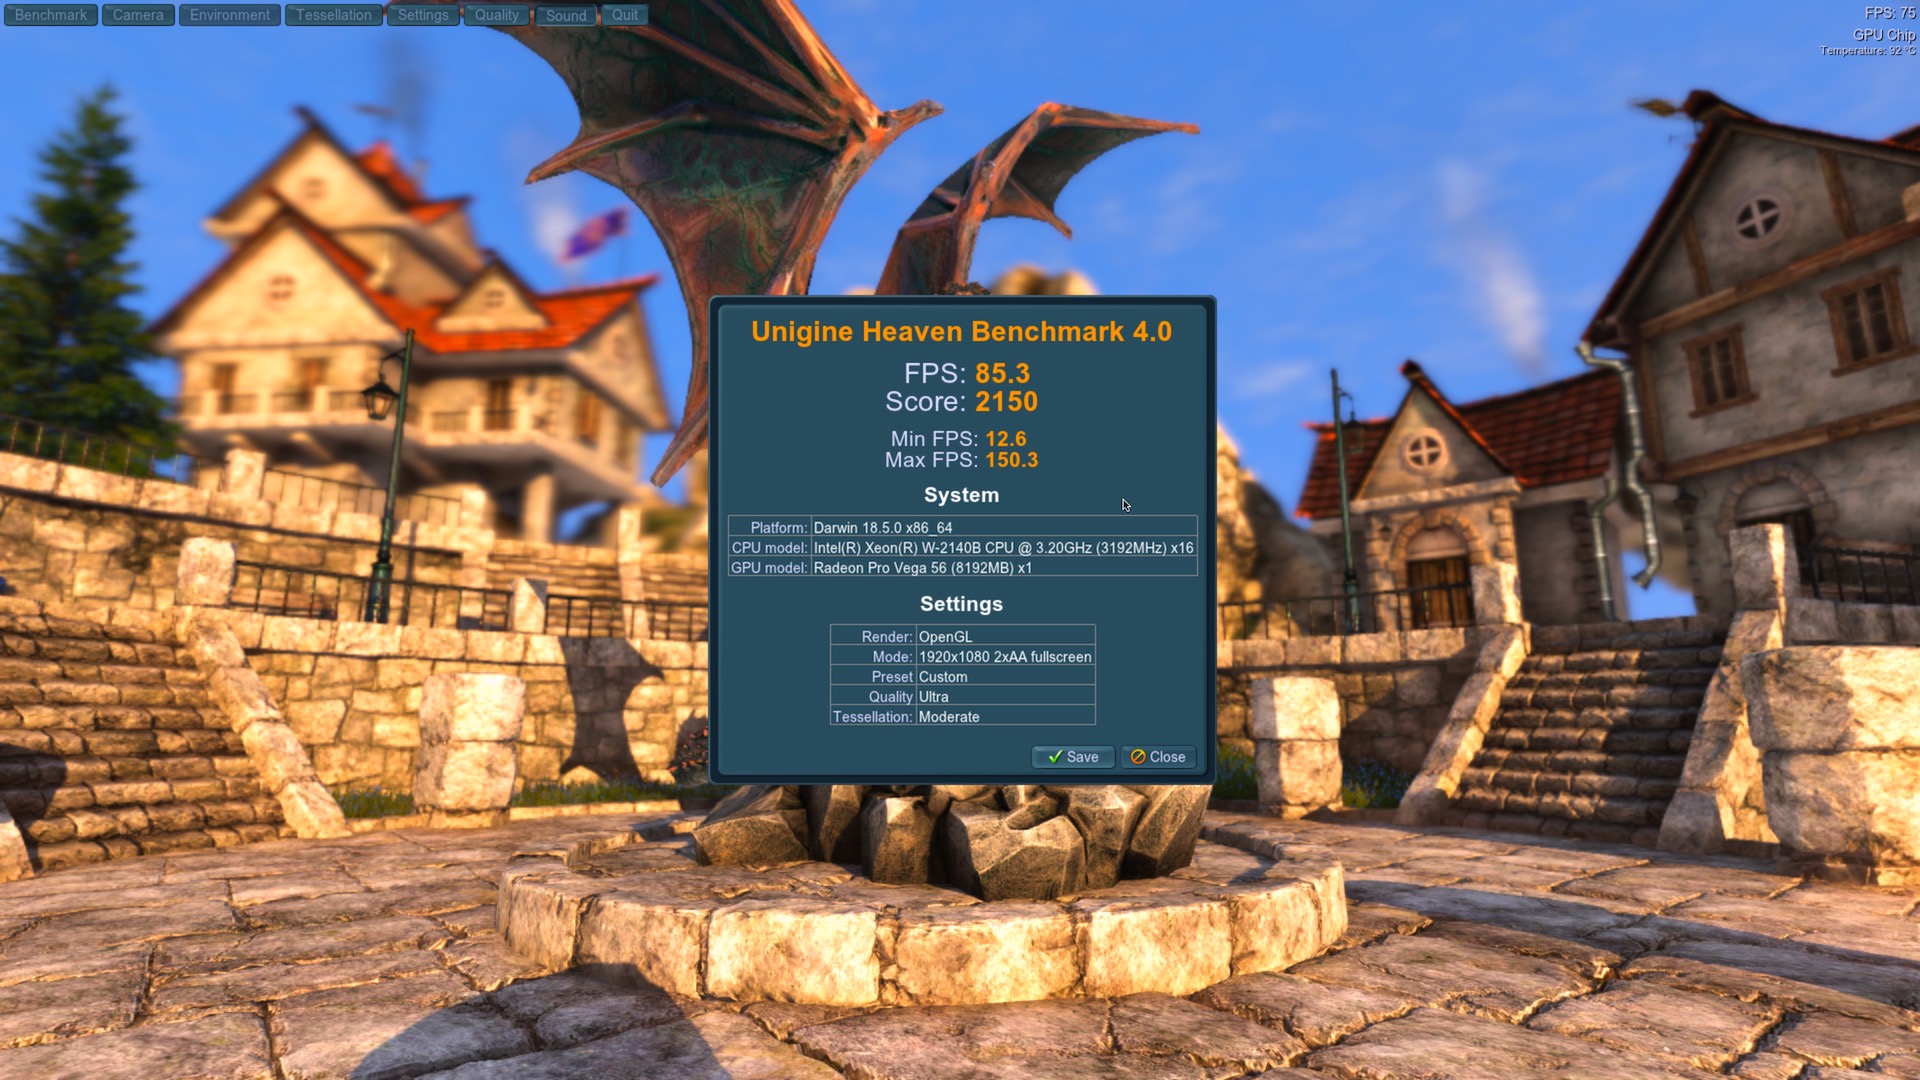 If your PC can’t hit those scores, then lower the graphics settings to medium or low and test again. If that still isn’t enough to yield good scores, then reduce the benchmark’s screen resolution as well (that is, unless Heaven adjusts it automatically).
IDG
An example of a Heaven 4.0 benchmark score.
If your laptop gets less than 30 frames on low graphics settings and 720p resolution, then most AAA games will likely be unplayable on your laptop. But fear not, you can still get your game on with this selection of 31 great games you can play on laptops and low-end PCs.
Now, what if your system shreds Heaven on high settings with scores above 60 fps? Then it’s time for more testing. Heaven is what we call a synthetic benchmark that attempts to simulate real-world processing loads. Well-designed synthetic benchmarks are fine for testing a CPU or general system performance, as well as for developing a baseline for your GPU. Under real-world gaming conditions, however, the computational workload imposed on the GPU varies greatly between games.
Games like FIFA 20 or Minecraft (without ray tracing) won’t tax your system the way 2015’s The Witcher 3 or 2018’s Assassin’s Creed Odyssey would. For that reason, we recommend using a game’s built-in benchmarks, when available, as a second step. Built-in benchmarks use the in-game engine rendering for testing. Ideally, a built-in benchmark includes a selection of scenes that tax the system the same way real gameplay would, but that’s not always the case.
On top of that not all games include built-in benchmarks. Still, there are some good built-in benchmarks out there in games such as Metro Exodus, Gears Tactics, and Forza Horizon 4. All three of those titles are part of Microsoft’s Xbox Game Pass for PC, meaning you only have to pay a small monthly fee to try them out.
If you don’t want to pay for a game or a Game Pass subscription just yet, there are tons of YouTubers who benchmark laptops and post the results online. Search YouTube using your GPU name—for example, “Intel UHD 630 gaming performance” or “GTX 1660 Ti laptop performance.” Chances are these videos include a system similar to yours, or at least your GPU.
Just like with Heaven 4.0, for the bare minimum of playability a game should stay above (or barely under) 30 frames per second, with 60 fps or more being the ideal.
Benchmark your laptop battery
IDG
VLC running with the loop toggle active.
We don’t have a recommended benchmark suite for battery tests, so instead we’d suggest something more DIY. Make sure the laptop battery is fully charged, and turn off the Wi-Fi and Bluetooth to avoid any outside activity that might drain power. Now run a 4K or high-definition video on a continuous loop in a desktop video player to see how long it lasts. You can try the ever-popular VLC player, but the most efficient video player we’ve seen is Movies & TV, the player built right into Windows. If you’re looking for a 4K video to use, PCWorld uses the open-source Tears of Steel video available here in different video formats, CODECs and resolutions.
Your battery test doesn’t necessarily require an exact measurement. Just start the loop and check on it every 30 to 60 minutes until it shuts down. Then record how many hours and minutes the laptop lasted under that video load.
So what does this mean in terms of real-world laptop performance? Well, you can extrapolate the machine will last for about 60 to 70 percent of the recorded test time under mixed usage. We’re talking web browsing, text editing, spreadsheet work, video calls, and online videos.
Another alternative is to spend two or three days using the laptop as you normally would, but only under battery power. After two or three complete battery drains, open a command prompt in Windows 10 and type powercfg /batteryreport and hit Enter. This will spit out a report you can open with a web browser that includes battery life estimates based on recent usage. You’ll also see some other statistics. Most items on this report cover only the last three days, so don’t let your tests run longer than that, and ask for the report as soon as possible if you go to a third day of testing.
Just remember that battery tests can be some of the most inconsistent in all of benchmarking. How long a battery lasts depends on so many different variables, such as how bright the screen is, and what you’re doing on the machine. If you’re watching a video, then battery life is generally fantastic on modern laptops. But if you’re browsing media-laden websites, it will be much worse. If you’re editing a movie or playing games, expect even worse performance. Basically, you’re mileage will vary.
Benchmarking your laptop is a great way to discover how well a machine performs compared to other systems, and the best part is you can do it without paying a cent.
Simple Benchmarks to Run on Your Computer to Check If It’s Working Well
At first glance the computer on your desk might look a lot like last year’s model or the model your colleague has, but looks can be deceptive—if you want to really rate your laptop and find its place in the power and performance stakes, that’s where benchmarks come in.
Long revered by gamers as a way of objectively judging the raw power of a rig, benchmarking is the best way to measure your rigs performance versus the rigs of your friends. There are two types of benchmarks to consider when testing your computer: real world and synthetic. Real world benchmarks are more simple ones, like timing how fast Photoshop opens or Blender renders a file. Synthetic benchmarks are software packages that run a carefully tailored series of tests, some designed to replicate ‘real world’ situations (like the games you actually play) and some designed to simply push the computer components as hard as possible.
Once a benchmark completes you’ll get a series of numbers that don’t mean much on their own, but compare them with other systems, or track them over time, and benchmarking becomes much more useful to gamers and non-gamers alike.
Why benchmark?
The primary reason for running benchmarks has always been to evaluate the performance of a computer, but it’s not just for gamers wanting to eke out as many frames per second as possible—you can use the same tests to check your laptop’s performance over time, or to weigh it up against newer models when you’re considering an upgrade.
They can be useful in checking that you’re getting what you’re supposed to be getting—as in the case of internet speed tests—or spotting problems before they occur—which is where hard drive benchmarks can come in handy.
No doubt you already have plenty of distractions without adding regular benchmark routines into the mix, but get into the habit of running them and you can make a much more informed decision about when you stump up for a new laptop, spot potential hardware issues before they get serious, make better choices about software and component upgrades, get proof that you’re running a sweeter system than someone else, and more besides.
There are plenty of different variables that can affect benchmark scores, and we’d recommend running each of these tests at least three times and taking an average. Most benchmarking software programs have an accompanying site where you can compare your scores against other systems.
1) Performance benchmarks
General-purpose performance benchmarks run through everything from the speed of your CPU to the capabilities of your GPU—use them to weigh up just how cutting edge (or out of date) your laptop is, and the kind of top-tier games you can expect to run.
Novabench is a decent and free benchmarking tool for Windows you can use for the job, while Geekbench is more professional, more comprehensive, and available on Windows, macOS, iOS, and Android—but it will set you back $9.99 once you’ve exhausted the free trial.
If you’re specifically interested in graphics performance then Cinebench is free to use and works across Windows and macOS, while 3DMark and PCMark are nice GPU testing tools with free basic editions (more advanced packages will set you back $29.99 each).
Run through these benchmarks regularly and you can see how performance holds up over time, check the impact of upgrades or changes to the hardware and software setup on your system, and (via global benchmark scores published on the web) work out the best time to buy a new laptop.
Every benchmark is different so check up on the guidelines for each one—the one’s for Geekbench are here. A Intel Core i7-6600U Surface Book is used as a baseline, with a single-core score of 4,000, so don’t panic if you’re way below that in the charts, as long as your machine is still doing what you need it to. On the other hand if your laptop is down in the low thousands (mid-range smartphone level) then it might be worth thinking about an upgrade.
Likewise, with gaming, check up on the 3DMark scores online to see how your system measures up, but don’t despair if you’re not right up there with the very best (10,000 and above on the Fire Strike test is a good yardstick for a decent gaming machine). The way that the Futuremark website lets you identify scores for particular components is helpful in working out how much more performance a particular upgrade might get you.
2) Browser benchmarks
We’re all spending much of our time in a browser these days, but is the one you’re using at the moment really the best one out there? Is your browser sucking up memory and disk space and slowing down your whole system? Is it time to switch?
Of course you can simply install a bunch of competing browsers and try them out yourself, seeing which feels snappier and weighing how your favorite web apps perform in each one.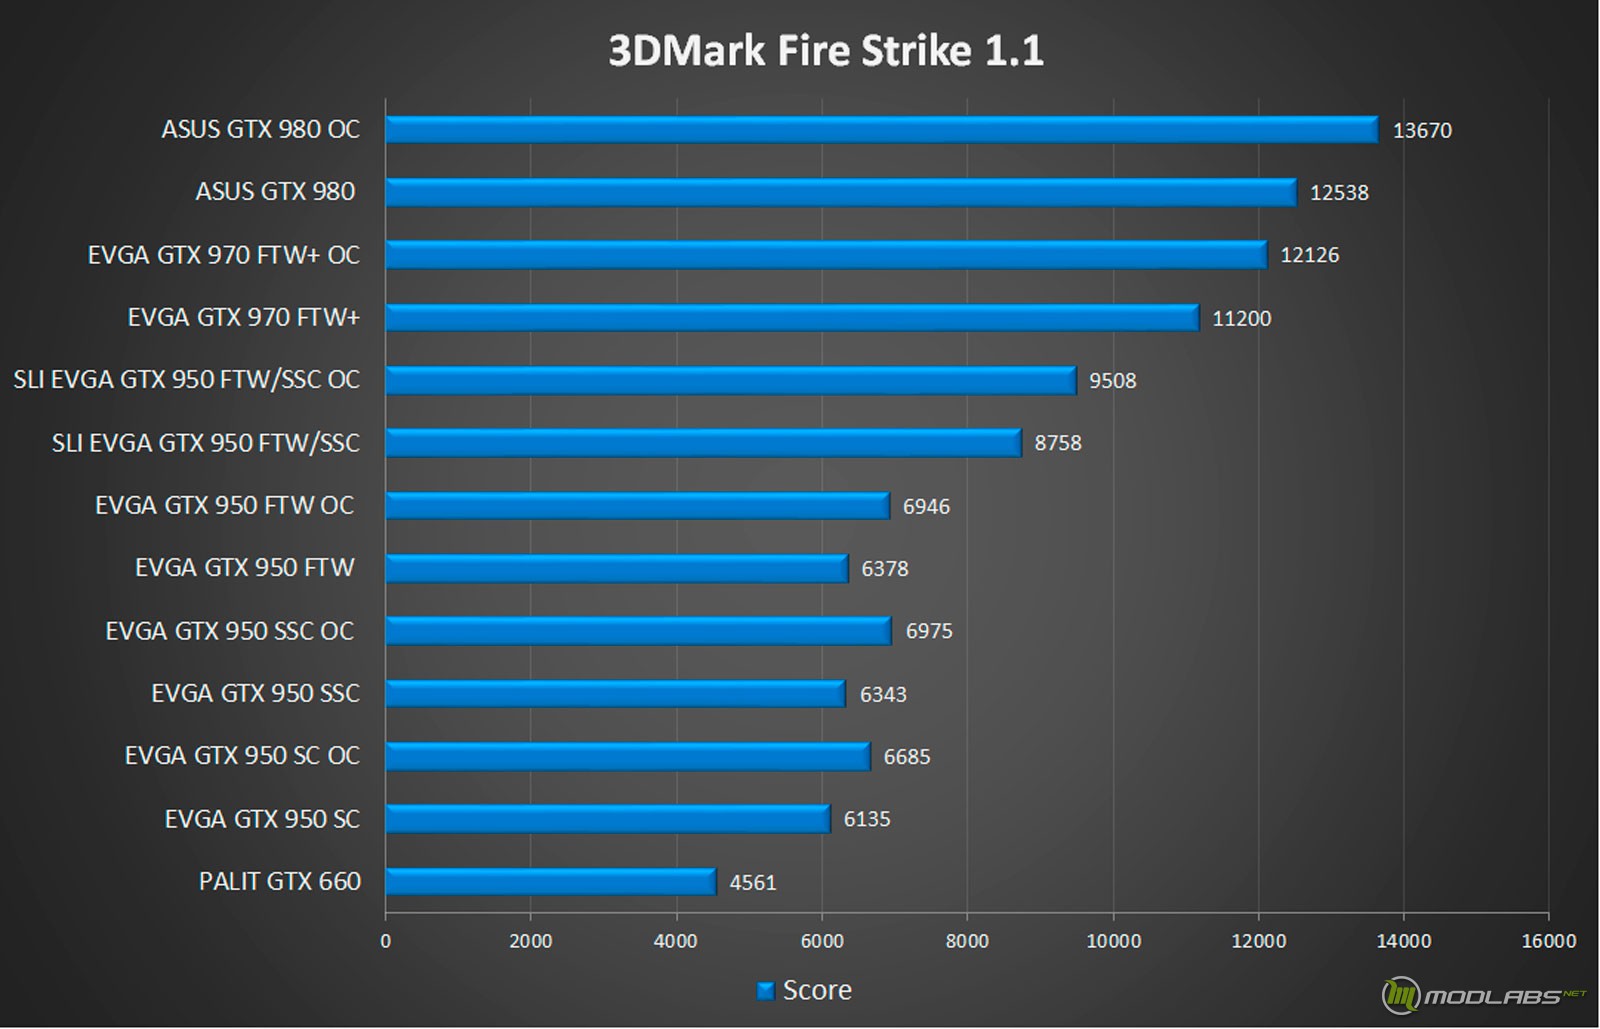 For something a bit more scientific, use a benchmark.
There are a host of tools which test various different web technologies and different aspects of the browser experience. We use WebXPRT 2015 when testing devices here at Gizmodo (we always test using the system’s native browser) as it tests a variety of scenarios in a web browser, including producing spreadsheets, editing photos, and encrypting files. Yet there are other nice options for giving you a well rounded view of your browser’s performance.
To that end we also like Basemark (for newer web technologies, including interactive elements and WebGL graphics), the older Peacekeeper (for general page rendering performance), and JetStream (specifically for testing JavaScript performance). It doesn’t matter so much which ones you pick, as long as you have a selection to hand, and stick to them.
Based on the figures you get back, and the figures publicly posted on the web, you should be able to work out which of your selected browsers is giving you the best performance. It’s also handy to check how different versions of each browser perform. If a browser is below par, there are ways of speeding it up.
For browsers, it’s more about how different programs compare on your own system, rather than how they stack up against scores from other users (though you can still check the public scores for reference). Interpreting the results also depends on what’s most important to you in a browser.
Scores from Basemark, Peacekeeper, and other tools that check all aspects of a browser performance are helpful as broad guidelines and then specialist benchmarks such as the Javascript-based Jetstream give you even more info—testing how fast web apps boot up and how smoothly they run.
3) Internet speed benchmarks
Speaking of internet use, how are your download and upload speeds doing? Testing these speeds is useful for a number of reasons: To hold your Internet Service Provider accountable to promises, to troubleshoot problems, and to check performance over time.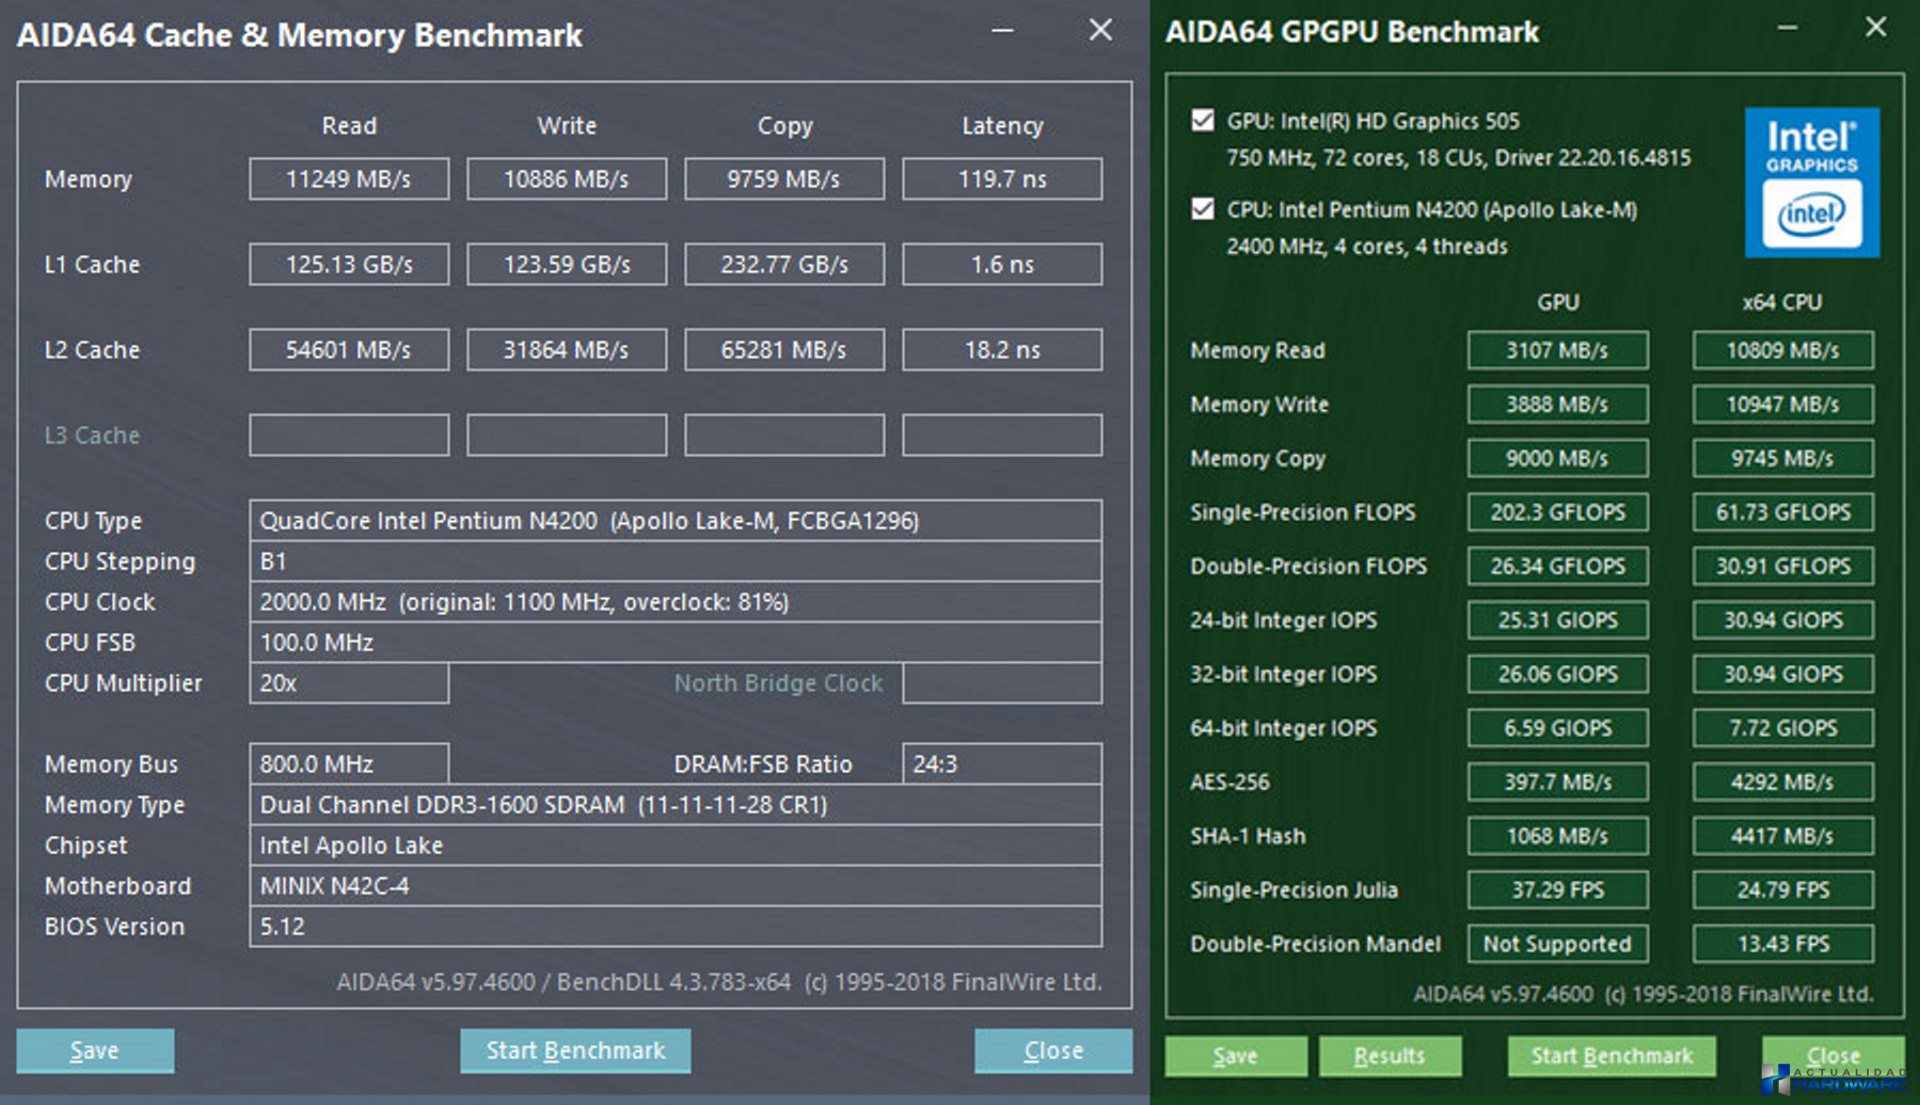
The go-to option for this is Speedtest, but it’s not the only choice out there—in fact it’s best if you do get a second or third opinion when it comes to bandwidth and speeds. Google will test your connection speed if you just search “internet speed test,” and Fast.com, which specifically checks your connection to Netflix, is worth a run too.
Speedtest will test the responsiveness of the wider web as your computer connects to it (a ping test), as well as the download and upload speeds you’re getting, then tell you how your scores match up with other users. In the case of a ping test, 30 milliseconds or less is a good score for a broadband connection.
Should you not be getting the download and upload speeds your ISP has promised you, you might want to get in touch with the company to find out why. Before you reach out though, run the ISP’s own benchmark test (most now offer one)—it might not be the most unbiased option around, but it’s good to have the stats to hand.
You can also use internet speed test benchmarks to work out just how far away you can place your laptop to get a decent connection, or where your home office needs to be placed, or how much impact six Amazon Echos have on your speeds, and so on. Run the tests, make the changes needed to your network layout, then run the tests again to see what’s changed.
4) System component benchmarks
You can also get benchmarks focusing on specific components inside your laptop, besides the graphics tests we mentioned above. These can be useful in troubleshooting problems on your machine or judging when it’s time for an upgrade, for example.
Hear some unhealthy sounds coming from your hard disk? Run a benchmark. CrystalDiskMark is a useful and free option for Windows, while Blackmagic Disk Speed Test will do much the same job on macOS and won’t cost you anything either (both options should work with SSDs as well as older mechanical drives).
If you want to put some pressure on your CPU, then Prime95 is a popular and free option for Windows-based machines. CPU-specific macOS options are thin on the ground, but general purpose benchmarking tools like Geekbench have CPU-specific sections.
All these tools are useful both for diagnosing existing problems and for heading off potential problems that might crop up in the future, but you’ll need to run these benchmarks regularly and note performance over time to flag anything that’s amiss. If you notice your laptop’s hard drive performance starts falling off a cliff, for example, it might be time to back up your stuff and buy a replacement drive.
Computer performance test
For many users, a PC is not just a machine for surfing the web and watching videos, but also a device for work or a hobby. Some programs and video games consume a significant amount of computer performance resources, and not everyone is able to «pull» them. To check if your device meets certain criteria, you can run a test — diagnostics of the performance of computer elements.
You can measure the performance of the entire system, as well as its individual parts, such as a processor or video card. Thus, it is possible to understand which parts are at an acceptable level, and which should be replaced in the first place. If you are the owner of a laptop, it may be difficult to replace it yourself, but in any case it can be done in the workshop.
Contents
- Benchmark Index
- Everest
- PCMark
- 3DMark
Benchmark Index
automatically. The test covers all the main details of the computer and laptop. To view the results of the study, follow the simple instructions:
- Use the Windows key to open the Start menu.
- Right-click on Computer to bring up the context drop-down menu.
- Select «Properties» from the list of actions.
- You will be taken to the information page of the system. The parameter you are interested in is «Rating». Click on the «Performance Index» button next to it.
- Notebook performance is rated on a special scale from 1 to 7.9. Each item is checked first, and the lowest score determines the overall result.
The processor and RAM are evaluated by the number of operations performed per second, by the video card — by the speed of the desktop and three-dimensional graphics, and by the hard drive — by the speed of information exchange.
This interface helps you understand which parts are dragging your PC down and need to be replaced first.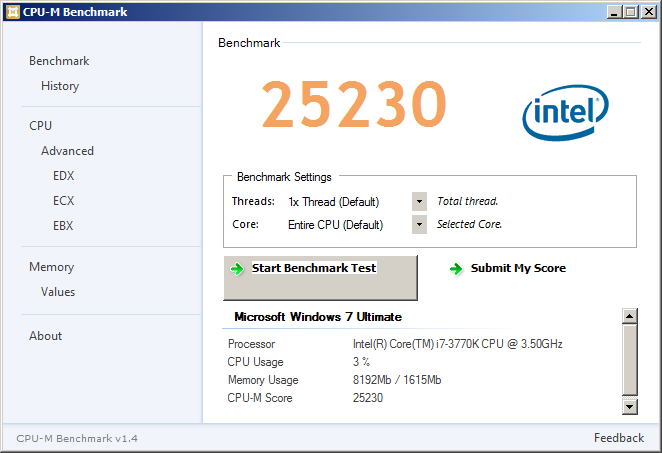
Everest
Everest from the developer Lavalys is a popular utility for a comprehensive examination of the performance of a laptop or personal computer. Such programs are called benchmarks. With Everest, you can collect almost any information about components.
You can also measure the temperature of individual parts and a host of parameters such as RAM bandwidth, maximum Hdd speed, and get information about software and installed drivers.
And of course, using the utility, you can test any element of the PC.
PCMark
Lighter software for narrow applications. It serves exclusively for performance testing. With its help, it is possible to conduct an integral test for any computer component. A peculiar feature of the program is the ability to compare your laptop with the world average.
3DMark
Benchmark specialized in testing computer graphics cards. It includes many checks for working with shaders, 3D modeling, texturing, rasterization.
There is also a complex test, which resembles a computer game with one difference — the program itself plays it. In the process, it measures the frame rate and evaluates the stability of the card under heavy loads.
How to find out how powerful our computer is, and which of its components cause a decrease in overall performance
How to find out how powerful our computer is compared to others, including systems based on cool modern hardware? How to find out the weak device of our system, which negatively affects its overall performance? It is possible that by replacing this separate device, the computer will run faster, and it will not have to be replaced entirely with a new one. Understanding only superficially in computer hardware, you can turn to computer wizards.
Or you can study this topic yourself — conduct an automated assessment of your computer system and identify its weak links. For this, there are special 9 on the Internet.0067 benchmark — services. Let’s consider the possibilities of one of them — the site UserBenchmark : how to solve the tasks with its help?
Contents of the article:
Benchmark service UserBenchmark
UserBenchmark is a benchmark service, a service for evaluating and comparing various computer components. Here the performance of various models of processors, video cards, hard drives, USB media, RAM is evaluated and compared. For processors and video cards, the service additionally gives the values of the effective FPS (min, average and max values) in 12 games, including: Counter-Strike , Minecraft , The Witcher 3 , GTA 5 0076 Battlefield 5 , Assassins Creed Odyssey . Here you can also use the PC constructor function to assemble a certain virtual system configuration, view its overall performance, and compare it with another virtual configuration.
Well, another notable function of this service, which we will discuss in detail below — testing of user computers and their evaluation. Test UserBenchmark evaluates the overall performance of our system and shows in percentage terms how powerful it is compared to other tested systems. And also this test evaluates the performance of individual computer components in comparison with other tested components, thus allowing you to identify weak links in the system.
UserBenchmark — English service, no Russian support, so you have to work with it using Google — translator, but this, alas, is fraught with clumsiness of translation in some moments.
Running test
To test your computer using UserBenchmark , go to the service website:
https://www. userbenchmark.com/
And download a free utility for testing your computer there.
This utility is UserBenchmark Benchmark Software , it is portable, you just need to run it and wait for a while while it tests the computer. The utility will carry out the necessary tests of computer devices and display a link in the final window. This link must be opened in a browser window. The link is not copied, it must be entered manually — add a slash after the site domain «UserRun» and then again through a slash enter individual ID -number.
Let’s analyze the test results on the example of a specific computer system.
General performance and hierarchy of computer systems
this is the sum of the percentage scores of all computer components. And such an assessment is displayed in three categories:
• «Games» — rating of the system as a gaming PC. When assessed in this category, the overall score is affected by 50% video card, 25% processor, 15% SSD , 10% HDD ;
• «Desktop» — evaluation of the system as a desktop for common user tasks. Here, the priority in the evaluation is the performance of one processor core, its 50% evaluations form the basis for the evaluation of the entire system. The remaining components have less effect on the overall indicator — 10% video card, 30% SSD , 10% HDD ;
• «Workstation» — assessment of the system as a workstation, ie. computer for solving IT -tasks. Here the emphasis is on the performance of multi-core processors, the overall score is 40% . The remaining components affect the overall score as follows: 20% video card, 25% SSD , 15% HDD .
And this is the result we see in our case. As a gaming computer, our system was rated 12% , as a desktop — by 44% , as a workstation — by 26% .
In addition to percentage ratings, the service also shows the hierarchical position, the status of the system by the type of hierarchy of watercraft and ships.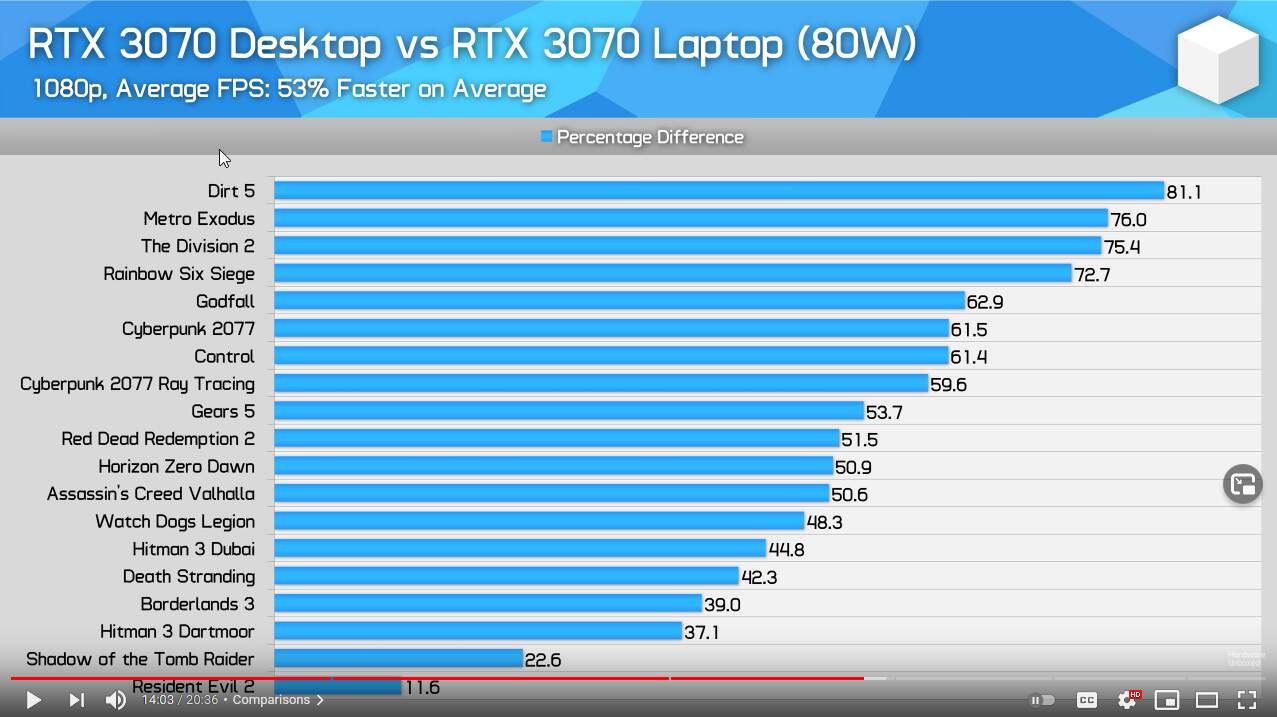 For those who are interested, you can look at this hierarchy by clicking on the link to the status assigned to you in any of the categories, but this hierarchy is superfluous as an evaluation benchmark. Enough and percentage assessment of the system. The only thing this hierarchy is useful for is the ability to see what is rated UserBenchmark service is a reference system. Those. which systems scored 80% , 90% and 100% performance in the test. If, for example, we click on the highest status with 100% score, we get a list of the most powerful systems, ranked in priority of CPU and GPU performance. Here you can also pay attention to the cost of such systems.
What is the standard — what processor, what year it is, what video card, the cost of components — all this is important for an objective assessment of our system. And, starting from this, we can understand that our result of evaluating the system as a desktop is 44% — this, given that the components of the system are already outdated, is very good. The computer is not used as a gaming device and workstation, so its low score in these categories does not matter.
But let’s get back to the test results of our build PC . On the page of these results, after a general assessment of the system in three categories, an explanation is provided for all computer components with color marking: green — good, orange — satisfactory, red — poor. And also provides a percentage assessment of each of the components separately. As you can see in the screenshot below, in general, the system was rated well, the RAM and the installed operating system were rated well separately. The processor received a satisfactory rating. And the video card and the boot drive that Windows is installed on are rated poorly.
In order to correctly determine the place of our system among other systems, to identify its possible weak links, to find out why some device provoked a subsidence of the overall rating, it is necessary to consider the assessment of each of the devices PC separately.
Test results for individual computer devices
Our processor scored 57.3% individually, which, in fact, influenced the relatively good rating in general. For the outdated Sandy Bridge processor, and this microarchitecture, for a moment, will turn 10 next year, against the backdrop of modern processor capacities, this is a really remarkable result.
The video card in our system is the bottom device, it scored only 1.63% . Not to mention games, even for sharpening a computer for multimedia tasks, it would be desirable to change such a video card for a better one.
SSD — the disk on which Windows is installed, oddly enough, also according to UserBenchmark became the weak link of the system, it scored only 9.8% .
But this, judging by the results of the data reading and writing tests carried out when testing the computer, is a failure on the part of the software UserBenchmark . The program simply for some reason could not conduct the necessary tests and slapped the disk with a critically low rating. This point is deliberately highlighted to draw attention to it. In this case, you need to re-test the computer with software UserBenchmark . In fact, the system has a fairly good SSD for disks with a SATA interface, with good read and write speeds. When tested on other systems, the same SSD received an average score of 57.5% . So, given this fact, and without even re-testing, we can estimate that the overall score of our system is not 44% , but more, somewhere at the level of the processor score.
But our non-system disk HDD was liked by the evaluation mechanism of the service UserBenchmark , it got as much as 76.7% . But this disk, as mentioned above, does not significantly affect the overall score of the entire system. Although for a computer performing everyday tasks, the speed of reading and writing is important not only for system data, but also for user files, which many still have stored on disks like HDD .
The next component is a flash drive. Its performance is rated benchmark — service low — 6.89% . The flash drive does not participate in the formation of the overall assessment of the system, its assessment is just information for information. The low rating of the flash drive is due to its connection to the USB 2.0 port .
Well, the last tested component of the system is RAM. She dialed 60.1% which is a very good score for outdated memory DDR3 1600MHz .
Brief information about the test results with a percentage score for each of the computer’s devices, if necessary, can be copied using a special function of the site and saved somewhere.
Summing up and conclusions
What can be learned from all this in the dry residue? In addition to the video card, there are no more devices in our system that would drag down its overall performance. A partial upgrade in the form of replacing the processor with a more powerful one or adding RAM will not seriously improve overall performance. In order to achieve a higher score in the desktop category, it is necessary to change the generation of hardware, i.e., in fact, change most of the stuffing of the computer, leaving only hard drives and a case in it.
According to this principle, everyone can evaluate their computer system and identify devices that cause the performance of the entire system to sag. In the column of each device that scored a small percentage, you can click on the link for testing it as part of other systems.
And see the test results of other users, as well as analyze the average rating of this device. For example, in our case, the video card as part of other PC assemblies scored about the same bottom percentage of performance.
But if some device on board our system in tests of other systems would gain a significantly higher percentage of performance, and this would not be a software failure potential.