How To Benchmark God Of War To Test Your Gaming PC’s Performance
homeNews
Sony’s Santa Monica Studios are the original creators of the God of War series, and while the 2018 release (simply titled «God of War«) could reasonably be called a «re-launch» for the popular game title, it’s not a reboot. The game centers on series main character Kratos, now living in the frozen north among the Norse pantheon, as he braves the harsh, icy wilderness and attempts to teach his son to do the same.
As mentioned, the game originally released to massive acclaim and almost universal praise on the PlayStation 4 back in 2018. It got a minor update to unlock 60 FPS mode when playing on the PlayStation 5 early last year, and most people would have said that if you hadn’t played it already, it’s a solid argument for buying a PS5, as a premier game title many enjoyed.
We noted, «would have said» because it’s not an exclusive anymore. God of War just released on Steam, and by all accounts it’s even better on PC. That account includes our own, by the way. We’re putting together a full performance review for the PlayStation-to-PC conversion, but for now, we can give you a sneak peek into how it runs on the PC platform, and show you how to test that out for yourself on your own rig.
Using CapFrameX To Check Your PC’s Game Performance
First of all, make sure you have the latest GPU drivers for your graphics card of choice. As we’ve covered previously, that can make the difference between a good and not-so good experience. For testing and benchmarking, we use a free, open-source tool called CapFrameX to benchmark and analyze game performance. CapFrameX is based on another tool called PresentMon, but PresentMon is a command-line utility, and while that has its charms in certain situations, CapFrameX both makes it easier to use and also provides quite a bit of extra functionality. You can grab CapFrameX from the project’s website.
(click to enlarge)
Once you’ve gotten CapFrameX running, you’ll be presented with this screen. Before you can do any performance analysis, you need to do performance capture, and this is where you’ll do it. In the center third of the screen you can see a list of running processes; this list will not include processes in the ignore list on the right-hand side. That’s to prevent CapFrameX from capturing performance data for things like Chrome, Office, or Discord or other apps running on your PC.
God of War doesn’t support exclusive full-screen mode, but that’s actually convenient here because you’ll want to make sure that it appears in the list of «Running Processes» (as «GoW») in CapFrameX. Once it has, get into some gameplay you’d like to test and press F11. You’ll hear a nice lady say «capture started,» and from there, proceed normally through gameplay. (You can change the capture hotkey if you want, and also replace the speech sample with a simple beep if you prefer. )
)
The capture will end after 20 seconds by default, and shortly you’ll see it appear in the list of captures on the left side of CapFrameX. From there, you can go over to the Analysis page and click on the capture to see detailed performance statistics across the 20-second run.
(click to enlarge)
Above, you can see a brief benchmark run around the first area of the game on one of our Windows 11 test systems equipped with a Ryzen 9 5950X CPU and a Radeon RX 5600 XT GPU. The test was performed in 1920×1080 resolution on the game’s Ultra settings preset. That machine pulled out an average of 51.6 FPS, which isn’t too shabby for a mid-range previous-generation graphics card on a just-released AAA game.
The Geeky Goodness Of Capturing Frame Times Never Gets Old
If you’re getting lower-than-expected performance, you can check for proper CPU, GPU, and memory utilization using the RivaTuner Statistics Server (RTSS) overlay. Despite its age, RTSS still gets regular updates, and you can use CapFrameX to configure and control the overlay. If you don’t have RTSS installed, clicking to the Overlay page in CapFrameX will present you a link to the official download page.
(click to enlarge)
Once you have it installed, the Overlay page will look like the above. From there, you can control exactly what you see in the in-game overlay as well as how it is presented. You can also customize the overlay hotkey there as well as the refresh period, but don’t set the refresh period too low or you could actually impact game performance. Actually, the overlay itself can affect game performance slightly, so we don’t recommend running with it 24/7.
CapFrameX Also Presents An FPS Overlay In-Game While Testing
CapFrameX also has the ability to compare multiple benchmark runs, to show you sensor data collected during performance captures, and to help you analyze render-chain input lag, but all of those features are a bit outside the scope of this post.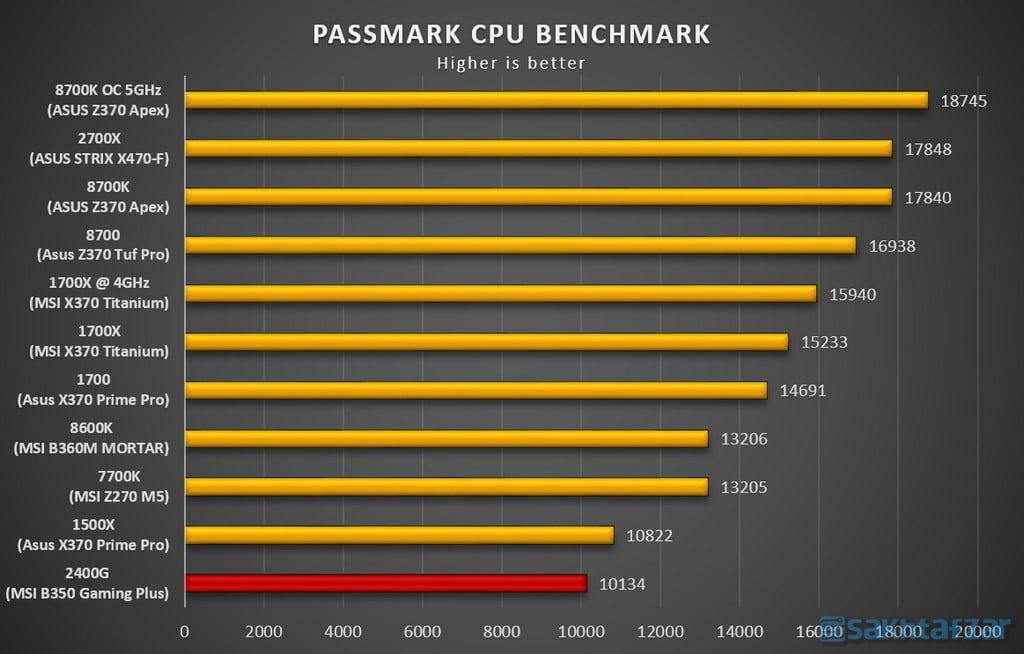
Regardless, here are GoW’s recommended system requirements, just so you’re aware of the game’s very basic horsepower needs:
- Requires A 64-bit Processor And OS — OS: Windows 10 64-bit Or Windows 11 64-bit
- Processor: Intel i5-6600k (4 core 3.5 GHz) or AMD Ryzen 5 2400 G (4 core 3.6 GHz)
- Memory: 8 GB RAM
- Graphics: NVIDIA GTX 1060 (6 GB) or AMD RX 570 (4 GB)
- DirectX: Version 11
- Storage: 70 GB available space
- Additional Notes: DirectX feature level 11_1 required
If you pick up God of War this weekend, let us know how it runs on your system (and what your system is) in the comments below.
PerformanceTest FAQ — Crash on Launch
I have Riva Tuner V6 installed
RivaTuner is a 3rd party graphic card software utility. It does frame rate display and video capture.
Riva Tuner is also called Afterburner and Riva Tuner Statistics Server (RTSS).
Unfortunately it is also buggy and can cause some 3D applications to crash.The observed crash occurs in Win10 in d3d9.dll (version 10.0.15063), which Riva presumably hooks into. Other older versions of d3d9.dll are OK it seems.
Crash dump information is
EXCEPTION_RECORD: (.exr -1)
ExceptionAddress: 00007ffe2d52fd0c (d3d9!CSwapChain::Reset)
ExceptionCode: c0000005 (Access violation)d3d9!CSwapChain::Reset
d3d9!CBaseDevice::ResetMain+0x921
d3d9!CBaseDevice::Reset+0xcc
RTSSHooks64+0x195c0Another crash dump seen caused by Riva Tuner
ExceptionAddress: 00007ff96cb9c416 (d3d9!CBaseDevice::GetBackBuffer+0x00000000000000c6))
ExceptionCode: c0000005 (Access violation)STACK_TEXT:
00000000`00000000 00000000`00000000 memory_corruption!d3d9+0x0Uninstalling RivaTuner / Afterburner can fix the problem.
Copying a old version of d3d9.dll (e.g. version 10.0.14393) into the PerformanceTest install
folder can also fix the problem.Update: After contacting the developers of Riva, they have released a fix in their V7 Riva Tuner release.
The change from their release notes are, «Hook engine is now using alternate shorter x64 hook trampoline to provide compatibility with
Windows 10 Creators Update Direct3D9 runtimes.» So this should also fix the problem.

Anti-virus software
Some Anti-Virus/Internet Security configurations have been known in the
past to prevent PerformanceTest from running without displaying any message
letting the user know what has happened (so no crash, and no error message).
Additionally PerformanceTest uses the Internet to download baselines from the web,
you may need to unblock HTTP(port 80) for PerformanceTest in your firewall for
this functionality to work.This is a rare issue associated with false postives
in the anti-virus software and hasn’t been seen for the last few years.
No 3D support
PerformanceTest used 3D graphics. But in some cases a system might have no support for 3D graphics. Possible reasons include
not having the correct video card device driver installed, using remote desktop software or running in a virtual machine.
PerformanceTest makes an attempt to detect the lack of 3D support and antomatically switch to a 2D interface. But you can
manually force this behaviour with /NO3D command line flag at start-up if desired.
Failure to collect system information
At startup PerformanceTest attempts to collect information about the system. The CPU type, the RAM type, temperature information
and lots of other details. Rarely this process can fail. The following command line flags can be used to disable individual sections
of the system information gathering, for faster startup or for bypassing sections that may have a problem.
/DontGatherGraphics
/DontGatherUSB
/DontGatherDisk
/DontGatherSMART
/DontGatherMemory
/DontGatherMemorySPD
/DontGatherWMI
/DontGatherSMBIOS
/DontGatherTemperatureIf you do experience this problem like this, we would like to know about it (maybe we can fix it).
Debugging other issues
Please see next item How to collect a debug log to help us with debugging for details on helping us collect a debug log to trace this problem.
find out the temperature and load of the processor and video card
Contents
- 1. MSI Afterburner settings
- 2. RTSS settings
Technical guides for PC gamers
- How to set up Windows 10 for games: maximum performance, game mode and other tips and video cards
- Loading a video card in games: how to check why it is not 100% loaded, what is disclosure
monitoring. There are several popular programs, but we will focus on MSI Afterburner, as it is free and has all the necessary features. We use it all the time to test gaming hardware and laptops.
There is nothing complicated here, the setup will take no more than 10-15 minutes. To get started, download the latest version of the program from the official website. On modern Windows, the archive can be opened with a regular explorer.
Afterburner comes with Rivatuner Statistics Server (RTSS), which is required for on-screen monitoring. Make sure that during installation there are checkboxes for installing both programs. Once the installation is complete, go to the settings.
MSI Afterburner 9 Settings0011
Turn on the classic skin first. It is much easier and more convenient. Click on the gear icon and go to the very last tab «Interface». Select Default MSI Afterburner v3 skin — big edition from the dropdown list. Apply the changes.
Do not exit settings. Go to the third tab «Monitoring». The sensor polling period can be set to 1000 ms. If you set the parameters too low, then the monitoring indicators may jump. It will be difficult to understand, for example, CPU usage. nine0003
Next, you need to check the box «Show in OED» those parameters that you want to see. First, click on the desired line, for example, “GPU Temperature”, and then check the box below.
You can also choose whether the information will be displayed: text, graph or text + graph. In most cases, it’s better to leave the text. But, for example, for the frame counter and frametime counter, it is convenient to set text + graph. Here you choose at your discretion.
Next, give the selected parameter a name. It is not necessary to do this, but it is still better to prescribe the names. Below, check the box «Override group name» and write the name of your processor or video card. Depending on what parameter you are calling. RAM can be left untouched, it is designated RAM by default. But if you want, you can specify the operating frequency and volume (example — 16 Gb 3200 MHz). Video memory can be referred to as VRAM to make it clearer. nine0003
Please note that some of the items may not be active. This is easy to understand by the lack of a check mark on the left. In this case, simply click on the outline of the checkmark and the item is activated. You can choose as you like, but we recommend displaying the following parameters:
- GPU temperature,
- GPU load,
- memory load,
- core frequency,
- CPU frequency (all available threads can be checked),
- RAM load,
- frame rate,
- frame time.
all available streams can be marked),
As for the popular indicators «Frame rate below 1%» and «Frame rate below 0.1%», they need to be measured at a certain period of time, activating the calculation manually. This is mainly for tests, but not on a daily basis. If you still want to enable it, then you need to configure the «Global monitoring hotkeys» at the very end of the «Monitoring» tab. nine0003
We also recommend assigning buttons to show or hide monitoring. Go to the «OED» tab and select the keys that you will use to turn the overlay on and off. In our case, these are F10 and F11, but you can put any that do not overlap with the game control. Thus, you can turn the overlay on and off at any time.
If there are two graphics cards in the system
If you have two graphics cards in the system: integrated and discrete, they will be displayed as GPU1 and GPU2. In order not to confuse and not display the indicators of the built-in card, look at which card is discrete. You can do this on the first tab «Basic». The first line is «Selecting the Leading GPU». nine0003
How to change the color of the overlay
If you want to change the colors of the overlay, click on the three dots next to «Show in OED». Then you can make, for example, the blue color of statistics for Intel processors or red for AMD.
How to take screenshots
We also recommend enabling the ability to take screenshots using Afterburner.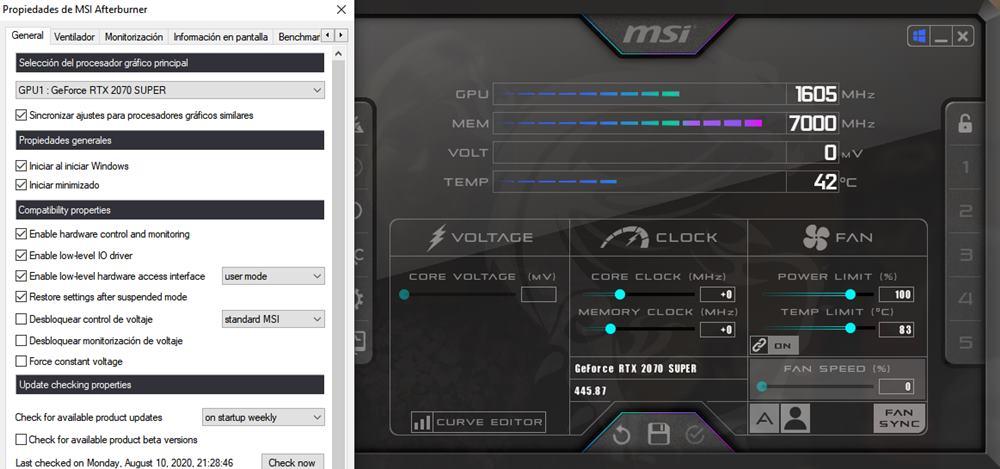 To do this, go to the «Screenshot Capture» tab and bind any key that is convenient for you. Format — JPG with quality 90-95%. Also, go to the «EOS» tab and uncheck «Show EOS on captured screenshots and videos» if you do not want the overlay to be displayed in the frame.
RTSS settings
Now you need to configure RTSS, but everything is simpler here. In the tray, click on the monitor icon with the number 60 to open the program. We are interested in several parameters.
- Start with Windows — autoload, we recommend enabling it.
- Framerate limit — limits the maximum FPS. nine0028
- On-Screen Display Shadow — shadow casting is better turned on for readability.
- On-Screen Display Fill — fill, improves readability, turn on as desired.
- On-Screen Display Zoom — scaling, leave the default on a 1080p monitor, increase the scale at 1440p and higher.
***
In this guide, we have considered only the optimal settings, without deepening. This is quite enough for everyday use and even for testing your new hardware. nine0003
- Loading a video card in games: how to check why it is not 100% loaded, what is disclosure
- How to set up an NVIDIA video card for games
- How to find out the temperature of the processor in Windows 10
TOP programs for monitoring the temperature of the processor and video card
Reviews (10)
Rating
-
1
-
2
-
3
-
4
-
5
Total votes: 11. Rating: 2.27 out of 5
Specialized programs for temperature control and monitoring (measuring) the operating frequencies of the video card and processor are most often used during games or other «heavy» tasks. It is at this point that the equipment is under maximum load and subject to overheating. By downloading the program for determining the temperature of the processor and graphics adapter, you will be able to respond in time to changes in sensor readings and reduce the load on PC elements. nine0186
Real Temp
- sensor and CPU speed test function;
- portability;
- there is a microprocessor load indicator.
- reports cannot be exported;
- non-localized interface.
- collection of various information;
- «Overheat protection» function;
- remote monitoring;
- BIOS version check redirects to the developer’s site;
- requires mandatory installation.
- monitoring of a large number of indicators;
- multifunctionality;
- low level access.
- has not been updated for a long time;
- Thoughtless adjustment of parameters can lead to equipment damage. nine0006
- compatibility with modern devices from different manufacturers;
- integrated screenshoter;
- performance graphing.
- no notification function;
- automatic fan speed control;
- «events» function;
- versatility;
- assignment of operations via the command line.
- low-level access can damage equipment. nine0006
- display of minimum, maximum and current values;
- portability;
- Report export.
- no notification function;
- reading data from different sensors;
- generating reports and uploading them to the Internet;
- resource analysis.
- it is not possible to display the numbers received from the sensors in a separate menu block.
- display of current and limit values;
- convenient tree structure of the interface; nine0006
- has a portable version.
- limited export toolkit;
- non-localized interface;
- the most «delicious» options are available after purchasing a license.
- clear tree structure;
- compatibility with various equipment;
- system testing;
- portability;
- support for all versions of Windows starting from Windows 95.
- license purchase required.
nine0074
The interface of this utility consists of only one window. However, in it you can get enough information to control current performance. The program displays the model, the current CPU load, the actual temperature values and the number of degrees that separate the real values from the critical ones. In addition, Real Temp captures the maximum and minimum values found during the session. nine0003
If necessary, you can run «stress» performance testing in the program, as well as test the performance of sensors.
Core Temp
nine0005 data logging.
A simple utility for determining temperature processor – program runs without problems on Windows 7 and even XP has an easy to understand interface. The Core Temp developers made sure that the user could get comprehensive information about the CPU (model, platform, chipset, and other data). The utility shows the current, maximum and minimum temperatures for each core separately, measures the energy efficiency of the «stone» and helps to update the BIOS drivers.
Separately, we note the presence of the «Protection from overheating» function. When a critical value is reached, Core Temp can send an email to E-Mail, turn off the PC or put it into sleep mode. nine0003
RivaTuner
A common utility for low-level settings for graphics adapters that allows you not only to find out the temperature of the GPU, but also to make adjustments to the operating frequencies of the core and memory, change the fan speed and other device settings. The utility is often used to «overclock» video adapters and unlock some device models.
The last update of Riva Tuner «released» at the end of summer 2009, so the utility is not compatible with modern equipment models. Because of this, the program received such a low score in the «Universality» section. nine0003
GPU-Z
nine0005 non-localized interface.
The utility collects various information about the installed graphics adapter. With its help, you can find out the model and technical characteristics of the device, information about the bus, BIOS version, the driver used, operating frequencies, temperature, cooler rotation speed, and other data.
Temperature monitoring is carried out in a separate “Sensors” tab, in this section, sensor readings are displayed online. There is no function to send notifications when certain values are reached. nine0003
SpeedFan
As the name implies, the main purpose of this utility is to control the speed of the cooler. This is exactly what the first versions of the program had. Over time, developers have expanded the functionality of the application. Today, Speed Fan is a multifunctional utility that allows you to take readings from all kinds of computer sensors (including temperature ones), as well as perform hard drive diagnostics and adjust the system bus frequency.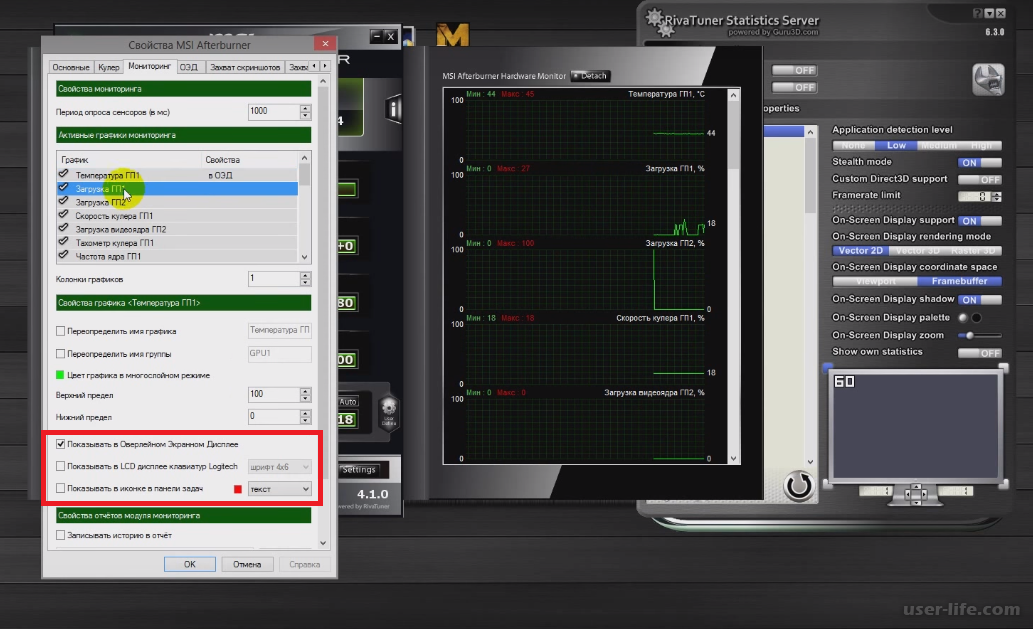 The «feature» of the program is the option to automatically change the cooler speed depending on the temperature. nine0003
Open Hardware Monitor
nine0005 limited information about passport characteristics.
Diagnostic software based on open source code. The program is designed for online monitoring of key indicators, including voltage data and information from various temperature sensors. The maximum and minimum values achieved during the program session are recorded in the corresponding fields; there is the possibility of «resetting» the indicators. The received information can be exported to a text report. nine0003
Interestingly, a number of developers use the Open Hardware Monitor source code as the basis for their products.
Speccy
nine0074
Multifunctional software for collecting information about existing equipment. The program allows you to find out the passport characteristics of devices, current productivity values, and monitor the resources involved. Separately, data is read from the temperature sensors of the equipment, this information is displayed among the list of characteristics.
Among the additional functions, we highlight the presence of various tools for exporting reports up to quick uploading of screenshots of the interface to the Internet. nine0003
Free version of Speccy contains basic options. The unlimited version of the utility allows you to receive detailed reports and includes technical support from the developer. Its cost is just under $20.
HWMonitor
Another system analyzer that allows you to download information from different PC sensors. In terms of its interface structure, the program resembles the standard system tool Device Manager. It uses the same tree structure, but much more data is shown in HWMonitor. For all parameters, three indicators are displayed — current, minimum and maximum value. Thus, you can find out the dynamics of temperature changes, monitor the fan speed. nine0003
Unlike Speccy, HWMonitor doesn’t have many export options. In fact, you can transfer the report only to a text document.
The unlimited version of the program additionally includes three options — remote access, a graph generator and the ability to display sensor values in the system tray. The price of a license key is from 20 euros.
AIDA64 Extreme Edition
nine0074
The history of this program is familiar to all «experienced» system administrators. The AIDA64 Extreme application has changed its name and licensing model several times during its existence and at one time was the only software for online monitoring and collecting information about the system. Even now, the capabilities of the program are impressive against the background of such solutions — the utility collects the most complete information about the PC, can test the system in various ways, supports equipment from various manufacturers and allows you to view all kinds of data online. nine0003
As with Speccy and HWMonitor, all AIDA64 Extreme Edition features are available after purchasing a license key. However, only in AIDA64 Extreme Edition, all options are blocked after a 30-day trial period. The cost of a license is just under $40.
As a specialized software for monitoring processor temperature, we recommend the free Core Temp utility.