Userbenchmark Reviews | Read Customer Service Reviews of www.userbenchmark.com
5-star
3%
4-star
<1%
3-star
2%
2-star
4%
1-star
90%
AM
Alexandru Mardari
1
review
Intentionally misleads users
Intentionally misleads users with biased results targeted against AMD.
There are already many videos and statements from reputable reviewers and websites about userbenchmark, so their untrustworthiness should be a wide-known fact at this point. I’m surprised they’re still in business.
Date of experience: December 13, 2022
Take a look
TK
T. kuvesi
1
review
If you wanted unbiased real world…
If you wanted unbiased real world information about CPUs and GPUs, this site is not it. The site owners have some strange beef with AMD and seems they manipulate scores accordingly.
Should probably look elsewhere if you want real data.
Date of experience: December 09, 2022
PC
Patrick C
1
review
CPUPro&GPUPro’s Delusional Review
CPUPro and GPUPro guys are braindead fanboys that keeps delusionally scraping their asses to AMD’s face and they can just see the weakness that they made up themself for AMD’s products.![]() Utterly disgusting pathetic maggots. This website definitely needs to be confronted with a lawsuit for defamation for giving false and fake information to the public.
Utterly disgusting pathetic maggots. This website definitely needs to be confronted with a lawsuit for defamation for giving false and fake information to the public.
Don’t waste your time and even money to read something in this braindead website.
Just go to the alternative websites for comparing CPUs and GPUs with detailed informations :
— Notebookcheck.net
— technical.city
— nanoreview.net
Date of experience: December 04, 2022
NO
Nomadish
1
review
This is useful tool for testing your…
This is useful tool for testing your own setup, especially since it is quick to run and tests all components.
However I don’t think it used be used to compare products for the purposes of making purchases. I was surprised by how userbenchmarks downrated AMD products when compared with other professional benchmarkers. There is an obvious anti-AMD vibe to their write-ups of the various products, with hysterical comments about social media trolls and marketing / PR budgets.
Date of experience: November 27, 2022
JO
Jevgenij Obzigailov
1
review
Installer and new UI is ruining experience
I always used UserBenchmark to quickly estimate system performance, and its older format — single EXE file without installation and stupid questions was perfect.
However, in NOV 2022 I’ve noticed that there is an installer — quite bad thing for single-use app. And when I launched it — there was some ugly 3D interface with sound, so I quit without trying to use it at all. Another annoyance is that there is no uninstaller — so user must manually delete everything from its Roaming profile and there is no warranty that some adware is left somewhere. My verdict — AVOID.
Date of experience: November 05, 2022
KW
Kristian Weichpart
3
reviews
So for anyone questioning.
So for anyone questioning.
They are faking reports, are biased as it gets, and their testing is a absolute scam. On the top they steal user accounts and re-write and post stuff without permission. Happened to me again after 6 months of not checking. So they used my account to post some bot lookalike reviews and i guess they can be sued for that. Keep away from them, they are scam turned nasty.
Date of experience: August 31, 2022
AA
Avro Arrow
3
reviews
It should be called «Loserbenchmark».
 ..
..
I’ll start by saying that I am a tech expert who has been building PCs since 1988 and I worked at Tiger Direct for years so I know what I’m talking about here.
Tech experts like me refer to Userbenchmark with the much more appropriate term of «Loserbenchmark» because it is easily the WORST benchmark listing that we’ve ever seen. The Intel bias makes me truly believe that Intel pays them off because I have never seen such anti-AMD numbers in my life anywhere else. I’ve even read an article on Techspot in which Loserbenchmark changed its «methodology» to hamper AMD’s Ryzen 3000-series scores.
All in all, it’s a scam site that lies to you. It’s about as accurate as «Info»Wars or the National Enquirer.
Date of experience: October 01, 2022
DA
Daniel
2
reviews
AMD Haters
AMD Haters. Just read the text below the 7600x vs the 13600k. Redicoulus that this site has such a high google ranking.
Date of experience: November 14, 2022
KY
Kyle
2
reviews
SEP 2022 Update sucks
The new app they have created drastically drains performance but isn’t taken into account on the benchmarks so the performance looks awful due to the app being so cpu and gpu intensive. The 2022 SEP update has ruined userbenchmark
Date of experience: September 30, 2022
KE
Kevin
3
reviews
Unreliable at best
This benchmark provides hand written results with weighted metrics that don’t reflect actual performance.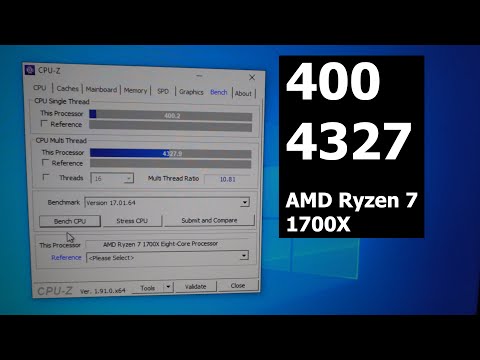 Within my organization, it’s actually a written rule that user benchmark scores are not credible in any way.
Date of experience: September 16, 2022
Max Payard
1
review
Only good for two things
There exist only two things Userbenchmark is good for.
1. To view if your components are performing well compared to similar models. That is to say that their service that verifies the percentile performance of a given component can sometimes be helpful, although, it is usually more for fun than for anything meaningful.
2. It’s pretty funny to read the unbelievably biased reviews. Gold star for that alone.
I hope Userbenchmark continues running their services as they are today, they’re always entertaining and never fail in giving a good laugh.
In seriousness, please don’t use this website.
Date of experience: August 18, 2022
Ashley
7
reviews
Clearly a stock market manipulation /…
Clearly a stock market manipulation / click bait website written by completely bias liars aiming entirely to paint AMD products in a bad light.
The extent of the bias is so significant, it likely borders on grounds for a libel case lawsuit by AMD.
Date of experience: July 30, 2022
HK
Henry K.
1
review
Don’t be fooled
Don’t be fooled, Userbenchmark isn’t meant for actual benchmarking.
It’s a funny college summer project that stuck around because it drew clicks, but don’t go here for benchmarks.
They’ve got actual software, but the points don’t matter.
Date of experience: July 30, 2022
JD
JDM
2
reviews
Their needlessly biased reviews seem to…
Their needlessly biased reviews seem to value the wrong weighted metrics for real world scenarios. They should by no means be counted on for buying decisions as they inexplicably seem to have several hills they are willing to die on that speak more to an inherent, nonsensical bias.
Date of experience: May 29, 2022
AQ
Acid Quotient
1
review
AMD isn’t trash, Userbenchmark
Userbenchmark is maybe one of the worst CPU/GPU comparison sites in existence. They only trash on AMD and favor Nvidia and Intel, who make (slightly) worser products or an equivelant of AMD’s offer. Don’t use Userbenchmark as they tell you BS. I cannot, will not, use this site anymore. They do have a huge list of products to compare, but that’s the only pro I can think of.
Date of experience: November 08, 2021
DD
Don’t Doxx Me TrustPilot
2
reviews
Don’t trust it with CPUs and GPUs
It’s probably good for anything else other than testing CPUs and GPUs, but they’re generally biased towards Intel, dissing AMD in any way they can. It’s if Intel’s doing the morally questionable (but somehow legal because the governments have crushes on corporations) tactic of paying UserBenchmark and other similar sites to make Intel look better (even when they’re not). That might sound terrible and flat-out scummy behavior from Intel, but trust me, other corporations have done MUCH worse (like Nestle, who participate in child trafficking and take water from areas that need it the most) and they’re still left unscathed because governments and corporations are pretty much married at this point, so hoping Intel gets punished for this behavior is right-out. UserBenchmark needs to get a new owner and new reviewers that don’t take sponsors if it wants to get its reputation out of the circus basement.
I was also foolish enough to install their software, and they didn’t have any manual uninstaller, nor did their app show up on add or remove a program, making uninstallation extremely difficult. I don’t know why they decided to not include an uninstaller, but it’s extremely scummy no matter what the reason is.
I can’t say how good their other comparisons are, but I’m assuming they’re better since next to none of them are made by Intel or AMD, but if you want to stay 100% safe, don’t trust any of their reviews, since who knows if they’re sponsored by other companies or not. Some other company like say Corsair might be silently paying UserBenchmark to praise their RAM sticks and SSDs, and might be taking advantage of Intel possibly paying UserBenchmark to hide in the shadows and get those foolish enough to think UserBenchmark at least doesn’t suck in RAM and SSD reviews mislead.
Tldr: They’re biased towards Intel because Intel probably pays them. Avoid this site for CPU and GPU reviews.
Date of experience: November 30, 2022
Aleksandar Puharic
21
reviews
Shameless bias towards Intel and nvidia
I don’t know whether are they sponsored by Intel or not, but all reviews are highly biased towards Intel. If you check any Intel’s CPU review, you will almost always find praises. When you check AMD’s CPU reviews, you’ll face negativity towards AMD product and praises towards Intel.
It’s very obvious and annoying. I expected an unbiased, neutral review, nothing more, nothing less.
Date of experience: August 02, 2021
NI
NightmaREEZ
1
review
One of the most misleading tech sites there is, gamers should look elsewhere for product comparisions.
Tends to remove reviews they don’t agree with. If you tell why you prefer AMD over Intel, your review is gonna be deleted rather sooner than later.
They also are blantantly anti-AMD. Rather than pro Intel or Pro NVidia.
Interestingly 11900K is on the top spot of their cpu charts, even if multiple benchmarkers on youtube have shown that it even struggles to beat their previous flagship in 10900K at times.
Date of experience: April 12, 2021
JP
Jamie Powell
35
reviews
Cost me thousnads on a wrong decision
Spent thousands on an Intel workstation / gaming laptop because the site recomended an intel i9 series CPU over a Ryzen 5000 series AMD CPU. Whiel I do tend to buy intel in the past I should have gone AMD. The site did’t get it a little bit wrong, its clearly in favour of intel based hardware and possibly others I just don’t know about yet, Don’t use this site to make your purchases. Its results are flawed.
Date of experience: April 13, 2021
RI
Riemman
1
review
Site is intentionally lying to their readers
Intel i9 11900k is number one cpu of the market and ryzen 5950x is the 17th? What the hell? How is that even possible? 11900k is slower in most tests than 10900k.
I have several INTEL cpus, even today, so believe me I am not a AMD fan boy.
Be careful this site is intentionally lying to their readers. You could even say that they are a scam. And it is on purpose.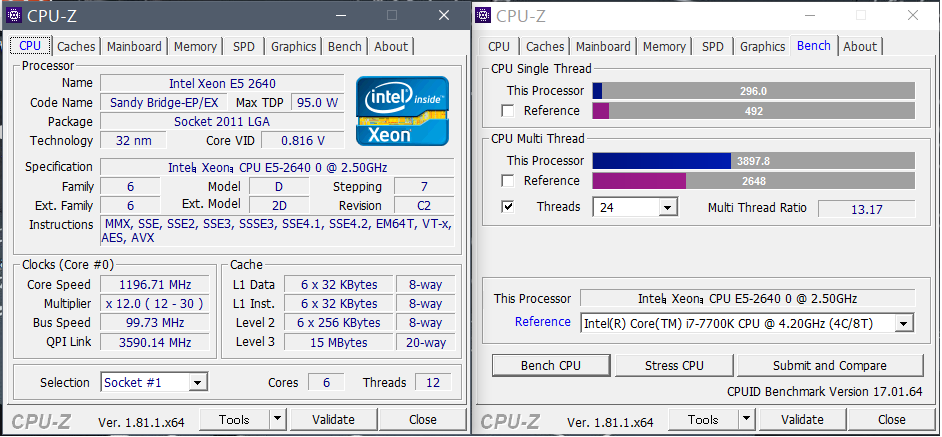 That is really scary. BE AWARE.
Date of experience: April 03, 2021
Is this your company?
Claim your profile to access Trustpilot’s free business tools and connect with customers.
Get free account
Take a look
About Userbenchmark
Information provided by various external sources
Top Market Research & Genuine Product Insight from our Users. Quickly find category leading products with UserBenchmark.
The Trustpilot Experience
Anyone can write a Trustpilot review. People who write reviews have ownership to edit or delete them at any time, and they’ll be displayed as long as an account is active.
Companies can ask for reviews via automatic invitations. Labeled Verified, they’re about genuine experiences.
Learn more about other kinds of reviews.
We use dedicated people and clever technology to safeguard our platform. Find out how we combat fake reviews.
Here are 8 tips for writing great reviews.
Verification can help ensure real people write reviews about real companies.
It goes against our guidelines to offer incentives for reviews. We also ensure all reviews are published without moderation.
Take a closer look
UserBenchmark offers explanation for changes to CPU score weights
A hot potato: Benchmark comparison site UserBenchmark has defended its decision to make changes to the way it weighs CPU average scores, thus favoring single-core performance. The response likely won’t resonate well among the website’s most vocal critics.
This past week a portion of the enthusiast community was lit aflame with controversy over UserBenchmark’s decision to adjust its CPU scoring system. While not a popular destination among hardcore users or reviewers, UserBenchmark remains a widely used tool for the general consumer and its comparisons rank highly in Google search results — Tom’s Hardware notes the website serves nearly 10 million visitors each month.
Enthusiasts were taken back by the website’s questionable decision to adjust its scoring algorithm in favor of single-threaded performance, inflating scores in such a way that doesn’t appear to be entirely representative of the processor in question. Previously, UserBenchmark apportioned the average score as 30% of the single-threaded performance, 60% of the quad-core performance, and 10% of the multi-core performance. Now, the weighted average is 40% single-core, 58% quad-core, and only 2% multi-core.
They claim this is to offset «unrealistic overestimating» for the new core-heavy Ryzen 3000 series, and the new score weighing indeed doesn’t show AMD’s newest chips in quite as favorable a light — a point of contention among AMD fans, to be sure.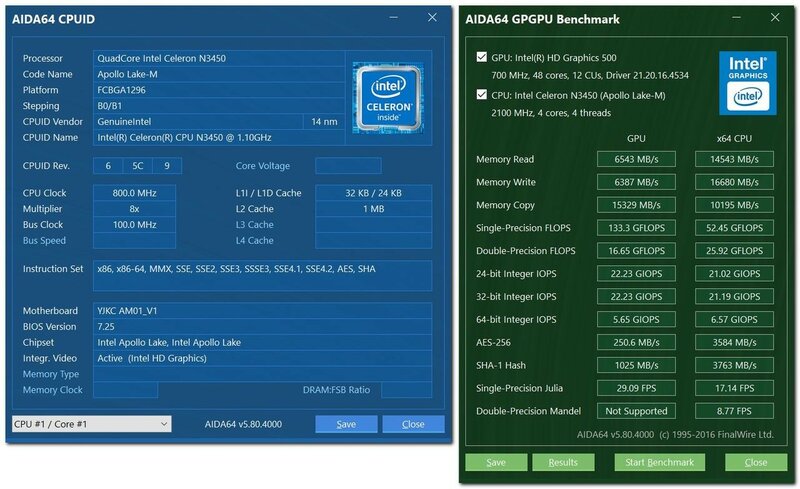 UserBenchmark updated its FAQ section to address the outcry.
Shortly after the Ryzen 3000 release, which we welcomed emphatically, we noticed that our CPU gaming and desktop estimates were unrealistically overestimating all CPUs with core counts beyond 8 so we corrected the estimates. Our underlying data points for single, quad and multi core performance remain unchanged and are clearly visible together with gaming, desktop and workstation scores on each of our product and comparison pages. (…) At present we estimate that our CPU gaming index is accurate to around 8%. By rebalancing the weights in favor of more cores we can probably reduce the error to around 5%. Even after a rebalance, the 4 core i3-9350KF would still, on average, offer a similar gaming experience to the 18 core i9-9980XE, a fact which many of our most vocal critics seem to find hilarious…
In UserBenchmark’s defense, they do acknowledge readers need to look deeper than the top of the page to get the big picture. However, the bizarre choice to weigh the average score so heavily in favor of single core/thread performance is hard to ignore. Especially when multi-core and multi-threaded performance is only going to become more important.
While I won’t take sides here, I will point out professional reviews are the best way to measure a CPU’s performance and glean a purchasing decision. If you haven’t already, check out TechSpot’s Ryzen 3000 coverage.
CPU stress test — what is it and how to do it?
- Why stress tests?
- CPU-Z
- Prime95
Stress test is a procedure aimed at exerting maximum load on the central processing unit (CPU). This is done in order to determine the performance (maximum bandwidth) of the CPU and / or the stability of its operation for a long time under heavy computing loads. Let’s figure out why and with the help of what programs stress tests are carried out. nine0011
Why stress tests?
In practice, stress tests are carried out for the following purposes:
- Determination of processor performance under continuous load (not to be confused with short-term performance tests).
 This is the most common reason for CPU stress testing among general users. Many testers allow you to compare test results with test results of other users, for which the data is uploaded to the network and presented in the form of easy-to-understand and read tables. nine0004
- Detection of errors in the operation of the processor under load, leading, for example, to freezing the computer or “crashes” from programs. In this case, we are talking about testing the stability of the CPU. For this purpose, stress tests are mandatory carried out after the overclocking of the processor (manual increase in the operating parameters of the processor in excess of the recommended values set by the manufacturer). If the computer freezes or even shuts down during stress testing, it means that overclocking was not done correctly (i.e. the user increased the CPU operating parameters too much). nine0004
- Evaluation of the efficiency of the cooling system. During stress testing, the processor gets very hot, so the user will be able to evaluate how well the cooler or liquid cooling system works, whether errors were made in the installation of equipment (for example, the user forgot to apply thermal paste to the processor).
 If everything is in order with cooling, then during the entire duration of the test, the CPU temperature will not reach the value at which the automatic shutdown function of the computer will work (usually it is about 80 degrees, but it all depends on the settings of the BIOS / UEFI chip). nine0004
Now let’s look at how processor stress testing is performed using several popular programs as an example.
CPU-Z
Free program
CPU-Z is one of the most famous free programs, including for CPU stress testing. It is characterized by maximum ease of use, allows you to compare test results with the results of other CPU-Z users. To run stress testing using this utility, just follow these simple steps:
- Go to the «Bench» tab and click the «Stress CPU» button in it. You can first change the type of testing in the «Benchmark» list, as well as set the number of threads that will be involved during the stress test, but we decided to leave all the default settings:
- Next, it remains to wait for the completion of testing.
 How long it takes depends on the characteristics of the processor. A stress test is carried out for each individual core, and the more there are, the longer the test will last. nine0004
- When the test is completed, the «Submit and Compare» button will become active. Clicking on it will open a page in the browser with test results of other CPU-Z users, where you can find out what place the tested processor took in the overall rating.
Prime95
Free program
The Prime95 program is well known among overlockers (users «obsessed with the idea» of overclocking all the processors that fall into their hands). Using integer and floating point instructions in load tests, the utility provides the processor with a consistent and verifiable workload to test the stability of the CPU itself and the three levels of cache (L1, L2, and L3). Prime9 program5 also supports multi-processor/multi-core systems, which can provide the user with a powerful tool for stress testing with high and long-term load.
To load the processor, Prime95 «forces» it to look for the squares of large numbers, for which the Fast Fourier Transform (FFT) algorithm is used.
The Prime95 utility is quite easy to use. To run a stress test in it, do the following:
- When you first start the program, click on the “Just Stress Testing” button (if you do not want to join the GIMPS community). nine0004
- If this message does not appear at startup, call the “Options” menu and select the “Torture Test…” item in it:
- A window with stress testing settings will appear on the screen, which is worth considering in a little more detail.
As you can see, in the «Run a Torture Test» window there are 5 testing modes, not counting the deactivated one, which cannot be clicked on (perhaps this test cannot be run on an existing processor). By default, the «Blend (all of the above)» option is selected, which implies the alternate use of all the above 3 testing modes (they differ in the minimum and maximum size of the fast Fourier transform):
- Smallest FFTs.
 Stress testing the processor without using external memory (RAM). Data for subsequent calculation will be stored in the internal memory of the CPU — caches of the first (L1) and second level (L2). The stress test in this mode will be subjected not only to the processor, but also to the internal memory itself. The labels «high power» and «heat» in the description of the test mode indicate that the CPU will consume a lot of electricity, and it will also get very hot.
 - Small FFTs. Unlike the previous one, this mode additionally loads the first level (L1) of the CPU cache. Testing involves using the maximum available power supply and, as a result, leads to stronger processor heating than in the previous mode. nine0004
- Large FFTs. And this stress test is designed to check the stability of the memory controller and the memory itself (RAM).
- Custom. A mode that allows users to independently change the stress testing parameters, namely:
- Set minimum (Min FFT size)/maximum (Max FFT size) FFT size
- Set the amount of memory that will be allocated for data storage (Memory to use).
 If you check the “Run FFTs in-place” checkbox, then all the amount of RAM available on the computer will be allocated for the Prime9 program5.
 - Set the time in minutes for CPU load by calculating each of the FFT size value.
Note that in the upper part of the testing settings window, the user can set the number of processor cores that will be subjected to a stress test (Number of cores to torture test), as well as enable/disable the option of multi-threaded calculations (Use hyperthreading).
At the start of testing (immediately after clicking «OK»), built-in windows will be created in the main program window — equal to the number of processor cores. The test results will be displayed in the main of the built-in windows — «Main thread»:
Prime95 can also be used as a service that continuously monitors the stability of the processor. To do this, activate the autorun option (Options > Start at Logon), set the utility operation parameters in this mode (Options > Preferences), limit the computer resources consumed during testing, if necessary (Options > Resource Limits). But we will not consider the operation of the program in this mode here, because this is a slightly different topic. nine0011
How to test the processor and RAM? — i2HARD
A personal computer stress test is one of the operations that sometimes have to go through when buying a new PC and having problems, or when purchasing components on the secondary market or in conditions when we overclock or undervolt the processor, RAM.
Contents:
- Stress test — what is it?
- Test scripts
- Processor 9 stress test software0004
- Prime95
- AIDA64
- y-cruncher
- OCCT
- RAM stress test
- Prime95 (Blend Test)
- y-cruncher
- TestMem5
- Memtest86
- Memtest86+
- System monitoring during stress test
- HWiNFO
- Conclusion
Stress test — what is it?
What is a stress test? This is a form of testing that is used to determine the stability of a system or module under conditions of exceeding the limits of normal operation. © Wikipedia
The very idea of testing is to create the maximum possible load or load that you will not go beyond during normal use of the computer.
Test scenarios
Thus, we have come to the conclusion that there can be two test scenarios. The first type is synthetic tests. Synthetic tests allow you to load computer components in a way that they will not be loaded in everyday tasks. Of course, if the priority is to use the processor in high-performance tasks, then such testing will not be superfluous.
nine0011
In the second type of testing (or testing on real tasks), it helps to keep the computer stable and the performance we need only where we want it to be. Such testing implies that we know temperature, consumption, or other situations where incompatibility occurs. Of course, it is possible to carry out testing without the programs described below, using only those application packages that we need or only in the right games.
We’ll look at the most popular and proven software and show you how to run it correctly. nine0011
Processor stress test software
There are various situations where you need to stress test your processor. So, it can be overclocking, undervolting, checking the maximum heating.
Prime95
One of the most popular computer testing tools is Prime95. It finds the Mersenne numbers using the processor, which creates a large load. If the computer can withstand the stress test for 1-2 hours, then we can conclude that everything is fine and overclocking / undervolting was a success. If, during testing, you notice the appearance of errors (errors) in the test, «stuttering» or restarting the computer, then it will be necessary to check further. nine0011
On the first run we select the stress test menu or in the menu Option -> Torture test… we can select several settings, list them from top to bottom. The number of cores for the test and a checkbox for testing hyperthreading or multithreading simulation, in other words, all available threads and cores for our processor. Then the Small FFTs test, which allows you to test the L1 / L2 cache, high consumption / heating / stress test of the CPU, in the second Small FFTs mode everything is similar, only now the test will be carried out with the maximum consumption for our processor. Medium FFTs allows you to test different cache levels, including level 4. Level 4 was found only on a few processors and is not used in modern versions, so the menu is not active. Large FFTs allows you to stress test the memory controller and the RAM itself. Blend performs a comprehensive test for all the possible items listed above. The Custom mode allows us to flexibly customize the test itself. We also have the option to disable AVX instructions when testing. nine0011
For example, one of the options for testing on AMD Zen 2 could be the following set of settings:
Unfortunately, the test does not determine which of the components causes stability on its own, unless only the processor is being tested.
Download here.
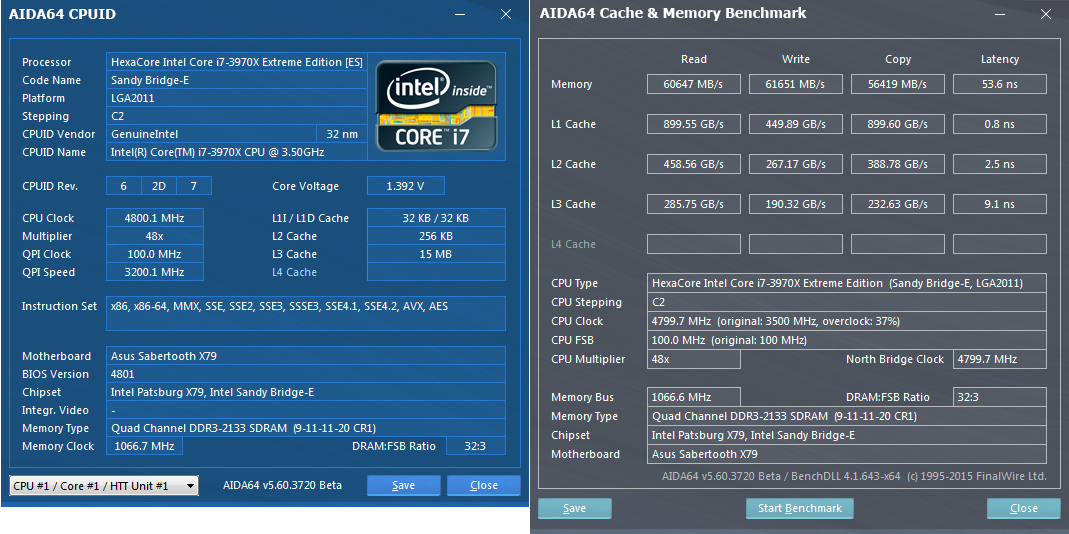
AIDA64
Another equally popular testing tool. Unfortunately, the full package costs some money, but even the TRIAL version will be enough for our purposes.
nine0010 To run a stress test, go to the Tools menu and then select System Stability Test. We will be greeted by the System Stability Test window, in which we can choose one of the options: Stress CPU, FPU, cache, system memory, or run all stress tests at the same time. Usually, in order to test the processor, it is enough to select Stress FPU. However, if it is clear that the load is not enough, then it will be enough to add Stress CPU to Stress FPU. The test itself is not a guarantee of 100 percent stability, but in most simple tasks it will give us the opportunity to keep the system in working condition. nine0011
We go to the site and select the Extreme version for download. Without a key, a Trial version will be available to us.
y-cruncher
y-cruncher is a program that can calculate pi and other constants up to trillions of digits.
Since its launch in 2009, it has become a popular performance and stress testing application for overclockers and enthusiasts.
We start y-cruncher, it displays information about our processor and some data on the operating system, which mostly refers to processors. In order to start the test, you need to go to the Component Stress Tester by entering the number 1 in the command line. Next, the test settings will be available to us. We can change the desired test settings by entering the desired number in the option line. After editing the settings, enter the number 0. Often the standard settings are enough, if you need a little more, then you can load some configuration file by entering option 9 in the line/10.
OCCT
OCCT is a fairly complex CPU stress test that is often neglected. With this test, we don’t get much heat like the Prime95 with AVX, but it’s a good choice for long-term stability tests. The software can log a number of important parameters, running in an endless loop or stopping after a certain period of time. You can download OCCT here.
OCCT with data set «Small»
This option is the heaviest of the four available options, however it is not as hard on the CPU as Prime95 with AVX and Small FFTs. However, we can say that it loads more memory than Prime95. Good for long CPU and memory test.
OCCT with data set «Large»
The overall load on the components is reduced, making this test suitable for laptops that do not have to be exposed to extreme temperatures.
Memory, in particular, is loaded more heavily than in Prime95. This is the second version of another memory stress test mode.
OCCT with «Large» data set, «Extreme» mode
The test is similar to the previous one, but it gives more load in the «Large data set» mode.
OCCT Linpack
Linpack’s OCCT implementation creates a complex overall load, although it does not reach the values we get in OCCT with the Small dataset of this program. We can still use the test as an additional memory stress test. nine0011
In addition to these tests, there are many others, but they are less popular. You can also test the processor in real conditions, namely in games or work applications, but be prepared for crashes or reboots. This option also has a place to be and many use it as the main one.
RAM stress test
Now let’s look at RAM stress tests. Often we can meet both with a marriage of RAM and the impossibility of working in XMP / EXPO mode. In addition, overclocking or undervolting memory also forces us to conduct additional stress tests. Do not forget that some of the problems with instability in the tests above can be caused by RAM, so some testing programs can also be used to test memory.
nine0011
If there are already problems when turning on a new computer or new RAM, then testing in this case makes no sense for us. It is enough to pull out one of the memory sticks one by one, start the computer and see if there are problems booting the system. It may also be that the motherboard itself is faulty. A malfunction of the slots on the motherboard can be determined by installing RAM in each slot in turn and checking its operation.
Prime95 (Blend Test)
One of the easiest ways to test RAM is with Blend Test in Prime95. This test will be useful in situations of overclocking the processor and RAM, but it will not always be able to help you identify errors in the memory itself.
y-cruncher
In general, as with Prime95, no one bothers to test the RAM using y-cruncher, the procedure is similar to that described a little earlier.
TestMem5
One of the most popular memory testing software, works up to DDR5. It should be noted that the testing time will depend on what the timings are and how much RAM is used. Also, it will most likely need to be tested several times due to the fact that the memory does not all heat up at once, it all depends on the heatsinks, so it will take some time to check for errors during heating. Now let’s move on to a little instruction. nine0011
After following the link and unpacking the archive, we are in no hurry to launch the program. We go to the tm5 configs folder and decide which option we will test.
Most recommend testing [email protected] and 1usmus_v3.cfg. After we have decided, we copy this file to the bin folder, which is located at the root of the main program. Next, right-click on the Cfg.link file and select Open with … In the list, use notepad. We change the existing path to the path in which the bin folder with our configuration file is located. For example, you should get the following: D:\Users\Anem\Desktop\TM5\bin\[email protected]. After that, we return to the program itself and run it as an administrator. If everything is done correctly, then no errors will be displayed, and in the program we will see Customize: Extreme1 @anta777 or 1usmus_v3, depending on which file was specified. nine0011
At the end of the work, the program will display a message in English that the test has been successfully completed. If errors start to appear in a small window, then you should not wait for the end of the test. This means that there are memory problems and we need to check the voltage, timings, resistances.
The program also has the ability to set your own settings, but those who want to test their memory more than the time set by the authors in their configurations can edit the configuration file. To do this, right-click on it in the same way, select Open with … and click on notepad. In the list we find the line Cycles=3 and change the number up. Thus, we change the number of cycles for the test that the program will conduct. This can also be useful in cases where we do not have enough time to heat up the RAM during a standard test. Decreasing the value will reduce the number of cycles and the test will run faster, but this is not recommended due to the fact that during the test the memory will not have time to heat up and we will not be able to check the stability when heated. nine0011
Memtest86
Moving on to the next RAM testing software, Memtest86. If earlier we considered programs that run from under the operating system, then this software runs only from UEFI. It would seem that this is not so convenient when you need to restart your PC and be left alone with white inscriptions on a black screen for a while. However, even when running tests from under the operating system, we do not have to use the computer all this time, so programs in the OS or UEFI, by and large, do not really matter. Due to the fact that we are working with UEFI, we will need an external media, for example, a USB flash drive. nine0011
The program’s website has a large user guide for working with the program, but we will focus only on installing the program and its simple use. This scenario is enough for almost all users, if you suddenly become interested in something more and there is a desire to get to know the software better, then it is better to familiarize yourself with the proposed guide. MemTest86_User_Guide_UEFI (English only).
Let’s move on to installing in Windows (note that you need to use an empty flash drive):
nine0011
1. Download MemTest86 Free.
2. Unpack the contents of the archive to any folder on your computer.
3. Connect the USB flash drive.
4. Run the ImageUSB program, which we unpacked along with the contents of the archive.
5. Select our USB flash drive from the list (Step 1).
6. Select from the list ‘Write image to USB drive’ (Step 2).
7. If there is no entry in this line, then click Browse and select memtest86-usb.img, which should be in the folder where we unpacked the file (Step 3).
nine0011
8. Press the ‘Write’ button (Step 4).
9. After confirming several pop-up windows, we get a bootable USB flash drive.
Now we can restart the computer, boot from the flash drive and start testing the RAM. To do this, just click Start Test in the left column and testing will begin. If errors are found during the test, then, without waiting for the end, we reboot and start looking for what caused the error (high / low memory voltage, timings, etc.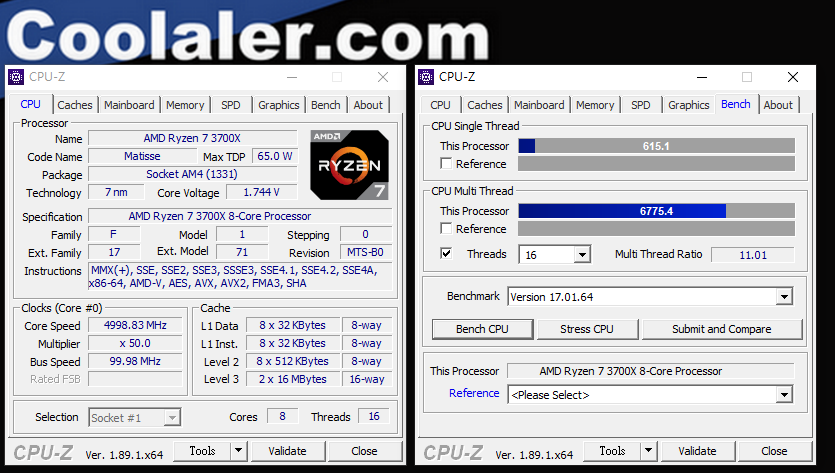 )
)
Various versions exist, including those for Linux, but most use the Windows operating system; the instruction in the guide is written in an understandable language for any OS, although in English.
Download here.
Memtest86+
This software is free and open source compared to the previous software. The developers emphasize that Memtest86+ has nothing to do with Memtest86. nine0011
Proceed to install Memtest86+. In this case, the program works similarly to Memtest86. We need to install it on a flash drive.
1. Download the Windows USB Installer (32/64 bits) from the website.
2. Connect the USB flash drive.
3. Run Windows USB Installer (32/64 bits).
4. Click I agree
5. Select a USB flash drive. The program warns that all data on the flash drive will be deleted, so first move the files you need. In addition, we can select (Recommended) Check this box if you want to format Drive E:\ The label E is indicated because on the test computer, flash drives are defined as a drive with label E. On other computers, it can be any other letter. After selecting the option, we format the flash drive and change the file system to Fat32.
nine0011
6. Click Create.
That’s it — a bootable flash drive has been created; now we can reboot and start testing the memory.
After loading from the flash drive, the program will start, wait for a pause so that we can configure if necessary. We just wait a bit and the test automatically starts. Further, everything is standard: if the test finds an error, then we stop it and proceed to eliminate errors; if it ended without errors, then the memory with the current settings has been checked and we can get to work or more thorough testing in the tasks we need. nine0011
You can download it here in the Download section.
Monitoring the system during a stress test
Currently, there are many different software to provide monitoring of the system. Someone uses them on an ongoing basis, and someone during a stress test. We will monitor the temperatures of the processor and RAM during the stress test in those programs that run from under the operating system. Yes, this cannot be done with Memtest86 and Memtest86+, but if possible, it is better to use monitoring programs. So we can quite simply determine if there are problems in terms of temperature or, for example, using Prime95, further determine if there are problems during the test with cores.
There will be only one recommendation in this section. This does not mean that something else cannot be used, but from the tested programs there were moments when the readings from the sensors either hung or showed some exorbitant values, which can lead to a stupor and make you additionally look for a problem where it really is. case no.
HWiNFO
A fairly powerful tool for monitoring data from all sensors available on the computer. With HWiNFO64, you can track various components in a form that is convenient for us. When running this tool, we can monitor the temperature on the processor, video card, RAM, motherboard, fan speed and the percentage of loading of a particular component. Also, third-party utilities often use the HWiNFO libraries or ask that the program be launched for widgets to work. nine0011
To download the program, just select a stable or beta version and install or a portable version on the site.
After installing or extracting from the archive (in the case of the portable version), run the program and see the following window:
Two types of display to choose from:
— Sensors-only
— Summary-only (Summary only)
When you select Summary-only (Summary only), we have access to general information on the computer: processor, motherboard, RAM, video card, operating system, drives. We are least interested in this from the side of the stress test. nine0011
We restart the program, remove the choice from Summary-only (Only summary) and put on Sensors-only (Only sensors), but now everything is much more interesting. The program is available in Russian, so if the OS uses Russian, then HWiNFO will use Russian by default. The example does not use Russian because English names are used everywhere, including in the BIOS, and they look more compact.
The abundance of indicators makes us dizzy, but we can hide indicators that are unnecessary for us — for example, in the example 56 values are hidden. To hide, just click on the indicator that we don’t need and click Hide. So the display becomes more compact and with the necessary parameters. nine0011
Conclusion
We’ve looked at several stress test tools. Everyone will stop at their own set of programs. Someone wants to test everyone — the choice is individual. In most cases, a stress test is needed when overclocking components, thus we check them for stability in various modes. Of course, the use of an undervolt will also require additional stability testing, while the temperature indicators will no longer be so critical. In rare cases, you have to test the assembly for stability without overclocking due to the fact that no one is safe from defective components.