21+ Programs to Analyze and Benchmark Your Hardware
You’ve just bought a new gaming desktop, or a laptop for the office. Maybe you’ve upgraded your computer with a new CPU and motherboard. You might be into overclocking and tweaking your system to make it run as fast as it can. But do you know exactly what you’ve got? Has your machine got the parts it’s supposed to have? How well is that PC actually working? These are really important questions.
That’s why it’s wise to get yourself some programs to check out what’s inside the case and test your rig against other machines or compare them with results shown in hardware reviews.
There’s lots to choose from, but we’ve compiled a list of 21 programs that are great for analyzing or benchmarking your devices — whether you’ve got a mobile phone, laptop or desktop PC running Windows, Linux, or macOS, we’ve got you covered.
The software applications suggested in this article will scan your device and check for information about the hardware contained within. Many of the applications we like and use regularly are completely free, although a few only unlock their full potential with a purchase. In no particular order, let’s get on with the list.
Part 1: Programs to Analyze and Monitor your PC
CPU-Z
Download Now from TechSpot | Website: CPU-Z
This little program has been around for over 20 years, and is the work of software developer Frank Delattre, based in France. Modern CPUs contain a set of instructions, that when activated, provide a wealth of information about the processor: brand, model, number of cores, cache levels, and so on.
In addition to the brains of the computer, it also displays similar information about the motherboard and system memory. The original version was pretty basic, but it now contains a lot more detail, and provides an overview of the graphics card, too.
There app also contains a simple CPU benchmark and stress test; you can upload your results onto their website and share your statistics — not bad for something costing exactly zero dollars! CPU-Z is available for Windows PCs only, and there’s a version for Android, too.
GPU-Z
Download Now from TechSpot | Website: GPU-Z
Next up is another hardware-specific program, GPU-Z appeared back in 2007, and is the work of the team at Techpowerup. It works in the same way as CPU-Z does, using an instruction set to gather information about the specifications of the graphics card.
There’s no benchmark tool in this one, but it can monitor and log the output from the settings and sensors on the card, such as clock speed, temperature, voltage, and usage. The tool provides a link to Techpowerup’s GPU database, so if you want to know more about your graphics card, hit the Lookup button. GPU-Z is available for Windows only and is free.
HWinfo
Download Now from TechSpot | Website: HWinfo
The next program in our list takes the opposite approach to CPU-Z as it tells you about everything it possibly can in your computer. There’s so much detail, it separates the information into 3 windows: a system summary, a full report, and active sensor readings.
The summary window is clean and informative, but it’s the full system report that’s the jewel in the crown. While much of the data can be gleaned from Windows’ Device Manager (Win Key + X, then select it from the list), but the data is presented in a far better way, and it’s a lot more comprehensive.
The active sensor readout is just as extensive, including data from the CPU, RAM, motherboard, graphics card, case fans, storage drives, and so on. Want a more visual way of displaying the statistics? Just click on any entry in the readout list and HWinfo will show it as a graph (see here).
HWinfo has been in circulation for over 20 years now, and it gets updated almost every month. And yes, this one will cost you absolutely nothing, too. The developer of the tool, Martin Malík, deserves huge praise for his long-running project. The program supports 32 and 64-bit versions of Windows, and there’s even one for DOS!
Speccy
Download Now from TechSpot | Website: Speccy
If HWinfo shows far too much detail for you, then there’s always Speccy.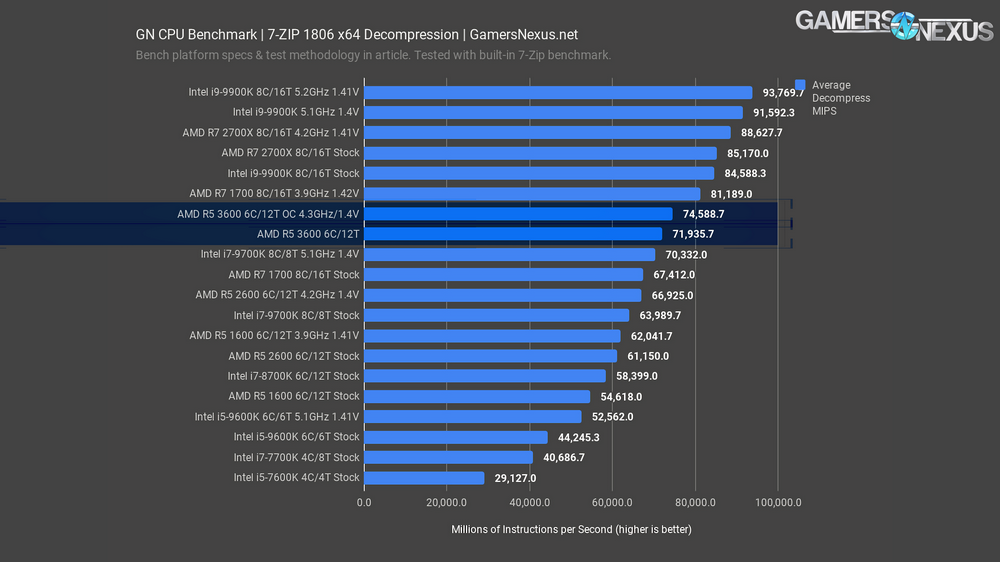 This little program is made by the developers of CCleaner and it’s essentially a system summary. There is some sensor logging built in, as you can see in the image below: the little green bar graphs actively plot temperature values or amount of RAM, storage, etc used.
Unlike the prior 3 entries in our list of programs, this one doesn’t seem to be updated as often but it’s simple and user friendly. Speccy is available for Windows PCs and is free to use, but if you want the additional features of automatic updates and premium support, it’s currently a $19.95 annual subscription.
AIDA64
Download Now from TechSpot | Website: AIDA64
Next in our list is AIDA64. The standard version, AIDA64 Extreme, is very much like HWinfo, but it’s not free. The software comes as a 30-day trial, with various outputs restricted, as shown below. After the trial period, the charge is currently $59.95, which enables all of the software’s features, and gives technical support and updates for a year. The program continues to work when the licence runs out, but you’ll need to renew it for continued support.
AIDA is made by Hungarian software developers FinalWire, and it’s been in circulation (in several forms) since 2010.
So why suggest this, when HWinfo seems to the same thing, and it’s free? AIDA64 gets a place in our list because it does possess some additional stress testing and diagnostics capabilities and there are versions for Android and iOS, too, so if you want a comprehensive dig into the guts of a mobile, then this is one way of doing it.
HWMonitor
Download Now from TechSpot | Website: HWMonitor
If the thought of paying for a program that monitors the sensor outputs of your hardware leaves you a little cold, then the makers of CPU-Z have you covered. At just over 1.2 MB in size, this tiny little app will be all you need.
HWmonitor is for Windows PCs only, but it’s free, and as a tool for keeping an eye on temperatures, fan speeds, and voltages, it fits the role perfectly. If you happen to be running a MacBook though, and you want temperature and fan control, check out Macs Fan Control.
Open HWM
Download Now from TechSpot | Website: Open Hardware Monitor
If you’re after a monitoring program for a Linux computer, your options are unfortunately rather limited. However, for 10 years, software developer Michael Möller has been running an open source project to help fill this niche — meet Open Hardware Monitor.
There’s no charge for the software, and it’s available for Windows, too. It looks and works very much like HWMonitor does, but we found Open Hardware Monitor to be a little snappier to fire up and work.
I-Nex
Download Now from TechSpot | Website: I-Nex
With monitoring covered, what about a specifications summary? Enter stage left: I-Nex. Developed by a small group of programmers in Poland, this Linux-only tool works a bit like CPU-Z does, but also provides additional details about the hard drives, audio system, and operating system structure.
Like many entries in this list, I-Nex is free, but it doesn’t seem to be updated as regularly as the other programs — so if your Linux box is packing the very latest hardware, it might not recognize it properly.
Part 2: Programs to Benchmark and Stress Test Your Hardware
You’ve now got all the monitoring tools you need, but how do you know if your device is performing exactly as it should do? That’s one of the reasons why we benchmark.
There are lots of benchmark programs out there, and plenty of games that have a benchmark feature built into them (some times but not always we use those). Games are great for stress testing your GPU, but for this article we’ve picked 13 pieces of software that are commonly used in hardware reviews or that provide additional testing features that games can’t do.
We’ve not included programs that can monitor and log the frame rate of a game, such as FRAPS or MSI Afterburner, as these don’t directly test the computer; however we’ll look at them in a follow up article about benchmarking.
Cinebench
Download Now from TechSpot | Website: Cinebench
The Cinebench benchmark tool is actually a very cut down version of a rendering program called Cinema 4D, by Maxon. When you run it, the app uses the CPU to produce a single image, but all done with the latest ray tracing techniques.
The GPU isn’t used in the test, other than to send the output to the monitor, but it’s great for analyzing how well a CPU manages threads and memory. Cinebench can be configured to render the scene using a set amount of threads, starting with just 1 (essentially just one core of the CPU) and then all the way up to 256.
Even if the processor doesn’t support that many threads, the benchmark will still run, as each string of instructions processes a small area of the image — in other words, using more threads just means each rendered section is smaller.
You’ll find Cinebench results in just about every CPU review on the web, but be aware that the older versions don’t run the same test, so the results aren’t comparable. While it’s not a detailed workout for your whole system, there’s nothing better than watching your new multicore processor rip through the scene. It’s totally free, and available for Windows and macOS.
Another popular CPU benchmark that is based on rendering tasks is Corona. This application is based on the Corona Renderer and lets you compare the performance of your CPU against a big results database.
SiSoft Sandra
Download Now from TechSpot | Website: SiSoft
To start the benchmark section, we’re using another long running system analyzing tool: SiSoft Sandra. On face value, it might seem to offer just the same features as HWinfo and AIDA64, but unlike those summary programs, Sandra comes packed with a host of benchmarking tools.
The list of tests is comprehensive, but most of them are specific to a particular task, such as the mathematics involved behind image processing. Fortunately, there is an overall computer test but a word of caution: it runs for a long time, and your computer may well bug out (screen switches off, RGB fans glitch, etc) during the test, as it’s really intensive.
The results page will compare the findings against other benchmarked platforms, as well as provide a breakdown of the individual facts and figures. For system administrators and PC builders, Sandra covers all the bases; it’s not quite so friendly towards the general PC user though.
Sandra is only available for Windows, but the ‘Lite’ version is free and comes with a wealth of tests. The upgrade price to unlock everything is currently a rather steep $69.99, but it can be installed on up to 5 different PCs. There are more versions for professionals and various industry sectors (which require multiple licences and remote monitoring), but their prices are significantly higher, ranging from $199.99, all the way up to $2,195.
PCMark 10
Download Now from TechSpot | Website: PCMark 10
If you’re looking for a more general benchmark that tests your Windows PC in a variety of common situations (office applications, video streaming, gaming, etc), then check out PCMark 10. Made by Futuremark in Finland (later acquired by UL), the program has been around in various revisions since 2002.
There is a free ‘Basic’ version that runs a single, overall benchmark test; unlocking the rest of the tests and other features will set you back $29.99; if you’re after even more tests (such as battery life, storage performance, and specific application testing) and greater control over the program, then you’ll need to spend $1,495 every year for the ‘Professional’ edition.
PCMark monitors various things during the test, such as CPU load and temperature, and the results can be uploaded to UL’s database, for comparison with other systems. There is a separate version of PCMark for Android devices.
3DMark
Download Now from TechSpot | Website: 3DMark
Another UL benchmark tool and one that’s even more popular, 3DMark appeared over 20 years ago and has been one of the standard ways of testing graphics cards — although games have taken over this role, for the most part. This is because it focuses on running intensive 3D graphics loads, using the latest rendering technology supported by modern graphics cards.
There are separate versions for Windows, Android, and iOS, and it comes in a free ‘Basic’ version that has 4 standard tests. The paid full product gives you all of the tests, including a looped Stress Test and so-called Feature Tests that analyze certain hardware or rendering capabilities, and the purchase allows you to customize the graphics settings.
The ‘Professional’ edition of 3DMark, aimed at industry specialists, provides greater control over automation and test configuration, also costs $1,495 per year but the only extra test you get is an image quality tool. 3DMark also allows you to upload to a database and compare your PC against other configurations.
3DMark is still popular with the overclocking community and the top scores in the database are often PCs cooled with liquid nitrogen, all clocked to extreme levels.
While on the topic of extremes, if you’re looking to stress test your GPU, FurMark is a lightweight and useful tool.
Basemark GPU
Download Now from TechSpot | Website: Basemark GPU
Basemark might seem to be a bit of a 3DMark clone (part of the dev team are ex-Futuremark employees) but this graphics test has an important advantage over its Finnish rival: there are versions for Windows, Linux, MacOS, Android, and iOS. So if you’re a professional hardware tester or you just have lots of gear to check out, Basemark GPU might just suit your needs.
For a single rendering test, it’s quite a large download at just under 1 GB; and if you want to explore how well your graphics card handles different types of texture compression, there’s even more to pull down from their servers. Basemark supports 3 different graphics APIs: DirectX 12, OpenGL, and Vulkan, which makes it unique in the market it competes in.
There’s a free version for all platforms, but if you want to unlock the ability to automate the test or configure them outside of what Basemark have set, then you’re probably out of luck. That’s because those features are only available in the Corporate edition and there’s no public price tag for that.
7-zip
Download Now from TechSpot | Website: 7-zip
7-zip is a file compression app, but it just so happens to contain a nifty little testing feature: it creates some junk data and then uses the LZM algorithm to compress and decompress it, without any loss of data. Just go to ‘Tools’, click on ‘Benchmark’, and away you go. Clearly this isn’t a benchmarking tool, but it’s nearly always shown in CPU reviews because it presents a real-world testing scenario.
The compression test is good at seeing how capable the cache of the CPU and the system memory are, in terms of bandwidth and latency; the decompression results are more affected by the CPU’s internal structure and how well it manages random, branching integer operations. So if you’re looking to compare these aspects across different makes and models of processors, 7-zip is handy to use and like Cinebench, it’s results are often shown in CPU reviews.
The best part of the program is that there is no cost, and it’s available for Windows and Linux users.
OCCT
Download Now from TechSpot | Website: OCCT
If you’re into overclocking or you’ve just built a new system and you want to test how stable it is, then you’ll want a program to stress test your computer. OCCT (Overclock Checking Tool) fits the bill very nicely, and although it’s only for Windows machines, it can monitor a variety of sensors and hardware levels as it’s running.
There’s not a huge range of tests in the app, but they do exactly what they’re supposed to: load up the CPU, GPU, or RAM and give them a good workout. OCCT is free for general use, although it does offer paid versions with additional exporting and reporting features.
Blender Benchmark
Download Now from TechSpot | Website: Blender Open Data
Blender is an open source software for 3D modeling, rendering, animation and post-production. The benchmark is based on this software and was developed by the project’s team to collect hardware test results and make comparisons between system hardware, installations, and to assist developers to track performance during Blender development.
The Blender benchmark is available for Windows, Linux and macOS.
The benchmark can be run online or offline. The benchmark runs Blender and renders production files, with the option to upload your results to the Open Data portal on blender.org.
Geekbench
Download Now from TechSpot | Website: Geekbench
Another popular benchmarking tool is Geekbench by Primate Labs. Geekbench has also been around for a long time and over the years had its fair share of negative criticism, notably by industry figure Linus Torvalds. That said, it’s one of the very few testing programs that’s available for all 5 major platforms: Windows, Linux, MacOS, Android, and iOS.
The interface is as basic as they come, and there are no fancy graphics while it’s running. Instead, it quietly runs a series of tests, performing calculations as used in various computational workloads, and displays the results in the form of list of scores.
Like many benchmark tools, the results can be uploaded to the maker’s online database, which means you can compare your findings against other systems or share your own.
Geekbench comes as a free unlimited ‘trial’ that does everything you need it to. For $9.95, though, you receive the capability to manage your online results, and for $99.99 you get to fully configure what and how the program is doing (but this is really aimed at commercial use).
Novabench
Download Now from TechSpot | Website: Novabench
If you’re after another multi-platform tester, then you should consider giving Novabench a look. Available for Windows, Linux, and macOS, this benchmark tool offers CPU, GPU, RAM, and hard drive tests.
While it lacks the graphical fidelity of the likes of 3DMark or the range of analytical tests that Sandra offers, the whole benchmark is short and sweet (it’s much quicker than Sandra, for example) and there’s an online comparison feature, too. Handing over $19 will get you the ‘Pro’ version of the tool, and for that you get temperature monitoring, a battery wear test for laptops, and more configuration options.
Phoronix Test Suite
Download Now from TechSpot | Website: Phoronix
What if you want to benchmark your computer (Windows, Linux, or macOS-based), but you don’t want to pay out for the full set of features? Or let’s say you’re a IT professional and you need to remotely test and monitor hardware, what then? Well, it’s simple: open-sourced Phoronix Test Suite is what you need.
A word of caution is needed though: Phoronix is not for the general, or even enthusiast, consumer. You need to be very comfortable with using a command-line interface, and understand what’s being tested, and how each benchmark works. But if you are a network manager or a system developer, then you won’t find a better collection of benchmarking tools anywhere else.
The default download comes with a vast number of tests, but additional ones can be sourced through the supporting OpenBenchmarking website.
Unigine Superposition
Download Now from TechSpot | Website: Unigine
The next entry in our benchmarking list is actually a collection of programs, all made by Unigine, who have been developing 3D graphics engines for gaming and visualization industries for 15 years. They have 3 graphics benchmarks, but as two of them are a little bit old for modern systems, we’ll just stick with their latest one, called Superposition.
The visuals are nice to watch (some parts of it are pushing 6 million triangles per frame, with 30 active light sources), while the test is running, and like 3DMark, you can set it to render the graphics at a resolution higher than the output monitor’s — it uses a very quick shader routine to scale back down, to fit onto the screen. So if you want to give your GPU a decent workout, then this is a quick way of doing it.
Also like the UL benchmark, you get a score at the end of the benchmark that you can upload and compare. There are versions for Windows and Linux, and the ‘Basic’ edition is free; $19.95 unlocks a stress test that runs through many cycles to see how stable the system is, and allows you to upload your results to Unigine’s leaderboards. If you want more options to running the app and analyzing the results, then you’ll need to get the ‘Professional’ version, which costs a staggering $995, but this really isn’t aimed at general users.
CrystalDiskMark
Download Now from TechSpot | Website: CrystalDiskMark
Where Unigine benchmarks focuses on 3D graphics, this one is all about your storage — specifically, how quickly it can read and write data to them, in various ways. CrystalDiskMark is very basic, but there’s nothing wrong with that.
There’s no overall score but the test has a range of settings scenarios, from ‘realistic’ workloads to peak performance checks. The latter is useful for checking that you’ve got everything set up right.
For example, the above results are for a SATA-connected SSD that has claimed sequential read/write figures of 540 and 520 MB/s respectively — the SEQ1M results show that this is pretty much the case. CrystalDiskMark is free and available for Windows PCs only.
PerformanceTEST
Download Now from TechSpot | Website: PerformanceTEST
No list article should be without at least one controversial choice, and this one is no different! We’ve picked PassMark’s PerformanceTEST, not because it does anything badly, but some people don’t like it because of the way it calculates the score in the CPU tests. Fans on either side of the AMD vs. Intel battle will sometimes claim that their favorite model is being unfairly represented, but that’s just the nature of benchmarking. It’s always best to use more than one program to get a good overview of your system’s capabilities.
PerformanceTEST runs a decent range of CPU, GPU, RAM, and hard drive tests to generate an overall score, and like so many others, this can be uploaded to an online database and compared to other systems. Some of the graphics tests (2D and 3D gets tested) are cool to watch, if just a little on the trippy side.
The actual controversial part to this benchmarking tool is that there is no real fully-free version: you can have a 30-day evaluation copy, but after that time period, you’ll need to spend to unlock the advanced tests and 12 months of upgrades. Compared to what SiSoft offer with Sandra or UL with PCMark, a time-limited trial version seems a bit outdated. That said, it does offer plenty of information about the tests, and if you examine lots of machines and components, going for the full version isn’t too bad of a deal.
Plenty of Tools
So there you go, plenty of recommended software to analyze, monitor, benchmark, and stress test your computing devices. There are many more out there, but we think these will suit almost everybody’s needs. If you think we missed any great one, feel free to point us in the right direction in the comments.
We also think it’s important to point out that benchmarking a computer can often put it under a load that it may not be stable with. So before testing, always ensure you’ve backed up all of your data, and if things start to look very unusual (e.g. very high temperatures, odd pixels on the screen), stop the program immediately.
And of course, there’s more to benchmarking… read our follow-up guide to best practices, real-life benchmarking using games and how to analyze the results.
Note: This feature was first published in October 2020. We have revised and bumped it because it’s as relevant today as it was before. Part of our #ThrowbackThursday initiative.
CPU comparisons of Intel, AMD, Samsung, Apple, Qualcomm and others
CPUs
GPUs
The best processors currently: Which processor is fastest
AMD Ryzen 3 PRO 4350GE
4x 3.50 GHz (4.00 GHz) HT
Intel Celeron G5920
2x 3.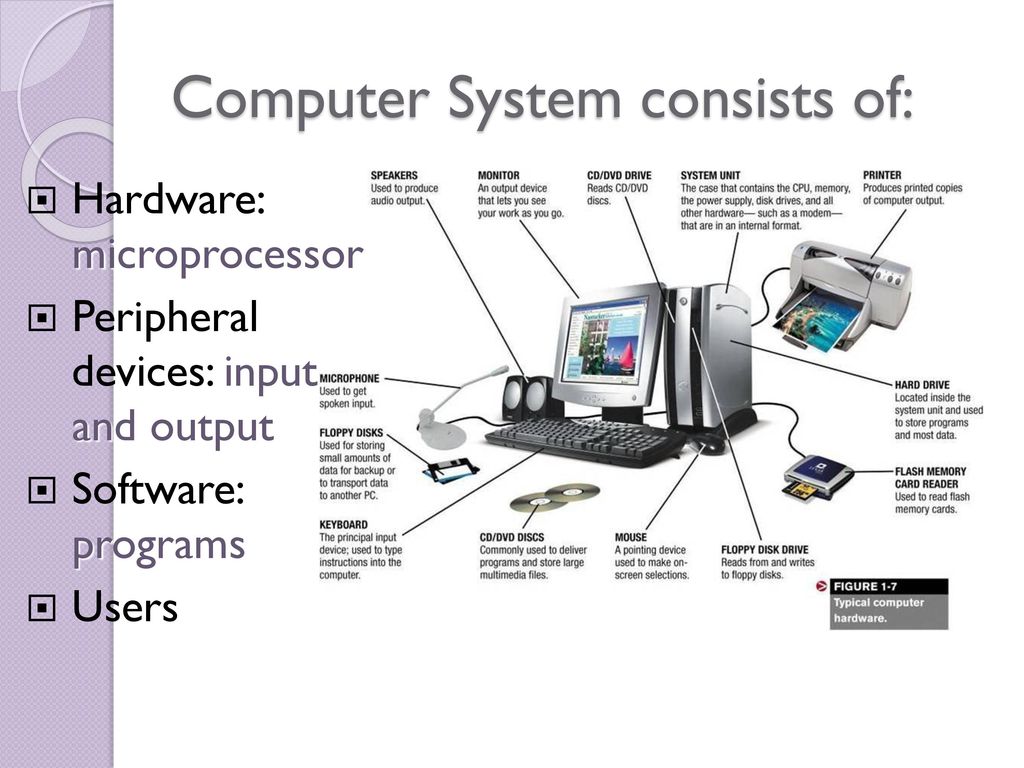 50 GHz (No turbo)
Intel Celeron 2957U
2x 1.40 GHz (No turbo)
AMD FX-8320E
8x 3.20 GHz (4.00 GHz)
Intel Core i5-10400F
6x 2.90 GHz (4.30 GHz) HT
Intel Atom Z3770
4x 1.46 GHz (2.39 GHz)
AMD Ryzen 7 3700X
8x 3.60 GHz (4.40 GHz) HT
AMD Ryzen 7 2700X
8x 3.70 GHz (4.30 GHz) HT
AMD Epyc 7F72
24x 3.20 GHz (3.70 GHz) HT
AMD Ryzen 7 3800X
8x 3. 90 GHz (4.50 GHz) HT
Best Performing CPUs in Benchmarks: Compare online
Our ranking is based on the actual performance of the processors. You will find the most advanced PC processor for gamers and creators. The information on our website is very useful :
— What is the performance of the CPU
— What is the best performance of the CPU
— How can I test the performance of my CPU
— How to improve the performance of my CPU
Cinebench R20 (Single-Core) ∎ Laptops CPU Ranking : Hierarchy Benchmarks | Best CPUs for Laptops
Intel Core i9-12900K
100%
Intel Core i9-12900KS
97%
Intel Core i9-12900KF
95%
Intel Core i9-12900K
95%
Intel Core i7-12700K
94%
Cinebench R23 (Single-Core) ⁕ What is a good Cinebench R23 single-core score
Intel Core i9-12900KS
100%
Intel Core i9-12900KF
95%
Intel Core i9-12900K
95%
Intel Core i9-12900F
95%
Intel Core i9-12900
95%
V-Ray CPU-Render ⁜ Test your CPU/GPU rendering power
AMD Ryzen Threadripper 3990X
100%
AMD Ryzen Threadripper PRO 3995WX
73%
AMD Ryzen Threadripper 3970X
57%
AMD Epyc 7702
54%
AMD Epyc 7702P
54%
AnTuTu 9 Benchmark Ѻ Know Your Android Better
MediaTek Dimensity 9000
100%
Samsung Exynos 2200
91%
Apple A15 Bionic (5-GPU)
84%
MediaTek Dimensity 8100
83%
Qualcomm Snapdragon 888 Plus
82%
Blender 3. 1 Benchmark ◕ Is Blender a good benchmark?
AMD Epyc 7713
100%
AMD Epyc 7713P
100%
AMD Ryzen Threadripper 3990X
88%
AMD Ryzen Threadripper PRO 3995WX
81%
AMD Ryzen Threadripper 3970X
57%
Cinebench R20 (Multi-Core) ※ How do you calculate processor speeds of multi core processors
AMD Ryzen Threadripper 3990X
100%
AMD Ryzen Threadripper 3990X
100%
AMD Ryzen Threadripper PRO 3995WX
98%
AMD Ryzen Threadripper Pro 3995WX
98%
AMD Epyc 7742
83%
Latest CPU Comparisons • Which processor should you buy
Our processor / CPU comparison helps you to compare two CPUs. We offer you the information about all the nuances and characteristics. To easily compare desktop and laptop processors, as well as CPU specs & benchmarks, discover our comparison tool. Thanks to our tool, you will find out which processor is the best today. There are ratings of devices for games, studies, graphic design classes. You will find the best budget processor or the most powerful device in a higher price category. And you will also consider the following:
— Which type of CPU is best?
— Which processor is fastest?
— How to compare two Intel processors?
Premiere Pro and After Effects Hardware Recommendations
User Guide
Cancel
Search
Last update
Oct 05, 2022 07:56:40 AM GMT
- Adobe Premiere Pro
- Beta Releases
- Beta Program Overview
- Premiere Pro
Beta home page
- Getting started
- Getting started with Adobe Premiere Pro
- What’s new in Premiere Pro
- Release notes | Premiere Pro
- Keyboard shortcuts in Premiere Pro
- Accessibility in Premiere Pro
- Long format and episode workflow guide
- Questions and answers
- Hardware and operating system requirements
- Hardware recommendations
- System requirements
- GPU and driver requirements
- GPU accelerated rendering and hardware encode/decode
- Create projects
- Create project
- Opening projects
- Moving and deleting projects
- Working with multiple open projects
- Working with project references
- Premiere Pro
- How to open and edit Premiere Rush projects in Premiere Pro
- Best Practice: Creating Your Own Project Templates
Project Backward Compatibility
- Work environments and work processes
- Work environments
- Questions and answers | Import and export in Premiere Pro
- Working with panels
- Windows touch and gesture control
- Using Premiere Pro in a dual monitor configuration
- Capture and import
- Capture
- Capture and digitize video footage
- HD, DV or HDV video capture
- Packet capture and recapture
- Setting up the system to capture HD, DV, or HDV media
- Import
- File transfer
- Import still images
- Digital audio import
- Import from Avid or Final Cut
- Import AAF project files from Avid Media Composer
- Import project XML files from Final Cut Pro 7 and Final Cut Pro X
- Supported file formats
- Support for Blackmagic RAW format
- Analog video digitization
- Working with time code
- Capture
- Editing
- Video editing
- Episodes
- Creating and editing sequences
- Changing scene settings
- Add clips in sequence
- Changing the order of clips in sequences
- Search, select and group clips in sequences
- Editing scenes downloaded to source monitor
- Simplify sequences
- Rendering and previewing sequences
- Working with markers
- Correcting the source and determining the target tracks
- Scene editing definition
- Video
- Creating and playing clips
- Trim clips
- Synchronizing audio and video using the Merge Clips function
- Rendering and media replacement
- Cancellation, history and events
- Freeze and Hold Frames
- Working with aspect ratio
- Audio
- Audio overview in Premiere Pro
- Audio track mixer
- Setting volume levels
- Editing, restoring and enhancing sound with the Essential Sound panel
- Automatic audio volume reduction
- Audio remix
- Controlling clip volume and panning with audio clip mixing
- Audio balancing and panning
- Advanced Audio — Phonograms, Downmixing and Routing
- Audio effects and transitions
- Working with audio transitions
- Applying audio effects
- Measuring the sound level with the Acoustic Locator effect
- Audio mix recording
- Editing audio in the timeline
- Audio channel mapping in Premiere Pro
- Using an Adobe Stock audio track in Premiere Pro
- Additional editing functions
- Multi-camera editing
- Setting up and using a head-mounted display for immersive video in Premiere Pro
- Editing VR Content
- Best Practice
- Best Practice: Speeding Up Audio Mixing
- Best Practice: Efficient Editing
- Editing workflows for feature films
- Video effects and transitions
- Overview of video effects and transitions
- Effects
- Effect types in Premiere Pro
- Applying and removing effects
- Effect presets
- Automatic video reformatting for various social media channels
- Color Correction Effects
- Change duration and speed of clips
- Adjustment layers
- Video stabilization
- Transitions
- Applying transitions in Premiere Pro
- Changing and setting transitions
- Morpho cut
- Titles, graphics, and captions
- Essential Graphics panel overview
- Headers
- Creating a header
- Graphics
- Shape Creation
- Drawing with the pen tool
- Align and distribute objects
- Changing the appearance of text and shapes
- Application of gradients
- Adding responsive design features to graphic elements
- Installing and using Motion Graphics Templates
- Replacing images or videos in Motion Graphics templates
- Use Motion Graphics templates based on data
- Signatures
- Speech-to-text translation
- Download language packs for transcription
- Working with signatures
- Spell checking, search and replace
- Text export
- Translate speech to text in Premiere Pro | Questions and answers
- Recommendation: Acceleration of graphics processing
- Removing the Legacy Title Builder in Premiere Pro | Questions and answers
- Upgrading legacy titles to source graphics
- Animation and keyframing
- Adding, navigating and keyframing
- Animation effects
- Use motion effect to edit and animate clips
- Keyframe Automation Optimization
- Moving and copying keyframes
- Viewing and adjusting effects and keyframes
- Compose
- Compose, alpha channels and clip opacity control
- Masking and tracking
- Blend Modes
- Color Correction and Grading
- Overview: Color Correction Workflows in Premiere Pro
- Automatic color correction
- Creative color experiments with Lumetri Styles
- Adjusting colors with RGB and hue/saturation curves
- Correction and color matching of different frames
- Using secondary HSL controls in the Lumetri Color panel
- Create vignettes
- Looks and LUTs
- Lumetri areas
- Display color management
- Broadcast HDR
- Enable DirectX HDR
support
- Media export
- Video export
- Export Set Management
- Workflow and export overview
- Quick export
- Mobile export and web publishing
- Still image export
- Export projects for other applications
- Export OMF files for Pro Tools
- Export to Panasonic P2 format
- Export settings
- Link to export settings
- Basic video settings
- Coding parameters
- Recommendations: Export acceleration
- Collaborate: Frame.
 io, team products and projects
- Collaborate in Premiere Pro
- Frame.io
- Installing and activating Frame.io
- Using Frame.io with Premiere Pro and After Effects
- Adobe Workfront and Frame.io integration
- Questions and answers
- Products
- Using Products
- Working with clips in product projects
- Best Practice: Working with
Products
- Team projects
- Getting started with team projects
- Create group project
- Adding and managing media in team projects
- Invite and manage collaborators in a Team 9 project0010
- Share and manage changes with collaborators
- View automatic saves and versions of group projects
- Archiving, restoring or deleting group projects
- Working with other Adobe applications
- After Effects and Photoshop
- Dynamic Link
- Audition
- Prelude
- Organization and management of resources
- Working with the Project panel
- Organize resources in the Project panel
- Reproduction of resources
- Search for resources
- Creative Cloud Libraries
- Synchronizing settings in Premiere Pro
- Merging, converting and archiving projects
- Metadata management
- Recommendations
- Best Practices: Lessons from TV Broadcasting
- Best Practices: Working with native formats
- Performance improvement and troubleshooting
- Parameter setting
- Reset and restore settings
- Working with proxy
- Proxy overview
- Takeover and Proxy Process
- Check if your system is compatible with Premiere Pro
- Premiere Pro for Apple
- Flicker removal
- Interlacing and field order
- Smart Rendering
- Control panel support
- Best practices: working with native formats
- Knowledge base
- Known issues
- Fixed bugs
- Troubleshooting Premiere Pro
- Green and pink video in Premiere Pro or Premiere Rush
- How to manage the media cache in Premiere Pro
- Fix rendering or export errors
- Troubleshoot playback and performance issues in Premiere Pro
crashes
processors
- Resource Monitor and Offline Media
- Resource Monitor
- Using Source Monitor and Program Monitor
- Using the reference monitor
- Offline media
- Working with offline clips
- Create clips for offline editing
- Relinking offline media
- Resource Monitor
User Guide
This page is a companion document for system requirements for Premiere Pro and After Effects. It provides additional information about system components and recommendations for optimal performance.
For more information about After Effects and multi-frame rendering, see System Setup below.
Need a summary of key information? Click here to download a PDF document.
Platform Selection
Premiere Pro and After Effects work equally well on both Windows and Apple computers. Since there are many variables in the video and motion graphics workflows, there will always be differences between the different settings, but all of them can be successfully managed with a good system and with a basic knowledge of video formats and the editing workflow.
Premiere Pro has built-in support for Apple M1 systems (including M1 Pro and M1 Max). After Effects for Apple M1 is currently in public beta.
macOS Benefits
Deeply integrated hardware and software with existing configurations to choose from. Typically, video processing requires a system with at least 16 GB of RAM, an SSD drive, an Apple M1 (or higher) processor, or a fast Intel processor with an AMD graphics card.
After Effects natively supported by the Apple M1 is currently in public beta.
Benefits of Windows
Choice, upgrade, and often cost savings. You can customize the system to suit your needs and budget, or select configurations that have been tested with Premiere Pro by Dell, Lenovo, HP, and specialist video workstation companies such as Puget Systems.
Windows systems can be more easily updated, which can mean longer system life.
Laptop or desktop?
Video editing requires significant resources, high performance processing and fast storage. These requirements can be configured on both desktop and mobile systems. Value for money for desktops is usually greater. They also offer more configuration options and are often easier to upgrade.
Laptops have the obvious advantage of portability and can be connected to external displays and augmented with external storage and even external graphics cards. Laptops can be more expensive in relation to the features they provide.
Apple Desktops
Modern Mac Pro, iMac Pro and iMac M1, and Mac Mini with 16 GB or more of memory and SSD storage will power your video editing workflows.
Apple Notebooks
Modern MacBook Pro notebooks with 16 GB or more of memory and SSD storage support standard video editing, including HD and 4K.
Windows Desktops
Build or choose configurations with a fast multi-core processor, AMD or NVIDIA graphics cards, fast SSD storage, and 32GB or more RAM.
Notebooks with Windows
Depending on the model, Windows laptops offer many options for customizing your video editing workstation to suit your needs.
You can also select a desktop configuration tested with Premiere Pro by Dell, Lenovo, HP, and specialized video workstation companies such as Puget Systems.
How much storage do you need?
As a rule, video files are large, so a lot of space is required. In addition to fast onboard storage, it is recommended that you use at least one fast external storage device for your editing workflow (SSD or NVMe with Thunderbolt or USB 3.1 connection). We recommend an optional mass storage device for archiving completed video projects.
File size and bit depth
File size
The two most common resolutions for video content today are HD and 4K. Measured in screen pixels (width x height), HD resolution is typically 1920 x 1080, while 4K video resolution is four times larger at 3840 x 2160.
| HD | 4K |
|---|---|
| HD files are smaller, which means they take up less hard drive space, are easier to edit and export faster. Most of the content on YouTube is still in HD resolution. | 4K files take up more storage space and require more processing power for playback and export. The advantage of 4K is greater image detail and more framing space without loss of quality. |
Bit depth
Bit depth indicates the amount of color information contained in the file.
| 8-bit video files | 10-bit video files |
|---|---|
| 8-bit files are more widely used and less demanding for video editing. | 10-bit files require more processing power to play. It’s hard to tell the difference to the naked eye, but for more productive color grading, 10-bit files provide a lot more color detail to work with. |
System Setup
The four key parameters in building a video workstation are the central processing unit (CPU), RAM, graphics processing unit (GPU), and storage. A well-equipped, high-quality system can keep Premiere Pro and After Effects running properly. Understanding how each application uses system resources will help you create the best system for your needs.
Processors
Both After Effects and Premiere Pro run better at 3.2 GHz or faster processor speeds.
With the transition to multi-frame rendering, After Effects can take advantage of multi-core processors. Starting with After Effects 22.0, users will immediately notice significant performance improvements for previewing and exporting. On high-end systems, After Effects with multi-frame rendering is up to 4x faster. We highly recommend Intel Core i7 or Core i9 processorsor AMD equivalents.
Premiere Pro: Eight cores are sufficient for Premiere Pro. Depending on the task at hand, Premiere Pro runs at 93-98% efficiency on eight cores.
- At least an Intel Core i7 or Core i9 processor, AMD or Apple M1 equivalent. The Intel Core i7 and Core i9 (as well as the latest mobile Xeon processors) feature Quick Sync technology to speed up H.264 and HEVC decoding/playback.
- Some Intel Xeon Desktop Processors not have QuickSync technology.
 They may be better suited for high quality workflows with camera formats (eg RED, Sony Venice, ARRI) and broadcast formats (eg XDCam HD).
After Effects: For After Effects 22.0 and later, an 8 or 12 core processor is a good starting point. For demanding tasks, 32 cores allow you to fully realize the benefits of multi-frame rendering.
The amount of RAM also affects how After Effects can use available CPU cores.
- AMD Ryzen 7 (8 cores) or Ryzen 9 (12 or 16 cores) deliver great performance and support up to 64GB of RAM.
- For ultra high performance AMD Threadripper (24 or 32 cores) or Intel Xeon (24 or 32 cores) processors that support 256 GB or more of RAM
- After Effects users who also use Premiere Pro should consider using an Intel Core i7 or Core i9with hardware accelerated Quick Sync for H.264 and HEVC formats. Use at least 32 GB of RAM.
Native support for Apple processors (M1, M1 Pro, and M1 Max) is currently available in After Effects (Beta).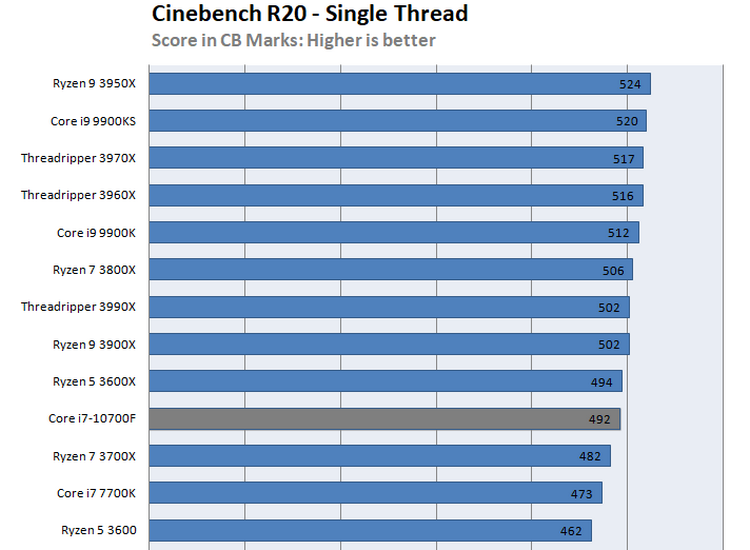
Memory
Premiere Pro: Windows computers or Mac video editing workstations based on Intel processors require at least 32 GB of RAM. For systems with the Apple M1, 16 GB of total memory is recommended (currently the maximum available).
After Effects 22.0 and later: Recommended to start with 64 GB of RAM. Typically, multiframe rendering requires 4 GB of RAM per processor core, plus another 20 GB, rounded up to the nearest standard RAM configuration.
Graphics
Both Premiere Pro and After Effects are designed to take advantage of the GPU.
Premiere Pro: GPU with at least 4 GB of memory (VRAM) is recommended. Using multiple GPUs, including external graphics cards, speeds up export and rendering in Premiere Pro.
After Effects 22.0 and later: Recommended GPU with 8 GB VRAM or greater.
Apple M1 systems use shared memory for graphics processing. For video editing, M1 systems with at least 16 GB of shared memory are recommended.
Outdated graphics drivers are one of the most common causes of performance issues with video applications. For optimal performance, make sure you have the latest drivers for your GPU installed, including Intel integrated GPUs. For more information, see GPU and driver requirements for Premiere Pro.
Storage
Fast storage is critical for video processing, which means you need fast SSDs or NVMe drives. In the absence of a fast RAID array, spinning disks usually don’t provide enough speed to process HD and UHD video.
- Solid State Drives or Flash Drives SSD and NVMe
- The optimal configuration uses three drives for local storage:
- System disk for OS and applications
- Disk for media cache — accelerator files, including peak files (.pek) and corresponding audio files (.cfa). Premiere can make thousands of accesses to these files every second.
- Media disc f or video resources and other media files of the project
High-speed external drives can be used for media data and its cache. If only two drives are available, you can store media and its cache on one drive.
Shared storage: With 10 Gbps or faster high-speed connectivity, Premiere Pro and After Effects work seamlessly with network-attached storage (NAS) systems, including mixed macOS and Windows environments. When using shared storage, the media cache should always be stored locally for individual users.
System upgrade
Adding memory is the easiest and usually the most effective way to upgrade your system to improve performance for both Premiere Pro and After Effects.
Update your Premiere Pro system in the following order:
- Upgrade your RAM to 128 GB if your motherboard supports it (especially for long content)
- Faster GPU or additional GPUs for faster export and rendering with Premiere Pro
- Storage: Faster (or more) SSD or NVMe 9 drives0010
- Processor with higher clock speed
Update your system to After Effects 22. 0 or later in this order of priority:
- A 32-core processor maximizes the benefits of multi-frame rendering.
- Upgrade the RAM to 128 GB or more depending on the application.
- Use faster SSD/NVMe drives or a faster shared storage connection.
- Faster GPU with more than 8 GB of VRAM.
FAQ
Export time is affected by both your graphics hardware and your workflow. A second GPU (of the same class as the main GPU) can greatly improve the export speed. Creating previews while editing can also speed up export time.
If you have a good system, the performance of multi-chamber workflows depends more on your project settings than your equipment. Advanced users create their own project templates to standardize their settings.
It is highly recommended to use a calibrated reference monitor connected via external transmission equipment to accurately display interlaced and color critical content. Proper monitoring of HDR content requires an external HDR capable display.
This is a matter of personal preference. Since the timeline is the centerpiece of the Premiere Pro user interface, a wide 37-inch display combined with a second reference monitor is a great option.
Simultaneous monitoring of multi-channel audio requires a multi-channel audio card. On Windows, the audio card must support ASIO.
Your workflow and how you choose to work with file formats can have a significant impact on overall performance. Our Native Format Guide provides suggestions for designing your workflow to ensure optimal performance from your equipment.
Additional resources
- How to choose the best hardware for multi-frame rendering in After Effects (Puget Systems)
- After Effects Multi-Frame Rendering GPU Performance Analysis (Puget Systems)
- After Effects multi-frame rendering processor performance analysis (Puget Systems)
- AMD Threadripper Pro for After Effects (PDF)
Recommended Configurations
- Dell Precision Workstation Hardware Recommendations for Premiere Pro and After Effects (PDF)
- HP: Selecting the appropriate Z platform for multi-frame rendering in After Effects (PDF)
- Puget Systems Recommendation for Premiere Pro
- Puget Systems Recommendation for After Effects
Account login
To come in
Account management
The best software to analyze and compare your PC specs
You may have bought a laptop for the office or built a gaming PC. Or maybe just upgraded an existing PC. Now we need to answer some important questions: do you know exactly what your purchase consists of? How well will your equipment perform with updated components?
There are special programs that can check what is inside the case. They can also test your system and compare results with other devices. We have compiled 10 programs that will scan your hardware and check different parts of the system. Most of them are free, although some may have a full paid version.
Important note: when checking the computer, a heavy load occurs, due to which the system may become unstable. We recommend that you back up important data before starting testing.
5 programs for analysis and diagnostics
CPU-Z
- Official website: CPU-Z
This program has been on the market for 20 years. The latest version contains a set of instructions that, when activated, provide the user with all the necessary information about the processor: brand, model, number of cores, processor cache and much more.
The program also displays similar information about the motherboard, RAM and video card. It includes a simple CPU performance test and a system stress test. You can share your statistics on their official website. CPU-Z is completely free software. It is available for Windows systems and there is an Android app.
GPU-Z
- Official website: GPU-Z
This program works just like CPU-Z. It collects more detailed information about the characteristics of your video card.
This software does not have benchmarks to evaluate the capabilities of your graphics card, but it can monitor and record output data such as clock speed, temperature, voltage, and memory usage. GPU-Z has a link to the graphics card database from Techpowerup. There you can learn more about your graphics card. Use the «Search» button. The program is completely free, but only available on Windows.
HWinfo
- Official website: HWinfo
This program will tell you everything and in great detail. It divides all the details into 3 windows: system summary, full report and active sensor data. You can quickly get a complete system report and extensive activity data, including graphics card, CPU, RAM, motherboard, fans, your drives, and more.
HWinfo is updated frequently (almost every month) and has been around for over 20 years. It is available for 32-bit and 64-bit versions of Windows. There is even a DOS version. The program is free.
Open HWM
- Official website: Open Hardware Monitor
This program is suitable for a Linux computer. It is open source and distributed free of charge. There is also a version for Windows. Very simple in interface and functionality, but designed to monitor systems. Works and starts quickly and does not require installation.
I-Nex
- Official site: I-Nex
For detailed information about your system on Linux, there is this tool. I-Nex works in much the same way as CPU-Z, but it provides additional information about hard drives, your audio system, and how your operating system works.
5 test programs
To stress test your video card, some games that have this feature by default may be suitable. But we have selected 5 great programs that provide additional testing features.
Sandra 20/20
- Official site: Sandra 20/20
This program has many tools to test your equipment. There is a general test of the entire system, but it must be done carefully: it is intensive and will take a long time. After the end, comparison with other platforms will be available in the results, you will see detailed data on individual components with specific numbers.
This program is suitable for system administrators and professional PC builders as it covers all major aspects. But ordinary users will have to figure it out.
There is a free version with some tests available. The paid version can be installed on up to 5 different devices at once. There are special paid versions for professional use. Unfortunately, the program is designed to work with Windows only.
PCMark 10
- Official website: PCMark 10
This is a more standard program. She tests with Windows systems in different situations (streaming, games, office applications, etc.). There is a free version with a basic general test feature. The paid version unlocks the rest of the tests and additional features.
The program analyzes various characteristics during testing, such as CPU load and temperature. You can compare your scores with other systems through the app’s database. There is also a version for Android devices.
3DMark
- Official website: 3DMark
The program appeared on the market almost 22 years ago and has become one of the most popular tools for checking video cards. 3DMark performs 3D graphics testing and uses the latest rendering technologies that GPUs can support.
There is a free version with 4 basic tests and separate programs for Windows, Android and iOS. The program also allows you to compare your results with other systems in the database.
Cinebench 20
- Official site: Cinebench
This program, when run, uses a processor to create a single image. But she does it using the latest ray tracing techniques.
The test does not use the video card, only to display the final image on the monitor. It is suitable for analyzing how well the processor manages threads and memory. You can set the program to render the scene using a specific number of threads, starting at 1 and going up to 256.0003
Even if your processor doesn’t support that many threads, the test will still work — it’s just that each line will process a small area of the image.
The program is free. It is available for Windows and MacOS.
Basemark GPU
- Official website: Basemark GPU
The program is similar in functionality to 3DMark, but it has an important advantage over its competitor: it has versions for Windows, Linux, MacOS, Android, and iOS. With this tool, you will be able to check all your devices.