How to fix bent Pins on a CPU and Motherboard (LGA & PGA)
TABLE OF CONTENTS
1
Bent pins can cause a variety of peculiarities. It could range from not detecting your memory and not booting at all to running just fine.
Why? Because it depends on your luck. If you’ve only messed up a reserved pin that’s set aside for a future processor, you won’t have a problem running your PC now.
Bent PGA Pins on the CPU
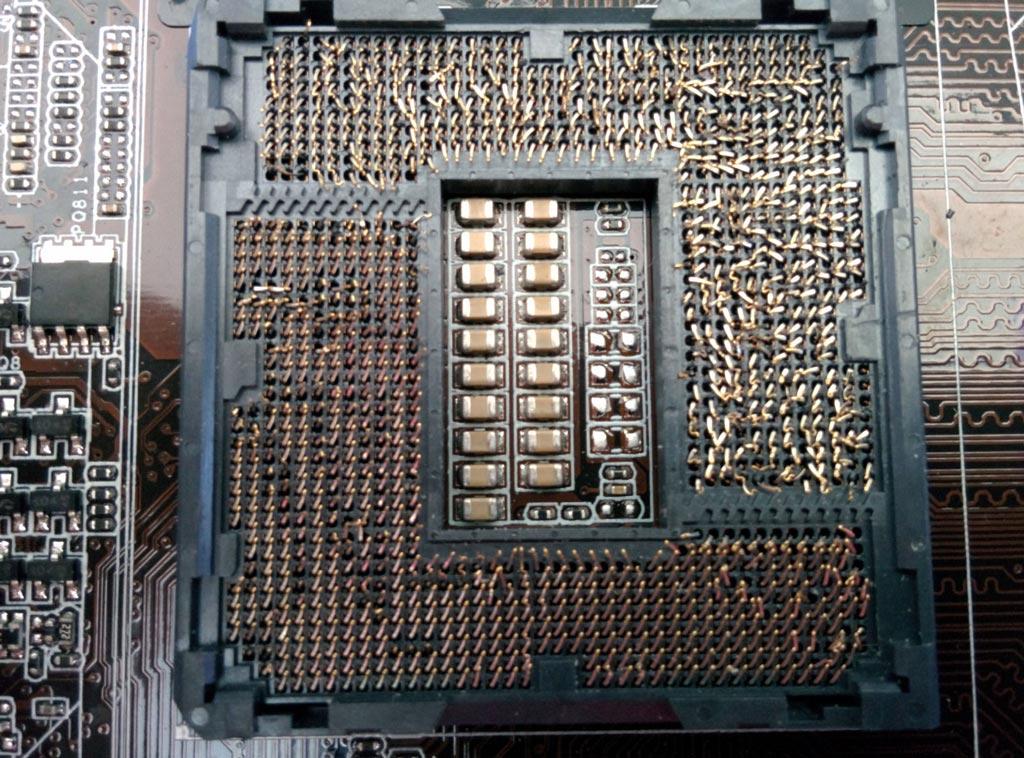
Bent LGA Pins on Motherboard
If you’ve messed up and your poor motherboard socket/CPU looks something like this, well, don’t lose hope yet. There’s an easy fix.
Here’s what to do:
- Check to make sure none of the pins have broken clean off. If they’re all still there, excellent, move on to the next step. If one or more pins have broken clean off, you might have to resort to more risky measures, as shown in this video.
- Check what way the pin is bent. If you’re unsure, look at the socket from as flat an angle as possible.
Bent Pins on a TR4 Socket; LinusTechTips
TR4 Socket; LinusTechTips
See the gap in the first image?
A word of warning – if one or more of those pins are severely bent, trying to straighten them might break them. Pins could also snap if you overcorrect and then try bringing them back again. BE GENTLE.
Fixing Bent PGA Pins
Now, there are a few things you can use to straighten PGA pins. A Precision tweezer, the thinnest credit (or any rigid plastic) card you can find, or even a thin-enough screwdriver are viable options. Although many swear by tweezers, I find I’m too clumsy to handle something that requires that much precision. I prefer the card/screwdriver method.
Straightening Bent PGA Pins on AMD Ryzen (Hardware Canucks)
Just stick the screwdriver/knife next to the offending pin(s) and slowly push it(them) back into line. You can see an example of how to go about doing it in the image above.
Fixing Bent LGA Pins
Unfortunately, fixing LGA pins can sometimes be an arduous task. It might require some nifty ‘lifting’ maneuvers.
Bent Z390 LGA Pins (Northridge Fix)
In the above image, you can see the pins need to face the correct direction while also matching the other pins’ height. Here’s when a screwdriver or credit card might not be enough. I’d recommend grabbing a pair of tweezers, a sewing needle, or a very thin pocketknife to get those pins straightened out.
Keep in mind, they might not bend back into place perfectly, and your final result could look something like this:
Bent Z390 LGA Pins (Northridge Fix)
Try to get them as close to perfect as possible, and don’t fiddle with them too much because you risk a clean break with every little tug/push.
Frequently Asked Questions (FAQs)
Can You Bend CPU Pins Back?
Yep, sure you can! If the damage isn’t too extreme, this is an easy fix.
What Problems Can Bent CPU Pins Cause?
Well, first – never try installing a CPU when it or the motherboard has bent pins (find more information about LGA vs. PGA here). ALWAYS try to straighten them out as much as humanly possible before using them.
As for the problems they can cause, you can run into a range of issues – from absolutely nothing to a dead CPU if the wrong pin falls off.
What Problems Can Missing CPU Pins Cause?
Unfortunately, there’s no way to know unless you try running it. Some pins are reserved for future processors or might be dedicated to testing. Your processor will run without any issues if one of those pins is missing.
However, if any of the other pins are missing, your issues can range from instability to a dead CPU.
Can You Reattach Broken CPU Pins?
Not really, but if you have managed to break one or more of your pins on a PGA processor, there is a workaround that you can attempt if you’re desperate (assuming you still have the broken pin).
First, identify the pin that fell off from the CPU. Once you see it, look for its matching location on the motherboard’s socket.
Now, slide the broken pin into the correct space on your motherboard socket. Repeat with as many broken pins as you have. Finally, install your CPU by dropping it into the socket very carefully. Here’s a video that shows you how to do it.
Please note that if you do mess up trying this, you are likely to cause further damage to your CPU or damage your motherboard (or both).
Over to you
Have any unanswered questions? Let us know in the comments or our forum!
CGDirector is Reader-supported. When you buy through our links, we may earn an affiliate commission.
How To Fix Bent CPU Socket Pins (Easy to follow Guide) – CareerGamers
So I got a text from a friend asking me if I could take a look at their broken Ryzen CPU where some pins had got bent after they dropped.
Fortunately, there are lots of different ways you can fix bent CPU socket pins.
You can use specialized tools that people have come up with for the sole purpose of realigning bent pins, but I’ll share with you how I like to do it. And it won’t cost you anything!
In this article, I’ll teach you how to:
- Figure out what causes CPU pins to bend
- Realign bent pins using a mechanical pencil
- Fix bent pins with a needle
- Bend back rows of bent pins with your credit card
- I’ll also give you a couple of tips on what you can do next!
What Causes Bent CPU Pins?
CPU and CPU socket pins are very fragile and bend very easily.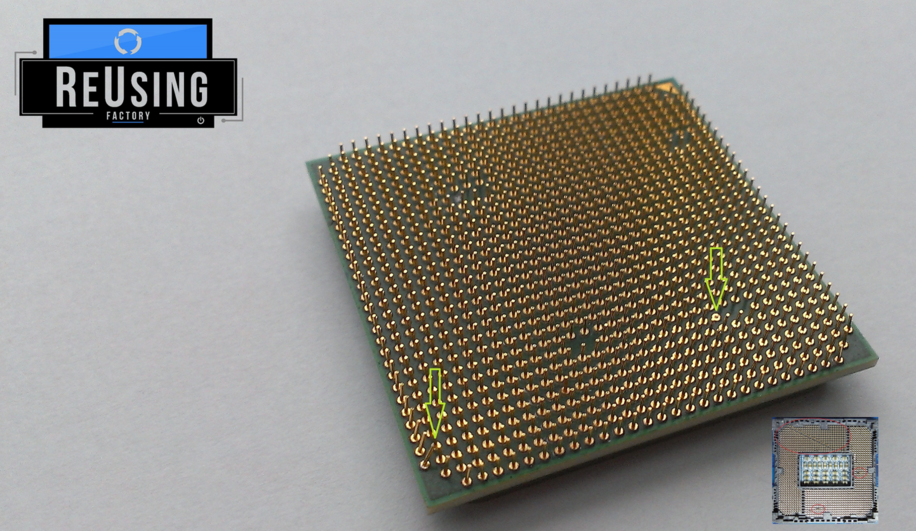
Taking extra care is necessary at all times when handling a CPU chip.
Improper insertion of the CPU into the socket and then locking it into place is usually how most pins get bent.
Dropping the CPU is another sure-fire way of damaging the pins.
A less common cause is dirt or debris in the pin grid of the socket that can distort the CPU pins.
And simply knocking the CPU against any surface will bend the pins out of alignment.
I’ve even been unlucky enough to receive a new CPU in the post which already had a few pins bent.
Bent pins will cause hardware issues in your computer if unfixed. Ost of the time your PC won’t even start.
Fortunately, bent CPU Socket pins are easy to fix by just using everyday items you have lying around the house.
3 Easy Ways Of Fixing Your Bent CPU Pins
Realigning CPU Pins Using A Mechanical Pencil
This method works best if you only have a few individual bent pins.
Here’s how you can do it:
Step1: You need the mechanical pencil to fit snugly around each CPU pin, so you need to find a properly sized pencil that has a 0. 5 or 0.7 millimeter opening.
Step 2: Carefully remove any pencil lead left from the mechanical pencil since you need the pencil’s opening to be free of any obstructions.
Step 3: What you want to do now is to carefully place the empty tip of the mechanical pencil over a bent pin and slowly maneuver the tip so that you’re bending the pin back into its original straight form.
Step 4: Repeat step 3 on all the bent CPU pins. But be very careful not to bend the pins too many times, in my experience, they turn brittle very quickly and snap.
Step 5: Once you’ve realigned all the pins,remount your CPU chip back to the motherboard and try to boot up your computer to check if everything works properly.
Realigning CPU Pins Using A Sewing Needle
This method works best for ‘hooked’ pins or those that are bent so far that it’s impossible to straighten the pins with just a mechanical pencil.
Step 1: Find a sewing needle that can fit between two CPU pins. If you don’t have needles at home, small tweezers or a toothpick works just fine as well.
Step 2: Carefully slide the needle underneath an individual bent pin without scratching the surface of your CPU chip.
Step 3: Next, you need to pull the needle up at one end to help leverage the bent pin back in place.
Step 4: Try re-straightening all the other bent pins using the needle, and if the pins still need a bit of bending, try the mechanical pencil approach to get all the pins straighter. Again, be careful not to re-bend the pins too much so they won’t snap.
Step 5: Mount your processor to the motherboard, and boot your computer to see if the trick worked.
Realigning CPU Pins Using Your Credit Card
Step 1: In this method, you need a hard, flat workspace to place your CPU chip on, pins up.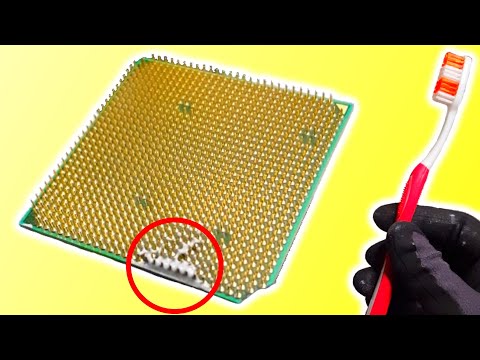
Step 2: Next, find the right card to do the job. Make sure the plastic card (your credit card or gift card will work just fine) is not too flimsy so you can bend back the pins without difficulty.
Step 3: Locate a row on your processor chip that has bent pins in it.
Step 4: Gently run the plastic card through one bent pin in both directions as if you’re making a “#” symbol with the card. Be careful not to bend the other pins in the process. Doing this will bend the pin straight in each direction.
Step 5: Replace the CPU back to the motherboard without shoving or jamming it to prevent any more bents in the pins. Finally, turn on your computer to see if the method worked.
Summary
Don’t let bent CPU socket pins get you down! Remember they can be fixed.
Here’s a quick rundown of what we’ve covered:
- CPU pins can be realigned using a mechanical pencil
- Hooked pins on intel sockets can be bent back using a sewing needle
- A credit card can be used to realign pins on a CPU
What Next?
How do I pick out a CPU if I want an upgrade?
There are three important things to consider when upgrading a CPU:
- The Socket Type
- The CPU Speed,
- The Core count.

What should I do if a pin has snapped off?
Unfortunately, if a pin has broken off your CPU, you only have two courses of action:
- Solder a replacement pin back on
- Buy a new CPU
What happens when you touch a processor?
If you touch the top of the CPU, which is the flat grey heat spreader, your finger oils could make your thermal paste less efficient thus give you higher temperatures.
If you touch the bottom of the CPU, also called the “contacts” or the pins, your finger oils might interrupt the connection between the pins and the sockets. So it’s best to grab the processor at the sides.
Tweet
Email
Print
Recent Posts
link to Review: Maono PD400X USB/XLR Podcast Dynamic Microphone
Review: Maono PD400X USB/XLR Podcast Dynamic Microphone
Score 5/5
Pros
Outstanding recording quality.
Very high build quality.
Rubber feet on the stand are welcome.
The unboxing experience was high quality and…
Continue Reading
link to The Complete Guide to Becoming a Jarl in Skyrim
The Complete Guide to Becoming a Jarl in Skyrim
You’ve slaughtered the dark brotherhood, joined the thieves gilled and pickpocketed Skyrim dry, and the Dragons have been vanquished back whence they came. But, Dovahkiin, you are still drunk on…
Continue Reading
How to assemble a computer yourself from components in 2018
Assembling a computer is not difficult. Assembling a computer as a designer — all the details fall into place only and knowing the theoretical part, in principle, there should be no problems with the assembly. All that is required of you is time and accuracy, since this constructor is often expensive and does not forgive mistakes.
In this article, we will look at the most important aspects and questions that may arise when building a PC. How to assemble a computer and not break anything? nine0003
Before assembling a computer, you must be sure that all components are compatible with each other. Checking the components for their compatibility is not difficult. If you are not sure yourself, then use the special assembly configurators that are available at many stores. For example, one of these configurators is www.regard.ru/cfg.
By the way, you can choose the most suitable assembly for you on our channel in Yandex.
Processor
There are two types of pads on desktop processors: PGA (in the form of “pins”) and LGA, where they have been replaced by contact surfaces. nine0003
PGA is used in AMD processors and older versions of Intel. After socket 775 (the place where the processor is installed), Intel switched to the LGA socket. It is extremely difficult to bend or break anything in such a processor, which cannot be said about motherboards for this connector. Manufacturers of motherboards for the Intel socket put a special plug for a reason.
Under it are a lot of contacts, which are called «legs». This is where accuracy is needed. You will most likely not get any dust or dirt that has fallen. The legs are very flimsy. If you bend one of the legs, then it is quite possible a mat. board will be invalid. It’s also not worth it to level them yourself. If this still happened, it would be wiser to contact the service center. nine0003
The socket cap must be removed just before installing the processor. Check if all the legs are intact, if nothing is bent, and only then proceed to install the processor into the socket.
By the way, the plug on the latest versions of motherboards for Intel processors can not be removed at all.
The locking mechanism is opened with a special lever. The flag on the processor and the socket must face the same direction.
He and a pair of keys on the connector and the processor are your main points of reference. Make sure that the processor is properly seated on the contacts, and only then close the locking mechanism. nine0003
He will resist a little, but don’t be afraid. This is normal, it’s just that the processor bezel presses the processor quite tightly against all the legs.
AMD processors are different. Their “legs” are located directly on the processor, and the motherboard connector is made in the form of special niches for these “legs”. Make sure that all the legs on the processor are in place and nothing is bent, and only then proceed to install the processor into the socket. When installing, again, you should focus on a special markup (check box). nine0003
Installing AMD processors is easier. Carefully open the socket and install the processor. It should be fully seated in the socket.
Next, close the socket with a special lever. The main thing is to avoid unnecessary efforts.
Cooling system
Installing the cooler may be more difficult than installing other components. They often have thermal paste already applied. Should it be replaced with something more valuable? If it’s a budget cooler or a box cooler (included) — yes, it’s desirable, but not critical. On top-end cooling systems, this will be superfluous. nine0003
Before installing the cooler, wipe the surface of the processor. This can be done with alcohol or a degreaser.
Read the instructions, do not ignore this step. Install and check that the cooler is fixed and does not hang out. You can grab it with your hand and lift it with the motherboard.
With cooling for AMD processes, everything is easier, but we must also read the instructions. We install the cooler and fix it with a lever.
A cooling system purchased separately also usually has thermal paste already applied, but fixing methods may be different. For tower coolers, for example, you need a special substrate for the processor (backplate), and in the case of AMD processors, you may need to dismantle the native latches on the board
Tower coolers are usually mounted with screws, the mounting key is most often included.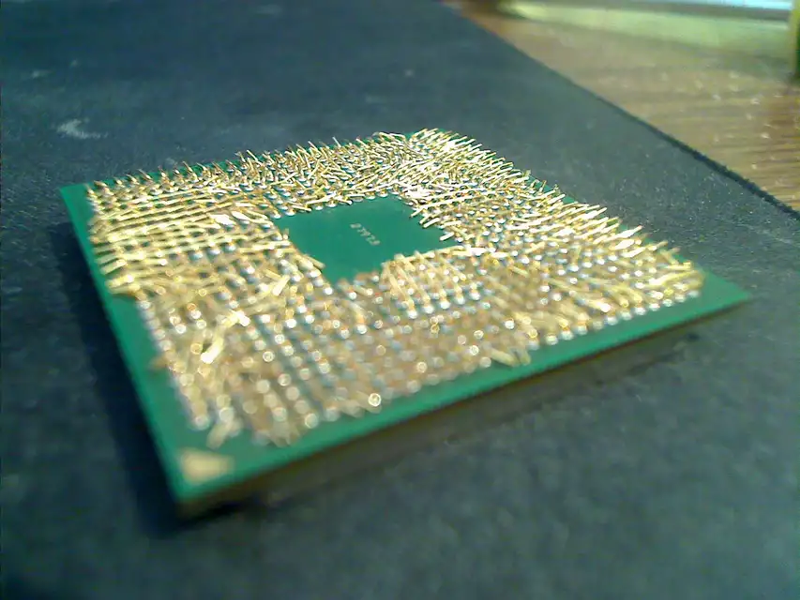 The most important thing when installing such a cooler is not to overdo it with tightening the screws. It should fit snugly against the processor, and not dangle, but this does not mean that the screws need to be tightened like a car wheel.
Don’t be too zealous. After installing the cooling system, connect it to the motherboard — CPU FAN connector.
Thermal grease
Sometimes the paste is not applied to the cooler, but lies separately with it in the box. Then you have to apply it yourself. The paste is applied only to the metal cover of the processor. The thinner the layer, the better. nine0003
Apply paste well, eg with a plastic card. It is not desirable that the paste gets on the processor substrate. Some thermal pastes conduct electricity and this can cause a short circuit.
Simply apply some paste to the center of the CPU and install the cooler. Under pressure, it is evenly distributed over the processor cover. Sometimes the edges remain unlubricated, but they do not play a significant role in the process of heat dissipation. Which thermal paste is better to choose and how to change it, read here. nine0003
RAM
The simplest thing is to install RAM. True, in slots with one-sided fixation, memory is inserted more difficult. Sometimes a normal effort is required.
There is a key in the socket socket, a notch on the memory board. Open the latch on the slot, insert the model until it stops, close the latch. Make sure the memory is level, especially for slots with one-sided fixation.
It often happens that the module is not fully inserted on the lever side. This can lead to the fact that after turning on the PC, the system will not start. nine0003
Usually, before installing the motherboard in the case, I check the system’s performance on an open bench. You can not do this, but maybe someone will come in handy.
After installing the processor, cooling system, hard disk and RAM, I power the motherboard, processor and connect the HDD from the power supply. Next, I close the connectors with a screwdriver, to which the power buttons from the case are connected. They are usually found in the lower right side of the mat. boards:
Also, before installing the motherboard, do not forget to install a special socket for the connectors that came with the motherboard on the back of the case. It starts from the inside of the case and is installed, as it were, by pressing it outward.
The board must stand in the case on special racks (stubs), there are from 4 to 15 of them. Don’t miss this moment! After matching the motherboard with its approximate location in the case, screw the racks into these holes in the case. nine0003
They must be the same height. Check if all the “stumps” are screwed into the body to the same height (until the end). In cheap cases, this can be a problem and often cannot be done without the help of a tool. The motherboard should not touch the case, it should lie evenly on the racks.
Standoffs are part of the chassis kit. It happens that there are more holes on the board than on the pallet. Don’t worry, you don’t have to use everything. The main thing is to fix the edges of the board and the middle of the board at least in one place. nine0003
Drives
Connecting a drive is easy. In the case of a conventional SSD (2.5 inch) or hard drive, you will only be dealing with two wires: power and the data (SATA) wire that comes with the motherboard.
Check the location of the key, if nothing interferes with their normal connection. With the SATA cable, everything is the same. In most cases, the cord has a latch with a lever at the top of the connector. If the cable needs to be removed, just pinch it, otherwise you can break the connector on the motherboard. nine0003
In modern cases, drives are fixed in special sleds. It is very convenient and does not require special screws, unlike budget cases.
Wire management
Avoid situations where the power wires or connector are kinked to the device, you are guaranteed to break the block or connector on the device itself, especially for drives.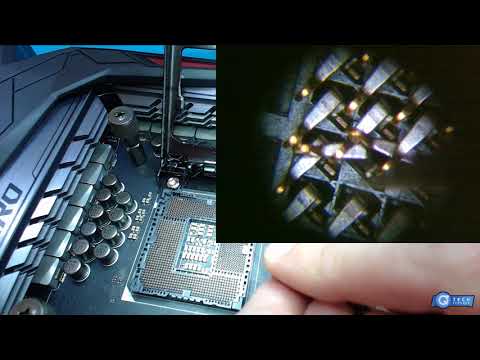
You can not give a damn about accuracy and cram all the wires in a lump. The system will certainly work, but unfortunately. The wires will interfere with the normal air circulation in the case, the system will become dusty faster and will overheat. Plus, there is a chance that one of the wires can get into the cavity of the processor fan. nine0003
Lead wires behind the rear wall and fix them with cable ties through special eyelets.
Case fans
There are usually two in front and one for exhaust. Attached to the body with self-tapping screws. Before installing into the case, pay attention to the airflow indicators. If this is the back wall (or the upper part of the case) — an arrow for blowing out of the case, the front one — air intake into the case.
The fan can be connected both to the motherboard and to the power supply (via an adapter). If the fan has a 4-pin connector, then you need to connect it to the corresponding connector on the mat.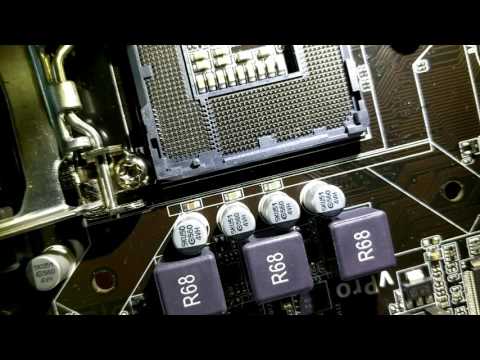 board, which is designated as SYS FAN. The advantage of the 4-pin connector is the ability to automatically control the fan speed depending on the processor load. nine0003
Make sure that nothing is blocking the air circulation path. The upper part of the hard drive should be ventilated — this will prolong its life.
Connecting the Power Supply
First of all, we connect the most important cables. There are two of them — a 24 pin (or 20 + 4) power cable for the motherboard and a cable for powering the CPU 8 pin (or 4 pin). We insert them to the limit, hear a characteristic click (not always). Do not confuse the wires of the 4 pin CPU and PCI-E power supply.
Sometimes it happens that the processor power connector on the motherboard has an 8-pin connector, but the power supply cable designed for the CPU is only 4 pin. nine0003
You can connect half and it will work, but it is not desirable to do so. Not the fact that your motherboard will survive it.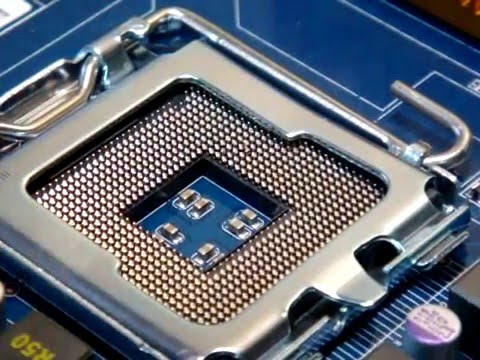
By the way, this does not apply to video cards, and we’ll see why later. If the characteristics of the power supply indicate CPU power 4 + 4pin, this means that the type-setting connector is suitable for both 8-pin and 4-pin connectors.
The same with the power supply of the board. Power 20 + 4 means that your block is suitable for both motherboards with a 20-pin slot, and for a standard 24-pin slot. nine0003
The situation is different with the video card. Here, too, there is a dial-in connector for 6 + 2 pins or only 6. In fact, there is only a 6-pin connector. It can be one, two or three — depending on the coolness of your power supply. And it differs from the 8-pin only by a jumper.
Additional 2 contacts do not create a potential difference, these are two zeros. They serve as a marker to the card that your power supply is strong enough for the card and will provide the correct amount of current.
It is not recommended to use adapters, for example, from Molex to PCI-E, and even more so, you should not power the processor or motherboard with them.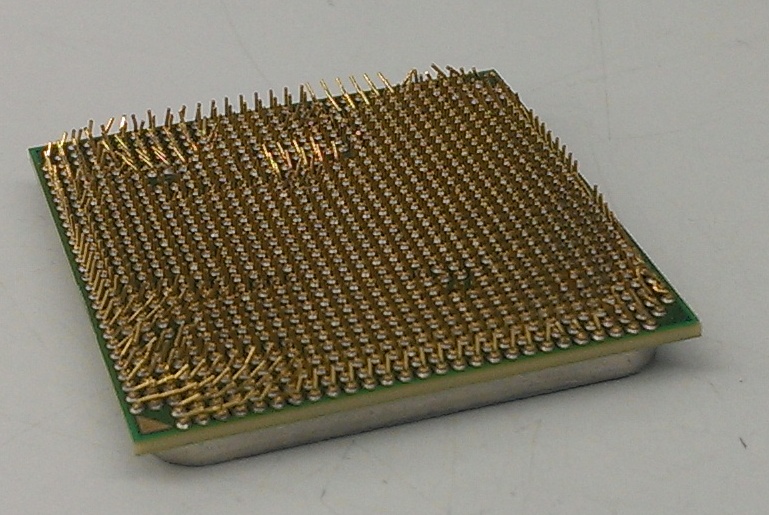
Connect additional chassis ports carefully. Do not hurry. There is a key on the connector — be guided by it, make sure that the legs of the connector are even, do not bend them. This is especially true of the USB 3.0 connector. It is not uncommon for the user to bend the leg on the connector due to inattention or tear it off when he sharply removes the connector. How to connect the front panel of the computer to the motherboard is described in more detail here. nine0003
Video adapter
Typically, the video adapter is installed last. Everything is simple here. Insert the video card into the graphics slot and fix it with a screw on the expansion card frame. If the card is wide, it is better to fix it with two screws.
Don’t forget the latch on the slot. It’s not for beauty. Before installation, it must be opened and only then we insert the video card until a characteristic click. Remove the card only with the release lever. Click on it, and the card will rise in the slot, after which it can already be removed.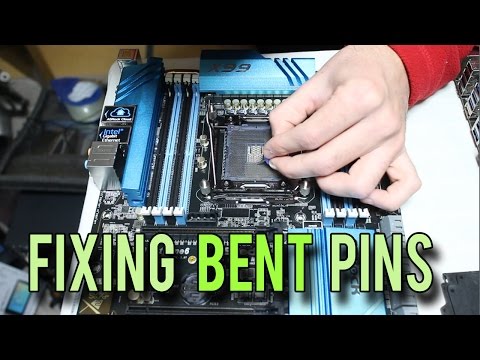 nine0003
Static electricity and how to deal with it
Do not assemble a PC in synthetic socks while standing on a wool carpet. You can use plain cotton gloves, especially when working with RAM modules without heatsinks. Perhaps this is the only detail that is afraid of static. Common sense and the obligatory reading of instructions are your best assistants.
If the computer does not start after assembly, check how you installed the components. It starts, but rather stops working — more likely a problem with RAM or its incorrect installation. assemble a computer
If it comes to the BIOS already well, you can find a possible cause. If the lights on the motherboard light up, the coolers spin, but there is nothing on the monitor, check the installation of the video card. Resetting the BIOS or updating it may help.
As you can see, assembling a computer from components is not so difficult. The main thing is to know the theoretical part. We have summarized the main points that may come in handy.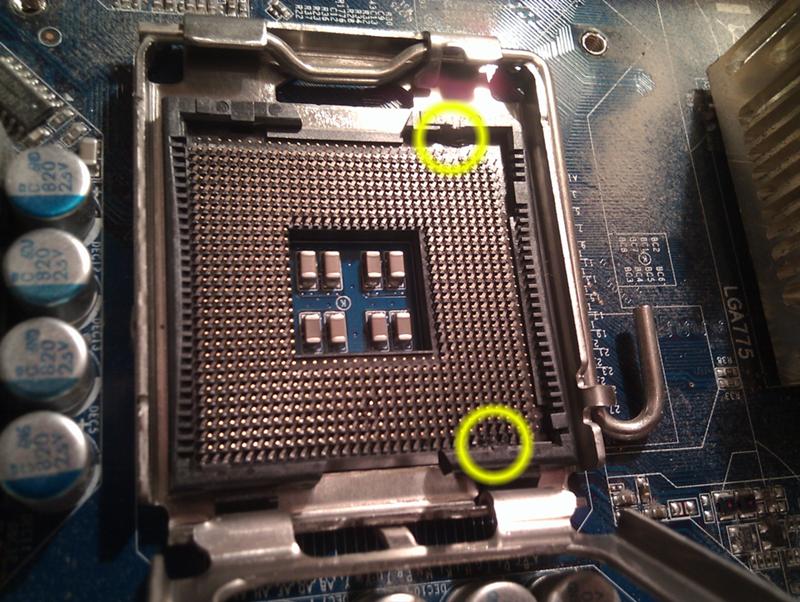 Naturally, this is not all. How many variations of the component are so many possible problems. The components must not be mechanically damaged. Before you decide to assemble a computer, carefully check the components for external defects. Good luck with the build. nine0003
What should I do if I broke off the leg of the processor when assembling the computer? — POCHEMUKHA.RU answers to questions.
Since assembling and disassembling a computer is no longer so frightening to the minds of ordinary computer users, and many even simply assemble computers from spare parts (but, no doubt, it is cheaper), counter-problems arise. Recently I had a problem, I change the processor not for the first time, but this time I hurried and broke off his leg. After much torment, I learned several ways to fix this oversight, and this, as it turned out, is not very difficult. nine0003
Processor legs usually do not fall off by themselves. After all, for this, processors have us — experimenters. Troubles occur when trying to straighten bent legs or when transporting processors (for example, I damaged a leg when inserting a processor into a socket). Worst of all, this is when the leg breaks off completely along with the contact area. If you notice that the leg has fallen off, so to speak, with the root, then you can safely use your processor as a fashionable keychain.
It is worth straightening bent legs very carefully, it is best to use something very hard and flat, I recommend an iron ruler or, for example, a medical needle. nine0003
So what should we do if we failed to align the leg, and it “safely” broke off? Don’t panic and focus on getting results. Let’s look at a variety of ways to restore the normal operation of the processor. Fortunately, there are a whole lot of them:
- You can restore a broken contact with a thin copper wire. To do this, we need a copper wire with a diameter of 0.4mm. Now you need to cut off a piece of the right size so that when you insert it into the socket, part of the wire looks out a little, then we press it on top with the processor.
 To achieve a good result, you have to repeat the manipulations several times, but the result will certainly be positive. Also, if you find it difficult to find a wire of a suitable diameter, then you can use a needle that is the right size instead. nine0234
- There is a way to glue a torn off leg from the processor or even a wire using an adhesive that conducts current, called «Contactol». It is better, of course, to glue the leg than the wire. If the native leg is lost, then you can take it from another processor (dead donor). It is better to take a donor leg, because it will definitely have a larger bonding area than any, even perfectly matched wire, which will result in a better connection. In general, both in the first and in the second case, after performing all the operations, it is better never to remove the processor from the socket again. nine0234
- The most difficult thing will be to solder the broken leg, but the fastening will be the most reliable, and the processor after the operation can be pulled out of the socket.