How to Power Limit your GPU with MSI Afterburner (AMD and NVIDIA)
In this guide, we will show you how to power limit your GPU. Using this method, your graphics card will run cooler, quieter, and more energy efficient. The method is particularly useful for owners of the latest generation NVIDIA GPUs, such as the RTX 4090 and RTX 4080.
These graphics cards are far from efficient at their default settings and may consume more than 450 watts when fully loaded.
In any case, it is a good practice to power-limit power hungry GPUs.
MSI Afterburner power limiting is a form of GPU underclocking that simply allows the card to drop frequencies/voltages, thus dropping power consumption and losing a bit of performance (around 5-10% for RTX 4090).
To accomplish this, we will be using a piece of software called MSI Afterburner. You can set it up in a matter of seconds, and it works with Windows.
What is MSI Afterburner
MSI Afterburner is a tool for monitoring and overclocking graphics cards. The software supports all major models from AMD and NVIDIA.
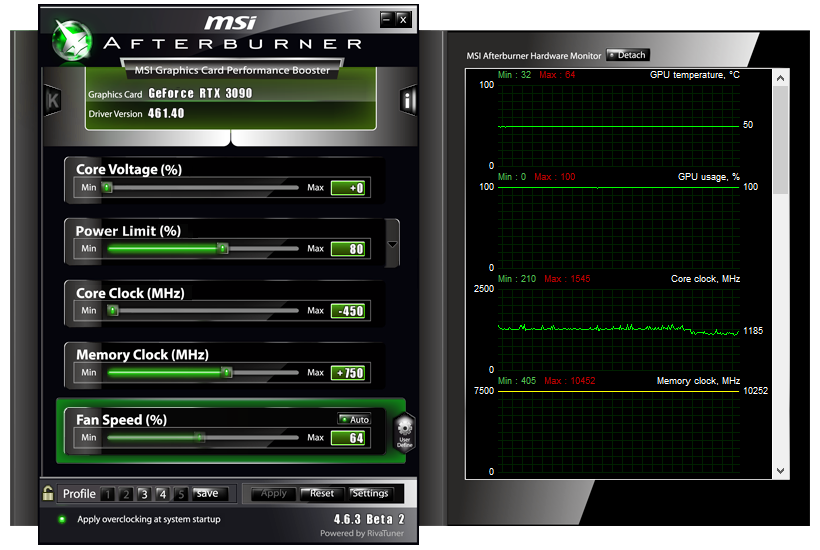
On the main screen there is a slider called Power Limit (%), which determines the maximum power consumption of the GPU. By default the slider is set at 100%, but you can move it left or right to decrease or increase the power consumption. To perform overclocking you can move the slider to the right and increase the power limit. Respectively you can move it left to reduce the consumption.
How to power limit NVIDIA and AMD GPUs with MSI Afterburner
To apply power limit to your NVIDIA or AMD graphics card do the following:
- Download and install MSI Afterburner
- Run MSI Afterburner
- On the main screen find the Power Limit (%) section
- Move the slider to left to reduce the power limit to 70%
- Use the apply button (the checkmark) to use the new settings
You can experiment with different power limit values and games. It is all personal preference.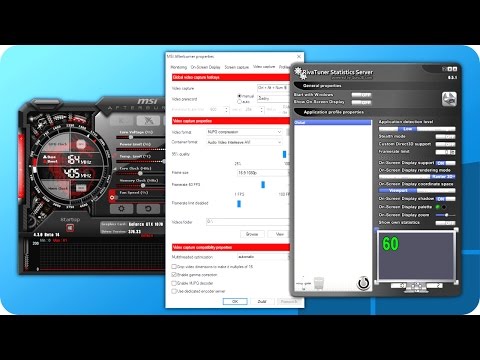 Check how much performance you lose and fine tune the settings.
Lets see some numbers and how much you are going to save in terms of power.
NVIDIA MSI Afterburner Power Limit performance test
The system we use is AMD Ryzen 5700X with 32 GB of DDR4-3200 memory and RTX 4090 Founders Edition graphics card. The test took 30 minutes at 4K resolution and three levels of power limit applied – 100%, 80% , and 60%. The game we test is Total Warhammer 3.
| Power limit 100% | Power limit 80% | Power limit 60% | |
| Average FPS | 122.5 | 120.2 | 113.2 |
| Clock rate | 2680 MHz | 2500 MHz | 2280 MHz |
| Temperature | 75 °C | 72 °C | 64 °C |
| Fan speed | 1700 RPM | 1480 RPM | 1100 RPM |
| Power | 460 watts | 360 watts | 270 watts |
Yes, we see less FPS, but much better performance with all the other parameters.
The system is cooler, the GPU is quieter and power consumption is drastically reduced.
AMD MSI Afterburner Power Limit performance test
For our AMD test we use an AMD Ryzen 5700X CPU with 32 GB of DDR4 memory and RX 6900 XT graphics card. The test took 30 minutes at 2K resolution and three levels of power limit applied – 100%, 80% , and 60%. The game we test is Total Warhammer 3.
| Power limit 100% | Power limit 80% | Power limit 60% | |
| Average FPS | 71 | 66 | 60 |
| Clock rate | 2300 MHz | 2190 MHz | 1910 MHz |
| Temperature | 78 °C | 75 °C | 70 °C |
| Fan speed | 1650 RPM | 1150 RPM | 780 RPM |
| Power | 300 watts | 258 watts | 200 watts |
The second test system confirms the result of the first one – less power consumption, quieter and cooler GPU.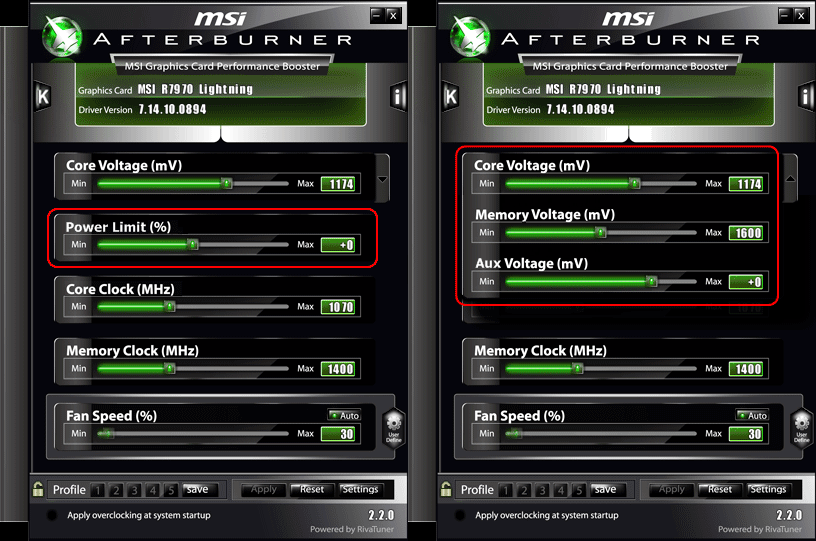
Is it dangerous to use MSI Afterburner power limit setting?
No, using MSI Afterburner power limit is not dangerous. In general, your GPU will reduce its clock/voltage when it reaches the target limit. Whenever you make a change, you can undo it with a click of the button.
Conclusion
Our suggestion is to experiment with the slider. See what combination of power limit, power consumptions, and loss of performance you can tolerate.
We think that a value between 60% and 75% will give you the best outcome in terms of power consumption to performance loss.
MSI Afterburner Not Detecting GPU
MSI afterburner is one of the sought-after software to manage and configure the system performance. This tool is widely used as it offers a one-click solution for overclocking. However, in recent times, users are reporting that it is not able to detect the GPU and is restricting them from performing system tune-ins.
This is very likely to happen if some other application interferes with Afterburners functionality.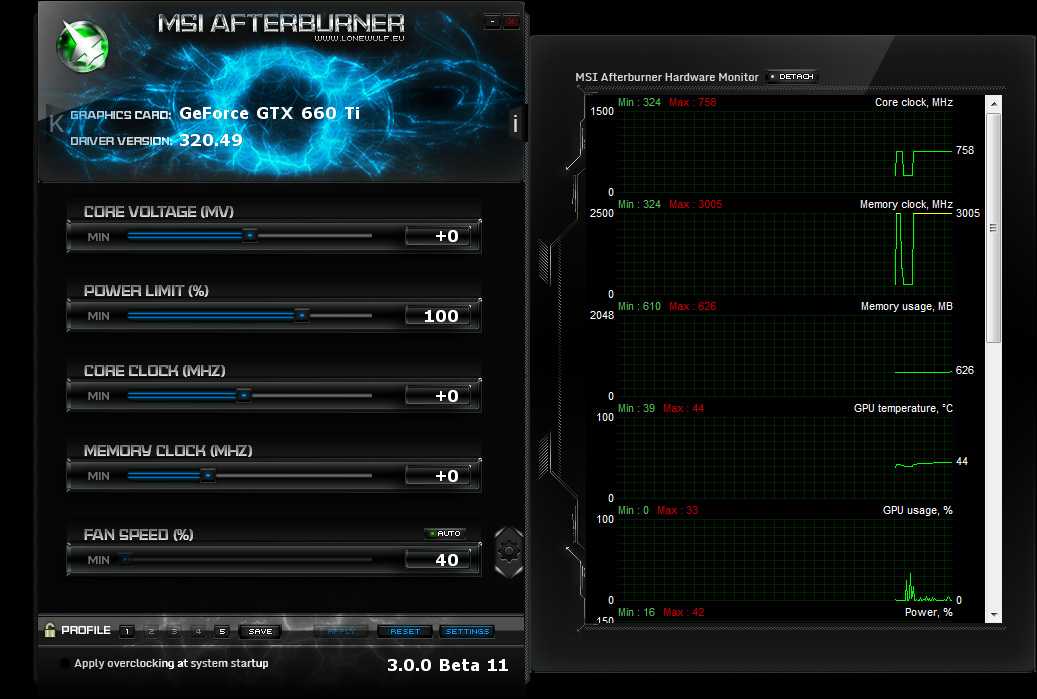 The obvious fix for this is to identify that particular program and disable it.
So, today in this article, well go into more detail regarding this problem and the various fixes you can use to solve it.
Table of Contents
Why is my MSI Afterburner Not detecting GPU?
Here are some salient explanations for why the MSI Afterburner may not recognize the GPU.
- Display unit connected to a wrong port
- Outdated Graphic card Drivers
- Apps interfering with the Afterburner
- Outdated Afterburner version installed
- Issues with the configurations in Afterburner
How to Fix MSI Afterburner Not Detecting GPU
Before you start the fixes below, perform basic troubleshooting by restarting the computer and checking if the issues persist after it boots up. Also, ensure that the monitors cable is connected to the correct GPU port. Try using a spare cable and see if the Afterburner registers the GPU.
Finally, try these fixes to find the resolution to this problem.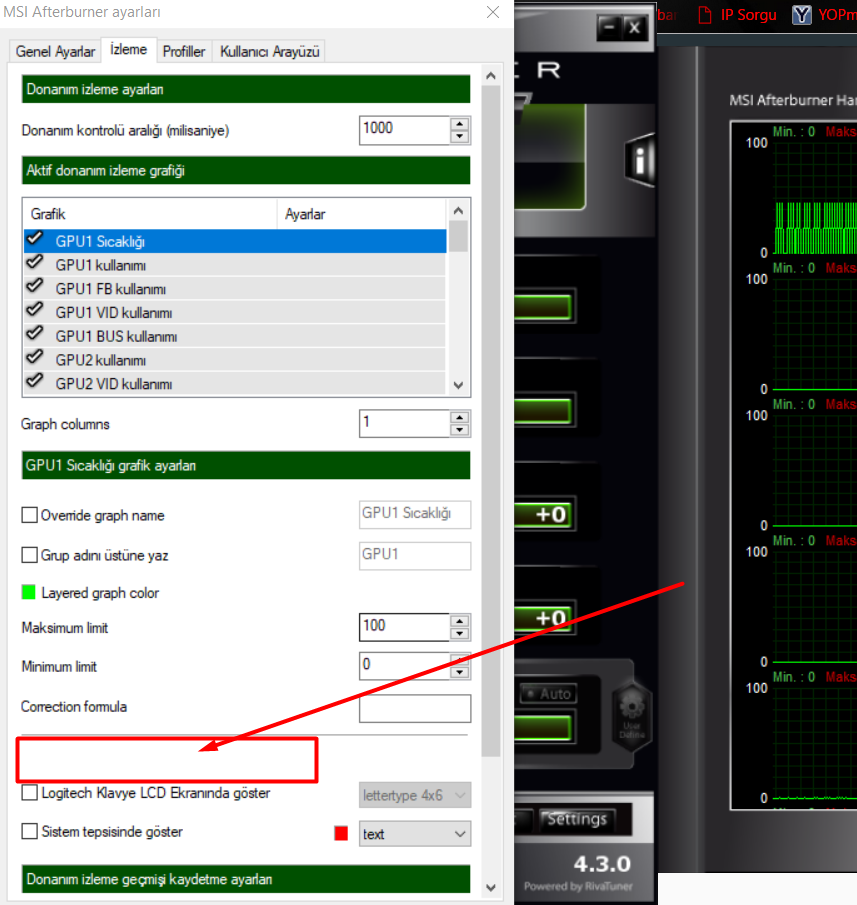
Disable Low-Level IO Driver
The Low-level IO driver facilitates communication between the Afterburner and the GPU to configure the GPU settings. This driver assists the Afterburner in bypassing the BIOS, in overclocking the GPU. However, as reported by many users, this functionality has prevented Afterburner from detecting their GPU.
The feature is enabled by default in the Afterburner, but you can disable it from the settings. Heres how you can do it.
- Open MSI Afterburner.
- Click on the Settings button.
- Under the Compatibility properties, you will find the Enable Low-level IO driver option.
- Click on it to uncheck the option and disable it.
- Click on Apply to save changes.
Uninstall Conflicting Apps
It is found that some apps are interfering with the Afterburner and preventing it from detecting the GPU. Vanguard anti-cheat is one such application found to be the culprit for this issue.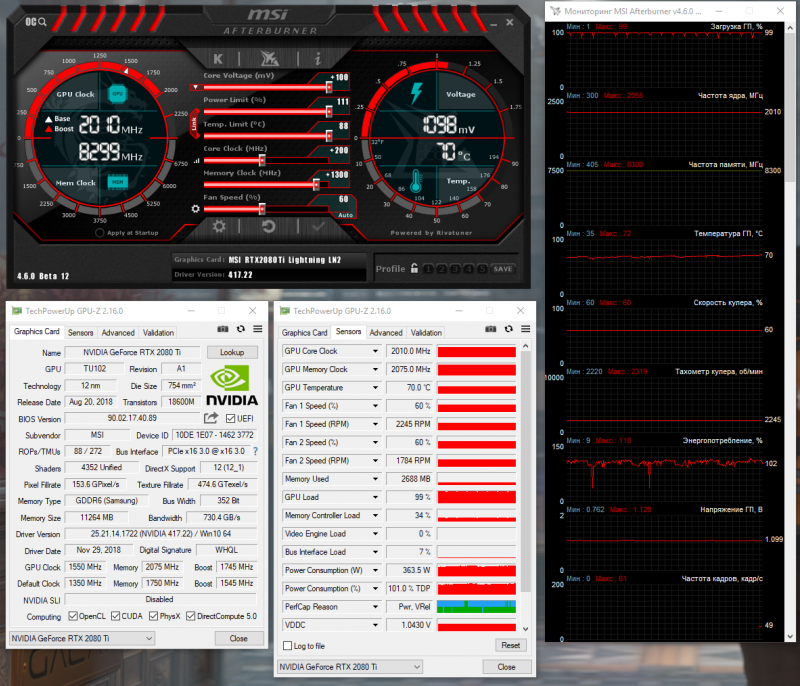 Most users have found that turning it off enabled the Afterburner to function properly.
The Vanguard program seems to interfere with the MSI Afterburn for some reasons and restricts it from recognizing the GPU.
You also can try disabling the Vanguard using this process.
- Go to the System tray.
- Find the Riot Vanguard Icon and right-click on it.
- Click on Exit Vanguard.
- Click on Yes when asked for confirmation to turn off vanguard. Your device will now restart.
- When the device boots up, check if the Afterburner is functioning well.
Note: After disabling the Vanguard, you wont be able to play the Valorant. You must re-enable it and restart the device to play the game.
If you have found any other application to be interfering with the Afterburn, try uninstalling that too.
- Press Windows + I to open up the Settings.

- Go to Apps > Apps and features.
- Navigate to the app you want to uninstall and click on the three vertical dots on its side.
- Click on Uninstall and give confirmation to remove the application from the device.
Perform Clean Boot
The clean boot is a great tool to troubleshoot issues in Windows and determine if a specific app is causing the issues. The Clean boot operates the windows under limited programs and drivers that let you resolve the issues related to system applications. To fix the MSI Afterburner issue, you should try troubleshooting through the clean boot.
- Press Windows Key + R to open Run.
- Type
msconfigand hit enter to launch the system configurations. - Navigate to the General tab and click on Selective startup.
- Uncheck Load startup items.
- Now, go to the Services tab and Click on Hide all Microsoft services.
- Click on Disable all.
- Go to Startup Tab and click Open Task Manager.
- In the Task Manager, select every app listed there and disable it.
- Restart the computer and check the Afterburner if it is detecting the GPU now.
If the Afterburner is functioning file, this indicates that the application you disabled earlier might be at fault for this error. Run trial and error by enabling the applications one by one, and uninstall the program that is causing the issue for Afterburn.
Update GPU Drivers
If you have outdated GPU drivers installed on your device, the MSI Afterburner probably misses out on detecting it. Thus, installing it can give you a fix for this issue. Furthermore, use these steps to update the GPU drivers.
- Press Ctrl + X and click on Device Manager.

- Expand the list of Graphic drivers under the Display Adapters.
- Right-click on the GPU driver and click on Update.
- Click on Search Automatically for Drivers. If you have already downloaded the drivers, choose the option Browse my computer for driver.
- Follow the prompt and update the drivers to the latest version.
Reinstall Afterburner
If none of these fixes go your way, you can also try reinstalling the Afterburner. The Afterburner might not have been properly installed, or it might be incompatible with the system.
If such is the case, use these steps to reinstall it by downloading the latest version from the MSIs download center.
- Go to the Download page for the MSI Afterburner.
- Click on Download Afterburner. A zip file will start downloading.
- Go to the download directory and extract the zip file.
- Open the executable file from the extracted folder and install the MSI Afterburner.
Perform Windows Updates
Sometimes the Afterburner does not detect the GPU if some underlying issues exist with the system. Microsoft rolls out regular Windows OS updates that fix the systems bugs and even the drivers. Hence, it is recommended that you keep your Windows device up to date to remain free of such GPU-related issues.
Heres how you can check and download the latest system updates.
- Press Windows Key + I to open up the Settings.
- Navigate to the Windows Update options.
- Now, click on Check for updates. It will search for the latest updates available for your system. It will say youre up to date if the latest updates are installed already.
- Click on Download and install if it finds new update releases.
MSI Russia
{{blogList.tagContent}}
{{blogList.blogTitle}}
By {{blogList.blogAuthor}}
|
{{bloglist.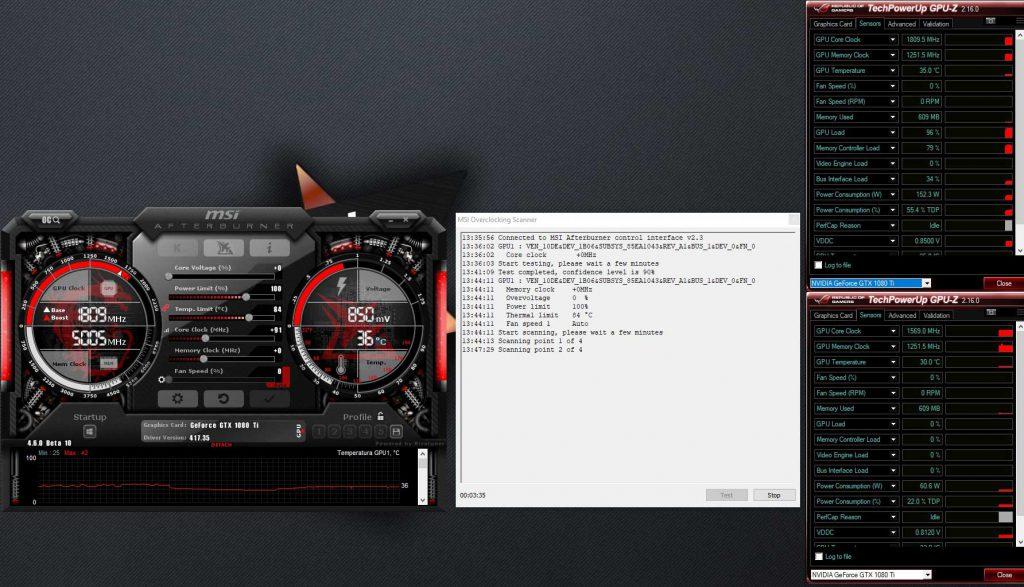 date}}
Want to monitor the performance of your system while you play? What’s the best way to see what your equipment is capable of? Does it reveal itself completely or is something preventing it?
You may have already seen game reviews with system performance information right on the computer screen while playing and wondered: How did they do it?
This information, shown in the upper left corner of the screen, is called OSD or OSD, and is one of the most commonly used functions in MSI Afterburner. It allows you to monitor the performance of your graphics card and other hardware while you play, and thus gives you important information about what can be improved to increase performance. Want to know how to get this information on your screen? Just follow our instructions below!
First, you need to get the latest version of MSI Afterburner and Rivatuner Statistics Server. Both programs are included in the MSI Afterburner installer.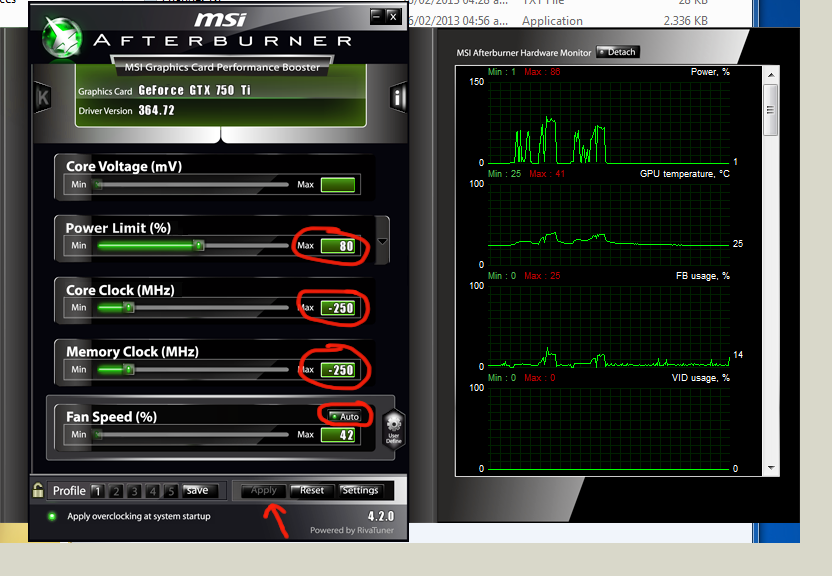 (Download here)
1. Run MSI Afterburner
2. Click “ Settings ”
3. Click “ Monitoring ” and go to “ Active hardware monitoring graphs” active hardware) and select the information you are interested in to display in the OSD menu (for example, we use “GPU usage” (GPU usage))
b. To display the information of interest on the screen, check the option “ Show in On-Screen Display ” (Show in the OSD menu).
c. In the column “ Properties ”” (Properties) you will see the inscription “ in OSD ” (in the menu). Select other information to be displayed on the screen in the same way. You can change the order of the information displayed on the screen by dragging the desired menu items up or down the list.
d. Text shown in “ Override group name “(Override group name) to be displayed in the OSD, you can change as you like. (Here we changed the name “GPU usage” to “GPU load”)
e.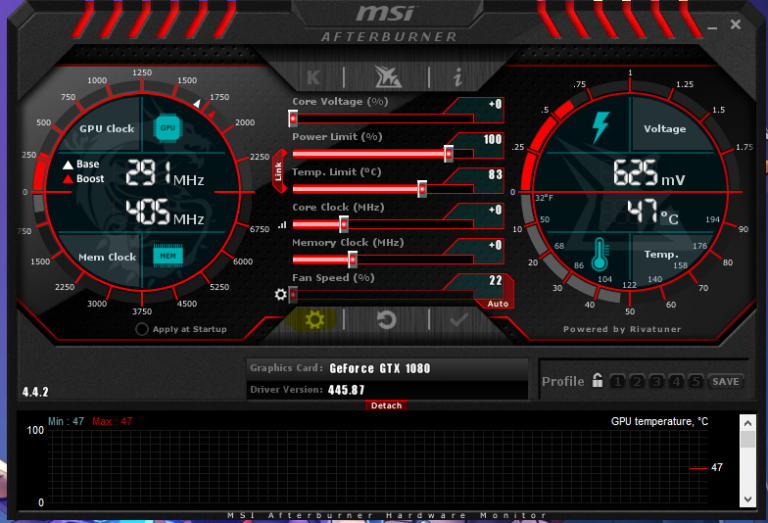 Don’t forget to click OK to save your changes and exit to MSI Afterburner.
Now when you start the game, you will see the OSD menu!
But that’s not all! You can also customize the appearance of the menu. You can easily customize the OSD using the RivaTuner Statistics Server utility, which is automatically installed with Afterburner.
1. Click on the icon “ Riva Tuner Statistics Server ”
2. In the menu that opens, you will see the settings that you can change. Here are some of the more interesting options to change:
a. On-Screen Display shadow (OSD shadow setting): When enabled, text will have a dark outline to improve its visibility.
b. On-Screen Display palette (Change OSD Color): Here you can change the color of the OSD text. You can also change the color of the shadow.
c. On-Screen Display zoom (On-Screen display zoom): Here you can change the text size of the on-screen menu.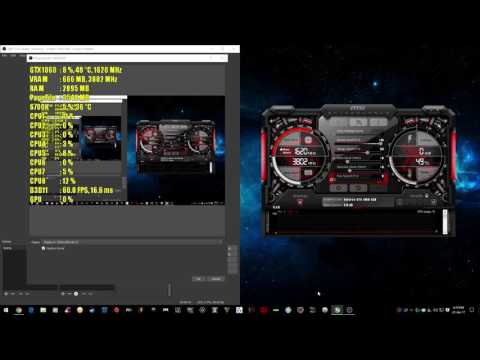
d. Position of OSD : Drag the OSD text to any position on the screen.
3. After you are done with OSD settings, start the game and watch the result. The MSI Afterburner application is a very handy tool for any gamer, not just an overclocker. You can use MSI Afterburner to optimize your gaming performance! The application is constantly updated and guarantees excellent stability and compatibility with your equipment. Since new versions are released regularly, please make sure you are using the latest version of the application, which is available for download at: http://gaming.msi.com/afterburner.
How to Use MSI Afterburner — Detailed Guide
Operating Systems
0 976 5 minutes to read
Computer hardware components turn on or off along with the entire system. They usually don’t have their own switches, except for Bluetooth and WiFi buttons, and most of the changes you can make to the hardware from inside the operating system are benign, like changing the volume, changing the brightness, turning Bluetooth on/off, etc. 0003
0003
The average computer has a number of hardware components, and the most popular desktop operating systems do not provide users with access to settings that could affect the operation of any of these components. Their settings are predefined by their manufacturers and you can’t change much if all you have at your disposal is your operating system’s settings panel.
Dedicated GPUs
Many laptops and desktops come with dedicated GPUs or dedicated graphics cards. They are mostly found in systems designed to be used in graphics-intensive tasks, such as games, animations, video processing, etc.
Its capabilities vary depending on the model, but in general the GPU is not always configured to run at maximum power.
Most of the GPUs in the system, whether the system is custom or pre-built, are configured to operate below their maximum performance level. This includes how fast they can run, how much power they can draw from the system, the speed of the GPU fans, etc.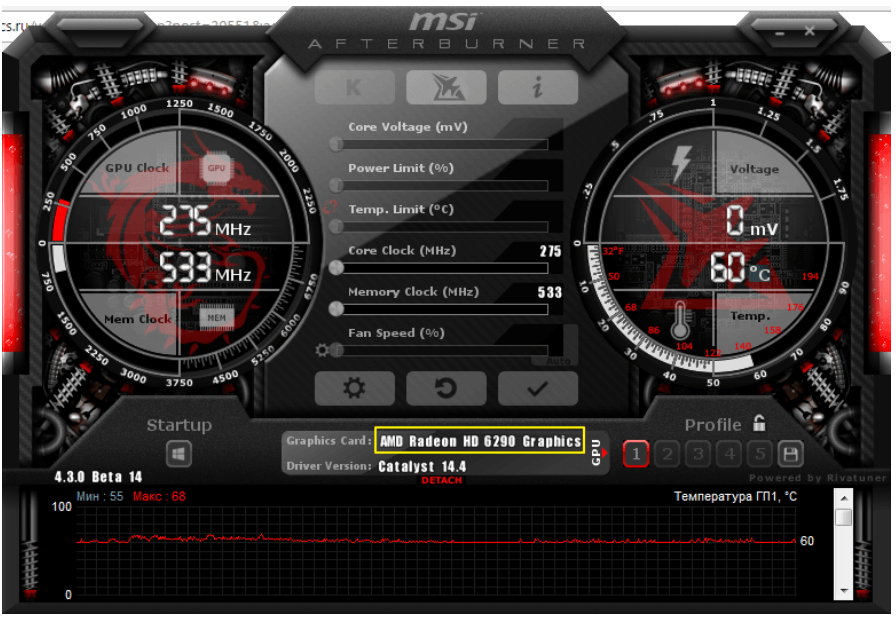
All of these settings can be changed, often resulting in more efficient GPU performance and improved system performance. The only trick is to find a tool that can handle these settings.
> What>
MSI Afterburner is one of the most popular and high performance applications available if you want to change how the GPU works on your system.
This application can work with AMD and Nvidia GPUs and is compatible with newer and older models from these manufacturers.
It was developed by MSI, a company that manufactures its own hardware components, including GPUs, and if you have an MSI GPU, this application will allow you to customize its settings, i.e. set the frequency or overclock various aspects of the hardware.
features
- GPU Status Monitor ; temperature, core frequency, clock speed, voltage/power consumption, usage.
- Comparative analysis; Test your GPU to see if it performs well.
- Video capture; Record your game at different frame rates and save it in various formats.
- Overclock / Overclock : Increase or decrease the GPU memory clock speed.
- Pressurized: reduces GPU power consumption.
- Set fan speed and create different profiles.
How to use MSI Afterburner
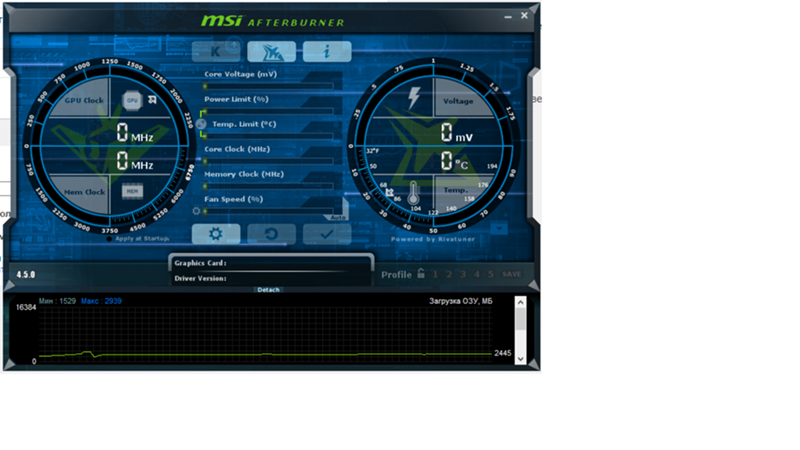
1. Monitoring with MSI Afterburner
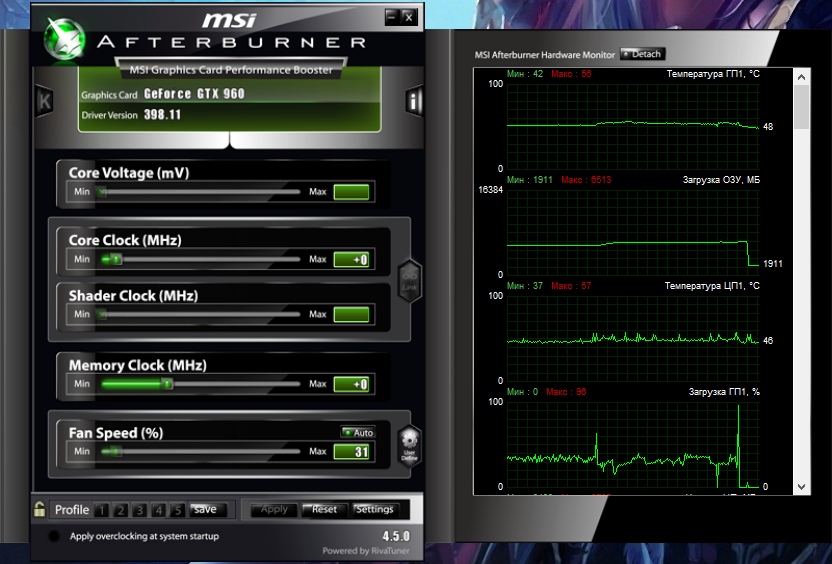
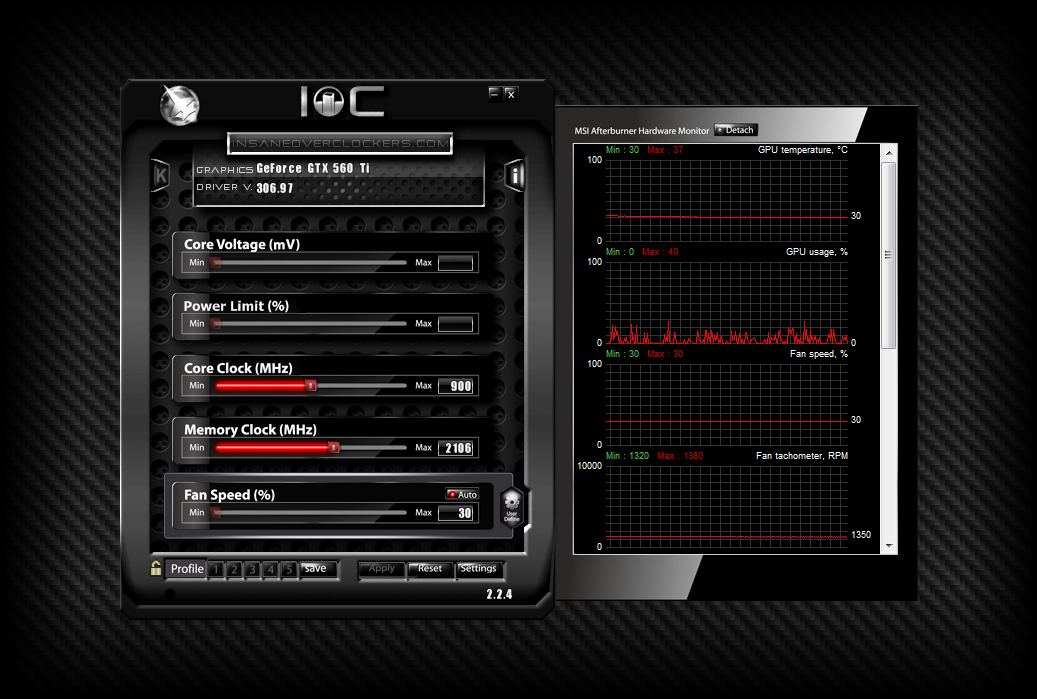
MSI Afterburner monitoring tool allows you to monitor vital aspects of your GPU live. When you overclock or underclock your memory and/or GPU voltage, you can use a monitoring tool to see the impact.
Use tracking tool;
- Open MSI Afterburner.
- down , you will see a small graph. Double-click inside this picture to make it stand out in a separate window.
- Go through temperature fluctuations, use, in VID help, in using BUS, using memory, etc.
 . The monitoring tool will also show you items The CPU is vital in addition to the GPU and integrated graphics card.
> 2.>
To run tests on your GPU, you need to use the Kombustor application. This application was also developed by MSI and works with Afterburner but needs to be downloaded and installed separately.
Application Combustor
Download the Combustor application from the MSI Afterburner website. Install it. If you have MSI Afterburner open, please close and reopen it after installing Kombustor.
Run tests
- Open MSI Afterburner.
- Make the desired changes to the GPU. If you would like to run tests in the current setup, continue to the next step.
- Press Button K at the top.
- The Combustor application opens. Press «START stress test» button.
- Leave them complete the tests and see the performance of your GPU.

> 3.>
To use the video capture function, you need to set up a keyboard shortcut that launches it.
- Open MSI Afterburner.
- Press settings button.
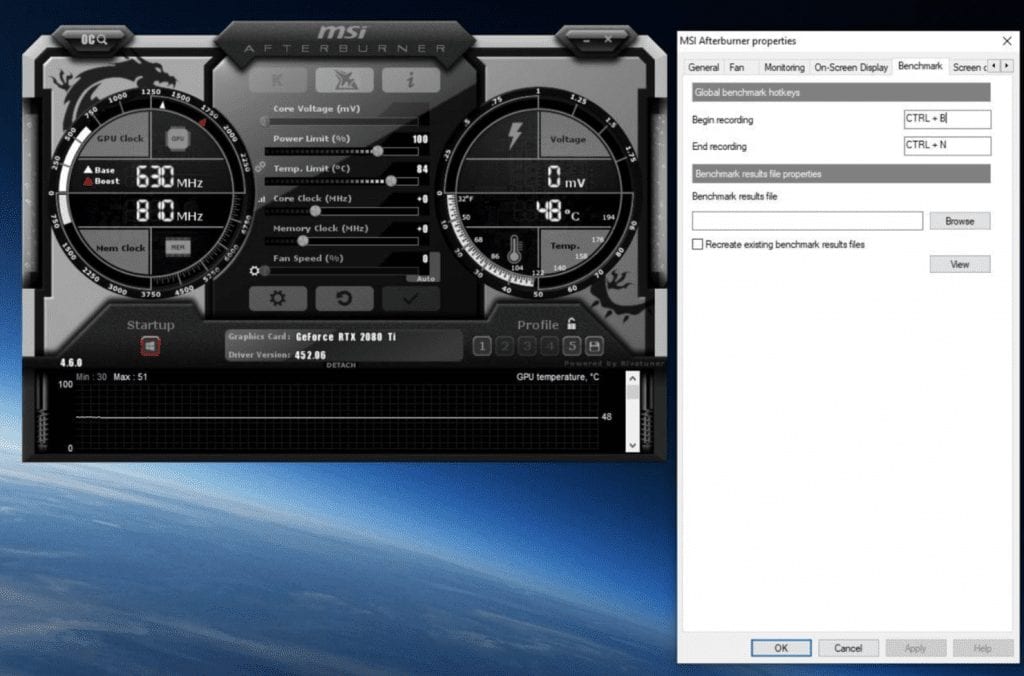
- In the settings window, navigate to Video Capture tab.
- Register keyboard shortcut for «Video Capture».
- Click Apply and then use the shortcut whenever you need to record the screen.
> 4.>
To overclock your GPU, follow these steps and remember to do so at your own risk.
- Open MSI Afterburner.
- Set maximum power and temperature limit from the respective sliders.
- Move to the center clock slider and increase the speed. Do this in small batches of to see if you set it too high for your system.
- Check out the performance of the Votre system and further increase the speed if you want or need it. If you are satisfied with the gain, do not increase the GPU clock speed unnecessarily.
> 5.>
Insufficient GPU power reduces the amount of power consumed. This may seem counterproductive, but it actually increases the performance of the processor.
- Open MSI Afterburner.
- Press settings button.
- In L ‘ General tab, select «Unlock tensioner».
- Apply change et restart application if necessary.
- Use Core Voltage and Power Limit sliders to reduce GPU power consumption.
Compatible with GPU
Before you can use MSI Afterburner to reduce GPU voltage, you must know that it will only work with Pascal GPUs. You can see a list of all Pascal GPUs here. If your GPU is not a Pascal GPU, you cannot use MSI Afterburner; however, you can look for other tools that can reduce the load on your GPU. For AMD GPUs, find the equivalent Nvidia cards and check the corresponding list.
6. Set custom fan speed using MSI Afterburner.
To adjust the fan speed using MSI Afterburner, please make sure your GPU model has its own fans. GPUs used in laptops usually don’t have their own fans, but the CPU fan keeps them cool.
- Open MSI Afterburner.
- Press settings button.
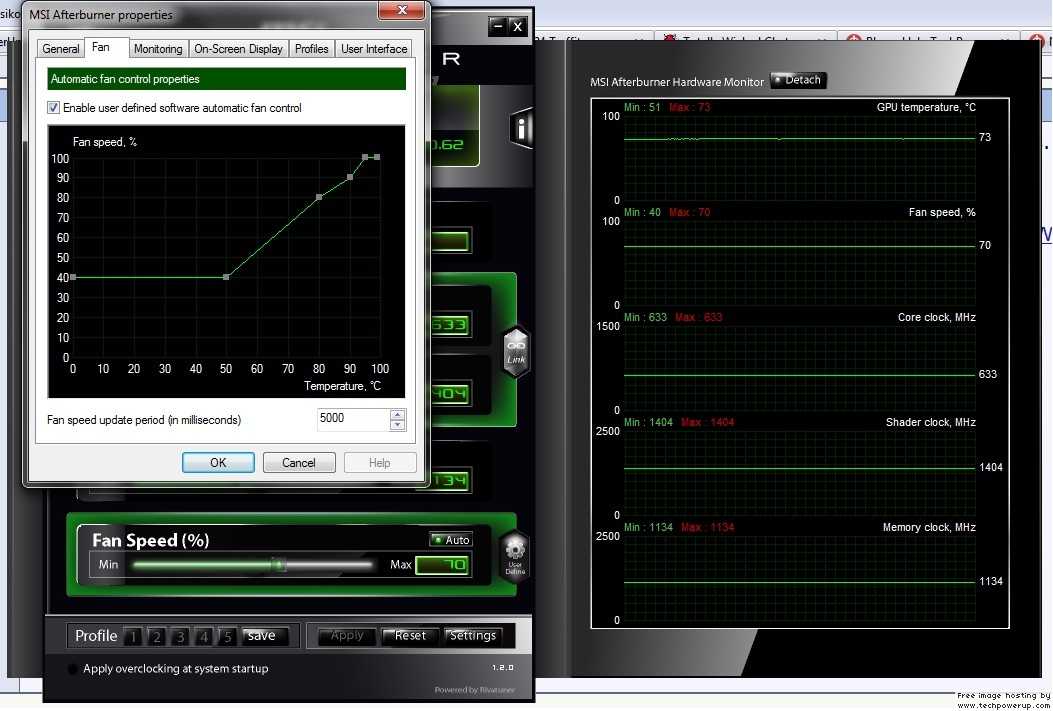
- Go to Fans tab.
- Activate «Enable automatic fan control via user software».
- You will see a curve that displays the fan speed and GPU temperature. The hotter the GPU, the faster the fans will run. Curve points can be moved. Move them to change the fan speed at a given temperature.
- Click OK and save the fan profile.