How to benchmark your graphics card
When you purchase through links on our site, we may earn an affiliate commission. Here’s how it works.
(Image credit: Tom’s Guide)
Want to know how to benchmark your graphics card? It’s a reasonable question. After all, you’ve just spent a hefty sum of money on an NVIDIA or AMD GPU, so why not let that beast fly and see what it can really do?
You could, of course, choose to ignore the dangerously addictive rabbit hole of frame rates and clock speeds and simply get on with why you bought the card in the first place (namely, having fun playing games), but where’s the joy in that?
(You can also check out our five essential tips for buying a new graphics card if you plan to buy one).
- How to find out which graphics card you have
- The best gaming PCs currently available
- Learn how to rotate your screen in Windows 10
Benchmarks are a fun way to compare your setup with other people’s rigs, and can be used to help you tweak and tinker with your GPU to ensure it’s running at the best possible performance. It’s a bit like measuring the performance of a car on a track, before tinkering with its engine to squeeze out every last bit of power.
It might sound intimidating, but it’s really not. Don’t believe us? Fine. We’ll show you, but let’s quickly cover what a GPU benchmark actually is before blindly diving in.
How to benchmark your graphics card: what is a GPU benchmark?
A GPU benchmark typically involves a bit of software that throws intense graphical challenges at your GPU, to see how it performs under stress. These challenges are often in the form of 3D environments, and you can tweak settings such as the resolution and quality to raise or lower the load.
The absolute bare minimum acceptable frame rate for most gamers is 60 fps, though many enthusiasts accept nothing less than 144 fps or even 244 fps, to keep up with their high-end gaming monitors.
If your GPU can run an intense test without dropping below 60 fps, it should be able to handle anything you throw at it without losing performance. This means all your gaming experiences will be smooth and stable, so you can enjoy games as their developers intended.
Obviously the higher the resolution and graphical detail you select, in both benchmarks and the games themselves, the more strain will be put on your GPU. If you’re lucky enough to own an insanely powerful card like the Nvidia RTX 3080 or 3090, it should be able to handle most things at Ultra settings.
With that out of the way, let’s crack on with how to benchmark your graphics card.
How to benchmark your graphics card
There are lots of different benchmarking options out there. One of the most popular is 3DMark benchmark , which offers numerous specialized benchmarks for all devices, ranging from standard GPU tests to VR-specific benchmarks and more.
While there are free versions available, they come with limited options (although you’re more than welcome to buy the full versions too.) For this guide, we’ll be using Heaven Benchmark , which has a free version with a generous amount of settings that still let you test everything properly.
Just to warn you in advance that, due to GPU shortages at the time of writing, this writer was unable to complete his gaming PC build. As a result, the below screenshots were taken running a benchmark on an Asus Ultrabook, with an Nvidia MX150, which is nowhere near as powerful as a regular desktop GPU.
It won’t make a difference to you in terms of the step-by-step instructions, but we wanted to explain our poor results just in case you wonder.
1. Download Heaven Benchmark to your PC from the official Heaven website . While you’re welcome to snap up the paid version, the free one is a great place to start and can be downloaded by clicking the green button on the left.
Once the file has downloaded, double click it, and install. It’s as easy as that.
(Image credit: Tom’s Guide)
2. Once Heaven Benchmark has installed, you’ll want to launch the program. The easiest way to do so is to type «Heaven Benchmark» in the Windows search bar.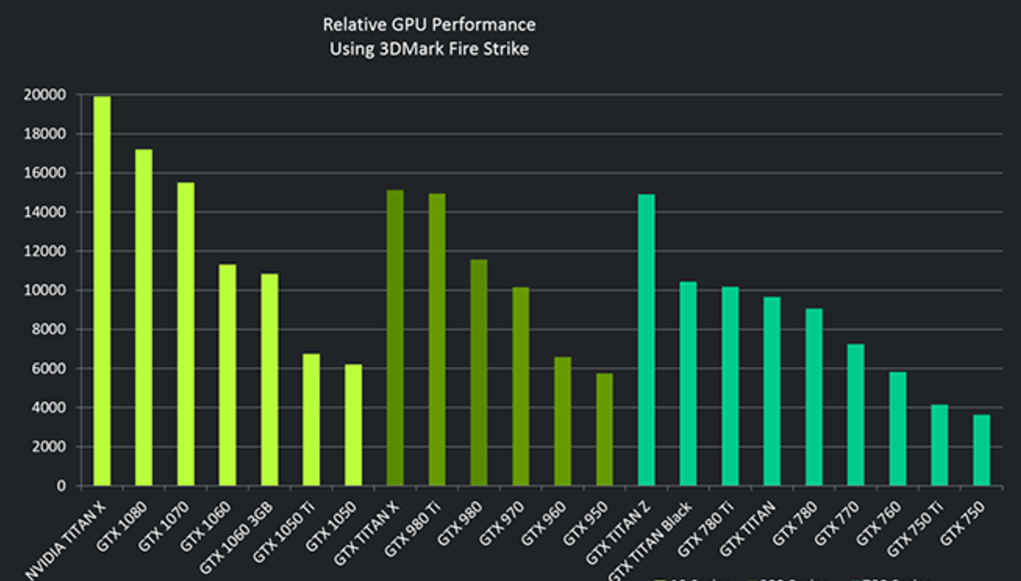
When the name appears in your search results, double click it to open the benchmarking tool.
(Image credit: Tom’s Guide)
3. The main screen in Heaven Benchmark lets you set a few things up before the actual benchmark starts. For beginners, we’d recommend leaving everything as it is on the default Custom setting, which chooses the best settings for your machine.
If you want to tweak things here, you’re more than welcome to, though if you do things like increase the resolution, amount of anti-aliasing and graphical quality, your numbers are obviously going to take a hit.
You can also change these settings during the benchmark itself, via a Settings button at the top, which will appear as one of the options when it’s running. There’s also a Quality button next to it that lets you change the graphical quality during the benchmark.
Note: In our screenshots we ran the benchmark in windowed mode at a very basic 720p resolution rather than selecting Full Screen at Full HD, due to lacking a proper desktop GPU. As almost every gamer would play in full screen at their monitor’s native resolution, we’d recommend that you opt for Full Screen when benchmarking yourself.
Once that’s all sorted, click the Run button at the bottom of Settings to begin.
(Image credit: Tom’s Guide)
4. When the benchmark runs, you’ll be taken on a virtual tour of a medieval village. How good this village looks will depend on your settings from earlier. Running at maximum resolution and ultra quality will obviously look better than anything at lower settings.
Throughout the test, you should keep an eye on the FPS counter in the top right, along with the temperature. The FPS counter is pretty self explanatory — it provides a figure for the frames per second your card is achieving, in real time.
The temperature is the temperature of the GPU itself. Benchmarks are therefore a good way to stress test the cooling of your PC build. If you’re getting temps of 100+ degrees Celsius, then you’re going to need to sort out the airflow. Most games won’t see you get anywhere near those temperatures.
Elsewhere along the top of the screen, you’ll notice buttons that let you tweak things on the fly. To start the actual benchmark, click the Benchmark button in the top-left corner.
(Image credit: Tom’s Guide)
5. As the benchmark runs, you have the option to let it automatically do its thing, or manually control the camera settings so that you can freely fly around the world, or even walk, simulating in-game activities. This can be done by selecting the Camera button in the top left.
As mentioned earlier, you can also change various other settings during the benchmark by pressing the buttons at the top. These include the graphical quality, resolution, and more. Play around with these options to see how it affects the performance.
(Image credit: Tom’s Guide)
6. You don’t actually have to do anything to end the benchmark, as the test will end itself, presenting you with the overall score. You can click Save in the bottom right if you want to store your results for later comparison.
(Image credit: Tom’s Guide)
7. When you click Save, you’ll be presented with a screen that lets you save the results file to your preferred location. In our case, we did the classic lazy move of saving straight to desktop.
(Image credit: Tom’s Guide)
8. Once you’ve saved your results, you can view them at any time simply by locating and double clicking the file. They’re saved as an html file, so you can open them in any browser.
(Image credit: Tom’s Guide)
9. If you want to see how your graphics card compares to others, visit the Unigine Leaderboards page , which has multiple leaderboard lists with thousands of scores. You can choose the relevant preset to see how your score compares.
Warning: this may prove pretty demoralising, as there are plenty of people out there who treat nabbing the highest benchmark scores as a serious hobby.
After that, there’s nothing left to do but have fun gaming. Or, of course, keep benchmarking and constantly tweaking settings and case components, forever chasing higher and higher numbers. The choice is yours.
(Image credit: Tom’s Guide)
- More: The best PC games of 2021 — so far
- How to update your Nvidia graphics card
Today’s best Graphics Cards deals
$49.57
View Deal
$99.99
View Deal
$120 off
$699. 99
99
View Deal
Show More Deals
Get instant access to breaking news, the hottest reviews, great deals and helpful tips.
Contact me with news and offers from other Future brandsReceive email from us on behalf of our trusted partners or sponsors
Topics
Gaming
Photoshop graphics processor (GPU) card FAQ
Search
Last updated on
Dec 12, 2022 04:05:25 PM GMT
Find answers to commonly asked questions about Photoshop and graphics processor (GPU) card usage.
Topics in this article:
- How does Photoshop use the graphics processor?
- How can I check the GPU compatibility report?
- How can I check the GPU status while working on a document in Photoshop?
- What are the various GPU modes in Photoshop?
- Which features in Photoshop use the graphics processor?
- What are the minimum graphics processor requirements?
- How do I enable Photoshop to use the graphics processor?
- Does Photoshop take advantage of more than one graphics processor or graphics card?
- Can I use Photoshop’s graphics processor features on a virtual machine?
How does Photoshop use the graphics processor?
Photoshop leverages the graphics processor in your system to provide a seamlessly smooth Photoshop experience and increased performance with many features.
How can I check the GPU compatibility report?
With the Photoshop 23.0 release, you can run the graphics processor compatibility check to ensure your GPU is compatible:
Go to Help > GPU Compatibility and see the report dialog that opens.
The information on this screen reflects the GPU state when Photoshop is launched. If the state of the GPU changed during the session, it would not be reflected here. For real-time feedback about using the GPU during an active session, see How can I check the GPU status while working on a document.
How can I check the GPU status while working on a document in Photoshop?
When you’re trying to diagnose rendering issues, there was no intuitive way to tell whether a document was rendering in CPU or GPU mode. If the GPU stops working in Photoshop, several features could be impacted. If you notice changes to any of the visuals or performance for these tools, it’s best to confirm what GPU mode Photoshop is in for your document.
With the October 2022 release of Photoshop 24.0, the new GPU Mode document status indicator will report the exact mode Photoshop’s GPU state is in, allowing you to address further GPU troubleshooting steps.
To access the new GPU status indicator, do any of the following:
- From the Document Status bar on the bottom left of the workspace, open the Document Status menu and select GPU Mode to display the GPU operating mode for your open document.
- Open the Info panel and select GPU Mode.
Use the new GPU Mode indicator for your active document from the Document Status barUse the new GPU Mode indicator for your active document from the Info panel
What are the various GPU modes in Photoshop?
Here’s the list of available GPU modes in Photoshop:
- CPU: CPU mode means that the GPU isn’t available to Photoshop for the current document, and all features that have CPU pipelines will continue to work, but the performance from GPU optimizations will not exist so these features could be noticeably slower, such as — Neural Filters, Object Selection, Zoom/Magnify, etc.
 The visual interface for many features like crop, selections, and transform will drop color borders or become harder to view (thinner).
 - D3D12: This is the preferred mode for Windows and means you can take full advantage of the most modern GPU APIS on that platform.
- Software: Software rendering is a Windows-only mode that returns to the Direct X 11 renderer. This happens if you explicitly set the Technology Preference, «Older GPU Mode Pre 2016)», or if Photoshop determines that the software renderer is required for better stability.
- Metal: This is the preferred mode for macOS and means the user is taking full advantage of the most modern GPU APIs on that platform.
- Legacy OpenGL: Legacy OpenGL means that Photoshop uses the previous generation of GPU technology. Ideally, users on macOS would see Metal, and Windows users would see D3D12.
Which features in Photoshop use the graphics processor?
If you encounter any issues working with the above features, see Graphics processor (GPU) troubleshooting.
What are the minimum graphics processor requirements?
- On Windows, a GPU with DirectX 12 support and 1.5 GB of GPU memory
- On macOS, a GPU with Metal Support and 1.5 GB of GPU memory
If you are using an older graphics card or driver, GPU functionality in Photoshop may be limited or not supported.
Generally, consider using GPUs with an Average Ops/Sec of 2000 or higher on PassMark’s GPU Computer Benchmark Chart.
How do I enable Photoshop to use the graphics processor?
-
Choose Edit > Preferences > Performance (Windows) or Photoshop > Preferences > Performance (macOS).
-
In the Performance panel, make sure that Use Graphics Processor is selected in the Graphics Processor Settings section.
-
Click Advanced Settings and specify the following option:
Use OpenCL: Enable to accelerate the new Blur Gallery filters, Smart Sharpen, Select Focus Area, or Image Size with Preserve Details selected (Note: OpenCL is available only on newer graphics cards that support OpenCL v1.
 1 or later.)
Does Photoshop take advantage of more than one graphics processor or graphics card?
Photoshop does not take advantage of multiple graphics cards. Conflicting drivers may also cause crashes or other problems.
- If you have a system with multiple graphics cards, see Configuring computers with multiple graphics cards.
- If you have multiple monitors, a best practice is to connect them to the same graphics card prior to starting Photoshop.
Can I use Photoshop’s graphics processor features on a virtual machine?
Running Photoshop under virtual machines, or VMs, is not tested extensively nor officially supported. Running Photoshop with Use Graphics Processor enabled under virtual machines and remote desktop is not supported at all.
More like this
- Basic troubleshooting to fix most issues
- Photoshop GPU troubleshooting
- Optimize performance Photoshop
- Photoshop plug-ins and extensions
- Photoshop plug-ins troubleshooting
Buy Adobe Photoshop or start a Free Trial.
Sign in to your account
Sign in
Manage account
How to find out which video card is installed on your computer
All computers are equipped with graphics hardware that handles everything from desktop drawing, video decoding, to rendering demanding PC games. Most modern PCs have GPUs made by Intel, NVIDIA, or AMD.
While your computer’s processor and RAM play a big role when it comes to PC gaming, the GPU is usually the most important component. If you don’t have a powerful GPU, you won’t be able to play new PC games, or you’ll have to play them at lower graphics settings. Some computers have a low-power «built-in» or «integrated» graphics card, while others have powerful «dedicated» or «discrete» graphics cards (also called graphics cards).
nine0003
In Windows 10, you can find GPU information and GPU load information right in Task Manager. Right-click on the taskbar and select «Task Manager» or press Windows+Esc to open it.
Click the «Performance» tab at the top of the window — if you don’t see the tab, click «More Information». Select «GPU 0» in the sidebar. The GPU manufacturer and model name will be displayed in the upper right corner of the window.
nine0003
In this window, you will also see other information, such as the amount of allocated memory for the GPU. Windows 10 Task Manager also displays GPU load here and you can view GPU load by application.
If you have multiple GPUs installed on your system, each one will be displayed using a number corresponding to its physical location, such as «GPU 1», «GPU 2» and so on.
nine0003
On older versions of Windows, such as Windows 7, this information can be found in the Direct diagnostic tool. To open it, Press Windows+R, type «dxdiag» in the run dialog that appears, and press Enter.
Click the «Display» tab and look at the «Name» field in the «Device» section. Other statistics such as the amount of video memory (VRAM) built into your GPU are also listed here.
nine0003
If you have multiple GPUs in your system—like a laptop with a low-powered Intel GPU for battery use, and a powerful NVIDIA GPU for use while plugged in and while gaming—you can control which GPU will be use the game using the Windows 10 Settings app. These controls are also built into the NVIDIA Control Panel.
GPU vs CPU comparison. Why is GPU faster? nine0001
Author: Serzhenko Fedor
I. Introduction
Over the past decade, the technological development of graphics processors has advanced so far that they can successfully compete with traditional solutions (for example, with central processing units) and are used for a wide range of tasks, including those associated with fast image processing.
This article will discuss the capabilities of the GPU and CPU to perform fast image processing tasks. We will compare two types of processors and show the advantages of the GPU over the CPU, answer the question why GPU image processing can be more efficient compared to similar solutions on the CPU. nine0003
In addition, we will look at common misconceptions by users and developers that prevent them from using the GPU for fast image processing.
II. Features of fast image processing algorithms
For the purposes of our article, from the whole variety of fast image processing algorithms, we will take only those that have such characteristics as locality, the possibility of parallelization and their relative simplicity. Let’s explain in more detail what we mean:
- Locality . Each pixel is calculated based on a limited number of neighbors.
- High parallelization capability . Each pixel does not depend on data from other processed pixels, which allows you to parallelize the processing process.
- 16/32-bit arithmetic precision . As a rule, when processing images, 32-bit real (floating point) arithmetic is sufficient for processing and a 16-bit integer data type for storage.
 nine0052
Criteria that are important for fast image processing
Key criteria important for fast image processing are:
1. Performance
As practice shows, maximum performance can be achieved in two ways — either by increasing hardware resources, that is, by increasing the number of processors, or by optimizing the program code. When comparing the capabilities of a GPU and a central processor, in this class of tasks, the GPU outperforms the CPU in terms of price / performance, and the realization of the full potential of the GPU is possible only with parallelization and careful multi-level optimization of the algorithms used. nine0003
2. Image processing quality
Another important criterion is the quality of image processing. For the same image processing operation, there may be several algorithms that differ in resource intensity and quality of the result. And here it is important to understand that usually resource-intensive algorithms give a better result. Thus, multilevel optimization is most in demand for resource-intensive algorithms. After its execution, complex algorithms can produce a result in an acceptable time, comparable to the running time of an initially fast, but coarser algorithm. nine0003
3. Latency
As mentioned above, the GPU has an architecture that allows parallel processing of image pixels, which leads to a reduction in latency, or processing time for one image. Central processors have rather modest latency indicators, since parallelism is implemented in the CPU at the level of individual frames, tiles, or lines of images.
III. Key Differences Between GPU and CPU
1. Number of threads per CPU and GPU
The architecture of the central processors assumes that each physical core on the CPU can perform 2 threads of computation in the presence of 2 virtual cores. In this case, each thread executes instructions independently. At the same time, the number of GPU threads is hundreds of times greater, since these processors use the SIMT (Single instruction, multiple threads) programming model. In this case, a group of threads (usually 32 of them) executes the same instruction. Thus, just such a group can be considered as the equivalent of a CPU thread, so this group is called a true GPU thread. nine0003
2. Method for implementing threads on the CPU and GPU
Another difference between GPU and CPU is how they hide instruction latency. The CPU uses out-of-order execution for these purposes, and the GPU uses true thread rotation, each time running instructions from different threads. The method used on the GPU is more efficient in hardware implementation, but it requires the algorithm to be parallel and the load to be high.
From all this, we can conclude that many image processing algorithms are ideally suited for implementation on the GPU. nine0003
IV. Advantages of GPU over CPU
- Our laboratory studies have shown that when comparing perfectly optimized software for the GPU and for the CPU (using AVX2), the advantage of the GPU is global: bit data types.
 Also is an order of magnitude different and the bandwidth of the memory subsystem . In the following paragraphs, we will consider this situation in more detail. nine0052
- If we use CPU software for comparison without using AVX2 instructions, then the difference in performance can reach 50-100 times in favor of the GPU.
- All modern GPUs are equipped with shared memory, which is simultaneously available to all «computers» of one multiprocessor, which, in fact, is a software-controlled cache. He is ideal for algorithms with a high degree of locality . The speed of access to this memory is several times higher than the capabilities of the L1 cache of the CPU. nine0052
- Another important feature of the GPU compared to the CPU is that the number of available registers can be dynamically changed (from 64 to 256 per thread), thereby reducing the load on the memory subsystem. For comparison, the x86 and x64 architectures use 16 universal registers and 16 AVX registers per thread.

- Availability of several specialized hardware modules on the GPU to simultaneously work on completely different tasks: hardware image processing (ISP) on Jetson, asynchronous copy to and from the GPU, GPU computing, hardware video encoding and decoding (NVENC, NVDEC), tensor cores for neural networks, OpenGL, DirectX, Vulkan for visualization. nine0052
But, as a result of all the advantages of the GPU over the CPU listed above, you have to pay for all this with high requirements for the parallelism of the algorithms. If dozens of threads are enough for maximum CPU load, then tens of thousands of threads are needed to fully load the GPU.
Embedded applications
You should also remember about such a type of tasks as embedded solutions. Here, GPUs are already competing with specialized devices such as FPGA (field-programmable gate array) and ASIC (application-specific integrated circuit). The main advantage of GPUs over other solutions is their significantly greater flexibility. For individual embedded solutions, the GPU can be a serious alternative, as powerful multi-core processors do not meet acceptable size and power consumption requirements. nine0003
V. Misconceptions of users and developers
1. Users have no GPU experience, so they try to do a lot on the CPU
One of the key misconceptions of users and developers is related to the fact that not so long ago, GPUs were considered poorly suited for high-performance computing tasks. But technology is developing rapidly. And while GPU image processing integrates well with CPU processing, the best results are achieved when fast image processing is performed on the GPU. Today there are a huge number of such applications. nine0003
2. Repeated copying of data to the GPU and back «kills» performance
There is also such a prejudice among users and developers regarding GPU image processing. And here, as it turned out, this is also just an incorrect interpretation, since a reliable solution in this case is to implement the entire processing scheme on the GPU within a single task. The initial data can be copied to the GPU, and only the calculation results are returned to the CPU. Thus, all intermediate data remains on the GPU. In addition, copies can be performed asynchronously, at the same time as the calculations on the previous frame. nine0003
3. The size of shared memory is 96 kB per multiprocessor, which is very small
Despite the small size of the GPU shared memory of 96 kB, with an economical approach to managing shared memory, this amount can be fully enough. This is the essence of software optimization for CUDA/OpenCL. That is, you cannot simply move code from the CPU to the GPU without taking into account all the features of the GPU architecture.
4. Insufficient GPU global memory for complex tasks
This is a significant moment, which, on the one hand, is decided by manufacturers by releasing new video cards with increased memory size. On the other hand, software solutions for memory management for its reuse are possible.
5. Processing libraries on the CPU also use parallel computing
Indeed, the CPU has the ability to work in parallel within vector operations such as AVX and multithreading (for example, via OpenMP). But in most cases, parallelization occurs in the simplest way: each frame is processed in a separate thread, and the code for processing one frame remains sequential. The use of vector instructions faces the complexity of writing and maintaining code for different architectures, processor models and systems. Code optimization in libraries of specific vendors, for example, Intel IPP, is at a high level. Problems arise when the required functionality is not available in the libraries and you have to use third-party open or proprietary libraries, where optimization may be missing. nine0003
Another aspect that has a negative effect on the performance of mass libraries is the widespread use of cloud computing. In most cases, it is much cheaper for a developer to buy additional capacity in the cloud on demand than to develop optimized libraries. Customers demand to accelerate the release of the finished product to the market, so developers are forced to use relatively simple and not the most effective solutions.
However, modern industrial cameras generate very high intensity video streams, which often exclude the possibility of transferring data for processing over the network to the cloud, so local PCs are usually used to process the video stream from such cameras. The computer used for computing must have the required performance for processing, and, importantly compared to the cloud approach, it must be purchased at the initial stages of implementing the solution. Solution performance depends on both hardware and software. When planning a solution, you should also consider what hardware is used. If you manage to get by with widely available hardware, there are no problems, and any software can be used. As soon as it becomes necessary to use more expensive equipment, the price per unit of performance begins to increase rapidly and this creates the prerequisites for the use of optimized software. nine0003
The task of processing data from industrial video cameras is characterized by a constant load. The load level is determined by the set of applied algorithms and the amount of data per unit of time. The image processing system must be designed early in the project to be able to handle this load with a guaranteed margin, otherwise processing without loss of data will not be possible. This is a key difference from web-based systems, where the load is uneven.
VI. Conclusion
So, summing up all of the above, we come to the following conclusions.
1. The GPU is a great alternative to the CPU for complex fast image processing tasks.
2. The performance of optimized image processing solutions on GPU is much higher than on CPU. As a proof of thought, we suggest you refer to another article from the Fastvideo blog, which describes benchmarks on different GPUs for commonly used image processing and compression algorithms. nine0003
3. The GPU has an architecture that allows parallel processing of image pixels, which in turn leads to a reduction in the processing time of one image (latency).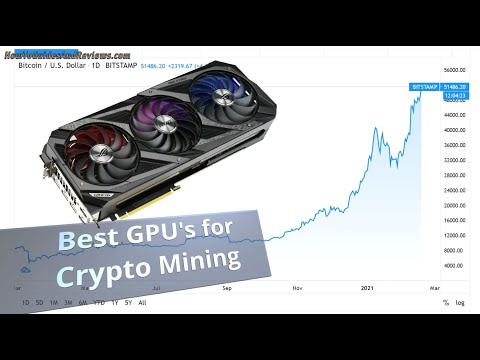
4. The cost of ownership of GPU-based imaging systems is lower than CPU-only systems. High GPU performance reduces the number of pieces of equipment in such systems, and high energy efficiency reduces electricity consumption. nine0003
5. The GPU has the flexibility, high performance, low power consumption to compete with highly specialized FPGA/ASIC solutions for mobile and embedded applications.
6. Combining the capabilities of CUDA / OpenCL and hardware tensor cores can significantly increase performance for tasks using neural networks.
Appendix #1
Comparison of CPU and GPU peak performance using NVIDIA 9 as an example0033
Comparison will be performed on float type (32-bit real type). This type is great for image processing. We will evaluate the performance for one core. In the case of the CPU, everything is simple, we are talking about the performance of one physical core. For GPUs, things are a bit more complicated. What is commonly called a GPU core is essentially an ALU, or, in NVIDIA terminology, an SP (Streaming Processor). The real analogue of the CPU core is the streaming multiprocessor (in NVIDIA terminology, Streaming Multiprocessor, SM). The number of streaming processors in a single multiprocessor depends on the GPU family. For example, NVIDIA Turing video cards contain 64 SPs in one SM, while NVIDIA Ampere has 128. For each cycle, one SP can execute one FMA (Fused Multiply-Add) instruction. The FMA instruction is chosen here for comparison because it is used to implement convolution in filters. Its integer counterpart is called MAD. The instruction (one of the options) performs the following action: B=AX+B, where B is the accumulator accumulating convolution values, A is the filter coefficient, X is the pixel value. By itself, such an instruction performs two operations: multiplication and summation. This gives us the performance per clock for SM: Turing — 2*64 =128 FLOP, Ampere — 2*128 = 256 FLOP
Modern CPUs have the ability to execute 2 FMA instructions from the AVX2 set for each clock cycle. Each such instruction contains 8 float operands and, accordingly, 16 operations (FLOP). In total, one CPU core performs 2*16=32 FLOPs per clock.
To get to performance per unit of time, you need to multiply the number of instructions per clock by the frequency of the device. On average, the GPU frequency is in the range of 1.5–1.9 GHz, and the CPU, when loaded on all cores, has a frequency of 3.5–4.5 GHz. The FMA instruction from the AVX2 set is complex for the CPU. During its execution, a large number of devices are involved and heat dissipation greatly increases. This causes the CPU to be forced to reduce its frequency to avoid overheating. For different CPU families, the amount of frequency reduction is different. For example, according to this article, you can estimate a decrease to the level of 0.7 from the full. Next, we will take a coefficient of 0.8, it corresponds to newer generations of CPUs. nine0003
Conventionally, we can assume that the CPU is 2.5 times faster than the GPU in terms of frequency. Taking into account the frequency reduction factor when working with AVX2 instructions, we get 2.5 * 0.8 = 2. In total, the relative performance in FLOP for the FMA instruction, when compared with the CPU core, we get: Turing SM = 128 / (2.0 * 32) = 2 times, and for Ampere SM is 256 / (2.0*32) = 4 times, i.e. one SM is better than one CPU core.
Evaluate the L1 performance for the CPU core. Modern CPUs can load two 256-bit registers from the L1 cache in parallel, or 64 bytes per clock. The GPU has a unified shared memory block/L1. The block performance is the same for the two architectures and is 32 floats per clock, or 128 bytes per clock. Using the frequency ratio, we get a performance ratio of 128 (bytes per clock) / (2 (CPU frequency is higher than GPU) * 64 (bytes per clock)) = 1.
Let’s also compare the sizes of L1 and shared memory for CPU and GPU. For CPUs, the standard L1 data cache size is 32 KB. The Turing SM has 96 kB and the Ampere SM has 128 kB of shared memory.
To evaluate the overall performance, let’s determine the number of cores per SP. For desktop CPUs, consider the option of 16 cores ( AMD Ryzen, Intel i9 ), the GPU ( NVIDIA Quadro RTX 6000 ) has 72 SP. The total ratio by the number of cores is 72/16 = 4.5. Thus, for this CPU/GPU pair, the bandwidth of L1 and shared memory differs by 1 * 4.5 = 4.5 times. nine0003
Based on this, we calculate the overall performance for float. For top-end Turing video cards, we get: 4.5 (the ratio by the number of GPU / CPU cores) * 2 (the ratio of SM performance to the performance of one CPU core) = 9 times.
For Ampere video cards ( NVIDIA Quadro RTX A6000, which has 84 SP ) we get: 4.5 (ratio by the number of GPU/CPU cores) * 4 (ratio of SM performance to the performance of one CPU core) *84/72 = 21 times.
We have obtained a numerical score that reflects the significant advantage of the GPU over the CPU both in terms of performance and fast memory access speed in image processing calculations.
It’s very important to remember here that the indicated ratios are obtained for the CPU only when using AVX2 instructions. In the case of using scalar instructions, the performance of the CPU core is reduced by 8 times, both in arithmetic operations and in memory access speed. Therefore, for modern CPUs, code optimization is of particular importance. nine0003
Let’s say a few words about the new AVX-512 kit for CPUs. This is the next generation of SIMD instructions with vector length increased to 512 bits. Performance is expected to double in the future compared to AVX2. Modern versions of the CPU provide a real advantage of up to 1.6 times, since they require even more frequency reduction than instructions from the AVX2 set. The AVX-512 kit has not yet become widespread in the mass segment, but this will most likely happen in the future. The disadvantages of this approach will be the need to adapt the algorithms to the new vector length and recompile the code for support. nine0003
Let’s try to compare the system memory bandwidth. Here you can also see a significant scatter of values. For CPUs, the starting figures are 50 GB/s (2-channel DDR4 3200 controller) for mainstream CPUs. The segment for workstations is dominated by CPU with four-channel controllers — this is 100 GB / s. For servers, you can find CPUs with 6-8 channel controllers and a performance of more than 150 GB / s.
The global memory bandwidth value of the GPU is also in a wide range. Starting from 450 GB / s for the Quadro RTX 5000 model, and ending with 1550 GB / s for the older A100 model. As a result, we can say that the throughput in comparable segments differs significantly, up to an order of magnitude difference. nine0003
From the above, we can conclude that the GPU is significantly (sometimes almost an order of magnitude) superior to the CPU, which executes the optimized code. In the case of code that is not optimized for the CPU, the performance difference can be even greater, up to 50-100 times. All this creates serious prerequisites for increasing productivity in real tasks.
Appendix #2 — memory-bound and compute bound algorithms
When we talk about these types of algorithms, we must understand that we are talking about a specific implementation of the algorithm on a specific architecture. Each processor has some peak arithmetic performance. If the implementation of the algorithm can reach the peak performance of the processor in the target area according to computational instructions, then it0050 compute-bound , otherwise the main limitation will be the memory and implementation of memory-bound .
The memory subsystem of all processors is hierarchical, consisting of several levels. The closer the level is to the processor, the smaller it is and the faster it is. The first level is the first-level data cache, and the last level is the RAM.
Algorithm can be initially compute-bound at the first level of the hierarchy, and then become memory-bound at higher levels of the hierarchy.
Consider a few examples. Let’s say we want to add two arrays and store the result in a third one. You can write this as X = Y + Z, where X, Y, Z are arrays. Let’s say we use AVX instructions to implement on the processor. Then for one element we need two reads, one summation and one write. A modern CPU can perform two reads and one write at the same time to the L1 cache. But at the same time, it can execute two arithmetic instructions, and we can use only one. This means that the array summation algorithm is memory-bound is already at the first level of the memory hierarchy.
Consider the second algorithm. Image filtering in a 3×3 window. Image filtering is based on the operation of convolution of the pixel neighborhood with the filter coefficients. The MAD (or FMA, depending on the architecture) instruction is used to calculate the convolution. A 3×3 window would require 9 such instructions. Instruction operation B = AX + B, where B is the accumulator accumulating convolution values, A is the filter coefficient, X is the pixel value. The A and B values are in registers, while the pixel values are loaded from memory. In this case, one load is required per FMA instruction. Here, the CPU will be able to supply data to two FMA ports due to two downloads and fully load the processor. The algorithm can be considered compute-bound .
Let’s consider the same algorithm at the level of access to RAM. Let’s take the most memory-efficient implementation, when one reading of a pixel updates all the windows it enters. In this case, there will be 9 FMA instructions per read operation. Thus, one CPU core processing float data at 4 GHz will require 2 (instructions per clock) × 8 (float in AVX register) × 4 (Bytes in float) × 4 (GHz) / 9 = 28.5 GB/s. The dual-channel controller with DDR4-3200 has a peak throughput of 50 GB/s and is estimated to only be able to source data for two CPU cores in this task. Therefore, such an algorithm running on 8–16 core processors is memory-bound . Despite the fact that at the lower level it is balanced.
Now consider the same algorithm when implemented on the GPU. It is immediately clear that the GPU has a less balanced architecture at the SM level with a bias in computing. For the Turing architecture, the ratio of the speed of arithmetic operations (in float) to the download speed from Shared Memory is 2:1, for Ampere 4:1. Due to the larger number of registers on the GPU, it is possible to implement the above optimization for the CPU directly on the GPU registers. This allows you to balance the algorithm even for Ampere. And at the Shared Memory level, the implementation remains compute-bound . In terms of top-level (global) memory, the calculation for the Quadro RTX 5000 (Turing) gives the following results: 64 (operations per clock) × 4 (Bytes in float) × 1.7 (GHz) / 9 = 48.3 GB / s per SM. The ratio of total bandwidth to SM bandwidth will be 450 / 48.3 = 9.3 times. The total number of SMs in the Quadro RTX 5000 is 48. and for the GPU, the high-level filtering algorithm is memory-bound .
As the window size grows, the algorithm becomes more complex and accordingly shifts towards compute-bound . Most image processing algorithms are memory-bound at the global memory level. And since the memory bandwidth of the GPU is in many cases an order of magnitude greater than that of the CPU, this provides a comparable performance boost.
Appendix #3
SIMD and SIMT programming models, or why GPUs have so many threads
SIMD (single instruction, multiple data) instructions are used to improve CPU performance. One such instruction allows you to perform several operations of the same type on a data vector. The advantage of this approach is the increase in performance without significant modification of the instruction pipeline. All modern CPUs, both x86 and ARM, have SIMD instructions. The disadvantage of this approach is the complexity of programming. The main approach to SIMD programming is the use of intrinsic. Intrinsic are built-in compiler functions that contain one or more SIMD instructions, plus instructions for preparing parameters. Intrinsic form a low-level language, very close to assembly language, which is extremely labor intensive to use. In addition, each compiler has its own Intrinsic set for each instruction set. A new set of instructions comes out — you need to rewrite everything, switch to a new platform (from x86 to ARM) you need to rewrite, switch to another compiler — again you need to rewrite everything. nine0003
The software model for the GPU is called SIMT (Single instruction, multiple threads). One instruction is synchronously executed in several threads. This approach can be considered an evolution of SIMD. The scalar programming model hides the vector essence of the machine, automating and simplifying many operations. That is why it is easier for most programmers to write the usual scalar code on SIMT than vector code on pure SIMD.
CPU and GPU solve the issue of latency of instructions in different ways when they are executed on the pipeline. The latency of an instruction is how many clock cycles the next instruction can use its results. For example, if the instruction latency is 3 and the CPU can run 4 such instructions per clock cycle, then in 3 clock cycles the processor will run 2 dependent instructions or 12 independent ones. To avoid such significant idle time, all modern processors use out-of-order execution of instructions. In this case, the processor in a given CPU window analyzes instruction dependencies and runs independent instructions out of turn. nine0003
The
GPU takes a different approach based on multi-threading. The GPU has a pool of threads. Each cycle, one thread is selected and one instruction is selected from it, which is sent for execution. On the next cycle, the next thread is selected, and so on. After one instruction has been launched from all the threads in the pool, we return to the first thread, and so on. This approach allows you to hide the latency of dependent instructions by executing instructions from other threads.