GTX 1080 Mining Settings
GTX 1080 Mining Settings for all the popular and most profitable Cryptocurrencies to mine, you’re one-stop page for everything related to your GPU
Last updated:
N/A
Overview
Settings
4
Offers
4
Live Price
$410.1
Daily Profit
soon…
ROI
soon…
GTX 1080 Specs
Vendor
NVIDIA
Series
GeForce 10
Release Date
27 May 2016
Memory
8GB GDDR5X
Chip
GP104-400
Interface
PCI-E 3.0 X16
TDP
180W
MSRP
$599
⚠️DISCLAIMER⚠️
The GTX 1080 Mining Settings will generally work for all models, but most of the time you will have some tweaking to do due to your GPU Silicon. Never mine with Stock settings as they will overheat your GPU! You can learn more in our Overclocking For Miners Guide.
GTX 1080 Mining Overclocks
Absolute Values are most commonly used in Linux-based Mining OS and they usually give more effeciency, while Offset is more common for Windows. N/A or 0 = leave blank.
ETChash
40 MH/s, 120 Watts
ZelHash
42 Sol/s, 140 Watts
KawPow
16 MH/s, 120 Watts
FiroPow
16 MH/s, 120 Watts
GTX 1080 ETChash Mining Overclocks
Expected Results
40 MH/s, 120 Watts
Core Voltage (VDD)
N/A
Power Limit
Watts: 120 or Percentage: 65%
Core Clock (CClock)
Absolute: 0 or Offset: ++40
Memory Clock (MClock)
Absolute: 1600 or Offset: +800
Memory Voltage
N/A
Fan Speed (%)
70% ± based on your temps
Provided by @Mining Chamber
ETH Enlargement Pill
You must use the ETH Enlargement Pill for your GTX 1080 Mining Settings to achieve 40% more hashrate on memory intensive algorithms. This applies to all GDDR5x memory GPUs.
Frequently Asked Questions
How to overclock my GPU for mining?
Overclocking for mining can be tedious, a lot of trial and error. You can use our mining settings as a base and if they crash then you can start slowly decrementing Clock values and slowly increment your Power Limit/Watt Limit until your GPU is stable.
Is mining harmful to my GPU?
Yes and No. The number one reason for Hardware failure is heat. If you can maintain good temperatures and take care of your GPU properly then your GPU will live with you longer than you can ask for. Your fans might break on you but that is always an easy fix.
How to reduce my GPU Temperature for mining?
There are a few things you can do to maintain healthy GPU Temps such as regularly dusting (Recommended Duster) and replacing Thermal Paste throughout the year, but what really stands out for me is using Heatsink Mods. It works especially well for the 3000 Series by bringing down temperatures by up to 20 degrees!
How much power does my GPU use while mining?
Your GPU power draw varies based on the algorithm you are mining, The best way to accurately know is through measuring your Rig/PC off the wall using Power Meters.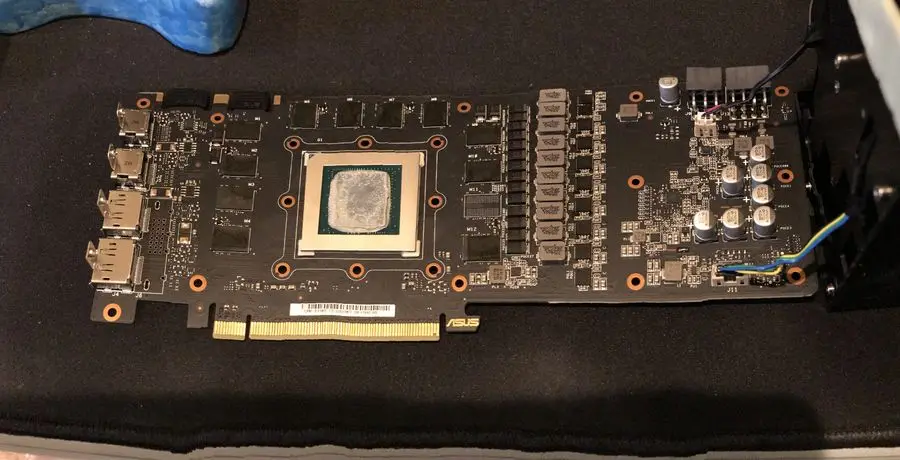
Where To Buy
Subscribe to our Miners Newsletter!
Hot headlines
•
PoW Cryptocurrencies
•
Mining Chamber Updates
They say if you sign up, your rig will never crash ??♂️
[Official] NVIDIA GTX 1080 Ti Owner’s Club | Page 921
Introducing the Nvidia GTX 1080 Ti
The GeForce® GTX 1080 Ti is NVIDIA’s new flagship gaming GPU, based on the NVIDIA Pascal™ architecture. The latest addition to the ultimate gaming platform, this card is packed with extreme gaming horsepower, next-gen 11 Gbps GDDR5X memory, and a massive 11 GB frame buffer.
How To Flash A Different BIOS
BIOS’s to flash.
Best BIOS Collection are the all the BIOS’s I tested that give decent results. XOC is power limit free BIOS developed for L2N, still working on our FE’s and other cards though.
Renamed by card they come from for clarification with power limit wattage of each one in the name.
View attachment BestBiosCollectionAndPowerLimitBatFiles.zip
Added the .bat files needed to run as Admin after each flash.
View attachment nvflash_5.370.0.zip
Unzip NVFlash to a folder.
Run an admin command prompt and cd to the folder you made.
Do in command prompt:
To turn protection off so you can flash the BIOS.
nvflash64 —protectoff
Then to backup original bios.
nvflash64 —save filename.rom
To flash bios.
nvflash64 -6 biosfilename.rom
If screen goes black just hit the ‘y’ key twice, it’ll flash and screen will come back on.
Reboot, reinstall Nvidia driver, reboot again.
For more than one card.
nvflash64 —protectoff
Turn protection off. Choose the number of card you want to turn protection off, 0 or 1 for example with two GPUs.
To backup original BIOS.
nvflash64 —save filename.rom
nvflash64 —save filename2.rom
Choose the number of card you want to save the BIOS, 0 or 1 for example with two GPUs.
To flash BIOS.
nvflash64 —list
nvflash64 -6 —index=0 BIOSfilename.rom
nvflash64 -6 —index=1 BIOSfilename.rom
If screen goes black just hit the ‘y’ key twice for each flash, it’ll flash and screen will come back on.
Important: Run the correct Powerlimt.bat file found in the BestBiosCollection.zip after you flash the BIOS and reboot to properly set the BIOS power limit voltage.
Important! Don’t flash the HOF or MSI Lightning Z BIOS’s or any BIOS that uses three power connectors.
They’ll brick your card and unless you have a spare card or iGPU you won’t be able to flash it back. Also two eight pin power connector Kingpin BIOS will brick your card.
If the video is poor quality showing right in overclock.net click on YouTube at the bottom of the video, much better quality watching right in YouTube.
I’ve found after flashing a BIOS or installing Nvidia drivers the max power limit is much lower than it should be and this is the fix.
Driver Uninstall Tool, (DDU) do this after flashing a BIOS, then reinstall the latest driver. Choose the Boot Into Safe Mode Option. You HAVE to know your login email or password, a four number pin won’t work.
http://www.wagnardsoft.com/
You can find your max TDP in the official BIOS’s link.[/I][/U][/B]
Link to XOC no power limit BIOS. You don’t need to run the power limit .bat file with this BIOS.
http://forum.hwbot.org/showthread.php?t=169488
Direct link To XOC BIOS from the forum post.
https://onedrive.live.com/?authkey=…d=FABF1EAAEEBFA9D9!148675&action=defaultclick
Afterburner
https://www.guru3d.com/files-details/msi-afterburner-beta-download. html
html
Use below settings to unlock the voltage curve.
Official BIOS’s found on link below.
https://www.techpowerup.com/vgabios…X+1080+Ti&interface=&memType=&memSize=&since=
Best Way To Do A Custom Voltage Curve. See short video for best explanation.
The link goes into a lot of detail on exactly the best way to get an overclock with little or no power limiting using a custom voltage curve.
Edit: I was testing power limiting with the Arctic Storm BIOS. I found at 2025 core, 6177 memory at .993v my card does zero power limiting in Fire Strike Ultra, Time Spy and Superposition 4K.
Also, it won’t power limit on the Fire Strike Ultra stress test. Every BIOS I’ve tested so far seems this is true at .993v under water.
My temps on a 360 RAD with a highly overclocked 5960x and my 1080 Ti never go above 43C on the GPU at these settings.
But a lot of that is adding Fuji 17. 0 W/mK thermal pads on the memory and VRMs and a few other key places.
Normally I run 2088 core, 6077 memory because I have a 4K G-Sync monitor and I cap games out at 59 FPS to keep G-Sync enabled and capped at 59 FPS it does no power limiting at 2088 at the highest graphics settings in games.
But if you run higher frame rates or have a 144Hz monitor and run it at cap you may want to consider your max clocks at .993v.
Under water is great and under air it will greatly reduce temps and thermal throttling you may encounter as well.
Also if you are getting ‘Display driver has stopped responding’ do below. It works for Windows 7 to Windows 10.
https://support.microsoft.com/en-us…recovered-error-in-windows-7-or-windows-vista
Before you start running Heaven these settings in Nvidia control panel, it’ll make your overclock more stable. Also in any game use Single Display Performance Mode and Prefer Max Performance, your games will be more stable with your overclock and have a more constant FPS.
Next you want to CTRL F in Afterburner, open the custom voltage curve, CTRL D to set it to defaults. Then you want to hold Shift, drag it to say +145 1999 core at 1050v and hit apply in Afterburner
It’ll run around 1999 core at 1.062v in Afterburner in Heaven. Don’t run Heaven though, drag the 1031v point up without holding Shift to the same as the 1050v point and hit apply.
If you do it right everything to the right of 1031v should be in a straight line.
Try lower voltages if you are on an air cooler and want to keep temps down, though you may need to start with lower clock speeds as well.
Keep your memory between +400 and +500 to start even if you can do more.
Crappy video I made how to actually do the custom voltage curve.
It’s how to do a 1.093v voltage curve, to do 1.031v you need it to look like the voltage curve picture farther down this guide.. Since I flashed the Strix BIOS on my FE I’m getting 2100 at 1.093v with no throttling.
Open Heaven at a lower resolution than your screen resolution NOT in full-screen mode so you can still see Afterburner.
When you run Heaven if you get no driver crashes or screen freezing about three seconds and restarting that’s good. Now raise the 1031v point with Heaven running one notch at a time to high core speeds like from +145 to +155 and hit apply, then between each time wait 30 seconds or so.
Keep doing this until the driver crashes or screen freezes three seconds and Heaven restarts. Close Heaven then drop in back down one notch, hit apply, and reboot. Your frame rate and stability will be compromised until you reboot.
Now do a full benchmark run with Heaven. If nothing crashes core is good. If driver crashes or screen freezes just drop it down one more notch. At 1.031v max core you can get you should get zero drops in voltages and core speed, should stay at 1.031v and the core it’s at.
You can have GPU-Z running and logging to see your core does not drop during the run and be sure you had no driver crashes. If core and volts drop drastically a few seconds, then resumes, your driver crashed.
Ideally, this is what your final voltage curve should look like, but with the maximum core you determine by this method.
After you get best voltages with maximum clocks drag each point in your voltage curve without holding Shift until it looks similar to this.
After you get core stable run Heaven and hit Shift to pause it at a scene. It’ll show the frame rate up top with screen paused. Stop it at a lower frame rate scene when the frame rate only fluctuates a few FPS while paused, usually a scene with no clouds or smoke or anything.
Now adjust your memory up/or down until you get the frame rate as high as it’ll go with no driver crashes or artifacts. HIGHER ISN»T ALWAYS BETTER. I find at +642 is a few frames slower than +610.
Your frame rate may only be higher a few FPS at best memory speed but that’s fine.
You have now found a low voltage best clock speed compromise for your water/air cooled 1080 Ti.
Being obsessive about these things, I’ve found under water, no shunt mod, voltage slider maxed out, the trick is to find the best clock speeds you can obtain at the lowest possible voltages for sustained voltages and core speeds.
If I run my core at +177 2062 at 1.031v I get a solid 1.031v and 2062 core on a full 1920×1080 Heaven run. This is the lowest I can go on voltages with zero driver crashes at +177 core.
If you look at my GPU-Z log not once did I dip below 1.031v or 2062 core.
View attachment GPU-ZSensorLog.txt
With 2093 core 1.093v it bounced up and down from 1.050v to 1.093v and in between, clock speeds changing as it does of course.
So while you can brag about maximum clocks (I got 2100 benching) for every day 24/7 scenarios a balance between voltages and clock speed seems to be key.
Hope this helps some. I’m reluctant to do the shunt mod as in my case my video card sits vertical and I’m not going to have the CLU run under my EK block and ruin my card.
How To Maximise Your Memory Overclock. Thanks goes to @nrpeyton for suggesting OCCT.
Download OCCT 4.4.2 Portable here.
http://www.softpedia.com/get/PORTAB…ble-Applications/OCCT-Portable.shtml#download
Uzip the files and run OCCT. Go to the GPU:3D tab and run it using these settings.
If you get a User Cancelled error go into the Settings and put ‘Hardware Monitoring’ to ‘None’.
Have Afterburner open on your second screen or if you only have one screen Alt Tab to it when you need to.
With OCCT GPU:3D running at those settings raise your memory +100 at a time, click your mouse back on the OCCT GPU:3D rendering window to put the focus back on it you after you adjust Afterburner and wait 30 seconds.
When you start getting errors drop it down -30 at a time until the errors stop, then run it at least two minutes.
Next open Heaven and run it. If Heaven stops responding and crashes lower your memory -30 at a time until the crashes stop. Then do a full benchmark. Profit!!
When it comes to memory I have an exceptional card and got +723 with this method with core at 2012 at .975v with zero power limiting in benches and games. My Heaven scored 4.5 frame rates higher and Superposition scored 100 points higher with the same 2012 core.
As well, in Power Option in Control Panel, put your Maximum Processor Frequency above what your max CPU speed is.
Put your Minimum Processor State at 100% for benching.
Also in PCI Express turn Link Power State Management Off.
My Nvidia Control Panel Settings (11208 Time Spy)
When benching it’s better to adjust the settings in the Global settings, not per app as it can cause issues.
A Shunt Mod Story By SlimJ87D
Unlocking the FE’s true potential
After hitting power limits, I could not take it anymore. I knew that it was time for be to do the shunt mod.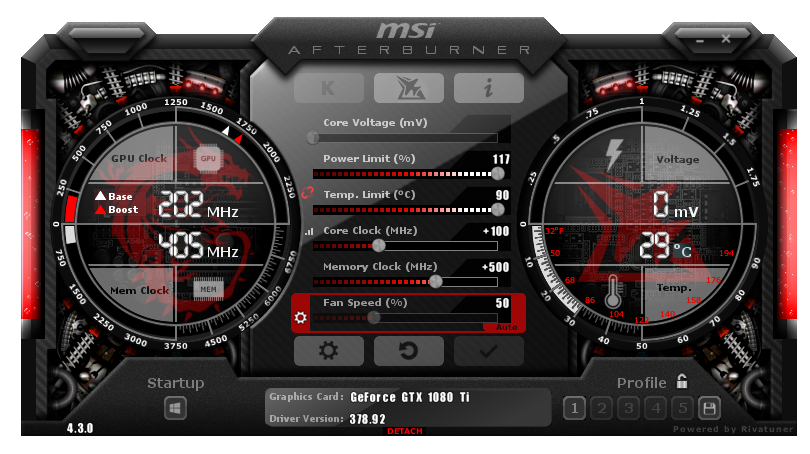 My card could bench at 2114 Mhz in heaven, and I believe it could go higher. After all, I’ve seen it boost to 2138 Mhz before without crashing.
I found it as a OC member, it was irresponsible for me to have so much potential thrown away. My theory was that I had a pretty nice golden card. That theory was proved to me today.
What I needed to prepare for
The shunt mod, if done right without too much CLU, will drop your 100% to 75-80%. This means that at 75%-80% you are drawing 300-310 Watts.This can be dangerous because at 120%, that is 450 Watts!
Because I set out to perform this shunt mod, I need to upgrade my cooling. My x41 was nearly at its limits. The liquid temperature was at 40C and my GPU temperatures stock was at 48C. If efficiency was 100%, then liquid and GPU temperatures would be equal according to newton’s energy equation. Thus, I knew there was things I could do.
1. I could improve the TIM in between my shim and heat pump. Originally, I was planning to CLU the die and other side of the shim, but after looking online, CLU is really bad for dies from a RMA stand point, it leaves stains.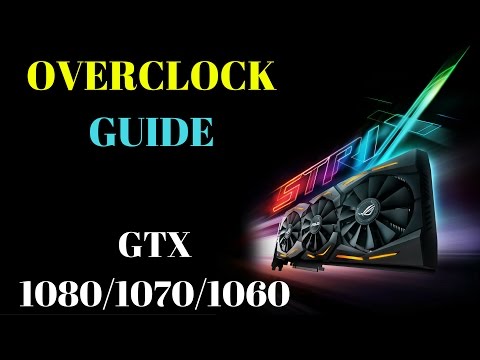 So I decided to just use Gelid Extreme on the die and CLU on the shim and pump. Eureka, this got liquid temperatures from 40C to 44C, this means that more heat was being transferred to the radiator.
2. The midplate is a heatsink itself. It is connected to VRMs, VRAMs and other components. If I was going to introduce more watts to this card, I need to keep them cool. Originally I had placed 8 heatsinks on my midplate. This dropped my core temperature from 51C to 48C. Taking thermal measurements, the shims were at 36C. I knew that if I added more heatsinks, specially closer to the VRMs, it would help with the extra 50 to 75 Watts.
3. Finally, the backplate was not absorbing any heat whatsoever. The aluminum plate is somewhat thin, my theory is that the plate was too thin to absorb heat from the GPU, it would cause warping and flexing. But using my engineering knowledge and deduction, I knew that my AIO was keeping my GPU at 48C, so 45-60C wouldn’t harm the back plate at all. So I added a thermal pad in between the back of the GPU and the backplate.
The shunt mod
For my shunt mod, I used CLU and liquid electrical tape.
My results
My previous calculations were correct. From the shunt mod, running a light heaven, I was drawing 300-310 Watts at 75-80% power draw. That means at 100%, I would be drawing 400 Watts.
At max, my card was drawing 95-100%, which mean I was drawing 400 Watts. This is confirmed below!
Here are my thermal results
Stock at 300 Watts, 48C.
Shunt modded at 400 Watts, 50C
All my modifications have successfully fought off the incoming 100 Watts.
After some light benchmarks, I can easily hit 2152 Mhz @ 1.093v with no limiting.
I have decided to call it a day and spend time with my wife. I have not pushed this card to is maximum core clock yet.
With great power… comes great responsibility… Conclusion
This card is now drawing 100 extra watts, which is very dangerous.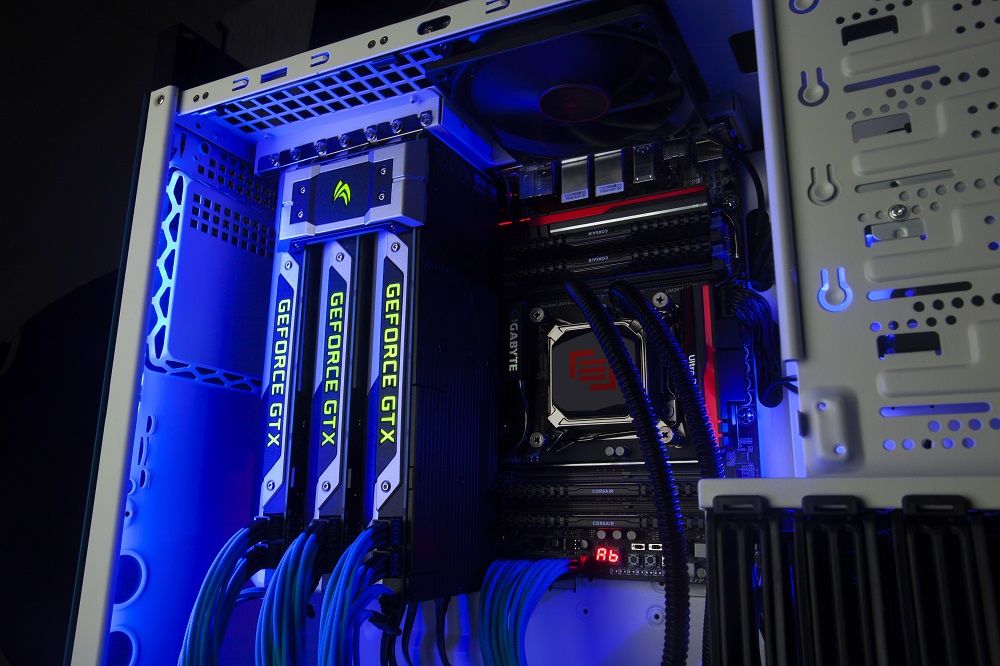 Because I do not want a $700 paper weight, my next step is to find a balance between my maximum core clock and voltage and try to limit my power draw to 350-375 Watts.
Do I recommend this mod?
To people on water, yes!
To people on AIO, maybe. You must take the extra steps I did to ward off that 100 Watts of extra heat that will be coming to your card.
To people on AIR, No. I do not recommend this mod to people on air. It can potentially be dangerous.
To people with partner cards. Maybe… you have to think about it, you’re adding 33% more power and that can increase your temperatures by 33% as a rough estimate. It can be counter productive due to thermal throttling. And if you don’t take extra pre-cautions to cool your card, it can blow up!
-
MSIAfterburner.zip
1.1 KB
Views: 1,427 -
EVGA.zip
1.1 KB
Views: 1,381 -
WildCard.zip
1.1 KB
Views: 2,005 -
HardwareMonitoring.zip
3.
 5 KB
5 KB
Views: 724 -
powerlimit.zip
251 bytes
Views: 3,804
Reactions:
Shweller, The Viper, Luckbad and 2 others
Save
Share
ReplyQuote
18401 — 18420 of 18543 Posts
kithylin
·
Like a fox!
mouacyk
·
Newb to Overclock.net
mouacyk
·
Newb to Overclock.net
kithylin
·
Like a fox!
StAndrew
·
Registered
kithylin
·
Like a fox!
StAndrew
·
Registered
kithylin
·
Like a fox!
V3teran
·
Registered
mouacyk
·
Newb to Overclock. net
net
kithylin
·
Like a fox!
kithylin
·
Like a fox!
Streetdragon
·
Manual breath enabled
neoroy
·
Registered
kithylin
·
Like a fox!
kithylin
·
Like a fox!
8051
·
Banned
kithylin
·
Like a fox!
8051
·
Banned
kithylin
·
Like a fox!
18401 — 18420 of 18543 Posts
⛏ NVIDIA GTX 1080 — mining performance and hashrate
NVIDIA GTX 1080 Specs
The NVIDIA GTX 1080 was released on May 27, 2016.
Average power consumption — 160.0W.
The current market price is 28495.03 ₽.
The maximum allowable graphics chip temperature is 94°C
NVIDIA GTX 1080 Hashrate
Hashrate is a unit of measurement that determines the processing power of a video card in mining. The higher it is, the better. The hashrate may differ depending on the coin that the card is mining. Details are in the table below.
nine0005
| Coin | Algorithm | Hashrate |
|---|---|---|
| Ethereum POW (ETHW) | DaggerHashimoto ETH | 35.5 MH/S |
| Ethereum Classic (ETC) | Etchash | |
| Ravencoin (RVN) | KawPow | 17.4 MH/S |
| Ergo (ERG) | Autolykos v2 | 59.5 MH/S |
| Expanse (EXP) | DaggerHashimoto EXP | |
| Ubiq (UBQ) | Ubqhash | 35.5 MH/S |
| Monero (XMR) | RandomX | 700.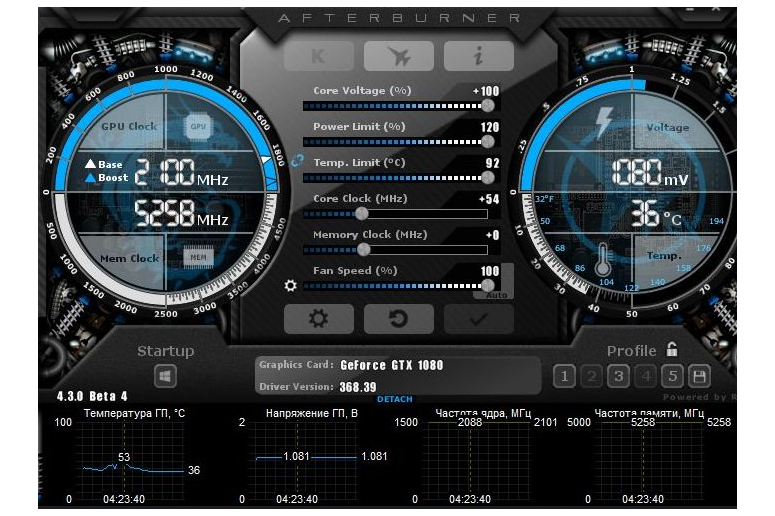 0 H/S 0 H/S |
| Beam (BEAM) | BeamHashIII |
 5 MH/S
NVIDIA GTX 1080 — mining performance
Hashrate and power consumption depend on overclocking and the specific device. The cost differs from case to case. Specify the values, click on the button calculate and get graphs for your specific device.
NVIDIA GTX 1080 — profit in mining
nine0091 Profit Graph shows the NVIDIA GTX 1080 mining income on the most profitable coin on a given day, including electricity costs.
Annual income: 13263 RUB
(0.00813995 BTC)
Average income per day: 36 RUB
(0. 00002224 BTC)
Last 365 days
NVIDIA GTX 1080 — mining payback
nine0003
Payback graph shows the ratio of the cost of NVIDIA GTX 1080 to its income on different days. This chart will help you understand what payback period to expect.
Driver
The minimum recommended driver version for mining on NVIDIA is 411.95. The latest version from the manufacturer’s official website usually works best.
Buy NVIDIA GTX 1080
Overclocking Nvidia GeForce GTX 1080 for Mining
Content of the article:
- The main tasks of acceleration of video cards
- Video acceleration techniques NVIDIA
- Spread and voltage curve
- Acceleration
- Acceleration 1000 Nicehash Kryptex
- Downclock
- Automatic switching PL
Despite the fact that the video card in question came out in mid-2016, even today, 1080 overclocking for mining is very popular.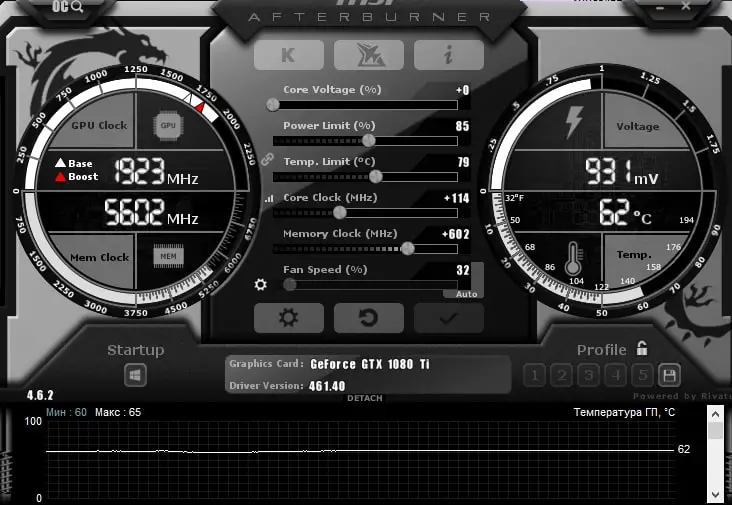 This is a model that is built on the optimal and proven Pascal architecture. It runs on a GP104 GPU, and the amount of video memory is an impressive 8 GB for its time. Even today, this is enough to mine all popular cryptocurrencies. nine0005
The mentioned architecture is much better than Maxwell. This is due to its increased performance and reduced power consumption. The video cards in question can be used when assembling farms. Overclocking the 1080 Ti for mining will only increase the gap between the model and its counterparts with 6 and 8 GB of video memory. A high production rate only reduces the payback period.
Basic overclocking tasks for graphics cards
This is a manual setting that is designed to improve the performance of the model. You can overclock 1080 for mining ETH and other cryptocurrencies. Miners use specialized software to set the best parameters for mining coins for a particular situation. If we consider this moment from a technical point of view, then a person changes the BIOS characteristics and reboots the graphics adapter. The overclocking for 1080Ti mining is similar. nine0005
Method for overclocking Nvidia video cards
You need to use specialized programs in order to increase performance. This can be done in several ways.
- Determine the maximum hashrate. In this case, you need to pay attention to the voltage of the GPU. It depends on the cost of electricity.
- Select the capacity and calculate the energy cost per farm. It is required to select the optimal indicators of the clock frequency of the CPU and GPU. Choose a fan speed to keep your system at the optimum temperature. It is important to achieve a combination in which the maximum performance will be exhibited along with the lowest possible power consumption. nine0130
- Settings can be adapted to multi-tariff meters. GPU overclocking allows you to choose the optimal power consumption mode. For example, at night the cost of utilities may be lower. During certain hours, the farm will operate at maximum capacity.
 This is true, for example, when mining ether at 1080.
As you can see, Nvidia video cards are highly flexible. Next, you will learn more information that will enable work efficiency. The optimal overclocking of 1080 Ti for mining will be considered. It is not so difficult, it is enough just to learn certain tips once. nine0005
Frequency and voltage curve
It allows efficient tuning. At first glance, this technique seems too complicated. First of all, you need to set the maximum amount of «boost». In this case, it is 1733 MHz. In order to open the curve of frequencies and voltages, you just need to press the button of the same name. It is available in any specialized software. Here you can use the search.
A window will appear in front of you, in which there will be a voltage indicator at the bottom, and a frequency on the left. The established points are the ratio of these indicators. This tool will let you know that the maximum voltage is excessive. Its exposure leads to a serious increase in energy consumption. nine0005
So you need to relieve stress in order to fit into the limits. This can be used when overclocking for mining at 1080 MSI. After selecting the appropriate options, click on the «Apply» button. Make sure the settings have been applied. After that, you should get a straight line without rounding.
Overclocking video cards
This procedure requires selection of a suitable frequency. To do this, you must perform a certain algorithm of actions. First of all, you need to find out the manufacturer of your video card. This can be done using the GPU-Z program. For the card in question, the overclocking limit is as follows:
- Samsung — +700 MHz;
- Micron — +500 MHz;
- Hynex — +200-400 MHz.
Naturally, these indicators are purely individual. So it is recommended to find 1080 overclocking parameters for mining on specialized forums. All special cases are considered here.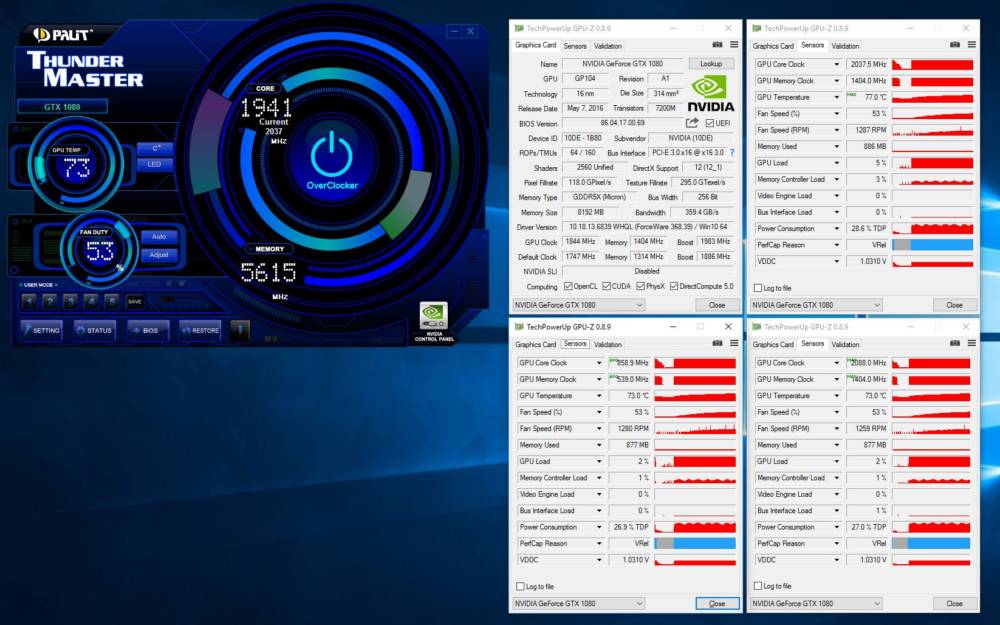 Next comes the stress test. This is the most important step, which is done with the help of the little application FurMark. It loads the video card to the maximum, checks its stability in extreme conditions. nine0005
When choosing overclocking parameters 1080 for mining, you should gradually increase the frequency. Overclocking can be done using MSI Afterburne. it supports all popular cards from Nvidia. The frequency should be increased by 50 MHz at each step.
At some point, you will start to notice artifacts on the screen. A video driver crash message or even a blue screen of death may appear. This is evidence that the overclocking of the GTX 1080 Ti should be completed. The product works to the limit. nine0005
Now you can start checking the stability. Leave the farm running for a day and make sure it hasn’t stopped mining. The computer should not restart and even slow down. Look at the GPU load graph. If there are sharp jumps on it, then additional adjustment should be made.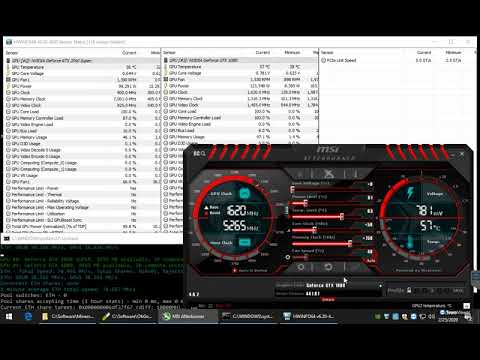 The actual power must match the predicted power.
Overclocking 1080 available for mining on Hive OS. To do this, you need to create an individual profile for the farm in the operating system. Here you will be able to select the appropriate GPU settings for each specific card. The Algo field specifies overclocking parameters for a particular algorithm. nine0005
Overclocking 1080 TI for mining Zcash
To achieve maximum results when mining this coin, it is recommended to use the OHGODANETHLARGEMENTPILL utility. With this software, you can achieve a figure of 55 MH / s (Whatomine data). If you use Equihash to mine Zcash, you will receive about $2.5 per card per day.
Overclocking 1080 TI for mining Ethereum
The utility in question is also suitable for obtaining the second most popular cryptocurrency. The optimal frequency is 1530 MHz. At the same time, the temperature of the card will be kept below +60 degrees. The resulting indicators (55 MH / s) will give about $ 2. 76 / day. Ethereum is the best currency for mining on this video card. nine0005
Overclocking 1080 Ti for Nicehash Kryptex
ETHlargement Pill is suitable for the card in question. It increases the capacity of the video memory. With this software, you can achieve the GTX 1080Ti. Do not forget to work with the Power Limit item. Do not be afraid to reduce the indicator with a strong increase in temperature.
Downclock
Points lower than 800mV cannot be edited in AfterBurner. The correct value is above. This condition has no significant effect. Points are set uniformly with found frequencies. This process is like steps. In the case of 1080Ti, it will not be possible to save points. You can change them at will. nine0005
Automatic switching PL
This is a mandatory point to consider if you decide to overclock 1080 for mining, overclocking must be done using the NVSMI utility. It analyzes the power limit. Automatically PL changes quite rarely. The utility eliminates burning, increases the service life of the card.