Laptop GPU power limits (TGP): What to know before buying
I recently wrote about GPU power limits in laptops, which is much more important than you might think. Differences in power can represent large differences in performance, even for two graphics cards that share the same name on paper.
Contents
- Why laptop power limit (TGP) is so important
- Nvidia RTX 30-series laptop GPU power limits
- AMD RX 6000 laptop GPU power limits
- How to figure the power limit of a laptop GPU
If you’re shopping for one of the best gaming laptops, knowing the power limits of the machine’s GPU is essential. I rounded up the power ranges for Nvidia RTX 30-series and AMD RX 6000 mobile graphics cards, as well as some information about how to find the power limit of the graphics card in any machine.
Why laptop power limit (TGP) is so important
Jacob Roach / Digital Trends
Laptops serve different purposes, so it doesn’t make sense to throw the same graphics card in every machine. Maybe a laptop builder wants a thin and light gaming laptop, or a semi-portable workstation with loads of cooling potential. These machines have different power budgets and thermal situations, so they can’t have the exact same GPU.
The issue is that differences in power can lead to much different performance. That’s why it’s important to know the TGP, or total graphics power, of the laptop you’re buying. In some cases, cards that should be lower in the range, like the RTX 3070 Ti, can outperform cards higher in the range, like the RTX 3080 Ti, because of power differences. Similarly, cards with the same name on paper may perform much differently in practice.
Unfortunately, it’s not as simple as looking at the TGP on a spec sheet to figure out how your GPU will perform. Mobile graphics cards have dozens of variations that can lead to much different performance, even with similar TGP, so reading individual laptop reviews is a must.
Nvidia RTX 30-series laptop GPU power limits
Nvidia’s RTX 30-series GPUs have a massive power range, with multiple cards offering 70W of wiggle room. Lower-powered options usually come with a lowered clock speed as well, so I listed the clock speed ranges alongside the power. Lower power doesn’t necessarily mean the card has a lower clock speed — it comes down to the individual mode — so keep that in mind.
| Power limit (TGP) | Clock speed | |
| RTX 3080 Ti | 80 – 150W | 1,125 – 1,590MHz |
| RTX 3080 | 80 – 150W | 1,245 – 1,710MHz |
| RTX 3070 Ti | 80 – 125W | 1,035 – 1,485MHz |
| RTX 3070 | 80 – 125W | 1,290 – 1,620MHz |
| RTX 3060 | 60 – 115W | 1,283 – 1,703MHz |
| RTX 3050 Ti | 35 – 80W | 1,035 – 1,695MHz |
| RTX 3050 | 35 – 80W | 1,057 – 1,740MHz |
Nvidia technically requires vendors to list the power and clock speed of laptops equipped with an RTX 30-series GPU. Multiple laptop builders don’t, though, including Asus, Razer, and Lenovo. Unfortunately, the only way to find out the TGP of these machines is to get your hands on a model.
AMD RX 6000 laptop GPU power limits
AMD cards are a bit different from Nvidia. AMD doesn’t list the power ranges for its mobile GPUs, instead using an “up to” number for the majority of cards it offers. They still have a power range, but AMD hasn’t pushed manufacturers to list this spec, likely because there are far fewer laptops with discrete Radeon graphics compared to Nvidia.
For now, I can only list the numbers AMD provides. Hopefully that will change in the future. Here’s how the power limits shake out for RX 6000M:
- RX 6850M XT — Up to 165W
- RX 6800M — 145W+
- RX 6800S — Up to 100W
- RX 6700M — Up to 135W
- RX 6700S — Up to 80W
- RX 6650M XT — Up to 120W
- RX 6650M — Up to 120W
- RX 6600M — Up to 100W
- RX 6600S — Up to 80W
- RX 6500M — Up to 50W
- RX 6300M — Up to 35W
How to figure the power limit of a laptop GPU
The easiest way to check your laptop GPU’s power limit is through the Nvidia Control Panel.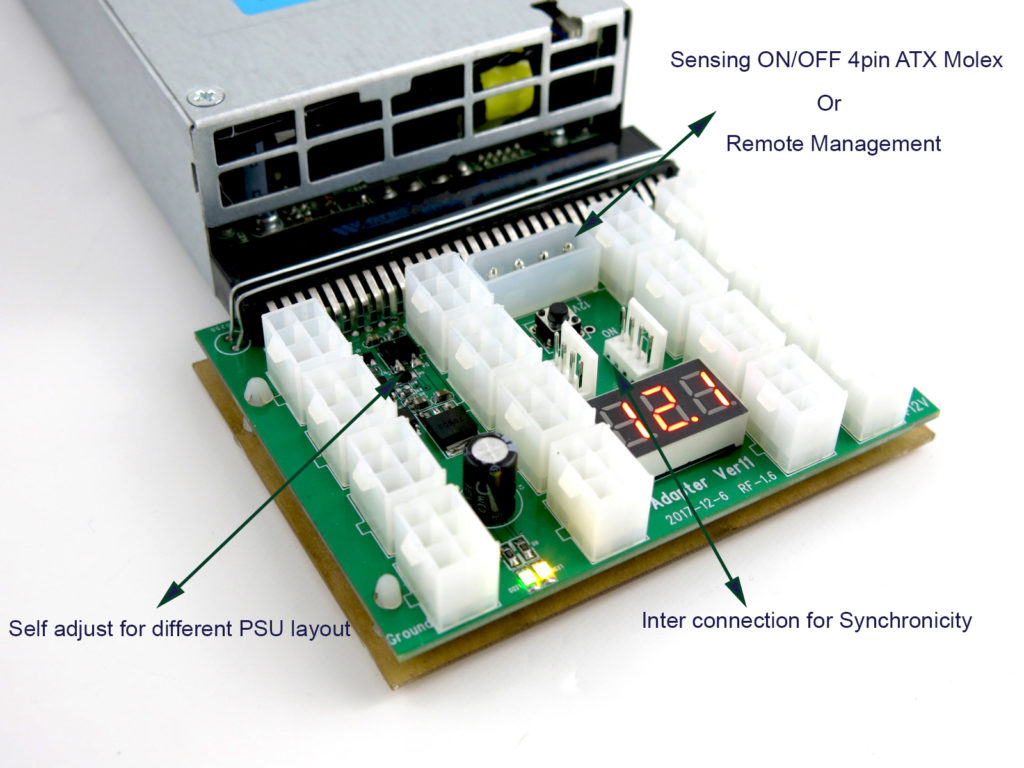 If you have an Nvidia GPU and the latest driver installed, open up the Control Panel and click System Information in the bottom left. Navigate down in the new window to find your power limit.
That’s one way, but I recommend finding the power limit for yourself. This works across all GPUs from all vendors, and you can be sure that your GPU is actually hitting its power limit without relying on what a spec sheet says.
To start, download HWInfo and load it up. Click the Sensors button to open up a new window, which might be a little overwhelming at first. Scroll down to your GPU and make sure to expand the menu. You’re looking for GPU power, which is fairly close to the top and noted by a small lightning bolt.
Keep HWInfo open and run a benchmark. You can use one of the best games to benchmark your PC, but I prefer to use a stress test like FurMark. Before starting the benchmark, hop back to HWInfo and click the Clock icon in the bottom (this will reset all of your values). Turn the benchmark on and wait.
In FurMark, at least, your GPU should shoot to maximum power immediately, so you don’t need to run the test long. Look at the Maximum column in HWInfo to find your GPU’s power limit. Power limits are usually rounded, so if your GPU has a power limit of 115W, you may see 114W with some decimals in HWInfo.
And that’s it. You can check through Nvidia Control Panel or with your laptop vendor, but a quick test with some monitoring tools is the best way to drill down on your GPU’s power limit. If your laptop has multiple performance modes, keep in mind that they may lower or raise the power limit, so you may want to retest with the different settings.
Editors’ Recommendations
-
Henry Cavill explains why he’s waiting on the RTX 4090
-
The canceled Nvidia RTX 4080 12GB takes a beating in benchmarks
-
Call of Duty Modern Warfare 2 (2022) PC performance guide: Best settings for high fps
-
Best gaming laptop deals for October 2022
-
Best laptop deals: Get a portable workhorse from $99 today
Power Supply Calculator – PSU Wattage Calculator
Choose your Components
Central Processing Unit (CPU)
Select Brand
Select Brand
This field is required.
Select Series
Select Series
This field is required.
Motherboard
Select a MotherboardATXE-ATXMicro ATXMini-ITXThin Mini-ITXSSI CEBSSI EEBXL AT
Select a Motherboard
This field is required.
Graphics Processing Unit (GPU)
Select Chipset
Select Chipset
Select Series
Select Series
x
12
1
Random Access Memory (RAM)
Select Your Memory128GB DDR564GB DDR532GB DDR516GB DDR58GB DDR54GB DDR5128GB DDR464GB DDR432GB DDR416GB DDR48GB DDR44GB DDR432GB DDR38GB DDR34GB DDR32GB DDR3
Select Your Memory
x
12345678
1
Solid state Drive (SSD)
Select a Solid State DriveNot InstalledUnder 120GB120GB — 256GB256GB — 512 GB512GB — 1TB1TB+
Select a Solid State Drive
x
12345678
1
Select a Solid State DriveNot InstalledUnder 120GB120GB — 256GB256GB — 512 GB512GB — 1TB1TB+
Select a Solid State Drive
x
12345678
1
Select a Solid State DriveNot InstalledUnder 120GB120GB — 256GB256GB — 512 GB512GB — 1TB1TB+
Select a Solid State Drive
x
12345678
1
Select a Solid State DriveNot InstalledUnder 120GB120GB — 256GB256GB — 512 GB512GB — 1TB1TB+
Select a Solid State Drive
x
12345678
1
Select a Solid State DriveNot InstalledUnder 120GB120GB — 256GB256GB — 512 GB512GB — 1TB1TB+
Select a Solid State Drive
x
12345678
1
Select a Solid State DriveNot InstalledUnder 120GB120GB — 256GB256GB — 512 GB512GB — 1TB1TB+
Select a Solid State Drive
x
12345678
1
Hard Disk drive (HDD)
Select a Hard DriveNot Installed5400RPM 3. 5″ HDD7200RPM 3.5″ HDD10,000RPM 2.5″ HDD10,000RPM 3.5″ HDD15,000RPM 2.5″ HDD15,000RPM 3.5″ HDD
Select a Hard Drive
x
12345678
1
Select a Hard DriveNot Installed5400RPM 3.5″ HDD7200RPM 3.5″ HDD10,000RPM 2.5″ HDD10,000RPM 3.5″ HDD15,000RPM 2.5″ HDD15,000RPM 3.5″ HDD
Select a Hard Drive
x
12345678
1
Select a Hard DriveNot Installed5400RPM 3.5″ HDD7200RPM 3.5″ HDD10,000RPM 2.5″ HDD10,000RPM 3. 5″ HDD15,000RPM 2.5″ HDD15,000RPM 3.5″ HDD
Select a Hard Drive
x
12345678
1
Select a Hard DriveNot Installed5400RPM 3.5″ HDD7200RPM 3.5″ HDD10,000RPM 2.5″ HDD10,000RPM 3.5″ HDD15,000RPM 2.5″ HDD15,000RPM 3.5″ HDD
Select a Hard Drive
x
12345678
1
Select a Hard DriveNot Installed5400RPM 3.5″ HDD7200RPM 3.5″ HDD10,000RPM 2.5″ HDD10,000RPM 3.5″ HDD15,000RPM 2.5″ HDD15,000RPM 3.5″ HDD
Select a Hard Drive
x
12345678
1
Select a Hard DriveNot Installed5400RPM 3. 5″ HDD7200RPM 3.5″ HDD10,000RPM 2.5″ HDD10,000RPM 3.5″ HDD15,000RPM 2.5″ HDD15,000RPM 3.5″ HDD
Select a Hard Drive
x
12345678
1
Optical Drive (CD/DVD/Blu-Ray)
Select an Optical DriveNot InstalledBlu-RayDVD-RWCOMBOCD-RWDVD-ROMCD-ROM
Select an Optical Drive
PSU wattage suggested for your complete PC:
0 Watts
Reset
Shop PSUs
NOTE: The PSU wattage recommended by the calculator above factors in watts suggested to efficiently power a complete PC. For example, added components such as PCI cards, external devices, cooling fans, and more may consume additional power. Looking for a complete build? Check out our PC Builder here.
Frequently Asked Questions
How do I calculate my PSU requirements?
The best power supply for your PC build is the one that provides the right amount of wattage to all components simultaneously. Manually calculating this requires that you multiply the total amps of all components by the total volts of all components. The result is the total watts that your PC build requires. If you input all the components of your PC build into our calculator, it will do this for you and provide a list of options.
Why should I use the calculator to find a power supply?
The power supply provides power to every component and if you install the wrong power supply, you could damage the components. The right PSU will provide all your components with a consistent amount of energy when they need it.
What are some of the top PSU brands that I can buy?
Top brands include:
Corsair,
EVGA,
Rosewill,
Seasonic,
Cooler Master,
Silverstone,
FSP and
Thermaltake. However, you need to select the PSU that’s right for you so consider all options before purchasing.
How do I know that the PSU is the right size?
Every PC case has a space for the power supply unit although the space may vary in size and shape. For example, small form factor cases will not be able to accommodate a PSU meant for a mid or full tower case. It is always best to look at the dimensions of your PC case and make sure that you are buying a power supply unit that can fit in the designated space.
Where can I get news about power supplies?
How do I know which power supply to buy?
Before you decide what power supply to buy, it is crucial that you know all the components that you currently have within your build or the ones that you would like to include. Here’s a complete list of items that you need to consider when calculating your power supply needs.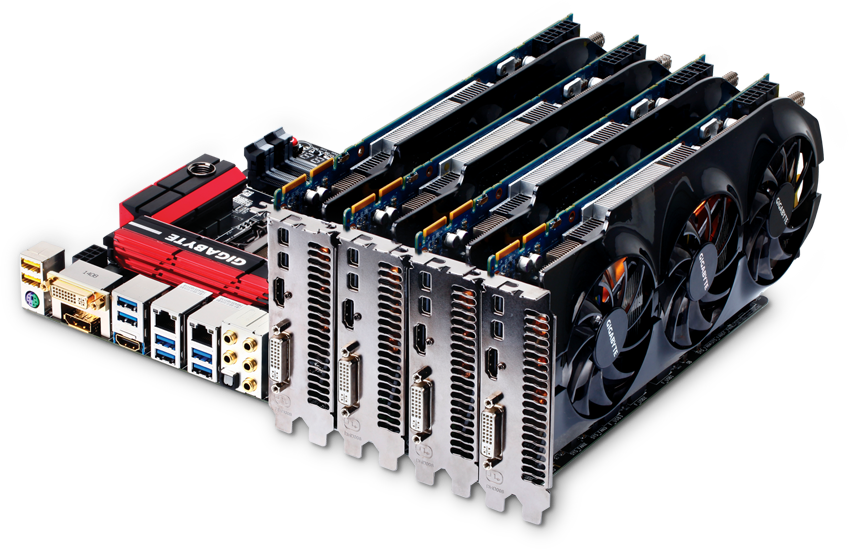
-
Motherboard – Be sure you know what kind of motherboard (Desktop, Server, Laptop, etc.) your build currently has or what form factor you want to put in your new build. This is a critical component of your calculations because almost everything within your build plugs into and derives power from the motherboard.
-
Central Processing Unit (CPU) – Be sure you know the make, model or series, and socket size.
-
Graphics Processing Unit (GPU) – You will need to account for the actual power draw and the number of additional power pins a GPU may have. It’ll be either 6, 8, 6+6, 6+8, or 8+8-pins – and that’s per GPU. So make sure your PSU has enough cable to support that. Most PSUs will have at least one cable that is compatible with either an 8-pin or a 6-pin connector.
-
Memory (RAM) – Always know the number of memory sticks that your motherboard can support as well as the size (GB) of each one.
-
Optical Drive – If your PC build includes an optical drive, be sure to include this in your calculations. Also make sure that you know the optical media type (Blu-ray, CD-ROM, etc.) of your optical drive.
-
Hard Drives (HDD) – You need to know the size (inches) and RPM (e.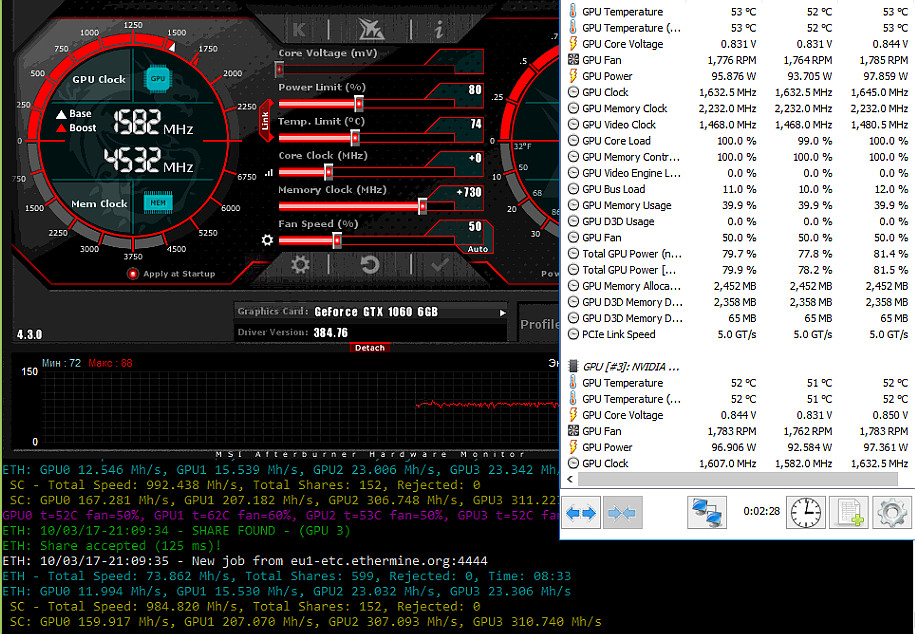 g. 7200RPM) of each hard drive that you currently have within your build or that you would like to include.
-
Solid State Drive (SSD) – You need to know the size (GB) of each solid state drive that you currently have within your build or that you would like to include. Remember that sometimes these can be attached to the motherboard.
-
Fans/Peripherals – You may want to include add-ons like a sound blaster card or RGB case fans. These devices also draw a small amount of power so err on the side of caution by rounding up power wattage to accommodate peripherals.
What is the 80 PLUS Certification?
80 PLUS is a certification that measures the power supply’s efficiency. Manufacturers will voluntarily send their products to an independent lab to test the power supply’s energy efficiency at different loads. Based on the results, PSUs are given one of 6 levels of certifications: 80 PLUS, 80 PLUS Bronze, 80 PLUS Silver, 80 PLUS Gold, 80 PLUS Platinum, or 80 PLUS Titanium.
Video card test: how to check the power of the GPU
Video card test is very simple. It is enough to download special programs that allow you not only to check the power of video cards, but also to compare them with others.
Video cards are tested for many purposes. For example, what to check the stability of the video processor. Which video processor is installed can be found from the name of the card on the box or a sticker on the device itself. The type, manufacturing process, as well as the use of all video converters will affect everything: from performance, power consumption (sometimes when purchasing a new video card, you have to change the power supply to a more powerful one), appearance and size, and ending with normal temperature conditions.
The test is also carried out to check the stability of the video memory. Very often, ordinary users judge the performance of a video card by the amount of local video memory. This is not entirely true.
A video card test is also done to determine its operating modes. This includes: the noise produced during operation, the temperature indicators of the video core, and these indicators in the projection of time under load.
Let’s start with testing the stability of the video core (video processor), since testing a video card without this test is pointless. Download the program — OCCT. Download page — the program is free, in English (you can find the crack). Install, run.
Video card test: how to check the power of the GPU / hpc.by
From the tabs, select GPU: 3D (GPU- Graphics Processor Unit).
In the options, check the Error Check box.
Press the green ON button.
The process has begun.
Test video cards: how to check the power of the graphics processor / hpc. by
by
You can not test a video card for a long time. Five minutes will be enough. We don’t know yet — maybe it overheats, and during the test we will just burn it (the load during such tests is much higher than during games on the computer).
SEE ALSO: The world’s first wireless video card is created
During the test, pay attention to the indicators in the upper left corner of the test. We need an indicator — ERRORS. During the entire test, it should be zero.
Video card test: how to check GPU power / hpc.by
In this way, you can test a video card for kernel (GPU) failures.
- video card kernel errors can manifest themselves as computer freezes (more often this pattern is observed with incompatible drivers. Then you need to install the drivers correctly, and possibly reinstall Windows.
- BSOD blue screens;
- The computer may not start.
READ ALSO: Several processors will be combined in one video card
You can see the temperature readings under load in the screenshots that the OCCT program takes during testing. The folder with them opens automatically after the end of testing the video card.
Temperatures above 75 degrees are considered overheating. If you do not lower it, your video card will fail for sure. It’s just a matter of time.
SEE ALSO: Mobile racing: Nvidia’s latest processor sets records
- Tags:
- video card test
- video cards
GPU processing with Spatial Analyst—ArcMap add-on
Available with a Spatial Analyst license.
- How does a GPU work?
- Supported cards and GPU drivers
- GPU configuration
The Spatial Analyst extension now has improved performance and uses the graphics processing unit (GPU) for some tools. In modern computers, this technology takes advantage of the processing power of the video card to improve the performance of certain operations.
GPU support is currently implemented in the following tools:
- Exposure
- Slope
- Mutual visibility 2
What is the operation of the GPU?
A graphics processing unit (GPU) is a computer hardware component whose main task is to speed up the rendering of graphics on a computer screen. Recently, the computing power of GPU processors has been directed towards performing general computing tasks.
In GPU-based tools, the raster processing task is directed not to the computer’s central processing unit (CPU), but to the graphical GPU. This approach provides a gain when performing operations of a certain type. In such cases, the program breaks the task into many small parts, which are sent to the GPU for processing. Next, the GPU performs the simultaneous processing of all these small tasks, but at a faster speed. The received data is sent back and the software assembles the individual components into the final finished product.
Supported cards and GPU drivers
There are various solutions available on the market for GPU graphics processing. Currently, only NVIDIA GPUs with CUDA processing power version 3.0 or higher are supported. To access this feature, the appropriate card must be installed in the system.
To check the types of graphics cards on a Windows computer, open Device Manager and expand Display Adapters. It will list the names and types of your graphics card. If no NVIDIA graphics card is listed, then you will not be able to access this feature and the tool will only use the CPU.
If there is an NVIDIA graphics card, then you need to check the type of graphics processor that is installed in the system using the NVIDIA Control Panel for this:
- Right click on any empty area of the desktop. From the context menu, click NVIDIA Control Panel.
- In the Control Panel window, open the Help menu and click System Information. All NVIDIA graphics card information, driver versions, and other information will be displayed.
Once you have determined your NVIDIA GPU video card type, find its CUDA processing power on the NVIDIA CUDA GPU help page. In the corresponding section, find your GPU board and take note of the Compute Power value listed for it. This value must be equal to or greater than 3.0.
The graphics card installed on computers comes with a default driver. Before running an analysis tool that uses the GPU, you must update your GPU graphics card to the latest version available on the NVIDIA driver update — page.
GPU configuration
This tool will use only one GPU for computing operations. But, if you have only one GPU in your computer, then it will be used for both visualization and computational operations. In this case, a warning message will appear during the execution of the tool, indicating that the display may become unresponsive. Therefore, it is recommended to use two GPUs for spatial analysis: one for visualization and one for computational operations.
When multiple GPUs are used in the system, the first GPU in TCC (Tesla Compute Cluster) driver mode will be used by default. If there is no GPU in TCC driver mode, then the first GPU (with index 0) will be used unless otherwise specified. To specify the GPU or disable it, see the following:
- To use a different GPU, you can specify it using the CUDA_VISIBLE_DEVICES system environment variable.
 To do this, first create this variable if it has not previously been created in the system. Then set its value to the index value (0 for the first, 1 for the second, and so on) representing the GPU device you would like to use and restart the application.
 - If you do not want any of the GPU devices installed in the system to be used in the analysis, then you can set the CUDA_VISIBLE_DEVICES system environment variable to -1 and restart the application. After that, the tool will be executed only by the CPU.
- To switch back to using the GPU, either delete the CUDA_VISIBLE_DEVICES system environment variable or set it to the GPU device you want to use and then restart the application.
See the CUDA Toolkit Programming Guide for more information about this CUDA_VISIBLE_DEVICES system environment variable.
The following subsections provide guidance on setting up the configuration for optimal performance using the capabilities of the GPU.
TCC Driver Configuration
For NVIDIA GPUs, the GPU device used for computing must use the TCC driver, not the default Windows Display Driver Model (WDDM) driver. TCC mode allows the GPU to work more efficiently.
To enable TCC driver mode, use the NVIDIA System Management Interface daemon, usually found in C:\Program Files\NVIDIA Corporation\NVSMI\nvidia-smi.exe. For example, the command ‘nvidia-smi -dm 1 -i 2’ switches the graphics card with device ID 2 to display mode 1 (TCC).
Note:
If you are using ArcGIS Server, the GPU used for compute must be in TCC driver mode.
Disable ECC mode
Disable Error Correcting Code (ECC) mode for the GPU used for computing because it reduces the amount of memory available to that GPU.
To disable ECC mode, use the NVIDIA System Management Interface (nvidia-smi) control program, usually found in C:\Program Files\NVIDIA Corporation\NVSMI\nvidia-smi.exe. For example, the command ‘nvidia-smi -e 0 -i 1’ disables the ECC mode of the GPU with device ID 1.
Changing TDR settings
When a GPU used for compute processes is in WDDM driver mode, the Windows display device driver may reset that GPU if any of these processes take more than 2 seconds.