Uninstall a GPU driver — Elastic GPU Service
This topic describes how to manually uninstall a GPU driver from a GPU-accelerated
instance. The commands that you run to uninstall the GPU driver vary based on the
installation method of the driver and the OS that the instance runs.
Background information
You can use GPU-accelerated instances only if relevant drivers are configured for
the instances. Before you uninstall a driver from your instance, install another driver
that matches your instance family and OS to ensure the performance of your instance.
For more information, see Upgrade NVIDIA drivers.
If you select Auto-install GPU Driver when you create GPU-accelerated instances, the
operations that you perform to uninstall the drivers vary based on the OSs that the
instances run:
- Ubuntu: Uninstall the .
deb installation package.
- CentOS or SUSE Linux: Uninstall the .run installation package.
To uninstall GPU drivers from different OSs, see the following references:
Uninstall a GPU driver from Windows
In this example, an instance that belongs to the GPU-accelerated compute-optimized
instance family gn6i and runs Windows Server 2019 is used.
- Connect to the instance. For more information, see Connect to a Windows instance by using a password or key.
- In the lower-left corner of a Windows desktop, click the icon and click Control Panel.
- In the Control Panel dialog box, click Uninstall a program.
- Find the GPU driver that you want to uninstall, right-click the driver, and then click
Uninstall/Change.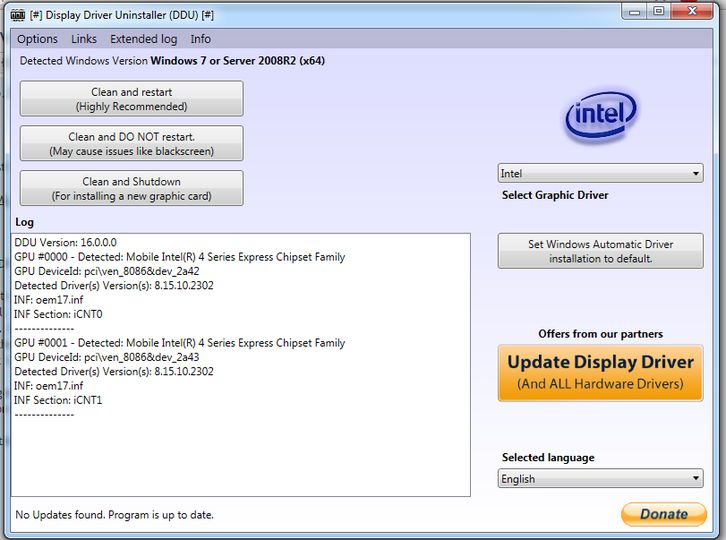
- In the NVIDIA Uninstaller dialog box, click UNINSTALL.
- After you uninstall the driver, click RESTART NOW.
Uninstall a GPU driver from Ubuntu
If you use the .deb installation package to install a GPU driver in Ubuntu, we recommend
that you perform the following operations to uninstall the GPU driver. In this example,
NVIDIA driver 410.104, CUDA 10.0.130, and cuDNN 7.5.0 are used.
- Run the following command to uninstall the GPU driver:
- Run the following commands to uninstall the CUDA and cuDNN libraries:
- Run the following command to reboot the instance:
If you use the .run installation package to install a GPU driver in Ubuntu, we recommend
that you perform the following operations to uninstall the GPU driver.
- Run the following command to uninstall the GPU driver:
- Run the following commands to uninstall the CUDA and cuDNN libraries:
- Run the following command to reboot the instance:
Uninstall a GPU driver from CentOS
If you use the .run installation package to install a GPU driver in CentOS, we recommend
that you perform the following operations to uninstall the GPU driver. In this example,
NVIDIA driver 410.104, CUDA 10.0.130, and cuDNN 7.5.0 are used.
- Run the following command to uninstall the GPU driver:
- Run the following commands to uninstall the CUDA and cuDNN libraries:
- Run the following command to reboot the instance:
If you use the .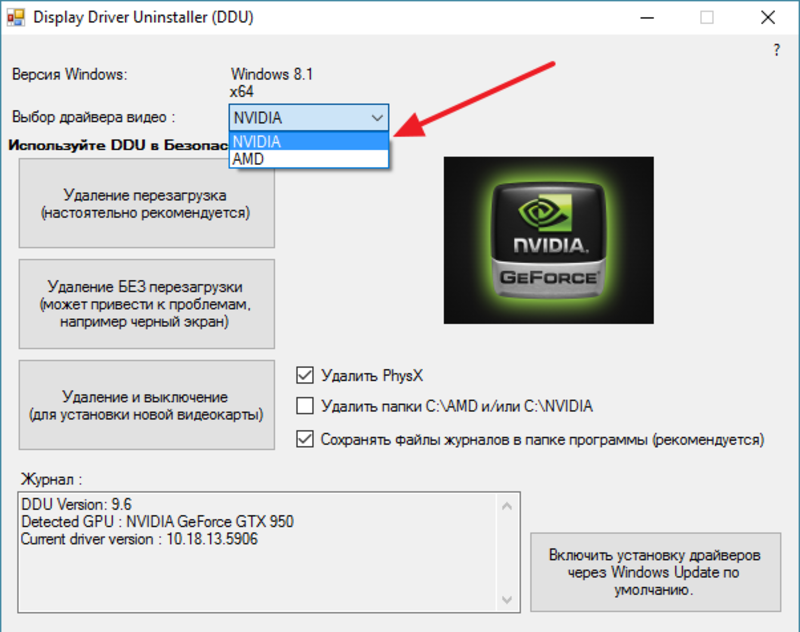 rpm installation package to install a GPU driver in CentOS 7, we recommend
that you perform the following operations to uninstall the GPU driver.
- Run the following command to uninstall the GPU driver:
- Run the following commands to uninstall the CUDA and cuDNN libraries:
- Run the following command to reboot the instance:
If you use the .rpm installation package to install a GPU driver in CentOS 6, we recommend
that you perform the following operations to uninstall the GPU driver.
- Run the following command to uninstall the GPU driver:
- Run the following command to uninstall the CUDA library:
- Run the following command to reboot the instance:
Uninstall a GPU driver from SUSE Linux
If you use the .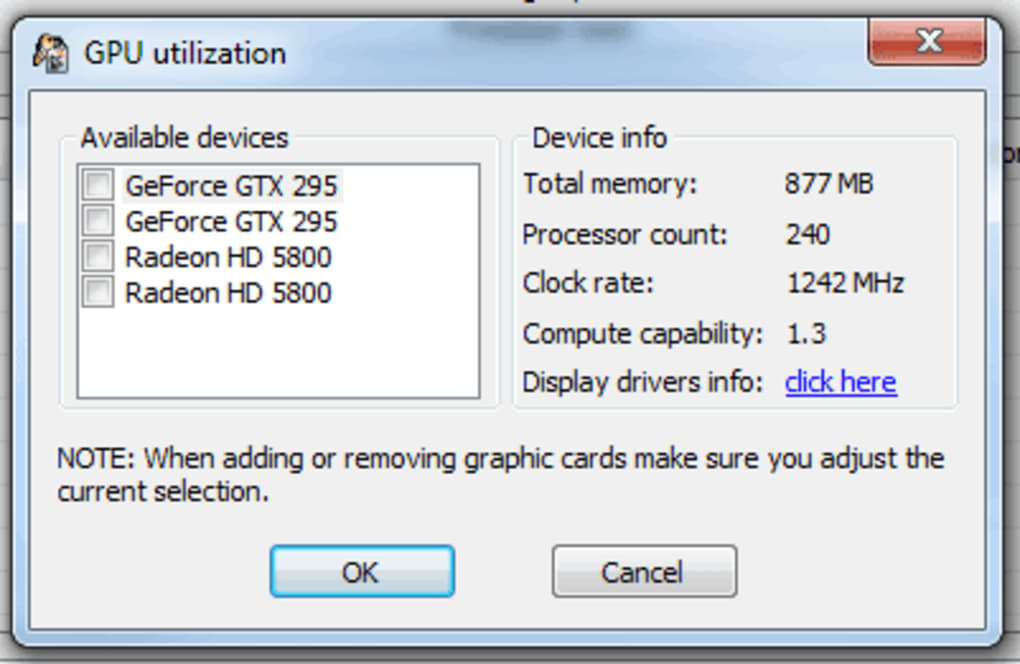 run installation package to install a GPU driver in SUSE Linux, we
recommend that you perform the following operations to uninstall the GPU driver. In
this example, CUDA 9.0.176 is used.
- Run the following command to uninstall the GPU driver:
- Run the following commands to uninstall the CUDA and cuDNN libraries:
- Run the following command to reboot the instance:
How to Remove NVIDIA Drivers from Windows 11
If you have a Windows 11 PC that comes with integrated intel graphics card accompanied by additional NVIDIA graphic cards for better performance, then sometimes you find yourself in a situation when you want to remove NVIDIA graphic drivers, right?
Most of the times users want to remove NVIDIA graphics drivers from Windows 11 because the current version is full of bugs or having compatibility issues with intel graphic drivers.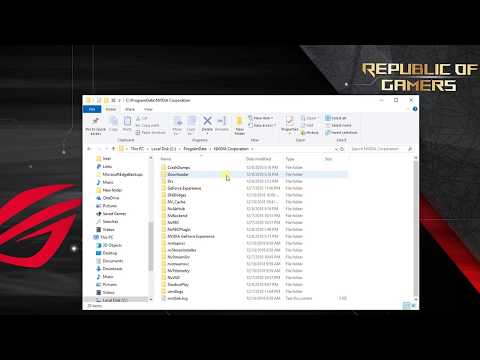 Apart from that there could be other reasons for doing so.
No matter, what is your reason behind removing NVIDIA graphic cards from Windows 11 PC. The following blog post has possible ways on how to do that:
You need to keep in mind that the steps discussed below works for both Windows 11 as well as Windows 10 to remove NVIDIA Graphic Drivers
Remove NVIDIA Drivers Using Control Panel
The very first way to remove NVIDIA drivers on your PC is using Control Panel. Here’s what you need to do:
Press the Windows key to open the Start Menu. In the Start Menu, search for Control Panel and then click on the relevant search result to open the Control Panel on your PC.
In the Control Panel, click on Uninstall a program option that you will find under the Programs section.
From the list of programs that opens up, click on the NVIDIA Graphics Driver and then on Uninstall/Change button.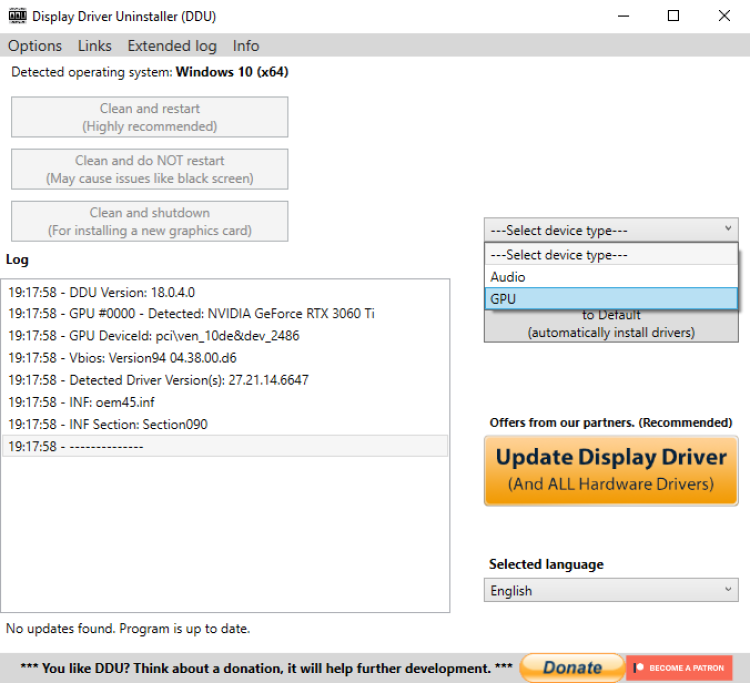
When UAC dialog box appear, click Yes uninstall the NVIDIA Graphic Driver. If possible reboot your computer to complete the process.
Remove NVIDIA Drivers Using Device Manager
Another way using which you can remove NVIDIA Graphic drivers from Windows 11 as well as Windows 10 is by using the Device Manager. Here’s you can do that:
Open the Start Menu by pressing the Windows key combo. Search for Device Manager in the Start Menu. Now from the search result, click on Device Manager to open it.
In the Device Manager, expand the Display Adapters by double-clicking on them.
Now select your NVIDIA drivers from the list. Right-click on it, and then click on Uninstall Device.
When asked to confirm uninstalling their device, click on Uninstall and you will have successfully removed NVIDIA Drivers.
At last, reboot your computer to apply the changes.
Remove NVIDIA Drivers Using File Manager
You can also delete NVIDIA folders available on your device to Remove NVIDIA Drivers from Windows 11 PC. Here’s what you need to do:
First of all, you need to Show hidden files and folder in Windows 11 File Explorer. In case, you’re using Windows 10, then use this method.
After that, you need to head over to C: drive. To do so, click on the C: drive on the left sidebar.
In the C: drive, double-click on the Program Files folder to open it.
Now, select the NVIDIA folder you see here and delete it by pressing the delete key on your keyboard.
Do the same for the NVIDIA folders in Program Files (x86) and Program Data folders.
Delete NVIDIA Registry
Another way to remove NVIDIA drivers from your PC is by deleting the NVIDIA Registry keys.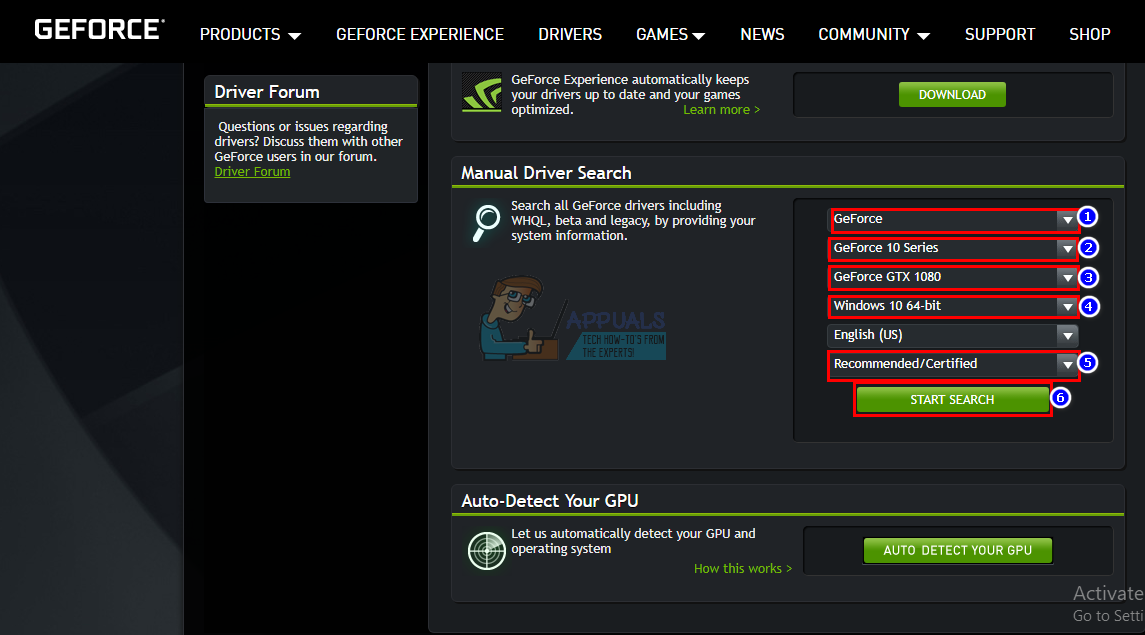 To do so, follow the steps given below-
Press the Windows key on your keyboard to open the Start Menu. In the Start Menu, search for Registry Editor and then click on the relevant search result to open the Registry Editor.
Next, head to the following address in the Registry Editor: HKEY_CURRENT_USER\Software
Now on the left sidebar, select the NVIDIA folder and delete it.
After doing so, head to the following address in the Registry Editor: HKEY_USERS\.DEFAULT\Software
Select any NVIDIA folders you see on the left sidebar, and then delete it.
After doing so, close the Registry Editor and the NVIDIA drivers will be removed from your PC.
Use Third-Party Driver Uninstall
Apart from these two options there are various third-party driver uninstall programs available for Windows 11 as well as Windows 10. You can search the web and find the suitable one for your device.
If you’re already using any program already, then feel free to share with us in the comments.
Please do not hesitate to Contact me on Twitter if you want assistance with issue related to Windows 11, Windows 10, and Edge browser. I will try my best to assist you ASAP. (Follow me first and then PM your issue on Twitter)
Buy us a coffee if you find information shared in this blog post useful. Mention ‘Coffee’ in Subject. So that I can thank you
How to Completely Uninstall Existing GPU Drivers
No matter how careful you are, there will always be times when updating a new driver will ruin your computer. This is often the case with GPU drivers. After updating to an unstable GPU driver, you may notice screen flickering or black screen issues. While uninstalling the GPU driver is the way to do it, it probably won’t solve your problems. This is because the default removal tool still leaves behind some files and registry entries. Therefore, when you install a firmware driver on your computer, these residual files will cause installation problems. This guide will show you how to properly completely uninstall existing GPU drivers using the Display Driver Installer (DDU). So let’s get this. nine0003
Why use the Driver Uninstaller (DDU)
The uninstaller leaves leftover files on your computer by default. However, the Display Driver Uninstaller is designed to find and remove all residual files and folders, clean up corrupted registry entries, and remove all traces of GPU drivers. Basically, when you try to install a GPU driver after using DDU, it will be like a clean install. nine0003
While DDU is undoubtedly a great tool to use, the various options and configuration settings it offers can be confusing for novice users. That’s why we’re going to highlight the easiest way to use DDU without harming your computer.
Things to consider when using DDU
Using DDU is easy, but there are a few things you need to keep in mind. First, make sure your system is offline. This is to prevent Windows Update from interfering with uninstalling GPU drivers. Secondly, DDU will not work on a network drive. Therefore, you will need to install and run it on your Windows PC. It is also recommended to exclude the DDU folder from your antivirus. nine0003
It is recommended to use DDU in Windows Safe Mode. However, if you choose to use DDU normally, you will need to repeat the entire process twice to make sure it cleans up all files properly. Now let’s move on to the process itself.
How to uninstall GPU drivers using DDU
Step 1: Download the DDU installer located at the bottom of the Guru3D website. Select the download site of your choice.
Download DDU for Windows
Step 2: After downloading the installer file, extract it to a folder of your choice. Now open the extracted folder and double click DDU.exe to launch the self-extracting tool.
Step 3: After extracting the files, you will have to reboot your system in safe mode.
Step 4: After restarting the computer in safe mode, open the DDU folder and double-click the Display Driver Uninstaller.exe file to launch it. nine0003
Step 5: In the Options window that appears, select your preferences. However, if you want certain files or additional programs to be installed on your system, uncheck them in the list.
Step 6: After making changes to suit your preferences, click Close.
Step 7: The DDU window should now open. On the right side, select your device type — GPU. nine0003
Step 8: Now select your GPU manufacturer — NVIDIA, AMD or Intel.
Step 9: Finally, click Clean and Restart.
That’s it. DDU will remove the graphics driver, clean up the registry, remove any remaining files, and then reboot your system. Once you start your computer, connect it to the Internet and Windows will automatically download the latest stable driver. nine0003
start again
After Windows has finished installing the GPU driver, you can continue to use your computer as you wish. Note, however, that Windows does not install the latest GPU driver. Instead, it installs the version it considers the most stable. You can update your GPU driver to the latest version later if you are sure it is stable now. If you have NVIDIA graphics installed on your PC, you can check out our installation and update guide. NVIDIA drivers without GeForce Experience. nine0003
DDU: Learn how to uninstall an AMD, NVIDIA or Intel GPU driver
We can fall into the trap of thinking that with the Windows uninstaller we can do a great job of removing a driver as complex as our GPU. Not at all, Windows will leave us with a huge number of records, folders and files that can affect system performance. For this reason, there are tools as sophisticated as these drivers, and so powerful that they assure us that they will erase any trace. nine0003
Contents
- DDU, the best software to uninstall graphics card drivers in Windows
- Where to download and how to install the display driver uninstaller?
- How do I configure the display driver uninstaller?
DDU or Display Drivers The uninstaller is a program developed by Wagnardsoft with the sole purpose already mentioned: to remove all remnants that a driver may have, including himself. Let’s say it’s like a prototyping sweeper on Windows, AMD and NVIDIA, although it can also be used on Intel as it supports it, and even more so when Xe GPUs are released. nine0003
The program has a basic interface and two modes of use, of which we will consider the best, the most correct and the one that should be used, since it cleans the operating system the best. These modes are known as Normal and Safe, of which we will obviously see the second one.
Why? Well, because this mode can clean up better thanks to the fact that we will have to enter Windows Safe Mode and from there it works wonders with a single click.
Where to download and how to install the display driver uninstaller?
DDU updates are permanent, NVIDIA, AMD or Intel are not required to release a new driver, Wagnardsoft guys can release one, two or more versions between driver and driver. They are always improving and looking for the newest versions, fixing bugs and optimizing everything for any version, so it’s good to go to their website and download the latest version available.
For this we will head to their forum/official site where they have a download section and the latest versions ready to download completely free of charge (for example, you can support them with Patreon donations). Once inside the network / forum, we will have several vertical sections in the center, several rows, such as software, latest drivers, related games, etc.
Logically, we are interested in a number of programs in which we will definitely see the latest version of DDU, as shown in the image above. You will also find it in the top carousel, as they always put the latest versions. In any case, we click on the version you touch while reading this article and it takes us to its branch, where we can see its changelog and other details.
Below and as you can see in the image above, we have a Download and Support button that we will click on to direct us to download the program. Once inside, we will have to scroll down and find the link that appears as Official Download here, where after clicking we will proceed to download the DDU on our computer. nine0003
Once the program has been downloaded we will double click on it and the first thing it will ask us is to extract it to the folder we order it is not clear and could be from the Windows desktop to an additional hard drive.
In the path that we assigned to it, we will see a folder, and inside the folder a series of files, such as:
We will click on Display Driver Uninstaller (application) and the program will start. It is not necessary that we do this as administrators, but if we need it and want it, it will always be recommended. nine0003
How do I configure the display driver uninstaller?
The program has a number of recommendations that we need to follow if we want to properly complete the entire process of uninstalling the driver. As we said, there are two modes, the normal one will not get us out of Windows, but it will not clean up as thoroughly as Safe Mode because Windows will block certain access to key entries and folders.
So, we will immediately go to safe mode, which involves restarting the operating system. When we click on a program, the first thing we see is this:
Before moving on, we recommend that you back up the OS or Windows image in case something goes wrong, since every computer is a world and something can go wrong, you better be careful. Also, at this point, we recommend downloading the drivers for your video card that you are about to install, because after the restart, we will refuse the network connection so that Windows does not download drivers from the computer. Microsoft repository. nine0003
Once all of the above is done, we will press Accept and enter the program itself, after which we will see this new window: NVIDIA GPU)
The options are described on their own, so we will not explain them, but go to the next step, namely: disable our network card whether it’s an ethernet board, wifi, usb stick or whatever, even if we have two of them. Requires that the PC does not have an Internet connection due to the above explained in the Windows repository.
Once this is done, we can continue working with DDU, as we will press the close button, after which the following message will appear:
We will accept and close the program without pressing any buttons or anything, we just click X because we want to open it again so that the interface changes to the following:
Here we will only have to click on Safe Mode (recommended) in the Boot Options drop-down menu, after which we will have to click on Start and the computer will restart. After restarting, it will only enter Windows Safe Mode, presenting this new interface:
After that, we will have to go to the Select device type drop-down menu.
Here we select the graphics processor and the program will automatically detect the type of graphics installed, after which we will only have to click on the «Clean and restart» button (if we are going to change the driver).