GeForce GTX 1080 Ti overclocking: pushing it to the limit
In the initial GTX 1080 Ti review, I wasn’t able to finish all the tests I wanted to include. I’ve been busy running additional benchmarks, and I have a few updates in the works. For this first piece, I’m looking specifically at the overclocking potential of the GTX 1080 Ti. With higher clockspeeds on the GPU and RAM compared to the Titan XP, you might think Nvidia pushed the card to its limits. Turns out, there’s still plenty of junk in the trunk.
I didn’t do anything crazy here, I just cranked the power limit to the maximum 120 percent, and after a bunch of testing I ended up with a 175MHz increase on the GPU core clock and a 500MHz increase on the GDDR5X—which takes the memory to an incredible 12Gbps. Then I set the fan speed to a static 80 percent, which is certainly audible but really isn’t too bad. The above image was captured while running a heavy GPU workload for literally hours—it completed with no crashes, despite the healthy overclock.
That was my burn-in result, which had the GPU core settling in at 1900-1950MHz and a temperature of 75C. For gaming workloads, depending on the game, resolution, and settings used, I saw sustained clockspeeds in the 1975-2035MHz range. And the temperatures were much better, typically in the 65-70C range.
Running at stock, core clockspeed was usually around 1700-1750MHz, but the fan speed was much lower leading to temperatures as high as 84C. Nvidia has tuned the 1080 Ti by default to keep fan speeds below about 50 percent, so rather than making more noise the clockspeed will drop until the card reaches equilibrium. That’s not a bad approach, leaving plenty of room for overclocking—and there will certainly be custom designs that make the most of the headroom.
But how does the overclocked GTX 1080 Ti perform? With core clocks about 15 percent higher and an extra 9 percent memory bandwidth, it allows the GPU to run just a bit faster. Of course the 1080 Ti was already bumping into CPU limits at 1080p, so I didn’t bother retesting that resolution. Instead I focused on 1440p ultra and 4K ultra/high. Here’s how the overclocks affect gaming performance at those two resolutions:
At 1440p, there are several games where the overclock doesn’t do much. Doom runs into the 200 fps framerate cap—yeah, at 1440p ultra, it’s still running 200 fps. Dishonored 2, Shadow Warrior 2, Ashes of the Singularity, and Civilization VI all show less than a four percent gain. But other games that are more GPU limited definitely benefit, with >10 percent gains in Battlefield 1, Far Cry Primal, Gears 4, Wildlands, and Rise of the Tomb Raider. Overall, performance improves by eight percent at 1440p thanks to overclocking.
4K is more GPU limited, so the improvements are even greater. Civ6 is the only game that sees no real benefit, and a few others also show single digit percentage improvements. But Doom sees nearly a 20 percent improvement, and several other games show impressive gains of 15-17 percent. On average, at 4K performance is up 10 percent—not too shabby!
The GTX 1080 Ti routinely bumps into the power limit when overclocked, and you can achieve a decent performance improvement without touching clockspeeds if you just increase the power limit. If you’re skittish about damaging a $700 GPU, raising the power limit without changing the clockspeeds is pretty much a ‘free’ performance boost (with a bit more power use from the graphics card).
Overall, GTX 1080 Ti is very similar to the rest of the Pascal lineup when it comes to overclocking. It doesn’t hit as high of an overclock as the 980 Ti and other 900-series cards achieved, but part of that is due to differences in architecture. Pascal may be similar to Maxwell, but Nvidia did add some new features, and stock clocks are substantially higher. Even with the process shrink from 28nm down to 16nm FinFET, there are still limits to how far silicon can go.
Now if only you could find the GTX 1080 Ti in stock…. Just as we expected, all of the places carrying the 1080 Ti sold out in rapid fashion. If you’re anxious to get one, the best advice I can give is to keep checking your favorite resellers . For the next few weeks at least, supply isn’t likely to keep up with demand, but you might get lucky.
Sign up to get the best content of the week, and great gaming deals, as picked by the editors.
Contact me with news and offers from other Future brandsReceive email from us on behalf of our trusted partners or sponsors
Jarred’s love of computers dates back to the dark ages when his dad brought home a DOS 2.3 PC and he left his C-64 behind. He eventually built his first custom PC in 1990 with a 286 12MHz, only to discover it was already woefully outdated when Wing Commander was released a few months later. He holds a BS in Computer Science from Brigham Young University and has been working as a tech journalist since 2004, writing for AnandTech, Maximum PC, and PC Gamer. From the first S3 Virge ‘3D decelerators’ to today’s GPUs, Jarred keeps up with all the latest graphics trends and is the one to ask about game performance.
How to Overclock Your Graphics Card
How to Overclock Your Graphics Card
Want the best Tech discounts and exclusive codes? — Get VoucherCodes email alerts today
We review products independently, but we may earn affiliate commissions from buying links on this page. Terms of use.
If you’re willing to tinker a bit, you can push your graphics card a bit farther than its out-of-the-box specs by overclocking it. Here’s how to overclock your GPU.
By Whitson GordonHow to Overclock Your Graphics Card
Step 4: Run a Final Stress Test and Play Some Games
Results and Final Words
What You Need to Overclock
Step 1: Benchmark Your Stock Settings
Step 3: Increase Your Voltage and Memory Clock (Optional)
Step 2: Increase Your Core Clock and Re-Benchmark
Your graphics card is the heart and soul of your gaming PC—the biggest determinant of the graphical fidelity and performance you see on screen. If you’re willing to tinker a bit, you can push your graphics card even further than its out-of-the-box specs by overclocking it.
Overclocking your video card is similar to overclocking your CPU, albeit a bit more straightforward: you’ll slowly bump up your graphics card’s core frequency, testing it for stability with a benchmarking tool each time you push it a little farther (all while keeping it from getting too hot).
If you have one of Nvidia’s latest RTX cards, the software we recommend in this guide may have the new «Nvidia Scanner» auto-overclocking feature that can bypass a lot of this process. We’ve used it before and it’s pretty decent for a one-click affair, though if you’re willing to put in a bit more time, a manual overclock will net you bigger gains in speed.
For this guide, I overclocked an Nvidia GeForce GTX 1080 Ti and an AMD Radeon RX 580. Here’s how to do it.
Step 4: Run a Final Stress Test and Play Some Games
Once you’ve found reasonably stable settings, it’s time to test your card for a bit longer. Fire up Heaven and dial in your graphics settings—since it’s a bit older, you’ll probably want to set them as high as you can to ensure it is maxing out your card. Click the Run button to start the stress test.
Unlike Superposition, which only allows you to run one benchmark at a time in the free version, Heaven will run indefinitely, until it crashes or you quit the program. Let it run for a few hours, checking in on your temperatures to make sure they’re safe. You should also watch out for any signs of a crash or artifacts. If it does crash, you may have to dial back your clocks just a tad to make sure they’re super stable.
Finally, fire up your favorite games and play for a bit! GPU overclocks can be finicky, and sometimes a benchmark will remain stable even if a certain game crashes. You can also use an in-game benchmark—Metro Exodus is a great choice, especially if you have an RTX card, since you can crank ray tracing up, turn DLSS off, and really stress your card to the max.
After a bit of time and tweaking, you should find the ideal settings for your rig, and you can enjoy a small boost in performance.
Results and Final Words
In the end, I received a similar performance boost in both the GTX 1080 Ti and RX 580. At lower graphics settings with high frame rates (in the hundreds), I saw an increase of 7 to 11fps, on average—not bad if you’re using a high refresh rate monitor.
At high graphics settings and lower frame rates (30-60fps), I got 3 to 5 more frames per second. That may not seem to make a huge difference, but if you’re using a 60Hz monitor with Vsync turned on, dropping below 60fps at all can cut your frame rate in half, due to the way Vsync works.
That means a few frames can actually be the difference between running at 60fps and 30fps in certain high-fidelity scenes, which is nothing to sneeze at. Your mileage may vary, as this will differ from rig to rig—especially if your CPU is bottlenecking the system.
This isn’t the end, either. From here, you can adjust Afterburner’s fan curve to customize your cooling, play with Nvidia’s GPU Boost curve for more fine-grained overclocking, or modify your card’s hardware or BIOS to push it even further. Enjoy the ride!
What You Need to Overclock
Just about any graphics card can be overclocked, although you’ll have better luck with a well-cooled card in a spacious case. If your card has a sub-par heatsink, or is cramped inside a tiny Mini-ITX build, you’ll have less headroom, and overclocking may not be worth your time. As far as software goes, though, you’ll only need a few programs:
An overclocking tool: There are multiple overclocking tools out there, most of which come from different video card manufacturers. We’ll be using MSI Afterburner for this guide, but if you don’t like Afterburner’s interface, you can try EVGA Precision, Asus GPU Tweak, or AMD WattMan. All except WattMan will work on any card, regardless of manufacturer. The settings we’ll use should be identical across programs; the interfaces may just look a little different than our screenshots below.
A benchmarking tool: To stress test your card, you’ll need to run a benchmarking tool that pushes it to the absolute max. I like to use both Unigine Superposition and Unigine Heaven—the former is newer and stresses recent cards a bit more heavily, while the latter is slightly older but lets you run an infinitely long stress test without paying.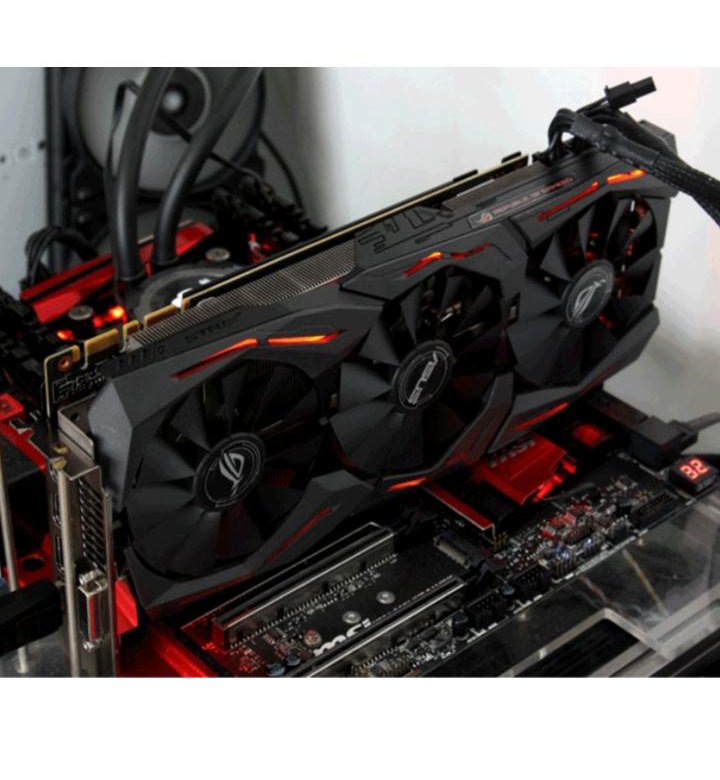 It’s good to have a few different stress tests, so we’ll use both in this guide.
GPU-Z: While this isn’t strictly required, I like to use GPU-Z to ensure my clock and voltage changes have actually taken place as I’m stress testing.
Once you’ve got all three of those installed, it’s time to start overclocking.
Step 1: Benchmark Your Stock Settings
Before you start, it’s a good idea to benchmark your system, so you can ensure it is stable at its out-of-the-box clock speeds. This will also give you an idea of how much performance you gained when all is said and done, which is a nice bonus.
Fire up Superposition and choose an option from the Preset menu. Try to choose something around or above the settings at which you’d run most games. You want Superposition to push your graphics card to 100 percent, without running at a dismally low frame rate—1080p High or Extreme probably isn’t a bad choice for most modern cards. Be sure to disable Vsync, since you don’t want your frame rate locked to your monitor’s refresh rate.
Then, click the big black Run button. It’ll play through a series of scenes, which will take about five minutes. You’ll see performance information in the corner, including clock speed, frame rate, and temperature.
If you’re using a more recent card, you may notice your clock speed fluctuating over the course of the benchmark. Modern AMD and Nvidia cards adjust the boost clock based on the card’s temperature and power usage, essentially self-overclocking to a certain degree if they see there is extra headroom.
However, manually overclocking your card can push these boost clocks even higher, pushing performance further than your card’s built-in limits. So don’t worry about this too much if you’re a beginner—just know that your clock speeds will fluctuate, and that’s okay.
In addition, watch your temperatures as the benchmark runs. You won’t necessarily see them get super high on this first pass, but they’ll increase as you start overclocking and you don’t want it to get too hot. Some auto-boosting cards will gracefully back themselves down from their maximum boost clocks, so I recommend overclocking with your fans at 100% to eliminate temperature as a variable during the process (you can always turn them back down later).
Older cards aren’t quite as smart about throttling down, and you’ll want to overclock with whatever fan control you plan on using long-term, and avoiding overclocks that cause your temperature to reach higher than the mid-80s.
Once the benchmark is finished, you’ll see a final scorecard. Write down the minimum, maximum, and average frame rates from that scorecard, as well as the benchmark score if you so desire—and keep an eye on your temperatures as the benchmark runs.
Step 3: Increase Your Voltage and Memory Clock (Optional)
If your temperatures are still within the safe range, you may be able to push your card a bit farther by increasing the voltage. This can allow for higher stable clock speeds, depending on the card.
To do this, open Afterburner’s settings and, under the General tab, check the Unlock Voltage Control and Unlock Voltage Monitoring boxes. Set the voltage control drop-down to Third Party, and click OK. A new slider should show up in Afterburner’s main window: Voltage.
If this slider measures voltage in mV, then you can increase the voltage supplied to the card. If, like on many new Nvidia cards, it shows a percent value, I recommend leaving this alone, as it won’t actually increase the amount of voltage you can access.
For cards that support it, bump this up by 10mV or so, and run your benchmark again. If you don’t experience crashes, you can try increasing the Core Clock further. Push the voltage up a bit more every time your Core Clock becomes unstable.
This is where you want to pay especially close attention to those temperatures, since increasing the voltage can produce more heat. Research your card to determine its maximum safe voltage to ensure you don’t damage your hardware.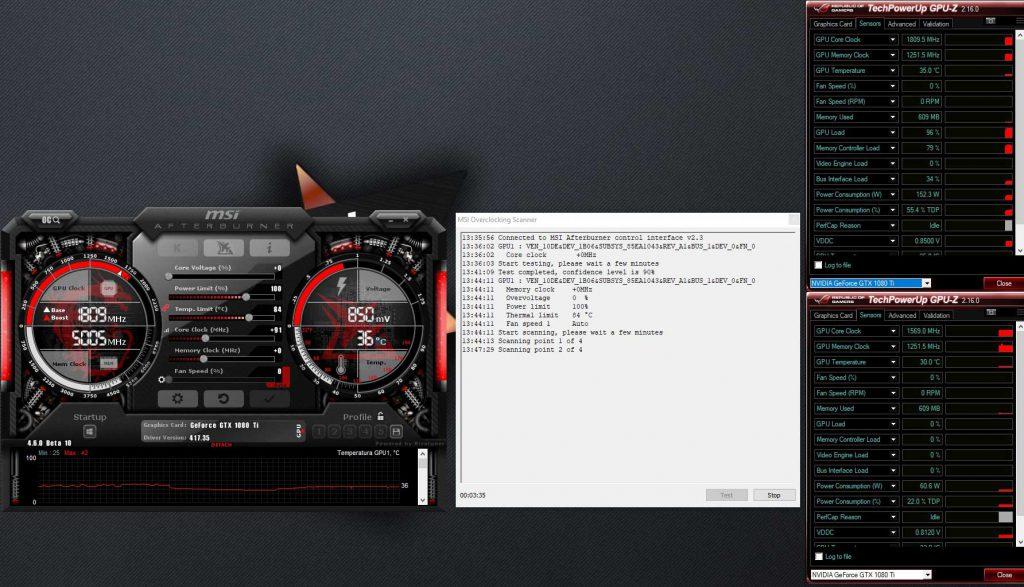
Once you’ve reached a stable Core Clock, you can also increase your Memory Clock in much the same way. Push it up by 100MHz or so, run your benchmark, and repeat the process like you did with Core Clock.
Overclocking your memory too far may not always produce artifacts or crashes—sometimes, it’ll just decrease performance due to your memory’s error correction. Watch for crashes and a decrease in frames per second, and stop increasing the Memory Clock when that happens.
Step 2: Increase Your Core Clock and Re-Benchmark
Ready to start pushing? Open MSI Afterburner (or your overclocking tool of choice), and push the Power Limit slider all the way up. Set the Temperature Limit slider to whatever you want (the maximum is usually okay, though if you’re particularly cautious, you can move it a little lower).
Then, boost your Core Clock by about 10MHz. Click the Apply button, and run Superposition again. Don’t forget to keep an eye on those temperatures, and ensure there aren’t any artifacts (weird lines, boxes, or static that flash on the screen) as the benchmark runs. Once it’s done, write down your frame rates and bump up the Core by 10MHz again. Keep repeating this process, boosting and benchmarking, until you run into issues.
At a certain point, the benchmark will fail—either it will crash, or you’ll see artifacts flash across the screen as it runs. When that happens, reboot your PC. (This is important: after a crash, Superposition will ignore your set clock speeds and return to stock until you reboot.)
If you want, you can stop here: return to your last stable clock speed and move down to Step 4. But if you’re willing to push it a little farther, there are a few other things you can do.
How to overclock ASUS ROG Strix GeForce GTX 1080 with GPU Tweak II utility?
The GeForce GTX 1080 is a pretty powerful gaming graphics card even by today’s standards. In the auto-acceleration mode, the GP104 chip is able to operate at a clock frequency close to 2 GHz. But do you know that this is not the limit? The profile adapter is charged with for more, especially if the owner has a version of the ASUS ROG Strix accelerator with a decent cooling system. How many additional megahertz can really be squeezed out of this device? Let’s try to find out. nine0006
The result is 2152/11460 MHz and 74 degrees under load.
ASUS ROG Strix GeForce GTX 1080 was overclocked using the GPU Tweak II utility. Unigine Heaven 4.0 was chosen as a program for checking the system for stability (3DMark is a good alternative).
ASUS ROG Strix GeForce GTX 1080 (ROG-STRIX-GTX1080-O8G-GAMING) works stably at 1936 MHz right out of the box mark and at 2050 MHz. nine0007
It is important to remind you of the need to constantly monitor the chip temperature during overclocking. It should not heat up above 80 degrees under load.
The process of overclocking the ASUS ROG Strix GeForce GTX 1080
We go into the GPU Tweak II and first of all click on the Professional Mode icon, and then switch to the program settings. Scroll down the list and check the box next to the Overclocking range enhancement option, click Apply and return to the launch panel. nine0007
We make the following changes:
- GPU Voltage (%) to 100%
- Fan Speed (%) to 100%
- Power Target (%) to 120% position
- GPU Temp Target (C) to position 92C
Next, we deal directly with overclocking the chip. Increase the value of the GPU Boost Clock (MHz) parameter by 15 MHz and run the test program (Unigine Heaven 4.0 or 3DMark). Was the run successful? Throw another 15 MHz. And so on until the limit is reached. nine0007
How to understand that the maximum is found? Everything is very simple. On the monitor screen you will see one of the following pictures :
- NVIDIA graphics driver crash
- crash Unigine Heaven 4.0 or 3DMark
- graphic artifacts
- the system will hang and stop responding to commands
If one of the above events occurs, restart your PC and start looking for a stable GPU frequency in 1-5 MHz increments.
The frequency limit of our ASUS ROG Strix GeForce GTX 1080 (ROG-STRIX-GTX1080-O8G-GAMING) is 2152 MHz. That is +1000 MHz to the nominal value. Pretty good, but the memory also needs to be overclocked. nine0007
To do this, pay attention to the Memory Clock (MHz) option. We will look for the frequency limit over in long steps of (100 MHz). The principle is the same as in the case of the GPU. Do not neglect the frequent launch of test programs. It definitely won’t get any worse.
The memory of the test video card GeForce GTX 1080 overclocked to a stable 11460 MHz. The result is 2152/11460 MHz and 74 degrees under load.
Testing doesn’t stop there. Now we have to operate the video card daily at the specified frequencies in games, multimedia tasks, etc. Perhaps the numbers will have to be adjusted downward, as different programs have different workloads. nine0007
Back to the Fan Speed (%) parameter again. Instead of 100%, set it back to Auto or User Define (you don’t need constant noise). The balance between propeller speed and temperature will have to be found on your own. But do not forget that the fans will accelerate anyway when the chip temperature reaches 55 degrees.
Keywords: ASUS GeForce
NVIDIA GTX 1080 graphics card in mining
nine0002
To read 3 min Published by
NVIDIA GTX 1080 graphics card is great for mining. Next, we will select the optimal overclocking parameters for mining on the NVIDIA GTX 1080. We will find out which drivers to use the most correctly and efficiently. Let’s look at the main characteristics and measure the hash rate for popular algorithms.
Specifications
The NVIDIA GTX 1080 was released on May 27, 2016. The average power consumption is 140.0W. nine0007
NVIDIA GTX 1080 yield
The current market price and yield of the NVIDIA GTX 1080 video card in mining fluctuates depending on the value of the cryptocurrency. The information in the plate is updated once a day.
View the full video card profitability table sorted by price, revenue and payback.
| Price | ETH | ETC | EXP | UBQ | RVN | BEAM | Profit | Payback |
|---|---|---|---|---|---|---|---|---|
NVIDIA GTX 1080 Hashrate
We have compiled the NVIDIA GTX 1080 hashrate table for popular algorithms. If you are just choosing a video card for mining, and you already know which coin you will be mining, then you can estimate the approximate performance from the table. And we also have an article about what a hashrate is.
| Coin | Hashrate | |
|---|---|---|
| Ethereum (ETH) | DaggerHashimoto ETH |
35. |
| Expanse (EXP) | DaggerHashimoto EXP | 35.5 MH/S |
| Ubiq (UBQ) | Ubqhash | 35.5 MH/S |
| Monero (XMR) | RandomX | 700.0 H/S |
| Grin (GRIN) | Cuckarooz29 | 3.1 H/S |
| Ravencoin (RVN) | KawPow | 17.4 MH/S |
| Beam (BEAM) | BeamHashIII | 18.0 H/S |
 5 MH/S
 NVIDIA GTX 1080 Driver
When installing NVIDIA GTX 1080 drivers, it is always recommended to uninstall the current drivers first.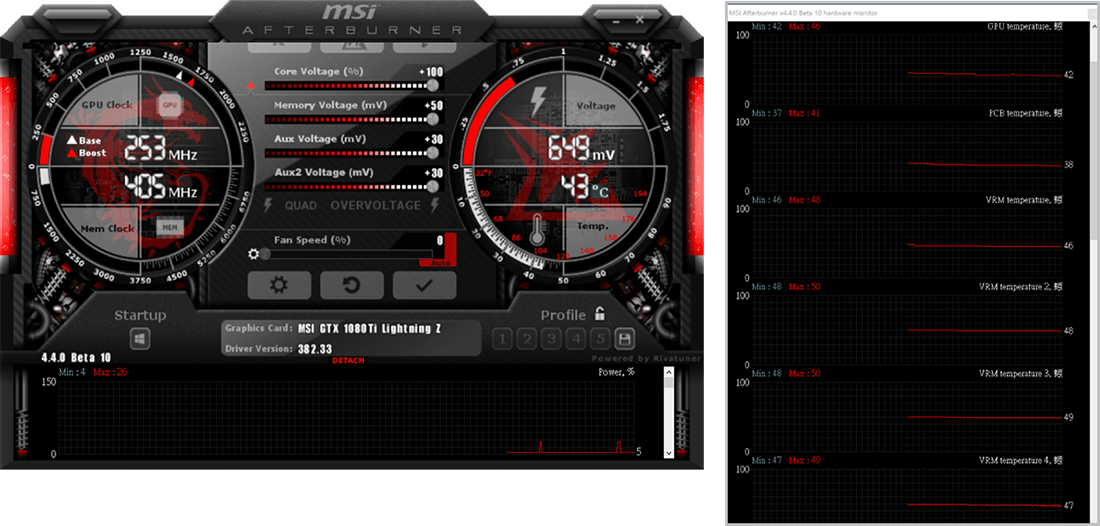 This way you can be sure that DCH drivers will not be installed by Windows 10.
You can download drivers NVIDIA GTX 1080 here. We recommend trying different driver versions. Some driver versions can cause problems during mining. Installing an older version may fix the issue.
Overclocking NVIDIA GTX 1080 for mining
We will overclock NVIDIA GTX 1080 for mining using MSI Afterburner. You can find it in Yandex. The program interface is very simple, albeit a little colorful) To overclock the video card, we need two sliders:
- Core Clock — overclocking the core, increases the frequency of the core;
- Memory Clock — memory overclocking, increases the frequency of the memory.
MSI Afterburner — overclocking video cards
You need to change the frequency values a little. Then test the stability of the work. If everything is fine, then increase the frequency even more. If the video card starts to crash or the driver crashes, then we simply reduce the frequency and that’s it.