How To Lock Your Clock Speed In MSI Afterburner – LiquidSky.com
Overclocking your graphics card is a great way to improve your gaming performance, and MSI Afterburner is one of the best overclocking tools available. However, one downside of overclocking is that it can lead to instability, and you may occasionally need to reset your clock speed back to its default. If you’re using MSI Afterburner to overclock your GPU, here’s how to lock your clock speed so that you don’t accidentally reset it. First, open MSI Afterburner and go to the Settings tab. Then, under the General tab, enable the “Lock Clock Speed” option. Now, whenever you try to change your clock speed in MSI Afterburner, it will automatically revert back to the clock speed you’ve specified. This is a great way to prevent accidental resets, and it can also help to improve your overclocking stability.
Graphics processing units (GPUs) are used to render graphics-intensive computer programs. Manufacturers of graphics cards typically set their products’ factory clock speed as the default clock speed. In underclocking, the clock speed of your graphics card is lowered. It is possible to use software to underclock a GPU. Can you underclock your graphics card? If you are a complete beginner and have no idea what you are doing, you should avoid making any changes right away. In some cases, the damage you cause to your graphics card can be irreversible.
How Do I Lower My Gpu Clock Speed With Msi Afterburner?
Credit: linustechtips.com
You can set the speed of your GPU cores by selecting Core Clock (Mhz) from the fourth slider. The left button will lower clock speed, such as underclocking, while the right button will raise it, such as overclocking. When moving the slider to the left, you can see how the clock speed decreases.
MSI Afterburner is an application that will assist you in managing your graphics card. It allows you to adjust fan speed, fan curves, and clock speeds. If you push your GPU too hard, it could cause it to perform poorly or even damage the card. You can automate overclocking your GPU in any way you want without having to use MSI OC Scanner. It is possible to move the numbers up 15 Hz at a time on the core clock and 35 Hz on the memory clock. You cannot stress test your credit card if it is not included in a variety of software programs.
How To Cool Your Graphics Card With Msi Afterburne
A GPU clock decrease reduces both the amount of power required by the GPU and the amount of heat generated by it. If you want to cool down your graphics card, you can do it by lowering the clock. In some cases, the lifespan of your card will increase, and it will not cause any damage to it. MSI Afterburner is a popular overclocking tool that is commonly used. Because it has been tested and found to be safe, it can be used on a card that is overclocking.
What Is The Best Clock Speed For Gpu?
Credit: linustechtips.com
There isn’t really a definitive answer to this question as it largely depends on the specific model of GPU and what you plan to use it for. Generally speaking, a higher clock speed will result in better performance, but this isn’t always the case. It’s worth doing some research on the specific model of GPU you’re interested in to see what others have to say about the best clock speed for that particular model.
The clock speed of a GPU is a very important aspect of its operation. This is why I’m writing this article to inform you of everything that is going on. An GPU clock speed can be as high as a millionth of a second. Furthermore, it is an important number for gamers because it increases framerates. A GPU’s clock speed rate is calculated as the GHz or MHz rate of a GPU, or 1000 MHz of a GPU. The clock speed rate is a metric that measures how quickly the cores of a graphics processing unit can run. For more performance, you must have a faster clock speed for professionals such as graphic designers, gamers, video editors, and game designers.
If you are an average user, using less powerful graphics will be fine with you. Overclocking any GPU or CPU results in a higher level of performance. As a result, you will be able to run the game at a higher framerate. A GPU clock speed of 1 GHz can move approximately one billion cycles per second. It is entirely up to you whether or not you play games that are based on fantasy. A processor with a clock speed greater than 1 GHz is most likely sufficient for a professional gaming machine. If you’re a casual gamer, a low-GHz frequency is sufficient.
It is especially important for users who perform graphics-intensive tasks such as graphic design. Graphics designing, video editing, game development, and so on are all part of the field. If you are constantly experiencing fluctuation even when you are not playing games, it is a bad sign, and you should act quickly. The GPU overheating is the most likely cause of this problem, but there are other possible explanations.
While overclocking your GPU core clock will always improve your performance, it may also result in issues. If the Power Management settings are not set to adaptive or optimal, the card can be kept at a higher clock speed. If this happens, it can cause instability as well as damage to your graphics processing unit. Furthermore, if your monitor/s require more pixel clock than is possible at idle frequency (usually between 139 Mhz – 253 Mhz), overclocking your GPU core clock may not be the best option for you. The reason for this is that the card may not be capable of carrying the required bandwidth.
Does A High Gpu Clock Speed Matter?
As a result, having faster VRAM allows your graphics card to process these assets faster, whereas having more VRAM allows for more assets to be stored. As a result, having a faster VRAM clock speed can help your games render more quickly.
How To Lock Voltage Msi Afterburner
To lock voltage in MSI Afterburner, go to the settings menu and click on the “General” tab. Next, click on the “Enable voltage control” option and then click on the “OK” button.
The GPU voltage is restricted to 100mV on notebooks; there is a method to unlock it for a notebook, but it is only available for notebooks with a GPU voltage of 100mV. You can now monitor the GPU voltage via the OSD, which was not previously possible. If you don’t want to use extreme over voltage (overvolting) but want to use the remaining 100mV, you can use a modded vBIOS with an increased base voltage that allows you to use the remaining 100mV of overvolt. MSI Afterburner is the primary operating system utility that can be installed with a modified vBIOS with a higher base voltage that allows the fix (voltage control) to use the remaining 100mV of overvolt. If the core clock/boost clock are stable, you can adjust them in this manner to maximize the use of this, then flash these values. You will most likely run at higher load temperatures if you raise your base core or increase clocks and voltages to circumvent this. The display drivers can be unlocked if your vBIOS is modified. Despite the fact that it isn’t necessary, it is sufficient if you do.
Once you get near IIRC, 1300-ish and 1.1v, does the power limit start reaching 100%+ at stock power limits set in the BIOS? It may result in either throttling or black screening. It took me until the day after the win 8.1 upgrade to install several drivers because it was not working properly. When you connect a microphone or headphones using an audio jack, a popup informing you that you have used the audio jack displays in the Realtek HDA window. You can’t use the headset microphone properly when doing so, so there’s a chance that the software is malfunctioning. I have a G703VI with a GTX 1080 Max-Q and I would like to have full control on it to do an undervolt. As I already stated, I cannot disable boost, so I tried adjusting the voltage-to-frequency ratio in MSI, which is a relatively painless procedure.
How can we achieve a cap at 1822 Mhz? I don’t want boost, but I tried changing the voltage-to-frequency ratio in MSI, which is the closest thing I could get. On GitHub, there is also a TUF-specific battery charge limit program that can be found in addition to the ROG notebook fan controller atrofac that can be found on G14 and G15 Zephyrus. The time has come to uninstall Asus’s useless software and run a clean gaming system.
Is Msi Afterburner Really Necessary?
Afterburner: constant voltage, afterburner MSI Afterburner, a fantastic tool, makes it possible for users to personalize their gaming experience. Some users may be uneasy about the idea of constantly changing voltage or speed. It is a powerful tool, but it should not be forced on users who do not want it. If your GPU is running at Mhz / GHz, it should do so in a consistent manner. At your Windows desktop, it should go into an idle state. If you don’t like MSI Afterburner, you don’t need to use it. Take care not to overheat your graphics card, and your GPU should be set to its default speed.
Memory Clock Msi Afterburner
The memory clock on MSI Afterburner can be increased to improve performance. This can be done by increasing the frequency of the memory, which will in turn increase the speed at which the data is accessed. The MSI Afterburner software also allows the user to change the timings of the memory, which can further improve performance.
Afterburner makes it easier for graphics card manufacturers to monitor the performance of their devices. Setting up advanced settings for overclocking hardware monitor Fan health is monitored at a regular level. On-screen display profiles are designed to be accessed via the on-screen display profiles user interface. When playing 3D games/applications, the GUP1 temperature can be displayed on the upper left corner of the screen. As soon as you select this item, a display with the GPU1 temperature can be found on the keyboard LCD of the Logitech. The MSI Afterburner window will close after you finish setting up settings; click [OK] to apply settings. It is simple for users to change their profiles by setting their own password.
Why Overlocking Your Gpu Memory Can Improve Stability And Performance
In addition to improving performance and stability, lowering the memory clock on your GPU can help with stability. If your GPU is causing crashes or lagging, you can overclock it by 10% or by 50 to 100MHz. It is still recommended that the performance of anything below 10% be stable. If your computer crashes or if your games start malfunctioning, your hardware may not be designed for overlocking; either, your computer’s temperature limit must be raised or you may need to modify its hardware.
What Is Core Clock In Msi Afterburner
Core clock is the main clock speed of a processor, and is used to determine the speed of the processor’s internal components. The higher the core clock speed, the faster the processor can operate. MSI Afterburner is a software program that allows users to change the core clock speed of their processor. This can be useful for overclocking, or for underclocking to save power.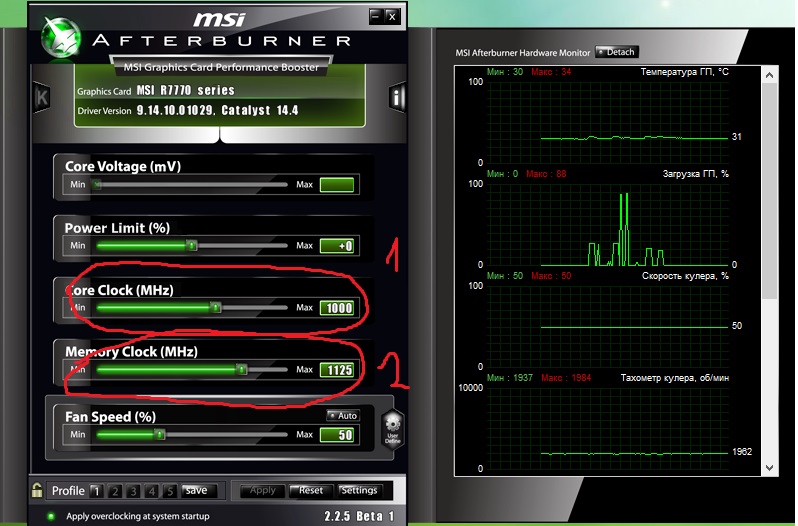
Msi Afterburner: A Great Tool For Overclocking Your Graphics Card
MSI Afterburner is a powerful tool for overclocking your graphics card and monitoring your computer’s performance. It’s simple to use and extremely safe to use.
Monitoring Your GPU With MSI Afterburner – MSI Afterburner
While most people regard MSI Afterburner as a great software for overclocking to boost your gaming experience, it also allows you to closely monitor your GPU’s performance on various parameters. This is an inherent part of the functioning of this particular application.
As a result, if you have Afterburner on your PC, then you can stay up to date with the state of your graphic card’s health.
How To Access GPU-Related Information Through MSI Afterburner?
You will also have six sliders which will be active and flexible only when the program is operational.
Once the program is installed on your system, all you need to do is open it and you will see an interface with various components to inform about the present state of your GPU.
At the bottom of the interface, you can select which graphic card’s performance you wish to look at. After you have selected that particular card, you will see its full name and the version in the same area.
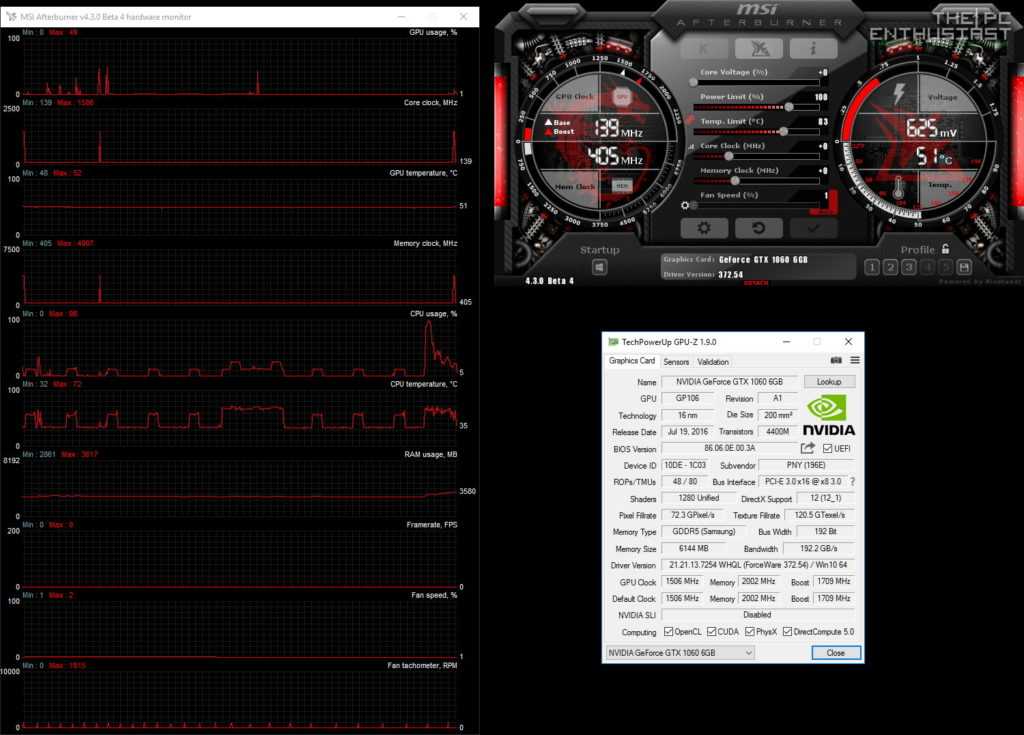
The interface would have two dials with sections to show the four essential measures of the GPU’s performance. These are: GPU Clock, Memory Clock, Voltage and Temperature.
If you haven’t turned on the overclocking mechanism, then these sections would be inactive.
Another important part of the interface is the display of the GPU’s base capacity (in megahertz terms) and the boost being provided by the Afterburner. Again, if the application is not running, then only the base capacity would be shown.
You can see the display even as you are playing the game.
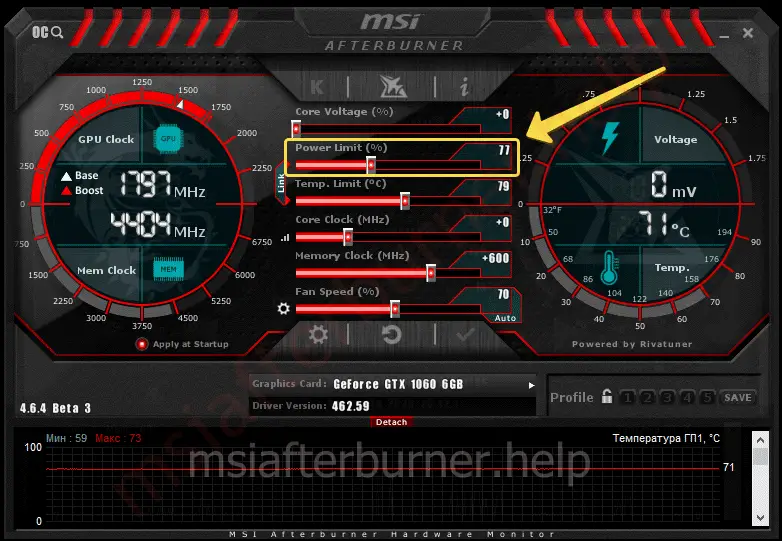
Along with the above-mentioned features, you will also have six sliders which will be active and flexible only when the program is operational. These six sliders show the five important aspects of the GPU’s functioning, namely, Core Voltage, Power Limit, Temperature Limit, Core Clock, Memory Clock and Fan Speed.
When you operate a game for which you have had to run the Afterburner, the status of your GPU on all the above-mentioned parameters will start appearing on the screen if you give the required command.
You can see the display even as you are playing the game. This will inform you about the performance of your GPU and how much of its capacity is it operating at for that particular game. It will also let you know how much the GPU is being overclocked.
You can get more information from the manufacturer’s website itself here.
Customizing Settings
By going to the ‘Settings’ you can customize your experience with Afterburner and even choose which features of it to keep on and which to hide. So, you can select the aspects of your GPU that you want being monitored regularly and the ones to relegate to the background.
Overall, MSI Afterburner may have been primarily intended to ensure a better gaming experience to all those whose systems and their graphic cards are not fully compatible with the game they are playing but it is also an invaluable tool for keeping an eye on your GPU’s performance to see if it is still in good health.
 If it is not, then you will be warned in time to take action before things go out of hand with your system.
How to Overclock a Video Card Using MSI Afterburner
The topic of overclocking a video card has become very popular, as this process allows you to increase performance by up to 7%, and sometimes more. It’s not much, but it’s still an increase.
However, many users do not know how to do this, and calling a specialist costs a pretty penny. Looking ahead, I note that you can overclock the video card both on a PC and on a laptop.
If the video adapter is pumped for mining, then with an increase in performance, income also grows. If for games, then the increase in power may allow you to play more demanding games or at higher settings.
Following this instruction, you can overclock the Nvidia Geforce GTX RTX / AMD Radeon HD RX video card, etc. by yourself.
Should I overclock my video card?
This question is relative, let’s look at what the consequences might be.
Pros
- video adapter performance increase
- in case of incorrect operation, you can always reset to factory settings
- does not affect the manufacturer’s warranty, since the video device BIOS firmware is not affected.
Cons
- video card may fail.
Whether to overclock a video card, each user decides for himself. If the equipment is under warranty, then you should not worry, if not, then you take the risks.
How to properly overclock a video card
The most popular program for overclocking a video card is MSI Afterburner. You can download it on the official website of the MSI manufacturer, it is absolutely free. It then needs to be installed on Windows or another supported operating system. Launch MSI Afterburner and follow the instructions.
The interface of the program changes over the years, so some time later it may differ from what is described in this article, but it does not matter, since the overclocking process itself remains the same.
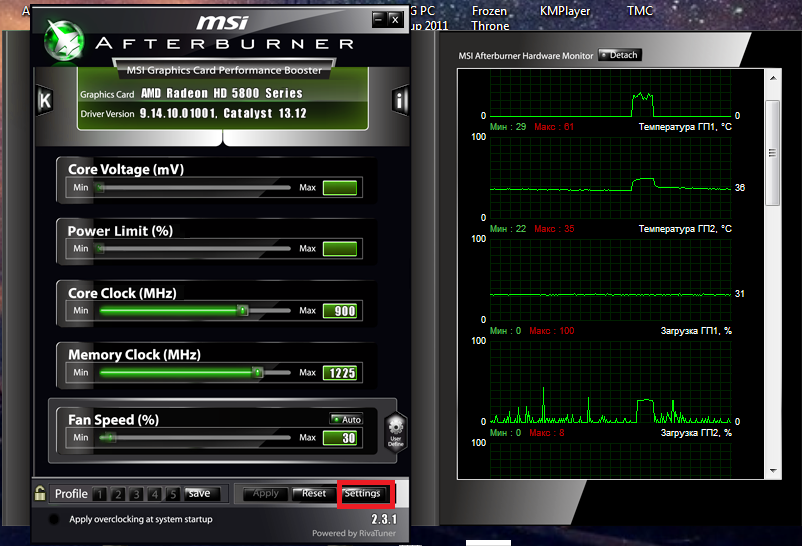
Open the Settings (Gear icon) in the program, you will see the «MSI Afterburner Properties» — «General» window.
In the «Select Lead GPU» heading, check the graphics card you want to overclock. Check the boxes in the required places, as indicated in the screenshot and save the settings by clicking OK. If the program prompts you to restart MSI Afterburner, click Yes.
Now let’s get a little acquainted with the interface functions we need:
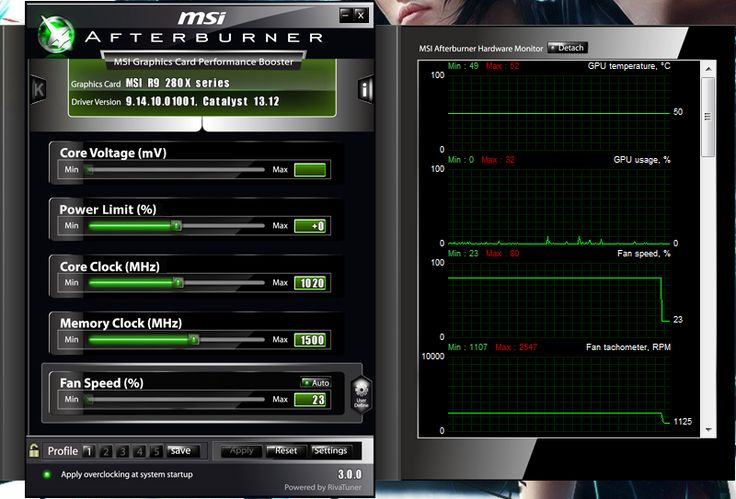
- Core voltage (mV) — the voltage of the graphics core. You will not be active, this is normal.
- Core Clock (MHz) — Shows the frequency of the GPU in megahertz. Responsible for the speed of information processing by the video card and is directly related to FPS.
- Memory Clock (MHz) — video memory frequency in megahertz. Used by 3D programs, the higher the memory frequency, the more tasks the video card can solve at a time.
- Apply changed settings.
- Save changes.
- Select the profile slot to save.
- Restore the settings to the factory state.
Further, these symbols A, B, C, D will be used to indicate further actions in the Overclock process.
Save the current settings in a profile before starting overclocking. To do this, press B — C (slot 1).
Stage 1. Set Core Clock (MHz). Move the slider to the right or specify the desired value in the cell and press Enter. In the first step, it is recommended to increase by 50 MHz. Then press A .
Run FurMark or a demanding game, run the graphics card for two hours. If it’s a pity to waste such time, then you can take 30 minutes, but there are no guarantees that the work will be correct. And so, if various artifacts or other distortions did not pop up on the screen, then increase the Core Clock frequency by another 20-30 MHz, press A .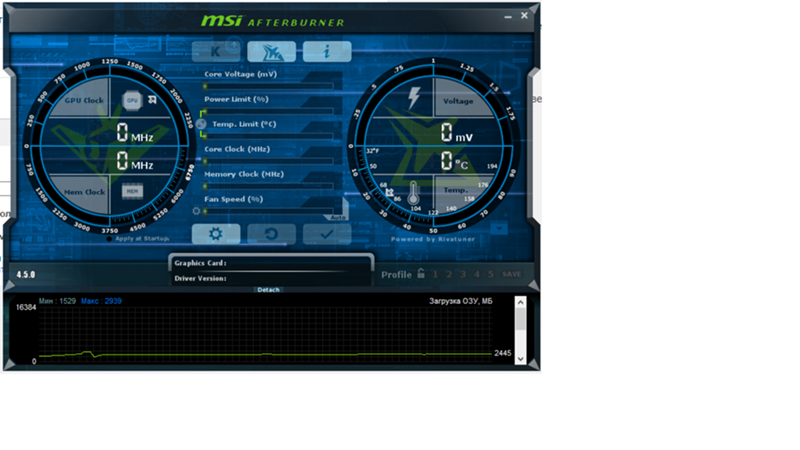 And so on in a circle until you find the optimal settings between performance and temperature. If at some stage distortions appear on the screen, then return to the previous MHz value, at which the computer worked correctly. After selecting the desired Core Clock value, press A — B — C (slot 2).
PS: Recommended temperature max. 75°C.
Stage 2. Set the Memory Clock (MHz). Similar to step 1. After the final selection of the required parameters, press A — B — C (slot 2) in sequence.
Stage 3. Now we need these settings to be automatically used when the computer boots. To do this, open the Settings (Gear icon) in the program interface, in the header on the right side, click on the right arrow until «Profiles» appears, open it.
At the bottom of the subheading «Automatic profile management» in the line «2D profile» select Slot 1 with factory settings, in «3D profile» — Slot 2 with overclocked parameters. Click OK.
If something goes wrong, you can always reset your settings to factory defaults by pressing D .
At some point, your sliders may hit the limit, they can be expanded using a special command, but I will not describe them, since further overclocking can lead to failure of the video card. If you still want more from your video adapter, then on other third-party sites you can find bypassing the limitations of MSI settings for overclocking a video card.
msi graphics card overclocking — details
HomeHardware
If you want to increase the performance of your video card without buying a new one, then overclocking your video card’s graphics processing unit (GPU) is a great way to do it. On a Windows PC, this has never been easier.
msi video card overclocking
To overclock the video card you will need:
Note! Not recommended for overclocking video cards on laptops, as their heat dissipation is difficult.
It also doesn’t make sense to overclock Intel graphics or other integrated systems.
Contents
- Step one. How to overclock a video card
- Step two. Check the basic configuration
- Overclocking the video card with MSi Afterburner — step three
- Step four. Final overclock stress test
- Step five. Control of fan, memory frequency and software profiles
- Video — msi graphics card overclocking
Step one. How to overclock video card
The overclocking results of any video card are individual, but it is better to find out as much as possible on the Internet about a particular video card before overclocking it, study its shortcomings and get preliminary estimates.
You can also find out on the Internet whether the latest version of the video card driver is used and download the necessary software.
Important! Although the risk of overclocking a graphics card is low, there is a chance of damage to its GPU or other PC components, so it is important to be careful when overclocking.

Step two. Check basic configuration
Finding the base FPS values of a video card with the Unigine Heaven 9 program0003
To see the results of overclocking, you need to get the base FPS values of the video card. To do this, you need to run the benchmark with high graphics settings and after passing it, save the results in any format.
If Unigine Heaven is used, you can record a run by clicking the «Benchmark» button in the upper left corner of the program, and after passing it, save (Save) the results to an html file on a PC.
To record a run, press the «Benchmark» button
Overclocking the video card with MSi Afterburner — step three
There are two variables that are important to pay attention to when overclocking a video card: clock frequency (Core Clock, MHz) and voltage (Core Voltage, mV) of the GPU. Changing any of these values may cause your graphics card and computer to become unstable.
Help! The goal of overclocking is to carefully raise the clock speed and voltage until stability issues arise, and then back off and leave a stable maximum.
- It is important to note that in the latest version of Afterburner, you may need to press the «Settings» button (gear icon next to the Fan Speed bar).
Press the «Settings» button
- In the General tab, you must check the «Unlock voltage control» and also «Unlock voltage monitoring» by clicking OK to make the voltage slider available for adjustment.
Put a tick on the items and click «OK»
Help! It is necessary to write down the default values set in the central panel of MSi Afterburner in case you need to return to the original settings configuration.
We write down the values set on the central panel of MSi Afterburner «by default»
- At the beginning of overclocking, it is necessary to increase the GPU clock frequency (Core Clock) by 10-20 MHz and click the «Apply» checkbox. It is important not to increase the clock frequency by more than 10-20 MHz at a time, because.
 this may cause the computer to crash and stop working.
Raise the GPU clock speed by 10-20 MHz and click «Apply»
Now you need to run the Unigine Heaven test program, where you can see a slightly improved FPS value.
If everything went «smoothly», you can again increase the clock frequency by 10-20 MHz, and repeat the process until:
- test program will not fail or hang;
- graphical artifacts will not appear in the program — for example, small black or colored cubes.
The above symptoms indicate unstable overclocking, and when this happens, you can:
By increasing the voltage on the GPU, you can see that artifacts and crashes go away, and everything is stable again.
The frequency increase process should be repeated by 10 MHz until failures or artifacts appear again in the test program. Again increase the voltage on the GPU by 5 mV.
Help! Please note that in case of raising the voltage on the GPU, this will also increase the temperature on it.
In the Unigine Heaven test program, in addition to the clock speed, you can also monitor the temperature of the GPU. The video card automatically regulates the speed of the fan that cools the GPU, however, there is a preset maximum temperature (Temp. Limit) that will cause the video card to turn off if it is exceeded.
Video card temperature during test
You must try to keep the GPU temperature at least a few degrees below the limit displayed in Temp. Limit, even after a long video card test.
Adjusting this maximum beyond the manufacturer’s default limits is possible, but this increases the risk of damage to the graphics card.
Help! The safe temperature for a graphics card varies by model, but many agree that 90 degrees Celsius is the maximum safe temperature for most graphics cards.
After reaching GPU clock and voltage values that can no longer be increased due to PC issues, you need to return to their last stable values. This is the last run.
Fourth step. Final overclock stress test
Run the program by pressing the «RUN» button
After finding the overclock settings, it is recommended to let Unigine Heaven run for a few hours. This will check the stability of the video card for long gaming sessions and in terms of heat accumulation.
It may be necessary to lower the overclock again if the test run results in hangs and artifacts. If the test run works without problems, stable overclocking is achieved. Congratulations!
Step five. Control of fan, memory frequency and software profiles
MSi Afterburner can control the fan speed (Fan Speed). By default, it’s in «Auto» mode, and it’s best to leave it like that.
- However, to «squeeze» more performance out of the video card or set the GPU for better cooling, you can go.
In the «Settings», in the «Cooler» (Fan) tab, select «Enable software user auto mode»
- This will allow you to manually set the dependence of the fan speed on the temperature of the GPU.

Manually set the dependence of the fan speed on GPU heating
In this case, the cooler speed will be kept with the specified «lead», allowing the GPU temperature to be slightly lowered. However, it is undesirable to set the cooler speed to about 100%. in this case, he may soon refuse.
In MSi Afterburner, you can also increase the clock speed of the video card’s memory (Memory Clock). This can give an increase in FPS, but it is much less than when changing the GPU clock speed. Overclocking by Memory Clock is carried out in the same way as the GPU, and on average gives a performance increase of 1-2%.
When Afterburner settings are finished, you can save them in the profile (Profile), located in the lower right corner of the program. You need to make sure that the lock icon (padlock) is «unlocked» by clicking on it. Then you need to click on the button with the image of a floppy disk (“Save”).
Select the digit number to save the program settings
When the numbered profile icons start flashing red, press «2».