Mouse Keeps Disconnecting? 8 Proven Ways To Fix It
Obviously, the mouse plays an important role in helping you complete your daily tasks. But, what if your mouse keeps disconnecting? You might get stuck trying to fix your mouse, but an improper method will only yield unfavorable results.
Whether it’s a wired mouse or a wireless one, the problem of it getting disconnected time and again is not a very surprising event. Maybe it happens because of your faulty mouse drivers or maybe there is some interference from other connected peripherals. Nevertheless, we can fix this problem with some patience and a bit of effort.
So, this guide will give you a better understanding of the reasons that cause your mouse to disconnect frequently. Also, by the end of this guide, you’ll be able to effectively fix your mouse back to normal. Let’s begin!
Table of Contents
Why Does My Mouse Keep Disconnecting?
Your mouse keeps on disconnecting most probably because you’ve configured settings that need a little bit of tweaking. So, including this and the ones mentioned above, here are all the reasons that might be influencing your mouse to keep getting disconnected.
- Hardware issues
- USB suspend
- Incompatible power management settings
- Driver issues
- Outdated Windows build
- A dirty mouse
How to Fix My Mouse From Getting Disconnected?
There are various ways you can stop your mouse from frequent disconnection. Explaining all these methods in a single paragraph is frankly impossible. Hence, I have listed them all down below.
However, you don’t need to worry too much as these methods are easy, simple, and verified. So, let’s get right at them!
Check for Underlying Hardware Issues
Before we aim for technical fixes, let’s first get the basics out of the way. That is, check if there are any underlying hardware issues on your devices. If so, then following the fixes listed below will not help and you have to resort to buying a new mouse.
So, check if the cables are connected firmly and secured in their respective positions. Then, try to verify if your mouse works on other computers or not. You can do this by connecting your mouse to a different system and seeing how it functions. Also, ensure your PC’s USB port has not broken down or anything.
Once these things are out of the way, we’ll be moving to more advanced fixes and creative workarounds.
Disable the USB Selective Suspend Setting
The Windows OS offers its user an option to suspend individual USB ports on the computer that are not actively in use for the time being. This is because doing so will help you secure your battery life and reduce any unwanted power consumption.
However, sometimes, USB suspension can create issues preventing certain ports from functioning properly. So, turning off the USB selective suspend feature will be the most suitable way for you to move forward. Hence, for this,
- Right-click on the battery icon that’s towards the bottom right corner of your screen.

- Select Power Option.
- Here, choose a Balanced power plan and also, Change plan settings.
- Now, click on Change advanced power settings.
- Extend the USB settings section.
- Click on USB selective suspend setting.
- Now, Disable this setting for both the On Battery and Plugged In options.
- Finally, Apply your changes and hit OK.
Alter Your Mouse’s Power Management Setting
This setting is similar to the USB selective suspend setting, meaning that its ultimate goal is to save as much power as possible. It does so by blocking the power to the particular USB port when idle.
So, your mouse might be misbehaving due to this power management glitch. Whether you use a wired mouse or a wireless one, here are the steps to resolve this issue:
For Wired Mouse
- Right-click on the Start menu and go to Device Manager.

- Expand the Mice and other pointing devices section.
- Now, right-click on your mouse and select Properties.
- Navigate to Power Management.
- Uncheck Allow the computer to turn off this device to save power.
- Save your changes with an OK.
For Wireless Mouse
- Right-click on the Start menu and go to Device Manager.
- Expand Bluetooth.
- Now, right-click on your mouse and select Properties.
- Navigate to Power Management.
- Uncheck Allow the computer to turn off this device to save power.
- Save your changes with an OK.
Update Your Mouse Driver
An updated mouse driver makes your device compatible with your operating system in various ways. An updated software interface provides efficient communication between the OS and your device. Hence, you can make your mouse’s issue disappear by updating its driver.
You can take the following steps to successfully update your mouse driver, depending on if you use it wired or wireless.
For Wired Mouse
- Right-click on the Start menu and go to Device Manager.
- Expand the Mice and other pointing devices section.
- Now, right-click on your mouse and select Update Driver.
- Search automatically for drivers when prompted to allow the computer to do so via the internet.
For Wireless Mouse
- In the Device Manager, expand the Bluetooth section.
- Now, right-click on your mouse and select Update Driver.
- Search automatically for drivers when prompted to allow the computer to do so via the internet.
Reinstall Your Mouse Driver
If you think that the update file you have installed on your driver is broken, you can reinstall it to paste a fresh copy of data into the system. So, any glitches and lines of error that were present on your driver’s previous build will be wiped away.
The steps to reinstall your mouse driver are shown below, including the exact process for both wired and wireless mice.
For Wired Mouse:
- Right-click on the Start menu and go to Device Manager.
- Expand the Mice and other pointing devices section.
- Right-click on your mouse and select Uninstall device.
- If prompted, select Attempt to remove the driver from this device.
- Now, click Uninstall.
- After it is done, restart your computer.
- Now, go to Device Manager again.
- Right-click on your PC name and select Scan for hardware changes.
- Follow and accept the on-screen process to scan and install the missing drivers.
For Wireless Mouse:
- Right-click on the Start menu and go to Device Manager.

- Expand the Bluetooth section.
- Right-click on your mouse and select Uninstall device.
- If prompted, select Attempt to remove the driver from this device.
- Now, click Uninstall.
- After it is done, restart your computer.
- Now, go to Device Manager again.
- Right-click on your PC name and select Scan for hardware changes.
- Follow and accept the on-screen process to scan and install the missing drivers.
Clean Your Mouse
A dirty mouse often disrupts the operational capability of the device. Dirt and greases stuck inside the mouse don’t make it feel good and hence, a filthy mouse fails to operate efficiently. So, it’s no surprise that you have to clean your mouse time and again.
If you recently cleaned it, then maybe that’s not the problem in your case. However, if it’s been long since you last cleaned in, or maybe never, we have an article that’ll help you safely clean your mouse the right way. So, go check it out and return back to us once you are done.
Check for Electromagnetic Interference
An EMI (Electromagnetic Interference) can glitch out your USB ports and influence the connected peripherals to misbehave. That is, another USB device connected to your system can interfere with your mouse’s normal workflow by pushing it towards the edge time and again to get disconnected. Or, it might be the power strip is causing interference.
Either way, the work here is to disconnect all USB devices connected to your computer and any other possible electric devices. Then, connect the mouse to your computer and notice what state it is in. If your problem seems to be fixed, you have to find the device that is causing the interference and replace it with a new one.
Update Your Windows Build
It goes without saying that installing all your Windows updates surely aims to make your system perform better. The reason for your mouse disconnecting time and again might be too many available updates that have been piled up over there for some time now.
So, if you have recently updated your mouse drivers but the Windows OS is still in a previous build, the newer driver might be incompatible with your windows build. Installing all the available Windows updates generally incorporates various compatibility patches to make your system function better. Hence, updating Windows could make things better for you, and here’s how to do so:
- Open the Settings app through the start menu.
- Select Windows Update from the panel on the left.
- Then, Check for updates.
- If you are returned a list of updates currently compatible with your device, follow the on-screen process to update your current Windows version.
How To Fix This Issue
Does your PS4 controller keep disconnecting from your PC? Are you looking for possible solutions for it? If yes, you are in the right place. It is a common problem faced by many users, but it is fixable, and luckily the fixes are all pretty quick and simple. .
.
A PS4 controller might keep disconnecting from your PC due to having the wrong drivers installed (software issue) or maybe because the controller is simply running out of battery. Try restarting both devices. Then, confirm you have the correct drivers installed.
There are numerous solutions for this disconnectivity issue that you should know about. These solutions are related to both the controller and your PC. So, if you want to have an amazing gaming experience on your PC using your PS4 controller, let’s dive in!
Why Does Your PS4 Controller Keep Disconnecting From Your PC?
PS4 DualShock 4controllers (on Amazon) tend to disconnect from the PC at times. It can be frustrating as you can lose a game when you are unable to use the controller in between the game.
The controller can disconnect a few seconds after you plug it in, or it can disconnect while playing a game out of the blue. In both cases, the reasons are the same.
In order of how often they occur, here’s a quick troubleshooting list of the common causes for this disconnect issue:
Outdated Bluetooth Drivers/Lack of Correct Drivers
The number one cause of disrupting the connection between your PS4 controller and your PC is outdated Bluetooth drivers. Bluetooth drivers should be updated regularly to keep them compatible with your controller.
If you don’t get a notification for your Bluetooth driver’s update, you should check it regularly and download and install any available updates. They may happen in the background automatically.
If you don’t have a Bluetooth driver installed on your PC, you need to download one for your PS4 controller to work on your PC.
Damaged Controller Wires
If you are using a wired controller, the connecting cable of your controller can be damaged, causing a connection issue. Cables can be damaged by stretching them too much or bending them in the wrong directions.
To prevent this, you should store your controller’s wires carefully and don’t jerk them around or have them draped across an area where someone’s going to trip over them or something like that.
Dirty or Damaged USB Port
The USB port of your PC where you connect the controller can be damaged or dirty. Electronic devices can go bad after using them for a while. So, it is quite common to experience a damaged USB port.
It can be damaged in a way that allows your PS4 controller to work only when the wire is placed in a certain position. When you misplace it from that particular position, the controller can disconnect from the PC.
Dirt and debris can disturb the connection between the controller and your PC. Always keep the system away from dust and regularly clean everything.
Signal Interference
Signals with the same frequency can cancel each other out and die down. If you use your controller in a place where there are multiple signals from Bluetooth or WiFi with the same frequency, it can affect the Bluetooth connectivity of your controller.
This can especially be a problem if your WiFi router is in the same room as your console. That can provide you with a faster WiFi connection, but it can interfere with your controller’s connectivity.
Exceeded Range of Controller
Controllers that work through Bluetooth have a specific range. Beyond this range, the Bluetooth will disconnect or form weak signals. The range of PS4 controllers is pretty high (about 30 ft), but that doesn’t mean you can be far back from your PC and use your controller.
Maintain a well-balanced distance from the screen to enjoy the strong connectivity of your controller.
Low Battery of Controller
A low battery of your controller can disturb the connectivity. When the battery is about to end, the function of the controller becomes slow, forming weak connectivity with the PC.
Old Controller
If your controller is too old and you have used it a lot, you might need to change it now. The hardware of your controller can be damaged, which can cause a weak signal.
If your controller has faced a lot of user damage, such as dropping it on the floor, hitting it, water damage, or dropping a hard object on it, it can go wrong.
Incompatibility with the PC
Depending upon your system and the model of your controller, it can be possible that your PC doesn’t support that controller, due to which it won’t be connecting. Having an outdated OS system can be a reason behind this incompatibility too.
Default Settings of PS4 Controller
Your controller’s settings to play on your PS4 and PC are different. If you have disconnected from your PS4 and now want to use the controller on your PC, the default settings would be saved and carried to the computer. It can cause a connection error, or some controller features might not work on the PC.
Other possible reasons include:
- Some games do not support your controller.
- Your controller connects to other saved Bluetooth devices nearby.
How To Stop PS4 Controllers From Disconnecting From PC?
PS4 controllers disconnecting from the PC is a common problem. But you don’t need to worry as you can still enjoy your games with a stable connection by following the solutions mentioned below.
These solutions address all the problems that your PS4 controller might be disconnecting from your PC. So, let’s get started!
Download DS4 Windows on Your PC
To use a PS4 controller on your PC, you need software that allows it to connect to the PC. If you already have it on your PC, make sure it is up-to-date to work correctly. Follow the steps below to download DS4Windows on your PC:
- Download the software from ds4-windows.com.
- Run the downloaded file.
- Save the user data in a suitable folder.
- Install the recommended drivers that arise when you open DS4windows for the first time. VIGEmBUS driver is essential, whereas hidhide is recommended. Fakerinput is optional.
- Connect your controller with your PC.
Download Bluetooth Driver on Your PC
Even after installing DS4windows, your controller might not connect to the PC due to an old Bluetooth driver. Old Bluetooth drivers might not support your PS4 controller.
Therefore, you need to make sure that your Bluetooth driver is the latest if you want stable connectivity of your controller with your PC.
To check any Bluetooth updates on your PC, follow the instructions below:
- Open settings and go to “Update and Security.
 ”
” - Click on “check for updates.” It might take a few minutes for the updates to show up.
- Click on the “view updates” option.
- Click on “driver updates,” if any.
- If there is an option for a Bluetooth driver, click on it and download it.
- Install the driver. Once the installation is completed, connect the controller to the Bluetooth and see if it is working.
Reconnect your PS4 Controller
Sometimes, simply connecting your PS4 controller with your PC can fix the disconnectivity issue. This is especially useful if you have been using your controller for hours.
To reconnect:
- Disconnect the controller from your PC.
- Turn the controller off.
- Turn off the Bluetooth from your PC.
- Restart the controller.
- Turn on the Bluetooth from your PC.
- Reconnect the controller to your PC and check if your problem has been solved or not.
Restart the PC
If you have newly downloaded software or a driver related to the PS4 controller, you might need to restart your PC to work the software efficiently.
For this:
- Disconnect your controller from the PC.
- Go to the power option in your system and click on “Restart.”
- When the system restarts, reconnect the controller with your PC.
Hard Reset the Controller
If your controller refuses to connect to the system, you can try resetting the controller. For this, follow the steps below:
- Turn off your controller and find the “Reset” button on its back.
- Use a needle to press the reset button. Hold it for five seconds or more to reset the controller.
- Turn the controller on and reconnect it with your PC. check if the controller has started working or not.
Check for Damaged Cables/USB Port
The LAN cable of your PS4 or the USB port of your computer could be damaged, causing a bad connection between the two. First, check if your cable is damaged or not.
For this, connect your controller with your PC and place it aside. Check if your controller gets disconnected that way or not. If it doesn’t disconnect, it could be because of a damaged cable. Now, move your controller and start playing a game. If the controller disconnects while using the controller, the cable might be damaged.
To check for a damaged USB port, use another port with the controller. Use the controller and play games. If the controller works fine, the USB port might be damaged.
Connection Resetting
Reset all the connections of your PS4 to make sure it is only connecting to your PC. At times, various recognizable connections might disturb the connectivity of your controller. For this, follow the steps given below:
- Turn on your PS4 controller.
- Press and hold the “PS” and “Share” buttons simultaneously for a few seconds.
- Let the buttons go, and the controller will start to find new connections.
- Connect the controller with your PC, and you are good to go.
Disconnection on Steam: Solved
Sometimes, the controller only disconnects when you are using Steam.![]() This is a common problem faced by many users. However, the solution is quite simple and easy. All you have to do is:
This is a common problem faced by many users. However, the solution is quite simple and easy. All you have to do is:
- Open Steam and go to “Settings.”
- Click on “Controller” in the settings and go to general controller settings.
- Click on “PS Configuration Support.”
- Change the shutdown time of the controller from “15 minutes” (usually) to “Never.”
This will stop your controller from being disconnected while you are using Steam.
Charge Your Controller
The low battery of your controller isn’t ideal, and it can cause a weak signal between the PC and the PS4 controller. It might be possible that your controller isn’t charging correctly due to a damaged controller wire.
If that’s the case, you can get Talk Works Charger Cable for PS4 Controller (on Amazon) for fast and reliable charging.
Control the Barriers
WiFi signals interrupting the Bluetooth signals of your controller can cause connectivity issues. For this, keep the WiFi router in a separate room and use your controller in another room. This way, both the signals won’t interfere with each other.
It would help if you sat near your PC within the Bluetooth range. The normal Bluetooth range is 30 ft. If you sit beyond it, the Bluetooth might disconnect altogether or have weak signals causing a lag.
Get a New Controller
If everything fails, it might mean that your controller has gone poor. The only solution to this is to replace your controller. But don’t come to this conclusion immediately. Try all the solutions mentioned above before getting a new controller.
If your controller is working on your PS4 or another PC, then your controller isn’t faulty. So, try to connect it with other devices before buying a new controller.
Final Thoughts
Now that you know about all the common reasons your PS4 might be disconnecting from your PC and its solutions, you can enjoy a fulfilling gaming experience.
By trying the solutions mentioned above, you can have a stable connection between your PS4 controller and your PC. Lagging connection or disconnecting in between the game can be a frustrating experience, and you should check for all the possible solutions for it. Happy gaming!
Frustrating Warzone & Vanguard bug is making players’ controllers useless
❘ Published: 2022-01-19T11:43:49
❘ Updated: 2022-01-19T11:43:49
Both Warzone and Vanguard are no strangers to the occasional glitch, and the latest issue is causing the right stick to completely stop working mid-match for controller players. Luckily, there is a really easy way you can fix it.
Ever since the launch of Vanguard and Warzone Pacific, the CoD series has been plagued with bugs and glitches. Some of these have been so strange they’re hilarious, while others, like the freezing Buy Stations, have been totally game-breaking.
The latest issue that players are running into sees the right stick become useless for controller players, leaving them unable to do anything but run straight ahead.
It’s a problem that popped up recently after a Warzone cheaters aimbot stopped working. But, now, it seems the right stick bug is affecting average players.
Activision
The right stick bug stops players from looking around and aiming.
The issue seems to crop up whenever a player’s controller disconnects mid-game, whether it’s lost all charge or the user has quickly swapped the batteries. Once the controller reconnects, be it on console or PC, the right stick stops working entirely.
As you can see from the clip posted by Reddit user spiderpunk92, although they remained in the game, they could only run and shoot without being able to aim.
- Read More: CoD Vanguard players expose ‘pay to win’ Double Barrel Blueprint after nerfs
This is the result of the game automatically changing your input settings from controller to mouse and keyboard. If this happens to you, there are a few different ways to solve the problem.
Your first point of call if you run into this issue should be simply hitting right on your controller’s D-pad, the button that normally accesses scorestreaks. This appears to help Warzone or Vanguard realize that a controller is connected rather than a mouse and keyboard.
- Read More: Will Call of Duty still be on PlayStation?
At the time of writing, this appears to be the only method that won’t disrupt your game slightly. If using the D-pad doesn’t work, other players have reported that the right stick issue resolves itself after death.
Of course, on Vanguard multiplayer this could be a small blip in the match, but having to do this in Caldera could completely ruin the game for you and your squad. It’s far from ideal, but it’s a small price to pay to regain full control of your character.
Activision
The right stick bug is a frustrating one, but these steps can help you solve it.
Failing all of this, the third and final option is to simply close the application altogether. Once you boot the game back up, your controller will be fully-functioning once again.
While it may seem minor, there’s no doubt this is an incredibly frustrating glitch that can easily disrupt play sessions. If you want to avoid the bug altogether, we recommend trying to make sure that your controller is fully-charged or sorted with fresh batteries before playing.
- Read More: Warzone camper reveals devious spray-paint tricks in viral TikTok
So, to recap, these are three best ways to solve the right stick bug in Warzone and Vanguard:
- Hit right on the D-pad
- Allow yourself to be killed in-game
- Close the application
If you’re in the middle of a long session, try and wait until between matches to start disconnecting the controller. If not, and the right stick goes missing, be sure to use these helpful tips to get it back on track.
For more handy guides, as well as the latest news, head over to our dedicated Call of Duty page.
Mindfulness Apps Turn Device Obsession Inside Out : Shots
Mindfulness Apps Turn Device Obsession Inside Out : Shots — Health News Finding inner calm hard to come by? Some people use their device obsession to help them disconnect. The apps aren’t a quick fix, therapists say, but might help you stick to a mindfulness practice.
Your Health
Heard on Morning Edition
Mindfulness Apps Aim To Help People Disconnect From Stress
She’s not tuning in, she’s tuning inward — letting go of stress, or at least trying to, with a mindfulness app on her phone.![]()
Photo Illustration by Carolyn Rogers/NPR
hide caption
toggle caption
Photo Illustration by Carolyn Rogers/NPR
She’s not tuning in, she’s tuning inward — letting go of stress, or at least trying to, with a mindfulness app on her phone.
Photo Illustration by Carolyn Rogers/NPR
From fires and hurricanes, to confrontational politics — with all that’s been going on, it’s no wonder the American Psychological Association found an increase in Americans’ stress levels over the last year.
Our constant checking of smartphones — with the bombardment of news and social media — can amp up our anxiety. So, why not use your device to help you disconnect?
Mindfulness apps, such as Simply Being, are an increasingly popular way to help manage stress. Using this app, you can tap into a soundtrack of soothing sounds to help clear your mind. (Cue babbling brook, singing birds, meditation gongs!)
The idea behind mindfulness is simple to explain, but hard to execute. The goal is to focus on the present moment, and to let go of regrets of the past or worries about the future. And some researchers say apps can be a useful tool to assist this practice.
«I think they can be helpful,» says Dr. Stuart Eisendrath, a psychiatrist at the University of California, San Francisco who researches Mindfulness-Based Cognitive Therapy.
«There are a variety of apps out there,» Eisendrath says. «Some of them are just simple meditation timers» to help users stay focused for a specific period of time. The UCSF Student Health and Counseling Center lists several of these apps, including Zazen and I-Qi, on its Mindfulness Meditation website.
Some of the documented benefits of mindfulness meditation, according the UCSF site, can include better management of chronic pain, an increase in self-awareness, improved digestion and higher immune function.
But here’s the rub: There’s no evidence that just using a mindfulness app will bring these benefits.
«Everybody wants a quick fix, they want to know the shortest, fastest root to be mindful,» says Steven Hickman, a psychologist and founder of the UC San Diego Center for Mindfulness. He says just using an app for a few minutes, a few times a week is likely not enough.
«It really does take ongoing practice — just like exercise,» Hickman says.
Therapists say people should be skeptical if they download an app that makes specific health claims, and shouldn’t use them as a replacement for therapy.
«Few of these apps are empirically validated,» says Jason Parcover, who directs the counseling center at Loyola University Maryland. And they can’t yet be tailored to a user’s specific needs.
A recent perspective piece published in the British Medical Journal points to the need for more rigorous review of apps. The authors say people who use apps should know if there’s evidence to back up claims made by the app developers. Consumers, they say, need to be taught «to look for signals of quality before downloading.»
The U.K.’s National Health Service is in the process of evaluating apps that might help manage or even improve health. So far, the listed apps include Chill Panda, which gives users simple breathing techniques and light exercises to «take your mind off worries,» according to its developers. Another one, Stress & Anxiety Companion, is billed as a way to help people handle stress and anxiety on the go.
When it comes to building a mindfulness meditation practice, «there’s no substitute for a live connection with a teacher — and encouragement from a group or class,» Hickman says. But for people who have already taken a class or been introduced to the basics, he says, «apps are a terrific support to the process. «
«
Parcover agrees that apps can be an effective «nudge» — a reminder to keep it up daily, or a few times a week.
«One of the struggles is having the discipline to build meditation into your lifestyle,» he says. «I know these apps are popular with students.»
Given the bombardment of the digital world, Parcover says, and all the daily stresses, many students recognize the value of «finding the time to be present in the here and now.»
Sponsor Message
Become an NPR sponsor
|
My controller has lag So, what is Lag — or more accurately Input Lag?
In video games, input lag is either the delay between the television or monitor receiving a signal and it being displayed on the screen, or the delay between pressing a button on your controller and seeing the game react. This troubleshooting guide will help you with lag solutions for BOTH your controller and your display.
The first part of the guide sets up your controller with the CronusMAX and will assume you are using a wireless controller with the Bluetooth adapter. The second part of the guide handles the display, which covers ALL controllers and should be followed by every gamer, whether or not you are using a CronusMAX.
First of all, latency will ALWAYS be higher on anything wireless. The conversion from wired to wireless and the transmission and receiving of it over the air will naturally add latency. That being said, CronusMAX still works well with Bluetooth — as long as everything is setup correctly and there is no interference causing problems. This guide is a little long but it’s very much worth it. The difference it makes in some cases is astonishing.
First make sure your Speed Up settings are correct as per the Controller Guides. The example below shows the recommended default Speed Up Settings for DualShock 4 Wireless Controllers when connecting to a PS4.
You can choose to tweak them if you have any issues. For example if you have a slower Bluetooth adapter or experience any issues with rumble then you should try different ‘Rumble Over Bluetooth’ speed settings. The default is Full Speed, however alternative options available are Flow Control+, Flow Control and Disabled. Start with ‘Disabled’ and go from there. Some Bluetooth adapters may not like DS4 BT Boost so disable that and test too. You can also try disabling Inframe In as that is known to cause disconnections/lag with certain setups. Another little known but important point to understand is that Bluetooth and Wi-Fi devices use the same radio frequencies to communicate, they often interfere with one another and are prone to interference from other devices operating on the same frequencies. If you are experiencing lag with your Bluetooth wireless controller, even though you have tried different Speed Up Settings in the Device Options panel and have setup your TV as per the settings suggested above, there is a good chance you have a WiFi Router that is causing interference.
You should also try changing the WiFi Router Channel to optimize your wireless signal. Click Here for more information on how to do that.
We also recommend that you Click Here to check out an article that looks at the effects of such interference, what causes it and how to reduce it in a home or office environment.
To demonstrate that this issue is nothing to do with the CronusMAX, here’s a screenshot from the PlayStation Support website showing just one example of many: Interestingly this user disabled the «Connect Directly to PS4» option under the PSVITA settings and they report that it solved their lag problems (they do say it disables the PS4’s Wi-Fi which is incorrect, it simply means it now connects directly to the PS4 Wi-Fi instead of through the router.
The next step is to setup your TV/Monitor itself. What many people overlook is that if a TV has a Game Mode, you will have input lag if it’s not being used. This is because generally newer TVs do their own processing to the image/sound before displaying it to the TV, resulting in a delay between the source output and displayed results.
Setting your TV/Monitor in Game Mode will eliminate this processing and give you a 1:1 source to display throughput. (This helps for any gaming system). If you don’t believe me, Google it, there’s thousands of blogs and articles that talk about it. I’ve compiled the most comprehensive and detailed guide that you’ll find anywhere to aid you in getting the perfect lag-free gaming setup.
QUOTE «Wow!!!! I was blown away that this actually worked, who would have thought the cause of all this enraging input delay was a result of game mode on my TV. It was a bit difficult to find, but it was indeed there. And WOW, did it make a difference. I cannot tell you how amazing it is to play now. The input lag is completely gone, I’m insanely particular about latency and input lag, and when I got my CronusMAX yesterday and tried it, I was disappointed, but this changes everything and now my setup is better than ever before. THANK YOU, THANK YOU!»
I was recently able to use a Leo Bodnar input lag tester to optimize settings for my TV. I’m going to list some obvious and not so obvious ways to reduce lag.
Whats amazing is that for every product I’ve ever done this on, the screen looks ten times smoother and actually has an anti-jaggy (AA) effect despite shutting off post-processing effects.
I personally have a Samsung and the difference is huge, however the manual says to specifically use HDMI Port 2 — remember to READ THE TV MANUAL!
Labelling the HDMI input to «PC» is preferred over Game Mode because on these models:
All that being said, I was personally able to shave off ~20ms of lag. I tested using the average of top, middle, and bottom readings which is the current meta.
Obviously, not all of these will translate from one TV set to another, but if anything else, it suggests that seemingly benign settings can introduce additional lag.
If you want to check out the Lag rating for your TV/Monitor/Projector, or any other model — we highly recommend displaylag.com — they currently have well over 500 models in their database!
|
||
|
Top |


 We have found that routers such as Apple’s Airport Express have this problem and you should make sure that the router is not in close proximity to your CronusMAX/Bluetooth Adapter.
 The PS4 now acts as the hub — perhaps it changes how the Wi-Fi signal works around the console which was causing some interefence with the Bluetooth adapter?). After some research and it seems others have resolved similar lag issues with this same solution too — so perhaps it’s something you can try?
 Follow these steps and it may just blow your mind in how much improvement it makes — without or without using a CronusMAX. Here’s one response from a customer….
 This is because AV modes almost always use some weird «artificial digital sharpness» that makes jaggies from games appear worse. I’m sure this feature can make movies look great, but its not meant for games. Even more surprising is often you’ll gain another inch of screen! AV mode (or AV/HDMI mode on Samsung) is often zoomed and stretched. TONS of people go years without even realizing they are missing a portion of their screen. Flip back and forth if you think you notice a difference. That said, many monitors already use the unzoomed format (also called «Just Scan» protocol), and in that case you won’t notice a difference. Either way, your picture should look better but most importantly you have just shaved about another 10-15ms from this switch.
 If you are a fanatic about TV picture calibration and are frustrated by the lack of fine-tuning white balance, check to see if there is a factory menu you can access for more granular adjustments. Game mode is the single most important thing you can do as far as reducing input lag and is found on most modern sets, where the settings of the TV, including colors, motion blur, and others variables, are set specifically to accommodate video games, and will help reduce video game lag. Where as certain settings can help with motion graphics, such as sports on live TV, these same settings can make your video game lag or feel delayed. Most of the time this option will have disappeared after selecting PC mode. PC mode usually stops ALL post-processing (which is what causes input lag), while game mode usually only stops some for HDMI mode. If you do still see a Game Mode, turn it on. Check to see if doing so resets your monitor back to «HDMI» mode. If so, go with PC mode over Game mode. If you can have both modes at the same time (it’s possible) then go with that.
 Picture, Color, Input, General, etc.), and when in doubt, just google something if you don’t know what it is. If you turn something off and it makes everything look like garbage, then obviously you can keep those vital processes. Once again remember if you do mess anything, you can just reset and try again.
 But they all basically do the same thing, with varying degrees of intensity.
 I also let the TV warm up for a few minutes before measuring each change as I observed this was the best way to observe lowest measurements and most accurately resembled real-world use.
 Not anymore.
Known Issues in Black Ops Cold War
Prestige Keys
Prestige Keys are now correctly awarded at every 50 Season Levels, and a fix rolled out to restore missing Prestige Keys that were earned during Call of Duty: Vanguard seasons.
Diamond emblems
Diamond emblems will now unlock after players earn Diamond camos.
Xbox Series X ventilation errors
False ventilation errors while playing Zombies on Xbox Series X should no longer occur.
Locked weapon customizations
Unlocked weapon camos and attachments should no longer relock.
PC crashes
PC crashes leading to error codes 3107840166 and 2909663725 have been fixed.
Zombies splitscreen
Graphical inconsistencies occurring while playing Zombies in splitscreen mode have been addressed.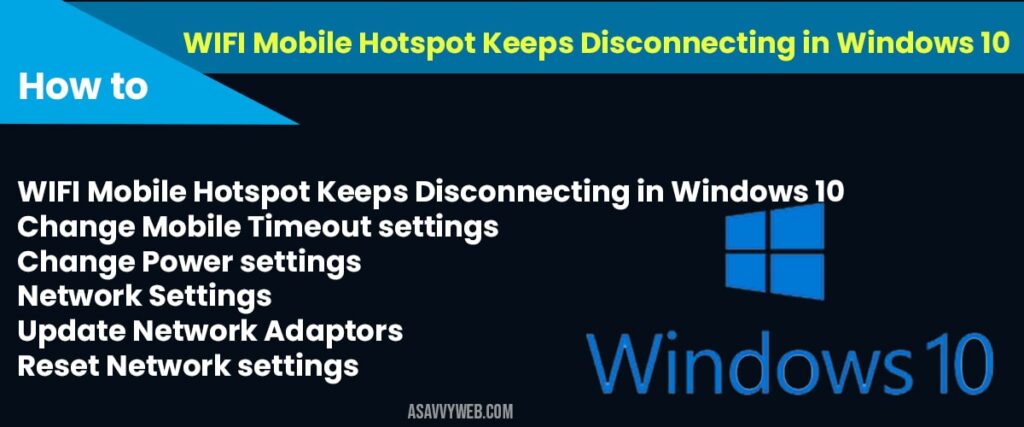
PC crashes in Outbreak
PC players should no longer experience increased crashes while playing Zombies Outbreak.
Operator Mission tracking
Tracking issues with Kitsune’s «Security Expert» Operator Mission, Beck’s Season Five Operator Mission, and Powers’ «Plausible Deniability» Operator Mission have been fixed.
Weapon and Challenge progression
We resolved a visual issue where some players were seeing lost progress toward weapons and challenges when resuming from a suspended state.
Crossplay Voice Chat
We fixed an issue where some players were unable to hear other party members on different platforms during crossplay.
«Lost connection to host» message in Zombies
We released stabilization improvements to help prevent a «Lost connection to host» message when loading into a Zombies match.
PS5 launching the PS4 version of the game
We released an update to resolve an issue with game versions launching.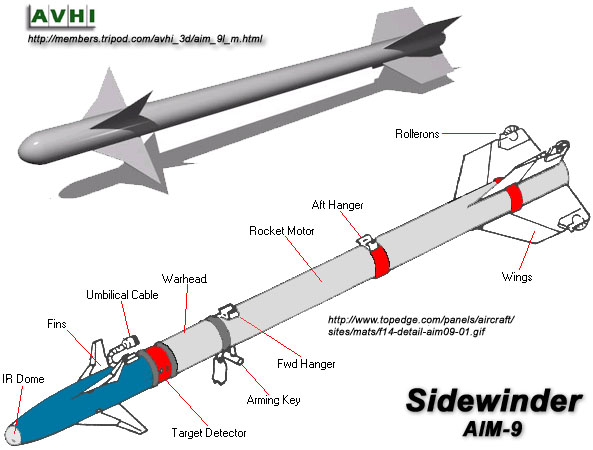 Follow these steps if your PlayStation 5 is launching the PlayStation 4 version of the game:
- Go to your Game Library.
- Highlight Call of Duty: Black Ops Cold War and press X.
- Select the […] button to view options.
- Select the PlayStation 5 version of the game.
Xbox Series X|S launching the Xbox One version of the game
We released an update to resolve an issue with game versions launching. Follow these steps if your Xbox Series X|S is launching the Xbox One version of the game:
- Open your game collection.
- Use the filter to select Optimized for Xbox Series X|S.
The optimized version of Call of Duty: Black Ops Cold War will also have an X|S logo on the game tile.
Deadshot Daiquiri perk
We fixed an issue where the Deadshot Daiquiri aim-assist perk wasn’t locking onto a Zombie’s head when using the AMP63.
My rank is stuck at 182
We resolved a visual issue where player rank appeared to be stuck at 182 within lobbies, during matches, and after matches. Players still earned ranks, and those affected should now see the correct rank appear.
Merciless Challenge tracking
We fixed an issue where the Merciless Challenge was not tracking properly.
Gator error messages
We resolved an issue where some players were getting variants of a Gator error: Bravo 381 Invisible Gator, Bravo 381 Defiant Gator, Bravo 381 Early Gator.
R1 Shadowhunter
We fixed an issue where some players weren’t receiving the R1 Shadowhunter Crossbow after completing the challenge to unlock the weapon. Players who completed the challenge will find the R1 Shadowhunter is now unlocked. Going forward, players who complete the challenge will unlock the R1 Shadowhunter.
Firebase Z
We fixed an issue causing the game to crash or freeze during gameplay after playing multiple rounds of Firebase Z.
Graphical corruption
We released stability improvements to address issues with ray tracing on supported consoles.
Performance issues following update
We made framerate optimizations to address performance issues identified after the Season Two update.
Splitscreen performance
We released several enhancements to improve splitscreen performance.
Charged for Battle Pass with Ultimate Edition
We resolved an issue where some players with the Ultimate Edition purchased the Season One Battle Pass included in the edition rather than redeeming it. If this happened to you, your COD Points were restored and you kept all Battle Pass items and progression.
Season Level rank
We resolved a visual issue related to how the Season Level displays in the After Action Report after prestiging.
Blackout Trial has ended
We fixed an issue preventing some players from playing after receiving a «Blackout Trial has ended» error message
Diamond Camo not unlocking/tracking
Diamond Camo progress should now be unlocked for all players who’ve earned it on their weapons.
Game Crashes in 4K
We resolved an issue where some players were experiencing game crashes when running the game in 4K.
Unable to see XP Tokens
We fixed an issue where some players who redeemed codes for 2XP Tokens were not seeing them available to use in game.
Negative XP
We resolved an issue causing some players’ COD Points balances to appear as a negative number.
Controller disconnects on PlayStation 4
The PlayStation 4 System Software Update 8.01 included a fix to resolve controller disconnects.
Frame drops and lighting issues in Zombies
The November 20th update included stability updates to address frame drops and lighting issues.
Crashes in Onslaught
The November 20th update included a fix to resolve crashes while playing Onslaught on the Arabic or Russian versions of the game.
Why Wi-Fi keeps dropping out and how to avoid it
Contents [show]
- Why Wi-Fi keeps dropping out
- We’re far away connected
- The quality of the hotspot is poor
- Computer security issues
- Some program is causing problems
- Network card problem
900 antivirus or firewall
- How to prevent Wi-Fi from turning off
- Use Wi-Fi boosters
- Connect to the right lane
- CONTRICTE OFFICICAL AND CLEAN and Safety
- Update the drivers and systems
- Manage a router
Why is Wi-Fi
, as we say, connection to Internet via Wi- Wi- Fi is very common today.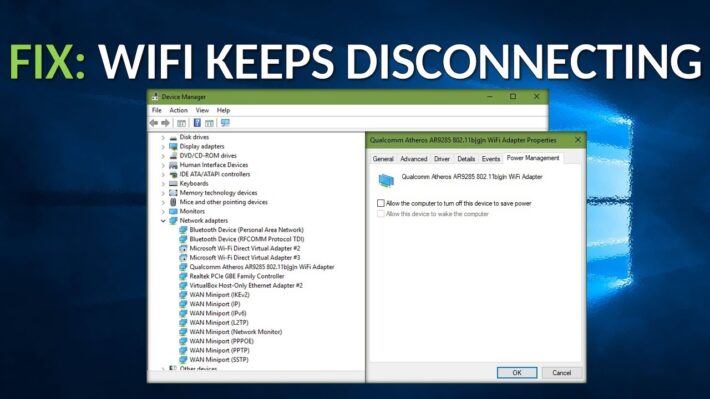 We have many devices connected with this technology at our disposal. There has also been significant growth in the Internet of Things. All these computers are connected without the use of cables.
The problem is that it is not as stable as cable. In addition to , the speed of is usually always lower. However, these differences have decreased over time. We don’t have as many problems today as we did a few years ago, although they still exist.
Without a doubt, one of the most common faults is Wi-Fi that keeps turning off. We are browsing the Internet either from a mobile phone or from a computer and suddenly we see that there is no connection. We observe that Wi-Fi has been disabled and it either reconnects automatically or we have to provide it ourselves. There are various reasons for this.
We are far away connected
One of the most common reasons why Wi-Fi is constantly disconnected is that we are very far connected . This makes the signal very weak and we cannot establish a proper connection.
If the signal is weak, this can lead to malfunctions, navigation failures, and in addition to poor speed, our device is constantly trying to connect. Therefore, whenever we have this problem, we may think that the cause may simply be distance.
The quality of the access point leaves much to be desired
Of course, this can also be due to the problem of the access point or router to which we are connecting. Perhaps the quality is very limited and you don’t have the ability to connect many devices at the same time, causing service interruptions.
In this case, the problem is external. This is due, as we see, with an error in the access point or our router. As we know, these devices can become saturated at certain times, especially if it is old equipment and its capacity is less.
Computer security problems
We can’t leave security problem behind us. There are many types of malware and threats that can affect our devices. They have very different goals, such as stealing information, passwords, or access to other computers connected to the network.
Whatever your goal is, it will always cause problems for your team. We may encounter errors when trying to connect to the network. This can be caused by malware that we have downloaded without realizing it, or through an attachment that we have received in the mail, for example.
Using antivirus or firewall
It can be said that using security software such as antivirus or firewall is necessary to avoid what we mentioned above. However, it should be noted that sometimes it is the use of these programs that can cause conflicts in our system.
Having an antivirus or firewall is helpful, but it can also block connections and cause Wi-Fi to be permanently disabled. We should take a close look at how the software works and check if it creates any unwanted interference.
Some program is causing problems
Programs Network connection can sometimes fail. It could even lead to signal loss. It can be disconnected from the network and thus affect the rest of the programs and tools that we use.
Network card problem
This is another very common question. This is especially true for laptops that use the network card which is integrated with the motherboard and is often very limited. We can suffer from connection failures, stability issues, and eventually constant network failures that make us constantly have to connect to Wi-Fi.
The network card is the backbone of any computer with Internet access. In the case of computers, it can be internal or external. Sometimes, over time, this can also lead to problems.
In a nutshell, these are some of the most important reasons our wireless network can experience outages. It’s an annoying thing we’ve all suffered from at one time or another, although the real problem comes when it becomes habitual and constant.
How to prevent Wi-Fi 9 from turning off0037
We have looked at some of the main causes of Wi-Fi Disable . This is a very common problem that can affect work, school, or just surfing the net. This is something that is present in all types of devices and it is recommended that you take steps to avoid it.
It is very important that we always keep the network functioning properly, because as we can see, this is a fundamental thing.
Use Wi-Fi Boosters
One way to avoid common wireless connection problems when we want to fill the gap is to use boosters. In this regard, we have different possibilities.
The most commonly used repeater is . Basically, it is a device that acts as an access point and repeats the wireless signal it receives from the main router. This is an inexpensive and easy to use option.
We can also use PLC systems, which are devices that operate using a home electrical line to transfer the Internet from one place to another. Even choose Wi-Fi Mesh System , although they are more expensive to cover a large area.
Connect to the right lane
This is something many users overlook. As we know, modern routers and devices can work on both 2.4GHz and 5GHz bands. Now the first one is most suitable when we are going to connect away from a router or access point. It is true that it is the one that offers less speed, but without a doubt we will have more stability since it is less sensitive to distance and possible obstacles.
Therefore, if we notice that Wi-Fi is constantly disconnecting, one of the steps to solve this problem is to make sure that we are connected to the correct range. Sometimes just by doing so, we can already significantly improve our communication.
Keep your equipment clean and safe
We saw earlier that one of the reasons a wireless network goes down can be related to security issues. This makes it very important that computers are free from threats, clean and in good working order.
To achieve this, we can take into account the use of security tools . There are many options that we can use, paid or free. They are available for all types of operating systems and platforms. A good antivirus can prevent the infiltration of threats that disrupt normal operation and affect browsing time.
Update drivers and systems
This point is also important to avoid many problems. Network card drivers are required for proper operation. Sometimes we use an outdated version that causes incompatibilities or issues with the operating system. Therefore, we must always have Latest version .
The same thing happens with the operating system we are using. To avoid problems with Wi-Fi disconnection, the latest versions must also be available to us.
Manage your router
Game machine The router is a fundamental element for connecting to the Internet. Any failure in this device may also result in Wi-Fi being disconnected from our devices. We have to control the security (for example, properly secure the wireless network), the channel it uses, and keep the firmware up to date.
Having the perfect router for the job will be key so that there are no issues with other devices that connect to the network. That way, the annoying crashes we talked about could have been avoided.
In short, these are some interesting tips that we can take into account in order to avoid problems with our network. This way, we could avoid annoying Wi-Fi disconnects when navigating.
Steam keeps disconnecting and reconnecting
Some Steam users are experiencing connection issues when using the Steam client. According to them, the Steam client connects and disconnects from the internet randomly, making Steam unusable. Because of this, some users lose their current game progress when the Steam client disconnects from the internet while playing. If Steam keeps disconnecting and reconnecting to your gaming system while playing or downloading, the solutions provided in this article may help you fix the problem.
The following solutions will help you resolve connection issues with the Steam client. But before you continue, we recommend that you switch from a Wi-Fi connection to a wired connection. You can use an Ethernet cable to connect your computer to the router. Because a wired Internet connection is more stable than a wireless Internet connection, switching from a wireless connection to a wired Internet connection fixes Internet connection problems in most cases. If your internet connection is working fine but Steam keeps disconnecting and reconnecting, repair the Steam client and see if that helps.
If Steam keeps disconnecting and reconnecting while playing or downloading, here are a few tips that might help you resolve the issue.
Programs for Windows, mobile applications, games — EVERYTHING is FREE, in our closed telegram channel — Subscribe 🙂
We’ve detailed all of these fixes below.
1] Clear your web browser cache
If you are having problems connecting to the web version of the Steam client, clearing your web browser cache may solve the problem. In addition to that, you can try one more thing, open Steam in a different web browser and see if that makes any difference.
2]Clear your Steam browser cache.
This solution is for users who are experiencing connectivity issues in the Steam client. Open the Steam client and clear your browser cache. The steps for this are written below:
- Open the Steam client.
- Go to Steam > Settings.
- Select Web Browser on the left side.
- Click CLEAR WEB BROWSER CACHE. Also, delete all browser cookies.
3]Switch to a different Internet connection (if available)
Some users have connected their computers to a different Internet connection, after which the Steam client starts working normally. You can also try this if another internet connection is available to you. If it works, contact your ISP.
4]Add the Steam folder as an exception to your antivirus.
Sometimes antivirus software blocks some genuine applications from accessing the Internet, causing users to experience Internet connection problems with these applications. This is a false positive antivirus. This may be the case with you. To check this, temporarily disable your antivirus and then launch Steam. Now watch Steam for some time and see if it disconnects from the internet. If not, the problem is with your antivirus software. If you are using Windows Defender, you can add the Steam folder as an exception to Windows Security. Also, temporarily disable your firewall.
If you are using a third party antivirus or firewall, please refer to their user manual to add Steam as an exception, or you can contact their customer support.
5]Change DNS server
If the problem persists, changing the DNS server may solve the problem. follow the instructions below to change the DNS server.
- Open the Run command window (hotkey Win + R).
- Select a category in view by.
- Click Network and Internet.
- Now select Network and Sharing Center.
- Click on the Wi-Fi or Ethernet connection. The status window for your internet connection will open.
- Now click Properties.
- Select Internet Protocol Version 4 (TCP/IPv4) and click the Properties button.
- In the IPv4 properties window, select the Use the following DNS server address option.
- Now enter 8.8.8.8 in your preferred DNS server and 8.8.4.4 in your alternate DNS server. These are Google’s DNS servers.
- Press OK to save changes.
After changing the DNS servers, they must be registered. To do this, open a command prompt as an administrator and enter the following commands. Press Enter after entering each of the following commands.
ipconfig /flushdns ipconfig /release ipconfig /renew
Now open the Steam client. This time the problem should be fixed.
6]Troubleshooting Clean Boot State
If the issue persists, a third-party application may be causing the issue. Some software or application asks us to start at system startup. If we allow them, they run in the background when we turn on our computer. Sometimes background applications conflict with other applications or programs and cause problems on the user’s system. To identify such applications or software, you can troubleshoot your computer in a clean boot state.
In a Clean Boot state, only essential services remain enabled, and all other services and startup applications remain disabled. This helps the user to identify the culprit program. After starting your system in a clean boot state, launch Steam and monitor it for a while to see if it randomly shuts down like it used to. If not, then some of your startup applications are to blame. To identify the problematic application or software, enable some of the applications you are running in a clean boot state and restart your computer in a normal state. Now start Steam and see if the problem reappears. If yes, then one of the programs you just turned on is to blame. Now start disabling enabled applications one by one and watch the Steam client for a while after disabling each application or software.
Once you find the problematic application, uninstall it or check its updated version on the official website.
7]Uninstall and reinstall Steam
If all else fails, uninstall the Steam client from your system. Visit the official Steam website and download the latest version of the Steam client. Now install the Steam client on your system.
Why does Steam keep losing connection?
One of the reasons why Steam keeps losing connection is an unstable internet connection. To fix this problem, connect your computer to your Wi-Fi router with an Ethernet cable and check if the problem is still there. In addition to this, you can try some other fixes like clearing the web browser and Steam browser cache and cookie data, restoring the Steam client, etc.![]() 0003
0003
In some cases, a firewall or antivirus generates false positives for a particular application or software and blocks its access to the Internet. To confirm this, we suggest that you temporarily disable your antivirus or firewall and check if that makes any changes. If the problem goes away after disabling your antivirus or firewall, add the Steam folder to your firewall or antivirus exception.
Why does my PC’s Wi-Fi keep disconnecting?
Disconnecting from the Internet is one of the most common Wi-Fi problems that occurs on a Windows PC. This usually happens when the signal strength of your internet connection is too weak. To verify this, connect your computer to a different Internet connection (if available). You can use your mobile data for this purpose. Connect your computer to mobile data via mobile hotspot and see if the problem occurs. If not, contact your ISP to fix the problem. Another thing you can try is to switch to a wired internet connection. An Ethernet cable can be used for this purpose.
Another cause of this problem is outdated or faulty network drivers. A driver is a piece of software that helps the operating system connect to a hardware device. Therefore, updating the network driver may solve this problem.
Read more: Steam Cloud won’t sync, won’t load, or isn’t working properly.
Programs for Windows, mobile applications, games — EVERYTHING is FREE, in our closed telegram channel — Subscribe 🙂
USB WiFi adapter keeps disconnecting [QUICK GUIDE]
Getting the best out of your home network often requires Wi-Fi access. However, it seems that users who access an external USB Wi-Fi adapter often run into problems. The one we’re referring to today deals with frequent outages.
Users cannot maintain a persistent connection and there is no good reason why this is the case. To that end, we’ve provided a few troubleshooting steps in the list below to help those in need.
- Check equipment
- Driver update
- Check power settings
1: Check the hardware
The first and obvious step is to confirm that the USB Wi-Fi adapter actually works. Testing on different PCs should give you a good starting point.
If the Wi-Fi USB adapter really works without problems, we are afraid that none of the steps below will help you. On the other hand, if it works well and the problems are closely related to one PC, continue with the steps below.
Also, be sure to try several USB ports before unplugging the hardware and proceeding to troubleshoot the software.
Bandwidth support will allow USB 3.0 to operate exclusively at 5 GHz, while USB 2.0 is most likely designed to operate at 2.4 GHz.
USB port not working in Windows 10? Fix it easily by following this amazing guide.
2: update drivers
Drivers are the most likely cause of connection inconsistencies. Most popular USB Wi-Fi adapters come with an installation disc with the appropriate software.
However, due to lack of compatibility with legacy motherboards, even OEM supplied drivers will not work every time.
In addition, many OEMs skip specific supporting software and advise you to use generic drivers that you normally install on your internal Wi-Fi adapter.
With this in mind, we can choose two ways to solve the problem of possible drivers. The first way is to reinstall the driver through Windows Update, and the second way is to download the drivers manually.
Let’s try to solve the problem with Windows Update first:
- Right-click the Start button and open Device Manager .
- Go to network adapters and expand this section.
- Right-click on the USB WiFi adapter in the list and delete it .
- Restart your computer without disconnecting USB device .
- The new driver will be installed immediately.
Windows cannot automatically find a driver for your network adapter? Rely on us to solve your problem.
Second, let’s try to manually find the drivers in the system:
- Right click Start and open Device Manager .
- Expand the Network Adapters section.
- Right-click on the USB Wi-Fi Adapter and select Update Driver .
- Click Browse My Computer to find the driver.
- On the next screen, click Let me choose from a list of available drivers on my computer «.
- Select an alternative driver and install it.
Alternatively, you can connect an external Google adapter and find suitable drivers. However, make sure you only download reliable drivers from official sources to avoid malware infection.
Did you know that most Windows 10 users have outdated drivers? Stay one step ahead with this guide.
3: Check your power settings
Besides the usual driver hassle, another possible cause of an inefficient USB Wi-Fi adapter is power settings.
There are various power options, some associated with the USB hub and others found in the adapter’s advanced settings.
However, they all share the same system goal: to conserve power by disabling certain features of the USB Wi-Fi Adapter.
So, in order to solve this problem, we need to make sure that all related options are disabled.
Disable USB selective suspend
- Right-click the battery icon in the notification area and open power options.
- Select Change plan settings .
- Select « Change advanced power settings «.
- Expand USB settings, followed by USB selective suspend settings .
- Disable this option for both options and confirm the changes.
Can’t find your meal plans? Get them back by following the simple steps in this article.
Disable USB Root Hub Power Saving
- Right click Start and select Device Manager from the Power User menu.
- Expand to Universal Serial Bus Controllers .
- Right-click USB Root Hub and open Properties .
- Click on the Power Management tab .
- Uncheck « Allow the computer to turn off this device to save power » and confirm the changes on each port.
- Restart your computer.
Disable WLAN adapter suspend
- Open device manager .
- Expand Network Adapters .
- Right click USB Wi-Fi Adapter and open Properties .
- On the « Power Management » tab, uncheck « Allow the computer to turn off the device to save power «.

- Now under the Advanced tab, look for Selective Suspend and disable it .
This should do it. If you have any questions or suggestions regarding turning off your USB Wi-Fi adapter frequently, feel free to share them with us in the comments section.
RELATED STORIES YOU SHOULD KNOW:
- Fix: Belkin Wireless Adapter not working on Windows 10, 8.1
- Fixed: USB Wi-Fi adapter is not recognized in Windows 10, 7
- Ethernet works, Wi-Fi won’t? Here’s how to fix it
- 8 Wi-Fi Promotional Programs to Monetize Wi-Fi and Promote Your Brand Smartly
Fixed: USB Wi-Fi keeps disconnecting
Getting the most out of your home network often requires Wi-Fi access. However, it appears that users who use an external USB Wi-Fi dongle tend to experience problems. What we are talking about today refers to frequent outages. Users cannot maintain a long-term connection, and there is no good reason for this.
To this end, we offer several troubleshooting steps listed below that should help those who need it.
How to correct the frequent shutdown of the Wi-Fi USB adapter in Windows 10
-
Check equipment
-
Check power settings
Update drivers
Also, be sure to test a few USB ports before you dispose of the hardware and troubleshoot the software. Due to frequency band support, USB 3.0 will only operate in the 5 GHz band, while USB 2.0 is designed to operate in the 2.4 GHz band.
2: Update the drivers
The most likely cause of connection inconsistency is conductors. Most popular USB Wi-Fi adapters come with an installation disc and supporting software. However, due to the lack of compatibility with legacy motherboards, even the driver provided by the original equipment manufacturers will not always work. Also, many OEMs skip specific support software and advise you to use generic drivers that you would normally install on your internal Wi-Fi adapter.
With this in mind, we can choose two ways to solve the probable driver problem. The first way is to reinstall the driver through Windows Update, the second way is to download the drivers manually.
First, let’s try to solve the problem with Windows Update:
-
Right-click the Start button and open Device Manager.
-
Go to Network adapters and expand this section.
-
Right-click the USB Wi-Fi adapter in the list and uninstall it.
-
Restart your computer without disconnecting the USB device.
-
The new driver will be installed immediately.

Second, let’s try to manually find the drivers in the system:
-
Right-click «Start» and open «Device Manager».
-
Expand the Network Adapters section.
-
Right-click the USB Wi-Fi adapter and select «Update Driver…»
-
Click Search My Computer for Drivers.
-
En la siguiente pantalla, haga clic en »Let me choose from a list of available drivers on my computer«.
-
Select an alternative driver and install it.
Also, you can google your external adapter online and find the appropriate drivers. However, be sure to only download verified drivers from official sources to avoid malware infection.
3: Check your power settings
In addition to the usual driver-related problems, power settings are another possible cause of USB Wi-Fi adapter not working properly. There are several power options — some are related to the USB hub, while others are found in the adapter’s advanced settings. However, they all share the same system goal: save power by disabling certain features of the USB Wi-Fi adapter.
Therefore, in order to solve this problem, we must ensure that all related options are disabled.
Disable USB selective suspend
-
Right-click the battery icon in the notification area and open Power Options.
-
Select Change plan settings.
-
Select «Change Advanced Power Settings»
-
Expand USB Settings and then USB Selective Suspend Settings.
-
Disable this option for both options and confirm the changes.
Disable USB Root Hub Power Saving
-
Right-click Start and select Device Manager from the Power User menu.
-
Expand to Universal Serial Bus drivers.
-
Right-click the USB Root Hub and open Properties.
-
Click the Power Management tab.
-
Uncheck «Allow the computer to turn off this device to save power» and confirm the changes for each port.

-
Restart your computer.
Disable WLAN adapter sleep mode
-
Open Device Manager.
-
Expand Network adapters.
-
Right-click your USB Wi-Fi adapter and open Properties.
-
On the Power Management tab, uncheck «Allow the computer to turn off the device to save power»
-
Now on the Advanced tab, find «Selective Suspend» and disable it.
This should be enough. If you have any questions or suggestions for turning off the Wi-Fi USB dongle frequently, feel free to share them with us in the comments section.
Labels: problems with Wi-Fi, fixing windows 10
If your computer turns off or does not turn on after transportation from one place to another and you need qualified assistance in solving this problem, you can always contact us: call and call the wizard.
The range of possible causes of spontaneous shutdowns is very wide. Some of them are more likely, while others can only occur if the computer was transported in a concrete mixer with “killed” depreciation and along a bombed road. It is also possible that the reason is not directly related to transportation — it’s just that the appearance of a problem coincided with the first inclusion after transportation.
Bad connection
First, physically disconnect the computer from the power source (wall outlet, surge protector, voltage stabilizer, uninterruptible power supply). Loosen the screws at the back of the case and remove the side cover. In most cases, for this you need to push it back a little, literally a couple of centimeters, and then lift it up. After that, touch the body to remove the static charge. Everything, now you can poke around inside the system unit.
First check the wires coming from the power supply. Pull out and firmly insert the plugs connecting to the motherboard until the latches are fixed. When shaking during transportation, the contact of anything can deteriorate: hard drive cables, power supply for CPU coolers, video cards and drives, expansion cards with the motherboard.
Video: Checking the reliability of the motherboard power supply
Sometimes it is not possible to fix the problem by moving the wires and you have to completely disassemble the system unit and then reassemble it. If you are not sure that you can do it, it is better to immediately call the master.
Tips for disassembly-assembly:
- Since you are disassembling the system unit anyway, you should also clean it from dust. Pay special attention to fans, radiators. For cleaning, it is better to use a can of compressed air (sold in computer stores), an antistatic brush.
- Before installing RAM sticks and expansion cards, clean the contacts of the boards and slots with a regular school eraser, then go over them with an antistatic brush.
- Insert memory sticks and cards straight.
- It would be a good idea to check if the thermal paste has dried up at the same time. If necessary, change. Thermal paste should be applied in a thin layer about one millimeter thick.

- If you suspect a hardware failure, first start the computer in the minimum configuration (processor + cooler, video card, one stick of RAM). If everything is fine, connect the rest of the plates, expansion cards, drives one by one. That way you can figure out exactly what the problem is.
Unstable power supply
This problem is more common among users when moving. In the old apartment, everything worked fine, in the new home, the PC began to turn off spontaneously. However, the tension can become unstable even where everything was fine before.
For example, if you have a maniac welder in your neighborhood or the network is overloaded due to an increase in the number of subscribers (connecting a couple of new buildings with 500 apartments to an old substation) or a sharp increase in the number of powerful electrical appliances (there is one subscriber, but this is a large enterprise with a large number of electrical equipment).
What can be done if you suspect that the mains voltage is unstable:
- Turn off and physically disconnect (unplug) all electrical appliances.
 After that, turn on the PC and check its performance. If your computer has previously shut down under load, run a system stability stress test in AIDA64. At the same time, you will see if the processor and video card are overheating.
 - Check the power at the socket with a voltmeter/multimeter. Naturally, if you do not have a measuring device, and indeed you do not know how to use it, this option is no longer available.
- If the PC only shuts down under load, check the voltages in a diagnostic software like AIDA64. Even if the values of the power parameters are inaccurate, you will notice jumps.
- Connect the computer through a voltage stabilizer.
However, if there is a voltage stabilizer or you can take it from relatives, friends, neighbors, it is better to start with it.
Faulty power supply
Rigid transportation may damage the power supply. Some capacitor fell off due to shaking, and here is the result: the computer turns on, but does not want to work normally — it turns off after a short time.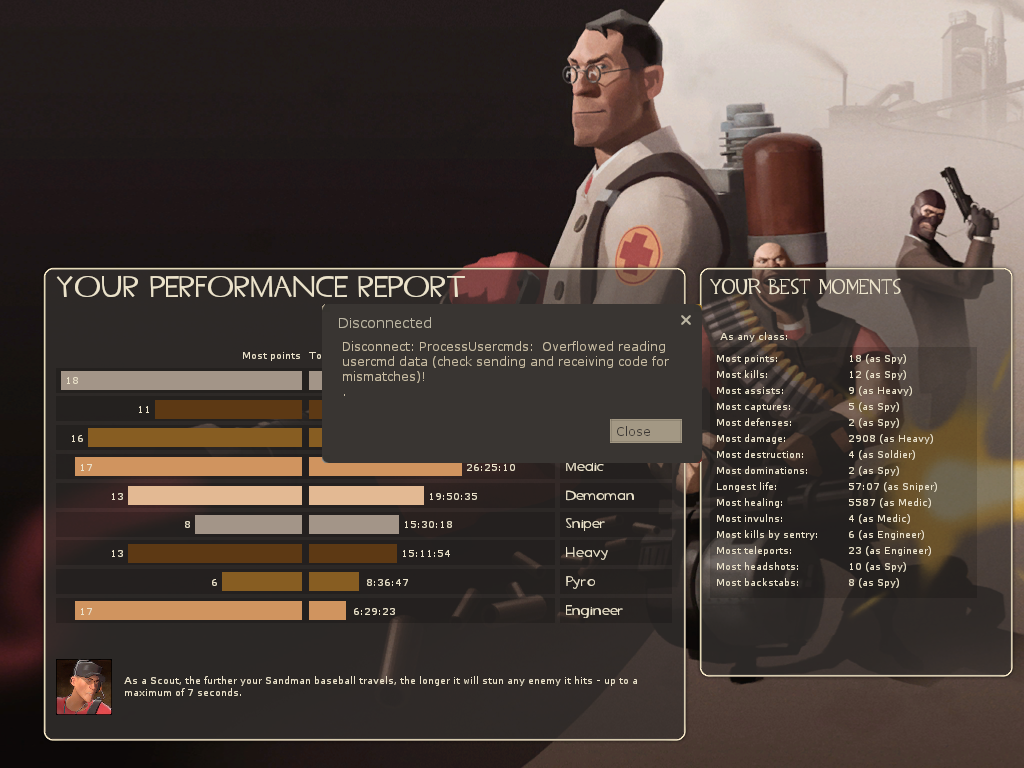
Important! Never test a suspicious power supply on another computer unless you want to pay a friend (neighbour, relative, colleague) to buy a new motherboard and other hardware.
Since you are unlikely to be able to conduct a full-fledged diagnostics on your own (otherwise you would not be reading this article), you have one option left: check the computer’s performance by putting a known-good power supply on it. Preferably not less or not much less power. If you have a relatively new computer, you definitely shouldn’t test it with a 250-watt power supply taken from an ancient Pentium I.
It is unlikely that the power cable will be damaged during transportation, but just in case a firefighter can check it, replacing it with a known good one.
Overheating
Shaking during shipping may warp the heat sink, the cooler may fall off or loosen. It is also possible that the thermal paste has dried up. For example, a cheap KPT-8 can become unusable in just six months. It is possible that the deterioration of the thermal paste will simply coincide with the transportation of the PC. All this causes overheating, which significantly affects the stability of the PC. Up to the point that the computer will turn off under load or in a matter of seconds after being turned on.
PC shuts down under load
If PC shuts down under load, check CPU temperature in BIOS. To get into the BIOS, you usually need to press Del or F2 after turning on the computer. Less common — Escape , F1 or F12 . In very exotic cases, you will have to press a combination of two or even three keys. See the motherboard manual or look for relevant information on the manufacturer’s website.
The desired key (or combination of keys) can also be indicated in the corresponding message during the PC self-diagnosis after switching on (see photo below).
In the BIOS, you will see the temperature of the processor actually in the idle state. With normal cooling, it should not exceed 50-60 degrees. See values above 70 degrees? There is clearly something wrong with the cooling system. Action is urgently needed (see below).
If you cannot enter the BIOS if no critical excess is detected or the temperature is not displayed in the configuration:
- Turn on the PC, wait for Windows to load.
- Download and run the AIDA64 utility.
- Go to menu item
Service>System stability testand run the stress test. As the load on the CPU and graphics card increases, follow the graph of temperature changes.
If, as the load increases, the temperature does not go beyond 50–60 degrees, the problem is most likely along the power line (unstable voltage in the mains, power supply problems, poor contact of power wires with components, damage to the motherboard).
Fighting overheating
If things are really bad with cooling, alas, you may not even have time to enter the BIOS.
How to identify and fix overheating:
- An indirect sign of overheating may be an increase or decrease in noise during computer operation. In the first case, this will happen due to the fact that the PC detects overheating and causes the cooler impeller to rotate faster. In the second — because one or more fans have stopped working.
- Remove the side cover and turn on the computer. Pay attention to the operation of the fans of the central processor, video card, power supply.
- If the cooler is not spinning, make sure the power is connected. Check for signs of physical damage and if the mechanism is jammed by a foreign object.
- If the cooler is spinning, make sure it is properly secured. For Intel processors, the fan + heatsink design is usually fastened with clips that rotate clockwise and counterclockwise (latches were often found on «ancient» models). For AMD processor coolers, screws are more common. If the fan dangles, fix it properly and check the operation of the computer.

- You may need to remove the cooler and heatsink and check if the thermal paste is dry. When replacing the paste, it must be applied in a layer no more than a millimeter thick. A thick layer is almost as bad as the complete absence of a thermal interface. Install the fan and heatsink neatly and without distortions.
- Check the video card cooler at the same time.
- Watch out for dust. Remove dust if necessary. Many users use a blow-out vacuum cleaner for this purpose, but in this case there is a potential risk of damaging electronic components. Safer tools are an anti-static brush and a can of compressed air (available at computer stores).
We remind you once again, , that before performing any manipulations inside the system unit, you must physically disconnect the computer from power and remove static charge from yourself.
Other reasons
If the transportation was very hard, the motherboard or other components may be broken. At the same time, it is far from the fact that the damage will be visible to the naked eye. So, it may be possible to identify a fallen-off capacitor during a visual inspection, but you are unlikely to notice microcracks.
In this case, it is easier to start the test with the minimum configuration:
- Turn off drives and drives. Pull out the expansion boards. Leave only the processor with a cooler, one bar of RAM and a video card.
- If the PC keeps shutting down, try another graphics card, integrated or discrete (as an add-on card).
- If the computer stops turning off, connect everything else in series. This way you can identify the problematic part.
If all else fails, take another good look at everything. Make sure that the motherboard is installed without distortions, does not close anything anywhere (a burning smell may indicate a short circuit), there is no oxidation of parts, the capacitors are not loose or swollen, there are no traces of electrolyte spillage under them.
If all else fails:
- Are you using liquid cooling? Make sure there is no refrigerant leak. If there is, anything can fail. Moisture is one of the main enemies of electronics.
- Inspect the system unit. Make sure it has no dents. A deformed case can short to the contact pads of the motherboard.
- Check the operation of the power button. If it is kept pressed all the time, the computer will turn off immediately after turning it on, and so on in a circle. This can happen both because of the button itself, and because of the closure of the Power SW contacts of the motherboard. To check the functionality of the button, you can temporarily connect the Reset button to the connector on the «motherboard».
We hope that some of the above helped to solve the problem of spontaneous shutdown of the computer after transportation. If not, the last trump card remains — contacting a service center.
vpn keeps disconnecting — geek
Here we can see that «vpn keeps disconnecting».
What to do if your VPN connection accidentally drops
Businesses and individuals are increasingly taking online security much more seriously than we should ever! This suggests that more people are using VPNs on their desktops, laptops and mobile devices. These services protect against surveillance and other cyber threats. But if a VPN disconnects frequently, it doesn’t serve its purpose. Almost all VPNs already interfere with your internet connection, but when your VPN connection drops in the middle of a session, it can lead to to data loss or broken file sync. Read below to find a simple solution to this problem and how to fix those annoying situations where your VPN disconnects after every blink.
Why does my VPN keep dropping my Internet connection?
Almost all VPNs work the same. They use a single internet connection and create an AES encrypted socket with the VPN server. All information sent or received by your device must first be sent through the VPN server to be encrypted. This requires tons of bandwidth abilities. The amount of traffic through your internet connection is greatly increased.
But the VPN software essentially puts all of its eggs in one basket. If something happens using the web connection, there will be no failover. the signal suddenly becomes unstable or there are problems with the Wi-Fi connection you are using.
Most VPN programs don’t use channel bonding. This tells you that while your device can connect to the internet via Wi-Fi and mobile data at the same time, the VPN will only trust one connection. So your VPN will disconnect every second to remain insecure. You don’t like extra bandwidth or connection redundancy.
Any problem with your internet connection, even if it’s just a momentary outage or fluctuation and you’re experiencing a VPN disconnect.
How to fix VPN disconnected from the Internet
Your VPN is the ultimate tool until it disconnects. .However, it’s terrible when you’re deep into a BoJack Horseman marathon and you’re constantly interrupted by a horrible spinner.
There are several possible reasons why you are having problems, and it could be your device, OS, or connection.
1. Firewall or antivirus
Any third-party firewall or antivirus programs installed on your device can also affect your VPN connection. These programs are always running in the background and can consume tons of bandwidth.
Disable any firewall or antivirus programs on your device and reconnect to the VPN. If your connection is not dropping, the issue is resolved; if the problem persists, there is another reason.
2. Server location or connection
There is a possibility that the connection to your VPN server may be hay-ridden. Try to connect to a more local server; if you’re in Australia, connect to an Australian server. Generally, your connection is strongest when you’re connected to a server in the same country as you. If this works, then you just have a weak connection to that particular server.
If you want to bypass geo-restrictions and watch content in the US but are still disconnected from the US server, you can check to change your VPN provider.
3. Switch protocol
Your protocol may also be causing the connection to drop. You can check this by switching protocols and testing the connection; the problem is solved if you find one that will maintain a reliable connection. For example, TCP may perform better than UDP. It will be a matter of trial and error to find the easiest one for you.
4. Change your DNS settings
Although less common, changing your DNS settings can resolve connectivity issues. This is often a trial and error process and can only be solved by testing different settings.
5. Check your internet connection
There can be many different problems with VPN disconnection, but most often it comes down to your internet connection. as you thought. Although you will be vulnerable, you should try to stream with your VPN disabled. If the connection still drops, you understand that this is your internet and not the VPN. If this is often the case, you can check to change your internet provider.
6. Try another VPN
If you are using a free VPN, performance and speed may also be lacking. No matter how valuable a VPN is to you, it is always recommended to use a premium VPN service. Free VPNs not only offer less protection , but also limit your bandwidth and speed by limiting your streaming options.
When choosing a VPN replacement, find out which features are offered and which ones are optimized for streaming to give you a much better experience. Sign up for free trials or take advantage of the money-back guarantee to avoid unwanted charges.
User questions:
- Why does GlobalProtect keep disconnecting?
This is most commonly caused by an intermittent wireless (Wi-Fi) connection. Let’s say you’re using a weak wireless network or with many other devices connected to it. connection of GlobalProtect.
- Can FortiClient be used without EMS?
FortiClient offline does not require a license. If you do not have an EMS license or a FortiGate FortiClient Telemetry license, Fortinet support is not provided.