How to install Radeon driver without software
by Tashreef Shareef
Tashreef Shareef
Windows & Software Expert
Tashreef Shareef is a software developer turned tech writer. He discovered his interest in technology after reading a tech magazine accidentally. Now he writes about everything tech from… read more
Updated on
Affiliate Disclosure
- If you want to install a Radeon driver without software on a Windows computer, it can be a tricky thing to do.
- The easiest way to install required drivers without the Adrenalin software is to use a dedicated driver updater tool.
- To do things manually, simply use the Device Manager as described in the procedure below.
- When everything fails, do not hesitate to take advantage of the Adrenalin installer package.
XINSTALL BY CLICKING THE DOWNLOAD FILE
To fix various PC problems, we recommend DriverFix:
This software will keep your drivers up and running, thus keeping you safe from common computer errors and hardware failure. Check all your drivers now in 3 easy steps:
- Download DriverFix (verified download file).
- Click Start Scan to find all problematic drivers.
- Click Update Drivers to get new versions and avoid system malfunctionings.
- DriverFix has been downloaded by 0 readers this month.
AMD offers drivers for its GPUs and CPUs through its proprietary software. Using the software, you can update existing drivers to install updates or set up new hardware on a new computer.
However, what if you want to find out how to install the Radeon driver without Adrenalin software? You may require to install the Radeon driver this way if you determine the utility to be causing system instability or crashes.
Fortunately, AMD and Windows make it easy and offer multiple ways to update the driver. In this article, we show you how to install AMD drivers without Adrenalin software on your PC.
How to manually install AMD drivers?
If Windows prevents the installation of AMD drivers, then your only option is to update them manually, and you can do that from the Device Manager.
Keep in mind that regular methods won’t work, so to update AMD Radeon drivers, you’ll need to use a different approach.
To learn how to do it, you might want to visit our guide and learn how to install older AMD drivers, or you can just follow the solutions listed in this guide.
How do I install the Radeon driver without software?
1. Install drivers with Device Manager
- Make sure to close any AMD programs that are running. Use the Task Manager to end the process.
- Next, go to the AMD download centre and download the ADM driver package you want to install.

- Next, download the AMD clean-up tool. Double-click on the AMDCleanupUtility.exe file to run the tool. When the Safe Mode prompt appears, click Yes. Wait for the computer to boot into Safe Mode.
- In Safe Mode, click OK to remove AMD drivers and applications from your computer. This will remove all the AMD drivers, including the graphics card, audio, and Radeon software.
- Follow on-screen instructions to reboot your computer.
Install new drivers
- Open Device Manager. To do this, press the Windows key + R to open Run.
- Type devmgmt.msc and click OK.
- In Device Manager, expand the Display Adapters section.
- Right-click on your AMD GPU and choose Update Driver.
- Choose Browser my computer for driver software.
- Next, click on Let me pick from a list of available drivers on my computer.

- Click the Have Disk button.
- Navigate to the following location depending on where you have stored the download driver package.
C:\AMD\Win10-64Bit-Radeon-Software-Adrenalin-XXXXX\Packages\Drivers\Display\WT6A_INF - Select the C0XXXXXX.inf file. XXX is the file version, so it could change depending on when you update the driver.
- Click OK, choose a card from the list, then click Next.
- Windows will now install the driver from the selected package without installing the Radeon software.
Expert tip:
SPONSORED
Some PC issues are hard to tackle, especially when it comes to corrupted repositories or missing Windows files. If you are having troubles fixing an error, your system may be partially broken.
We recommend installing Restoro, a tool that will scan your machine and identify what the fault is.
Click here to download and start repairing.
If this method did not work for you or if you want to install some drives from the Adrenalin 2020/2021, you can do it from the Device Manager.
After installing the GPU driver, if you notice any mismatch, check out this guide to fix the Radeon settings and driver do not match issue.
2. Install AMD drivers manually from the AMD Adrenalin software
- Download the Adrenalin 2021 software package to your computer.
- Run the Adrenalin package and copy the installation path that is shown on the screen. Save the file path in a notepad file just in case you clear your clipboard.
- Click on Install. This will not install the tool yet but will begin the extraction process.
- Once extraction is complete, an Adrenalin screen will appear. Click the Cancel button on the left corner to abort the installation. Click Yes to confirm the action.
- Next, open Device Manager and expand the Display adapters section.
- Right-click Microsoft Basic Display Adapter and choose Update Driver.
- Click on Browser for drivers on your computer.
- In the location field, paste the copied location from the Adrenalin installation setup.
- Click Next and proceed with the on-screen instructions to complete the installation.
Up next, launch any hardware information tool to check if you have the latest version of the AMD Radeon drivers installed.
You can have many reasons for not installing the AMD Radeon software to install the drivers. The additional tools such as benchmarking, gaming, and social media tools that come with the Radeon software could be useless to some users.
While you will not have access to any of the Radeon software tools, you can install the AMD Radeon driver without software by following the steps in this article.
For simplicity, sometimes it’s better to use specialized software such as DriverFix. Doing so will make the whole process faster, and fully automated, so you might want to try it out.
Let us know if you managed to do so in the comments area below.
Was this page helpful?
Start a conversation
Share
Copy link
Newsletter
Software deals
Friday round-up
I agree with the Privacy Policy regarding my personal data
atihowto — Debian Wiki
This page does not exist yet. You can create a new empty page, or use one of the page templates.
Create new empty page
|
Or choose a page template to create an already-formatted page: |
Before creating the page, please check if a similar page already exists. Here are some existing pages with similar names: |
|
|
 debian.org/effortsTemplate
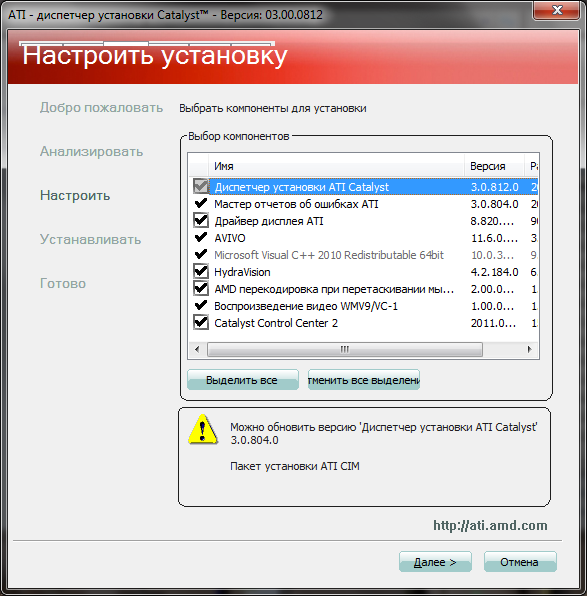
What the ATI Catalyst Custom Install Options Mean — Network Administration
by adminPosted on
I posted a guide to the NVIDIA Driver Installation Process yesterday that covered all the add-ons that are installed with the Express Install option. Most of these features may not be needed, but are still installed by most users, which can mean additional startup items and processes running in the background. I promised to do the same for the ATI Catalyst installation.
I don’t have an ATI card right now, which makes things a bit more difficult since I can’t test the effect of not having components in the system. However, I can explain what each component is for, so you can customize your installation and avoid installing components that can add startup items and processes to the system, even though you might not use their features at all.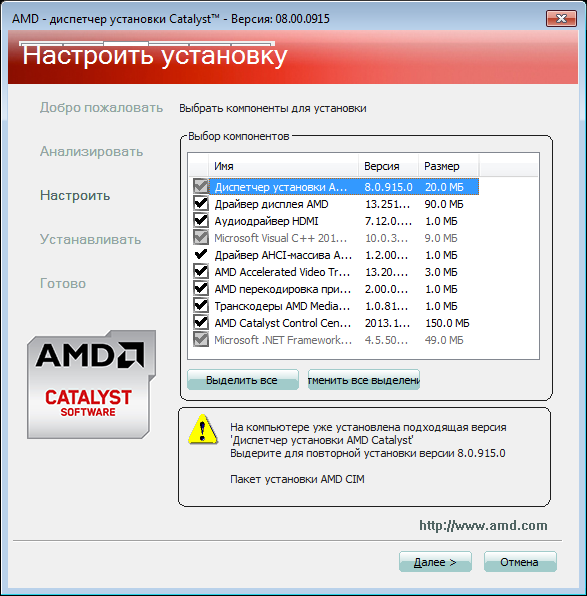
- AMD APP SDK Runtime — This is the SDK runtime that you will need if you use programs that use OpenCL. If you are unsure, I would advise you not to install it and see what happens. You can run the installer at any time later to install the component if you need it.
- ATI Display Driver — Obviously you need to install a driver to get the most out of your graphics card.
- HDMI/DP Audio Driver — This is similar to NVIDIA’s HD Audio Driver. You only need it if you use sound over HDMI, such as when you connect the card to an HDTV.
- AVIVO — Software package for using the GPU for video related tasks, including video decoding, encoding and processing. You only need to install this if you are using software that uses it, and only if you want it to be used.
- HydraVision is AMD’s multi-monitor management software that provides you with virtual desktops and the ability to effectively manage those virtual or physical desktops, among other things.
 You don’t need to install software even if you have multiple monitors connected to your computer as they will work fine without HydraVision.
 - AMD Drag and Drop Transcoding — Seems useful only if you are running Windows 7 or newer versions of Windows and are connecting portable media players to a system that uses Windows 7 Device Stage. Chances are you won’t, and even if you do, you have other options for transcoding files to put them in a media player.
- wmv9 vc-1 video playback — I haven’t been able to learn much about this component, it seems to speed up playback of WMV9 video content. I wouldn’t mind it and would say it’s really not needed unless you play a lot of wmv9 video files. Also only seems to be compatible with Windows 7 or newer.
- Catalyst Control Center — This is an optional component. Install if you want to tinker with settings and not use third party alternatives like ATI Tray Tools or Riva Tuner.

Hope this helps AMD/ATI users who are having trouble deciding what to install during driver installation. If you have questions or corrections, shoot.
Posted in Optimization
See all entries from
How to Install the Latest Radeon Driver in Ubuntu / Mint
0016 Version 12.4 drivers Catalyst from AMD, this is the last one available to cardholders Radeon 2000/3000/4000 and how could it be less, this version does not support X.org 1.12.
Ubuntu y mint By default they come with free drivers, for sure many who have a laptop have noticed temperatures higher than the proprietary driver, and in some cases, like mine, 15-20 degrees higher. Looking for Phoronix I found this to be true, and I wasn’t the only one suffering from this problem, so I started researching and decided to find a solution.
First we install via this PPA made by User Phoronix, latest git xorg-server-radeon and ati, latest table etc.
Perform the following steps:
Add ppa:
 sudo add-apt-repository ppa:oibaf/graphics-drivers
 sudo apt-get update
 sudo apt-get dist-upgrade
PPA site: https://launchpad.net/~oibaf/+archive/graphics-drivers
The above step is done if we already have the drivers that are included by default in Ubuntu / Mint otherwise we have to uninstall driver fglrx via Synaptic .
After that we will install the vdpau package
sudo apt-get install vdpau-va-driver
To make it work, install package
sudo echo "low" > /sys/class/drm/card0/device/power_profile
Since the change will be temporary, we do the following to make the system always start from low:
sudo nano /etc/rc .local
and inside we write:
echo "low" > /sys/class/drm/card0/device/power_profile
We did it, save.