10.2.5. Possible problems and solutions | usermanual
10.2.5. Possible problems and solutions | usermanual | darktable
- English
- French
- Italian
- Spanish
- German
- Polish
- Brazilian Portuguese
10.2.5. Possible problems and solutions
darktable will detect OpenCL run-time problems automatically. It will then reprocess
everything on CPU; only speed is affected, the final result should not be endangered.
There can be various reasons why OpenCL could fail during initialization phase. We depend
on hardware requirements and on the presence of certain drivers and libraries. In addition
all these have to fit in terms of maker model and revision number. If anything does not
fit, e.g. your graphics driver (loaded as a kernel module) does not match the version of
your libOpenCL.so, OpenCL support is likely not available.
In that case, the best thing to do is start darktable from a console with
darktable -d opencl
This will give additional debugging output about the initialization and use of OpenCL.
First see if you find a line that starts with “[opencl_init] FINALLY …”
This should tell you, if OpenCL support is available for you or not. If initialization
failed, look at the messages above for anything that reads like “could not be
detected” or “could not be created”.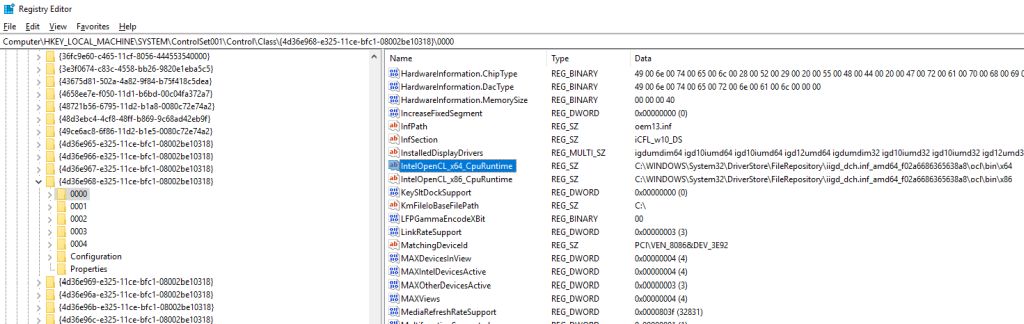 Check if there is a hint about
where it failed.
Here are a few cases observed in the past:
-
darktable might tell you that no OpenCL aware graphics card is detected or that the
available memory on your GPU is too low and the device is discarded. In that case you
might need to buy a new card, if you really want OpenCL support. -
darktable might find your libOpenCL.so but then tell you that it couldn’t get a
platform.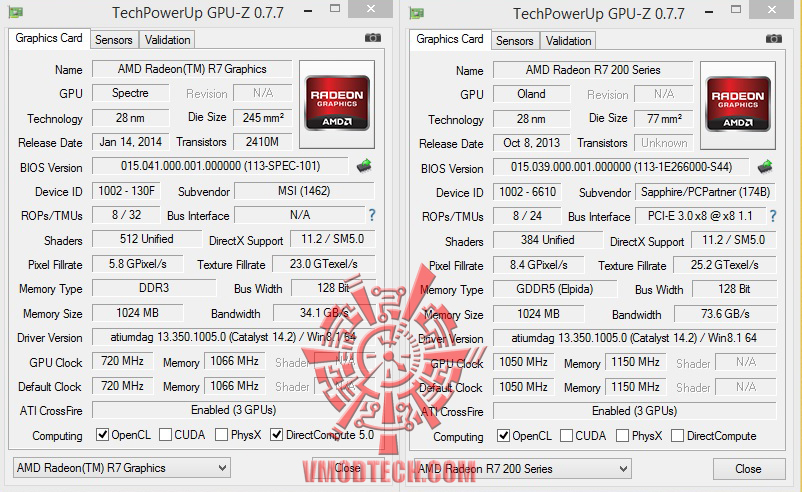 NVIDIA drivers will often give error code -1001 in that case. This happens
because libOpenCL.so is only a wrapper library. For the real work further
libraries – specific to vendor, device and driver – need to be
loaded. This failed for some reason. There is a structure of files in /etc/OpenCL on
your system that libOpenCL.so consults to find these libraries. Check if you find
something fishy in there and try to fix it. Often the needed libraries cannot be found
by your system’s dynamic loader. Giving full path names might help. -
darktable might also tell you that a context could not be created.
 This often indicates
a version mismatch between (loaded) graphics driver and libOpenCL. Check if you have
left-over kernel modules or graphics libraries of an older install and take appropriate
action. In doubt, make a clean reinstall of your graphics driver. Sometimes, immediately
after a driver update, the loaded kernel driver does not match the newly installed
libraries: reboot your system in that case. -
darktable might crash in very rare cases directly during startup. This can happen if
your OpenCL setup is completely broken or if driver/library contains a severe bug. If
If
you can’t fix it, you can still use darktable with option
“—disable-opencl”, which will skip the entire OpenCL initialization step. -
darktable might fail to compile its OpenCL source files at run-time. In that case you
will get a number of error messages looking like typical compiler errors. This could
indicate an incompatibility between your OpenCL implementation and our interpretation of
the standard. In that case visit us in IRC in #darktable on FreeNode or on the
developers mailing list at darktable-dev@lists. darktable.org and report the problem.
Chances are good that we can help you. Please also report if you see significant
differences between CPU and GPU processing of an image!
There also exists a few on-CPU implementations of OpenCL. These come as drivers provided
by INTEL or AMD. We observed that they do not give us any speed gain versus our
hand-optimized CPU code. Therefore we simply discard these devices by default. This
behavior can be changed by setting the configuration variable opencl_use_cpu_devices to
TRUE.
rendering — OpenCL detection bug
Ask Question
Asked
Modified
2 years, 5 months ago
Viewed
4k times
I’m new to Adobe Premiere and GPU acceleration. I started to follow simple tutorial on editing video with Premiere Pro CC that I had «Stopped Working» error after seconds when I hovered on my video or dragged it. Found that problem is because of OpenCL. So I put my settings to «Software Only» to have just CPU rendering.
My hardware and software:
- HP ProBook 450 G1
- Microsoft Windows 8.1 X64
- AMD Radeon 8600/8700M
- 14.12 AMD Catalyst Omega Software
- Intel HD 4600
- AMD APP SDK 2.9
- Microsoft Visual Studio Ultimate 2013
(For web developing. I’m not a CPP programmer.)
- Adobe Premiere Pro CC
I used GPU-Z to have details about my AMD GPU and I saw that OpenCL is disabled and other one (Intel) is enabled.
Image
So I used /program files/adobe/adobe premiere pro cc/gpusniffer.exe and this is the output:
Found 2 devices supporting GPU computation. OpenCL Device 0 - Name: Intel(R) HD Graphics 4600 Vendor: Intel Capability: 1.2 Driver: 1.2 Total Video Memory: 1348MB * Not enabled by default because it did not match the named list of cards. OpenCL Device 1 - Name: Oland Vendor: AMD Capability: 2 Driver: 1.2 Total Video Memory: 2048MB
I read all the docs of APP SDK but I didn’t find anything except this one:
Output of /windows/system32/clinfo.exe
Compiler available: Yes Execution capabilities: Execute OpenCL kernels: Yes Execute native function: No Queue properties: Out-of-Order: No Profiling : Yes Platform ID: 00007FFBA45D6B60 Name: Oland Vendor: Advanced Micro Devices, Inc. Device OpenCL C version: OpenCL C 1.2 Driver version: 1642.5 (VM) Profile: FULL_PROFILE Version: OpenCL 1.2 AMD-APP (1642.5)
What should I do in order to enable OpenCL in GPU-Z for my AMD Radeon GPU?
Thanks.
- rendering
- opencl
- adobe-premiere
- amd-gpu
After two weeks Googling for my problem I found my answer in playing with regedit.
To have fun with OpenCL on Windows 8.1 and AMD Radeon we must do these:
- Only use
AMD Catalyst Control Centerdownloaded from AMD official website. (For me, installer downloaded fromHP Support Centerdidn’t work. I think because it didn’t contains some packages.) - Download and install
AMD APP SDKfromAMD Developersofficial website. - Go to
C:\Program Files (x86)\AMD APP SDK\2.9\bin. (It will be different based on your version.) - Copy and replace files from
x86folder (OpenCL.dllandamdocl.) to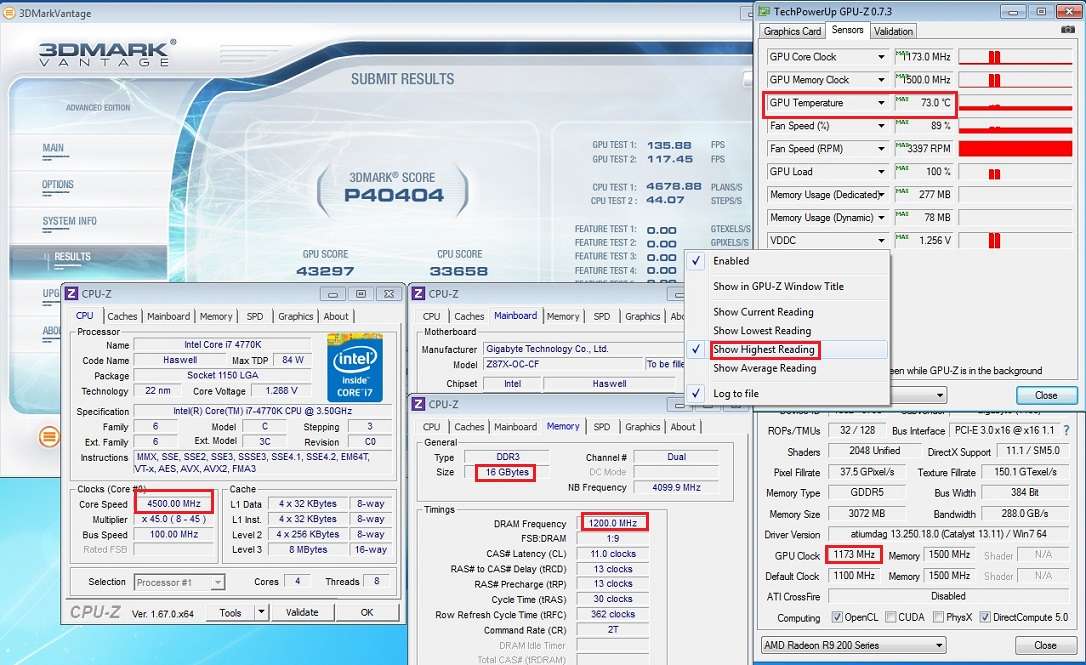 dll
dllC:\Windows\SysWOW64. - Copy and replace files from
x86_64folder (OpenCL.dllandamdocl64.dll) toC:\Windows\System32.
Note:OpenCL.dllfiles are different with each other. Pay attention. - Open
Startand typeregeditinsearchorRUN. - Go to
Computer\HKEY_LOCAL_MACHINE\SOFTWARE\Khronos\OpenCL\Vendors\. - Add
amdocl64.dllasDWORD (32-bit) Value. (Do not edit it after creation!) - Navigate to
Computer\HKEY_LOCAL_MACHINE\SOFTWARE\Wow6432Node\Khronos\OpenCL\Vendors\. - Add
amdocl.dllasDWORD (32-bit) Value. - Restart windows (Because of
Catalyst) and startCatalyst. - In
Premierego toFile -> Project Settings -> General -> Video Rendering and Playbackand setRenderertoMercury Playback Engine GPU Acceleration (OpenCL).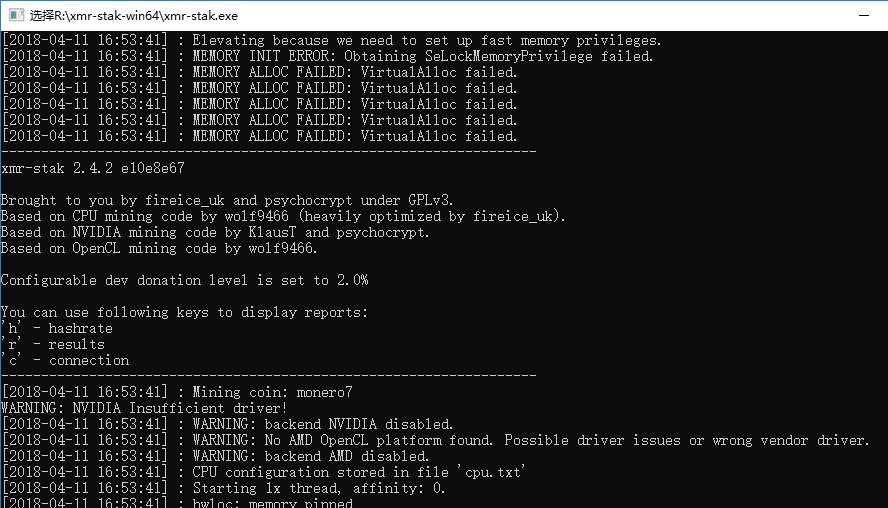
Note: In Registry Editor, 0 means true (enabled) and 1 means false (disabled) for OpenCL.
Note: regedit must run as administrator.
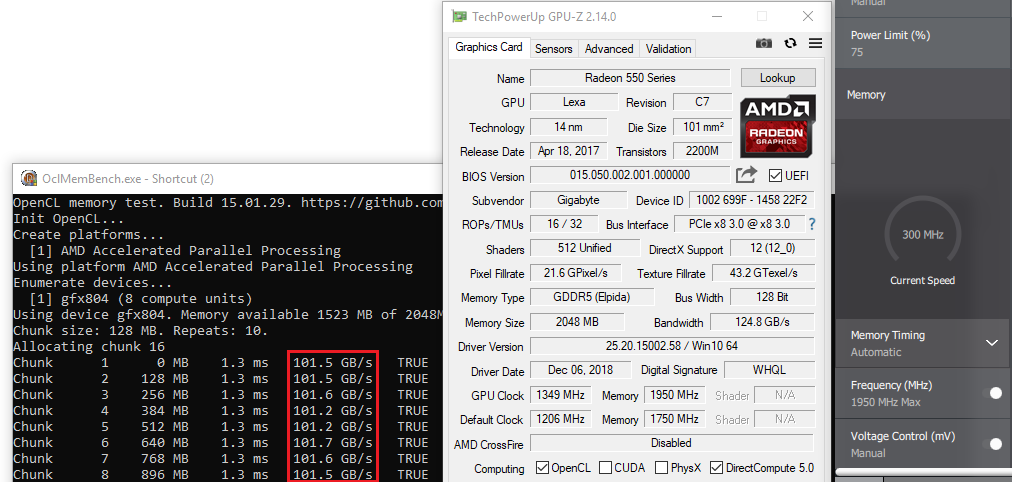
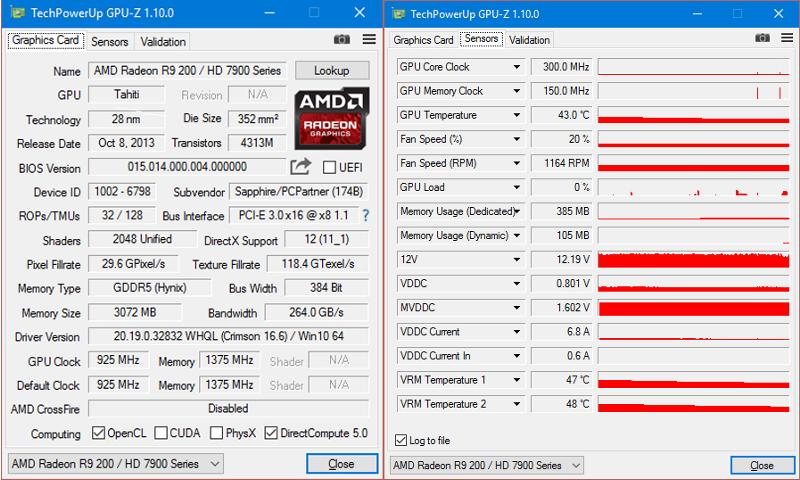
Done! Adobe Premiere Pro CC works fast and fine. Note: GPU-Z will not show OpenCL enabled. I think because its old version.
Image
1
Sign up or log in
Sign up using Google
Sign up using Facebook
Sign up using Email and Password
Post as a guest
Required, but never shown
Post as a guest
Required, but never shown
Full Opencl.
 dll Problems in Windows 10, 8.1, 7
Author Oleg Belov Reading 7 min. Views 1.3k. Posted by
Although Windows 10 is becoming the most popular Windows on the market, it still has bugs. Speaking of errors, users have reported problems with opencl.dll on Windows 10 and today we will try to fix it.
Contents
- How to fix Opencl.dll problems in Windows 10
- Solution 1: Update your graphics cards
- Solution 2: Use a Windows image file
- Solution 3 – Copy the missing file
- Solution 4 – Download the latest OpenCL runtime package
- Solution 5 – Uninstall your graphics card drivers and run a DISM scan
- Solution 6: Prevent automatic driver updates
- Solution 7: Disable the dedicated graphics card
- Solution 8: Run a DISM and SFC scan.
- Solution 9 – Install the latest updates
Opencl.dll is an important file and if this file is missing, you may encounter various problems. Speaking of issues, here are some issues reported by users:
- Opencl.dll is missing Windows 10, 8, 7 . According to users, this problem can appear on any version of Windows, but you should be able to fix the problem using one of our solutions.
- Opencl.dll corrupted . Sometimes this file can get corrupted, but you can fix the problem simply by using the Windows 10 ISO file and the DISM command.
- Opencl.dll is missing from your computer . If this file is missing from your computer, you will not be able to run certain applications, but you can always copy the file from another computer.
- AMD is missing from Opencl.dll. According to users, this problem can occur due to your graphics card drivers, and in order to fix this problem, you just need to update your drivers to the latest version.
-
Opencl.dll could not be found . Sometimes the necessary files may not be found, but you should be able to fix the problem simply by installing the latest Windows updates.
Solution 1: Update your video cards
As we mentioned, opencl.dll is related to your graphics card, so it’s worth checking for the latest driver updates. To do this, go to the website of the manufacturer of your video card and find the model of your video card. Check for the latest drivers and install them. Once the latest drivers have been installed, check if the issue has been resolved.
We also recommend this third party tool (100% safe and tested by us) to automatically download all outdated drivers to your PC.
- READ ALSO: How to fix mfc100.dll errors in Windows 10, 8.1
Solution 2: Use the Windows image file
To do this, you will need a Windows 10 ISO of the same assembly that you installed. We should mention that this solution is a bit more advanced, so if you don’t know how to do it, it might be best to consult a specialist.
-
Mount the ISO image.

- Run Command Prompt as administrator.
-
Create a temporary directory to mount the Windows image file using the following command:
- MKDIR C: WIM
-
Mount the WIM file:
- Dism/Mount-Wim /WimFile:D:sourcesinstall.wim/index: 1/MountDir: C:WIM/ReadOnly
- Run DISM:
- Dism/Online/Cleanup-Image/RestoreHealth/Source: C:WIMWindows/LimitAccess
-
Once the process is complete, unmount the image and delete the folder created in step 3:
- Dism/Unmount-Wim/MountDir: C:WIM/Discard
- rmdir C: WIM
- Restart your computer.
Solution 3 – Copy the missing file
According to users, one of the ways to fix the Opencl.dll problem is to manually copy the missing file. To do this, it’s usually best to copy the file manually from another computer.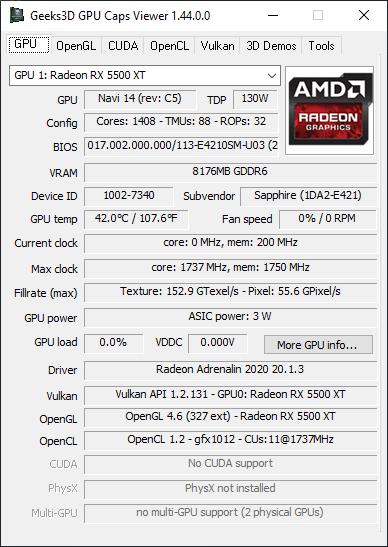
To fix the problem, simply copy the file to the C:WindowsSystem32 directory. If you’re running a 64-bit version of Windows, you’ll also need to copy the missing file to the C:WindowsSysWOW64 directory.
Before copying these files, be sure to back up the original files just in case. After you overwrite the original files, you will need to check in the new files. To do this, just do the following:
- Press Windows Key + X to open the Win + X menu. Now select Command Prompt (Admin) or PowerShell (Admin) .
- Now enter the command regsvr32 opencl.dll and press Enter .
After doing that, the problem with the DLL file should be resolved.
Several users have reported that you can copy the file from another directory on your computer. According to users, the file is located in the Nvidia drivers directory and you just need to copy it by following these steps:
-
Change to directory C:Program FilesNVIDIA CorporationOpenCL .
 Locate OpenCL64.dll , right click it and select Copy from the menu.
- Go to directory C:WINDOWSSystem32 and paste the file there. Be sure to change its name from OpenCL64.dll to OpenCL.dll .
After that, the issue should be resolved and everything will start working again.
- READ ALSO: How to Fix DLL Errors in Windows 10, 8, 8.1
Solution 4 – Download the latest OpenCL runtime package
If you have problems with Opencl.dll, you might be able to fix this problem simply by downloading the OpenCL runtime package. According to users, you can download the OpenCL runtime directly from the Intel website.
After downloading the runtime, run the setup file to install it. Once everything is installed, the issue should be resolved.
Solution 5 – Uninstall your graphics card drivers and scan with DISM
According to users, Opencl. dll is related to your graphics card drivers, and in order to fix this problem, it’s advised to uninstall your graphics card drivers and switch back to the default drivers. To do this, simply follow these steps:
- Press Windows Key + X and select Device Manager from the list.
- Locate your video card driver, right click it and select Delete device .
- A confirmation menu will appear. If available, click the Uninstall software for this device button. Now press the button Delete .
- After uninstalling the driver, click the Scan for hardware changes icon and your system will automatically install the missing drivers.
Alternatively, you can uninstall your drivers with a third party solution like Uninstall display driver . This is a free third party utility that can remove any display driver along with all its files from your PC.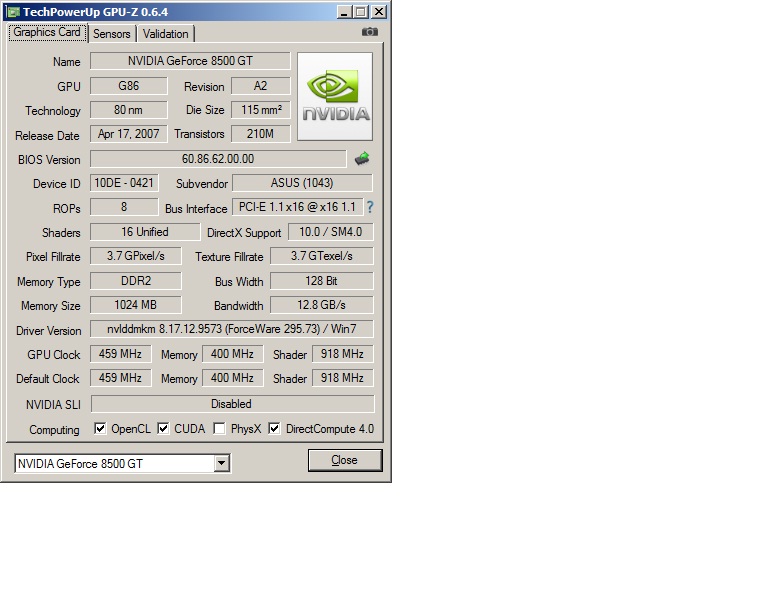
After uninstalling the driver, repeat the steps from Solution 2 to restore the system.
Solution 6: Prevent automatic driver updates
According to users, in order to fix this issue, you should prevent your graphics card driver from updating automatically. If you already have a video card driver installed, be sure to uninstall it from Device Manager .
Now you need to prevent Windows from automatically updating the driver. After that, download the latest driver from the graphics card manufacturer and install it. After installing the driver, the problem with opencl.dll will be completely resolved.
- READ ALSO: Full Fix: Autorun.dll errors in Windows 10, 8.1, 7
Solution 7: Disable the dedicated graphics card
Problems with Opencl.dll are usually due to your graphics card drivers, and if you are unable to resolve the issue, it is advised to temporarily disable your dedicated graphics card.
Keep in mind that this is just a workaround and until the proper drivers are released it is recommended that you use the integrated graphics card. Your built-in graphics card may not be able to handle the latest games, but at least your computer will be stable so you can perform the most basic tasks without issue.
To disable a dedicated graphics card, be sure to check the graphics card software on your PC. In addition, you can disable the video card directly from BIOS .
Solution 8 – Perform a DISM and SFC scan
Users have figured out which directory is causing problems with opencl.dll, and in order to fix this problem, you just need to run a DISM and SFC scan. To do this, simply follow these steps:
- Mount the Windows 10 ISO image.
- Run Command Prompt as administrator and run the following commands:
-
Dism/Online/Cleanup-Image/RestoreHealth /Source:esd:F:sourcesinstall.
 esd1WindowsWinSxSwow64_microsoft-windows-r..xwddmdriver-wow64-c_31bf3856ad364e35_10.0.10586.0_none_3dae054b
- sfc/scannow
After that, the problem should be completely resolved.
Solution 9 – Install the latest updates
It might just be a Windows 10 bug, and like most Windows bugs, you can fix it with the latest updates. Microsoft is hard at work fixing various Windows issues, and if you want to make sure your system is bug-free, it’s a good idea to keep it up to date.
By default, Windows 10 installs missing updates automatically, but sometimes you might miss one or two updates. However, you can always check for updates manually by doing the following:
- Press Windows Key + I to open the Settings app .
- Go to Update and Security .
- Press button Check for updates .
Windows will now check for available updates and download them automatically in the background.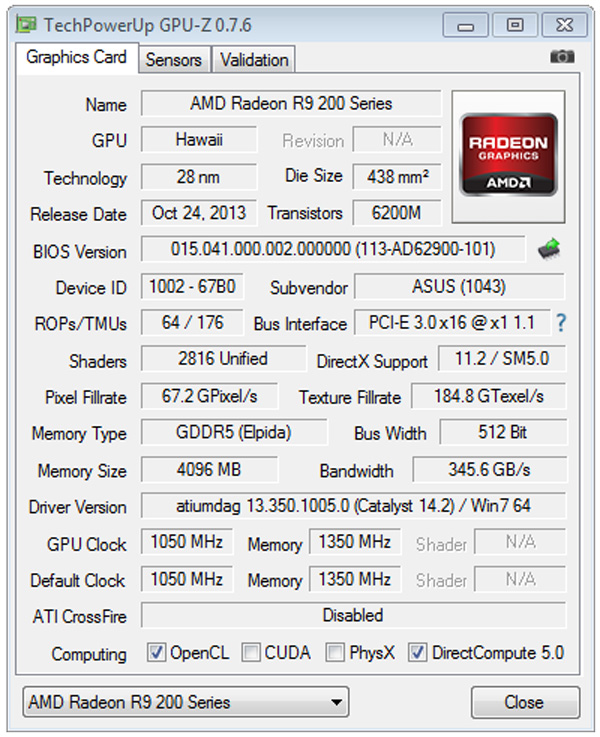 After downloading the updates, restart your computer to install them and the issue should be completely resolved.
That’s all, I hope this article has helped you solve problems with Opencl.dll on your computer. To learn more about fixing missing DLLs in Windows 10, check out this article.
If you have any comments or questions, just write them down below.
Editor’s Note . This post was originally published in January 2016 and has since been completely revised and updated to ensure freshness, accuracy and completeness.
Troubleshooting atikmdag sys blue screen error
Most often, atikmdag sys blue screen error occurs due to an incorrectly installed or corrupted AMD/ATI Radeon video card driver. And in most cases, reinstalling or updating helps to solve the problem, but not everything is so simple and simple, there may be other problems.
Check out the similar «atikmpag sys» failure, maybe some solutions will come in handy.
Let’s touch on this topic in more detail and try to fix everything ourselves.
Contents of the article
- Uninstalling installed drivers
- Installing fresh drivers
- Blue screen after update
- File replacement
- Atikmdag.sys error with code 0x0000003
- Other types of errors and common solutions
- User comments
0012
Removing installed drivers
First of all, I suggest removing already installed drivers. I recommend doing this using the Display Driver Uninstaller utility. Its main advantage is that it completely removes the drivers from the system, cleaning up all the tails (the remaining folders and entries in the registry). Works on all operating systems, including Windows 7, 8, 10.
Only a complete removal can guarantee the effectiveness of a new installation.
Before proceeding with the uninstall procedure, download the latest version of the drivers. You can find them on the manufacturer’s website. Come in, choose your video card model, choose your version of Windows and download.
Let’s get started:
- The program is free and does not require installation. Therefore, we download it from the official site and launch it.
- It is very important to carry out all actions from safe mode. Otherwise, you may get a black screen or other errors. Therefore, we boot from it and move on.
- We launch the utility, select the manufacturer of the video card, for convenience, set the «Russian language» and click on the «Delete and restart» button.
- The program will automatically start searching for and deleting all leftovers.
Wait for the uninstall process to complete, restart your computer, and re-enter Safe Mode.
If for some reason this utility did not suit you, there are other similar analogues, for example, Revo Uninstaller, Your Uninstaller and others. You can use them.
Installing fresh drivers
After the uninstallation has been successfully completed, you can start a clean installation.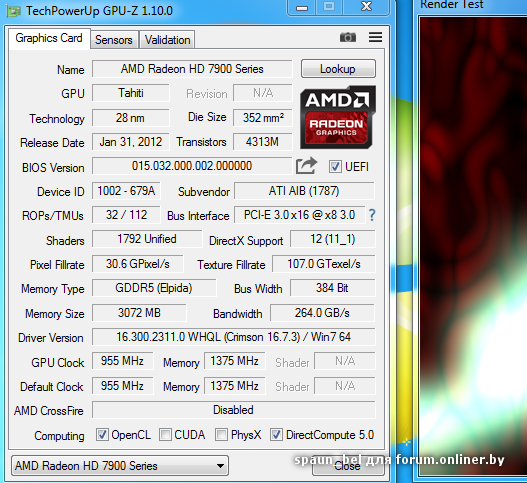
You should already have the latest software downloaded.
In fact, everything is simple here, perhaps the only rule, especially for beginners: install everything automatically, ticking all the items that the program offers us.
More details:
- After starting the installer, we will be offered 2 installation options: «Express» and «Custom». If you do not have the necessary experience and necessary knowledge, choose the first one.
We are waiting for the end of the procedure, restart the PC and start it in normal mode.
If you did everything correctly, according to the instructions, then the blue screen (BSOD) with the atikmdag sys error will be resolved.
A blue screen appears after updating
It is also rare for a blue screen to appear after updating Windows or graphics card drivers. In both cases, rolling back the system to a working state can help.
In the second case, you can also do the following:
- In the Device Manager, go to the «Display adapters» tab and right-click on your graphics card, then click «Properties».
- Go to the Driver section and click Roll Back.
- Action needs to be confirmed.
After completing the procedure, do not forget to restart your computer.
If this was the problem, the blue screen will no longer appear.
File replacement
The fact is that when you install fresh software for the video card, the old version of the atikmdag.sys file is moved to the «System32\Drivers» directory, as a result of which Windows uses the old version, and the new one remains unused. Because of this, a blue screen appears.
So let’s try to fix the atikmdag sys BSOD error by replacing the old file with the new one.
To do this:
- Download and install the latest drivers for the video card.
- Then go to the partition with the installed OS, usually the «C» drive. Next, in the “Windows / System32 / Drivers” folder, find the atikmdag.sys file and give it a new name Atikmdag.sys.old.
- Now we go to the «C» drive, open the «ATI» folder, find the Atikmdag.
 sy_ file and copy it to the desktop.
 - Open a command prompt. How to do it in Windows 10 read here. Some of the considered methods are universal and are suitable even for Windows XP,7,8.
- Enter the following: chdir Desktop and press «Enter».
- Now we perform the replacement procedure by typing the command EXPAND.EXE atikmdag.sy_ atikmdag.sys and pressing «Enter».
- Copy the new version of the file from the desktop to the «Drivers» folder and restart the PC.
The blue screen should no longer appear.
atikmdag.sys error with code 0x0000003
As a rule, the problem is fixed quite easily, you just need to download the official patch from Microsoft. You can find it here. Before installing it, do not forget to enable automatic updates.
Turning off the quick launch feature
Also, the blue screen can only appear under certain circumstances, for example, when exiting sleep mode, then changing the startup settings can help.
Make sure you are logged in as an administrator before proceeding with the specific steps.
In order to change the settings, you need to:
- Click on the start, enter «Power» in the search bar and go to the required section.
- In the menu on the left, click on «Button Actions» and go inside the settings.
- At the top of the window, click «Change settings».
- Remove the checkmark from the quick launch item and click «Save».
Reboot the system.
Other types of errors and common solutions
There are other types of atikmdag.sys related errors that you may encounter. For example, Windows 8/10 users very often see a blue screen with a system service exception error. It indicates problems in the video card driver, and is fixed by reinstalling them, which we talked about at the beginning of the article.
So we’ve covered the main types of problems associated with a particular file, but there may be other problems:
- Malfunction of the hard drive, errors in system files, power supply, RAM, motherboard or the video card itself.
