Best PC fans in 2022
Getting the best PC fans might be the last thing on your mind after sinking hundreds or even thousands into your setup, but don’t underestimate how important it is to keep your gaming PC cool. If even a single component overheats, it throws the whole rig into disarray and can result in a janky frame rate or even a system-wide shutdown.
You can’t just chuck any old blowers in your case, either, as even the best gaming PC falters without the right PC fans in all the correct places to support it. It’s difficult to go wrong with premium brands like Noctua, be quiet, Cooler Master, or Thermaltake, but you’ll first need to check whether they’ll fit in your PC case, you want coolest or most silent PC possible, and what kind of fans you need as airflow models are different from the static pressure fans you need for the best AIO cooler.
Once you’re sure everything’s compatible, you’ll need to consider the amount of air your case takes in versus how much it exhausts. Ideally, you’ll want either the same amount or more air coming into your case, but we’ll run through everything you need to know after presenting you with our selection of the best PC fans.
Here are the best PC fans in 2022 that can stop thermal throttling and help boost fps:
- Noctua NF-S12B redux-1200 PWM – our favourite PC fans
- Be quiet! Light Wings – RGB at its best
- Cooler Master MF120 Halo – fantastic budget RGB fans
- Be quiet! Silent Wings 3 – less than whisper quiet
- Thermaltake Toughfan 12 Turbo – ideal for AIO coolers
- Noctua NF-A12x15 – a top small form factor fan
- Phanteks Halos RGB Lux Fan Frame – add RGB to fans without lighting
1. Best PC fans
The best PC fans all-round are the Noctua NF-S12B redux-1200 PWM.
Expect to pay from $15 USD / £13 GBP.
You might know Noctua as the company that douses its fans in beige and brown, but this grey blower packs a huge punch for its price. As the perfect embodiment of the ‘why not both’ meme, the Noctua NF-S12B redux-1200 PWM refuses to compromise between noise and airflow, delivering a whopping 59.2CFM airflow at just 18.1dBA.
It’s possible to go even quieter, but the NF-S12B isn’t just our favourite overall fan, it’s one of the best cheap PC fans. A few decibels sacrificed are worth the cost and it’s still the second quietest fan on this list – you can use Noctua’s anti-vibration mounts if you want to pull out all the stops.
Noctua is almost entirely function over form as the two-tone colour will divide plenty of PC gamers, but there is a solution at the bottom of this list if you want to add RGB and complete the trifecta. Yes, you read that right, you can add RGB to a fan.
Pros
- Great at cooling components
- Quiet
- Very affordable
Cons
- Colour scheme clashes with most builds
- Doesn’t manage cables with daisy chaining
| Noctua NF-S12B redux-1200 PWM | |
| Sizes (mm) | 120mm |
|---|---|
| Airflow (CFM) | 59. 2 2 |
| Speed (RPM) | 400 – 1,200 |
| Noise (dBA at max speed) | 18.1 |
| Connector | Four-pin PWM (also in three-pin) |
| Lighting | None |
| Type | Airflow |
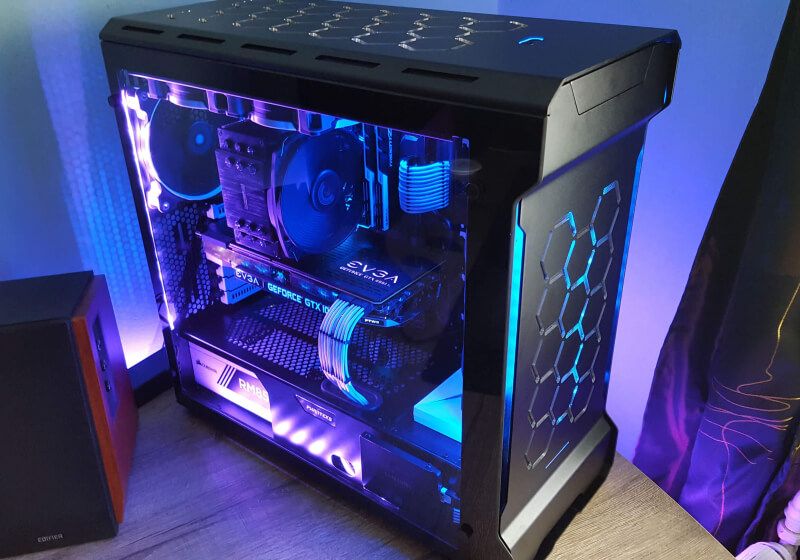
2. Best RGB fans
The best RGB fans are the Be quiet! Light Wings.
Expect to pay from $32 USD / £20.99 GBP.
There’s no beating around the bush, Be quiet! is all about living up to its name and keeping things hush. Fortunately, its first attempt at a splash of colour is no exception, as the Light Wings are the quietest RGB fans we’ve ever used. The ring light itself packs 18 LEDs in the 120mm model and 20 LEDs in the 140mm version, each of which is addressable in your motherboard’s software.
You’re not stuck for selection, as Be quiet! not only sells Light Wings in 120mm and 140mm versions, but in both airflow and high-speed models so you can cater to the best AIO cooler. Single fans are on the expensive side, though, so it’s worth grabbing the triple-pack that also includes an ARGB hub. If you do end up buying one fan at a time, however, you can add it into the loop using a built-in daisy chain system, keeping your cables neat.
Pros
- Wonderful RGB lighting
- Good RPM to airflow ratio
Cons
- Pricey
- Not as quiet as Silent Wings
| Be quiet! Light Wings | |
| Sizes (mm) | 120mm (also in 140mm) |
|---|---|
| Airflow (CFM) | 41.51 |
| Speed (RPM) | 1,700 |
| Noise (dBA at max speed) | 20.6 |
| Connector | Four-pin PWM |
| Lighting | 18 ARGB LEDs |
| Type | Airflow (high-speed static pressure available) |
3. Best budget RGB fans
The best budget RGB fan is the Cooler Master MF120 Halo.
Expect to pay from $20 USD / £19.16 GBP.
Addressable RGB is in the DNA of the Cooler Master MF120 Halo, with two lighting rings that shine no matter whether you position it as an intake or exhaust. It cleverly uses white fan blades to better reflect the RGB across the entire face of the fan, which you can customise using Asus Aura Sync, MSI Mystic Light, ASRock Polychrome, or Gigabyte RGB Fusion.
The most impressive thing here is that Cooler Master undercuts the cost of most other premium fans, if you don’t mind some extra noise. The triple pack serves up a decent discount than if you buy each fan separately and includes Cooler Master’s controller, but this isn’t mandatory. MF 120 Halos are also compatible with any addressable Gen 2 RGB header on compatible motherboards. Besides, $30 per RGB fan is pretty reasonable, and you’ll regularly find them reduced.
Pros
- RGB with value
- Great build quality
Cons
- Not great with AIO coolers
- Best bought as a bundle
| Cooler Master MF120 Halo | |
| Sizes (mm) | 120mm |
|---|---|
| Airflow (CFM) | 47. 2 2 |
| Speed (RPM) | 600 – 1,800 |
| Noise (dBA at max speed) | 30 |
| Connector | Four-pin PWM |
| Lighting | 24 ARGB LEDs |
| Type | Airflow |
4. Best silent PC fans
The best silent PC fans are the Be quiet! Silent Wings 3.
Expect to pay $22 USD / £17.49 GBP.
It takes a lot to beat mainstays like Noctua in the audible department, but Be quiet! Silent Wings 3 fans are as silent as they come. Of course, noise scales with airflow, so you can expect them to blow a little lighter in exchange for their whisper quiet operation, but there’s still a stronger gust than most other fans on this list – perhaps due to its seventh blade.
Be quiet! assures that the six-pole motor should vibrate less than competitor devices, but just in case ships the Silent Wings 3 with anti-vibration corner fittings. It comes with a premium price, but you certainly get what you pay for with a solid build and three-year warranty should anything go wrong.
Pros
- Quietest fans around
- Rubber noise dampening mount
- PWM control
Cons
- Slightly less airflow than others
| Be quiet! Silent Wings 3 | |
| Sizes (mm) | 120mm (also in 140mm) |
|---|---|
| Airflow (CFM) | 50.5 |
| Speed (RPM) | 1,450 |
| Noise (dBA at max speed) | 16.4 |
| Connector | Four-pin PWM (also in three-pin) |
| Lighting | None |
| Type | Airflow |
5. Best AIO fans
The best AIO fan with static pressure is the Thermaltake Toughfan 12 Turbo.
Expect to pay $29.99 USD / £35 GBP.
The Thermaltake Toughfan 12 Turbo isn’t quite as bold of a statement as Noctua usually makes, but it sheds the traditional matte black coating for something a bit more eye-catching. It’s also what’s known as a static pressure fan instead of the usual lot you’d stick on the sides of your case.
Static pressure fans are built to shunt air through the grills of a radiator on an AIO cooler. The higher airflow is also handy in small form factor cases where space is tight and you can’t fit as many fans. It’s overkill for most, but you can fill your gaming PC solely with static pressure fans without issue, provided you can stomach the higher price tag.
Most static pressure fans make your gaming PC sound like a jet engine, but Thermaltake Toughfan 12 Turbo fans strike a fantastic balance of audio versus airflow. Once a fan hits its 2,500RPM ceiling, it only makes 28.1dBA of noise, which is loftier than most on this list but you’ll get a significantly higher airflow and 3.78mm-h3O of air pressure for your troubles.
Pros
- Great for liquid cooling radiators
- Well-built
Cons
- Expensive in single packs
| Thermaltake Toughfan 12 Turbo | |
| Sizes (mm) | 120mm (also in 140mm with Toughfan 14) |
|---|---|
| Airflow (CFM) | 72. 69 69 |
| Speed (RPM) | 500 – 2,500 |
| Noise (dBA at max speed) | 28.1 |
| Connector | Four-pin PWM |
| Lighting | None |
| Type | Static pressure |
6. Best slim fan
The best slim fan is the Noctua NF-A12x15.
Expect to pay $28 USD / £19.99 GBP.
The Noctua NF-A12x15 looks as though someone accidentally sat on an NF-A12x25, flattening it to give it a low profile. Regardless of how it got so slim, being just 15mm thick makes it ideal for small form factor (SFF) cases and CPU coolers when there isn’t a lot of clearance.
For its size, it’s pretty speedy at 1,850RPM. The 23.9dBA noise level really isn’t anything to scoff at, but you have the choice to lower this to a near-inaudible 16.8dBA if you use the low noise adapter it comes bundled with – just be prepared to sacrifice some airflow in the process. And, as with all Noctua equipment, you’ll get anti-vibration mounts to cement its silence.
Pros
- Tiny enough to fit in SFF PCs
- Built-in anti-vibration pads
Cons
- Pricey
- Brown and beige colourway
| Noctua NF-A12x15 | |
| Sizes (mm) | 120mm |
|---|---|
| Airflow (CFM) | 55.4 |
| Speed (RPM) | 450 – 1,850 |
| Noise (dBA at max speed) | 23.9 |
| Connector | Four-pin PWM (also in three-pin) |
| Lighting | None |
| Type | Airflow |
7. Best way to add RGB to non-RGB fans
The best way to add RGB to your PC fans is the Phanteks Halos RGB Lux Fan Frame.
Expect to pay $19.99 USD / £19.68 GBP.
Sacrificing the aesthetics of your gaming PC in favour of better cooling is a tough pill to swallow, which is why Phanteks has created the Halos RGB Fan Frames. You can pop these on pretty much any standard 120mm or 140mm fan provided you have an extra 6mm clearance, and it’ll add 30 LEDs per fan to brighten your setup. Do note that the lighting shines brightest when paired with white blades.
With the Lux version, you get full addressable RGB that you can control with Asus Aura and rainbow RGB with MSI Mystic Light. You can daisy chain multiple Halos together to better manage cables. And you can even choose between a black or silver frame, the latter of which pairs perfectly with our top pick.
If the Lux is a little too rich for your blood, there’s a standard Phanteks Halos RGB Fan Frame that drops addressable RGB in favour of solid colours. These aren’t quite as bright with fewer LEDs, but do the job brilliantly for the price.
Pros
- Adds RGB flair
- Relatively bright
Cons
- More wires
- Cost almost as much as new fans
5 Best PC Fan in 2022
5 Top Picks
2 Reviewers
25 Hours of Research
19 Options Considered
There is nothing that will kill your computer faster than overheating. Your data can be damaged, your computer can have a decreased life overall, and you can find yourself dead in the water just doing something as simple as trying to check your email. This has happened to me as I try desperately to breathe life into my older computers that hold all of my information. It was two computers too late when I discovered the magic of a good fan. So that’s why I’m here to share the best PC fans with you. I also recommend some of the best PC cases under $100 which we also reviewed.
3 Top PC Fans
1. [Best Overall]
Corsair LL Series LL120 RGB 120mm Dual Light
These fans provide everything that you could want in a PC fan. Ranging from the ability to control the airflow to the incredible patterned LED lights, these fans are high powered and produce great results for any user. If you need more airflow, the answer is simply to increase the RPMs. If there is too much air within your build, just decrease them.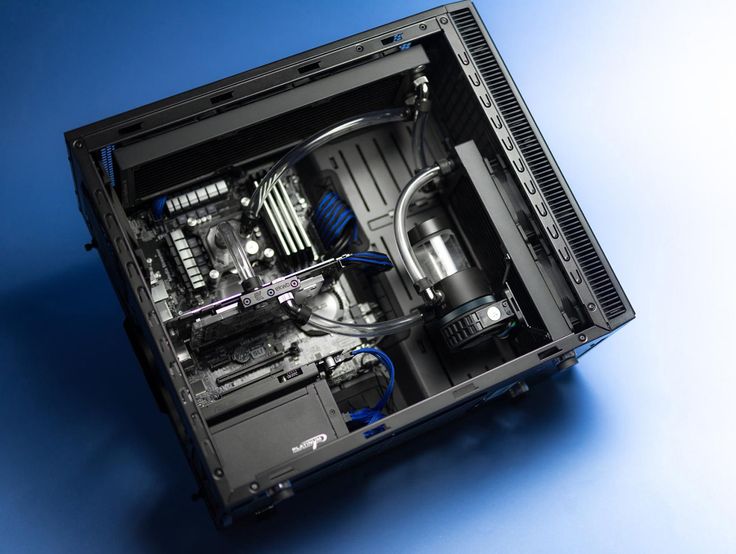
- Durability
- Low sounds
- Adjustable lighting, including patterns
Check Current Price
2. [Best For The Money] Noctua NF-P12 redux-1700 PWM, High-Performance Cooling Fan
If you want a fan of tremendous quality, you tend to look for Noctua fans for your PC. However, these fans can run at a pretty high price point, meaning that unless you’re willing to dedicate a chunk of money to making your setup, you may find yourself disappointed. That is, until you look into the NF-P12.
- Extremely affordable
- Very quiet
- Understated, to go with any setup
Check Current Price
3. [Best For The Durability]
ARCTIC P12 PWM PST — 120 mm Case Fan with PWM Sharing Technology
This fan is incredibly reliable for providing quiet, full air to your systems.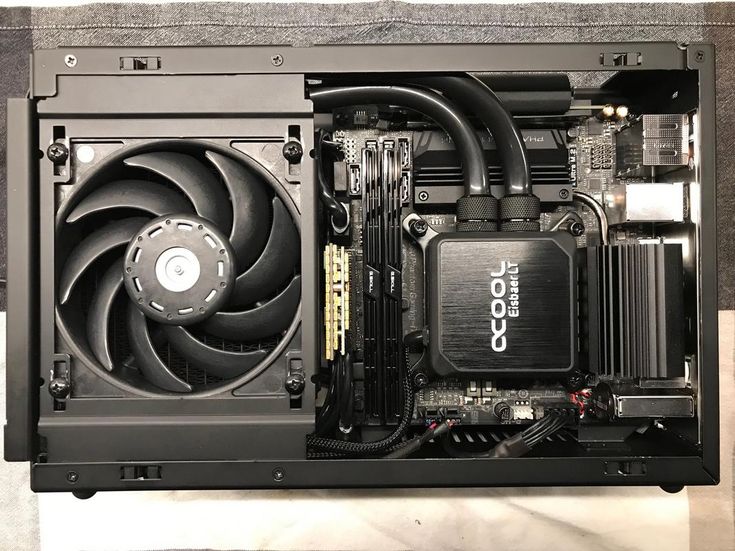 I installed this set of fans in my build and kept that setup in my bedroom, and because of the quality of the fan and the way they are developed and aligned, they were absolutely silent.
-
Durable
- Synchronizing fans is easy
- Redesigned blades for static air pressure
Check Current Price
TOP PC Fans Buying Guide
If you’re looking to buy the best case fans on the market, you need to have a general idea of what you need to be looking for. By looking at the important information about the case fan before you buy it, you are ensuring that you will make a smart decision.
Cooling Capability
You definitely want to consider the cooling capabilities of your fans before you commit. For instance, did you know that many big fans move as much air as small fans? They simply spin slower than the smaller fans, meaning that you can get more bang for your buck with a smaller, high-quality fan. Are you looking for airflow or static pressure to cool your gaming PC? Airflow fans tend to be quieter than their static pressure counterparts, and are more easily assembled into different areas on your PC. However, if your PC has limited space and you need to forcefully move hot air, you may consider a static pressure system.
Durability
You don’t want to buy something if it will merely break within three weeks of use. Determining how durable a fan system is will be vital to maintaining your PC. Broken computer fans can create tons of complications with your machine overall, so make sure you’re not making unwise choices.
Best PC Fan Reviews
[Best Overall]
1. Corsair LL Series LL120 RGB 120mm Dual Light
Features:
- Hydraulic bearings for low friction and increased lifespan means you can invest in these fans
- Powerful fan with the ability to adjust the RPMs means that this can power large cases
- Intense 16 separate RGB lights provide tons of visibility and an amplified look to your space
- CORSAIR iCue software can bring your lighting system to life for an enhanced aesthetic in your setup
- Quiet operation means that you can truly focus on your gameplay
Corsair LL Series LL120 RGB 120mm Dual Light Specifications
|
Airflow |
43. |
|
Noise Level |
24.8 decibels |
|
RPMs |
Adjustable between 600 RPM to 1500 RPM |
|
Bearings |
Hydraulic |
 25 CFM
These fans provide everything that you could want in a PC fan. Ranging from the ability to control the airflow to the incredible patterned LED lights, these fans are high powered and produce great results for any user. If you need more airflow, the answer is simply to increase the RPMs. If there is too much air within your build, just decrease them.
The hydraulic bearings are phenomenal assets for the fans themselves, lending them durability and allowing them to spin without any friction or inhibition. Not only does this mean that these fans can go way longer without being replaced, it means they’re quieter as well.
If you want a fan that adds a creative flair to your space without sacrificing the need for quality airflow, this is a great fan for you to add to your setup. This is currently attached to my own system, and since installing these fans I’ve only seen increased productivity from my PC. They are basically silent unless I set them to performance mode, in which case they make far less noise than other fans I’ve used in the same setting.
These fans may become a permanent part of my setup, due to their quality and ability to handle whatever is thrown at them. They’re durable, stylish, and adjustable, making them great additions to any build. Colors are easy to control through the software provided with the fan. And most importantly, they’re wildly efficient for gaming. You never have to worry that they will stop working or that your system will overheat.
If you’re looking for a set of quality RGB fans but don’t want to risk quality for color, this is the fan you need for your build. I’d go so far as to say that this set of Corsair fans will blow you away.
- Durability
- Low sounds
- Adjustable lighting, including patterns
- Adjustable RPMs for total control of your cooling
- iCue programming may not work well with old models without updates
Check Current Price
[Best For The Money]
2. Noctua NF-P12 redux-1700 PWM, High-Performance Cooling Fan
Features:
- Incredibly high-performing fan that works on any system that requires large amounts of airflow, meaning you can trust the fan to complete its job every time.
- Pressure-optimized blade design for a quieter fan, meaning you don’t have to listen to a constant roar of sound
- Virtually silent at idle, compared to other high-performance fans
- Most affordable Noctua on the market for the size, quality, and utility
Noctua NF-P12 redux-1700 PWM, High-Performance Cooling Fan Specifications
|
Airflow |
70.68 CFM |
|
Noise Level |
12.6 db/a |
|
RPMs |
1700 RPMs |
|
Bearings |
Unlisted |
If you want a fan of tremendous quality, you tend to look for Noctua fans for your PC. However, these fans can run at a pretty high price point, meaning that unless you’re willing to dedicate a chunk of money to making your setup, you may find yourself disappointed. That is, until you look into the NF-P12.
This fan is powerful. And by that, I mean that it is full Noctua quality while simultaneously not carrying a high dollar price tag. It’s fast, nearly silent, and carries a high CFM, meaning that you are buying a cooling system that will perform for your build.
You can also control the rate of speed on this fan, up to 1700 RPMs. At the full 1700 RPMs, the fan can be a little loud, however, this product always performed at 1300 RPMs and kept my entire system, which is prone to overheating, very cool.
These fans do not move around once installed, and are made with pressure-optimized blades in order to continue spinning with as little noise possible. At idle, they are completely silent.
The materials this fan is developed from are also top-notch. Firstly, they’re not brown (thank God.) The sleek design of these fans give a beautiful, neutral quality that you can trust will blend into your build. If you are looking for the same level of quality and design in a more expensive Noctua fan, you will find it in this fan.
This is one of the best PC fans on the market for the price. You simply cannot beat it.
- Extremely affordable
- Very quiet
- Understated, to go with any setup
- Large quality of airflow
- Noctua quality on a more realistic budget
- If it is not properly cared for, it can become loud over time due to friction in the bearing
Check Current Price
[Best For The Durability]
3.
 ARCTIC P12 PWM PST — 120 mm Case Fan with PWM Sharing Technology
Features:
- Adjustable speeds so you can control the level of sound and the amount of air in your system
- Seamlessly synchronize your fans through the ARCTIC PWM Sharing Technology, allowing you to get to what you want to be doing more efficiently, and to balance your build
- Especially effective on heatsinks due to its redesigned blades that are optimized for static air pressure
- The fan has recently been redesigned with a newly developed motor that has a low coil temperature, allowing you to replace it far less frequently
- Can be daisy-chained together to give you a synchronized and optimized system
ARCTIC P12 PWM PST — 120 mm Case Fan with PWM Sharing Technology Specifications
|
Airflow |
56. |
|
Noise Level |
0.3 Sone at 1800 RPMs |
|
RPMs |
1800 RPMs |
|
Bearings |
Fluid Dynamic Bearing |
 3 CFM
3 CFMThis fan is incredibly reliable for providing quiet, full air to your systems. I installed this set of fans in my build and kept that setup in my bedroom, and because of the quality of the fan and the way they are developed and aligned, they were absolutely silent.
If you need a fan that can perform at high levels, for gaming, for old computers, for large setups with intense CPUs or radiators, then this fan is a great fit for your setup. It provides the chill necessary to keep your systems running without the intense levels of noise that can come with other products that run at 1800 RPMs.
Synchronization is made easy because of just how adjustable this fan is, and if you’d like, you can daisy-chain these fans to make a system that runs smoothly without too much thought. Installation is easy. They’re also very cheap compared to other fans that run at similar speeds and at even more sound.
Another brilliant thing to consider is how this fan could potentially save you money. Because of its design, it uses considerably less power than other powerful fans. Leaving this fan on will not kill your battery, and it won’t run up your energy bill as quickly as other high power fans.
- Adjustable speeds from 200 RPMs to 1800 RPMs
- Redesigned blades for static air pressure
- Synchronizing fans is easy
- Durable
- If the user is not knowledgable about daisy-chaining, your fans may produce a high pitched noise
Check Current Price
4.
 ABKONCORE SP120 PC FAN
Features:
ABKONCORE SP120 PC FAN Specifications
|
Airflow |
Not available |
|
Noise Level |
Not available |
|
RPMs |
1200 RPMs |
|
Bearings |
Hydro Bearing |
These are some gorgeous fans. The unique spider shape is stylish, and the LED RGB light additions to the fan make these an almost glamorous addition to your setup. The frame itself can be controlled by means of color, speed, and color effect with one simple remote, giving you total control over your build.
Not only do these fans look great, they also perform very well. The hydraulic bearings consistently keep the fan from developing outrageous noises, and the ease of installation is almost unmatched.
These fans run so quietly not just because of the bearing. The kit they come in includes an anti-vibration pad. This not only decreases the level of noise you may hear from the fan, but increases the life of your build because of the lack of wobble and friction.
The remote that this fan set comes with is very understandable, and a great addition to the kit. I honestly love these fans, especially for their look and color, and you cannot beat the price point for what you receive.
- Sleek, attractive
- Controlled by remote
- Easy to install
- Affordable
- Fans are very quiet
- The kit that these fans come in may not be an entirely universal kit
Check Current Price
5. UPHERE 3-PACK LONG LIFE COMPUTER CASE FAN
Features:
UPHERE 3-PACK LONG LIFE COMPUTER CASE FAN Specifications
|
Airflow |
38 CFM |
|
Noise Level |
19DB |
|
RPMs |
1200 RPMs |
|
Bearings |
Hydraulic Bearing |
When I pulled these fans out of the packaging for the first time, I was blown away. The blades on the fan are clear. And at first I thought this may cause me problems because I didn’t necessarily want to see the inside of my machines. However, when I installed them and flipped on the LED function, I was mesmerized.
The clear blades allow for the LED light to basically take up the entirety of the fan. It was a pool of color that provided great aesthetic value to my setup.
And not only was this fan set beautiful— it was also incredibly reliable and durable. The hydraulic bearing kept this fan running longterm, and the rubber itself was anti-vibration to keep the noises reduced.
When I bought these fans, I assumed they would be cheap. However, they are made out of durable, high-quality materials, and spin at a respectable level without producing too much sound. Needless to say, I really have enjoyed these fans and think they look great on my build.
Some people claim that these are of the same quality and caliber as the stock fans that come with your build. I’d say that they run a little bit quieter and potentially will last far longer if you take care of them.
If you want the full RGB fan effect, you do have to buy a pricepoint up. However, with the fan that you get and the beautiful and intricate systems you can create, it’s definitely worth it if you want that pure RGB look. There is, however, not a remote, which means that you do have to manually make changes.
- Durable
- Vibrant colors
- Moves air well
- Self-lubricating bearing
- Quiet
- Does not have as advanced RGB function capabilities unless you buy up
Check Current Price
Noise Level
If you have ever spent time around a loud computer fan, you know exactly what I’m talking about. Roaring PC fans are more than distracting and can be indicative of other problems with the machine. Cheaper fans tend to be louder, meaning that you can invest in quality for both peace of mind and peace in your space.
There are tons of factors that can go into your fan creating noise, such as the space, the materials used to build the case, and how quickly the fan moves, but investing in a good fan means you don’t need to be as concerned about constant noise.
Sufficient Airflow for Bigger Cases
This seems like a no-brainer, but sometimes something as vital as “does this fan move air efficiently in my larger case” can be overlooked. When investing in a computer fan, be sure to check out the technical specs of each product to gauge if it can move air the way that you need.
The spec that I most consider is the CFM, or the Cubic Feet Minute. The higher the CFM, the more air is moved, and the quicker it is moved. Pairing the CFM with the RPM will give you generally the efficiency of the fan. Keep in mind that if you have a well-ventilated case, or your case has multiple places to install these fans, you don’t necessarily need a high-powered fan.
High airflow fans are often a good choice for people who need accurate air movement in bigger cases. Sometimes, you have the option of installing multiple fans, and if it’s the case, or if you’re creating your own build, installing multiple fans can give you the necessary airflow while letting you keep a quiet pc fan.
LED Lighting
If you want to add a little flair to your setup, you can add an LED light to your fan itself. Not only do these look beautiful, they also provide extra lighting to your space. If your days are too long, or you game into the night, having these extra lights can really add brightness to your space.
These LED lighting fans can be a little expensive, so this lighting is not necessary to have a great build. Typically, lights only add to the aesthetics. However, if you are looking to make your setup unique, this is definitely a way to add some personalization to your space.
Best PC cooling with limited fans
This content has been written by a website visitor and has been rewarded.
Introduction
How to effectively cool the components inside the system unit? It would seem that a simple question, the answer to which will not be thought of by any experienced PC user, and even more so by an overclocker or computer enthusiast. They say what is there to think: cold air goes down, and hot air rushes up — simple physics from the school course, therefore, it is necessary to organize blowing (cold air intake) from below, and blowing hot air from above, cold air must pass through all the components, along the way cooling them and becoming warm, and «jump» out of the case according to the classics through a fan located on the back wall. But this is a theory. A theory that does not take into account the air flow created by the fans and the number of these same fans.
I propose to consider a more specific and realistic situation: how to effectively cool the components inside the system unit, having only two fans? Let’s look at both classic cooling schemes and atypical ways to arrange fans in a case.
recommendations
I propose to go to the test bench.
Test bench
In an article of this format, it was decided to slightly change the structure of the test bench description.
So, the Thermaltake View 31 TG, which appears quite often in our experiments, was chosen as the «experimental» case. The choice of this model as a «test» was due to the fact that the View 31 TG allows you to position the fans inside it almost anywhere, and thanks to the removable front panel, this case allows you to simulate models with poor and good ventilation.
Two included Riing 14 LED Blue fans were responsible for cooling the components inside the case. The participation of these fans in the experiment is due to the fact that they create a sufficiently powerful air flow, relative to the noise emanating from them. And, in fact, a powerful air flow will «reveal» the layout of the fans, since weak fans could provide sufficient blowing or blowing power, and the experiment could be considered not fair and objective enough.
The case was heated from the inside by an AMD Ryzen 7 2700 processor, overclocked to a frequency of 3.9 GHz for all cores, the heat dissipation of which was about 140 watts, and an NVIDIA GeForce GTX 1060 video card with a TDP of about 120 watts. The dual-tower cooling system GELID Phantom was responsible for cooling the processor, the review and testing of which was done in the last article. I recommend to get acquainted.
Tested at room temperature 22 degrees. The temperature was maintained by a split system. The components were heated by the OCCT program. As a test, we chose the stress test of both the video card and the processor at the same time, while AVX instructions were involved. Each test run lasted a little over 15 minutes to provide almost the maximum possible heating of the components under the conditions created.
Zeroing test: testing without using fans
To begin with, it was decided to conduct a zeroing test, which consisted in the fact that the components inside the closed case would be heated by natural air circulation. The meaning of this test was to identify the «reference» temperature, with which we will subsequently compare in order to determine which fan layout will show itself as efficiently as possible.
During testing, hot air flows will naturally escape through the perforations on the top cover of the case, and will also be «thrown out» through the perforations in the back wall using the GELID Phantom tower cooler.
The following results were obtained, which you can see in the attachment.
Heating and speed (no fans)
Test one, circuit one: both fans blow out, poor air intake from the front / good air intake from the front wall
Please pay attention to the location of the fan on top. It is this arrangement of the fan in the upper part of the case that is the most effective solution, since it makes no sense to place the fan on top in the front of the case, since this solution is as inexpedient as possible — why throw out still cold air? I would also like to note right away that in this article there will be no schemes with «blowing from above», since we intend to check the real variants of the schemes, and not consider all kinds of nonsense of inexperienced users.
So, with poor air intake (closed front wall), we manage to gain almost 10 degrees in CPU temperature relative to a case without fans. The video card gets colder by 4 degrees. And the speed of rotation of the fans on the tower was reduced by 100 revolutions. The computer became noticeably quieter and cooler.
Please see the results
Heating and rotation speed: two exhaust fans (poor air intake)
With a good air intake (open front panel), it is possible to gain an additional degree in processor temperature. CPU fan speed is slightly reduced. The computer becomes noisier due to poorer soundproofing.
Please see attachment for more detailed results.
Heating and rotation speed: two exhaust fans (good air intake)
Additional test, simplified circuit: one exhaust fan (closed front panel)
Next, I propose to find out how necessary it is to have two fans to blow out hot air. To do this, of course, I remove the fan located above the CPU cooler.
This action resulted in a slightly noticeable deterioration in the results compared to the scheme with two blowers. The temperature of the processor rose by 1 degree, the video card also warmed up by 1 degree more. The fan speed has increased.
Please see attachment for more detailed results.
Heating and rotation speed: one fan per exhaust (poor air intake)
Test two, circuit two: two fans per intake, closed and open front panel
Now let’s see how effective both fans located in front of the case will show themselves. Hot air will be blown out by the fans of the tower cooler, as well as naturally through perforations in the upper part of the case.
With the front panel closed, this fan layout was completely inefficient. The processor temperature rose by two degrees relative to the scheme without the use of case fans. But the video card was cooled by a couple of degrees.
For more detailed results, please see the materials presented in the attachment.
Heating and speed: two fans per intake (closed front panel)
The open front panel gives a real «breath of fresh air» to the components. Relative to the case, devoid of fans, the temperature of the processor dropped by 9 degrees. This layout proved to be much better, the same arrangement of fans with a closed panel, but loses to two blowing fans that work even with a closed front panel. Superiority over one blowing fan by 0.3 degrees is an error.
For more detailed results, please see the materials presented in the attachment.
Heating and rotation speed: two fans for intake (open front panel) , open and closed front panel.
Now we move on to the «classic» schemes, combined into a single test, since they all provide for the location of one fan for intake and one for exhaust.
Let’s start with the most classic version, when we have an intake fan located at the bottom of the front of the case and blowing hard drives, the exhaust fan is located on the back of the case. The front panel of the case is closed.
Such a «classic» fan arrangement loses in efficiency to the two-fan-exhaust variants in terms of CPU temperature. However, it is worth noting that with this arrangement of fans, the hard drives inside the system unit are cooled much better than in the case when there are no blowing fans in the case at all.
For more detailed results, please see the materials presented in the attachment.
Heating and rotational speed: «classic» fan arrangement (bottom intake fan, front panel closed)
And now everything is the same, but with the front panel open.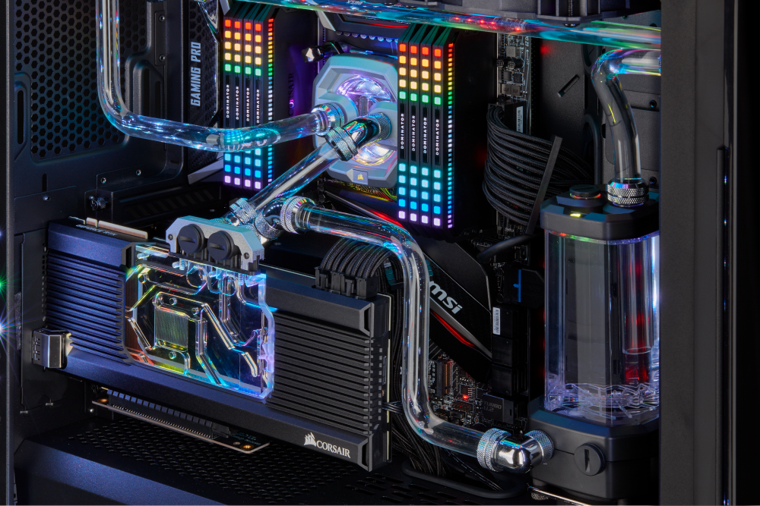
CPU temperature dropped to two exhaust fans with front panel closed. The temperature of the hard drives has dropped to the minimum value.
For more detailed results, please see the materials presented in the attachment.
Heating and rotation speed: «classic» arrangement of fans (ventilation fan at the bottom, front panel open)
Definitely, this layout makes absolutely no sense, since the temperature of the processor has become even higher than with one fan per exhaust. But it is worth noting that with this arrangement.
For more detailed results, please see the materials presented in the attachment.
Heating and rotation speed: «classic» arrangement of fans (fan blowing from above, front panel closed)
We keep the arrangement of fans and tear off the front panel of the case.
The processor temperature was average between two exhaust fans with the cover closed and with the cover open. The temperature of the video card remained at about the same level. The cooling efficiency of the hard drive cage has definitely decreased.
For more detailed results, please see the materials presented in the attachment.
Heating and rotation speed: «classic» arrangement of fans (the fan is blown from above, the front panel is open.
Conclusion
the front panel with side perforations worsens the cooling of components, choose cases with direct air intake from the front of the case; second, the «classic» scheme with a fan located at the bottom of the front panel proved to be the most balanced, which helps to blow hard drives, however, if your PC no longer has hard drives, then you should think about the location of two fans for blowing out; third, blowing out is much more important than blowing in — it’s not for nothing that even the weakest and cheapest computers put one fan to blow hot air out of the case, at least one fan blowing must be in your computer.0004
Supplement
The testing did not take part in the blowdown scheme, when the case has one intake fan that draws air through the perforation through the bottom wall of the case, and one exhaust fan located on the top wall of the case above the CPU cooler. Definitely, such a scheme has a place to be, but requires a horizontal location of the tower, so that the tower fans take cold air from below and help to «throw» it up to the blowing fan. This scheme can show itself most effectively in rare cases with a horizontal motherboard, such as, for example, in the legendary SilverStone Raven RVX01:
What is the layout of the fans in your system unit?
This material was written by a site visitor and has been rewarded.
Airflow in the housing. What do you need to know? — i2HARD
In today’s material, we will analyze the important topic of airflow in the case. Let’s compare fans of different types and, most importantly, determine how best to place the liquid cooling radiator: in front or on top. The classic way to improve cooling will also be measured — removing the side wall.
Contents:
- Test stand and test procedure
- Checking stock values
- Installation of additional fans
- Compare F- and P-series fans
- Where to put AIO?
- Installing the RTX 3090 graphics card
- Making the front wall «deaf»
Test bench and test method
Naturally, we must start with the case. Unfortunately, it is not possible to cover all their diversity, but we will take a sort of collection of the most popular ideas in designing a case for reasonable money — Deepcool Matrexx 55 Mesh with a mesh in front. In addition, it has four fans in the kit and it is possible to install AIO or additional fans on top. The ideal candidate.
In addition, we stocked up with AIO 240mm, a budget air cooler and two packs of Arctic fans of various types, beloved by many — F12 and P12.
So, let’s place a test assembly with a Ryzen 9 5950X processor in the case. Calm down — we are not going to overclock it or somehow substitute a modest cooling tower. But we will not leave the processor in stock either, changing frequencies and voltages will ruin the entire test. Therefore, we fix the frequency value at 4500 MHz for all cores, and set the voltage so that it is slightly less than 1.2 V in the load. We get a heat dissipation level close to the stock level of about 150 W in the Aida64 stress test with only the CPU ticked. In general, it doesn’t matter how to create a load for today’s measurements, the main thing is repeatability.
There will be two video cards: a Radeon RX6800 with a stock power consumption of 250 W for the entire card and a GeForce RTX 3090 with the ability to heat the air much more efficiently — the limit can be expanded to 480 W if desired.
We also fix the parameters of video cards and the rotation speed of their coolers as far as possible, and for the 3090 we will choose the option with sparing 380-390 W in the Heaven benchmark. It is he who will warm up the video cards, the uniformity of the process will be ensured by a pause in the same scene.
Almost done. We will inform you that the memory works in xmp without additional settings, the voltage is 1.45 V. All fans, except for video cards, will be fixed at around 1000 rpm. A special controller will help us with this, it will impartially monitor the rotation speed and temperatures.
Full parts list
- CPU: AMD Ryzen 9 5950X
- Motherboard: ASUS ROG Crosshair VIII Formula
- RAM: G.SKILL F4-3600C14D-32GTESA 2x16GB
- Power supply: Cooler Master V850
The controlled parameters in comparison will be: processor temperature by TCtl / Tdie sensor, temperature of the video card cores (excluding hotspot and memory, this is still more likely for specific performances, but the theoretical component is important for us) . For RAM, we take the first bar from the list in monitoring into account, the second will almost always be a little hotter, but all the important monitoring data will be available to the curious.
This carnival of figures is completed by two thermal sensors, which are fixed by special means at strategic points of the case. The first one is in the upper corner above the motherboard, it will indirectly show the state of the air near the power circuits and hint at the efficiency of blowing out of the system unit. We place the second sensor under the video card in order to have some approximate data on the temperature of the air entering the video accelerator cooling system.
The hardest part is controlling the room temperature during this turbulent spring time, the target is 22 degrees and it has almost always been accurate according to the Chinese thermometer.
Checking the stock values
Phew, we didn’t forget to tell you anything in the introduction, let’s start capturing the initial data. The fans in the case are complete, on the Gammax 400 EX processor, it also has a fixed speed — 1000. Video card — RX 6800.
We run tests, the processor temperature cheerfully exceeds 70 degrees, the video card does not lag behind.
But the starting spurt is not the most interesting, we continue to observe. After 15 minutes, the temperatures almost stabilized, we are waiting for the same amount. A half-hour test shows values very close to the final ones, let’s stop there, otherwise everything that was planned simply cannot be implemented in a reasonable time.
To be honest, the results are not very inspiring. The total power consumption of the system during the test is about 470 watts. No, the temperatures of the processor and video card are quite normal, but on the memory, the sensor outside the chip is already almost 50, i.e. under such conditions, you can forget about serious overclocking and high performance of the memory subsystem, it is better to lower the voltage to 1.35-1.4 and try your luck like that.
Well, we have tools in our hands to improve cooling. First of all, this is a proven method for years of removing the side wall, in this case — glass. The temperature immediately begins to respond with positive dynamics. After fifteen minutes, all the values, one might say, have stabilized, but for the experiment we will let the system work for another 15 minutes. It can be seen that it was possible not to wait so long, the difference is insignificant, the data is more accurate, but even 15 minutes is enough for some conclusions.
So, this upgrade of the cooling system had the best effect on the processor. Its cores have become colder by almost 9 degrees, the video card has lost 3 degrees, the memory — 4. I would like more, but we will consider this a success. It is quite logical that the temperature in the upper corner of the case also dropped significantly.
Installing additional fans
The next experiment: add two Arctic F12 fans to the top of the exhaust case and close the lid. We will turn on in turn, first one and in the next measurement — the second.
With one additional fan, we can notice a significant decrease in air temperature in the upper part of the case, which is very logical — almost 6 degrees of gain. As for the rest of the components, the changes are within the limits of fluctuations in the microclimate of the room, but the processor cores deviated in the other direction, which means we can hope that the symbolic improvement is not an accident.
We continue the experiment by turning on the second fan, and now we do not register any significant changes. Temperatures rose a little on everything, but this was due to the duration of the test, there was no pause between sessions with the top fans. We can conclude that the second fan on top does not make a significant contribution with this configuration of the cooling system and with a dust filter on top.
It’s time to move on to the next step. We change all the complete fans to Arctic F12, leaving only one on top. In total, we get 5 case turntables. We fix all speeds again at 1000 rpm and measure the indicators after half an hour of the test.
Compare with a similar configuration of stock fans and one extra on top. F, as they say for Flow, and in the name of the fans it is not in vain. The decrease in temperatures affected all measured values, primarily due to the improvement in the flow of fresh air through the front panel. That is why the RAM won the most, the decrease in its temperature exceeded 4 degrees, while for the processor the change was about three.
We do not go far from the stand, remove the glass and measure the difference with stock fans. As expected, there is almost none of it, the processor cooler and the video card cooling system mainly get air from the side opening, and memory without direct airflow can only rely on front wall fans. And here there are improvements, more than 2 degrees, the final 42 degrees already leave hope for some kind of RAM setting.
Comparing F- and P-series fans
Naturally, it would be very interesting to know the differences between the F-series of fans, which are designed for airflow, and the P-series, which, on the contrary, are designed for increased static pressure and are good for blowing radiators. We change, run tests, we are convinced of the importance of dividing fans by task. P12 are great fans, but not like case fans. The loss in all values is significant, the temperatures are even worse than those pre-installed in the case initially.
The saddest thing is to see memory temperatures above 50 degrees Celsius again.
With the case open, the temperatures of the processor and video card come to the same values as with any fans before. The memory is hotter than with F turntables by 3 degrees.
We can draw an intermediate conclusion: you should choose fans not only according to the backlighting capabilities, but also based on their application, for radiators look at the values of the pressure developed, for the case — at the generated air flow. Many manufacturers make it easy and create specialized lines of fans, such as the aforementioned Arctic. F — for the case, P — for radiators.
Where to put AIO?
AIO time has come. Common sense says that installing it in front, or rather on blowing, will greatly help the processor, but will dramatically worsen the position of the memory and video card. At the same time, the radiator will be heated from above (or blown out) by the warm air of the case, which increases the temperature of the processor. Both of these options are not ideal. It’s time to figure out which chair is worse.
We install the radiator in front for blowing, we fix its fans at 1000 rpm, we place the released case fan on top, because we can. Compare with an air cooler and a case equipped with dedicated F12 fans. Yes, the Gammax 400ex is certainly good and really surprises with its performance, but now we immediately get a 10-degree gain in terms of the processor. The video card and the upper corner also lose, but only by a degree. but the memory receives a sensitive blow to the sensor. Again about 50 degrees — it’s hard to put up with it.
We continue the experiment with an open wall. The difference with air cooling in the same conditions for the processor is reduced to 6 degrees. But worst of all is the RAM. The case has lost structured flows and now a heat bag is created around the slats, hence the temperatures are 9 degrees worse than with air. The video card also catches a little warm air from the radiator. But it’s too early to draw conclusions, in front of the upper radiator.
What do we have after half an hour of tests? But nothing good: the processor temperature, as expected, crept up — more than seven degrees difference with the front radiator and only three degrees with the cooler. At the same time, the gain in temperatures for the video card and, what is most offensive, for the RAM, is minimal (1-2 degrees). It’s kind of a shame.
The situation is slightly better with the open case, the main achievement is the decrease in the memory temperature compared to the front-mounted heatsink.
It turns out that those who said that dropsy must be placed in front were right? Yes and no! Yes, in the sense that if your case is exactly like this and equipped with the same type of dust filters, then the result will be similar. Attentive readers must have noticed that when the heatsink was placed on the top, the temperature rise of the processor was somehow disproportionately large. This is due to a dust filter with a small cell, it severely cuts the air flow and literally stifles the possibilities of everything that tries to exchange air through the filter.
We bring the experiment to a level that does not depend on the size of the holes in the dust filters and the degree of perforation of the front panel. We remove both of these unknowns and get the following data.
The processor cores have become colder by almost 8 degrees. This is when compared with the same location of the radiator, but with dust filters installed. The temperature of the RAM dropped by 6 degrees, the changes in the video card are not so significant.
But these numbers cannot be directly compared with the values obtained earlier for the front radiator, there were also filters. We rebuild the stand, the radiator is forward. Compare with the top AIO also without filters. We get the processor temperature lower, but only by 3 degrees, but the RAM feels much worse — plus 6 degrees. The zone in the upper corner also suffers — also plus 6 degrees, which means that the load on the VRM of the motherboard increases, and the saddest thing is that the chances of a good RAM setting decrease noticeably.
And now we can draw the following conclusion: if you do not intentionally interfere with blowing through the upper part of the case with non-optimal dust filters, then installing an AIO with a top exhaust position will be preferable. The temperature of the video card in these two configurations does not differ much, but the climate inside the case, and hence the temperature of the memory and power circuits of the motherboard, will be much worse with the front blowing radiator. Yes, with a front-facing heatsink, the processor will cool a little more efficiently, but it’s not worth it.
If the issue of memory settings is not an issue, and the motherboard is selected with a power reserve, which is not uncommon today, then the placement of the heatsink is absolutely not important. However, like the type of radiators, the main thing is that the appearance or the backlighting capabilities suit you.
Installing the RTX 3090 graphics card
This could be the end, but we have a hotter graphics card. How are things going there if you have such a jewel installed in your case?
Let’s start, as before with Radeon, with air cooling, but from the point when all case fans were replaced with F12.
The total consumption of the system unit from the socket exceeded 620 W, the video card itself confidently consumes more than 380 W, but the chip temperature is lower than that of Radeon. Why did we call the 3090 hot? Yes, the temperature also depends on the higher fan speed, but in general, calling a video card hot or not is based on the amount of heat given off to it in the case. Look at the temperature of the processor, the heating from the 3090 added 17 degrees to it compared to the RX 6800 (all other things being equal). The RAM is also warmed up — the difference is almost 8 degrees. It is safe to say that in order to draw more than 600 watts from an air-cooled case, it is worth considering a very efficient air exchange with the outside world.
Let’s not lose courage and use the old-fashioned method — remove the glass. Access to cool outside air affects the processor strictly positively — immediately minus 15 degrees. It’s still 8 degrees hotter than the same configuration, but with only 250 watts of graphics card. But here you should not forget about blowing hot air directly to the fans of our Gammax and as a keepsake. The slats of the operational became colder by almost 6 degrees due to the opening of the wall. Yes, all measured temperatures have become much better.
We leave the dust filters in their original places, leave the front wall untouched, take measurements with the front and top position of the AIO heatsink. The result is absolutely predictable and similar to the one obtained earlier on the RX6800, the difference in processor temperatures even increased due to the hotter video card. With filters and difficult blowing upwards, the front radiator placement is again the most preferable option. Memory in all variants has a temperature close to 52 degrees, which is absolutely terrible.
Now a cleaner experiment: remove the front panel and the dust filter on top. We carry out measurements with two options for placing the radiator, compare. The processor gets about 6 degrees of temperature gain with the front AIO, but at the same time, in this configuration, the memory is 5 degrees hotter, the zone in the upper corner also warms up by 5 degrees more. At the same time, under the video card, the difference is again small — about two degrees.
Comparing all the pros and cons, we can recommend getting rid of unnecessary resistance in the form of blow filters and, if you are interested in overclocking the memory, place the AIO heatsink on top.
Although there is another option — put a special fan in front of the memory and force it to cool, then the conclusions will no longer be so obvious.
And according to all the results of this long-term study, we can say that for top-end hardware, the possibilities of air cooling and even factory AIO liquid cooling kits are limited and very much depend on case ventilation. Confident air exchange with the outside world and not very high room temperatures are almost the only way to avoid custom liquid cooling. Another option would be to leave everything without overclocking and use the components, as they say, “out of the box”. As practice shows, there will be no overheating. Or not?
Making the front wall «blind»
The test used a case with a mesh front panel, but there are narrow slots on the sides for air intake. As well as in models with blank front walls. Let’s try to imitate such a case: we glue the mesh, now the fans in the front have only one, or rather two ways to draw air into the case — on the left and on the right.
AIO heatsink on top, dust filter also in place. To endure half an hour was not allowed by natural pity for the helpless.