Reddit — Dive into anything
Here’s my Dell XPS 720 upgrade/rebuild. I know this is many years behind a lot of the BTX to ATX mod-builds that have been done and posted online. Some date back to 2014 I think.
Anyway, I’ve currently got 7 Dell XPS 730/730X cases that I’ve upgraded and rebuilt, and they are all still working and can run fine today. I’ve got a couple with EVGA Z370’s, one with an EVGA X99, one with an EVGA X79 mobo. They are still pretty fast, and all have SSD’s for their main drive. All run Windows 10.
Around 4 or 5 years ago, I found someone with an XPS 720 system that was completely unchanged and the case was/is almost perfect. I bought it with the intention of doing the entire BTX to ATX mod on it, which I have done. Tearing apart the case and cutting out the rear panel to make it able to handle a modern ATX gaming mobo was kinda stressful. I am no expert or even a basic welder/solderer. Not good at it whatsoever. So I tried to get it done by a local shop, but nobody would take on the project since the metals are not the same. Seems aluminum and steel aren’t compatible with each other. So it was Gorilla Epoxy to the rescue.
The back panel was replaced with a new slot/mobo panel from Lian Li. Black, power-coated aluminum. I was able to graft it into the cutout I had done in the back panel metal screen, and the epoxy worked great. I then rebuilt the slotted plastic back cover, and it looks good IMHO, but the back isn’t really seen ever.
Most rebuilds I’ve seen have done a lot of work to put in a different tray, or standoffs to support a modern motherboard. Unfortunately, most of these guys didn’t realize a 730x motherboard tray will slide right into the 720. The EVGA X299 Mobo I chose is wider than the original 730x mobo (EATX), so I had to cut off the back lip of the tray. However, even though it is really tight in there, I can slide that tray/mobo in and out now and it locks down very well into the case.
To make the most of the Dell lighting and fan control work with a modern mobo, I’m still using a 730x master control board. Its mounted in own tray like a 730X and connects to all the RGB lights, the power switch, front interface board, and back to the mobo. I had to re-pin the front RGB LED’s as they are not the same wiring as the 730x. All the other RGB lights are from a 730x so nothing had to be changed.
Probably the biggest challenge other than the case modding was the front headphone jack. The front interface board has been well documented by several people before me, and the best one listed the issues he had. Following his post, I validated his pinouts and got the same results. Basically, it won’t work. The mic will work, but with a rear mic jack already present on the mobo, I don’t and won’t ever use the front one. The headphone jack would not work properly. So, I took a modern PC case that has a mic/headphone jack panel (board) and grafted it onto the Dell front panel board so the headphone jack would line up with the original hole in the case panel. Works like a charm. I also ripped out the 1394 port and grafted a USB 3 port onto the board which connects back to the mobo header for USB 3.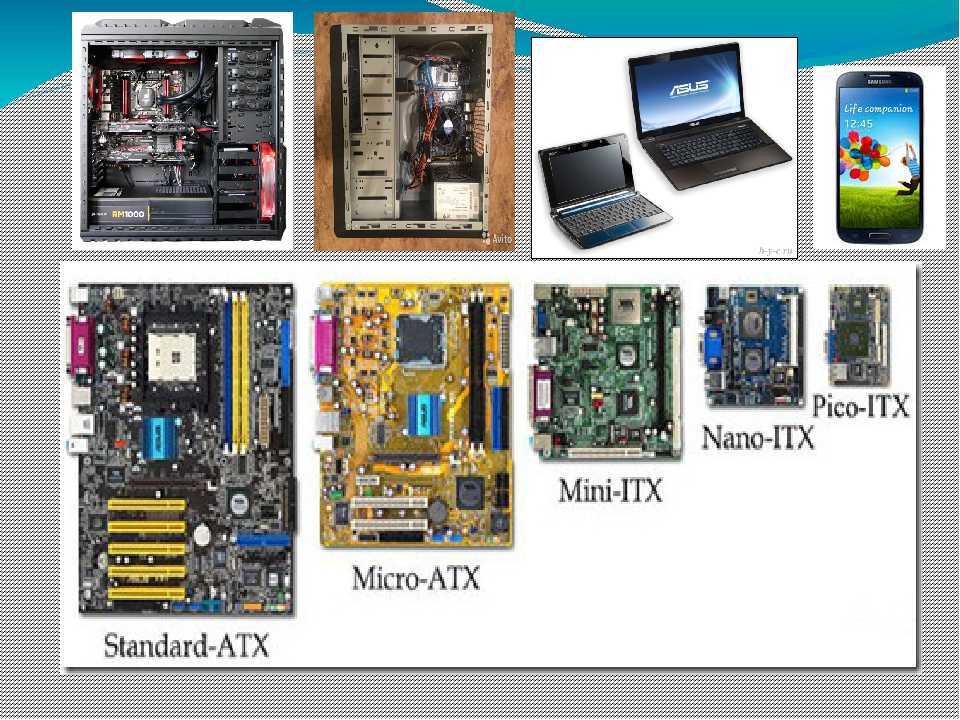 I also was able to splice the original 28-pin cable into the mobo to show the disk activity light on the front panel. None of the other five lights were needed for me. 4 of them are Dell diagnostic lights (useless without the original mobo) and the 5th is network, which I could care less about on the front panel.
The other big challenge was the power button. It is its own assembly under the lower front panel. It has its own daughter board that connects back to the master control board. I knew I would never figure out how to re-wire the 720 board to work with a modern mobo, but the 730x power button board does on its own. So, I decided to figure out how to mount the 730x button board to the 720 switch. I had to line up the push button so it would hit the actual power button on the 730x board. It took a bit of southern engineering, but I was able to epoxy two thin plastic strips across the back of the button casing and then screw the 730X button board into those strips so the power button works just like the original. I was not a fan of the way several other builders had done their power button setups. I don’t think any of them used the original. Also, many of them didn’t figure out the LED’s so I saw some put toggle switches right in the front and destroy part of the front panel. I was not going to do that no matter what. If I’m going to spend all this time and effort on this conversion, I want the case to look like it should.
The Corsair H80i V2 has been cut open and grafted with the original Dell TEC (Thermal Electric Cooler) in between the radiator and pump.
Here’s my build list:
· Dell XPS 720 Case.
· EVGA X299 FTW K
· Dell XPS 730X Master Control Board
· Dell XPS MCB and MoBo board trays. The mobo tray has had the back lip removed, and retaining slots extended. This allows everything to bolt in like it should and use most of the original screw holes provided from Dell.
· EVGA 1050 Gold Power Supply
· EVGA 3090 Ti FTW
· NZXT USB internal hub
· Intel Core i9-10900X
· 32GB G.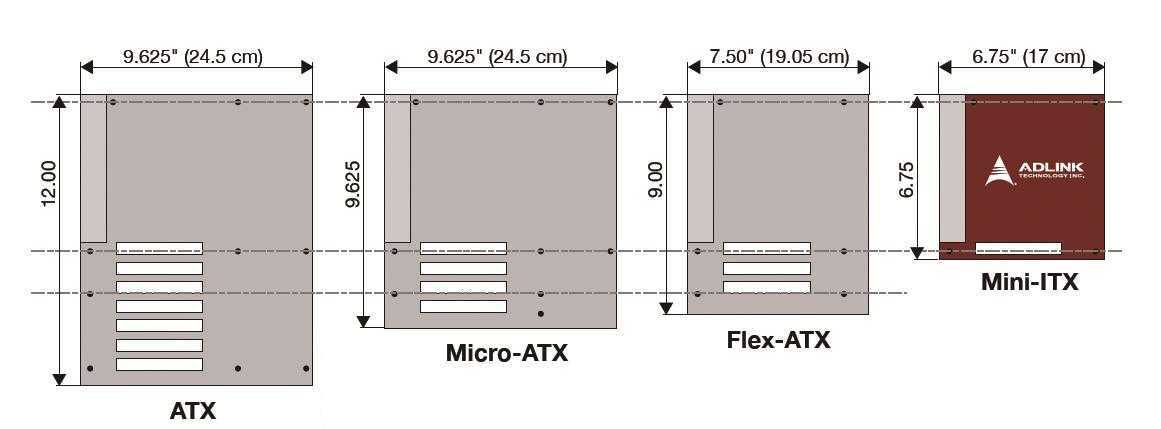 Skill Trident Z RGB PC4-28800 RAM (4X8GB)
· WD Black 4TB Performance Hard drives (2 configured for RAID 1)
· WD Black 500GB NVMe internal gaming SSD.
· ASUS USB BlueTooth receiver
· LG Blu-Ray burner
· Samsung Super DVD Writer
· Corsair H80i V2 CPU Cooler/Radiator
· Dell XPS 730X TEC (Thermal Electric Cooler)
· Windows 11 Pro
Converting BTX case to ATX?
JavaScript is disabled. For a better experience, please enable JavaScript in your browser before proceeding.
- Status
- Not open for further replies.
#1
-
Add bookmark
-
#1
Is it possible to convert a BTX case to ATX? I have a couple OEM cases (Dell) that are BTX form factor, and I would like to switch them over to ATX in order to install AMD-based hardware inside. Is that possible at all?<BR><BR>Thanks.
#2
-
Add bookmark
-
#2
Anything is possible if you put enough effort into it.<BR><BR>Space would seem to dictate uATX and a loss of slots, as BTX is upside down compared to ATX.
#3
-
Add bookmark
-
#3
Just sell ’em for pennies on the dollar and buy an ATX case or two. It’s just not worth it.
#4
-
Add bookmark
-
#4
<BLOCKQUOTE><div>quote:</div><div>Originally posted by Foo Fighter:<BR>I have a couple OEM cases (Dell) that are BTX form factor<BR> </div></BLOCKQUOTE><BR><BR>May I ask what Dell BTX case do you have? I personally like the Optiplex BTX desktop (DT) chassis (front, back, inside). <BR><BR>I wonder if I could put an after-market (Asus, MSI, Intel, Gigabyte…) BTX mainboard into one.
#5
-
Add bookmark
-
#5
<blockquote>
<div>quote:</div>
<div>Originally posted by BEpsilon:<br>I wonder if I could put an after-market (Asus, MSI, Intel, Gigabyte.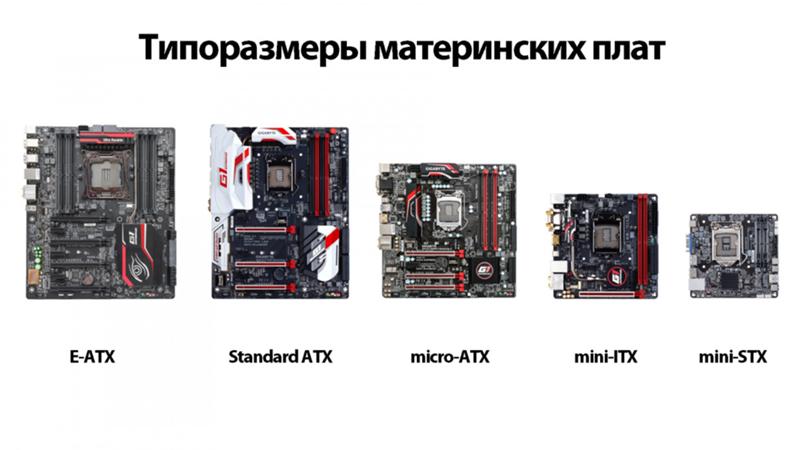 ..) BTX mainboard into one. </div>
</blockquote>
<br><br>I was under the impression that there were no BTX motherboards that were AMD compatible. Have you found some? If so, do share…I actually think the BTX format is nifty, and would be interested to adopt it…but I am a shameless AMD fanboy. — View image here: https://cdn.arstechnica.net/forum/smilies/biggrin.gif —
#6
-
Add bookmark
-
#6
<BLOCKQUOTE><div>quote:</div><div>I was under the impression that there were no BTX motherboards that were AMD compatible. </div></BLOCKQUOTE><BR><BR>BTX is a solution searching for a problem as far as AMD is concerned.
#7
-
Add bookmark
-
#7
<BLOCKQUOTE><div>quote:</div><div>Originally posted by BEpsilon:<BR>May I ask what Dell BTX case do you have? I personally like the Optiplex BTX desktop (DT) chassis </div></BLOCKQUOTE><BR><BR>Case 1 is a PowerEdge 2500 server case.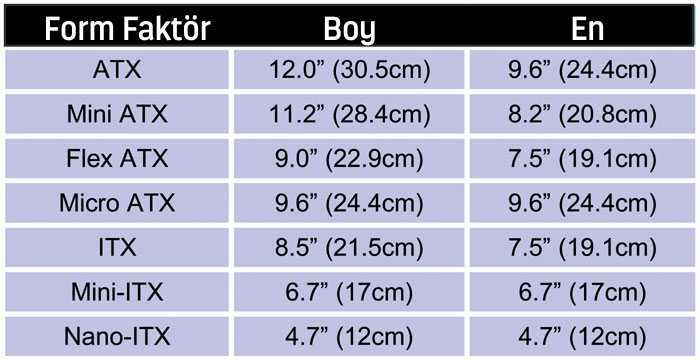 Not sure what the bloody heck I’m going to do with that thing considering it’s a data server and not even configured with optical drive bays. <BR><BR>Case 2 is a Dimension 5100. <BR><BR><BLOCKQUOTE><div>quote:</div><div>I wonder if I could put an after-market (Asus, MSI, Intel, Gigabyte…) BTX mainboard into one. </div></BLOCKQUOTE><BR><BR>Unfortunately there are no BTX boards compatible with AMD processors. And very limited options are available for Intel processors as well, unless you choose a board made <I>by</I> Intel.<BR><BR>That’s the real tragedy here. Both cases are great, but the BXT back arrangment makes them all but useless. The only possible solution I could see is removing the plastic body panels and trying to attach them to a standard ATX chassis. But what would be the point in that? May as well just go with a different case altogether.<BR><BR>Oh well. My GigaByte 3D Aurora case is arriving today (w00t!).
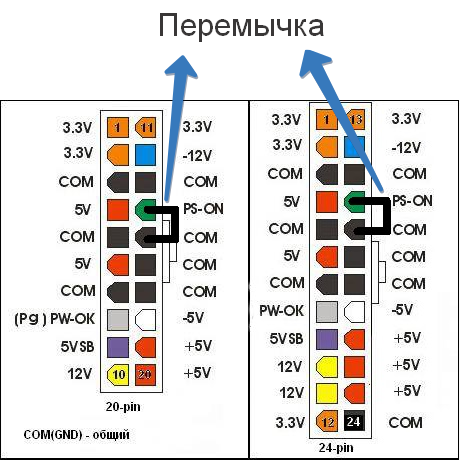 I’ll start building my new gaming rig starting next month (double w00t!).
#8
-
Add bookmark
-
#8
Here’s another example of why I hate BTX. Look at this eBay auction..<BR><BR>http://cgi.ebay.com/Dell-PowerEdge-SC-430-Tower-Case-Wi…QQrdZ1QQcmdZViewItem<BR><BR>I love Dell’s standard form factor PowerEdge severs, which <I>could</I> make wonderful cases for high-end PCs.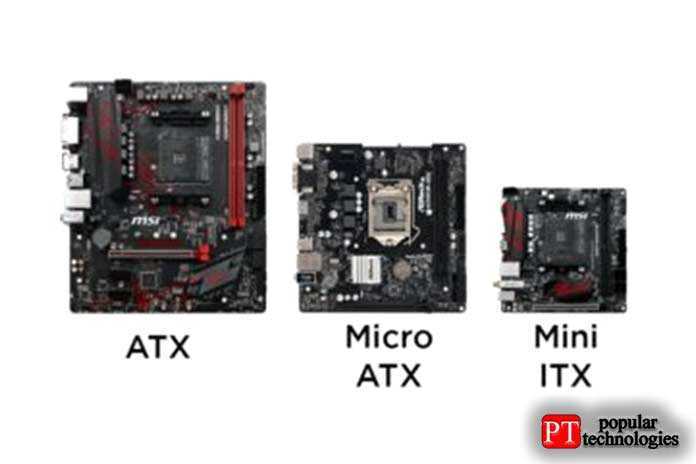 But what is that on the back? Oh..that’s a BTX configuration isn’t it? Mmm hmmm.
#9
-
Add bookmark
-
#9
The PE2500 isn’t a BTX…is it? That is a server that is three «generations» old in dell terms.
#10
-
Add bookmark
-
#10
How about if you chop out the backplane, flip it upside down and then fix it back in?<br>Be more of a WTX than an ATX but it might be more plausible if you’re dead set on the conversion route. <br><br>I’m not sure on the standoff layout but that should be easy enough to drill & tap accordingly.<br><br>Just a thought. — View image here: http://episteme.arstechnica.com/groupee_common/emoticons/icon_smile.gif —
- Status
- Not open for further replies.
Sea Sonic quiz answers / News / Overclockers.ua
The Seasonic quiz that has been running on our website for the last couple of weeks has come to an end.
In order not to torment its participants with thoughts «Did I answer correctly?», we suggest that you immediately familiarize yourself with the correct answers. The winners of the quiz will be determined after 10 days, i.e., approximately, on March 15th.
Recall that in this quiz, two Seasonic power supplies, X-850 and X-660, are valuable prizes. So, you are in the circle of applicants if you answered the questions as follows:
1. What voltage conversion methods are used in modern power supplies?
- Dynamic Stability Control
- Direct conversion RFC-to-PFC
- Group stabilization
- Parallel-serial conversion
- Sequential DC-to-DC conversion
2. Which of the power factor correction methods are implemented in modern power supplies?
- EMI/EMC
- CB/CE
- RoHS/WEEE
- APFC/PPFC
- ATX/BTX/EPS
3. Which method of reactive power compensation was implemented in Seasonic power supplies for the first time among PC PSU manufacturers?
- Active PFC
- Passive PFC
- Lazy PFC
- RoHS/WEEE
4. What other innovations and championships does Sea Sonic Electronics have among PC PSU manufacturers?
- Eco-friendly bamboo power supplies
- Automatic surface mounting of PCB components
- PSU output test automation
- Fan control depending on PSU temperature and load
- 80PLUS certified
- 80PLUS Gold certified above 500W
- 80PLUS Gold Certified Fanless Power Supplies
- Hybrid cooling system with fan activation only after exceeding a certain load threshold or PSU temperature
- Software control of fan speed change laws
- Implement a recycling program for the packaging of power supplies
5. The most efficient 220V power supply will be marked as…?
- 80PLUS Silver
- 80PLUS Bronze
- 80PLUS Gold
- 80PLUS Platinum
- 80PLUS Diamond
- 80PLUS Titanium
6. Is the Seasonic SS-1000XP Active PFC power supply certified as…?
- 80PLUS Silver
- 80PLUS Bronze
- 80PLUS Gold
- 80PLUS Platinum
- 80PLUS Diamond
- 80PLUS Titanium
7. How many PSU models are there in the Seasonic Platinum series at the moment?
- 1
- 2
- 3
- 5
8. What is the warranty period for the Seasonic Platinum-1000 power supply?
- 1 year
- 3 years
- 5 years
- 7 years
- 10 years old
9. How does the fan of the cooling system work in the PSU Seasonic Platinum-1000?
- constant speed minimum possible for fan
- minimum speed at less than 50% load, gradual acceleration at higher load
- 0 rpm at less than 50% load, gradual acceleration at higher load
- 0 rpm at less than 30% load, minimum speed at less than 50% load, gradual acceleration at higher load
- Minimum rotation speed at less than 30% load, half rotation speed at less than 60% load, gradual acceleration at higher load
- constant maximum speed for silent fan
10. How many PCIE slots for powering video cards does the Seasonic Platinum-1000 PSU have?
- 2
- 3
- 4
- 5
- 6
11. What form factor is the Seasonic SS-300TGW Active PFC power supply?
- microATX
- ATX
- BTX
- TFX
- mini-ITX
12. Seasonic SS-300TGW Active PFC power supply certified as…?
- 80PLUS Silver
- 80PLUS Bronze
- 80PLUS Gold
- 80PLUS Platinum
- 80PLUS Diamond
- 80PLUS Titanium
13. How does the fan of the cooling system work in the PSU Seasonic SS-300TGW Active PFC?
- constant speed minimum possible for fan
- minimum rotation speed at less than 50% load, gradual acceleration at higher load
- 0 rpm at less than 50% load, gradual acceleration at higher load
- 0 rpm at less than 30% load, minimum speed at less than 50% load, gradual acceleration at higher load
- Minimum rotation speed at less than 30% load, half rotation speed at less than 60% load, gradual acceleration at higher load
- constant maximum speed for silent fan
14. How many SATA connectors for supplying power to drives does the PSU Seasonic SS-300TGW Active PFC have?
- 1
- 2
- 3
- 4
- 5
15. Which of the statements below most likely belongs to the browser of the famous British resource bit-tech.net?
- Power supplies are an integral part of the PC, their quality affects the performance of all PC components. All Seasonic power supplies have already been awarded and will always be awarded 9 medals0015
- Of course, if we talk about Seasonic power supplies, then we cannot fail to mention the triple DC-to-DC conversion, which allows you to achieve the stability of the main parameters of the computer
- Power supplies manufactured by Sea Sonic Electronics Co. Ltd. under the Seasonic brand, as well as for other well-known brands together, probably won the most awards in the world of power supplies
16. What year was Sea Sonic Electronics Co. founded? Ltd.?
- 2005
- 1995
- 1985
- 1975
- 1991
technology balance for modern PCs — Ferra.ru
A year full of standards updates, 2004 finally brought us another change for desktop PCs. In November, the BTX standard was officially introduced and, in fact, sales of systems based on the new specifications started immediately. The first BTX-based PCs so far have only minor external differences from the familiar ATX family, and only after properly «digging» in the specifications of the new standard do you begin to understand that one way or another we have entered a new, still completely unconscious era of «computer building». And it all started quite recently…
…The process of creating a new desktop form factor has evolved very rapidly. In November 2003, the requirements for the standard (version 0.1) were briefly formulated, already in January 2004 the first draft version 0. 5 was presented, in April the second draft version, 0.9, and on July 26 the official presentation of the final version of The Balanced Technology Extended (BTX ) 1.0 Public Release.
As you can see, the specifications took less than a year to complete, which simply doesn’t compare to the several years normally spent preparing other standards. Evil tongues gladly picked up the considerations about the haste and the fact that Intel allegedly prepares the ground before the release of «super-hot» processors and seems to be developing a system with a more powerful cooling potential specifically for this purpose. By the way, it was this argument that was picked up by AMD as an argument against immediate support for BTX — they say that AMD64 processors do not need such cooling yet.
To be fair, Intel started developing new form factors long before 2003 and the introduction of processors with TDPs over 100W. In fact, talk about the development of new form factors has not stopped since 1995, when the ATX platform first appeared.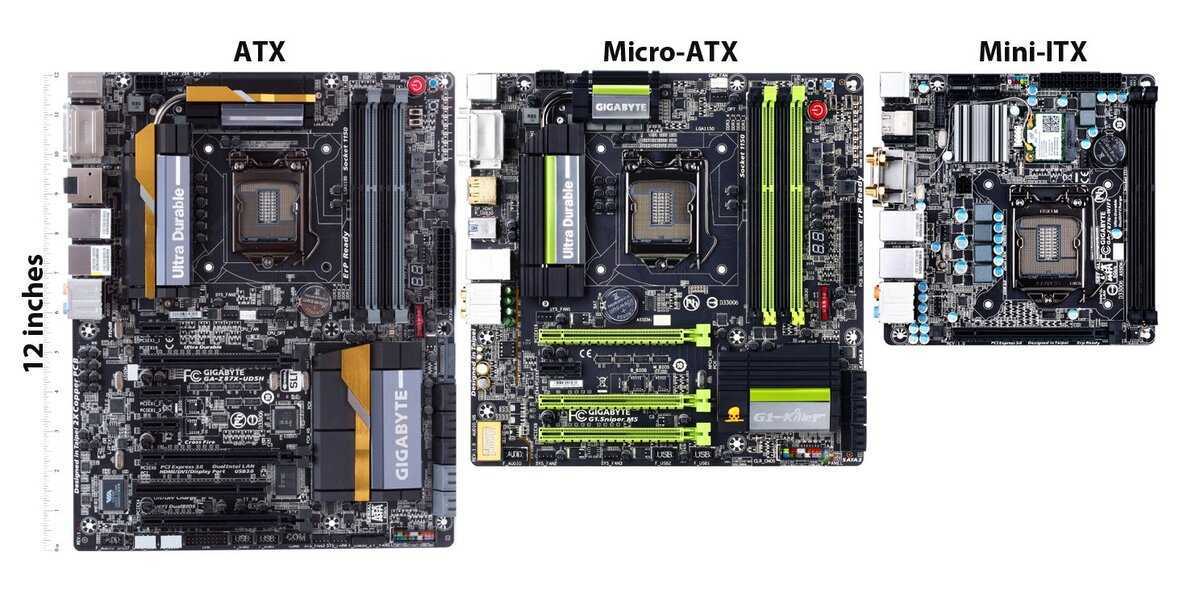 For example, as early as IDF Spring 2002, Intel demonstrated a prototype of a new system under the working title Tidewater. True, this platform was based on Micro ATX form factor motherboards. But for the first time announced there, the promising development of Big Water was positioned from the very beginning as a platform of the future, with its own set of specific elements — motherboards, cooling modules and other components. In fact, it was in early 2002 with the advent of the Big Water concept that the foundations were laid, which later resulted in the BTX form factor.
Time gradually puts everything in its place. The appearance of new form factors was prompted by the appearance of completely unusual heavy thermal modes of operation of desktop computer systems, as well as the emergence of the latest generation of components such as modern sockets for processors and PCI Express buses. On the other hand, the buyer went more capricious: the case with the design of a dog house no longer suits him, and the noise drives him crazy, and the dimensions are far from suitable for any .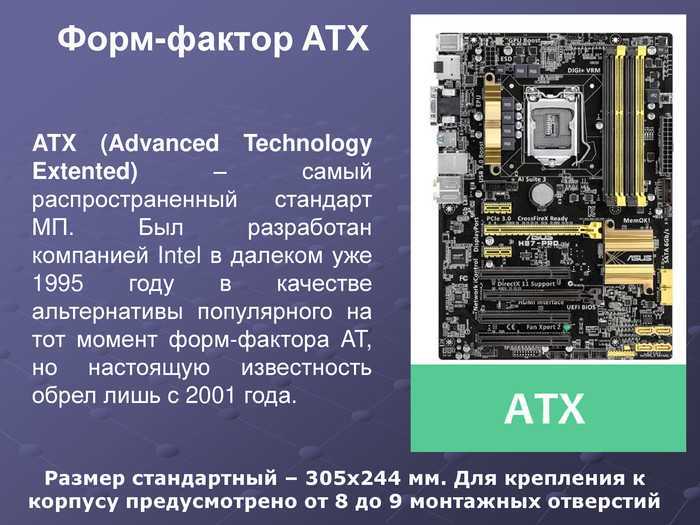 ..
..
BTX: considerations of expediency
In official documents, the purpose of BTX is formulated as follows: the Balanced Technology Extended specifications are designed to standardize interfaces and define form factors for desktop computing systems in the field of their electrical, mechanical and thermal properties. The specifications describe the mechanical and electrical interfaces for developing motherboards, chassis, power supplies, and other system components.
The main advantages of the new BTX form factor over the usual ATX look like this:
• Ability to use low-profile components to build miniature systems
• Thoughtful placement of system elements inside the case, taking into account airflow paths and interconnected thermal balance
• Form factor scalability: BTX, microBTX, picoBTX
• Ability to use small power supplies
• Optimized board mounting structure, better mechanical performance to handle larger motherboards and components
The BTX standard, it should be noted, is quite gentle in determining the dimensions of motherboards and cases for them. A new generation PC based on the new standard can look anything, it can be a typical Tower, an office «cube», a luxurious Entertainment PC with a respectable horizontal design, and a whole host of compact options invented and not yet invented.
The data sheet provides several examples of BTX layouts and, most importantly, explains in great detail, with air flow charts and thermal balance charts, why this layout is preferred.
However, each manufacturer has the right to take the specifications only as a basis in their mandatory part and create completely unique components. For example, could you imagine such an arrangement of a graphics card using a special adapter — PCI-Express suspension? Now it’s not just a reality, it’s now a standardized design.
BTX Details
The BTX specifications describe three main form factors of motherboards and cases, but in reality support for many more different sizes is implied. All boards have the same depth — 266.7 mm, but the width varies significantly in each case.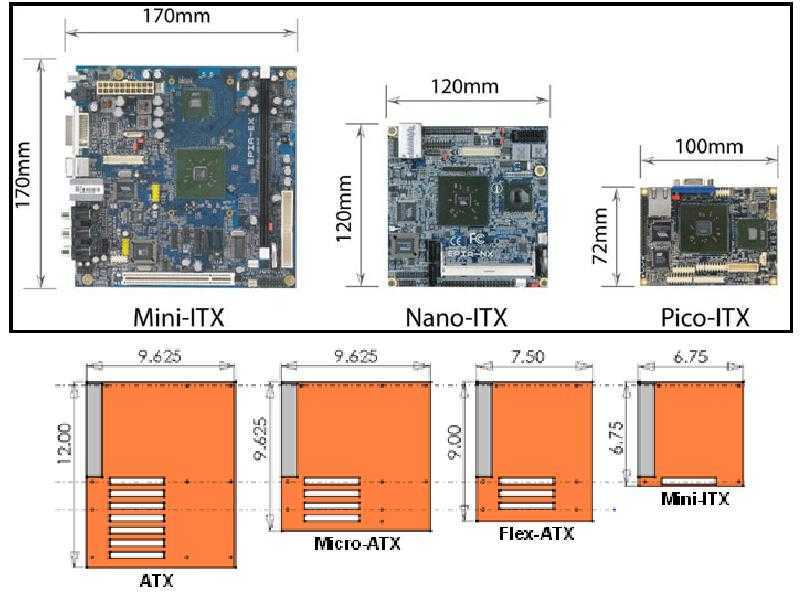
The standard BTX has a board width similar to that of the ATX, 325.12 mm. Support for up to 7 expansion slots is implied.
The microBTX format implies a board width of 264.16 mm. Supports up to 4 expansion slots.
The low profile picoBTX format is standardized to only 203.20 mm wide. Support for only one expansion slot is implied.
In general, it is worth noting that, despite the presence of at least three well-developed standard form factors — BTX, microBTX and picoBTX, Intel developers proposed two basic reference models of BTX systems that differ from each other in case volume and some strapping elements. That is, in practice we are dealing with two platform options — S1 (12.9L) BTX Reference Design (BTX) and S2 (6.9L) BTX Reference Design (picoBTX), whose case capacity is standardized at a design volume of 12.9 and 6.9 liters, respectively. Each of the platforms has a carefully calculated thermal design and detailed recommendations on the layout of elements.
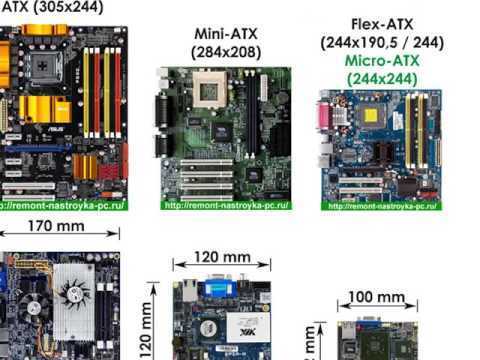
As part of this material, designed to acquaint the reader with the new form factor in general terms, we will not delve into the smallest details, fortunately, for this, a list of relevant literature is given at the end. However, anyone can open the comparison drawing below and appreciate the scaling principle of the BTX family form factors.
In fact, there is an analogy with the family of previous form factors — ATX, microATX and FlexATX, where scaling is to some extent built on a similar principle. However, it is worth mentioning that the development of BTX took into account the introduction of new generation buses and interfaces — PCI Express, Serial ATA, etc. That is why the main slot, present even in the picoBTX form factor, remains PCI Express, mainly for graphics. However, do not forget that the picoBTX form factor was immediately positioned for the use of some «mobile» interfaces like the «laptop» version of PCI Express — ExpressCard.
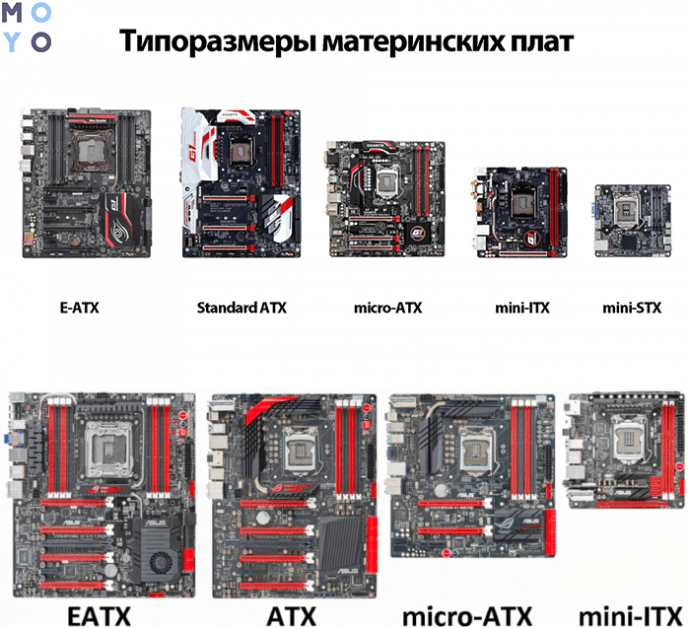
For a better comparison of BTX form factors, see the two illustrations below. As you can see, there is a clear sequence of growth of supported peripherals with the area of the «central computer» unchanged.
Of course, the formats of the BTX family did not come out of nowhere. The developers had to take into account the market dominance of ATX form factors and provide for backward compatibility with existing cases. That is why, by analogy with microATX boards, which are installed not only in microATX cases, but also in full-sized ATX cases, BTX form factor boards will easily be mounted in any of the current ATX cases — until there are enough specially designed under them are constructive. That is why the power connectors of BTX systems and the requirements for voltage stability have remained generally unchanged.
However, the system for attaching boards of form factors of the BTX family to the chassis has changed significantly and now, including for standardizing mounting holes, it is made using specialized support and retention modules — Support and Retention Module (SRM).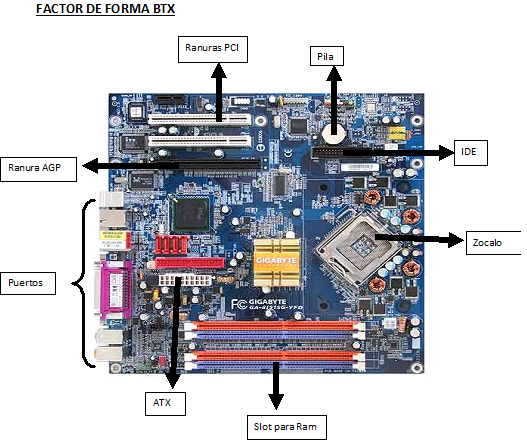
It is absolutely not necessary to assume that for the sake of a uniform fastener style, the weighting of the entire structure with an additional SRM plate was conceived. In fact, such a mechanism, along with giving additional rigidity to the entire structure, implies maintaining the optimal cooling regime for system components, especially the processor.
The organization of cooling of the BTX system components is perhaps the most detailed and lengthy chapter in the specifications of the standard. With the help of numerous formulas, graphs, tables and block diagrams, recommendations for ensuring optimal thermal conditions for each element of the system — processor, north and south bridges of the logic set, memory modules, graphics and other expansion cards are set out in the most detailed way.
Separately, air flows for various combinations of components are considered, for example, it is explained in detail why it is more profitable to place the planes of the processor socket and the northbridge case at an angle of 45º relative to the side walls, and not otherwise.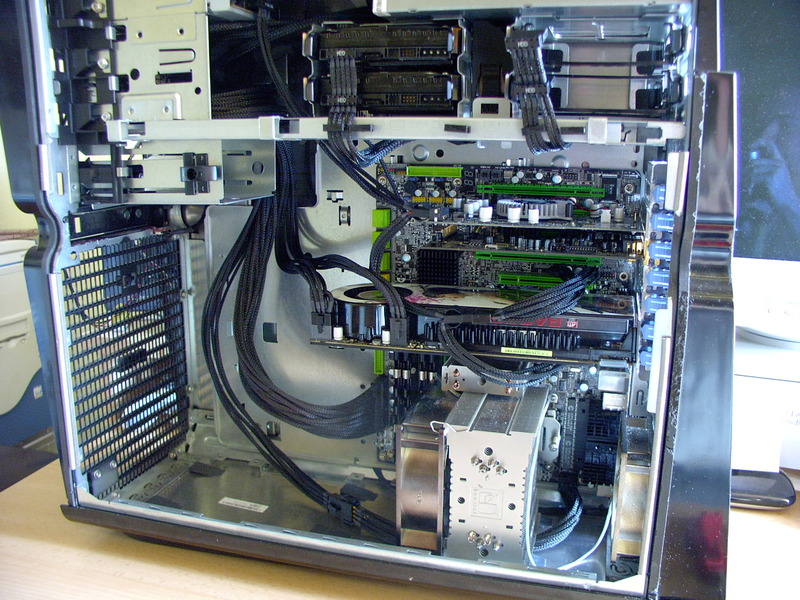 And this whole structure is crowned by a single cooling system — the so-called «thermal balance module» — Thermal Module, the fan of which is the «initiator» of creating air flows inside the BTX system. This does not mean at all that the Thermal Module is engaged in direct cooling of the processor and its socket, voltage stabilizers, memory modules, expansion cards and other elements of the system, however, «system blowing» with air flows is assigned to this module and it is thanks to it that heat removal from case and maintaining a stable temperature of components and subsystems.
The specifications describe two types of Thermal Module systems, the full-size Thermal Module Type I and the low-profile Thermal Module Type II, as well as two types of corresponding processor heatsinks. There is no clear separation of the types of thermal module for use with one or another form factor. It is worth relying on common sense here: for example, if a system is being designed with a productive processor and an expected heavy mode of its operation, it is more rational to use a full-size design.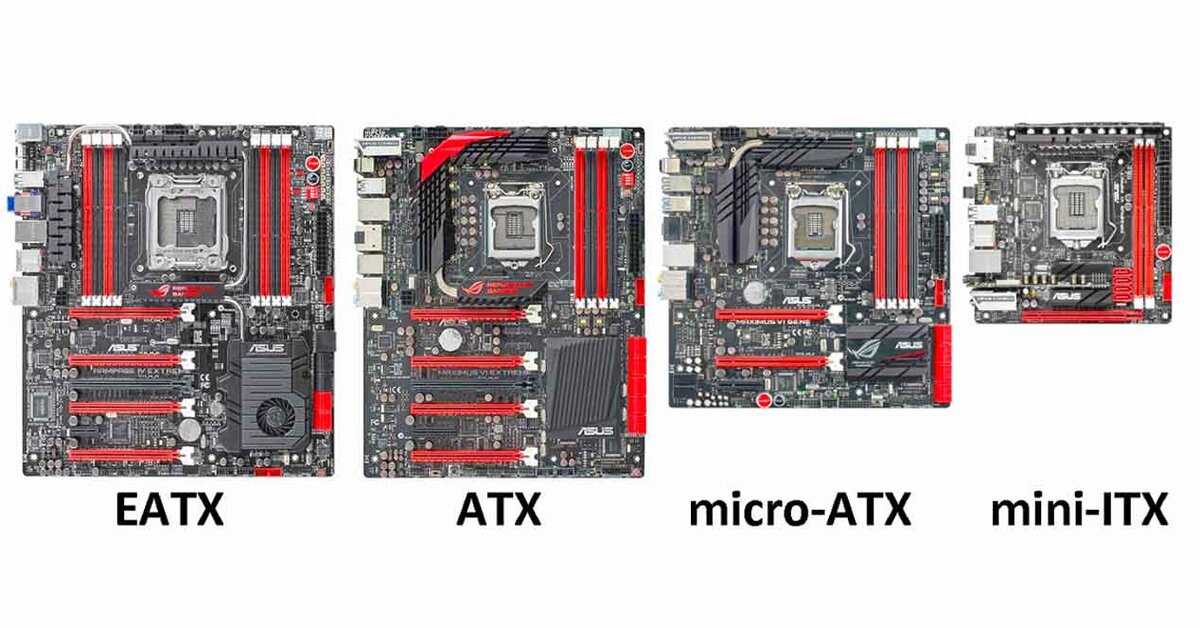 By default, it is recommended for most BTX systems and some high-performance microBTX systems. The low profile design is designed for compact and thin systems, however, it can also be used in any system. In short, everything is left to the discretion (and conscience) of the system integrator.
For a better understanding of the structural organization of the thermal balance modules, below are block diagrams of typical «sectional» options.
Thus, in contrast to the new fashion for hanging modern ATX cases with many additional «system» fans, a typical BTX system is equipped with fans for the thermal balance module and power supply, except that in serious tower structures you have to take care of additional airflow.
In general, the term Thermal Module refers to the processor cooling system and guide profiles to optimize airflow inside the case. It is interesting to note that when developing the BTX design, taking into account the internal pressure in the case, the smallest details of the layout were calculated, for example, the profile of figured cutouts and grilles in the chassis of the system, through which the flow of warm air exits much «slowing down».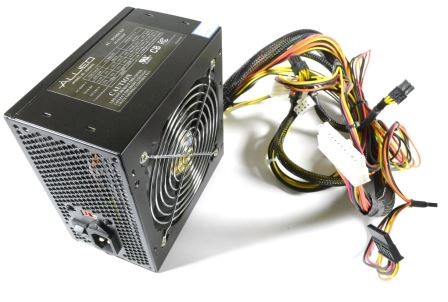
Check out the thermal image below of the BTX system, which clearly illustrates the benefits of intelligent air distribution inside the case. In practice, this means that individual attempts to optimize airflow inside an ATX case, which almost every one of us made on our own — through optimal cable management, selection of a «cunning» processor fan and layout of PCI cards, are taken into account in the BTX standard and thought out in advance, on a professional level.
The processor heatsink also deserves special mention. It is worth emphasizing that for different designs a specific type of processor cooling system has been developed. For example, in the case of a «classic» BTX system, the heatsink looks like this:
While for a low-profile system, the recommended type of processor cooling module has a more familiar look — a conventional stacked heatsink made of copper fins:
However, do not forget that the standard only makes recommendations, and there is no doubt that in the very near future cooler manufacturers will be happy to switch their attention to designing their cooling quirks for BTX. The main thing is that they satisfy the parameters set out in the standard.
From the outset, the developers of the new standard ensured that any system in the BTX form factor had the opportunity to pass a full range of test measurements to meet the requirements of the specifications before it was launched at retail. A very interesting document called Balanced Technology Extended (BTX) System Design Guide Version 1.0 details not only the smallest requirements for BTX systems, but also defines in detail the boundary parameters of compliance with the standard and the detailed characteristics of test equipment — «acoustic room», thermal and vibration stands, equipment for measuring electrical deviations.
A very, in my opinion, useful document for the future — the more accurate the technique, the higher the repeatability of measurements and the limits of requirements for system integrators. The technique will also allow third-party independent testing laboratories (like ours) to easily check the modes declared by the manufacturer and make their own verdict of the adequacy of the declared characteristics obtained during testing.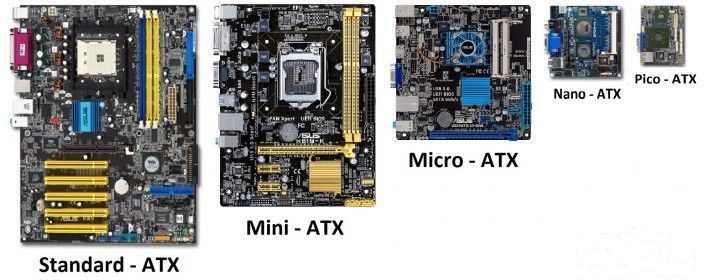 As well as the compliance of these parameters with the standard.
Distribution prospects of BTX
It would be naivety to think that, having first appeared in retail shortly before the new year 2005, the new form factor would have forced out its predecessors of the ATX family in a short time. Moreover, taking into account the backward compatibility of ATX cases with BTX boards, the new standard was originally designed for gradual implementation. Nevertheless, according to experts from Intel, BTX will dominate the market around 2006.
The forecast, in my opinion, is quite realistic: already the very first retail samples of systems in a very interesting and now in demand «cube» form factor were to the taste of many consumers. And the traditional manufacturers of SFF (Small Form Factor) barebone-«cubes», which initially perceived the BTX offensive as a threat to their own business with alarm, now are happy to switch to a new form factor. What can I say, for comparison, I will give the theoretical design design of such a Cube PC and the requirements for its temperature regime:
This is how the theoretical design of the Cube PC was seen by developers six months ago.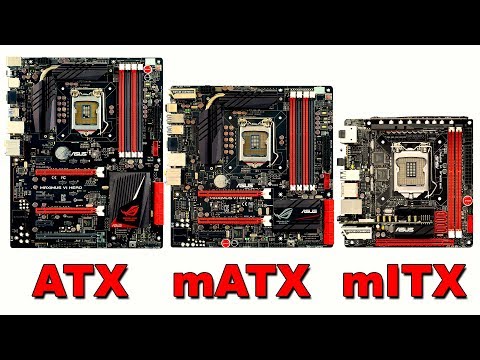 In fact, this resulted in the appearance of a similar construct from many manufacturers. As an example, I will give the Shuttle XPC SB86i BTX system.
Brief specifications:
• Motherboard: Shuttle FB86, Micro BTX, 266.7 x 264.2 mm
• Chipset: Intel 915G + ICH6R
• Processor: LGA775 Pentium 4/ Celeron D
P • Power supply: PSU CFX12V 275W
• One 5.25″ bay, two internal 3.5″ bays
• Slots: PCI Express 16X, PCI
• 8-channel audio (Realtek ALC880)
• Gigabit LAN (Broadcom 5751 GbE) on PCI-E bus
• Front connectors: 4 x USB 2.0, HD Audio, IEEE-1394
• Thermal Module Type 1
• Dimensions: 375 x 24 x 195 mm
• Weight: 4.2 kg
Thus, we can already talk about the beginning of the introduction of the BTX form factor to the mass market. So, last month, at the time of the official announcement of the start of deliveries of BTX solutions, Intel directly announced mass deliveries of the corresponding components — Pentium 4 530J, 550J and 560J processors, D9-class motherboards15GMH or D915GMHLPP, cooling systems, power supplies, enclosures and associated piping.