CHA_FAN On Your Motherboard — Everything You Need to Know
TABLE OF CONTENTS
1
Motherboards these days come in all shapes and sizes.
Form factors, chipsets, slots… And: all sorts of (fan) headers.
Well, many are asking us about a motherboard fan header that is labeled “CHA_FAN”.
So what is CHA_FAN and what is it used for?
Let’s find out!
What is CHA_FAN?
CHA FAN stands for chassis fan and is used for powering additional fans in your system through either 4-pin or 3-pin connectors.
Chassis is another word for your “PC Case”, and the CHA_FAN header, therefore, is mostly used to power and control your PC Case’s additional fans.
CHA_FAN Headers on an Asus B550 Motherboard
Depending on the motherboard you’re using, you will have anywhere between one and six CHA_FAN headers alongside CPU_FAN and potentially a CPU_OPT header too.
3-pin CHA FAN headers don’t have the ability to accurately adjust their RPM (rotations per minute). They typically run at maximum speed, though can slightly lower it down by lowering the voltage.
4-pin CHA FAN headers have pulse width modulation on the fourth wire which allows direct control over the RPM.
RPM can be controlled either through the BIOS, dedicated software, or the operating system. The adjustments are based on internal temperature data, either average system temperature or CPU temperature.
In the image below you can see how individual fans can be controlled by adjusting their fan curve and choosing the source temperature sensor.
In this MSI BIOS, the CHA_FAN1 Header would be controlled through the “System 1” tab, CHA_FAN2 Header through “System 2” and so on depending on where your case fans are plugged in to.
Some Motherboard manufacturers use the name “SYS_FAN” instead of CHA_FAN, but they are essentially the same thing.
Custom fan curve in an MSI UEFI BIOS – Source: MSI
What Other Types of PC Fan Headers Exist?
Of course, CHA FANS are only a part of the story! Motherboards have several other fan headers that serve different purposes.
Here’s a closer look:
CPU FAN
CPU FAN, as its name suggests, is used for powering and controlling your processors’ fan.
MSI B450 TOMAHAWK Motherboard
CPU FAN features a 4-pin connector with PWM so that the connected fan can easily be adjusted according to the constantly-changing CPU temperatures.
CPU OPT
CPU OPT stands for CPU Optional and is used for powering up additional CPU fans. For those of you who are wondering if there’s a tangible difference between CPU FAN and CPU OPT, there is!
CPU FAN is the default fan header for your CPU and if not connected (depending on your motherboard), it might even prevent your system from booting.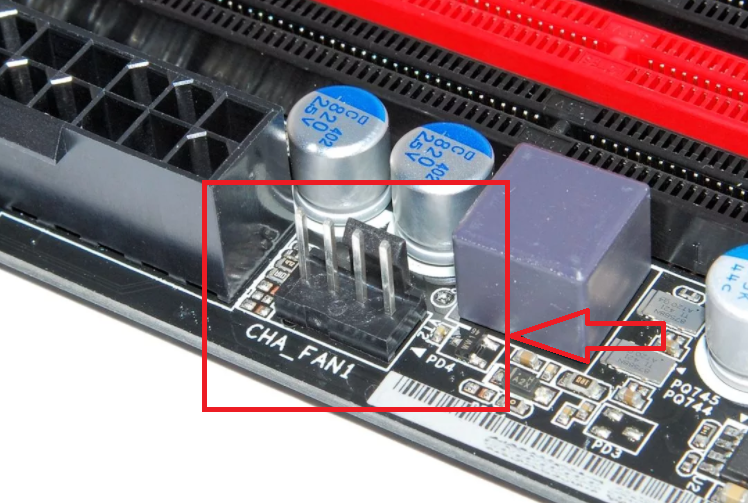
CPU OPT, on the other hand, serves as a secondary CPU FAN header but won’t prevent booting nor it will give you any error messages. So, in essence, CPU FAN is a must, CPU OPT is not (hence the name optional).
SYS FAN
Some motherboard manufacturers use SYS FAN labels instead of CHA FAN.
MSI B450 TOMAHAWK Motherboard
These are essentially the same exact thing – they’re used for system/chassis fans and come as either 3-pin or 4-pin variants.
Conclusion
Long story short – CHA FAN headers are the same as SYS FAN headers. They are in charge of powering system/chassis/case fans and typically come in 3-pin or 4-pin variants.
FAQ
What is a CHA FAN header?
CHA FAN header, often called SYS FAN header, is a connector on your motherboard used for powering and controlling your system/chassis/case fans.
Is CHA FAN the same as SYS FAN?
Yes, CHA FAN is the same as SYS FAN.
They’re both used for powering additional fans to help with your system’s airflow, and they can both come as either 3-pin or 4-pin variants.
Is CPU FAN the same as CPU OPT?
No, CPU FAN is not the same as CPU OPT.
In most systems, you need to connect a fan to the CPU FAN header, otherwise, your system might give you error codes and, in some cases, might not even boot at all.
As for CPU OPT, it’s an (optional) connector meant to power additional CPU fans you might have. You won’t experience any errors if there’s nothing connected to it.
Over to You
Does your motherboard have CHA_FAN or does it use a different label?
Tell us more in the comments below or on our forum with whatever issues or questions you may have on your motherboard’s fan labels.
CGDirector is Reader-supported. When you buy through our links, we may earn an affiliate commission.
Kann ein 3-Pin Gehäuselüfter an einem 4-Pin PWM-Port verwendet werden?
Aktiv
Inaktiv
Functional cookies are absolutely necessary for the functionality of the web shop. These cookies assign a unique random ID to your browser so that your unhindered shopping experience can be guaranteed over several page views.
Aktiv
Inaktiv
Diese Cookies werden verwendet, um anonymisiert Daten für Statistiken und Analysen zu erfassen und darauf basierend unsere Inhalte, die Funktionen unseres Onlineshops sowie Marketingaktivitäten zu optimieren und Werbung und/oder Inhalte in anderen Zusammenhängen, in weiterer Folge zu personalisieren.
Aktiv
Inaktiv
Aktiv
Inaktiv
Aktiv
Inaktiv
Aktiv
Inaktiv
Aktiv
Inaktiv
Aktiv
Inaktiv
Aktiv
Inaktiv
Wir nutzen Cookies, um Dir die bestmögliche Nutzung unserer Webseite zu ermöglichen und unsere Kommunikation mit Dir zu verbessern. Wir berücksichtigen hierbei Deine Präferenzen und verarbeiten Daten für Marketing und Analytics nur, wenn Du uns durch Klicken auf «Alle akzeptieren» Deine Einwilligung gibst oder über den Button „Präferenzen setzen“ eine spezifische Auswahl festlegst. Mehr Informationen
How to fix the CPU Fan Error when booting the computer
Likbez
Technologies
December 11, 2019
A black screen with an incomprehensible inscription instead of the usual Windows window is scary, but the problem is solved quite simply.
What does the CPU Fan Error mean? Press F1 to Resume
or CPU Fan Error! Press F1 to Run SETUP . As you might guess from the name, the computer self-diagnosis system reports a processor cooling fan error and prompts you to continue or run the settings.
Basically, you can press the F1 key to boot the system and work normally. But you should do this only if you are sure that everything is in order with the cooling and there is no risk of overheating of the processor.
What Causes a CPU Fan Error
The BIOS monitors voltage and other hardware parameters, including fan speeds, before and while the computer is running. The performance of the latter is determined by their rotation frequency.
Error CPU Fan Error! appears when the system detects low fan speeds or their complete absence. Without active cooling, the processor will quickly overheat, so the user is warned about this.
How to fix CPU Fan Error
1. Make sure the fan is spinning
Look inside the system unit, or rather carefully remove the side cover on the left side and check the rotation of the processor fan.
If the cooler is not spinning, then something is probably blocking it. Most often, the rotation of the blades is blocked by wires hanging from the power supply or a large accumulation of dust.
The solution is simple and straightforward: tie up the cables with plastic ties and remove the dust with compressed air and a brush. If the fan is heavily soiled, it may be necessary to remove it by unscrewing the screws or snapping off the latches. All this must be done, of course, when the computer is turned off.
2. Check if the connection is correct
If the fan is clean and easily rotated by hand, but does not rotate while the PC is running, it is most likely not properly connected to the connector on the motherboard.
The connector has a special key that prevents it from being inserted incorrectly into the intended place. And yet, out of ignorance or inattention, this can be done. Especially if you connect a fan with three wires.
Sometimes users get confused and connect the cooler to the wrong connector. There are several of them on the board, and the processor fan must be connected to the one marked as CPU_FAN . It’s easy to confuse it with the nearby CHA_FAN , which is actually a case cooler.
On the left is a connector on the board, on the right are fan connectors with a different number of wires. The purpose of the pins is always the same: 1 — «minus», 2 — «plus», 3 — speed sensor, 4 — speed control / Public domain / Pinterest / Artyom Kozoriz / Lifehacker
In both cases, you just need to insert the plug into the correct connector and so on so that the grooves on the connectors match. The next time you turn it on, everything will work as it should.
3. Increase fan speed
Public domain / Pinterest
In the BIOS settings, you can change the speed of rotation of the cooler. And error CPU Fan Error! often appears if the RPM is set too low. The system simply assumes that the fan is not spinning.
If you have changed these settings, you must disable the Smart Q‑FAN speed control and press F10 to save. You can also choose the speed at which the error will not appear. To do this, you need to gradually increase the speed, save the parameters and reboot to check.
4. Replace the fan
Public domain / Pinterest
In very rare cases, the lack of rotation can be caused by a failure of the cooler itself. You can check its performance by applying voltage from 5 to 12 volts to the connector. It is most convenient to use a Krona battery or four AA cells connected in series.
To do this, the “minus” of the batteries is connected to the connector pin number 1 (black wire), and the “plus” is connected to pin number 2 (red or yellow wire). If the fan does not turn on, you will have to replace it with a new one.
5. Disable rotation monitoring
If the cooler is connected to another connector on the motherboard or you intentionally lowered its speed in order to achieve silent operation, you can disable the rotation control function and, accordingly, get rid of the annoying error. This is only worth doing if you understand the risk of overheating or separately control the temperature using additional software like SpeedFan.
Public domain / Pinterest
To do this, find the CPU FAN Fail Warning option in the BIOS and disable it by setting it to Disabled or Ignored, then save the settings and restart the computer. In some boards, it may be called CPU FAN Speed or a little differently, but in approximately the same meaning.
Read also 🖥💽🔧
- How to reset the BIOS and revive the computer
- What to do if the computer’s USB ports do not work
- What to do if the Internet is lost on Windows
- What to do if your Windows computer slows down
- How to restore a hard drive
ASRock X670E Pro RS Motherboard
ASRock X670E Pro RS
- Support for AMD Ryzen™ 7000 Series Processors
- 14+2+1 Phase Power Design, SPS
- 4 x DDR5 DIMMs, supports up to 6600+(OC)
- 1 PCIe 5.0 x16,
- 2 PCIe 4.0 x1,
- 1 M.2 Key-E for WiFi support
- Graphic output device: 1 HDMI, 1 DisplayPort
- Realtek A LC897 7.1 HD Codec, Nahimic Audio
- 1 Blazing M.2 (PCIe Gen5x4),
- 3 Hyper M.2 (PCIe Gen4x4),
- 1 M.2 (PCIe Gen3x2 & SATA3),
- 6 SATA3
- 1 USB 3.
 2 Gen2x2 Type-C (Front),
 - 1 USB 3.2 Gen2 Type-C (Rear),
- 1 USB 3.2 Gen2 Type-A (Rear),
- 8 USB 3.2 Gen1 (4 Rear) , 4 Front)
- Realtek 2.5G LAN
- 802.11ax Wi-Fi 6E + Bluetooth
SPS (Smart Power Stage)
Latest SPS (Smart Power Stage) power distribution technology. Monitors the current and temperature on each phase, providing a smooth uniform power supply to the processor, improves system performance and provides the ability to overclock components.
Power System
Has durable components and evenly supplies power to the CPU. In addition, it features unrivaled overclocking capabilities with the lowest temperature for advanced gamers.
Low Loss Server Board
Server-grade PCB enhances signal integrity and supports PCIe 5.0 graphics cards and M.2 SSDs, and expands overclocking potential for extreme memory pumping.
8-layer PCB
A total of 8 PCB layers ensure stable electrical signal flow and voltage profiles, reducing temperatures and improving power efficiency when overclocking memory!
Reinforced DIMM Socket
The Reinforced DIMM socket is fixed on the surface of the motherboard to improve physical contact and signal throughput, and thanks to this solution, it becomes possible to overclock memory modules to crazy values.
DDR5 Protection
Due to the unique electrical architecture of DDR5 DIMMs, there is a risk of damage to memory modules if the AC power is incorrectly disconnected during installation or removal. ASRock has implemented a protection circuit on all DDR5 motherboards to reduce the risk of damage to memory modules.
PCIe Gen5 Blazing M.2
The Blazing M.2 slot supports the latest PCI Express 5.0 standard at twice the speed of the previous generation, up to 128Gbps, to unlock the full potential of future ultra-fast SSDs.
XXL M.2 Heatsink
Larger aluminum alloy M.2 heatsink efficiently dissipates excess heat to keep high-speed M.2 SSD temperatures cool, improving system stability under heavy loads.
PCIe 5.0 + Board Mount
Compared to conventional PCIe «DIP» type connectors, «PCIe SMT» type connectors improve signal throughput and stability at high speeds, which is critical for the PCIe 5.0 standard.
The latest PCI Express 5.0 interface delivers staggering speeds of up to 128Gbps, matching the potential of future high-end graphics cards.
Nahimic Audio System
Whether using headphones, a headset, external speakers or the built-in speaker, via USB, Wi-Fi, analog output or HDMI, Nahimic Audio provides the best sound experience with rich detail.
SPECIFICATIONS
Processor
— Supports AMD Socket AM5 Ryzen™ 7000 Series Processors
Chipset
— AMD X670
Memory
— Supports Dual Channel DDR5 Memory Technology
— 4 x DDR5 DIMM
— Support for DDR5 non-ECC, unbuffered up to 6600+(OC)
— Maximum memory: 128 GB
— Support for Extreme Memory Profile (XMP) and Extended Overclocking Profiles (EXPO) memory modules
BIOS
— 256MB AMI UEFI BIOS with graphics
Graphics
Integrated AMD RDNA™ 2 graphics (Depends on CPU model)
— 1 x HDMI 2. 1 TMDS/FRL 8G compatible, HDR, HDCP support 2.3 and max. resolution up to 4K 120Hz
— 1 x DisplayPort 1.4 with DSC (compressed), HDCP 2.3 support and max. resolution up to 4K 120Hz
Audio
— 7.1CH HD Codec (Realtek ALC897 Audio Codec)
— Nahimic Audio
LAN
— 2.5 Gigabit LAN 10/100/1000/2500 Mbps
— Dragon RTL8125BG
— Dragon 2.5G LAN Software support
— Smart traffic auto-tuning
— Intuitive visual interface
— Network statistics display
— Optimal default settings for games
— Configurable Priority Control
Wireless LAN
— 802.11ax Wi-Fi 6E Module
— Supports IEEE 802.11a/b/g/n/ac/ax
— Supports dual-band 2×2 with extended 6GHz support*
— 2 antennas with 2 (transmit) x 2 (receive) diversity
— Bluetooth + High speed class II support
— MU-MIMO support
*Wi-Fi 6E (6 GHz band) will be supported on Microsoft® Windows® 11. Operation of this communications standard may be subject to local laws. It will be activated (for compatible countries) via Windows® and software updates as available.
6E requires a compatible 6GHz router.
Sockets
CPU:
— 1 x PCIe 5.0 x16 Slot (PCIE1), supports in x16 mode*
Chipset:
— 2 x PCIe 4.0 x1 Slots (PCIE2 and PCIE3)* E), Support WiFi/BT PCIe WiFi module type 2230
— Gold Plated Pins 15? Gold on VGA PCIe (PCIE1)
*Supports NVMe SSD modules as boot drives
Storage
c) mode*
— 1 x Hyper Socket M.2 (M2_2, Key M), support type 2260/2280 PCIe Gen4x4 (64Gb/s) mode*
Chipset:
— 1 x Hyper M.2 Socket (M2_3, Key M), Support type 2260/2280 PCIe Gen4x4 (64 Gb/s) mode*
— 1 x M.2 Socket (M2_4, Key M), Support type 2242/2260/2280 SATA3 6.0 Gb/s & PCIe Gen3x2 (16 Gb/s) modes*
— 1 x Hyper Socket M.2 (M2_5, Key M), support type 2260/2280 PCIe Gen4x4 (64 Gb/s) ) mode*
— 6 x SATA3 6.0 Gb/s
*Supports NVMe SSD modules as boot drives
Supports ASRock U.2 Kit
RAID
— Supports RAID 0, RAID 1 and RAID 10 for SATA drives
— Supports RAID 0, RAID 1 and RAID 10 for M. 2 NVMe drives
Connectors
— 1 x SPI TPM
— 1 x Power indicator and speaker connector
— 1 x RGB LED header*
— 3 x Control header LED s**
— 1 x CPU Fan Header (4-pin)***
— 1 x CPU / Water Pump Fan Header (4-pin) (Smart Fan Speed Control)****
— 4 x Chassis Fan/Water Pump Connector (4-pin) (Smart Fan Speed Control)*****
— 1 x 24-pin ATX Power Connector (High Density Power Connectors)
— 1 x 8-pin 12V Power Connector (High Density Power Connectors)
— 1 x 4-pin 12V Power Connector (High Density Power Connectors)
— 1 x Front Panel Audio Out
— 2 x USB 2.0 (supports up to four USB 2.0)
— 2 x USB 3.2 Gen1s (supports up to four USB 3.2 Gen1)
— 1 x Front Panel Type C USB 3.2 Gen2x2 Header (20Gb/s)
*Supports LED strip 12V/3A, 36W
**Support in total up to 5V/3A, 15W LED Strip
***CPU_FAN1 Support the fan power up to 1A (12W).
****CPU_FAN2/WP Support for the fan power up to 2A (24W).
*****CHA_FAN1~4/WP support the fan power up to 2A (24W).
CPU_FAN2/WP and CHA_FAN1~4/WP are detected automatically when installing fans with 3- or 4-pin connectors.
Rear I/O Panel
— 2 x Antenna Connectors
— 1 x HDMI
— 1 x DisplayPort 1.4
— 1 x Optical SPDIF Out
— 1 x USB 3.2 Gen2 Type-A (10 Gb/s) (ReDriver )
— 1 x USB 3.2 Gen2 Type-C (10 Gb/s) (ReDriver)
— 4 x USB 3.2 Gen1
— 4 x USB 2.0
— 1 x RJ-45 LAN
— 1 x BIOS Flashback Switch
— 1 x Audio Output Jack (Gold Audio Jack)
— 1 x Microphone Input Jack (Gold Audio Jack)
Source: https://www.asrock.com/mb/AMD/X670E%20Pro%20RS/ index.ru.asp#Overview
Specifications Motherboard ASRock X670E Pro RS
| Form factor | ATX |
| AM5 | |
| Chipset | AMD X670E |
| Memory type | DDR5 |
| Number of DDR slots | 4 |
| PCI slots | PCIe x1*2 slots, PCIe x16 |
| 3.0, 5.0 | |
| SATA connectors | SATA III*6 |
| SSD connectors | M.2*4 |
| Video connectors | HDMI, DP |
| USB connectors | USB 2.0*6, USB 3.
|