Apple M1 Ultra review | 64 facts and highlights
100points
Apple M1 Ultra
Apple M1 Ultra
Why is Apple M1 Ultra better than the average?
- CPU speed?
16 x 3.2GHz & 4 x 2GHzvs12.49GHz - RAM speed?
6400MHzvs2487.99MHz - CPU threads?
20vs7.73 - GPU clock speed?
1300MHzvs419.67MHz - Semiconductor size?
5nmvs17nm - L2 cache?
48MBvs2.23MB - PassMark result?
41261vs8672.34 - Maximum memory bandwidth?
800GB/svs37.7GB/s
Which are the most popular comparisons?
Apple M1 Ultra
vs
Intel Core i9-12900K
Apple M1 Ultra
vs
AMD Ryzen Threadripper Pro 5995WX
Apple M1 Ultra
vs
AMD Ryzen Threadripper 3990X
Apple M1 Ultra
vs
Apple M2
Apple M1 Ultra
vs
Intel Core i5-10300H
Apple M1 Ultra
vs
Intel Xeon W-11955M
Apple M1 Ultra
vs
AMD Ryzen 9 7950X
Apple M1 Ultra
vs
Intel Core i9-13900K
Apple M1 Ultra
vs
Apple M1 Max
Apple M1 Ultra
vs
AMD Ryzen Threadripper Pro 3995WX
Price comparison
User reviews
Overall Rating
Apple M1 Ultra
7 User reviews
Apple M1 Ultra
7. 3/10
7 User reviews
Features
Value for money
6.3/10
7 votes
Gaming
5.4/10
7 votes
Performance
6.9/10
7 votes
Reliability
6.9/10
7 votes
Energy efficiency
6.9/10
7 votes
Performance
1.CPU speed
16 x 3.2GHz & 4 x 2GHz
The CPU speed indicates how many processing cycles per second can be executed by a CPU, considering all of its cores (processing units). It is calculated by adding the clock rates of each core or, in the case of multi-core processors employing different microarchitectures, of each group of cores.
2.CPU threads
More threads result in faster performance and better multitasking.
3.turbo clock speed
Unknown. Help us by suggesting a value.
When the CPU is running below its limitations, it can boost to a higher clock speed in order to give increased performance.
4.Has an unlocked multiplier
✖Apple M1 Ultra
Some processors come with an unlocked multiplier which makes them easy to overclock, allowing you to gain increased performance in games and other apps.
5.L2 cache
A larger L2 cache results in faster CPU and system-wide performance.
6.L3 cache
Unknown. Help us by suggesting a value.
A larger L3 cache results in faster CPU and system-wide performance.
7.L1 cache
A larger L1 cache results in faster CPU and system-wide performance.
8.L2 core
Unknown. Help us by suggesting a value.
More data can be stored in the L2 cache for access by each core of the CPU.
9.L3 core
Unknown. Help us by suggesting a value.
More data can be stored in the L3 cache for access by each core of the CPU.
Memory
1.RAM speed
6400MHz
It can support faster memory, which will give quicker system performance.
2.maximum memory bandwidth
800GB/s
This is the maximum rate that data can be read from or stored into memory.
3.DDR memory version
DDR (Double Data Rate) memory is the most common type of RAM. Newer versions of DDR memory support higher maximum speeds and are more energy-efficient.
4.memory channels
More memory channels increases the speed of data transfer between the memory and the CPU.
5.maximum memory amount
The maximum amount of memory (RAM) supported.
6.bus transfer rate
Unknown. Help us by suggesting a value.
The bus is responsible for transferring data between different components of a computer or device.
7.Supports ECC memory
✖Apple M1 Ultra
Error-correcting code memory can detect and correct data corruption. It is used when is it essential to avoid corruption, such as scientific computing or when running a server.
8.eMMC version
Unknown. Help us by suggesting a value.
A higher version of eMMC allows faster memory interfaces, having a positive effect on the performance of a device. For example, when transferring files from your computer to the internal storage over USB.
9.bus speed
Unknown. Help us by suggesting a value.
The bus is responsible for transferring data between different components of a computer or device.
Benchmarks
1.PassMark result
This benchmark measures the performance of the CPU using multiple threads.
2.PassMark result (single)
This benchmark measures the performance of the CPU using a single thread.
3.Geekbench 5 result (multi)
Geekbench 5 is a cross-platform benchmark that measures a processor’s multi-core performance. (Source: Primate Labs, 2022)
4.Cinebench R20 (multi) result
Unknown. Help us by suggesting a value.
Cinebench R20 is a benchmark tool that measures a CPU’s multi-core performance by rendering a 3D scene.
5.Cinebench R20 (single) result
Unknown. Help us by suggesting a value.
Cinebench R20 is a benchmark tool that measures a CPU’s single-core performance by rendering a 3D scene.
6.Geekbench 5 result (single)
Geekbench 5 is a cross-platform benchmark that measures a processor’s single-core performance. (Source: Primate Labs, 2022)
7.Blender (bmw27) result
Unknown. Help us by suggesting a value.
The Blender (bmw27) benchmark measures the performance of a processor by rendering a 3D scene. More powerful processors can render the scene in less time.
8.Blender (classroom) result
Unknown. Help us by suggesting a value.
The Blender (classroom) benchmark measures the performance of a processor by rendering a 3D scene. More powerful processors can render the scene in less time.
9.performance per watt
Unknown. Help us by suggesting a value.
This means the CPU is more efficient, giving a greater amount of performance for each watt of power used.
Features
1.uses multithreading
✖Apple M1 Ultra
Multithreading technology (such as Intel’s Hyperthreading or AMD’s Simultaneous Multithreading) provides increased performance by splitting each of the processor’s physical cores into virtual cores, also known as threads. This way, each core can run two instruction streams at once.
2.Has AES
✖Apple M1 Ultra
AES is used to speed up encryption and decryption.![]()
3.Has AVX
✖Apple M1 Ultra
AVX is used to help speed up calculations in multimedia, scientific and financial apps, as well as improving Linux RAID software performance.
4.SSE version
Unknown. Help us by suggesting a value.
SSE is used to speed up multimedia tasks such as editing an image or adjusting audio volume. Each new version contains new instructions and improvements.
5.Has F16C
✖Apple M1 Ultra
F16C is used to speed up tasks such as adjusting the contrast of an image or adjusting volume.
6.bits executed at a time
Unknown. Help us by suggesting a value.
NEON provides acceleration for media processing, such as listening to MP3s.
7.Has MMX
✖Apple M1 Ultra
MMX is used to speed up tasks such as adjusting the contrast of an image or adjusting volume.
8.Has TrustZone
✔Apple M1 Ultra
A technology integrated into the processor to secure the device for use with features such as mobile payments and streaming video using digital rights management (DRM).
9.front-end width
The CPU can decode more instructions per clock (IPC), meaning that the CPU performs better
Price comparison
Cancel
Which are the best CPUs?
AMD Ryzen Threadripper 3990X review
94points
AMD Ryzen Threadripper 3990X
AMD Ryzen Threadripper 3990X
Why is AMD Ryzen Threadripper 3990X better than the average?
- CPU speed?
64 x 2.9GHzvs12.49GHz - RAM speed?
3200MHzvs2487.99MHz - CPU threads?
128vs7.73 - Semiconductor size?
7nmvs17nm - L2 cache?
32MBvs2.23MB - Turbo clock speed?
4. 3GHzvs3.83GHz
 - PassMark result?
81363vs8672.34 - L3 cache?
256MBvs9.55MB
Which are the most popular comparisons?
AMD Ryzen Threadripper 3990X
vs
Intel Core i9-10980XE
AMD Ryzen Threadripper 3990X
vs
AMD Ryzen 9 5950X
AMD Ryzen Threadripper 3990X
vs
Apple M1 Ultra
AMD Ryzen Threadripper 3990X
vs
AMD Ryzen 9 3950X
AMD Ryzen Threadripper 3990X
vs
AMD Ryzen Threadripper Pro 5995WX
AMD Ryzen Threadripper 3990X
vs
Apple M1
AMD Ryzen Threadripper 3990X
vs
AMD Ryzen Threadripper Pro 3995WX
AMD Ryzen Threadripper 3990X
vs
Intel Core i9-12900K
AMD Ryzen Threadripper 3990X
vs
AMD Ryzen Threadripper 3970X
AMD Ryzen Threadripper 3990X
vs
Intel Core i9-9900K
Price comparison
Cheap alternatives for AMD Ryzen Threadripper 3990X
User reviews
Overall Rating
AMD Ryzen Threadripper 3990X
3 User reviews
AMD Ryzen Threadripper 3990X
10. 0/10
0/10
3 User reviews
Features
Value for money
9.0/10
3 votes
Gaming
10.0/10
3 votes
Performance
10.0/10
3 votes
Reliability
10.0/10
3 votes
Energy efficiency
9.0/10
3 votes
Performance
1.CPU speed
64 x 2.9GHz
The CPU speed indicates how many processing cycles per second can be executed by a CPU, considering all of its cores (processing units). It is calculated by adding the clock rates of each core or, in the case of multi-core processors employing different microarchitectures, of each group of cores.
2.CPU threads
More threads result in faster performance and better multitasking.
3.turbo clock speed
4.3GHz
When the CPU is running below its limitations, it can boost to a higher clock speed in order to give increased performance.
4.Has an unlocked multiplier
✔AMD Ryzen Threadripper 3990X
Some processors come with an unlocked multiplier which makes them easy to overclock, allowing you to gain increased performance in games and other apps.
5.L2 cache
A larger L2 cache results in faster CPU and system-wide performance.
6.L3 cache
A larger L3 cache results in faster CPU and system-wide performance.
7.L1 cache
4000KB
A larger L1 cache results in faster CPU and system-wide performance.
8.L2 core
0.5MB/core
More data can be stored in the L2 cache for access by each core of the CPU.
9.L3 core
4MB/core
More data can be stored in the L3 cache for access by each core of the CPU.
Memory
1.RAM speed
3200MHz
It can support faster memory, which will give quicker system performance.
2.maximum memory bandwidth
95.37GB/s
This is the maximum rate that data can be read from or stored into memory.
3.DDR memory version
DDR (Double Data Rate) memory is the most common type of RAM. Newer versions of DDR memory support higher maximum speeds and are more energy-efficient.
4.memory channels
More memory channels increases the speed of data transfer between the memory and the CPU.
5.maximum memory amount
The maximum amount of memory (RAM) supported.
6.bus transfer rate
Unknown. Help us by suggesting a value.
The bus is responsible for transferring data between different components of a computer or device.
7.Supports ECC memory
✔AMD Ryzen Threadripper 3990X
Error-correcting code memory can detect and correct data corruption. It is used when is it essential to avoid corruption, such as scientific computing or when running a server.
8.eMMC version
Unknown. Help us by suggesting a value.
A higher version of eMMC allows faster memory interfaces, having a positive effect on the performance of a device. For example, when transferring files from your computer to the internal storage over USB.
9.bus speed
Unknown. Help us by suggesting a value.
The bus is responsible for transferring data between different components of a computer or device.
Benchmarks
1.PassMark result
This benchmark measures the performance of the CPU using multiple threads.
2.PassMark result (single)
This benchmark measures the performance of the CPU using a single thread.
3.Geekbench 5 result (multi)
Geekbench 5 is a cross-platform benchmark that measures a processor’s multi-core performance. (Source: Primate Labs, 2022)
4.Cinebench R20 (multi) result
Cinebench R20 is a benchmark tool that measures a CPU’s multi-core performance by rendering a 3D scene.
5.Cinebench R20 (single) result
Cinebench R20 is a benchmark tool that measures a CPU’s single-core performance by rendering a 3D scene.
6.Geekbench 5 result (single)
Geekbench 5 is a cross-platform benchmark that measures a processor’s single-core performance. (Source: Primate Labs, 2022)
7.Blender (bmw27) result
30seconds
The Blender (bmw27) benchmark measures the performance of a processor by rendering a 3D scene. More powerful processors can render the scene in less time.
8.Blender (classroom) result
88.6seconds
The Blender (classroom) benchmark measures the performance of a processor by rendering a 3D scene. More powerful processors can render the scene in less time.
9.performance per watt
This means the CPU is more efficient, giving a greater amount of performance for each watt of power used.
Features
1.uses multithreading
✔AMD Ryzen Threadripper 3990X
Multithreading technology (such as Intel’s Hyperthreading or AMD’s Simultaneous Multithreading) provides increased performance by splitting each of the processor’s physical cores into virtual cores, also known as threads. This way, each core can run two instruction streams at once.
2.Has AES
✔AMD Ryzen Threadripper 3990X
AES is used to speed up encryption and decryption.
3.Has AVX
✔AMD Ryzen Threadripper 3990X
AVX is used to help speed up calculations in multimedia, scientific and financial apps, as well as improving Linux RAID software performance.
4.SSE version
SSE is used to speed up multimedia tasks such as editing an image or adjusting audio volume. Each new version contains new instructions and improvements.
5.Has F16C
✔AMD Ryzen Threadripper 3990X
F16C is used to speed up tasks such as adjusting the contrast of an image or adjusting volume.
6.bits executed at a time
Unknown. Help us by suggesting a value.
NEON provides acceleration for media processing, such as listening to MP3s.
7.Has MMX
✔AMD Ryzen Threadripper 3990X
MMX is used to speed up tasks such as adjusting the contrast of an image or adjusting volume.
8.Has TrustZone
✖AMD Ryzen Threadripper 3990X
A technology integrated into the processor to secure the device for use with features such as mobile payments and streaming video using digital rights management (DRM)./i.s3.glbimg.com/v1/AUTH_08fbf48bc0524877943fe86e43087e7a/internal_photos/bs/2020/B/B/JewxHRSGCRAmrBeqIbAg/intel.png)
9.front-end width
Unknown. Help us by suggesting a value.
The CPU can decode more instructions per clock (IPC), meaning that the CPU performs better
Price comparison
Cancel
Which are the best CPUs?
Migrating to Microsoft Sentinel: Upgrading SOC Processes and Analysts
- Article
- Reading takes 5 minutes
The Information Security Center (SOC) is a centralized function within an organization that integrates people, processes, and technology. The SOC implements an organization’s overall cybersecurity platform. The SOC brings together organizational efforts to monitor, alert, prevent, detect, analyze, and respond to cybersecurity incidents. SOC teams led by the SOC Manager may include Incident Response Specialists, Level 1, 2, and 3 SOC Analysts, Threat Finders, and Incident Response Managers.
SOC teams use telemetry data from the IT infrastructure across the organization, including networks, devices, applications, activities, devices, and information stores. The teams then correlate and analyze the data to determine how to manage it and what actions to take.
To successfully migrate to Microsoft Sentinel, you must upgrade not only the technology that the SOC uses, but also the tasks and processes of the SOC itself. This article describes how to upgrade the Information Security Center and Analyst processes as part of the migration to Microsoft Sentinel.
Analyst workflow update
Microsoft Sentinel offers a range of tools designed for the typical analyst workflow, from assigning incidents to closing. Analysts have the flexibility to use some or all of the available tools to review and investigate incidents. As your organization migrates to Microsoft Sentinel, analysts must adapt to these new toolkits, features, and workflows.
Microsoft Sentinel 9 Incidents0025
In Microsoft Sentinel, an incident is a collection of alerts that Microsoft Sentinel determines to be accurate enough to trigger an incident. Thus, when using Microsoft Sentinel, the analyst first analyzes the incidents on page Incidents and then moves on to analyze alerts if a deeper dive is required. Compare your incident terminology and SIEM management scopes with Microsoft Sentinel.
Analyst workflow steps
This table describes the key steps in the Analyst workflow and highlights specific tools related to each activity within the workflow.
| Assignment | Review | Analysis | Remedy |
|---|---|---|---|
| Assignment of incidents : • Manually on page Incidents • Automatically using schematic books or automation rules |
Reviewing incidents using the following details: • Incident details on page Incident • Entity details on page Incident on tab Entities • Jupyter notebooks |
Analyze incidents using the following tools: • Analytic Graph • Microsoft Sentinel Books • Log Analytics Query Window |
Incident Response using the following tools: • Diagram Books and Automation Rules • Microsoft Teams WAR Room |
The following sections map analyst terminology and workflow to specific Microsoft Sentinel features.
Assign
Use the Incidents page in Microsoft Sentinel to assign incidents. Page Incidents includes a preview of the incident and a detailed view for individual incidents.
To assign an incident, follow these steps:
- Manual . Set field Owner to the appropriate username.
- Automatic . Apply a custom solution based on Microsoft Teams and Logic Apps, or an automation rule.
Investigation
To conduct a review exercise in Microsoft Sentinel, you can start with different features of Microsoft Sentinel, depending on your level of knowledge and the nature of the incident you are investigating. Choose 9 as a typical starting point0027 View full details of on page Incident . There you can explore the alerts that make up the incident, view bookmarks, select specific entities to drill down on, or add comments.
The following are recommended actions to further review the incident:
- Select Analyze to visually represent the relationships between incidents and their respective entities.
- Use the Jupyter Notebook to do an activity to take a deeper look at a particular entity. Notebook 9 can be used for this exercise.0027 Incident handling .
Faster review
Use the following features and options to speed up the review process:
- For quick filtering, on the Incidents page, find incidents related to a specific entity. Filtering by entity on page Incidents is faster than filtering by entity column in legacy SIEM incident queues.
- To speed up review, use window Alert details to include key incident details in the incident name and description, including the associated username, IP address, or host. For example, an incident can be dynamically renamed to
Ransomware activity detected in DC01, whereDC01is a critical resource dynamically identified using custom alert properties.
- For a deeper analysis, on page Incidents select an incident and press Events in section Evidence to view the specific events that led to the incident. The event data appears as the output of the query associated with the analytic rule, not the raw event. The rule migration engineer can use this output to make sure the analyst is getting the right data.
- For details on an entity, on page Incidents , select the incident and entity name in section Entities to view catalog, timeline, and analytic details of an entity. Learn how to map entities.
- Select Incident Preview to link to the relevant books. You can customize the workbook to display additional incident details or related entities and custom fields.
Analysis
Use the analysis graph to analyze incidents in more depth. On page Incidents select an incident and click Analyze to view the analysis graph.
Using the analytic graph, you can:
- Scope and identify the root cause of a potential security threat by associating relevant data with any relevant entity.
- Explore the entities in detail and select different extension options.
- Easily view connections between different data sources by analyzing the connections automatically extracted from the raw data.
- Expand the scope of the investigation using built-in investigation queries to present the threat in its entirety.
- Use standard research options to ask the right questions in the threat analysis process.
Books can also be opened in the analysis graph to further assist the analysis process. Microsoft Sentinel includes several book templates that you can customize to suit your specific use case.
Remediation
Use Microsoft Sentinel’s automatic response capabilities to respond to complex threats and reduce alerts. Microsoft Sentinel provides automatic response with Logic Apps automation schemas and rules.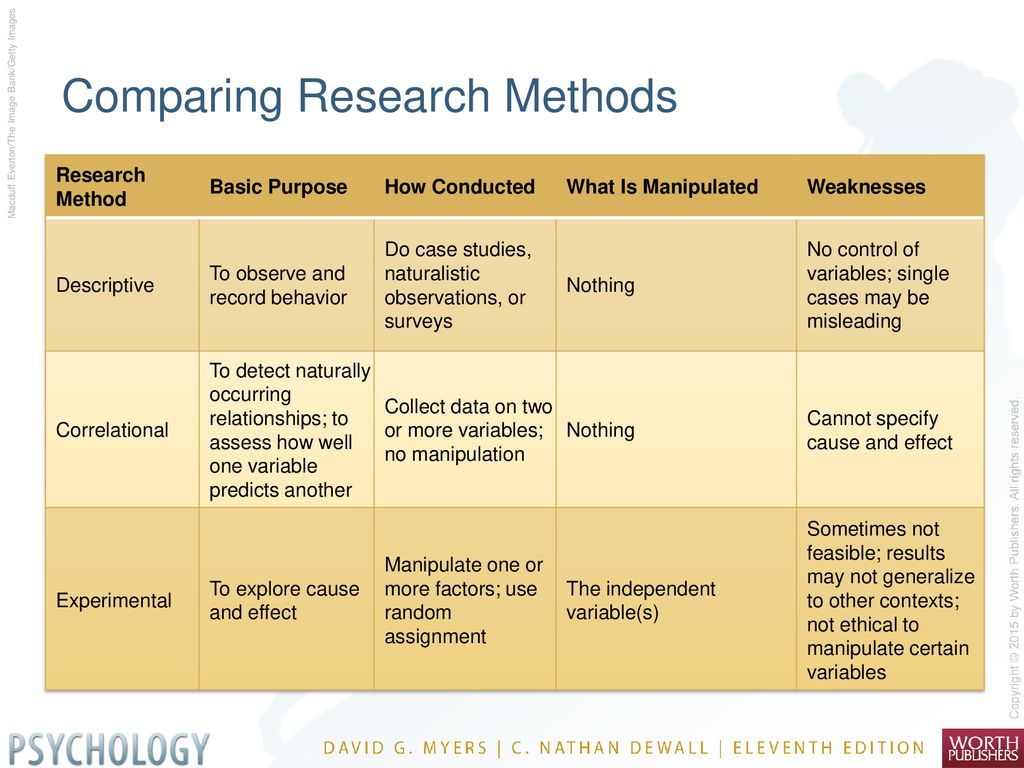
You can use one of the following options to access the schematic books:
- Templates tab Automation > Schematic Book
- Microsoft Sentinel 9 Content Center0004
- GitHub repository in Microsoft Sentinel
These sources include a wide range of safety-oriented circuit collections that cover a wide variety of use cases of varying complexity. To optimize your work with schematic books, use the templates in the Templates section Automation > Schematic Books . Templates make it easy to deploy diagram collections to a Microsoft Sentinel instance and then modify diagram collections to meet the needs of your organization.
Review the SOC process framework to map the SOC process to Microsoft Sentinel capabilities.
Comparison of SIEM concepts
Use this table to compare the core concepts of legacy SIEM with Microsoft Sentinel concepts.
| ArcSight | QRadar | Splunk | Microsoft Sentinel |
|---|---|---|---|
| Event | Event | Event | Event |
| Correlation event | Correlation event | Important event | Alert |
| Incident | Offense | Important event | Incident |
| List of offenses | Tags | Incidents Page | |
| Tags | Custom field in SOAR | Tags | Tags |
| Jupyter Notebook | Jupyter Notebook | Microsoft Sentinel Notebooks | |
| Dashboards | Dashboards | Dashboards | Workbooks |
| Correlation rules | Standard blocks | Correlation rules | Analytics rules |
| Incident queue | Offenses Tab | Incident overview | Page Incident |
What to do next
After migrating, review Microsoft Sentinel resources to expand your skills and get the most out of Microsoft Sentinel.
We also recommend strengthening your threat protection by using Microsoft Sentinel with Microsoft 365 Defender and Microsoft Defender for the Cloud for integrated threat protection. Take advantage of the rich monitoring in Microsoft Sentinel and deep-dive into detailed threat intelligence.
For more information, see Section
- Rule Migration Guidelines
- Webinar: Best Practices for Converting Discovery Rules
- Orchestration, Automation, and Security Response (SOAR) in Microsoft Sentinel
- Improved SOC management with incident metrics
- Microsoft Sentinel Learning Path
- Certificate SC-200 Microsoft Security Operations Analyst
- Become an expert in Microsoft Sentinel
- Investigating an attack in a hybrid environment using Microsoft Sentinel
Merge and rebase comparison | Atlassian Git Tutorial
The git rebase command is often used as a dangerous dark magic to scare beginners. In fact, it can make life a lot easier for a development team if used correctly. This article compares the command
 git rebase with the similar command git merge and describes all the possible situations in which it is appropriate to include a rebase in the standard Git workflow.
Highlights overview
First of all, you need to understand that the git rebase command solves the same problem as the git merge command. Both commands are designed to incorporate changes from one branch into another, but do so in different ways.
Imagine that you start working on a new feature on a separate branch, and then another team member adds new commits to the main branch main . There is a history of forks that is familiar to anyone who has used Git for collaboration.
Now suppose that the new commits in the main branch main affect the feature you are working on. There are two options for including new commits into your feature branch feature : merge or rebase.
Merge method
The easiest way to merge the main branch into a feature branch is with the following command:0015
git merge feature main
This operation creates a new «merge commit» on branch feature that links the histories of both branches. The branch structure will look like this:
Merge is an excellent non-destructive operation. Existing branches are not changed in any way. This operation avoids the potential problems associated with running the rebase command (and described below).
On the other hand, this means that every time you need to commit upstream changes to feature branch feature will hit an external merge commit. If there is active work on main branch main , your feature branch history will quickly get clogged. While this problem can be fixed using advanced variations of the git log command, other developers will have a hard time understanding the history of the project.
Rebase method
Instead of merging, you can rebase feature branch feature to master branch main with the following commands:
 git checkout feature
 git rebase main
This will put the entire feature branch feature on top of the main branch main , including all new commits in the main branch. If rebase is used instead of the merge command for commits, this command overwrites the project’s history, creating new commits for each commit in the source branch.
The main benefit of rebase is a cleaner project history. First, this command eliminates unnecessary merge commits required for git merge . Secondly, as shown in the picture above, the rebase command creates a perfect linear history of the project — you will be able to trace the functionality of back to the very beginning of the project without any forks. This makes it easier to navigate the project with commands like git log , git bisect , and gitk .
However, such an impeccable commit history comes at a sacrifice: security and traceability. If the Golden Rule of Rebase is not followed, rewriting project history can be disastrous for collaborative workflows. Also, doing a rebase loses the context available in the merge commit: you won’t be able to see when upstream changes were included in the feature.
Interactive rebase
An interactive rebase operation allows you to modify commits as they are moved to a new branch. This option provides even more power than automatic rebase because it gives you complete control over the branch’s commit history. It’s usually used to clean up obfuscated history before the feature branch is merged into the master branch main .
To start an interactive rebase, pass parameter i command git rebase :
 git checkout feature
 git rebase -i main
A text editor will open. It will list all the commits that are ready to be moved:
 pick 33d5b7a Message for commit #1
 pick 9480b3d Message for commit #2
 pick 5c67e61 Message for commit #3
This list accurately reflects what the branch will look like after the rebase.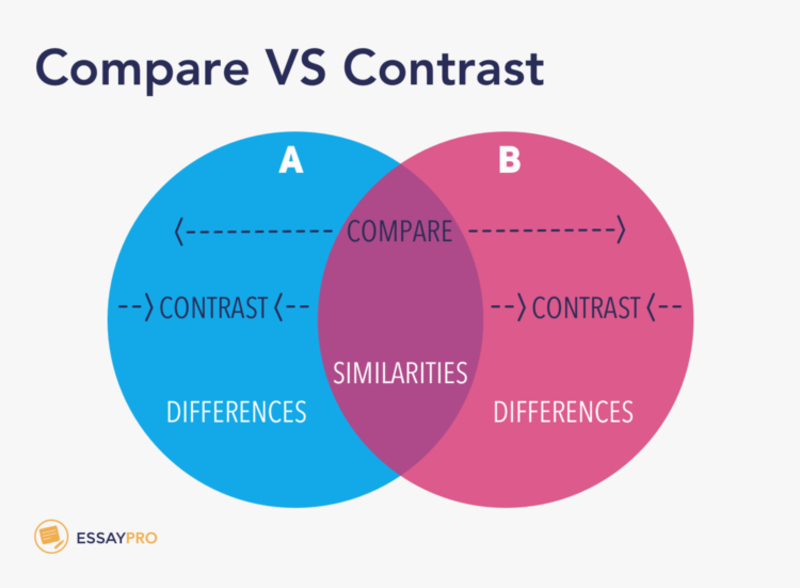 By changing the
 pick command and/or the order of the commits, you can give the branch history the look you want. So, if the second commit contains a fix for a small problem in the first, they can be merged with command fixup :
 pick 33d5b7a Message for commit #1
 fixup 9480b3d Message for commit #2
 pick 5c67e61 Message for commit #3
When you save and close the file, Git will rebase as directed. The project history will then look like this:
Removing minor commits helps you quickly understand the history of the feature branch. The command git merge just can’t do it.
The golden rule of relocation
Having understood the possibilities of rebase, the first thing to understand is when to use this not command. The golden rule for the git rebase command is to never use it on public branches.
For example, imagine what happens if you rebase master branch main to your feature branch feature .
Rebase moves all commits of branch main to the end of branch feature . The problem is that this only happens in your repository while other developers keep working on the main source branch. Since the rebase creates completely new commits, Git will assume that your master branch main has diverged from the rest of the history.
The only way to synchronize the two main branches main is to merge them back. This will result in an additional merge commit and to two sets of commits that contain the same changes (original changes and changes from your rebase branch). Do I need to say that the situation will be extremely confusing?
Therefore, before running the git rebase command, you should make sure that someone else is not viewing the current branch. If you are really working on it, stop any activity and think about how you can make changes in a non-destructive way (for example, using the command git revert ). In other cases, you are free to overwrite the history if necessary.
Force submission of changes
Git will block an attempt to push the rebase branch main back into the remote repository because it will conflict with the remote branch main . But this operation can be forced by adding the flag --force :
# Be extremely careful with this command! git push --force
This will make the remote branch main match the branch in your repository after the rebase. As a result, your colleagues will also get confused. Therefore, be careful and use this command only if you fully understand what you want to achieve.
One of the few situations that requires a forced code push is a local cleanup after pushing a private feature branch to a remote repository (for example, to create a backup). This is tantamount to saying, “Oh, I didn’t mean to push the original version of this feature branch. Better get the current version.» It is also important here that no one, after the commits, starts working from the original version of the feature branch.
Step by step process
Rebase can be used with Git to the extent that suits the command. In this section, you’ll learn about the benefits of rebasing at different stages of product feature development.
Any workflow using git rebase must first create a separate branch for each feature. The resulting branch structure is needed for a safe rebase:
Local cleanup
One of the most effective workflow rebase scenarios is to clean up local feature branches that are still being worked on. If you periodically rebase interactively, no commit in your branch will lose its meaning. You can be sure that your code will not break into isolated commits. If this happens, the situation can always be corrected.
When using the git rebase command, there are two options for the new branch position: the upstream branch for the feature branch (for example, branch main ) or an earlier commit in the feature branch. The first option was described in the example in section Interactive rebase . The second option is useful when you only need to fix a few recent commits. For example, the following command only runs an interactive rebase operation for the last three commits.
git checkout feature git rebase -i HEAD~3
Specifying HEAD~3 as the new location does not move the branch per se, but only interactively rewrites the 3 subsequent commits. It should be noted that during this operation, the higher changes not are included in the feature branch .
If you want to rewrite the entire feature branch using this method, you can use the git merge-base command to find the start position of the feature branch . The following command returns the commit ID of the origin, which can then be passed to the git rebase command:0152 git rebase into the workflow as it will only affect local branches. Other developers will only see the finished version with a simple and trackable feature branch history.
Again, this only works for private feature branches. If you are working on the same feature branch with other developers, it is public and it is not allowed to rewrite its history.
Option to clean up local commits using rebase interactively with command git merge does not exist.
Incorporate upstream changes into a feature branch
Section Overview of Highlights discussed how to incorporate upstream changes from master main into a feature branch using git merge or git rebase . The merge operation can be performed safely because it preserves the entire history of the repository. When a rebase is performed, a linear structure is created: the feature branch is moved to the end of the branch main .
In this case, the git rebase command is used in the same way as a local purge (which can be done at the same time), but it includes the upstream changes from the master branch main .
Remember that you can also rebase to a remote branch other than main . For example, when collaborating on a feature with another developer and want to include their changes in your repository.
For example, if you and developer John were committing to branch feature , then after getting the remote branch feature from John’s repository, your repository might look like this:
upstream changes from branch main : either merge into local branch feature for branch john/feature , or rebase local branch feature to the end of branch john/feature .
Note that this rebase does not violate the golden rule , because only the commits of your feature branch are moved, while the preceding elements remain intact. In essence, this operation only allows you to add your changes to John’s work. This is often easier than syncing with the remote branch via a merge commit.
Default command git pull performs a merge. However, if you pass it the option --rebase , it will rebase the remote branch.
Checking a feature with a pull request
If pull requests are used in the code review process, do not use the git rebase command after creating the pull request. Once the pull request is created, other developers will be able to see your commits, meaning your branch will become public . If her history is overwritten, Git and your colleagues will not be able to track subsequent commits to the feature branch.
All changes made by other developers should be added with git merge , not git rebase .
So it’s a good idea to clean up the code with an interactive rebase before creating a pull request.
Implementation of an approved function
Once a feature branch is approved by a colleague, you can rebase it to the end of the main branch, and then use the git merge command to include the feature branch in the main codebase.
This is similar to merging upstream changes into a feature branch, but since rewriting commits on the master branch main is not allowed, you will need to use the git merge command to include the feature branch. By doing a rebase before the merge, you ensure a faster merge and a perfect linear history. This approach also allows any subsequent commits added before the pull request is closed to be glued together.
If you are not used to working with command git rebase , you can always rebase to the temporary branch. That way, if you accidentally mess up the feature branch history, you can always switch back to the original branch and try again. For example:
 git checkout feature
 git checkout -b temporary-branch
 git rebase -i main
 # [Clean up the history]
 git checkout main
 git merge temporary-branch
Summary
Now you have enough information to start using rebase on your branches.