What is IP Blacklist | How to Block IP Addresses
What Is IP Blacklisting?
IP blacklisting is a method used to filter out illegitimate or malicious IP addresses from accessing your networks. Blacklists are lists containing ranges of or individual IP addresses that you want to block. You can use these lists in combination with firewalls, intrusion prevention systems (IPS), and other traffic filtering tools.
Creating and applying blacklists enables you to filter malicious traffic according to policies or through the manual addition of IP addresses. Many network security tools that use blacklists are also able to add new addresses to be blocked. This can be done as externally referenced lists are updated or according to the results of event analysis.
5 IP Blacklisting Challenges
Although blacklisting is a good way to prevent specific IPs from accessing your network, it is not a foolproof method. This is because attackers have developed multiple ways to get around blacklisting. These methods include:
1. Changing IP addresses
Many attackers work to avoid getting put on blacklists in the first place by periodically changing their IP address. Criminals may have a range of addresses that they use, enabling them to swap addresses if they find that one is blocked. These changes also make it more difficult to track attackers, reducing the risk of prosecution.
2. IP spoofing
In case of network layer attacks (e.g. DDoS attacks that don’t require a full three-way TCP connection), attackers can use IP spoofing to make it appear as though they are connecting via a different IP address. This enables them to bypass blacklisting while obscuring their identity. It can also enable them to trick monitoring systems into thinking that compromised credentials are being used legitimately.
3. Botnets
Many attackers operate massive botnets, including thousands to millions of end-user devices or Internet of Things (IoT) devices. The attackers compromise these devices and take control over them, or in many cases, rent a botnet as a service on the dark web.
Due to the increased availability and size of botnets, many attacks are performed using very large numbers of IP addresses, which may constantly change as devices join and leave the botnet. IP blacklists cannot defend against this attack scenario.
4. False positives
False positives are another challenge you might face when implementing blacklists. Although not related to attackers or security, these challenges can still interrupt productivity.
5. Inaccurate IP detection
Another challenge is if you have multiple individuals using the same IP address. When IP addresses are dynamically assigned you have no way of knowing who the end-user currently using an address is. This means that if you block one user due to abusive actions, you may accidentally prevent a legitimate user from accessing your network in the future.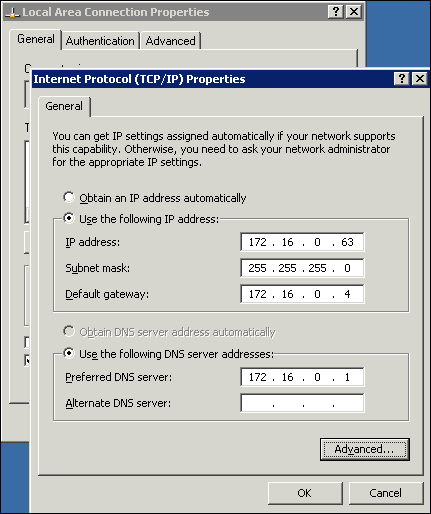
Reputation Intelligence: The Next Generation of IP Blacklists
Due to the challenges associated with blacklisting, this method is not particularly effective for modern security practices. Instead of blacklisting, security teams can use reputation intelligence. Reputation intelligence is data about users or cyber entities that can be applied to restricting or allowing activity via web application firewalls (WAFs).
Reputation intelligence data provides additional context about user behavior, letting you cross-verify suspicious behavior sequences with historical information about the IP ranges users are connecting from. This helps security teams identify threats based on this information and reduces the need to individually evaluate every network event.
In particular, reputation intelligence can help you identify and block the following entities:
- Malicious IP addresses—IPs known to be used in attacks.
- Anonymous proxies—users coming from proxy servers that hide their IP information.
- TOR networks—resource sharing user networks that can be used by attackers to disguise the source of traffic.
- Phishing URLs—URLs of sites known for phishing attacks.
- Comment spammers—IP addresses of users known to spam content or messages.
IP blacklisting
What Information Can Reputation Intelligence Provide?
Reputation intelligence provides information that can help you narrow down who potential attackers are, and can be applied to effectively distribute your network security resources. Below is the type of information that you can gain.
Risk score
A risk score is determined for each IP accessing your network. This score is based on the activity of the IP address during the last two weeks. As the number and severity of attacks performed by an IP increases, the risk score also increases.
Attack details
Details about attacks performed by a specified IP address include:
- Associated organization name and ASN
- Number of requests sent in the last two weeks
- Known attack methods used by the IP
- Known targets of attacks stemming from the IP
Geographical targeting
Geographical targeting represents information on where attack targets are located. This information can help you determine if you are likely to be the target of a particular IP based on its attack history and location preference.
Imperva Reputation-Based IP Filtering
Imperva provides reputation intelligence capabilities that fill the gaps left by traditional IP blacklists. Instead of constantly worrying about IP spoofing, alternating botnet IPs, search engine crawlers, and false positives, you can leverage the power of Imperva’s advanced bot protection management tooling.
Imperva’s reputation intelligence provides you with the information needed to compile an accurate profile of traffic. For each IP, you get the following details:
- Risk assessment—this score is calculated by Imperva researchers to help you better understand the maliciousness level of each IP. Using this information, you can more accurately prioritize response mitigation.
- Attack types and tools—provides information about IP attack types, including the tools used during the attack.
- Attack scope—you get increased visibility into the range and perimeter of the attack, including attacked industries, geographical targeting, and violations.
- API integration—Imperva’s Reputation API can support your in-house dashboards and workflows. This integration automatically delivers reputation intelligence to your WAF, enabling you to consume reputation intelligence on a continual basis.
Once you get a detailed profile of each IP, you can then take the appropriate action. You can use reputation intelligence to block threats, perform forensics, and build compound policies. If you set your WAF to blocking mode, based on Imperva’s reputation intelligence, you can even achieve a low-to-zero false-positive rate.
IP Blacklist Removal — How To Fix a Blacklisted IP Address
Table of Contents
- What is an Email Blacklist?
- What Causes an IP to Get Blacklisted?
- How to Remove IP from Blacklist
- IP Blacklist Check
- Is It Necessary to Remove IP from Blacklist?
- IP Blacklist Removal
- How IP Blacklist Removal Works
- The Bottom Line
- Additional Resources:
A blacklist is a dynamic list of IP addresses that have been flagged for sending spam. Email service providers (ESPs), free mailbox providers, and anti-spam vendors use artificial intelligence from blacklists to protect their users from spam and other malicious activity.
Your server IP address can be placed on a blacklist by:
- sending spam
- sending mail that contains viruses
- having a high spam-complaint rate
- sending to purchased/bad email lists
Do you know if your IP is blacklisted?
Run Free IP Blacklist Check
Types of Blacklists
- Internal
- External
An internal blacklist is owned by a mailbox provider. For example, an IP could be placed on Gmail’s or Yahoo’s blacklist.
An external blacklist is owned by a third party. Mailbox providers may use an external blacklist to identify spammers. If your IP was listed on one of these lists, you would need to contact the third party for manual removal, rather than a mailbox provider who blocked you.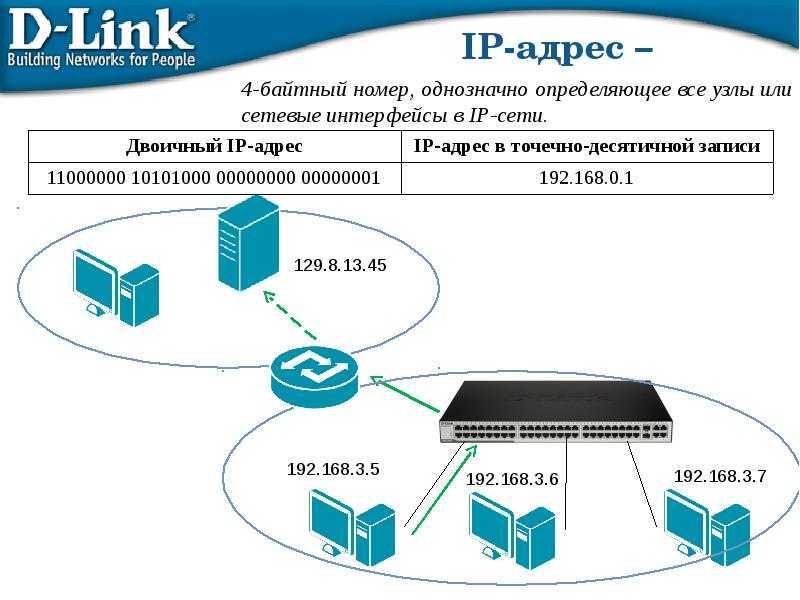
What Causes an IP to Get Blacklisted?
Each blacklist has its own criteria when determining which mail servers to list. Those criteria can consist of several factors including technical listings, policy listings, and evidence-based listings.
- Technical listings occur because of mail server configuration issues (missing or incorrect reverse DNS records, missing or incorrect banner greetings, and mail servers operating within a suspicious range of IP addresses).
- Policy listings happen because the receiving server does not wish to accept emails from certain countries, or ISPs, that have a history of not handling “unsubscribe” requests.
- Evidence-based listings are those where the server has received direct (or indirect) evidence that the sending IP address has been involved in sending unsolicited emails.
To protect their users from spam, mailbox providers carefully choose which blacklists they use. They assess whether an email is spam by analyzing several characteristics of the email, including the IP address it was sent from.
If the sender’s IP address is listed on a blacklist that the receiving mail server uses, the mailbox provider might filter the email as spam, bounce the email, or drop it entirely.
Does a Blacklisted IP Affect Deliverability?
If you are sending mail from a blacklisted IP address, you will probably receive a bounce message indicating that your email was rejected because you’re listed on a blacklist.
In most cases, the bounce message includes the name or URL of the blacklist.
An example of this type of message is:
“Message rejected due to IP [1.1.1.0] listed on RBL [X]”
If you do not see this type of message in your bounce notifications, it’s unlikely that the blacklist is impacting your deliverability.
How to Remove IP from Blacklist
IP blacklist removal has 4 basic stages:
- Discovery.
 You may not know that you’ve been blacklisted until you notice your email metrics tanking. It’s important to pay attention to signals that could land you on most blacklists such as spam complaints from customers, low deliverability levels, etc.
 - Evaluation. Being blacklisted can have little to no impact on your deliverability. However, it can also be powerful enough to block your emails entirely. Either way, you should try to remove you IP from most blacklists.
- Take Action. After you find out what blacklist you are on, find the exact removal process on the blacklist’s website. But remember to be polite, professional, and show you are interested in resolving the issue.
- Solve the Problem. After you’ve completed all the steps for removal, contact the blacklist admin and let them know that you have dealt with the problem that caused your IP address blacklisted. Depending on the blacklist, de-listing could be manual or automatic after a certain period of time.

Now let’s look at each of these steps more closely.
IP Blacklist Check
To understand whether or not your IP is blacklisted, we recommend you either:
- Run an IP blacklist check to check whether you’re blacklisted on any major blacklist.
- Use GlockApps IP Uptime Monitor to be alerted as soon as your domain is blacklisted. Our Uptime Monitor automatically checks dozens of the largest blacklists every day, so you don’t have to worry.
You will see exactly where your IP is listed and receive direct links to the blacklists’ websites where you can find more information about your IP listing and the removal process.
Check IP Blacklist
Monitor your IP
Uptime Monitor: IP Blacklist Monitor
Is It Necessary to Remove IP from Blacklist?
All blacklists are not created equal:
- Real-time blacklists may list your IP address, but that doesn’t necessarily mean that it will stay listed.
 It may actually pop up in and out of the blacklist.
 - Major blacklists, like Spamhaus, are notoriously difficult to delist from. A Spamhaus listing is likely to result in your mail being blocked, while a listing on SORBS, UCEPROTECT, or SpamCannibal might not have as much impact on your deliverability.
Large mailbox providers typically use big blacklists like Spamhaus, whereas smaller mailbox providers typically use small local blacklists.
Services that ask you to pay for delisting or do not accept delist requests are unlikely to be used by major mailbox providers.
With that said, a few questions you want to answer:
- How powerful of a blacklist are you on?
- Will you be permanently listed or are you popping in and out of it?
- Are you running into email deliverability problems because of your blacklisted IP?
IP Blacklist Removal
There are two scenarios that involve different actions on your part:
#1 You are sending via email service provider or SMTP relay service.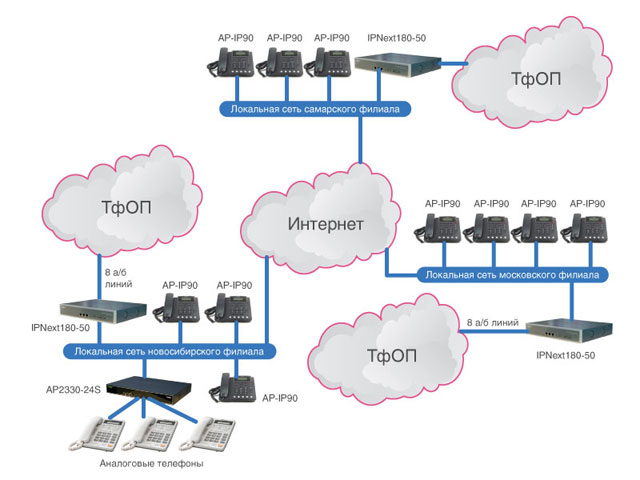
Email service providers like MailChimp and SMTP relay services like Amazon SES use a pool of IP addresses to send emails from. They are aware that portions of their IP address space are sometimes listed on a few blacklists like SORBS and UCEPROTECT.
They carefully and continually monitor the reputation of their IP address space and work closely with mailbox providers and blacklist operators to identify and resolve the listings.
That being said, you should leave the resolution of the IP blacklisting issue to the ESP or SMTP relay service that you use.
However, if you are a high-volume sender and don’t want your deliverability to be affected by other senders, you can ask for a dedicated IP address from your ESP or SMTP relay service. Thus, you will be able to build your own sender reputation.
Read also: Dedicated vs Shared IPs: Which Should You Choose for Better Deliverability
#2 You are sending via your SMTP server.
As we mentioned above, you should first see how powerful of a blacklist you’re listed on and whether or not your deliverability problems are caused by the IP blacklisting issue.
If the IP address is on a smaller blacklist and does not impact your deliverability, you can disregard this listing.
If the blacklist is one of the major ones and causes serious problems, you should seriously consider a blacklist removal.
Run an IP blacklist check or visit the blacklist’s website and look up your IP address. Most blacklist databases will provide general listing reasons, but they don’t list email addresses linked to the blacklisted IP addresses.
After you find out why your IP address is blacklisted, follow the blacklist’s steps to resolve the issue. For example, they may ask you to correct both forward and reverse DNS records, as well as SMTP banners to ensure your network and mail server are configured correctly.
You may want to work with someone who is technically savvy to help you if you don’t have enough knowledge on IP blacklist removal.
Plus, you should also scan all your network computers for viruses, install needed updates for your operating system, configure routers more securely, and establish stronger passwords.
How IP Blacklist Removal Works
Diagram of the IP Blacklist Removal Process
If you think you have fixed the issues on your end, go back to the blacklist’s site and follow their IP blacklist removal instructions. There are blacklists with a self-service removal feature and time-based removal service.
- Self-Service Removal: It lets you take your IP address off the blacklist without much trouble. However, if you get listed again, it won’t be as easy to be removed.
- Time-Based Removal: It is a built-in, automatic process that removes lower-level listings (IP addresses that are light offenders) within a week or two. But if the IP address had sent spam more than once or concentrated on sending a large number of emails, the time frame would be longer.

When attempting blacklist removal, follow the rules and cooperate. If you are truly innocent of any deliberate wrongdoing or if you made an honest mistake, let them know. The more open and honest you are, the simpler it may be to have your IP address removed from the list.
You should be able to resolve any blacklist issues online. If you’re having difficulty with the removal process, try contacting the list maintainer by phone and see if that helps to resolve the issue.
Spam is a serious problem. Blacklists were invented to reduce the likelihood of spam reaching customers.\
If you find that your IP or domain is blacklisted, contact each DNSBL service and request that they delete your listing. Some of them will automatically remove your listing after some buffer period, others will not.
If you made a mistake, were blacklisted, and then delisted, don’t make the same mistake again. You likely won’t be forgiven the second time.
Additional Resources:
How to Remove Your IP Address from Gmail’s Blacklist
How to Remove Your IP Address from the Hotmail/Outlook’s Blacklist
How to Remove Your IP Address from the Yahoo!’s Blacklist
Is your email server blacklisted?
GlockApps Spam Testing
Get your email scanned by every major spam filter and blacklist before you send.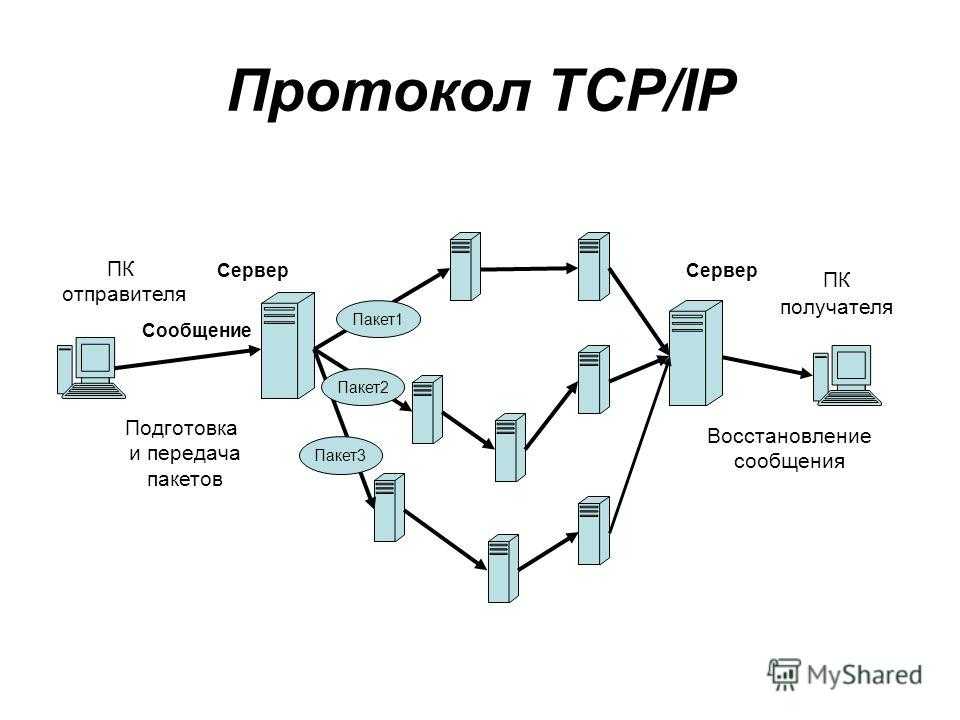
Test your subject lines and email content to ensure your emails get to your subscriber’s inbox.
How to determine a white or gray IP address, what’s the difference ?
I start this article about IP addresses with such a funny headline. I hope that such an IP does not need to be explained? But just in case, an IP address is the digital address of every device connected to a network, such as a local network or the Internet.
More specifically, this is a set of four digits from 0 to 255, separated by a dot, for example «193.126.243.10» i.e. each of us has our own IP and a lot can depend on these numbers. IPs are different: external and internal, static and dynamic, white and gray (do not confuse with MAC addresses!). Now I want to talk about the last classification.
Contents
White and gray IP addresses
It so happened in the modern world of the Internet that despite the huge number of possible IP addresses, which is a little more than four billion, there are not enough of them for all! Ideally, each Internet user should have their own unique IP address.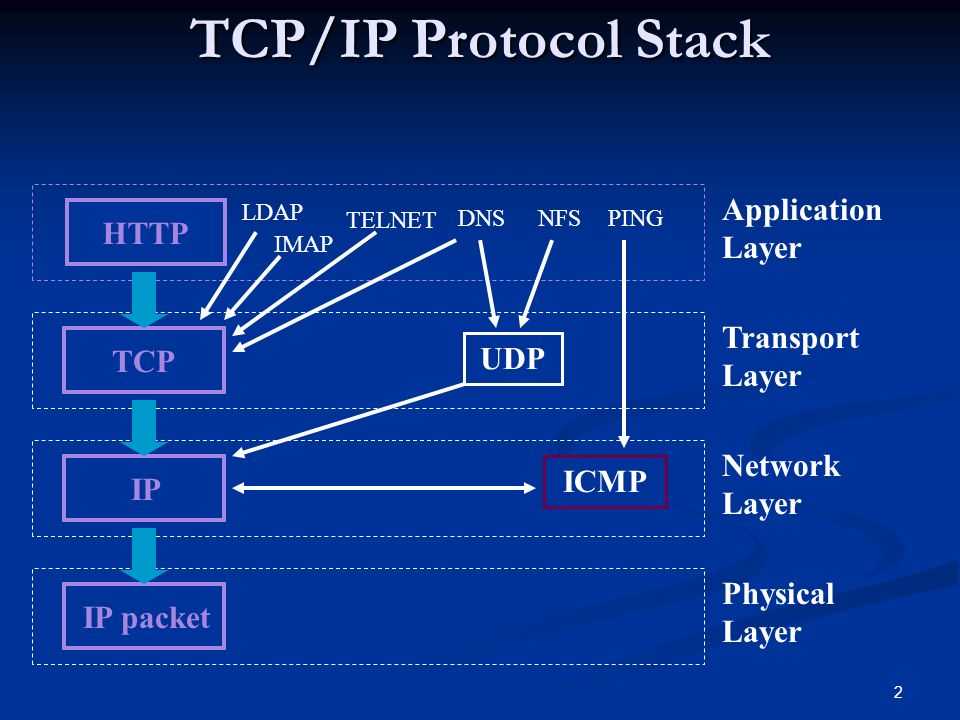 And these are not only computers, but also phones, security cameras, TVs and even refrigerators with Internet access! So it turns out that some Internet providers go to some kind of «trick».
They reserve one or more addresses for themselves, and all who are connected to it go online only under these addresses. To make it clearer, let me give you an example. Let’s say the provider has the address «193.126.243.10», then everyone who is connected to this provider will have the same IP address on the Internet «193.126.243.10». At the same time, in the internal (local) network, each client will have its own internal address, but on the Internet, everyone will have a common one. This is gray IP address , i.e. not unique.
For more or less large providers, the network is divided into several subnets and there can be many such common addresses, but still many people “sit” on each one. Previously, when there were not so many network users, no one followed this, there were enough addresses for everyone, and each had its own unique, i.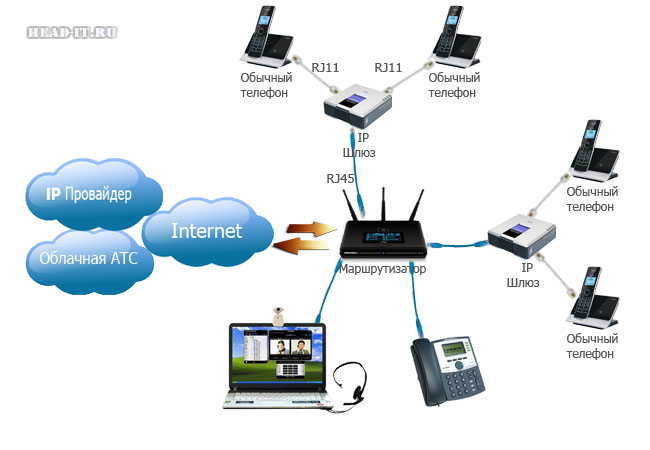 e. white IP address . It is also called real IP address. If at the same time it does not change with each connection to the network, then it is also called permanent IP address.
Now you have to pay money to your ISP for this. Let it be a little, but you still have to pay every month. But not everyone needs it, and those who need it, maybe they don’t even know about it ? You can see your external IP address using special services, for example whoer.net
Why do you need a white IP address
A natural question arises : Why should I pay for a white IP address? It’s easier to tell what happens if your IP is gray.
Firstly, , with a large number of «sitting» at one address, an absurd situation may arise. For example, on some resource, a participant was banned forever by ip-address, and when you go to the same resource, you see a nice message “You are BANNED!”. Although you went there for the first time, your address is the same as that of the blocked person! The probability of such an outcome of events is not high, but a much more common problem is the inability to download files from some large file hosting services, such as DepositFiles or Turbobit. There is a restriction on free download, and it is still tied to IP.
As a result, you want to download a file, and there it says “Download is already in progress from your IP address!” ? fun, right? And after “that guy” downloads his file, we see another message “The download limit for your IP address has been exceeded, please visit in 258 minutes 47 seconds…” In general, if the file is really needed, you have to look for it in other file storage sites or connect through proxy servers and VPN. I think the meaning of this shortcoming is clear.
The second minus , and it is also a plus (yes, the gray SP also has a plus) is the inability to connect to a computer from the Internet directly.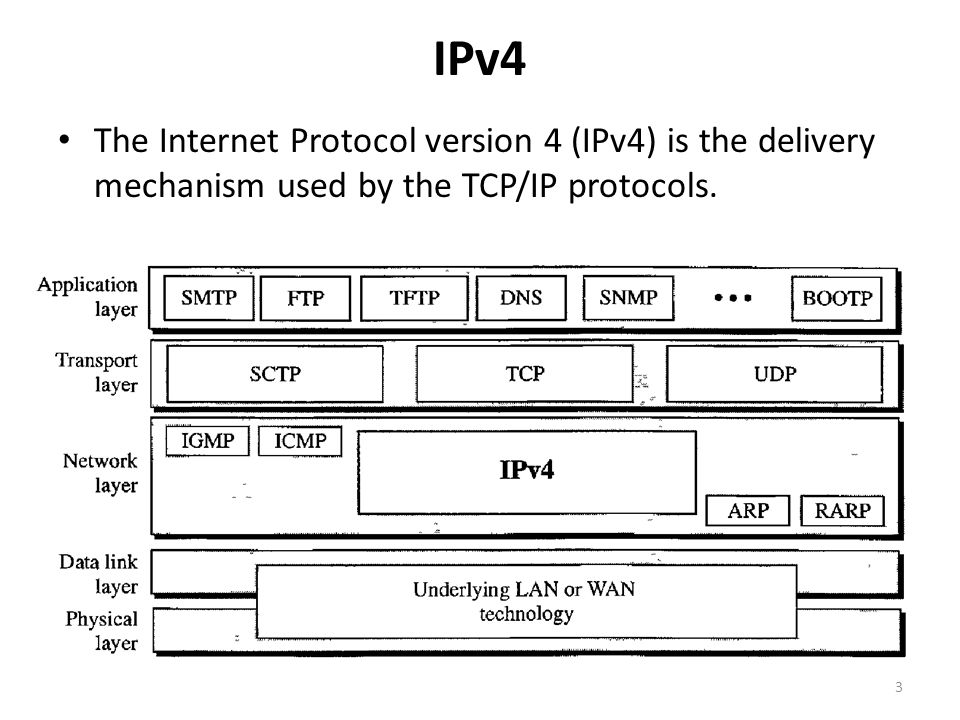 Most often, gamers suffer from this when they cannot participate in an online game. Another need arises when you need to remotely control your computer using programs such as Remote Administrator, Dameware Utilities or VNC Viewer. There are ways to get around this limitation, for example by setting up a VPN channel between computers, but they require extra gestures.
Or you can use the TeamViewer program if you just need to access the desktop of a remote computer. It allows computers with gray addresses to connect. This is what tinkerers like me use ? to help solve a problem on another computer that may be thousands of miles away. By the way, if you have unresolved problems, then I can connect to your computer and figure out what’s what, please contact ?
will not establish an outer connection. This means that until you catch the virus, hackers will not be able to find out how to find you on the Internet. But your computer can easily be found on the ISP’s local subnet. This can be done by the very people who “sit” with you under the same IP address.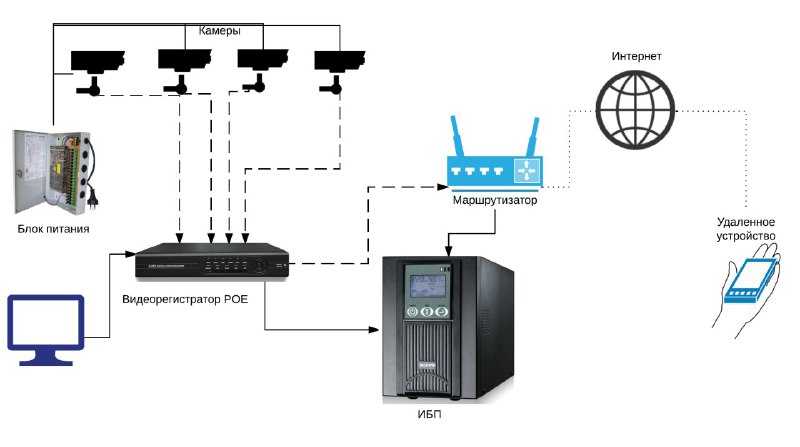 It’s funny, isn’t it? But anyway, visibility for millions or for a couple of hundred neighbors are two big differences.
Thirdly, there are guesses that when a large number of users from the same address access the network at the same time, your speed may drop.
How to find out what your address is, white or gray
The main thing is to find out your IP address in the provider’s network. The method depends on how you are connected to the Internet: directly with a cable or through a router (via cable or Wi-Fi).
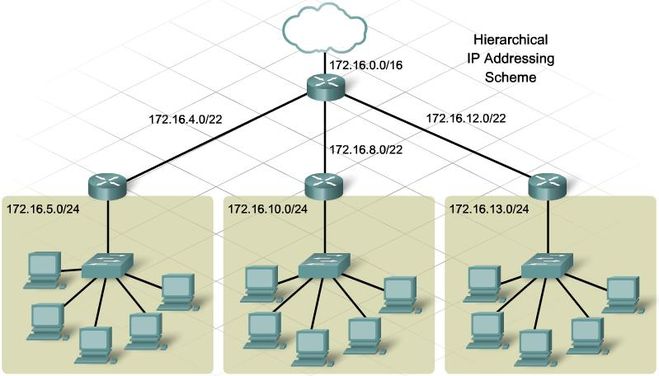
In any case, you have a gray address if your ISP’s IP address matches the mask:
- 192.168.xxx.xxx
- 172.16.xxx.xxx
- 10.xxx.xxx.xxx
- 127.xxx.xxx.xxx
- 169.254.xxx.xxx
Direct connection of the computer to the provider’s cable
You can see this in Windows 7/8/10 if you go to «Control Panel -> Network and Sharing Center». You can also open it by right-clicking on the connection icon and selecting «Network and Sharing Center»
Next, click on your connection:
and go to the «Details» tab or the «Details» button (in Windows 10).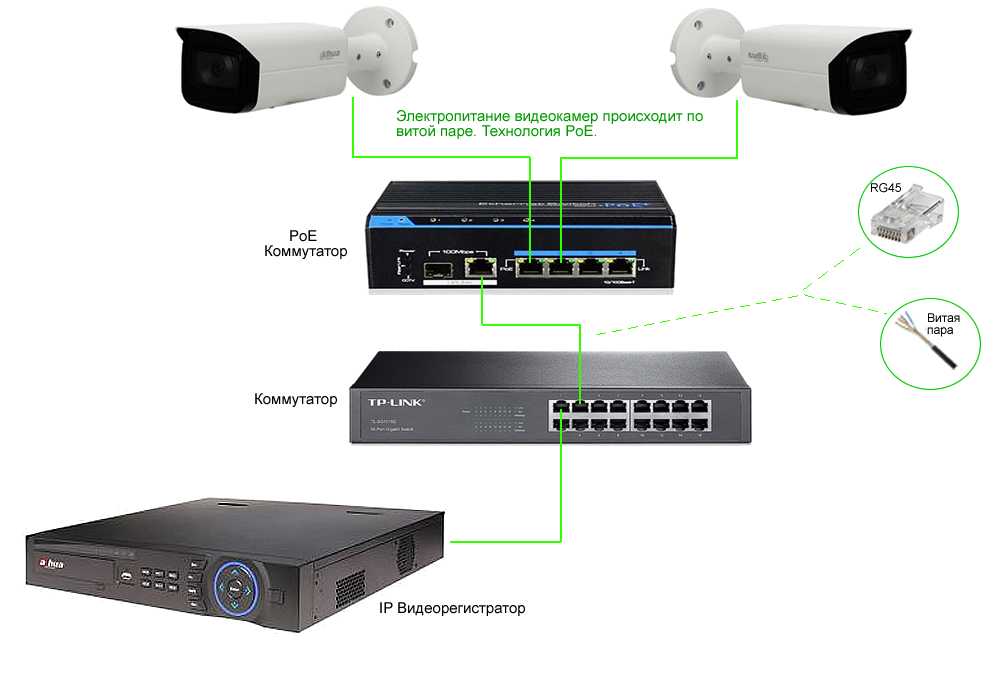 We need the Client IPv4 Address field. As you can see, I have a gray IP.
White cannot start with 172 (see above). Watch the video:
Watch this video on YouTube
If you have a Wi-Fi router
When you are connected to the Internet through a router, the network connection status data will always show an internal gray address. This happens because the computer is working on the router’s network, and that, in turn, is already connected to the provider and receives an IP from it. Therefore, there is only one option here — go to the admin panel of the router and see everything there.
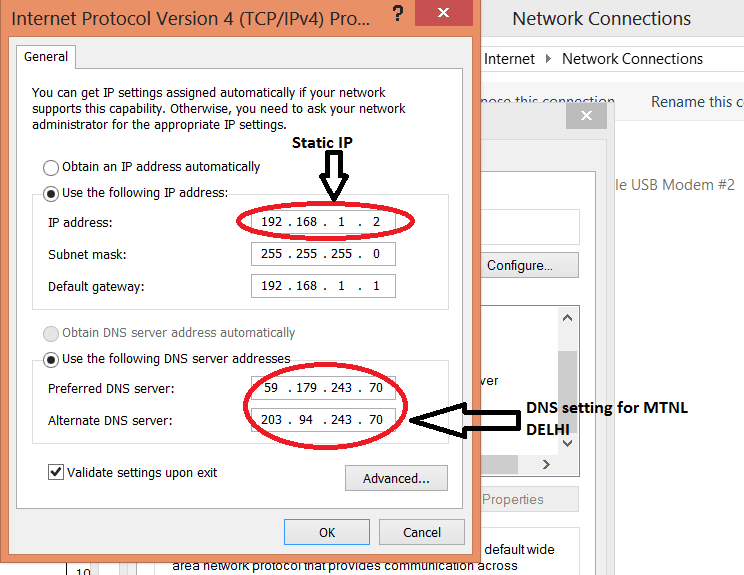
I’ll show you the example of a TP-Link router. First, we go through any browser to the admin panel of our router by its IP, driving it into the address bar. By default it is 192.168.0.1 or 192.168.1.1. Next, you will need to enter your username and password. The default is admin/admin. The panel itself on the start page usually contains summary information about the status of the device.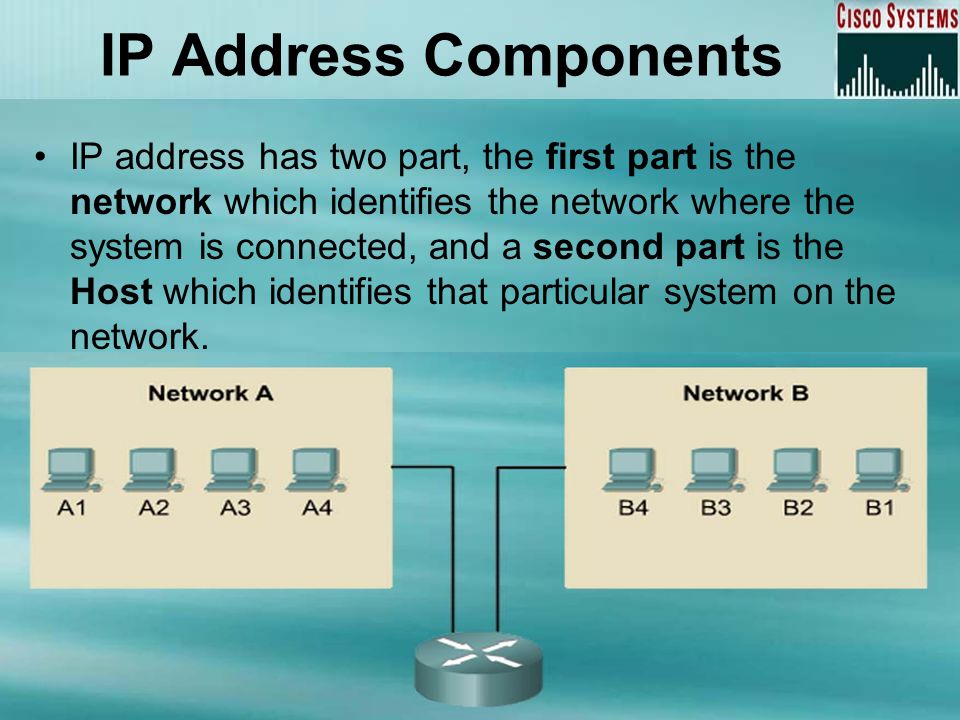 Here you need to find the «WAN» section and read the value of «IP Address»:
I repeat that all routers are different, and I showed only a special case. But the logic is always the same. If the information is not on the main screen, then find a section similar to «Network -> WAN» and look there. In the screenshot, I have a white IP address.
Communication with dynamic and static addresses
Dynamic IP addresses change every time the router is rebooted, so it is not white in 99% of cases. The static address is always the same. Therefore, most likely it will be white, because. it makes sense and is logical.
Let’s sum it up
- Depending on the selected provider’s tariff, or on its greed, your IP address on the Internet may be white or gray
- Under the white IP, you are the owner of the Internet, and under the gray one, you may find yourself out of work for no reason
- Internet security for a gray address is higher than for a white one
- The easiest way is to call your provider and ask what you have ?
How to get white IP on Tandem
routers
November 01.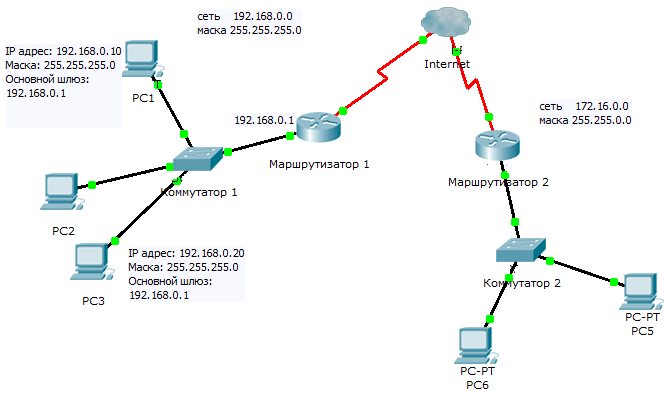 2019
2019
In this article we will talk about the meaning of a white static IP address for remote monitoring via GSM networks.
In the era of a lightning-fast technological breakthrough in the world, it became possible to remotely control the house using video surveillance, as well as manage the server, alarm systems, smart home.
But in order to implement remote control of our techno devices or web server from anywhere in the world, we need a static (white) IP. Since Internet providers provide only «gray IP», we will have to purchase our own statistical IP, the cost of such a service from telecom operators is very impressive. But there is another, more economical solution — registering a «white IP» with one of the Internet services.
In this article I will show you how, using the example of our Tandem 4GL router — OEM, to implement a remote connection through the service — birevia.com.
You can find a more detailed description of the «white IP address» and its difference from the «gray IP» on the Internet.
Perform the following steps:
Step #1. We go to the site — birevia.com. Select «Get a free static IP address». We are connected to a free test tariff — XS, then — we enter our e-mail and an email arrives with an activation link and data for entering your personal account on the site. In your personal account, select the L2TP protocol and the site issues our permanent IP and port range.
Step #2. Connect the router to the network, go to the router settings by IP: 192.168.1.1
Step #3. In the menu Network-> VPN -> L 2 TP set the parameters:
9
Step #4.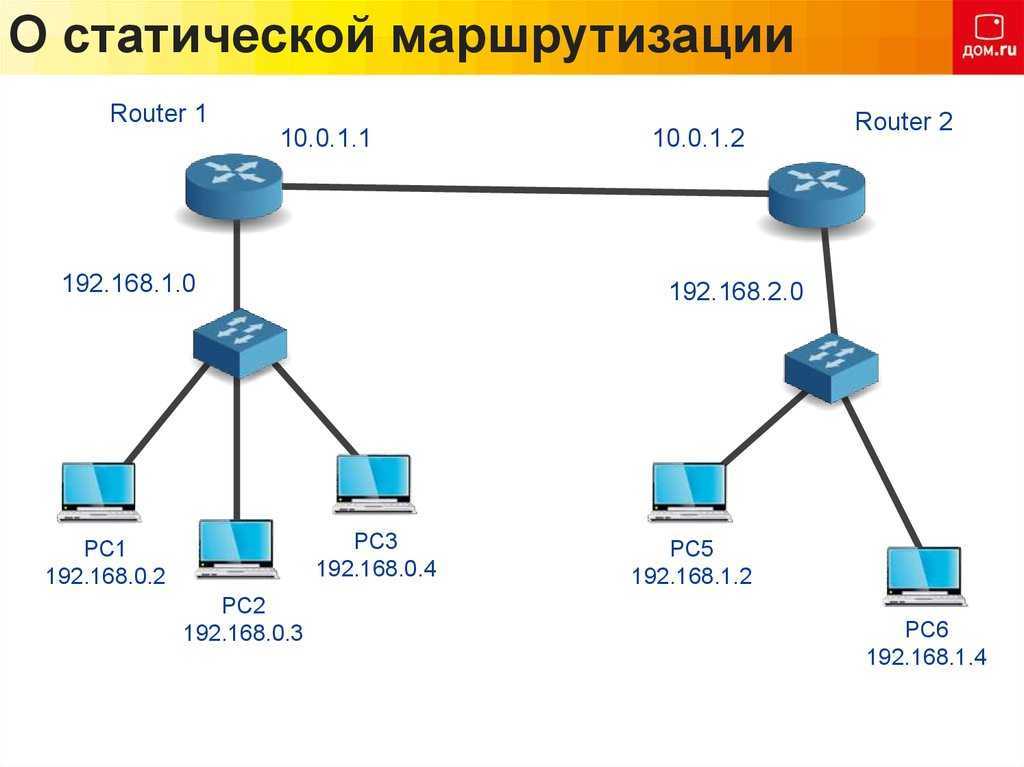 In menu Status->Interfaces , check the status of the L2TP interface. The interface must be connected.
Step #5. Configure incoming traffic redirection (port forwarding) in menu Network->Firewall->Port Forwarding
To access the web interface, add the following rule:
- Name: any (for example WEB )
- Protocol: TCP/UDP
- Outer zone: WAN
- External port — specify one of the ports from the range provided by the Birevia service, for example 13701
- Inner zone: LAN
- Internal IP address: 192.168.1.1
- Internal port: 80
- Save and apply
Step #6. Set a password for access to the WEB interface and SSH in the menu System->Management .