[Teseted] How to Create A New User on Windows 10
Creating a new account for personal use or guest use is necessary, you might want to know how to create a new user on windows 10 without logging in, without password, using cmd, from login screen, from powershell, and even in safe mode, no worries, this blog will solve all your worries in creating new user windows 10, no matter a local admin/user account or guest account.
So, let’s have a look at how to create new user Windows 10 under different scenarios. By the way, how to create a local admin account on windows 10 already has detailed and precise answers.
Case 1: Create New User on Windows 10 without Logging in
This method can be divided into two separate parts. Here is a detailed description of those two.
- 1. Create a new user from login screen/without password
- 2. Create a new user cmd
1. Create a new user from login screen/without password
To complete this process, you can easily use iToolab UnlockGo (Windows). It is an all-in-one password recovery tool for Windows that can easily meet all your needs regarding passwords. With the help of this, you can easily create a local admin and domain admin account, or you can use it to remove/reset login password and then after entering the computer to create a local user account or guest account.
This specific tool can help you to create, reset or remove all the local, admin, and domain users from the lock screen of Windows 10. You just need to download this and access your accounts in Windows 10 with ease. This is how you can create a new user in Windows 10 without logging in via iToolab UnlockGo.
Step 1: Download and launch the program on another accessible PC. Click on “Start” on the main page. And then insert your own bootable USB/CD/DVD into it to start burning process.
Step 2: Insert the burned USB/CD/DVD to the computer that you want to create a new user, and then follow on-screen instructions to enter bios menu, after entering it, using arrow key to select boot tab and boot device priority to set bootable USB/CD/DVD and then press F10 to save and exit.
Step 3: After exiting bios menu, your locked computer will reboot and then UnlockGo (Windows) icon shows up, now you need to choose the windows 10 as your windows system, now you can create a new user in it. Or you can remove/reset login password.
Now you can login with new account or with new password to use your computer freely!
2. Create a new user cmd
You can also create user account Windows 10 by following two methods. These methods involved Command prompt. So make sure to check it carefully. Let’s have a look.
Method 1: Create Local User Account
In this method, you can easily create a new user account in Windows 10 without the need of logging in, just with the help of the Command Prompt. You can open this easily outside of Windows using an installation disc. So, let’s have a close look at the steps of how to create a new user in Windows 10 without logging in and using Command Prompt.
- Take a bootable Windows 10 install disc or a USB flash drive and insert the recovery disc into the PC.
- Now, just turn on your PC, which will then boot from the media that is bootable.
- Press “Shift+F10” when you are in Windows 10 Setup screen. After that, your Command Prompt will open.
- Now type the command: C:\WINDOWS\system32>move d:\Windows\system32\utilman.exe d:\ and then press the “Enter key”.
- Then Input the command: C:\WINDOWS\system32>copy d:\Windows\system32\cmd.exe d:\Windows\system32\utilman.exe
- In the Prompt, showing below, and press “Enter key”.
- Now, remove the installation disc from your computer.
- Then enter wpeutil reboot in the Command Prompt, and next press “Enter” to start the command. Thus, your computer will start to reboot.
- Now, click on the button of Utility Manager, on the login screen of your Windows 10 to open the Command Prompt.
- Now, you need to type the following command and press Enter key: C:\WINDOWS\system32>net user account name account password/add
- Please replace the account name and account password with the name and password you want.

- Now type this command: net localgroup administrators account name/add
- And then just press the “Enter” key. Then, replace the “account name” in the command with the actual name you entered in the first command.
After that, the login screen will now include the new admin account. So, with the help of Command Prompt, you can easily crack your password in Windows 10.
Method 2: Create Local Admin Account
If you wish to create a new admin account without login into your Windows 10, then here are the steps to help you out. You can easily do this process with the help of Command Prompt again.
Step 1. Press “Shift+F10” keys to launch Command Prompt window on your computer.
Step 2. Use the command line stated below to change the location of utilman.exe and cmd.exe. To do this, first insert the command:
move d:\windows\system32\utilman.exe d:\
Then, paste the command showing:
copy d:\windows\system32\cmd. exe d:\Windows\system32\utilman.exe
Step 3: Now, take out your installation disc and then type in the window the wpeutil reboot. It can reboot the PC directly from the hard drive. So, whenever you just click on the icon of Utility Manager, the window of the Command Prompt will open.
Step 4: Create user account in Windows 10 by entering user ID and password of the administrator account using the command line. For instance, if you think about creating an Administrator account Angela and password abc321, just type:
net user Angela abc321/add
net local group administrators Angela/add
Then just hit “Enter”, and the account will appear on the lock screen.
Step 5: Now, restart your PC, and change back the function of the Utility Manager’s icon. Then, press “Shift +F10”, and type the line shown below:
move d:\utilman.exe d:\Windows\system32\utilman.exe
Now, just hit “Enter” and wait.
Step 6: Lastly, just restart your PC and log in with the password that you used to access the user account. Though this method is a bit technical, if you type the command lines carefully, you can complete the process of creating user account in Windows 10.
Creating new user on windows 10 using cmd is a little bit complex, let’s continue to see the ways to create a new user on windows 10.
Case 2: Create New User on Windows 10 after Logging in
After logging into windows 10, creating a new user becomes easier than using cmd, but if you want to save time to the extreme extend, then UnlockGo for windows is the best choice. Let’s see how to create a new user on windows 10 after logging in.
- 1. Create new user Windows 10 Powershell
- 2. Create new user Windows 10 Safe Mode
1. Create new user Windows 10 Powershell
1. Search Powershell on Start, run it as administrator, type: $Password = Read-Host -AsSecureString and press Enter, then you can type the new password for the new windows 10 account, continue to type: New-LocalUser “NEW_ACCOUNT_NAME” -Password $Password -FullName “USER_FULL_NAME” -Description “DESCRIPTION”, please note that change NEW_ACCOUNT_NAME for the account name and USER_FULL_NAME for the user’s full name, please also replace Description with what you want to use to description the account.
2. Continue to type: Add-LocalGroupMember -Group “Administrators” -Member “NEW_ACCOUNT_NAME” to add the account to the right user group, and press Enter, and also note that use the real name of the new account in NEW_ACCOUNT_NAME, here you can choose the account type, administrators means add it to admin group, Standard User means local user account. Choose as per your reequirement.
3. Ok, your new account has been created, you can see it in user group, search Control Panel, you can see user accounts, then all users will be there.
2. Create new user Windows 10 Safe Mode
1. Press F8 untill Windows Advanced Options shows up, choose Safe Mode with Command Prompt and hit Enter, type: net user removevirus /add and hit Enter, the removevirus can be replaced with the name that you like, then type: net localgroup administrators removevirus /add and hit Enter, then type: shutdown -r to hit Enter.
2. Now you can wait the windows reboot in Normal Mode, then you can use see the newly created user account.
Conclusion
So, at the end of this article, we can say that these ways to create a new user on windows 10, UnlockGo – Windows Password Recovery is the best chioce for time-saving and easy to operate. So, you don’t have to panic when you need to go through the steps of how to create a new user on Windows 10 without logging in or without password/email.
Home
>
Windows Password
>
4 Ways to Create A New User on Windows 10 in 2023
How to Create Administrator Account on Windows 10 When Can’t Sign in
Generally, to create a new admin account for Windows 10, you must first sign in to Windows 10 with an administrator or a regular user with administrative rights. However, occasionally, you may not be able to sign in Windows 10 for some reason, such as forgetting your password, losing administrator rights or some other errors. In this case, how can you create a new administrator account with which you can regain access to Windows 10? Don’t worry. Here are two ways to create an admin account when you can’t sign in Windows 10.
- Way 1: Create administrator account with command prompt
- Way 2: Create administrator account with iSumsoft disk
Way 1: Create administrator account for Windows 10 with command prompt
Since you can’t sign in to Windows 10, you can’t open Command Prompt within Windows 10. But don’t worry, you can bring up a Command Prompt from the sign-in screen, just with the help of a Windows 10 installation media.
Step 1: Replace utilman.exe with cmd.exe using installation media.
1. Boot your computer from a Windows 10 installation media (USB or CD flash drive). How to Boot Computer from USB Drive
Tips: If you don’t have an installation media, just create one with the media creation tool or by burning Windows 10 ISO file to a USB drive.
2. When Windows Setup screen appears, press Shift + F10 to open a cmd.exe window. Then run the following two command lines to replace the utilman.exe file with the cmd.exe file. Note: c is the system drive letter.
- move c:\windows\system32\utilman.exe c:\
- copy c:\windows\system32\cmd.exe c:\windows\system32\utilman.exe
3. Finally, run wpeutil reboot and disconnect the Windows 10 installation media to restart the computer.
Step 2: Open Command Prompt from Windows 10 sign-in screen.
With the installation disk disconnected, your computer will restart normally. When you reach the Windows 10 sign-in screen, click the Ease of Access icon in the lower right corner of the screen. This will open a command prompt if the previous steps went right.
Step 3: Create a new administrator account with command lines.
Now you can create a new administrator account for Windows 10 by running the following two command lines. Replace user_name with the user name you want.
- net user user_name /add
- net localgroup administrators user_name /add
After a few seconds, the newly created administrator account will be displayed in the lower left corner of the sign-in screen and you can use it to sign in to Windows 10.
Step 4: Restore the utilman.exe file.
After you finish creating administrator account, you’d better restore the utilman.exe file. If not, you won’t be able to use the Utility Manger on Windows 10 sign-in screen and on the other hand, others might use command prompt to change your Windows 10 admin password or make other changes to your computer. To restore the utilman.exe file, simply follow the steps below.
- 1. Boot your computer from the Windows 10 installation media again.
- 2. When the Windows Setup screen appears, press Shift + F10 to open the command prompt.
- 3. Then type move c:\utilman.exe c:\windows\system32\utilman.exe and press Enter key. When the question «Overwrite c:\windows\system32\utilman.exe?» appears on the screen, type Yes and hit Enter.
- 4. Remove the installation media and restart the computer. That’s it.
Way 2: Create an admin account for Windows 10 with iSumsoft disk
The above method is not easy for you? Don’t worry, another simpler way to create an administrator account for Windows 10 when you can’t sign in is using an iSumsoft disk created with the Windows Password Refixer tool. This approach is much simpler and it doesn’t require you to make any changes to your computer.
Step 1: Create an iSumsoft disk.

1. On any computer you can access as administrator, download and install iSumsoft Windows Password Refxier program.
2. Launch this program and follow the on-screen steps to burn it into a USB device or CD/DVD flash drive to create a bootable disk.
Step 2: Boot computer from the iSumsoft disk.
Connect the iSumsoft disk to the Windows 10 computer, then start the computer and enter the Boot Menu or BIOS menu to set the computer to boot from the iSumsoft disk.
- How to Boot Computer from USB Drive
- How to Boot Computer from CD/DVD
Step 3: Create new admin account for Windows 10.
When iSumsoft Windows Password Refixer appears, click on the Add User button. Type a user name and password (optional) and click OK. This will create a new administrator account for Windows 10.
After that, click Reboot and remove the iSumsoft disk to restart the computer.
Step 4: Sign in Windows 10 with the newly created admin account.

The computer will restart normally. When you reach the sign-in screen, you will see the newly created administrator account display on the screen and you can use it to sign in Windows 10.
Creating an account in Windows 7, 10, granting rights: ways | IT S.W.A.T.
Good day, friends. Today, creating an account in the seventh and tenth releases of the Windows operating system is on the agenda. Let’s look at the main ways to add a new user and grant him rights, talk about possible problems and try to solve them together.
Ten
Let’s start talking about creating an account with the 10th edition of Windows OS, since it is the most common at the present time.
Parameters
The easiest and most well-known way is to use the “Parameters” section in the OS GUI. You can access it through the Start menu.
Next, select the «Accounts» item and expand the «Family and other users» category.
You can add a new person using the corresponding plus button.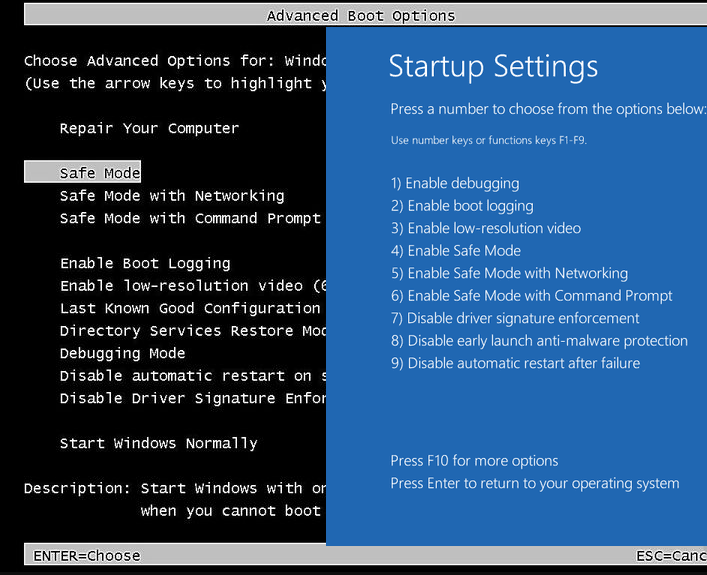 When the system prompts you to select a login method, you need to click on the inscription «I do not have login information for this person» at the bottom of the window.
This is necessary to create a user without using Microsoft, which should be reported to the OS in the next window by selecting the appropriate command.
The next step is to fill in the required form — specify the name, password twice and a hint for it, click «Next».
Desired goal achieved. You can see the new user in the «Other users» section.
All newbies are born with a standard set of permissions. To create an account with administrator rights in Windows 10, you must follow the same steps, and then right-click on the icon that appears, select «Change KM type» and set the required parameter.
Command line
Creating an account in Windows 10 is also possible through the command line (cmd), but only it must be run with administrator rights, for which there is a corresponding item in the Start menu.
After opening the desired window, enter the command “net user XXXXX password / add” (no need to enter quotes), where XXXXX is the name of the future user, and the password is a code character set. For example, «net user Marusya qwertyuiop / add». After that, you need to press the Enter key.
By default, beginners created in this way have limited rights. To grant them administrative privileges, you need to enter an additional command in the same window. In our case, «net localgroup administrators Marusya / add». If the KM needs to be deleted, then the command will look like this: “net localgroup users Marusya / delete” (I remind you that we do not write quotes).
Local Users and Groups
Creating an account through the command line is not the last way. There is at least one more, but it is mainly relevant for the professional and corporate edition of the tenth Windows. Let’s get started:
- Open «Start» and in the search bar enter «lusrmgr.
 msc» (without quotes).
 - Opening the local group policy editor.
- Go to the «Users» section.
- We right-click and open the context menu, in which the “New User” item we need will be located at the very top position, and select it.
- Fill out the form that appears — only the line with the name is required, but ideally, to increase security, it is advisable to enter a password as well.
Done, a new user has appeared, but with the usual set of rights. In order to expand them to the admin level, you should add it to the appropriate group, for this:
- Open the properties of its KM (right-click with the mouse).
- Go to the «Group Membership» tab and click the «Add» button.
- We prescribe the name of the group «Administrators» or Administrators, click OK.
Problems and solution
Friends, sometimes in Windows 10, when creating a new account, some problems can occur, the most common is the appearance of a dialog box with the message «There was a failure. » I will tell you about one of the possible solutions (it helps someone, but not someone). You need to perform a system reset. This is done like this:
- Through the «Start» go to «Settings».
- Select the «Update and Security» section there, and then «Recovery».
- We return our PC to its original state with the appropriate command (all installed programs are removed, only personal data is left if desired).
- Performing a reboot.
This is the only way I know of at the moment. Although, if nothing else helps, then you can try installing an earlier version of the system, for example, the eighth and upgrade to the tenth.
Seven
The main steps for creating an account in Windows 7 differ in order from the methods in the top ten we considered above.
Control Panel
The easiest and most affordable method is to use the Control Panel, which can be easily accessed from the Start menu. There we select the «User Accounts» section.
Since we do not need to work with an existing KM, but create another one, we select in turn the commands “Manage another KM” and “Create a new KZ”.
The creation of an account has not yet been completed — we call our brainchild and determine the level of its omnipotence in Windows 7 — we give administrator rights or leave it in normal mode with limited access.
Safe Mode
You may need to create an account in Safe Mode to perform all sorts of tasks and problems with Windows 7. To enter it, we restart the computer, while it is loading, press the F8 key several times, select the required item. I recommend «Safe Mode with Driver Loading». Next, we perform all the same actions as described above — «Start», «Control Panel» and so on. In conclusion, you need to restart the PC again and log in under the desired name.
Registry
I am often asked if it is possible to create an account in Windows 7 through the registry. Unfortunately, I cannot give a definite answer to this question. If it’s possible, I don’t know how it’s done. I have information on how to change the username through the registry or activate an existing administrator, but that’s a completely different story.
Friends, describe in the comments the methods that you own, and then we will discuss them together. Thank you all for your attention and see you soon.
Starting a Mac in Safe Mode
Search this guide
Starting your Mac in Safe Mode can help you determine if problems on your computer are related to software that starts when you start your Mac.
Before you begin
To start your Mac in Safe Mode, you need to know your Mac type.
-
On a Mac, choose Apple menu > About This Mac.
-
Look at the information in the window and determine which Mac you have.
-
If you see an item labeled Chip followed by the name of the chip, then you have a Mac with an Apple chip.

-
If you see an item that says Processor followed by the name of the Intel processor, then you have a Mac with an Intel processor.
-
-
Follow the appropriate instructions below to start your Mac in Safe Mode.
Starting a Mac with an Apple chip in Safe Mode
-
On a Mac, choose Apple menu > Shut Down.
Please wait until your Mac is completely shut down. A Mac is completely turned off when the screen goes black and all lights (including the Touch Bar lights) go out.
-
Press and hold the power button on your Mac until «Loading Launch Options» appears.
-
Select a volume.
-
Press and hold the Shift key, then click Continue in Safe Mode.
The computer will restart automatically. When the login window appears, the menu bar will display the Safe Boot option.
Starting an Intel-based Mac in Safe Mode
-
Turn on or restart your Mac, then immediately press and hold the Shift key until the login window appears.
