How to Use DiskPart to Clean and Format a Drive on Windows 10
Drives failing due to logical or physical issues is a common sight. Unfortunately, there is no clear way to know when or how a drive might fail. What we can try, however, is to make a corrupt storage drive usable.
This is where DiskPart comes in. Here’s how you can use DiskPart to wipe, reformat, and partition a drive ready for use.
What Is DiskPart?
DiskPart is a command-line utility that Microsoft ships with Windows. In other words, DiskPart is built in every Windows machine, so you don’t need to download it separately.
DiskPart allows you to wipe the data of a local or an external drive, reformat the drives into a filesystem of your choice, and make new volumes from an existing block of storage.
Now, because DiskPart is a command-line tool, you need to know some commands to use it.
How to Reformat a Drive Using DiskPart
While physical issues can never be corrected with a software tool, you can resolve logical issues by reformatting.
Reformatting a drive involves wiping the drive clean, deleting all the data you have on the drive, and formatting the drive to a filesystem of your choice. The process is simple but results in an unrecoverable loss of data, so back up your files before proceeding.
1. Open DiskPart and Select a Disk
Open DiskPart by typing diskpart in the Start menu search bar, then selecting the Best Match. This will open up a Command Prompt window with DiskPart already selected.
Once the command-line window is open, type list disk and press enter. You will see the list of all available disks pop up on the screen. You will see the disk’s name in the first column, the status in the next column, and the size and the free space in subsequent columns. You can ignore the last two columns as they will be empty if your disk is working properly.
In the list, find the drive you want to format. You can find the drive by size. If you don’t know the size, remove the drive, run the list disk command again, and note the first column’s disk numbers. Reconnect the drive, run the command, and you’ll see a new disk number in the list. This is your drive, so note the number.
Now, choose the drive by typing select disk DISK-NUMBER, replacing DISK-NUMBER with the actual number of the disk that you previously noted from the list.
For instance, if I want to select Disk 2, as shown in the image below, I will type the command as select disk 2. Finally, press enter.
You will see a confirmation message telling you that your storage drive is selected. To verify this, type list disk and press enter. The list of drives that appears will mark the selected drive with an asterisk (*) in front of the drive’s number.
If you want to change the drive, repeat the select command with the number of the disk.
2. Clean and Partition the Drive
Now, before reformatting, make sure that you have backed up your data.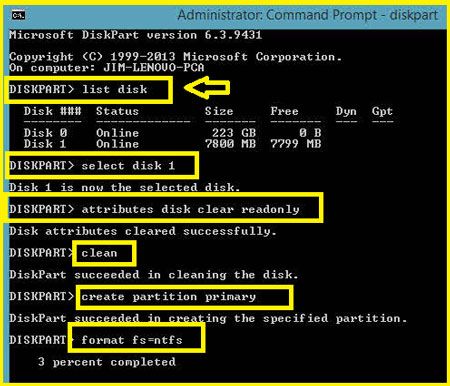 After this, type clean and press enter. This will erase all the data from your drive. Once DiskPart has successfully cleaned the drive, you will see a message on the screen.
After cleaning the drive, you are ready to reformat it.
One more thing before you move on to reformatting: you need to partition your drive before you can use it again. After cleaning the drive, your computer will no longer recognize the drive as a storage unit. So, you need to partition it into one or multiple blocks for your computer to recognize the device.
You should also consider partitioning your storage drive into multiple filesystems if you are going to use it with different operating systems. For instance, you can partition a portion of storage as exFat for Windows and another portion as macOS Extended Partition for use with Macs.
Related: The Best Free Windows Partition Manager for Your Needs
But for now, we are only going to partition the drive into one storage block.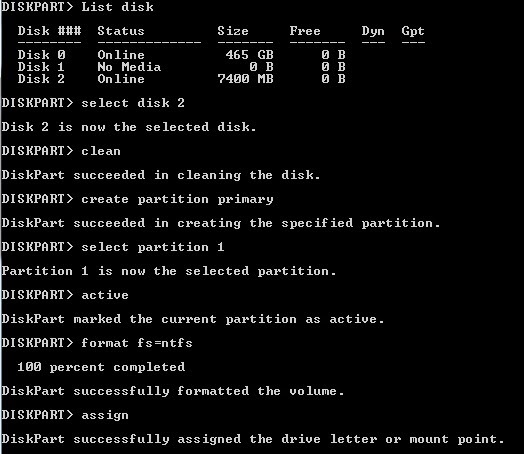 So, type create partition primary or create part pri and press Enter. This will partition the drive into one block.
After partitioning, make sure to activate the partition as your computer can only use an active partition. So, type active and press enter. This will make the partition you just made an active partition.
3. Format the Drive With a New Filesystem
Finally, you can now reformat the drive.
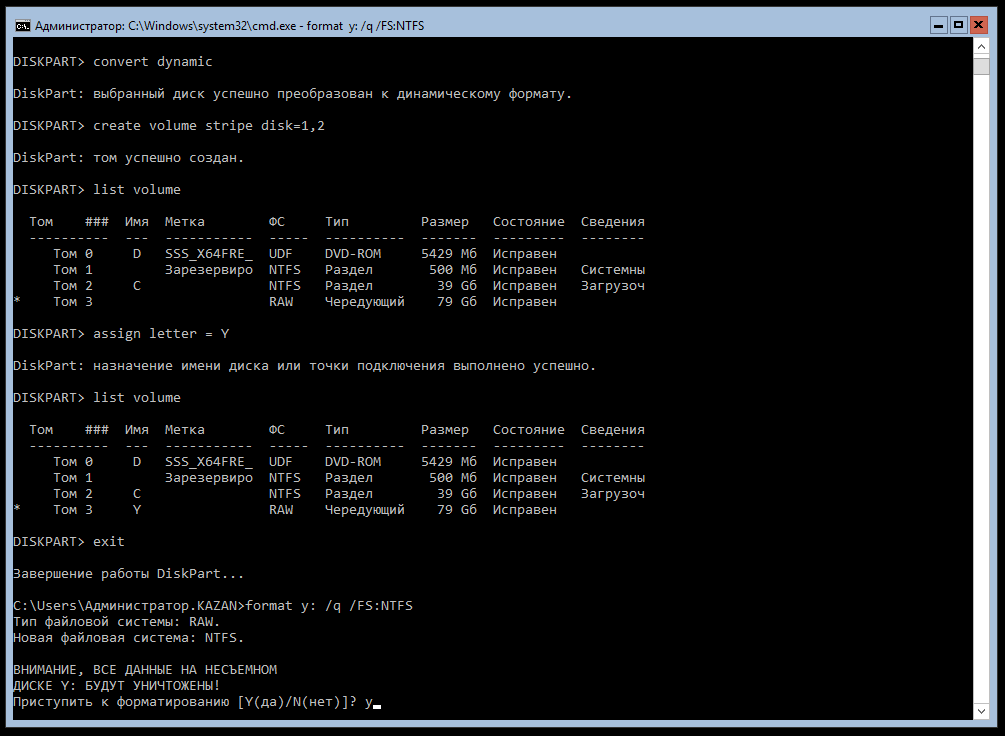
Input format fs= FILE-SYSTEM label=DRIVE-LABEL quick and press Enter. Make sure to replace FILE-SYSTEM with the filesystem of your choice (such as NTFS, FAT, or exFAT) and LABEL with the name of the drive.
For instance, if you are formatting a removable USB drive to hold music, replace the FILE-SYSTEM with “exfat” and the LABEL with “Music.”
A confirmation message will pop up telling you that the drive has been formatted.
Related: Fixes for the «Windows Was Unable to Complete the Format» Error
Assign the New Drive a Letter
The final step of the process is to assign your storage drive a letter.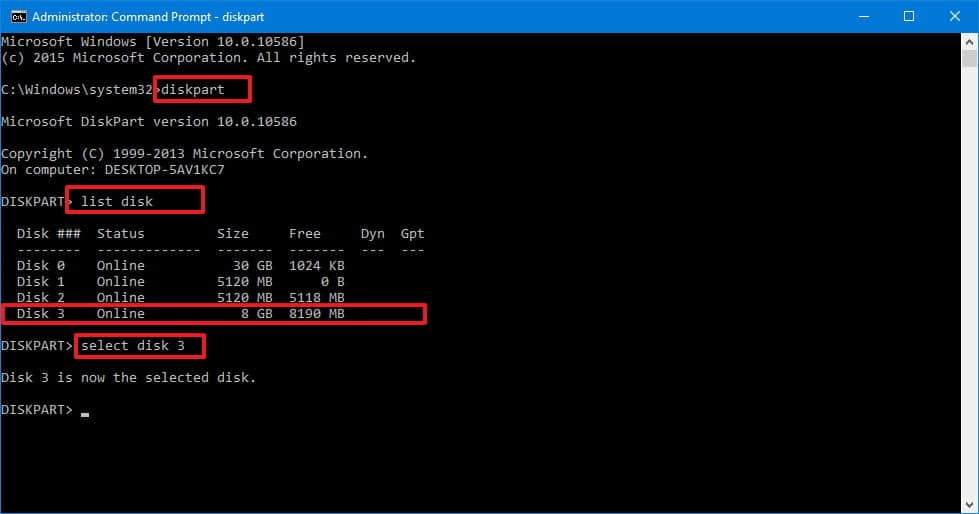 Windows needs these letters to display drives in the file explorer. In most cases, the letters “C,“ “D,» and “E” are already in use by internal storage devices. So, choose a different one.
In any case, make sure to assign a letter that is not already in use by your internal drives.
Input assign letter=DRIVE-LETTER, replacing DRIVE-LETTER with “f” and press Enter. You will receive a confirmation message telling you that the letter has been assigned.
Now, verify that you have done everything correctly by typing list volume and press Enter. The drive you just formatted will have an asterisk (*) in front of it, and it will reflect all the properties you specified during the process.
Close the DiskPart command-line utility by typing exit and pressing enter.
Reformatting Only Works for Logical Issues
Unfortunately, we can’t solve every storage issue by reformatting. If your drive repeatedly corrupts or fails to show up after reformatting, this can indicate a hardware failure. And nobody can solve a hardware issue with a software tool.
Unfortunately, that means you will need to spend some money and buy a new drive.
DISKPART Format — Format a disk — Windows CMD
DISKPART Format — Format a disk — Windows CMD — SS64.com
- SS64
- CMD
- How-to
Format a disk for use with Windows using the DISKPART command.
Syntax
DISKPART FORMAT [[FS=FS] [REVISION=X.XX] | RECOMMENDED] [LABEL="label"] [UNIT=N]
[QUICK] [COMPRESS] [OVERRIDE] [DUPLICATE] [NOWAIT] [noerr]
Key
volume A volume must be selected for this operation to succeed.
FS=FS The type of the file system (FAT, FAT32, exFAT, NTFS, UDF, ReFS).
REVISION=X. XX Specifies the file system revision (if applicable).
RECOMMENDED If specified, use the recommended file system and revision
instead of the default if a recommendation exists. The
recommended file system (if one exists) is displayed by the
FILESYSTEMS command.
LABEL="label" Specify the volume label.
UNIT=N Overrides the default allocation unit size. Default settings
are strongly recommended for general use. The default
allocation unit size for a particular file system is displayed
by the FILESYSTEMS command.
NTFS compression is not supported for allocation unit sizes above 4096.
QUICK Perform a quick format.
COMPRESS Files created on the new volume will be compressed by default. NTFS only.
OVERRIDE Force the file system to dismount first if necessary.
XX Specifies the file system revision (if applicable).
RECOMMENDED If specified, use the recommended file system and revision
instead of the default if a recommendation exists. The
recommended file system (if one exists) is displayed by the
FILESYSTEMS command.
LABEL="label" Specify the volume label.
UNIT=N Overrides the default allocation unit size. Default settings
are strongly recommended for general use. The default
allocation unit size for a particular file system is displayed
by the FILESYSTEMS command.
NTFS compression is not supported for allocation unit sizes above 4096.
QUICK Perform a quick format.
COMPRESS Files created on the new volume will be compressed by default. NTFS only.
OVERRIDE Force the file system to dismount first if necessary.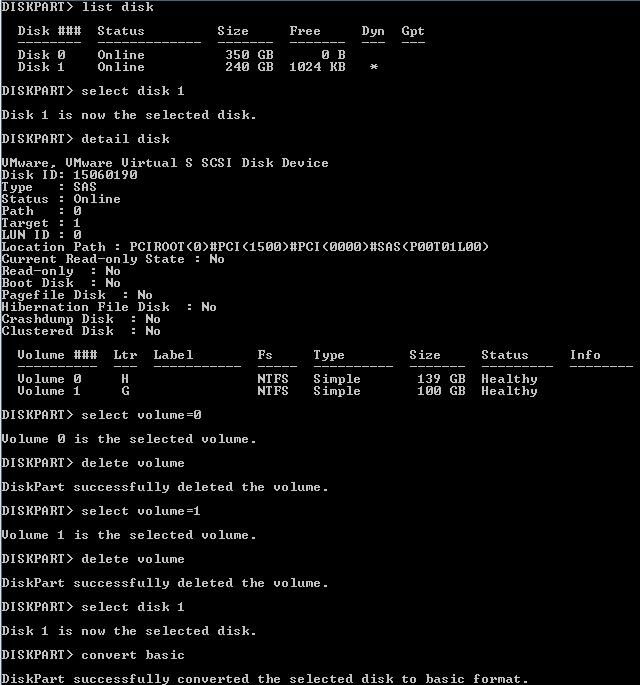 All opened handles
to the volume would no longer be valid.
DUPLICATE UDF Only: This flag applies to UDF format, version 2.5 or higher.
This flag instructs the format operation to duplicate the file
system meta-data to a second set of sectors on the disk. The
duplicate meta-data is used by applications, for example repair
or recovery applications. If the primary meta-data sectors are
found to be corrupted, the file system meta-data will be read
from the duplicate sectors.
NOWAIT Forces the command to return immediately while the format
process is still in progress. If NOWAIT is not specified,
DiskPart will display format progress in percentage.
NOERR For scripting only. When an error is encountered, DiskPart
continues to process commands as if the error did not occur.
All opened handles
to the volume would no longer be valid.
DUPLICATE UDF Only: This flag applies to UDF format, version 2.5 or higher.
This flag instructs the format operation to duplicate the file
system meta-data to a second set of sectors on the disk. The
duplicate meta-data is used by applications, for example repair
or recovery applications. If the primary meta-data sectors are
found to be corrupted, the file system meta-data will be read
from the duplicate sectors.
NOWAIT Forces the command to return immediately while the format
process is still in progress. If NOWAIT is not specified,
DiskPart will display format progress in percentage.
NOERR For scripting only. When an error is encountered, DiskPart
continues to process commands as if the error did not occur. Without the NOERR parameter, an error causes DiskPart to exit
with an error code.
Without the NOERR parameter, an error causes DiskPart to exit
with an error code.
Example
FORMAT FS=NTFS LABEL=»SS64 Volume» QUICK COMPRESS
FORMAT RECOMMENDED OVERRIDE
«Successful people are successful because they form the habits of doing those things that failures don’t like to do» ~ Albert Gray.
Related commands:
docs.microsoft.com — Configure UEFI/GPT-Based Hard Drive Partitions using Windows PE and DiskPart.
docs.microsoft.com — Configure BIOS/MBR-Based Hard Disk Partitions using Windows PE and DiskPart.
DISKPART — Disk Administration.
FORMAT — Format a disk.
Equivalent bash command (Linux): mkfs, in FreeBSD & OSX: newfs, fsck_exfat
Copyright © 1999-2022 SS64.com
Some rights reserved
How to use DiskPart to clean and format a drive in Windows 10 • Okie Doki
Drives that fail due to logical or physical problems are a common occurrence.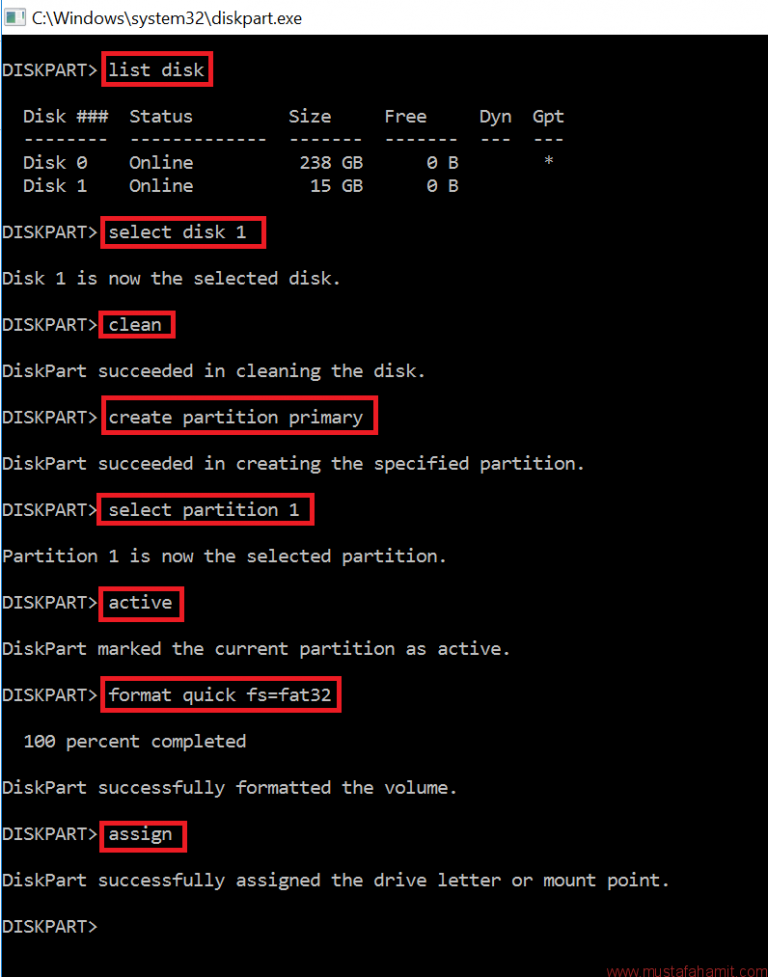 Unfortunately, there is no clear way to know when and how a drive might fail. However, we can try to make the damaged drive usable.
This is where DiskPart comes to the rescue. Here’s how you can use DiskPart to clean, reformat, and partition your drive, ready to use.
What is DiskPart?
DiskPart is a command-line utility provided by Microsoft with Windows. In other words, DiskPart is built into every Windows machine so you don’t have to download it separately.
DiskPart allows you to erase data from a local or external drive, reformat drives to the file system of your choice, and create new volumes from an existing storage block.
Programs for Windows, mobile applications, games — EVERYTHING is FREE, in our closed telegram channel — Subscribe 🙂
Now, since DiskPart is a command line tool, you need to know some commands to use it.
How to reformat a drive using DiskPart
Although physical problems cannot be fixed with a software tool, you can solve logical problems by reformatting.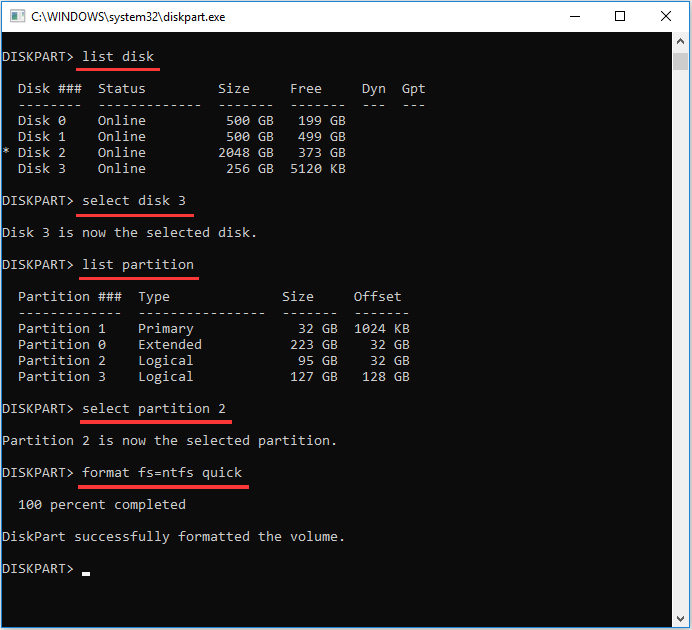
Reformatting a drive involves wiping the drive, deleting all the data you have on the drive, and formatting the drive with the file system of your choice. The process is simple, but results in permanent data loss, so please back up your files before proceeding.
1. Open DiskPart and select a drive.
Open DiskPart by typing diskpart in the Start menu search bar and selecting Best Match. A command prompt window will open with DiskPart already selected.
When the command prompt window opens, type list disk and press Enter. A list of all available drives will appear on the screen. You will see the drive name in the first column, the status in the next column, and the size and free space in the subsequent columns. You can ignore the last two columns as they will be blank if your drive is working properly.
Find the drive you want to format from the list. You can find the disc by size. If you don’t know the size, remove the disk, run the list disk command again and write down the disk numbers in the first column.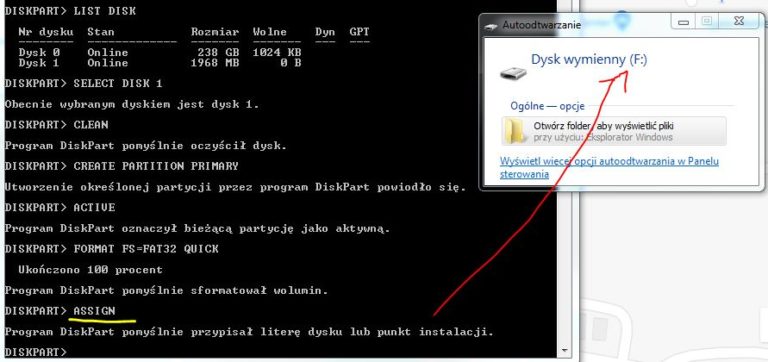 Plug in the drive, run the command, and you’ll see the new drive number listed. This is your drive, so write down the number.
Now select the disk by typing select disk DISK-NUMBER, replacing DISK-NUMBER with the actual disk number you previously listed.
For example, if I want to select Disk 2 as shown in the image below, I would type the command as select disk 2. Finally press Enter.
You will see a confirmation message that your drive has been selected. To check this, type list disk and press Enter. In the list of disks that appears, the selected disk will be marked with an asterisk.
in front of the drive number.
If you want to change the disk, repeat the select command with the disk number.
2. Clean up the disk and partition it.
Now, before reformatting, make sure you back up your data. After that, type clean and press Enter. This will erase all data from your drive. After DiskPart has successfully cleaned up the disk, you will see a message on the screen.
After cleaning the disk, you are ready to reformat it.
One more thing before you move on to reformatting: you need to partition the drive before you can use it again. After cleaning the drive, your computer will no longer recognize the drive as a mass storage device. So, you need to split it into one or more blocks so that your computer can recognize the device.
You should also consider dividing your drive into multiple file systems if you intend to use it with different operating systems. For example, you can partition part of the storage as exFat for Windows and the other part as an extended macOS partition for use with a Mac.
Related: The Best Free Windows Partition Manager for Your Needs
But for now, we’re only going to partition the drive into one storage unit. So, type create partition primary or create part pri and press Enter. This will split the disk into one block.
After partitioning, don’t forget to activate the partition because your computer can only use the active partition.
 So, type active and press Enter. This will make the section you just made active.
3. Format the drive with the new file system.
Finally, you can now reformat the drive.
Input format fs = FILE-SYSTEM label = DRIVE-LABEL quick and press Enter. Be sure to replace FILE-SYSTEM with the file system of your choice (such as NTFS, FAT, or exFAT) and LABEL with the drive name.
For example, if you are formatting a removable USB storage device for storing music, change FILE-SYSTEM to exfat and LABEL to Music.
A confirmation message will appear indicating that the drive has been formatted.
Related: Fixes for «Windows could not complete formatting» error
Assign drive letter 9 to new drive0003
The final step in the process is to assign a drive letter to your drive. Windows needs these letters to display drives in File Explorer. In most cases, the letters «C», «D», and «E» are already used by internal storage devices. So choose another.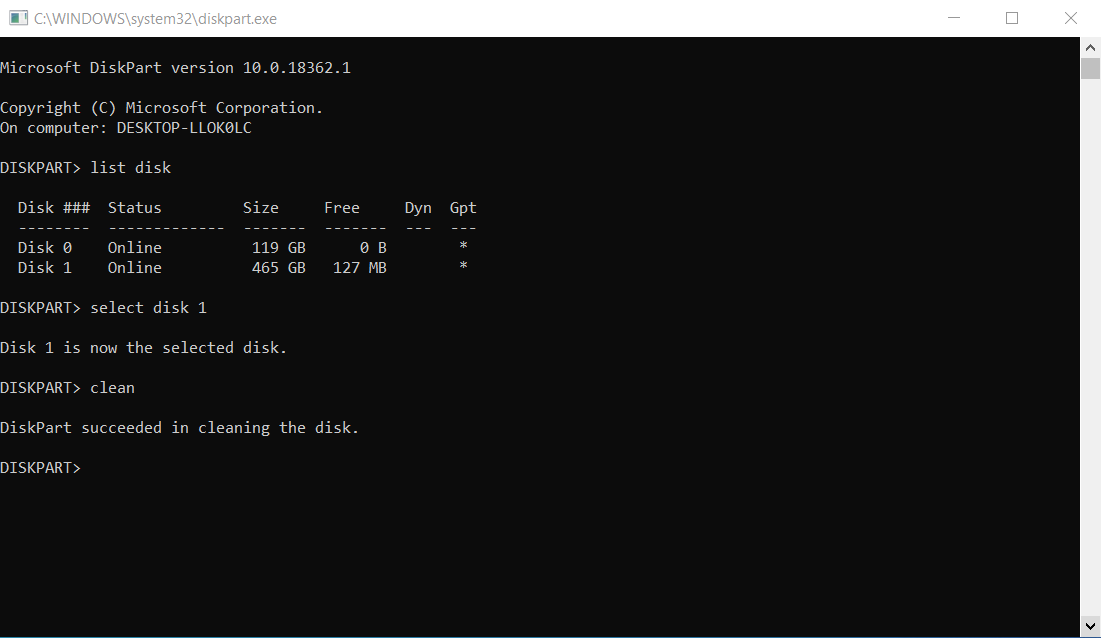
In any case, remember to assign a drive letter that is not already used by your internal drives.
Enter the assigned letter = DRIVE-LETTER, replacing DRIVE-LETTER with «f» and press Enter. You will receive a confirmation message that the letter has been assigned.
Now make sure you did everything right by typing the list size and pressing Enter. A newly formatted drive will have an asterisk.
in front of it and it will reflect all the properties you specified in the process.
Close the DiskPart command line utility by typing exit and pressing ENTER.
Reformatting only works for logical reasons
Unfortunately, we cannot solve all storage problems by reformatting. If your drive is repeatedly corrupted or not showing up after reformatting, this could indicate a hardware failure. And no one can solve a hardware problem with software.
Unfortunately, this means that you will need to spend some money and buy a new drive.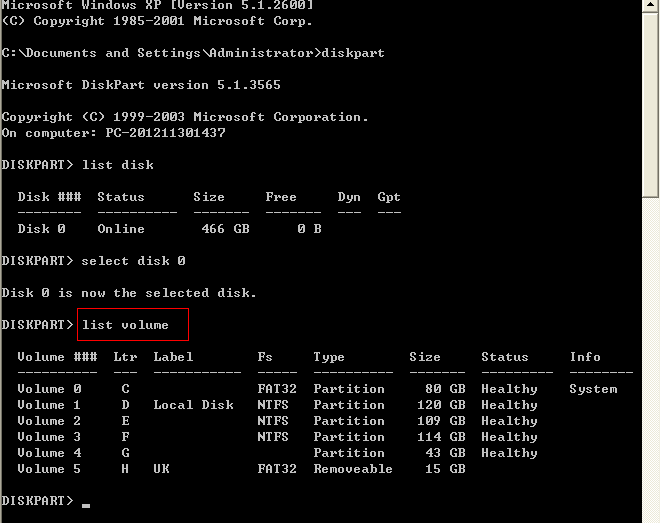
Programs for Windows, mobile applications, games — EVERYTHING is FREE, in our closed telegram channel — Subscribe 🙂
diskpart | Microsoft Learn
- Article
- Reading takes 4 minutes
Applies to: Windows Server 2022, Windows 10, Windows 8.1, Windows 8, Windows 7, Windows Server 2019, Windows Server 2016, Windows Server 2012 R2, Windows Server 2012 and Windows Server 2008 R2, Windows Server 2008
The diskpart command interpreter helps you manage your computer’s disks (disks, partitions, volumes, or virtual hard disks).
Before using the diskpart commands, you must first enumerate and then select an object to give it focus. Once an object has focus, all diskpart commands you issue will operate on that object.
Defining focus
When you select an object, focus remains on that object until you select another object. For example, if the focus is on disk 0 and volume 8 on disk 2 is selected, the focus moves from disk 0 to disk 2, volume 8.
Some commands change focus automatically. For example, when creating a new section, the focus automatically switches to the new section.
Focus can only be transferred to sections on the selected disk. After the partition has focus, the associated volume (if any) also has focus. After volume focus, the associated disk and partition are also focused if the volume is mapped to one specific partition. If this is not the case, focus on the disk and partition is lost.
Syntax
To start the diskpart command interpreter, type the following at the command line:
diskpart
Important!
You must be in local group Administrators or a group with equivalent permissions to run diskpart.
Options
You can run the following commands from the Diskpart command interpreter:
| Get-Help | Description |
|---|---|
| active | Marks the disk partition with focus as active. |
| addition | Mirrors a simple volume with focus on the specified drive. |
| assign | Assigns a drive letter or mount point to the volume with focus. |
| vdisk connection | Attaches (sometimes called connections or surfaces) a virtual hard disk (VHD) so that it appears on the host computer as a local hard disk. |
| attributes | Displays, sets, or clears the attributes of a drive or volume. |
| automount | Enables or disables the auto-off feature. |
| break | Splits the mirror volume with focus into two simple volumes. |
| clean | Removes any and all formatting of the partition or volume from the drive with focus.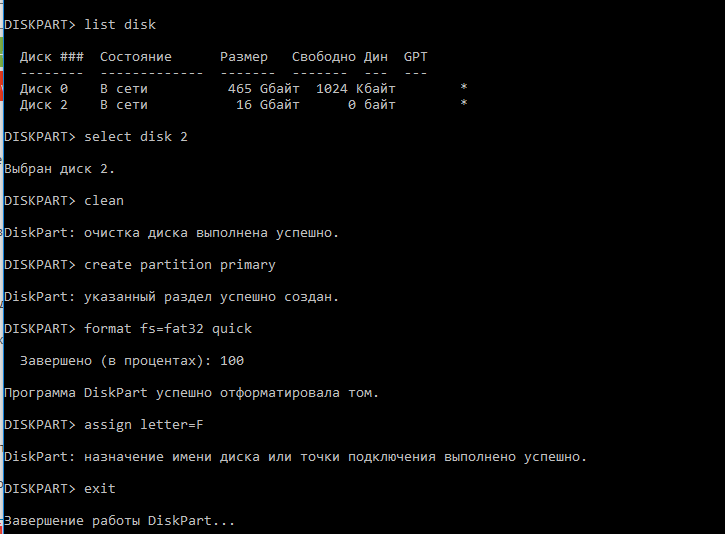 |
| compact vdisk | Reduces the physical size of a dynamically expanding virtual hard disk (VHD) file. |
| convert | Converts the file allocation tables (FAT) and FAT32 to the NTFS file system, leaving existing files and directories intact. |
| create | Creates a partition on a disk, a volume on one or more disks, or a virtual hard disk (VHD). |
| delete | Deletes a partition or volume. |
| detach vdisk | Stops the selected virtual hard disk (VHD) from being displayed as a local hard disk on the host machine. |
| detail | Displays information about the selected disk, partition, volume, or virtual hard disk (VHD). |
| exit | Terminates the diskpart command interpreter. |
| expand vdisk | Expands a virtual hard disk (VHD) to the specified size. |
| extend | Extends the volume or section with focus along with the file system to free (unallocated) disk space. |
| filesystems | Displays information about the current file system of the volume with focus and lists the file systems supported for formatting the volume. |
| format | Formats the drive to accept files. |
| gpt | Assigns gpt attributes to a partition with focus on basic GUID Partition Table (gpt) disks. |
| help | Displays a list of available commands or detailed help information for a specified command. |
| import | Imports an external drive group into the local computer’s drive group. |
| inactive | Marks the system partition or boot partition with focus as inactive on Master Boot Record (MBR) disks. |
| list | Displays a list of disks, partitions on a disk, volumes on a disk, or virtual hard disks (VHDs). |
| merge vdisk | Merges a differencing virtual hard disk (VHD) with the corresponding parent VHD. |
| offline | Takes a mounted drive or volume offline. |
| online | Brings an offline drive or volume online. |
| recover | Updates the status of all disks in a disk group, attempts to recover disks in an invalid disk group, and resynchronize mirrored and stale RAID-5 volumes. |
| rem | Provides a way to add comments to a script. |
| remove | Removes a drive letter or mount point from a volume. |
| repair | Recovers a RAID-5 volume with focus by replacing the failed disk region with the specified dynamic disk. |
| rescan | Finds new drives that may have been added to the computer. |
| retain | Prepares an existing dynamic simple volume for use as a boot or system volume. |
| san | Displays or sets the storage area network (san) policy for the operating system. |
| select | Shift focus to a disk, partition, volume, or virtual hard disk (VHD). |
| set id | Changes the section type field for the section with focus. |
| shrink | Reduces the size of the selected volume by the specified amount. |
| uniqueid | Displays or sets the GUID Partition Table (GPT) ID or Master Boot Record (MBR) signature for the drive with focus. |
Listing available objects
You can view the list of options associated with each command by running the main command followed by what is available for a particular command. When doing list the following four parameters are displayed:
Note
After executing command list an asterisk ( * ) will appear next to the focus object.
Examples
To view available drives, follow the steps below.